Netgear orporated 17200381 WWAN module User Manual NM8207 Quick Start Guide r0 5 rev 6
Netgear Incorporated WWAN module NM8207 Quick Start Guide r0 5 rev 6
User Manual rev 4.pdf

NETGEAR, INC.
350 East Plumeria Drive San Jose, CA 95134
1
Quick Start Guide
Model: NM8207
Date: Jun, 27 2017
Rev 0.5

NETGEAR, INC.
350 East Plumeria Drive San Jose, CA 95134
2
Table of Contents
1 Revision History ............................................................................................................ 3
2 Setup/connect the device for testing. .......................................................................... 4
2.1 Install USB driver. .......................................................................................................... 4
2.2 Adjust jumpers on carrier board. ................................................................................. 4
2.3 Insert Nano SIM card into NM8207 module. ................................................................ 4
2.4 Connect NM8208 module with carrier board ............................................................... 4
2.5 Connect antenna cable with NM8207 module. ............................................................ 5
2.6 Connect carrier board and PC via USB cable. ............................................................ 5
3 Create data call connection .......................................................................................... 6
4 Execute AT command ................................................................................................... 8
4.1 Connect to NMEA port of module. ................................................................................ 8
5 Connect to QPST ........................................................................................................... 8
5.1 Add Diagnostics port .................................................................................................... 8
5.2 Add port to QPST Software Download ........................................................................ 9
NETGEAR, INC.
350 East Plumeria Drive San Jose, CA 95134
3
1 Revision History
0.1 2017/06/09 Initial version Woody Cheng
0.2 2017/06/13 Changed model name to NM8207. Woody Cheng
0.3 2017/06/21 Add module and Dev kit installation guide on section 2.3 &2.4 GuanYu Jiang
0.4 2017/06/27 Added section 3, “Create data call connection”. Woody Cheng
0.5 2017/06/27 Updated the screenshot of the section 3 step7. Woody Cheng
NETGEAR, INC.
350 East Plumeria Drive San Jose, CA 95134
4
2 Setup/connect the device for testing.
2.1 Install USB driver.
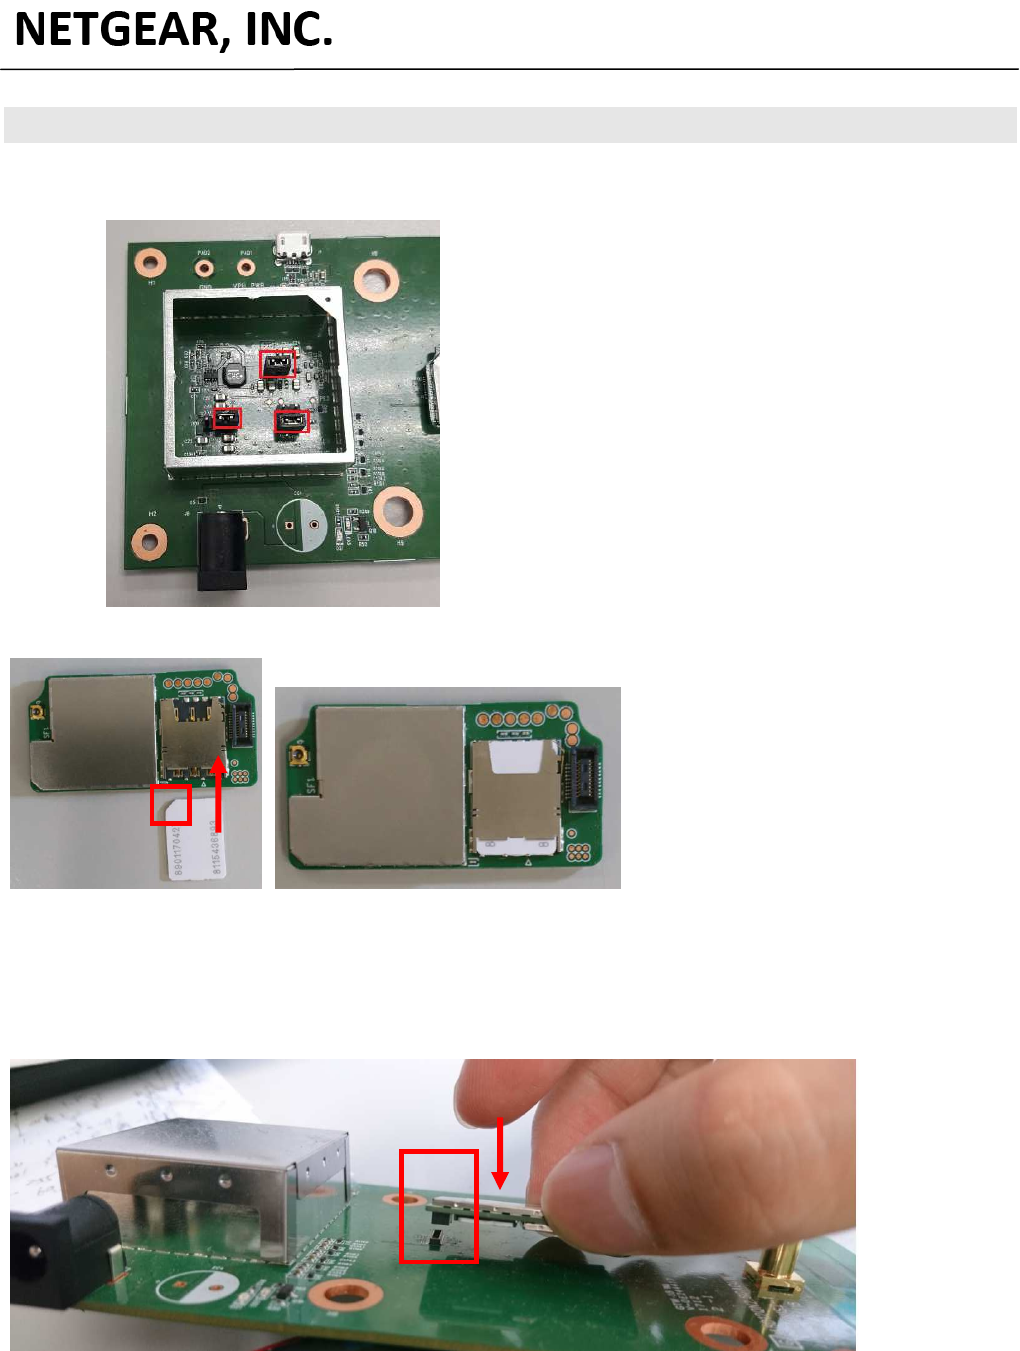
2.2 Adjust jumpers on carrier board.
2.3 Insert Nano SIM card into NM8207 module.
2.4 Connect NM8208 module with carrier board
A particular attention must be paid, please make sure the board to board connectors are perfect
aligned before pushing down the NM8207 module toward the carrier board.
Caution: An inappropriate installation will break the board to board connectors permanently.
NETGEAR, INC.
350 East Plumeria Drive San Jose, CA 95134
5
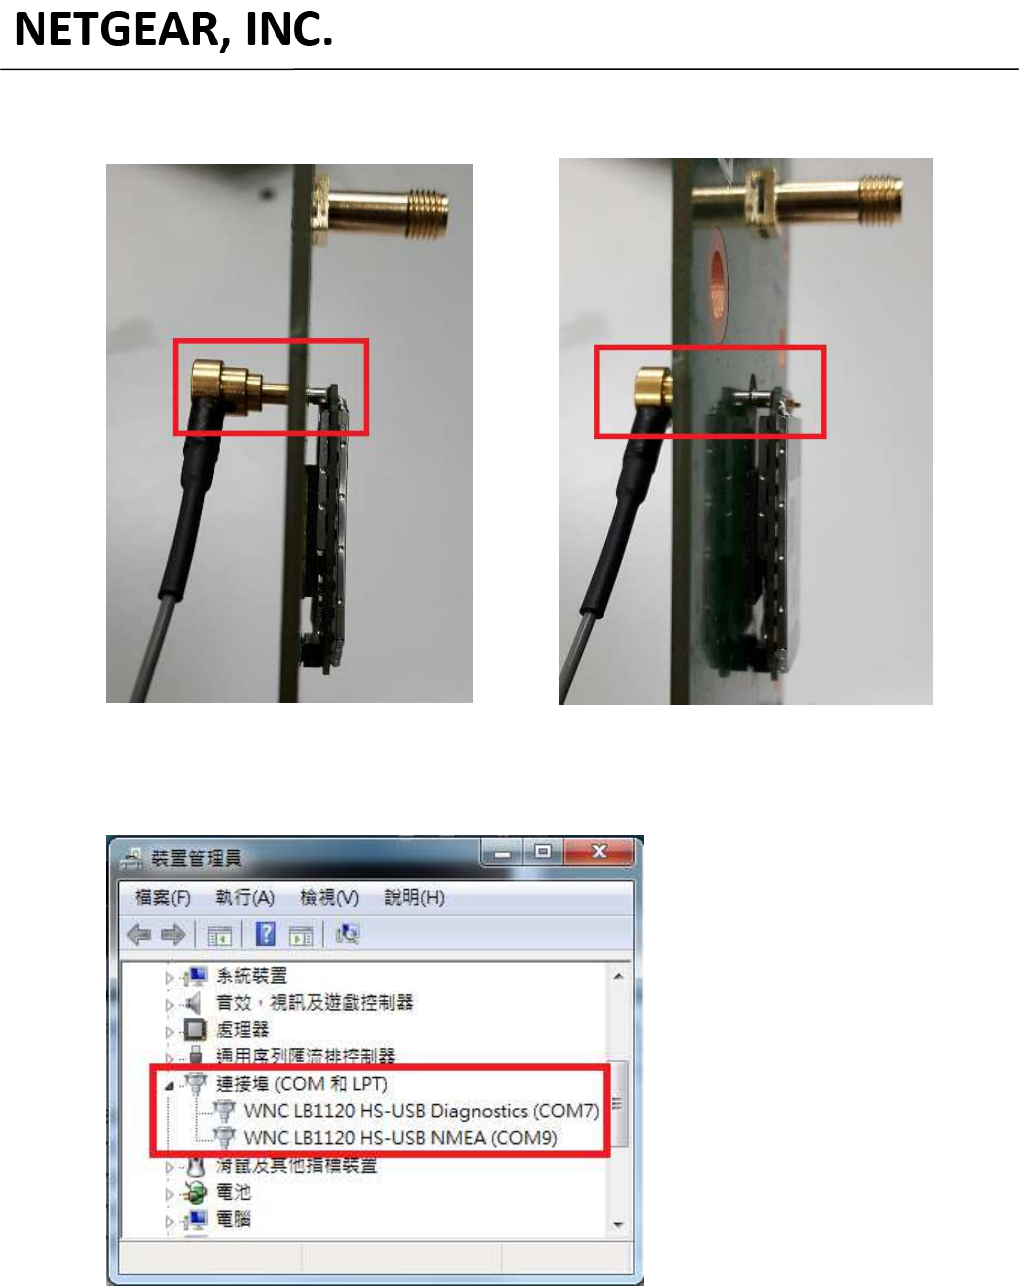
2.5 Connect antenna cable with NM8207 module.
2.6 Connect carrier board and PC via USB cable.

NETGEAR, INC.
350 East Plumeria Drive San Jose, CA 95134
6
3 Create data call connection
Please follow the steps below to create data call connection.
Step1: Insert SIM card into module.
Step2: Connect PC and module via USB cable. And run “adb shell” on PC side in advance.
Step3: Use putty to connect module.
Step4: Execute the following commands to setup APN and launch connection manager.
/ # wnc-tools at_cmd AT+CGDCONT=1,\"IP\",\"internet\",\"\",0,0
/ # wnc-tools at_cmd "at+cgdcont?"
/ # /etc/init.d/start_QCMAP_ConnectionManager_le start
/ # QCMAP_CLI
NETGEAR, INC.
350 East Plumeria Drive San Jose, CA 95134
7
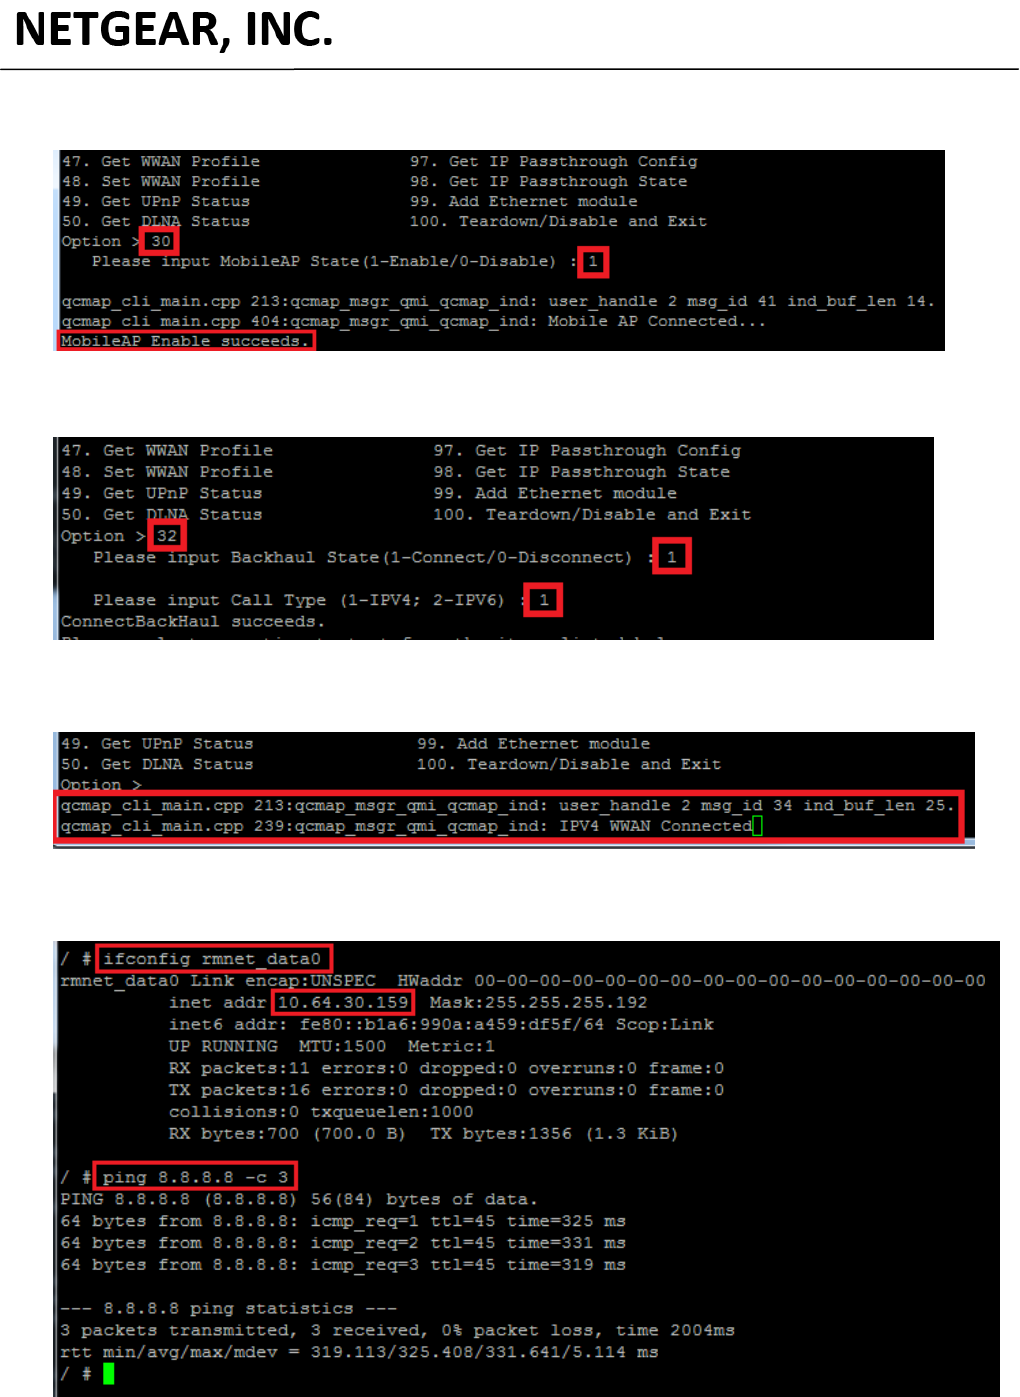
Step5: Select 30 to setup Mobile AP and then select 1 to enable it.
Step6: Select 32 to connect Backhaul and set call type to IPv4.
If the module connected to network successfully, “IPV4 WWAN Connected” message would show
on the putty.
Step7: Keep the original putty window, and then use putty to new another adb session to check
the connection.
NETGEAR, INC.
350 East Plumeria Drive San Jose, CA 95134
8
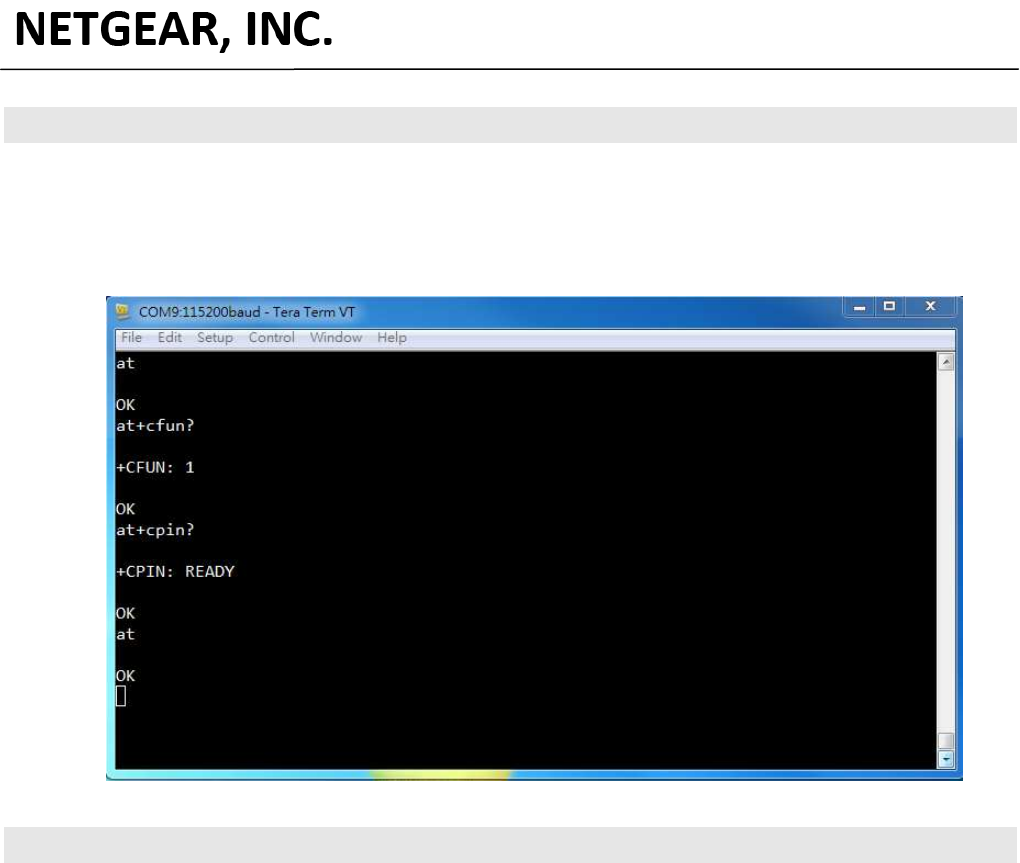
4 Execute AT command
4.1 Connect to NMEA port of module.
After the NMEA port was shown on device manager.
You can connect to it via Tara Term tool. (or putty)
Then you can use it to send AT command to module.
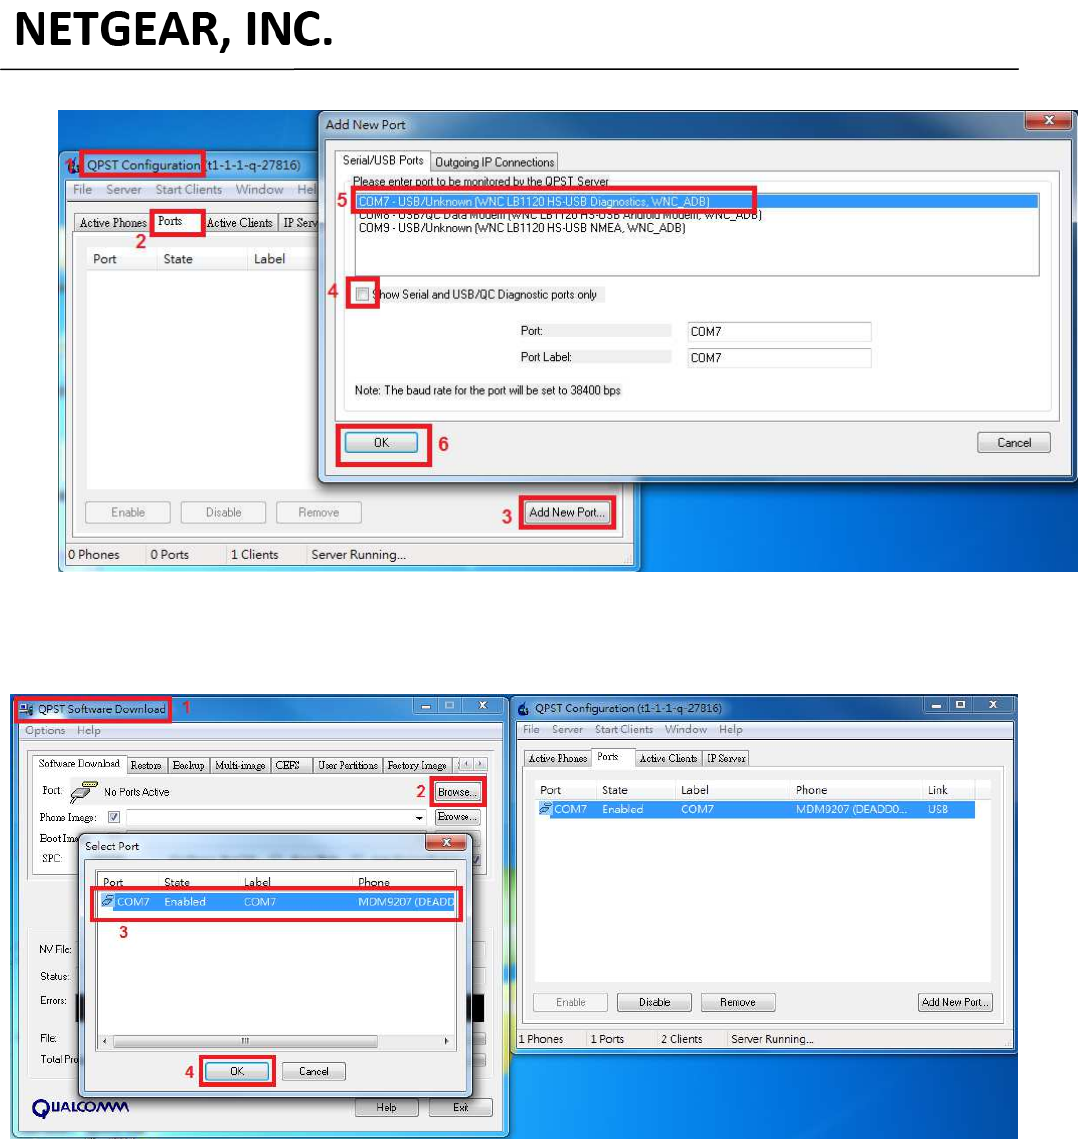
5 Connect to QPST
5.1 Add Diagnostics port
After the Diagnostics port was shown on device manager. Then you can use “QPST
Configuration” tool to add Diagnostics port. Please follow the steps on the screenshot to add
port.
NETGEAR, INC.
350 East Plumeria Drive San Jose, CA 95134
9
5.2 Add port to QPST Software Download
Add Diagnostics port to “QPST Software Download”, then you can start to use it to do QPST functions.
NETGEAR, INC.
350 East Plumeria Drive San Jose, CA 95134
10
It powered by DC 3.3V (normal voltage), rating for lowest voltage is 2.97V and highest voltage is 3.63V
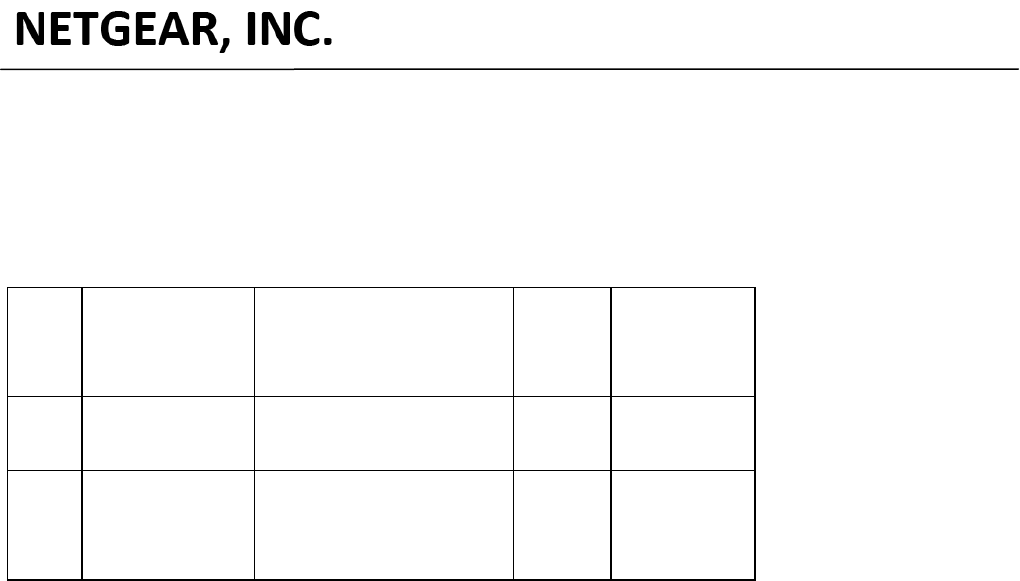
Test Antenna spec.
Ant. Gain(dBi)
Including cable loss
Frequency range
(MHz to MHz)
Antenna
Type
Connecter Type
(External only)
ANT1 3.4
4.39
824 to 849 MHz
880 to 915 MHz
PIFA I-PEX MHF IV
ANT2 2.62
4.25
3.82
1850 to 1915 MHz
1710 to 1785 MHz
1920 to 1980 MHz
PIFA I-PEX MHF IV

NETGEAR, INC.
350 East Plumeria Drive San Jose, CA 95134
11
Federal Communication Commission Interference Statement
This device complies with Part 15 of the FCC Rules. Operation is subject to the following two
conditions: (1) This device may not cause harmful interference, and (2) this device must accept
any interference received, including interference that may cause undesired operation.
This equipment has been tested and found to comply with the limits for a Class B digital device,
pursuant to Part 15 of the FCC Rules. These limits are designed to provide reasonable
protection against harmful interference in a residential installation. This equipment generates,
uses and can radiate radio frequency energy and, if not installed and used in accordance with
the instructions, may cause harmful interference to radio communications. However, there is
no guarantee that interference will not occur in a particular installation. If this equipment
does cause harmful interference to radio or television reception, which can be determined by
turning the equipment off and on, the user is encouraged to try to correct the interference by
one of the following measures:
- Reorient or relocate the receiving antenna.
- Increase the separation between the equipment and receiver.
- Connect the equipment into an outlet on a circuit different from that
to which the receiver is connected.
- Consult the dealer or an experienced radio/TV technician for help.
FCC Caution: Any changes or modifications not expressly approved by the party responsible for
compliance could void the user's authority to operate this equipment.
This transmitter must not be co-located or operating in conjunction with any other antenna or
transmitter.
Radiation Exposure Statement:
The product comply with the FCC portable RF exposure limit set forth for an uncontrolled
environment and are safe for intended operation as described in this manual.
The further RF exposure reduction can be achieved if the product can be kept as far as possible
from the user body or set the device to lower output power if such function is available.
This equipment complies with FCC / ISED radiation exposure limits set forth for an
uncontrolled environment. This equipment should be installed and operated with
minimum distance 20cm between the radiator & your body.

NETGEAR, INC.
350 East Plumeria Drive San Jose, CA 95134
12
This device is intended only for OEM integrators under the following conditions:
1) The antenna must be installed such that 20 cm is maintained between the
antenna and users.
2) The transmitter module may not be co-located with any other transmitter or
antenna.
As long as 2 conditions above are met, further transmitter test will not be required.
However, the OEM integrator is still responsible for testing their end-product for
any additional compliance requirements required with this module installed
IMPORTANT NOTE: In the event that these conditions can not be met (for
example certain laptop configurations or co-location with another transmitter),
then the FCC authorization is no longer considered valid and the FCC ID can not
be used on the final product. In these circumstances, the OEM integrator will be
responsible for re-evaluating the end product (including the transmitter) and
obtaining a separate FCC authorization.
End Product
Labeling
This transmitter module is authorized only for use in device where the antenna
may be installed such that 20 cm may be maintained between the antenna and
users. The final end product must be labeled in a visible area with the following:
“Contains FCC ID: PY317200381”. The grantee's FCC ID can be used only when
all FCC compliance requirements are met.
Manual Information To the End User
The OEM integrator has to be aware not to provide information to the end user
regarding how to install or remove this RF module in the user’s manual of the end
product which integrates this module.
The end user manual shall include all required regulatory information/warning as
show in this manual.
1.
NETGEAR, INC.
350 East Plumeria Drive San Jose, CA 95134
13
Industry Canada statement:
This device complies with ISED’s licence-exempt RSSs. Operation is subject to the following two
conditions: (1) This device may not cause harmful interference, and (2) this device must
accept any interference received, including interference that may cause undesired
operation.
Le présent appareil est conforme aux CNR d’ ISED applicables aux appareils radio exempts de
licence. L’exploitation est autorisée aux deux conditions suivantes : (1) le dispositif ne doit pas
produire de brouillage préjudiciable, et (2) ce dispositif doit accepter tout brouillage reçu, y
compris un brouillage susceptible de provoquer un fonctionnement indésirable.
Radiation Exposure Statement:
This equipment complies with ISED radiation exposure limits set forth for an uncontrolled
environment. This equipment should be installed and operated with minimum distance 20cm
between the radiator & your body.
Déclaration d'exposition aux radiations:
Cet équipement est conforme aux limites d'exposition aux rayonnements ISED établies pour un
environnement non contrôlé. Cet équipement doit être installé et utilisé avec un minimum de
20 cm de distance entre la source de rayonnement et votre corps.
This device is intended only for OEM integrators under the following conditions: (For module
device use)
1) The antenna must be installed such that 20 cm is maintained between the antenna and
users, and
2) The transmitter module may not be co-located with any other transmitter or antenna.
As long as 2 conditions above are met, further transmitter test will not be required. However,
the OEM integrator is still responsible for testing their end-product for any additional
compliance requirements required with this module installed.
Cet appareil est conçu uniquement pour les intégrateurs OEM dans les conditions suivantes:
(Pour utilisation de dispositif module)
1) L'antenne doit être installée de telle sorte qu'une distance de 20 cm est respectée
entre l'antenne et les utilisateurs, et2) Le module émetteur peut ne pas être coïmplanté avec
un autre émetteur ou antenne.
This equipment complies with ISED radiation exposure limits set forth for an uncontrolled
environment. This equipment should be installed and operated with minimum distance 20cm
between the radiator & your body.
NETGEAR, INC.
350 East Plumeria Drive San Jose, CA 95134
14
Tant que les 2 conditions ci-dessus sont remplies, des essais supplémentaires sur l'émetteur ne
seront pas nécessaires. Toutefois, l'intégrateur OEM est toujours
End Product Labeling This transmitter module is authorized only for use in device where the
antenna may be installed such that 20 cm may be maintained between the antenna and
users. The final end product must be labeled in a visible area with the following: “Contains IC:
4054A-17200381”.
Plaque signalétique du produit final
Ce module émetteur est autorisé uniquement pour une utilisation dans un dispositif où
l'antenne peut être installée de telle sorte qu'une distance de 20cm peut être maintenue entre
l'antenne et les utilisateurs. Le produit final doit être étiqueté dans un endroit visible avec
l'inscription suivante: "Contient des IC: 4054A-17200381".