Netgear orporated 26200346 Powerline WiFi 1000, Powerline WiFi Essentials Edition 1010 User Manual PowerLINE WiFi 1000 Models PL1000v2 and PLW1000v2
Netgear Incorporated Powerline WiFi 1000, Powerline WiFi Essentials Edition 1010 PowerLINE WiFi 1000 Models PL1000v2 and PLW1000v2
Contents
- 1. PLW1000v2 Manual
- 2. PLW1010v2 Maual
- 3. UM Notification of Compliance
- 4. PLW1000v2 Manual
- 5. PLW1010v2 Manual
- 6. Users Manual Notification of Compliance
PLW1000v2 Manual

Quick Start
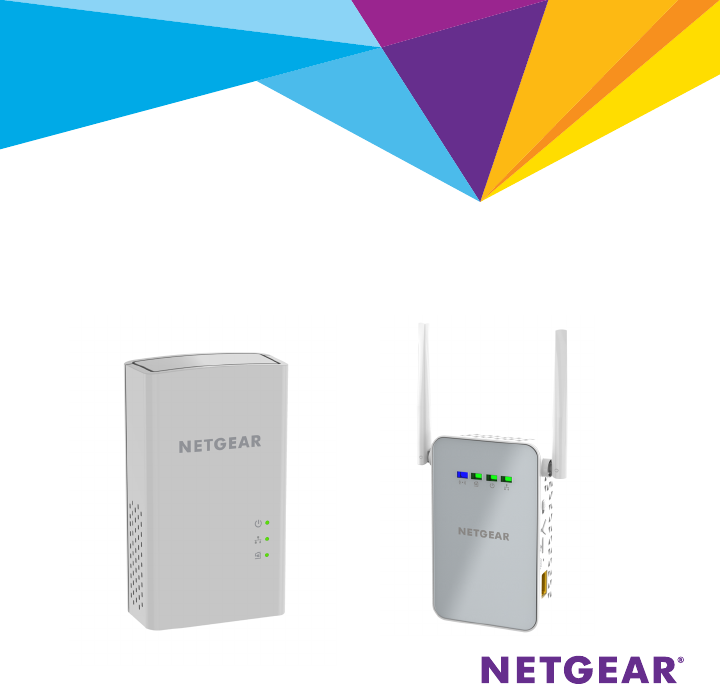
PowerLINE WiFi 1000
Models PL1000v2 and PLW1000v2

2
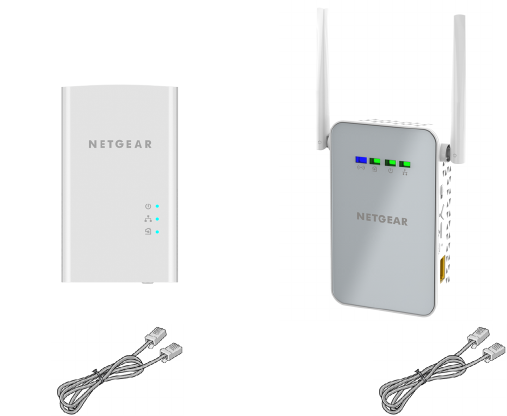
Package Contents
In some regions, a resource CD is included with your product.
3
Get Started
PowerLINE adapters give you an alternative way to extend your network
using your existing electrical wiring. Plug two or more PowerLINE adapters
into electrical outlets to create a wired network connection. Use a
PowerLINE WiFi access point to add a WiFi access point to your wired
network. You can add up to eight adapters to extend your network.

4
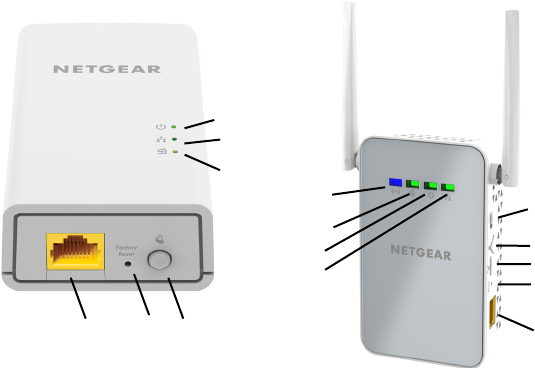
1
2
1. Power LED 4. Ethernet port 7. WiFi LED
2. Ethernet LED 5. Factory Reset button 8. On/O switch
3. Pick A Plug LED 6. Security button 9. WPS button
8
1
3
4 5 6
Meet Your Adapters
Before you install your adapters, familiarize yourself with their LEDs,
buttons, and ports.
2
3
4
5
6
9
7

5
Power LED Solid green. The electrical power is on.
Solid amber. The adapter is in power saving mode
(PL1000v2 only).
Blinking green. The adapter is in the process of setting up
security.
O. The adapter is not receiving electrical power.
Ethernet LED Solid. The Ethernet port is linked.
O. No Ethernet connection is detected.
Pick A Plug LED The Pick A Plug feature lets you pick the electrical outlet
with the strongest link performance, indicated by the color
displayed by the LED:
Red. Link rate < 50 Mbps (good).
Amber. Link rate > 50 and < 80 Mbps (better).
Green. Link rate > 80 Mbps (best).
O. The adapter did not find any other compatible
PowerLINE devices using the same encryption key.
WiFi LED
Solid blue. The WiFi radio is on.
O. The WiFi radio is o.
6
Factory Reset
button
Press the Factory Reset button for one second, and then
release it to return the PowerLINE adapter to its factory
default settings.
Ethernet port Connect your wired devices, including computers, WiFi
routers, and game consoles, to your PowerLINE network.
Security button Use the Security button to create a secure PowerLINE
network.
On/O switch Use the On/O switch to turn the device on and o.
WPS button Use the WPS button to automatically connect your computer
or other WiFi-enabled devices that support WPS to your
PowerLINE network.
7
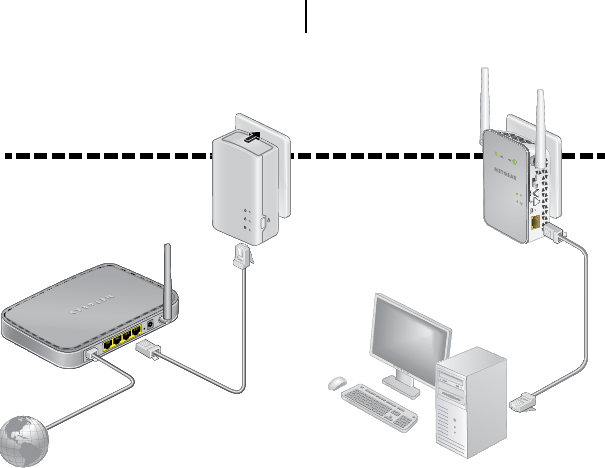
Install Your Adapters
Note: Do not plug your PowerLINE adapters into extension cords, power
strips, or surge protectors.
Room 1 Room 2
8
¾To install your adapters:
1. Plug in your new adapters.
2. Wait until the Pick A Plug LEDs are lit.
3. Use your computer, tablet, or smartphone to connect to your new
PowerLINE WiFi network. The WiFi SSID and key are printed on the
adapter labels. The SSID is similar to Netgear##_EXT or Netgear##-
5G_EXT.
Congratulations. You installed your adapters and set up your network.
You can customize the network and security settings later.
9
Do More
Aer your PowerLINE network is installed and running, you can use WPS to
connect your access point, expand your network, customize the network
settings, and customize security.
Use WPS to Connect to Your Network
¾To automatically connect to the PowerLINE access point
using a WPS button:
1. Press and hold the WPS button on the PowerLINE access point for
two seconds and release it.
The WiFi LED starts to blink.
2. Press the WPS button on your WiFi-enabled device for two seconds
and release it.
When the WiFi LED stops blinking, your WiFi device is automatically
connected to the PowerLINE access point and you can surf the web.
10
Add Adapters
To add adapters before you configure the network security feature, just
plug them in and connect the adapters to your equipment.
¾To add an adapter to a PowerLINE network with security
set:
1. Plug the adapter into a wall outlet where you want to add Internet
access.
2. If you used a private encryption key, press the Security button on
one of the adapters that is already a part of the network for two
seconds, and then press the Security button on the new adapter for
two seconds.
Both buttons must be pressed within two minutes.
Note: The Security button does not work in power saving mode.
Do not press the Security button on the PowerLINE adapter until
installation is complete and the adapters are communicating with each
other (indicated by the blinking Power LED). Pressing this button too soon
can temporarily disable PowerLINE communication. If this occurs, use the
Factory Reset button to return the PowerLINE adapter to its factory
default settings.
11
Customize Your Network Settings
The web browser setup guide helps you configure the WiFi settings of the
PowerLINE.
¾To change your settings:
1. With your WiFi-enabled computer or mobile device connected to your
WiFi network, open a web browser.
2. Navigate to the following address: www.mywifiext.net.
3. Follow the on-screen instructions.
4. When prompted to log in, enter the user name admin and the
password password.
You can record the new WiFi settings here:
__________________________________________
WiFi network name (SSID)
___________________________________________
Network key (passphrase)
___________________________________________
12
Customize Your Network Security
When you first set up your network, the setup uses a default encryption
key common to all adapters. You can change this.
¾To create a private secure network:
1. Wait until the Pick A Plug LEDs are lit.
2. Press the Security button for two seconds on one adapter, and then
press the Security button on one of the other adapters for two
seconds. Both buttons must be pressed within two minutes.
Note: The Security button does not work in power saving mode (see
Troubleshooting Tips on page 13).
Warning: Do not press the
Security
button on the PowerLINE adapter
until installation is complete and the adapters are communicating with
each other (indicated by the Power LED). Pressing this button too soon
can temporarily disable PowerLINE communication. If this occurs, use the
Factory Reset button to return the PowerLINE adapter to its factory
default settings.
If you add adapters later, use this procedure to add the new adapters to
your secure network.
13
Troubleshooting Tips
Power LED is o. Make sure that power is supplied to the electrical
outlet, and that the PowerLINE devices are not plugged
into an extension cord, power strip, or surge protector.
Power LED is amber. Power saving mode occurs when the Ethernet LED is
o. This can occur in the following circumstances:
• The Ethernet cable is unplugged.
• The device that is connected through the Ethernet
cable is turned o.
• The adapter is idle for 10 minutes.
It returns to normal mode within two seconds
aer the Ethernet link is established.
Pick A Plug LED is o. • If you already set network security, make sure
that all PowerLINE devices are using the same
encryption key. For informtion, see the online user
manual.
• Press the Factory Reset button on each device
for one second to return the PowerLINE adapter to
its factory default settings.
Pick A Plug LED is
amber or red.
Something is interfering with communication between
adapters. To resolve this, do the following:
• Move the adapters to other outlets.
• Unplug devices that might be causing interference
such as surge suppressors and items with motors.
14
Ethernet LED is o. • Make sure that the Ethernet cables are working
and securely plugged into the devices.
• Press the Factory Reset button on each device
for one second to return the PowerLINE adapter to
its factory default settings.
15

September 2016
NETGEAR INTL LTD
Building 3, University Technology Centre
Curraheen Road, Cork, Ireland
NETGEAR, Inc.
350 East Plumeria Drive
San Jose, CA 95134, USA
Support
Thank you for purchasing this NETGEAR product. You can visit
www.netgear.com/support to register your product, get help, access the latest
downloads and user manuals, and join our community. We recommend that you use only
ocial NETGEAR support resources.
Trademarks
© NETGEAR, Inc., NETGEAR and the NETGEAR Logo are trademarks of NETGEAR, Inc.
Any non‑NETGEAR trademarks are used for reference purposes only.
Compliance
For the current EU Declaration of Conformity, visit
http://kb.netgear.com/app/answers/detail/a_id/11621.
For regulatory compliance information, visit
http://www.netgear.com/about/regulatory/.
See the regulatory compliance document before connecting the power supply.
PLW1000v2 Manual
Quick Start
PowerLINE WiFi 1000
Models PL1000v2 and PLW1000v2
2
Package Contents
In some regions, a resource CD is included with your product.
3
Get Started
PowerLINE adapters give you an alternative way to extend your network
using your existing electrical wiring. Plug two or more PowerLINE adapters
into electrical outlets to create a wired network connection. Use a
PowerLINE WiFi access point to add a WiFi access point to your wired
network. You can add up to eight adapters to extend your network.
4
1
2
1. Power LED 4. Ethernet port 7. WiFi LED
2. Ethernet LED 5. Factory Reset button 8. On/O switch
3. Pick A Plug LED 6. Security button 9. WPS button
8
1
3
4 5 6
Meet Your Adapters
Before you install your adapters, familiarize yourself with their LEDs,
buttons, and ports.
2
3
4
5
6
9
7

5
Power LED Solid green. The electrical power is on.
Solid amber. The adapter is in power saving mode
(PL1000v2 only).
Blinking green. The adapter is in the process of setting up
security.
O. The adapter is not receiving electrical power.
Ethernet LED Solid. The Ethernet port is linked.
O. No Ethernet connection is detected.
Pick A Plug LED The Pick A Plug feature lets you pick the electrical outlet
with the strongest link performance, indicated by the color
displayed by the LED:
Red. Link rate < 50 Mbps (good).
Amber. Link rate > 50 and < 80 Mbps (better).
Green. Link rate > 80 Mbps (best).
O. The adapter did not find any other compatible
PowerLINE devices using the same encryption key.
WiFi LED
Solid blue. The WiFi radio is on.
O. The WiFi radio is o.
6
Factory Reset
button
Press the Factory Reset button for one second, and then
release it to return the PowerLINE adapter to its factory
default settings.
Ethernet port Connect your wired devices, including computers, WiFi
routers, and game consoles, to your PowerLINE network.
Security button Use the Security button to create a secure PowerLINE
network.
On/O switch Use the On/O switch to turn the device on and o.
WPS button Use the WPS button to automatically connect your computer
or other WiFi-enabled devices that support WPS to your
PowerLINE network.

7
Install Your Adapters
Note: Do not plug your PowerLINE adapters into extension cords, power
strips, or surge protectors.
Room 1 Room 2
8
¾To install your adapters:
1. Plug in your new adapters.
2. Wait until the Pick A Plug LEDs are lit.
3. Use your computer, tablet, or smartphone to connect to your new
PowerLINE WiFi network. The WiFi SSID and key are printed on the
adapter labels. The SSID is similar to Netgear##_EXT or Netgear##-
5G_EXT.
Congratulations. You installed your adapters and set up your network.
You can customize the network and security settings later.
9
Do More
Aer your PowerLINE network is installed and running, you can use WPS to
connect your access point, expand your network, customize the network
settings, and customize security.
Use WPS to Connect to Your Network
¾To automatically connect to the PowerLINE access point
using a WPS button:
1. Press and hold the WPS button on the PowerLINE access point for
two seconds and release it.
The WiFi LED starts to blink.
2. Press the WPS button on your WiFi-enabled device for two seconds
and release it.
When the WiFi LED stops blinking, your WiFi device is automatically
connected to the PowerLINE access point and you can surf the web.
10
Add Adapters
To add adapters before you configure the network security feature, just
plug them in and connect the adapters to your equipment.
¾To add an adapter to a PowerLINE network with security
set:
1. Plug the adapter into a wall outlet where you want to add Internet
access.
2. If you used a private encryption key, press the Security button on
one of the adapters that is already a part of the network for two
seconds, and then press the Security button on the new adapter for
two seconds.
Both buttons must be pressed within two minutes.
Note: The Security button does not work in power saving mode.
Do not press the Security button on the PowerLINE adapter until
installation is complete and the adapters are communicating with each
other (indicated by the blinking Power LED). Pressing this button too soon
can temporarily disable PowerLINE communication. If this occurs, use the
Factory Reset button to return the PowerLINE adapter to its factory
default settings.
11
Customize Your Network Settings
The web browser setup guide helps you configure the WiFi settings of the
PowerLINE.
¾To change your settings:
1. With your WiFi-enabled computer or mobile device connected to your
WiFi network, open a web browser.
2. Navigate to the following address: www.mywifiext.net.
3. Follow the on-screen instructions.
4. When prompted to log in, enter the user name admin and the
password password.
You can record the new WiFi settings here:
__________________________________________
WiFi network name (SSID)
___________________________________________
Network key (passphrase)
___________________________________________
12
Customize Your Network Security
When you first set up your network, the setup uses a default encryption
key common to all adapters. You can change this.
¾To create a private secure network:
1. Wait until the Pick A Plug LEDs are lit.
2. Press the Security button for two seconds on one adapter, and then
press the Security button on one of the other adapters for two
seconds. Both buttons must be pressed within two minutes.
Note: The Security button does not work in power saving mode (see
Troubleshooting Tips on page 13).
Warning: Do not press the
Security
button on the PowerLINE adapter
until installation is complete and the adapters are communicating with
each other (indicated by the Power LED). Pressing this button too soon
can temporarily disable PowerLINE communication. If this occurs, use the
Factory Reset button to return the PowerLINE adapter to its factory
default settings.
If you add adapters later, use this procedure to add the new adapters to
your secure network.
13
Troubleshooting Tips
Power LED is o. Make sure that power is supplied to the electrical
outlet, and that the PowerLINE devices are not plugged
into an extension cord, power strip, or surge protector.
Power LED is amber. Power saving mode occurs when the Ethernet LED is
o. This can occur in the following circumstances:
• The Ethernet cable is unplugged.
• The device that is connected through the Ethernet
cable is turned o.
• The adapter is idle for 10 minutes.
It returns to normal mode within two seconds
aer the Ethernet link is established.
Pick A Plug LED is o. • If you already set network security, make sure
that all PowerLINE devices are using the same
encryption key. For informtion, see the online user
manual.
• Press the Factory Reset button on each device
for one second to return the PowerLINE adapter to
its factory default settings.
Pick A Plug LED is
amber or red.
Something is interfering with communication between
adapters. To resolve this, do the following:
• Move the adapters to other outlets.
• Unplug devices that might be causing interference
such as surge suppressors and items with motors.
14
Ethernet LED is o. • Make sure that the Ethernet cables are working
and securely plugged into the devices.
• Press the Factory Reset button on each device
for one second to return the PowerLINE adapter to
its factory default settings.
15

September 2016
NETGEAR INTL LTD
Building 3, University Technology Centre
Curraheen Road, Cork, Ireland
NETGEAR, Inc.
350 East Plumeria Drive
San Jose, CA 95134, USA
Support
Thank you for purchasing this NETGEAR product. You can visit
www.netgear.com/support to register your product, get help, access the latest
downloads and user manuals, and join our community. We recommend that you use only
ocial NETGEAR support resources.
Trademarks
© NETGEAR, Inc., NETGEAR and the NETGEAR Logo are trademarks of NETGEAR, Inc.
Any non‑NETGEAR trademarks are used for reference purposes only.
Compliance
For the current EU Declaration of Conformity, visit
http://kb.netgear.com/app/answers/detail/a_id/11621.
For regulatory compliance information, visit
http://www.netgear.com/about/regulatory/.
See the regulatory compliance document before connecting the power supply.