Netgear orporated HA311 UNII PCI Card User Manual Installation Guide
Netgear Incorporated UNII PCI Card Installation Guide
Users Manual
1
NETGEAR HA311 802.11a Wireless PCI Adapter
Installation Guide

2
FCC WARNING
This equipment has been tested and found to comply with the limits for a Class B digital
device, pursuant to Part15 of the FCC Rules. These limits are designed to provife
reasonable protection against harmful interference in a residential installation. This
equipment generates, uses, and can radiate radio frequency energy and, if not installed
and used in accordance with the instructions, may cause harmful interference to radio
communications. However, there is no guarantee that interference will not occur in a
particular installation. If this equipment does cause harmful interference to radio or
television reception, which can be determined by turning the equipment on and off, the
user is encouraged to try to correct the interference by one or more of the following
measures:
u Reorient or relocate the receiving antenna.
u Increase the separation between the equipment and the receiver.
u Connect the equipment into an outlet on a circuit different from that to which the
receiver is connected.
u Consult the dealer or an experienced radio/TXV technician for help. Modifications
made to the product, unless expressly approved by Netgear Inc., could void the
user’s authority to operate the equipment.
u RF Exposure Requirements WARNING!! To ensure compliance with FCC RF exposure
requirements, the antenna used for this device must be installed to provide a
separation distance of at least 20cm(8 in) from all persons and must not be co-
located or operating in conjunction with any other antenna or radio transmitter.
Installers an end-users must follow the installation instructions provided in this
user guide.
Radio Frequency Interference Requirements This device is restricted to indoor use due
to its operation in the 5.15 to 5.25GHz frequency range. FCC requires this product to be
used indoors for the frequency range 5.15 to 5.25GHz to reduce the potential for
harmful interference to co-channel Mobile Satellite systems. High power radars are
allocated as primary users of the 5.25 to 5.35GHz and 5.65 to 5.85GHz bands. These
radar stations can cause interference with and/or damage this device.
Canadian Department of Communications Radio Interference Regulations This digital
apparatus (Model HA311 Wireless PCI Adapter) does not exceed the Class B limits for
radio-noise emissions from digital apparatus as set out in the Radio Interference
Regulations of the Canadian Department of Communications.
3
NETGEAR, INC.
4500 Great America Parkway
Santa Clara, CA 95054
USA
Phone: 1-888-NETGEAR
E-mail: support@NETGEAR.com
www.NETGEAR.com
Technical Support
YOU MUST REGISTER TO OBTAIN TECHNICAL SUPPORT. PLEASE RETAIN PROOF OF PURCHASE and
the warranty information.
To register your product, get product support or obtain product information and product
documentation, go to http://www.NETGEAR.com. If you do not have access to the World Wide Web,
you may register your product by filling out the registration card and mailing it to NETGEAR
customer service.
You’ll find technical support information at: http://www.NETGEAR.com/ through the customer
service area. If you want to contact technical support by telephone, see the support information
card for the correct telephone number for your country.
©2002 by NETGEAR, Inc. All rights reserved.
NETGEAR is a registered trademark of NETGEAR, Inc. in the United States and/or
other countries. Other brand and product names are trademarks or registered trademarks of their respective holders.
Information is subject to change without notice.
4
Introduction
Thank you for purchasing the NETGEAR HA311 802.11a Wireless PCI Adapter. This wireless PCI
adapter enables you to network various PC’s together without physically laying any wire and
delivers high-speed wireless performance – up to 54 Mbps, 72 Mbps in turbo mode. It provides
small business networks with reliable, standards-based 802.11a LAN connectivity that is
protected with industry-standard security against unauthorized access. NETGEAR's 802.11a
solution is interference-free and coexists with 802.11b and Bluetooth™ devices. It works with
Windows® 98, Me, NT 4.0, 2000, and XP operating systems.
This installation guide shows you how to install the adapter and the software for the adapter, and
configure it to create a wireless network. Setup is easy—follow the instructions in this guide and
your system will be up and running quickly.
If you have problems, there is a troubleshooting section on page 18 to help you. Or you can get
more detailed troubleshooting information from the reference guide on the HA311 Resource CD-
ROM. NETGEAR also offers free support 24 hours a day, 7 days a week on the Web
(www.NETGEAR.com), by e-mail (support@NETGEAR.com), and by phone (see the provided
support information card for phone numbers).
Installation Overview
Estimated setup time: 10 to 15 minutes
1. Determine the configuration of your wireless network.
2. Install the wireless PCI adapter.
3. Install the wireless configuration utility for the adapter.
4. Configure the adapter.
5. Test the connection.
For more detailed information about installation, troubleshooting, and configuration procedures,
see the reference guide on the HA311 Resource CD-ROM.
5
What’s In the Box
When you open the box, verify that you received everything.
The package includes:
• HA311 802.11a Wireless PCI Adapter
• HA311 Resource CD-ROM, including a full reference guide
• HA311 Installation Guide (this document)
• Warranty and registration card
• Support information card
If you don’t have everything listed above, see the Support information card for contact
information. If the support information card is missing, go to
www.NETGEAR.com/support_contacts.html to obtain contact information.

6
1 Determine the Network Configuration
To set up the wireless PCI adapter, you need to determine the network setting of your wireless
network.
Are you running the wireless network in ad-hoc mode or
infrastructure mode?
There are two modes of configuring your wireless PCI adapter: ad-hoc mode or infrastructure
mode. In an ad-hoc wireless network, there is no access point. Each node communicates with any
other node directly. (A node is a network connection point. For example, a PC in a LAN is a node.)
In the infrastructure mode, the wireless access point bridges between the wired LAN and wireless
network. Connecting multiple access points via a wired Ethernet backbone can further extend the
wireless network coverage. As a mobile computing device moves out of the range of one access
point, it moves into the range of another. As a result, wireless clients can freely roam from one
Access Point domain to another and still maintain a seamless network connection.
If you are running a wireless network in infrastructure mode, please set up the access point (such
as the NETGEAR HE102 802.11a Wireless Access Point) first, before you set up this wireless PCI
adapter.
Ad-hoc mode or infrastructure mode: _________________________________________
What is the SSID for your wireless network?
The Service Set Identification (SSID) is an alphanumeric character string identifying the wireless
local area network. The HA311 Wireless PCI adapter only can communicate with wireless NICs or
access points configured with the same SSID. For the access point and wireless nodes to
communicate with each other, all must be configured with the same SSID. Either the SSID for your
wireless network was assigned in a preexisting wireless network or, if there was no preexisting
wireless network, you must create the SSID just as you would create a network name, using from 1
to 32 characters and not including any spaces or hyphens between characters.
SSID: _________________________________________
Which wireless channel to use?
When the HA311 Wireless PCI adapter is configured to operate in Infrastructure mode, it
automatically scans through all eight available channels (three when in turbo mode) for the closest
access point to associate with. When the HA311 Wireless PCI adapter is configured to operate in
ad-hoc mode, one of the HA311 Wireless PCI adapters will automatically operate as a virtual
access point. There is no need to set up the wireless channel for the wireless PCI adapter.

7
What is the WEP Encryption key?
The absence of a physical connection between nodes makes the wireless links vulnerable to
information theft. To provide a certain level of security from eavesdroppers and hackers, you can
enable WEP encryption. The following information is needed to determine the WEP encryption
level.
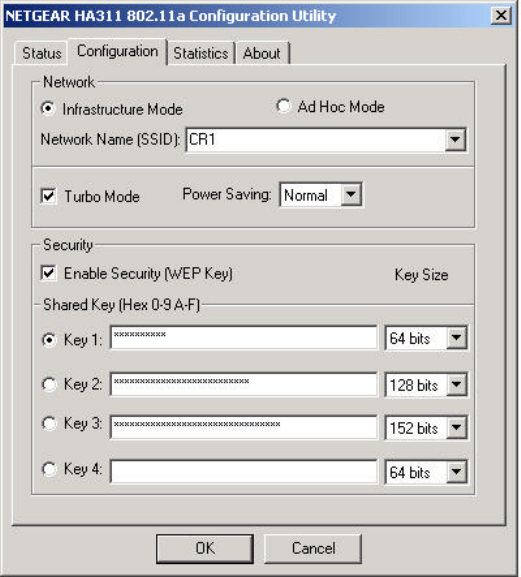
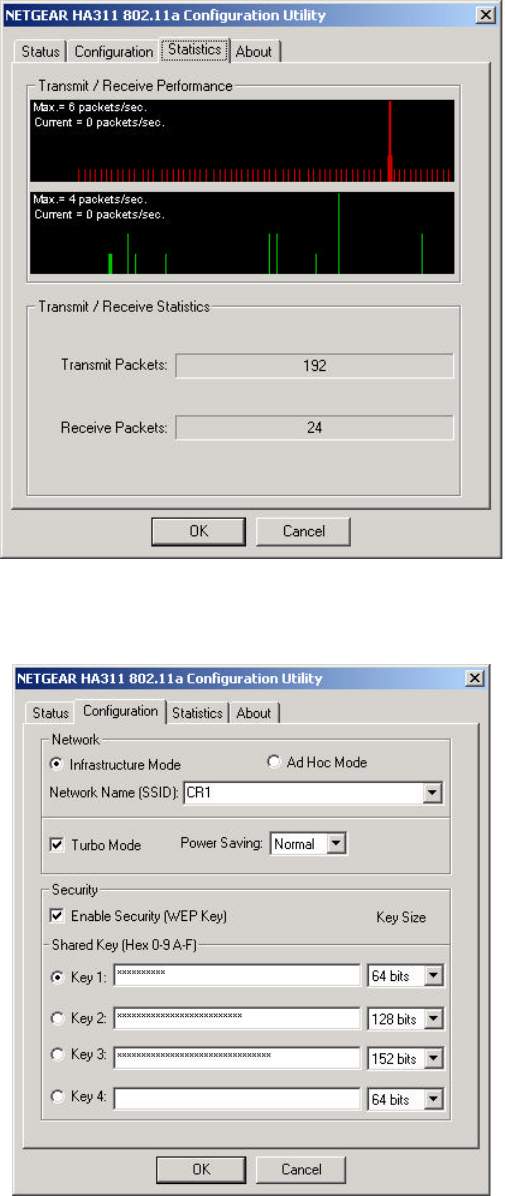
Note: The Shared Key, as well as the key content used by the HA311 Wireless PCI adapter and the
wireless access point or other wireless nodes in the same network, must be the same. You can
enter up to four different keys in the dialog box (see the screen shot below) but only the selected
key is effective.
Note: Twenty-four bits in the encryption key are factory preset and not modifiable. A 64-bit
encryption key can be represented by ten (10) hexadecimal digits. For a 128-bit encryption key,
twenty-six (26) hexadecimal digits need to be provided. For a 152-bit encryption key, thirty-two
(32) hexadecimal digits need to be provided.
Note: Hexadecimal digits are the first ten numbers of the decimal system (0, 1, 2, 3, 4, 5, 6, 7, 8,
and 9) and the letters A, B, C, D, E, and F. Your choice of characters is arbitrary. You might use,
for example, a phone number. (Do not use an obvious one, such as your office phone number).
The table below shows you some examples of encryption settings.
Encryption
Key Size
# of
Hexadecimal
Digits Example of Hexadecimal Key Content
64-bit
(24+40)
10 4C72F08AE1
128-bit
(24+104)
26 4C72F08AE19D57A3FF6B260037
152-bit
(24+128)
32 4C72F08AE19D57A3FF6B26003715D
AC2
8
Shared Key (1 of 4): _____________________
Key Size (64, 128, or 152 bits): ___________________
Key Value (Hex 0-9 A-F): ______________________________________________________________
9
2 Install the Wireless PCI adapter
After unpacking the box and determining all the configuration information, you’re ready to install
the wireless PCI adapter.
Install the Wireless PCI adapter
The HA311 Wireless PCI adapter requires a PCI slot in your computer. You must turn off your
computer and open the computer before installing the HA311 Wireless PCI Adapter. You must
install the HA311 Wireless PCI adapter before installing the network driver.
Before you proceed with the installation steps, decide on a name for your network and for each PC
(this information is different from the wireless parameters previously mentioned. Each network
much has the same workgroup name and each PC must have a unique computer name for
Microsoft networking to work properly.)
Install the Adapter Driver (First Time Installation)
Note: If you are reinstalling or upgrading the driver, you may need to contact NETGEAR Technical
Support for advice. You will find contact information in the Support information card that came
with your adapter.
This section explains the installation of the Windows 2000 adapter driver. Other versions of
Microsoft Windows may respond with different dialog boxes, or the dialog boxes may open in a
different sequence than those shown in this guide, but should prompt you for the same
information.
Note: You may need the Windows 2000 CD-ROM and the HA311 Resource CD-ROM ready to use
in the installation.
Note: If the “insert disk” dialog box opens and the ”Please insert the disk labeled Windows 2000…”
message appears at any time during the installation process, insert the Windows 2000 CD-ROM
and click “OK.” Then follow the next step in the instructions.
Note: To install the driver on Windows XP, 200, or NT 4.0, you must log in with Administrator
privilege.
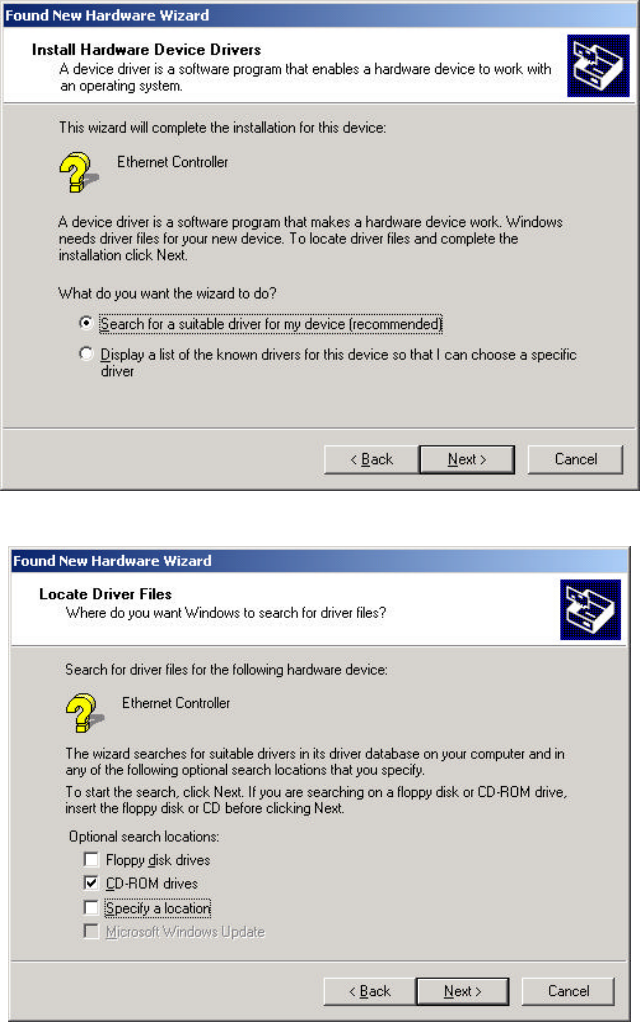
1. If you have chosen to install the card with the PC turned off, turn the power on now. The
new hardware is found. Click “Next”.
2. Insert the HA311 Resource CD-ROM into your CD-ROM drive.
3. In the next window, select “Search for a suitable driver for my device (recommended),”
and then click “Next.”
10
4. In the next Found New Hardware Wizard window, select the “CD-ROM drives” search
option and click “Next”.
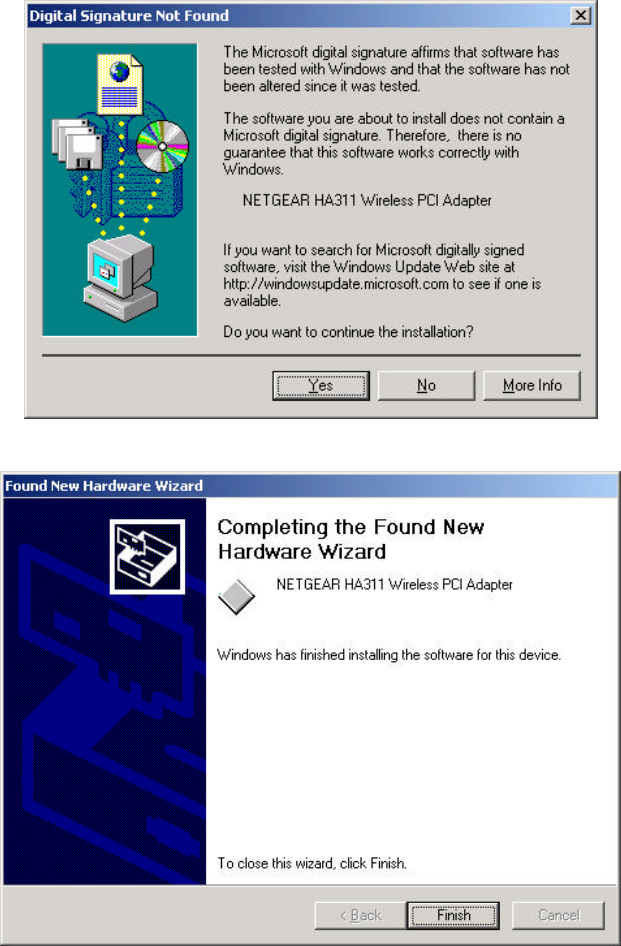
5. In the Found New Hardware Wizard window, make sure that the driver name is
“D:\netha311.inf” assuming that the driver letter for the CD-ROM drive is “D:”. (You
should see the correct drive letter that represents your PC’s CD-ROM.)
6. Click “Yes” when asked if you still want to install the driver when it is not digitally signed.
11
7. Click “Finish” at the final Found New Hardware wizard window.
12
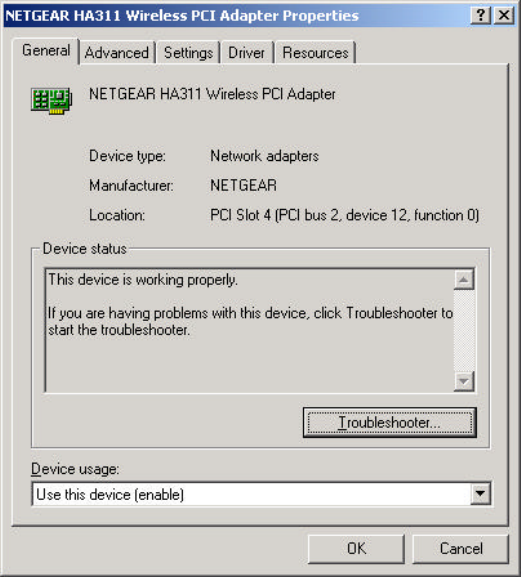
Verify the Driver Installation
1. Right-click the “My Computer” icon on the Windows 2000 desktop.
2. Click and select “Properties” from the pull-down menu.
3. Click on the “Hardware” folder tab.
4. Click the “Device Manager” button.
5. Double-click “Network Adapters”.
6. Double-click “NETGEAR HA311 Wireless PCI adapter”.
7. The pop-up window should indicate that the device is working properly.

13
3 Install the Wireless Configuration Utility
A wireless LAN configuration utility is provided to give you information on your wireless
network, such as signal quality, and to allow you to modify the various configurable
parameters of the PC Card.
Install the wireless LAN utility
1. Insert the HA311 Resource CD-ROM in the CD-ROM drive. From the Windows 2000
desktop, open “My Computer”. Double-click the CD-ROM drive letter to look into the
contents of the CD-ROM.
2. Double-click the SETUP application icon to start the installation procedure. The
InstallShields Wizard opens. Click “Next” to continue.
3. Click “Yes” in the software license agreement window to accept the agreement.
4. Click “Next” to go past the Product Information window.
5. Click “Finish” when the program indicates that the installation is complete.
Note: Users of Windows 98 or Me need to install the Windows Message Interface (WMI) to complete
the installation of the HA311 Configuration Utility.
System Tray application
Note: The SysTray (System Tray) resides on one end of the taskbar in the Microsoft Windows
desktop. It displays interface icons for memory-resident applications that execute in the
background continuously, such as the clock, speaker volume, and virus detection.
The wireless LAN configuration utility installation for the HA311 Wireless PCI adapter adds a
configuration and status reporting utility icon in the SysTray. Once you have completed the utility
installation, the Windows 2000 SysTray should show the icon in different colors.

14
bHA311 Configuration/status utility icon
Icon color Ad-hoc mode Infrastructure mode
Red The wireless PCI
adapter has not
initiated
communication with
any other wireless
node
Either the wireless PCI adapter is not
able to link to any access point, or
the link between the wireless PCI
adapter and the access point is lost.
Yellow N/A The link condition between the
wireless PCI adapter and the
associated access point is weak.
Green The wireless PCI
adapter has
communicated
successfully with
another wireless
node.
The wireless PCI adapter has
established good communication
with an access point and the signal
is strong.
15
4 Configure Wireless Parameters for the Adapter
Double-click the wireless SysTray icon to activate the wireless PCI adapter configuration utility for
the HA311 Wireless PCI adapter. You can click on the folder tabs in the window to modify any
wireless parameter. The configurable parameters of the HA311 Wireless PCI adapter are shown
here. Follow the parameters determined previously to configure the wireless PCI adapter.
[ ]
The wireless utility program also can show the status of the adapter card and the signal strength
connection to the access point. The Statistics folder tab allows you to view the packet transmit
and receive status.
16
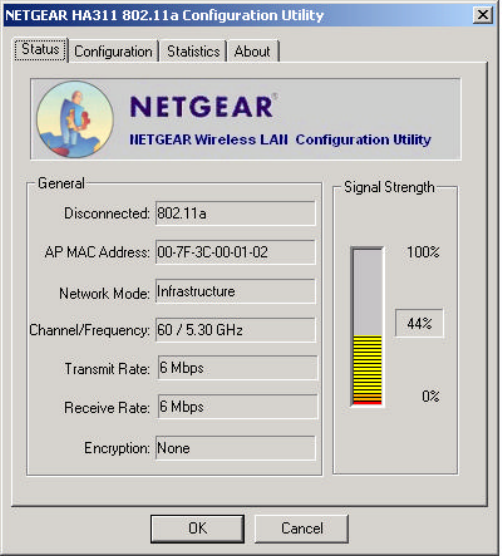
The following screen shot shows a wireless PCI adapter card that’s properly configured in
infrastructure mode and connected to an access point.
Note: Users of Windows 98 or Me must reboot after making any configuration changes in the
HA311 Configuration Utility.
17
Note: Users of Windows XP will have increased configuration capability if they use the HA311
802.11a Configuration Utility instead of using Windows XP to configure the wireless network
settings. The Zero Configuration feature can be disabled in the Wireless Network Connection
Properties window by uncheck the “Use windows to configure my wireless network settings”
default setting.

18
5 Test the Connection
The end panel of the HA311 Wireless PCI adapter has two lights (LEDs): Power and Network that
let you monitor the status of your wireless network:
LED Activity Meaning of LED Activity
Alternate blinking Looking for a network association
Slow-rate blinking Associated or joined with the network; no activity
Fast-rate blinking Associated or joined with the network; activity on
the network
Both of the LED’s on the HA311 Wireless PCI adapter should be blinking together (not alternating)
to indicate linking condition between the access point and the wireless PCI adapter.

19
Troubleshooting
Problem Cause Solution
No lights are lit on
the wireless PCI
adapter
The wireless card driver is
not inserted into the PCI
slot properly Or the proper
HA311 wireless PCI
adapter driver is not
loaded.
• Remove and reinsert the wireless PCI adapter.
• Check the device manager in Windows to see if
the adapter card is properly recognized in the
Windows operating system. Reload the driver if
necessary.
• Try to install the driver in different PCI slot on
your Windows NT system if it’s available.
The two LED’s are
blinking alternately
The wireless PCI adapter is
not associated to any
access point properly. You
may not have configured
the wireless parameters of
the wireless nodes to be
the same as the access
point.
• The access point may not be powered on.
• The access point and the PC card are not
configured with the same wireless parameters.
Check into the SSID, Turbo mode option and WEP
encryption settings.
• The access point may be out of range. Try
moving the system closer to the access point or
readjusting the antenna on the access point. You
may also move the access point to a higher
location for better signal reception by the
wireless PCI adapter.
I am associated and
connected to an
access point, but I
cannot see the
other computers on
the Ethernet side of
the network
This could be a physical
layer problem or a network
configuration problem.
• Check to make sure that the access point is
physically connected to the Ethernet network.
• Make sure that the IP addresses and the
Windows networking parameters are all
configured correctly.
20
Specifications
General Description: HA311 802.11a Wireless PCI adapter
Radio Data Rate: 6,9,12,18,24,36,48,54,72 Mbps (Auto rate capable)
Modulation Type: OFDM (BPSK, QPSK, 16-QAM, 64-QAM)
Frequency Band: 5.15 ~ 5.25 GHz (lower band) for US/Canada, Japan
5.25 ~ 5.35 GHz (middle band) for US/Canada
Encryption: Hardware-based 64, 128, & 152-bit WEP encryption
Standards Compatibility: IEEE 802.11
Operating Range: Indoor Outdoor
@6 Mbps 165 ft. @ 6 Mbps 132 ft. @ 54 Mbps
@54 Mbps 60 ft. @ 54 Mbps 1650 ft. @ 6 Mbps
Bus type: 32-bit CardBus PC card interface
Drivers: Microsoft Windows 98, Me, NT 4.0, 2000, XP
Dimensions: W: 88 mm (3.4 in)
D: 54 mm (2.1 in)
H: 5 mm (0.2 in)
Weight: 43.4 g (1.6 oz)
Status LEDs: Power/Network
Environmental Specifications: Operating temperature: 0 to 60C (32 to 140º F)
Operating humidity: 5-95%, noncondensing
Electromagnetic Compliance: FCC Part 15 Class B and Class E
Warranty: Limited 3-year
21
© 2002 by NETGEAR, Inc. All rights reserved.
Trademarks
NETGEAR is a registered trademark of NETGEAR, INC. Windows is a registered trademark
of Microsoft Corporation. Other brand and product names are trademarks or registered
trademarks of their respective holders. Information is subject to change without notice.
All rights reserved.
Statement of Conditions
In the interest of improving internal design, operational function, and/or reliability,
NETGEAR reserves the right to make changes to the products described in this
document without notice.
NETGEAR does not assume any liability that may occur due to the use or application of
the product(s) or circuit layout(s) described herein.
Federal Communications Commission (FCC) Compliance Notice: Radio
Frequency Notice
Netgear Inc., 4500 Great America Parkway, Santa Clara, CA 95054, (408) 907-8000,
declares under our sole responsibility, that this device complies with part 15 of the FCC
Rules. Operation is subject to the following two conditions:
• This device may not cause harmful interference.
• This device must accept any interference received, including interference that
may cause undesired operation.
Note: This equipment has been tested and found to comply with the limits for a Class B
digital device, pursuant to part 15 of the FCC Rules. These limits are designed to
provide reasonable protection against harmful interference in a residential installation.
This equipment generates, uses, and can radiate radio frequency energy and, if not
installed and used in accordance with the instructions, may cause harmful interference
to radio communications. However, there is no guarantee that interference will not
occur in a particular installation. If this equipment does cause harmful interference to
radio or television reception, which can be determined by turning the equipment off
and on, the user is encouraged to try to correct the interference by one or more of the
following measures:
• Reorient or relocate the receiving antenna,
• Increase the separation between the equipment and receiver,
• Connect the equipment into an outlet on a circuit different from that to which
the receiver is connected,
• Consult the dealer or an experienced radio/TV technician for help.
Radio Frequency Interference Requirements
22
This device is restricted to indoor use due to its operation in the 5.15 to 5.25 GHz
frequency range. FCC requires this product to be used indoors for the frequency range
5.15 to 5.25 GHz to reduce the potential for harmful interference to co-channel Mobile
Satellite systems. High power radars are allocated as primary users of the 5.25 to 5.35
GHz and 5.65 to 5.85 GHz bands. These radar stations can cause interference with and
/or damage this device.