Netgear orporated WGE101 802.11g Wireless Ethernet Bridge User Manual NETGEAR ME102 QCard
Netgear Incorporated 802.11g Wireless Ethernet Bridge NETGEAR ME102 QCard
UserManual.wiki
>
Netgear orporated
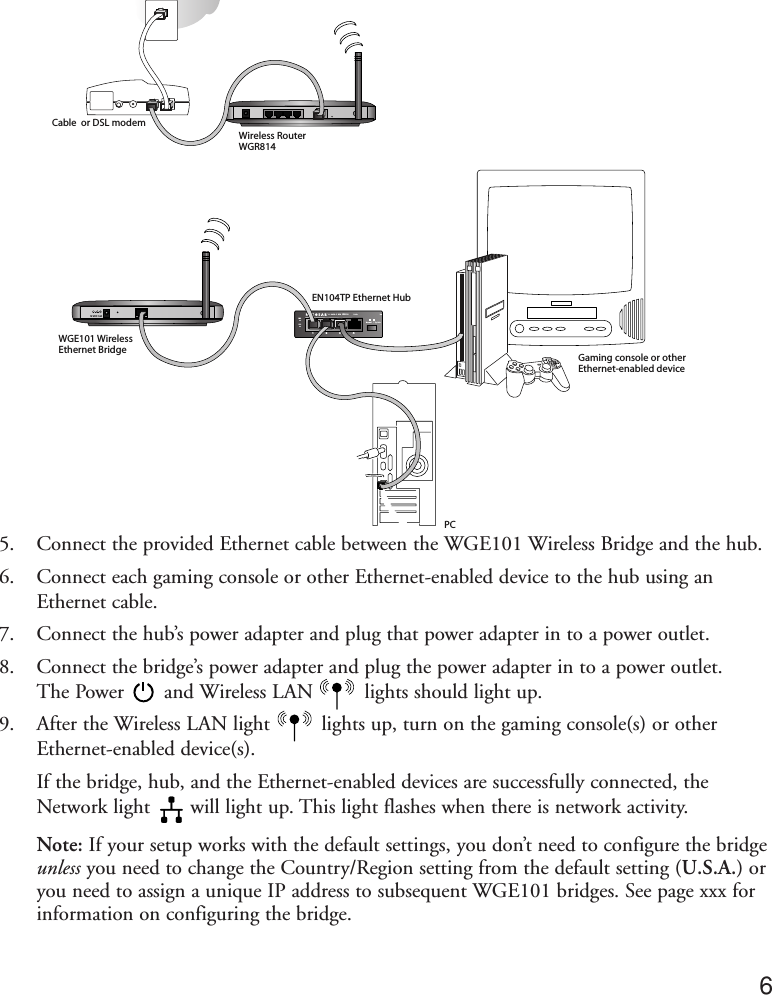
>
WGE101 User Manual
Manual
Navigation menu
Upload a User Manual
Namespaces
Wiki Guide
HTML
PDF
Info
Views
User Manual
Discussion / Help
Navigation
![WGE101 Default Wireless Configuration SettingsNote: If you are setting up a new wireless network, please set up the network and make sure itworks before adding the WGE101 Wireless Ethernet Bridge into the network.You will need to identify the wireless configuration and security parameters already defined inyour wireless network.Note: All NETGEAR, Inc. 802.11g and 802.11b wireless access products use the similarfactory settings as the WGE101 and will work without any configuration changes.The factory default settings for your WGE101 802.11g Wireless Ethernet Bridge are:•Mode (Infrastructure or Ad-Hoc): Infrastructure•Wireless network name Service Set Identification (SSID): AnyNote: Any means the bridge will connect to the first access point or wireless router thatresponds to the bridge’s request for connection. This may not be the strongest signal or theclosest access point or router. For the WGE101 Wireless Ethernet Bridge to communicatewith a specific wireless router or access point, both devices must be configured with thesame SSID.•User ID: admin•Password: password•Authentication type: Auto•WEP security: Disabled•Country/Region: U.S.A.Warning: Having the bridge set to the wrong country or region may result in the violationof local laws.WGE101-specific default settings:•IP address: 192.168.0.201•Protocol: Static•Device name: netgearnnnn (where nnnn is the last 4 digits of the MAC address)•Data rate: b/g combo[any others that should be included?]3](https://usermanual.wiki/Netgear-orporated/WGE101/User-Guide-336885-Page-5.png)
![WGE101 802.11g Wireless Ethernet BridgeLights and SettingsWGE101 802.11g Wireless Ethernet Bridge LightsThe WGE101 802.11g Wireless Ethernet Bridge has the following three lights, which give youfeedback on the status of your wireless connection:PWR Green OFF: No power to the unit.ON: Power applied to the unit.WLAN Green OFF: No wireless LAN activity.Flashing: Searching for an access point or wireless router.ON: Connected to a wireless LAN.LAN Green OFF: No Ethernet traffic.Flashing: Wired Ethernet traffic.ON: Connected to the Ethernet.Restoring the Bridge to the Default SettingsThere are two ways to return the bridge to its default factory settings.Using the Default button: [VERIFY and UPDATE AS NEEDED]Press the Default button with the point of a pen or pencil for at least 6 seconds and thenrelease the button. This reboots the WGE101 and reverts all the current settings to the factorydefaults.Using the browser-based software:Note: To use this procedure the bridge must be connected to a computer — either directlyor through a hub.1. Open and log into the browser-based configuration software.2. Click Restore Factory Default.[will the uer have to log in to do this?]3. Click Restore.4. Click Logout.163. Click Restore.4. Click Logout.](https://usermanual.wiki/Netgear-orporated/WGE101/User-Guide-336885-Page-18.png)
![System Requirements for the BridgeTo use the bridge in your network you must have:•Wireless router or access point (infrastructure mode) or a network of wireless devices (ad hoc mode)•Network software (Windows, Mac OS, Linux, or UNIX)•Internet Explorer 5.0 or later; Netscape Navigator 4.7 or laterBridge Specifications [MOST NEED TO BE UPDATED]Dimensions: W: 108.2 mm (4.26") D: 62.31 mm (2.45") H: 27.51 mm (1.08") Weight: 0.099 kg (0.219 lbs.)LAN: 10BASE-TWLAN: 802.11g or 802.11bPower Adapter: 5V AC, 2A with localized plug for North America, UK, Europeor AustraliaEnvironmental Specifications [ACCURATE???]Operating temperature: –10 to 55°C (14˚ to 131˚F)Operating humidity: 85% maximum relative humidity, noncondensingElectromagnetic Emissions: CE/LVD: EN 60950:1992+A1+A2+A3+A4+A11CE/EMC: EN 301489-17 V1.1.1: 09-2000EN 301489-1 V1.3.1: 09-2001CE/Radio: EN 300328-1 V1.3.1: 12-2001EN 300328-2 V1.2.1: 12-2001FCC Part 15 Subpart CFCC Part 15 Subpart BSafety Certifications: UL 1950, C UL Marks, TUV (EN 60950)Note: For more troubleshooting information, go to the NETGEAR, Inc. web site.Solution•If the wireless LAN setting arecorrect, make sure all the devicesare on the same IP network.•Make sure the RJ-45 connectorsare plugged into the computer andbridge securely.•You may need to change the IPaddress of your computertemporarily. See page xx.•Reset to factory defaults. See pg.xx.SymptomI can’t get theconfigurationsoftware for thebridge to show usingmy browser.CauseThis could be a networkconfiguration problem or a hardware connectionproblem.08-200208-2002W: 174mm (6.85") D: 116.5mm (4.59") H: 26mm (1.02")0.261kg (0.5741 lbs.)10/100 BASE-T802.11g or802.11b12V DC 1.2A](https://usermanual.wiki/Netgear-orporated/WGE101/User-Guide-336885-Page-21.png)