Netgear orporated WGT624V3 108 Mbps Wireless Firewall Router User Manual FullManual
Netgear Incorporated 108 Mbps Wireless Firewall Router FullManual
Contents
- 1. User Manual 1
- 2. User Manual 2
- 3. User Manual 3
- 4. User Manual 4
User Manual 2
Wireless Configuration 4-1
June 2004 202-10036-01
Chapter 4
Wireless Configuration
This chapter describes how to configure the wireless features of your WGR624v3 router. In
planning your wireless network, you should consider the level of security required. You should
also select the physical placement of your firewall in order to maximize the network speed. For
further information on wireless networking, refer to Appendix D, “Wireless Networking Basics.
Observe Performance, Placement, and Range Guidelines
The operating distance or range of your wireless connection can vary significantly based on the
physical placement of the wireless firewall. The latency, data throughput performance, and
notebook power consumption of wireless adapters also vary depending on your configuration
choices.
For best results, place your firewall:
• Near the center of the area in which your computers will operate.
• In an elevated location such as a high shelf where the wirelessly connected computers have
line-of-sight access (even if through walls).
• Away from sources of interference, such as computers, microwaves, and 2.4 GHz cordless
phones.
• Away from large metal surfaces.
The time it takes to establish a wireless connection can vary depending on both your security
settings and placement. WEP connections can take slightly longer to establish. Also, WEP
encryption can consume more battery power on a notebook computer.
Note: Failure to follow these guidelines can result in significant performance
degradation or inability to wirelessly connect to the router. For complete range/
performance specifications, please see Appendix A, “Technical Specifications.”
Reference Manual for the 108 Mbps Wireless Firewall Router WGR624v3
4-2 Wireless Configuration
June 2004 202-10036-01
Implement Appropriate Wireless Security
Unlike wired network data, your wireless data transmissions can be received well beyond your
walls by anyone with a compatible adapter. For this reason, use the security features of your
wireless equipment. The WGR624v3 router provides highly effective security features which are
covered in detail in this chapter. Deploy the security features appropriate to your needs.
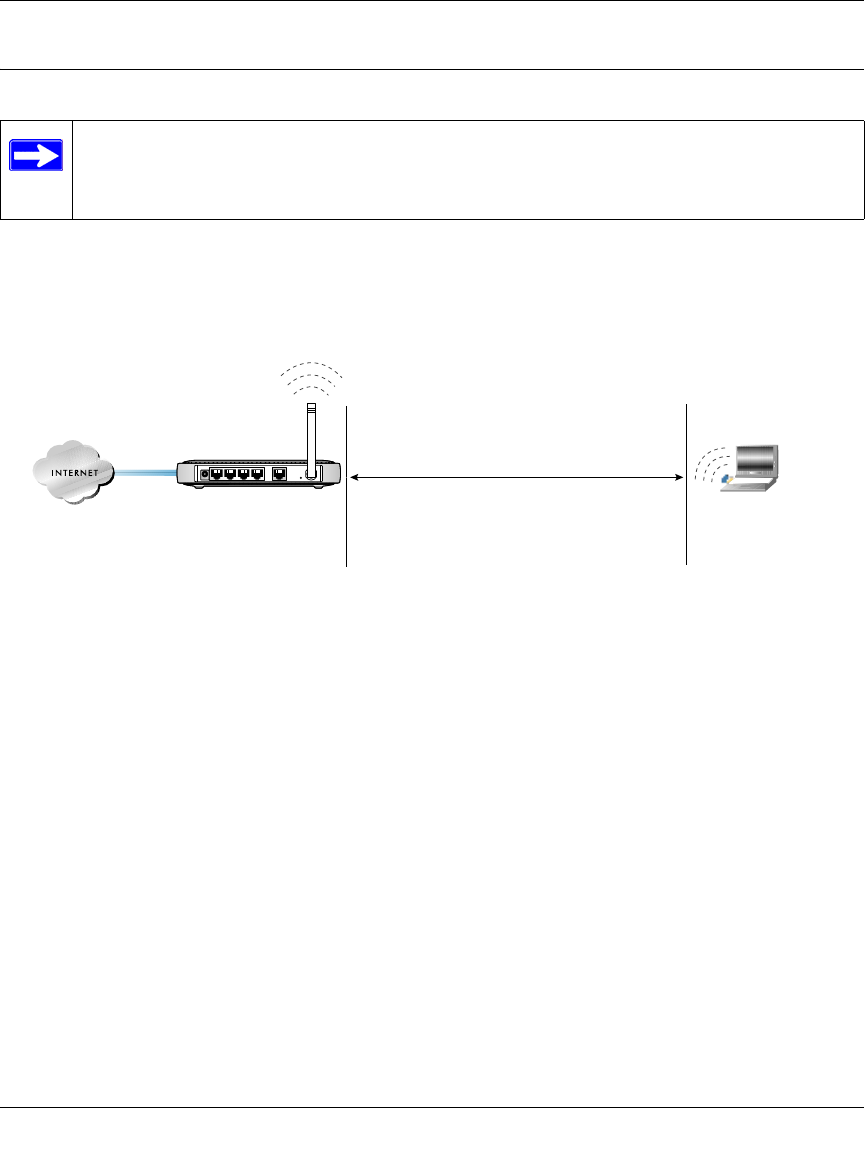
Figure 4-1: WGR624v3 wireless data security options
There are several ways you can enhance the security of your wireless network.
•Restrict Access Based on MAC address. You can restrict access to only trusted computers so
that unknown computers cannot wirelessly connect to the WGR624v3. MAC address filtering
adds an obstacle against unwanted access to your network, but the data broadcast over the
wireless link is fully exposed.
•Turn Off the Broadcast of the Wireless Network Name SSID. If you disable broadcast of
the SSID, only devices that have the correct SSID can connect. This nullifies the wireless
network ‘discovery’ feature of some products such as Windows XP, but the data is still fully
exposed to a determined snoop using specialized test equipment like wireless sniffers.
•WEP. Wired Equivalent Privacy (WEP) data encryption provides data security. WEP Shared
Key authentication and WEP data encryption will block all but the most determined
eavesdropper.
Note: Indoors, computers can connect over 802.11b/g wireless networks at ranges of up
to 300 feet. Such distances can allow for others outside of your immediate area to access
your network.
:LUHOHVV'DWD
6HFXULW\2SWLRQV
5DQJHXSWRIRRWUDGLXV
2SHQV\VWHPHDV\EXWQRVHFXULW\
0$&DFFHVVOLVWQRGDWDVHFXULW\
:(3VHFXULW\EXWVRPHSHUIRUPDQFHLPSDFW
:3$36.YHU\VWURQJVHFXULW\
WGR624v3
Reference Manual for the 108 Mbps Wireless Firewall Router WGR624v3
Wireless Configuration 4-3
June 2004 202-10036-01
•WPA-PSK. Wi-Fi Protected Access (WPA) data encryption provides strong data security.
WPA-PSK will block eavesdropping. Because this is a new standard, wireless device driver
and software availability may be limited.
•Turn Off the Wired LAN. If you disable the wireless LAN, wireless devices cannot
communicate with the router at all. You might choose to turn off the wireless the LAN when
you are away and the others in the household all use wired connections.
Understanding Wireless Settings
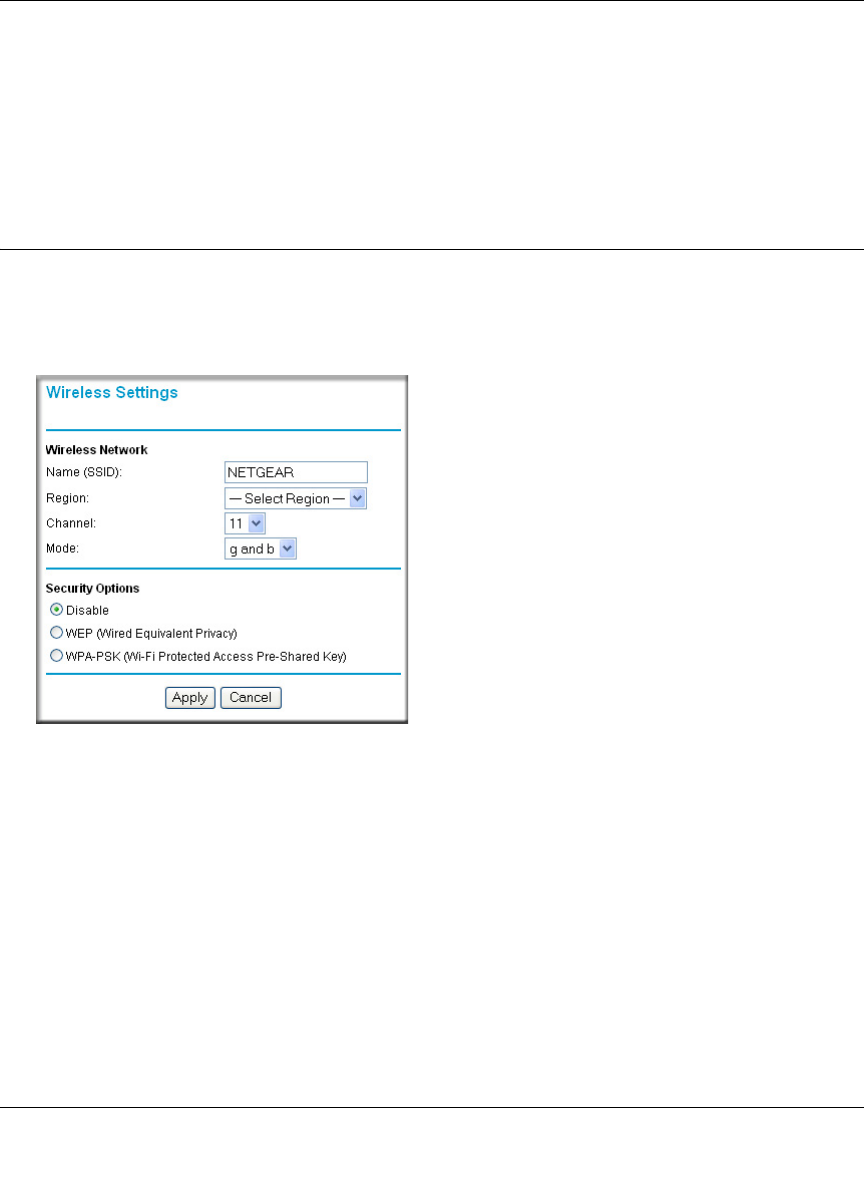
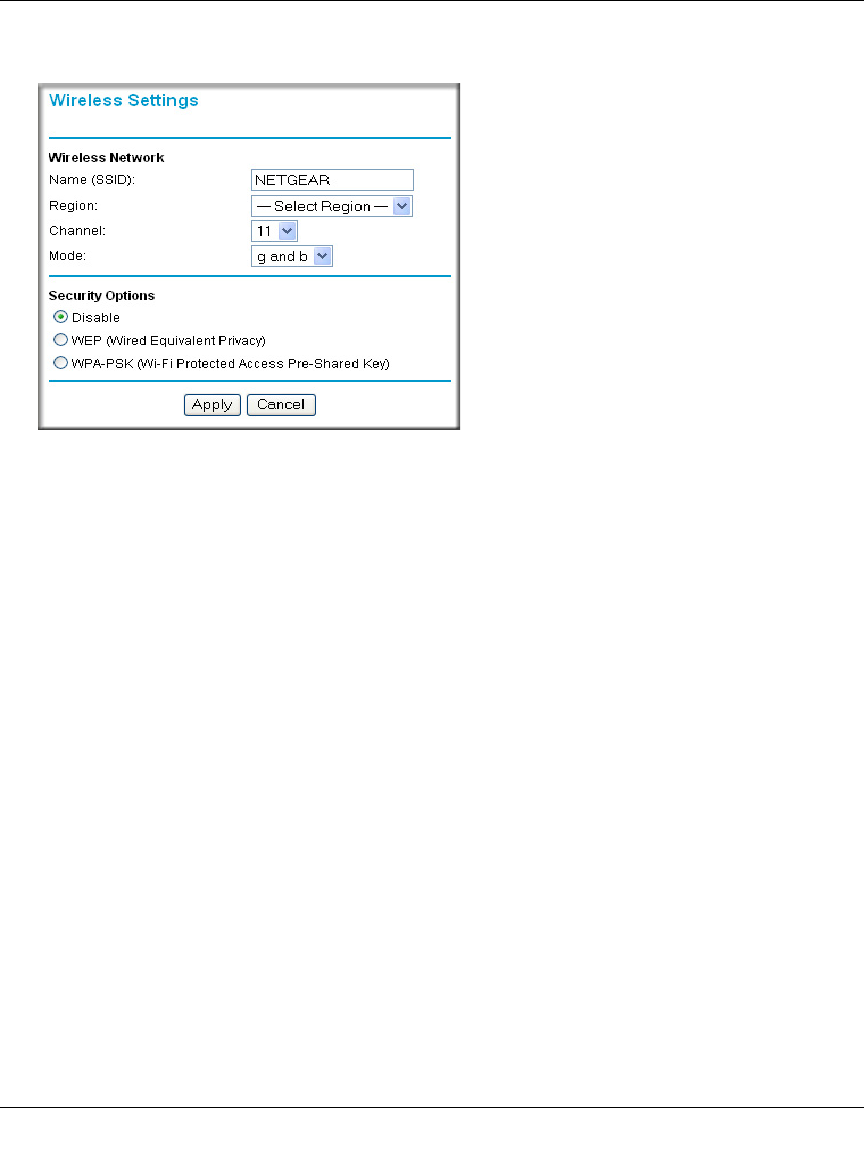
To configure the Wireless settings of your firewall, click the Wireless link in the main menu of the
browser interface. The Wireless Settings menu will appear, as shown below.
Figure 4-2: Wireless Settings menu
•Name (SSID). The SSID is also known as the wireless network name. Enter a value of up to
32 alphanumeric characters. In a setting where there is more than one wireless network,
different wireless network names provide a means for separating the traffic. Any device you
want to participate in a particular wireless network will need to use this SSID for that network.
The WGR624v3 default SSID is: NETGEAR.
• Region. This field identifies the region where the WGR624v3 can be used. It may not be legal
to operate the wireless features of the wireless router in a region other than one of those
identified in this field.

Reference Manual for the 108 Mbps Wireless Firewall Router WGR624v3
4-4 Wireless Configuration
June 2004 202-10036-01
•Channel. This field determines which operating frequency will be used. It should not be
necessary to change the wireless channel unless you notice interference problems with another
nearby access point. For more information on the wireless channel frequencies please refer to
“Wireless Channels” on page D-2.
•Mode. This field determines which data communications protocol will be used. You can select
“g only,” “b only,” or “g and b.” “g only” dedicates the WGR624v3 to communicating with
the higher bandwidth 802.11g wireless devices exclusively. “b only” dedicates the WGR624v3
to communicating with the higher bandwidth 802.11b wireless devices exclusively. The “g
and b” mode provides backward compatibility with the slower 802.11b wireless devices while
still enabling 802.11g communications.
•Security Options. These options are the wireless security features you can enable. The table
below identifies the various basic wireless security options. A full explanation of these
standards is available in Appendix D, “Wireless Networking Basics.”
Table 4-1. Basic Wireless Security Options
Field Description
Automatic No wireless security.
WEP WEP offers the following options:
• Open System
With Open Network Authentication and 64- or 128-bit WEP Data Encryption, the WGR624
v3 does perform 64- or 128-bit data encryption but does not perform any authentication.
• Shared Key
Shared Key authentication encrypts the SSID and data.
Choose the Encryption Strength (64- or 128-bit data encryption). Manually enter the key
values or enter a word or group of printable characters in the Passphrase box. Manually
entered keys are case sensitive but passphrase characters are not case sensitive.
Note: Not all wireless adapter configuration utilities support passphrase key generation.
•Auto
WPA-PSK WPA-Pre-shared Key does perform authentication, uses 128-bit data encryption and
dynamically changes the encryption keys making it nearly impossible to circumvent.
Enter a word or group of printable characters in the Password Phrase box. These characters
are case sensitive.
Note: Not all wireless adapter configuration utilities support WPA. Furthermore, client software
is required on the client. Windows XP and Windows 2000 with Service Pack 3 do include the
client software that supports WPA. Nevertheless, the wireless adapter hardware and driver
must also support WPA.
Reference Manual for the 108 Mbps Wireless Firewall Router WGR624v3
Wireless Configuration 4-5
June 2004 202-10036-01
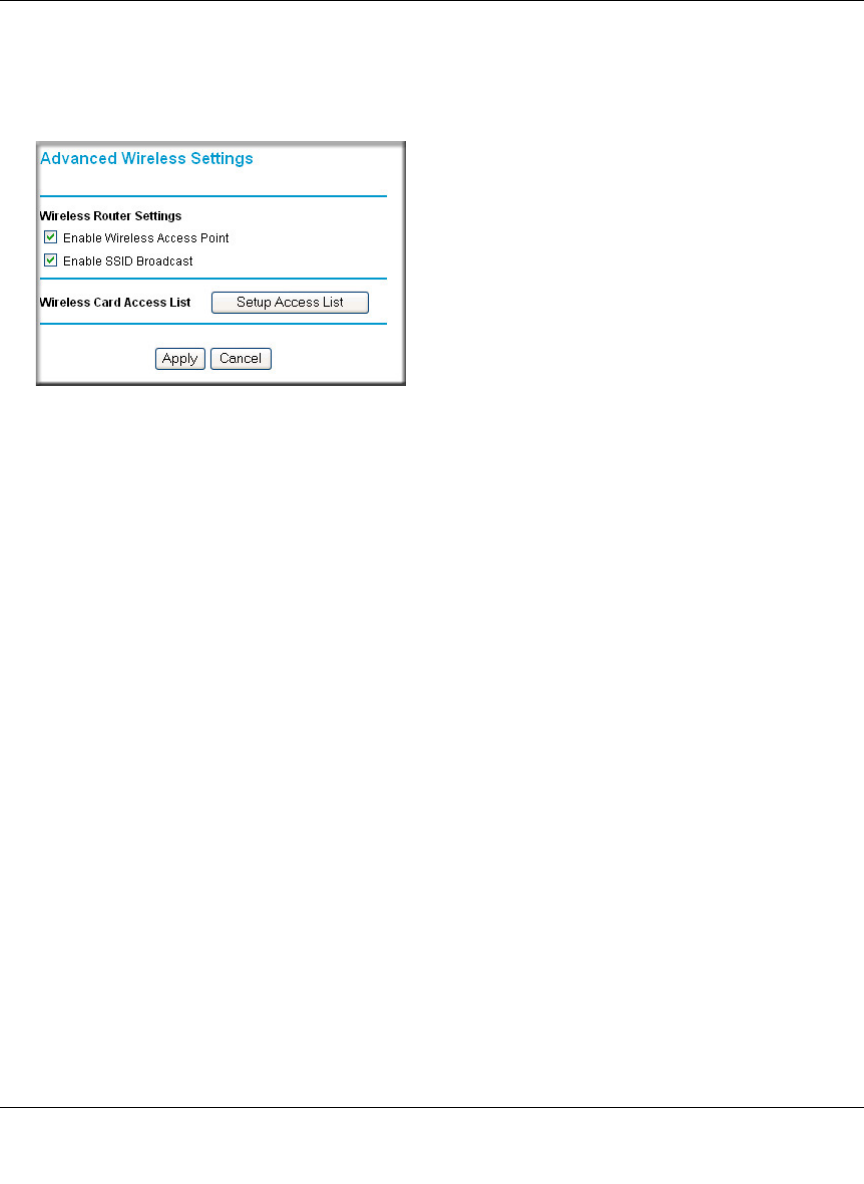
To configure the advanced wireless settings of your firewall, click the Wireless Setup link in the
Advanced section of the main menu of the browser interface. The Wireless Settings menu will
appear, as shown below.
Figure 4-3: Advanced Wireless Settings menu
•Allow Broadcast of Name (SSID). If you disable broadcast of the SSID, only devices that
have the correct SSID can connect. Disabling SSID broadcast nullifies the wireless network
‘discovery’ feature of some products such as Windows XP.
•Enable Wireless Access Point. If you disable the wireless access point, wireless devices
cannot connect to the WGR624v3.
•Wireless Card Access List. When the Trusted PCs Only radio button is selected, the
WGR624v3 checks the MAC address of the wireless station and only allows connections to
computers identified on the trusted computers list.

Reference Manual for the 108 Mbps Wireless Firewall Router WGR624v3
4-6 Wireless Configuration
June 2004 202-10036-01
Information to Gather Before Changing Basic Wireless Settings
Before customizing your wireless settings, print this form and record the following information. If
you are working with an existing wireless network, the person who set up or is responsible for the
network will be able to provide this information. Otherwise, you will choose the settings for your
wireless network. Either way, record the settings for your wireless network in the spaces below.
•Wireless Network Name (SSID): ______________________________ The SSID, identifies
the wireless network. You can use up to 32 alphanumeric characters. The SSID is case
sensitive. The SSID in the wireless adapter card must match the SSID of the wireless router. In
some configuration utilities (such as in Windows XP), the term “wireless network name” is
used instead of SSID.
•If WEP Authentication is Used. Circle one: Open System, Shared Key, or Auto.
Note: If you select Shared Key, the other devices in the network will not connect unless they
are set to Shared Key as well and are configured with the correct key.
–WEP Encryption key size. Choose one: 64-bit or 128-bit. Again, the encryption key size
must be the same for the wireless adapters and the wireless router.
–Data Encryption (WEP) Keys. There are two methods for creating WEP data encryption
keys. Whichever method you use, record the key values in the spaces below.
•Passphrase method. ______________________________ These characters are case
sensitive. Enter a word or group of printable characters and click the Generate Keys
button. Not all wireless devices support the passphrase method.
•Manual method. These values are not case sensitive. For 64-bit WEP, enter 10 hex
digits (any combination of 0-9 or a-f). For 128-bit WEP, enter 26 hex digits.
Key 1: ___________________________________
Key 2: ___________________________________
Key 3: ___________________________________
Key 4: ___________________________________
•If WPA-PSK Authentication is Used.
–Passphrase: ______________________________ These characters are case sensitive.
Enter a word or group of printable characters. When you use WPA-PSK, the other devices
in the network will not connect unless they are set to WPA-PSK as well and are configured
with the correct Passphrase.
Use the procedures described in the following sections to configure the WGR624v3. Store this
information in a safe place.
Reference Manual for the 108 Mbps Wireless Firewall Router WGR624v3
Wireless Configuration 4-7
June 2004 202-10036-01
Default Factory Settings
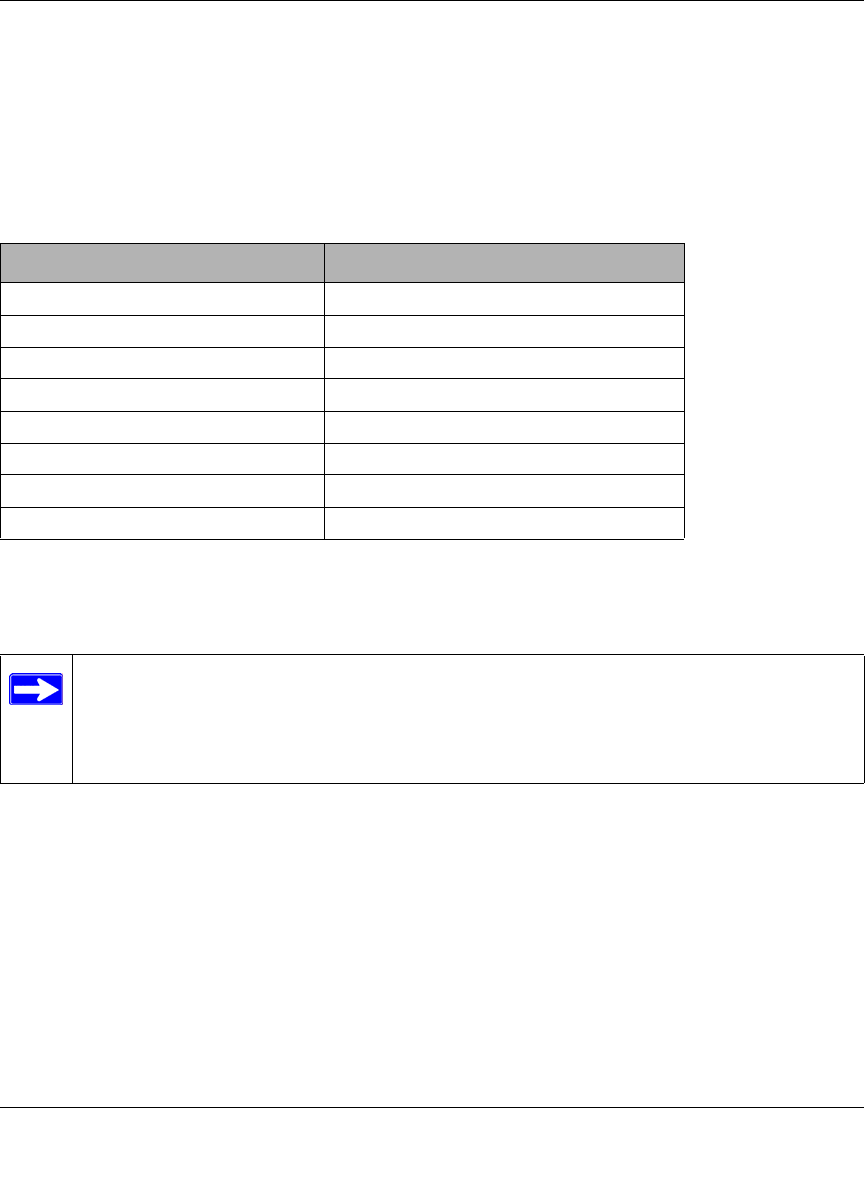
When you first receive your WGR624v3, the default factory settings are shown below. You can
restore these defaults with the Factory Default Restore button on the rear panel. After you install
the WGR624v3 router, use the procedures below to customize any of the settings to better meet
your networking needs.
How to Set Up and Test Basic Wireless Connectivity
Follow the instructions below to set up and test basic wireless connectivity. Once you have
established basic wireless connectivity, you can enable security settings appropriate to your needs.
1. Log in to the WGR624v3 firewall at its default LAN address of http://www.routerlogin.net
with its default user name of admin and default password of password, or using whatever
LAN address and password you have set up.
FEATURE DEFAULT FACTORY SETTINGS
Wireless Access Point Enabled
Wireless Access List (MAC Filtering) All wireless stations allowed
SSID broadcast Enabled
SSID NETGEAR
11b/g RF Channel 11
Mode g and b
Authentication Type Open System
WEP Disabled
Note: If you use a wireless computer to configure WPA settings, you will be
disconnected when you click Apply. Reconfigure your wireless adapter to match the
new settings or access the wireless router from a wired computer to make any further
changes.
Reference Manual for the 108 Mbps Wireless Firewall Router WGR624v3
4-8 Wireless Configuration
June 2004 202-10036-01
2. Click Wireless Settings in the main menu of the WGR624v3 firewall.
Figure 4-4: Wireless Settings menu
3. Choose a suitable descriptive name for the wireless network name (SSID). In the SSID box,
enter a value of up to 32 alphanumeric characters. The default SSID is NETGEAR.
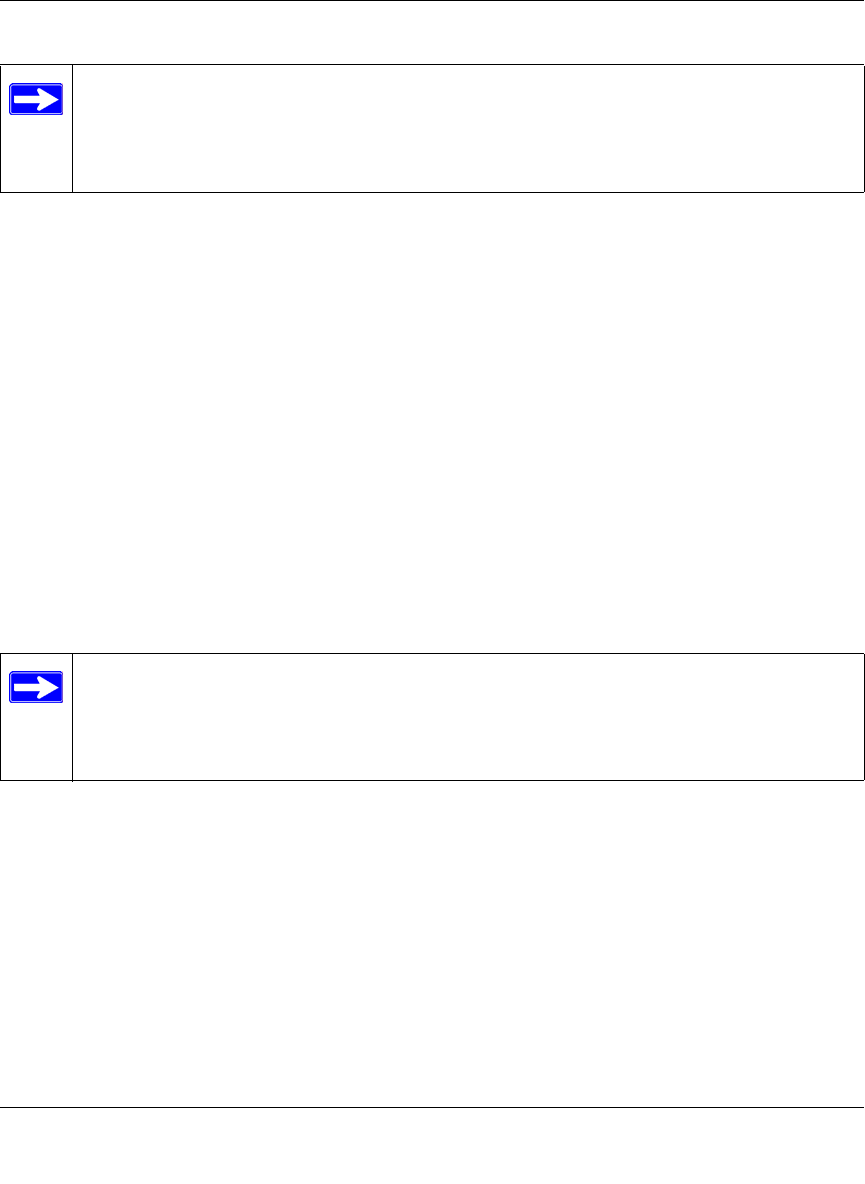
Note: The SSID is case sensitive; NETGEAR is not the same as nETgear. Also, the SSID of
any wireless access adapters must match the SSID you configure in the 108 Mbps Wireless
Firewall Router WGR624v3. If they do not match, you will not get a wireless connection to the
WGR624v3.
4. Set the Region. Select the region in which the wireless interface will operate.
5. Set the Channel. The default channel is 11.
This field determines which operating frequency will be used. It should not be necessary to
change the wireless channel unless you notice interference problems with another nearby
wireless router or access point. Select a channel that is not being used by any other wireless
networks within several hundred feet of your firewall. For more information on the wireless
channel frequencies please refer to “Wireless Channels” on page D-2.
6. For initial configuration and test, leave the Wireless Card Access List set to “Everyone” and
the Encryption Strength set to “Disabled.”
7. Click Apply to save your changes.
Reference Manual for the 108 Mbps Wireless Firewall Router WGR624v3
Wireless Configuration 4-9
June 2004 202-10036-01
8. Configure and test your computers for wireless connectivity.
Program the wireless adapter of your computers to have the same SSID and channel that you
configured in the router. Check that they have a wireless link and are able to obtain an IP
address by DHCP from the firewall.
Warning: The Network Name (SSID) is case sensitive. If NETGEAR is the Network Name
(SSID) in your wireless router, you must enter NETGEAR in your computer's wireless
settings. Typing nETgear will not work.
Once your computers have basic wireless connectivity to the firewall, you can configure the
advanced wireless security functions of the firewall.
How to Configure WEP
To configure WEP data encryption, follow these steps:
1. Log in to the WGR624v3 firewall at its default LAN address of http://www.routerlogin.net
with its default user name of admin and default password of password, or using whatever
LAN address and password you have set up.
2. Click Wireless Settings in the main menu of the WGR624v3 firewall.
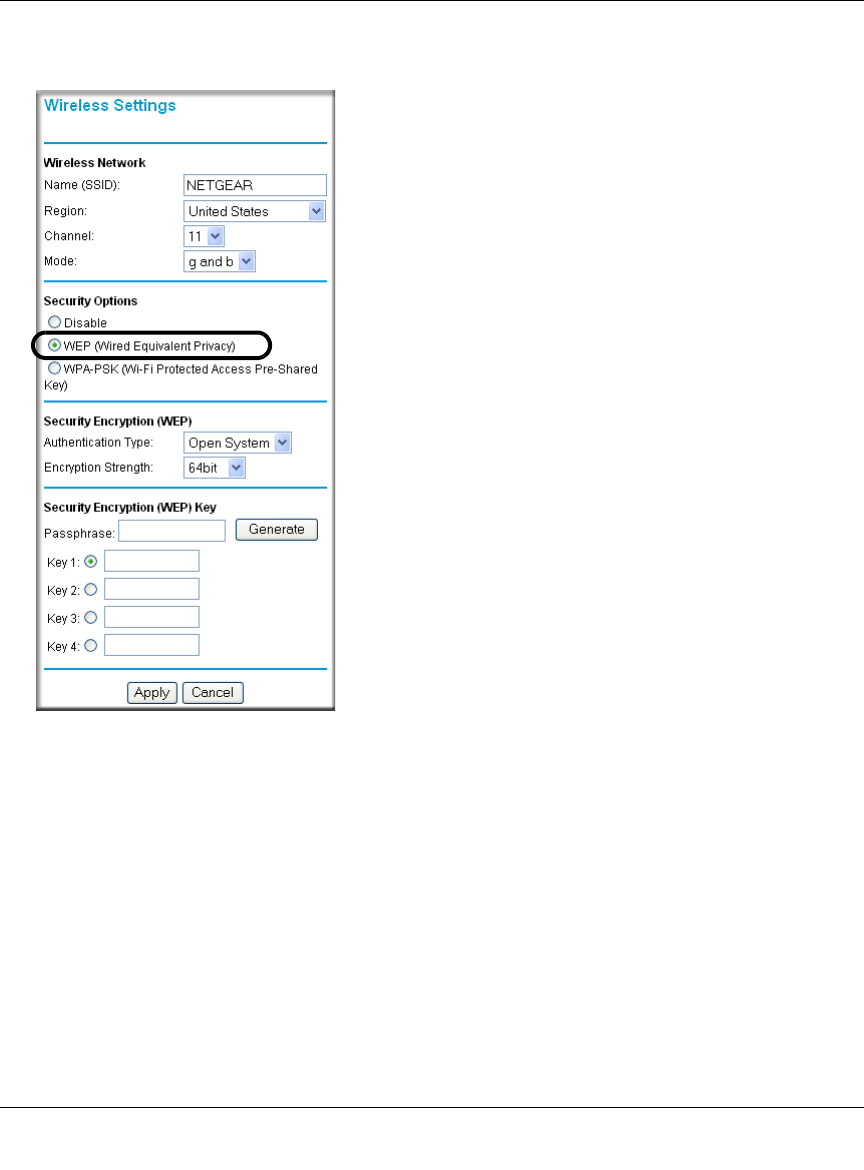
3. From the Security Options menu, select WEP. The WEP options display.
Note: If you are configuring the firewall from a wireless computer and you change the
firewall’s SSID, channel, or security settings, you will lose your wireless connection
when you click on Apply. You must then change the wireless settings of your computer
to match the firewall’s new settings.
Note: If you use a wireless computer configure WEP settings, you will be disconnected
when you click on Apply. You must then either configure your wireless adapter to match
the wireless router WEP settings or access the wireless router from a wired computer to
make any further changes.
Reference Manual for the 108 Mbps Wireless Firewall Router WGR624v3
4-10 Wireless Configuration
June 2004 202-10036-01
4. Select the Authentication Type and Encryptions strength from the drop-down lists.
Figure 4-5. Wireless Settings encryption menu
5. You can manually or automatically program the four data encryption keys. These values must
be identical on all computers and Access Points in your network.
• Automatic - Enter a word or group of printable characters in the Passphrase box and click
the Generate button. The passphrase is case sensitive; NETGEAR is not the same as
nETgear. The four key boxes will be automatically populated with key values.
• Manual - Enter ten hexadecimal digits (any combination of 0-9, a-f, or A-F). These entries
are not case sensitive; AA is the same as aa.
Select which of the four keys will be active.
Please refer to “WEP Wireless Security” on page D-4 for a full explanation of each of these
options, as defined by the IEEE 802.11 wireless communication standard.
6. Click Apply to save your settings.
Reference Manual for the 108 Mbps Wireless Firewall Router WGR624v3
Wireless Configuration 4-11
June 2004 202-10036-01
How to Configure WPA-PSK Wireless Security
Note: Not all wireless adapters support WPA. Furthermore, client software is also required.
Windows XP and Windows 2000 with service pack 3 do include WPA support. Nevertheless, the
wireless adapter hardware and driver must also support WPA. For instructions on configuring
wireless computers or PDAs for WPA-PSK security, consult the documentation for the product
you are using.
To configure WPA-PSK, follow these steps:
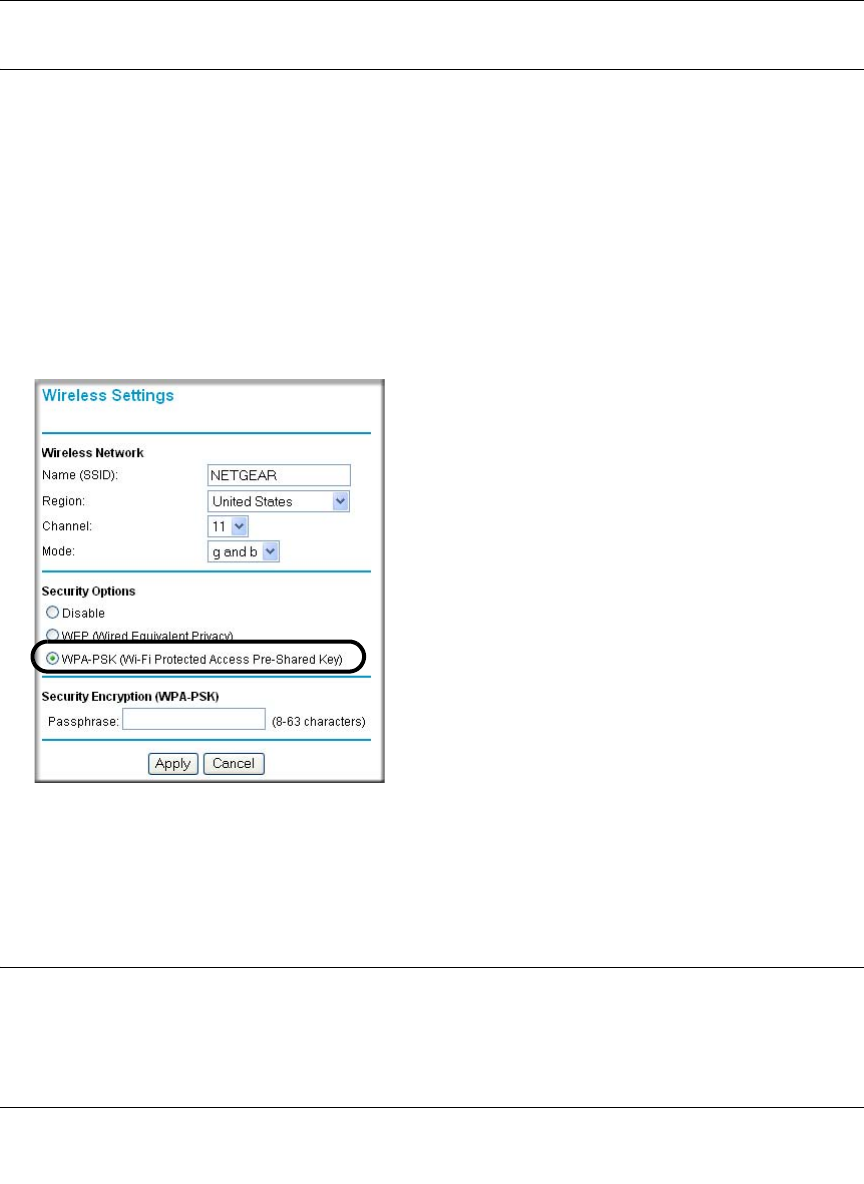
1. Click Security Settings in the Setup section of the main menu and select WPA-PSK for the
Security Type.
Figure 4-6: WPA Settings menu
2. Enter a word or group of 8-63 printable characters in the Password Phrase box.
3. Click Apply to save your settings.
How to Restrict Wireless Access by MAC Address
To restrict access based on MAC addresses, follow these steps:
Reference Manual for the 108 Mbps Wireless Firewall Router WGR624v3
4-12 Wireless Configuration
June 2004 202-10036-01
1. Log in to the WGR624v3 firewall at its default LAN address of http://www.routerlogin.net
with its default user name of admin and default password of password, or using whatever
LAN address and password you have set up.
2. Click Advanced Wireless Setup in the main menu of the WGR624v3 firewall.
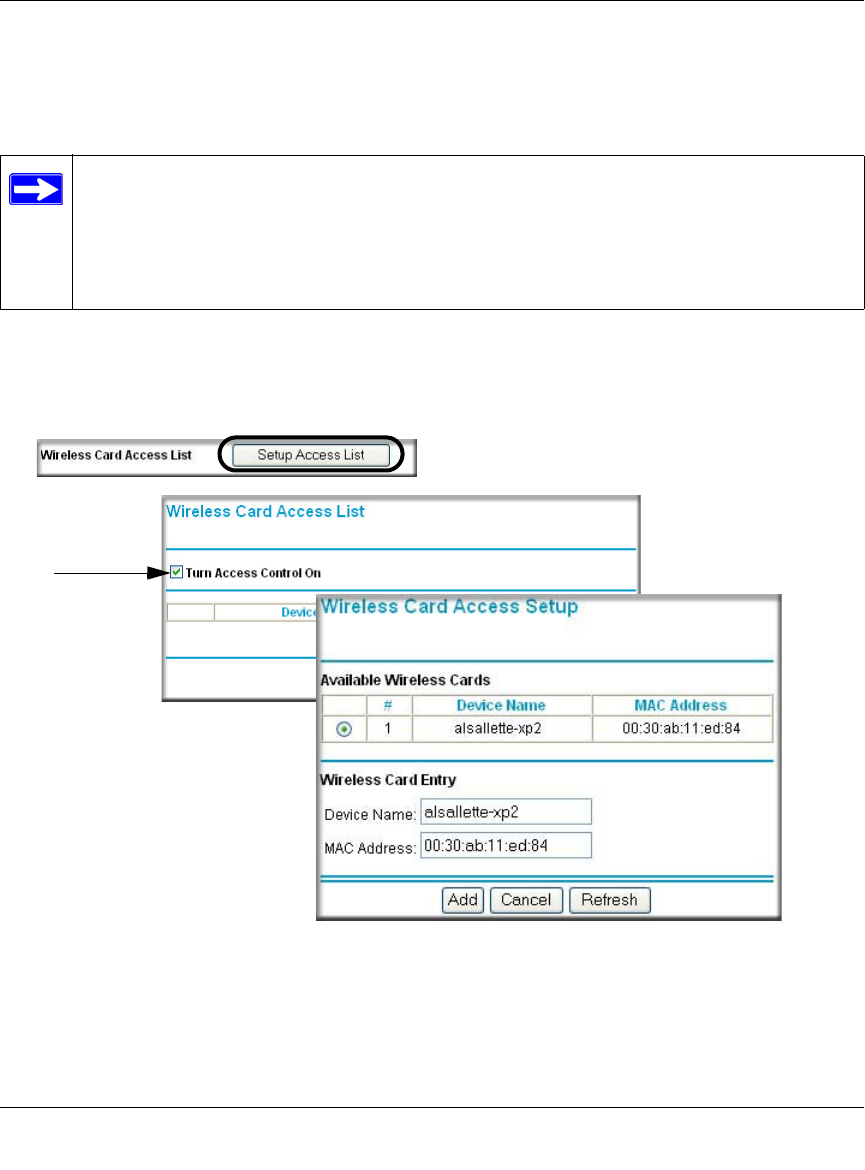
3. From the Wireless Settings menu, click Setup Access List to display the Wireless Access
menu shown below.
Figure 4-7: Wireless Card Access List Setup
4. Click Add to add a wireless device to the wireless access control list. The Available Wireless
Cards list displays.
Note: When configuring the firewall from a wireless computer whose MAC address is
not in the Trusted PC list, if you select Turn Access Control On, you will lose your
wireless connection when you click on Apply. You must then access the wireless router
from a wired computer or from a wireless computer which is on the access control list to
make any further changes.

Reference Manual for the 108 Mbps Wireless Firewall Router WGR624v3
Wireless Configuration 4-13
June 2004 202-10036-01
5. Click the Turn Access Control On check box.
6. Then, either select from the list of available wireless cards the WGR624v3 has found in your
area, or enter the MAC address and device name for a device you plan to use. You can usually
find the MAC address printed on the wireless adapter.
Note: You can copy and paste the MAC addresses from the firewall’s Attached Devices menu
into the MAC Address box of this menu. To do this, configure each wireless computer to
obtain a wireless link to the firewall. The computer should then appear in the Attached
Devices menu.
7. Click Add to add this wireless device to the Wireless Card Access List. The screen changes
back to the list screen. Repeat these steps for each additional device you wish to add to the list.
8. Be sure to click Apply to save your wireless access control list settings.
Now, only devices on this list will be allowed to wirelessly connect to the WGR624v3.

Reference Manual for the 108 Mbps Wireless Firewall Router WGR624v3
4-14 Wireless Configuration
June 2004 202-10036-01

Content Filtering 5-1
July 2004 202-10036-01
Chapter 5
Content Filtering
This chapter describes how to use the content filtering features of the 108 Mbps Wireless Firewall
Router WGR624v3 to protect your network. These features can be found by clicking on the Content
Filtering heading in the Main Menu of the browser interface.
Content Filtering Overview
The 108 Mbps Wireless Firewall Router WGR624v3 provides you with Web content filtering options,
plus browsing activity reporting and instant alerts via e-mail. Parents and network administrators can
establish restricted access policies based on time of day, Web addresses and Web address
keywords. You can also block Internet access by applications and services, such as chat or games.
To configure these features of your router, click on the subheadings under the Content Filtering
heading in the Main Menu of the browser interface. The subheadings are described below:
Reference Manual for the 108 Mbps Wireless Firewall Router WGR624v3
5-2 Content Filtering
July 2004 202-10036-01
Blocking Access to Internet Sites
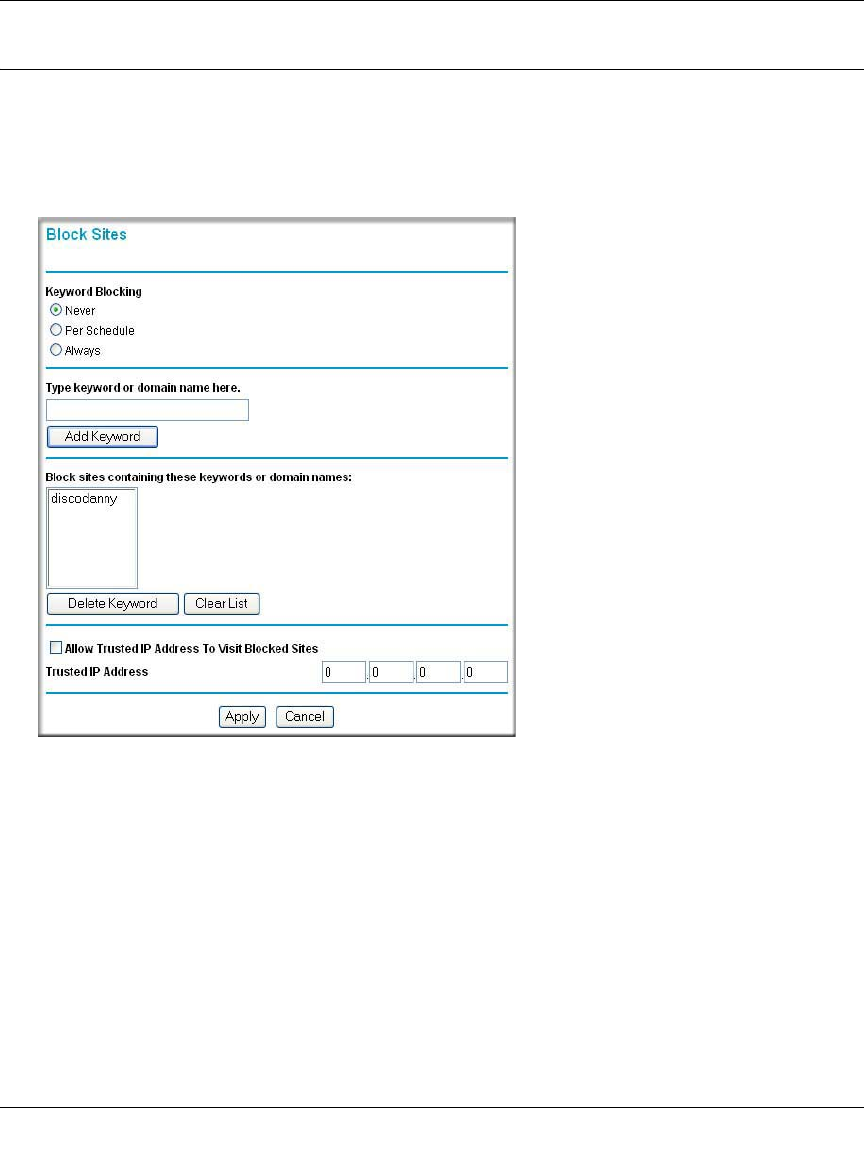
The WGR624v3 router allows you to restrict access based on Web addresses and Web address
keywords. Up to 255 entries are supported in the Keyword list. The Block Sites menu is shown in
Figure 5-1 below:
Figure 5-1: Block Sites menu
To enable keyword blocking, select either “Per Schedule” or “Always”, then click Apply. If you
want to block by schedule, be sure that a time period is specified in the Schedule menu.
To add a keyword or domain, type it in the Keyword box, click Add Keyword, then click Apply.
To delete a keyword or domain, select it from the list, click Delete Keyword, then click Apply.
Keyword application examples:
• If the keyword “XXX” is specified, the URL <http://www.badstuff.com/xxx.html> is blocked.
Reference Manual for the 108 Mbps Wireless Firewall Router WGR624v3
Content Filtering 5-3
July 2004 202-10036-01
• If the keyword “.com” is specified, only Web sites with other domain suffixes (such as .edu or
.gov) can be viewed.
• If you wish to block all Internet browsing access during a scheduled period, enter the keyword
“.” and set the schedule in the Schedule menu.
To specify a Trusted User, enter that PC’s IP address in the Trusted User box and click Apply.
You may specify one Trusted User, which is a PC that will be exempt from blocking and
logging. Since the Trusted User will be identified by an IP address, you should configure that
PC with a fixed IP address.
Blocking Access to Internet Services
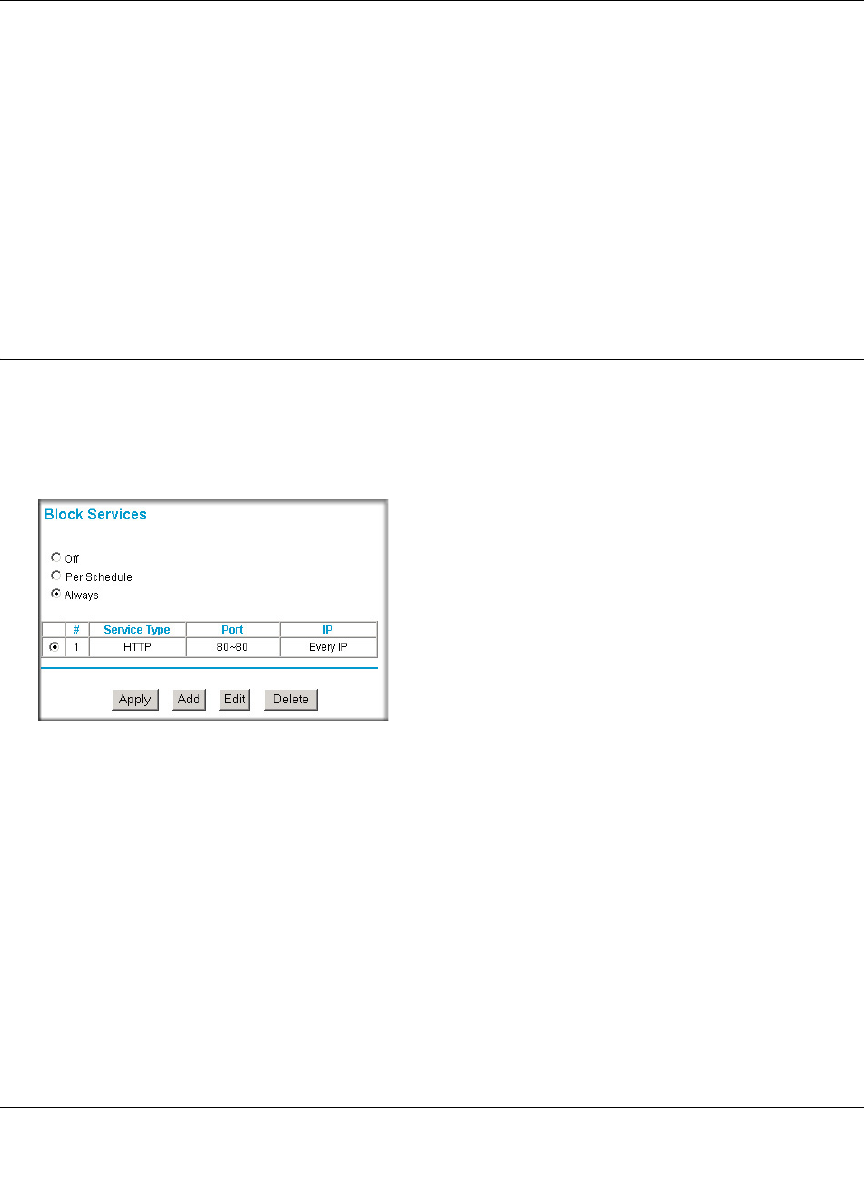
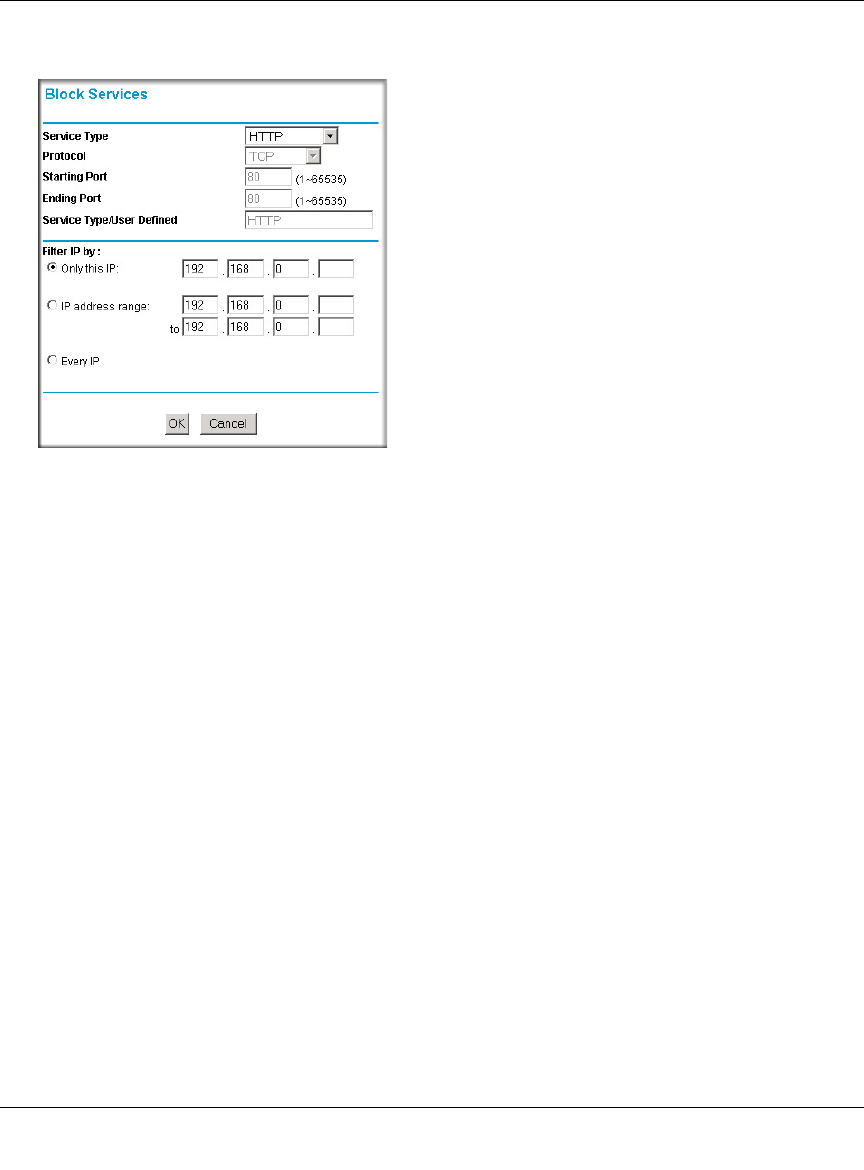
The WGR624v3 router allows you to block the use of certain Internet services by PCs on your
network. This is called services blocking or port filtering. The Block Services menu is shown
below:
Figure 5-2: Block Services menu
Services are functions performed by server computers at the request of client computers. For
example, Web servers serve Web pages, time servers serve time and date information, and game
hosts serve data about other players’ moves. When a computer on your network sends a request for
service to a server computer on the Internet, the requested service is identified by a service or port
number. This number appears as the destination port number in the transmitted IP packets. For
example, a packet that is sent with destination port number 80 is an HTTP (Web server) request.
To enable service blocking, select either Per Schedule or Always, then click Apply. If you want to
block by schedule, be sure that a time period is specified in the Schedule menu.
Reference Manual for the 108 Mbps Wireless Firewall Router WGR624v3
5-4 Content Filtering
July 2004 202-10036-01
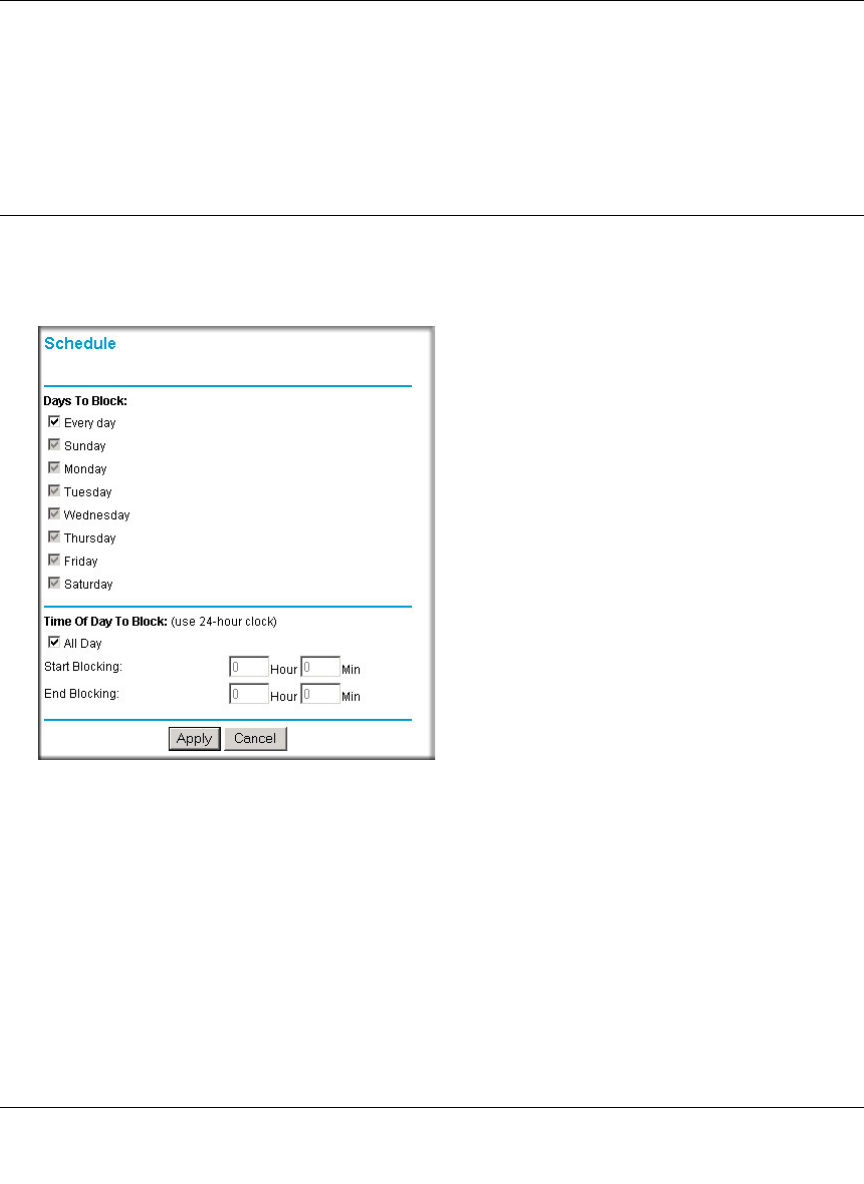
To specify a service for blocking, click Add. The Add Services menu will appear, as shown below:
Figure 5-3: Add Services menu
From the Service Type list, select the application or service to be allowed or blocked. The list
already displays several common services, but you are not limited to these choices. To add any
additional services or applications that do not already appear, select User Defined.
Configuring a User Defined Service
To define a service, first you must determine which port number or range of numbers is used by
the application. The service numbers for many common protocols are defined by the Internet
Engineering Task Force (IETF) and published in RFC1700, “Assigned Numbers.” Service
numbers for other applications are typically chosen from the range 1024 to 65535 by the authors of
the application. This information can usually be determined by contacting the publisher of the
application or from user groups of newsgroups.
Enter the Starting Port and Ending Port numbers. If the application uses a single port number, enter
that number in both boxes.
If you know that the application uses either TCP or UDP, select the appropriate protocol. If you are
not sure, select Both.
Reference Manual for the 108 Mbps Wireless Firewall Router WGR624v3
Content Filtering 5-5
July 2004 202-10036-01
Configuring Services Blocking by IP Address Range
Under “Filter Services For”, you can block the specified service for a single computer, a range of
computers (having consecutive IP addresses), or all computers on your network.
Scheduling When Blocking Will Be Enforced
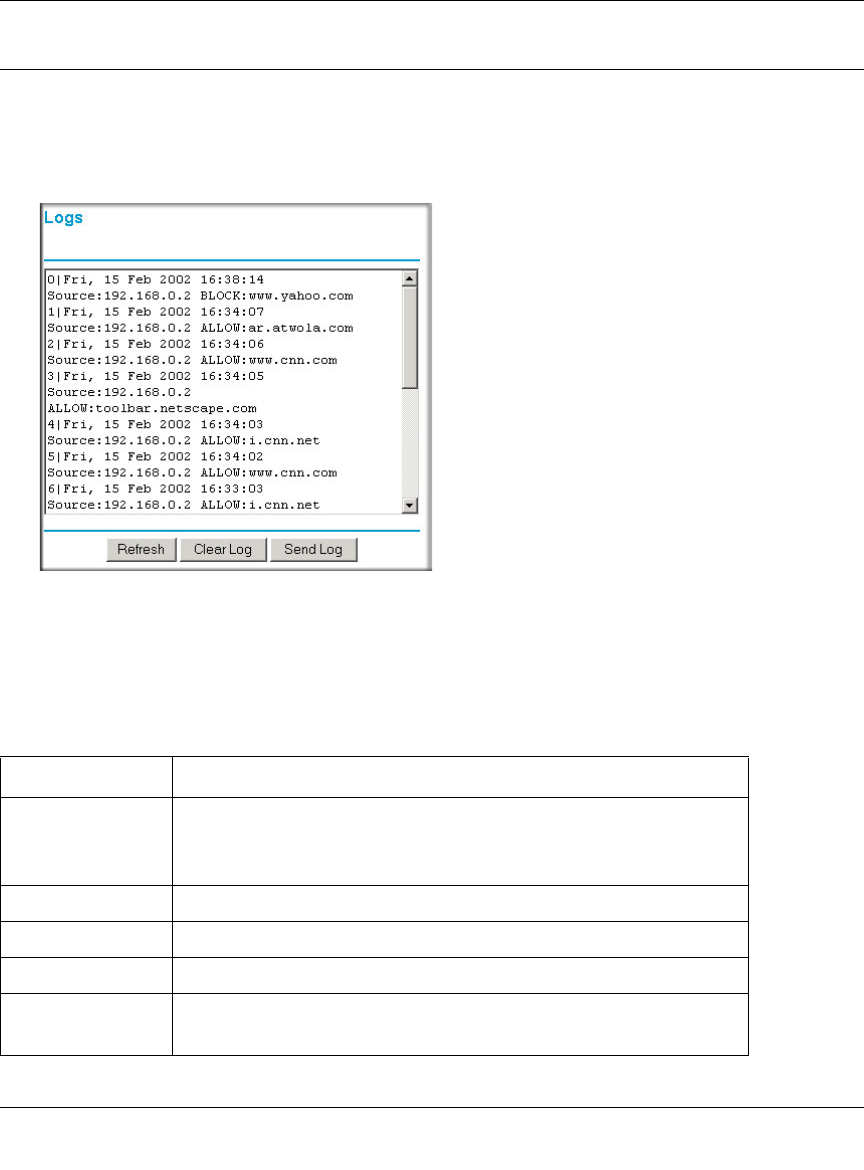
The WGR624v3 router allows you to specify when blocking will be enforced. The Schedule menu
is shown below:
Figure 5-4: Schedule menu
• Use this schedule for blocking content. Check this box if you wish to enable a schedule for
Content Filtering. Click Apply.
• Days to Block. Select days to block by checking the appropriate boxes. Select Everyday to
check the boxes for all days. Click Apply.
• Time of Day to Block. Select a start and end time in 23:59 format. Select All day for 24 hour
blocking. Click Apply.
Be sure to select your Time Zone in the E-Mail menu.
Reference Manual for the 108 Mbps Wireless Firewall Router WGR624v3
5-6 Content Filtering
July 2004 202-10036-01
Viewing Logs of Web Access or Attempted Web Access
The log is a detailed record of what Web sites you have accessed or attempted to access. Up to 128
entries are stored in the log. Log entries will only appear when keyword blocking is enabled, and
no log entries will be made for the Trusted User. An example is shown below:
Figure 5-5: Logs menu
Log entries are described in Table 5-1
Table 5-1. Log entry descriptions
Field Description
Number The index number of the content filter log entries. 128 entries
are available numbered from 0 to 127. The log will keep the
record of the latest 128 entries.
Date and Time The date and time the log entry was recorded.
Source IP The IP address of the initiating device for this log entry.
Action This field displays whether the access was blocked or allowed.
The name or IP address of the Web site or newsgroup visited or
attempted to access.