Netgear D6300 Quick Start Guide WiFi ADSL Modem Router Installation
2014-07-06
: Netgear Netgear-D6300-Quick-Start-Guide netgear-d6300-quick-start-guide netgear pdf
Open the PDF directly: View PDF ![]() .
.
Page Count: 19

NETGEAR, Inc.
350 East Plumeria Drive
San Jose, CA 95134, USA
July 2012
Technical Support
Thank you for selecting NETGEAR products.
After installing your device, locate the serial number on the label
of your product and use it to register your product at
NETGEAR.com/register. Registration is required before you can
use our telephone support service. Registration through our
website is strongly recommended.
Go to support.netgear.com for product updates and web support.
D6300 WiFi ADSL Modem Router
Installation Guide
Package Contents
The box should contain the following items. If any items are
incorrect, missing, or damaged, contact your NETGEAR dealer.
Ethernet cable
Filter/splitter
Phone cable
D6300 Modem Router
Power adapter (2 parts)

You can use this diagram to connect your modem router to ADSL or cable/fiber modem, or you can follow the
instructions in this booklet.
3 Computer
2 Power
4 Browser
1 ADSL or
Cable/Fiber
Note: A user manual is available online at http://downloadcenter.netgear.com or through a link in this modem router’s user interface.
Modem
Compliance
Declarations of Conformity
For complete DoC please visit the NETGEAR EU Declarations of Conformity
website at: support.netgear.com/app/answers/detail/a_id/11621/.
For GNU General Public License (GPL) related information, please visit
support.netgear.com/app/answers/detail/a_id/2649.
This symbol is placed in accordance with the European Union
Directive 2002/96 on the Waste Electrical and Electronic Equipment
(the WEEE Directive). If disposed of within the European Union, this
product should be treated and recycled in accordance with the laws of
your jurisdiction implementing the WEEE Directive.
For indoor use only in all EU countries and Switzerland.
Contents
Before You Begin (DSL Connection). . . . . . . . . . . . . . . . . . . . . 2
Install Your Modem Router . . . . . . . . . . . . . . . . . . . . . . . . . . . . . 3
1. Connect the router to your Internet service. . . . . . . . . . . 3
2. Power on your router. . . . . . . . . . . . . . . . . . . . . . . . . . . . 4
3. Connect a computer. . . . . . . . . . . . . . . . . . . . . . . . . . . . 5
4. Open a web browser. . . . . . . . . . . . . . . . . . . . . . . . . . . . 5
Preset Wireless Security . . . . . . . . . . . . . . . . . . . . . . . . . . . . . . 6
Wireless Network Settings . . . . . . . . . . . . . . . . . . . . . . . . . . 7
Join the Wireless Network . . . . . . . . . . . . . . . . . . . . . . . . . . . . . 8
WPS Method. . . . . . . . . . . . . . . . . . . . . . . . . . . . . . . . . . . . 8
Manual Method . . . . . . . . . . . . . . . . . . . . . . . . . . . . . . . . . . 8
Access the Router to Make Changes . . . . . . . . . . . . . . . . . . . . . 9
NETGEAR genie App . . . . . . . . . . . . . . . . . . . . . . . . . . . . . . . . 10
ReadySHARE Access. . . . . . . . . . . . . . . . . . . . . . . . . . . . . . . 11
ReadySHARE Printer . . . . . . . . . . . . . . . . . . . . . . . . . . . . . . . 12
Control Center Configuration . . . . . . . . . . . . . . . . . . . . . . 13
USB Printer . . . . . . . . . . . . . . . . . . . . . . . . . . . . . . . . . . . . 14
Scan with a Multifunction Printer . . . . . . . . . . . . . . . . . . . 15
Troubleshooting. . . . . . . . . . . . . . . . . . . . . . . . . . . . . . . . . . . . 15

2
Before You Begin (DSL Connection)
If you are connecting to a DSL line, make sure that your DSL service
is active before you install the modem router. You need the
information listed here to install your DSL modem and connect to the
Internet. Locate it and have it on hand before you start the installation
procedure.
•DSL user name and password. These are included in the
welcome letter your DSL Internet service provider (ISP) sent you
when you signed up for your service. Record your DSL Internet
service account user name and password here:
User name:
Password:
•Your telephone number or DSL account number. If you do not
have voice service, you can use your DSL account number in
place of a phone number.
If you do not know or cannot locate your user name and
password, call your DSL Internet service provider.
Be specific when speaking with your DSL Internet service
provider. For example, you could say:
I need my DSL service user name and password. Can you help
me?
Note: If your provider says that they do not support NETGEAR
devices, tell them you need only your DSL user name and
password; you do not need support.
3
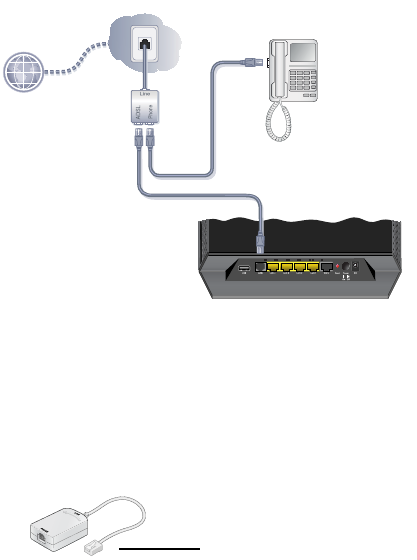
Install Your Modem Router
Note: Keep your modem router in a vertical position.
1. Connect the router to your Internet service.
You can connect either directly to a DSL line or to a fiber/cable
modem.
To connect to a DSL line:
a. Install an ADSL microfilter between the phone line and the
phone.
b. Connect the ADSL port of the modem router to the ADSL
port of the microfilter
c. Use an ADSL microfilter for every phone line in the house if
your modem router and telephone connect to the same
phone line.
Plugs into the ADSL line
4
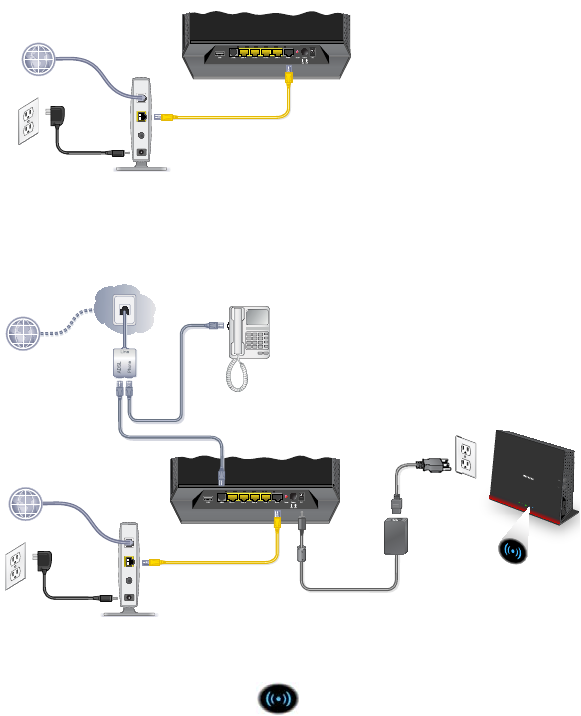
To connect to a cable/fiber modem:
Connect one end of the yellow Ethernet cable to the WAN port on
the router, and connect the other end to your cable/fiber modem.
2. Power on your router.
a. Connect the power adapter to the router, and plug the power
adapter into an outlet.
b. Wait until the WiFi LED turns solid blue.
5
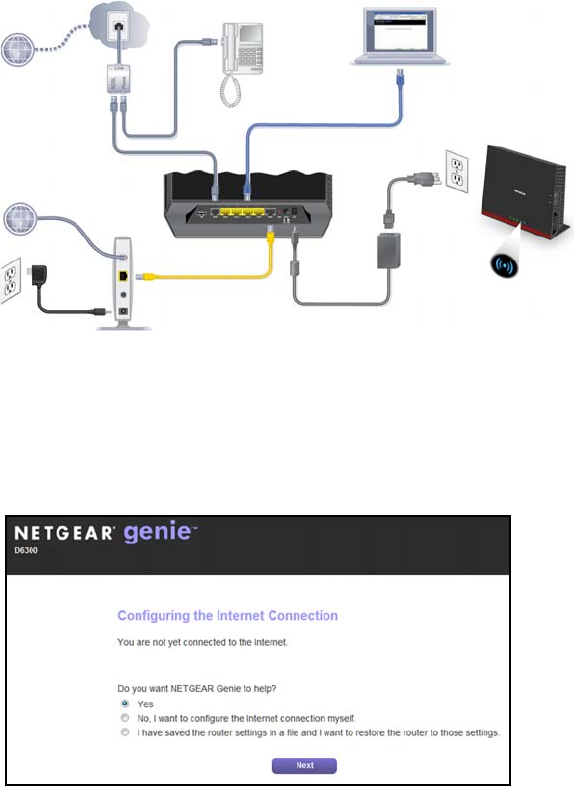
3. Connect a computer.
You can use an Ethernet cable or connect wirelessly.
• Use an Ethernet cable (not provided) to connect your
computer to an Ethernet port on your router.
• Or, connect wirelessly by using the preset wireless security
settings on the label on the bottom of the router.
4. Open a web browser.
The NETGEAR genie installation wizard displays.
6
If you do not see the genie screen, close and reopen the browser,
and enter http://routerlogin.net in the address bar. See
Troubleshooting on page 15.
5. Click Next to allow the genie to help you. Follow the steps to set up
your Internet connection.
Note for DSL: If your DSL Internet service requires a user name
or password, you are prompted to enter this information. If you do
not have this information, contact your Internet service provider
(see Before You Begin (DSL Connection) on page 2).
Preset Wireless Security
This product has a unique WiFi network name (SSID) and network
key (password). The default SSID and network key (password) are
uniquely generated for every device, like a serial number, to protect
and maximize your wireless security. This information is on the label
on the bottom of the product.
The WiFi
network name
(SSID) and
Passphase
are here.
NETGEAR recommends that you do not change the preset WiFi
network name (SSID) and network key (password). If you do change
the settings, the security SSID and password on the bottom of the
product no longer apply.
Note: Your network names (SSIDs) and passphrases are case-
sensitive. Your network name, security method, and passphrase need
to be the same for all the wireless devices that are connected to your
router on a network.

7
Wireless Network Settings
Record the default preset wireless settings that are printed on the
label in the spaces here for easy reference.
2.4-GHz WiFi network name (SSID):
2.4-GHz network key (password):
5-GHz WiFi network name (SSID):
5-GHz network key (password):
If you change the default settings, record them here for easy
reference, and then store this booklet in a safe place:
2.4-GHz WiFi network name (SSID):
2.4-GHz network key (password):
5-GHz WiFi network name (SSID):
5-GHz network key (Password):
To retrieve or update your wireless password, type
http://www.routerlogin.net in a web browser and log in using the
default user name (admin) and password (password).
Select Basic > Wireless Settings to locate your wireless passwords.

8
Join the Wireless Network
You can use either the Wi-Fi Protected Setup (WPS) method or the
manual method to join your wireless network.
WPS Method
WPS lets you join your WiFi network without typing the password.
If your wireless device supports WPS, the first time you join the
network, you might be prompted to press the WPS button on the
modem router.
1. Press the WPS button on the modem router.
2. Within 2 minutes, press the WPS button on the computer or
wireless device that is trying to join the network. Follow the WPS
instructions that came with your computer or wireless device to join
the network.
Note: Some older wireless computers or devices cannot use WPS.
Manual Method
1. On your computer or wireless device, open the software that
manages its wireless connections. This software scans for
wireless networks in your area.
2. Look for the WiFi network name (SSID) on the list and select it. The
SSID is on the label on the bottom of the modem router.
Note: If you changed the name of your network during the setup
process, look for that network name.
3. Enter the preset password (or your custom password if you
changed it), and click Connect.
9
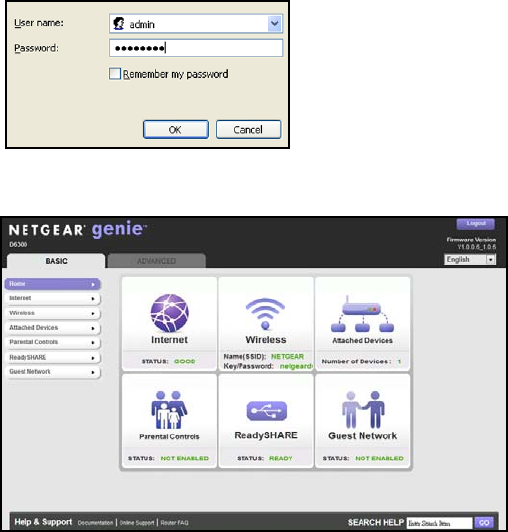
Access the Router to Make Changes
After you use genie to set up the modem router, you can log in to the
modem router to view or change its settings.
To log in to the modem router:
1. Launch a web browser from a computer or wireless device that
is connected to the modem router.
2. Type www.routerlogin.net or www.routerlogin.com in the
address field of the browser. A login screen displays:
3. Enter admin for the user name and password for the password.
The genie Home screen displays:
See the User Manual for information about the modem router
screens and features.
10
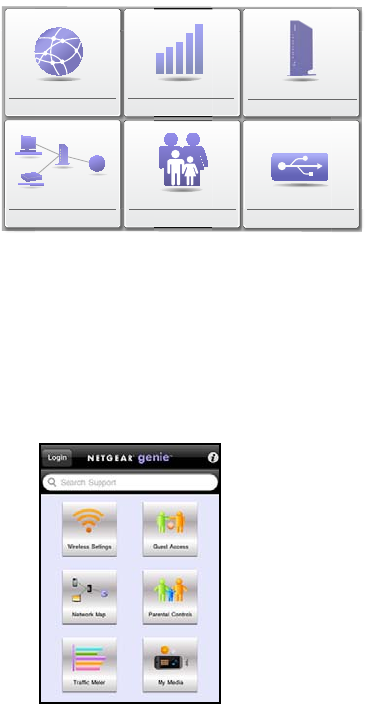
NETGEAR genie App
The genie app is your home network dashboard. It lets you easily
view, manage, and control your entire home network, and helps you
fix common network problems. You can use the genie app or the
genie mobile app.
Internet
STATUS GOOD
Network Map
Number of devices 16
Parental Controls
WiFi Connection
STATUS Connected
Router Settings
Click here
ReadySHARE
Click here
Click here
genie app
Visit the NETGEAR genie web page at: www.netgear.com/genie.
To install the genie mobile app:
1. Using your mobile device, navigate to the Apple AppStore or
Android Market, and search for NETGEAR genie.
2. Install the app on your iPad or phone.
Launch the app, and it displays the dashboard screen.
11
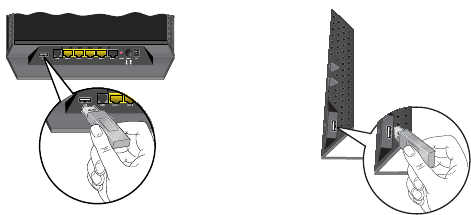
ReadySHARE Access
After installation, you can insert a USB storage device into the USB
ports on the modem router and share the contents with others on the
network. (If your USB device has special drivers, it is not compatible.)
USB port USB port
on the rear on the side
If your USB device needs a power supply, you have to use it when
you connect the USB device to the USB port. It might take up to 2
minutes before the USB drive is ready for sharing after you connect it.
To access your USB device:
On Windows systems, use any of these methods:
•Select Start > Run and enter \\readyshare in the dialog box.
Click OK.
•Open Explorer or Safari and enter \\readyshare in the address
bar.
•Open My Network Places, and enter \\readyshare in the address
bar.
On Mac systems, do this:
1. Select Go > Connect to Server.
2. Enter smb://readyshare as the server address.
3. Click Connect.
The readyshareconnect.exe file (for Windows) is available to
download here: www.netgear.com/readyshare
12
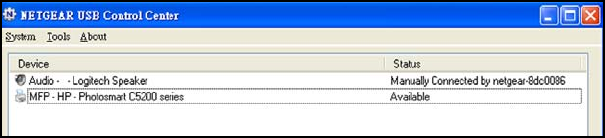
ReadySHARE Printer
The USB Control Center utility allows you to control a shared USB
device from your computer that is connected to the USB port on your
router. The utility allows you to control a printer.
Install the utility on each computer on your network from which you
want to control the device. You can download this utility at
www.netgear.com/landing/en-us/readyshare.aspx.
When you launch the USB Control Center utility, a screen similar to
the following displays:
The main screen shows a device icon, the description for this USB
device, and its status.
Available. The device is available from the computer that you are
using.
Waiting to Connect. You need to connect to this device from the
computer that you are using. The first time you connect, you might be
prompted to install the device driver.
The following menu selections are available:
•System. Exit the utility.
•Tools. Access the Control Center Configuration to set up your
shared USB device. See the following section, Control Center
Configuration.
•About. View details about the USB Control Center software.
13
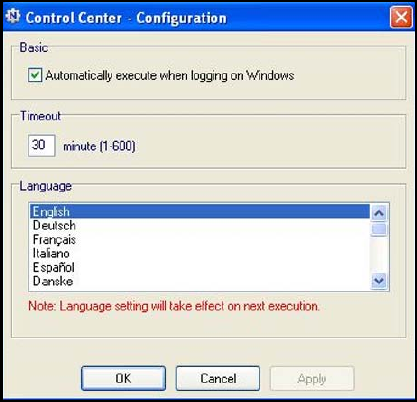
Control Center Configuration
Select Tools > Configuration to display the following screen:
Automatically execute when logging on Windows. Select this
check box to have the utility start automatically when you are logged
in to Windows.
Timeout. Specify the time-out value for holding the USB resource
when it is not in use.
Language. Select the display language for this utility.
14
USB Printer
The first time that you use a printer, you need to click Connect. You
might be asked to install the driver for this printer. After the driver is
installed, the printer status changes to Available.
Note: Some USB printers (for example: HP and Lexmark printer)
request that you do not connect the USB cable until the installation
software prompts you to do so.
If the USB printer is detected and connected automatically, you need
to disconnect the printer, and then wait for the prompt asking you to
click Connect.
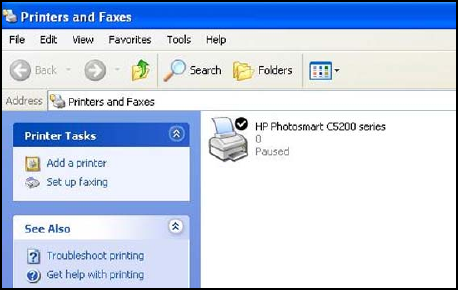
Once the printer shows Available status, the grayed out Paused state
no longer displays in the Windows Printers and Faxes window.
This USB printer is ready. The utility does not always need to hold the
connection of this USB printer. Once there is any print job for this
printer, the USB utility connects to this USB printer automatically, then
prints. After the print job is done, the printer status returns to the
Paused state.
15
Scan with a Multifunction Printer
You can use the scan feature of a multifunction printer.
1. Make sure that the printer status shows as Available.
2. Click the Network Scanner button.
The scanning window activates so you can perform scans.
Troubleshooting
If the browser does not display the web page:
•Make sure that the computer is connected to one of the four LAN
Ethernet ports, or wirelessly to the router.
•Make sure that the modem router has full power and that the WiFi
LED is lit.
•Close and reopen the browser so the browser does not cache the
previous page.
•Browse to http://routerlogin.net.
•If the computer is set to a static or fixed IP address (this is
uncommon), change it to obtain an IP address automatically from
the modem router.
If the modem router does not power on:
1. Make sure that the On/Off button on the back of the modem
router is in the on position.
2. Check your cables.
•Disconnect and reconnect each cable. There is usually an
audible click when the cable is correctly connected.
•For ADSL connections, see if the telephone cable connecting
your modem router to the wall jack is plugged into a filter. If
you do not have telephone voice service, a filter is not
required. A filter that is installed where it is not needed might
eliminate your ADSL signal.
16
3. Power down your modem router, and then power it up again.
a. Turn off the modem router.
b. Unplug the power adapter cord and all other cables from the
back of the modem router.
c. Wait 30 seconds, then reconnect the cables and power
adapter cord to your modem router, and turn it on.
d. Make sure that the Power LED is on. If the LED is off, try
plugging the power adapter cord into another power outlet.
e. Wait for the WiFi LED to turn blue.
4. Open a web browser and try to access the Internet.
If steps 1–4 do not resolve the problem:
5. Reset your modem router.
To reset your modem router, use a pin or paper clip to press in
and hold the Reset button.
17
© 2012 NETGEAR, Inc. All rights reserved.
No part of this publication may be reproduced, transmitted, transcribed,
stored in a retrieval system, or translated into any language in any form or by
any means without the written permission of NETGEAR, Inc.
DO NOT stack equipment, or place equipment in tight spaces or in drawers.
Be sure that your equipment is surrounded by at least 2 inches (5 cm) of air
space.
Trademarks
NETGEAR, the NETGEAR logo, and Connect with Innovation are trademarks
and/or registered trademarks of NETGEAR, Inc. and/or its subsidiaries in the
United States and/or other countries. Information is subject to change without
notice. Other brand and product names are registered trademarks or
trademarks of their respective holders. © 2011 NETGEAR, Inc. All rights
reserved.
Statement of Conditions
In the interest of improving internal design, operational function, and/or
reliability, NETGEAR reserves the right to make changes to the products
described in this document without notice. NETGEAR does not assume any
liability that may occur due to the use or application of the product(s) or circuit
layout(s) described herein.
