Netgear Wgm124 Quick Start Guide WGM124_IG_121604
WGM124 wgm124_install_guide
2014-07-06
: Netgear Netgear-Wgm124-Quick-Start-Guide netgear-wgm124-quick-start-guide netgear pdf
Open the PDF directly: View PDF ![]() .
.
Page Count: 2
- Start Here
- Prepare to Install Your Wireless Router
- First, Connect the Wireless Router to the Internet
- 1. Connect the wireless router to the computer and the modem
- a. Turn off your computer.
- b. Turn off and unplug the cable or DSL broadband modem.
- c. Locate the Ethernet cable (cable 1 in the diagram) that connects your modem and PC.
- d. Disconnect the cable at the computer end only, point A in the diagram.
- e. Securely insert the Ethernet cable from your modem into the Internet port of the wireless router.
- f. Securely insert the blue cable that came with your wireless router into a LAN port on the router, and the other end into the Ethernet port of your computer.
- 2. Restart your network in the correct sequence
- a. First, plug in and turn on the broadband modem. Wait about 2 minutes.
- b. Now, plug in the power cord to your wireless router and wait 1 minute.
- c. Last, turn on your computer. Note: For DSL customers, if ISP provided software logs you in to the Internet, do not run that s...
- d. Check the wireless router status lights to verify the following:
- 1. Connect the wireless router to the computer and the modem
- 3. Use the Smart Wizard to configure the wireless router
- a. Connect to the router by typing http://192.168.1.1 in the address filed of Internet Explorer or Netscape® Navigator.
- b. For security reasons, the router has its own user name and password. When prompted, enter admin for the router user name and password for the router password, both in lower case letters.
- c. Follow the Smart Wizard prompts to connect to the Internet.
- Now, Set Up a Computer for Wireless Connectivity
- 1. Configure the computer’s Wireless Settings
- a. If you are not already logged in the WGM124 configuration utility, type http://192.168.1.1 in your Internet browser and click Enter.
- b. When prompted, type in admin for the router user name and password for the router password.
- c. Click Wireless Settings in the WGM124 main configuration menu. Select a Region. Do not change the other settings.
- d. Click Apply to save your changes.
- 1. Configure the computer’s Wireless Settings
- 2. Configure the computer’s Wireless Adapter Settings
- 3. Verify Wireless Connectivity
- Here are some tips for correcting simple problems you may have.
- Be sure to restart your network in this sequence:
- Make sure the Ethernet cables are securely plugged in.
- Make sure the wireless settings in the computer and router match exactly.
- Make sure the network settings of the computer are correct.
- Check the router status lights to verify correct router operation.
- Advanced user access.
- Technical Support
- Thank you for selecting NETGEAR products.
- After completing the Smart Wizard configuration assistant, register your product at http://www.NETGEAR.com/register. Registration is required before you can use our telephone support service.
- Go to wireless router http://kbserver.netgear.com for product updates and web support.
8ÁjjÄÄË-ÖÍjÁË8 ¤Ô|
ÄÍ??ÍËÖaj
Start Here
Before proceeding with the wireless router installation, familiarize yourself with the
contents of the product package, especially the Setup Manual on the CD and the
animated tutorials on configuring PCs for networking.
Follow these instructions to set up your router.
Prepare to Install Your Wireless Router
•For Cable Modem Service: When you perform the wireless router setup steps be
sure to use the computer you used when you first set up your cable Internet
connection.
•For DSL Service: You may need information such as the DSL login name/e-mail
address and password in order to complete the wireless router setup.
• Observe the wireless placement and range guidelines in the Setup Manual.
First, Connect the Wireless Router to the Internet
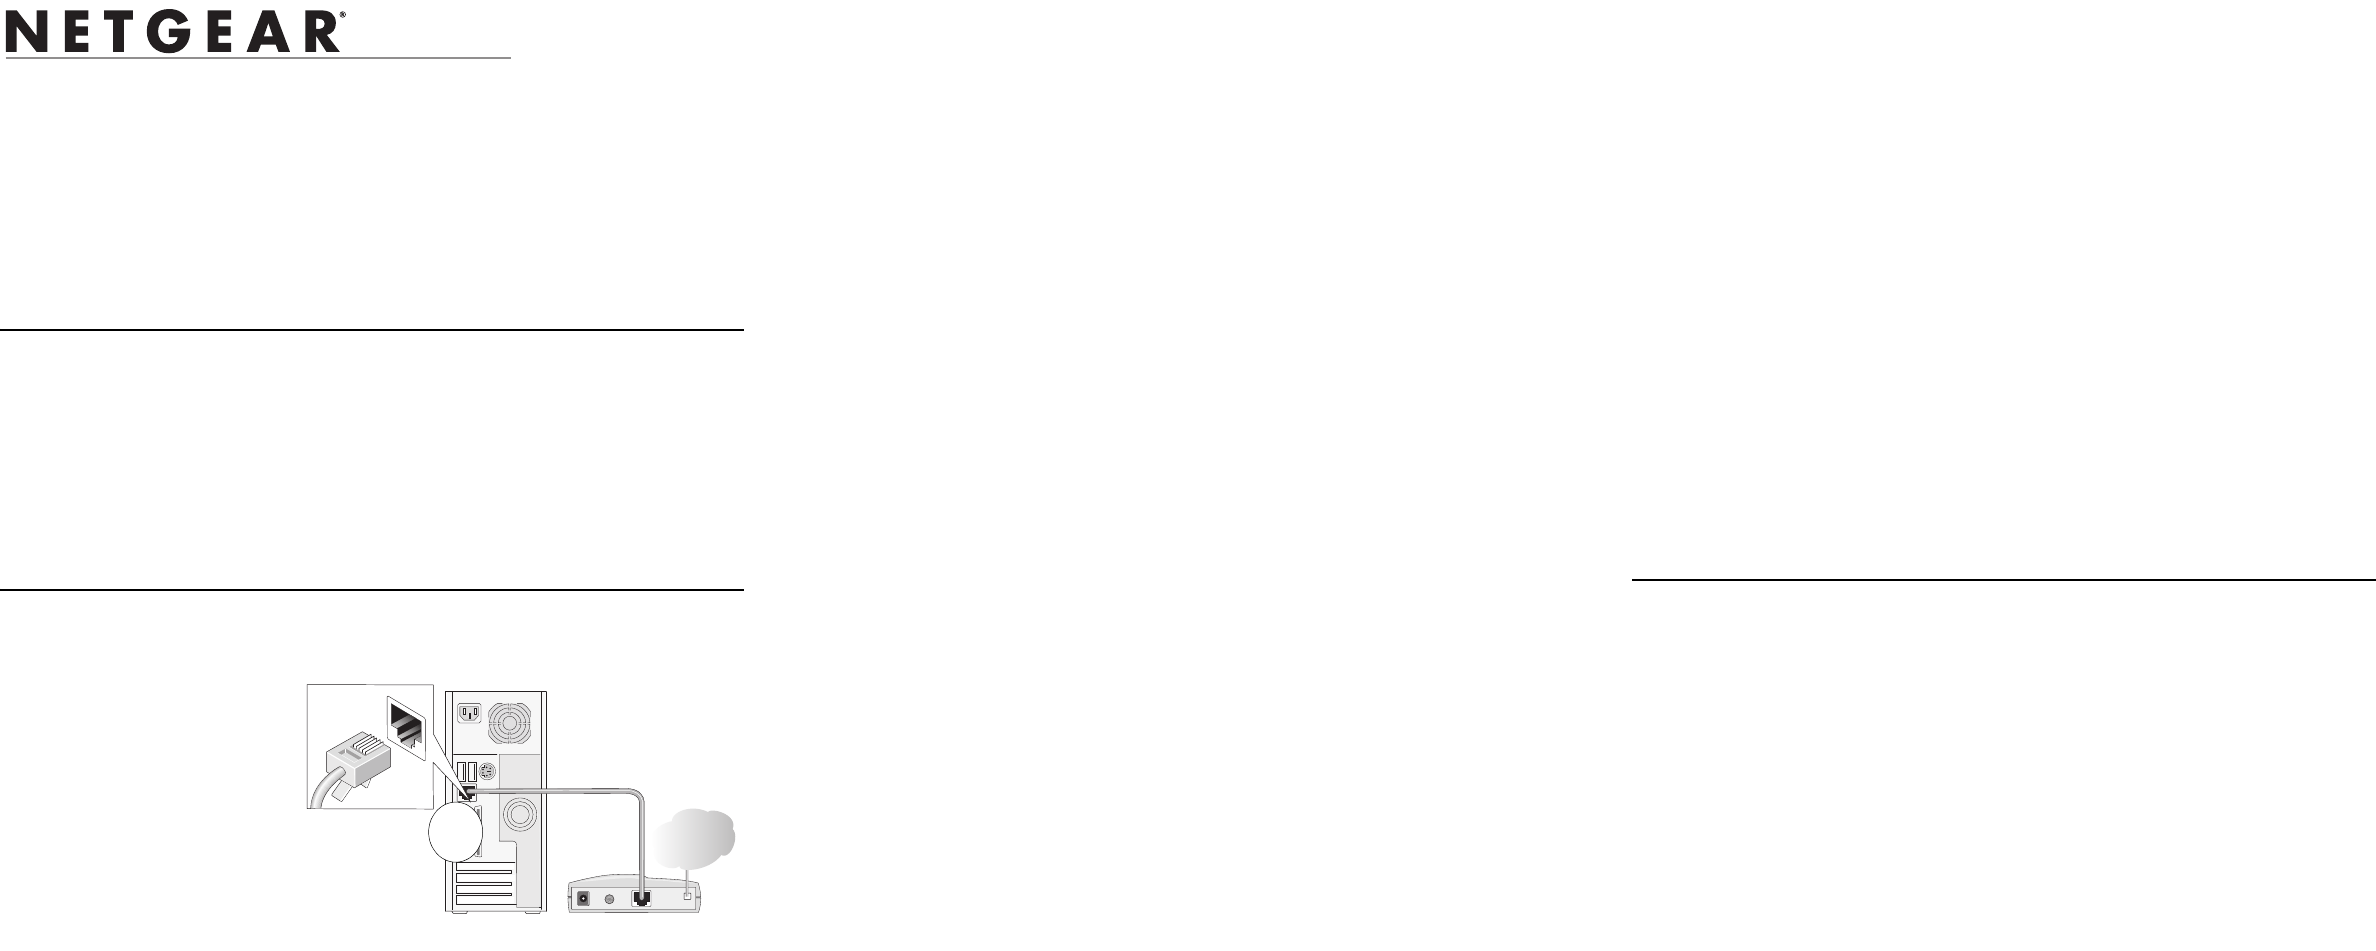
1. CONNECT THE WIRELESS ROUTER TO THE COMPUTER AND THE MODEM
a. Turn off your computer.
0RGHP
&DEOH
,QWHUQHW
&RPSXWHU
A
b. Turn off and unplug the
cable or DSL broadband
modem.
c. Locate the Ethernet
cable (cable 1 in the
diagram) that connects
your modem and PC.
d. Disconnect the cable at the computer end only, point A in the diagram.
e. Securely insert the Ethernet cable from your modem into the Internet port of
the wireless router.
f. Securely insert the blue cable that came with your wireless router into a
LAN port on the router, and the other end into the Ethernet port of your
computer.
Your network cables are connected and you are ready to restart your network.
2. RESTART YOUR NETWORK IN THE CORRECT SEQUENCE
Warning: Failure to restart your network in the correct sequence could prevent
you from connecting to the Internet.
a. First, plug in and turn on the broadband modem. Wait about 2 minutes.
b. Now, plug in the power cord to your wireless router and wait 1 minute.
c. Last, turn on your computer.
Note: For DSL customers, if ISP provided software logs you in to the Internet,
do not run that software. You may need to go to the Internet Explorer Tools
menu, Internet Options, Connections tab page where you can select “Never dial
a connection.”
d. Check the wireless router status lights to verify the following:
•Power: The power light should turn solid green. If it does not turn solid
green, see the Troubleshooting Tips in this guide.
•Link/ACT: The Link/ACT light should be lit. If not, make sure the
Ethernet cable is securely attached to the wireless router Internet port
and the modem, and the modem is powered on.
•Wireless: The Wireless light should be lit. If the Wireless light is not lit,
see the Troubleshooting Tips in this guide.
•LAN: A LAN light should be lit. If a LAN light is not lit, check that the
Ethernet cable from the computer to the router is securely attached at
both ends, and that the computer is turned on.
3. USE THE SMART WIZARD TO CONFIGURE THE WIRELESS ROUTER
a. Connect to the router by typing http://192.168.1.1 in the address filed of
Internet Explorer or Netscape® Navigator.
b. For security reasons, the router has its own user name and password. When
prompted, enter admin for the router user name and password for the router
password, both in lower case letters.
Note: The user name and password are not the same as any user name or
password you may use to log in to the Internet.
The wireless router will display the NETGEAR Smart Wizard page.Click
OK to proceed.
Note: If you cannot connect to the wireless router, verify your computer
networking setup. It should be set to obtain both IP and DNS server
addresses automatically, which is usually so. For help with this, please see
the Setup Manual or animated tutorials on the CD.
c. Follow the Smart Wizard prompts to connect to the Internet.
You are now connected to the Internet and the wireless feature of the wireless
router is enabled! Next, configure your wireless computer.
Now, Set Up a Computer for Wireless Connectivity
1. CONFIGURE THE COMPUTER’S WIRELESS SETTINGS
a. If you are not already logged in the WGM124 configuration utility, type
http://192.168.1.1 in your Internet browser and click Enter.
b. When prompted, type in admin for the router user name and password for
the router password.
c. Click Wireless Settings in the WGM124 main configuration menu. Select a
Region. Do not change the other settings.
d. Click Apply to save your changes.

2. CONFIGURE THE COMPUTER’S WIRELESS ADAPTER SETTINGS
Configure the wireless adapter of your computer to match these settings exactly.
NETGEAR, Inc. wireless adapters display a list of available wireless networks,
and, when wireless security is disabled, you simply choose yours from the list
and connect.
For a non-NETGEAR wireless adapter, configure it to match your settings
exactly. If you changed the default Network Name (SSID), be sure to use what
you set in the wireless router.
Warning: The Network Name is case sensitive. Entering nETgear will not work.
December 2004
3. VERIFY WIRELESS CONNECTIVITY
Connect to the Internet from a computer with a wireless adapter.
You are now wirelessly connected to the Internet!
Important: Implement wireless security options appropriate to your needs.
These settings enable basic wireless connectivity that let you set up your
wireless computers and test wireless Internet access through the router.
The NETGEAR wireless router provides many wireless security options. Your
wireless computer may not support all of these options. Please read the
NETGEAR manual to identify the wireless security features of your router that
satisfy your requirements and work with your wireless computer.
Troubleshooting Tips
Here are some tips for correcting simple problems you may have.
Be sure to restart your network in this sequence:
1) Turn off the modem, wireless router, and computer; 2) Turn on the modem,
wait two minutes; 3) Turn on the wireless router and wait 1 minute; 4) Turn on
the computer.
Make sure the Ethernet cables are securely plugged in.
• The Internet status light on the wireless router will be lit if the Ethernet cable to
the wireless router from the modem is plugged in securely and the modem and
wireless router are turned on.
• For each powered on computer connected to the wireless router with a securely
plugged in Ethernet cable, the corresponding wireless router LAN port status
light will be lit. The label on the bottom of the wireless router identifies the
number of each LAN port.
Make sure the wireless settings in the computer and router match exactly.
The Wireless Network Name (SSID) and security settings of the router and
wireless computer must match exactly.
Make sure the network settings of the computer are correct.
• Ethernet cable and wirelessly connected computers must be configured to obtain
IP and DNS addresses automatically via DHCP. For help with this, please see the
animated tutorials on the CD or the Setup Manual Appendix C on the CD.
• Some cable modem ISPs require you to use the MAC address of the computer
registered on the account. If so, in the Router MAC Address section of the Basic
Settings menu, select, “Use this Computer’s MAC Address.” The router will
then capture and use the MAC address of the computer that you are now using.
You must be using the computer that is registered with the ISP. Click Apply to
save your settings. Restart the network in the correct sequence.
Check the router status lights to verify correct router operation.
• If the Power light does not turn solid green within 2 minutes of turning the router
on, reset the router as described in the Setup Manual on the CD.
• If the Wireless light does not come on, verify that the wireless feature is turned
on according to the instructions in the Setup Manual on the CD.
Advanced user access.
Technically advanced users who want to bypass the configuration assistant can
do so by logging in to the router at http://www.routerlogin.net/basicsetting.htm
with the user name of admin and the password of password in lower case letters.
Technical Support
Thank you for selecting NETGEAR products.
After completing the Smart Wizard configuration assistant, register your product at
http://www.NETGEAR.com/register. Registration is required before you can use
our telephone support service.
Go to wireless router http://kbserver.netgear.com for product updates and web
support.
©2004 by NETGEAR, Inc. All rights reserved.
NETGEAR is a registered trademark of NETGEAR, Inc. in the United States and/or other countries.
Other brand and product names are trademarks or registered trademarks of their respective holders. Information is
subject to change without notice.
WIRELESS FEATURE DEFAULT SETTING
Network Name (SSID) NETGEAR
Security Disabled
