User Manual

User Manual
DP-C02
Baby Monitor
EN

Attentions
Warning
Oriental Inspiration Limited reserves the right to the
interpretation of the product and correlative contents.
Please stop using the product if any abnormal phenomena.
Please use neutral solvent to clean the blot, do not use organic
solvent.
Do not modify any accessories, or our company won't responsible for any
malfunctions and calamities may cause.
Do not put the product into fire, or our company won't responsible for any
malfunctions and calamities may cause.
Power supply accessories must be operated in the right way as user manual,
or our company won't responsible for any malfunctions and calamites may
cause.
Cla s s B di git al dev ice , p ur s ua nt to p ar t 1 5 o f t he FCC Ru l es . Th ese li mit s
Th is eq ui pm en t h as b ee n t es t ed a nd fo un d t o c om pl y wit h the l i mi ts fo r a
are designed to provide reasonable protection against harmful interference in
a resi dentia l in stall a tion. This equipme nt g enerat es, uses a nd c an r a diate
radio fr e q uency energy and, if not installed and used in accordance with the
instructions, may cause harmful interference to radio communications.
However, there is no guarantee that interference will not occur in a particular
in s tal lat i on. If this equ ipm e nt does cau se harm ful int e rfe renc e t o r adio or
televis i on recep t ion, whi ch can be determ i ned by turning t he equi p ment off
and on, the user is encouraged to try to correct the interference by one or more
of the following measures:
—Reorient or relocate the receiving antenna.
—Increase the separation between the equipment and receiver.
—Connect the equipment into an outlet on a circuit different from that to
which the receiver is connected.
—Consult the dealer or an experienced radio/TV technician for help.
FCC Statement
This equipment complies with FCC RF radiation exposure limits set forth for
an un co ntr ol le d e n vi ro nme nt . T h is tr an smi tt er mu s t not be co -l oca te d o r
operating in conjunction with any other antenna or transmitter. This equipment
should be installed and operated with a minimum distance of 20 centimeters
between the radiator and your body.
This equipment complies with Part 15 of the FCC Rules. Operation is subject
to the following two conditions:
(1) This device may not cause harmful interference, and
(2) This device must accept any interference received, including interference
that may cause undesired operation.
FCC Radiation Exposure Statement
Caution!
The manufacturer is not responsible for any radio or TV interfer ence cau sed
by u nauthorize d modifica t ions to this e quipment. Such mo d ifications could
void the user authority to operate the equipment.
co mplia nc e with th e essentia l requir em en ts and ot he r rele va nt
pr ovisi on s of Dire ct iv e 1999 /5 /E C
Her e by, N eto p Ind u str i al Co . Lt d d ecl a res t hat t his d evi c e is i n

Part List 2
1
Contents
1
Product Overview
5
Warranty Terms and Conditions
4
Screen Display 3
Setup before Use 3
4
Specifications 5
Contents
Product Overview
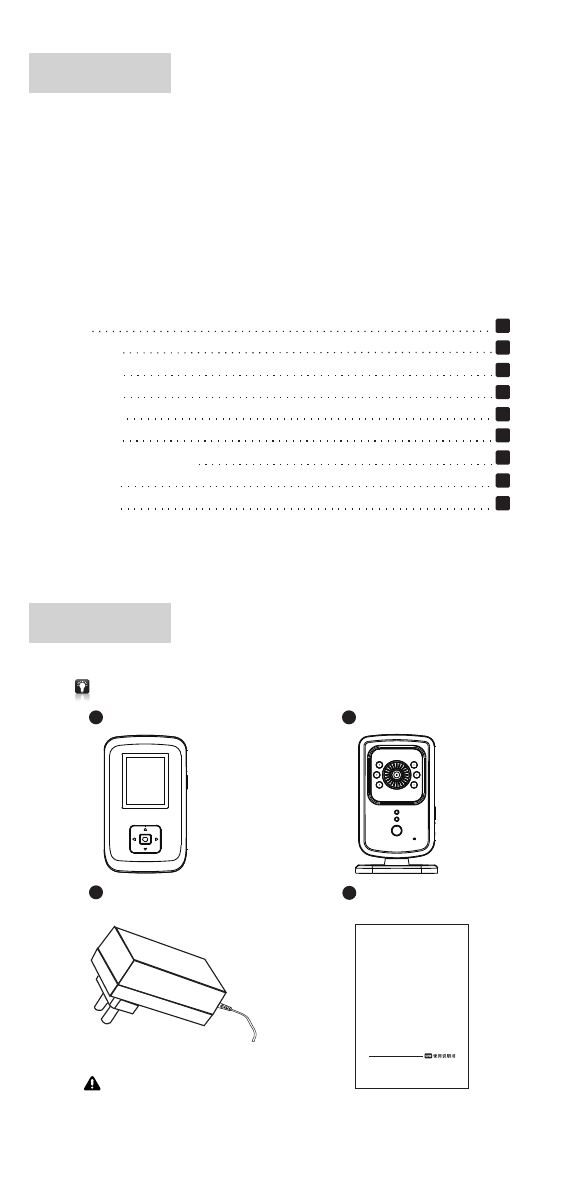
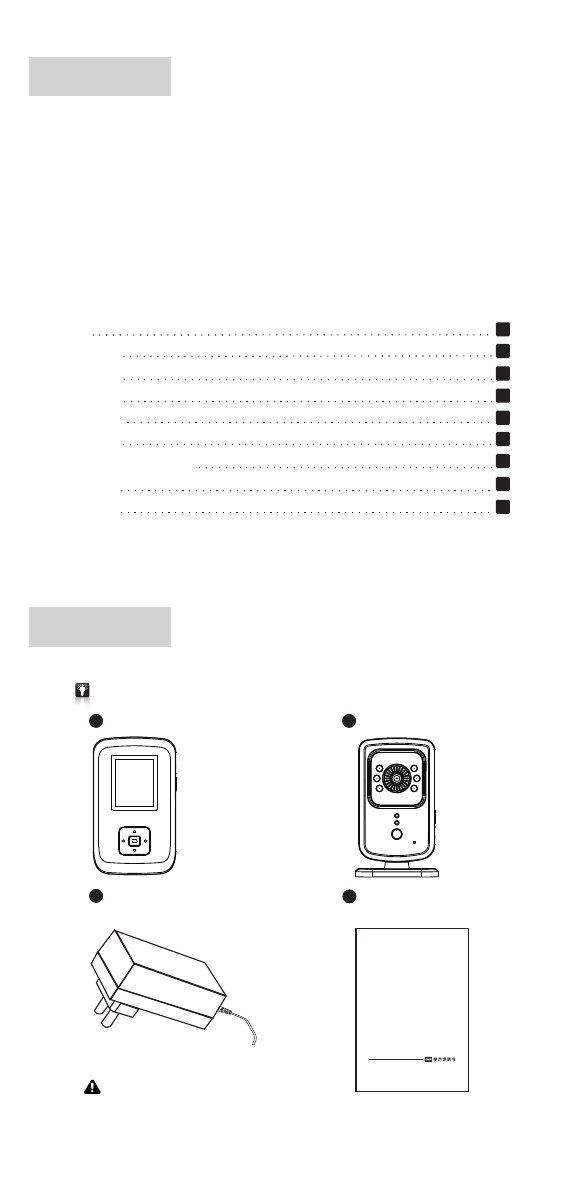
Please check and confirm all the accessories are available before use.
Parent Unit X 1
aBaby Unit x 1
b
cdMain Unit x 1
Output:DC 6.0V= 500mA
DP-C02
Baby Monitor
-1-
※
※
※
※
※
※
※
※
※
meters (at line of sign).It is compact, lightweight,easy to setup and use.
To guarantee all the functions into fully play and prolong the service
specifications and the manual without prior notification.
Thank you for buying our baby minitor 'DP-C02'.It enables you to see
and hear your infant just about anywhere in your house within 300
life, please read the user manual carefully before installations and
keep the product under well cleaning and maintenance.
In line wi th the poli cy of c ontinued development, if there ar e any
amendments on the appearance,color or assemblies, please refer to
th e rea lobject.Our compan y r eserves the r ig ht to a me nd on th e
Installations
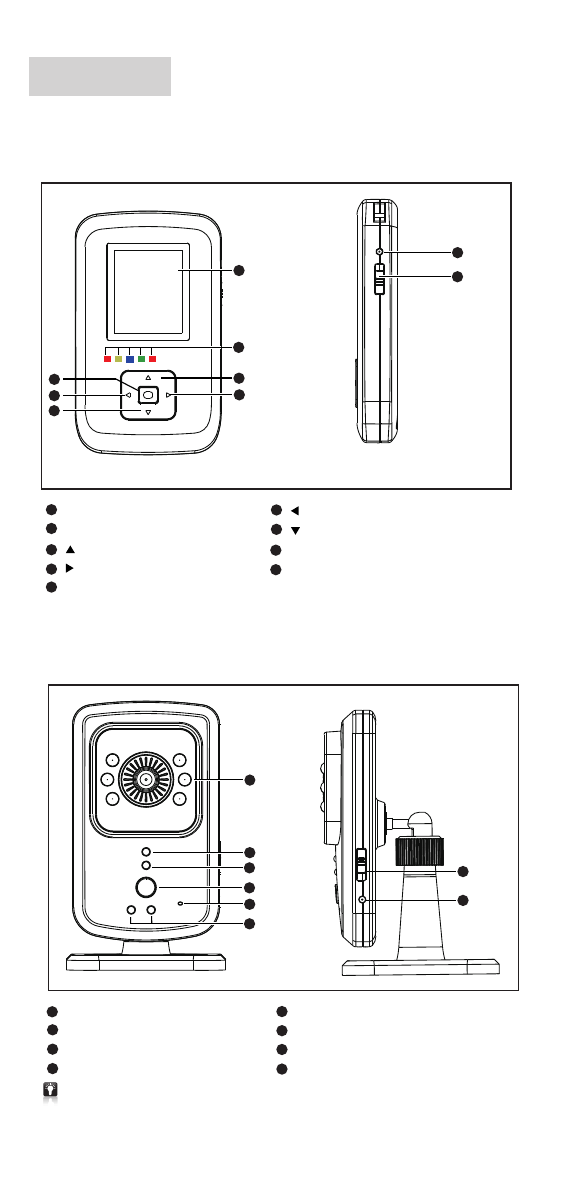
Parent Unit LED Indicators
Adapter X 2
Part List
6
7
5
2
4
3
8
9
7
8
1
2
3
4
5
6
1
2
4
3
8
7
5
6
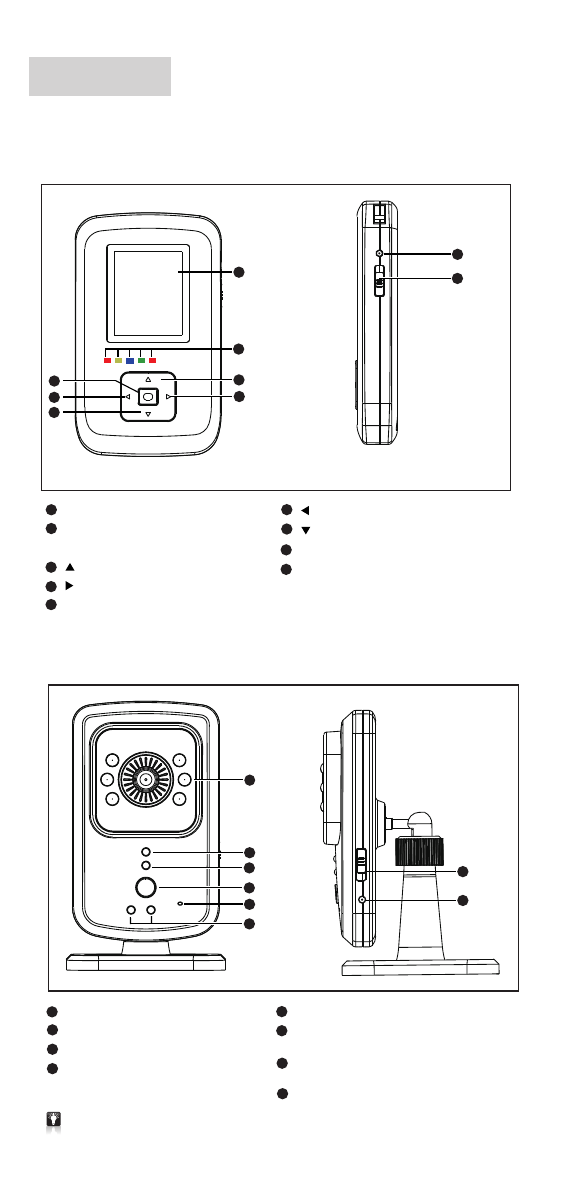
1.Parent Unit
2.Baby Unit
-2-
1
LED Indication
Red/Yellow/Blue/Green/Red) (
Up
Down
Enter
Left
Right
DC Jack
DC Jack
Power switch
(Up side is on / down side is off)
Power switch
(Up side is on / down side is off)
Night Vision IR LED
Power On LED indicators
While disconnecting , hold on this key to pair BU and PU, till paired successfully , the release .
While connecting, press this key to turn on/off night light.
Microphone hole
Night Light
Red/Yellow)
LED Indicators
(
1.8" Color TFT Display 128 x 160
Parent Unit LED Indicators
Parent Unit Night Light
Function Key
1
2
3
5
6
7
4
9
8
Setting Before Use
1.
2.
*×
3
3
4
4
1
1
2
2
*×
1
2
3
4
54
+1
6
7
8
9
12
10
11
-3-
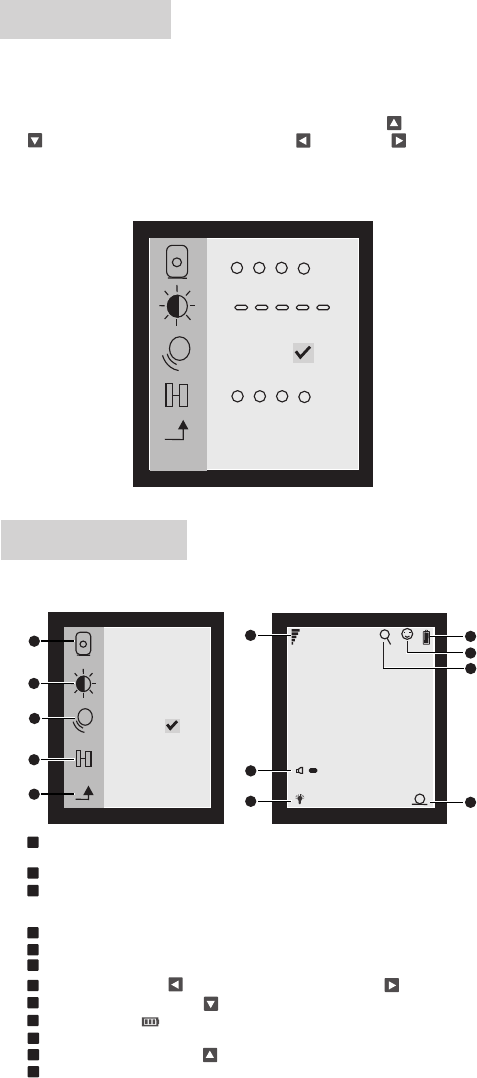
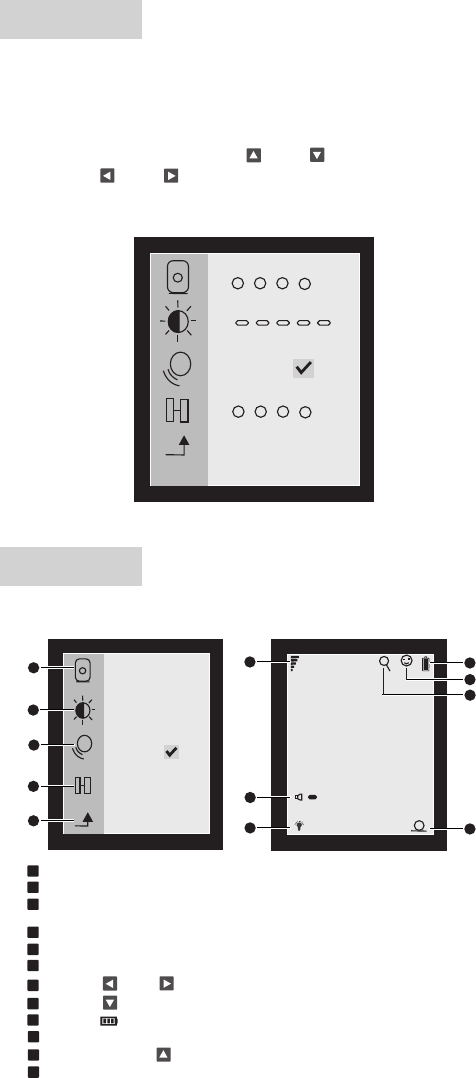
2Brightness setting: 5 levels adjustable
3
and thereis a smile face display on LCD.
VOX function ON/OFF: While this VOX is on ,Parent unit will go to sleep mode
to save power automatically , It can be powered on by Baby unit microphone ,
9Battery capacity
*First time use the product, please pair baby unit and parent unit.
Light press on parent unit <Enter> to enter into menu for data setting,
all the data will be factory default if not set up.
Press on <Enter> to enter into menu setting. Use <Up > or <Down
> to select setting and then Use <Left > or <Right > to select
setting.
*
After entering into menu, there are baby unit selection, brightness setting,
VOX function on/off, and pairing function.
Screen Display
Menu Functions
1Baby unit selection: Up to 4 baby units selectable, the selected baby unit
number will display on the lower right corner.
4Pairing function: Pair baby unit and parent unit, up to 4 baby units can be paired .
5Enter : Enter / Quit Menu
6Signal strength
7Volume: Press on <Left > to volume down and press on <Right > to volume up.
8Night light: Press on <Down > to turn on / off.
10 VOX function on
11 Zoom in / Out, press on <Up > to adjust to X2, X4
12 The paring baby unit no
Yellow
ON
Working Status Red Red
Green
Blue
ONONON
ON
ON
ON
ON
ON
ON
FLASH
FLASH
OFFOFFOFFOFF
OFF
OFF
OFF
OFF OFFOFF
OFFOFF
OFF
(Off under battery in full charge)
2.
1.
*
34
1 2
-4-
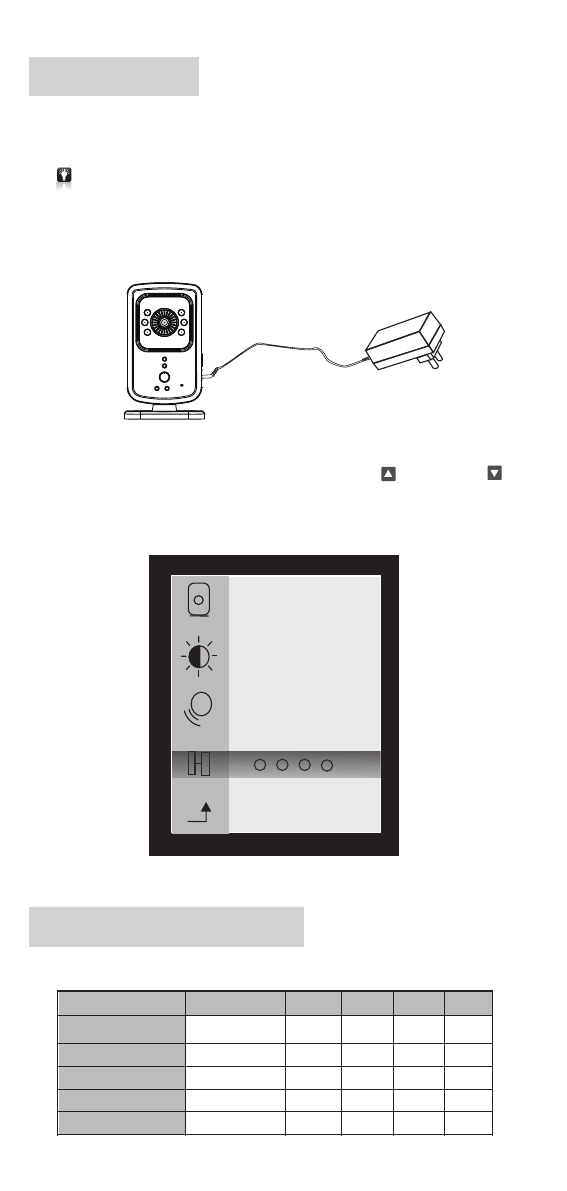
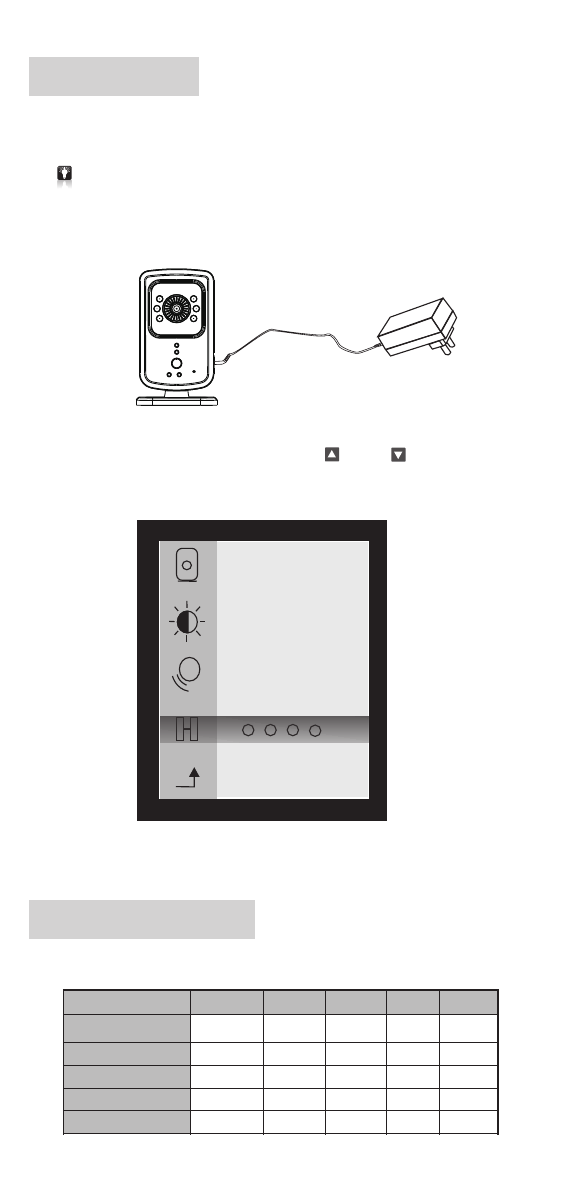
Installations
Please enter into menu settings to set up the date &time and other
settings before installations.
*
* All the data are factory defaults if not set up.
Setting method please refer to setting before Use.
*One parent unit can pair more baby units,up to 4pcs.
Put the baby unit in the best place you can here and see. Connect it
to adapter and slide up power switch to turn it on and the red LED with
light up. The blue LED on parent unit will flash.
*Night vision IR LED will light up automatically according to darkness.
Slide up parent unit power switch to turn on and you'll hear the sound
of drip-drip-drip which means paring with baby unit is not successful.
Press on <Enter> to enter into menu and use <Up > and <Down >
to enter into pairing function. Select a baby unit to pare and after paring
is successful, the selected baby unit number will display on the lower
right corner and the sound will disappear.
Parent Unit LED Indicators
Connect to DC
Power On
Successful Paring
Low Volume
High Volume
Specifications
-5-
Storage Temperatue
-30~70 ℃
2.4GHZ FHSS
54°
65 x 35 x 105mm
90G
-10~40 ℃
Working Temperature
Weight( )Parent Unit
Size( )Parent Unit
Power supply
Audio
LCD Display
Lens Viewing Angle
Built-in Microphone / Speaker
Image Sensor
Digital Technology
VGA COMS Night Vision IR
300M(at line of sign)
Transmission Range
1.8"Color TFT Display,128x 160
5V Adapter / 6V-500mA output, Built-in Li-ion Battery 400nA

DP-C02
Baby Monitor
S.CHN

注意事项
警告
佳骏(环球)有限公司
本说明书最终解释权归 所有
如产品出现异常情况, 请马上停止使用.
如需清洁, 请使用清水轻微湿润棉布, 轻力擦拭, 不要使用任何化学
品进行清洁.
请勿私自进行任何改装, 否则一切责任自负.
请不要把产品投入到火焰中, 否则一切责任自负.
请根据说明书正确连接电源, 否则一切责任自负.
接收机 x 1
a摄像机 x 1
b
cd
电源适配器 x 2 说明书 x 1
目录
设备清单
使用 前请 检查配件是否齐全.
感谢您选购本公司出品的“DP-C02" .
为了保障本产品能在今后的工作中充分发挥其功能及延长其使用
寿 命, 请 在 安 装 使 用 前 详 细 阅 读 此 说 明 书, 安 装 使 用 过 程 中 请 注 意
产 品 的 保 养 及 保 护.
基 于 产 品 不 断 改 进 的 需 要, 产 品 外 观/颜 色/配 件 如 有 改 动, 请 以 实
物 为 准; 若 产 品 技 术 改 进, 本 公 司 将 保 留 对 产 品 技 术 更 新 及 此 说 明
书 更 改 之 权 利, 恕 不 另 行 通 知.
数 码 便 携 式 视 频 监 控 器 它 将
让您在300米 范 围 内 ( 无 障 碍 ) 随 时 随 地 视 听 到 家 中 婴 儿 的 任 何 动
静.它 小 巧 便 携 , 设 置 简 单 易 用.
部件 名称 2
1
目录
1
设备 清单
5
保用 细则
接收 机LED灯指示 表 4
屏幕 讯息 3
用前 设定 3
使用 安装 4
技术 参数 5
输出 :DC 6.0V= 500mA
-1-
DP-C02
Baby Monitor
※
※
※
※
※
※
※
※
※
部件名称
<左>按键
6
<下>按键
7
5确认 键
11. 8寸彩 色显示屏 128x160
2LED灯指示< >红/黄/蓝/绿/红
<右>按键
4
<上>按键
38
9
电源 接口
电源 开关 〈向上开启/向下关闭〉
7
8
1
2
3
4
5
6
1
2
4
3
夜视 红外L ED灯
LED开机指 示灯
接收 机LED灯
8电源 接口
7电源 开关 〈向上开启/向下关闭〉
5麦克 风孔
6夜指 示灯<红/黄>
1.接收机
2.摄像机
1
2
3
5
6
7
4
9
8
-2-
接收 机按 及 键键 夜灯 功能
如果 摄 像机与 接 收机未 连 接,也 可 按住摄 像 机 中夜 灯 功 能按键 一 直到连 接 成功后 松 开.
轻按 接 收机按 键 为开启 或 关闭夜 灯.
用前设定
1. 轻按 接 收 机<确 认 键>可进 入 选单栏对主 机 的 数 据进行设 定,如不 设 定
一切 数据 将是出厂时设定的默认值.
2.
进入设置画面可对摄影机选择 、亮度设定、音频开关、配对功能等
相关信息进行设置.
*
*用户 第一 次使用时请将摄像机和接 收器 进行 校码配对
象,通过<左 >或<右 >按 键选 择您要设定的相应规格.
轻按<确认键>进入选单设定,按<上 >或<下 >按键来选择需设置的对
*×
3
3
4
4
1
1
2
2
屏幕讯息
*×
1
2
3
4
54
+1
6
7
8
9
12
10
11
1 摄影机 选择: 最多 可以选择4个 摄影机 ,在右下 角会显 示选择的 摄影机 号码
2 亮度设 定: 有5个级别 可以调节
3音频功 能开/关: 当音 频功能开 启,接收机 就会自动 进入睡 眠模式来 节省电 源,
也可以通过摄影机麦克风来开启, 开启后显示屏上会有一个笑脸显示
4配对功 能 将接收 机和摄影 机配对,最 多可以跟4个 摄影机 配对:
5确认键 :进入 / 退 出菜单
6接收信号强度
7音量:按<左 >或<右 >按键调节音 量大 小
8夜灯:按<下 >按键 开启或 关闭
9电池容量
10 音频开启
11 画面放大/缩小 x2 、x4按<上 >按键调 节画面 倍数
主机 屏幕 显示
12 所配对的摄影机号码
-3-
接收机LED灯指示表
红黄 蓝 绿红
状 态
电源 连接
电源 开启
亮光
亮光
亮光 亮光
亮光
亮光
亮光
亮光 亮光 亮光
(电池充满 时 熄灭)
闪烁
闪烁
熄灭
熄灭
熄灭
熄灭
熄灭
熄灭 熄灭
熄灭
熄灭
熄灭
熄灭 熄灭
熄灭
配对 成功
音 量 低
音 量 高
使用安装
2. 将接收机 开启进入画 面随 之将会 听到 滴滴...声响 ,这 是未与 摄像 机
相 配 对 成 功.按确 认 健 进 入 选 单 通 过<上 >或<下 >按 键 进 入 到 配
对功能 选择 相对应 的摄影 机配对.配 对成功 屏幕右 下方将 显示所 配对
的摄 影机 号码随之滴滴...声将停止.
安 装 前 请 先 进 入 选 单 设 置 进 行 相 关 设 定.
* 设定方 法详见"用 前设定"操作 方法.
* 如不设 定, 一切数 据将是出 厂时的 默认值.
将摄像机安置于您所要视听到的最佳位置.并与随之的电源适配器相
;开启电源开关后开机指示LED红灯将亮, 将
连
接 闪烁.接收 机LE D蓝灯
1.
* 夜视红 外LED灯 将会根据 所在环 境的光度 自动开 启
*
34
1 2
* 一 接收机 可以接 收多 摄像机 视频, 最多4个.个 个
-4-

技术参数
请妥存 本证及 购买收据,于 维修产 品时一并 出示
多谢阁 下 选购本产品. 本公 司提供购买日 起 计为期12个月免费保用,请 参 阅下列
之保用 细 则:
1.请妥 存 正本及已盖章 的购货收据,于维 修 产品时一并 出 示,方可享用免 费 维修服务,
否则本 公 司将收取适当 费用.
2.此项 免 费保用不包括 由于意外、使 用 不当、输入 不 适当电压、 疏 忽、不依说 明
书使用 、 外壳或零件破 烂、产品内部 会 受入水及电 池 漏液所造成 之 损坏。
3.如产 品 会经由非本公 司之技术人员 拆 开、分解、 改 装或修理, 此 免费保用则 失 效。
本公司 亦 将收取零件及 维修费用。
4.此项 免 费保用不包括 更换外壳、天 线 及一切随机 之 附件、零件 ( 如液晶显示 等 )
或电池 之 费用。
5.如因 污 秽物积聚所形 成的机件故障 , 本公司将收 取 更换零件之 费 用。
6.于任 何 情况下概不延 长免费保用期 。
香港新界沙田香港科 学 园 科 技 大 道 西1 0号浚湖楼西翼6楼607室 电 话 : (8 52)2687-3496
维修时间:
星期一至五 - 上午9:30至下午1:00, 下 午2:00至6:00
星期六、星期日及公 众 假 期 休 息
保 用 细 则
-5-
存储 环境
-30~70 ℃
5V电源适配器/6V-500mA 400毫安输出, 内置 锂电池
传感 器像 素
数字 技术
镜头 视角
传输 距离
显示 屏
音 频
电 源
产品 尺寸(接 收机)
产品 重量(接 收机)
工作 环境
VGA CMOS红外夜 视
2.4GHZ FHSS
54度
300M( )无障 碍
1.8寸彩色 显示屏 128x160
内置 麦克 风 / 喇叭
65 x 35 x 105mm
90G
-10~40 ℃

DP-C02
Baby Monitor
使用說明書
T.CHN

注意事項
警告
佳骏(环球)有限公司
本說明書最終解釋權歸 所有
如產品出現異常情況,請馬上停止使用.
如需清潔,請使用清水輕微濕潤棉布,輕力擦拭,不要使用任何化學品
進行清潔.
如功能出現異常,請用細物按壓<複位鍵>產品將恢復到出廠設定時
的默認值(詳細位置請見第2頁"部件名稱").
請勿私自進行任何改裝,否則一切責任自負.
請不要把產品投入到火焰中,否則一切責任自負.
請根據說明書正確連接電源,否則一切責任自負.
接收機 x 1
a攝像機 x 1
b
cd
電源適配器 x 2 說明書 x 1
目錄
設備清單
使用前請檢查配件是否齊全.
感謝您選購本公司出品的“DP-C02"數碼便擕式視頻監控器 .它將讓您
在300米範圍內(無障礙)隨時隨地視聽到家中嬰兒的任何動靜.它小巧
便攜,設置簡單易用.
為了保障本產品能在今後的工作中充分發揮其功能及延長其使用壽命,
請在安裝使用前詳細閱讀此說明書, 安裝使用過程中請注意產品的保養
及保護.
基於產品不斷改進的需要, 產品外觀/顏色/配件如有改動, 請以實物為准;
若產品技術改進, 本公司將保留對產品技術更新及此說明書更改之權利,
恕不另行通知.
部件名稱 2
1
目錄
1
設備清單
5
保用細則
接收機LED燈指示表 4
屏幕信息 3
用前設定 3
使用安裝 4
技術參數 5
輸出:DC 6.0V= 500mA
-1-
DP-C02
Baby Monitor
※
※
※
※
※
※
※
※
※
部件名稱
<左>按鍵
6
<下>按鍵
7
5確認鍵
11.8 128x160寸彩色顯示屏
2LED燈指示<紅/黃/藍/綠/紅>
<右>按鍵
4
<上>按鍵
38
9
電源接口
電源開關〈向上開啟/向下關閉〉
7
8
1
2
3
4
5
6
1.接收機
2.攝像機
-2-
1
2
4
3
夜視紅外LED燈
LED開機指示燈
接收機LED燈
8電源接口
7電源開關〈向上開啟/向下關閉〉
5麥克風孔
6夜指示燈<紅/黃>
接收機按鍵及夜燈功能鍵
如果攝像機與接收機未連接,也可按住攝像機中夜燈功能按鍵一直到連接成功後鬆開.
輕按接收機按鍵為開啟或關閉夜燈.
1
2
3
5
6
7
4
9
8
用前設定
1. 輕按接收機<確認鍵>可進入選單欄對主機的資料進行設定,如不設定一
切資料將是出廠時設定的預設值.
2.
進入設置畫面可對攝影機選擇 、亮度設定、音頻開關、配對功能等相關信息進
行設置.
*
*用戶第一次使用時請將攝像機和接收器進行校碼配對
象,通過<左 >或<右 >按鍵選擇您要設定的相應規格.
輕按<確認鍵>進入選單設定,按<上 >或<下 >按鍵來選擇需設置的對
*×
3
3
4
4
1
1
2
2
屏幕訊息
*×
1
2
3
4
54
+1
6
7
8
9
12
10
11
1 攝影機選擇: 最多可以選擇4個攝影機,在右下角會顯示選擇的攝影機號碼
2 亮度設定: 有5個級別可以調節
3音頻功能開/關: 當音頻功能開啟,接收機就會自動進入睡眠模式來節省電源,
也可以通過攝影機麥克風來開啟, 開啟後顯示屏上會有一個笑臉顯示
4配對功能:將接收機和攝影機配對,最多可以跟4個攝影機配對
5確認鍵:進入 / 退出菜單
6接收信號強度
7音量:按<左 >或<右 >按鍵調節音量大小
8夜燈:按<下 >按鍵開啟或關閉
9電池容量
10 音頻開啟
11 畫面放大/縮小 按<上 >按鍵調節畫面倍數x2 、x4
主機屏幕顯示
12 所配對的攝影機號碼
-3-

紅黃藍綠 紅
狀 態
電源連接
電源開啟
亮光
亮光
亮光 亮光
亮光
亮光
亮光
亮光 亮光 亮光
(電池充滿時熄滅)
閃爍
閃爍
熄滅
熄滅
熄滅
熄滅
熄滅
熄滅 熄滅
熄滅
熄滅
熄滅
熄滅 熄滅
熄滅
配對成功
音 量 底
音 量 高
使用安裝
2. 將接收機開啟進入畫面隨之將會聽到滴滴...聲響,這是未與攝像機相配
對成功.按確認健進入選單通過<上 >或<下 >按鍵進入到配對功能選
擇相對應的攝影機配對.配對成功屏幕右下方將顯示所配對的攝影機號
碼隨之滴滴...聲將停止.
安裝前請先進入選單設置進行相關設定。
* 設定方法詳見"用前設定"操作方法.
* 如不設定, 一切數據將是出廠時的預設值.
將攝像機安置於您所要視聽到的最佳位置.並與隨之的電源適配器相連
接;開啟電源開關後開機指示LED紅燈將亮,接收機LED藍燈將閃爍.
1.
* 夜視紅外LED燈將會根據所在環境的光度自動開啟
*
34
1 2
-4-
* 一個接收機可以接收多個攝像機視頻,最多四個。
接收機LED燈指示表

技術參數
-5-
存儲環境
-30~70 ℃
5V /6V-500mA電源適配器 輸出, 內置400毫安鋰電池
傳感器象素
數字技術
鏡頭視覺
傳輸距離
顯示屏
音 頻
電 源
產品寸尺(接收機)
產品重量(接收機)
工作環境
VGA CMOS紅外夜視
2.4GHZ FHSS
54度
300M(無障礙)
1.8 128x160寸彩色顯示屏
內置麥克風 / 喇叭
65 x 35 x 105mm
90G
-10~40 ℃
保 用 細 則
請妥存本證及購買收據,於維修產品時一並出示
多謝閣下選購本產品.本公司提供購買日起計為期12個月免費保用,請參閱下列之
保用細則;
1.請妥存正本及已蓋章的購貨收據,於維修產品時一並出示,方可享用免費維修服務,
否則本公司將收取適當費用.
2.此項免費保用不包括由於意外、使用不當、輸入不適當 電壓、
4
5
6
疏忽、 不依
說明書使用、外殼或零件破爛、產品內部會受入水及電池漏液所造成之損壞.
.此項免費保用不包括更換外殼、天線及一切隨機之附件、零件(如液晶顯示等)
或電池之費用.
.如因污穢物積聚所形成的機件故障,本公司將收取更換零件之費用.
.於任何情況下概不延長免費保用期.
維修時間:
星期一至五 --- 上午9:30至下午1:00,下午2:00至6:00
星期六、星期日及公眾假期休息
香港新界沙田香港科學園科技大道西10號浚湖樓西翼6樓607室 電話: (852)2687-3496
3.如產品會經由非本公司之技術人員拆開、分解、改裝、或修理,此免費保用則失效.
本公司亦將收取零件及維修費用.

RoHS
ORIENTAL INSPIRATION LIMITED
佳駿(環球)有限公司
0168