Netronix W400 Wireless 802.11b/g PCI Card User Manual UserMan NOI W400 revised 3
Netronix Inc Wireless 802.11b/g PCI Card UserMan NOI W400 revised 3
Netronix >
Manual

User’s Guide
×ÛÛÛ èðîòïï¹ É·®»´»-- ÐÝ× ß¼¿°¬»®

ï
ÚÝÝÝ»®¬·º·½¿¬·±²-
Ú»¼»®¿´ ݱ³³«²·½¿¬·±² ݱ³³·--·±² ײ¬»®º»®»²½» ͬ¿¬»³»²¬
̸·- »¯«·°³»²¬ ¸¿- ¾»»² ¬»-¬»¼ ¿²¼ º±«²¼ ¬± ½±³°´§ ©·¬¸ ¬¸» ´·³·¬- º±® ¿ Ý´¿--
Þ ¼·¹·¬¿´ ¼»ª·½»ô °«®-«¿²¬ ¬± ﮬ ïë ±º ¬¸» ÚÝÝ Î«´»-ò ̸»-» ´·³·¬- ¿®»
¼»-·¹²»¼ ¬± °®±ª·¼» ®»¿-±²¿¾´» °®±¬»½¬·±² ¿¹¿·²-¬ ¸¿®³º«´ ·²¬»®º»®»²½» ·² ¿
®»-·¼»²¬·¿´ ·²-¬¿´´¿¬·±²ò ̸·- »¯«·°³»²¬ ¹»²»®¿¬»-ô «-»- ¿²¼ ½¿² ®¿¼·¿¬» ®¿¼·±
º®»¯«»²½§ »²»®¹§ ¿²¼ô ·º ²±¬ ·²-¬¿´´»¼ ¿²¼ «-»¼ ·² ¿½½±®¼¿²½» ©·¬¸ ¬¸»
·²-¬®«½¬·±²-ô ³¿§ ½¿«-» ¸¿®³º«´ ·²¬»®º»®»²½» ¬± ®¿¼·± ½±³³«²·½¿¬·±²-ò
ر©»ª»®ô ¬¸»®» ·- ²± ¹«¿®¿²¬»» ¬¸¿¬ ·²¬»®º»®»²½» ©·´´ ²±¬ ±½½«® ·² ¿ °¿®¬·½«´¿®
·²-¬¿´´¿¬·±²ò ׺ ¬¸·- »¯«·°³»²¬ ¼±»- ½¿«-» ¸¿®³º«´ ·²¬»®º»®»²½» ¬± ®¿¼·± ±®
¬»´»ª·-·±² ®»½»°¬·±²ô ©¸·½¸ ½¿² ¾» ¼»¬»®³·²»¼ ¾§ ¬«®²·²¹ ¬¸» »¯«·°³»²¬ ±ºº ¿²¼
±²ô ¬¸» «-»® ·- »²½±«®¿¹»¼ ¬± ¬®§ ¬± ½±®®»½¬ ¬¸» ·²¬»®º»®»²½» ¾§ ±²» ±º ¬¸»
º±´´±©·²¹ ³»¿-«®»-æ
óλ±®·»²¬ ±® ®»´±½¿¬» ¬¸» ®»½»·ª·²¹ ¿²¬»²²¿ò
óײ½®»¿-» ¬¸» -»°¿®¿¬·±² ¾»¬©»»² ¬¸» »¯«·°³»²¬ ¿²¼ ®»½»·ª»®ò
óݱ²²»½¬ ¬¸» »¯«·°³»²¬ ·²¬± ¿² ±«¬´»¬ ±² ¿ ½·®½«·¬ ¼·ºº»®»²¬ º®±³ ¬¸¿¬
¬± ©¸·½¸ ¬¸» ®»½»·ª»® ·- ½±²²»½¬»¼ò
óݱ²-«´¬ ¬¸» ¼»¿´»® ±® ¿² »¨°»®·»²½»¼ ®¿¼·±ñÌÊ ¬»½¸²·½·¿² º±® ¸»´°ò
̸·- ¼»ª·½» ½±³°´·»- ©·¬¸ ﮬ ïë ±º ¬¸» ÚÝÝ Î«´»-ò Ñ°»®¿¬·±² ·- -«¾¶»½¬ ¬± ¬¸»
º±´´±©·²¹ ¬©± ½±²¼·¬·±²-æ øï÷ ̸·- ¼»ª·½» ³¿§ ²±¬ ½¿«-» ¸¿®³º«´ ·²¬»®º»®»²½»ô
¿²¼ øî÷ ¬¸·- ¼»ª·½» ³«-¬ ¿½½»°¬ ¿²§ ·²¬»®º»®»²½» ®»½»·ª»¼ô ·²½´«¼·²¹
·²¬»®º»®»²½» ¬¸¿¬ ³¿§ ½¿«-» «²¼»-·®»¼ ±°»®¿¬·±²ò
ÚÝÝ Ý¿«¬·±²æ ß²§ ½¸¿²¹»- ±® ³±¼·º·½¿¬·±²- ²±¬ »¨°®»--´§ ¿°°®±ª»¼ ¾§ ¬¸»
°¿®¬§ ®»-°±²-·¾´» º±® ½±³°´·¿²½» ½±«´¼ ª±·¼ ¬¸» «-»®ù- ¿«¬¸±®·¬§ ¬± ±°»®¿¬» ¬¸·-
»¯«·°³»²¬ò
×ÓÐÑÎÌßÒÌ ÒÑÌÛæ
ÚÝÝ Î¿¼·¿¬·±² Û¨°±-«®» ͬ¿¬»³»²¬æ
̸·- »¯«·°³»²¬ ½±³°´·»- ©·¬¸ ÚÝÝ ®¿¼·¿¬·±² »¨°±-«®» ´·³·¬- -»¬ º±®¬¸ º±® ¿²
«²½±²¬®±´´»¼ »²ª·®±²³»²¬ò ̸·- »¯«·°³»²¬ -¸±«´¼ ¾» ·²-¬¿´´»¼ ¿²¼ ±°»®¿¬»¼
©·¬¸ ³·²·³«³ ¼·-¬¿²½» îð½³ ¾»¬©»»² ¬¸» ®¿¼·¿¬±® ú §±«® ¾±¼§ò
̸·- ¬®¿²-³·¬¬»® ³«-¬ ²±¬ ¾» ½±ó´±½¿¬»¼ ±® ±°»®¿¬·²¹ ·² ½±²¶«²½¬·±² ©·¬¸ ¿²§
±¬¸»® ¿²¬»²²¿ ±® ¬®¿²-³·¬¬»®ò

î
×ÛÛÛ èðîòïï¾ ±® èðîòïï¹ ±°»®¿¬·±² ±º ¬¸·- °®±¼«½¬ ·² ¬¸» ËòÍòßò ·-
º·®³©¿®»ó´·³·¬»¼ ¬± ½¸¿²²»´- טּ®±«¹¸ ïïò
ÝÛÓ¿®µ É¿®²·²¹
̸·- »¯«·°³»²¬ ½±³°´·»- ©·¬¸ ¬¸» ®»¯«·®»³»²¬- ®»´¿¬·²¹ ¬± »´»½¬®±³¿¹²»¬·½
½±³°¿¬·¾·´·¬§ô ÛÒ ëëðîî ½´¿-- Þ º±® ×ÌÛô ¬¸» »--»²¬·¿´ °®±¬»½¬·±² ®»¯«·®»³»²¬ ±º
ݱ«²½·´ Ü·®»½¬·ª» èçñííêñÛÛÝ ±² ¬¸» ¿°°®±¨·³¿¬·±² ±º ¬¸» ´¿©- ±º ¬¸» Ó»³¾»® ͬ¿¬»-
®»´¿¬·²¹ ¬± »´»½¬®±³¿¹²»¬·½ ½±³°¿¬·¾·´·¬§ò
ݱ³°¿²§ ¸¿- ¿² ±²ó¹±·²¹ °±´·½§ ±º «°¹®¿¼·²¹ ·¬- °®±¼«½¬- ¿²¼ ·¬ ³¿§ ¾» °±--·¾´» ¬¸¿¬
·²º±®³¿¬·±² ·² ¬¸·- ¼±½«³»²¬ ·- ²±¬ «°ó¬±ó¼¿¬»ò д»¿-» ½¸»½µ ©·¬¸ §±«® ´±½¿´
¼·-¬®·¾«¬±®- º±® ¬¸» ´¿¬»-¬ ·²º±®³¿¬·±²ò Ò± °¿®¬ ±º ¬¸·- ¼±½«³»²¬ ½¿² ¾» ½±°·»¼ ±®
®»°®±¼«½»¼ ·² ¿²§ º±®³ ©·¬¸±«¬ ©®·¬¬»² ½±²-»²¬ º®±³ ¬¸» ½±³°¿²§ò
Ì®¿¼»³¿®µ-æ
ß´´ ¬®¿¼» ²¿³»- ¿²¼ ¬®¿¼»³¿®µ- ¿®» ¬¸» °®±°»®¬·»- ±º ¬¸»·® ®»-°»½¬·ª» ½±³°¿²·»-ò
ݱ°§®·¹¸¬w îððêôß´´ η¹¸¬- λ-»®ª»¼ò

í
UNPACKING INFORMATIONX .................................................... 4
INTRODUCTION TO THE IEEE802.11GWIRELESS PCI ADAPTER......5
Key Features..................................................................................5
HARDWARE INSTALLATION ..................................................... 6
SOFTWARE INSTALLATION ...................................................... 6
Driver and Utility Installation..........................................................6
MAKING A BASIC NETWORK CONNECTION ................................... 8
Before You Start.............................................................................8
Ad-Hoc Mode.............................................................................10
Infrastructure mode..................................................................12
INTRODUCTION TO THE WIRELESS LAN UTILITY .........................14
Starting the Wireless LAN Utility...................................................14
General........................................................................................15
Profile..........................................................................................16
Available Network.........................................................................17
Status..........................................................................................18
Statistics......................................................................................19

ì
Overview
Thank you for purchasing this product. Read this chapter to know
about your IEEE 802.11g Wireless PCI Adapter.
˲°¿½µ·²¹ ·²º±®³¿¬·±²¨
Before getting started, please verify that your package includes the following items:
1.IEEE 802.11g Wireless PCI Adapter]
2.One Quick Installation Guide
3.One Utility/ Manual CD
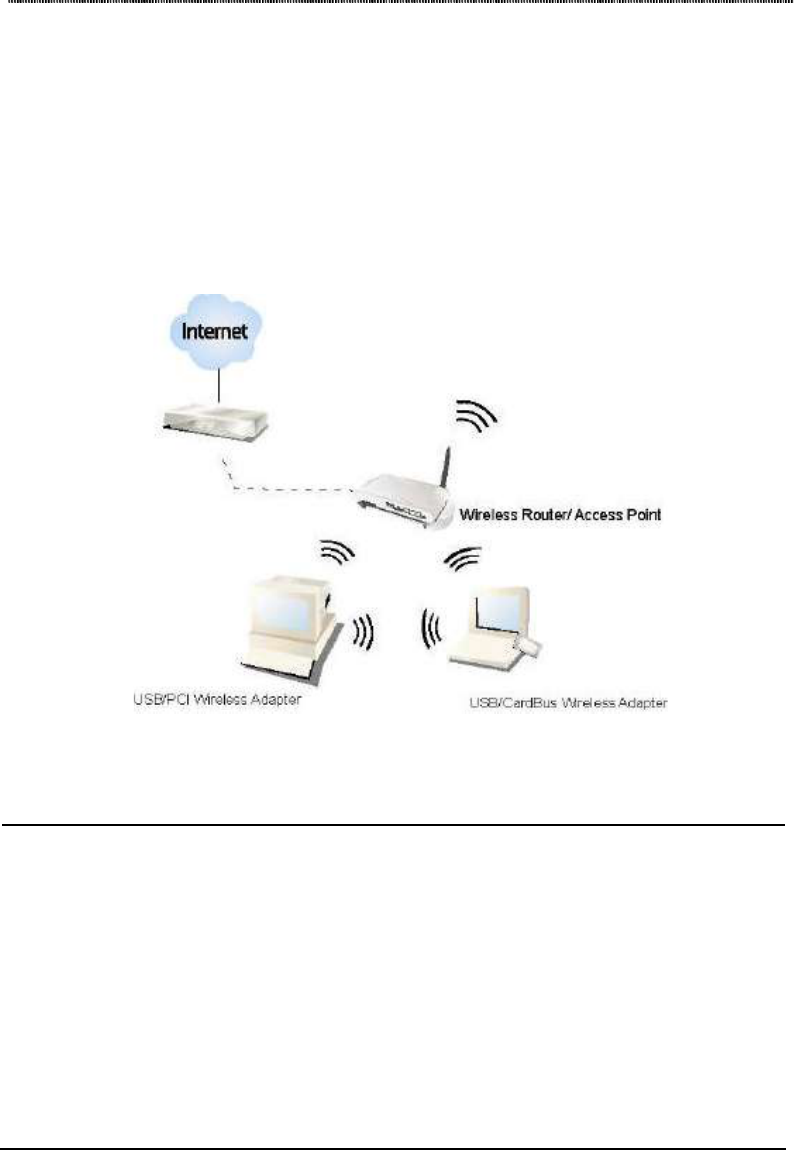
ë
ײ¬®±¼«½¬·±² ¬± ¬¸» ×ÛÛÛ èðîòïï¹ É·®»´»-- ÐÝ× ß¼¿°¬»®
The IEEE 802.11g Wireless PCI adapter provides users to launch IEEE 802.11g
wireless network at 54 Mbps in the 2.4GHz frequency, which is also compatible with
IEEE 802.11b wireless devices at 11Mbps. You can configure this adapter with
ad-hoc mode to connect to other 2.4GHz wireless computers or with Infrastructure
mode to connect to a wireless AP or router for accessing to Internet. This adapter
includes a convenient Utility for scanning available networks and saving preferred
networks that users usually connected with. Security encryption can also be
configured by this utility.
Õ»§ Ú»¿¬«®»-
•Complies with IEEE 802.11b/g wireless
standard
•Support Wake -on-LAN(WOL) function
and remote wake -up
•Complies with PCI revision 2.2 and PCI
power management revision 2.1
•Equips one external detachable dipole
antenna
•High Speed transfer data rate up to 54
Mbps
•Support driver for Windows 98se, Me,
2000 and XP.
•Support turbo mode for 72 Mbps data
rate
•Supports auto-installationand diagnostic
utilities.
•Support wireless data encryption with
64/128-bit WEP, WPA (TKIP with IEEE
802.1x) and AES functions.

ê
Installation Guide
Ø¿®¼©¿®» ײ-¬¿´´¿¬·±²
1.Turn off your computer.
2.Unplug the power cord of your computer from outlet.
3.Remove the cover of your computer.
4.Install the adapter into a PCI socket.
5.Secure this adapter to the back panel of your computer with the included screw.
6.Replace the cover.
7.Plug the power cord to the outlet and turn your computer on.
ͱº¬©¿®» ײ-¬¿´´¿¬·±²
Ü®·ª»® ¿²¼ ˬ·´·¬§ ײ-¬¿´´¿¬·±²
Note: The following driver installation guide uses Windows XP as the presumed
operation system. The procedures and screens in Windows 98se, 2000 are familiar
with Windows XP.
1.Insert the CD-Rom that came with this product to your CD-Rom drive. Double
click your CD-ROM drive icon to access this CD.
2.Double click the CI Driver Utility □ folder and then select the TL8185 □
folder. Double click the icon to start driver installation.
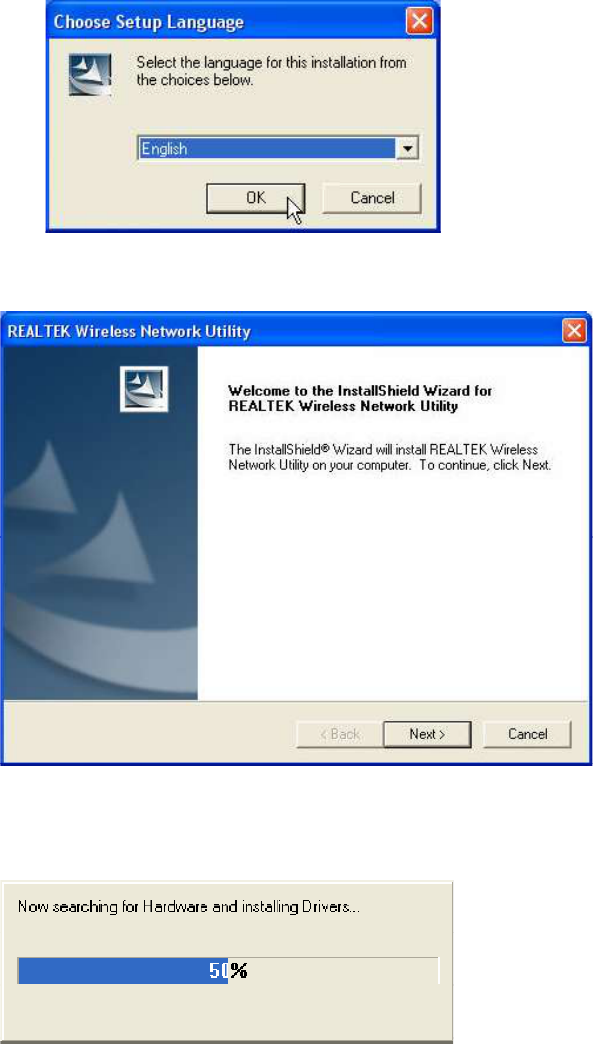
3.The language-selecting window pops up. Please select the language you use
and click OK.
é
4.The welcome window pops up. Click the “Next” button to proceed.
5.Please wait while installation.
6.Clickthe “Finish” button to complete driver and utility installation. (Note:
Windows 98 users please skip to step 9)
7.If you are using Windows 98se, the system may ask for the driver CD. Please
click the Browse button. Select your CD-ROM Drive then select PCI Driver
Utility@rtl8185@Win98 to browse the driver. After installing the driver, restart
your computer to activate the driver.
è
Ó¿µ·²¹ ¿ Þ¿-·½ Ò»¬©±®µ ݱ²²»½¬·±²
Þ»º±®» DZ« ͬ¿®¬
In the following instruction for making a network connection, we use the Utility we
provided to configure your wireless network settings.
Note: For Windows XP users to configure your wireless network using this Utility,
please perform the following procedures to disable your native Windows XP wireless
support (Wireless Zero Configuration Service)
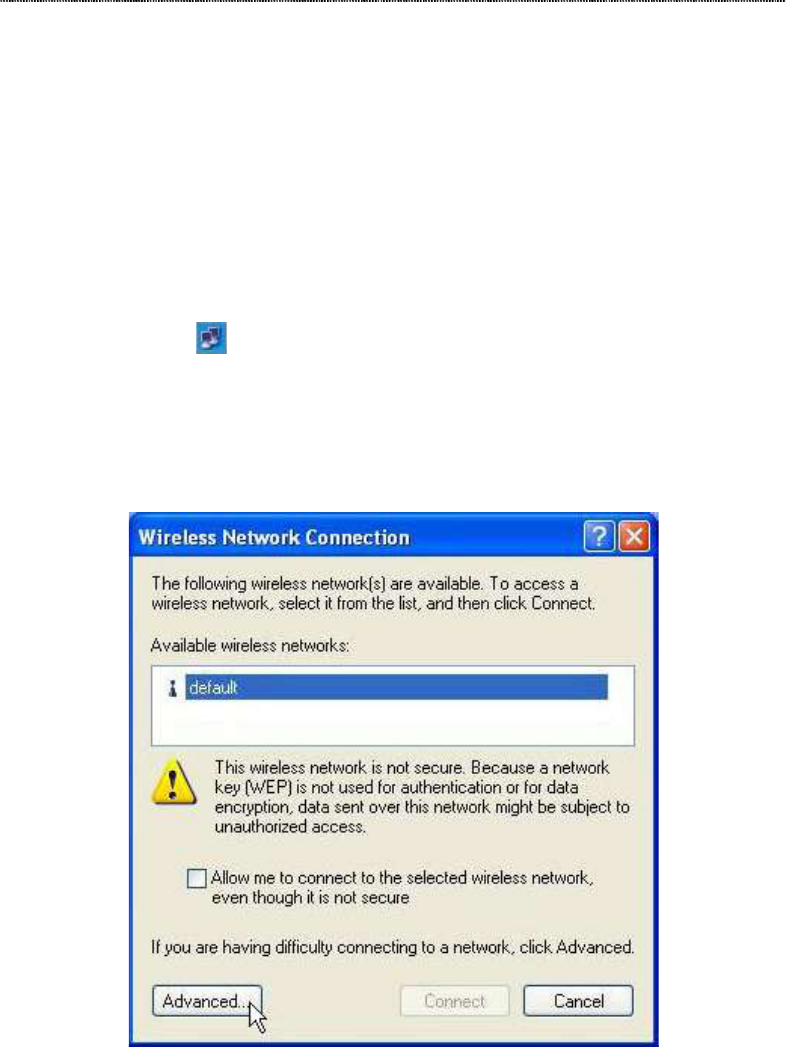
1.Double click the icon on your system tray, which located at the lower-right
corner of your desktop.
2.Click the “Advanced” Button
ç
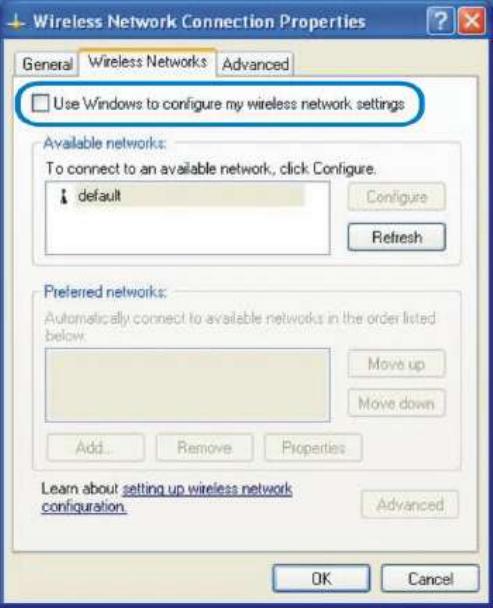
3.Uncheck the “Use Windows to configure my wireless network settings”
Checkbox and click “OK”
ïð
ß¼óر½ Ó±¼»
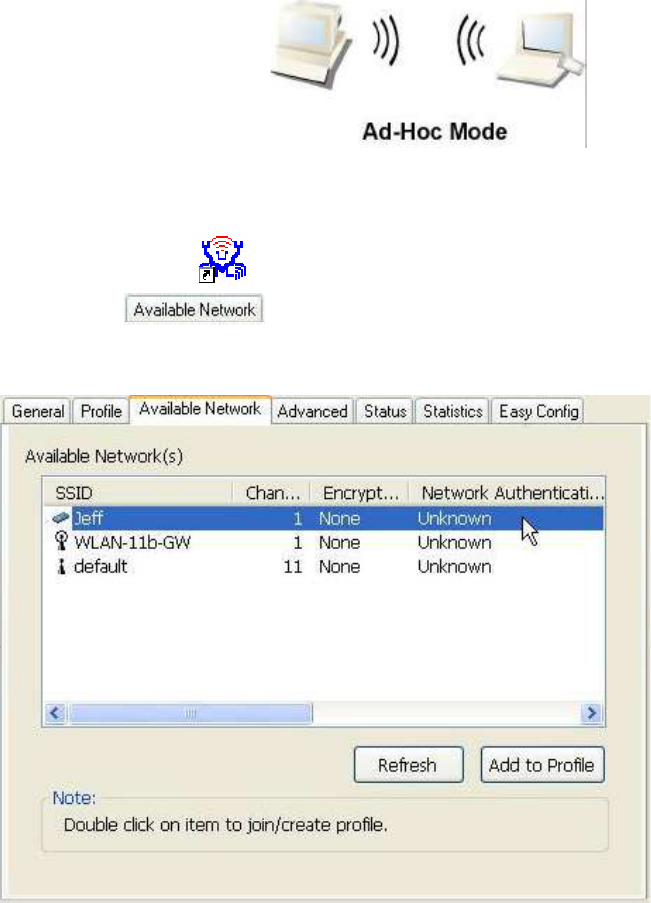
An Ad-Hoc mode wireless network connects two computers directly without the use
of a router or AP. It is also know as a peer-to-peer network. For example, we can
install this wireless adapter to two computers respectively. The communication
between the two computers is an Ad-Hoc mode network.
To use this adapter in Ad-Hoc Mode
1.Double click the icon on your desktop.
2.Click the button to scan available wireless network adapters.
Double click on the network adapter that you are going to connect to.
ïï
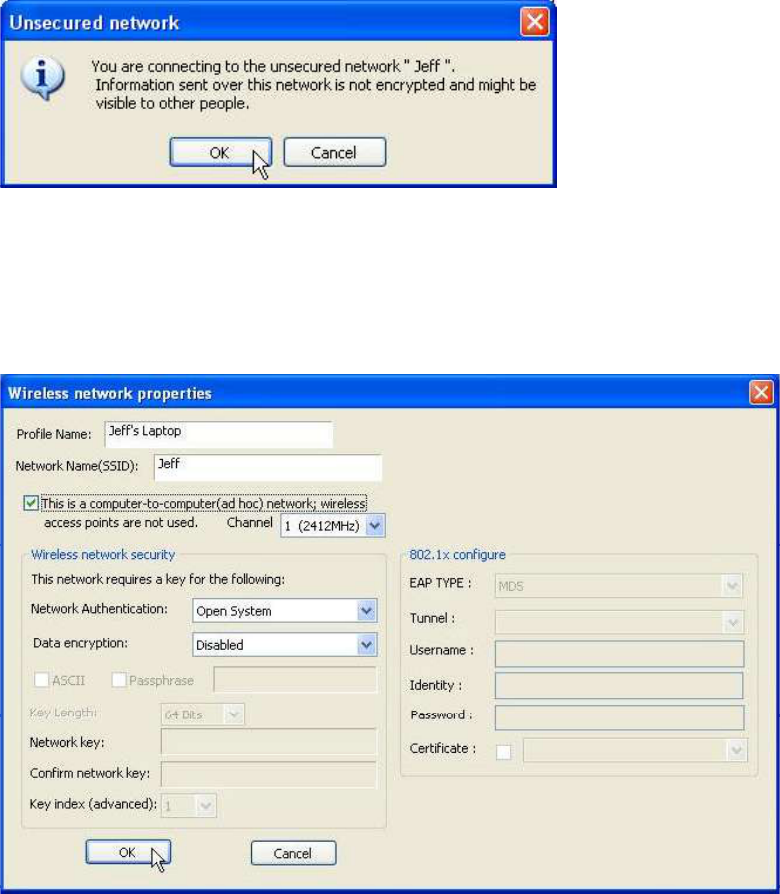
3.Click the OK button to confirm that you are connecting to an open wireless
network.
4.Click OK to add this network into the profile list.
Note: This example is an open wireless network. If you are going to connect to a
Wireless adapter with security protection, you will have to configure the encryption
settingsin this profile to be corresponding to the other wireless adapter.
ïî
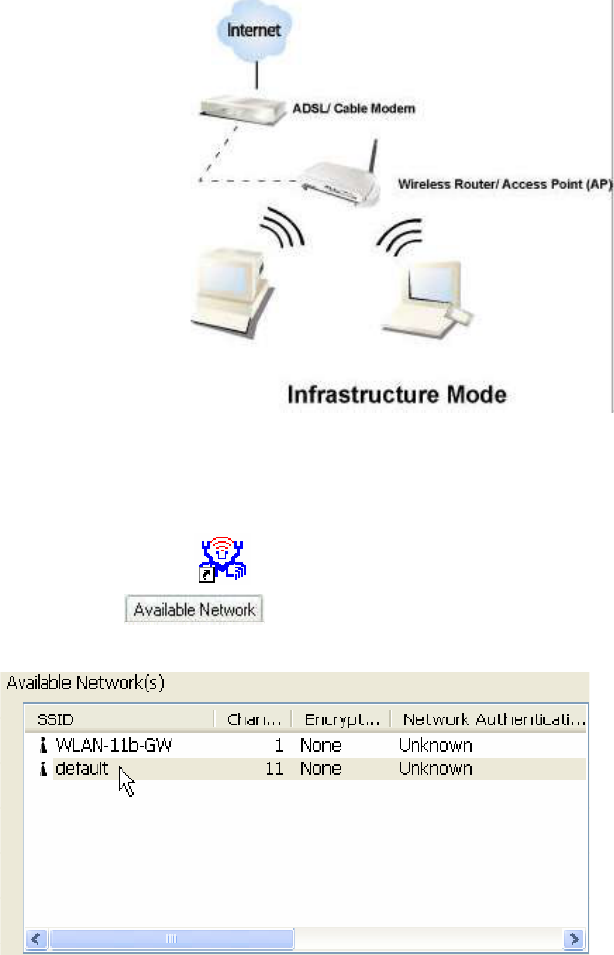
ײº®¿-¬®«½¬«®» ³±¼»
An Infrastructure Mode network contains at least one wireless client and one
wireless AP or router. This client connects to Internet or intranet by communicating
with this wireless AP.
To use this adapter in Infrastructure Mode:
1.Double click the icon on your desktop.
2.Click the button to scan available Access points. Double click on
the AP that you are going to connect to.
ïí
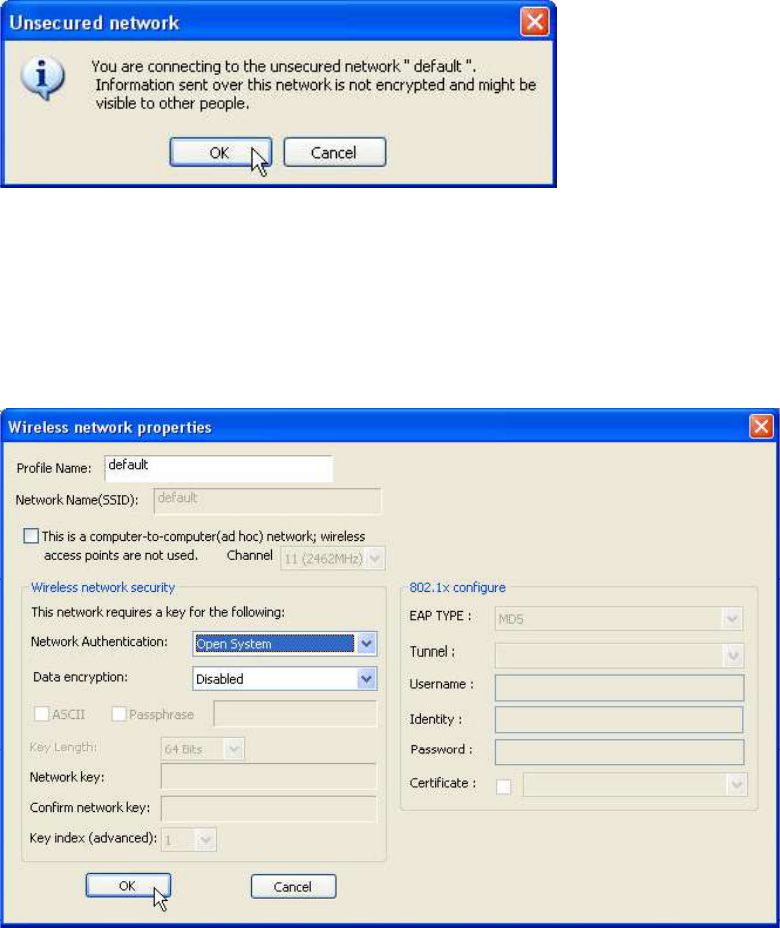
3.Click the OK button to confirm that you are connecting to an open wireless
network.
4.Click OK to add this network into the profile list.
Note: This example is an open wireless network. If you are going to connect to an
AP with security protection, you will have to configure the encryption settings in this
profile to be corresponding to your AP.

ïì
Management Guide
Read this chapter to understand the management interface of the
device and how to manage the device.
ײ¬®±¼«½¬·±² ¬± ¬¸» É·®»´»-- ÔßÒ Ë¬·´·¬§
ͬ¿®¬·²¹ ¬¸» É·®»´»-- ÔßÒ Ë¬·´·¬§
Double click the shortcut on your desktop. The Wireless LAN Utility pops up.
You may click on the tabs above to configure this adapter. The checkboxes below
provide the following functions:
Show Tray Icon
Check this checkbox to show the utility icon on your
system tray, which is in the notification area at the
lower-
right corner of the windows desktop. You may
also uncheck it to remove the utility icon from system
tray.
Windows Zero Config
Uncheck this checkbox to use
native Windows XP
wireless support (Wireless Zero Configuration Service)
instead of using this util
ity to configure your wireless
network.
Radio Off
Check this checkbox to prevent this adapter form
transmitting or receiving signals. Uncheck it to
communicate.
Disable Adapter
Check this checkbox
to disable this wireless adapter.
Uncheck it to enable this adapter again.
ïë
Ù»²»®¿´
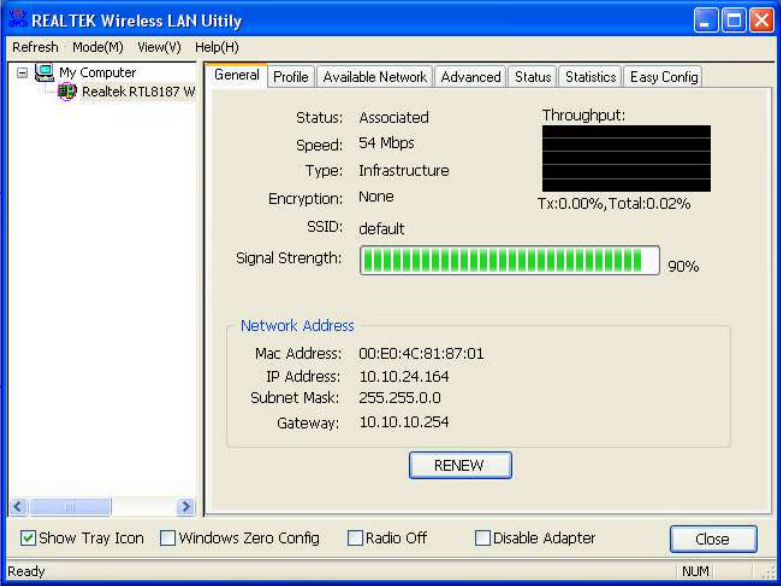
After starting the utility, the general page pops up This General tab provides the
information of your current wireless network connection. You may click the Renew
button to refresh those listed information.
Status: Check if the device associated to target network.
Speed: The current connection speed
Type: Infrastructure mode or Ad- Hoc mode.
Encryption:
The performing encryption mode for connecting to current
network profile.
SSID: The SSID (network name) of the connected wireless network.
Signal Strength: Indicated the signal strength detected by this adapter.
Network Address: Shows the current IP addresses settings for this adapter.
ïê
Ю±º·´»
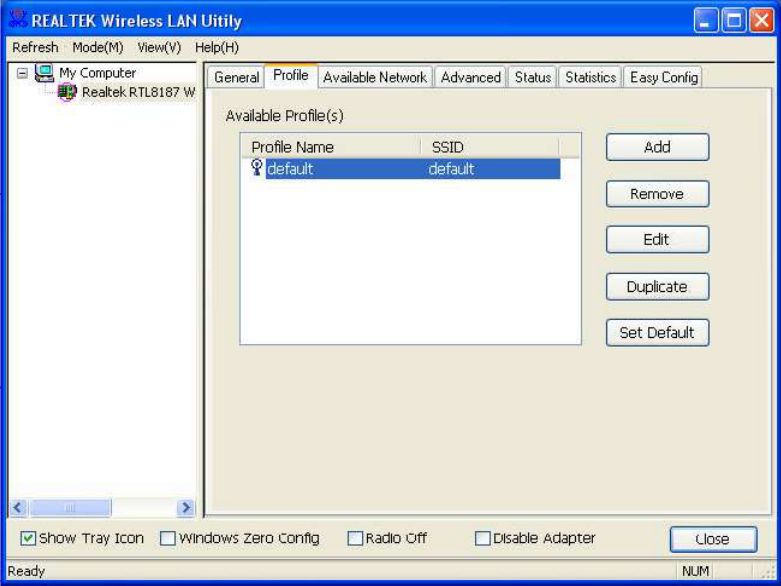
The Profile tab lists the preferred connections. You can click the buttons beside the
list to do configurations to each connection.
Add Click this button to add a connection profile for this adapter.
Remove To remove a connection profile, click this profile on the
profile
list and click this button to delete it.
Edit
To modify the configurations for a profile, click this profile on
the profile list and click this button to edit.
Duplicate
To make a copy of a profile, click the profile that going to be
copied, and click this button to copy it.
Set Default To se
lect a profile as your default wireless connection, click this
profile on the list and click this button. You may also double click
on each profile to select it as your default wireless connection.
ïé
ߪ¿·´¿¾´» Ò»¬©±®µ
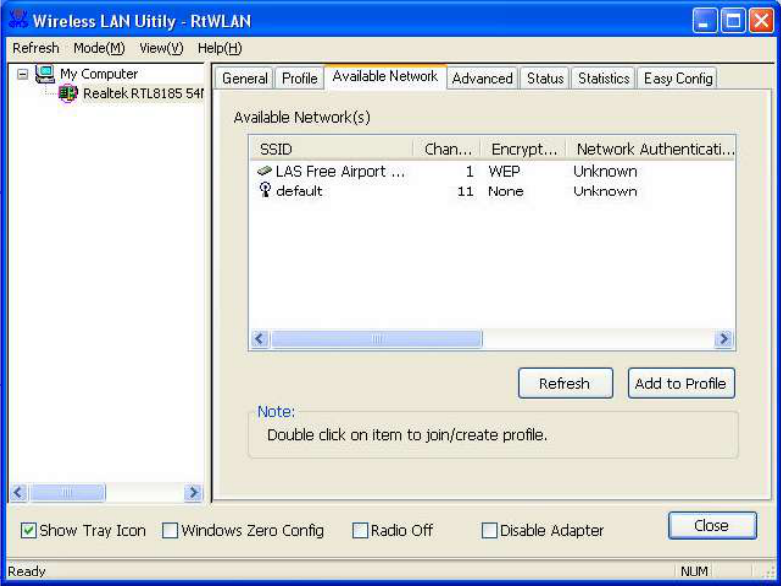
This available tab lists the reachable wireless network of this adapter.
Refresh
Click this button to rescan available networks around the
adapter.
Add to Profile
To add an available to your profile list, select a available
network and click this button to add.
ïè
ͬ¿¬«-
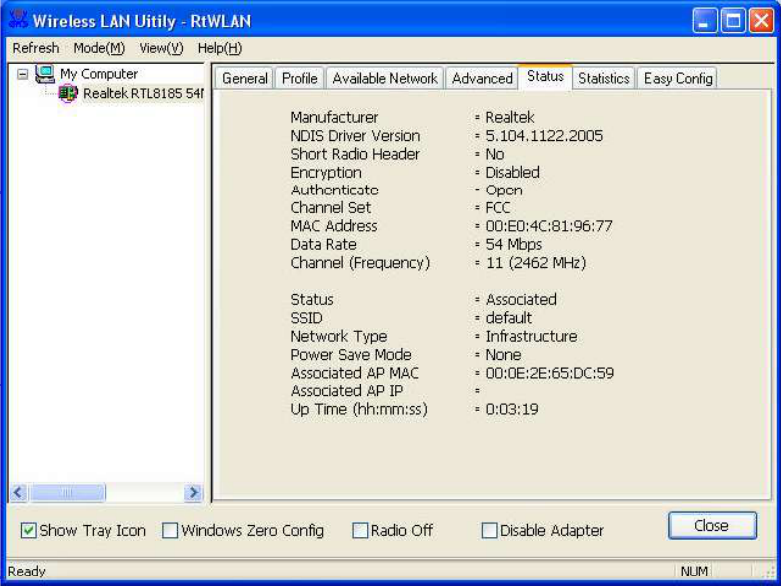
This tab shows the current connection status of this adapter.
ïç
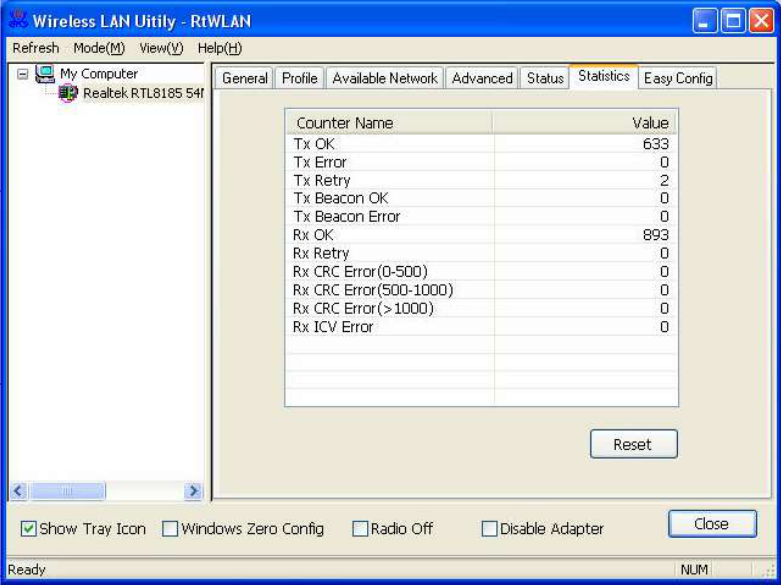
ͬ¿¬·-¬·½-
See this tab to show the transmission activity record.

îð
61NB -W4000+207C
Product Specification
Standard
IEEE 802.11g, IEEE 802.11b
Interface
PCI Interface
Security
64/128-bit WEP, WPA (TKIP with IEEE 802.1x), AES
Receiver Sensitivity
54Mbps OFDM, 10%PER, -68dBm
11Mbps CCK, 8%PER, -86dBm
1Mbps BPSK, 8%PER, -92dBm
Cannel
USA 11, Europe 13, Japan 14
Data Rate
802.11b: 1, 2, 5.5 and 11Mbps
802.11g: 6, 9, 12, 18, 24, 36, 48, and 54Mbps
Transmit Power
16dBm~18dBm
Range Coverage
Indoor 35~100 meters
Outdoor 100~300meters
LED indicator
Link(Green)
Operating Temperature
0- 40 ðC (32 – 104 ðC)
Operating Humidity
10% ~ 90% (non-condensing)
Dimension
152 x 122x 22 mm
Emission
FCC Part 15.247 for US, ETS 300 328 for Europe