Network Technologies Asi Ip Gtw Users Manual TVG420 User 2.2 (SW Release 1.2.2)
ASI-IP-GTW 7a74abe9-df30-428b-befa-3eb461a08f6e
DVB-ASI to IP to the manual 7a74abe9-df30-428b-befa-3eb461a08f6e
2015-02-05
: Network-Technologies Network-Technologies-Asi-Ip-Gtw-Users-Manual-494319 network-technologies-asi-ip-gtw-users-manual-494319 network-technologies pdf
Open the PDF directly: View PDF ![]() .
.
Page Count: 93
- 1 Introduction
- 1.1 Purpose of this Manual
- 1.2 Contact Information
- 1.3 Role of the ASI-IP-GTW in a Typical System
- 1.4 Summary of Features
- 1.5 Guided Tour
- 1
- 2 Installing the Equipment
- 1
- 3 Operating the Equipment
- 4 Options
- 5 Equipment Description
- 6 Preventive Maintenance and Fault-finding
- 7 Appendix A: Glossary
- 8 Appendix B: Technical Specification
- 9 Appendix C: References
- 10 Appendix D: Upgrade of Features
- 11 Appendix E: Upgrading Software
- 12 Appendix F: Quality of service – Setting Packet priority

network-electronics.com
DVB-ASI to IP
Gateway
Rev. 2.10.0
Flashlink User Manual
ASI-IP-GTW

ASI-IP-GTW User's Manual
Page 2
This page is intentionally left blank

ASI-IP-GTW User's Manual
Page 3
Important notice:
Network Electronics ASA reserve the right to make corrections,
modifications, enhancements, improvements and other changes to its
products or services at any time and to discontinue any product or
service without notice.
About this manual
This manual explains how to operate the ASI-IP-GTW IP to ASI Video
Gateway. It is shown how to install and maintain the unit. In addition,
the functionality of the unit is described in detail.
This manual should be kept in a safe place for reference for the life time
of the equipment. Further copies of this manual can be ordered from
Network. If passing the equipment to a third party, please ensure to
pass all relevant documentation including this manual.
Issues of this manual are listed below:
How to use this manual
Novice users unfamiliar with the Video Gateways from Network should
read this manual starting with Chapter 1. Users familiar with the
Network Video Gateways and operation of video over IP equipment may
start with Chapter 2. Users which are more interested in the
functionality offered by the ASI-IP-GTW may directly go to Chapter 3.
Rev. Date SW ver. Comment
1.1 July 2005 0.11.4 Initial release
2.0 September 2005 1.1.0 Release with FEC, VLAN and SFP interface
2.1 November 2005 1.1.5 Intermediate release with implementations on
iterative FEC, more on alarms and other general
improvements.
2.2 January 2006 1.2.2 Release with SNMP support as optional feature
and support for UDP transmission mode
2.3 April 2006 1.3.x Release with bi-directional operation, and IGMPv3
support.
2.3b May 2006 1.3.x Small patch on description of RTP sequence
errors.
2.4 July 2006 1.3.11 Ping option (3.5.5), New clock options (3.5.2),
Advanced tab on IPRX (3.7.4),
Speed-/ duplex mode for management port (3.5.1)
2.5 Sept. 2006 1.3.18 Added support for GPS module.
2.6 Oct. 2006 1.3.22 Added support for User Security and RIPv2.
2.7 March 2007 1.3.33 SNMP tab, Burst/Spread mode, No lock mode,
updated features list.
2.8 April 2007 1.4.0 Dual ASI, Increased FEC matrixes, VBR mode,
new FEC alarm, password resetting.
2.9 November 2007 2.20.4 Data channel ping, ASI bitrate limiter, Static MAC
2.10 January 2008 2.22.0 204 byte MPEG-2 transport stream support

ASI-IP-GTW User's Manual
Page 4

ASI-IP-GTW User's Manual
Page 5
Table of Contents
1 Introduction ................................................................................ 8
1.1 Purpose of this Manual ......................................................... 8
1.1.1 Who Should Use this Manual................................................... 8
1.1.2 Warnings, Cautions and Notes................................................. 8
1.2 Contact Information.............................................................. 9
1.2.1 What Equipment is Covered by this Manual ............................ 9
1.2.2 Software versions................................................................... 10
1.3 Role of the ASI-IP-GTW in a Typical System......................... 10
1.4 Summary of Features.......................................................... 10
1.5 Guided Tour ....................................................................... 12
1.5.1 The User Interface ................................................................. 12
1.5.2 Front Panel Description ......................................................... 12
1.5.3 Rear Panel Description .......................................................... 12
1.5.4 Construction.......................................................................... 13
1.5.5 Hardware Options.................................................................. 13
1.5.6 Software Options ................................................................... 14
2 Installing the Equipment ........................................................... 15
2.1 Introduction........................................................................ 15
2.1.1 Read this first! ....................................................................... 15
2.1.2 To inspect package content.................................................... 15
2.2 Installing the Equipment..................................................... 15
2.2.1 Selecting a site for the equipment .......................................... 15
2.2.2 To fix the equipment .............................................................. 16
2.2.3 To cable the equipment.......................................................... 16
2.2.4 Equipment access.................................................................. 16
2.2.5 Ventilation ............................................................................. 16
2.2.6 To connect the equipment...................................................... 17
2.3 Power ................................................................................. 18
2.3.1 AC Power Supply ................................................................... 18
2.3.2 Power Cable and Protective Earth .......................................... 18
2.3.3 Optional DC Power Supply..................................................... 20
2.4 Signal Connections ............................................................. 21
2.4.1 Introduction........................................................................... 21
2.4.2 ASI ports ............................................................................... 21
2.4.3 Ethernet data port ................................................................. 22
2.4.4 Ethernet management port .................................................... 23
2.5 LEDs .................................................................................. 23
2.6 Powering Up/Down ............................................................. 24
2.6.1 Before Powering up ................................................................ 24
2.6.2 Powering Up .......................................................................... 24
2.6.3 Powering Down ...................................................................... 24
3 Operating the Equipment........................................................... 25
3.1 Introduction........................................................................ 25
3.2 Changing the IP address of the unit .................................... 25
3.3 Looking at the WEB interface .............................................. 26
3.4 Status................................................................................. 28
3.5 Device Info.......................................................................... 29
3.5.1 Network ................................................................................. 30

ASI-IP-GTW User's Manual
Page 6
3.5.2 Time settings ..........................................................................33
3.5.3 Alarms....................................................................................34
3.5.4 SNMP .....................................................................................34
3.5.5 Ping ........................................................................................36
3.5.6 Security ..................................................................................38
3.6 IP TX .................................................................................. 39
3.6.1 Main.......................................................................................39
3.6.2 FEC Settings...........................................................................42
3.6.3 Ethernet Settings....................................................................44
3.6.4 Ping Settings ..........................................................................45
3.7 IP RX .................................................................................. 46
3.7.1 Main.......................................................................................46
3.7.2 FEC Settings...........................................................................48
3.7.3 Ethernet Settings....................................................................50
3.7.4 Ping Settings ..........................................................................51
3.7.5 Advanced Tab .........................................................................52
3.8 Network .............................................................................. 54
3.9 Save/Load .......................................................................... 56
3.9.1 Saving a Configuration ...........................................................56
3.9.2 Loading a Configuration .........................................................57
4 Options ..................................................................................... 58
4.1 1PPS/10MHz interface modules .......................................... 58
4.1.1 Separate 10MHz/1PPS module ...............................................58
4.1.2 1PPS interface ........................................................................58
4.1.3 Operating the 1PPS/10MHz interface module .........................59
4.1.4 LED descriptions ....................................................................60
4.2 RIPv2 functionality.............................................................. 61
4.2.1 User interface .........................................................................61
5 Equipment Description .............................................................. 63
5.1 Introduction........................................................................ 63
5.2 Functional Description........................................................ 63
5.2.1 Introduction ...........................................................................63
5.2.2 IP Transmit Mode ...................................................................63
5.2.3 IP Receive Mode ......................................................................64
5.2.4 IP Bi-directional Mode.............................................................64
5.2.5 Management...........................................................................64
5.2.6 Alarms....................................................................................64
5.3 Overview of Video over IP .................................................... 67
5.3.1 Protocol mapping....................................................................67
5.4 Data Flow Block Diagrams .................................................. 68
5.4.1 Forward Error Correction (FEC) ..............................................68
6 Preventive Maintenance and Fault-finding.................................. 70
6.1 Introduction........................................................................ 70
6.2 Preventive Maintenance ...................................................... 70
6.2.1 Routine Inspection..................................................................70
6.2.2 Cleaning .................................................................................70
6.2.3 Servicing.................................................................................70
6.3 Maintenance ....................................................................... 70
6.3.1 Warranty ................................................................................70
6.4 Fault-finding....................................................................... 71
6.4.1 Fault finding Philosophy .........................................................71

ASI-IP-GTW User's Manual
Page 7
6.4.2 Preliminary Checks................................................................ 71
6.4.3 PSU LED Unlit / Power Supply Problem................................. 72
6.4.4 Fan(s) Not Working / Overheating.......................................... 73
6.4.5 Alarm LED lit / Alarm condition ............................................ 73
6.5 Disposing of this Equipment ............................................... 75
6.5.1 General.................................................................................. 75
6.6 To return the unit ............................................................... 75
7 Appendix A: Glossary................................................................. 76
8 Appendix B: Technical Specification........................................... 80
8.1 DVB ASI port ...................................................................... 80
8.2 Ethernet data port .............................................................. 81
8.3 Ethernet management port ................................................. 81
8.4 Alarm relay and maintenance port specification .................. 81
8.5 AC Mains Input................................................................... 82
8.6 DC Mains input .................................................................. 82
8.7 Physical Details .................................................................. 83
8.8 Environmental Conditions................................................... 84
8.9 Compliance......................................................................... 84
8.9.1 Safety .................................................................................... 84
8.9.2 Electromagnetic Compatibility - EMC..................................... 84
8.9.3 CE Marking ........................................................................... 85
8.9.4 Interface to “public telecommunication system” ..................... 85
9 Appendix C: References ............................................................. 86
10 Appendix D: Upgrade of Features............................................... 87
11 Appendix E: Upgrading Software................................................ 90
12 Appendix F: Quality of service – Setting Packet priority .............. 92
12.1 MPLS .................................................................................. 92
12.2 Layer 3 Routing .................................................................. 92
12.3 Layer 2 priority ................................................................... 93

ASI-IP-GTW User's Manual
Page 8
1 Introduction
1.1 Purpose of this Manual
This manual describes how to operate the ASI to IP Gateway, hereafter
referred to as the ASI-IP-GTW. It also describes how to install and
maintain the unit. A detailed technical description of the functionality
of the unit is given as part of this document.
The following topics are covered in this manual:
o General introduction to the ASI-IP-GTW
o Installation of the Unit
o Functional description of the Unit
o Fault finding and maintenance
1.1.1 Who Should Use this Manual
This manual is written for operators and users of the ASI-IP-GTW and
is meant to provide necessary information for installation, operation
and day-to-day maintenance of the unit.
Note: This manual does not include any maintenance information or
procedures which require the removal of covers.
1.1.2 Warnings, Cautions and Notes
1.1.1.1 Heed Warnings
All warnings on the product and in the operating instructions should
be adhered to. The manufacturer can not be held responsible for
injuries or damages where warnings and cautions have been ignored or
taken lightly.
1.1.1.2 Read Instructions
All the safety and operating instructions should be read before this
product is operated.
1.1.1.3 Follow Instructions
All operating and use instructions should be followed.
1.1.1.4 Retain Information
The safety and operating instructions should be retained for future
reference.
Warning: Warnings give information, if strictly observed, will prevent
personal injury and death, or damage to personal property or the
environment.

ASI-IP-GTW User's Manual
Page 9
Caution: Cautions give information, if strictly followed, will prevent
damage to equipment or other goods.
Note: Notes provides supplementary information. They are highlighted
for emphasis, as in this example, and are placed immediately after the
relevant text.
1.2 Contact Information
Our primary is to provide first class customer care that is tailored to
your specific business and operational requirements.
Telephone: +47 33 48 99 99
Fax: +47 33 48 99 98
Email: support@network-electronics.com
Web: http://www.network-electronics.com
Service: +47 90 60 99 99
Mailing and visiting address:
Network Electronics ASA
Thorøya, P.O. Box 1020
N-3204 Sandefjord
Norway
This manual does not include any maintenance information or
procedures which require the removal of covers.
1.2.1 What Equipment is Covered by this Manual
This manual covers the ASI to IP Gateway. Figure 1 shows the physical
unit.
Figure 1. The product
The ASI-IP-GTW consists of a 1RU high rack-mounted enclosure with a
DSP module (Master Module) and 1 or 2 ASI I/O boards. Optical
Gigabit or a second electrical Gigabit port is provided by an optional
SFP (Small Form-Factor Pluggable) slot.
ASI-IP-GTW User's Manual
Page 10
1.2.2 Software versions
This manual covers the functionality of the software version 1.4.0 or
later of the ASI-IP-GTW. This manual continues to be relevant to
subsequent software versions where the functionality of the equipment
has not changed. When a new software version changes the
functionality of the product, a new version of this manual will be
provided.
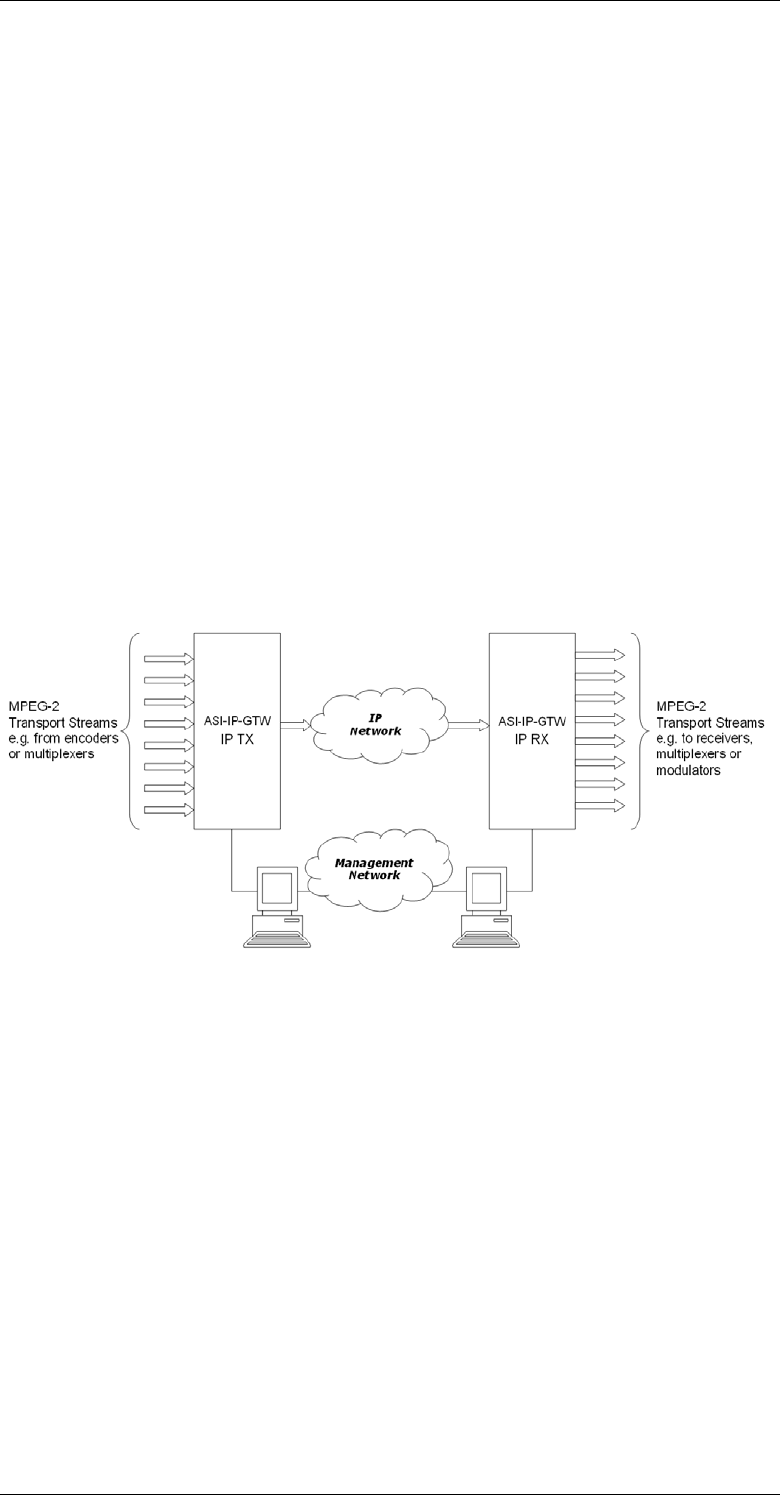
1.3 Role of the ASI-IP-GTW in a Typical System
The ASI-IP-GTW provides a bridge between the MPEG-2 world and the
IP world. The unit provides an interface between MPEG-2 transport
streams, via DVB-ASI interface, to the IP based Network. It provides the
ability to carry up to 8 individual MPEG-2 transport streams over an IP
network. Each individual MPEG-2 transport stream is carried on an
individual UDP port. At the reception site, the unit de-concentrates the
MPEG-2 transport streams from the IP network, back to individual
MPEG-2 transport streams and out through the DVB-ASI connections.
Figure 2 provides an overview of the ASI-IP-GTW in transmit and
receive mode.
Figure 2. ASI-IP-GTW in a system
1.4 Summary of Features
Features of the ASI-IP-GTW include:
o Transmission of MPEG-2 Transport Streams over Gigabit
Ethernet.
o Flexible Forward Error Correction
o End to end Quality of Service
o MPTS/SPTS
o Up to 8 DVB-ASI inputs/outputs
o User configurable as transmitter or receiver
o Increased robustness against network packet losses

ASI-IP-GTW User's Manual
Page 11
o User-friendly configuration and control
o WEB/XML based remote control
o Easy access to unit from any WEB browser
o Easy integration to Network Management System (NMS) with
SNMP Trap support
o Type of Service (TOS) field support for reliable end-to-end
transmissions

ASI-IP-GTW User's Manual
Page 12
1.5 Guided Tour
1.5.1 The User Interface
All connectors are provided at the rear panel. Configuration and
monitoring of the unit is performed via a FLASH-based WEB interface
using a standard WEB browser such as Internet Explorer. The unit also
supports configuration via file transfer of XML files. Once configured,
the unit runs without the need for further intervention unless system
configuration requirement change.
1.5.2 Front Panel Description
The front panel provides four LEDs per ASI-IP-GTW. Table 1 describes
the meaning of the different LED indicators.
Table 1. Front panel LEDs
1.5.3 Rear Panel Description
All connectors to the ASI-IP-GTW are provided at the rear panel. Figure
3 shows the rear panel of a ASI-IP-GTW equipped with 4 DVB-ASI
connectors.
1. ASI. In IP TX mode, the connector provides a DVB-ASI input. In IP
Rx mode, the connector provides a DVB-ASI output.
2. Management port. The ASI-IP-GTW provide one Ethernet port for
control and management of the unit.
3. Ethernet data port. The ASI-IP-GTW provides one Ethernet data
port for high speed signal transmission and reception.
4. Alarm/RS232 Connector. This 9-pin male D-SUB connector
provides RS232 access and alarm information.
5. Technical Earth. The ASI-IP-GTW provide a Technical Earth.
6. Mains Power Connection. This is the Power Supply Connection.
Indicator Colour Description
Power Green This LED is lit when power is being received by the
unit.
Alarm Red This LED is lit when a failure is detected by the unit.
IP TX Blue This LED is lit when the unit is configured to transmit
data to the IP Network.
IP RX Yellow This LED is lit when the unit is configured to receive
data from the IP Network

ASI-IP-GTW User's Manual
Page 13
Note: Some units are delivered to use 48 VDC power. These units have
a 3-pin power D-SUB connector instead of the mains connector.
7. LEDs. The ASI-IP-GTW provides on the rear four LEDs related to the
operation of the equipment. In addition, there are LEDs related to the
ASI ports, the management port and the data port.
1.5.4 Construction
The ASI to IP Gateway consists of a main board and one or two ASI
boards mounted horizontally in a screened, self-ventilated cabinet. The
unit is 1RU high and two units can be mounted side-by-side in a 19
inch rack. All inputs and outputs are available at rear panel and there
are no front panel keypads or display. Figure 3 shows the rear panel of
the unit.
Figure 3. Rear view
1.5.5 Hardware Options
1.1.1.5 4 additional ASI ports
The ASI-IP-GTW is at least fitted with 4 ASI ports from factory. 1 to 4 of
these inputs are enabled from factory. As an option, the unit can be
fitted with an additional ASI module, providing 4 additional ASI ports,
which gives a total of 8 ASI ports.
1.1.1.6 SFP Module
As a factory option, the ASI-IP-GTW can be equipped with an SFP slot
to feature optical Gigabit or a second, redundant electrical Gigabit port.
The SFP module itself is not provided.
1.1.1.7 GPS Module
As a factory option, the ASI-IP-GTW can be equipped with a sync signal
input module. This module gives the ASI-IP-GTW the option to sync to
either a 1pps or 10MHz signal.
1.1.1.8 SFP/GPS Module
As a factory option, the ASI-IP-GTW can be equipped with an SFP slot
to feature optical Gigabit or a second, redundant electrical Gigabit port.
The SFP module itself is not provided. This module also includes a
1pps input for use as a sync signal.

ASI-IP-GTW User's Manual
Page 14
1.5.6 Software Options
The following table describes the features available as software option.
Please refer to
Appendix D: Upgrade of Features for more information
Table 2. Functionality enabled through software licenses
Functionality Max value Description
Number of enabled ports 8 The number of ASI ports enabled. This
can be different from the number of ports
physically mounted.
Data port max. speed: 1000Mbit/s The speed of the data port can be
100Mbit/s or 1000Mbit/s.
Connect Control NA Enabled supervision of the unit through the
Connect software.
Forward Error Correction NA Pro-MPEG Forward Error Correction
enabled for use on all streams.
Bi-directional operation NA Enables simultaneous transmission and
reception of MPEG2 data on the Ethernet
data interface.

ASI-IP-GTW User's Manual
Page 15
2 Installing the Equipment
2.1 Introduction
2.1.1 Read this first!
The ASI-IP-GTW must be handled carefully and thoughtfully to prevent
safety hazards and damage. Ensure that the personnel designated to
install the unit have the appropriate skills and knowledge.
Follow the instructions for installation and only use installation
accessories recommended by the manufacturer.
2.1.2 To inspect package content
o Inspect the shipping container for damage. If your shipping
container is damaged, keep the shipping container or cushioning
material until you have inspected the contents of the shipment for
completeness and have checked that the ASI-IP-GTW
mechanically and electrically.
o Verify that you received the following items and any optional
accessories you may have ordered:
2.2 Installing the Equipment
2.2.1 Selecting a site for the equipment
The ASI-IP-GTW should not be placed where it will be a subject to
extreme temperatures, humidity, or electromagnetic interference.
Specifically, the site you select should meet the following requirements:
o The ambient temperature should be between 0 to 50 degrees
Celsius (32 and 122 degrees Fahrenheit).
o The relative humidity should be less than 90 percent, non-
condensing. Do not install the unit in areas of high humidity or
where there is danger of water ingress.
o Surrounding electrical devices should not exceed the
electromagnetic field (RFC) standards for IEC 801-3, Level 2
(3V/M) field strength.
o Make sure that the equipment receives adequate ventilation. Do
not block the ventilation holes on each side of the ASI-IP-GTW.
o The power outlet should be within 1.8 meters (6 feet) of the ASI-IP-
GTW.
o ASI to IP Gateway
o Power cord
o User’s manual
Note: 48V DC versions do not ship with a power cord, but a male
Power D-SUB connector for soldering to the supply leads.

ASI-IP-GTW User's Manual
Page 16
o Where appropriate ensure that this product has an adequate level
of lightning protection. Alternatively, during a lightning storm or
whenever it is left unattended and unused for long periods of time,
unplug it from the supply outlet and disconnect the output
equipment. This prevents damage to the product due to lightning
and power-line surges.
2.2.2 To fix the equipment
The ASI-IP-GTW is designed for stationary use. The ASI-IP-GTW is
designed for installation in standard 19" racks. When installed in a
rack, ensure that the unit is surely and safely installed and that the
equipment has adequate through-flow of air.
2.2.3 To cable the equipment
Ensure that power supply cables are routed in such a way that they are
not likely to be walked on or pinched by items placed upon or against
them.
Do not run ac power cables and signal cables in the same duct.
2.2.4 Equipment access
The ASI-IP-GTW has connectors at the rear. When installing the unit,
ensure that the unit is installed to allow easy access to the rear of the
unit.
2.2.5 Ventilation
Please observe the following:
1. Openings in the cabinet are provided for ventilation and to ensure
reliable operation of the product and to protect it from overheating.
These openings must not be blocked or covered. This product
should never be placed near or over a radiator or heat register. This
product should not be placed in a built-in installation such as a
rack unless proper ventilation is provided or the instructions have
been adhered to.
2. The fans contained in this unit are not fitted with dust/insect filter.
Play particular attention to the environment in which it is to be
used.
The ASI-IP-GTW should be installed to allow adequate flow of free-
air. Ensure that the ventilation holes on each side of the ASI-IP-
Warning: If the Video Gateway has been subject to a lightning strike or
the power surge which has stopped it working, disconnect the power
immediately. Do not reapply power until it has been checked for safety.
If in doubt, contact Network.
Warning: Never push objects of any kind into this equipment through
openings as they may touch dangerous voltage points or short-out
parts that could result in a fire or electric shock. Never spill liquid of
any kind on or into the product.
ASI-IP-GTW User's Manual
Page 17
GTW are no not blocked and allow at least 50 mm free air-space at
each side of the unit. The ASI-IP-GTW is designed to be stacked in
19"racks without ventilation panels between. In systems with
stacked units, it may be required to use forced-air cooling to reduce
the operating ambient temperature.
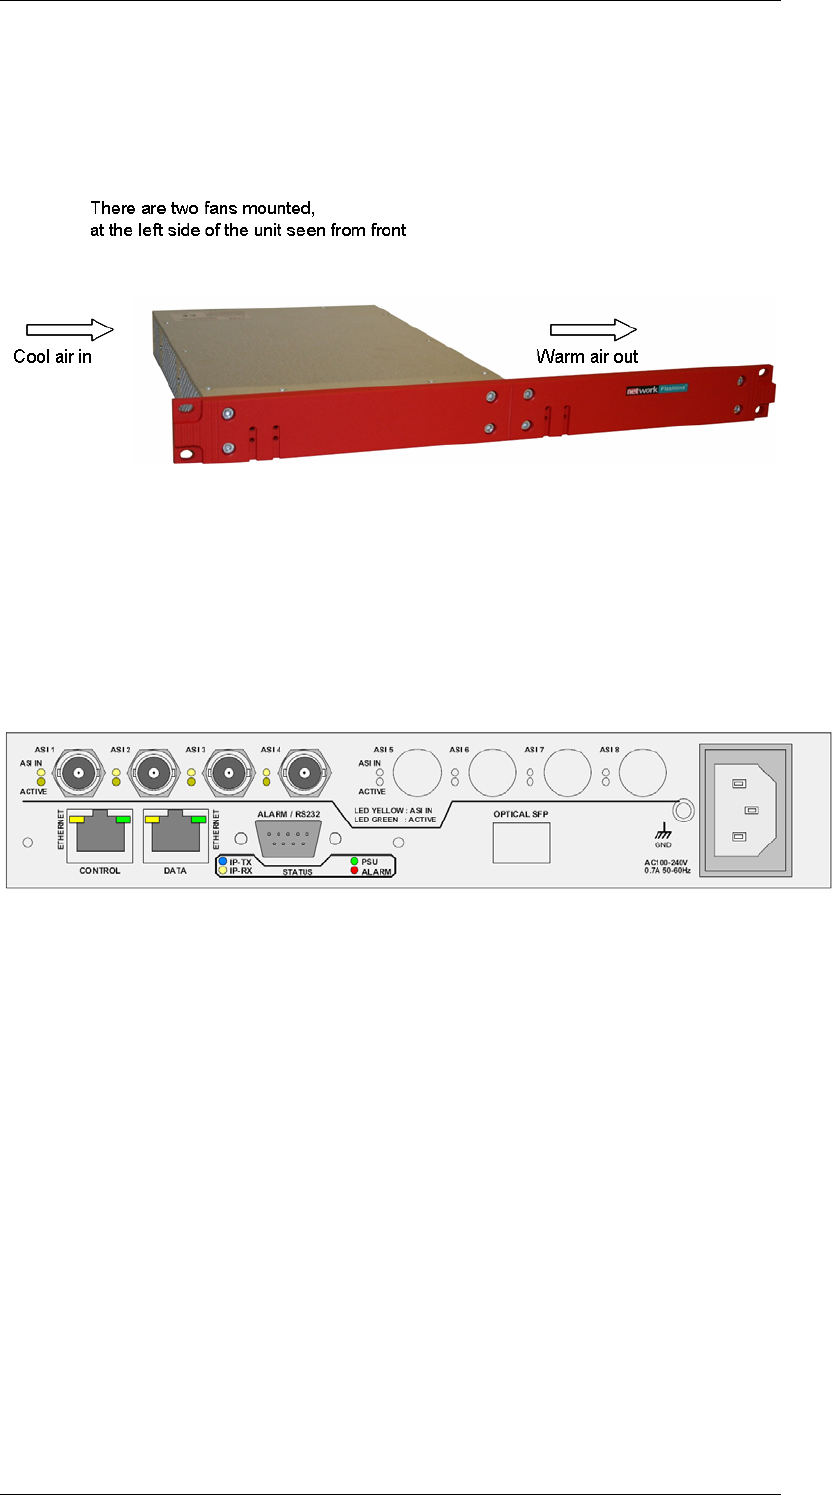
Figure 4 shows the air path through the unit.
Figure 4. Air Path through the unit
2.2.6 To connect the equipment
Once the ASI-IP-GTW is installed in its intended operating position, it is
ready to be connected to the rest of the system. The following figure
shows the different equipment connections.
Figure 5. Signal connections
Remove mains supply previous to move or install the equipment.
Ensure ESD precautions are observed whilst interconnecting
equipment.
1.1.1.9 ASI port
The ASI-IP-GTW can be operated in three modes: IP Transmit, IP
Receive, and IP bi-directional mode.
In IP transmit mode, the equipment receives up to 8 DVB-ASI streams
and sends them to the IP network. In this mode, connect the individual
DVB-ASI input signals to the connectors marked with ASI. If you have
ordered the unit with less than 4 ASI ports, the enabled ports starts at
number 1 up to the number of ports ordered.
In IP receive mode, the equipment receives an IP stream and sends the
individual MPEG-2 transport streams out on the DVB-ASI connectors.
In this mode, connect the DVB-ASI output to the input of the
equipment to receive MEG-2 transport stream from the unit. If you

ASI-IP-GTW User's Manual
Page 18
have ordered the unit with less than 4 ASI ports, the enabled ports
starts at number 1 up to the number of ports ordered.
In IP bi-directional mode, half the DVB-ASI connectors are used as
inputs, and the other half as DVB-ASI outputs. ASI connectors 1, 2, 5
and 6 are used as inputs, while ASI connectors 3, 4, 7 and 8 are used
as outputs.
1.1.1.10 Ethernet data port
Connect the Ethernet data port to the network. In IP transmit mode,
the ASI-IP-GTW will send an IP stream to the network. In IP receive
mode, the ASI-IP-GTW will receive an IP stream from the network.
1.1.1.11 Power supply
Section 2.3 provides details of the power supply, protective earth and
security. Read all these instructions, prior to connecting the unit to
power mains.
1.1.1.12 Management port
The ASI-IP-GTW provides one Ethernet port for control and
management. Connect the management port to the management
network.
1.1.1.13 Technical Earth
Connect the Technical earth to a suitable earth point.
1.1.1.14 Alarm
The ASI-IP-GTW provides an alarm relay for connection to external
alarm system.
2.3 Power
2.3.1 AC Power Supply
The ASI-IP-GTW provides a wide-ranging power supply covering a rate
voltage range 100-240Vac, 50/60Hz. Please refer to
Appendix B: Technical Specification for a detailed specification of the
AC power supply.
2.3.2 Power Cable and Protective Earth
1.1.1.15 General
Ensure that the AC power cable is suitable for the country in which the
unit is to be operated.
Warning: This product should be operated only from the type of power
source indicated on the marking label. Please consult a qualified
electrical engineer or your local power company if you are not sure of
the power supply to your business.

ASI-IP-GTW User's Manual
Page 19
The unit is supplied with a two meter detachable power supply cable
equipped with the moulded plug suitable for Europe, UK or US.
The wires in the mains cable are coloured in accordance with the wire
colour code shown in Table 3.
Table 3. Supply Cable wiring colours
1.1.1.16 Protective Earth /Technical Earth
The unit has a Technical Earth terminal located at the rear panel. Its
use is recommended. This is not a Protective earth for electrical shock
protection. The terminal is provided to:
1. Ensure all equipment chassis fixed in the rack are at the same
Technical earth potential. To achieve this, connect a wire between
the Technical earth terminal and a suitable point on the rack.
2. Eliminate the migration of stray charges when connecting between
equipment.
Warning: If the moulded plug fitted to the mains cable supplied with
this unit is not required, please dispose of it safely. Failure to do this
may endanger life as live ends may be exposed if the removed plug is
inserted into a mains outlet.
Caution: Power supply cords should be routed so that they are not
likely to be walked on or pinched by items placed upon or against
them, paying particular attention to cords at plugs, convenience
receptacles, and the point where they exit from the appliance.
UK (BS 1363) EUROPE (CEE 7/7) USA (NEMA 5-15P)
Earth: Green-and yellow Green-and yellow Green
Neutral: Blue Blue White
Live: Brown Brown Black
T
o achieve protection against earth faults in the installation, connected
to the equipment by signal cables etc., the equipment should always be
connected to protective earth. If the mains appliance coupler is
disconnected while signal cables are connected to the equipment, earth
connection should be achieved by connecting earth to the additional
technical earth connection on the rear panel of the unit.
Warning: This unit must be correctly earthed through the moulded
plug supplied. If the local mains supply does not have an earth
conductor do not connect the unit.
Caution: Consult the supply requirements in
Appendix B: Technical Specification prior to connecting the unit to the
supply.

ASI-IP-GTW User's Manual
Page 20
1.1.1.17 Connecting the Video Gateway to the AC Power Supply
To connect the unit to the local AC power supply:
1. Ensure that the local ac power supply is switch OFF.
2. Connect the ac power lead to the Video Gateway mains input
connector and then the local mains supply.
2.3.3 Optional DC Power Supply
The ASI-IP-GTW can be delivered with a 48 VDC power supply for use
in environments where this is required. The DC power can tolerate a
voltage range of 36 – 72 VDC. Please refer to
Appendix B: Technical Specification for a detailed specification of the
power supply.
Units delivered with DC power supply, has a 3–pin male power D-SUB
connector in stead of the standard Mains Power Connector. Also a
female 3-pin D-SUB connector is supplied.
The pin assignment is shown in Table 4.
Table 4 DC power connector pin assignment
To connect the unit to the local DC power supply:
1. Use a soldering tool to attach the supplied loose female power D-
SUB connector to your power leads (not supplied).
2. Connect the power leads to your local power supply.
3. Connect the DC power connector, with attached power leads, to the
Video Gateway power input connector.
Warning: If the terminal screw has to be replaced, use an M4x12mm
long pozidrive panhead. Using a longer screw may cause a safety
hazard.
Warning: Do not overload wall outlets and extension cords as this can
result in a risk of fire or electrical shock. As no power switch is fitted in
this unit, ensure that the local ac power supply is switch off before
connecting the supply cord. The unit is not fitted with an on/off switch.
Ensure that the socket-outlet is installed near the equipment so that is
easily accessible. Failure to isolate the equipment properly may cause a
safety hazard.
Pin (placement) Specification
1 (top) + (positive terminal)
2 (middle) - (negative terminal)
3 (bottom) Chassis Ground
ASI-IP-GTW User's Manual
Page 21
2.4 Signal Connections
2.4.1 Introduction
All signal connectors are located at the rear of the ASI-IP-GTW. For
detailed specifications of the different interfaces, please refer to Chapter
0. Please ensure that specified cables are used in order to ensure signal
integrity and compliance with EMC requirements.
The following figure shows the back panel of the ASI-IP-GTW.
Figure 6. Rear panel connectors
2.4.2 ASI ports
The ASI-IP-GTW provides up to 8 DVB ASI ports. The unit can be
delivered with 4 or 8 DVB ASI connectors. For the 4 ASI port version, 1,
2, 3 or all 4 ports can be enabled.
The operator can configure the unit as an IP transmitter, an IP receiver,
or to IP bi-directional operation. In the IP transmitter mode, all enabled
ASI ports are configured as DVB ASI inputs. In the IP receive mode, the
ASI ports are configured as DVB ASI outputs. In IP bi-directional mode,
half the DVB ASI ports are used as inputs, the other half as outputs
(see 2.2.6)
Table 5. ASI ports
Item Specification
Safety status SELV
Type Analogue
Connector name ASI 1,2,3,..., 8
Connector type BNC 75 ohm socket
Signal Compliant with EN50083-9: 1998 Table B.1
Line rate 270Mbit/s
Data rate 0,1-213Mbit/s

ASI-IP-GTW User's Manual
Page 22
1.1.1.18 DVB ASI input
Inputs connected to the DVB ASI ports should be on DVB compliant
transport streams in asynchronous serial format.
Each DVB ASI connector has two LEDs associated with it; ASI Rx and
Active. Both LEDs are lit when the ASI input is enabled and a DVB ASI
stream is connected to the port. If the input is enabled, but no valid
stream is connected to the port, only the ASI Rx LED is lit. If the ASI
input is disabled none of the LEDs are lit.
1.1.1.19 DVB ASI output
When in IP receive mode, the ASI port will provide a DVB compliant
transport stream. When no stream is received over the IP network, the
output will be idle characters. If a stream is received, the output will be
a combination of MPEG-2 transport stream data bytes and idle
characters.
The ASI Rx is always unlit when the ASI port is configured as an ASI
output. The LED, designated Active, is lit when the output is enabled
and unlit when the output is disabled.
2.4.3 Ethernet data port
The Ethernet port provides an electrical Ethernet data port. The default
interface is 100Base-T. As an option, the port can be operated as
1000Base-T. In this case the port can auto sense between 100 and
1000 Mbits/s. The operator is able to force the interface speed to fixed
100Mbit/s or fixed 1000Mbit/s. This is useful to minimize the
synchronization time when reconnecting signal cables.
Table 6. Ethernet data port
Two LEDs are associated with the Ethernet data port.
For flexibility, the ASI-IP-GTW provides an optional Small Form-Factor
Pluggable (SFP) slot to carry a copper or optical SFP, allowing
customers to use different SFPs for special distance, cost, existing
infrastructure, and future expansion requirements. The ASI-IP-GTW is
prepared for electrical (1000Base-T) or optical 1000BASE-SX and
1000BASE-LX SFP transceivers.
Item Specification
Type 10/100/1000Base-T
Connector type RJ45

ASI-IP-GTW User's Manual
Page 23
Table 7. Optional SFP Ethernet data port
Note: Please note that the optional SFP slot always provide Gigabit
Ethernet. Other bitrates are not supported by the SFP slot.
Note: Please note that data will not be available simultaneously on the
electrical Ethernet port and the SFP slot. Through the user interface
the user selects on which port the data should be available.
2.4.4 Ethernet management port
The ASI-IP-GTW is provided with an Ethernet management port for
configuration and control. The interface is 100Base-T. Please connect
the management port to the appropriate LAN for configuration and
control.
Table 8. Ethernet management port
Two LEDs are associated with the Ethernet management port.
2.5 LEDs
The ASI-IP-GTW is equipped with 4 LEDs at the front. The following
table describes the meaning of the front LEDs.
Table 9. Front panel LEDs
The front LEDs are replicated at the rear panel.
Each ASI port has two LEDs associated with it.
Item Specification
Type Gigabit Ethernet, Small Form-Factor Pluggable
(SFP) slot to carry copper or optical SFP,
compatible with approved modules conforming to
the Small Form-factor Pluggable Transceiver
MultiSource agreements (Sept.14, 2000).
Optical interface must comply with safety
requirements IEC 60825 (Class 1) and 21 CFR
1040.10 & 1040.11 (Class 1).
Item Specification
Safety status SELV
Type 10/100Base-T
Connector type RJ45
Indicator Colour Description
Power Green This LED is lit when power is being received by the
unit.
Alarm Red This LED is lit when a failure is detected by the unit.
IP TX Blue This LED is lit when the unit is configured to transmit
data to the IP Network.
IP RX Yellow This LED is lit when the unit is configured to receive
data from the IP Network

ASI-IP-GTW User's Manual
Page 24
Table 10. ASI port LEDs
Each Ethernet port (data and management) has two LEDs associated
with it.
Table 11. Ethernet port LEDs
2.6 Powering Up/Down
2.6.1 Before Powering up
Before powering-up the unit, please check the following:
o The unit is installed in a suitable location
o The unit has been connected to external equipment as required
2.6.2 Powering Up
Power up the unit by inserting the power cable connected to a power
source.
The cooling fans will start up in a full-speed mode. When the unit has
finished the start-up procedure, the fans will run at normal speed.
Please check that the all cooling fans are rotating. If they are not,
switch of the unit immediately.
2.6.3 Powering Down
To power down the unit, remove the power supply connection at the
rear of the unit.
Mode ASI Rx Active Description
Unlit Unlit Input disabled (ASI input)
Lit Unlit Input enabled, no ASI stream detected (not in
sync)
IP Tx
Lit Lit Input enabled, ASI stream detected (in sync)
Unlit Unlit Output disabled (ASI output) IP Rx
Unlit Lit Output enabled
Traffic and link indicator Description
Green Lit when link
Blinks when data is transmitted or received.
Speed indicator Description
Unlit 10Mbit/s
Green 100Mbit/s
Yellow 1000Mbit/s

ASI-IP-GTW User's Manual
Page 25
3 Operating the Equipment
3.1 Introduction
The ASI-IP-GTW is configured and controlled locally and remotely
through a flash-based WEB interface. The only application required on
the computer to use this interface is a WEB browser (Internet Explorer,
Mozilla or Opera) and FLASH player 7.0. In order to connect to the user
interface of the ASI-IP-GTW only enter the IP address of the
management data port. The default IP address of the management port
is 10.0.0.10. Please refer to Section 3.2 for information about how to
change the IP address of the management port using the RS232
connection.
If you don’t have FLASH player 7.0 or newer installed on your
computer, this will be detected and you will be informed to install this
prior to configuring the ASI-IP-GTW.
3.2 Changing the IP address of the unit
The ASI-IP-GTW is configured with IP address 10.0.0.10 for the
management port. There are two ways to change the IP address of the
management port:
1. Connect from a WEB browser and use WEB-interface to set IP
address of management port (See section 3.5.1).
2. Connect via RS232 via HyperTerminal (115200kb/s, 8, N, 1, no flow
control). Type the following command:
net ipconfig --ip (ip address) --mask (subnet mask) -
-gw (gateway).
Example:
net ipconfig --ip 10.40.80.100 --mask 255.255.255.0 -
-gw 10.40.80.1
Note: FLASH player 7.0 or newer is required to use the WEB interface
of the ASI-IP-GTW.
Note: It is recommended to use Internet Explorer 6.0 or newer.
T
he ASI-IP-GTW can be configured to transmit MPEG2 transport
stream data over an Ethernet link or receive data from an Ethernet
interface. In IP transmit mode (IP TX), up to 8 DVB ASI inputs are
provided. In IP receive mode (IP RX), up to 8 DVB ASI output streams
are provided. An optional mode for bi-directional operation (IP-TXRX) is
available, where half the DVB ASI ports are used as inputs, and the
other half as outputs.
ASI-IP-GTW User's Manual
Page 26
This will result in the IP address 10.40.80.100. The subnet mask is set
to 255.255.255.0 and the default gateway to 10.40.80.1.
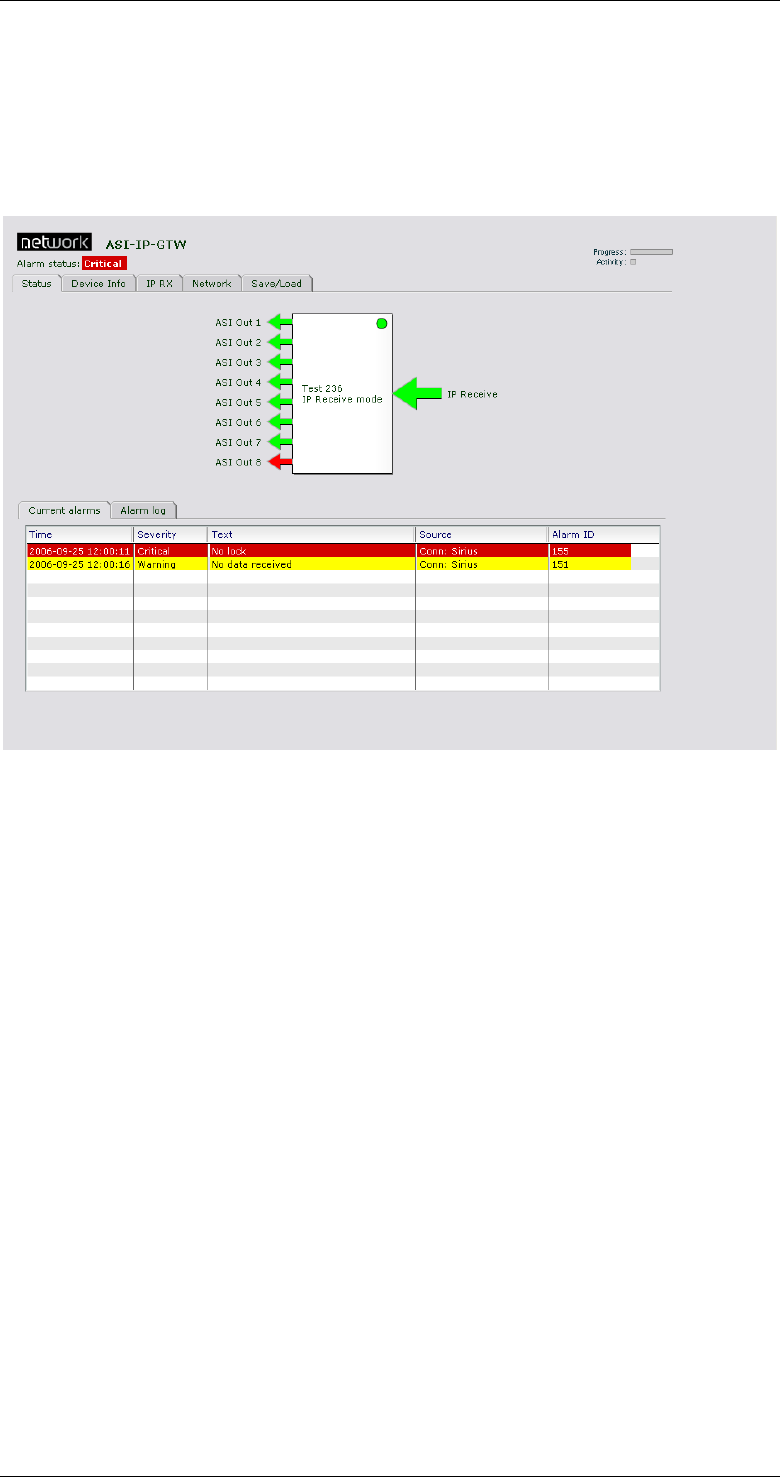
3.3 Looking at the WEB interface
Figure 7 shows the Status page of the WEB-based user interface to the
equipment.
Figure 7. The overall status page
Overall status: The top part of the page is the same for all pages. The
type name of the product is given. In the upper left corner two bars are
presented. The first is the progress bar which will show the progress of
an action started, e.g. the download of a new parameter set. The
activity bar will light every time the computer is requesting or sending
data to the ASI-IP-GTW. Under normal operation, the activity bar shall
twinkle regularly.
Main menus: The WEB-based user interface of the ASI-IP-GTW consists
of the following main pages: Status, Device Info, IP TX/IP RX, Network
and Save/Load. Some of the main pages have a number of sub-pages.
The following table gives an overview of the different pages.

ASI-IP-GTW User's Manual
Page 27
To select a page, just click on the tab of the page you want to view.
Main tab (page) Sub-tab Description
Current alarms The current status of the unit is shown. The page
shows pending alarms together with information
about when the alarm appeared and the severity level
of the alarm.
Status
Alarm log The alarm log shows past alarms. Current alarms are
not shown on alarm log.
This gives information about the serial number and
software version of the unit. In addition, the user can
assign a name to the unit. The user can also change
the operation mode (IP Transmit , IP Receive or both)
or manually reset the device from this page.
Network This is where IP address, subnet mask and default
gateway is defined for management interface and
data interface. In addition, for the data interfaces, the
Advanced tab provides configuration of in-band
management. The SFP tab provides information
about the SFP.
Time settings Set SNTP server address. Current time is shown if
valid SNTP server is already defined.
Device Info
Alarms Provides a list of all alarms and configuration of
severity level for the alarm events.
SNMP Set Trap Destination Servers.
Ping A page offering an interface to check for connectivity
by pinging a remote host.
Security Enable or disable password protection, and change
password.
RIP-2 Show status, and change parameters for the Routing
Information Protocol
This is where each input is configured
Main This is where the main parameters of each input are
configured. In addition, status of each stream is
shown.
FEC This is where the FEC parameters are configured.
IP TX
Ethernet This is where VLAN tagging, and Static MAC is
configured.
Ping This is where Ping parameters for the IP channel is
configured.
IP RX This is where the outputs are configured.
Main This is where the main parameters of the outputs are
configured.
FEC This is where the FEC parameters are configured.
Ethernet This is where VLAN tagging, and Static MAC is
configured.
Ping This is where Ping parameters for the IP channel is
configured.
Advanced Advanced parameters related to buffer regulator.
Network Overview of IP addresses UDP ports and bitrates.
Save/Load Save and load of configurations.

ASI-IP-GTW User's Manual
Page 28
In order to activate a change in a parameter, you need to click the
Apply button. The refresh button, will read back all parameters on the
page from the unit.
3.4 Status
Figure 7 shows the overall status of the unit. This view shows a unit in
IP receive mode. In this view a block diagram of the unit with ASI
outputs and IP port is shown. The unit name and the mode are
illustrated.
Only licensed ASI ports are shown in the diagram. Each port is
represented by an arrow indicating its direction, and the arrow is
coloured depending on the status of the port: red on alarm, yellow on
warning, green when OK and grey when the input is disabled from
software. Each ASI port arrow is clickable, linking to the parameter sets
for that port. The IP port arrow links to the Network page.
The small circle in the body of the diagram shows the highest alarm
level for internal alarms, i.e. alarms that are not associated with an
input or an output port.
The lower part of the page shows a current alarm table. Each line is
associated with a current alarm condition. The line is coloured with the
severity of the alarm; red when critical alarm and yellow for warning.
The current alarm table contains the following information:
Time: The time when the alarm appeared.
Severity: The severity level of the alarm event. This can be Critical or
Warning.
Text: This gives a description of the alarm condition.
Source: This parameter describes which module as created the alarm.
Alarm ID: Each alarm condition has an alarm ID associated. This is a
number. A detailed overview of the alarm conditions is given in section
5.2.6.
ASI-IP-GTW User's Manual
Page 29
3.5 Device Info
Figure 8 shows the Device Info page.
Figure 8. The device info page
The upper part of the Device Info page contains product information.
This includes the following parameters:
Name: The name of the unit configured by the user.
Product type: ASI-IP-GTW
Serial number: A number which uniquely identifies the unit.
Software version: The version number of the software running on the
unit.
Software build time: The time and date when the software was
compiled.
Internal temperature: The internal temperature of the unit shown in
degrees Celsius and Fahrenheit.
Flash Power LED: When this button is pressed, the power LEDs on rear
and front of unit will flash for a short period. This functionality can be
used to identify a unit in a rack.
Mode of Operation: Select ‘ASI --> IP’ for IP transmit mode. In this
mode the ASI connectors operate as inputs, and the MPEG2 transport
streams on these can be transmitted on the Ethernet port.
Select ‘ASI <-- IP’ for IP receive mode. In this mode, the ASI connectors
operate as outputs, and transport streams can be mapped from the
Ethernet port to the ASI outputs.

ASI-IP-GTW User's Manual
Page 30
When the bi-directional feature is enabled, a third option ‘ASI <--> IP’ is
available to operate half of the ASI connectors as inputs and the other
half as outputs.
Note that a mode switch requires a device re-boot, this is done
automatically when pressing OK in the confirmation window that is
displayed when a new mode is selected.
Reset device: Press this button to perform a soft reset of the device. An
alert is displayed, with an option to cancel, before the reset message is
sent to the box.
On the lower part of the Device info page, three sub-pages are available:
Network, Time settings and Alarms.
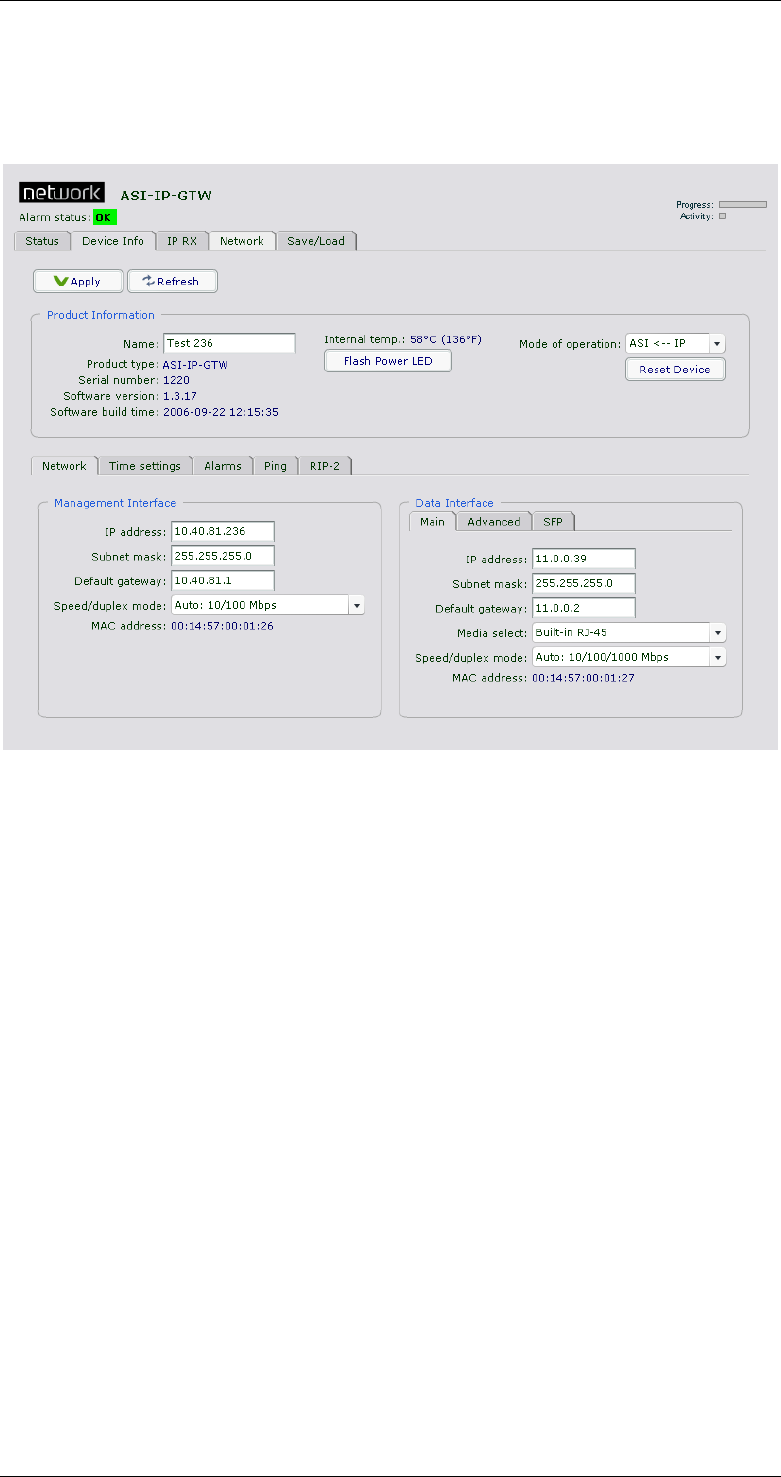
3.5.1 Network
On Network sub-page the management interface and the Ethernet data
interface is configured. For each of the interfaces the following
information is configured:
1.1.1.20 Main
IP address: The IP address entered as four decimal triplets separated
by decimal points (full stop/period) e.g. 10.40.81.120.
Sub mask: The subnet mask entered as four decimal triplets separated
by decimal points (full stop/period) e.g. 255.255.255.0.
Default gateway: The IP address of the default gateway entered as four
decimal triplets separated by decimal points (full stop/period) e.g.
255.255.255.0.
Speed/duplex mode: The speed and mode of the management
interface: Auto 10/100Mbps, Auto 10Mbps, Fixed 100Mbps-full duplex,
Fixed 10Mbps-full duplex, Fixed 100Mbps-half duplex and Fixed
10Mbps-half duplex.
Remark that switching to a mode that is not compatible with the peer
side may cause you to loose connection with the device. Remark also
that in the fixed modes, the auto straight-through or crossover cable
detection is disabled, so you have to use the right type of cable.
MAC address: The MAC address is displayed.
For the Data interface the following is also possible to configure the
following on the main tab:
Media select: This field is only shown if the unit is equipped with an
optional SFP slot. Select "Built-in RJ-45" to use the data port marked
Data for data traffic. Select "SFP" to use the SFP module for data traffic.
Speed/duplex mode: The speed of the data interface: Auto
10/100/1000Mbps, Auto 10/100Mbps, Auto 10Mbps, Fixed 1000Mbps
-full duplex, Fixed 100Mbps-full duplex, Fixed 10Mbps-full duplex,
Fixed 100Mbps-half duplex and Fixed 10Mbps-half duplex.
Furthermore the same remarks apply as for the management port.
ASI-IP-GTW User's Manual
Page 31
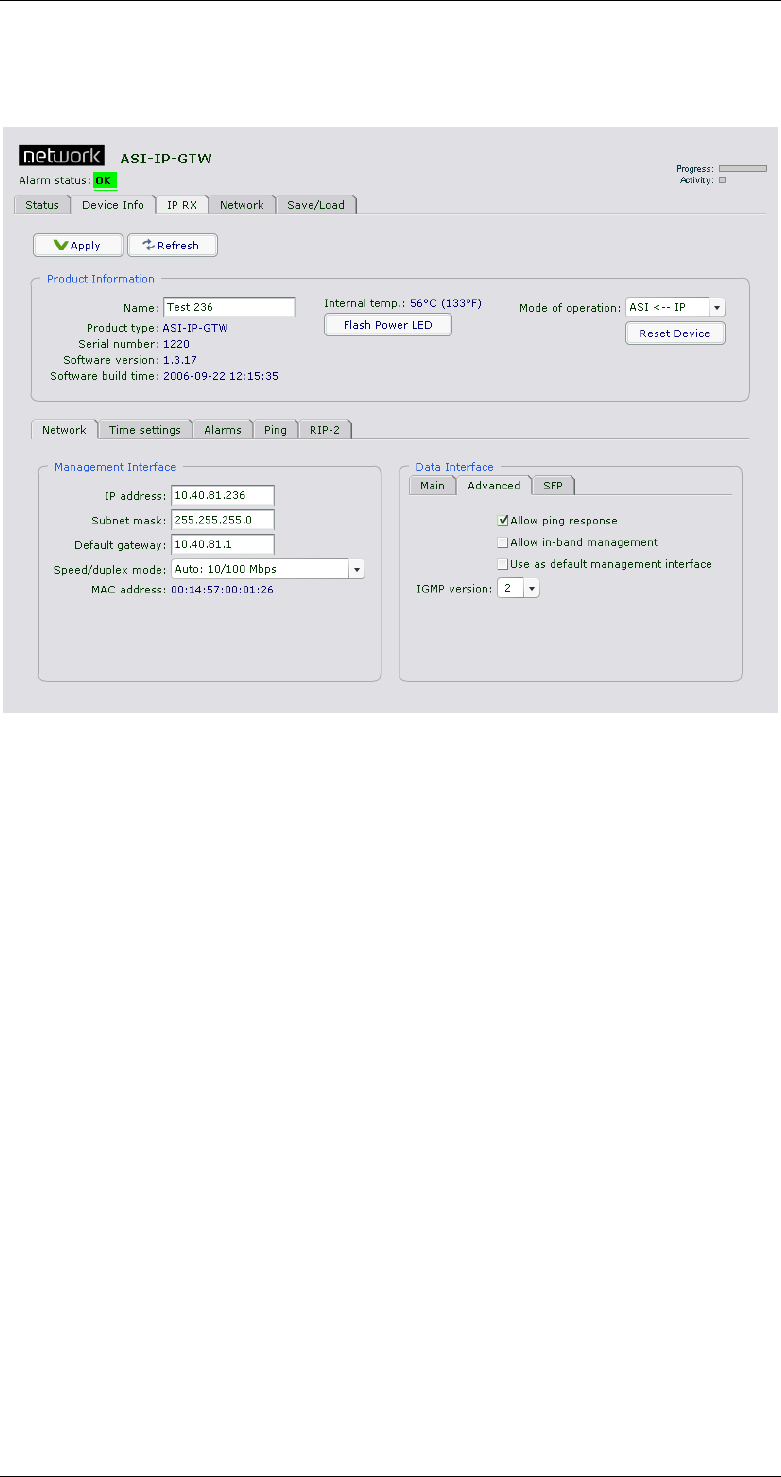
1.1.1.21 Advanced
The advanced sub-tab of the Data interface allows configuration of in-
band management.
Figure 9. The device info, network and advanced sub-page
Allow ping response: Tick this box to filter incoming ICMP messages. If
this option is not enabled, the device will not answer to ping requests
on the data port.
Allow in-band management: Tick this box to allow management traffic
on the data port.
Use as default management interface: Tick this box to use the data
port as the default management interface. Enabling this option will
force management traffic to IP addresses not matching either of the
sub-nets of the two interfaces, to the data interface. Note that this
means you will only be able to reach the device through the
management interface if you are located at its sub-net.
Multicast router: The IP address of the multicast router. The address
here is used in conjunction with the “use multicast router” option on
the IP TX page. (see chapter 3.6.1). This parameter is only showed on
units configured for IP transmission.
IGMP version: The default IGMP version to use. This parameter is only
showed on units configured for IP reception. There is limited support
for IGMP version 2 and 3. IGMP version 3 is limited to INCLUDE mode,
one source only per channel, with no automatic fallback to IGMP
version 2.
1.1.1.22 SFP
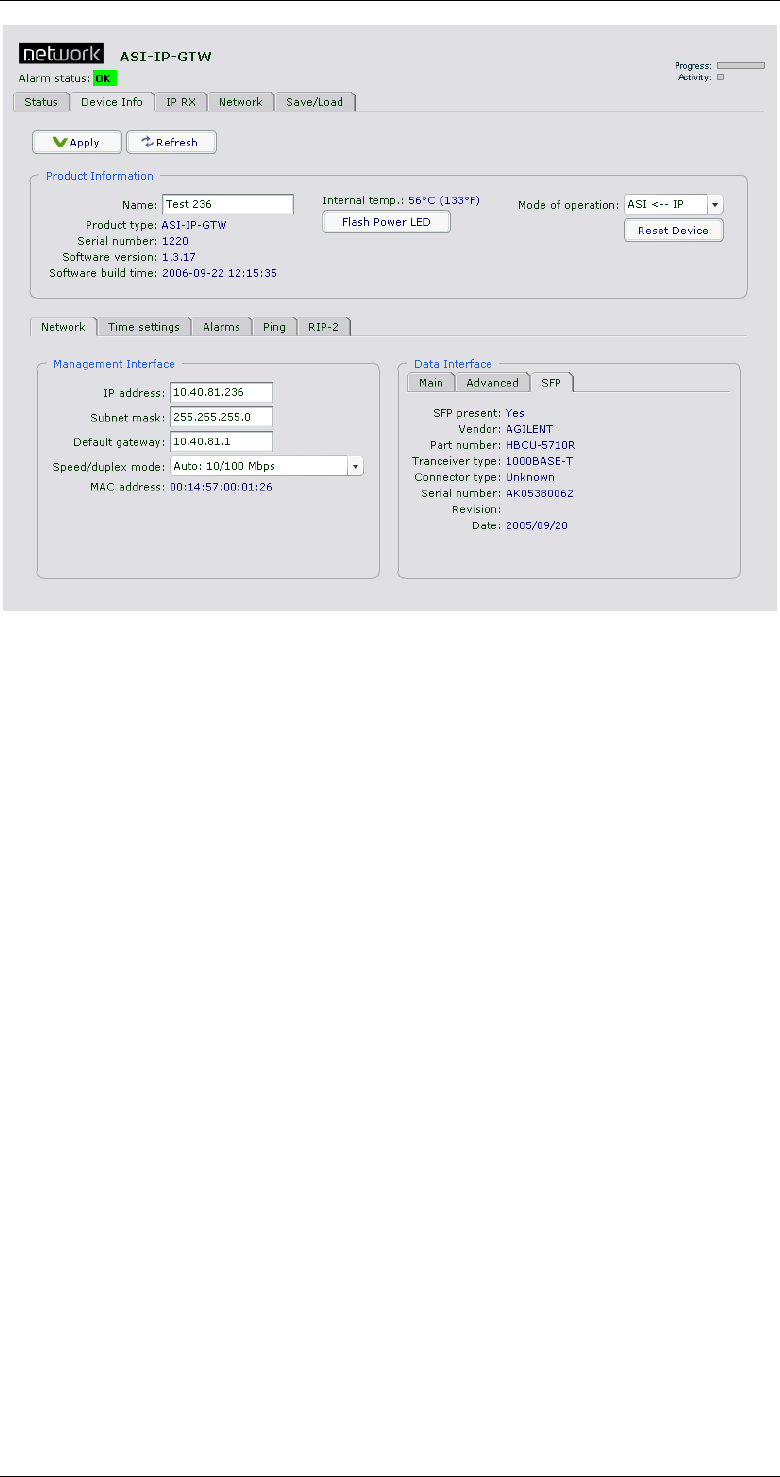
ASI-IP-GTW User's Manual
Page 32
Figure 10. The device info page, Network and SFP sub-page
This sub-page is only shown if the unit is equipped with an SFP slot.
The page displays information provided by the SFP module installed.
ASI-IP-GTW User's Manual
Page 33
3.5.2 Time settings
Figure 11 shows the sub-page for time setting used for alarm reports.
Figure 11. Time setting sub-page
Current time: This shows the current time used by the unit. The time
is displayed in local time with an indication of the local time zone
relative to UTC.
Time zone: Here it is possible to configure the local time zone to
operate in. The time zone is specified in hours offset to UTC. All time
stamps in the GUI are displayed in local time. If you switch time zone
during operation, the alarm log entries will also be updated to reflect
the new time zone. The alarm log export option prints the time zone at
the time of the export at the top of the log.
Clock source: Select the synchronizing source for the device real time
clock. The options are SNTP and Internal. In SNTP mode the clock is
retrieved from a specified server, in Internal mode the clock is
maintained locally by the device. Remark that the clock value is not
kept after a reboot when running in Internal mode. To synchronize the
alarm logs on several devices it is recommended to use a SNTP server.
SNTP server address: The IP address of the SNTP server entered as
four decimal triplets separated by decimal points (full stop/period) e.g.
10.40.81.10. An example on a SNTP server is the Windows Time Service
built into the MS Windows operating system. The SNTP protocol runs
on UDP port 123, which must be let through in eventual firewalls.
ASI-IP-GTW User's Manual
Page 34
Manual Update: Enter the wanted date and time and press this button
to set the clock manually. Remark that if you are running in SNTP
mode and the device receives answers from the time server, the time
value will be overwritten. The manual update button only updates the
clock value, to configure time zone, clock source and SNTP server
address you have to press the Apply button at the main tool bar.
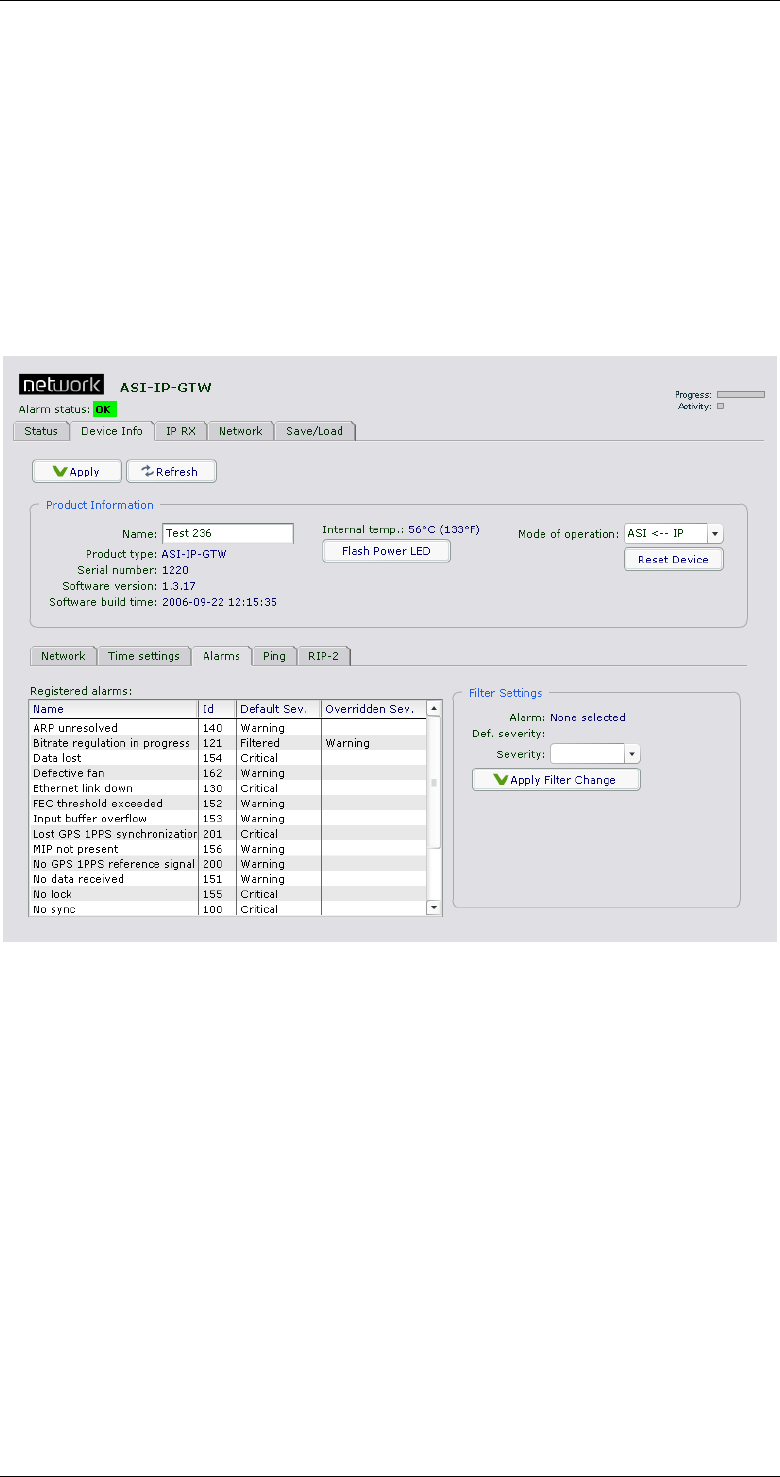
3.5.3 Alarms
The alarm page contains a list of all alarm events that can be displayed
by the unit.
Figure 12. Alarm sub-page
In order to change the severity level of an alarm event, select the alarm
event in the left table and the selected event will appear in the "Filter
Settings" frame. Select the severity level (Filtered, Warning or Critical)
from the list and press "Apply Filter Change" to change the severity
level. The severity level is reflected in the user interface and in the
SNMP traps sent by the unit.
The default severity level is shown in the "Default sev." column and the
current severity level if different from default is shown in the
"Overridden sev." column.
3.5.4 SNMP
The SNMP page allows configuration of the SNMP Trap Servers that the
unit should send SNMP traps to.

ASI-IP-GTW User's Manual
Page 35
Figure 13 SNMP tab
Trap Destination Servers: A list containing the IP-addresses of all the
current receivers of SNMP trap messages.
Add Trap Server: Clicking this button adds the IP-address from the
neighbouring IP input field to the list of trap servers. If you haven’t
entered an address or if the IP-address is already in the list you will get
an error message.
Delete Trap Server: This button is only enabled if you have selected a
trap server in the “Trap Destination Servers” list. Clicking the button
deletes the currently selected server from the list. A confirmation dialog
will appear to make sure you really want to delete it. Clicking ok will
confirm the deletion.
ASI-IP-GTW User's Manual
Page 36
3.5.5 Ping
The ping page can be used to check for connectivity between devices. It
is especially useful to ping the receiving data port from the IP
transmitter to see if the receiver can be reached. Figure 14 shows the
Ping page with its parameters.
Figure 14 Ping tab
IP destination: Enter the IP address to check for contact here. The ping
messages will be routed to the matching Ethernet port, either data or
management, or to the port configured as default management
interface if the specified IP address does not match either of the two
sub-nets. Remark that if you are pinging between data interfaces, the
‘allow ping response’ option on the network page advanced tab (see ch
3.5.1) must be enabled on both the transmitter and the receiver.
TTL (Time to live): Enter the Time to Live value for the ping messages
here. The time to live value is a field in the IP protocol header that is
decremented once for each router that the diagram passes. When the
count reaches 0, the diagram is discarded. You can use this to check
the number of routers from the transmitter to the receiver by starting
with a low value and increment it until answers are received. TTL is
also specified for each data channel on the IP transmitter, and must be
high enough to reach the receiver. Values range from 1 to 255.
Ping count: The number of messages to send. The messages are
transmitted with an interval of about 1 second.
Start: Press this button to start the ping sequence configured above.
The status of the ping sequence is displayed in the status frame at the
right side. Status values are reset on pressing the start button. After

ASI-IP-GTW User's Manual
Page 37
pressing the start button the label switches to Stop, and the button can
be pressed again to cancel the ping sequence.
OK responses: The number of successful answers received.
Timeouts: The number of ping requests that were not answered. If the
timeout counter is incrementing while the OK responses counter is
zero, there is no contact with the specified IP address.
Last: The round trip time measured for the last request in units of
milliseconds.
Average: The average round trip time measured for the ping requests
in this session. Value is reset every time the start button is pressed.
Min: The fastest round trip time registered for the ping requests in this
session.
Max: The slowest round trip time measured for the ping requests in
this session.
Remaining: The number of remaining ping requests in this session.
ASI-IP-GTW User's Manual
Page 38
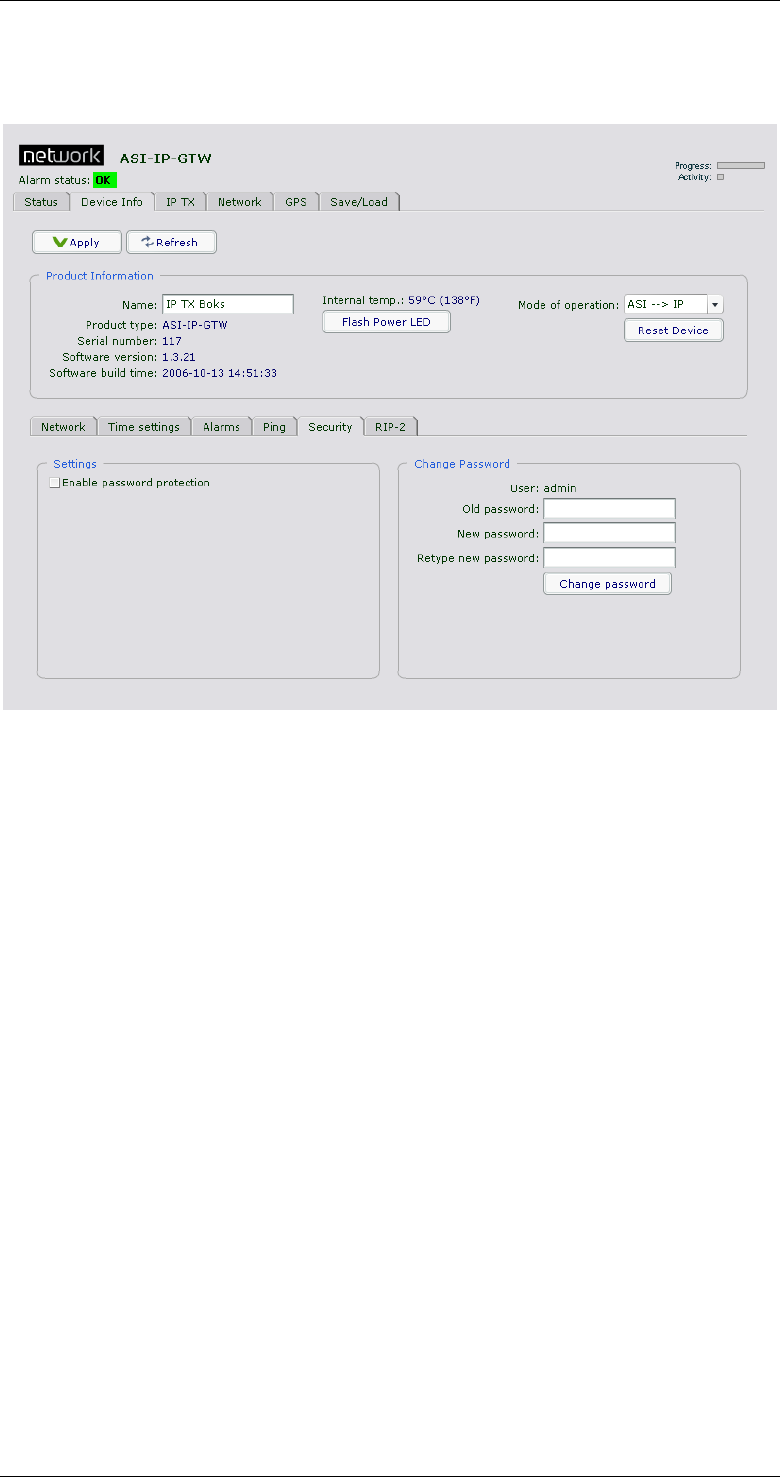
3.5.6 Security
Figure 11 shows the sub-page for user security (password protection).
Figure 15. Time setting sub-page
Enable Password Protection: Mark this to enable password protection.
If password is not set, it will use the factory default password.
Factory default:
Administrator login: admin
Password: salvador
Old Password: To be able to set a new password, the user must know
the old password.
New Password: Type the new password. Allowed length is 0 to 20
characters.
Retype New Password: Retype the new password as a security
measure.
Change Password: Click this button to activate the new password.
Note: If you forget the password that has been configured, you will
need to log on to the unit through the RS232 port. When you are logged
on, type “userdb factory_defaults”. This will reset the password to the
factory defaults detailed above.
ASI-IP-GTW User's Manual
Page 39
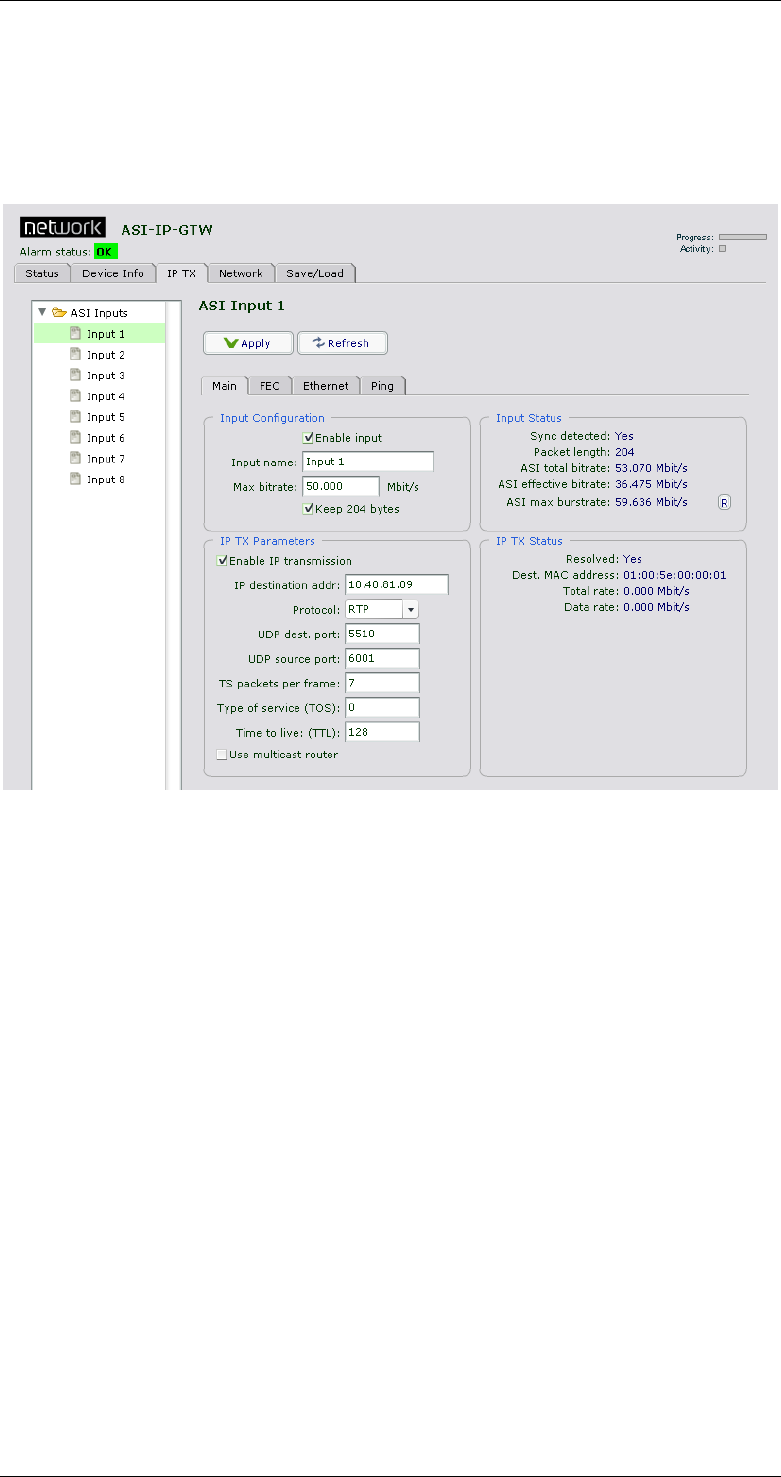
3.6 IP TX
Figure 16 shows the IP TX page. The purpose of this page is to provide
an interface for configuring the different streams to be sent through the
unit.
Figure 16. IP TX page
The left part of screen shows a three containing all the DVB ASI input
ports. To select a port, click that port. The information to the right of
the page shows the IP transmission parameters for the selected port.
3.6.1 Main
The IP TX main sub-page is where you configure most of the
parameters related to a stream to transmit over the IP network.
1.1.1.23 Input Configuration
Enable input: Tick this box to enable an input. If this is not ticked, you
will not receive any MPEG-2 transport stream on this ASI input. The
input port will be grey in the status view (See Section 3.4.)
Input name: Enter a name reference to an ASI input stream.
Max bitrate: Enter the maximum bitrate the ASI input stream is
allowed to use. If the ASI input stream exceeds this bitrate, some data
in this stream is discarded to keep its bitrate lower than the maximum
bitrate setting. This prevents, when set correctly, one ASI stream from
maxing out the IP channel, and thus disrupting all streams present on
the IP channel. The sum of ‘Max bitrate’ for all active channels should
not exceed the IP channel bandwidth.

ASI-IP-GTW User's Manual
Page 40
Keep 204 bytes: Tick this box to transparently transmit all 204 bytes
of the incoming ASI transport stream, if present. When only 188 byte
packets are received or the box is unchecked, only 188 bytes of each
transport stream packet is transmitted.
1.1.1.24 Input Status
Sync detected: Yes if the unit is receiving a valid DVB ASI stream on
the ASI input interface. No if no DVB ASI stream is received.
Packet length: Shows the packet length of the MPEG2 transport
stream packets received (188 or 204 bytes).
ASI total rate: Shows the bitrate of the MPEG2 transport stream on the
input including NULL packets.
ASI effective rate: Shows the effective bitrate of the MPEG2 transport
stream on the input i.e. bitrate excluding NULL packets.
1.1.1.25 IP TX Parameters
Enable IP transmission: Click this box to enable the MPEG-2 transport
stream on the DVB ASI input to be sent through the IP network.
Protocol: Select UDP or RTP transmission mode. See 5.3.1 for more
information on this
IP destination addr: Enter the destination IP address to use when
transmitting data on the stream. The address may be either a unicast
address or a multicast address.
UDP dest. port: Enter the UDP destination port to use when
transmitting data on the stream. The UDP destination port is used by
the receiver to separate one stream from another. UDP port numbers
are in the range 1-65535.
Warning: Please ensure that there is no conflict in UDP ports in use.
Pay special attention to the fact that FEC data are always sent on UDP
port two higher than the media port and four higher than the media
port, e.g., if UDP destination port is 5510, column FEC UDP port is
5512 and row FEC UDP port is 5514.
UDP source port: Enter the UDP source port to be used in the outgoing
UDP frames for the current stream. UDP port numbers are in the range
1-65535. (Note that the ASI-IP-GTW receiver unit does not check this
parameter when receiving streams)
FEC streams are transmitted with the same UDP source port as the
media frames.
TS packets per frame: Enter the number of 188 byte MPEG-2 transport
stream packets to map into each UDP frame. Valid values are between
1 and 7. We generally recommend using 7 when ASI-IP-GTW is used
both at the sender and the receiver to reduce overhead. For very low
bitrate streams, less than 7 packets per frame may be used to reduce
the delay through the unit.

ASI-IP-GTW User's Manual
Page 41
Type of service (TOS): Enter Type of Service parameter as a byte value
to be set in the Type-of-Service (TOS) field in the IP header as specified
in RFC-791. This parameter is used for Class-of-Service prioritization.
It depends on the Routers honouring this field. Please refer to
“Appendix F: Quality of service – Setting Packet priority” for further
details.
Time to Live (TTL): Enter Time to Live parameter as a byte value to be
set in the Time to Live (TTL) field in the IP header as specified in RFC-
791.
Use multicast router: Click this box, to enable use of multicast router.
The address of the multicast router is the same for the entire unit and
is configured in the Network sub-page of the Device Info page. When
this option is enabled, the MAC address used when configuring a
multicast destination IP address, will be resolved to the IP address of
the multicast router. If not using the multicast router option, multicast
addresses automatically resolve to dedicated multicast MAC addresses.
1.1.1.26 IP TX Status
Resolved: Yes, when the MAC address of the configured IP destination
address is resolved. The parameter is always yes, when multicast is
used without using multicast router. No, when the MAC address is not
yet resolved by ARP lookup.
Destination MAC address: Shows the destination MAC address used for
the stream. This may be the MAC address of the receiving unit or the
gateway if the receiving unit is on another network).
If using a multicast destination IP address without enabling multicast
router, the field shows the multicast MAC address corresponding to the
configured IP address. In the case of multicast router, the MAC
address resolved for the multicast router is shown.
When the address is still not resolved this field displays the value
00:00:00:00:00:00.
Total bitrate: The bitrate of the IP frames containing this MPEG-2
transport stream and any FEC data related to this stream.
Data bitrate: The bitrate of the IP frames containing this MPEG-2
transport stream, excluding FEC information.

ASI-IP-GTW User's Manual
Page 42
3.6.2 FEC Settings
Figure 17. IP TX FEC page
This sub-page will only appear if the unit is enabled with FEC.
FEC Mode: Select "No FEC" to not calculate and send any FEC data.
Select "Column only" to calculate and send one-dimensional FEC data.
Select "Column and Row" to calculate and send two-dimensional FEC
data.
Number of columns (L): Enter number of columns.
Number of rows (D): Enter number of rows.
Note: Please note that the maximum matrix size is 256 (L*D) and
that D is in the range 4 ≤ D ≤ 32. In column only mode L is in the
range 1 ≤ L ≤ 32, while in column and row mode 4 ≤ L ≤ 32. L+D can
not exceed 32.
Note: Please note that FEC column packets are transmitted on UDP
port n+2 and FEC row packets are transmitted on UDP port n+4
where n is the UDP port of the media data. This is in accordance
with Pro-MPEG CoP 3.
Skew: Controls whether to organize the column FEC with or without
skew. When enabling skew, the delay required on the receiver is less
than when transmitting straight columns.
FEC overhead: This number is the overhead in percent caused by the
current FEC configuration.

ASI-IP-GTW User's Manual
Page 43
Resulting total rate: This is the resulting total IP bitrate including FEC
overhead for this channel. The Status frame contains status
parameters related to the FEC setting.
Column UDP port: This parameter is the UDP port used for the column
FEC data. The value is always Media UDP port + 2 which is in
accordance with Pro-MPEG CoP 3.
Row UDP port: This parameter is the UDP port used for the row FEC
data. The value is always Media UDP port + 4 which is in accordance
with Pro-MPEG CoP 3.
Data rate: This parameter shows the IP data rate for this channel
excluding FEC data.
Column FEC rate: This parameter shows the IP data rate for the column
FEC data of this channel.
Row FEC rate: This parameter shows the IP data rate for the row FEC
data of this channel.
In order to make it possible to demonstrate the function of the FEC
engine, ASI-IP-GTW provides a mode to drop IP packets on the
transmitter.
Frame drop: Enter the percentage of packets to be dropped from this
channel. This value is not stored in the unit and must be entered after
each power on.
Frames dropped: This counter shows the number of frames discarded
at the output of the unit.
ASI-IP-GTW User's Manual
Page 44
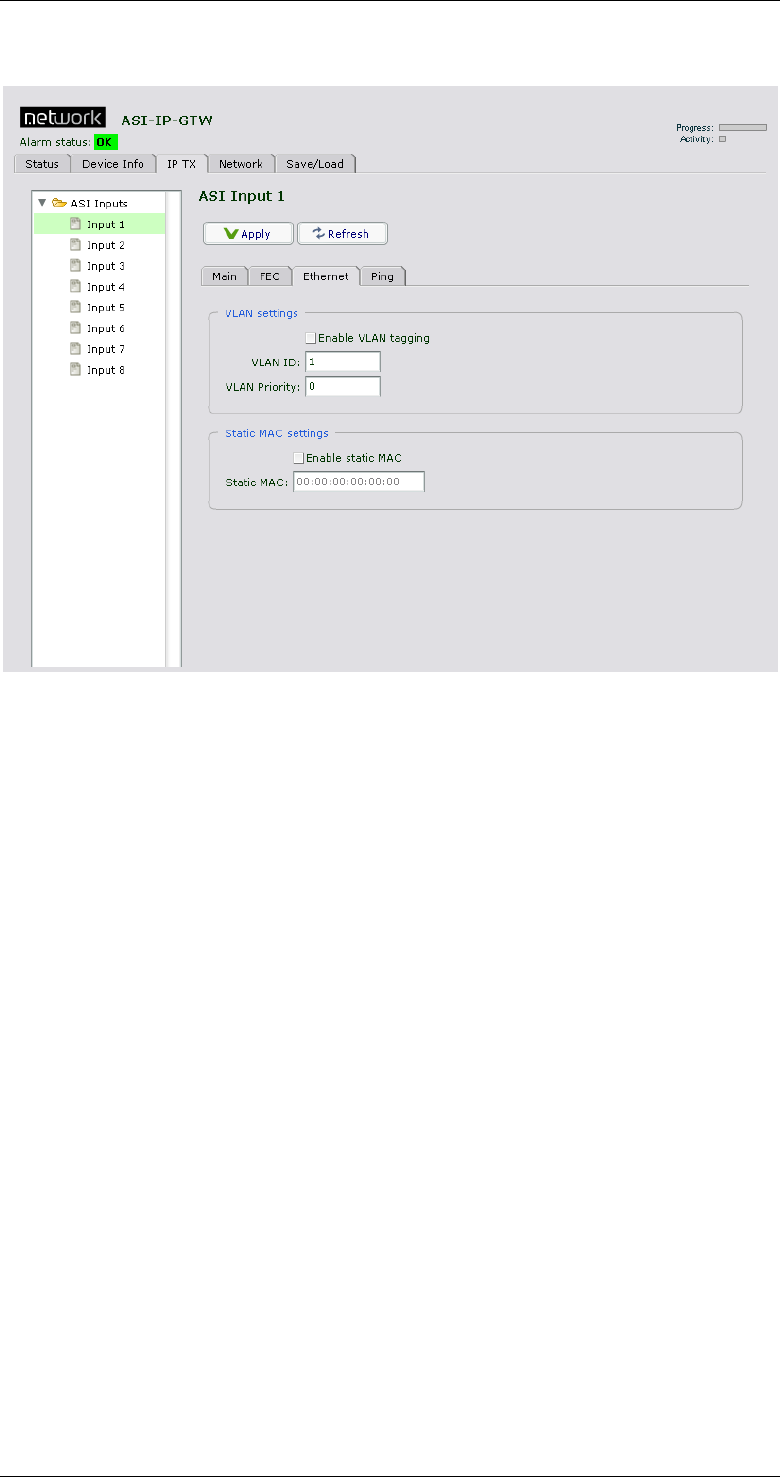
3.6.3 Ethernet Settings
Figure 18. The Ethernet page of an IP transmitter
3.6.3.1 VLAN settings
By enabling VLAN tagging, IEEE802.1Q VLAN tags will be added to the
outgoing streams. In effect, the video data Ethernet port will act as an
802.1Q VLAN trunk.
Enable VLAN tagging: Check this box to enable VLAN tagging.
VLAN ID: Enter VLAN ID in this field. This value shall be between 1 and
4094.
VLAN Priority: Enter VLAN priority in this field. This value shall be
between 0 and 7.
3.6.3.2 Static MAC setting
Static MAC destinations address is used to specify a fixed MAC
destination address in outgoing streams. This makes it possible to
transmit to a destination host over a one-way link. The static MAC
address setting then replaces the normal ARP lookup.
Enable static MAC: Check this box to enable insertion of the static MAC
address.
Static MAC: Enter the destination MAC address.
ASI-IP-GTW User's Manual
Page 45
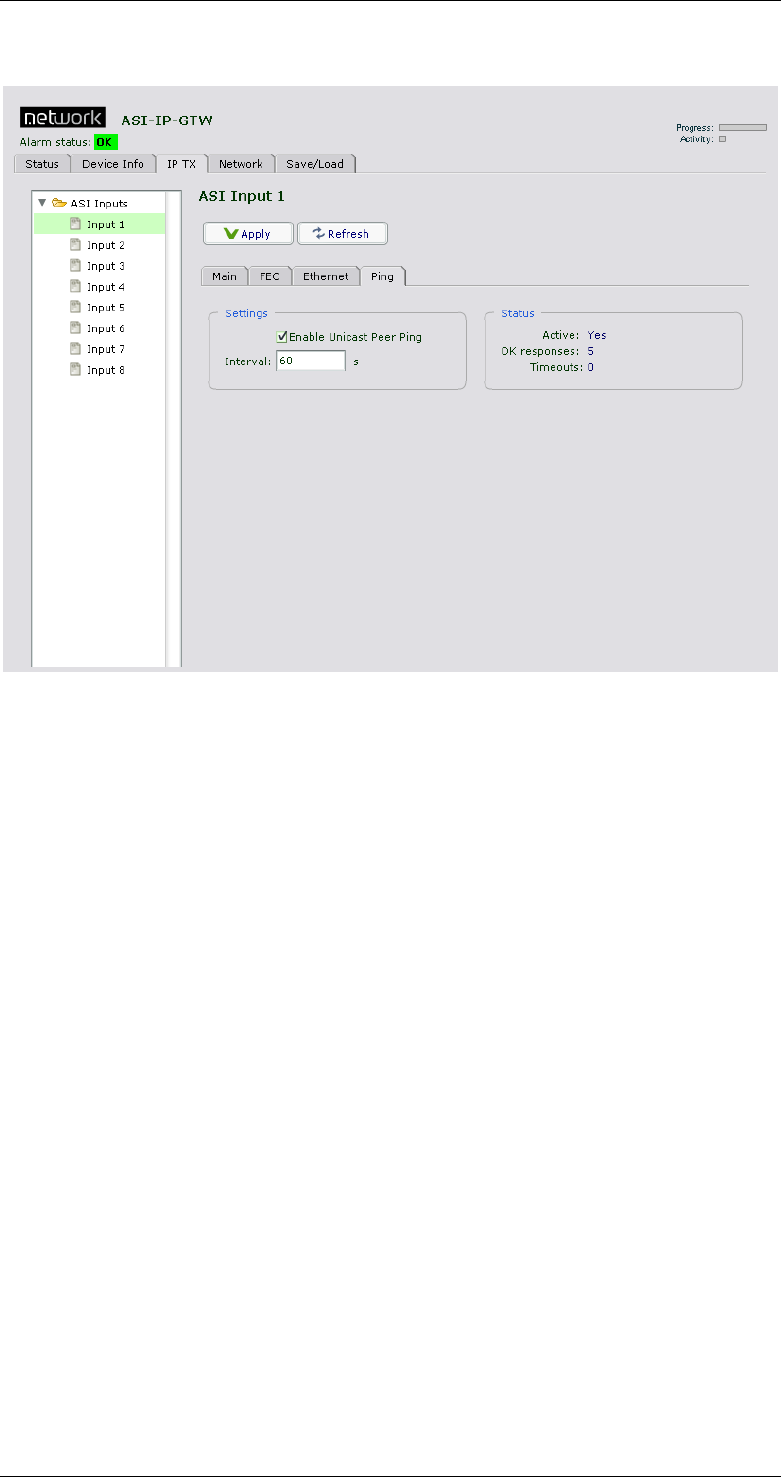
3.6.4 Ping Settings
Figure 19. The Ping page of an IP transmitter
To resolve network problems, avoiding flooding, were the receiver or
specific network components on the way to the receiver time out on
there MAC address lookup. This feature solves this by pushing through
a ping message regularly. This feature makes it also possible for the
sender to know if there is an active recipient, or if it is down at the
moment.
Enable Unicast Peer Ping: Check this box to enable regular pinging of
the peer, e.g. the receiver of the stream. This will only have effect in
unicast mode.
Interval: Set the interval in seconds between each Ping.
Active: Indicates if the channel is actively sending Ping.
OK responses: Indicates how many valid Ping responses have bean
received.
Timeouts: Indicates how many of the sent Ping messages timed out,
without receiving a valid response.
ASI-IP-GTW User's Manual
Page 46
3.7 IP RX
3.7.1 Main
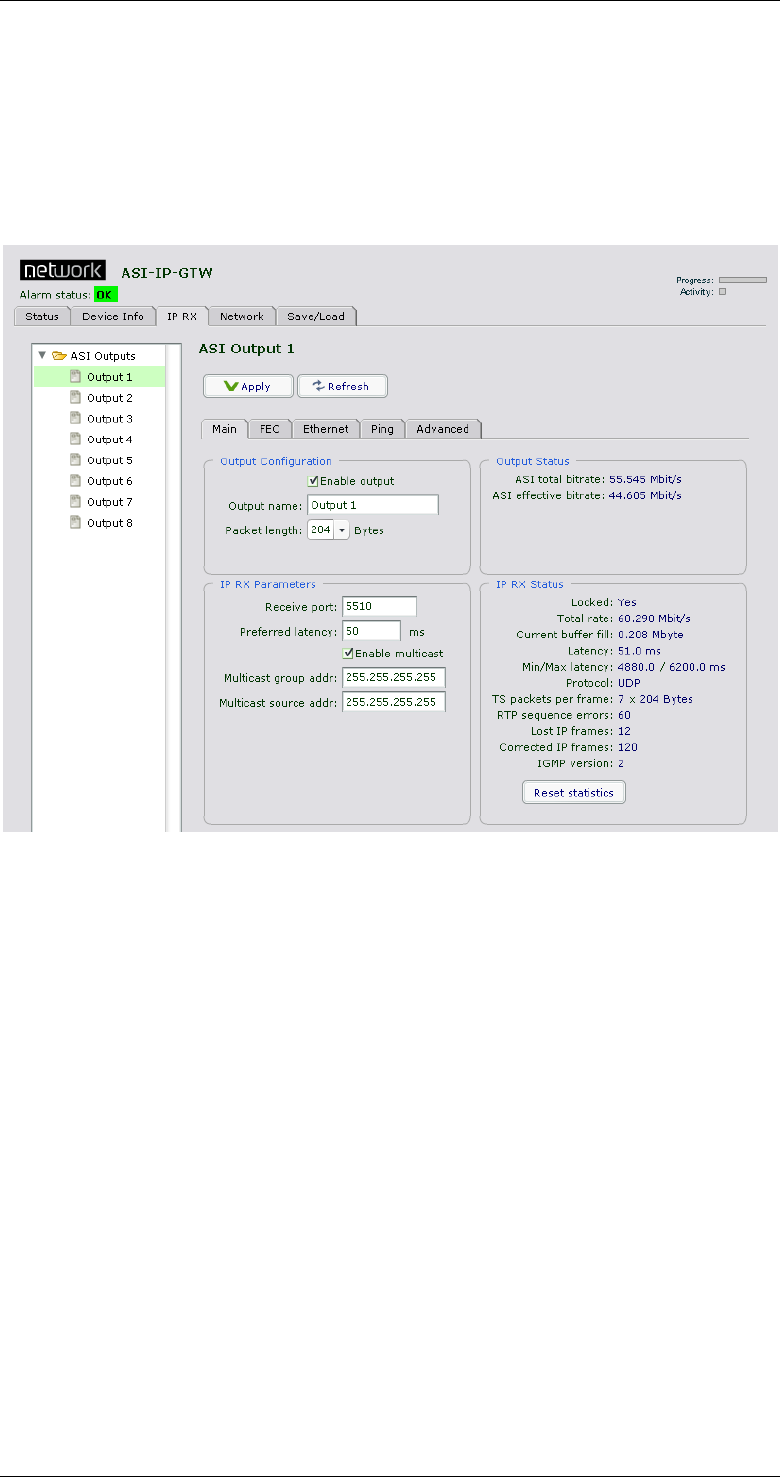
Figure 20 shows the IP RX page. The purpose of this page is to provide
an interface for configuring the different streams to be received by the
unit.
Figure 20. IP RX page
The left part of screen shows a three containing all the DVB ASI
outputs port. To select a port, click that port. The information to the
right of the page is related to the selected port.
1.1.1.27 Output Configuration
Enable output: Tick this box to enable an output. If this is not ticked,
you will not send any MPEG-2 transport stream on this ASI output.
The output port will be grey in the status view.
Packet length: This lets you configure the ASI output to transmit 188
or 204 byte transport stream packets. If incoming IP frames contain
204 byte MPEG-2 transport stream packets and the packet length is set
to 188, the last 16 bytes of the 204 byte packets will be discarded. If
incoming IP frames contain 188 byte MPEG-2 transport stream packets
and the packet length is set to 204, the last 16 bytes of the 204 byte
packets will contain the hexadecimal value FF.
Output name: Enter a name reference to an ASI output stream.
Copy of previous port: Every even numbered output includes this
option. Selecting this option makes the port output exactly the same as
the previous port, and no other IP RX options are used.

ASI-IP-GTW User's Manual
Page 47
1.1.1.28 Output Status
ASI total rate: This shows the bitrate of the MPEG-2 transport stream
on the output including NULL packets.
ASI effective rate: This shows the effective bitrate of the MPEG-2
transport stream on the output i.e. bitrate excluding NULL packets.
1.1.1.29 IP RX Parameters
Receive port: Enter the UDP port of this output. The UDP port together
with the IP address uniquely identifies the stream to receive. UDP port
numbers are in the range 1-65535. This field corresponds to the UDP
destination port field of the transmitter.
Preferred latency: Enter the latency in units of milliseconds. This
parameter is used together with the detected bitrate to set the size of
the receive buffer. The receive buffer is used to remove network jitter,
and to perform forward error correction.
Enable multicast: Click this box to use multicast.
Multicast group addr: This setting is only used when enable multicast
is selected. Enter the multicast IP address of the incoming stream.
When enabling multicast mode, the IGMP sub-module will be activated
to join the multicast group and respond to membership queries.
Multicast source addr: This setting is applicable when using IGMP
version 3 (see ch 3.5.1). The device will join a source specific multicast
group, informing the router that it is interested in receiving data from a
specific transmitter only.
1.1.1.30 IP RX Status
Lock: Yes, when the unit has locked to the input stream and has
correctly estimated the bitrate of the input stream. No, when the unit
has not been able to receive the input stream correctly.
Total rate: The total IP rate received on this channel.
Current buffer fill: Shows the number of megabytes currently in the
buffer.
Latency: This parameter reflects the network jitter the unit can handle
at the moment.
Min/Max Latency: This shows the minimum and maximum measured
latency since the last statistics reset.
TS packets per frame: The number of transport stream packets per IP
frame in the incoming stream.
RTP sequence errors: A counter showing the number of RTP sequence
errors caused by lost packets or out-of-order packets. A value of zero
indicates that all packets are received in order.
Lost IP frames: A counter showing the number of IP frames that is lost,
i.e. lost and not corrected by the unit.
Corrected IP frames: A counter showing the number of IP frames
corrected by the FEC engine.
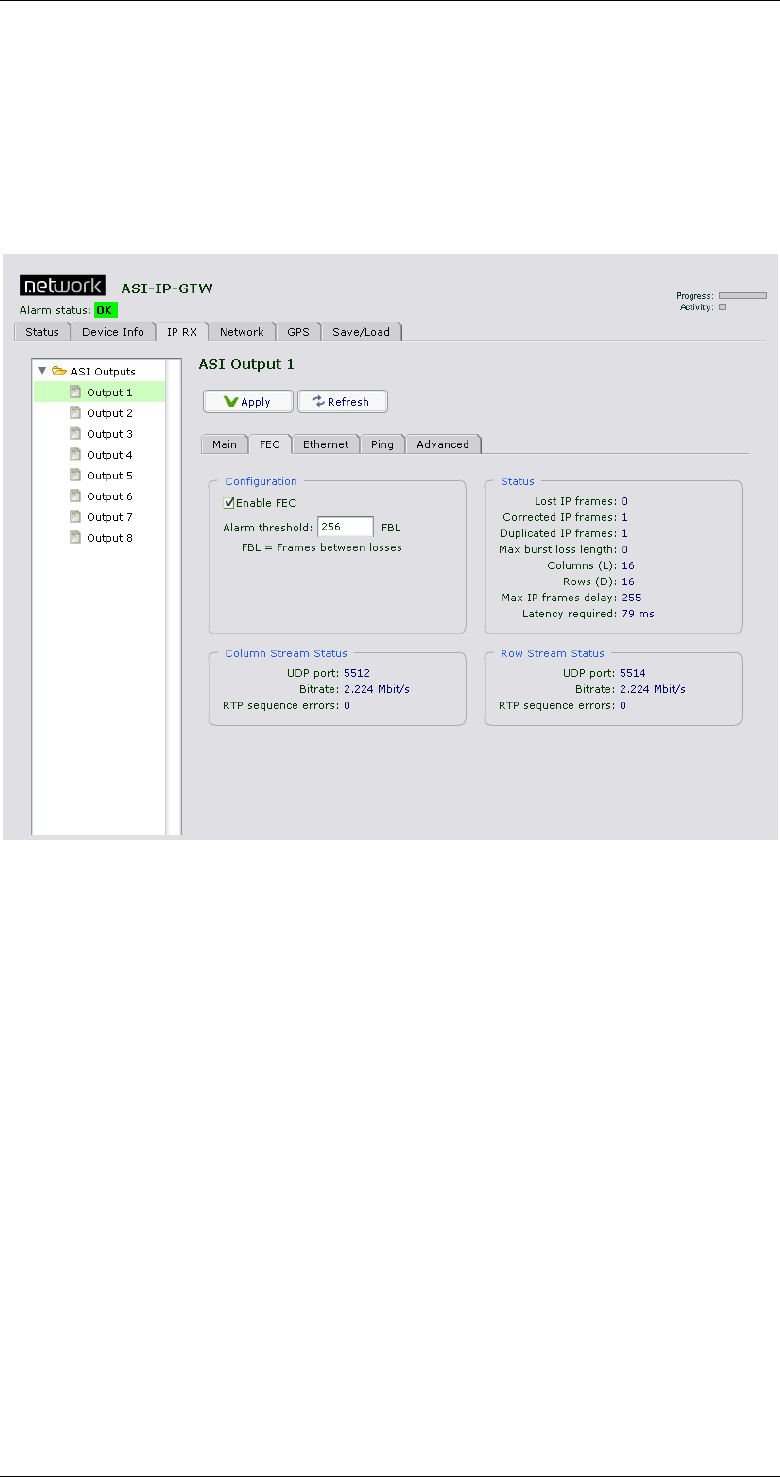
ASI-IP-GTW User's Manual
Page 48
IGMP version: Shows the IGMP version currently selected in the
”Device Info” page under “Network”, “Advanced” Settings.
Reset statistics: Press this button to reset the counters: RTP sequence
errors, Lost IP frames and Corrected IP frames.
3.7.2 FEC Settings
Figure 21. The FEC sub-page of an IP receiver
This sub-page will only appear if the unit is enabled with FEC.
Enable FEC: Tick this box to enable use of FEC.
Alarm threshold: This parameter controls the frequency of lost frames
that should cause activation of the ‘FEC Threshold Exceeded’ alarm.
The threshold is configured in the unit of frames between losses,
causing the alarm to be activated if the number of frames received
between two losses falls below the configured number.
In the Status frame the following parameters are shown:
Lost IP frames: This counter shows the number of lost IP frames. This
means packets which remain uncorrected.
Corrected IP frames: This counter shows the number of IP frames
corrected by the FEC engine.
Duplicated IP frames: This counter shows the number of duplicated IP
frames received.
Columns (L): This shows the number of columns in the incoming FEC
stream.
Rows (D): This shows the number of rows in the incoming FEC stream.

ASI-IP-GTW User's Manual
Page 49
Max frames delay: This field shows the maximum number of frames
delay measured for the FEC streams.
Latency required: This field is calculated from the ‘Max frames delay’
field and the current total bitrate to show the minimum delay needed
by the FEC engine to fully utilize the incoming FEC streams.
When the delay displayed in the ‘Latency’ field of the ‘IP RX Status’
sub-page falls below the value of ‘Latency required’ field, the FEC
engine may not be able to recover all lost frames that could have been
corrected with a larger buffer.
For Column and Row the following status parameters are shown:
UDP port: The UDP port of the stream.
Bitrate: The bitrate of the incoming FEC stream.
RTP sequence error: This counter shows the RTP sequence errors in
the incoming stream caused by lost IP frames or out-of-order packets.
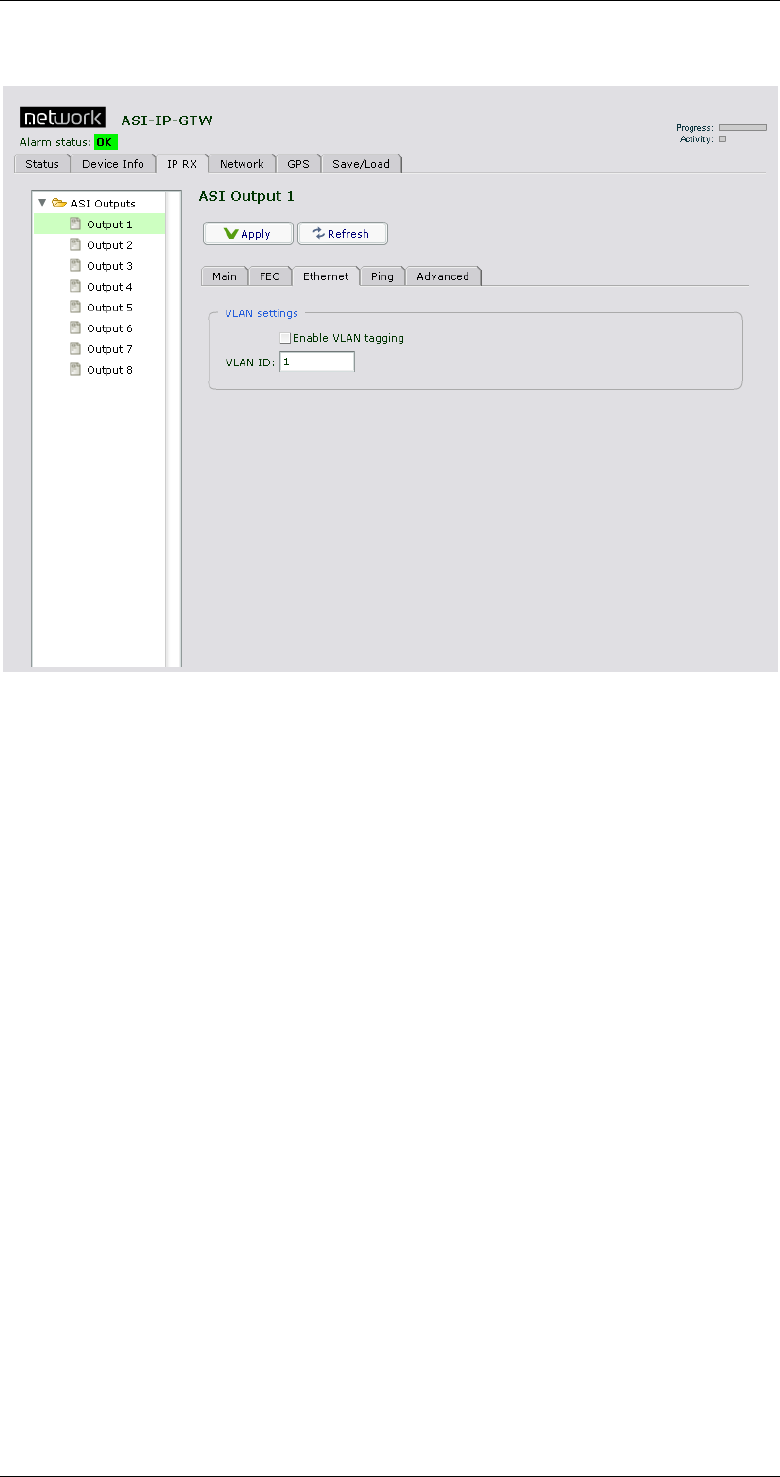
ASI-IP-GTW User's Manual
Page 50
3.7.3 Ethernet Settings
Figure 22. The Ethernet sub-page of an IP receiver
3.7.3.1 VLAN settings
Enable VLAN tagging: Check this box to enable VLAN tagging.
VLAN ID: Enter VLAN ID in this field. This value shall be between 1 and
4094.
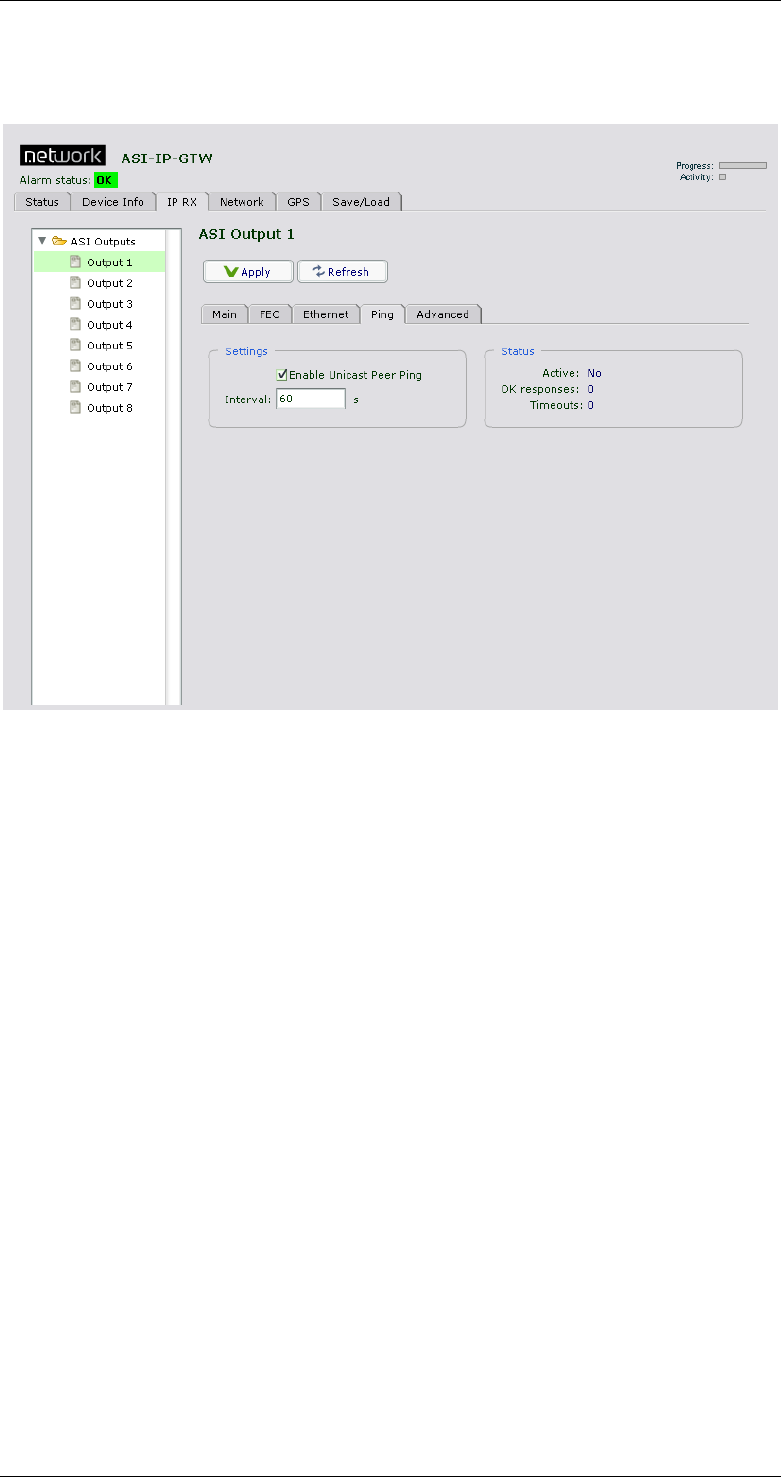
ASI-IP-GTW User's Manual
Page 51
3.7.4 Ping Settings
Figure 23. The Ping page of an IP receiver
To resolve network problems, avoiding flooding, were the transmitter or
specific network components on the way to the receiver time out on
there MAC address lookup. This feature solves this by pushing through
a ping message regularly. This feature makes it also possible for the
receiver to know if there is an active sender, or if it is down at the
moment.
Enable Unicast Peer Ping: Check this box to enable Unicast Peer Ping.
This enables regular pinging of the transmitting device.
Interval: Set the interval in seconds between each Ping.
Active: Indicates if the channel is actively sending Ping requests.
OK responses: Indicates how many valid Ping responses have bean
received.
Timeouts: Indicates how many of the sent Ping messages timed out,
without receiving a valid response.
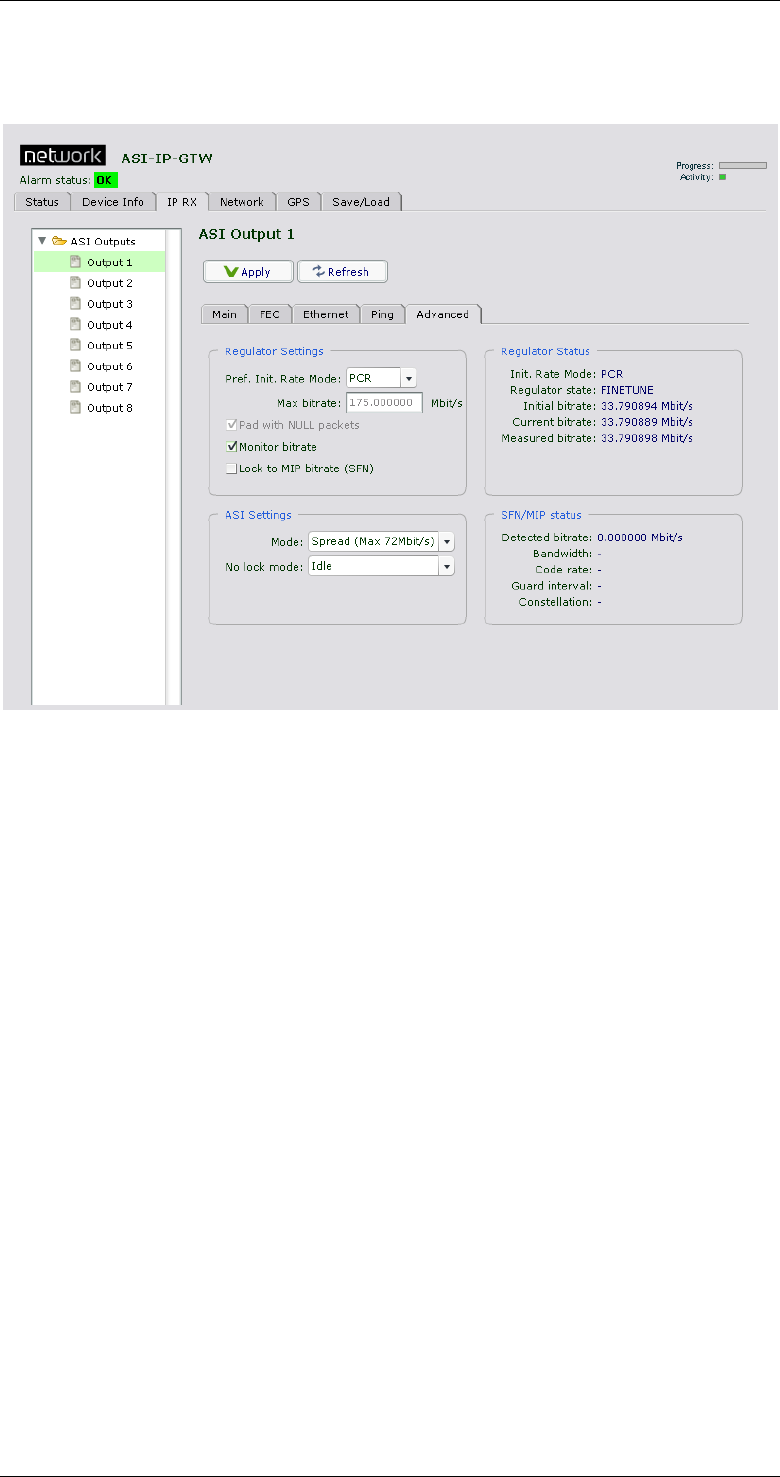
ASI-IP-GTW User's Manual
Page 52
3.7.5 Advanced Tab
Figure 24 Advanced Tab
On the advanced tab it is possible to control and inspect the status of
the buffer regulator for a port.
Pref. Init. Rate Mode: This parameter is used to select the preferred
algorithm to use to find an initial bitrate for a received data stream.
o PCR: The default mode is ‘PCR’, in which a number of consecutive
TS packets on the first PCR PID encountered are used to calculate
the bitrate. If no PCR PID is found, COARSE mode is
automatically used.
o MIP: This mode may be used for signals that do not contain any
PCR PIDs, but do have a DVB MIP PID (PID 21) used in Single
Frequency Networks. In MIP mode, two consecutive MIP packets
are used to estimate the bitrate. If no MIP PID is found, COARSE
mode is automatically used.
o COARSE: In this mode, a simple 2 second measurement is used to
estimate the bitrate. This method is sensitive to network jitter and
does not give as good results as PCR and MIP mode.
o VBR: In this mode, the unit attempts to transmit data at the rate
entered in the Max bitrate input. If the incoming rate is lower than
this, the unit will either pad with idle bytes (resulting in a VBR
output stream) or with NULL packets, depending on whether the
“Pad with NULL packets” checkbox is checked. In this mode, no
PCR adjustment is performed.

ASI-IP-GTW User's Manual
Page 53
Max bitrate: : If VBR rate mode is chosen, this tells the unit what
bitrate it should attempt to transmit at.
Pad with NULL packets: Checking this means that the unit, when in
VBR rate mode, will pad the output stream with NULL packets up to
the entered max bitrate.
Monitor bitrate: Checking this box will make the unit resync faster in
the case of small bitrate changes.
Init. Rate Mode: This parameter shows the initial bitrate mode that
was used at last re-sync. If you have selected PCR mode, and this
parameter shows COARSE mode, the device has not been able to find a
valid PCR PID on the signal.
Regulator state: This parameter shows the current state of the buffer
regulator.
The possible states are Stopped, Rate Estimation, Coarse and Finetune.
When data is received and an initial bitrate estimate is found, the
regulator enters the “Rate Estimation” state, where the signal is
analyzed to check if a better estimation of the bitrate can be found.
When a better estimate is found, the regulator switches to coarse mode,
where the output bitrate is coarsely moved closer to the new rate. From
Coarse mode, the regulator enters Finetune mode.
Initial bitrate: Here the exact initial bitrate found is displayed.
Current bitrate: This parameter shows the exact bitrate played out on
the ASI port at the moment.
Measured bitrate: This parameter is an input to the regulator in the
Rate Estimation and Coarse phase, and shows the bitrate measured for
the datastream since last re-synch. In the first minutes after a re-
synch, this measurement is highly inaccurate and dependent on IP
network jitter. After a few minutes of operation the value gets more and
more accurate, and can be compared to the current bitrate to see how
far off the bitrate target the regulator is operating.
Mode: Here you can configure the unit to transmit ASI data using burst
or spread mode. Note that spread mode only works with bitrates up to
72Mbit/s. If you choose spread mode and a transmit a higher bitrate,
the signal will become a burst/spread hybrid.
No lock mode: This parameter lets you choose what the unit should
transmit on the ASI port when it has no lock. You can choose to send
idle bytes or turn the port completely off.
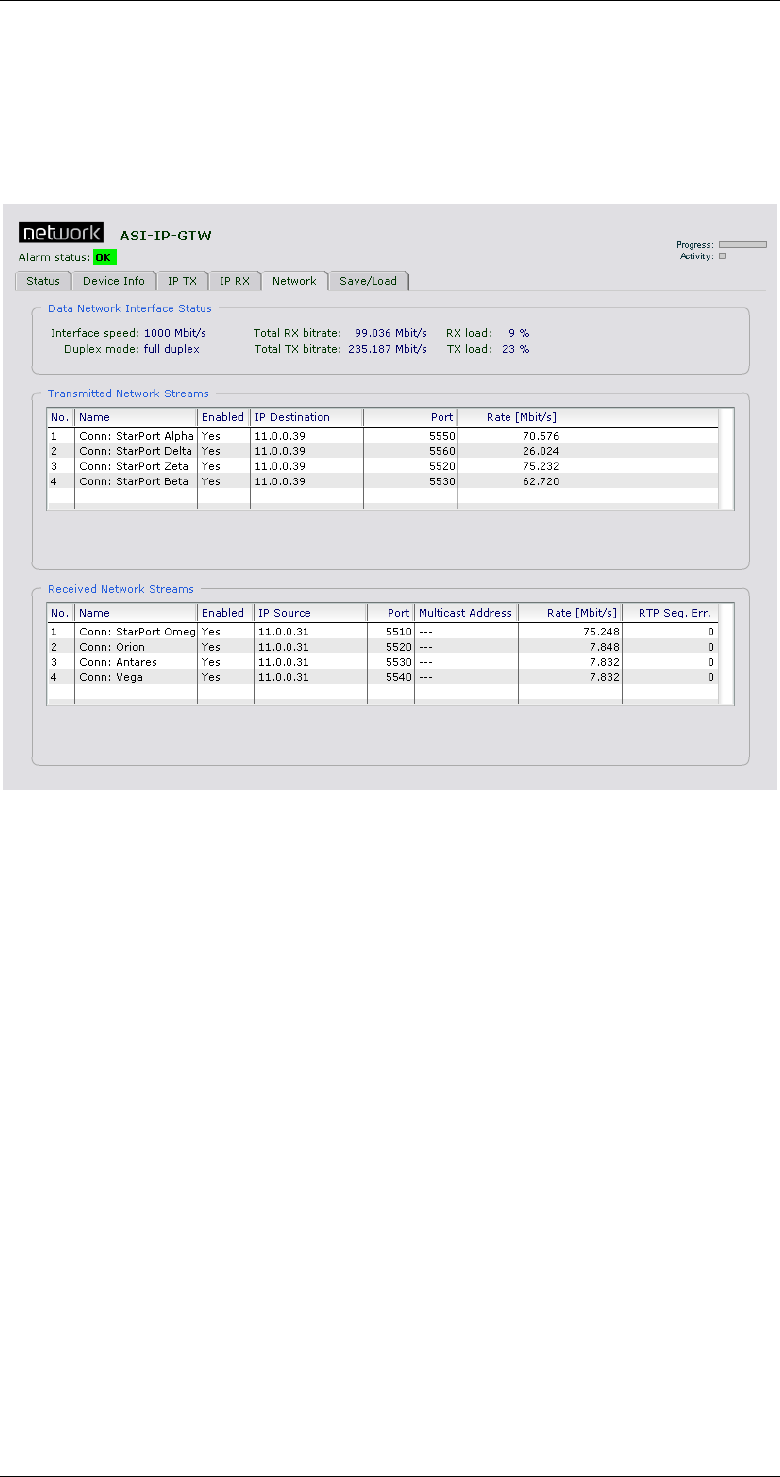
ASI-IP-GTW User's Manual
Page 54
3.8 Network
Figure 25 shows the Network page for a unit configured to bi-
directional operation of the Ethernet interface. The purpose of this page
is to provide network related information.
Figure 25. Network page for unit in IP TX mode
1.1.1.31 Data Network Interface Status
Interface speed: Shows the rate in Mbit/s of the data network
interface.
Duplex mode: Full duplex or half duplex dependent of the
configuration of the port.
Total RX bitrate: The total bitrate of IP frames received over the
network data interface.
RX load: The percentage of the total interface speed used by the IP
frames received over the network data interface.
Total TX bitrate: The total bitrate of IP frames sent over the network
data interface.
TX load: The percentage of the total interface speed used by the IP
frames sent over the network data interface.
1.1.1.32 Transmitted Network streams
The transmitted network streams table shows a list of all ASI inputs.
For each individual ASI input, the tables shows the name of the input,
if input is enabled (Yes/No), the IP destination address of the stream,
the UDP destination port, the total bitrate of the interface (in Mbit/s).
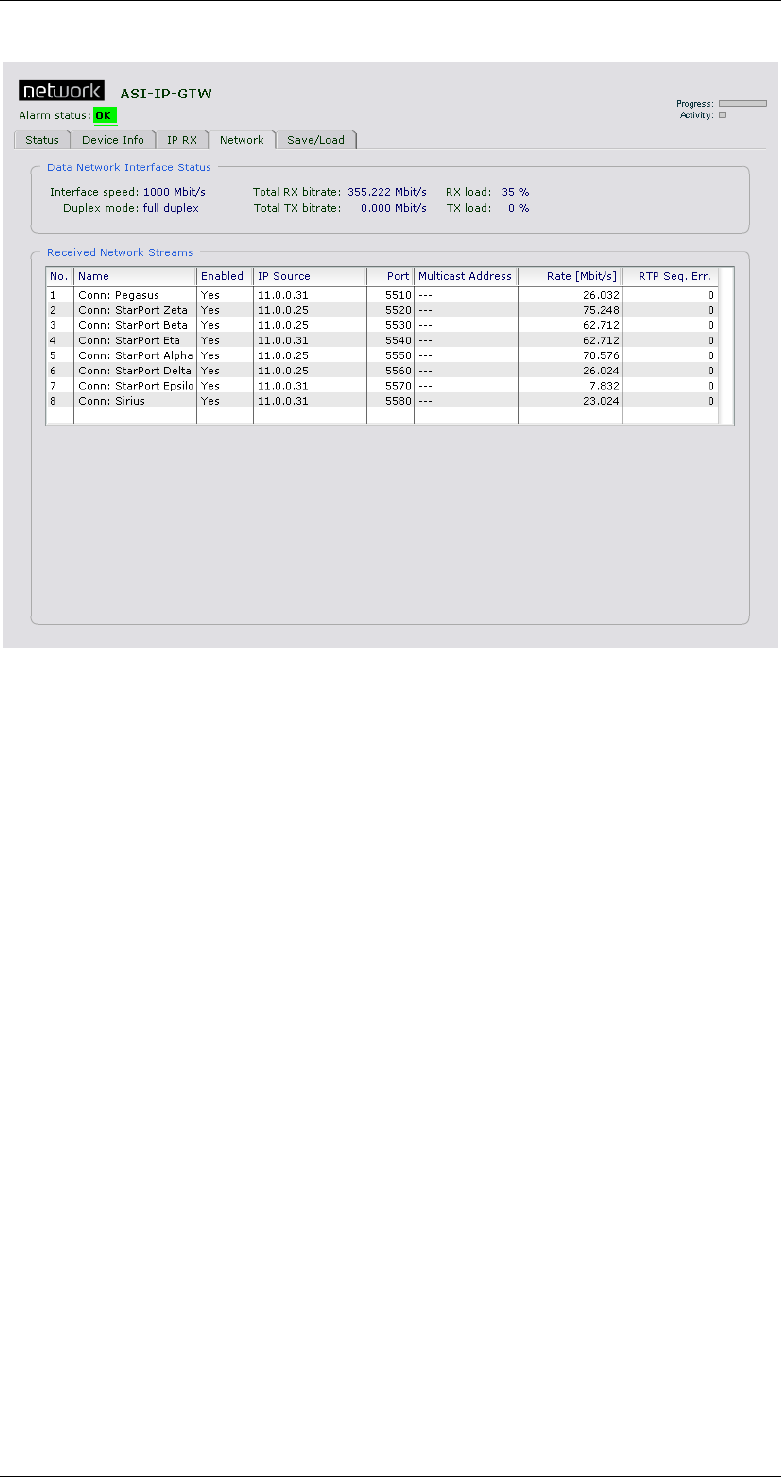
ASI-IP-GTW User's Manual
Page 55
Figure 26 shows the Network page for a unit configured to IP-RX mode.
Figure 26. Network page for unit in IP RX mode
We see that only received network streams is visible. The Data Network
Interface Status is the same for an IP transmitter and an IP receiver.
1.1.1.33 Received Network streams
The network streams table of a unit configured for IP reception shows a
list of all ASI outputs.
For each individual ASI output, the table shows the name of the
output, if the output is enabled (Yes/No), the IP source address, the
UDP port, the total bitrate of the interface (in Mbit/s) and a counter
showing RTP sequence errors.

ASI-IP-GTW User's Manual
Page 56
3.9 Save/Load
Figure 27 shows the Save and Load configuration page. This is where
you save the current configuration or restores a configuration from file.
Figure 27. Save/load configuration page
The configuration in effect while the unit is operating is called the
current configuration.
3.9.1 Saving a Configuration
In order to save the current configuration of the unit to a file, please
right-click the link labelled "XML Configuration file" and select "Save
target as". Enter the file name of the configuration file. Figure 28 shows
the user interface.
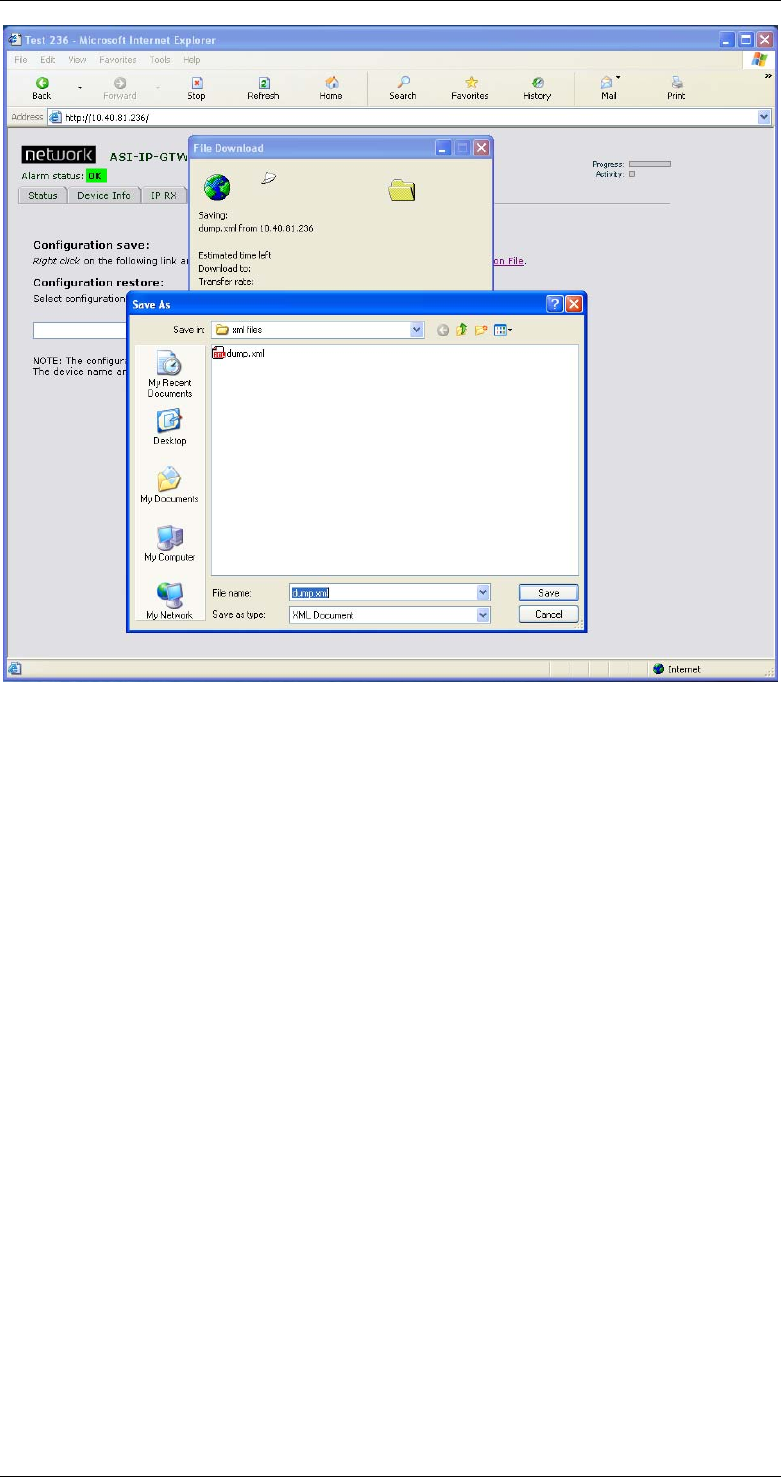
ASI-IP-GTW User's Manual
Page 57
Figure 28. Save/Load page when saving configuration
3.9.2 Loading a Configuration
In order to upload a new configuration file to the unit, browse to find
the file and select the file or enter the file including path directly. When
the file name including path is entered, select "Upload configuration".
Note: The configuration file will be activated once it is uploaded!
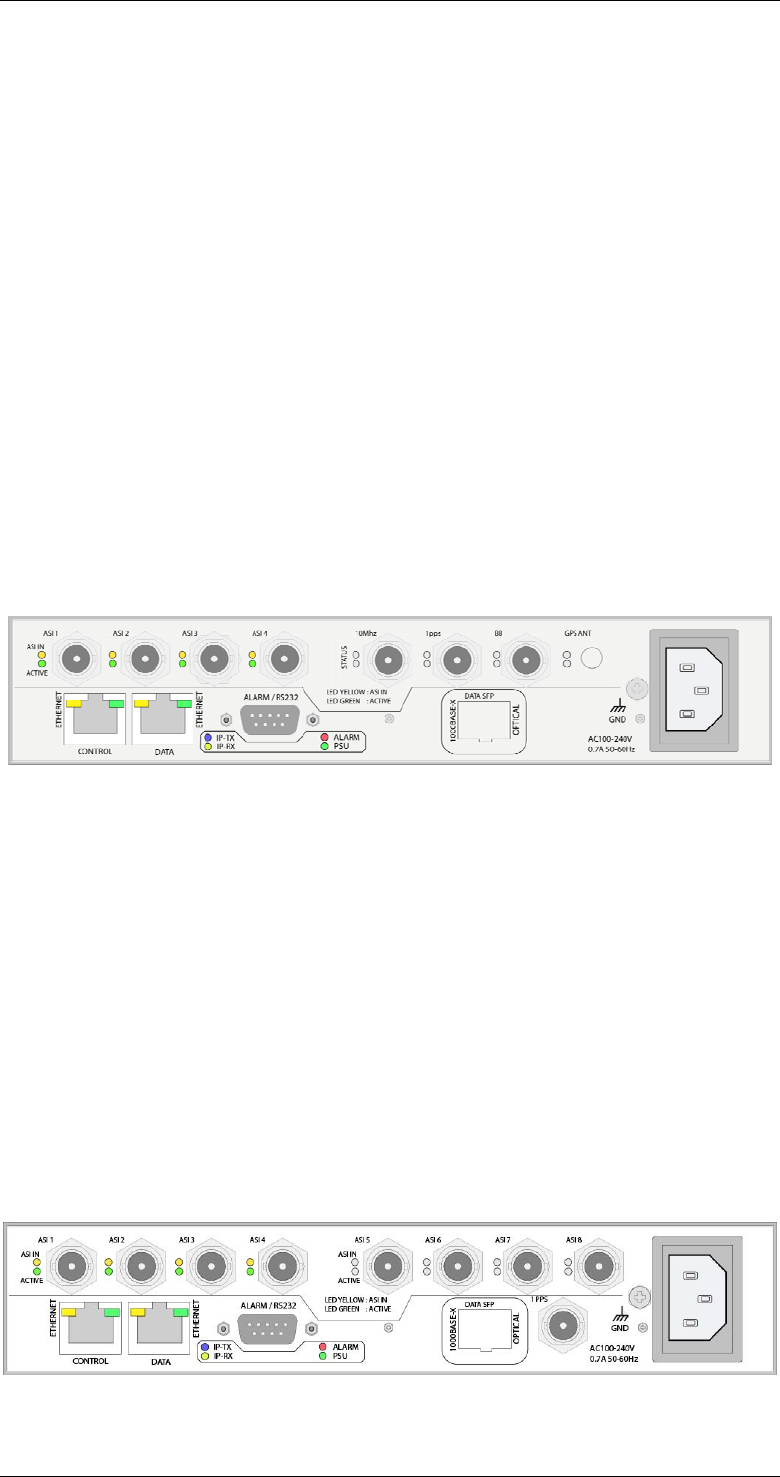
ASI-IP-GTW User's Manual
Page 58
4 Options
This chapter describes functionality and operating instructions for
various additional product options.
4.1 1PPS/10MHz interface modules
In order to achieve exact bitrate control for use in SFN networks, the
ASI-IP-GTW may be equipped with 1PPS/10MHz interface modules.
The purpose is to lock the internal system clock of the ASI-IP-GTW to
external 1PPS/10MHz signals to obtain exact bitrate control. The
typical application is to receive a stream over IP network and send it
out on ASI connectors at a fixed, accurate rate. The transmitter needs
to transmit at the same rate.
Two options exist to lock the product to external time reference: A
separate 10MHz/1PPS module which occupies an ASI slot, or a
separate 1PPS input module that allows 8 ASI ports.
4.1.1 Separate 10MHz/1PPS module
Figure 29 shows a picture of the back panel when this module is
mounted.
Figure 29. ASI-IP-GTW with 1PPS/10MHz interface module equipped
The signals are:
o 10MHz. 50 ohm terminated input for a sinusoidal 10MHz signal.
o 1PPS. 50 ohm TTL input for a 1 pulse-per-second signal.
For physical parameters of these ports, see appendix B.
Both signals may be connected. However, the ASI-IP-GTW only uses
one of them at a time. The active input is selected from the “GPS” tab in
the ASI-IP-GTW WEB user interface.
4.1.2 1PPS interface
When 8 ASI outputs are required together with SFN operation, an
alternative to the 1PPS/10MHz module is to use a separate 1PPS
interface as described in the following figure.
Figure 30. ASI-IP-GTW with separate 1PPS interface module
The signals are:

ASI-IP-GTW User's Manual
Page 59
o 1PPS. 50 ohm TTL input for a 1 pulse-per-second signal.
For physical parameters of the 1PPS port, see appendix B.
4.1.3 Operating the 1PPS/10MHz interface module
A new top-level tab named “GPS” appears in the user interface of the
ASI-IP-GTW units with the interface mounted. The control part of this
tab only consists of a ComboBox where the lock mode is selected.
Figure 31 shows the layout of the page.
Figure 31. GPS tab
The control parameter simply consists of a combobox:
27MHz lock mode: Select the lock mode for the internal 27MHz. Set
this parameter to “Disabled” if you don’t want to use the GPS board.
Set to “Lock to external 1PPS” or “Lock to external 10MHz” if you want
to lock the system clock to the reference signal.
The status parameters show the current state of the lock mechanism.
The parameters are as follows:
Regulator state: Shows “Idle”, “Waiting” or “Fine tune” dependent on
the selected mode. In the “Waiting” state, the ASI-IP-GTW waits for a
valid input signal to lock to. After some seconds with valid input signal,
the regulator enters the “Fine tune” state which indicates that the
system clock is locked OK. The “Idle” state indicates that the regulator
is disabled.
Current phase offset: This is an integer number that gives an
indication of the current phase offset between the internal and external
clock sources. It’s absolute value should be below 100 in the stable
phase.
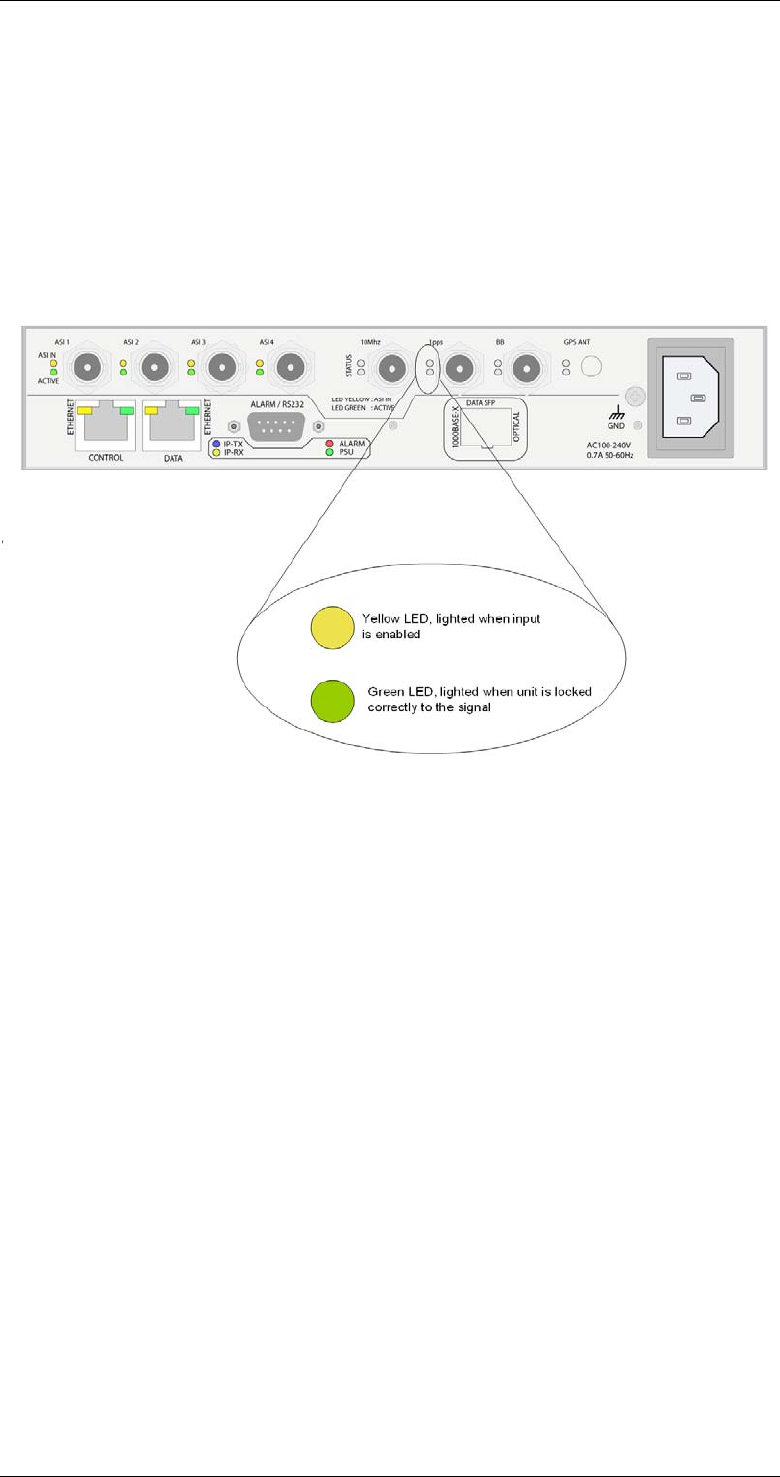
ASI-IP-GTW User's Manual
Page 60
Current freq. offset: This shows the offset between the internal clock
(in idle state) and the external clock reference.
4.1.4 LED descriptions
(Separate 1PPS/10MHz module only)
Each input connector has two LEDs associated with it; one yellow and
one green LED. The yellow LED is lit when the input is enabled. The
green LED is lit when the unit has locked correctly to the signal, as
shown in the following figure.
Figure 32. LED description for separate 1PPS/10MHz interface module
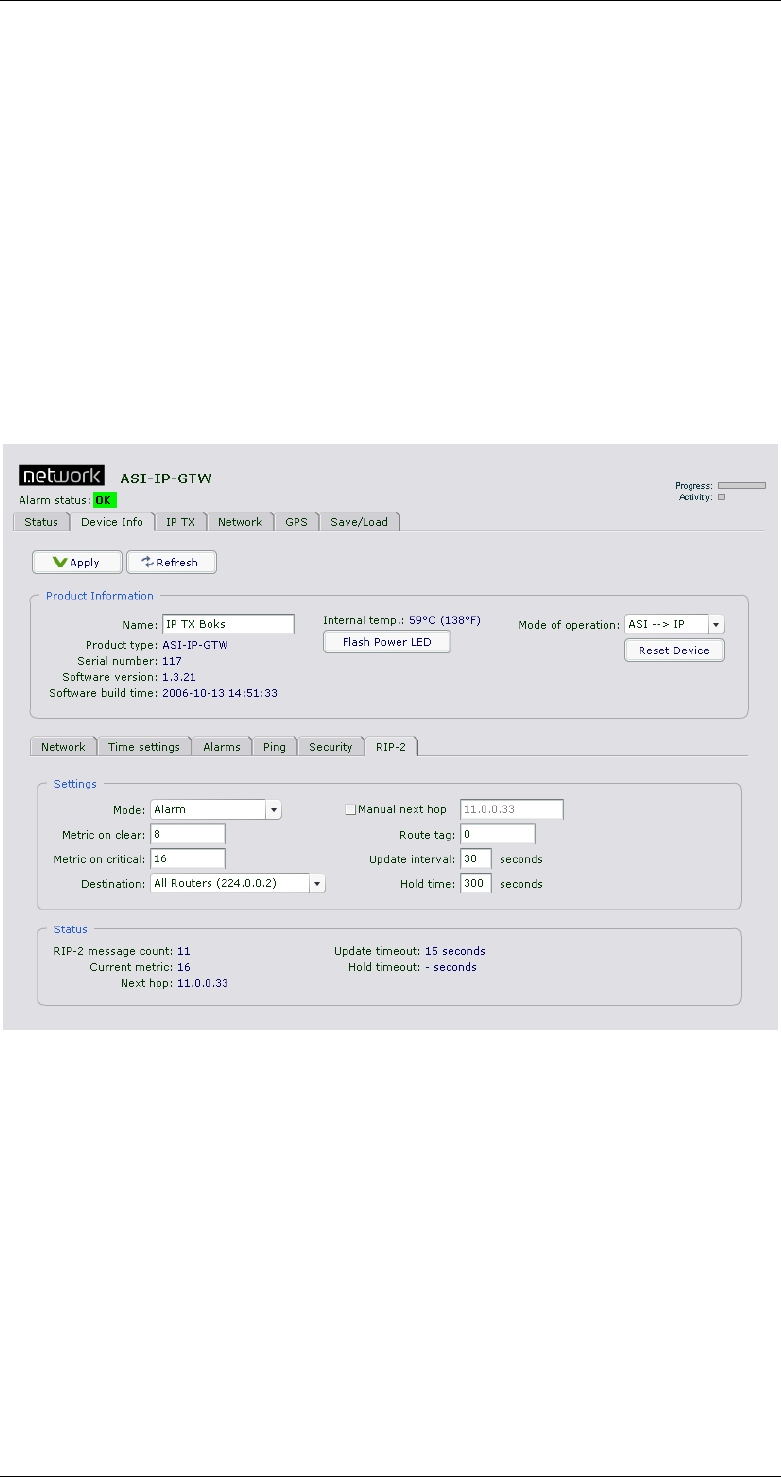
ASI-IP-GTW User's Manual
Page 61
4.2 RIPv2 functionality
The ASI-IP-GTW is equipped with RIPv2 functionality. The ASI-IP-GTW
will then transmit RIPv2 messages regularly. The content of the RIPv2
messages is set as specified in this chapter.
RIP2 messages are sent with one entry each. The metric of this entry
can be set either manually or automatically based on the current alarm
level of the unit. This information may be used by network routers to
select the source with the lowest metric; i.e. in effect automatic
redundancy switchover.
4.2.1 User interface
Figure 33 shows the layout of the RIP-2 screen.
Figure 33. RIP-2 screen
The configuration parameters are as follows:
Mode: Controls the mode of the RIP-2 engine. The valid choices are:
o Off: No RIP-2 messages are sent.
o Auto: RIP-2 messages are sent. The metric in the RIP entry is set
dependent on the current unit alarm state. If the alarm state is
critical, the “Metric on critical” value is used. If the alarm state is
“OK”, the “Metric on clear” value is used.
o Alarm: RIP-2 messages are sent. The “Metric on critical” value is
used, independently on the current alarm state.
o Clear: RIP-2 messages are sent. The “Metric on clear” value is
used, independently on the current alarm state.

ASI-IP-GTW User's Manual
Page 62
Metric on clear: The metric number to be used in the RIP messages
when there are no active alarms in the unit.
Metric on critical: The metric number to be used in the RIP messages
when there are at least one critical alarm present.
Destination: The IP destination address to use for the RIP messages.
Enable manual next hop: If set, the RIPv2 messages will specify the
next hop as defined in the “Next hop address” field.
Next hop address: The address to be used for the next hop.
Route tag: Corresponds to the route tag field in the outgoing RIP
messages.
Update interval: Specifies the average update interval for the RIPv2
messages. Note that the ASI-IP-GTW adds some random delay to avoid
sending messages too regularly.
The status parameters are:
RIP-2 message count: Shows the number of RIP-2 messages
transmitted.
Current metric: Shows the current metric used in the outgoing RIP-2
messages. Will be either the “Metric on clear” or the “Metric on critical”
value.
Next hop: Shows the next hop value.

ASI-IP-GTW User's Manual
Page 63
5 Equipment Description
5.1 Introduction
This chapter provides an overview of transmission of MPEG-2 data over
IP networks and a high-level functional description of the ASI-IP-GTW.
5.2 Functional Description
5.2.1 Introduction
The ASI-IP-GTW consists of a main module and 1 or 2 ASI boards each
handling up to 4 ASI ports. Optical Gigabit is provided as a hardware
option.
The ASI-IP-GTW can be configured by the operator to be IP transmitter
or an IP receiver. A SW option is also available to enable bi-directional
operation of the IP data interface. In the IP transmitter mode, the ASI-
IP-GTW encapsulates MEG-2 transport streams received on the ASI
ports into IP streams. These streams are sent on an Ethernet interface
onto the IP network.
In IP receive mode, the ASI-IP-GTW receives and de-capsulates up to 8
transport streams from the IP network and outputs the MPEG-2
transport streams on the DVB ASI ports.
In bi-directional mode, half the ports are used as ASI outputs, while the
other half operate as ASI inputs.
5.2.2 IP Transmit Mode
In the IP transmit mode, the MPEG-2 transport streams are sourced
from the ASI ports on the ASI boards.
The ASI-IP-GTW is able to handle source transport streams on ASI on
the following formats:
o Packet format of 188 bytes
o Packet format of 204 bytes, including padding
o Packet format of 204 bytes, including RS bytes (no RS checking
performed)
The sourced transport stream is then processed by the Main board. The
ASI-IP-GTW will always send 188 bytes packets over the IP network.
The MPEG-2 transport stream packets are encapsulated as described
in section 5.3.1. The user configures the IP address of the Ethernet
data port. For each transport stream to be sent over the IP network, the
IP destination address and UDP port are configured. The ASI-IP-GTW
handles both unicast and multicast transmissions.
The IP packets from one ASI input port are then merged with the IP
packets from the other ASI inputs. The combined IP stream is then
passed onto the physical Ethernet connector.

ASI-IP-GTW User's Manual
Page 64
5.2.3 IP Receive Mode
In IP receive mode, the ASI-IP-GTW receives IP packets from the data
Ethernet interface. The ASI-IP-GTW will receive streams from different
sources. In the case of unicast, the ASI-IP-GTW will parse the IP stream
and send the transport stream to the ASI output which is configured
with the matching UDP port. In case of multicast, the ASI-IP-GTW will
send a join message to join the configured multicast. When reception is
disabled, the ASI-IP-GTW will send a leave message to the network.
For each transport stream, the reassembled MPEG-2 transport packets
are held in a buffer. The function of this buffer is to handle re-ordering
of packets, eliminate network jitter and support the adaptive rate
recovery.
After clock recovery, the MPEG-2 transport stream is passed to the
DVB ASI output port.
In the current version of the product, the ASI output will always output
188 byte packets. If you require 204 byte packets, please contact
Network support as this is likely to be available in a future software
version.
5.2.4 IP Bi-directional Mode
In IP bi-directional mode, half the ASI ports are operate as described in
IP transmit mode, while the other half are operated as described in IP
receive mode.
5.2.5 Management
The ASI-IP-GTW provides an Ethernet management port for
configuration and control of the unit. The management port has its own
IP address. This interface provides the following features:
o WEB interface for remote control
o SNMP for alarm and status monitoring (optional).
o FTP for software and firmware updates
o Telnet for engineering and debug purposes
In addition, the IP address of the management port can be set though
the RS232 connector.
The WEB interface is described in detail in Chapter 1. SNMP is an
option to the product. The unit will send SNMP traps to report alarm
conditions; in addition it is possible to read from the unit all active
alarms and trap history. The MIB is available on request.
5.2.6 Alarms
The ASI-IP-GTW indicates alarm or fail status to the user in four ways:
o WEB interface
o Alarm LED on the front and on the rear
o SNMP traps to Network Management System
o Alarm relay
The user can define the severity level of the different alarm events. The
three levels are No alarm, Warning and Critical.

ASI-IP-GTW User's Manual
Page 65
The WEB interface gives the most detail alarm information as all active
alarms and warning are listed with time when the alarm condition
occurred.
The unit sends an SNMP trap message when an alarm condition rises.
A critical alarm will have severity level 6 and a warning will have
severity level 3. When the alarm is cleared, a new message is sent to
indicate that the alarm condition is cleared.
Finally, the red alarm LED will illuminate when an unmasked alarm
condition rises. At the same time the alarm relay will be in an alarm
state.

ASI-IP-GTW User's Manual
Page 66
Table 12. Alarms
Alarm
id Alarm Severity level Description
100 No sync Critical No valid ASI input stream detected.
101 ASI bitrate too high Critical The ASI input bitrate has exceeded the
configured maximum value.
121 Bitrate regulation in
progress Filtered The regulation algorithm is estimating the
incoming bitrate to compensate for the
difference in PCR clocks on the source
encoder and the IP receiver. While this
alarm is active, the output bitrate may be
tuned beyond the limits of the ASI
specifications.
130 Ethernet link down Critical No link on Ethernet layer
131 Output buffer
overflow Warning The total bitrate of the ASI input streams is
too high.
140 ARP unresolved Warning IP address is not resolved into physical
MAC address.
150 Sequence error Warning Analysis of the sequence number of the
RTP layer indicates that IP frames have
been lost or that they have been received
out of order.
151 No data received Warning No data received on Ethernet input for
stream
152 FEC threshold
exceeded Warning The frequency of lost frames is higher than
the configured value. Threshold values are
configured per stream.
153 Input buffer
overflow Warning The total bitrate of the IP input streams is
too high.
154 Data lost Critical The data stream received for a channel is
incomplete, and if running FEC, the FEC
engine is not able to recover all the lost
frames.
155 No lock Critical The IP receive channel is not able to find
an initial bitrate for the data received.
156 MIP not present Warning No MIP frames are received.
157 Too low latency for
FEC Warning The preferred latency is set lower than the
latency required by the incoming stream.
160 SNTP server
unreachable Warning Unit is not receiving answers from the
SNTP server.
161 Too high
temperature Warning Internal temperature of unit is too high.
162 Defective fan Warning One or both of the fans are not spinning.
200 No GPS 1PPS
reference signal Warning The 1PPS reference signal is lost. (The
regulator has however not lost
synchronization)
201 Lost GPS 1PPS
synchronization Critical The clock synchronization mechanism has
been resynchronized due to too large
phase error.
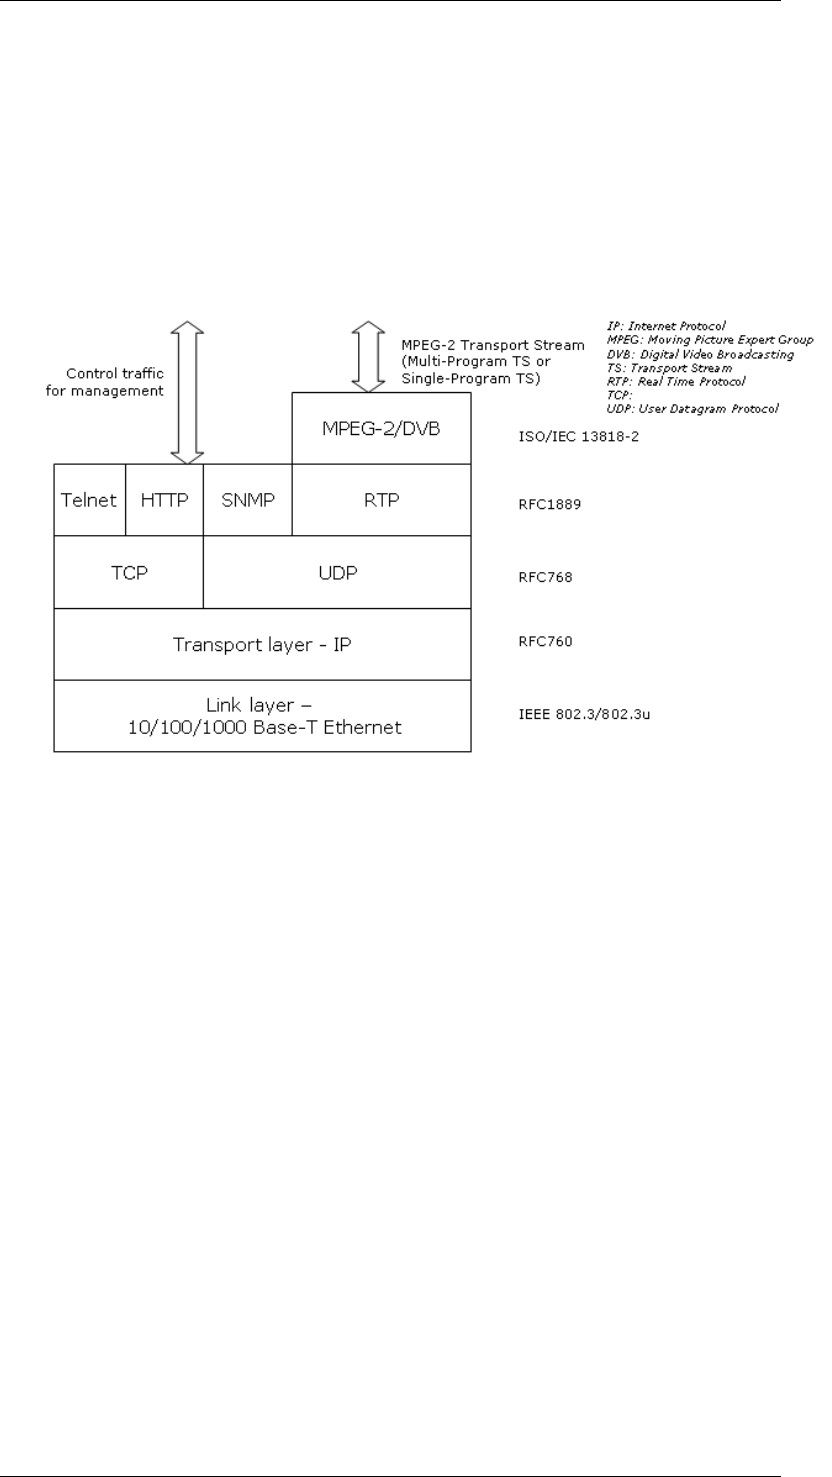
ASI-IP-GTW User's Manual
Page 67
5.3 Overview of Video over IP
5.3.1 Protocol mapping
One of the core functions in the ASI-IP-GTW is the IP encapsulation of
the MPEG-2 transport streams. The task is basically to encapsulate
video packets into IP frames, using the right headers.
Figure 34 shows how the transport can be separated into various
layers.
Figure 34. Protocol mapping
The MPEG-2/DVB layer is specified in ISO/IEC 13818-1.
The ASI-IP-GTW is able to handle both Multi-Program Transport
Streams (MPTS) and Single-Program Transport Streams (SPTS). In the
current version, the ASI-IP-GTW operates in a transparent mode. The
unit will encapsulate and de-capsulate complete transport streams
without changing the streams. This means that no insertion or removal
of NULL packets is performed and PCR is sent transparently through
the unit.
Control data are handled differently from transport stream data on the
next layer. RTP as defined in RFC1889 is applied for the MPEG-2
transport stream data. Three types of protocols are used for control
data. HTTP is used when the unit is configured and monitored via the
internal WEB server. SNMP is used for alarm traps and simple status
polling. Telnet is used for development purposes.
The transport stream data are handled according to RFC768 on the
UDP layer. The operator can configure destination port for the MPEG-2
transports stream. The MTU for Ethernet is usually 1500 bytes. This
limits the number of transport stream packets to embed into the
outgoing Ethernet/IP frames to be between 1 and 7.
TCP is used for control data.
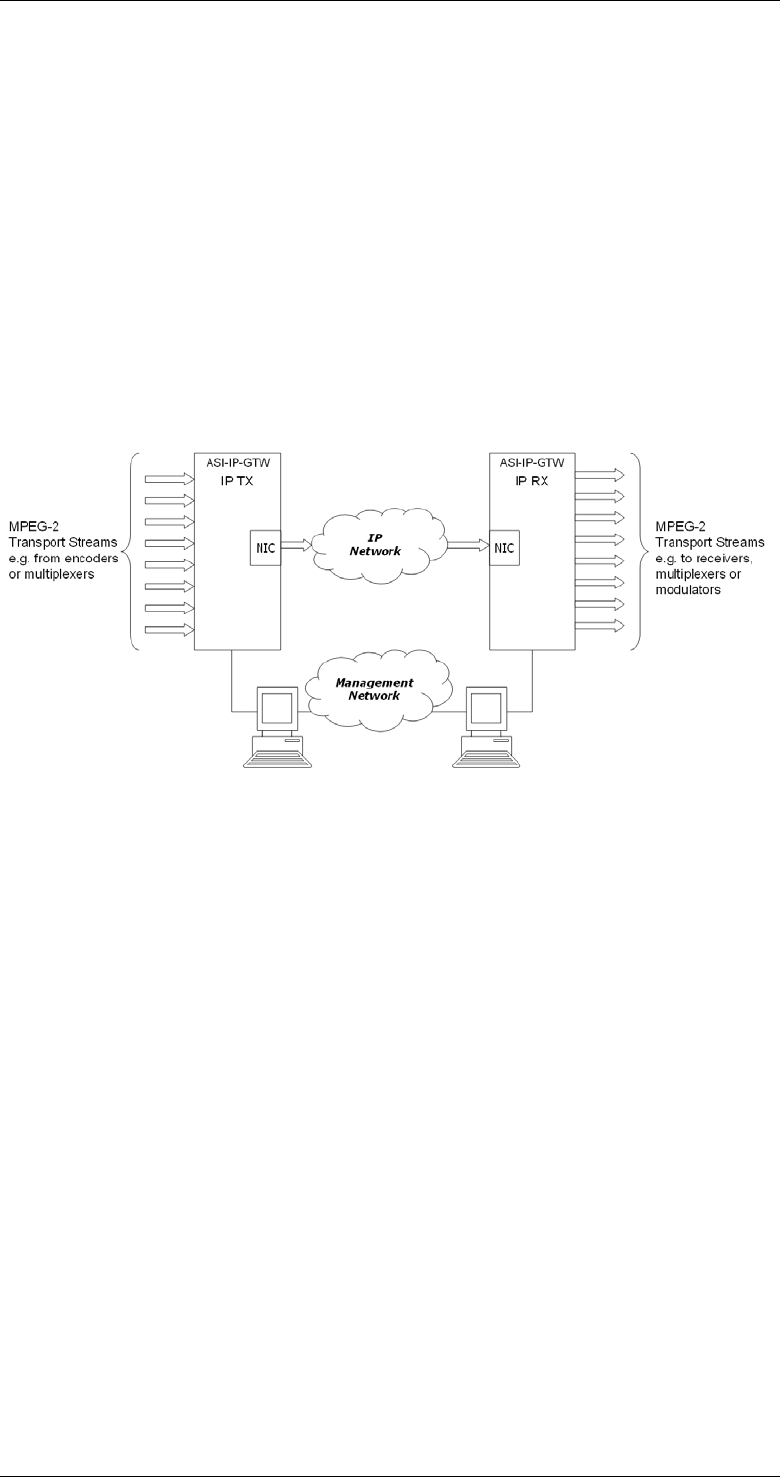
ASI-IP-GTW User's Manual
Page 68
1.1.1.34 UDP Mode
To allow interoperability with legacy equipment, the ASI-IP-GTW can
stream video over IP without using the RTP protocol encapsulation.
This is also called UDP mode or UDP only. UDP mode is manually
configured on the transmitting ASI-IP-GTW unit, and automatically
detected on the receiving ASI-IP-GTW.
Note: FEC relies on information in the RTP protocol, and will not be
available in UDP mode. FEC is explained in 5.4.1.
5.4 Data Flow Block Diagrams
The following figure shows the data flow between two ASI-IP-GTW over
an IP network.
Figure 35. Data flow between two units
5.4.1 Forward Error Correction (FEC)
Unfortunately, real networks are not perfect and packet losses occur. In
order to cope with packet losses, the ASI-IP-GTW has implemented Pro-
MPEG FEC according to Pro-MPEG Code of Practice #3 rev. 2. Pro-
MPEG FEC is carried out on RTP packets. The mechanism is based on
the insertion of additional data containing the result of an XOR
(exclusive OR)-operation of packets over a time window.
The generation of FEC packets is based on the use of a matrix. The
matrix size is defined by the number of columns (L) and the number of
rows (D). The FEC packets are calculated as an XOR operation over the
packets in a column and the packets in a row. Figure 36 shows an
example of the FEC scheme. Three packets are lost and corrected.

ASI-IP-GTW User's Manual
Page 69
11098765432
11 201918171615141312
21 302928272625242322
31 403938373635343332
41 504948474645444342
51 605958575655545352
61 706968676665646362
11098765432
1
2
7
6
5
4
3
1
Column FEC packets
Row FEC packets
FEC packets
1Media packets
1Missing media packets
1
2
3
Figure 36. Illustration of two-dimensional FEC, where packet 7, 35 and 56 are lost and corrected.
One missing packet per row or column can be calculated by XOR'ing
the FEC packet with the other packets in that row or column. By
iterative operations it is possible to correct more than one missing
packet per column or row. Please note that 4 ≤ L ≤ 32, 4 ≤ D ≤ 32 and
L+D ≤ 32 and that the maximum matrix size is 256(L*D). When using
column FEC only, L is allowed to be in the range 1 ≤ L ≤ 32. The size of
the matrix is a trade between latency, transmission overhead and error
protection.
Column FEC provides correction for consecutive burst packets loss of
up to L packets. The FEC packets are generated per a column within
the matrix allowing loss of any single media packet within a column or
a burst of packets of errors within a row to be corrected through the
FEC packet. Column FEC is used to correct burst errors and random
errors.
Row FEC provides correction of non-consecutive packet loss and can
correct any single packet loss within a row of media packets. The FEC
packets are generated per a row allowing loss of any single packet to be
recovered. Row FEC is ideal for correcting random packet errors.
Once the FEC packets have been computed they are transmitted with
the media packets to the receiver site. FEC column packets are
transmitted on UDP port n+2 and FEC row packets are transmitted on
UDP port n+4 where n is the UDP port of the media data. This is in
accordance with Pro-MPEG CoP 3.

ASI-IP-GTW User's Manual
Page 70
6 Preventive Maintenance and Fault-finding
6.1 Introduction
This chapter provides the schedules and instructions, where applicable,
for routine inspection, cleaning and maintenance of the ASI-IP-GTW to
be carried out by the operator of the unit.
6.2 Preventive Maintenance
6.2.1 Routine Inspection
1.1.1.35 Cooling fans
This equipment must never be used unless all the cooling fans are
working. They should be checked when the unit is switched on and
periodically thereafter.
6.2.2 Cleaning
o Remove power from the unit.
o Clean the external surfaces of the ASI-IP-GTW with a soft cloth
dampened with a mixture of mild detergent and water.
o Make sure that the unit is completely dry before reconnecting it to
a power source.
6.2.3 Servicing
1.1.1.36 Damage requiring service
Unplug the unit from the power and refer servicing to qualified
personnel under the following conditions:
o The power supply cord or plug is damaged
o Liquid has been spilled or objects have fallen into the product
o Product has been exposed to rain or water
o Product does not operate normally by following the operating
instructions
o Product has been dropped or has been damaged
o Product exhibits a distinct change in performance
6.3 Maintenance
6.3.1 Warranty
The ASI-IP-GTW is covered by standard Network warranty service for a
period of 12 months from delivery.
Warning: Do not attempt to service this product as opening or
removing covers may expose dangerous voltages or other hazards. Refer
all servicing to service personnel who have been authorised by Network.

ASI-IP-GTW User's Manual
Page 71
The warranty covers the following:
o All material defects in the equipment for a period of 12 months
o All parts and labour charges
o Return of the repaired item to the customer, postage paid.
o Customer assistance through Network Customer Service Help Line
The warranty does not cover any engineering visit(s) to the customer
premises.
6.4 Fault-finding
6.4.1 Fault finding Philosophy
The objective of this chapter is to provide sufficient information to
enable the operator to rectify apparent faults or else to identify where
the suspect fault might be. It is assumed that fault-finding has already
been performed at a system level.
Warning: Do not remove the covers of this equipment. Hazardous
voltages are present within this equipment and may be exposed if the
covers are removed. Only Network trained and approved service
engineers are permitted to service this equipment.
Caution: Unauthorised maintenance or the use of non-approved
replacements may effect the equipment specification and invalidate any
warranties.
This manual does not provide any maintenance information or
procedures which would require to removal of covers.
If the following information fails to clear the abnormal condition, please
contact your local reseller or Network customer care.
6.4.2 Preliminary Checks
Always investigate the failure symptoms fully, prior to taking remedial
action. The operator should not remove the cover of the equipment to
carry out the fault diagnosis. The following fault-finding tasks can be
carried out:
o Check that the PSU LED is lit. If this is not lit, replace external
equipment, power source and cables by substitution to check that
they are not defect.
o Confirm that the equipment hardware configuration is suitable for
the purpose and has been correctly connected.
o Confirm that inappropriate operator action is not causing the
problem, and that the equipment software set-up is capable of
performing the required functionality.
o Check that the fans are unobstructed and working correctly.
When the fault condition has been fully investigated, and the symptoms
are identified, proceed to fault-finding according to the observed
symptoms. If the fault persists, and can not be rectified using the
instructions given in this manual, contact Network Customer Support.
Switch off the equipment if it becomes unusable, or to protect it from
further damage.

ASI-IP-GTW User's Manual
Page 72
6.4.3 PSU LED Unlit / Power Supply Problem
If the ASI-IP-GTW PSU LED is unlit, fault-finding the problem is
detailed in the following table.
Table 13. Power fault-finding
The PSU does not have any user changeable fuses.
Step Action If the result of action is Yes... If the result of action is
No...
1 Check the
Power LED. Is
the LED unlit, but
the Video
Gateway still
working
properly?
If the Video Gateway is working
normally then the Power LED
itself is probably at fault - Call a
Service Engineer.
Proceed to next step
2 Check the
Power Source.
Connect a
known-working
equipment to the
power source
outlet. Does it
work?
The problem lies within the ASI-
IP-GTW or the power cable.
Proceed to next step.
The problem lies with the
power source. Check
building circuit breaks, fuse
boxes source outlet. Does it
work? If problem persists,
contact the electricity
supplier.
3 Check Power
Cable. Unplug
power connector
and try it in
another piece of
equipment. Does
it work?
The problem lies within the ASI-
IP-GTW. Call a Service
Engineer.
The problem lies with the
cable. Replace the cable.

ASI-IP-GTW User's Manual
Page 73
6.4.4 Fan(s) Not Working / Overheating
This equipment has forced air cooling and must not be operated unless
all cooling fans are working. In the event of overheating problems, refer
to table.
Note: Failure to ensure a free air flow around the unit may cause
overheating.
6.4.5 Alarm LED lit / Alarm condition
The alarm LED on front and rear will light when a critical alarm occurs.
The following table describes the different alarm conditions and what
might be the cause of these alarms.
Step Action If the result of action is Yes... If the result of action is
No...
1 Check Fan
Rotation.
Inspect the fans
located at the
sides of the unit.
Are the fans
rotating?
Check that the Video Gateway
has been installed with sufficient
space allowed enclosure for air
flow. If the air is too hot,
additional cooling may be
required.
Possible break in the dc
supply from the PSU module
to the suspect fan(s). Call a
Service Engineer.

ASI-IP-GTW User's Manual
Page 74
Table 14. Alarm condition description.
The description of the severity levels of the different alarms are given in
Section 5.2.6.
Alarm Description Error source
Bitrate regulation in
progress The regulation algorithm is working with
bitrate estimation. This alarm may stay on the first minutes
after tuning to a new IP stream. If the
alarm does not clear, the input stream
may be a variable bitrate stream.
SNTP server
unreachable Unit is unable to connect to SNTP
server. There is no SNTP server on the
configured IP address or there is no
contact with the SNTP server due to
network problems.
No sync No valid ASI input stream detected. The problem can be related to a
problem with the sending device or the
cable.
Too high
temperature Internal temperature of unit is too high. The fans are not working or forced
cooling is required.
Sequence error Analysis of the sequence number of the
RTP layer indicates that IP frames have
been lost or that they have been
received out of order
Typically this error is generated by
packets being dropped by some
equipment in the network, f.ex when a
link is overloaded.
Defective fan There is an error with fan of the unit Hardware problem.
No data received No data received on Ethernet input for
stream The most likely error is that there is a
set-up problem where IP address and
UDP port are not correctly configured.
The error can result from an error with
the transmitting unit or an error on the
network.
No lock The IP receive channel is not able to
find an initial bitrate for the data
received.
The stream contains a PCR PID with an
invalid clock reference.
Data lost Stream received is incomplete and a
valid ASI output can not be expected See ‘Sequence errors’. If you have
‘Sequence errors’ but not ‘Data lost’, all
frames are received but they are out of
sequence, or enough data is received
for the FEC engine to correct all lost
frames.
ARP unresolved IP address not resolved into physical
MAC address. This error may be caused by wrong
default gateway configured, wrong
unicast IP address on same subnet or
unit on same subnet does not respond.
Ethernet link down No link on Ethernet layer No connection on physical layer.
Input buffer
overflow The total bitrate of the IP input streams
is too high. There is a configuration error or one of
the sources is generating a too high
bitrate.
Output buffer
overflow The total bitrate of the ASI input
streams is too high. There is a configuration error or one of
the sources is generating a too high
bitrate.

ASI-IP-GTW User's Manual
Page 75
6.5 Disposing of this Equipment
6.5.1 General
Dispose this equipment safely at the end of its life time, Local codes
and/or environmental restrictions may affect its disposal. Regulations,
policies and/or environmental restrictions differ throughout the world
and they might have changed since you acquired this equipment.
Please contact your local jurisdiction or local authority for specific
advice on disposal.
6.6 To return the unit
Before shipping the ASI-IP-GTW to Network, contact your local Network
reseller or Network directly for additional details.
o Write the following information on a tag and attach it to the ASI-
IP-GTW.
o Package the ASI-IP-GTW.
o Seal the shipping container securely, and mark it FRAGILE.
o Name and address of the owner
o Model number
o Serial number
o Description of service required or failure indication
o You can use the original shipping containers or adequate other
packing containers

ASI-IP-GTW User's Manual
Page 76
7 Appendix A: Glossary
1000Base-T: The term for the Electrical Gigabit Ethernet interface. This
is the most common interface for Gigabit Ethernet. Most Gigabit-
enabled PCs and equipment use this interface.
ARP: Address Resolution Protocol. A protocol used to "resolve" IP
addresses into underlying Ethernet MAC addresses.
ATSC: Advanced Television Systems Committee. An American
organisation working with standardisation of digital television
broadcasts, primarily in the US but also in Asia and other parts of the
world.
DiffServ: Differentiated Services. A mechanism used on layer 3 - e.g.
the IP layer - to differentiate between traffic of various types. DiffServ is
based on the ToS field and provides a mechanism for the network to
give e.g. video traffic higher priority than other traffic (for example
Internet traffic).
DVB: Digital Video Broadcasting. The European consortium defining
standards for transmission of digital TV broadcasts, primarily in
Europe.
DVB ASI: Digital Video Broadcasting Asynchronous Serial Interface. A
common physical interface for transmission of MPEG2 Transport
Streams (i.e. MPEG2-compressed video) over a serial interface, typically
coaxial cables.
DWDM: Dense Wavelength Division Multiplexing. A mechanism to
utilize existing fiber with even more bandwidth by adding extra signals
using other wavelengths/colors.
Ethernet: Originally a 10Mbit/s shared medium network type
developed by Xerox. Later transformed into an official standard.
Nowadays, most Ethernet networks are based on full duplex
connections over twisted pair cables. Ethernet switches in the network
take care of routing Ethernet frames between nodes. The speeds now
supported are 10Mbit/s, 100Mbit/s and 1000Mbit/s. 10Gigabit/s
Ethernet networks are now emerging.
FEC: Forward Error Correction. A mechanism to add extra data to a
transmission in order to protect it. Dependent on the amount of extra
data added, the receiver will be able to correct errors (i.e. regenerate
lost packets) in case of network packet loss.
HDTV: High Definition Television. The new, coming television
standard(s) that gives clearer and more detailed TV pictures. Many TV
sets sold today (especially flat-screen TVs) are prepared for high
definition TV.
HTTP: HyperText Transfer Protocol. The fundamental protocol used on
the Internet for transmission of WEB pages and other data between
servers and PCs.
ICMP: Internet Control Message Protocol. ICMP messages, delivered in
IP packets, are used for out-of-band messages related to network
operation or mis-operation.
IGMP: Internet Group Management Protocol. IGMP is a protocol used to
manage multicasts on the Internet. For a host (receiver unit) to receive
a multicast, it needs to transmit IGMP "join" messages on the right

ASI-IP-GTW User's Manual
Page 77
format. Three versions exist. IGMPv2 is common today but IGMPv3 is
the next step.
Meta-data: Meta-data is descriptive data that is "tagged" to a movie or
audio clip. Meta-data is essential for the broadcaster.
MPEG2: Moving Picture Experts Group 2. The compression standard
used today on most satellite and cable TV digital broadcasts.
MPLS: Multi-protocol Label Switching. A Quality of Service mechanism
for IP networks that allow IP packets to flow along a predefined path in
a network, improving the reliability and robustness of the transmission.
MPTS: Multi Program Transport Streams. Transport Streams that carry
multiple TV/Radio services.
Multicast: An IP mechanism that allows transmission of data to
multiple receivers. A multicast can also have several transmit sources
simultaneously. In video applications, multicast is typically used to
distribute a video signal from a central source to multiple destinations.
NMS: Network Management System. A system used to supervise
elements in an IP network. When a device reports an alarm, the alarm
will be collected by the NMS and reported to the operator. NMS systems
typically collect valuable statistics information about the network
performance and can warn the operator early.
PCR: Program Clock Reference. A sampled 27MHz video clock used in
MPEG2 Transport Streams. The primary purpose of the PCR is timing
synchronization between transmitter and receiver.
PSI/SI: Program Specific Information / Service Information. This is
information tables (meta-data) that is carried in MPEG2 transport
streams in addition to video and audio. The information carried is
typically service/program IDs, program names, conditional access
information etc.
QAM: Quadrature Amplitude Modulation. A digital modulation type
that is used for transmission of digital TV signals over cable TV
networks. Often referred to as DVB-C.
QoS: Quality of Service. A common term for a set of parameters
describing the quality you get from an IP network: Throughput,
availability, delay, jitter and packet loss.
QPSK: Quadrature Phase-Shift Keying. The digital modulation type
typically used for transmission of digital TV signals over satellite. Often
referred to as DVB-S.
RIP2: Routing Information Protocol v2. A protocol used between
network routers to exchange routing tables and information.
RSVP: ReSerVation Protocol. A Quality-of-service oriented protocol used
by network elements to reserve capacity in an IP network before a
transmission takes place.
RTP: Real-time Transfer Protocol. A protocol designed for transmission
of real-time data like video and audio over IP networks. RTP is used for
most video over IP transmissions.
SDI: Serial Digital Interface. Also known as ITU-R BT.656. A
specification describing how to digitize and transmit uncompressed
video signals. The typical bit rate of an SDI signal is 270Mbit/s.

ASI-IP-GTW User's Manual
Page 78
SDP: Session Description Protocol. A protocol to signal multicasts in a
network. SDP is used as a mechanism to describe an ongoing
multicast; for example the type of compression used, IP addresses etc.
SDTI: Serial Data Transport Interface. A mechanism that allows
transmission of various types of data over an SDI signal. This may be
one or more compressed video signals or other proprietary data types.
The advantage of SDTI is that existing SDI transmission infrastructure
can be used to transport other types of data.
SDTV: Standard Definition Television. The normal television
standard/resolution in use today.
SFP: Small Form-factor Pluggable module. A standardized mechanism
to allow usage of various optical interfaces for Gigabit Ethernet. Several
types of SFP modules exist: Single mode fiber modules for long-distance
transmission and multi mode fiber modules for shorter distances. SFP
is also known as "mini-GBIC".
SIP: Session Initiation Protocol. A common acronym for the ongoing
effort to standardize signalling over IP networks, i.e. connection setup
and tear-down. SIP makes it possible to "dial" a remote receiver of data
and set up the connection in this way.
SNMP: Simple Network Management Protocol. A fundamental and
simple protocol for management of network elements. Very common in
use today by most Network Management Systems and other
applications.
SNTP: Simple Network Time Protocol is an Internet protocol used to
synchronize the clocks of computers to some time reference. It is a
simplified version of the protocol NTP protocol which is too complicated
for many systems.
SPTS: Single Program Transport Streams. A Transport Stream that
contains a single program/ service.
TCP: Transmission Control Protocol. A protocol above the IP layer that
provides automatic retransmission of datagrams in case of packet loss,
making it very robust and tolerant against network errors. TCP is the
fundamental protocol used in the Internet for WEB traffic (HTTP
protocol). TCP is indented for point-to-point protocol; you cannot use
TCP for communication from one node to many others.
TCP/IP: A common term used for the Internet protocol suite, i.e. the set
of protocols needed to get fundamental IP network access: TCP, IP,
UDP, ARP etc.
ToS: Type of Service. This is a field in the header of IP datagrams to
provide various service types. It has now been "taken over" and reused
by DiffServ.
Transport Streams: The common name for MPEG2 Transport Streams.
A bit stream used to carry packets with MPEG-2 compressed video. A
transport stream typically carries approximately 10 compressed TV
channels, but can consist of an arbitrary number of TV and Radio
services.
UDP: User Datagram Protocol. A protocol above the IP layer that
provides port multiplexing in addition. In essence, you can transmit IP
data packets to several receiving processes in the same unit/device.

ASI-IP-GTW User's Manual
Page 79
Unicast: Point-to-point connection, i.e. the "opposite" of multicast
which is one to many (or many to many). In this mode, a transmit unit
sends video data direct to a unique destination address.
VLAN: Virtual LAN, a network of units that behave as if they are
connected to the same wire even though they may actually be
physically located on different segments of a LAN.
Watermarking: A mechanism to "stamp" video content with unique
marks, making it possible to trace the origins of illegaly distributed
content. The marks are invisible for the viewer.
XML: eXtensible Markup Language. A very common self-describing
text-based data format. Used for many purposes: Meta-data,
configuration files, documents, etc. The readability of the format has
made it very popular and is now the fundament for many types of WEB
services.

ASI-IP-GTW User's Manual
Page 80
8 Appendix B: Technical Specification
8.1 DVB ASI port
Table 15. DVB ASI Port Specification
Item Specification
Type ASI-C, Coaxial cable
Connector type BNC 75 ohm socket
Signal Compliant with ETSI TR 101891v 1.1.1
(DVB A010 rev.1)
Line rate 270Mbit/s ± 100ppm
Data rate 0,1-213Mbit/s
Packet length Input: 188 or 204 bytes
Output: 188 bytes
Maximum cable length
(Belden 8281 type) 300m typical
Safety status (UK) SELV

ASI-IP-GTW User's Manual
Page 81
8.2 Ethernet data port
Table 16. Ethernet Data Port Specification
Table 17. Electrical Ethernet Data Port Specification
Table 18. Optional SFP Ethernet Data Port Specification
8.3 Ethernet management port
Table 19. Ethernet Management Port Specification
8.4 Alarm relay and maintenance port specification
Table 20. Alarm Relay and Maintenance Port Specification
Item Specification
Maximum ASI data rate 680 Mbit/s
Maximum IP data rate 700 Mbit/s
Protocols :
Link layer:
VLAN:
Transport layer:
UDP:
RTP:
FEC:
DVB/MPEG-2:
IEEE Std 802.3-2002
IEEE Std 802.1q
RFC 760
RFC 768
RFC 1889, RFC 3550, RFC 2250,
Pro-MPEG CoP3, rev.2
RFC2733, Pro-MPEG CoP3, rev.2
ISO/IEC 13818-1:2000
Item Specification
Type IEEE Std 802.3-2002, 10/100/1000Base-T
Connector type RJ45
Safety status (UK) SELV
Item Specification
Type Gigabit Ethernet, Small Form-Factor Pluggable
(SFP) slot to carry copper or optical SFP,
compatible with approved modules conforming to
the Small Form-factor Pluggable Transceiver
MultiSource agreements (Sept.14, 2000).
Item Specification
Type 10/100Base-T
Connector type RJ45
Safety status (UK) SELV

ASI-IP-GTW User's Manual
Page 82
8.5 AC Mains Input
Table 21. AC Power Supply Specification
8.6 DC Mains input
Table 22. DC Power Supply Specification
Item Specification
Connector type 9-pin DSUB Male
RS232 baudrate 115,2 kbaud
RS232 framing 8 bit, no parity, 1 stop bit
RS232 handshake None
Relay rating 0.1 A max, 50 Vdc max
Relay minimum load 10 µA at 10 mVdc
Pins 1. NC
2. RS232 Receive Data (input)
3. RS232 Transmit Data (output)
4. NC
5. Ground
6. Alarm on
7. Alarm relay common
8. Alarm off
9. NC
Safety status (UK) SELV
Item Specification
Rated voltage 100-240 VAC
Voltage tolerance limits 85-264 VAC
Rated frequency 50/60 Hz
Rated current 0.7 A
Power consumption < 50 W
Item Specification
Rated voltage 48 VDC
Voltage tolerance limits 36-72 VDC
Power consumption < 60 W

ASI-IP-GTW User's Manual
Page 83
8.7 Physical Details Table 23. Physical details
Item Specification
Height 43 mm, 1U
Width 222 mm excluding fixing brackets
Overall width 485 mm including fixing brackets
Depth 320 mm excluding connectors
Overall depth 340 mm including connectors
Approximate weight 3 kg
Rack-mount case 19 inch width, 1 U height

ASI-IP-GTW User's Manual
Page 84
8.8 Environmental Conditions
Table 24. Environmental specification
8.9 Compliance1
8.9.1 Safety
The equipment has been designed and tested to meet the requirements
of the following:
EN60950 European Safety of information technology
equipment including business
equipment.
IEC 60950 International Safety of information technology
equipment including business
equipment.
In addition, the equipment is designed to meet the following:
UL 1950 USA Safety of information technology
equipment including business
equipment.
8.9.2 Electromagnetic Compatibility - EMC
The equipment has been designed and tested to meet the requirements
of the following:
EN 55022 and
AS/NZS 3548
European
Australian and
New Zealand
Emission Standards
Limits and methods of
measurement of radio frequency
interference characteristics of
information technology equipment
– Class A
EN 61000-3-2 European Electronic Compatibility (EMC),
Part 3 Limits, Section 2.
1 The version of the standards shown is that available at the time of
manufacture.
Item Specification
Operational temperature 0˚C to +50˚C
Storage temperature -20˚C to +70˚C
Relative humidity 5% to 95% (non-condensing)
Handling/movement Designed for fixed use when in operation

ASI-IP-GTW User's Manual
Page 85
Limits for the harmonic current
emission.
EN 50082-1 European Generic Immunity Standard Part 1:
Domestic, commercial and light
industry environment.
FCC US Conducted and radiated emission
limits for a Class A digital device,
pursuant to the Code of Federal
Regulations (CFR) Title 47-
Telecommunications, Part 15: radio
frequency devices, subpart B –
Unintentional Radiators.
8.9.3 CE Marking
The CE mark is affixed to indicate compliance with the following
directives:
o 89/336/EEC of 3 May 1989 on the approximation of the laws of
the Member States relating to electromagnetic compatibility.
o 73/23/EEC of 19 February 1973 on the harmonisation of the laws
of the Member States relating to electrical equipment designed for
the use within certain voltage limits.
o 1999/5/EC of March 1999 on radio equipment and
telecommunication terminal equipment and the mutual
recognition of their conformity.
o
8.9.4 Interface to “public telecommunication system”
The equipment is not constructed for electrical connection directly to a
"public telecommunication system". None of the signals shall be
connected directly from the unit to a "public telecommunication
system" leaving the building without using some kind of interface in
between such as a telecom terminal, switch or similar unit. Such kind
of buffer is required to achieve a protective electrical barrier between
the "public telecommunication system" and the unit. This electrical
barrier is required to achieve protection against lightening or faults in
nearby electrical installations.

ASI-IP-GTW User's Manual
Page 86
9 Appendix C: References
o ISO13818-1,2 and 3: MPEG-2 Video and Audio and Systems
o EN 300 468: Digital Video Broadcasting (DVB); Specification for
Service Information (SI) in DVB systems
o RFC 1889 - RTP: A Transport Protocol for Real-Time Applications.
o RFC 3550 - RTP: A Transport Protocol for Real-Time Applications.
o RFC 2733 - RTP: An RTP Payload Format for Generic Forward
Error Correction.
o RFC 2250 - RTP: RTP Payload Format for MPEG1/MPEG2 Video
o RFC 3497 - RTP: Payload Format for Society of Motion Picture and
Television Engineers (SMPTE) 292M Video
o RFC 3376 - IGMP: Internet Group Management Protocol, Version
3
o RFC 2236 - IGMP: Internet Group Management Protocol, Version
2
o RFC 0791 - IPv4: Internet Protocol
o RFC 3261 - SIP : Session Initiation Protocol
o RFC 0793 - TCP : Transmission Control Protocol
o RFC 0792 - ICMP: Internet Control Message Protocol
o RFC 0768 - UDP : User Datagram Protocol
o RFC 0959 - FTP: File Transfer Protocol
o RFC 2068 - HTTP: Hypertext Transfer Protocol -- HTTP/1.1
o RFC 0764 - Telnet: Telnet Protocol specification
o RFC 1157 - SNMP: Simple Network Management Protocol (SNMP)
o RFC 2030 - SNTP: Simple Network Time Protocol (SNTP) Version 4
for IPv4, IPv6 and OSI
o RFC 3497 - RTP Payload Format for Society of Motion Picture and
Television Engineers (SMPTE) 292M Video
o RFC 3550 - RTP: A Transport Protocol for Real-Time Applications
o Pro MPEG Forum Code of Practice 3 version 2: Transmission of
Professional MPEG-2 Transport Streams over IP Networks
o Pro-MPEG Code of Practice \#4 release 1 July 2004 Transmission
of High Bit Rate Studio Streams over IP Networks

ASI-IP-GTW User's Manual
Page 87
10 Appendix D: Upgrade of Features
The ASI-IP-GTW ASI to IP Video Gateway encompasses software
licensing of functionality. This appendix describes how to upgrade the
product features with the software feature system.
Customers who purchase "base" software licenses may wish to increase
their software functionality or feature set at some point. A feature
license conveys the right to use a feature, but cannot add a feature to a
software release that does not support it.
The following table describes which functionality is currently available
through software licenses:
Table 25. Functionality enabled through software licenses
When you order upgrade of functionality on your ASI-IP-GTW, you will
receive a license key on email. Figure 37 shows the format of the
license key. The license key is an encrypted code linked to the serial
number of the unit to be upgraded.
----------------------------------------
6ysyqeGI/3vcJVAWmxv6oJ9EJZQLEE0NzEBkjUZa
/rTozK6ZqTH0g70XBFow7pmDq0yVdtnwSleHrcGM
LgewY1PXwWOlwHc7fLvDq6wsGnv6ZiNHYmeljiEP
0mk5K5D7lEKlCxxsR9BP4ab90V08xBy8hk2OVSeq
DHx7iTLSnryP9IXydyM01J3I3yMGzoKSvkSd9ZyV
7w8xNF+q1KLjYMRKc1p5QE3TVUdjM+PjV3lPOkjI
36uWViPKQjybdBD372DSyGXoudiwP+YZlhuLNcmD
JmgOc12yctrfGwzXum72McNUM/oKtURptnupiuFX
kWHljxHKomJRkPv9OIIMQLNIbE41Gp6YwC/cQYpD
vIvQJX5fmVvfwPNL6hIXuF9yORfZpN7PJ6883nye
IM2pdMgo3kLzMTwXTNTbdzK56Ngxfc5wKEL7HsDQ
7JN2BytuctrfGwzXum7dOaxAmr5lVERptnupiuFX
4en1cXPkGnRRkPv9OIIMQHZHsI2bHY5DitH3nha8
Jd7QJX5fmVvfwPNL6hIXuF9y+8Qe8v1I2fYQ/plC
2KRICsgo3kLzMTwXTNTbdzK56NjoFEBEDiCcW8DQ
7JN2BytuKelcSUunCXjKx4O1PRpXpw==
----------------------------------------
Figure 37. Format of feature key
In order to upgrade the unit, open the web page
"http://<ip_address_of_unit>/upgrade"
(ex. http://192.168.0.100/upgrade).
Functionality Max value Description
Number of enabled ports 8 The number of ASI ports enabled. This
can be different from the number of ports
physically mounted.
Data port max. speed: 1000Mbit/s The speed of the data port can be
100Mbit/s or 1000Mbit/s.
Connect Control NA Enabled control of the unit through the
Connect software.
Forward Error Correction NA Pro-MPEG Forward Error Correction
enabled for use on all streams.
Bi-directional operation NA Enables simultaneous transmission and
reception of MPEG2 data on the Ethernet
data interface.
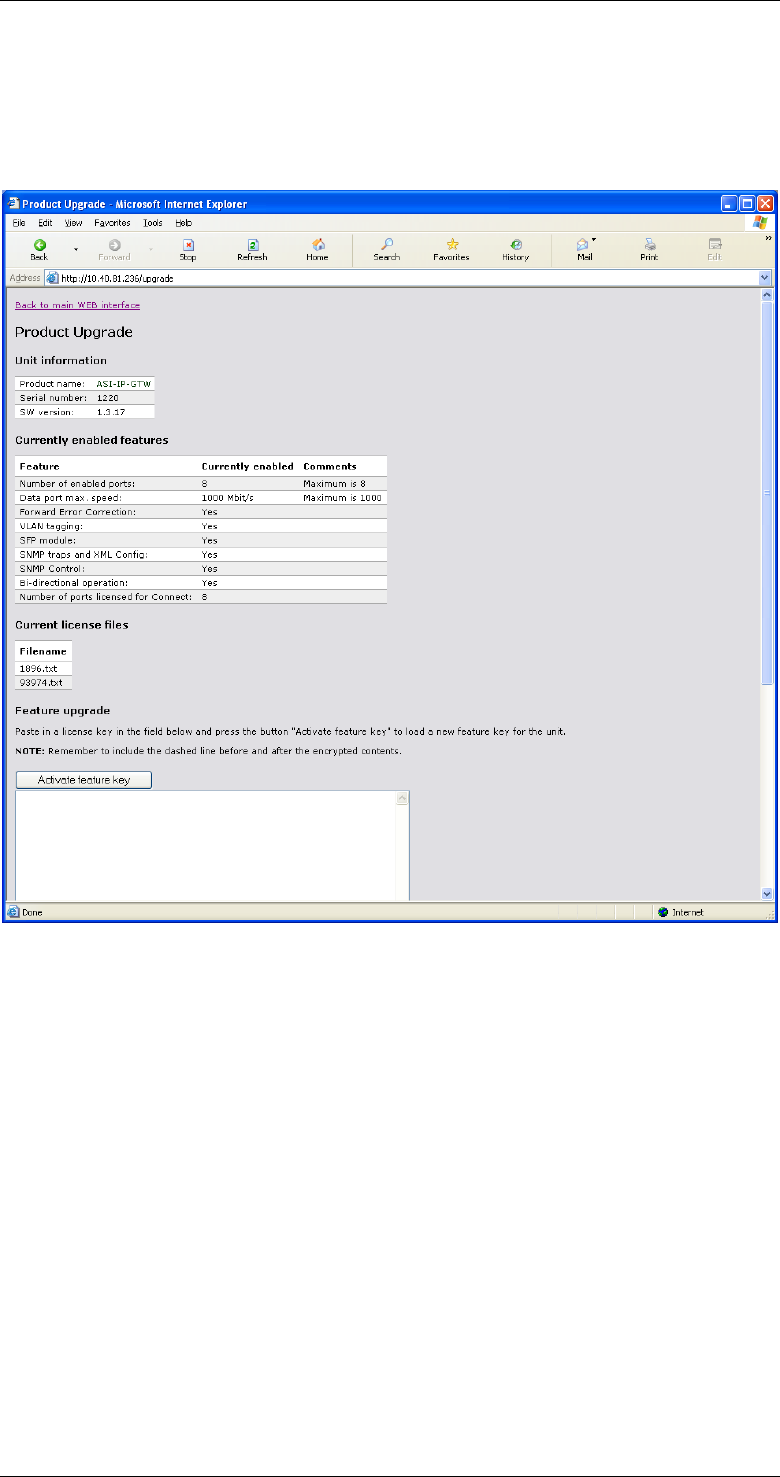
ASI-IP-GTW User's Manual
Page 88
Figure 38 shows the feature upgrade page. Please paste in the license
key in the "Activate feature key" field and press the button "Activate
feature key" to load a new feature key for the unit.
Figure 38. Feature upgrade page
Note: Remember to include the dashed line before and after the
encrypted contents.
The dialogue shown in Figure 39 will appear when a valid license key is
downloaded to the unit.
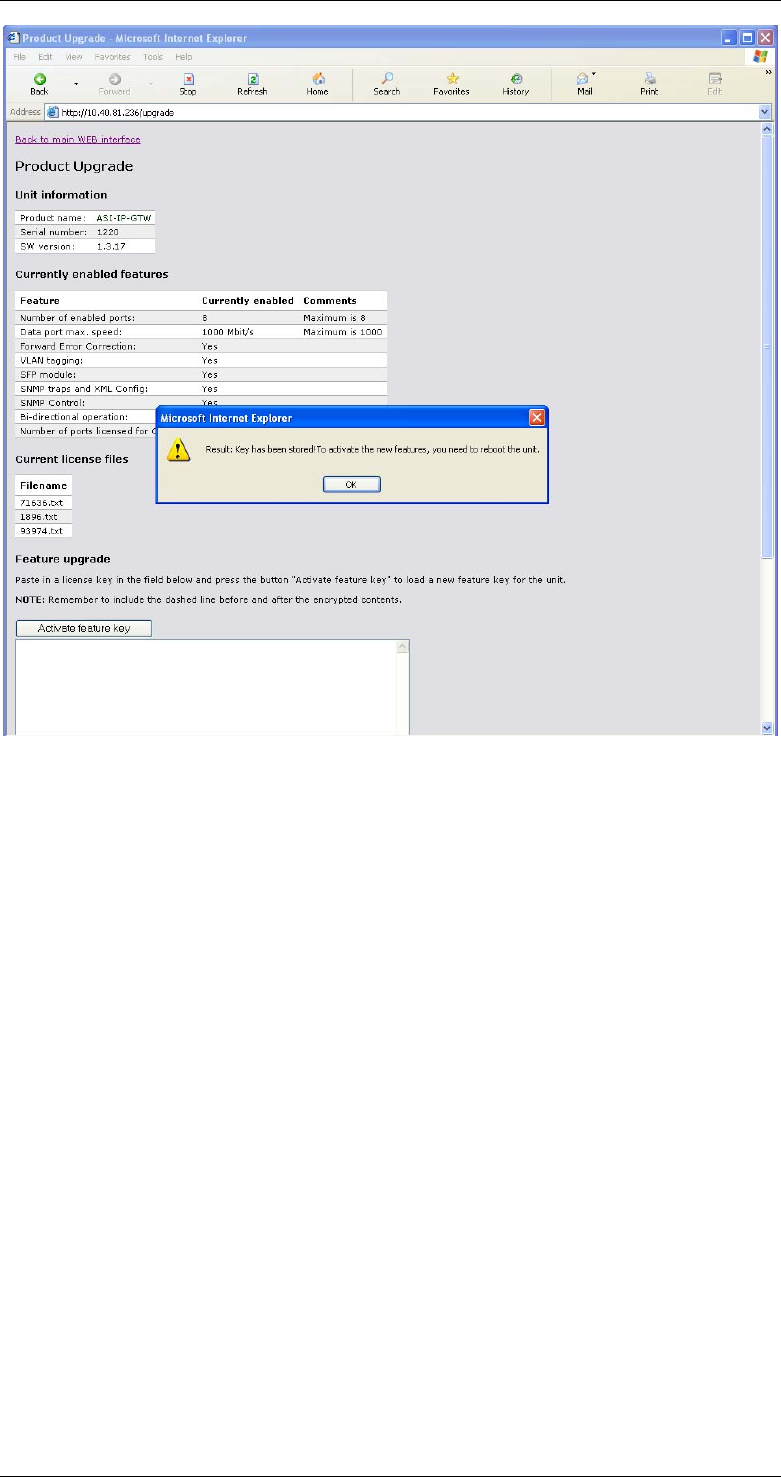
ASI-IP-GTW User's Manual
Page 89
Figure 39. Feature upgrade dialogue
Note: Please observe that you have to switch off and on the unit to
active the new keys.
In addition to the feature upgrade field, the Upgrade-page contains
information about the unit and currently enabled features.
The license files already entered to the unit are listed under current
license files. A license key can contain license to one or more features.
The feature set of the unit is always the sum of the features from all the
license keys entered.
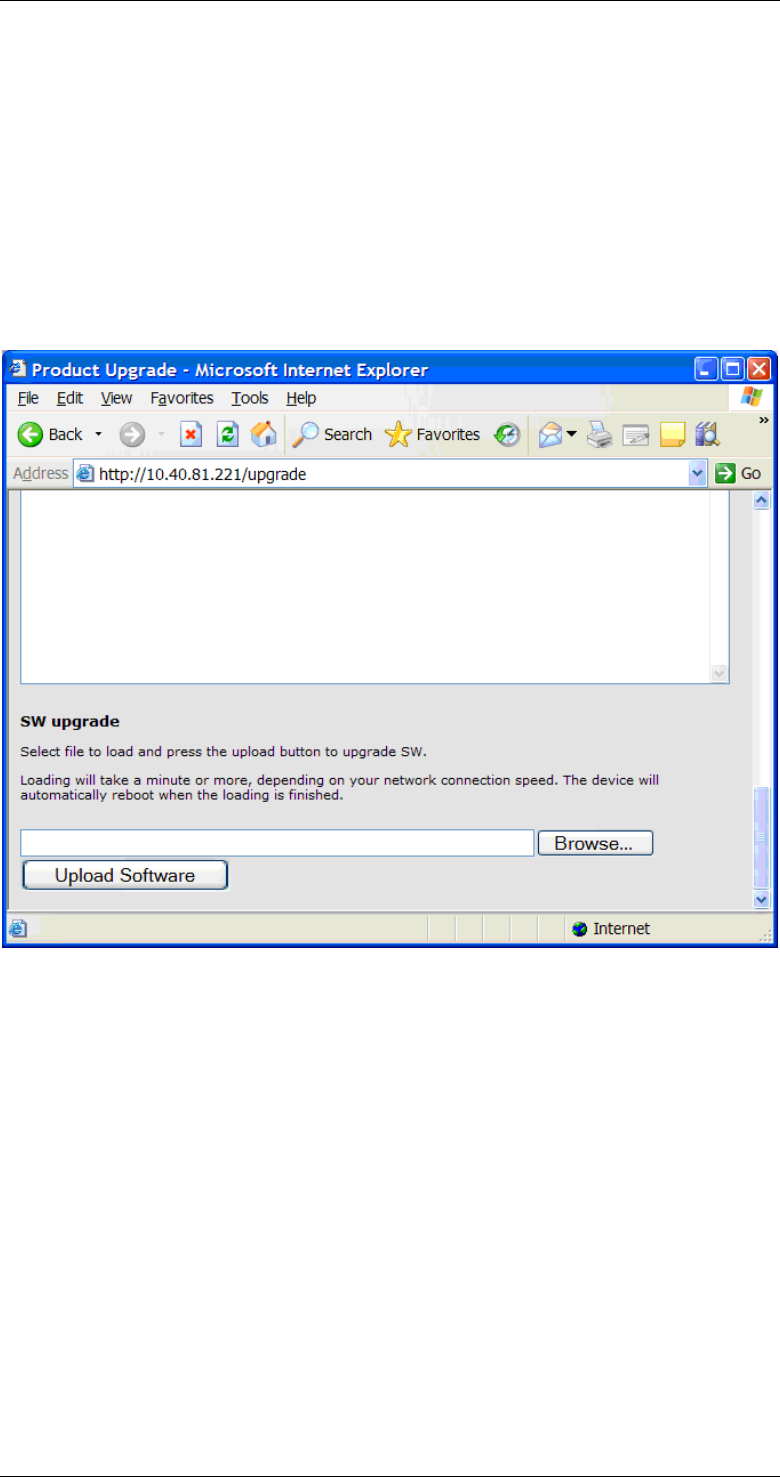
ASI-IP-GTW User's Manual
Page 90
11 Appendix E: Upgrading Software
SW loading can be performed from the bottom of the /upgrade page, as
shown in Figure 40.
This option is available on SW versions 1.3.0 and above. To load SW on
older SW versions, please refer to documentation on how to load SW by
FTP.
Press the ‘Browse’ button and select the file to load to the device. The
file must have the filename extension ‘.out’. Then press the ‘Upload
Software’ button to start the SW loading.
Figure 40 Upgrade SW
File loading from this page uses HTTP port 80, making it useful to pass
through firewalls. If you have not blocked pop-ups in your browser, a
progress meter (Figure 41) is displayed during file transfer. By pressing
the ‘cancel’ button the transmission can be cancelled. If you do not see
the progress meter, the SW loading can still be interrupted by pressing
the stop button in your browser.
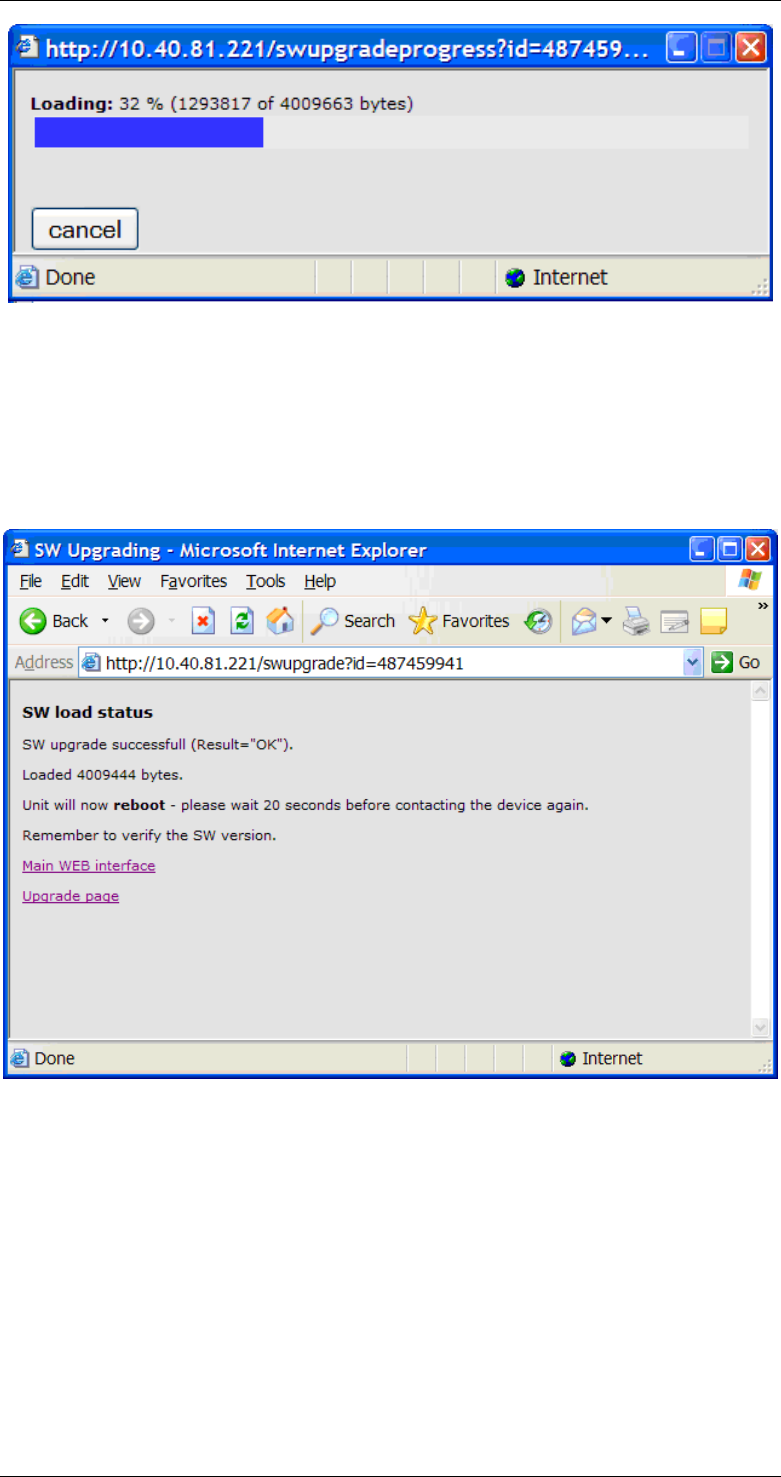
ASI-IP-GTW User's Manual
Page 91
Figure 41 SW load progress
When the file is transferred, a status message is printed in the main
browser window. If the loading was successful, the device is
automatically rebooted to start the new SW.
Figure 42 SW load status
Please remember to verify the new SW version on the ‘Device Info’ page
after the device has re-booted.
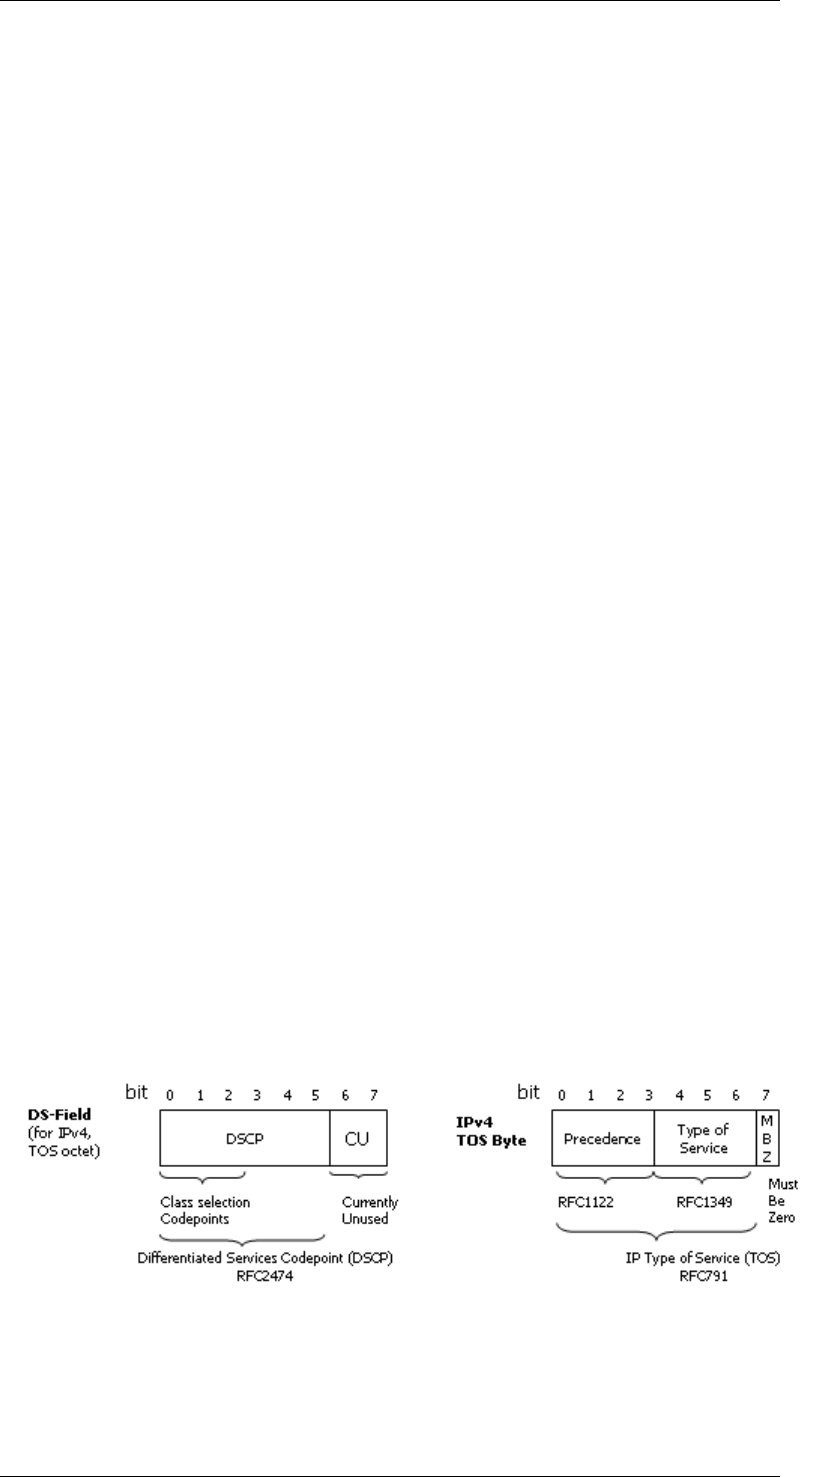
ASI-IP-GTW User's Manual
Page 92
12 Appendix F: Quality of service – Setting
Packet priority
Normal IP routing is by best effort. This does not work well for
broadcast television as the video and audio components needs to be
transport as a continuous flow of packets without inference caused by
other traffic over the internet. There are different techniques to secure a
high quality of service. The main ones are:
o MPLS (Multi Protocol Label Switching)
o Layer 3 routing priority
o Layer 2 routing priority
12.1 MPLS
In networks running MPLS, the packets are forwarded along a
predefined path from an ingress router to an egress router. Packet
switching is then done according to the label and packets will be
switched expediently. The MPLS label is added to the IP packet by the
ingress router and removed on the egress router. The labelling is done
on the basis of packet classification.
12.2 Layer 3 Routing
An alternative technique to get QoS is to use layer 3 routing and give
video content packets higher priority than other data. IP packets are
put into queues according to their priority. Packets with high priority
are forwarded expediently and have a lower probability to being
discarded due to buffer overflow.
There are two ways prioritize IP packets called Differentiated services
(Diff-serve) or by the precedence bits (TOS). Both these method use
the same bits in the IP header and both of them are in common use.
IP precedence values range from 0 to 7.
DSCP values range from 0 to 63.
Figure 43 Differentiated services (Diff-serve) or by the precedence bits (TOS )
Layer 3 prioritisation may also be combined with MPLS where layer 3
routing is used in the aggregation network and MPLS in the core
network. The DSCP priority setting may be used for MPLS tagging.

ASI-IP-GTW User's Manual
Page 93
1.1.1.37 ASI-IP-GTW Configuration
The number entered into the Type of service (TOS) field on
ASI-IP-GTW IP TX configuration menu defines all 8 bits. The value used
should be in accordance with traffic engineering policy of network and
should be in the range from 0 to 255.
12.3 Layer 2 priority
Prioritisation can also be supported at layer 2 for the case when VLAN
tags. The 802.1q VLAN tag has 3 bits for setting the Class of Service
(COS). The operation is further defined in 802.1p. The COS bits will be
handled in the same ways as diff-serve or precedence bits with regard
to packet classification in the network
1.1.1.38 ASI-IP-GTW Configuration
The COS priority is entered on the VLAN configuration tab on the
ASI-IP-GTW IP TX configuration menu, in the field named VLAN
Priority. A value in the range from 0 to 7 should be inserted. This
value will be directly transferred to 3 user priority bits in the VLAN
header.
More information on quality of service issues and configuration can be
found in the literature e.g. router configuration guides.
