NeuroPace 902 Wand User Manual NeuroPace
NeuroPace, Inc. Wand NeuroPace
User manual
1
NeuroPace®
Remote Monitor
Manual
CAUTION: Federal law restricts this device to sale by or on
the order of a physician.
10/2011 DN 1013557 Rev 1
2
© 2011 NeuroPace, Inc.
3
This Manual supports:
• NeuroPace® Wand Model W-02
• NeuroPace® Remote Monitor Model DTR-300 with Application Software version
1.6
FCC Information
The following is communications regulation information on the Model RNS-300M
Neurostimulator and Model W-02 Wand.
Neurostimulator FCC ID: WBWRF300
Wand FCC ID: WBW902
All components comply with Part 15 of the FCC Rules. Operation is subject to the
following 2 conditions: (1) This device may not cause harmful interference, and (2) this
device must accept any interference received, including interference that may cause
undesired operation.
IMPORTANT: Changes or modifications to these components not expressly approved
by NeuroPace, Inc. could void the FCC Certification, and negate your authority to
operate them.
This equipment complies with FCC radiation exposure limits set forth for an uncontrolled
environment. This transmitter must not be co-located or operating in conjunction with
any other antenna or transmitter.
Electromagnetic Emissions and Immunity and Wireless Technology
Medical Electrical Equipment needs special precautions regarding EMI and the
following precautions should be taken before use.
The Remote Monitor may cause radio interference or may disrupt the operation of
nearby equipment. The Remote Monitor may be interfered with by other equipment,
even if that other equipment complies with CISPR emission requirements. It may be
necessary to take mitigation measures, such as re-orienting or relocating the Remote
Monitor or shielding its location.
The Remote Monitor should not be used adjacent to or stacked with other equipment. If
adjacent or stacked use is necessary, the Remote Monitor should be observed to verify
normal operation in the configuration in which it will be used.
Portable and mobile RF communications equipment can affect the Remote Monitor.
4
Table of Contents Page
About the RNS® System 5
Warnings and Precautions 8
When you should use the Remote Monitor 12
Setting up the Remote Monitor 14
Operating the Remote Monitor 18
How to use the Remote Monitor to collect and
send data to the PDMS database 20
Changing your Remote Monitor communication
settings 35
Care and maintenance 40
Troubleshooting 42
Technical Specifications 49
If You Need Help 50
5
About the RNS® System
Indications for Use
The RNS® System is an adjunctive therapy in reducing the frequency of seizures in
individuals 18 years of age or older with partial onset seizures from no more than two
foci that are refractory to two or more anti-epileptic medications.
Purpose of your Remote Monitor
The NeuroPace® Remote Monitor Model DTR-300 is designed for use with the RNS®
Neurostimulator Model RNS-300M.
A Remote Monitor lets you collect data from the Neurostimulator, and send the data to
your doctor. The Remote Monitor consists of a special software program installed on a
laptop computer, a Wand and telephone accessories.
After connecting the hand-held Wand to the laptop, data in the Neurostimulator are
collected by placing the Wand over the Neurostimulator. The Wand uses Radio
Frequency (RF) communication to collect the data. Data are stored in the laptop and
then sent to a secure database over a phone line. The database is called PDMS
(Patient Data Management System) and only your doctor can access your data. Your
doctor will review the data and use the results to adjust the Neurostimulator settings
during future office visits.
Important Information
Please see your RNS® System Patient Manual for important safety information such as
Contraindications, Warnings, and Precautions and additional information regarding the
RNS® System and your therapy.
You must be willing to collect data daily from the Neurostimulator, and then send the
data to the PDMS database at least once a week. Your doctor may direct you to collect
and send data more often.
The Remote Monitor and its Parts
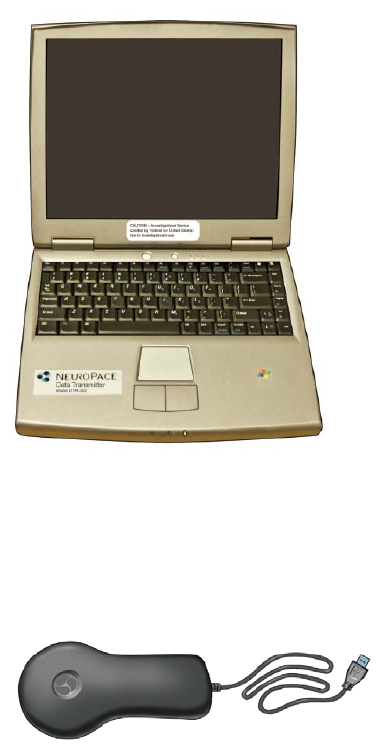
The Remote Monitor Software on Laptop Computer
The Remote Monitor software program is already installed on the laptop computer. It
stores data collected by the Wand, and then sends it to the secure PDMS database
over a phone line.
(The laptop computer you receive may not be the same model shown here. The location
of power cord, phone cord and USB connections may also differ from the model shown
here.)
Wand
The Wand collects data from the Neurostimulator and stores it in the laptop computer.
Data are collected through Radio Frequency (RF) communication.
Power cord
The power cord powers the laptop computer and charges its battery. The laptop comes
with battery installed, but not fully charged.
6
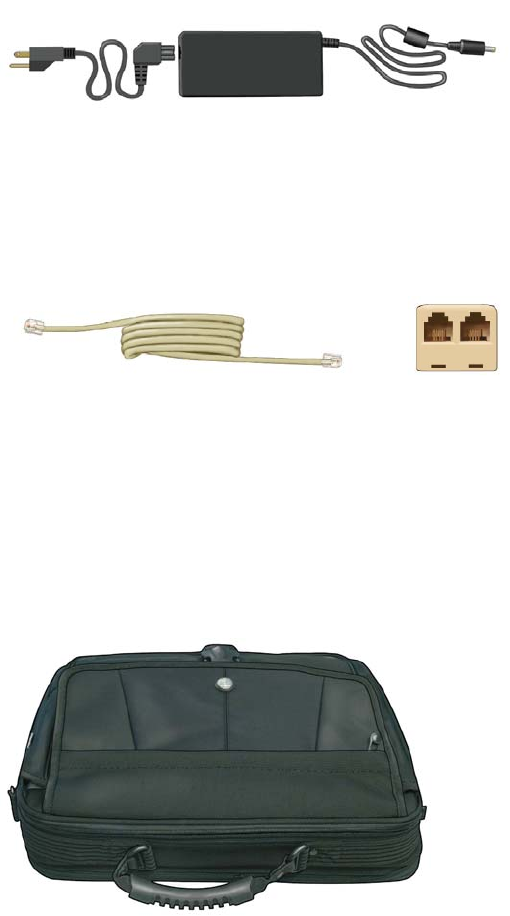
(The Power Cord may come as 1 or 2 pieces, depending on the laptop computer model
you receive.)
Phone Accessories
The phone accessories let you connect the laptop computer to your phone wall jack. A
phone cord is included along with a Phone Splitter that converts 1 phone wall jack into 2
separate jacks.
Quick Start Guide
The Quick Start Guide is short reference guide that covers the key tasks for operating
the Remote Monitor.
Carrying Case
The carrying case is for storing your Remote Monitor parts when not in use.
Make sure you have all the items described above. Contact NeuroPace® Customer
Support if any items are missing. See the back cover of this Manual for contact
information.
7
8
Warnings and Precautions
WARNING
• To avoid electrical shock (as with any electronic device such as a laptop
computer):
o DO NOT use the Wand or laptop when you are wet
o DO NOT get water or liquids on the Wand or laptop.
o DO NOT modify the power cord that came with your Remote Monitor in
any way. Connect the power cord to a properly grounded wall outlet. If
your Remote Monitor came with a 3-pronged plug, connect it to a wall
outlet that accepts that type of plug.
o DO NOT use the Wand or laptop during an electrical storm.
o DO NOT clean the Wand or laptop with any cleaning liquids or aerosols.
Wipe the outside of the Wand and laptop with a clean cloth, dampened
with water and wrung out. Make sure to disconnect the laptop from the
wall outlet before cleaning.
o DO NOT use the Wand or laptop if you think they appear to be damaged
or are not working properly. DO NOT attempt to repair the Wand or laptop.
Contact NeuroPace® Customer Support for assistance.
Not following these instructions may cause an electrical shock that may result in
serious injury or death, and may damage the Wand or laptop.
CAUTION:
• DO NOT use (position) the Wand over any other medical device. The Wand may
momentarily interfere with operation of the other device but should not result in
any harmful effects. This includes other implanted devices such as a pacemaker
or defibrillator, as well as devices that are used outside the body, such as a
CPAP machine. Not following these instructions may momentarily interfere with
the operation of other medical devices.
9
• DO NOT use the laptop for any other purpose except as instructed in this
Manual. The laptop is designed to operate only as part of the Remote Monitor.
DO NOT make any changes or adjustments to the laptop hardware or software.
This includes attaching external devices like a mouse, or inserting CDs or DVDs
into the drive. Any changes you make that are not part of the instructions in this
Manual may damage the Remote Monitor and may not allow you to send data to
the PDMS database.
• You should collect data daily from the Neurostimulator, and send it to the PDMS
database at least once a week. Your doctor may direct you to collect and send
data more often. By sending your data on a regular basis, your doctor will be able
to identify problems and make adjustments. Your doctor will also be able to
determine when battery power is getting low. If you do not collect and send data
as directed, your doctor may not be able to review your data and make
adjustments on a timely basis.
If you are having seizures more frequently or with greater severity, talk with your
doctor as soon as possible. Your doctor may ask you to collect and send data to
the PDMS database on a more frequent basis until adjustments can be made to
the Neurostimulator settings.
There may be a few times when you will be unable to collect and send data. This
might be due to a damaged Wand or laptop, a problem with the phone line, or
while you are travelling. Talk to your doctor about what you should do if you are
unable to collect or send data to the PDMS database as directed.
• DO NOT test the Wand signal for more than 10 minutes a day. Test the Wand
signal only as necessary to check the Wand signal strength and quality. Testing
the Wand signal for more than 10 minutes a day may cause the Neurostimulator
battery to drain more quickly than expected.
• DO NOT use the Wand or laptop in temperatures above or below the
recommended operating range (32oF-95oF). The Wand or laptop may not operate
properly at temperatures below 32oF or above 95oF. These devices may also
become warm during normal operation. DO NOT use them when the room
temperature is above 95oF to avoid discomfort.
• DO NOT rest the laptop on exposed skin during use. The bottom of the laptop
computer may become hot during normal operation and may cause discomfort or
a possible burn.

10
• DO NOT set up the Remote Monitor where people can trip over the cords. The
laptop power cord and phone cord may be tripping hazards, especially for small
children and pets. Tripping over the cords may damage the Remote Monitor
parts, and may result in bodily injury. DO NOT rest anything on the power cord.
• DO NOT move the Remote Monitor to another location without first disconnecting
the parts and storing them in the Carrying Case. Disconnect the Wand from the
laptop, and the laptop from the wall outlet and phone jack/splitter. You may
damage the parts if you do not disconnect them before moving.
• You cannot make an outgoing call and send data at the same time, using the
same phone number. If you need to make an emergency call while the Remote
Monitor is sending data, disconnect the phone cord from the laptop. This will
suspend data transmission so you can make the call. Any unsent data will be
included with the data you send the next time.
• DO NOT connect your Remote Monitor laptop to any type of “digital” phone line.
It must be connected to an “analog” phone line. Connecting to a digital phone line
will damage the laptop and not allow you to send data to the PDMS database. If
you are not sure what type of phone line you have, call your phone service
provider and ask them. You may also contact NeuroPace® Customer Support for
assistance.
Refer to the RNS® System Patient Manual for complete information on
Contraindications, Warnings and Precautions related to the Neurostimulator, Leads and
Magnet.
Interference from electronic devices
Electrical devices and appliances in and around the home emit energy when they are
on. That energy can interfere with the RNS® Remote Monitor. This type of interference
is called electromagnetic interference (EMI). The RNS® System is designed to operate
in the presence of EMI. Some common household devices and appliances that produce
EMI may temporarily affect the ability of the Wand and Remote Monitor to collect data
from the Neurostimulator. Such devices include mobile phones, personal audio players,
fluorescent lights, computer equipment, and home medical equipment. Appliances such
as blenders, electric toothbrushes, vacuum cleaners and televisions can also produce
EMI. The possibility of EMI decreases as you move the Wand and Remote Monitor
further away from the device or appliance.
11
In addition, using the Wand and Remote Monitor to collect data from the
Neurostimulator could interfere with common household devices such as a Bluetooth
headset or AM radio.
The RNS® Remote Monitor has not been tested in the presence of all possible sources
of EMI.
12
When you should use the Remote Monitor
NOTE: Completing both of the following steps on a regular basis will ensure that
important information about your brain activity and about the Neurostimulator is
available for review by your doctor on a timely basis.
You are expected to use the Remote Monitor on a regular basis for as long as you use
the RNS® System. You should 1) collect data daily from the Neurostimulator, and 2)
send it to the PDMS database at least once a week.Your doctor can then make
adjustments to the Neurostimulator settings during future office visits. The data also lets
your doctor see when the battery is low or when there are problems with the
Neurostimulator. Your doctor may direct you to collect and send data more often.
CAUTION: If you are having seizures more frequently or with greater severity, talk with
your doctor as soon as possible. Your doctor may ask you to collect and send data to
the PDMS database on a more frequent basis until adjustments can be made to the
Neurostimulator settings.
Testing the Wand Signal
Your Wand and Neurostimulator communicate through Radio Frequency (RF). RF is
how data are collected from the Neurostimulator by the Wand and then stored in the
laptop.
You can test the Wand signal on the Remote Monitor laptop screen. Signal strength is
higher the closer you move the Wand to the Neurostimulator. Signal quality is higher
when there is little interference from other nearby electronic appliances or devices.
Whenever it is time to collect data from the Neurostimulator, you can check the Wand’s
signal to make sure you have positioned the Wand close enough to the Neurostimulator
for data collection to occur. You should keep the Wand within about an inch of the
Neurostimulator for best results.
See pages 22-25 for more information on testing the Wand signal.
13
Collecting and sending data through the Remote Monitor to the PDMS
database
Expect that it may take a few minutes to collect data from the Neurostimulator, and up
to 20 minutes to send the data to the PDMS database.
See pages 29-32 for information on sending data to the PDMS database.
If you have problems using the Wand or laptop computer, contact NeuroPace®
Customer Support.
14
Setting up the Remote Monitor
Step 1
Find a suitable place to set up the Remote Monitor. Make sure you review the Warnings
and Precautions on pages 8-11 before choosing a location.
This should be an area:
• Away from water, moisture or dampness that can damage the Wand and laptop
• Away from extreme temperatures (below 32oF or above 95oF) that can interfere
with Wand and laptop operation
• Away from small children and pets who can damage the Wand and laptop
• Away from large electrical appliances that might be a source of electromagnetic
interference (EMI) and interfere with Wand and laptop operation
• Close to an analog phone line jack
• Near an electrical wall outlet that will accept the type of power cord plug that
came with your laptop.
You will not be able to confirm that there are no large sources of EMI nearby until you
test the Wand signal. See pages 22-25 for information on testing the Wand.
Determine if the Remote Monitor will be sharing the same wall jack as your phone. If so,
it is recommended that you use the Phone Splitter that is provided. This will allow you to
connect 2 phone cords (one for the Remote Monitor and one for your regular phone) to
the same wall jack. This way you can keep your regular phone connected at all times.
• CAUTION: DO NOT connect your Remote Monitor laptop to any type of “digital”
phone line. It must be connected to an “analog” phone line. Connecting to a
digital phone line will damage the laptop and not allow you to send data to the
PDMS database. If you are not sure what type of phone line you have, call your
phone service provider and ask them. You may also contact NeuroPace®
Customer Support for assistance.
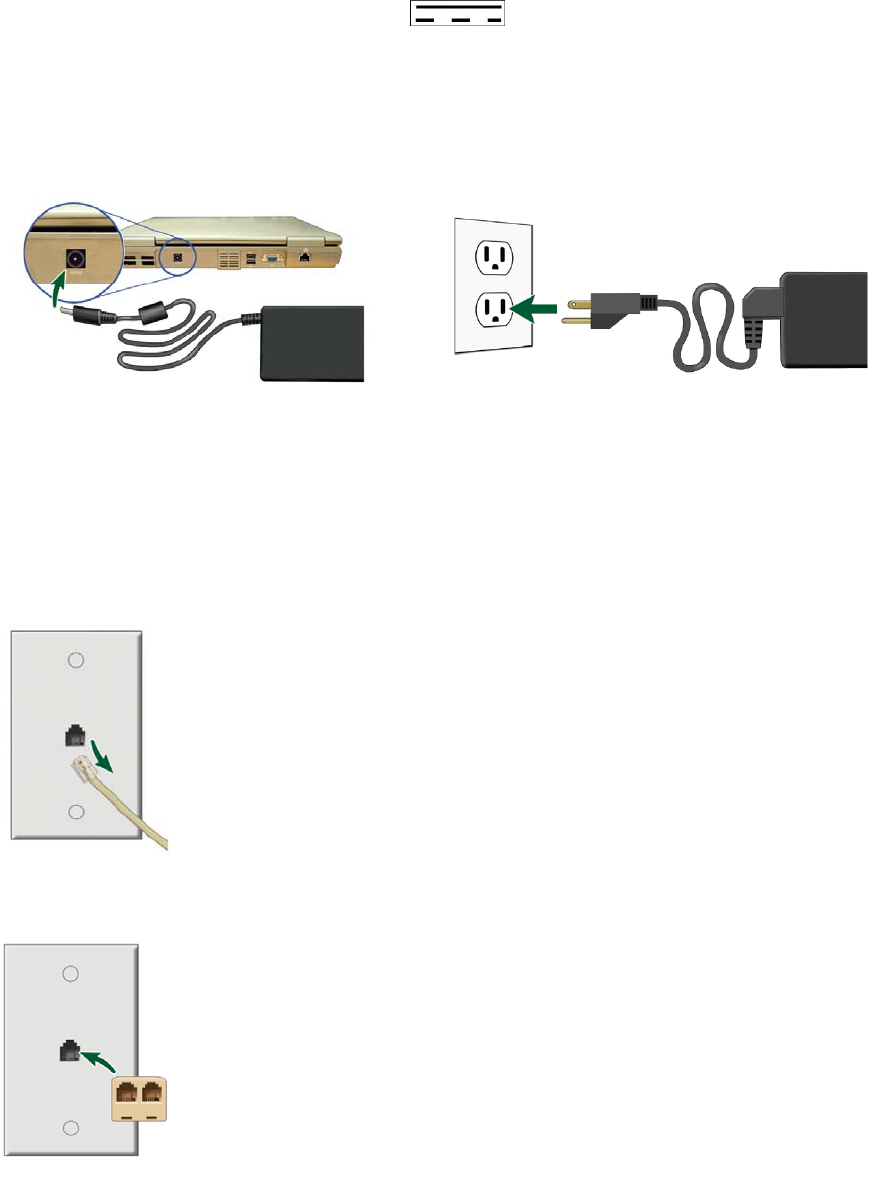
Step 2
Locate the power connection symbol ( ) on the side or back of your laptop.
Plug one end of the Power Cord into the laptop and the other end into an electrical wall
outlet. You may need a wall outlet that accepts a 3-pronged plug. If your Power Cord
comes as 2 separate pieces, first attach the 2 pieces before connecting the laptop to the
wall outlet.
Step 3
Skip this step if the Remote Monitor will not be sharing the same wall jack as your
regular phone.
Disconnect your regular phone cord from the wall jack.
Connect the Phone Splitter to the phone wall jack.
15
Then reconnect your regular phone cord to the Splitter.
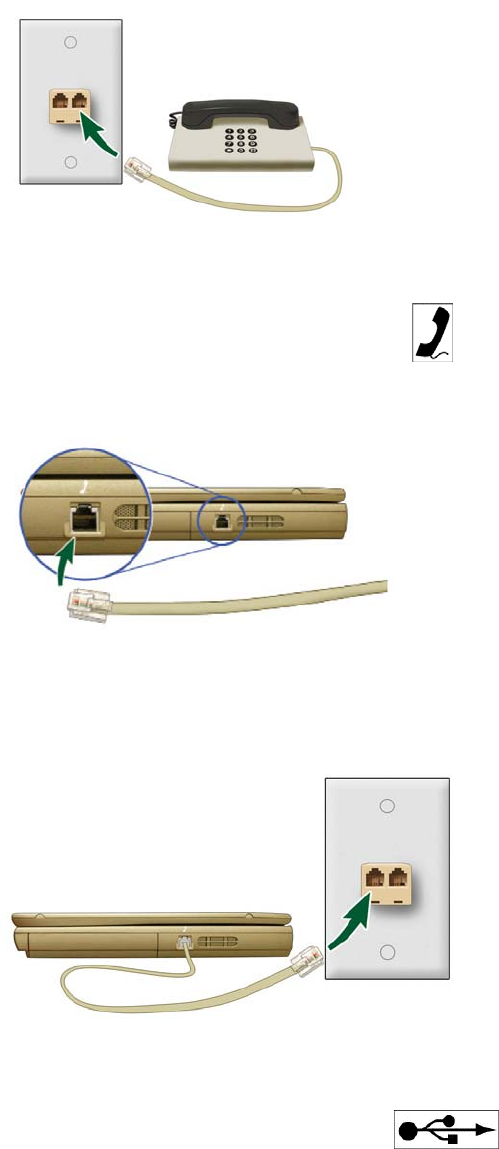
Step 4
Locate the phone connection symbol ( ) on the side or back of your laptop. Take the
phone cord (provided) and connect one end to the laptop.
Then connect the other end to the wall jack (or Splitter).
Step 5
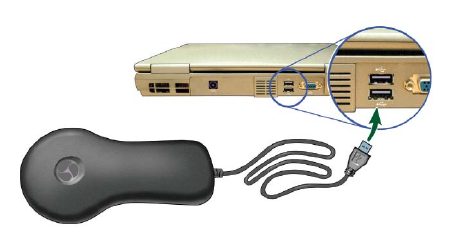
Locate the USB connection symbol ( ) on your laptop. Plug the Wand cord
into the USB port. Remote Monitor setup is now complete.
16
NOTE: To confirm that the Remote Monitor is set up correctly, you should:
1) Test the Wand signal (see pages 22-25)
2) Collect data from the Neurostimulator (see pages 26-28)
3) Send data to the PDMS database (see pages 29-32)
If you are able to complete all 3 tasks successfully, you have properly set up the
Remote Monitor. If not, See Troubleshooting on pages 42-48 for information on how to
solve the problem.
17
Operating the Remote Monitor
The main components of the Remote Monitor are the laptop computer with the special
software installed, and the Wand. You will use the Wand to collect data from the
Neurostimulator, and store it in the laptop computer. The laptop is then used to send the
data over an analog phone line to a secure PDMS database that only your doctor can
access. The Remote Monitor also lets you test the signal between the Wand and
Neurostimulator to verify you have a strong signal. A software program installed on the
laptop controls the use of the Remote Monitor.
NOTE: Software screens that appear on the laptop and that are described below may
not exactly match the screens that will appear on your laptop. This is due to differences
in the type of laptop you may receive as part of the RNS® System.
How to use the Laptop Computer
Turning the laptop computer on
NOTE:
• Before turning on the Remote Monitor, be sure you have completed all of the
setup steps on pages 14-17.
• If this is the first time you are using the Remote Monitor, the laptop battery will
not be fully charged until it is plugged into the wall outlet for about 2 hours.
Step 1
Open the laptop display.
18
Step 2
Press the power button ( ) on the laptop to turn it on.
The Home screen will appear whenever you turn the laptop on.
NOTE: If the laptop does not turn on, it may not be connected to a wall outlet, or the
laptop battery may be drained.
Using the touchpad/button to make screen selections
To use the Remote Monitor, you will need to know how to move through the
NeuroPace® screens that will appear on the laptop display. Navigation is controlled with
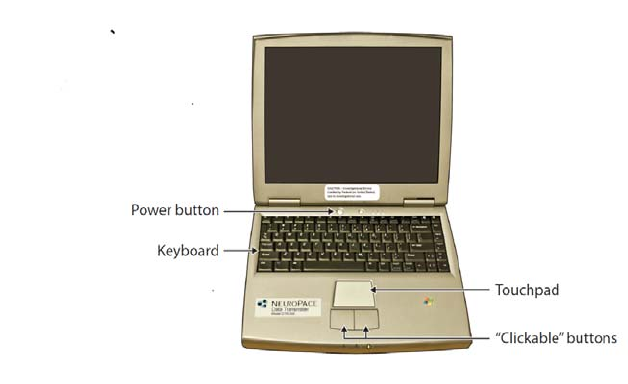
the laptop touchpad and adjacent buttons. The touchpad is located under the laptop
keyboard. Below or next to the touchpad are two “clickable” buttons.
The laptop keyboard is used to enter information, like your User Name
Slide your finger on the touchpad to move the cursor ( ) around the laptop screen to a
desired location. This is how you move about screens.
The left “clickable” button is used to select an item on the screen once your cursor is in
the right spot. Press and release (click) the left button to make your selection and move
to the next screen.
NOTE: DO NOT connect an external mouse to the laptop.
19

How to use the Remote Monitor to collect and send data to
the PDMS database
Step 1
Turn the laptop on to display the Home screen.
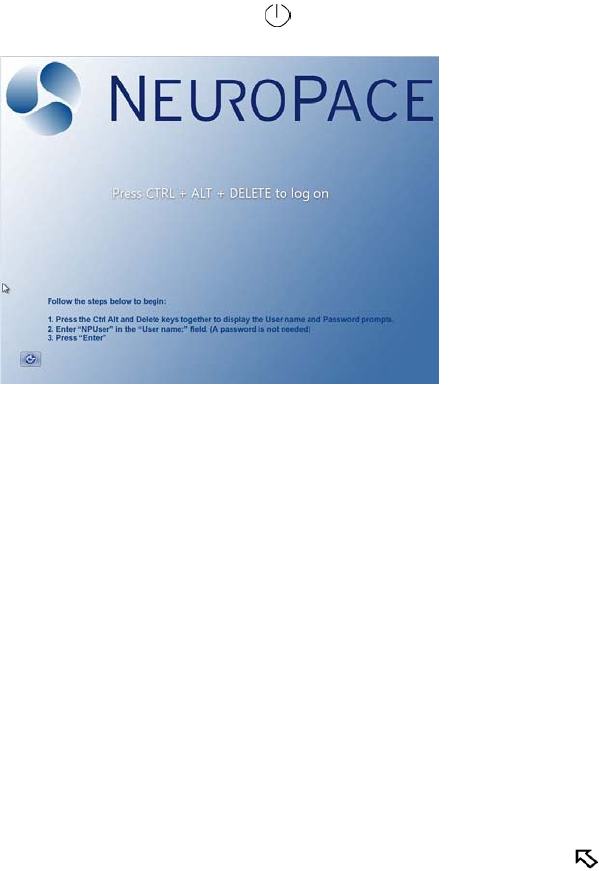
Step 2
Press and hold Ctrl, Alt, and then Delete on the keyboard. Keep all keys pressed
down together.
The Login screen appears.
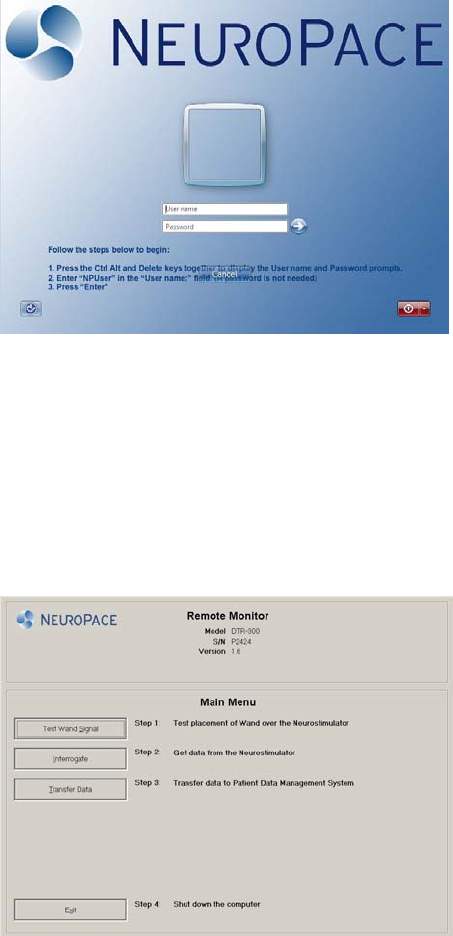
20
Step 3
NPUser should already appear in the “User Name” box. If not, move the cursor over the
User name box and right click using the touchpad. Then, use the keyboard to enter
NPUser in the box. This is the User Name you will see (or enter) every time you see
this screen.
NOTE: The User Name NPUser is not case-sensitive.
Ignore the bottom “Password” box. You will leave this entry blank.
Step 4
Move the cursor over the Arrow button on the screen to the right of the “Password” box.
Click the Arrow button to complete the login.
21
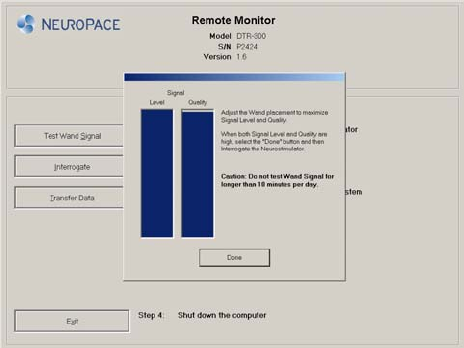
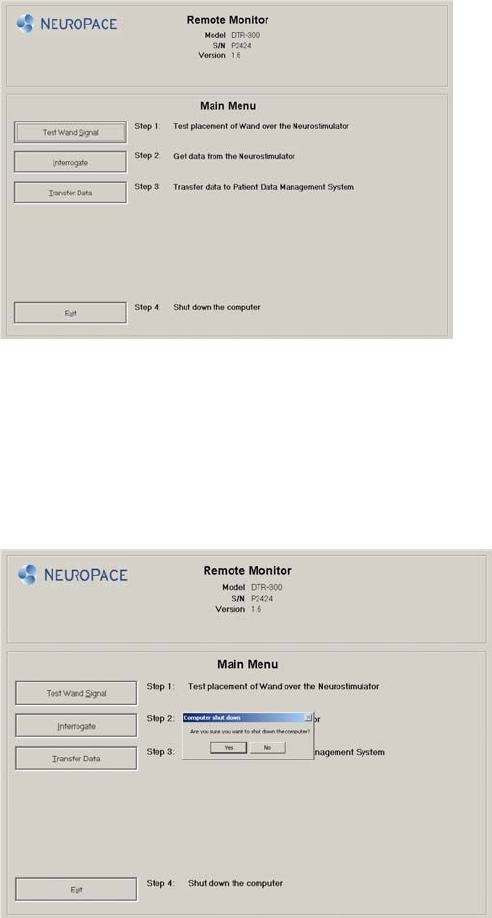
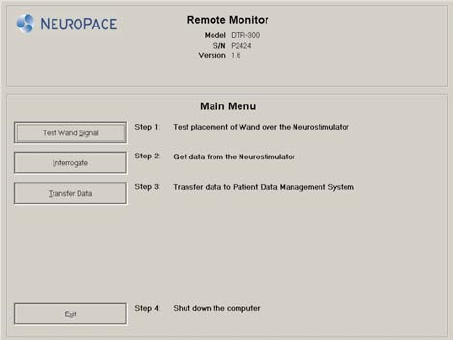
The Main Menu screen appears. The top 3 buttons on the Main Menu screen let you
perform the 3 main Remote Monitor tasks. The Exit button at the bottom lets you turn
the laptop off.
Testing the Wand signal
The Wand is used to collect data from the Neurostimulator and store it in the laptop.
Data are collected using Radio Frequency (RF) communication. Whenever it is time to
collect data from the Neurostimulator, you can check the Wand’s signal to make sure
you have positioned the Wand close enough for data collection to occur. You should
keep the Wand within about an inch of the Neurostimulator for best results.
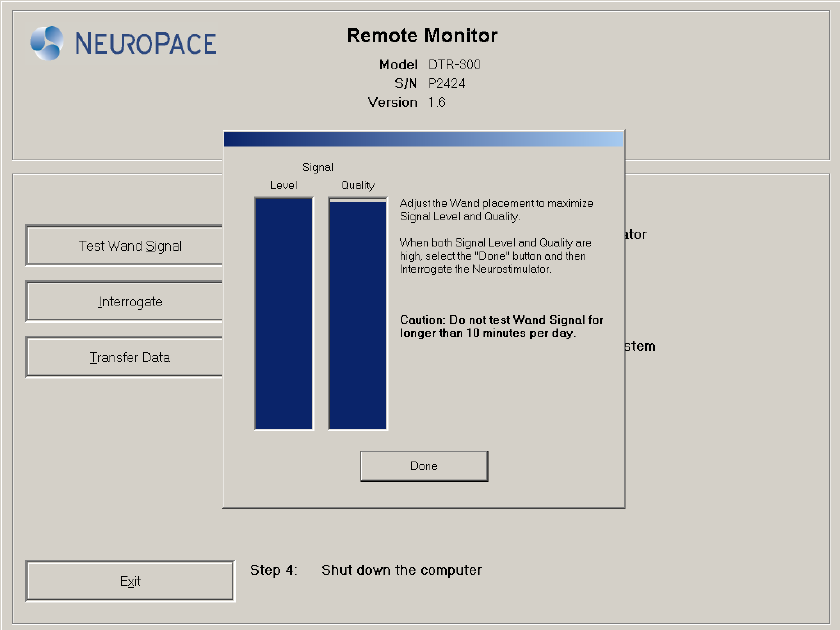
When you test the Wand signal, 2 vertical bars will appear on the screen. One bar
indicates signal Level (how strong the signal is). The second bar indicates signal Quality
(if the signal is free of interference).
NOTE: The signal Level and Quality bars also appear on the screen when you begin
collecting data.
22
When you first set up your Remote Monitor, you should test the Wand signal to make
sure there are no large sources of EMI that may affect data collection. You may need to
move the Remote Monitor to another location if the signal Quality bar shows a lot of
interference. Sometimes simply unplugging the Laptop from the wall outlet and using
the Laptop battery power is enough to eliminate interference.
You should also test the Wand signal once or twice before you actually start collecting
data from the Neurostimulator. This way you will get a good sense of how Wand
placement near the Neurostimulator affects signal strength. Once you know you have
chosen a good location, and know how to best position the Wand, you only need to test
the Wand signal if you are having problems collecting data.
NOTE: Testing the Wand signal uses battery power in the Neurostimulator. There is no
need the test the Wand signal more often than necessary. If you test the Wand signal
for more than 5 minutes at a time, a pop-up window will appear on the screen with a
message instructing you to stop.
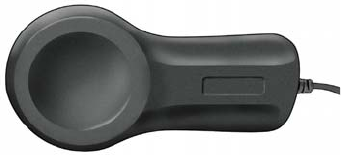
Step 1
Place the cupped side of the Wand over the Neurostimulator and rest the Wand on the
scalp. It should be no more than about 1 inch away from the center of the
Neurostimulator. For best results, keep the Wand directly over the Neurostimulator.
Cupped side of Wand
23
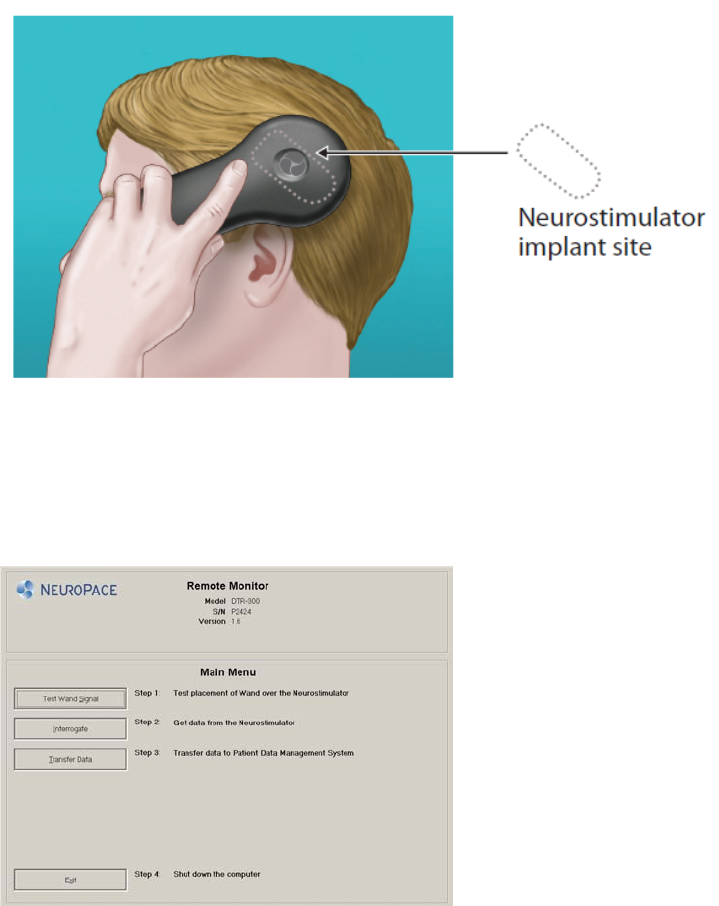
Step 2
On the Main Menu screen, click the Test Wand Signal button.
A pop-up window appears on the screen with 2 vertical blue bars. The first bar shows
the signal Level (the current signal strength between the Wand and the
Neurostimulator). The Level bar height will vary as you move the Wand closer or further
from the Neurostimulator. The second bar shows the signal Quality (the current signal
strength based on how free the signal is from interference).
24
Both bars will range from empty to full, with the height of the bars representing the Level
and Quality of the current signal. Signal Level and Quality are considered “high” when
the bars are at least half full, or more. This will typically allow for data collection to occur
without interruption.
If you need to adjust the Wand position to increase the signal Level, go to Step 3 below.
Or, you can click the Done button on the pop-up window to go back to the Main Menu
screen.
Step 3
Move the Wand over the Neurostimulator until both bars are at least one half full. Try to
find the spot where signal strength is as close to the maximum level as possible.
You may need to unplug the laptop from the wall outlet and use battery power. Or, try
moving the Remote Monitor to another location if you are unable to get the signal quality
that is at least half full.
Step 4
Click Done. The Wand is now properly positioned for data collection.
CAUTION: Testing the Wand signal for more than 10 minutes a day may cause the
Neurostimulator battery to drain more quickly than expected. Test the Wand signal only
as necessary to check the signal strength and quality. DO NOT test the signal for more
than 10 minutes a day.
25

Collecting data from the Neurostimulator
When collecting data, you will need to position the Wand as you did in the previous
section so that signal strength is at least half full.
Step 1
From the Main Menu screen, click the Interrogate button.
Step 2
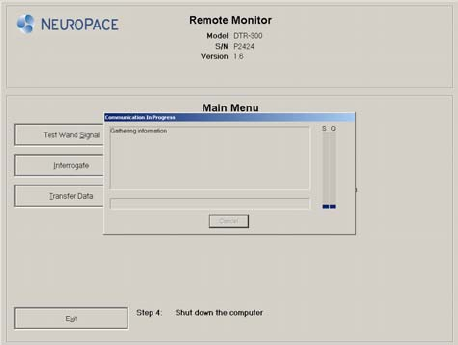
A pop-up window with “Gathering information” appears on the screen to let you know
that data collection has begun. Data collected from the Neurostimulator are stored in the
laptop.
NOTE: The signal strength and signal quality bars that appear when testing the Wand
signal also appear here. This is to help you find the best Wand position for collecting the
data.
26
If you move the Wand too far away from the Neurostimulator during data collection, the
following message may appear:
“Telemetry has been lost. Reposition the Wand over the Neurostimulator and try
again.”
Move the Wand closer to the Neurostimulator “Gathering information” reappears. This
means that data collection has resumed.
If you get another type of error message, follow the instructions on the screen. Then
click the Retry button. Refer to the Troubleshooting section for more information on
error messages that might appear. If you still need assistance, contact NeuroPace®
Customer Support.
Step 3
A pop-up window appears on the screen to let you know when data collection has been
successful. Click the Return to Main Menu button to go back to the Main Menu screen.
27

Step 4
Now you can put the Wand down and prepare to send data to the PDMS database.
28
29
Sending data to the PDMS database
You will use your Remote Monitor to send data stored in the laptop to the secure PDMS
database. Data are sent over an analog phone line. The Remote Monitor must first
connect to the PDMS database server before data will be sent. This allows the PDMS
database to identify where the data is coming from. If your Remote Monitor and phone
share the same phone line, you cannot make outgoing calls or receive incoming phone
calls while you are sending data. Incoming or outgoing calls will interrupt data
transmission.
CAUTION: You cannot make an outgoing call and send data at the same time over the
same phone line. If you need to make an emergency call while the Remote Monitor is
sending data, disconnect the phone cord from the laptop. This will suspend data
transmission so you can make the call. Any unsent data will be sent the next time you
send data.
If you have “call waiting” on your phone line, you may need to temporarily disable this
feature while you are sending data. Call waiting sends a call signal to your phone line
that an outside call is waiting for you to pick up the call. When you are sending data,
you would not be aware that the call waiting signal is coming through, but the signal
may interrupt data transmission. If you have difficulty sending data, you can have
Remote Monitor automatically disable call waiting whenever data are being sent. Call
waiting is then automatically turned back on when data transmission is complete.
See pages 35-39 for instructions on disabling the call waiting feature.
NOTE: It is not necessary to disable call waiting through your phone company.
Before you begin sending data, make sure your phone is not in use.
Step 1
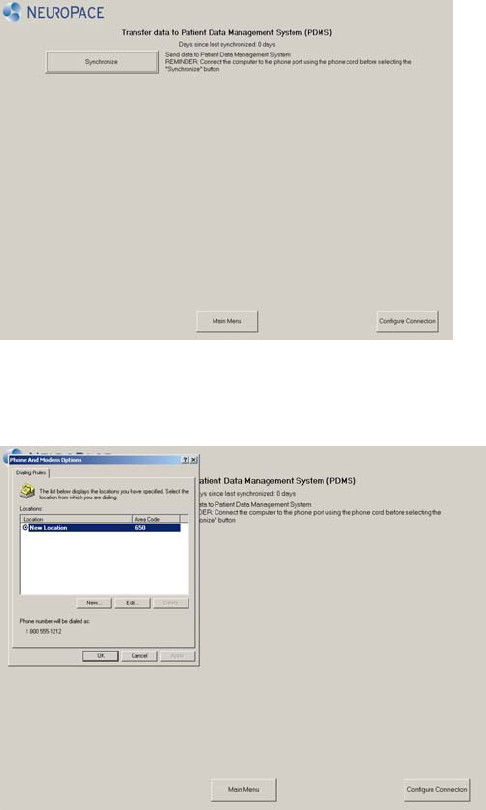
On the Main Menu screen, click the Transfer Data button.

A second screen appears that prompts you to begin.
Step 2
Click the Synchronize button.
30
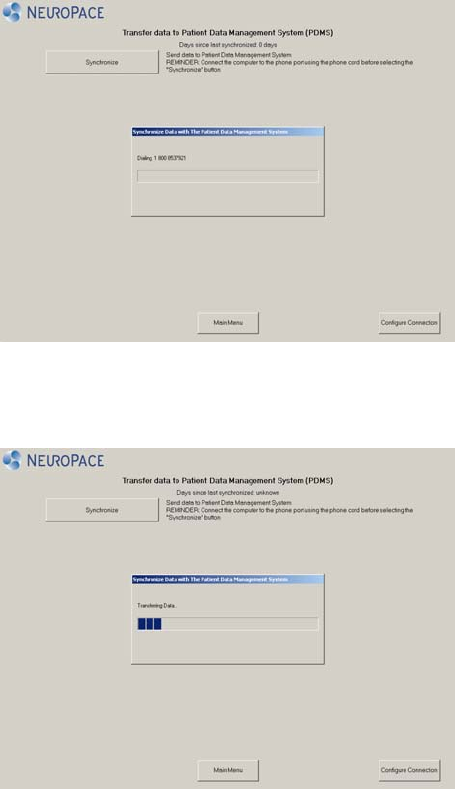
A pop-up window appears on the screen to let you know that the Remote Monitor is
connecting to the PDMS database.
Once connected, data transmission will begin. A second pop-up window shows you the
status of data being sent. Allow up to 20 minutes for data to be sent.
NOTE:
● If you get an error message, write down the message. You may need to refer to the
message when troubleshooting or when contacting NeuroPace® Customer Support.
Then click the OK button.
● If a pop-up window with a “Synchronization failed” message appears, click OK. See
Troubleshooting on pages 42-48 for information on how to solve the problem.
● If data transmission stops or is interrupted, any unsent data will be stored in the
laptop. It will be sent to the PDMS database with the next data transmission.
31
Step 3
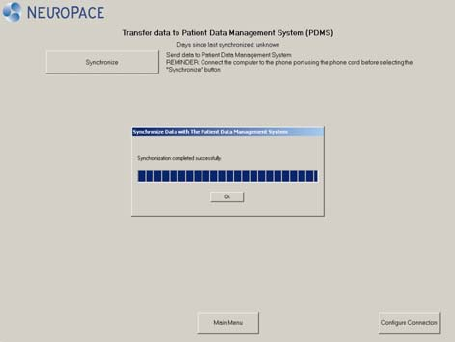
When the data have been successfully sent, the Synchronization completed
successfully pop-up window appears. Click the OK button.
Step 4
Click the Main Menu button to return to the Main Menu screen.
32
Turning the Remote Monitor off
Step 1
On the Main Menu screen, click the Exit button.
Step 2
Confirm that you want to exit the program and turn the Remote Monitor off. Click the
Yes button to exit or click the No button to return to the Main Menu.
33
NOTE: When you are finished using the Remote Monitor, be sure to turn it off (by
clicking Exit, then Yes on the Main Menu). This will help conserve laptop battery power
34
and/or electricity when not in use. The Remote Monitor laptop does not automatically
go into “sleep” mode if you forget to turn it off.
Changing your Remote Monitor communications settings
The Remote Monitor sends your data to the secure PDMS database through a toll-free
phone number that is programmed into the laptop.
There are times when you may need to change the communications settings when you
use the Remote Monitor in your home.
Disable call waiting
The call waiting feature can interrupt data transmission. You can change the Remote
Monitor settings to automatically disable call waiting whenever data are being sent. Call
waiting is then automatically turned back on when data has been sent.
If you plan to disable call waiting, you will need to call your current phone service (or
service at your current location), and ask them for the code that disables call waiting.
NOTE: You only need to enter and save the code numbers once to have call waiting
disabled whenever necessary.
To disable call waiting, follow these steps.
Step 1
Turn the laptop on and get to the Main Menu screen after the Login screen.
Step 2
On the Main Menu screen, click the Transfer Data button.
35
A second screen appears that lets you begin sending data or make changes to your
settings.
Step 3
Click the Configure Connection button.
The Phone and Modem Options window appears on the screen and lets you begin
making changes.
Step 4
Click on New Location. This will activate the Edit button.
36
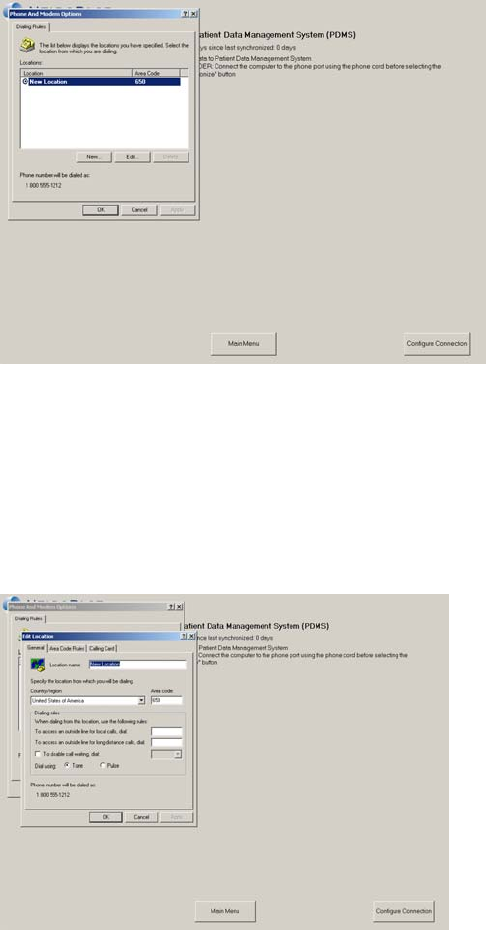
Step 5
Click the Edit button.
The Edit Location pop-up window appears.
Step 6
On the Edit Location window, click the box that lets you disable call waiting. A check
mark indicates the feature is disabled.
37
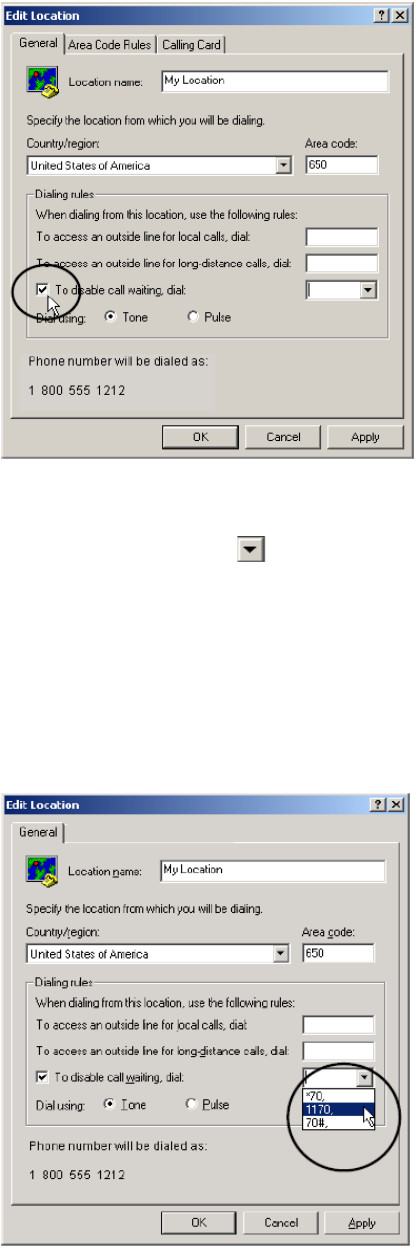
Step 7
Click the down arrow ( ) to the right of the box you just clicked. A drop-down list of
code numbers will appear. If you see the code number you obtained from your phone
service provider, click it. If it is not listed, enter the number using the keyboard.
NOTE: The code number you enter and save will be used to disable call waiting every
time you send data, until you either change it or delete the code number.
38
39
Step 8
Click OK to save the new setting. You will return to the Phone and Modem Options
window. Click OK to go back to the Main Menu screen.
NOTE: DO NOT change any of the other settings on the Edit Location screen. Doing so
may prevent data from being sent to the PDMS database.
40
Care and maintenance
The Remote Monitor does not require any special maintenance.
• To remove dirt or dust from the Wand or laptop, wipe the outside with a soft cloth
dampened with water and wrung out. DO NOT use any cleaning liquids or
aerosols.
• When not in use, the Remote Monitor should be turned off.
• DO NOT store the Wand or laptop above or below the recommended storage
temperature range (-40°F to 140°F).
• The laptop has a rechargeable battery installed. Battery power will last about 2
hours on a full charge. The battery recharges any time the laptop is plugged into
a wall outlet but it could take about 2 hours to fully charge a drained battery. If
you plan to use battery power when collecting or sending data with the laptop,
make sure the battery is fully charged.
• If you need to move the Remote Monitor to another location, first disassemble
the pieces and store them in the Carrying Case.
• All laptop computers generate a moderate amount of heat when they are turned
on. DO NOT cover or enclose the laptop with anything that might not allow the
heat to disperse.
• A shock from the buildup of static electricity may cause the Remote Monitor to
stop responding. One example of when a shock might occur is after you walk
across a rug and then touch the laptop. If the laptop does not respond after a
shock, follow the troubleshooting instructions on pages 42-43 to restart the laptop
when it does not respond.
Traveling with the Remote Monitor
There are a few things you need to be aware of when traveling. If you plan to take the
Remote Monitor with you, make sure to disassemble the parts and store them in the
Carrying Case.
41
1) Going through airport security.
The laptop can be treated like any other computer when going through airport security.
2) Traveling for an extended period of time within the U.S.
If you are unable to bring your Remote Monitor with you, you will not be able to transfer
your Neurostimulator data as directed. Talk with your doctor in advance to find out what
you should do in these situations.
CAUTION: Many hotels and offices use “digital” phone systems. DO NOT connect your
Remote Monitor to any type of digital phone line. It must be connected to an “analog”
phone line. Connecting to a digital phone will damage the laptop and not allow you to
send data to the PDMS database. Confirm that your location uses an analog phone line
before using the Remote Monitor. If you are not sure what type of phone line you have,
contact your phone service provider and ask them. If you need assistance, contact
NeuroPace® Customer Support.
3) Traveling outside the U.S.
Since the Remote Monitor uses a toll-free phone number only available when dialing
within the U.S., it cannot be used to send data from a location outside the U.S. Talk with
your doctor in advance to find out what you should do in these situations.
Return/disposal of Laptop Computer and Wand
The laptop computer and Wand should be returned to your doctor or NeuroPace® if you
are no longer using them. They contain electrical parts that need to be disposed of in
accordance with local regulations.
42
Troubleshooting
Remote Monitor Problems
Problem:
Laptop does not turn on when the power button is pressed.
Possible Cause:
Laptop is not plugged into the wall outlet or the battery is drained.
What to do:
Make sure the power cord is securely plugged into the wall outlet and into the correct
outlet on the Remote Monitor.
If using the laptop battery for power, make sure it is fully charged. The laptop must be
connected to a wall outlet for at least 2 hours for the battery to be fully charged.
Problem:
When fully charged the laptop battery power lasts less than 1 hour.
Possible Cause:
The laptop battery can no longer hold a charge and needs to be replaced.
What to do:
Contact NeuroPace® Customer Support for a replacement battery.
Problem:
The laptop does not respond to keyboard/touchpad commands.
Possible Cause:
There may be a problem with the laptop operating system.
What to do:
43
Press and hold the power button until the laptop turns off. Restart the laptop by pressing
the power button. If the problem persists, contact NeuroPace® Customer Support for
assistance.
Problem:
“Remote Monitor is locked” appears on the screen when you turn the laptop on.
Possible Cause:
The laptop is on and has been running on battery power for 30 minutes, but has not
been in use.
or,
The laptop is on but the display was closed and then opened again.
What to do:
Make sure the laptop display is open and the laptop is turned on. Press and hold Ctrl,
Alt, and then Delete on the keyboard. The NeuroPace® Login screen appears. Enter
NPUser as the User Name if it does not already appear in the “User name” box. Leave
the Password blank. Then click the OK button.
Check the laptop battery level at the bottom of the screen. If it is low, plug the laptop
into a wall outlet.
Login Problems
Problem:
“Invalid password name or user name” appears on the screen.
Possible Cause:
An incorrect username or a password was entered.
What to do:
44
Enter NPUser (no spaces between the letters) as the User Name. Leave the Password
blank. Then click the OK button.
Refer to pages 20-22 for login instructions.
Problem:
The Login screen appears but it will not let me enter a User Name. The User Name and
Password boxes look grayed out.
Possible Cause:
There were six failed attempts to enter the correct NPUser User Name.
What to do:
Press and hold the power button until the laptop turns off. Restart the laptop by pressing
the power button.
Press and hold Ctrl, Alt, and then Delete on the keyboard. The NeuroPace® Login
screen appears. Enter NPUser as the User Name. Leave the Password blank. Then
click the OK button.
Wand Problems
Problem:
The Wand signal strength is very low, absent or the signal is erratic.
Possible Cause:
The Wand may be loosely connected, disconnected from the laptop or plugged into the
wrong port.
or,
The Wand is not positioned properly over the Neurostimulator.
or,
The cupped side of the Wand is not facing the Neurostimulator.
or,
45
There is a lot of interference from another nearby electronic device.
What to do:
Make sure the Wand is properly connected to the laptop and you have positioned the
cupped side of the Wand directly over the Neurostimulator.
Retest the Wand signal.
If the signal is low or bouncing up and down, move the Wand closer to the
Neurostimulator to see if signal quality improves.
If the signal quality is low, a nearby electronic device (e.g., another computer, television,
microwave, etc.) may be causing interference. Try unplugging the laptop from the wall
outlet. Make sure the battery is charged before doing so. If this does not solve the
problem, try moving the Remote Monitor to another location and then retest the Wand
signal.
If your Wand signal continues to be a problem, contact NeuroPace® Customer Support
for assistance.
Data collection problems
Problem:
One of the following messages appears on the screen:
“Telemetry has been lost. Reposition the Wand and try again.”
“Unable to communicate with the Neurostimulator. The Wand may not be properly
connected. Please reconnect the Wand and select Retry or select Cancel to
continue.”
Possible Cause:
The Wand was moved while collecting data from the Neurostimulator.
or,
The Wand cord may be loosely connected or disconnected from the laptop USB port.
or,
There is interference from a nearby electronic device.
46
What to do:
Make sure the Wand is properly connected to the laptop. If this does not solve the
problem, try plugging the Wand cord into a different USB port.
Use the signal strength bar on the screen to help you position the Wand over the
Neurostimulator to maximize signal strength. The cupped side of the Wand should be
facing the Neurostimulator. Data collection should continue when the signal strength is
high.
If the signal quality is low, a nearby electronic device (e.g., another computer, television,
microwave, etc.) may be causing interference. Try unplugging the laptop from the wall
outlet. Make sure the battery is charged before doing so. If this does not solve the
problem, try moving the Remote Monitor to another location and then retest the Wand
signal.
Data sending problems
Problem:
The following message appears on the screen:
“There was an error encountered while communicating with the PDMS. Error
Description: There is no dial tone. Please try again later.”
Possible Cause:
The Remote Monitor is connected to a digital phone line instead of an analog phone
line.
or,
There is no dial tone because the phone line is disconnected, out of service or requires
an outside line.
or,
The phone cord is not properly connected to the laptop or wall jack.
or,
Pulse rather than Tone Dialing was selected by mistake on the Edit Location screen.
47
or,
Data transmission interrupted by outgoing call on same phone line.
or,
Data transmission interrupted by incoming call waiting signal.
or,
The PDMS database is currently unavailable.
What to do:
Make sure you have an analog phone. You must be connected to an analog phone line
or you may damage the Remote Monitor (see pages 14-17).
Plug a phone into the wall jack to confirm there is a dial tone. If not, contact your phone
service provider.
Check the phone cord connections. See pages 14-17 for setup instructions.
Check that “Tone” Dialing, rather than “Pulse” Dialing is checked on the Edit Location
screen. Contact NeuroPace® Customer Support for assistance.
Make sure no one else is making an outgoing phone call on the same line shared by the
Remote Monitor.
Make sure call waiting is disabled if you have this feature. See pages 35-39 for
instructions.
If you still have difficulty sending data, try again in an hour and then the next day. If you
are still having trouble, then contact NeuroPace® Customer Support.
Problem:
The following messages appear on the screen:
“The connection with the server has been reset.”
Possible Cause:
The phone cord may have become disconnected from the laptop or wall jack.
48
What to do:
Check the phone cord connections and try to send the data again. See pages 14-17 for
setup instructions.
Problem:
Sending data to the PDMS database is taking a long time.
Possible Cause:
There may be a problem with the PDMS database or with your phone service.
A large amount of data is being sent to the PDMS database.
What to do:
Wait and send data to the PDMS database on the next day.
Always allow up to 20 minutes for data to be sent.
Send data to the PDMS database more frequently.

49
Technical Specifications
Wand
Dimensions (Length x Width x Depth) 7” x 3.5” x 1.5” (18 cm x 9 cm x 4cm)
Weight 0.5 pounds (240 g)
Operating temperature 32°F to 95°F (0°C to 35°C)
Storage temperature -40°F to 140°F (-40°C to 60°C)
Laptop Computer
Dimensions (Length x Width x Depth) 13” x 11” x 2” (33 cm x 27 cm x 4.4 cm)
(typical. Your laptop may be different)
Weight 7.7 pounds (3.5 kg) (typical)
Power source 100-240 VAC, 1.4A or internal
rechargeable battery
Operating temperature 32°F to 95°F (0°C to 35°C)
Storage temperature -40°F to 140°F (-40°C to 60°C)
RNS® System Wireless Specifications
Wireless technology Type Short Range, Low Power Inductive
Telemetry
Frequency Band of Transmission 20 kHz – 50 kHz
Frequency Band of Reception 20 kHz – 50 kHz
Receive Bandwidth of the Neurostimulator 100 kHz
Receive Bandwidth of the Wand 9.4 kHz
Number of Channels Single Channel
Modulation Type On/Off pulse amplitude modulation
RF Data Flow characteristics Half duplex
Effective Radiated Power 224 pW or less
50
If You Need Help
Contact your doctor as soon as possible if:
• You are experiencing seizures with greater frequency or severity than before
• You are having any type of medical emergency
• You want to check if you can undergo a certain medical procedure or treatment
while you have the RNS® System implanted
• You are unable to collect and send data to the PDMS database as your doctor
has directed
Contact NeuroPace® Customer Support if:
• You need help setting up or using up the Wand and Remote Monitor
• You want to make sure your current phone lines and equipment will work with the
Remote Monitor
• You need to replace any part of the Wand or Remote Monitor
• You need more information about what to do when traveling through airport
security and other surveillance systems
51
NeuroPace, Inc.
1375 Shorebird Way
Mountain View, CA 94043 USA
Customer Support: 1-866-726-3876
(Toll Free in the United States)
Website: www.neuropace.com