Users Manual
Patient Manual 11052 Rev A (2015-01-15) [DRAFT] 1
Patient Manual
Patient Manual 11052 Rev A (2015-01-15) [DRAFT] 2
Symbols
Description
Manufacturer
Catalog number
Consult Instructions for Use
Non-ionizing radiation
Type B Applied Part
Type BF Applied Part
Do not dispose of this product in the unsorted municipal
waste stream. Dispose of this product according to local
regulations.
CE Marking of Conformity
Authorized representative in the European Community
MR unsafe
MR Unsafe
Conditional
MR Conditional
For USA audiences only
0086

Patient Manual 11052 Rev A (2015-01-15) [DRAFT] 3
NEVRO CORP.
All questions or concerns about Nevro products should be forwarded to:
Nevro Corp.
4040 Campbell Avenue, Suite 210
Menlo Park, CA 94025
USA
Tel: +1.650.251.0005
Fax: +1.650.251.9415
info@nevro.com
© Copyright 2015, Nevro Corp. All rights reserved.
No part of this publication may be reproduced, transmitted, transcribed, stored in a retrieval system or
translated into any language or computer language, in any form or by any means, including, but not
limited to, electronic, magnetic, optical, chemical, manual, or otherwise without written permission of
Nevro Corp.
Registered Trademarks: Senza, HF10, Nevro, and the Nevro logo are trademarks of Nevro Corp.
CE Mark effective on 4 May 2010
Nevro hereby declares that the Senza® system is in compliance with the essential requirements and other
relevant provisions of the R&TTE Directive (1999/5/EC).
IMPORTANT: Do not change or modify any component of the Nevro® Senza system, unless expressly
approved by Nevro Corp.

Patient Manual 11052 Rev A (2015-01-15) [DRAFT] 4
Table of Contents
INTRODUCTION ............................................................................................................................................. 5
ABOUT CHRONIC PAIN................................................................................................................................... 5
YOUR SENZA SYSTEM .................................................................................................................................... 5
INDICATIONS .................................................................................................................................................. 7
WARNINGS .................................................................................................................................................... 7
WARNINGS ABOUT OTHER MEDICAL TREATMENTS ..................................................................................... 9
PRECAUTIONS .............................................................................................................................................. 12
ADVERSE EVENTS ......................................................................................................................................... 14
IMPLANTATION SURGERY ............................................................................................................................ 15
TRIAL PHASE ................................................................................................................................................ 15
How to Set Up Your Trial Stimulator, Cables, and Remote Control ........................................................................ 16
The Remote Control ................................................................................................................................................ 19
YOUR PATIENT ID CARD ............................................................................................................................... 23
IMPLANTED STIMULATOR PHASE ................................................................................................................ 23
Battery Status ......................................................................................................................................................... 23
How to Charge the IPG ........................................................................................................................................... 24
How to Charge the Charger .................................................................................................................................... 26
Optimizing Charging ............................................................................................................................................... 26
Charging Tips .......................................................................................................................................................... 27
ASK YOUR DOCTOR ...................................................................................................................................... 27
TROUBLESHOOTING .................................................................................................................................... 28
Troubleshooting Therapy........................................................................................................................................ 28
Troubleshooting the Remote Control ..................................................................................................................... 28
Troubleshooting the Trial Stimulator...................................................................................................................... 29
Troubleshooting the Recharging Process ............................................................................................................... 29
All of the Lights are Blinking! .................................................................................................................................. 30
DEVICE DISPOSAL ......................................................................................................................................... 30
Device Specifications .............................................................................................................................................. 31
System Specifications ............................................................................................................................................. 31
System Components ............................................................................................................................................... 35
RC2000 Remote Control Instructions ..................................................................................................................... 38
INDEX ........................................................................................................................................................... 40

Patient Manual 11052 Rev A (2015-01-15) [DRAFT] 5
INTRODUCTION
This booklet was written for people who are considering or have received a Nevro® Senza® Spinal Cord
Stimulator (SCS) system to help treat pain. Every person is unique and your medical needs differ from
those of others, even people with the same condition and the same SCS system. For this reason, always
talk to your doctor if you have questions about your condition. This booklet presents general information
and can help you better communicate with your doctor.
The first part of this booklet discusses chronic pain, spinal cord stimulation, and the Senza system. It is
based on common questions that patients have about their condition, this particular treatment option,
and the Senza system.
The second part of this booklet explains how to use the devices.
In the back of the booklet, we have added some information in the appendices. The first appendix
contains technical information about this product. This information may be useful to you, but it is not
necessary for you to understand it in order to use your device. The second appendix shows pictures of
the parts of the Senza system.
Throughout the booklet, we have provided definition of medical or electronic terms in a shaded box with
a definition.
Finally, the back of the booklet contains an index to help you look up specific information if you ever
need it.
STIMULATION. Small electrical pulses produced by the SCS system delivered to your spinal cord to
provide therapy for your pain. Spinal cord stimulation is sometimes called “therapy delivery.”
ABOUT CHRONIC PAIN
Everybody feels pain when there is a painful external stimulus such as a pinprick or touching something
hot. This is referred to as acute pain and is an important normal sensation that helps protect against
injury. Chronic pain is very different. People with chronic pain may also feel pain when there is no
obvious reason or may have pain that does not go away long after an injury.
CHRONIC. Something that persists or lasts for more than 3 months.. Chronic pain is pain that does not go
away with the passage of time or as the body heals from an injury.
Chronic pain can be intractable, which is the medical term meaning that it is hard to treat. You have
probably tried many treatments to control your pain and found that they did not work well or perhaps
they did not work at all.
INTRACTABLE. Any condition, such as chronic pain, which is very difficult to control or treat effectively.
YOUR SENZA SYSTEM
The Senza system works by delivering electrical energy from a device to an area around your spine. The
system is capable of delivering the HF10™ therapy, a therapy that does not produce tingling sensations
called paresthesia. It is also capable of providing stimulation that produces paresthesia at some therapy
settings. You will first go through a trial phase where you and your doctor evaluate the therapy to see if it
is right for you. The Senza system trial phase consists of several components:
Patient Manual 11052 Rev A (2015-01-15) [DRAFT] 6
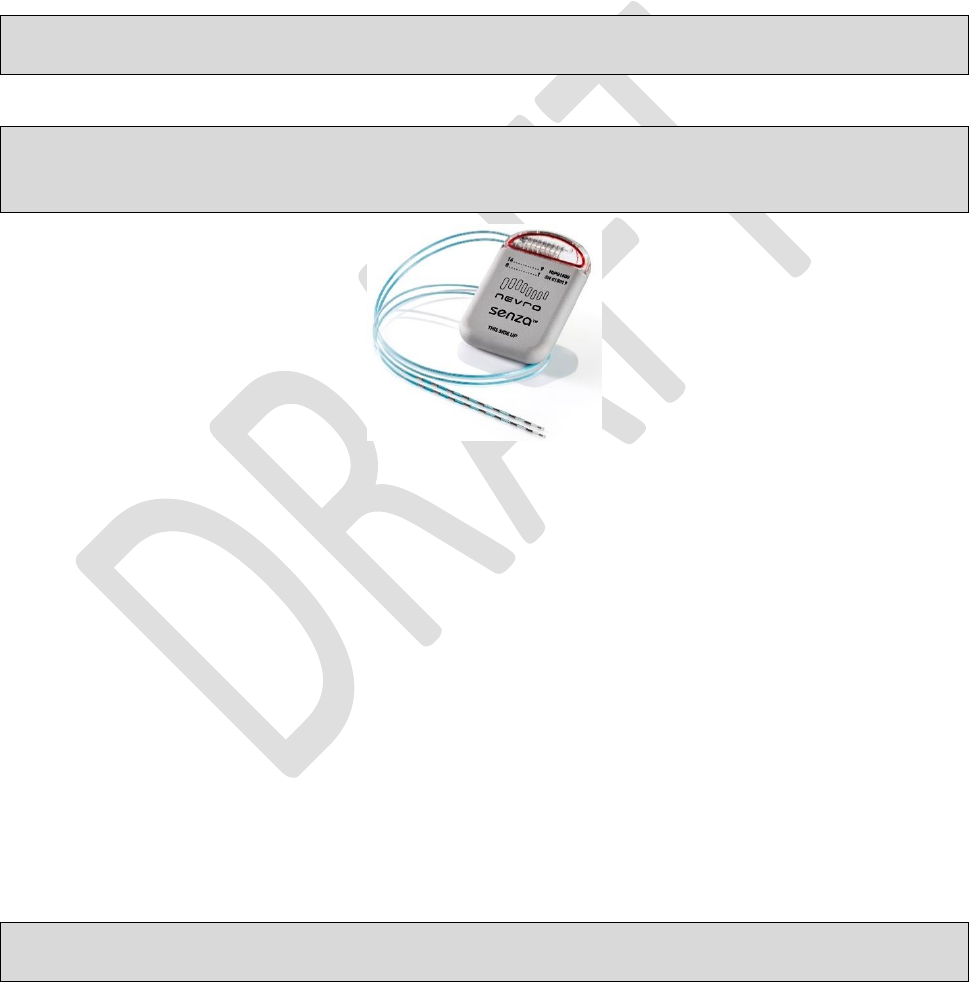
Trial Stimulator is a temporary device that you use outside the body to test to see if the therapy
is helpful to you.
Lead is a thin insulated wire that connects to the Trial Stimulator at one end and with small
electrodes on the other end placed near your spine. A small amount of electrical energy from the
device travels through the lead and near the spine.
OR cable is an insulated wire used outside the body to temporarily connect the leads to the Trial
Stimulator.
Remote Control is a unit that can turn the stimulator ON or OFF and allows for some adjustments
of therapy settings.
PARESTHESIA. A sensation of tingling, “pins and needles,” prickling, or even burning. Paresthesia may be
brief or it may last a long time.
TRIAL PHASE. A time during which a person with chronic pain tests SCS therapy to see if and how well it
works. During the trial phase, the person will temporarily use a Trial Stimulator, which is not implanted in
the body.
If the Senza system is right for you, your doctor will discuss with you the implantation of a battery-
powered device after the trial phase. The Senza system components will include:
Implantable pulse generator (IPG) is a small, battery-powered electronic device that is implanted
inside the body (see IPG in the diagram above).
Lead, instead of connecting to an external stimulator as occurred during the trial phase, will
connect to the implanted IPG. After implantation there are no external wires or connections as
occurred during the trial phase (see lead wires in diagram above).
Charger recharges the IPG after it is implanted.
Power Adaptor recharges the Charger.
Charger Belt and Charger Holster holds the Charger during recharging.
Remote Control can turn the IPG ON or OFF and allows for some adjustments of therapy settings.
For pictures of the Charger, Power Adaptor, Charger Belt and Remote Control, please see the “System Components” section at the
end of this manual.
IMPLANTABLE PULSE GENERATOR or IPG. A self-contained battery-powered device that is small enough
to fit in a person’s hand and delivers small amounts of electrical energy or pulses.
You will first use the Trial Stimulator and Remote Control. If the Senza system is right for you, your doctor
will then implant the IPG. You control the implanted device with the same Remote Control.

Patient Manual 11052 Rev A (2015-01-15) [DRAFT] 7
INDICATIONS
The Senza system is not right for everyone. Indications for the use of this device are as follows:
The Senza™ neuromodulation system is indicated as an aid in the management of chronic intractable
pain of the trunk and/or limbs, including unilateral or bilateral pain associated with the following: failed
back surgery syndrome, intractable low back pain, and leg pain.
INDICATIONS. Reasons that you should get a device, drug, or treatment. Indications are determined by
medical experts, clinical studies, and the Food & Drug Administration (FDA).
CONTRAINDICATIONS
CONTRAINDICATIONS. Situations in which the device should not be used because the risk of use clearly
outweighs and possible benefit. Contraindications are determined by medical experts, clinical studies,
and the Food & Drug Administration (FDA).
The Senza system is contraindicated (not appropriate) for certain patients. Contraindications for the
Senza system include:
Not being able to operate the Nevro SCS system
Not being able to have the SCS surgery
Failing to receive effective pain relief during trial stimulation.
Your doctor can tell you if the Senza system might be appropriate for you. If you have questions about
whether the Senza system may be right for you, ask your doctor.
WARNINGS
Warnings are statements about safety of your device that you should take very seriously. If you do not
follow these warnings, it is possible that you could be hurt and/or the device could be damaged. The
following are some warnings for the Senza system:
Stimulation Frequencies - Stimulation frequencies in the range of 2 Hz to 1,200 Hz are indicated for
paresthesia-based therapy and the system must be configured to produce paresthesia. Stimulation at
10,000 Hz is indicated as paresthesia-free therapy and the system must be configured to deliver
paresthesia-free stimulation. Stimulation between 1,200 Hz and 10,000 Hz has not been evaluated for
safety, effectiveness and perception of paresthesia. It is unknown whether stimulation amplitude settings
at frequencies not studied (i.e., between 1200 Hz and 10,000 Hz) can produce injury at stimulation
output levels that produce paresthesia.
Stimulation at vertebral levels above T8 – Safety of Nevro SCS system at >2kHz to10 kHz program
settings above the T8 vertebral level has not been studied.
Pediatric Use - The safety and effectiveness of spinal cord stimulation has not been established for use in
children.
Other Active Implanted Devices – Please let your doctor know if you have any other active implanted
devices in your body. The Senza system may interfere with other implanted stimulators, such as cardiac
pacemakers and defibrillators which have sensing features, and may result in sensing problems or

Patient Manual 11052 Rev A (2015-01-15) [DRAFT] 8
inappropriate responses. The effect of other implanted devices, including deep brain stimulators,
peripheral nerve stimulators, implanted drug delivery pumps, and cochlear implants on the Senza system
are unknown.
Sleep – If you are using therapy that generates paresthesia (tingling sensations caused by stimulation)
you may choose to turn stimulation off to avoid uncomfortable sensations during sleep (see Warning
regarding Stimulation Frequency). If you are using therapy at 10 kHz which does not generate
paresthesia, stimulation can remain on during sleep.
Operation of Vehicles (e.g., driving) or Machinery - If you are using therapy that generates paresthesia
you should not operate motorized vehicles such as automobiles or potentially dangerous machinery and
equipment with the stimulation on when using paresthesia-causing programs. Stimulation must be
turned off first in such cases. Any sudden stimulation changes may distract you from proper operation of
the vehicle, machinery, or equipment. If you are using therapy at 10 kHz which does not generate
paresthesia, it is less likely that sudden stimulation changes resulting in distraction could occur.
Heat from Charging - You will have to recharge the battery in your device. Always use the special Charger
Belt when recharging. During recharging, the Charging Coil may become warm or even burn you. If you
feel warmth or discomfort when recharging the device, stop recharging and contact your doctor. Do not
place the charger over an area of skin where you do not feel any sensation.
Electromagnetic Interference (EMI) - Ordinary household appliances, magnets, and devices encountered
in everyday life will not affect your implanted Senza device. However, some equipment generates
electromagnetic interference (EMI) which may affect your Senza system.
ELECTROMAGNETIC INTERFERENCE (EMI). Invisible signals generated by some equipment, appliances,
and devices, also known as noise or static. Even if you cannot hear this noise, it may be picked up by your
implanted SCS system and can affect it.
Electromagnetic interference (EMI) can affect the implanted Senza system in ways that are hard to
predict. For example, EMI might:
Turn your Senza system ON or OFF
Cause your Senza system to give you more stimulation (a “shock”)
Cause damage to the system that may result in loss of therapy and require reoperation to replace
the system
There are many sources of EMI today so it is not possible to give exact instructions as to how to avoid
them. Listed below are some well-known sources of EMI that you should avoid:
Power lines and power generators
Arc welders
Large, magnetized stereo speakers
Radiofrequency identification devices (RFID)
Exposure to strong EMI can result in serious patient injury or death, resulting from heating of the
implanted components of the SCS system and damage to the surrounding tissue.

Patient Manual 11052 Rev A (2015-01-15) [DRAFT] 9
Theft Detectors and Security Screening Devices - Security checkpoints, metal detectors, screening
systems at airports, and theft detectors all produce EMI. If you must pass through such a system, tell the
personnel that you have an implanted medical device and show them your patient ID card. They may be
able to help you get through the checkpoint without going through the scanner. If that is not possible,
you may be able to pass through the scanner or detector by turning the device OFF and moving through
the scanner as quickly as possible.
Theft detection systems may also produce EMI. While some theft detection systems are obvious and are
located at store exits, others may be concealed within the store. If you are in a store or other
environment and suspect EMI is affecting your device, turn OFF the Senza system and move out of the
area. Once you are out of the area, check whether therapy is ON or OFF. You may have to recharge the
device. If you have specific questions about EMI sources, talk to your doctor.
Strong electromagnetic fields arising from closeness to electrical equipment such as mobile phones,
satellite phones and radio systems may interfere with the radio communication between the Remote
Control and IPG. As described in the “Troubleshooting” section of this manual, communication failure is
indicated by three beeps. Communication can be restored by moving away from the interfering electrical
equipment and retrying the operation.
Electrostatic Discharge (ESD) is a common source of electromagnetic interference that can occur when a
person or object accumulates a static charge. ESD is made worse by low humidity and synthetic
materials.
If the battery terminals of the Trial Simulator are exposed to ESD, the device may reset and stop
stimulation. Stimulation can be restarted by following the instructions in the “How to Turn ON
Stimulation” section of this manual. To avoid unintentionally stopping stimulation, do not open
the battery compartment while stimulation is ongoing.
ESD may cause the Charger to stop charging the IPG. If this happens, charging can be resumed by
repeating the steps in the “How to Charge the IPG” section of this manual. ESD events can be
minimized by keeping the charger in the Charger Holster while recharging the IPG.
WARNINGS ABOUT OTHER MEDICAL TREATMENTS
Always tell your doctors, nurses, and other clinicians (including dentists, physical therapists, occupational
therapists, and others) that you have the Senza Spinal Cord Stimulation system implanted in your body.
There are some procedures that are not recommended for people with the Senza system, and there are
other procedures which may be possible for you only with certain precautions. If you ever need any of
these treatments, be sure to discuss them with your pain doctor as well as with the clinical team doing
the procedure.
Procedures that are not recommended for you with an implanted SCS system include:
Diathermy
Computed tomography (CT scans)
Magnetic resonance imaging (MRI scans)
Lithotripsy
External defibrillation
Ultrasound procedures
Radiation
Radio-Frequency or Microwave Ablation
DIATHERMY. A medical treatment in which heat energy from shortwaves, microwaves, or ultrasounds
are used as treatment or in surgery.

Patient Manual 11052 Rev A (2015-01-15) [DRAFT] 10
Diathermy Therapy - Energy from the diathermy device can be transferred to the SCS system and can
cause the lead to overheat, which may cause damage to the device, heating and damage to the body,
severe injury, and even death.
CT SCAN. A type of technology in which x-ray-like images are taken in sections (slices) and then re-
assembled by computer to provide detailed two- and three-dimensional pictures of inside the body.
Computed Tomography (CT) – Please inform your doctor and medical personnel conducting your CT scan
that you have an implanted SCS system. You must turn your device off temporarily while the scan is
being conducted. It is important that the person conducting your CT scan does the following:
• Determines the device type;
• If practical, tries to move external devices out of the scan range;
• Minimizes x-ray exposure to the implanted or externally worn electronic medical device by:
o Using the lowest possible x-ray tube current consistent with obtaining the required
image quality; and
o Making sure that the x-ray beam does not dwell over the device for more than a few
seconds;
Important note: For CT procedures that require scanning over the medical device continuously for more
than a few seconds, as with CT perfusion or interventional exams, attending staff should be ready to take
emergency measures to treat adverse reactions if they occur.
After CT scanning directly over the implanted or externally worn electronic medical device:
• You should turn your Senza system device back on.
• Check that the Senza system is working properly.
• Contact your doctor as soon as possible if you suspect the Senza system is not functioning
properly after a CT scan.
MRI SCAN. A type of technology in which electromagnetic energy is used to take images of soft tissue in
the body.
Magnetic Resonance Imaging (MRI) - The Senza system is MR Conditional which means that safety has
been demonstrated only within specifically defined conditions. Scanning under different conditions may
result in severe injury, death or device malfunction. If your doctor determines it is safe for you to have an
MRI, your doctor will have you turn off the device before the scan and turn it back on when the scan is
complete. This should be done with extreme caution, since these scans may injure you or damage the
device. Never undergo an MRI scan without making sure the team doing the scan knows you have an SCS
device.
If your doctor recommends an MRI, inform the doctor that you have the Senza Spinal Cord Stimulation
system and show him/her your patient ID card (refer to Your Patient ID section in this manual). The
doctor will need to take specific precautions (as identified in the 1.5T and 3T MRI Guidelines) to prevent
patient injury and device damage. Do not take the trial stimulator, patient remote, or charger into the
MRI scan room. They are not considered safe for MRI and may be rapidly pulled into the MRI scanner. In
doing so, they may strike and injure a person.
Patient Manual 11052 Rev A (2015-01-15) [DRAFT] 11
Before undergoing these or any other procedures, discuss them with your doctor to be sure they are safe
for you.
LITHOTRIPSY. The use of sound waves to help break up calcified stones in the body.
EXTERNAL DEFIBRILLATION. The emergency use of two large paddles placed on the chest to deliver a
large amount of electrical energy to “re-start” the heart.
ULTRASOUND PROCEDURES. Any number of procedures that use sound waves to get images of the soft
tissue in the body.
RADIATION. The use of radiation energy for therapy. There are many types of radiation treatments.
Radiation can be as simple as an x-ray of the body or it can be targeted therapy to kill cancer cells (radio
therapy).
Lithotripsy, External Defibrillation, Ultrasound Procedures and Radiation - If you are required to
undergo lithotripsy, external defibrillation, high-output ultrasound, radiation therapy, or ultrasonic
scanning, inform the medical personnel conducting the procedure that you have an implanted SCS
system and follow these precautions:
• Turn off the IPG before the procedure.
• Have medical personnel use the equipment as far away from the IPG as possible.
• Have medical personnel keep fields, such as current, radiation, or high-output ultrasonic
beams, away from the IPG.
• Equipment should be set to the lowest energy setting possible.
• After the therapy or procedure, check to see that the IPG is functioning properly by
gradually increasing the IPG’s stimulation to the desired level.
• If you suspect that the device is not functioning properly after the use of these therapies
or procedures, please contact your doctor.
Radio-Frequency or Microwave Ablation - An electrical current produced by a radio/micro wave is used
to heat up a small area of nerve tissue, thereby decreasing pain signals from that specific area.
Radio-Frequency or Microwave Ablation - Safety has not been established for Radio-Frequency or
Microwave Ablation in people who have an implanted neurostimulation system. Induced electrical
currents may cause heating, especially at the lead electrode site, resulting in tissue damage.

Patient Manual 11052 Rev A (2015-01-15) [DRAFT] 12
PRECAUTIONS
Precautions are instructions about your device you should follow to avoid damage to the device, so that
it will function correctly and last longer.
Store the Trial Stimulator and Remote Control at normal temperatures in the range of -4 to 140°
F (-20 to 60°C).
Keep the Trial Stimulator and Remote Control dry.
Do not drop the Trial Stimulator and Remote Control. Although these devices are built for
constant use, they could break if dropped onto a hard surface.
Do not plug your Charger into a power source near water.
Use only Nevro or Nevro-approved accessories with your Senza system.
Caring for the Trial Stimulator, Remote Control, and Charging System - You can care for your Trial
Stimulator, Remote Control, and Charger by cleaning them with a soft, damp (not wet) cloth and mild
detergent. If you prefer, you can also clean these accessories with isopropyl alcohol, available at a drug or
department store. Do not use any harsh or abrasive cleansers and never let moisture get inside these
items.
Pregnancy and Nursing - This device is not to be used in pregnant/nursing women, or women who may
become pregnant.
Patient Activities - Some therapy settings are known to cause tingling sensations (called “paresthesias”).
With such settings, you may feel a sudden increase in these sensations when you change your posture or
make large or sudden movements. You can lower the amplitude or turn off the stimulation before
making posture changes. If you are using stimulation at 10 kHz which does not generate paresthesia,
these postural changes should not affect you.
Patient Activities Related to Lead Movement - Do not make sudden and excessive bending, stretching,
or twisting movements, particularly within the first weeks after the surgery. An implanted lead can move
from its original location during such movements, which might affect delivery of therapy. In such cases,
your system may need to be reprogrammed or the lead may need to be repositioned through another
operation.
Scuba Diving and Hyperbaric Chambers – Your Senza system is sensitive to high pressure. To prevent
possible damage to the device, prior to beginning these activities turn OFF the Senza system and:
Do not scuba dive to depths greater than 115 feet (35 meters)
Do not enter a hyperbaric chamber with pressure above 4.5 atmospheres
HYPERBARIC CHAMBER. A special chamber or compartment in which 100% oxygen is delivered to a
person under very high pressures, far above the normal atmospheric pressure. Hyperbaric therapy is
used for some medical treatments, such as wound healing.
Transcranial Magnetic Stimulation (TMS) and Electroconvulsive Therapy (ECT) - Safety has not been
established for TMS or ECT in people who have an implanted neurostimulation system. Induced electrical
currents may cause heating, especially at the lead electrode site, resulting in tissue damage.
TMS. A non-invasive way that uses magnetic fields to stimulate nerve cells in the brain.

Patient Manual 11052 Rev A (2015-01-15) [DRAFT] 13
ECT. A procedure in which electric currents are passed through the brain to intentionally cause a seizure.
Transcutaneous Electrical Nerve Stimulation - Do not place transcutaneous electrical nerve stimulation
(TENS) electrodes so that the TENS current passes over any part of the neurostimulation system. If you
feel that the TENS may be interfering with the implanted neurostimulator, discontinue using the TENS
and consult with your doctor.
TENS. A TENS unit is a device that sends small electrical currents to targeted body parts. These currents
are used to relieve pain.
Post-Operative Pain - In the days after the surgery, you may experience pain in the implant area, which is
typical in SCS surgeries.
IPG Location and Patient Manipulation - Do not to twist or rotate the IPG. If the IPG flips over in the
body, the charger may not be able to charge the IPG. Manipulation of the IPG in your body may cause the
skin over the IPG to become thinner over time.
Infection - If you experience persistent discomfort or excessive redness around the wound areas, please
advise your physician. You may need to be checked for infection. Infections related to the SCS may
require the implanted components to be explanted. Do not use the charger if the incision is not
sufficiently healed. The charger and the charging belt are not sterile and should not be in contact with the
incision.
Cell Phones - The impact of cell phones on the neuromodulation system is unknown at this time.
IPG Failure - If your IPG does not provide stimulation even after complete charging of the IPG or
replacement of the batteries in the Patient Remote Control, turn off the IPG and contact your physician.
When frequency of recharging becomes too inconvenient for you, the IPG may need to be replaced. You
should contact your physician if this occurs.
Device Disposal - Do not dispose the IPG, Patient Remote Control or Charger in fire. The battery in these
devices can explode in fire. The IPG should be explanted in the case of cremation. All explanted IPGs
should be returned to Nevro Corp. Do not dispose of electrical components, including batteries, in the
unsorted municipal waste stream. Dispose of electrical components, including batteries, according to
local regulations.
Long-Term Effectiveness of Spinal Cord Stimulation - The long-term effectiveness of spinal cord
stimulation has been documented. Not all patients realize long-term benefits from spinal cord
stimulation. Stimulation effectiveness at 10 kHz has been established for one year.

Patient Manual 11052 Rev A (2015-01-15) [DRAFT] 14
ADVERSE EVENTS
Adverse events, or side effects, are risks associated with the use of this or any other SCS system. There
are adverse events associated with the implant procedure, with stimulation, and with the device itself.
Please contact your physician if you experience any adverse events associated with the device.
Possible Adverse Events Associated with the Implant Procedure and Additional Medical Risks
Risks associated with anesthesia, including cardiac arrest
Surgical complications, such as infection, fever, or bleeding
Leaking of the cerebrospinal fluid (CSF)
Intracranial hypotension
Hematoma, seroma, or thrombosis
Epidural hemorrhage
Impaired or inadequate wound healing
Temporary or persistent tenderness or pain at implant site
Lead movement leading to ineffective pain control or other undesirable changes in stimulation
Suboptimal placement or movement of the IPG or lead, requiring another surgery or explant
Pressure on the spinal cord, or injury to the spinal cord, nerve, or nerve root
Paralysis
Death
Possible Adverse Events Associated with Stimulation
Loss of pain relief or unpleasant paresthesia, such as tingling or prickling
Jolting or shocking sensation associated with changes in posture or sudden movements
Increased pain
Changes over time in the cells around the electrodes of the leads, or changes in the electrode,
lead, or its connection, leading to undesirable stimulation
Uncomfortable stimulation of tissue (such as skin or muscle) around the leads
Weakness, clumsiness, or numbness
Possible Adverse Events Associated with the Implanted Device Components
Tissue reaction or allergy to implanted materials
Persistent pain at the lead or IPG implant site(s)
Failure of device components or the battery, including lead breakage or movement (migration),
hardware malfunctions, loose connections, electrical shorts, or open circuits and lead insulation
breaches
Failure or malfunction, resulting in ineffective pain control or other undesirable changes in
stimulation, possibly requiring explant and another surgery
Skin erosion or seroma at the lead or IPG site
Pressure sores
External sources of electromagnetic interference that could affect stimulation and/or cause the
device to malfunction
Infection
Exposure to magnetic resonance imaging (MRI) can result in heating of tissue, image artifacts,
induced voltages in the IPG and/or leads, and lead dislodgement
Epidural Mass Formation at Lead: Though incidence is rare (14 cases over 30 years), over the
course of months or years, permanent implantation of an SCS paddle lead or percutaneous lead
can result in epidural mass formation around the lead, which could compress the spinal cord. The
effect of spinal cord compression can range from muscle weakness to progressive quadriparesis.

Patient Manual 11052 Rev A (2015-01-15) [DRAFT] 15
If a patient with a SCS lead presents with a new neurological deficit, spinal cord compression due
to reactive tissue mass formation should be considered as a potential cause. If an epidural mass
is identified in a patient who is asymptomatic, periodic monitoring should be considered. For
more information please visit:
http://professional.medtronic.com/wcm/groups/mdtcom_sg/@mdt/@neuro/documents/docum
ents/scs-compression-ltr-feb2014.pdf
Adverse Events Associated with the External Device Components
Tissue reaction or allergy to external materials
Uncomfortable heating effects, discomfort, or burn
If you have questions or are experiencing adverse events, contact your doctor.
Please consult the Clinical Summary (P/N 12057) for additional information regarding clinical studies of
the Senza System and safety and effectiveness data.
IMPLANTATION SURGERY
If you and your doctor decide to proceed with SCS therapy, the first step is a trial phase. Typically, your
doctor will first place a lead in your body. This procedure may be done under local anesthetic, so you are
awake and aware of what is going on. You may be given medication to help you relax and some numbing
medicine for the insertion site. The lead is placed in your body during a minor procedure usually without
any incision. Most patients are able to leave the hospital the same day, depending on physical condition,
the procedure, and doctor’s preferences. Once the lead is in the body, you will typically use the device
over a period of days as decided by your doctor. This provides an opportunity for you and your doctor to
experience the system on a temporary basis and evaluate the how well the device might work for you.
If your SCS therapy works for you, you will move to the permanent implant phase, during which an IPG
will be implanted in your body. Your doctor will select the implant site based on your individual body type
and need. This procedure may be done under local or general anesthesia.
Following either of the implant procedures, you will be given instructions on how to care for the wound.
You may experience some pain and tenderness around the implant site. Tell the clinical team if you are
uncomfortable or in pain.
Following IPG surgery, you may find you are very aware of the implanted device and may want to touch
it. Try to avoid twisting or fiddling with the IPG. If you manage to flip the implanted device over in your
body, it will not work properly. Do not pull on the lead, which can cause it to loosen or even come out.
Touching the implant site too much can cause your skin to get very thin in that area.
In the first weeks after surgery, avoid big and sudden movements, bending over, lifting heavy objects,
and stretching. Your IPG and lead(s) need a few weeks in the body to become secure. Your doctor or
nurse will advise you on what you should and should not do in these first weeks after implantation.
TRIAL PHASE
If you are in the Trial Phase of getting the Senza system, this is an exciting and important time. The Senza
system may offer you a way to control your pain without taking more drugs. In fact, you may be able to
Patient Manual 11052 Rev A (2015-01-15) [DRAFT] 16
discontinue some of your drugs and still get pain control. To get the best results during this important
time, please follow your doctor’s advice closely.
When you are in the trial phase, you will receive a Trial Stimulator and a Remote Control so you have a
chance to see if the Senza system works for you. If it works well for you, you will have an IPG implanted in
the body to replace the Trial Stimulator. This trial phase typically lasts several days.
For your trial, your doctor has set up a special stimulation program for you. He or she has adjusted the
device’s features specifically for you. You will be given the external Trial Stimulator, a Remote Control,
and some cables. Using this system, you can test the stimulation system to see how it works for you. At
the end of the trial phase, you will discuss with your doctor whether or not a device should be implanted
in your body to take the place of the Trial Stimulator.
How to Set Up Your Trial Stimulator, Cables, and Remote Control
The Trial Stimulator provides stimulation during the trial phase. You can increase or decrease stimulation
by pressing the big plus (Stimulation Start/Increase) and minus (Stimulation Decrease) buttons on the
face of the Trial Stimulator. To turn the Trial Stimulator OFF, press the red Stimulation OFF Button in the
corner. Your Trial Stimulator may be locked for your safety and you will be asked to control your system
using the Remote Control.
The Remote Control communicates wirelessly with the Trial Stimulator when you hold the Remote
Control near it. The Remote Control turns itself OFF when it is not in use. To turn it ON, just press the
yellow ON/OFF Button on the upper left-hand corner. Once the Remote Control is ON, you can increase
or decrease stimulation by pressing the big plus (Stimulation Start/Increase) and minus (Stimulation
Decrease) buttons on the front of the Remote Control. To turn the device OFF, press the red Stimulation
OFF Button on the upper right-hand corner. If you want to turn the Remote Control OFF immediately
instead of waiting for it to respond, press the yellow ON/OFF Button on the upper left-hand corner again.
(Note: some patients receive a different Remote Control unit, the RC2000—please see the Appendix for
information on how to use the RC2000 Remote Control).
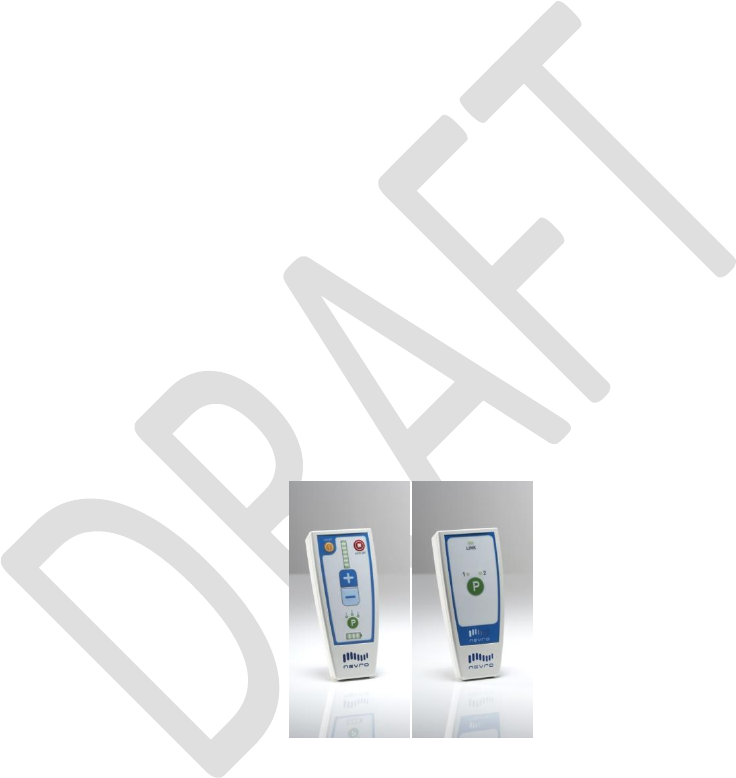
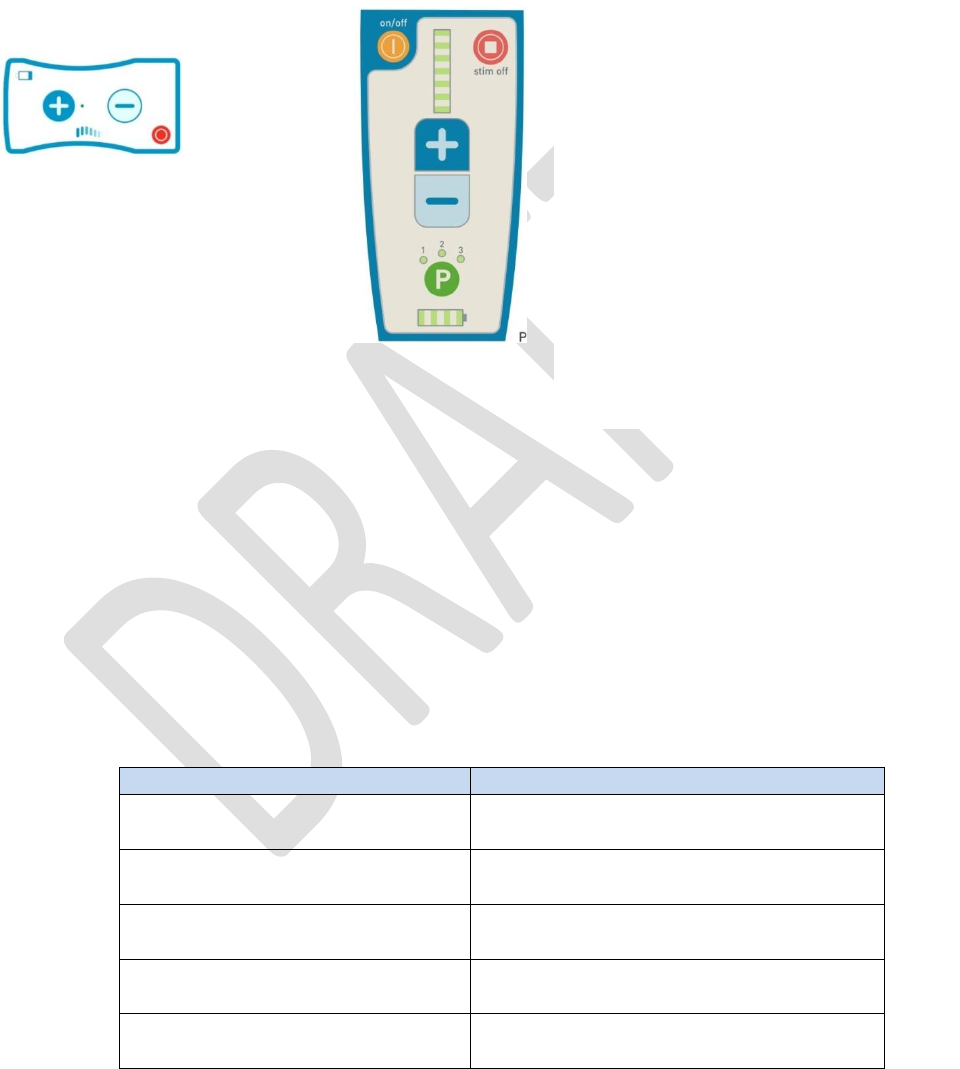
RC1000 RC2000
The Trial Stimulator
The Trial Stimulator has a special safety feature that locks it to prevent you from accidentally turning the
stimulation feature too far up or down. The Trial Stimulator can be used when it is locked—in fact, that is
the way it is supposed to be used. You should only unlock the Trial Stimulator when you are with your
clinician.
To unlock the Trial Stimulator, press both the plus and minus buttons at the same time and hold
them down for at least two full seconds. The Trial Stimulator will beep once for one second to
confirm it is unlocked.
Patient Manual 11052 Rev A (2015-01-15) [DRAFT] 17
When the Trial Stimulator is unlocked, you can use the plus and minus buttons to make
adjustments to the stimulation strength.
The Trial Stimulator will lock itself again automatically if you do not press any button on it for a
minute or more.
Plugging OR Cables into the Trial Stimulator
You will receive the Trial Stimulator with OR Cables. A diagram of these cables and the Trial Stimulator
appears in the Appendix. To plug them into the Trial Stimulator, follow these steps:
1. Make sure the Trial Stimulator is turned OFF by pressing the red Stimulation OFF Button.
2. Select one of the OR Cables (it does not matter which one you start with). Check the color of the
sticker at the end of the cable that plugs into the Trial Stimulator.
3. Plug that end of the OR Cable into the Trial Stimulator port of the same color. You will hear a click
when the cable is fully inserted into the port.
4. Repeat for the other OR Cable.
Trial Stimulator Alert
If the Trial Stimulator is set up but cannot deliver therapy, it will sound an alert. This alert will sound until
you press the red Stimulation OFF Button on the Trial Stimulator. Pressing the red button turns
therapy OFF.
A frequent reason for the Trial Stimulator alert is one or more loose connections. Check that both OR
Cables are properly in place and securely plugged in. If a cable is loose or disconnected, plug it in
securely. Double-check that the OR Cables are in the correct port (match colors on the cable to color of

Patient Manual 11052 Rev A (2015-01-15) [DRAFT] 18
the port). Once you are sure that the OR Cables are correctly in place, turn stimulation ON by pressing
the plus sign Stimulation Increase Button and try again.
If you still get the alert sound, then the Trial Stimulator cannot deliver therapy. Contact your doctor.
Trial Stimulator Batteries
Your Trial Stimulator uses a special type of battery that is provided by Nevro. These batteries have a
distinctive purple color. Do not use any other batteries in the Trial Stimulator. Use only the batteries
provided by your doctor or a technician. If you use another type of battery, you may damage the Trial
Stimulator.
WARNING: Do not use any batteries in the Trial Stimulator except the purple batteries from Nevro.
The Trial Stimulator will warn you when the batteries are running low. When the Low Battery Indicator
Light flashes, you have 10 minutes or less of battery life available. If the Low Battery Indicator Light stops
flashing and remains lit, the battery is exhausted and has to be replaced.
How to Change the Batteries in the Trial Stimulator
You will regularly need to replace the batteries in your Trial Stimulator. Use only the special Nevro
batteries provided. A spare set of batteries will be provided with the Trial Kit. If needed, additional
batteries can be obtained from your physician. Typically, batteries last for approximately 5 days.
1. Turn OFF the Trial Stimulator by pressing the red Stimulation OFF Button on the lower right.
2. Turn the Trial Stimulator over and remove the battery cover.
3. Remove the two old batteries.
4. Double check that the new batteries are the special Nevro batteries. They should be purple.
5. Insert the batteries as you would in any device, matching the positive ends of the battery to the
positive symbol in the battery compartment. You may need to use a little force to get the new
batteries into the battery compartment.
6. Replace the cover; the battery compartment should always be covered.
The arrow points to the Low Battery Indicator Light. The
Low Battery Indicator Light will flash for about 10 minutes
before the batteries wear out. Replace the batteries when
the Low Battery Indicator light first begins to flash so that
you can avoid interrupting your therapy.
When this indicator light is lit, the Trial Stimulator can no
longer provide stimulation. Replace the batteries at once.
Low Battery Indicator
Patient Manual 11052 Rev A (2015-01-15) [DRAFT] 19
The Remote Control
How to Turn on the Remote Control
Most of the time, your Remote Control will be OFF to help save battery life. The Remote Control needs to
be turned ON in order for it to communicate with the Trial Stimulator.
1. Press the small yellow ON/OFF Button on the upper left-hand corner of the Remote Control.
2. Hold it down for up to five seconds.
o If the Remote Control turns on, you will hear a long beep.
o Lights will flash as the Remote Control tries to establish communication with the Trial
Stimulator.
If communication with the Trial Stimulator is established, the lights stop flashing
If communication with the Trial Stimulator cannot be established, the Remote
Control will beep three times and turn itself OFF
If the Remote Control cannot communicate with the Trial Stimulator, make sure the Trial Stimulator is
close to the Remote Control. You may need to move the Remote Control closer to the Trial Stimulator. If
this does not work, check the batteries in the Trial Stimulator—if the Trial Stimulator needs new
batteries, it will not be able to communicate with the Remote Control.
The Remote Control is also battery powered. When the batteries get low, the Remote Control will beep
six times when it is turned ON. When this occurs, change the batteries.
The Remote Control will turn itself OFF anytime it is not in use for two or more minutes. Simply turn it
back on when you are ready to use it again.
Remote Control Batteries
Your Remote Control should come with batteries already installed. It uses two AA alkaline batteries.
Never use any other type of battery with your Remote Control because this could damage the device.
WARNING: Use only two AA alkaline batteries in the Remote Control; any other type of battery could
damage the device.
How to Change the Batteries in the Remote Control
Make sure the Remote Control is OFF; it turns itself OFF automatically if it is not touched in one minute.
Or, you can you push the yellow ON/OFF Button on the top left corner.
Patient Manual 11052 Rev A (2015-01-15) [DRAFT] 20
1. Turn the Remote Control over and remove the battery compartment cover.
2. Remove the two old batteries.
3. Double check that the new batteries are AA alkaline batteries. Do not use any other type of
battery.
4. Insert the batteries as you would in any device, matching the positive ends of the battery to the
positive symbol in the battery compartment.
5. Replace the cover; the battery compartment should always be covered.
Adjusting Stimulation
Once the Remote Control is ON and has established communication with the Trial Stimulator, you can use
the Remote Control to turn the stimulation ON and OFF, or increase/decrease the strength of the
stimulation.
How to Turn OFF Stimulation
If you are using the Trial Stimulator, you can turn stimulation OFF by pressing the round red Stimulation
OFF Button on the lower right-hand corner. This button is always active and can be pressed at any
time, even if the Trial Stimulator is locked.
You can also turn stimulation OFF with the Remote Control, but the Remote Control must be turned ON
first (press the yellow ON/OFF Button on the upper left). Turn stimulation OFF from the Remote Control
by pressing the round red Stimulation OFF Button on the upper right-hand corner.
You can use either method to turn stimulation OFF. Note that the red buttons do not turn stimulation
back ON.
How to Turn ON Stimulation
Turn stimulation OFF: press
the red button on the lower
right-hand corner
Turn stimulation ON: press
the plus sign
Turn stimulation OFF:
press the red button on
the upper right-hand
corner
Turn stimulation ON:
press the plus sign
Trial Stimulator
Remote Control
Patient Manual 11052 Rev A (2015-01-15) [DRAFT] 21
To turn stimulation ON, press the Stimulation Start/Increase Button (the plus sign) on the Trial Stimulator
or the Remote Control. If you are using the Remote Control, turn it on first (use the yellow ON/OFF
Button on the upper left) and then turn stimulation ON by pressing the plus sign. When the device
stimulates, it will indicate this by flashing (Trial Stimulator) or lighting up at least one LED light (Remote
Control).
Your doctor has set up your stimulation program for you already. When you turn stimulation ON, it will
stimulate as programmed. The Trial Stimulator will stimulate based on the last program it used.
Increasing or Decreasing Stimulation Strength
Follow the directions given to you by your doctor when changing the stimulation strength. The
stimulation you receive can be made more or less intense using the Trial Stimulator or the Remote
Control. To increase stimulation strength, press the plus sign button repeatedly until you reach the
stimulation strength you want. Your doctor has programmed a maximum stimulation strength into the
device and it cannot be made to stimulate more intensely than that. To decrease the stimulation
strength, press the minus sign button.
When you change stimulation strength, you will hear some beeps. The table below explains what the
beeps mean.
What You Hear
What It Means
One single soft beep
This confirms that the plus sign or minus
sign button has been pressed
One single regular beep
Stimulation has increased or decreased by
one level
Two regular beeps
You have reached the highest or lowest
stimulation level possible
Three regular beeps
The device cannot respond the way you
want
Continuous beeping
One of the cables on the Trial Stimulator is
loose
Turn stimulation ON: press the
plus sign. The lights will flash
when it is stimulating.
Turn stimulation OFF: press the
red button.
To turn stimulation ON from the Remote
Control, first turn the Remote Control on
by pressing the yellow ON/OFF Button for
up to five seconds. One long beep sounds
to tell you the Remote Control is on.
Once the Remote Control is ON;
Turn stimulation ON: press the plus sign.
Turn stimulation OFF: press the red
button.
When the device is stimulating, you will
see at least one of the LED lights turn on.

Patient Manual 11052 Rev A (2015-01-15) [DRAFT] 22
If you ever hear three regular beeps, it means that the device cannot do what you want. This may
happen because:
The Remote Control is too far away from the Trial Stimulator
The Remote Control is having some other difficulty communicating with the Trial Stimulator
In this case, move the Remote Control closer to the Trial Stimulator and try again.
Your device is adjustable so that you can find the right level of stimulation to control your pain. If your
pain remains uncontrolled, even at the maximum level, or if you are having difficulty getting pain relief
with this system, tell your doctor.
Switching Between Programs
Your doctor may have set up your stimulator to offer one, two, or three different stimulation programs.
Follow the directions given to you by your doctor when switching the program. If you have more than
one stimulation program available, you can change programs by pressing the green P button on the
Remote Control. The number of the program you have selected will light up. The button runs through
the numbers in order and then starts over, so keep pressing until you reach the number you want.
1. Turn the Remote Control on by pressing and holding the yellow ON/OFF Button on the upper left-
hand corner for up to five seconds. You will hear one long beep to tell you that the Remote
Control is on.
2. Press the green P button to change the stimulation program. The programs go in order (1, 2,
3, then 1, 2, 3, and so on).
3. Stop when light by the desired number is lit.
If only one program is available, the number 1 will remain lit and you will not be able to change
programs.

Patient Manual 11052 Rev A (2015-01-15) [DRAFT] 23
YOUR PATIENT ID CARD
You will receive a temporary patient identification (ID) card during the trial phase. If you have the device
implanted, you will get a permanent ID card from Nevro once you send in the necessary paperwork. Your
doctor or nurse can help you with the necessary forms.
Carry this patient ID card with you at all times. It identifies you as a device patient and it may be
important for you in a medical emergency. If you ever need to go through a security checkpoint, you
should show your Patient ID card.
If you move or if your personal information changes, be sure to let your doctor know. It is important to
update your contact information with your doctor and Nevro.
IMPLANTED STIMULATOR PHASE
After your Trial Phase using the Trial Stimulator and the Remote Control, you and your doctor will decide
if SCS therapy is right for you. During the trial phase, you learned to use the Remote Control. You will use
either the same or a similar Remote Control with the IPG. You also learned what it felt like to receive
therapy and how it worked to control your pain. It is expected that the therapy will work the same way
after the IPG implantation. There may come a time when your IPG no longer holds a charge well. When
your therapy cannot be maintained with daily charging, the IPG may need to be replaced. At that point,
the doctor can remove your old IPG and replace it with a new one. This involves another surgical
procedure. This second procedure is usually faster and more straightforward than the original implant
surgery. The rechargeable battery in your IPG should last many years. How long it lasts will depend on
many factors, including how often the IPG stimulates. Ask your doctor how long the battery might be
expected to last for you.
If you have already gone through the trial phase, you know how to turn the Remote Control ON, turn
stimulation ON and OFF, increase and decrease stimulation strength, and switch between stimulation
programs. These are done exactly the same way as before using the Remote Control.
You may be able to resume many of the everyday things you are used to. Talk with your doctor about
appropriate activities. With the Senza system you may be able to resume:
Driving
Going to work
Travel
Many leisure activities
Moderate exercise (ask your doctor)
Normal sexual activity
Your doctor will want to see you regularly for check-ups. These are important not only for your health,
but also to monitor how the device is working.
Battery Status
Your IPG is a battery-powered device, and it can be recharged. This will help you get maximum service
from your system. The clinical team should show you how to recharge your IPG. The best way to recharge
is to get into the habit of recharging once a day, although you may be able to charge it less often. Many
factors can affect how often you need to recharge the IPG (such as how much you use it, how intensely it
stimulates, how old the system is).
Patient Manual 11052 Rev A (2015-01-15) [DRAFT] 24
You have a Charger, a Charger Belt, and a Charger Holster for recharging the IPG. These are shown in the
Appendix.
You also have equipment to recharge the Charger. This is shown in the Appendix. It is recommended that
you recharge the Charger after every use.
Battery Level Indicators
There are Battery Level Indicators on the Charger and on the Remote Control.
The Battery Level Indicators on the Charger report the battery level of the implanted device.
The Remote Control also has a Stimulator Battery Level Indicator.
How to Charge the IPG
You can still get stimulation from your device even during charging. Follow these steps to charge the IPG.
1. Place the Charging Coil (the big blue circle) into the mesh pouch of the Charger Belt. The mesh
pouch is the part of the Charger Belt that does not have the Nevro logo.
WARNING: Use only the Power Adaptor, Charging Coil, and accessories from Nevro Corp. Always
recharge using the Charger Belt provided. Failure to use the Charger Belt may result in a burn.
2. Identify the area where the IPG is implanted. When charging, the Charging Coil in the mesh
pouch of the Charger Belt should be lined up so the center of the Charging Coil covers the top of
the IPG. You do not need to remove any clothing—you can recharge through a thin layer of
The right-sided battery level indicator on the
charger tells you the status of the IPG battery.
If you see two or fewer bars, then your IPG
needs to be recharged.
The Stimulator Battery Level Indicator
on the Remote Control tells you how
much energy is left in the IPG battery.
If you see three or fewer bars, then
the IPG battery should be recharged
so that it is always fully operational.
If you see two or fewer bars, recharge
the batteries at once.
Patient Manual 11052 Rev A (2015-01-15) [DRAFT] 25
fabric. However, make sure that there is no metal between the Charging Coil and the IPG or
near the Charging Coil because it could result in serious burns. (Metal might be in jewelry, a
belt, buttons, zipper, and so on.) Fasten the belt to hold the Charging Coil in place; you may want
to use the optional Charger Holster to help hold the Charger.
WARNING: If you feel warmth or discomfort when recharging the device, stop recharging and contact
your doctor.
WARNING: Never charge your IPG when the Charger is plugged into a wall outlet. Always remove the
Power Adaptor before pressing the Charge Start Button.
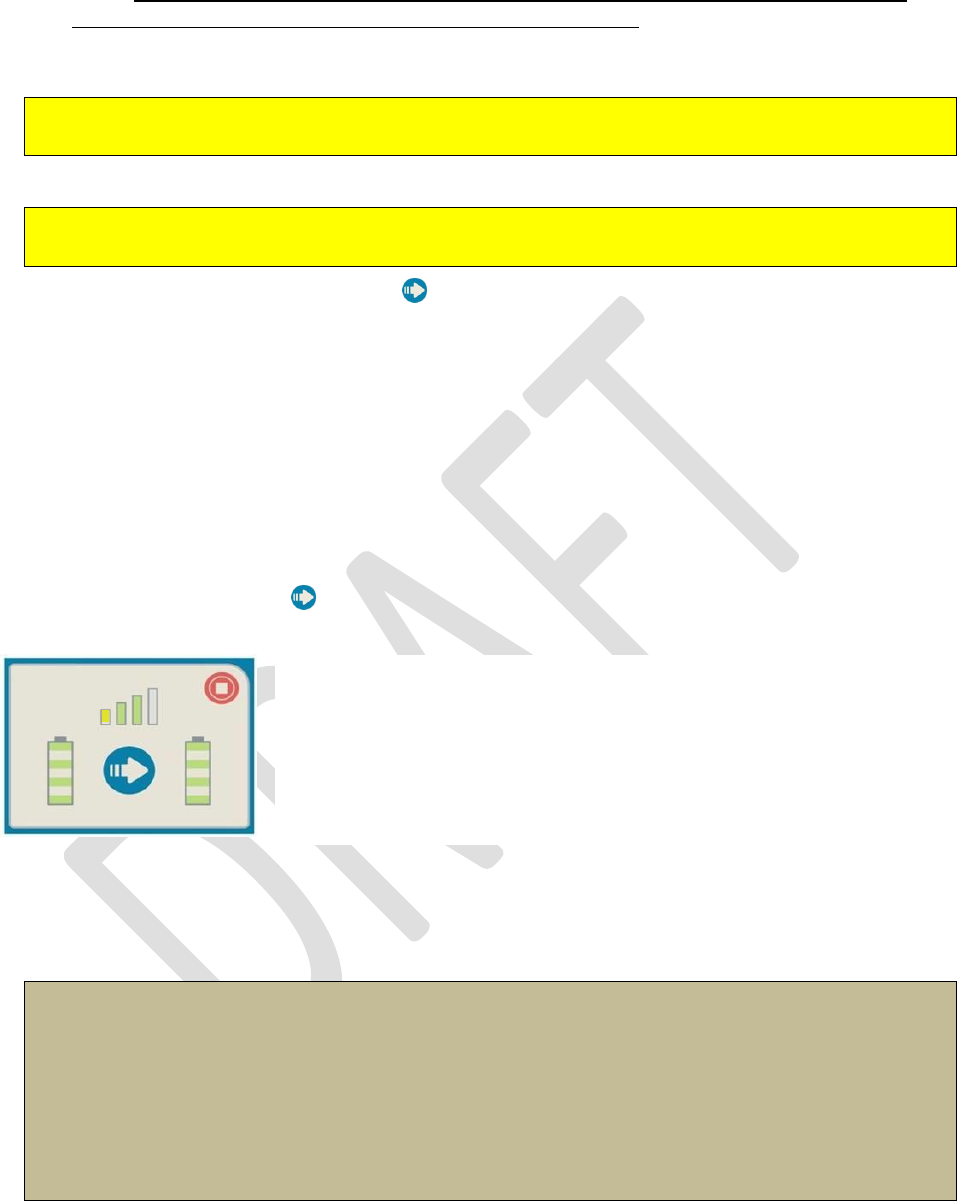
3. Press the arrow Charge Start Button to turn on the Charger.
4. The Charger will start to look for the IPG. It beeps as it searches.
5. When the Charger finds the IPG, you will see at least two bars on the Antenna Strength Indicator.
(If you do not have at least two bars, move the Charging Coil slightly until you get sufficient
antenna strength.) You can charge successfully with two or more bars. If the antenna strength
still is 1 (the yellow bar) or no bars, then please advance to the “Optimizing Charging.” The more
bars you see, the better the communication you have and the more efficient the charging session
will be.
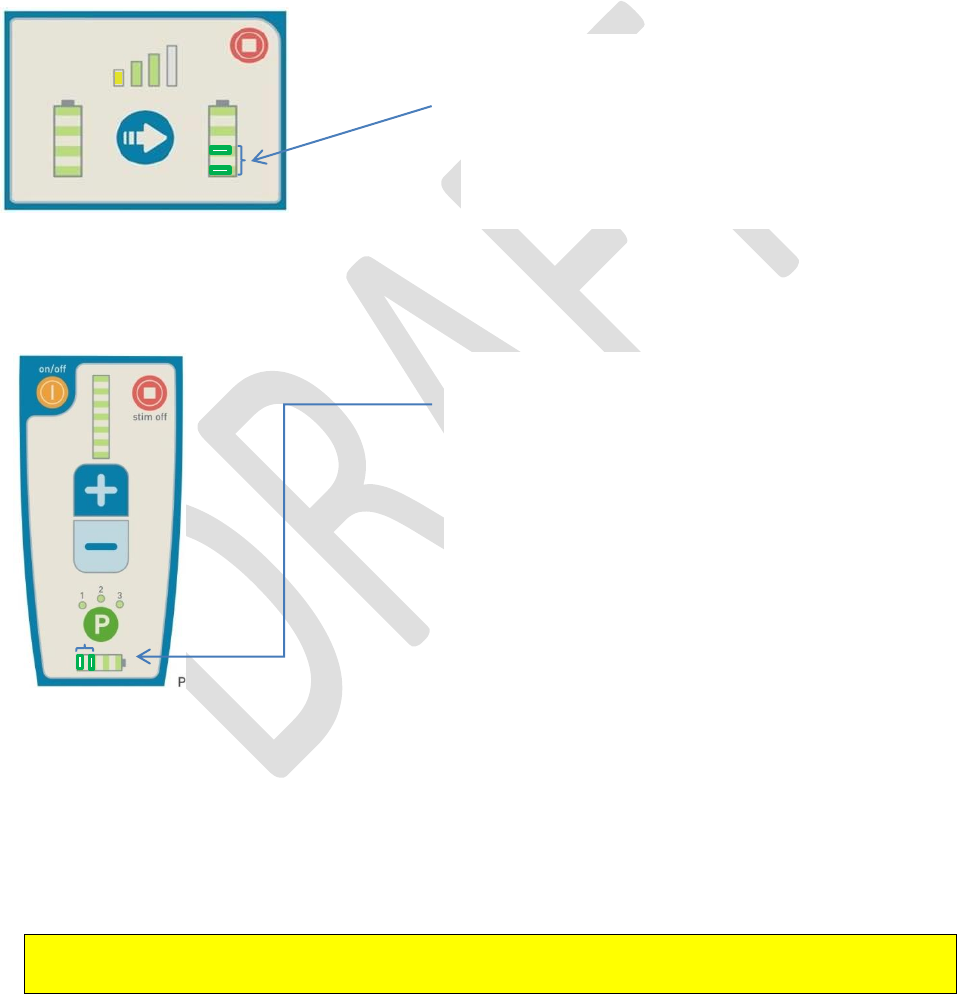
6. When the Charger is in the correct position, the IPG Battery Level Indicator and the Implanted
Stimulator’s Battery Level Indicator will light up. These are the status bars to the right and left of
the Charge Start Button .
7. Keep the Charging Coil steady in the same position. The Charger will keep charging until the IPG is
fully charged (or until the Charger runs out of its own charge).
NOTE: If the Charging Coil is moved during the charging session, it may lose communication with the
IPG. If this occurs, you will see one orange bar on the Antenna Strength Indicator and you will hear
intermittent beeps. Slowly move the Charging Coil back into proper position, wait about three
seconds, and confirm that the antenna strength shows at least two bars. Keep moving slightly and
pausing, checking until you re-establish communication. If the Charging Coil and the IPG lose
communication for a long period of time, the Charger will sound one long beep and turn itself off. If
this happens, re-start the charging process. The IPG can still be charged even if the charging session is
interrupted.
8. When the IPG is fully charged, the Charger will sound a long beep and the Implanted Stimulator’s
Battery Level Indicator (the ones on the right) will show four bars. The Charger turns itself off
automatically.
The Charger shows two battery status bars. The one to the
left of the arrow button shows the battery status of the
Charger.
The one to the right of the arrow button shows the battery
status of the IPG.

Patient Manual 11052 Rev A (2015-01-15) [DRAFT] 26
NOTE: If you ever need to turn off the Charger during a recharging session, just move the Charging
Coil away from the IPG. If the Charger cannot locate the IPG after 10 seconds, it turns itself off
automatically.
CAUTION: Do not charge your IPG while you are drowsy, sleeping, or sedated, as this may result in a
burn. If you feel warmth or discomfort around the Charging Coil, discontinue the charging process
and contact your doctor.
9. Once the charging is complete, turn ON the Remote Control (press the yellow ON/OFF Button on
the upper left and hold for about five seconds) and verify that therapy is ON.
NOTE: The IPG will continue to provide therapy while being recharged.
The battery life is estimated to be 10 years but the battery life may be more or less depending on the
stimulation parameters used. The battery will eventually need to be replaced in a surgical procedure.
How to Charge the Charger
You should recharge the Charger after every use. The best way to remember to do this is to get into a
daily routine of charging the IPG and then recharging the Charger. You can find a diagram of the Charger
parts in the Appendix.
WARNING: Never charge the IPG at the same time you are recharging the Charger.
1. The Charger has a Power Adaptor Port. Plug the Power Adaptor Port plug into the Power Adaptor
Port.
2. This initiates the charge. You will see a red light on the Power Adaptor light up. This means the
Charger is being recharged.
3. Allow the recharging to continue until the light turns green. The green light indicates that the
recharging is complete.
NOTE: Once the Charger is fully charged, you do not have to unplug it until you the next time you charge
the IPG. There is no harm in continuously charging the Charger. You may also remove the plug, if you
prefer.
Optimizing Charging
In order to charge the IPG, the Charging Coil must establish good communication with the IPG. There may
be times when you have trouble getting the Charger and the IPG to communicate.
If there is no communication at all, the Antenna Strength Indicator will show one single orange bar and
beep occasionally. The Charger will eventually turn itself off.
1. Make sure that there is no metal near the Charging Coil. (Be sure to check for jewelry, metal
buttons, belt buckles, watches, zippers, and so on.)
2. The Charger will work through a thin layer of fabric. Remove any thick or heavy clothing.

Patient Manual 11052 Rev A (2015-01-15) [DRAFT] 27
3. Make sure the Charging Coil is lined up with the top of the implanted device (IPG). You may need
to use your fingers to feel the shape of the device through your skin.
4. Check to see that the Charger has enough charge to work (you should see at least two status bars
to the left of the arrow on the charger). If the Charger does not have enough charge, recharge it
first and then try to charge the IPG.
If there is poor communication, you will see one orange bar but there will not be any beeping. The
Charging Coil can still recharge the IPG, but it will happen slowly. You may be able to get better
communication by moving the Charging Coil slightly, waiting about three seconds, and seeing if this
improves the antenna strength.
If communication is lost during a recharging session, simply move the Charging Coil back into position
until you see at least two bars on the Antenna Strength Indicator. An interruption in charging will not hurt
the system.
Charging Tips
It is very important that you get familiar and comfortable with charging your system and develop a
routine so that your device is charged every day. This assures that you can get the pain control therapy
you need when you need it.
Charging times will vary for each session. Things that can affect charging time include battery
status, how much therapy you have had, therapy strength, and time elapsed from the last
charge. Do not be concerned if the charging process seems to take longer some days than others.
If the charging time is very short, check that the IPG is turned on.
The more bars shown on the Antenna Strength Indicator, the better communication the Charging
Coil has with the IPG. The better the communication, the more efficient (and faster) the charging
session.
To find the top of the implanted device, use your fingers to gently feel for the device through the
skin. Your doctor can assist you in learning how to do this.
Keep the Charging Coil steady in position as you charge. If the Charging Coil moves, it may lose
communication with the IPG. If this happens, you will hear a long beep and the Charger will turn
itself off. Simply put the Charging Coil back in position and start again.
If you need to turn OFF the Charger during a charging session, just move it away from the IPG. It
will turn itself OFF automatically in about 10 seconds.
You can still get therapy while the device is recharging.
Do not press the red Stimulation OFF Button on the Charger unless you want to turn therapy
OFF. There is no need to do this during charging. If you should ever press the red button on the
Charger, turn therapy back ON using the Remote Control (press the yellow ON/OFF Button to
turn on the Remote Control, then press the plus sign).
ASK YOUR DOCTOR
SCS therapy has helped many people, but you must be willing to share information with your doctor for
best results. You should have the name and phone number of your doctor and/or healthcare professional
(technician) handy at home and at work, so that you can get in touch with him or her quickly if need be.
Tell your family and individuals close to you about your Senza system in the event that they will ever have
to speak for you.

Patient Manual 11052 Rev A (2015-01-15) [DRAFT] 28
Contact your doctor at once if:
You feel unusual pain or discomfort during stimulation. (Turn stimulation OFF at once.)
The implant site is swollen, reddened, irritated, tender, or painful.
You experience any unusual symptoms that you think may be related to the device.
If you have a medical emergency, do not call your doctor. Call 911 and seek emergency help.
Ask your doctor or other healthcare professional for help if you have trouble with any of the following:
Using the Remote Control
Using the Trial Stimulator
Charging the IPG
Charging the Charger
Changing batteries
Understanding how to increase/decrease stimulation strength
Discuss with your doctor changes in your condition and how you are responding to therapy.
TROUBLESHOOTING
If you should experience problems with your Senza system, please see if any of these troubleshooting
recommendations might address that problem. Many times, problems with the device turn out to have
simple solutions. If you cannot fix your problem with these recommendations or if you are having a
problem not described here, contact your doctor.
Troubleshooting Therapy
If therapy has stopped:
Check that therapy has not been inadvertently turned OFF. Turn therapy ON by pressing the plus
sign button.
If you are using the Trial Stimulator, there may be a loose connection. Check that the OR Cables
are in the right ports (match the colors) and make sure they are fully inserted into the port. You
will hear a click when the cable is fully inserted into the port.
Check battery status.
o On the Trial Stimulator, look if the Low Battery Indicator Light is on or flashing.
o Listen for six beeps when you turn ON the Remote Control.
o If necessary, replace batteries.
If you have an IPG, check the battery status and recharge, if necessary.
Troubleshooting the Remote Control
If you press the buttons on the Remote Control and nothing happens:
Make sure the Remote Control is ON. You must turn ON the Remote Control before you use it; it
automatically turns itself OFF when not in use. To turn it ON, press and hold the yellow ON/OFF
Button on the upper left for up to five seconds.

Patient Manual 11052 Rev A (2015-01-15) [DRAFT] 29
If this does not fix the problem, look at the battery status bars on the Remote Control to see if
the battery is low. If it is, replace the batteries in the Remote Control with two AA alkaline
batteries. Batteries should be replaced every three months.
If you are using the Trial Stimulator, look at the Trial Stimulator to see if the Low Battery Indicator
Light (upper left-hand corner) is flashing or lit. If the light is flashing or lit, replace the Trial
Stimulator battery. Use only the special batteries provided by Nevro for use in your Trial
Stimulator.
Move the Remote Control to make sure it is close enough to the Trial Stimulator or IPG to work. It
may be out of range.
If none of these steps restores the Remote Control to normal operation, contact your doctor.
If you have an IPG and the Remote Control sounds three beeps to indicate that a command was not
accepted:
Move the Remote Control closer to the Trial Stimulator or IPG and try again.
Move away from possible sources of electromagnetic interference, such as electrical equipment
and radio systems, and try again.
If you notice that the Remote Control is turned off after the three beeps, the IPG battery is low.
Recharge the IPG.
Troubleshooting the Trial Stimulator
If the Trial Stimulator beeps continuously:
There may be a loose connection. Double check that the OR Cables are in the correct ports
(match the colors) and that they are securely inserted. You should feel a click when the cables are
inserted the right way.
Once you are sure the cables are properly inserted, turn therapy ON again.
If the Trial Stimulator does not seem to be responding to the Remote Control:
Using the Remote Control, notice if you hear three beeps after pressing a button. Three beeps
means the command was not accepted. If this happens:
o Move the Remote Control closer to the Trial Stimulator and try again.
o If this does not help, the Trial Stimulator batteries may be low. In this case, you will hear
three beeps and notice the Low Battery Indicator Light on the Trial Stimulator. Replace
the batteries in the Trial Stimulator.
The batteries may also be low in the Remote Control. Replace the batteries.
If you go through these steps and it does not help, contact your doctor.
Troubleshooting the Recharging Process
If your device needs very frequent recharging
After each charging session, check to see that the IPG is fully charged.
If frequent charging persists, contact your doctor.
If you ever charge your device and it does not provide stimulation:
Check to see that the IPG is fully charged.

Patient Manual 11052 Rev A (2015-01-15) [DRAFT] 30
Replace batteries in the Remote Control
Check that stimulation is turned ON; if it is not
o Turn on the Remote Control by pressing the yellow ON/OFF Button on the upper left
o Press the plus sign button
If these do not work, contact your doctor.
If you are trying to recharge the IPG and you have low antenna strength that you cannot improve
Slowly move the Charging Coil slightly. The goal is that the center of the Charging Coil circle is
lined up over the top of the implanted device. Wait about three seconds and observe if the
antenna strength improves.
You may have to do this a few times—make sure your movements are slow and small.
You can still charge if you have two bars on the Antenna Strength Indicator, although it may take
longer than usual to charge.
All of the Lights are Blinking!
If you ever see all of the lights blinking or hear long beeps or a series of many rapid short beeps, your
device may require service. Contact your doctor.
DEVICE DISPOSAL
If you want to dispose of any components in your system, it is best to bring them back to your doctor. Do
not throw them (or any electronic components, including batteries) in the regular household trash. Your
local community will have regulations and advice as to how to dispose of batteries and other
components.
Never put these device components in fire as they may explode.
If an IPG and/or lead is ever removed from your body, your doctor will return it to Nevro Corp. This helps
Nevro monitor its products and is required by U.S. law.
In the event of death and cremation, the implanted IPG should be removed prior to cremation.
Patient Manual 11052 Rev A (2015-01-15) [DRAFT] 31
APPENDICES
Device Specifications
System Specifications
Parameter
Range
Frequency
2 – 10,000 Hz
Pulse Width
20μsec – 1msec
Amplitude
0 – 15mA
Charger Specifications
The following table contains technical specifications for the Charger.
AC input for the charger:
Parameter
Specification
Frequency
50 to 60 Hz
Voltage
100 to 240 VAC
Input Current
0.2 A max
Additional technical information, including the Guidance and Manufacturer’s Declarations on
electromagnetic emissions and immunity, is available. To request this information, please contact Nevro
Corp.
Stimulation Parameter Ranges
The following table summarizes the maximum impedance for which the maximum current of 15 mA can
be delivered at the maximum pulse width (1 msec, at a maximum frequency of 400 Hz) and maximum
frequency (10,000 Hz, at a maximum pulse width of 30 µsec).
Frequency
Maximum
Amplitude
Maximum
Pulse Width
Maximum
Impedance
400 Hz
15 mA
1 msec
1,270 Ω
10,000 Hz
15 mA
30 µsec
1,080 Ω
Quality of Wireless Service
The Senza system uses a wireless communication system in the MedRadio frequency band (402-405
MHz). This band is reserved for implantable medical devices. The typical communication range is less
than 5 feet (1.5 meters) between the Remote Control/Programmer Wand and Implantable Pulse
Generator (IPG)/Trial Stimulator. Before each communication, the Remote Control/Programmer Wand
scans 8 channels in the band and selects the least interfered channel for communication. All
communication is verified for accuracy. Any communication containing uncorrectable errors are rejected
and communication is retried automatically. If the retries fail, the user is notified of the communication
failure.
Wireless Security
The Senza system has a telemetry range of less than 5 feet (1.5 meters). The Remote Control is uniquely
paired to a specific IPG or Trial Stimulator and can only communicate with that device. The IPG or Trial
Stimulator will not respond to any communication that does not come from a linked device (a device that

Patient Manual 11052 Rev A (2015-01-15) [DRAFT] 32
is paired with the IPG). There are additional mechanisms that ensure the integrity of the communicated
data.
Telemetry Information
The Senza system uses a wireless communication system in the MedRadio frequency band (402-405
MHz). Refer to the troubleshooting sections in this manual if communication difficulties are encountered.
This device complies with part 15 of the FCC Rules. Operation is subject to the condition that this
device does not cause harmful interference. Changes or modifications of any kind not expressly
approved by Nevro could void the user’s authority to operate this device.
This transmitter is authorized by rule under the Medical Device Radiocommunication Service (in
part 95 of the FCC Rules) and must not cause harmful interference to stations operating in the
400.150-406.000 MHz band in the Meteorological Aids (i.e., transmitters and receivers used to
communicate weather data), the Meteorological Satellite, or the Earth Exploration Satellite
Services and must accept interference that may be caused by such stations, including
interference that may cause undesired operation.
This transmitter shall be used only in accordance with the FCC Rules governing the Medical
Device Radiocommunication Service. Analog and digital voice communications are prohibited.
Although this transmitter has been approved by the Federal Communications Commission, there
is no guarantee that it will not receive interference or that any particular transmission from this
transmitter will be free from interference.
Refer to the tables in the “Electromagnetic Interference” section to determine the recommended
separation distances between the Senza system and other transmitters.
Wireless Charging Information
The Senza system uses charging frequency of 410-485 kHz. The charging distance between the Charger
and the IPG is between 0 to 2.5 cm. Refer to the instructions provided in the Patient Manual to optimize
charging.
Electromagnetic Interference
Guidance and Manufacturer’s Declaration - electromagnetic emissions
The Senza system is intended for use in the electromagnetic environment specified below. The customer or user
of the Senza system should assure that it is used in such an environment.
Emissions Test
Compliance
Electromagnetic Environment Guide
RF emissions CISPR 11
Group 1
The Senza system uses RF energy only for its internal function.
Therefore, its RF emissions are very low and are not likely to cause
any interference in nearby electronic equipment.
RF emissions CISPR 11
Class B
Class A
(Programmer
Wand)
The Senza system is suitable for use in all establishments.
Including domestic establishments and those directly connected
to the public low-voltage power supply network that supplies
buildings used for domestic purposes.
The Programmer Wand is suitable for use in all establishments
other than domestic and those directly connected to the public
low-voltage power supply network that supplies buildings used for
domestic purposes.
Harmonic emissions
IEC 61000-3-2
Class B
Voltage fluctuations /
Flicker emissions IEC 61000-
3-3
Complies

Patient Manual 11052 Rev A (2015-01-15) [DRAFT] 33
Guidance and Manufacturer’s Declaration - electromagnetic immunity
The Senza system is intended for use in the electromagnetic environment specified below. The customer or user
of the Senza system should assure that it is used in such an environment.
Immunity Test
IEC 60601 Test
Level
Compliance Level
Electromagnetic environment guidance
Electrostatic
discharge (ESD)
IEC 61000-4-2
± 6 kV contact
± 8 kV air
± 6 kV contact
± 8 kV air
Floors should be wood, concrete, or ceramic tile.
If floors are covered with synthetic material, the
relative humidity should be at least 30%.
Electrical fast
transient/burst
IEC 61000-4-4
± 2 kV for power
supply lines
± 1 kV for
input/output lines
± 2 kV for power
supply lines
± 1 kV for
input/output lines
Mains power quality should be that of a typical
commercial or hospital environment.
Surge IEC 61000-
4-5
± 1 kV line(s) to
line(s)
± 2 kV line(s) to
earth
± 1 kV line(s) to
line(s)
± 2 kV line(s) to
earth
Mains power quality should be that of a typical
commercial or hospital environment.
Voltage dips,
short
interruptions and
voltage variations
on power supply
input lines IEC
61000-4-11
<5 % UT
(>95 % dip in UT)
for 0.5 cycle
40 % UT
(60 % dip in UT)
for 5 cycles
70 % UT
(30 % dip in UT)
for 25 cycles
<5 % UT
(>95 % dip in UT)
for 5 s
<5 % UT
(>95 % dip in UT)
for 0.5 cycle
40 % UT
(60 % dip in UT)
for 5 cycles
70 % UT
(30 % dip in UT)
for 25 cycles
<5 % UT
(>95 % dip in UT)
for 5 s
Mains power quality should be that of a typical
commercial or hospital environment. If the user
of Nevro SCS system requires continued
operation during power mains interruptions, it is
recommended that the Nevro SCS system be
powered from an uninterruptible power supply or
a battery.
Power frequency
(50/60 Hz)
magnetic field
IEC 61000-4-8
3 A/m
3 A/m
Power frequency magnetic fields should be at
levels characteristic of a typical location in a
typical commercial or hospital environment.
NOTE UT is the a.c. mains voltage prior to application of the test level.
Guidance and Manufacturer’s Declaration - electromagnetic immunity
The Senza system is intended for use in the electromagnetic environment specified below. The customer or user
of the Senza system should assure that it is used in such an environment.
Immunity Test
IEC 60601 Test
Level
Compliance Level
Electromagnetic environment guidance
Conducted RF
IEC 61000-4-6
3 Vrms
150 kHz to 80
MHz
3 Vrms
150 kHz to 80
MHz
Portable and mobile RF communications
equipment should be used no closer to
any part of the Senza system, including
cables, than the recommended
separation distance calculated from the
equation applicable to the frequency of
the transmitter.
Recommended separation distance :
d=1.2√𝑃
Radiated RF
IEC 61000-4-3
3 V/m 80 MHz to
2.5 GHz
3 V/m
80 M Hz to 2.5
GHz
d=1.2 √𝑃 80 MHz to 800 MHz
d=2.3 √𝑃 800 MHz to 2.5 GHz
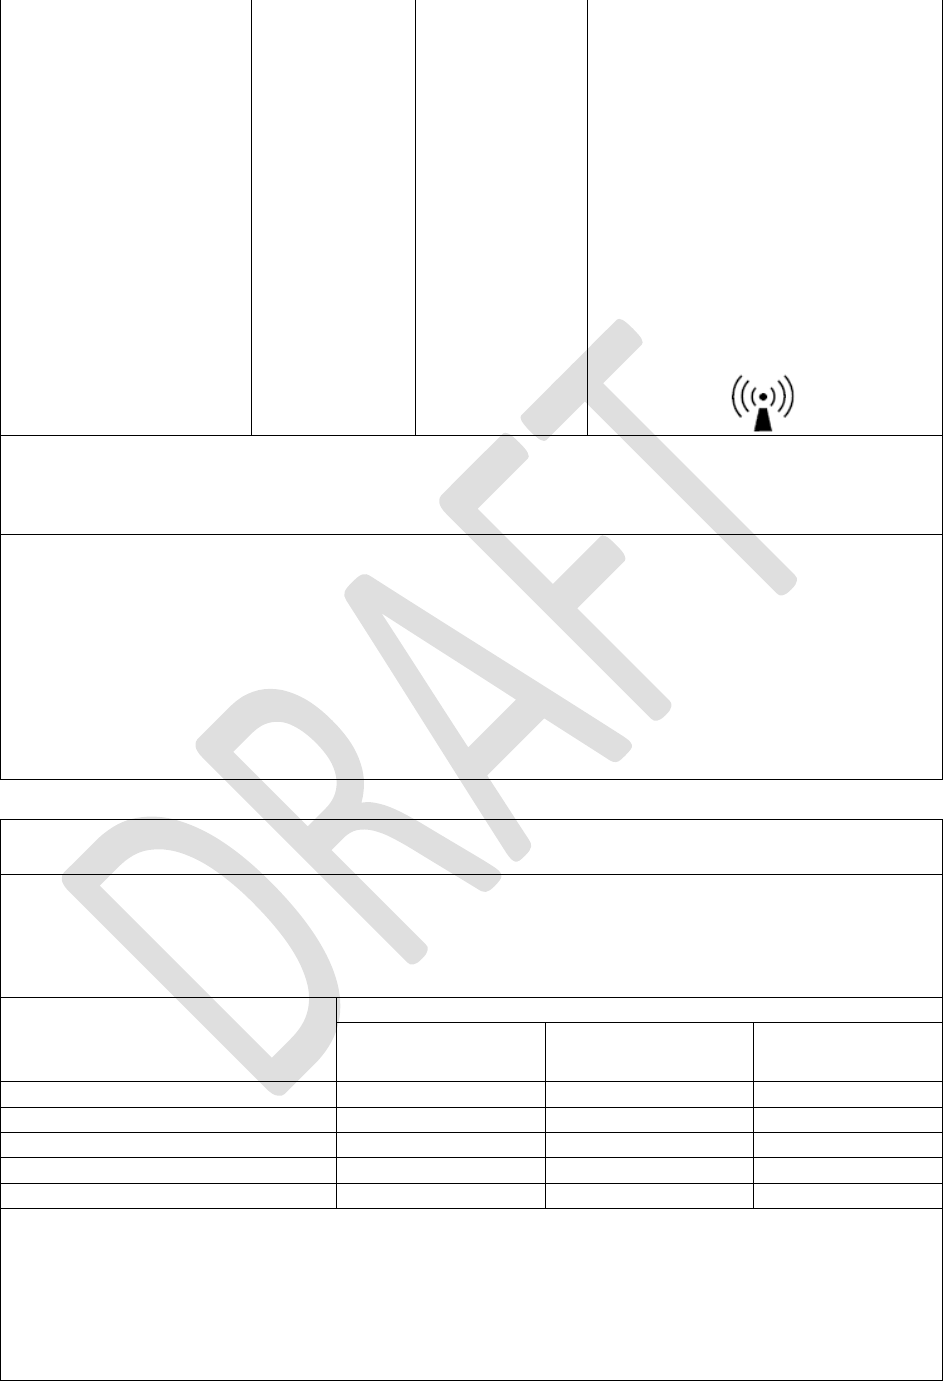
Patient Manual 11052 Rev A (2015-01-15) [DRAFT] 34
Where P is the maximum output power
rating of the transmitter in watts (W)
according to the transmitter
manufacturer and d is the
recommended separation distance in
meters (m).
Field strengths from fixed RF
transmitters, as determined by an
electromagnetic site survey, should be
less than the compliance level in each
frequency range (b) Interference may
occur in the vicinity of equipment
marked with the symbol shown below:
NOTE: At 80 MHz and 800 MHz, the higher frequency range applies.
NOTE: These guidelines may not apply in all situations. Electromagnetic propagation is affected by absorption
and reflection from structures, objects and people.
a) Field strengths from fixed transmitters, such as base stations for radio (cellular/cordless) telephones and land
mobile radios, amateur radio, AM and FM radio broadcast, and TV broadcast cannot be predicted theoretically
with accuracy. To assess the electromagnetic environment due to fixed RF transmitters, an electromagnetic site
survey should be considered. If the measured field strength in the location in which the Senza system is used
exceeds the applicable RF compliance level above, the Senza system should be observed to verify normal
operation. If abnormal performance is observed, additional measures may be necessary, such as re-orienting or
relocating the Senza system.
b) Over the frequency range 150 kHz to 80 MHz, field strengths should be less than 3 V/m.
Recommended separation distances between portable and mobile RF communications equipment
and the Senza system
The Senza system is intended for use in an electromagnetic environment in which radiated RF disturbances are
controlled. The customer or the user of the Senza system can help prevent electromagnetic interference by
maintaining a minimum distance between portable and mobile RF communications equipment (transmitters)
and the Senza system as recommended below, according to the maximum output power of the communications
equipment.
Rated maximum output power of
transmitter
W
Separation distance according to frequency of transmitter (meters)
150 kHz to 80 MHz
d = 1.2 √P
80 MHz to 800 MHz
d = 1.2 √P
800 MHz to 80 GHz
d = 2.3 √P
0.01
0.12
0.12
0.23
0.1
0.37
0.37
0.74
1
1.17
1.17
2.33
10
3.69
3.69
7.38
100
11.67
11.67
23.33
For transmitters rated at a maximum output power not listed above, the recommended separation distance d in
meters (m) can be estimated using the equation applicable to the frequency of the transmitter, where P is the
maximum output power rating of the transmitter in watts (W) according to the transmitter manufacturer.
NOTE: At 80 MHz and 800 MHz, the separation distance for the higher frequency range applies.
NOTE: These guidelines may not apply in all situations. Electromagnetic propagation is affected by absorption
and reflection from structures, objects, and people.
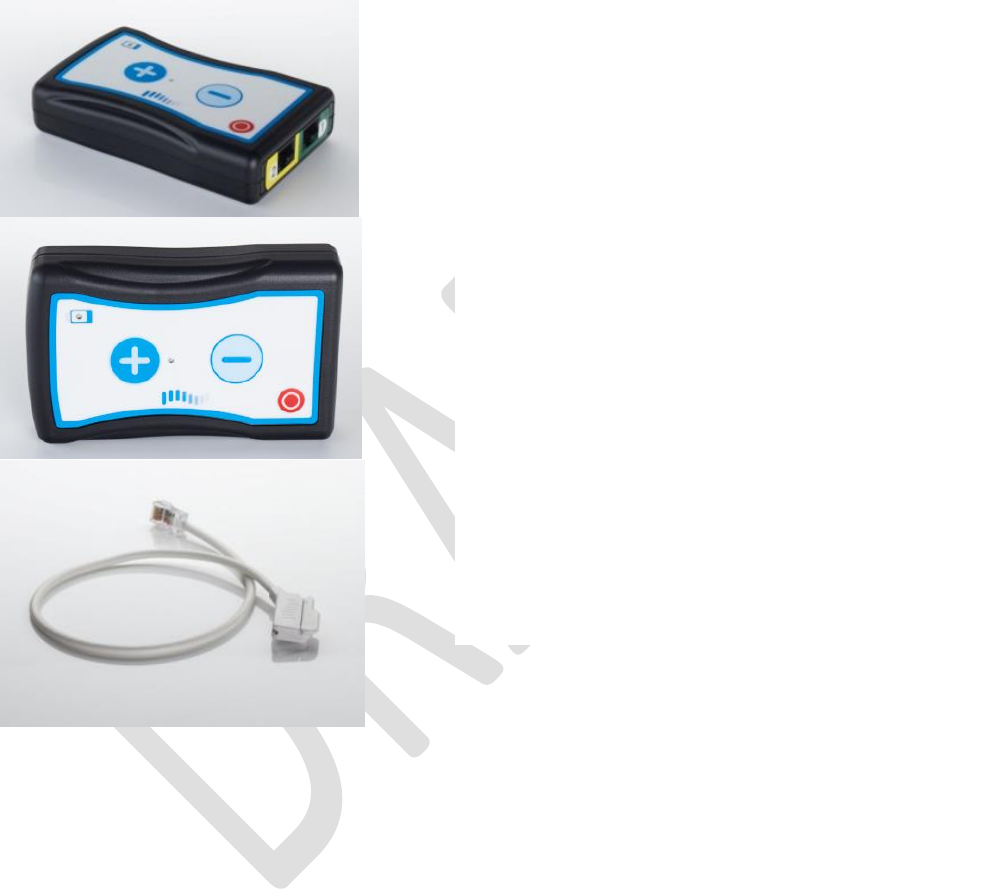
Patient Manual 11052 Rev A (2015-01-15) [DRAFT] 35
System Components
The Trial Stimulator and OR Cable
1
2
3
6
7
5
4
8
9
1. Left Cable Port
2. Right Cable Port
3. Stimulation OFF Button
4. Low Battery Indicator Light
5. Stimulation Increase Button
6. Stimulation Decrease Button
7. Stimulation ON Indicator Light
8. OR Cable, the lead end
9. OR Cable, the Trial Stimulator end
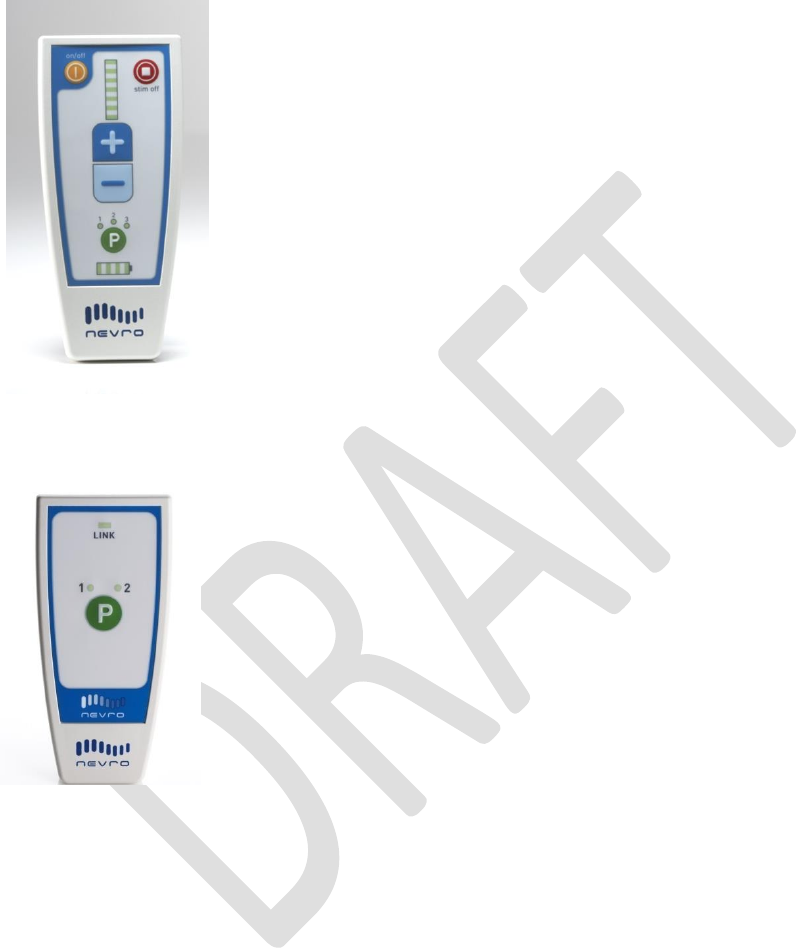
Patient Manual 11052 Rev A (2015-01-15) [DRAFT] 36
REMOTE CONTROL
Remote Control (RC1000)
10. Remote Control On/Off Button
11. Stimulation OFF Button
12. Stimulation Level Indicator
13. Stimulation Start/Increase Button
14. Stimulation Decrease Button
15. Program Indicator
16. Program Selection Button
17. Stimulation Battery Level Indicator
(Charge level of the IPG or Trial
Stimulator)
Remote Control (RC2000)
See Appendix section RC2000 Remote Control Instructions for details about this device.
10
13
12
11
16
17
14
15
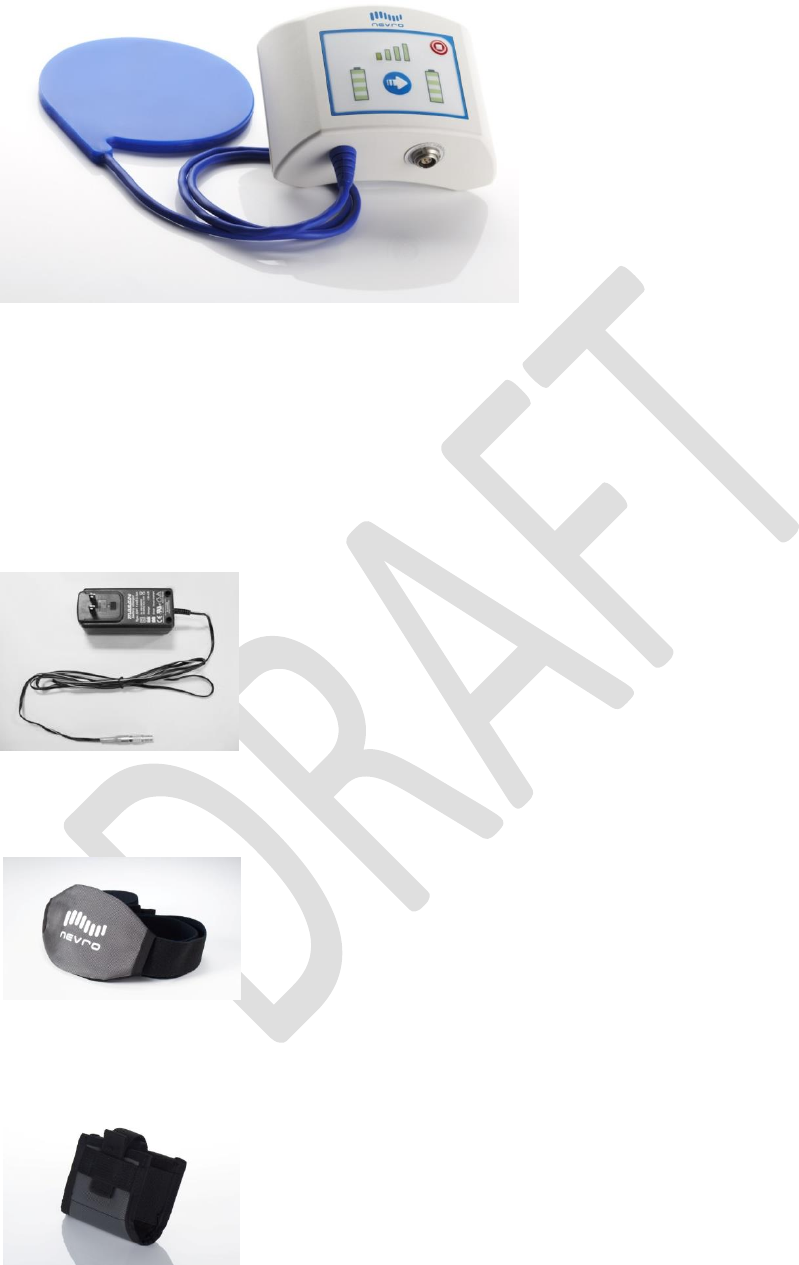
Patient Manual 11052 Rev A (2015-01-15) [DRAFT] 37
CHARGER
1. Stimulation OFF Button
2. Antenna Strength Indicator
3. Charger Battery Level Indicator
4. Charge Start Button
5. Implanted Stimulator’s Battery Level Indicator
6. Charging Coil
7. Power Adaptor Port
8. Power Adaptor Wall Plug
9. Power Adaptor Port Plug
Charger Belt
Charger Holster
1
2
3
4
5
6
8
9
7
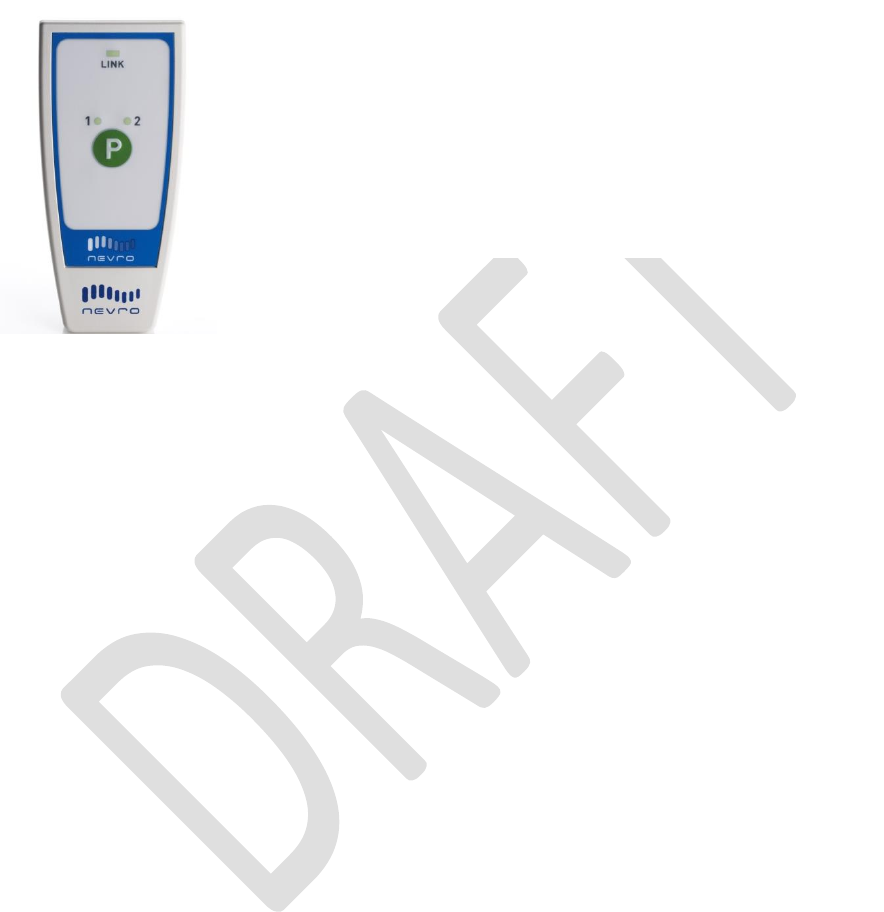
Patient Manual 11052 Rev A (2015-01-15) [DRAFT] 38
RC2000 Remote Control Instructions
Some people will receive the RC2000 Remote Control unit. If you have this Remote Control, follow these
instructions.
How to Turn ON the RC2000
1. Press the Program (P) button and hold for about two seconds.
2. When you release the Program button, you will hear a long beep. This means that the command
has been received.
3. A short beep will sound when the Remote Control turns ON. The indicator light above the word
LINK will light up at this time.
Once the RC2000 Remote Control is ON, it will try to establish communication with either the Trial
Stimulator or the IPG. As it looks for these devices, the LINK indicator light will blink and you will hear
some beeps.
If the RC2000 Remote Control establishes communication with either the Trial Stimulator or the
IPG, the LINK indicator light will stop blinking and remain ON.
If no communication is established, the RC2000 Remote Control will give three short beeps and
turn itself OFF.
How to Turn OFF the RC2000
The RC2000 Remote Control will automatically turn itself OFF if the Program Button is not pressed for at
least one minute.
You can verify that the Remote Control is OFF because the LINK indicator light will not be ON or blinking.
How to Turn Therapy ON and OFF with the RC2000
Press the green Program Button. The light will come on indicating Program 1 or Program 2. Keep pressing
the button until the light is ON by the desired program. Therapy with the selected program is ON.
Press the green Program Button until the lights by Program 1 and Program 2 are both OFF. This means
the Trial Stimulator or IPG is OFF and not delivering therapy.
The numbers 1 and 2 on the face indicate Program 1 and
Program 2.
The large round green button marked P is the Program
button.
At the top, there is an indicator light above the word LINK.

Patient Manual 11052 Rev A (2015-01-15) [DRAFT] 39
RC2000 Indicator Lights
Use the table to help you interpret the lights on the RC2000 Remote Control.
What You See
What It Means
None of the lights are ON or blinking
The Remote Control is OFF
The indicator light above LINK is ON
The Remote Control is ON
The indicator light above LINK is
blinking
The Remote Control is ON and the Remote Control is trying
to communicate with the Trial Stimulator or the IPG
The indicator light by Program 1 is ON
The Trial Stimulator or IPG is ON and delivering Program 1
therapy
The indicator light by Program 2 is ON
The Trial Stimulator or IPG is ON and delivering Program 2
therapy
The indicator lights by Program 1 and 2
are both OFF but the indicator light
above LINK is ON
The Remote Control is ON but the Trial Stimulator or IPG is
OFF and not delivering therapy

Patient Manual 11052 Rev A (2015-01-15) [DRAFT] 40
INDEX
Adverse events
Batteries
Battery status
Beeps
Caution
Charger
Charger Belt
Charging Coil
Charger Holster
Charging tips
Chronic pain
Components
OR Cable
Remote Control (RC1000)
Remote Control (RC2000)
Trial Stimulator
Computed tomography
Contraindications
Device disposal
Device specifications
Diathermy
Doctor
Electromagnetic interference
EMI
External defibrillation
Hyperbaric chamber
Implantable pulse generator
Implantation surgery
Implanted stimulator phase
Indications
IPG
kHz
Lead
Lights
Lithotripsy
Magnetic resonance imaging
Neuromodulation
Neuropathy
OR Cables
Paresthesia
Power Adaptor
Power Adaptor Port
Precautions
Programs
Radiation
Recharging
Recharging the IPG
Recharging the Charger
Remote Control
Remote Control batteries

Patient Manual 11052 Rev A (2015-01-15) [DRAFT] 41
Senza system
Stimulation
Adjusting stimulation
Turning stimulation ON
Turning stimulation OFF
Ranges
Telemetry information
Trial phase
Trial Stimulator
Trial Stimulator alert
Trial Stimulator batteries
Troubleshooting
Ultrasound procedures
Warning
Wireless security
Wireless service

Patient Manual 11052 Rev A (2015-01-15) [DRAFT] 42
NEVRO CORP.
All questions or concerns about Nevro Corp. products should be forwarded to:
Nevro Corp.
4040 Campbell Avenue, Suite 210
Menlo Park CA, 94025
USA
Tel: +1.650.251.0005
Fax: +1.650.251.9415
Email: info@nevro.com