New Element Medical Equipment Technology Development WRM-1XY REMOTE & MOBILE AMBULATORY BLOOD PRESSURE MONITORING SYSTEM User Manual
Shenzhen New Element Medical Equipment Technology Development Co., Ltd. REMOTE & MOBILE AMBULATORY BLOOD PRESSURE MONITORING SYSTEM
Users Manual
1
Table of Contents
1 Components........................................................... 2
2 Introduction ........................................................... 1
2.1 Blood Pressure Collector............................... 1
2.2 Cuff................................................................ 1
2.3 Health Mobile Phone..................................... 1
3. Operations ............................................................ 5
3.1 Monitoring Blood Pressure............................ 5
3.1.1 Installing Batteries...................................... 5
3.1.2 Powering On............................................... 6
3.1.3 Wearing the Cuff......................................... 1
3.1.4 Measuring Blood Pressure.......................... 2
3.2 Collecting Blood Pressure Data..................... 2
3.2.1 Message Bar................................................ 4
3.2.2 Data Section................................................ 4
3.2.3 Function Bar ............................................... 7
3.2.3.1 Interactive Message ......................... 7
3.2.3.2 Behavior Record.............................. 9
3.2.3.3 Data List......................................... 12
3.2.3.4 System Setting ............................... 14
3.3 Emergency Button....................................... 15
4 Cautions................................................................. 1
2
1 Components
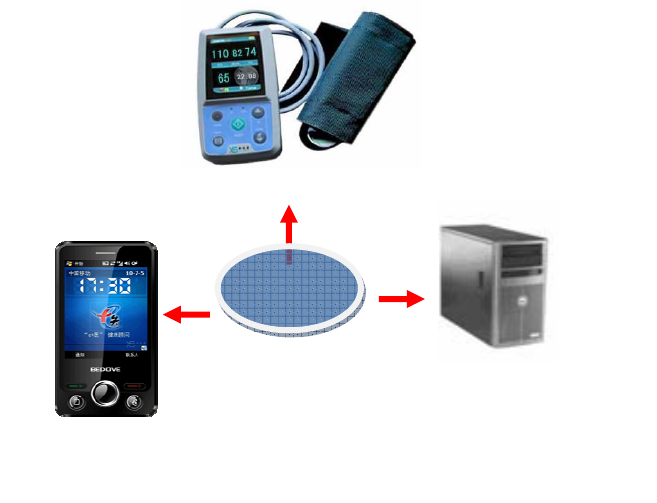
Remote & Mobile Ambulatory Blood Pressure Monitoring
System monitors the blood pressure and uploads data to the
server through an e+Health mobile phone in real time. It
provides doctors and nurses with real-time data, and uploads
emergency events (including events generated by pressing
the emergency button and events generated when the blood
pressure exceeds preset alarm value) to the server for
alarming.
It consists of blood pressure collector, e+Health mobile
phone and doctor workstation, as shown in Figure 1-1.
1
Figure 1-1
2 Introduction
2.1 Blood Pressure Collector
Blood pressure collector is the terminal of collecting blood
pressure data. It connects the mobile phone via Bluetooth.
Data transmitted includes blood pressure data, control
information and parameters.
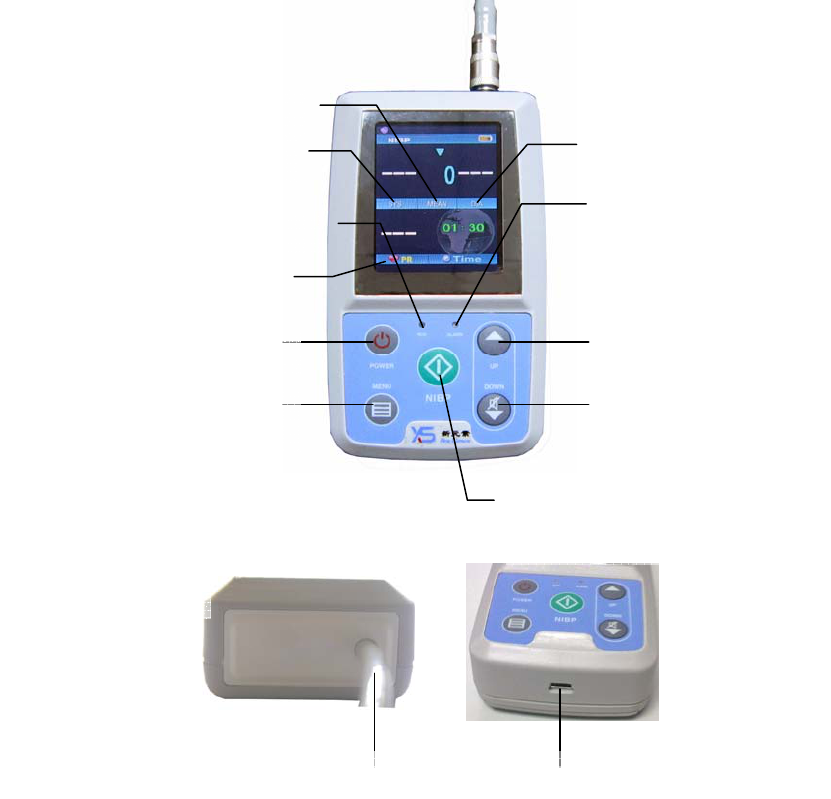
The appearance of the blood pressure collector is shown in
Figure 2-1:
BP collector
Doctor workstation
e+Health
mobile phone
监护系统
Monitoring
s
y
stem
2
Front:
9. USB port 8. NIBP air tube
Side:
4. NIBP measurement
button
1. Run indicator 7. Alarm indicator
3. Menu
2. Power button
6. Up
5. Down
13. MEAN
12. SYS
15. PR
14. DIA
3
Figure 2-1
Function and usage of each label and button are shown in
Table 2-1:
Table 2-1
No. Type Name Function
1 Indicator RUN
indicator
The Run indicator flashes
once every three seconds,
indicating the collector is
working.
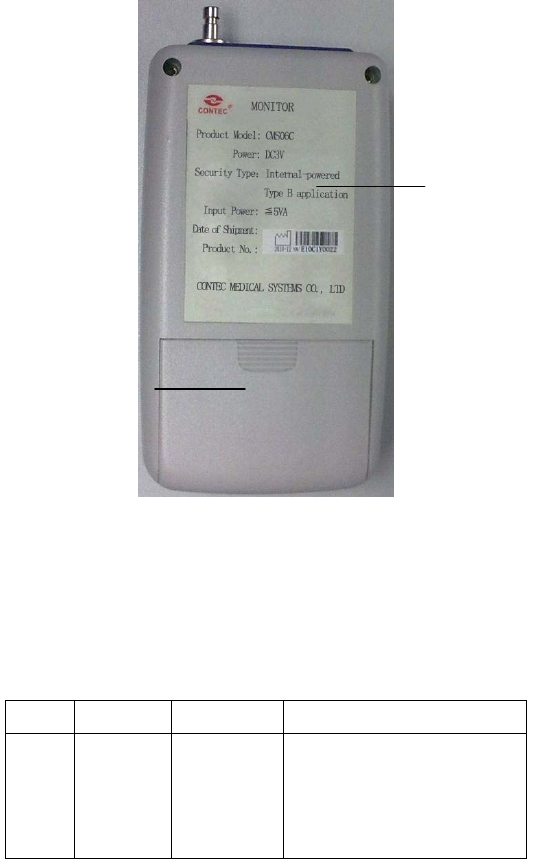
Rear:
10. Rear cover
11. Label

4
No. Type Name Function
2 Button Power
button
Power switch of the blood
pressure collector.
Pressing and holding it
for three seconds to
power on.
3 Button Menu Pressing this button to
execute the selected
function.
4 Button Measuring
button
Pressing this button to
inflate the cuff and
measure blood pressure.
Pressing the button to
stop measuring and
deflate the cuff during the
measuring.
5 Button Down Button for selection.
Pressing this button on
main interface to pause
alarming. Pressing it
again to restore alarming.
6 Button Up Button for selection.
7 Indicator Alarm
indicator
The indicator flashes
when alarm is generated
during the measuring.
8 Other Air tube
Connecting the cuff of the
collector.

5
No. Type Name Function
9 Other USB port
Used to connect USB
cable.
10 Other Battery
cover
One of the collector
shelves. It is used to load
and unload the batteries.
11 Other Label Product information.
Remark: the No.9 USB port just for renew the programme
in the factory, will not function to the users.
1
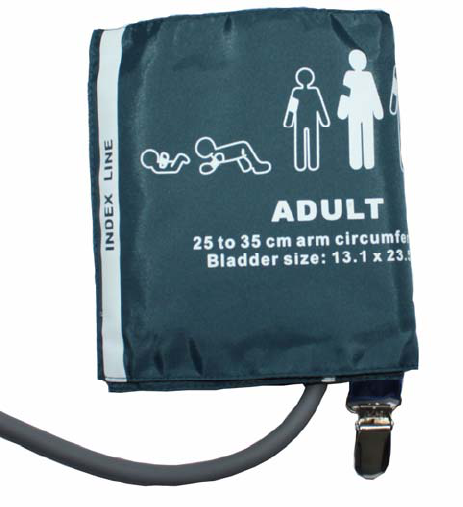
2.2 Cuff
Cuff connects the upper arm of the user and blood pressure
collector, as shown in Figure 2-2:
Figure 2-2
1
2.3 Health Mobile Phone
The health mobile phone obtains blood pressure data
collected by the collector and upload data to the doctor
workstation in real time. It can analyze and display data in
user-defined period, and offer simple statistics and search.
The phone can also receive interactive messages sent by the
doctors, and transmit the parameters of blood pressure
collector to the doctor workstation.
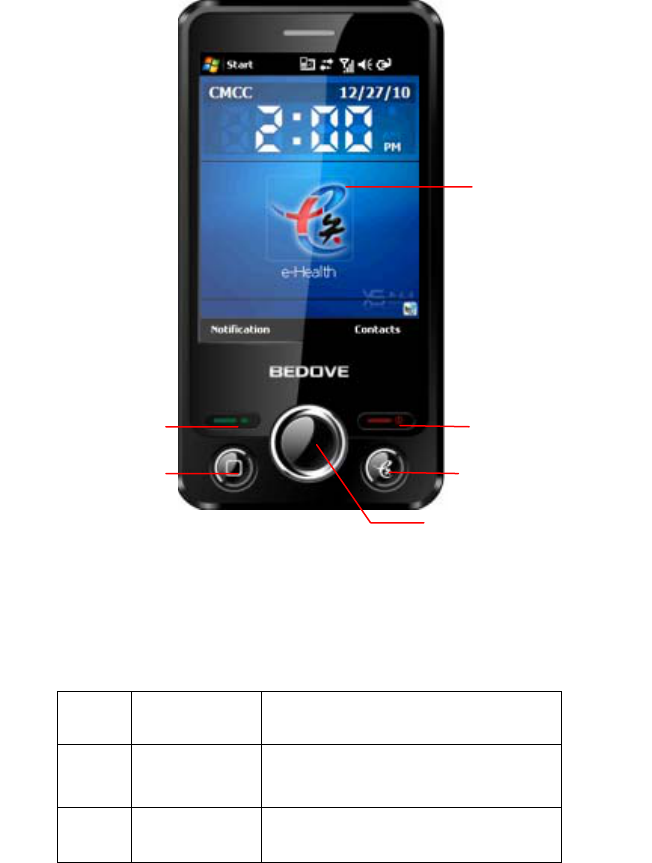
The appearance of the health mobile phone is shown in
Figure 2-3.
2
Figure 2-3
Function and usage of the health mobile phone keys are
shown in Table 2-2.
Table 2-2
No. Name Function
1 Dialing
button To dial numbers.
2 Emergency Pressing this button when the
⑥
①
②
⑤
④
③ Navigation button

3
No. Name Function
button user feels uncomfortable to
generate an emergency alarm, so
the doctor can receive
emergency information in time
and give advice.
3 Navigation
button
OK or move upwards and
downwards
4 e+Health
Pressing this button to start the
system and display the interface
when the interface is hidden.
5 Hang-up Pressing this button to end the
call or hide the interface.
6
e+Health
shortcut
icon
Refer to the function of the
e+Health button.
Monitoring interface and functions of the health mobile
phone are shown in Figure 2-4.
4
Figure 2-4
1. Message bar
2. Blood pressure: displaying all data (SBP, DBP, HR,
MAP) measured at certain time
3. Curve chart: displaying data (SBP, DBP, HR, MAP)
measured in certain period with curve chart.
4. Statistics: displaying statistics data in certain period
(max. blood pressure, blood pressure load, DBP load, SBP
load, HR).
②
③
④
①
5
3. Operations
3.1 Monitoring Blood Pressure
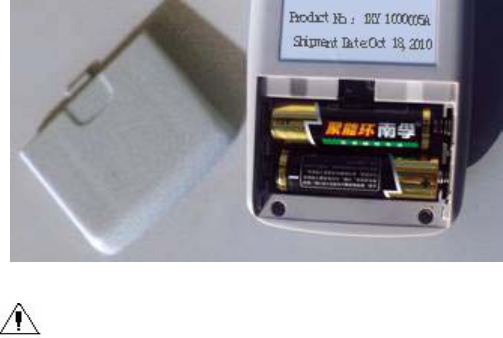
3.1.1 Installing Batteries
The collector is powered by two AA alkaline batteries. Load
two batteries to collector before using. (Note the positive
and negative marks in the battery box.)
1. Press the rear cover lock to remove the rear cover.
2. Load the batteries correctly.
3. Put the rear cover back.
Figure 3-1 Loading batteries
Caution
Unload the batteries when the collector is idle.
6
3.1.2 Powering On
Press and hold the Power button for three seconds to power
on the collector. Run indicator and alarm indicator cyclically
flash once. Then the main interface is displayed. The system
will switch to standby mode to save power if no button is
pressed during the preset power saver time-out. You can
press any button to display the interface again.
Note:
Because the LCD is not self-luminous, a luminous source
should be placed on the LCD to display the interface.
Backlight time is the time of luminescence of the LCD
luminous source.
1
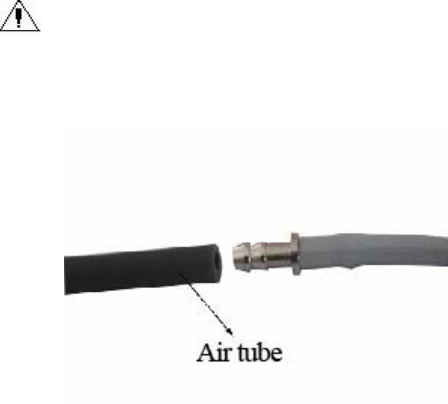
3.1.3 Wearing the Cuff
Caution:
Connect the cuff of the collector correctly, as shown in
Figure 3-2:
Figure 3-2 Connection
Wrap the cuff to the upper arm as shown in Figure 3-3.
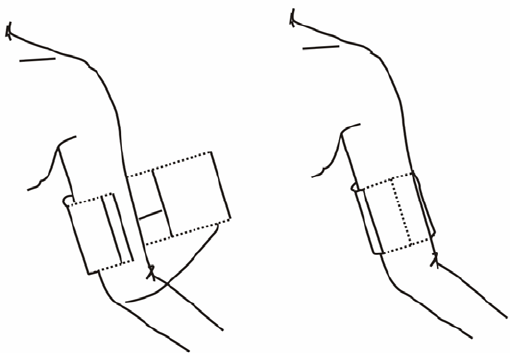
2
Figure 3-3 Wraping the cuff
3.1.4 Measuring Blood Pressure
After being distributed, the blood pressure collector
automatically measures blood pressure at the schedule set
by the doctor. If manual measurement is needed, you can
press the NIBP button on the front panel of the collector.
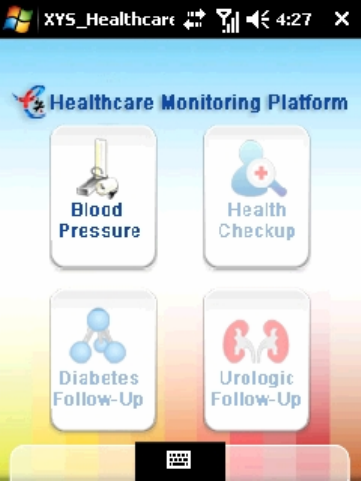
3.2 Collecting Blood Pressure Data
1. Power on the mobile phone. Press e+Health button or
click the shortcut icon to access the main interface. (If the
phone is on power-saving mode, press the power switch on
3
the top to activate the phone.) See Figure 3-4.
Figure 3-4 Monitoring platform for personalized
healthcare
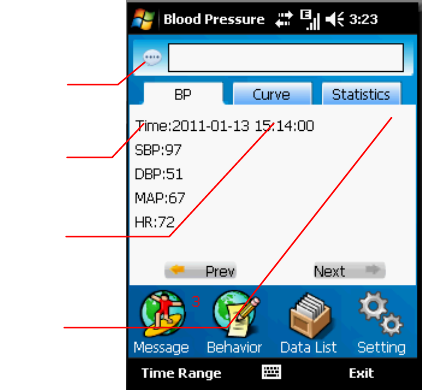
Click Blood Pressure to access the monitoring interface (as
shown in Figure 3-5), which is divided into three sections:
message bar, data section and function bar.
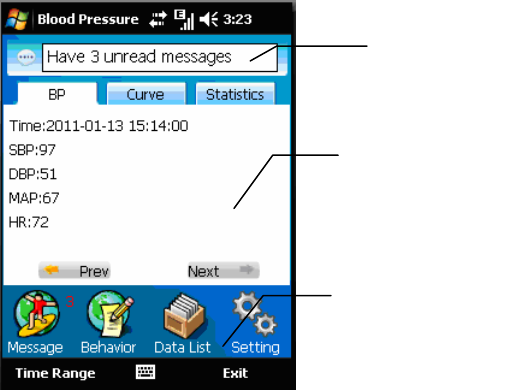
4
Figure 3-5 Blood pressure monitoring
3.2.1 Message Bar
Displaying collector low battery alarm, interactive message
reminding and alarm of insufficient mobile phone memory.
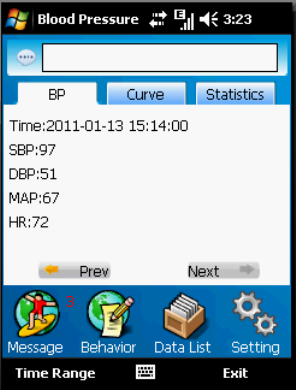
3.2.2 Data Section
Click blood pressure, curve chart and statistics in the chart
bar to view monitoring status (as shown in Figure 3-6, 3-7
and 3-8).
Blood pressure: displaying real-time blood pressure data
collected by the collector (as shown in Figure 3-6).
Message
bar
Data displaying
bar
Function bar
5
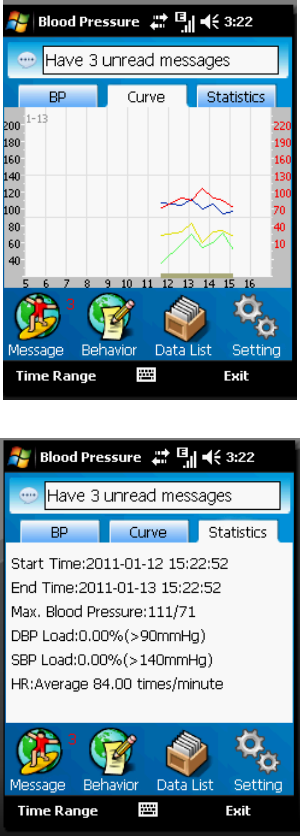
Curve chart: displaying real-time blood pressure data curve
chart collected by the collector. (SBP: dark blue curve; DBP:
green curve; MAP: yellow curve; HR: red curve)
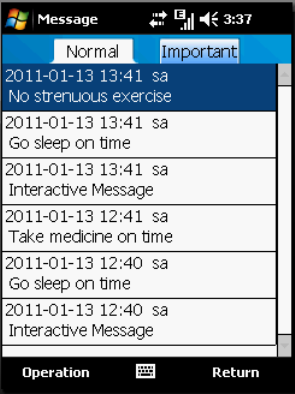
Statistics: displaying blood pressure statistics measured in
certain time period (max. blood pressure, DBP load, SBP
load, and HR).
Figure 3-6 Blood pressure
6
Figure 3-7 Curve chart
Figure 3-8 Statistics
7
3.2.3 Function Bar
The functional bar lies on the bottom of the main interface,
including interactive message, behavior record, data list and
system setting.
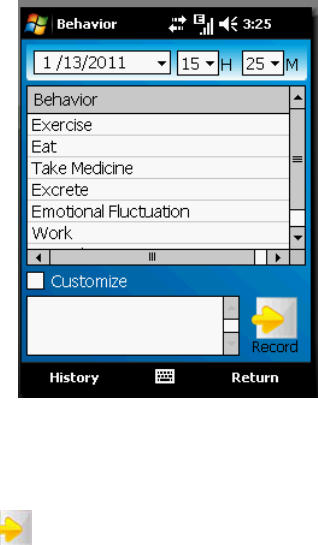
3.2.3.1 Interactive Message
Click Interactive Message on the interface (as shown in
Figure 3-5) to access the interface shown in Figure3-9. You
can search for messages sent by the doctor by date.
Received messages are stored as common interactive
messages by default. If a message is regarded as important,
you can click Options to move it to important interactive
messages.
8
Figure 3-9 Interactive message
Receiving interactive messages sent by doctors:
Interactive messages are downloaded when uploading blood
pressure data or refreshing interactive messages, and saved
as common messages. Patients are also notified of that.
Operation: choose Operation > Download on the lower
right of the interface shown in Figure 3-9 to download.
Searching interactive messages by date:
Display all interactive messages by sorting them in reverse
order of date. Page turning button is displayed when the
number of interactive messages exceeds 100.
9
Deleting interactive message:
Delete interactive messages which are not needed any more
based on types. You can delete a message or all messages of
the same type.
Operation: select a message, choose Options > Delete on
the lower right of the interface shown in Figure 3-9 to delete
the message. Click Delete All to delete all interactive
messages.
Managing important interactive messages:
Received messages are stored as common interactive
message by default. If a message is regarded as important,
you can click Options to move it to important interactive
messages.
Operation: select a message, choose Options > Move to
Important on the lower right of the interface shown in
Figure 3-9 to move the message.
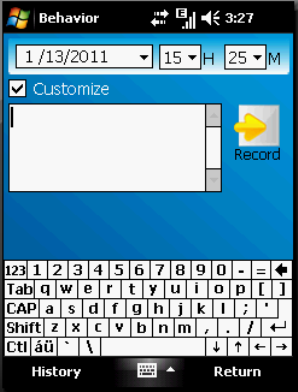
3.2.3.2 Behavior Record
Click Behavior Record shown in Figure 3-5 to access the
interface. You can select a certain date to view behaviors on
that day, including exercises, eating, taking medicines,
excretion, emotional fluctuation, work and poor sleep etc.
10
See Figure 3-10.
Figure 3-10 Behavior record
Select User-Defined Behavior in Figure 3-10 to access the
editing interface as shown in Figure 3-11. Enter the content
and click to finish editing. This record will be saved in
historical records.
11
Figure 3-11 Behavior record editing
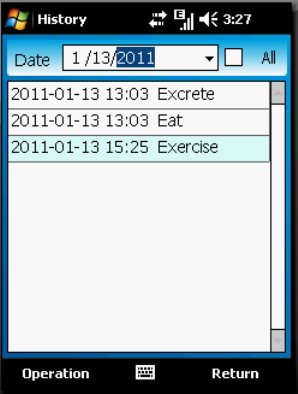
Click History to view behavior records of other days (as
shown in Figure 3-12). You can select a certain date, record
the behavior of that day, or select all buttons to view all the
historical records.
12
Figure 3-12 Historical records
Select a record, choose Options > Delete on the lower right
of the interface shown in Figure 3-12 to delete the message.
Click Delete All to delete all uploaded historical records.
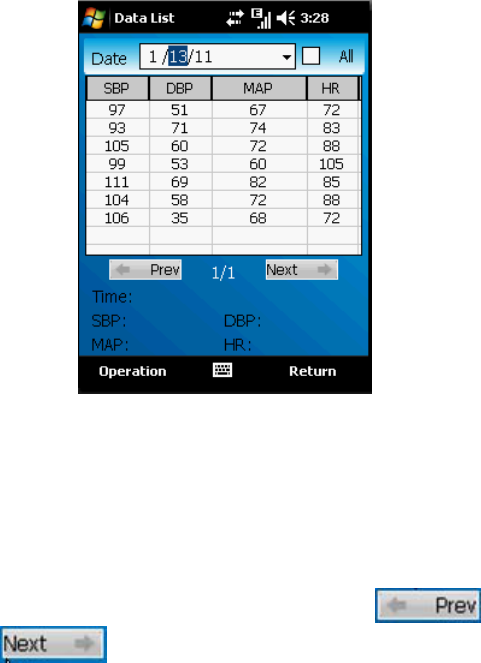
3.2.3.3 Data List
Click Data List shown in Figure 3-5 to access the interface.
You can select a certain date to view detailed data, or select
All to view all data (as shown in Figure 3-13).
13
Figure 3-13 Data list
Select an item in the data list shown in Figure 3-13, the
SBP, DBP, MAP and HR during certain measuring period
are displayed. Note: the period can be measured in second.)
The data list in Figure 3-13 displays 10 items on each page.
You can turn the pages by clicking
and .
Choose Options > Delete on the lower right of the interface
shown in Figure 3-13 to delete the record. Click Delete All
to delete all uploaded blood pressure data.
14
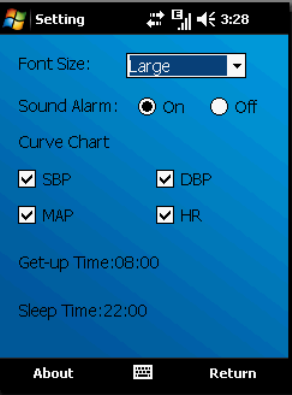
3.2.3.4 System Setting
Click System Setting on the interface (as shown in Figure
3-5) to access the interface shown in Figure3-14.
Figure 3-14 System setting
1. Font Size
You can adjust the font size to Large, Medium and Small.
Medium is the default font size.
2. Audible Alarm
You can enable or disable the function.
3. Curve Chart
You can set whether to display SBP, DBP, MAP and HR on
15
the interface with curve chart.
SBP: displayed with dark blue curve
DBP: displayed with green curve
MAP: displayed with yellow curve
HR: displayed with red curve
3.3 Emergency Button
A user can press the emergency button when feeling
uncomfortable. Meanwhile, the message "Sending…" is
displayed on the phone interface, and later on "Sending
succeeded", meaning the event has been sent to the doctor
workstation. The doctor can give advice in time.
1
4 Cautions
1. Make sure the distance between the collector and mobile
phone is between 5 cm and 10 m when collecting data.
2. If the user presses dialing key on the left or hang-up key
unintentionally, the blood pressure monitoring interface may
switch to backstage running. Then the user needs to press
the e+Health key on the phone, or click e+Health health
consultant shortcut icon on the standby interface to access
the operation interface.
3. The air tube connecting the collector is fixed. Do not pull
it out. Unload the batteries when the collector is idle.
4. Keep the mobile phone on during the monitoring; replace
with new batteries when the phone generates a prompt
indicating that the battery level of the blood pressure collector
is low.
5. Keep the arm still and relaxed when measuring the blood
pressure.
Additional Information:
1. Figures and description in this user manual are only for
demonstration. All information is subject to actual products
in case of any discrepancy.
2
2. Please contact relevant hospital personnel in case of any
questions during the operation.
FCC NOTE:
This device complies with Part 15 of the FCC Rules.
Operation is subject to the following two conditions:
(1)this device may not cause harmful interference, and (2)
this device must accept any interference received,
including interference that may cause undesired operation.
The manufacturer is not responsible for any radio or TV
interference caused by unauthorized modifications to this
equipment. Such modifications could void the user's
authority to operate the equipment.