User Manual

NewTek, Inc. www.newtek.com
Connect Spark: NC1S-SDI-3G
USER MANUAL
NewTek, Inc. www.newtek.com
About our user manual
Thank you for purchasing NewTekTM NC1S-SDI-3G SDI WIFI video
encoder.
Before install NC1S-SDI-3G video encoder, please read this user manual
carefully. Please strictly to follow our manual to install and use our encoder, or
install and use under guiding by professional person, to protect your body
safety and to avoid the encoder damage from physical and electrical. The
encoder may be damaged if incorrect electrical connection or the physical
installation, even threaten the operator safety.
Copyright
© 2017 NewTek, Inc.
This manual is protected by international copyright laws. Any of the contents of
this manual can not in any form or manner (electronic or mechanical) copy,
distribute, translate or disseminate, including any information storage and
retrieval photocopying, recording, or stored in systems without NewTek, Inc.
prior written permission.
Trademark
NewTek is registered trademark of NewTek, Inc.
NewTek, Inc. www.newtek.com
Manual
1 DEVICE CONNECTION........................................................................... 1
1.1 CONNECT VIDEO SIGNAL ................................................................... 1
1.2 CONNECT INTERNET .......................................................................... 1
1.3 CONNECT ANALOG AUDIO INPUT/OUTPUT (OPTION) .......................... 1
1.4 CONNECT THE POWER ADAPTER ........................................................ 1
2 LED INDICATOR DESCRIPTIONS ............................................................ 2
3 DEVICE CONFIGURATION AND MANAGEMENT .................................... 3
3.1 FACTORY DEFAULT IP ADDRESS ......................................................... 3
3.2 LOG IN MANAGEMENT INTERFACE VIA WEB BROWSER ..................... 3
3.3 DEVICE WORKING STATUS ................................................................. 4
3.4 AUDIO SIGNAL SOURCE OPTION ......................................................... 5
3.5 DECODER/VIDEO DECODER SOFTWARE CONNECT THE ENCODER ....... 7
3.6 RESTORE FACTORY SETTINGS ............................................................ 8
3.7 FIRMWARE UPGRADING ..................................................................... 8
3.8 NETWORK CONFIGURATION .............................................................. 9
3.9 QUICK RESET .................................................................................. 10
3.10 REBOOT .......................................................................................... 10
4 NOTICE AND STATEMENT ................................................................... 11
NewTek, Inc. www.newtek.com
Connect Spark: NC1S-SDI-3G
User Manual
1
1 Device connection
1.1 Connect video signal
(1) Connect SDI signal
Connect SDI signal to corresponding NC1S-SDI-3G SDI input port through the
corresponding cable from the signal source (such as camera or other SDI
devices).
To improve signal quality and ensure the effective transmission distance of SDI
signal, please use high quality SDI coax. Inferior coax may seriously cause the
signal quality, like snow, streaking, smear, blurring, or worse, no signal input.
1.2 Connect internet
Connect one end of the network cable to the encoder Ethernet interface. The
other end is connected to the network switch, or the computer's Ethernet port.
Please note: When using the common network cable directly to the computer's
network port, the port should have automatic transfer function. Otherwise, please
use a crossover cable to connect.
1.3 Connect analog audio input/output (option)
Audio input/output interface is 3.5mm analogy audio.
1.4 Connect the power adapter
Using the power adapter (DC12V1A) connect to the main product, after the power is
turned on, then the product starts working immediately.
NewTek, Inc. www.newtek.com
Connect Spark: NC1S-SDI-3G
User Manual
2
Be sure to use the original power adapter, or compatible with the
electrical/mechanical characteristics of device power adapter. Improper power
adapter may damage the device, and even endanger the operator safety! When
you use a charger for charging, adapter shall be installed near the equipment and
shall be easily accessible.
Manufacturer of Power Adapter: Dongguan Xiaoerduo Electronics Co., LTD.
Parameters of Power adapter: Input voltage: 100-240VAC 50/60Hz; Output voltage:
Output voltage: 12V; Product name: AC/DC Adapter;Model No.: STD-412K-A+
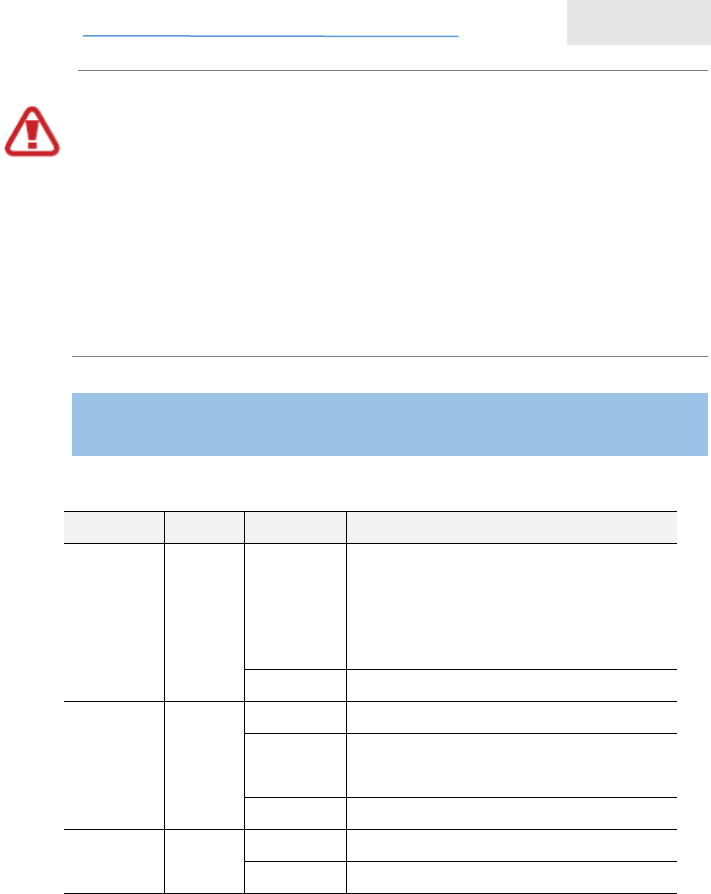
2 LED indicator descriptions
Name
Color
State
Descriptions
RUN
green
flashing
the device is start to encode, or
encoder is not start, or restore device
to factory settings (and LINK lights
flashing simultaneously)
off
device not working properly
LINK
green
always on
network cable is connected
flashing
restore device to factory settings (and
LINK lights flashing simultaneously)
off
network cable is not connected
POWER
red
always on
power supply is connected
off
power supply is not connected
NewTek, Inc. www.newtek.com
Connect Spark: NC1S-SDI-3G
User Manual
3
3 Device Configuration and Management
3.1 Factory default IP address
Encoder default IP address is 192.168.1.168, net Mask is 255.255.255.0. You can
log in WEB management interface to change the address.
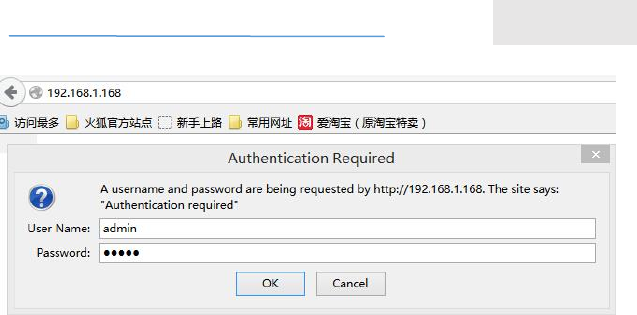
3.2 Log in management interface via WEB browser
Before log in NC1S-SDI-3G Web management interface, please ensure that the
following network conditions are connected:
Your computer is connected with encoder correctly;
Insure your computer IP address and the IP address of the encoder in
same network segment;
Try using PING and other network testing tools to identify and insure to be
communicated with the encoder based on TCP / IP protocol.
After reaching the above conditions, use a Web browser to access the following
address:
http://<device IP address>
For example, if the factory default IP address is 192.168.1.168,then access the
following address:http://192.168.1.168, then the authentication dialog box will
appears.
Default log in name is admin, and default password is admin.
NewTek, Inc. www.newtek.com
Connect Spark: NC1S-SDI-3G
User Manual
4
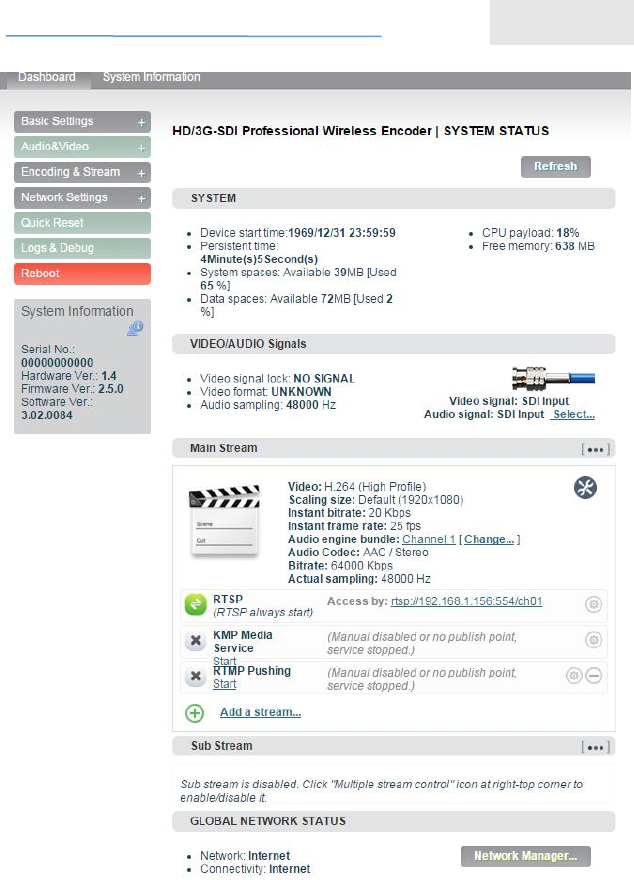
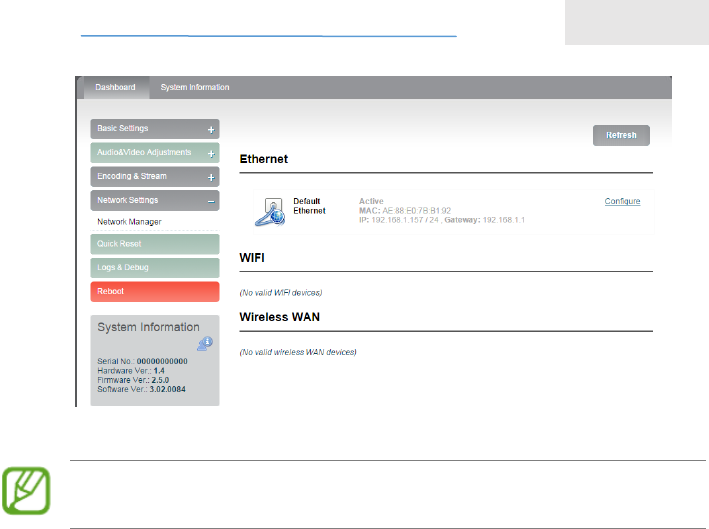
3.3 Device working status
After logging in to the WEB management interface, first appeared the working
status in the information page. You can also manually click the WEB
management interface of the "BasicSettings" menu to appear the status page.
NewTek, Inc. www.newtek.com
Connect Spark: NC1S-SDI-3G
User Manual
5
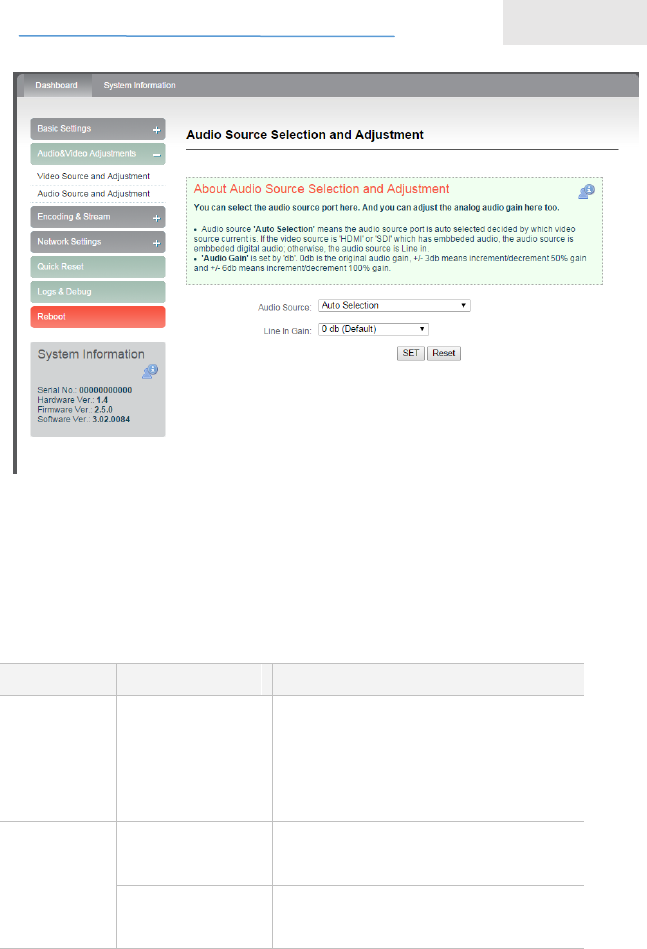
3.4 Audio signal source option
Click the "Select Source" in the WEB management interface.
NewTek, Inc. www.newtek.com
Connect Spark: NC1S-SDI-3G
User Manual
6
Or select Web Management Interface "Source selection & scaling"→"source
selection & cropping," sub-function (see right), you can select the video and
audio via software configuration:
Video/Audio signal source option:
Parameter
Option
Description
Video
source port
SDI video input
Input, loopback
Audio
source port
SDI embedded
audio
Audio signal source is embedded
digital audio.
analog audio
input
the audio source is Line in, whatever
which video port input.
NewTek, Inc. www.newtek.com
Connect Spark: NC1S-SDI-3G
User Manual
7
After switching the audio source, the encoder will quickly reset (currently connected
decoder will be disconnected), this process takes about three seconds.
3.5 Decoder/video decoder software connect the encoder
The encoder uses the standard of RTSP Media Transfer Protocol to transmit
the encoded video and audio, the products which support the standard RTSP
transport protocol and which support H.264 decoding (such as the company's
KV-DC series decoders, PC client software) all can be connected to the
encoder device and obtain the encoded video and audio.
How does the RTSP of encoder visit URL:
Main streaming:
rtsp://<encoder address>/ch01
(For example:rtsp://192.168.1.168/ch01) Secondary streaming:
rtsp://< encoder address >/sub01
(For example:rtsp://192.168.1.168/sub01)
ch01, sub01 is RTSP session ID (Session ID).
If the encoder involves firewall / NAT traversal issues, please refer to 7.8 firewall
/ NAT traversal setup instructions. If the encoder set the mapping on the firewall
/ NAT port, then the RTSP of encoder access URL is:
Main streaming:
rtsp://<firewall/NAT device’s public network address>:<RTSP mapping
port>/ch01
(for example:rtsp://211.0.0.1:554/ch01)
Sub streaming:
rtsp://<firewall/NAT device’s public network address>:<RTSP mapping

NewTek, Inc. www.newtek.com
Connect Spark: NC1S-SDI-3G
User Manual
8
port>/sub01
(for example:rtsp://211.0.0.1:554/sub01)
RTSP supports media capture, parameter setting and PTZ remote control.
3.6 Restore factory settings
Restore factory settings two methods:
1. Via the WEB interface, "Basic Setup > restore factory settings" function;
2. Through RESET button:
Pressing on RESET button for 3 seconds, device will restore factory settings.
Restoring factory setting will lead to the device hard restart, restarting course
will last 1 minute.
After restoring factory settings, below parameters will be changed as default
value:
* Log in will be still as admin;
* Network address capture way is restored as manual capture;
* IP address will be still 192.168.1.168, subnet mask will be 255.255.255.0;
* All video, audio encoding parameters will be restored as default value;
* RTSP setting will be restored as default value.
lick on the “Delete user” icon“ ”in user interface list, you can delete the user.
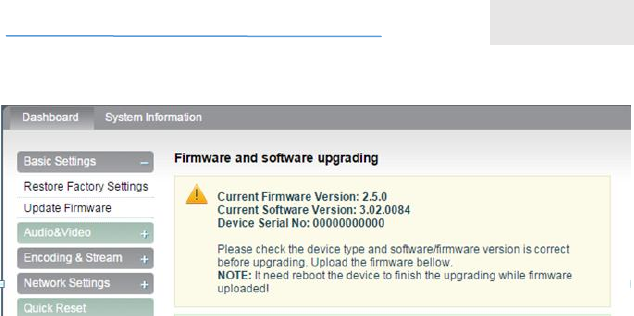
3.7 Firmware upgrading
The encoder supports online firmware upgrade,use for updating the software
version .
Via the WEB management interface, "Basic Setup> update
firmware/software", you can online upload the firmware upgrade file which
provide by the manufacturer.
NewTek, Inc. www.newtek.com
Connect Spark: NC1S-SDI-3G
User Manual
9
Kindly noted:
1. The speed of firmware upgrades file upload is slow, please be patient.
2. After uploading firmware file successfully, the encoder will automatically
restarts the encoder, this process will takes about 1-2 minutes (the time will
be different according to upgrade content), and please be patient.
3. Please do not upload the unofficial release of the firmware upgrade file, or
other illegal files, in order to avoid permanent damage the encoder.
4. After the upgrade is complete, via the WEB interface "system
information>version information" to check whether the latest version
information in accordance with expectations, and confirm the upgrade is
successful.
3.8 Network Configuration
Via the WEB management interface function "Network Settings>Network
Parameters", you can configure the encoder IP address and related network
parameters.
NewTek, Inc. www.newtek.com
Connect Spark: NC1S-SDI-3G
User Manual
10
Note: After setting the address obtains way is "DHCP dynamic obtain", please
manually restart the encoder to update the DHCP address obtain.
3.9 Quick Reset
"Quick Reset" is quickly reset the video encoding function of encoder. When
the video signal instability or improper parameter setting cause the encoder
does not work, try to set the device quickly reset. The quickly reset probably
need to wait three seconds or so.
3.10 Reboot
“Reboot” is for encoder performs a warm reboot, when the encoder still does
not work after quick reset, please try to reboot the device. Device reboot last
around one minute.

NewTek, Inc. www.newtek.com
Connect Spark: NC1S-SDI-3G
User Manual
11
4 Notice and Statement
The product shall only be connected to a USB interface of version USB2.0.
Extreme Temperature: -20℃~80℃ max.
FCC Statement:
This equipment has been tested and found to comply with the limits for aClass
B digital device, pursuant to part 15 of the FCC Rules. These limits are
designed to provide reasonable protection against harmful interference in a
residential installation. This equipment generates, uses and can radiate radio
frequency energy and, if not installed and used in accordance with the
instructions, may cause harmful interference to radio communications. However,
there is no guarantee that interference will not occur in a particular installation. If
this equipment does cause harmful interference to radio or television reception,
which can be determined by turning the equipment off and on, the user is
encouraged to try to correct the interference by one or more of the following
measures:
• Reorient or relocate the receiving antenna.
• Increase the separation between the equipment and receiver.
• Connect the equipment into an outlet on a circuit different from that to which
the receiver is connected.
• Consult the dealer or an experienced radio/TV technician for help.
Caution: Any changes or modifications to this device not explicitly approved by
manufacturer could void your authority to operate this equipment.
This device complies with part 15 of the FCC Rules. Operation is subject to the
following two conditions: (1) This device may not cause harmful interference,
and (2) this device must accept any interference received, including
interference that may cause undesired operation.
The device has been evaluated to meet general RF exposure requirement.
This equipment complies with FCC radiation exposure limits set forth for an
uncontrolled environment.
This equipment should be installed and operated with minimum distance 20cm
between the radiator & your body.