Newair Acp 1300H Users Manual Ooad04\华源 (G)\2008\FJ\3.1...
ACP-1300H newair-acp-1300h
ACP-1300H to the manual e79695bb-3c61-4147-b189-9a38ed2582ef
2015-02-05
: Newair Newair-Acp-1300H-Users-Manual-494842 newair-acp-1300h-users-manual-494842 newair pdf
Open the PDF directly: View PDF ![]() .
.
Page Count: 5
ACP-1300H Portable Air Conditioner
Owner's Manual
Please read all instructions carefully before operating
1.Safety Instructions
(1) Warning................................................................................... 2
(2) Precautions.............................................................................. 3
(3) Maintenance......................................... ................................... 4
2. Parts List
(1) ACP-1300H Unit and Accessories...............................................5
(2) Control Panel ........................................................................... 6
(3) Remote Control.........................................................................7
(1) Operating the ACP-1300H for the First Time; Operating Modes;
and Thermostat.........................................................................8
(2) Setting the Timer....................................................................... 9
(3) Adjusting the Airflow...................................................................9
(4) Installing the Battery for the Remote Control...............................10
(5) Emptying the Auxiliary Water Tank.........................................11-12
(6) Setting up the Exhaust Hose.................................................13-14
4. .......................................................................15
5. ..........................................................................16
6. ................................................................ 17
3.Operating Instructions
Troubleshooting Tips
Electrical Diagram
Electrical Specifications
Contents
1
Connect the ACP-1300H's plug into an
appropriate power outlet.
Do not turn off the power supply by
pulling the power cord; use the On/
Off power button.
Make sure the air conditioner's ground
wire is connected.
If you notice smoke or an odd odor coming
from the ACP-1300H, turn the unit off and
disconnect the power plug.
To avoid injury, keep fingers and foreign
objects out of the unit.
1. Safety Instructions
Warning
If problems persist or if the unit malfunctions, please contact your NewAir
dealer or a professional repair center.
Before operating the ACP-1300H,
make sure your hands are clean and dry.
2
Be careful not to damage the power
cord, and do not operate the ACP-1300H
if the cord appears to be damaged.
Do not use a power strip or an extension
cord.
Precautions
1. Safety Instructions
3
Leave the ACP-1300H in an upright position for at least two hours before operating.
The unit must be installed in accordance with national and local wiring regulations.
The ACP-1300H's supply cord requires a Y-type attachment. If the supply cord is
damaged, it must be replaced by the manufacturer, an authorized service agent, or a
qualified repair professional in order to avoid further damage, to prevent voiding the
warranty, and to avoid bodily injury.
Never operate the ACP-1300H in an area where flammable gasses or chemicals are
present.
To prevent electromagnetic interference, place the unit at least three feet away from
radios or televisions.
When connecting or disconnecting the power cord, hold the plug itself - never pull the
power cord.
When not using the unit for an extended period of time, disconnect the power cord and
drain any water from the auxiliary water tank.
When cleaning the ACP-1300H, do not spray liquid directly onto the unit. Moreover,
do not use harsh chemicals or cleansers to clean the unit. Instead, apply water or a
mild cleanser to a soft cloth and wipe the ACP-1300H clean.
The ACP-1300H is not intended to support heavy objects, be used as a step-stool, or
be shaken or bumped into. Keep this in mind when deciding where to place the unit.
If you choose to use the continuous drain function on the ACP-1300H, make sure the
condensate can drain off into an appropriate receptacle.
To ensure adequate air circulation, place the air conditioner at least four inches away
from walls and furnishings. Be aware of draperies or other items which may interfere
with the intake vents and cause restricted airflow.
Place the ACP-1300H on a level, flat surface. Do not operate the unit on an angle of
more than 4 inches.
Maintenance
1. Safety Instructions
4
Please Note:
When cleaning the air filter, use only warm water or a mild detergent. Once the
filter has been cleaned, allow it to completely dry in a cool place. Also remember
that the external case should only be cleaned with a soft, moist cloth.
To avoid electrical shock, be sure to disconnect the power cord
before cleaning the unit.
Avoid using chemicals such as benzene, alcohol, gas, or turpentine
when cleaning the unit.
It is recommended that the air filter be replaced every two months
(more frequently if the filter is visibly soiled). Built-up dust and debris
on the filter will decrease airflow and impact the air conditioner's
cooling efficiency.
When removing the filter from the ACP-1300H, following these steps:
1.Gently lift up the air filter cover.
2.Grasp the air filter and separate it from the cover.
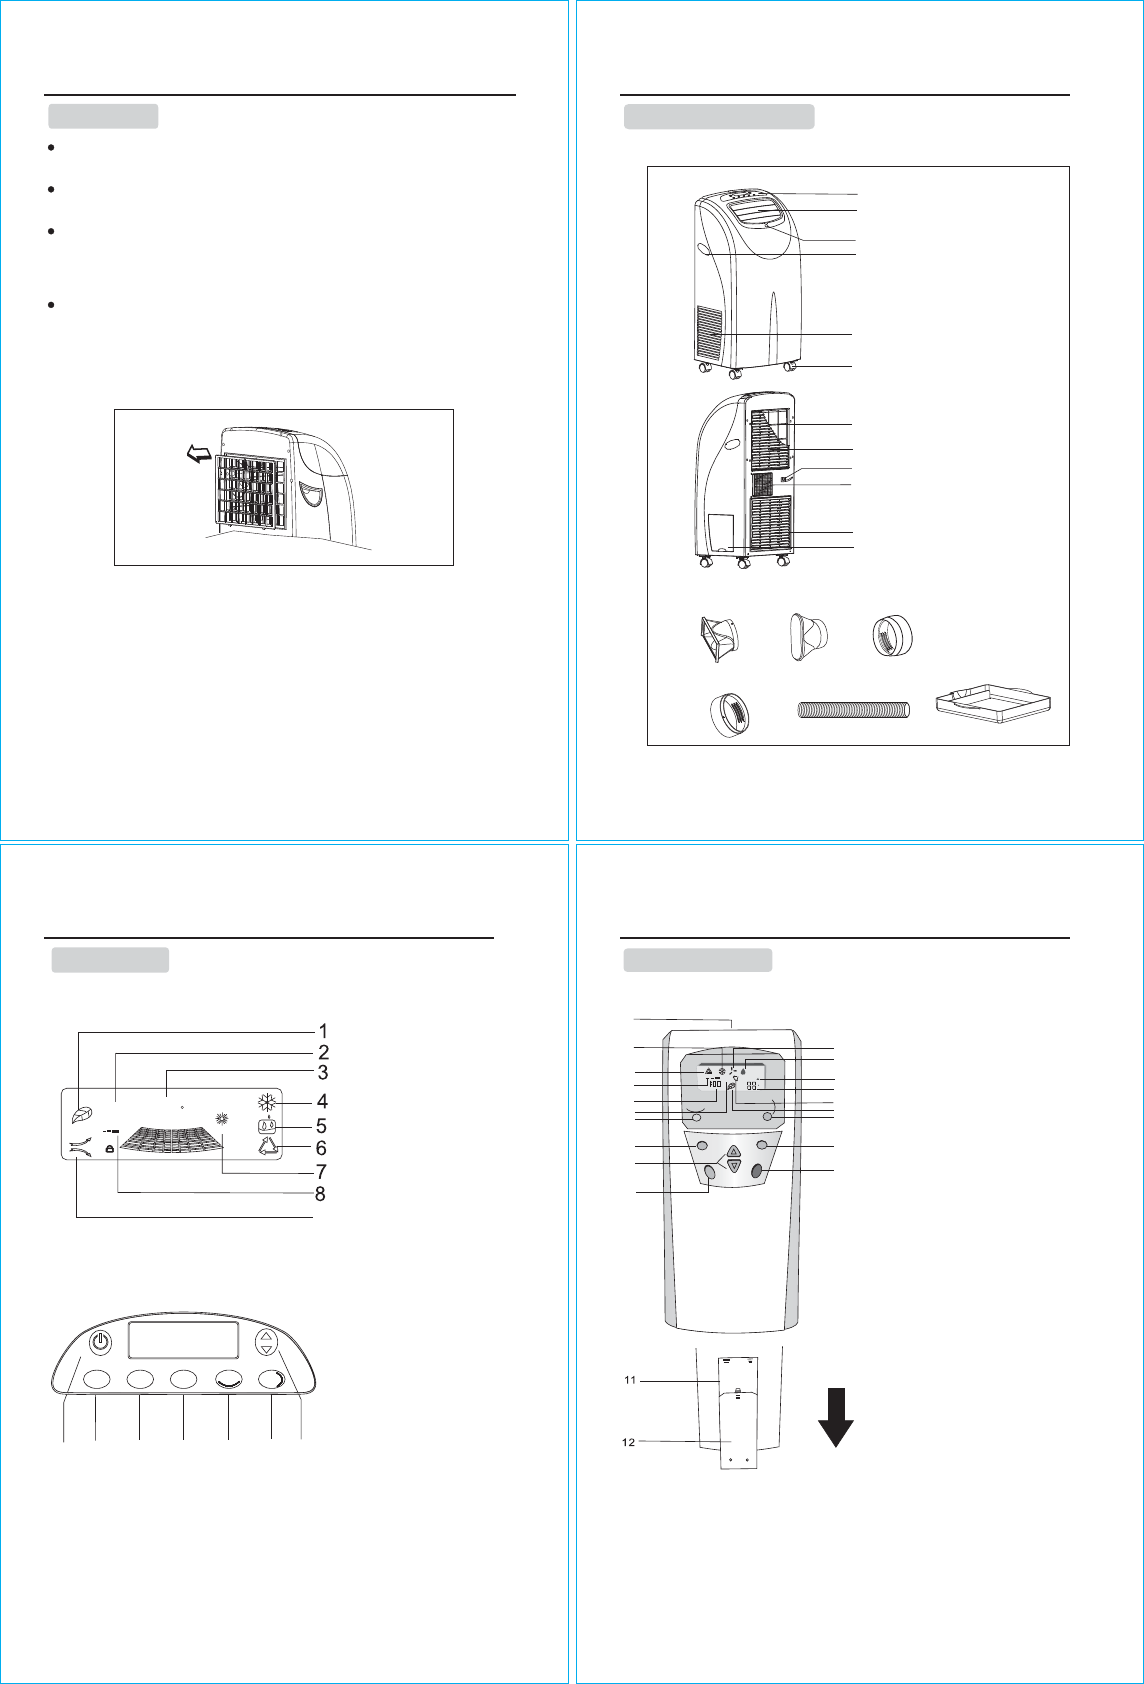
2. Parts List
Parts and Accessories
1.Control Panel
2.Air Outlet
3.Remote Sensor
4.Handle
5.Exterior Air Inlet
6.Caster
7.Filter
8.
9.Power Cord
11.Exterior Air Inlet
12.Cover Board
13.Exhaust Joint
14.Exhaust Joint
15.Exhaust Joint
16.Exhaust Joint 4
18.Water Tank
Interior Air Inlet
10.
1
2
3
17.
Air Exhaust Outlet
Exhaust Hose
18
13
14
17
5
15
16
1
2
3
4
5
6
7
8
9
10
11
12
2. Parts List
Display Panel Icons
Display Panel
Control Panel Buttons
6
Please Note: Not all controls will require adjustment, as some controls may
be designed for other NewAir models.
Display Panel Icons
1.Fresh Air Icon (Ionizer)
2.Timer Icon
3.Temperature Display
(or Error Code)
4.Cooling Icon
5.Dehumidification Icon
6.Auto-Mode Icon
7.Heating Icon
8.Fan/Speed Icon
9.Air Sweep Icon
COOL
AUTO
DRY
SET TIME
88:8
AIR FRESH
AIR SWEEP
88
LOCK
HOT
9
F
10.On / Off
12.Fan Speed
Oscillation Button1
Oscillation Button2
16.Temperature Adjustment
11.Mode
13.Timer
14.
15.
MODE
SPEED
TIMER
WIND
TEMP/TIME
ON/OFF
WIND
10 11 12 13 14 15 16
Remote Control
2. Parts List
7
Remove the rear cover by pulling it forward.
1.Oscillation Window
2.Cooling Icon
3.Auto-Mode Icon
4.Output Icon
5.Time Display
6.Operation Icon
7.
8.Mode Button
9.Temperature Button
10.Set Time Button
11.Battery Compartment
12.Battery Cover
13.Fan Icon
14.Dehumidification Icon
15.Remote Signal
16.Temperature Display
17.Oscillation Icon
18.Fresh Air Icon (Ionizer)
19.Oscillation Button2
20.Fan speed Button
21.Power Button
Oscillation Button1
Mode Temp Speed
Timer on/off
13
14
15
16
17
18
19
20
21
1
2
3
4
5
6
7
8
9
10
Wind Wind
F
High
MidLow
3.Operating Instructions
8
1.When first plugging in the ACP-1300H,
a tone indicating that the power is connected
will sound. After pressing the
"On"
button,
the unit will start in Auto Mode and display
the current room temperature.
2.To select the mode, press the "Mode" button. This will then cycle the
ACP-1300H through the "Auto ,""Heating," "Fan,""Cooling, "and "Dehumidify"
options.
3.When adjusting the temperature, keep in mind that the ACP-1300H is
adjustable between 60 and 88 F. To set the temperature, press the "Temperature"
button until the desired temperature is displayed. The air conditioner will now
cool the room to that temperature. After five seconds of setting your desired
temperature, the display will then revert back to displaying the current room
temperature.
OO
4.To adjust the fan speed, press the "Speed button." This will allow the
ACP-1300H to cycle through the "High,""Medium," and "Low" speed
options.
5.
6.
To turn off the unit, press the "Off" button. The air conditioner will
cease operation and a tone will sound.
1.For fresh air, press the "Fresh Air" button while the unit is running.
This will then engage the built-in ion generator.
MODE
SPEED
TIMER
WIND
TEMP
ON/OFF
WIND
Please Note:
While in dehumidification mode, the unit will automatically set the fan speed to
"Low". The ACP-1300H will not allow fan speed adjustments, nor will adjusting
the temperature affect the unit's operation.
In addition, while in fan mode, adjusting the temperature will not affect the unit's
operation. If the ACP-1300H is in standby mode, the remote control's memory
function will turn on. Your settings will be stored in the unit's memory, and when
used next, it will operate according to the last saved settings only the timer
function will need to be reset (if you are using this function).
Auto Cooling Dehumidify
FanHeating
3. Operating Instructions
9
Setting the Timer Function:
To set the timer function, press the "Timer" button and enter the time that
you would like the unit to shut down. You will then have the option of setting
the time for the unit to resume function (ranging from half an hour to 12 hours,
in half hour increments). You can also exit the timer function at that time.
While the unit is in standby mode, you can also set the operation times by
pressing the "Timer" button. Enter the time in which you would like the air
conditioner to begin operating, and you will then be able to program the time
at which you want the unit to go back into standby mode (ranging from half
an hour to 12 hours, in half hour increments). You can also exit the timer
function at that time (Note: While in the set time frame, the air conditioner will
display a countdown of the remaining time until the next mode is initiated).
To adjust the airflow, if you would like to have the airflow oscillated from the
ceiling to the floor, press the "Oscillation" button on the remote control. Right
to left airflow can then be set by manually adjusting the louvers.
Please Note:
When turning off the unit, VFD indicators will appear "Off" until the sweep
shuts down.
Battery Installation:
3. Operating Instructions
10
Remote Control Panel
Battery
Battery Cover Panel
1.Open the battery compartment by sliding down the battery cover
panel.
2.Remove and discard old batteries replace with new batteries
3.Replace the battery panel back onto the remote.
Please Note:
1.The polarity of the batteries must match the indicator in the remote control.
2.Do not mix old and new batteries in the remote control.
3.To prevent corrosion, remove the batteries if the remote control will not be
used for an extended period of time.
Water Tank
Drainage
3. Operating Instructions
11
When the ACP-1300H is in operation, the condensed water will be drained into
the water tank. If the water tank is full, a buzzer will sound 20 times, and the
VFD indicator will display an "E2" error warning. At that time, the unit will cease
operation, and if you wish to restart the unit, the water tank must be emptied by
taking the following steps:
1.Turn off the unit.
2.Remove the rubber plug. The condensed water will then flow out.
3.After the water is emptied, replace the rubber plug.
4.Restart the unit.
Drainage Hole Rubber Plug
3. Operating Instructions
12
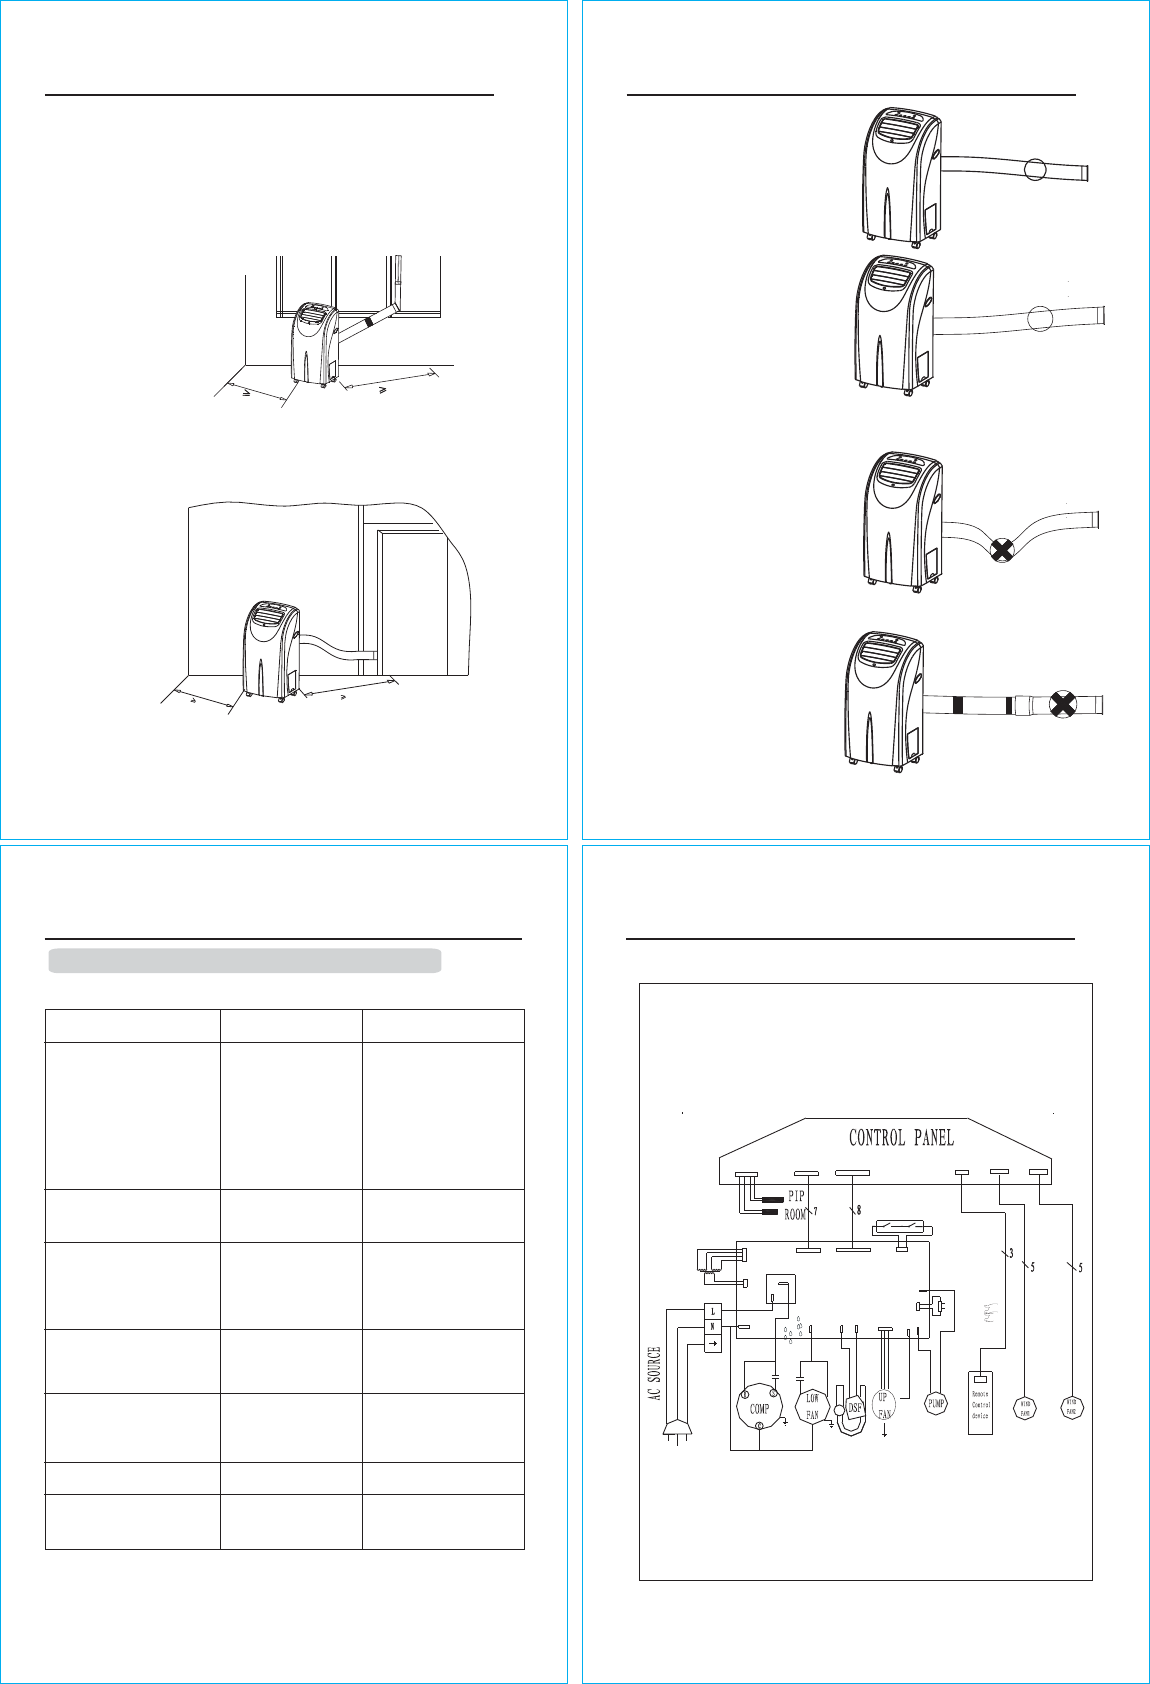
Air Exhaust Hose
The hot air exhaust conducts the hot, moist air produced by the unit away from
the space you are cooling. The window kit and exhaust hose can also be moved
from room to room with the unit. You can exhaust the ACP-1300H by following
one of the following two methods:
Exhaust the hot air through a window or sliding glass door (a window
kit extension may be necessary). Open the window or sliding glass
door, install the window kit, and connect the exhaust hose.
1.
2.If an existing window or sliding glass door cannot be used, a custom
opening through a wall or ceiling can be cut out in order to facilitate
the exhaust hose.
Please Note:
The hot air must be exhausted in order for the unit to produce a cooling effect.
When the ACP-1300H is not in use, safely store away the exhaust hose in a
clean, dry place.
50cm
50cm
50cm
50cm
Exhaust Hose
3. Operating Instructions
13
3.The length of the exhaust hose
should not be extended past 6.5 feet.
Replacement hoses are available for
purchase through your NewAir
vendor. We also recommend that
you use only certified NewAir re-
placement parts.
1.The exhaust hose can extend
from 1.8 feet to 6.5 feet. The
shorter the hose , the better
the cooling effect .
2.The hose should be as straight
as possible, as sharp or unnece
-ssary bends in the hose will prevent effective airflow.
This will subsequently result in overheating and possible
shut-down of the unit.
4. Troubleshooting
Problems Possible Causes Suggested Solutions
The unit doesn't work.
14
Troubleshooting Your ACP-1300H Portable Air Conditioner
Before investing in repairs, check to see if any of the following apply to you:
There could be power trouble.
1.The power cord is not
plugged in.
2.The circuit breaker has
been tripped.
3.There is a problem with
the socket or outlet.
4.Either the power cord is
damaged, or the fuse
needs to be replaced.
1.Connect the power cord corre-
ctly.
2.Reset the circuit at the breaker
box.
3.Change the socket or outlet.
4.Take the unit to a qualified techn-
ician and have the fuse replaced
(fuse specification: 3A/250V).
The unit stops working on its own.
Either the timer has been
activated or the temperature
in the room is lower than the
set temperature.
Either turn the timer off or wait
for the room temperature to rise.
There is no cool air coming out
of the unit when it is in cooling
mode.
1.The room temperature is
lower than the set temp-
erature.
2.The evaporator is frosted
over.
1.Wait for the room temperature
to rise to resume normal
operation.
2.Allow the evaporator to defrost
and normal operation will
resume.
There is no cool air coming out of
the unit when it is in dehumidifying
mode.
1.The evaporator is frosted
over.
2.The unit is eliminating frost.
Allow the evaporator to defrost
andnormal operation will resume.
Error code E2 is displayed on the
control pane.l The water tank is full. Empty the water tank and restart
the unit.
Error code E4 is displayed on the
control panel. The coil pipe is damaged. Replace the coil pipe.
Error code E1 is displayed on the
control panel.
1.The voltage is too high or
too low.
2.The unit is damaged.
1.Restart the unit when the voltage
is normal.
2.Have the unit repaired by your
NewAir dealer or at a professional
repair center.
Please Note:
Never service your ACP-1300H portable air conditioner by yourself.
If your unit needs to be repaired, please contact your NewAir dealer
or a professional repair center for assistance.
5. Electric Diagram
15
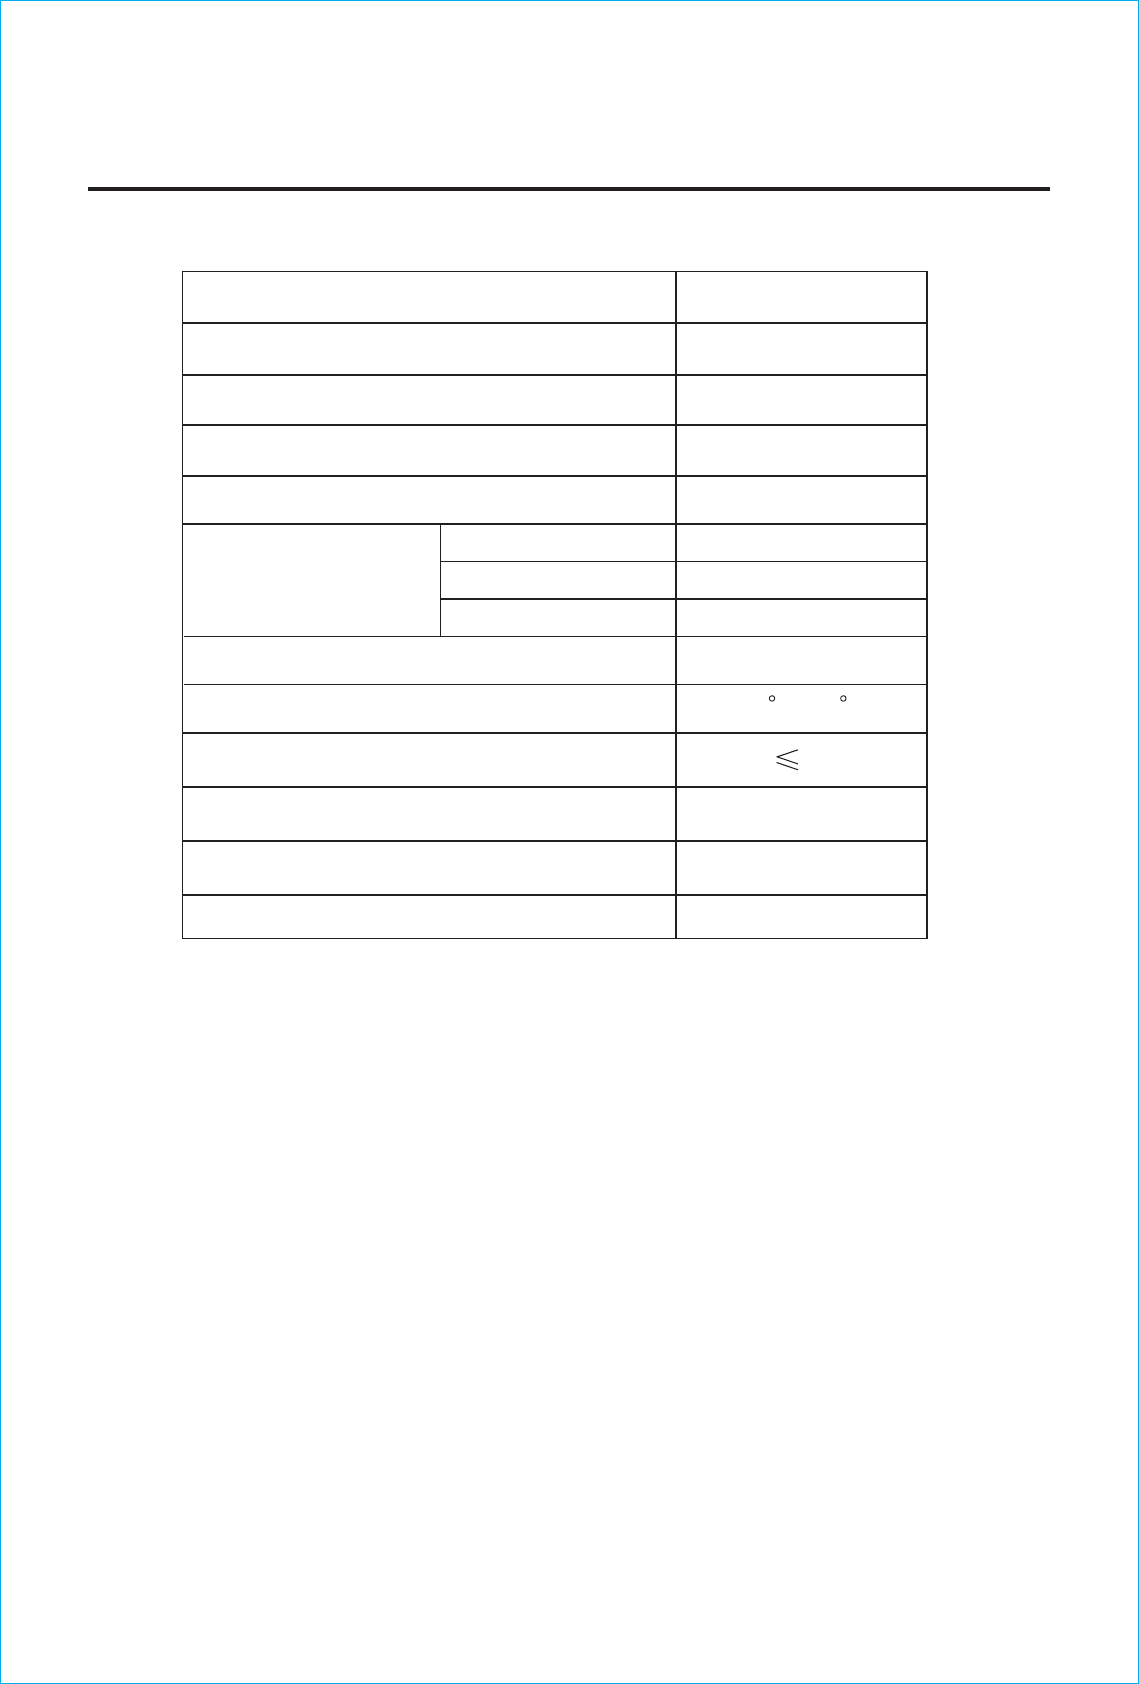
6. Technical Specifications
16
Model Number
Cooling Capacity (Btu/h)
Dehumidifying(Pints/day)
Power
Consumption
Noise Level(dB)
Refrigerant
Cooling
ACP-1300H
13000(MAX)
120(MAX)
52
R22(21.2oz)
Dehumidifying
Unit Weight (Lb) 88
Unit Dimensions (inches) 13.8X17.4X34.2
Power Supply 120V/60Hz
Water Tank Capacity (Liters)
Temperature Set Range
1250W/10.8A
950W/8.2A
2L
61 F-88 F
Heating 1000W/8.7A
The cooling capacity of the unit may be affected by several factors such as
the height of the ceiling, the quality of insulation, number of windows, etc.
Please Note:
Heating Capacity (Btu/h) 13000(MAX)
