Nexstgo 9560NG Intel Wireless-AC 9560 User Manual 4
Nexstgo Company Limited Intel Wireless-AC 9560 4
Nexstgo >
Contents
- 1. 9560NGW- UserMan_Part 1_20190102
- 2. 9560NGW- UserMan_Part 2_20190102
9560NGW- UserMan_Part 1_20190102
USER’S MANUAL
l 1
User’s Manual

2 l
1: Product Overview ............................................................................ 6
Package Contents ............................................................................................................... 6
Front View ............................................................................................................................ 7
Left Side View ...................................................................................................................... 9
Right Side View ...................................................................................................................10
Bottom Side View ...............................................................................................................10
Status Indicators and Lights .............................................................................................11
Labels ..................................................................................................................................13
Identifying Labels .............................................................................................................13
.................................................................................................. 14
Main Features ..................................................................................................................14
Dimensions and Power Specications .............................................................................16
Using Nexstgo Software ....................................................................................................17
Accessing Nexstgo Software ...........................................................................................17
Overview of Nexstgo Software .........................................................................................17
2: Using the Computer and Basic Settings ..................................... 30
Operating System Information ..........................................................................................30
Registering Your Computer ...............................................................................................30
Keyboard Overview ............................................................................................................31
Keyboard Basics ..............................................................................................................31
Windows Keys .................................................................................................................31
Multimedia Keys ...............................................................................................................32
Touchpad Overview ............................................................................................................34
Touchpad Basics ..............................................................................................................34
Using the Touchpad Gestures ..........................................................................................34
Power Management ............................................................................................................36
Using AC Power ...............................................................................................................36
Using the Internal Battery ................................................................................................36
Power-Saving Modes .......................................................................................................38
Using Network Connections ..............................................................................................39
Wireless Connections ......................................................................................................39
Using the Airplane Mode ..................................................................................................41
Table of Contents
Table of Contents

USER’S MANUAL
l 3
3: Accessibility Features .................................................................. 50
Keyboard Shortcuts ...........................................................................................................50
Using the Ease of Access Center .....................................................................................50
Narrator ............................................................................................................................51
Magnier ..........................................................................................................................51
Color and High Contrast ..................................................................................................51
Closed Captions ...............................................................................................................51
Keyboard ..........................................................................................................................52
Mouse ..............................................................................................................................52
Other Options ...................................................................................................................53
Ergonomic Considerations ................................................................................................54
Positioning Your Computer ..............................................................................................54
Posture ............................................................................................................................54
Viewing angle of the display ............................................................................................54
Room lighting ...................................................................................................................54
4: Taking Care of Your Computer ..................................................... 55
General Cleaning Guidelines .............................................................................................55
Cleaning Your Computer ...................................................................................................55
Preparation for Cleaning ..................................................................................................56
Cleaning the Sides, Covers, Keyboard, and Touchpad ...................................................56
Cleaning the Display ........................................................................................................56
Using Audio Features ........................................................................................................42
Conguring Audio Settings ...............................................................................................42
Using the Camera .............................................................................................................. 43
Using a Media Card ............................................................................................................44
Inserting a Media Card .....................................................................................................44
Removing a Media Card ..................................................................................................44
......................................................................................46
Conguring the Advanced Settings ..................................................................................46
.................................................................................................48
Connecting an External Display .......................................................................................48
Selecting a Display Mode ................................................................................................49
Table of Contents
5: Protecting Your Computer ............................................................ 57
Accessing the System .......................................................................................................57
Conguring Sign-In Options .............................................................................................57
Setting Up Passwords in Setup Utility ..............................................................................60

4 l
............................................................... 73
Backup Features .................................................................................................................73
Conguring File Backup ...................................................................................................73
Conguring System Backup .............................................................................................76
Restoring Features .............................................................................................................80
Restoring Personal Files and Folders .............................................................................80
Restoring the System ......................................................................................................81
7: Troubleshooting ............................................................................ 88
General Recommendations ...............................................................................................88
Problems and Solutions ....................................................................................................89
Computer Becomes Unresponsive ..................................................................................89
Problems with Wireless Networks ....................................................................................90
Problems with the Keyboard ............................................................................................90
Touchpad is not Functioning ............................................................................................91
Problems with the Screen ................................................................................................91
Problems with Audio ........................................................................................................92
Problems with the Fingerprint Reader .............................................................................92
Problems with the Battery ...............................................................................................92
Problems with the Internal Storage Drive ........................................................................93
Problems with the Software .............................................................................................93
Problems with USB Devices ............................................................................................93
Table of Contents
Using Windows BitLocker Drive Encryption .....................................................................61
Trusted Platform Module (TPM) .......................................................................................62
Deleting Data on the Storage Drive .................................................................................63
Using Antivirus Software ..................................................................................................64
Using Firewall Software ...................................................................................................64
.............................................................65
Nexstgo System Conguration Utility Navigation .............................................................66
Boot Manager ..................................................................................................................66
Device Manager ...............................................................................................................67
Boot From File .................................................................................................................67
Setup Utility ......................................................................................................................68
............................................................................72
Getting the Latest Drivers ................................................................................................72

USER’S MANUAL
l 5
For safety and regulatory information, please refer to the Quick Start Guide.
IMPORTANT NOTICE
All trademarks used in this user’s manual are the property of their respective companies.
ABOUT THE USER’S MANUAL
This manual contains information that will help you to operate the Nexstgo PRIMUS NX301
computer. It is divided into seven chapters and one appendix:
Product Overview
Using the Computer and Basic Settings
Accessibility Features
Taking Care of Your Computer
Protecting Your Computer
Advanced Conguration
Troubleshooting
Index
Table of Contents

6 l
Package Contents
Nexstgo PRIMUS NX301
AC adapter
Power cord
Thank you for choosing the Nexstgo PRIMUS Series computer. Depending on the purchased
model, the computer is equipped with Intel Core i5, or Core i7 processor and Intel’s integrated
HD graphics. Your computer comes with preinstalled Windows 10 Pro or Windows Home
operating system. For enhanced security, selected models support ngerprint reading and face
recognition.
Before using the computer, make sure the following items are included in the package. If any
items are damaged, please contact Nexstgo service center. Please refer to “Troubleshooting” on
page 88.
Product Overview
1
Product Overview
USER’S MANUAL
l 7
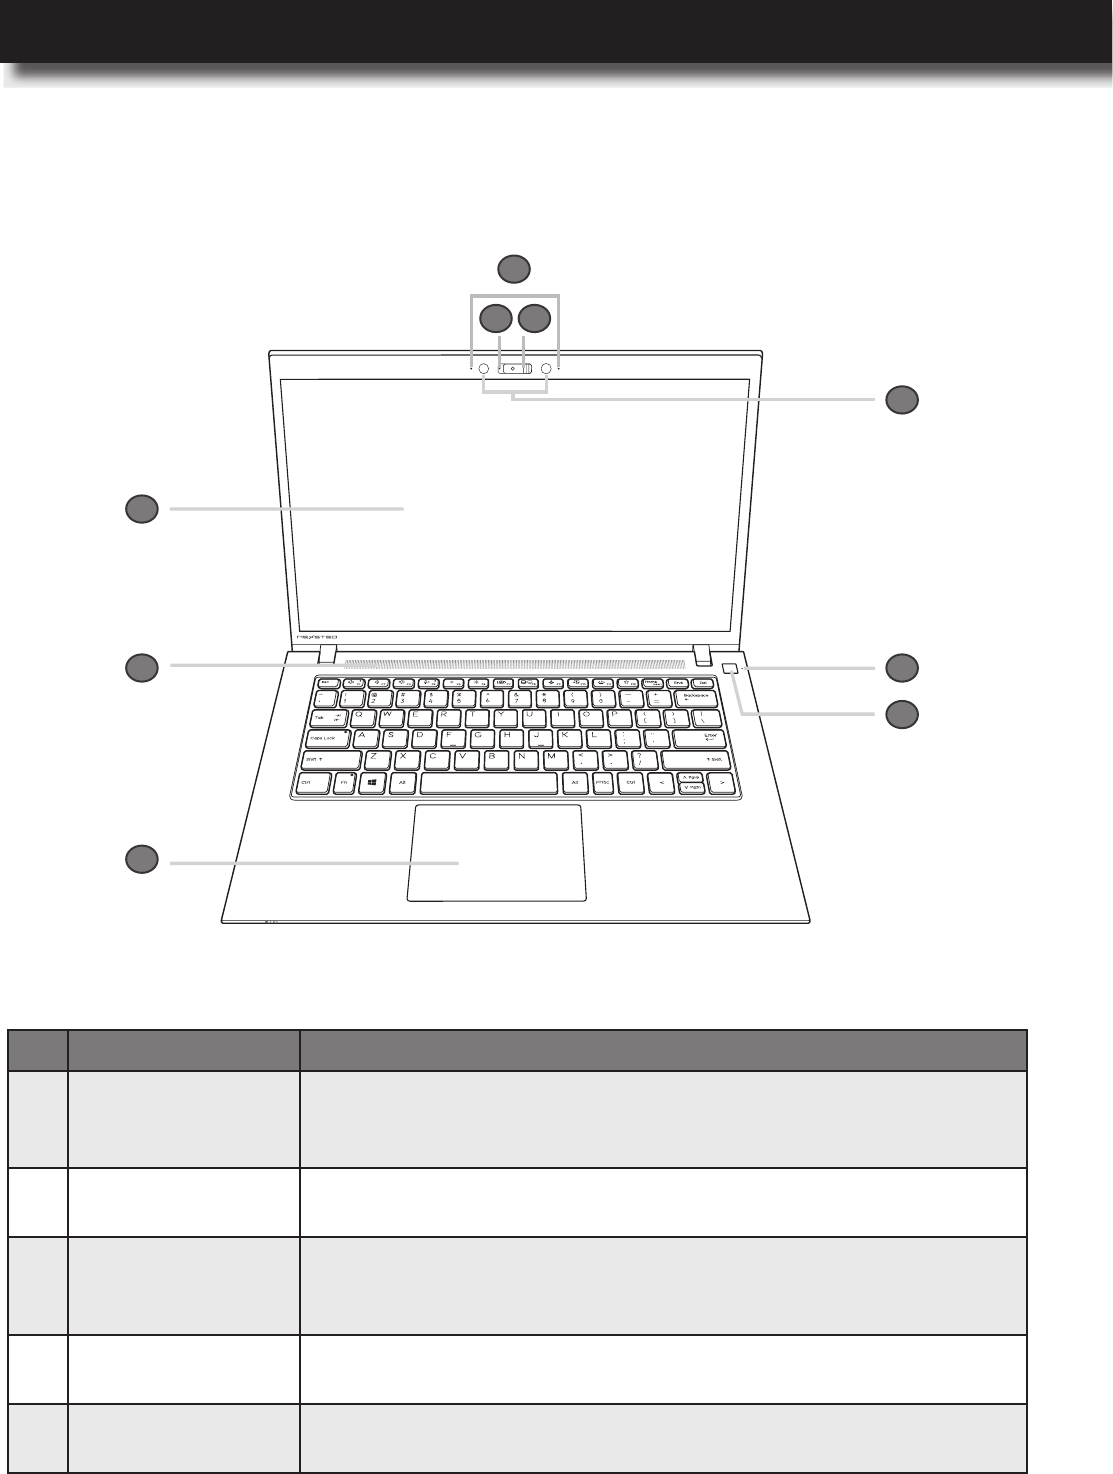
Front View
1
2 3
4
5
6
8
7
9
No. Item Description
1 Microphones x2
Use microphones to record sound and voice for applications
that support audio recording. For muting/unmuting microphones,
please refer to “Status Indicators and Lights” on page 11.
2 Camera LED Camera activity LED. Please refer to “Status Indicators and
Lights” on page 11.
3Camera and
Camera shutter
Use camera to capture images, record videos, or hold a video
conference. Please refer to “Using the Camera” on page 43.
To turn camera on/off by sliding the shutter rightward or leftward.
4 Infrared sensors x2 Infrared sensors help the camera to overcome illumination
changes during face recognition setup process.
5 Power LED For power indicator behavior, please refer to “Status Indicators
and Lights” on page 11.
Product Overview
8 l
6
Power button (with
optional ngerprint
reader)
Power button function:
Press to turn on the computer.
While turned on, press to put the computer to sleep.
Fingerprint reader (optional):
Fingerprint authentication provides an efcient user access by
relating your ngerprint with a password.
7 Touchpad
Use the multitouch gestures enabled touchpad as a mouse-like
cursor with touch-sensitive movement pad. Please refer to “Touch-
pad Overview” on page 34.
8Speakers
Use for stereo sound and audio output for video and music
playback. For muting/unmuting audio, please refer to “Status
Indicators and Lights” on page 11.
9 Display panel 14” FHD IPS display panel with back lighting for displaying text
and graphics.
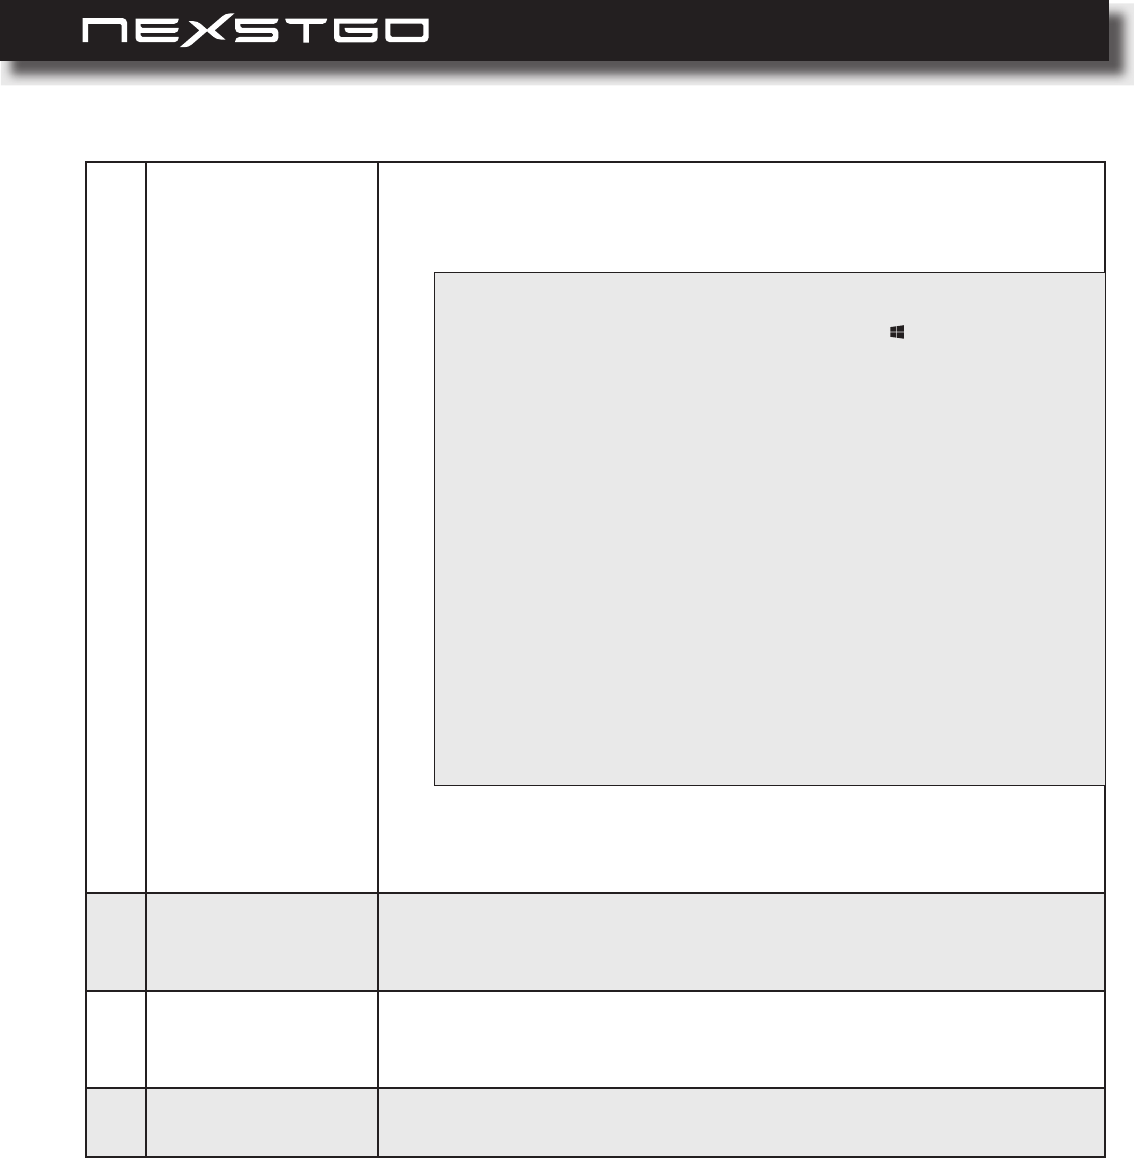
NOTE:
− Toturnoffthecomputer,opentheStartmenu ,clickPower,and
thenclickShut down.
− If your computer becomes unresponsive, you can shut down the
computerbypressingandholdingthePowerbuttonforatleastthree
seconds.
− You can customize the Power button behavior. For example, by
pressingthePower button,thecomputerturnsoffthedisplayifitis
runningonbatterypowerorhibernatesiftheACadapterisplugged
in, and many more options. The Power button behavior can be
customizedinControl Panel > Power Options > Choose
what the power buttons do.
If you cannot nd the Control Panel, type “control panel” (without
quotationmarks)insearchbar.
Asyou type, the Control Paneldesktop app will appear in the Best
matchlist.
Product Overview
USER’S MANUAL
l 9
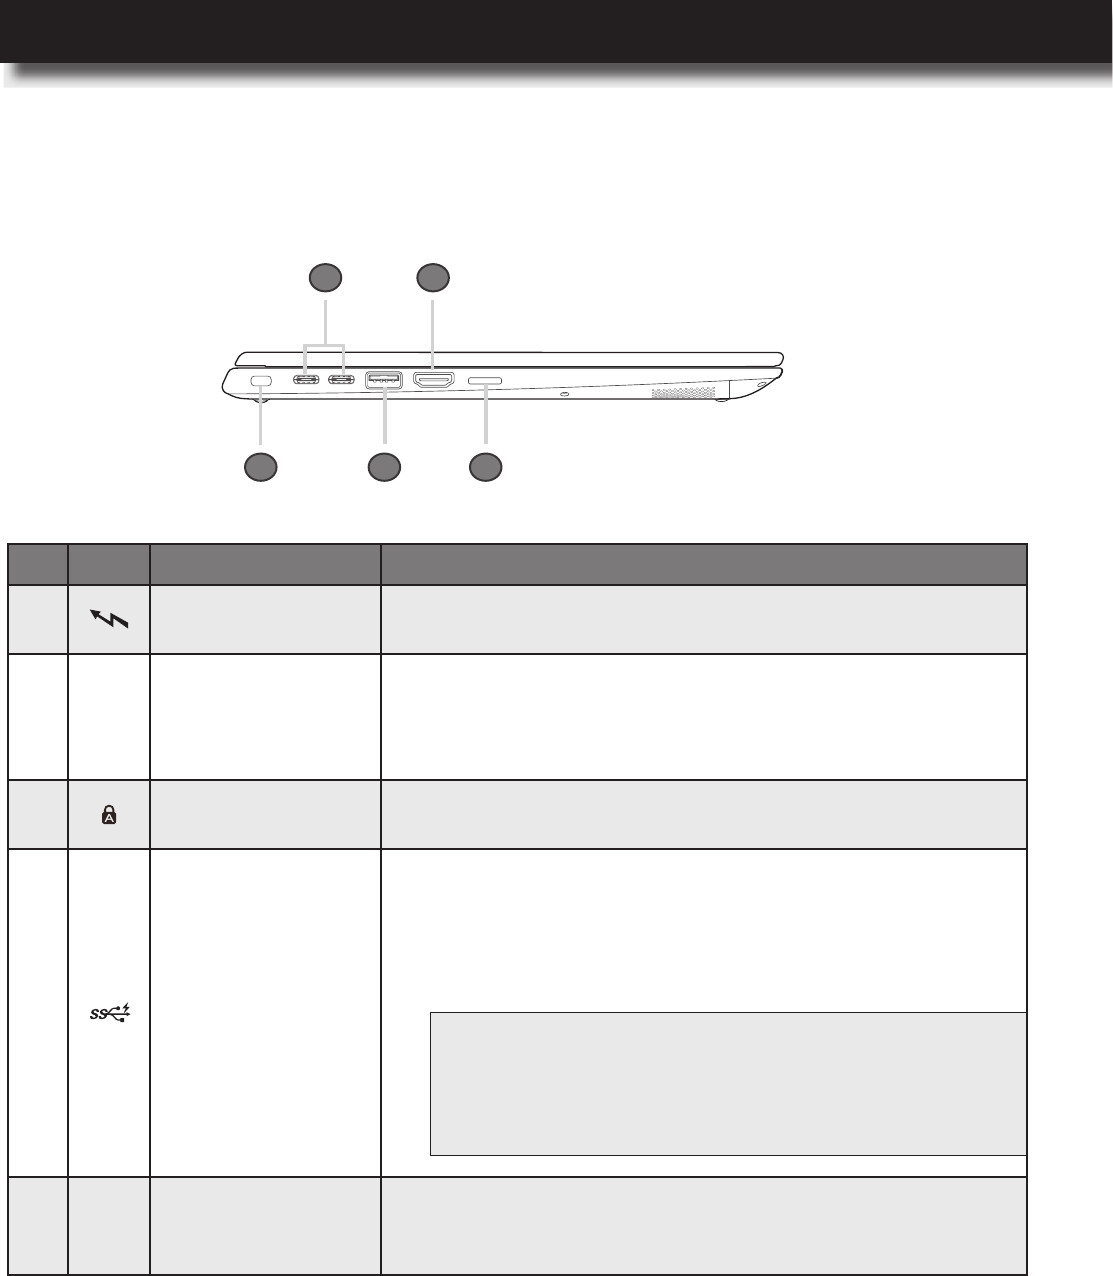
Left Side View
1 2
35
4
No. Icon Item
1USB type-C 3.1
ports
Use this port to plug in the USB type-C AC adapter to
power your computer and charge the embedded battery.
2 HDMI port
Use the High-Denition Multimedia Interface (HDMI) port to
connect your computer to a compatible digital audio device
or video monitor, such as television, projector, DVD player,
or other supported device.
3Security lock slot Use this slot to secure your computer to an immovable
object with an optional security cable.
4 USB type-A 3.1 port
Use this port to charge a USB compatible device in the
following scenarios:
Your computer is turned on or in sleep mode.
Your computer is turned off or in hibernation mode, but
connected to the AC power source.
5 SD card reader
Insert a supported memory card into the card reader for
data access or storage. Please refer to “Using a Media
Card” on page 44.
NOTE: By default the USB charger function is always on. If
youneedtodisablethisfunction,youcandoitthrough
the Setup Utility. Please refer to “Using the Nexstgo
SystemCongurationUtility”onpage65.
Product Overview
10 l
Bottom Side View
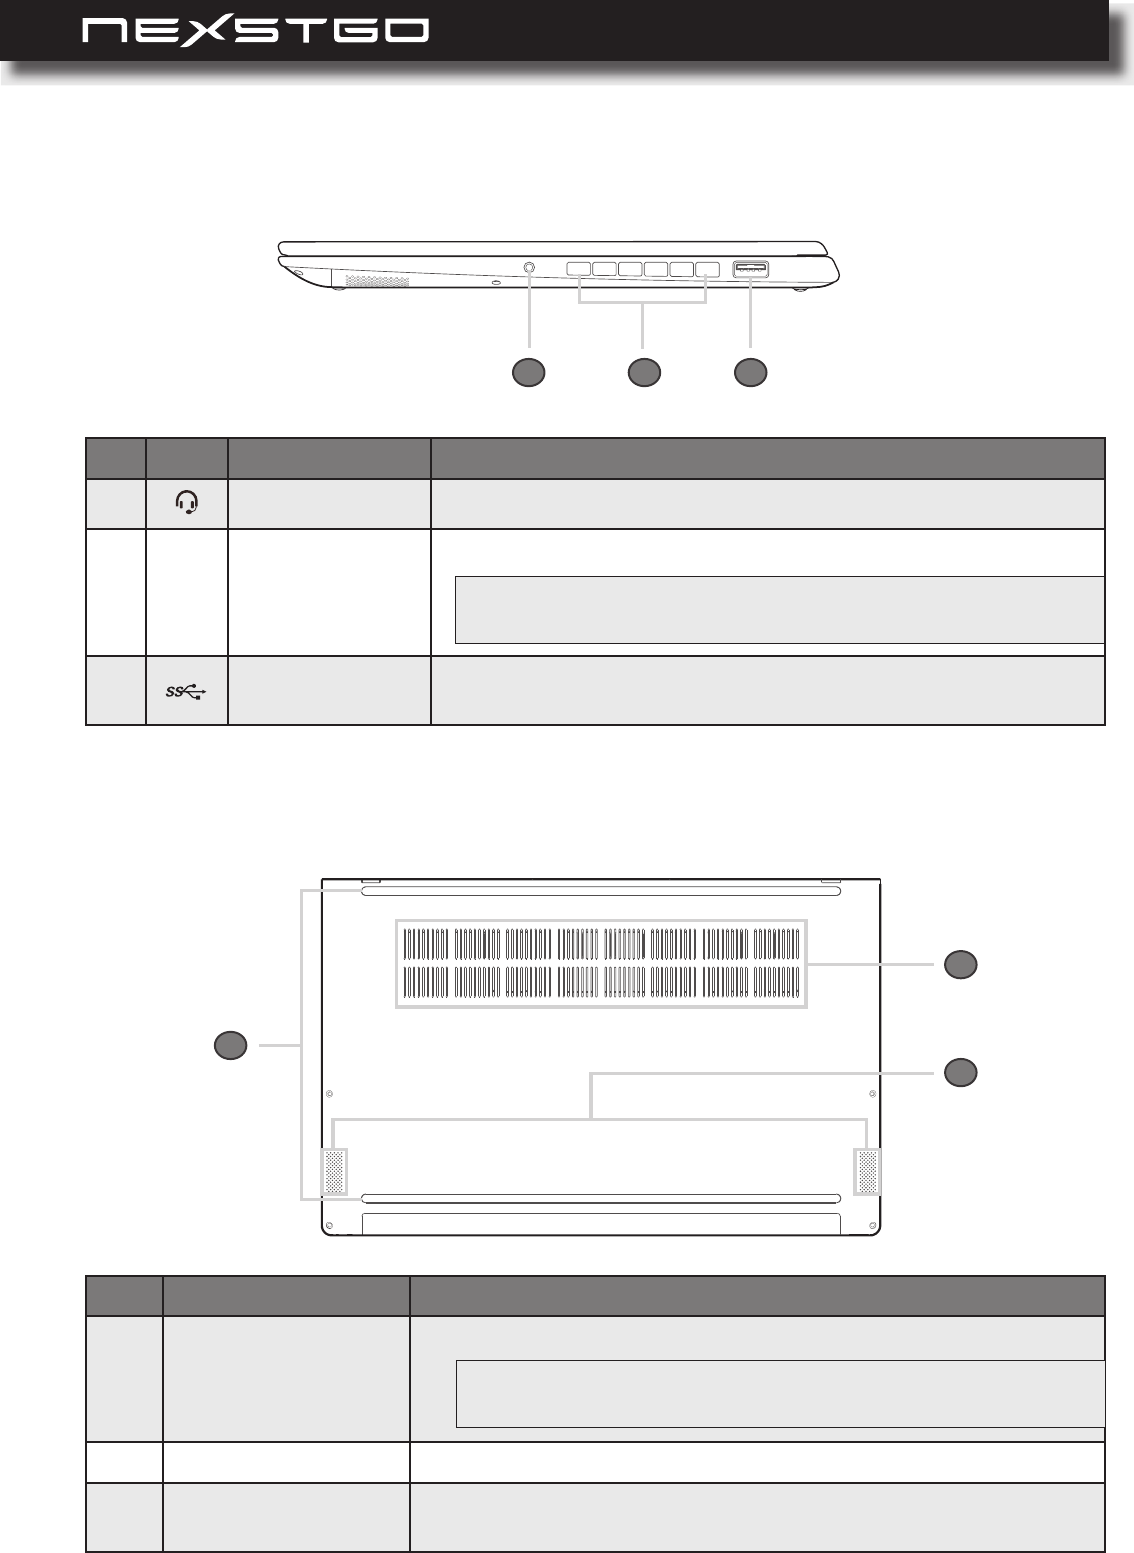
Right Side View
1 2 3
No. Icon Item
1Headset jack Use this port to connect a headset.
2 Ventilation slots Allow proper ventilation for the computer.
3USB type-A 3.1
port
Use this port to connect any USB compatible devices, such as
USB mouse, USB keyboard, USB storage device, or others.
No. Item
1 Ventilation slots
Allow proper ventilation for the computer.
2Down-ring speakers
Use for stereo sound and audio output for video and music playback.
3 Rubber feet x2
Allow air circulation under the computer and prevent the
computer from slipping.
WARNING:Topreventthesystemoverheating,donotobstructthe
ventilationslots.
1
2
3
WARNING:Topreventthesystemoverheating,donotobstructthe
ventilationslots.
Product Overview
USER’S MANUAL
l 11
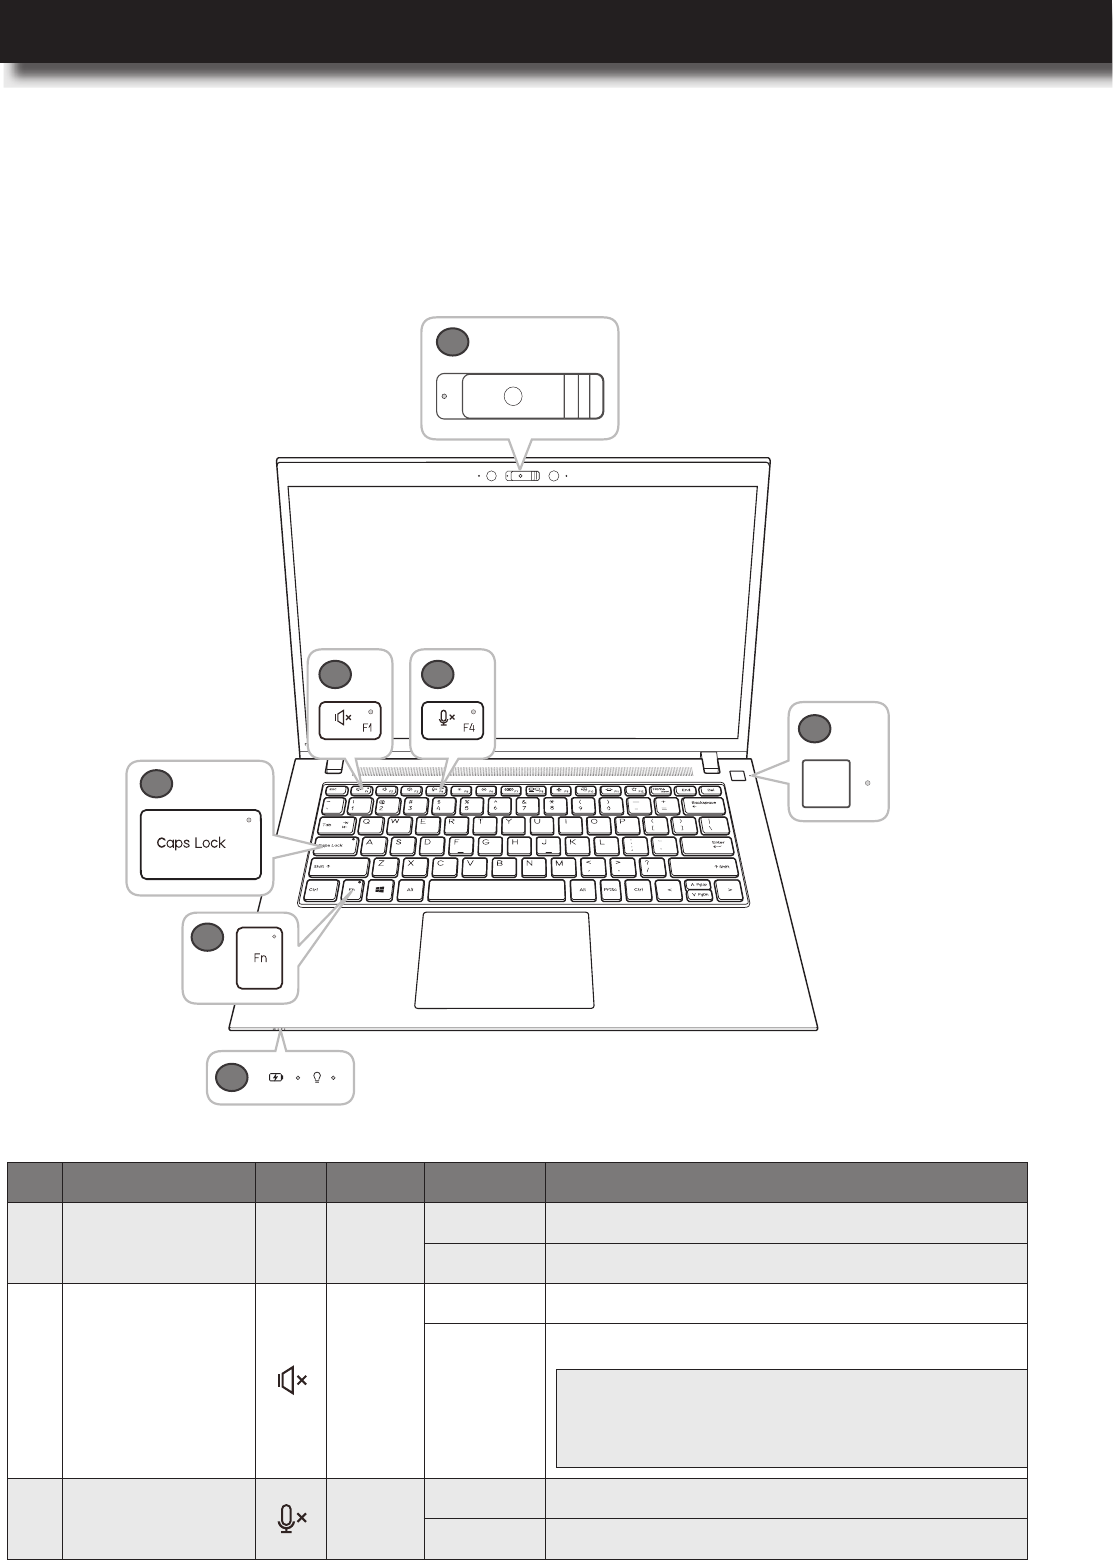
No. Indicator Icon Color Status
1 Camera LED White On The camera is in use.
Off The camera is not in use.
2Audio mute
toggle key Orange
On Audio is muted.
Off Audio is unmuted.
3Microphone
mute toggle key Orange On Microphones are muted.
Off Microphones are unmuted.
Status Indicators and Lights
1
4
2 3
6
5
7
In this section, you will nd information on the location and identication of the status indicators
on your computer.
NOTE: Audio is automatically unmuted also if
theFnlockkeyisoffandyoupressthe
volumecontrolkeysF2orF3.
Product Overview

12 l
4Caps Lock
toggle key Green
On You can type uppercase letters by directly
pressing the letter keys on the keyboard.
Off
The automatic uppercase function is off
when directly pressing the letter keys on
the keyboard.
5Fn lock toggle
key Green
On
The Fn lock is on. The multimedia keys
from F1 ~ F12 are disabled and Windows
standard function keys from F1 ~ F12 are
enabled. Please refer to “Multimedia Keys”
on page 32.
Off
The Fn lock is off. The multimedia keys
from F1 ~ F12 are available for use and
Windows standard function keys from F1 ~
F12 are disabled. Please refer to “Multime-
dia Keys” on page 32.
6 Battery status
Amber
On The computer is connected to the AC
power and charging the battery.
Off
The computer is disconnected from the AC
power.
The computer has turned off due to the low
battery power.
Blinking The computer is turned on and the battery
power is less than 10%.
White
On The computer is connected to the AC
power and the battery is fully charged.
Off The computer is disconnected from the AC
power.
White
On The computer is using the battery power.
Off
The computer is not using the battery
power. Either turned off or in hibernation
mode.
Breathing
The indicator is on for 2 seconds and off for
2 seconds in a sequence. The computer is
in sleep mode.
7 Power White
On The computer is turned on and running in
normal mode.
Breathing
The indicator is on for 2 seconds and off for
2 seconds in a sequence. The computer is
in sleep mode.
Off The computer is turned off.
Product Overview
USER’S MANUAL
l 13
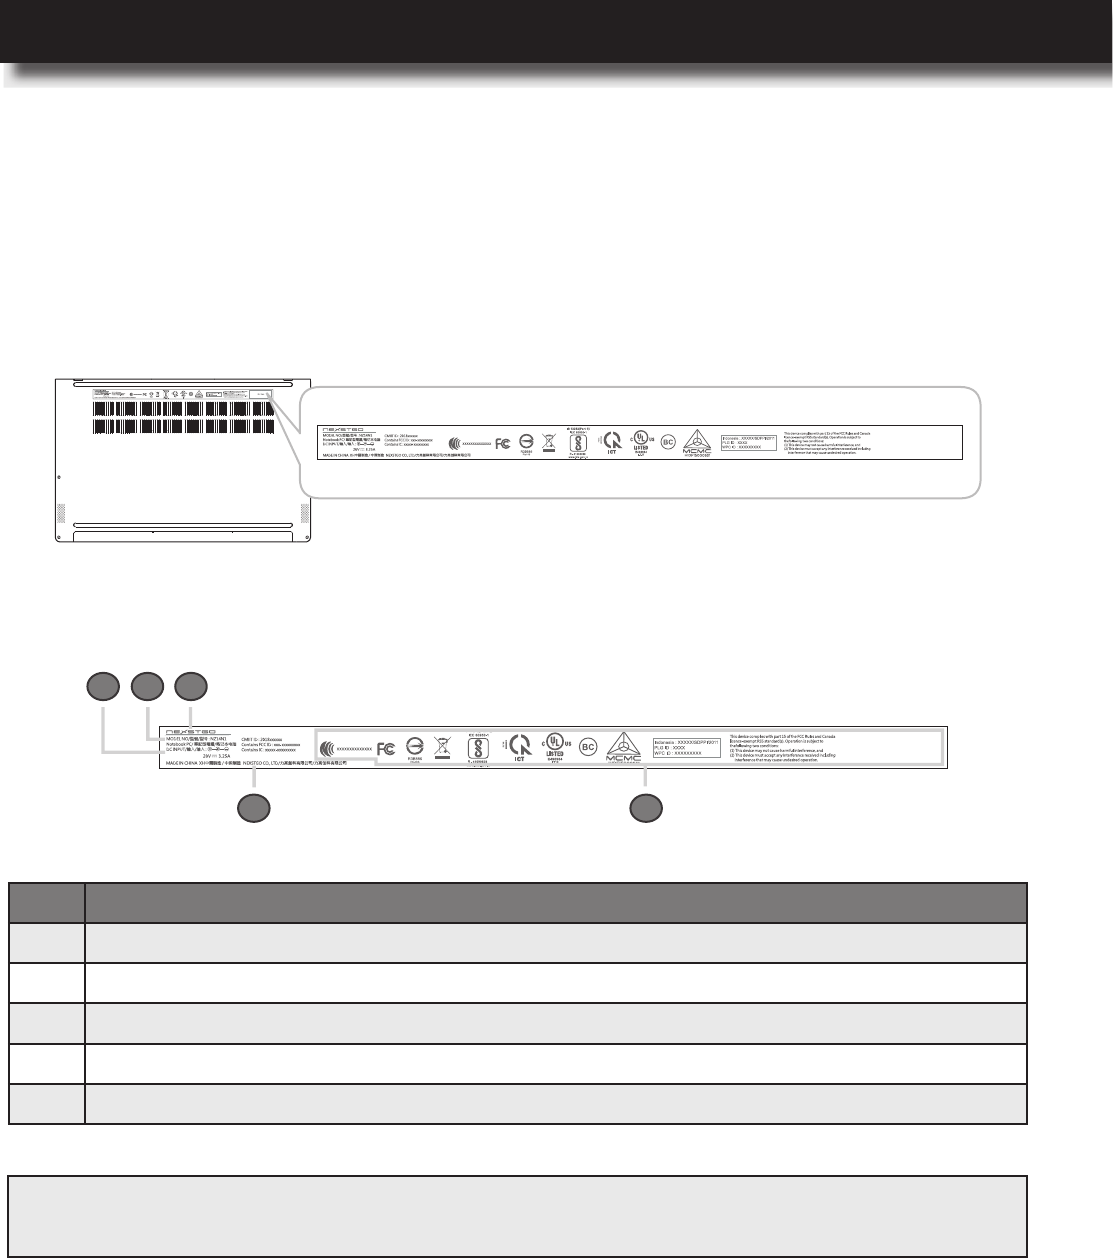
Labels
The product labels are located on the bottom side of the computer. These labels inform you
about the model name, serial number, and safety information you need to know to operate your
computer safely.
Identifying Labels
No.
1 Input current information
2
Model number
3
Company logo
4 Regulatory and safety information, Serial number
5 Country of manufacture and company name
1 2 3
54
NOTE: IfyouneedtocontactNexstgoforassistance,themodelnumberandserialnumberhelpthetechnician
toidentifyyourcomputerandprovidemorerapidservice.
Product Overview

14 l
In this section, you will nd the main features and operational requirements regarding the
computer.
Main Features
Item
Platform Intel Whiskey Lake
Processor Core i5, i7 (15W WHL-U CPU); vPro / non-vPro
Chipset Integrated SoC Chipset
Graphics Internal Graphics:
Intel® UHD Graphics 620
Panel Technology 16:9 Wide View Anti-Glare LED-backlit with Camera and
Microphone
14” FHD IPS (1920x1080), 72% NTSC, eDP1.3 with PSR
Memory 8 GB 2400 MHz DDR4 (1GB *8)
16 GB 2400 MHz DDR4 (2GB *8)
Storage Solid State Drive (SSD):
256GB Solid State Drive
512GB Solid State Drive
co-layout M.2 SATA & M.2 PCIe
Webcam Web camera FHD 1080p resolution, xed focus (Windows
Hello) (IR / RGB)
Digital Mic x2
Enable Noise Cancellation
Audio Four Speakers (two top-ring, two down-ring)
Dolby Audio Atmos DAX3
Wireless Networking Integrated Wireless:
11ac+BT, Dual Band Wireless-AC, 2x2, M.2 card
11ac+BT, Dual Band Wireless-AC, 2x2, M.2 card
External Expansion
UHS-II, support SD/SDHC/SDXC
Input / Output 1x USB type A 3.1 (USB 3.1 gen2)
1x USB type A 3.1 (USB 3.1 gen2; support charging)
2x USB type C 3.1 (USB 3.1 gen2; support DP, PD,
Thunderbolt)
HDMI v1.4 supporting: up to 3840×2160p @ 30 Hz
Headphone-out and Mic-in (combo)
Micro-SD Card Reader
Product Overview

USER’S MANUAL
l 15
Keyboard /
Touchpad
Keyboard:
Island Style Backlit Keyboard
Spill Resistant (detail requirement refer to validation spec)
Touchpad:
Touchpad w/ Clickpad
Multitouch Gestures Enabled
Support Win10 Precision Touchpad (PTP)
Power Requirements Battery:
Lithium Ion Polymer Battery (50Whr)
Lithium Ion Polymer Battery (46Whr)
Support Battery Fast Charge
AC Adapter:
65W USB Type-C AC Adapter (with Nexstgo logo)
Mechanical Requirements Chassis Buttons:
1x Power Button + LED (White Color)
1x Keyboard Caps Lock Indicator (Green Color)
1x Keyboard Mute indicator (Amber Color)
1x Keyboard Mic indicator (Amber Color)
1x Keyboard Fn indicator (Green Color)
1x WebCam Indicator (White Color)
1x Battery Indicator (White/Amber Color)
1x Power on Indicator (White Color)
Security Trust Technology Trusted Platform Module (TPM) 2.0 (Hard-
ware solution)
Chassis Lock Slot support
Camera Shutter
(Optional) Fingerprint Reader (Integrated with Power Button)
Operating System Windows 10 Pro 64
Windows 10 Home 64
Warranty 3 Years
Certications Full support for shipping into countries listed in the country
list tab
WEEE compliant (Waste Electric and Electronic Equipment)
HDMI v1.4 compliant
Product Overview

16 l
Dimensions and Power Specications
Item
Size
(Width (W) x Depth (D)
x Height) (H)
Front dimensions:
324 (W) x 217.9 (D) x 15.9 (H) mm
13.2 (W) x 8.6 (D) x 0.6 (H) inches
Rear dimensions:
324 (W) x 217.9 (D) x 17 (H) mm
13.2 (W) x 8.6 (D) x 0.67 (H) inches
Weight 1.25Kg
Product Overview
USER’S MANUAL
l 17
Using Nexstgo Software
Your computer is equipped with Nexstgo software that helps you to backup and recover the
computer, manage the power consumption of the system, and update software easily.
In this section, you will nd an overview of Nexstgo apps.
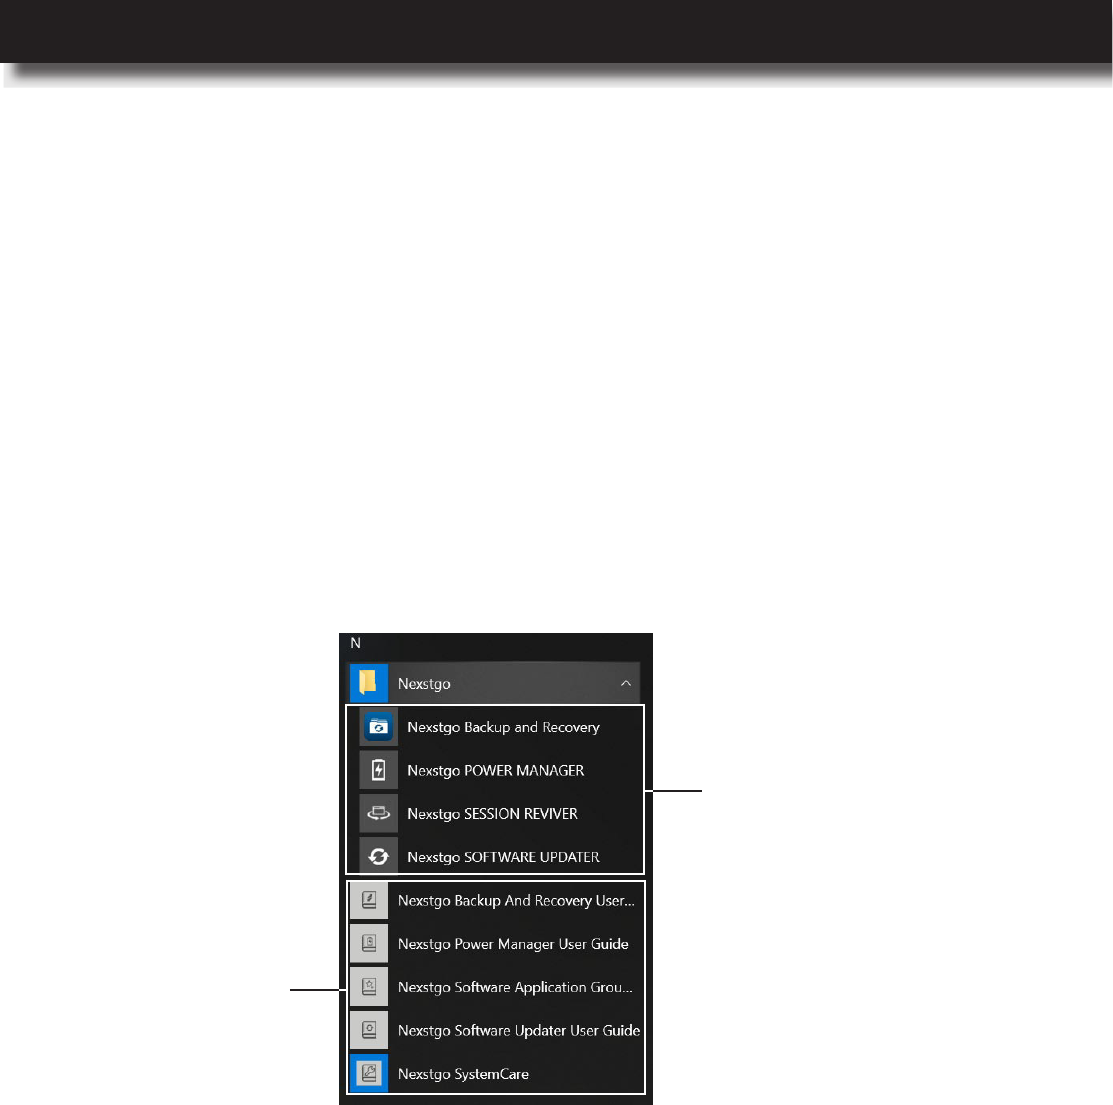
To access the Nexstgo software and tutorials on your computer, do the following:
1 Open the Start menu and nd the Nexstgo group in the apps list.
2 Do any of the following:
– Click on the Nexstgo folder to access Nexstgo Backup and Recovery app, Nexstgo
POWER MANAGER app, Nexstgo SESSION REVIVER app or Nexstgo SOFTWARE
app.
– Read tutorials on Nexstgo software located below the Nexstgo folder.
Accessing Nexstgo Software
Overview of Nexstgo Software
Nexstgo apps
Nexstgo tutorials
Product Overview
18 l
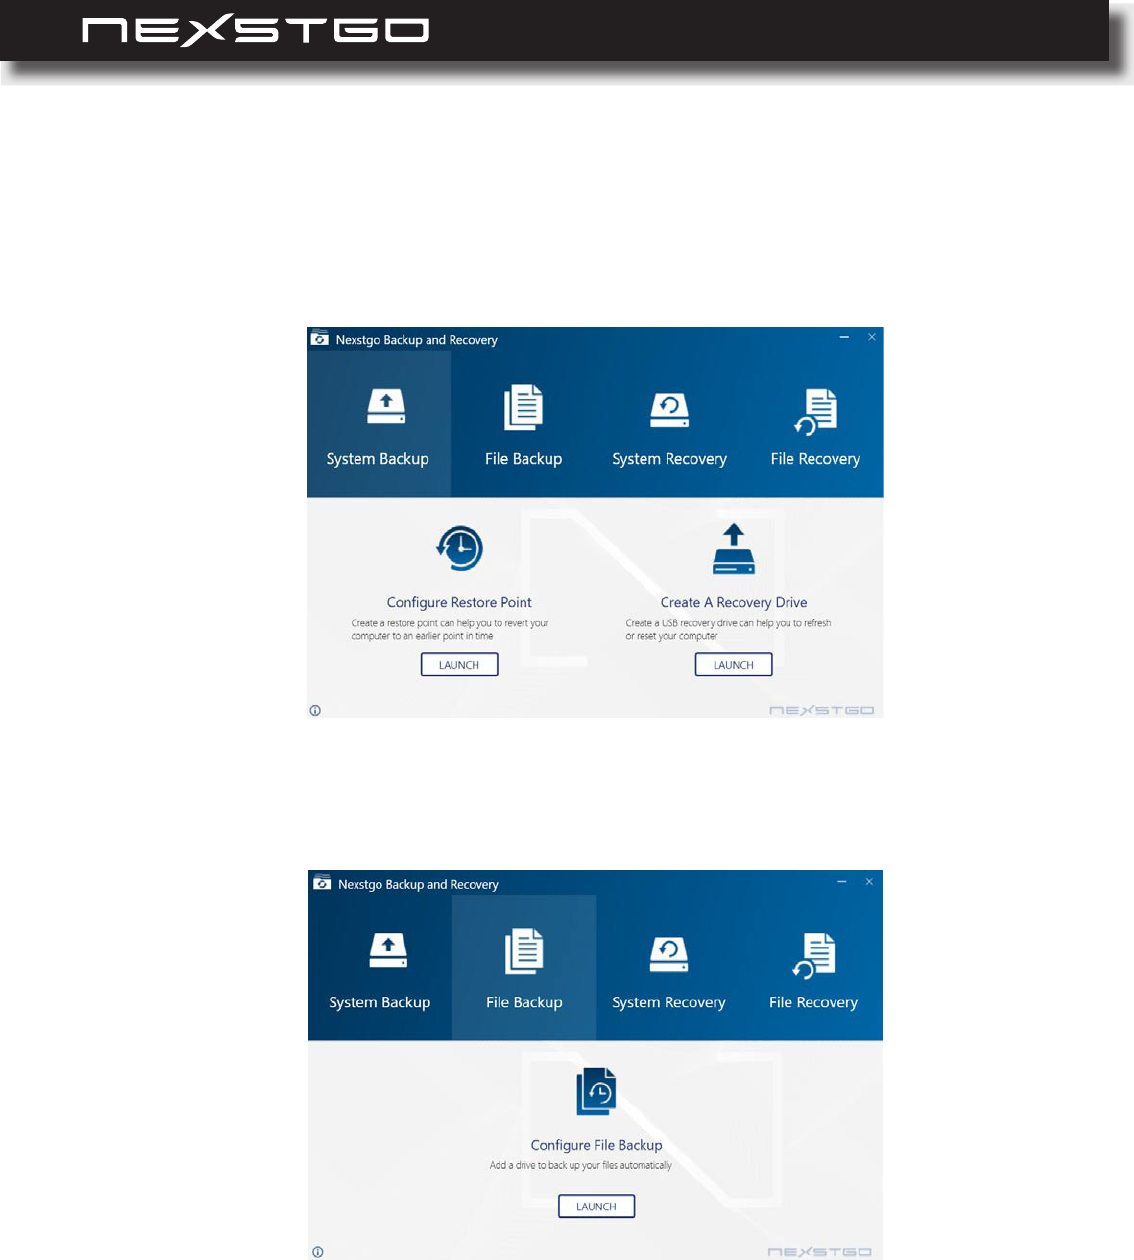
System Backup: Enables you to congure system restore point and create a recovery drive
that you can use to reinstall Windows operating system in case of a system failure.
File Backup: Enables you to backup personal les manually or automatically.
Nexstgo Backup and Recovery
With the Backup and Recovery app, you can backup and restore system and personal les
when using Nexstgo computer. The Backup and Recovery app interface is divided into 4 tabs,
such as System Backup, File Backup, System Recovery, and File Recovery.
Product Overview
USER’S MANUAL
l 19
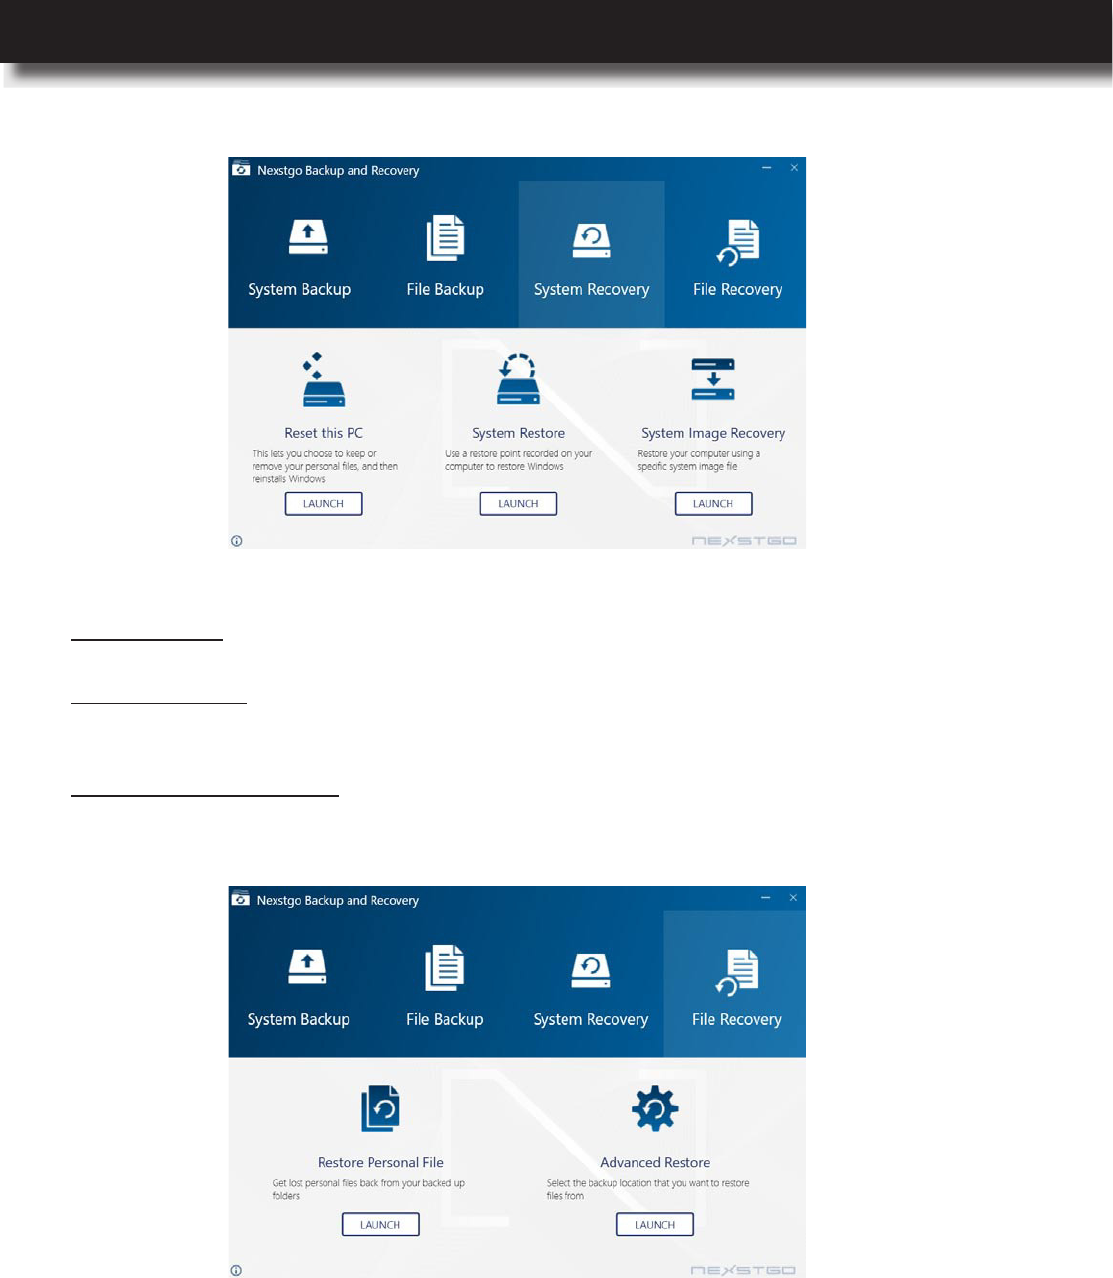
File Recovery: Recovers a le or folder that has been backed up previously. If the le or
folder has many versions, you are able to see all versions and choose which one to restore.
System Recovery: You can choose between the following options:
– Reset this PC: Reinstalls the operating system but keeps your personal les and settings or
reinstalls the operating system by removing everything from the computer.
– System Restore: Troubleshoots the system by xing problems that might make your system
running slowly or stop responding. This procedure does not affect your personal data stored
in the computer.
– System Image Recovery: Recovers the system from an image le that has been created in
system backup section.
Product Overview
20 l
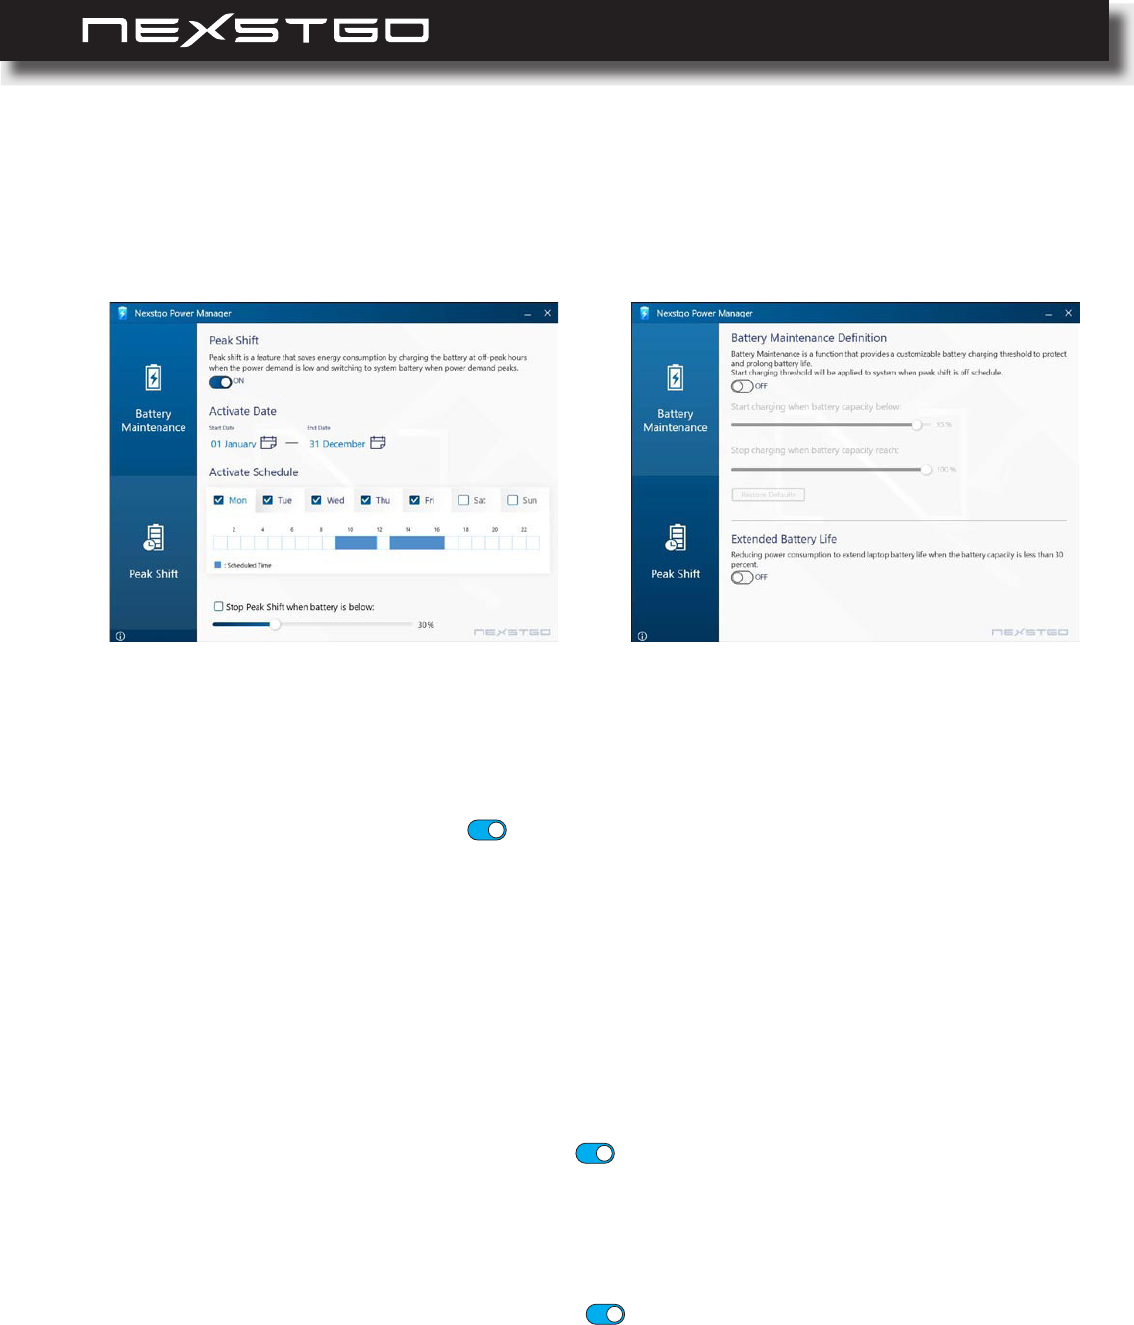
Peak Shift (selected models only): Helps to save energy consumption by charging the battery
at off-peak hour when the power demand is low and switching to the system battery when the
demand peaks.
To start using the Peak Shift function, do the following:
a) Click the Peak Shift ON/OFF toggle button to ON to enable the function.
b) Set the schedule for the Peak Shift by setting the time period, selecting week-days and
time period when you want to enable the Peak Shift.
c) If you want to disable the Peak Shift when the battery capacity drops below a certain level,
then check the Stop Peak Shift when battery is below: option rst and then set the
lowest battery capacity level on the control bar.
Battery Maintenance: Provides customized battery charging threshold to protect and prolong
battery life.
To set up the battery maintenance plan, do the following:
a) Click the battery maintenance ON/OFF toggle button to ON to enable the function.
b) Set the battery level on the slider bar below Start charging when battery capacity below:
to set the beginning of charging.
c) Set the battery level on the slider bar below Start charging when battery capacity reach:
to set the end of charging.
d) Click the Extended Battery Life ON/OFF toggle button to ON if you wish the system to
reduce heavy loading process to effectively extend the battery life.
Nexstgo Power Manager
With the Nexstgo Power Manager app, you can manage the power usage of the system. The
Power Manager app interface is divided into 2 tabs, such as Peak Shift (selected models only)
and Battery Maintenance.
Product Overview
USER’S MANUAL
l 21
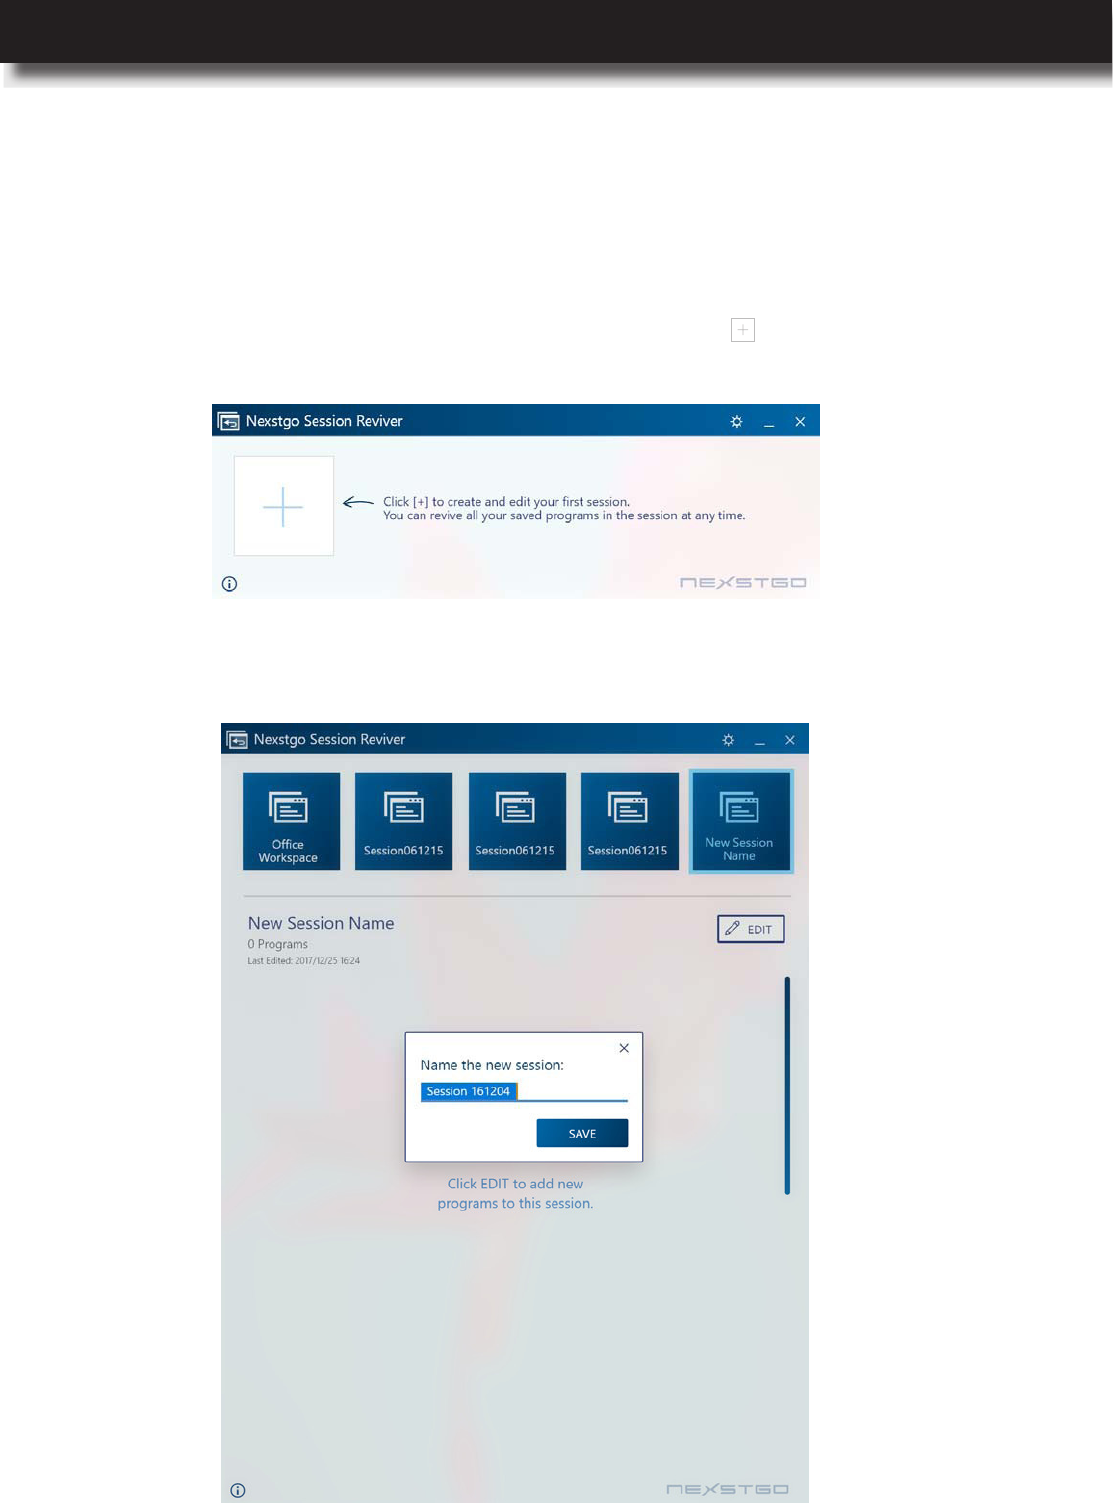
Nexstgo Session Reviver
With the Nexstgo Session Reviver app, you can quickly create session and revive to the saving
point on demand.
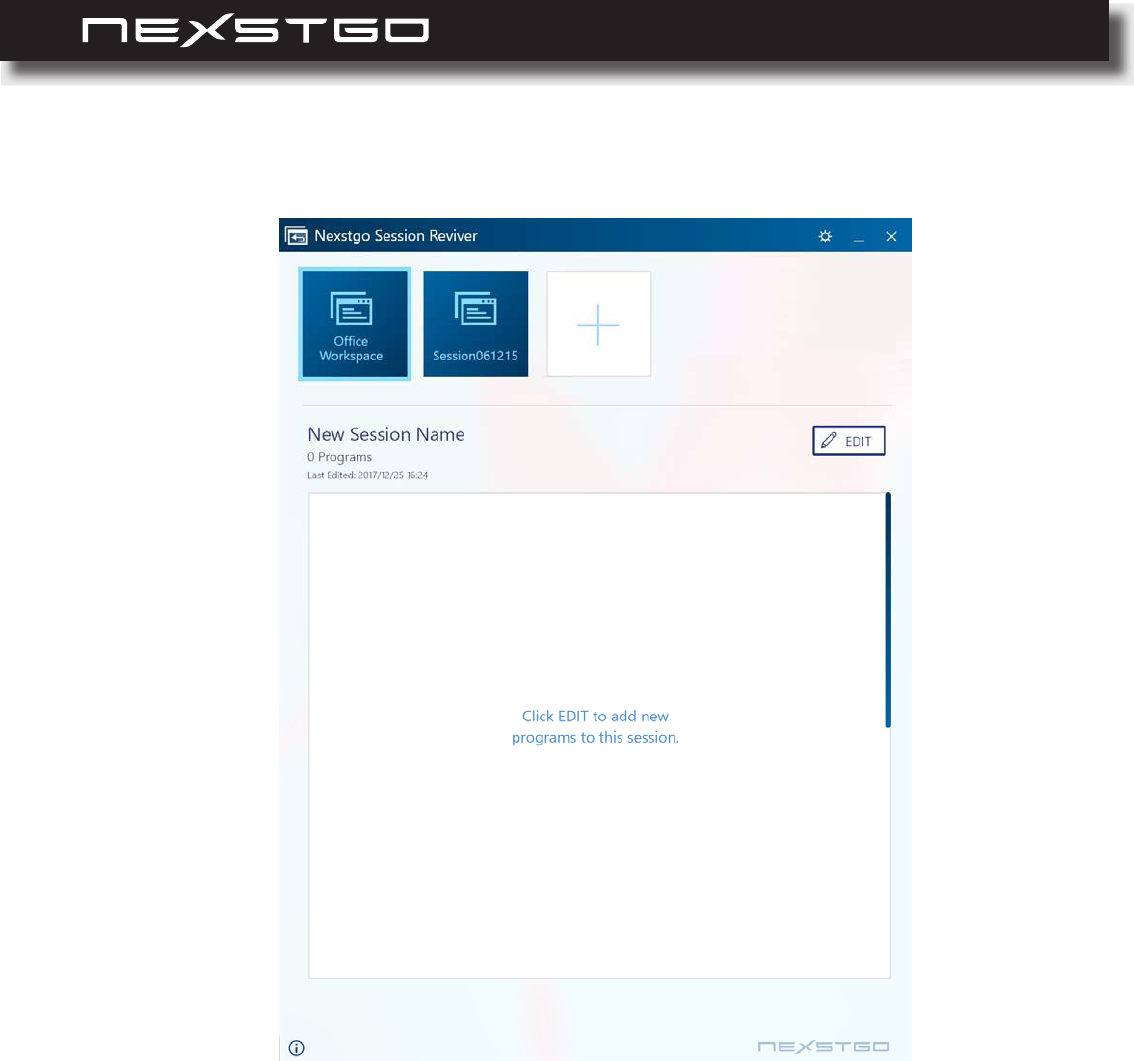
1 How to create/rename/remove a session:
1) When this is your rst time using this app, you have to click to create and edit for the
rst session.
2) Session Reviver will create a new session and popup window on the top for you to input
session name, then click on SAVE.
Product Overview
22 l
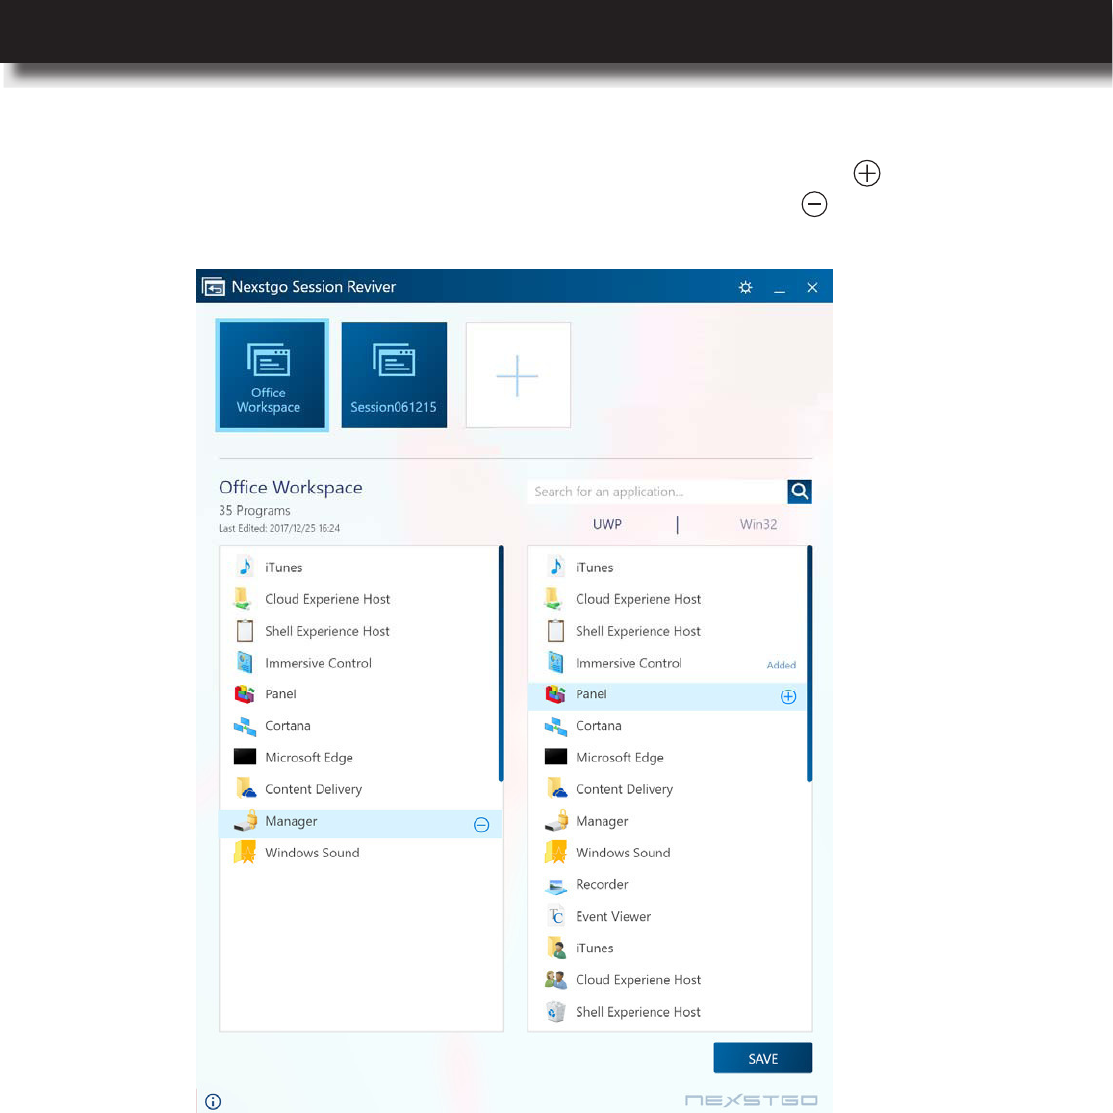
3) Click on to enter edit mode.
Product Overview
USER’S MANUAL
l 23
4) In edit mode, you can nd Win32/UWP application you want, and click to add to the
session. If you wish to remove added apps from your session, click will do the trick.
5) Click on SAVE to keep the setup.
6) If you wish to rename existed session, simply click pencil image on the bottom right corner
of the session.
7) If you wish to delete existed session, simply click recycle bin image on the bottom right
corner of the session.
Product Overview
24 l
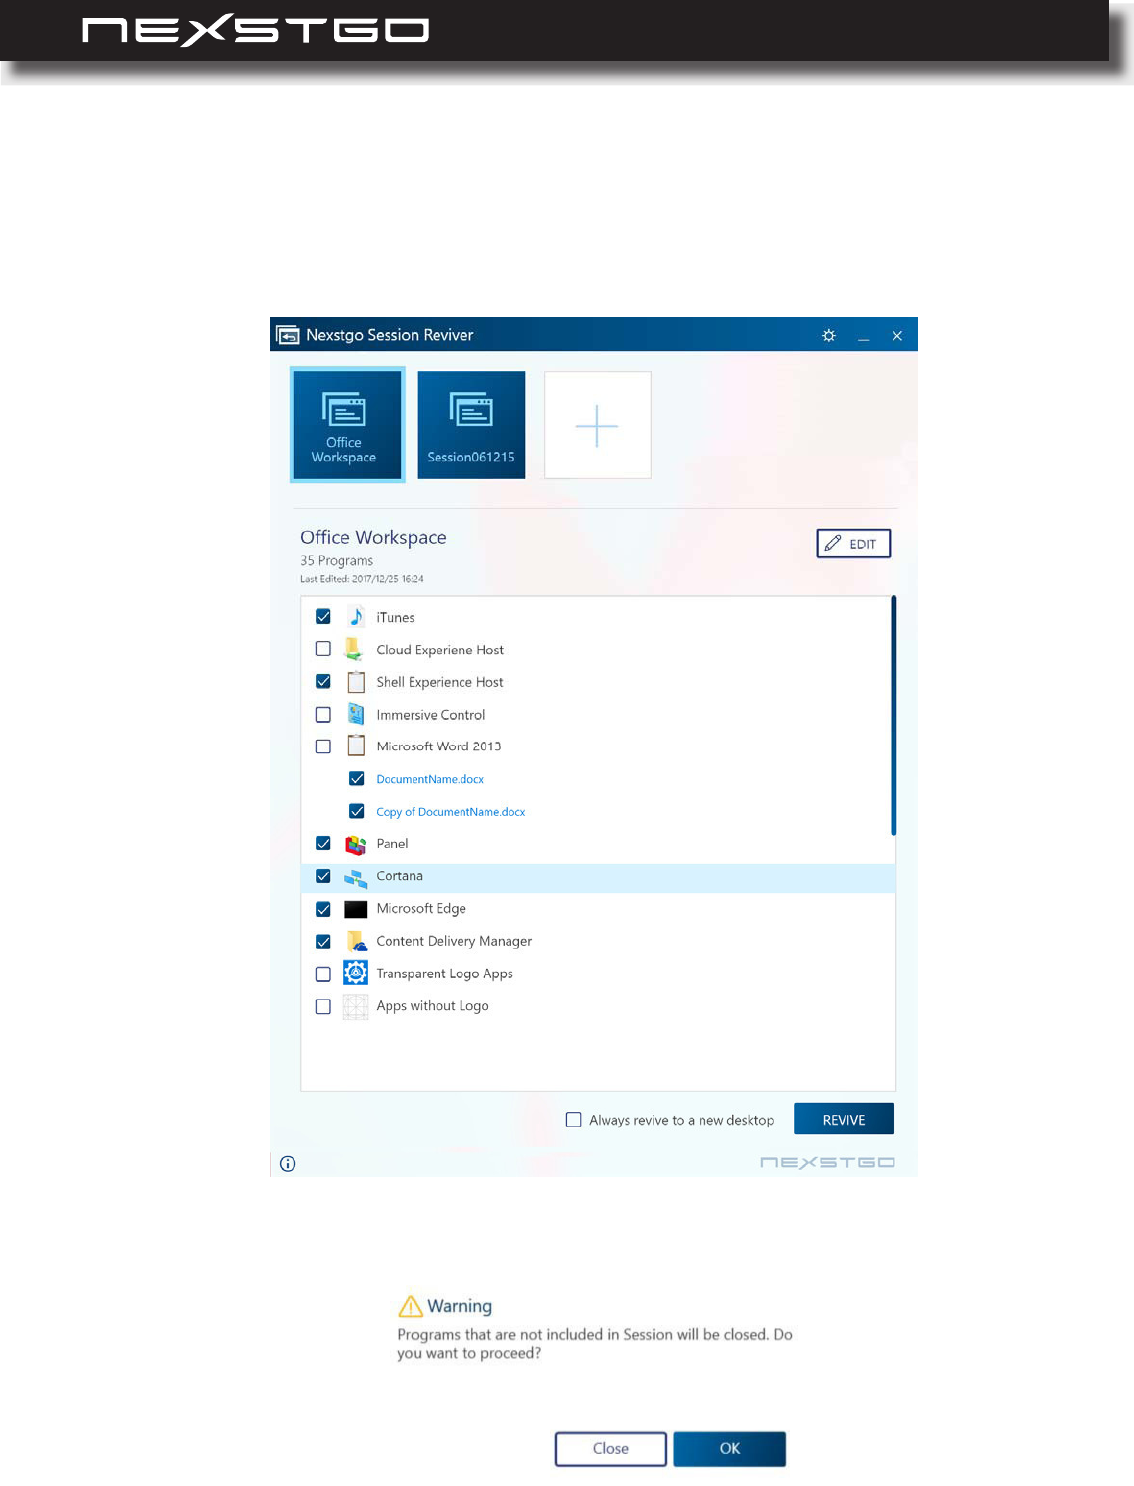
3) Click on REVIVE, and you will see a conrmation dialog as below:
We recommend you save data before reviving a session. Click on OK will revive your session.
2 How to revive a session:
1) Select an existed session.
2) There is a checkbox for each program, Session Reviver will only revive checked
programs.
Product Overview
USER’S MANUAL
l 25
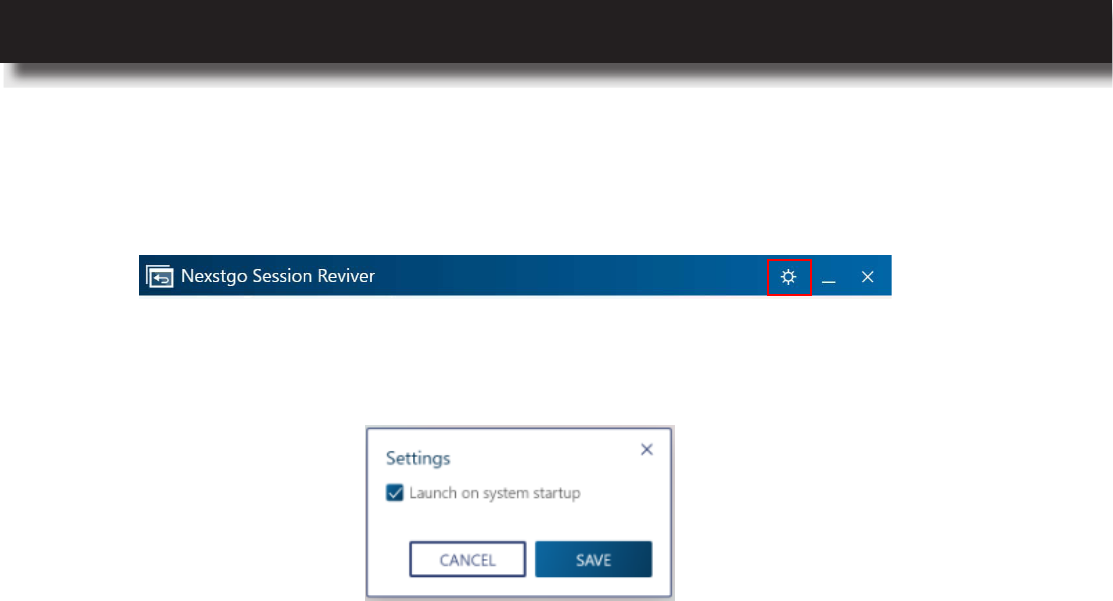
3 How to launch Session Reviver on system startup:
1) Launch Session Reviver app, and click Settings icon.
2) Setting window will pop out.
When the checkbox is checked, Session Reviver will be launched and minimized to the
system tray at Startup.
Product Overview
26 l
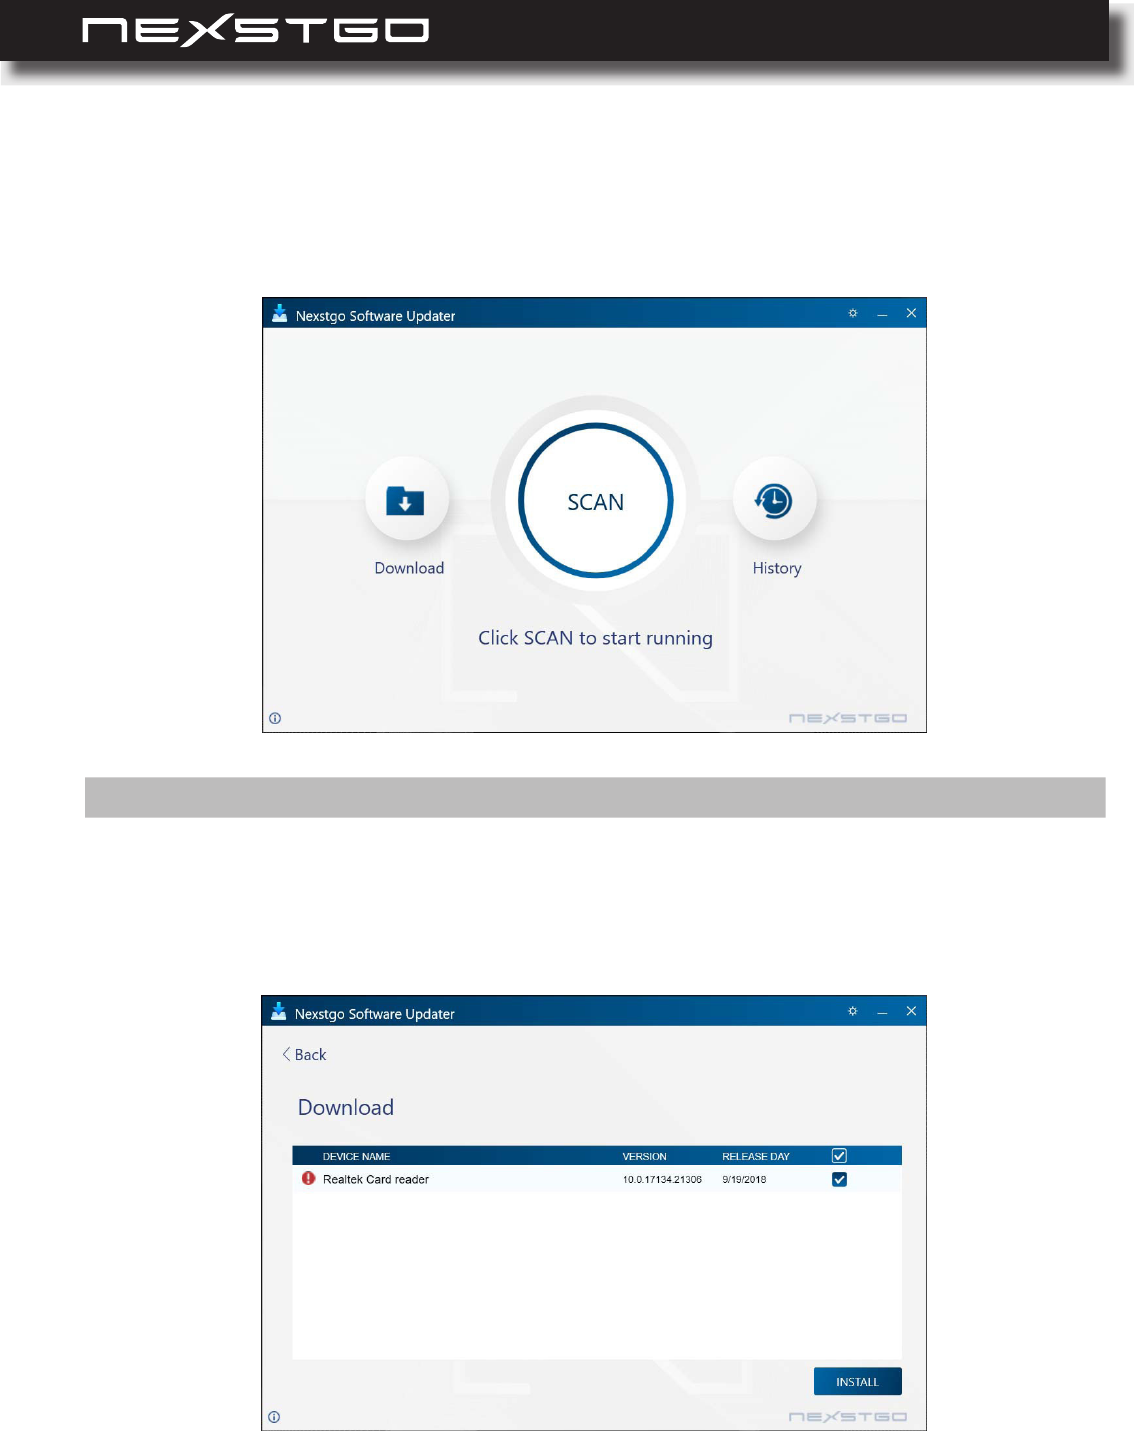
SCAN: Click on SCAN to start scanning for updated software. When the download is complete,
you will see a list of drivers and apps that have an updated version. Select the updates you
want to apply and then click INSTALL.
Nexstgo Software Updater
With the Software Updater app, you can scan and update the system and review outdated/
missing/incorrect drivers and apps of the system.
NOTE: Todownloadtheupdateddriversandapps,makesureyourcomputerisconnectedtotheInternet.
Product Overview
USER’S MANUAL
l 27
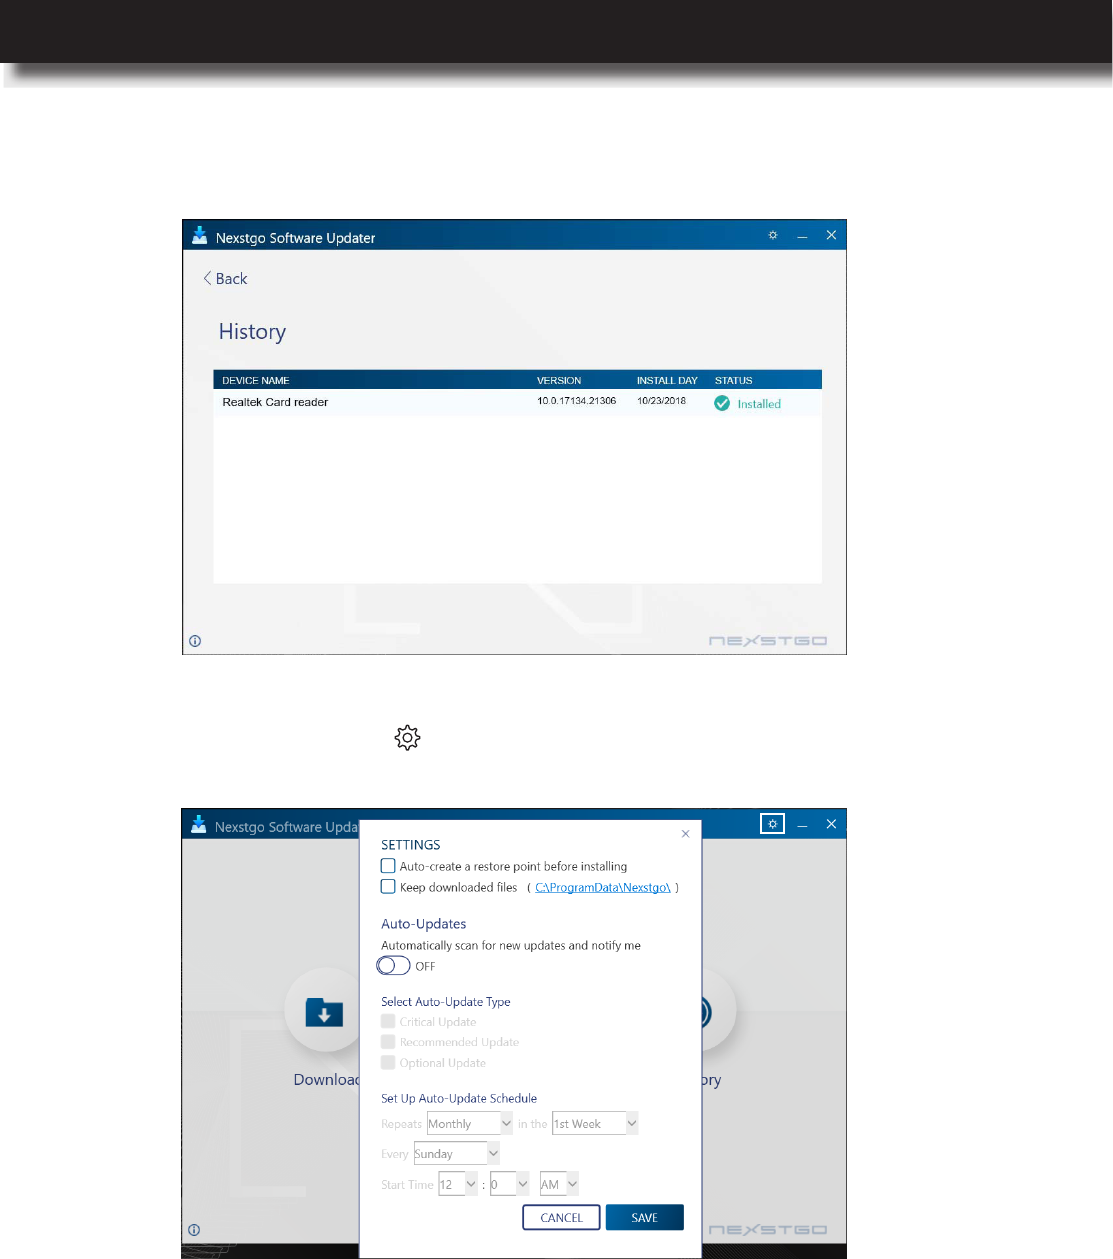
SETTINGS: Click on SETTINGS icon on the top right corner of the Software Updater to set
the download path for updated drivers and apps.
HISTORY: Click on HISTORY to review the update history.
Product Overview
28 l
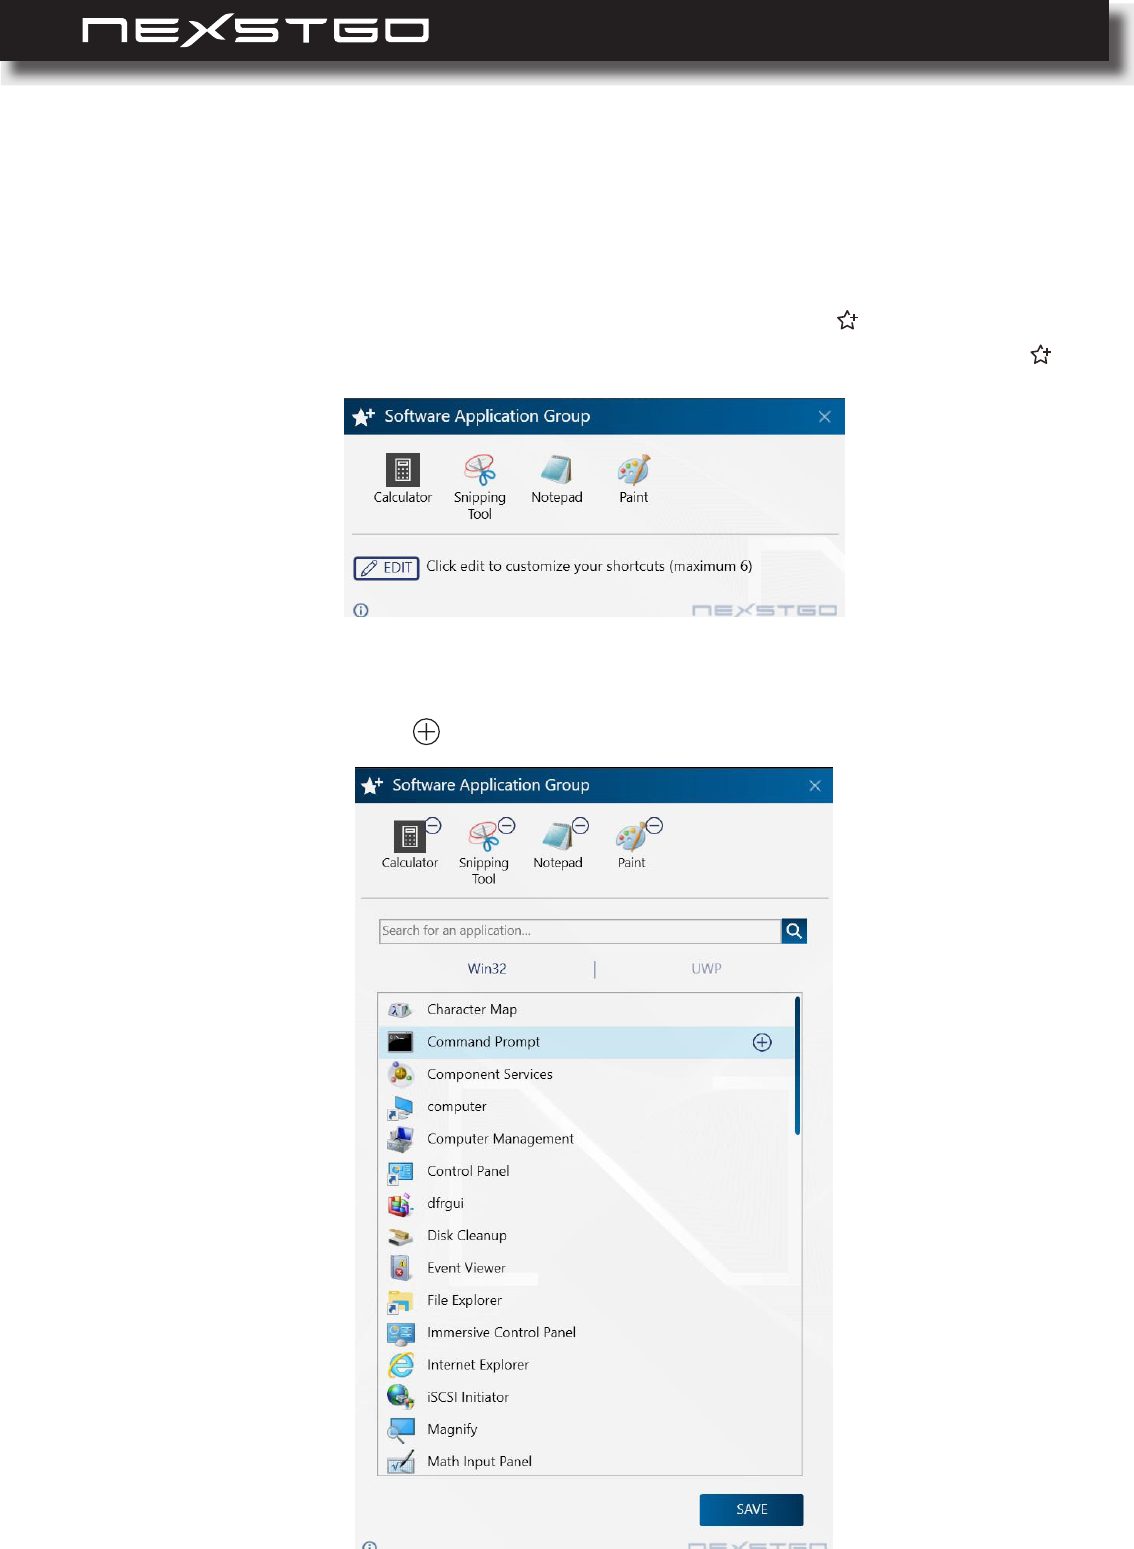
Nexstgo Software Application Group
With the Software Application Group app, you can add shortcuts of frequently used apps for
quick access.
1 Launches Software Application Group by using the following two methods:
1) When Fn is disabled, trigger the application by a single hotkey: F12
2)
When Fn is enabled, trigger the application by a combination of two hotkeys: Fn + F12
2 Add the application that you usually use:
1) Click on Edit to enter the Edit mode, select Win32/UWP you would like to add to the
group, and simply click .
Product Overview
USER’S MANUAL
l 29
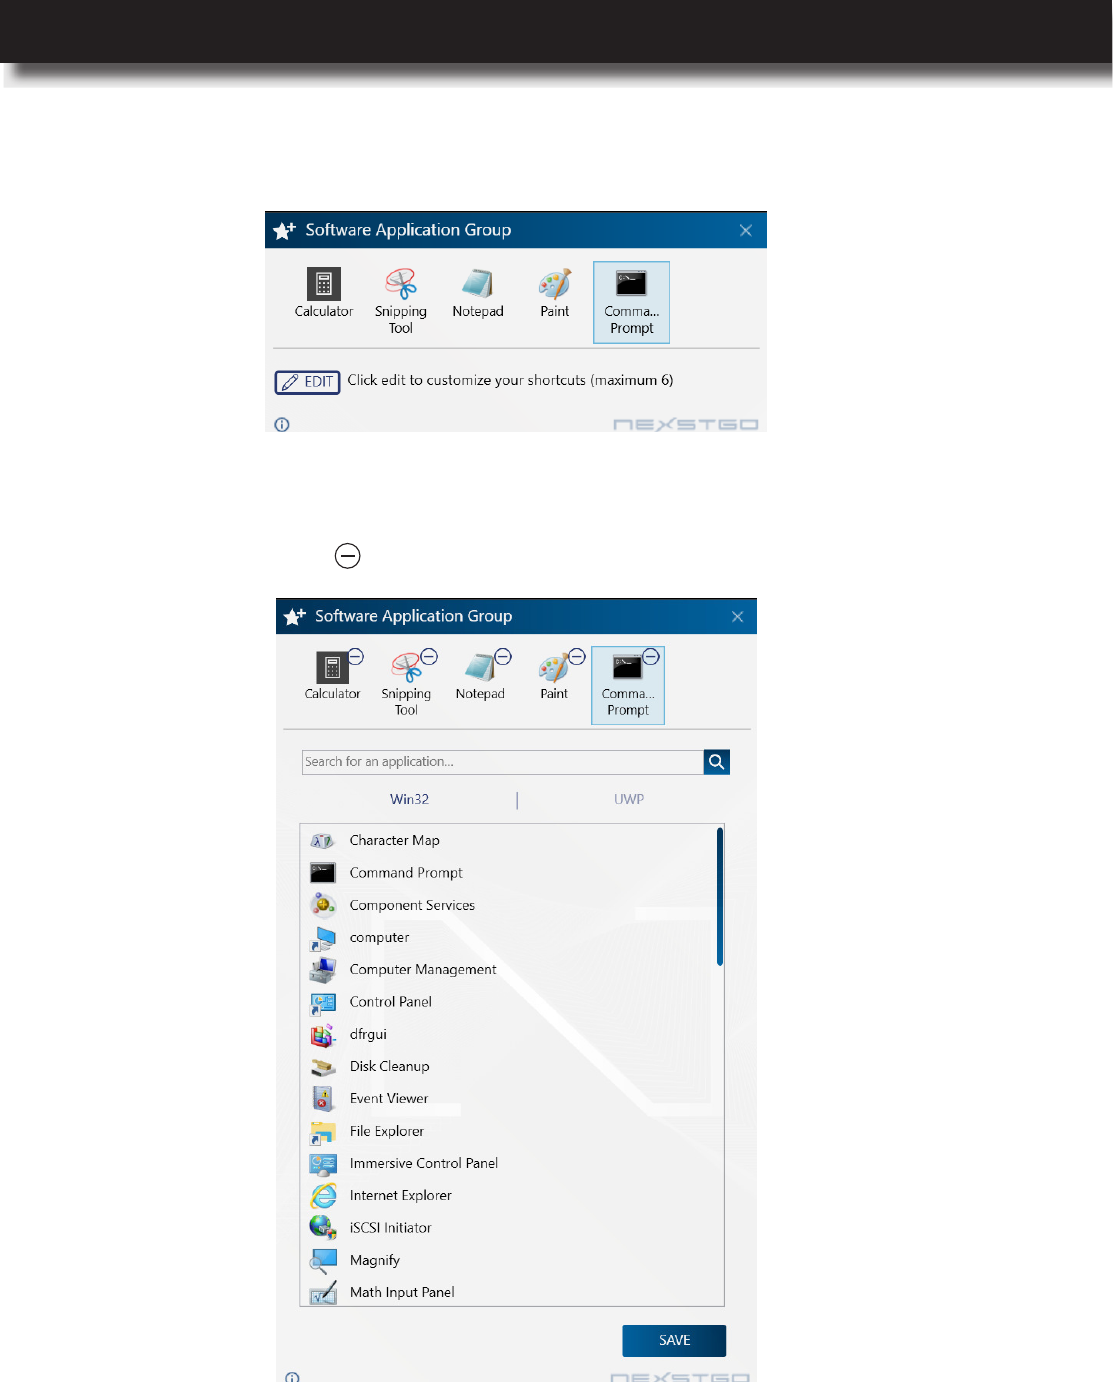
3 Remove the application:
1) Click on Edit to enter the Edit mode, select Win32/UWP you would like to remove from the
group, and simply click .
2) Click on SAVE to keep the setup.
2) Click on SAVE to keep the setup.
Product Overview

30 l
Operating System Information
Registering Your Computer
Windows 10 provides you with detailed information about using the operating system so that you
can get the most of your computer. To access the Windows help information system, do any of
the following:
We recommend you to register your computer. For registration, please visit our website at
www.nexstgo.com for more details.
Tap anywhere on the touchpad with three ngers or click on the icon on the taskbar to open
the Search bar. Then type your question to search.
Press the F1 function key to open the Windows 10 online help center.
In this chapter, you can nd information on the Windows 10 operating system and on various
features of your computer.
Using the Computer and
Basic Settings
2
NOTE: MakesureyourcomputerisconnectedtotheWi-Fi.
Open the Start menu and click on the Get Help app in the app list. Then type your question
to the search eld, and click .
Using the Computer and Basic Settings
USER’S MANUAL
l 31
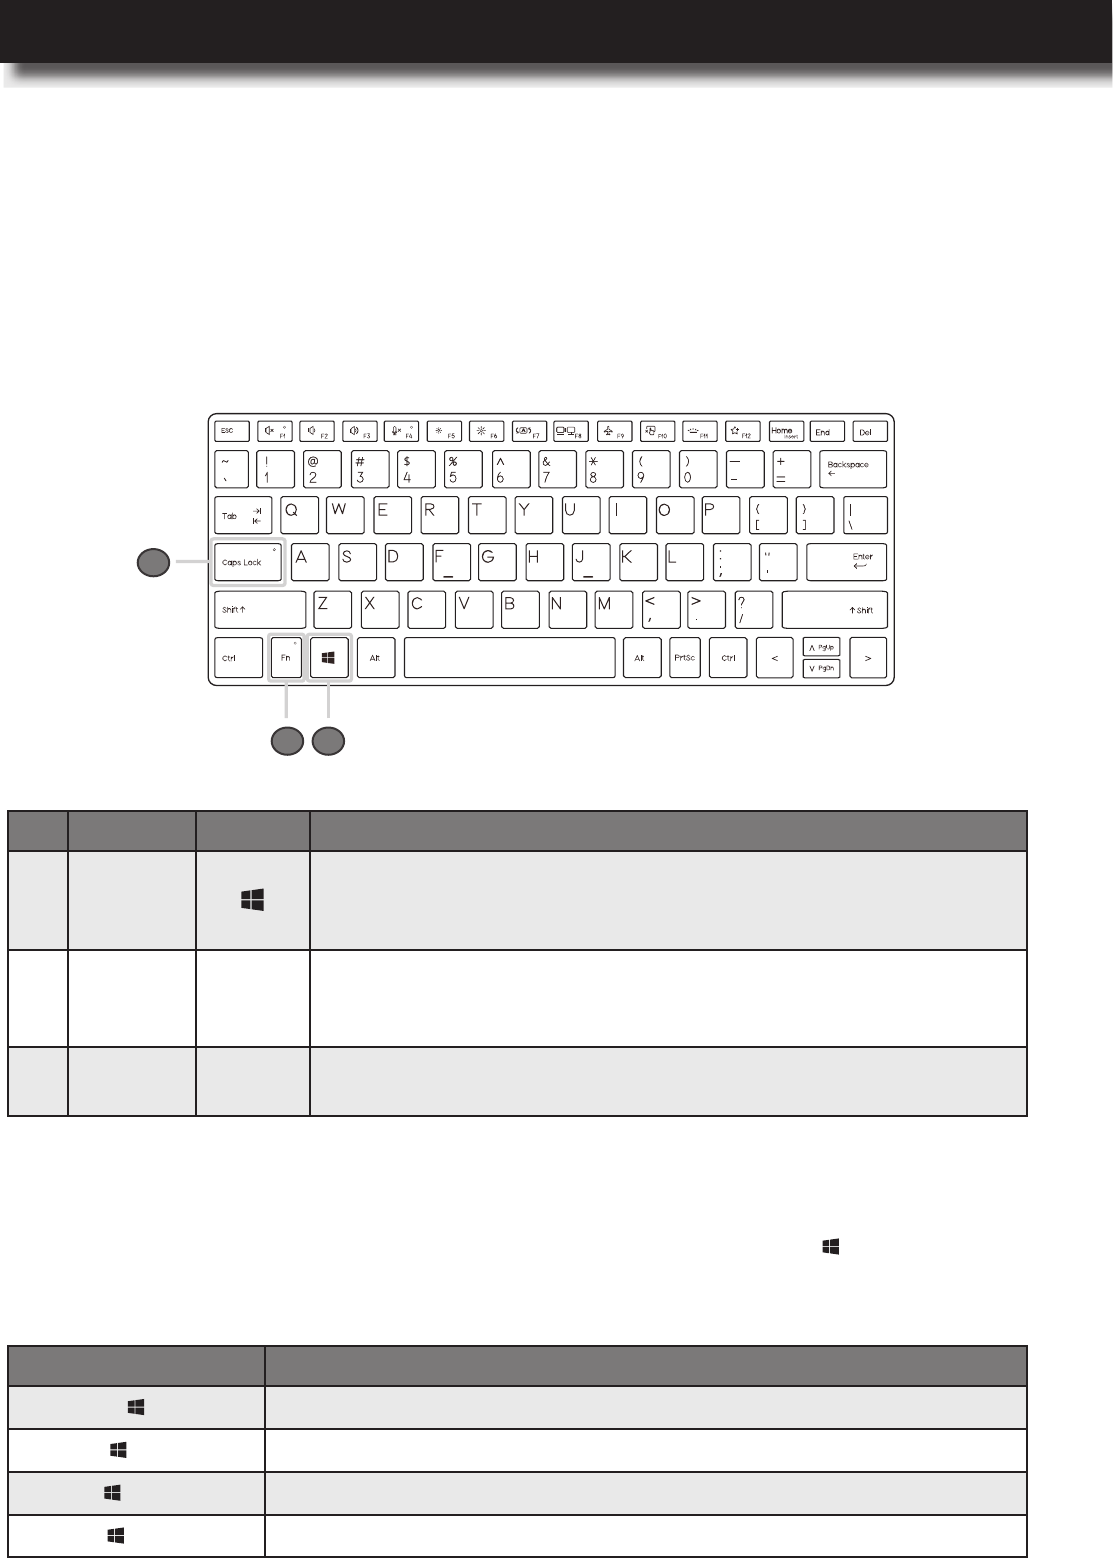
Keyboard Overview
Your computer has various special keys, such as Windows keys, multimedia keys, and more that
help you to work more smoothly and effectively. In this section, you can nd information on those
keys.
To use the Windows key combinations, you need to press the Windows key together with the
special key to perform the desired operation. The table below shows you the different functions
that the Windows key combinations can do:
Keyboard Basics
Windows Keys
No. Key Icon
1 Windows
Press to open or close the Start Menu.
When used with other keys, it provides a number of functions.
Please refer to “Windows Keys” on page 31.
2 Fn
Press to toggle the Fn lock key on or off to switch between
multimedia keys and default Windows function keys. Please refer
to “Multimedia Keys” on page 32.
3Caps
Lock
Press to toggle the Caps Lock key on or off. When on, all
alphabetic characters are typed in uppercase.
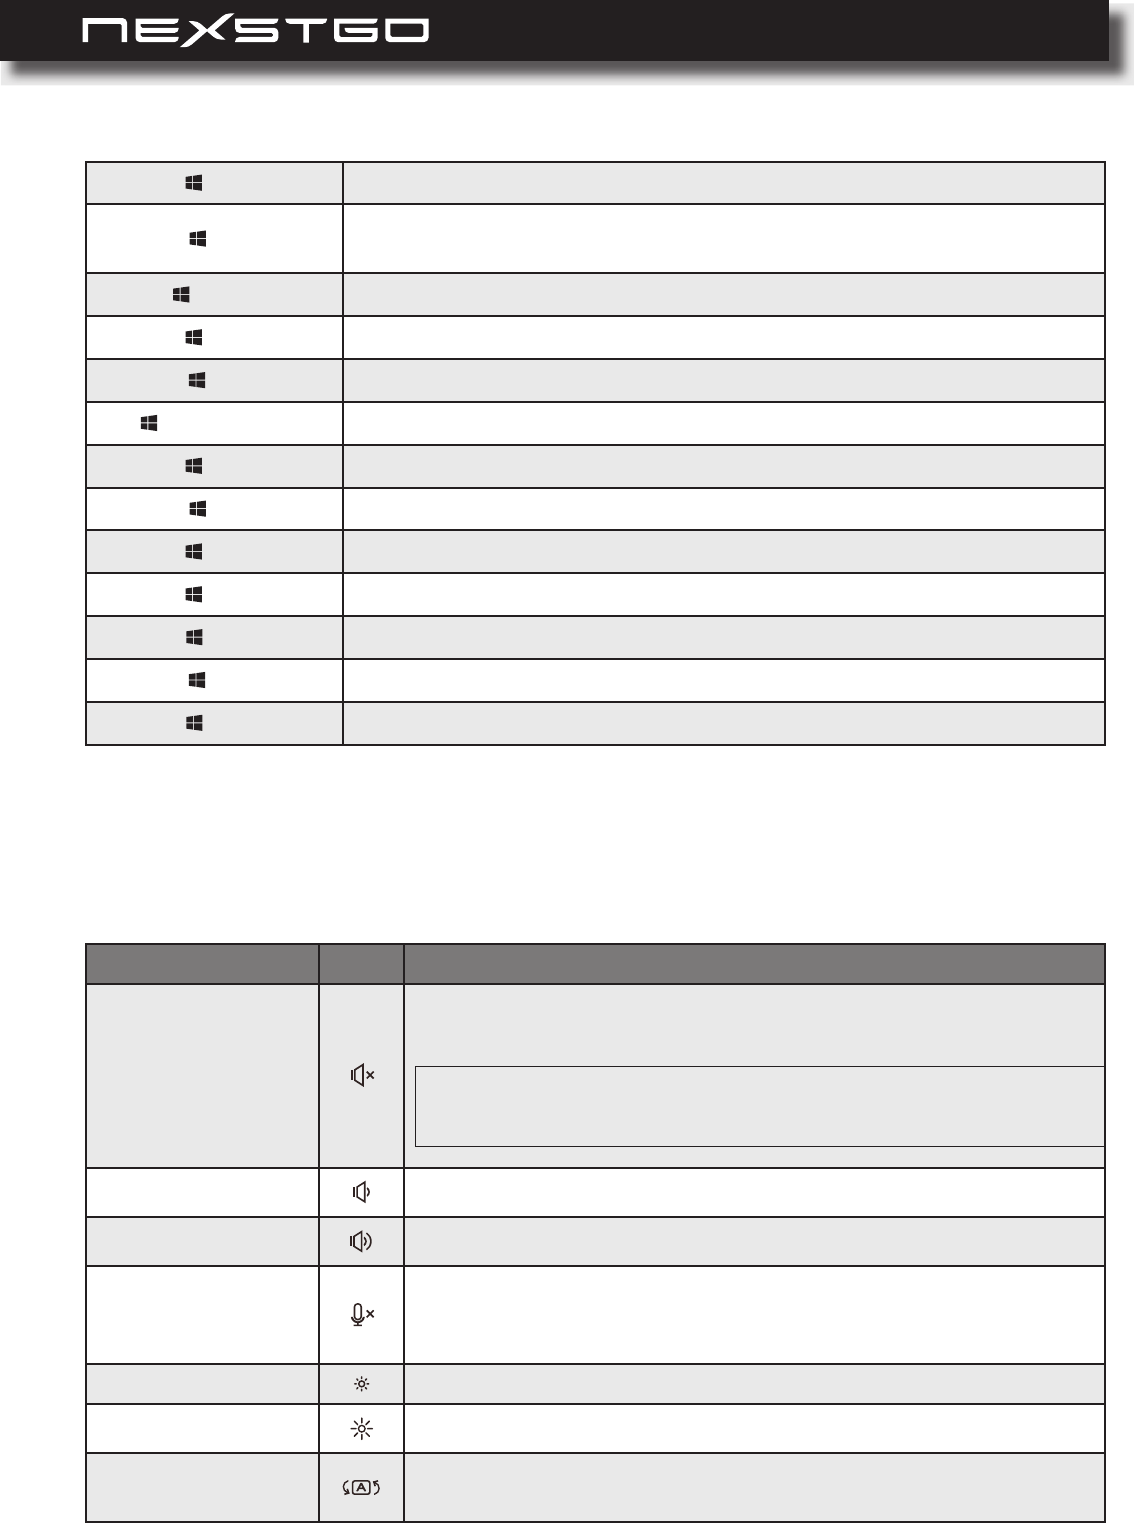
Key Combination
Opens or closes the Start menu.
+ r Opens the Run dialog box.
+ m Minimizes all open windows.
+ e Opens Windows Explorer.
12
3
Using the Computer and Basic Settings
32 l
+ d Shows the Desktop.
+ l Locks the computer. To access the computer, you need to re-enter the
password on the lock screen.
+ Tab Cycles through apps on the toolbar.
+ u Opens Ease of Access Center.
+ f Opens Feedback Hub.
+ Spacebar Switches between keyboard languages.
+ q Opens Search bar.
+ i Opens Windows Settings page.
+ a Opens Action Center.
+ h Starts speech recognition.
+ k Starts searching for nearby wireless displays and audio devices.
+ ; Opens Emojis page.
+ x Opens the Start menu with the right-click.
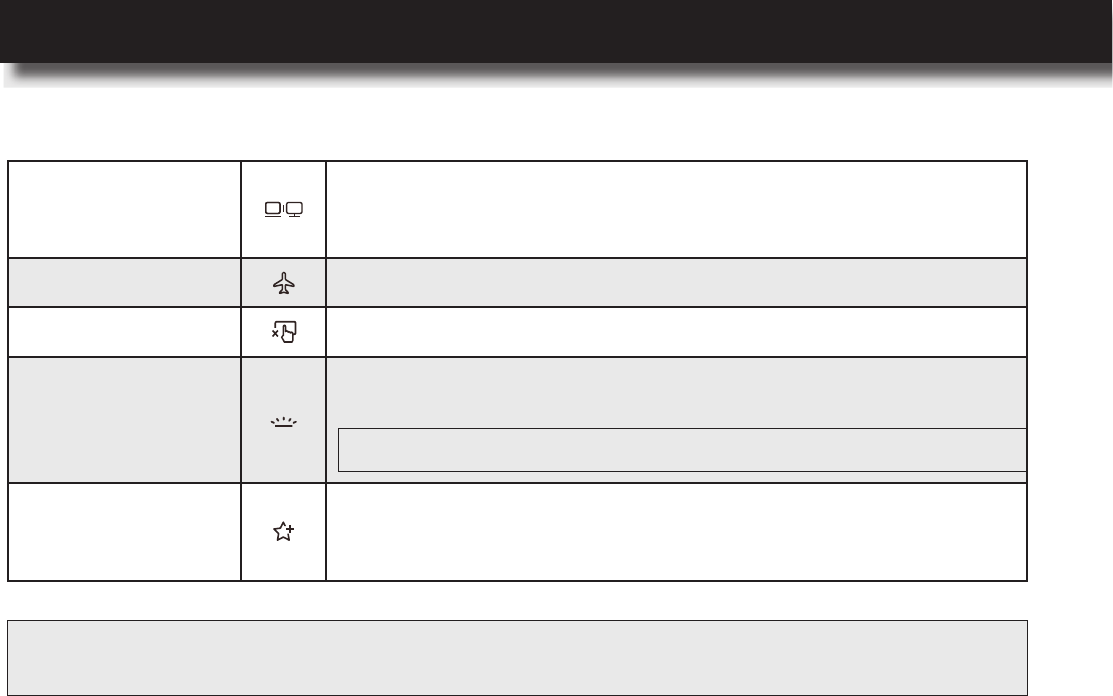
Your computer supports multimedia keys that function depending on the Fn lock key status. The
table below describes the available multimedia keys.
Multimedia Keys
Function Icon
Audio mute
Toggle key that mutes or unmutes audio. For key’s indicator
status, please refer to “Status Indicators and Lights” on page 11.
Volume down Decreases audio volume.
Volume up Increases audio volume.
Microphone mute
Toggle key that mutes or unmutes microphone. For key’s
indicator status, please refer to “Status Indicators and Lights” on
page 12.
Brightness down Decreases display brightness.
Brightness up Increases display brightness.
Display orientation
toggle
Toggle key that changes the display orientation 180° with each
keypress.
NOTE: Audiois automatically unmuted if you press the volume control
keys(F2)or(F3).
Using the Computer and Basic Settings
USER’S MANUAL
l 33
External display
control
Manages external displays. You can choose between the
following congurations: PC screen only, Duplicate, Extend, and
Second screen only.
Airplane mode Toggle key that turns the Airplane mode on or off.
Touchpad lock Toggle key that enables or disables the touchpad.
Keyboard backlight
Toggle key that turns the keyboard backlight on, brighter on, or
off in a sequence.
Nexstgo Software
Application Group
Opens the Nexstgo Software Application Group app where you
can add shortcuts of apps for quick access. Please refer to
“Nexstgo Software Application Group” on page 28.
NOTE: Thekeyboardbacklightfunctionisanoptionalfeature.
NOTE: TheFnlockkeyfunctioncanbemodiedintheSystem Conguration Utility > Setup Utility
> Advanced > Device Conguration > Fn Activate Function Key Default.
Using the Computer and Basic Settings
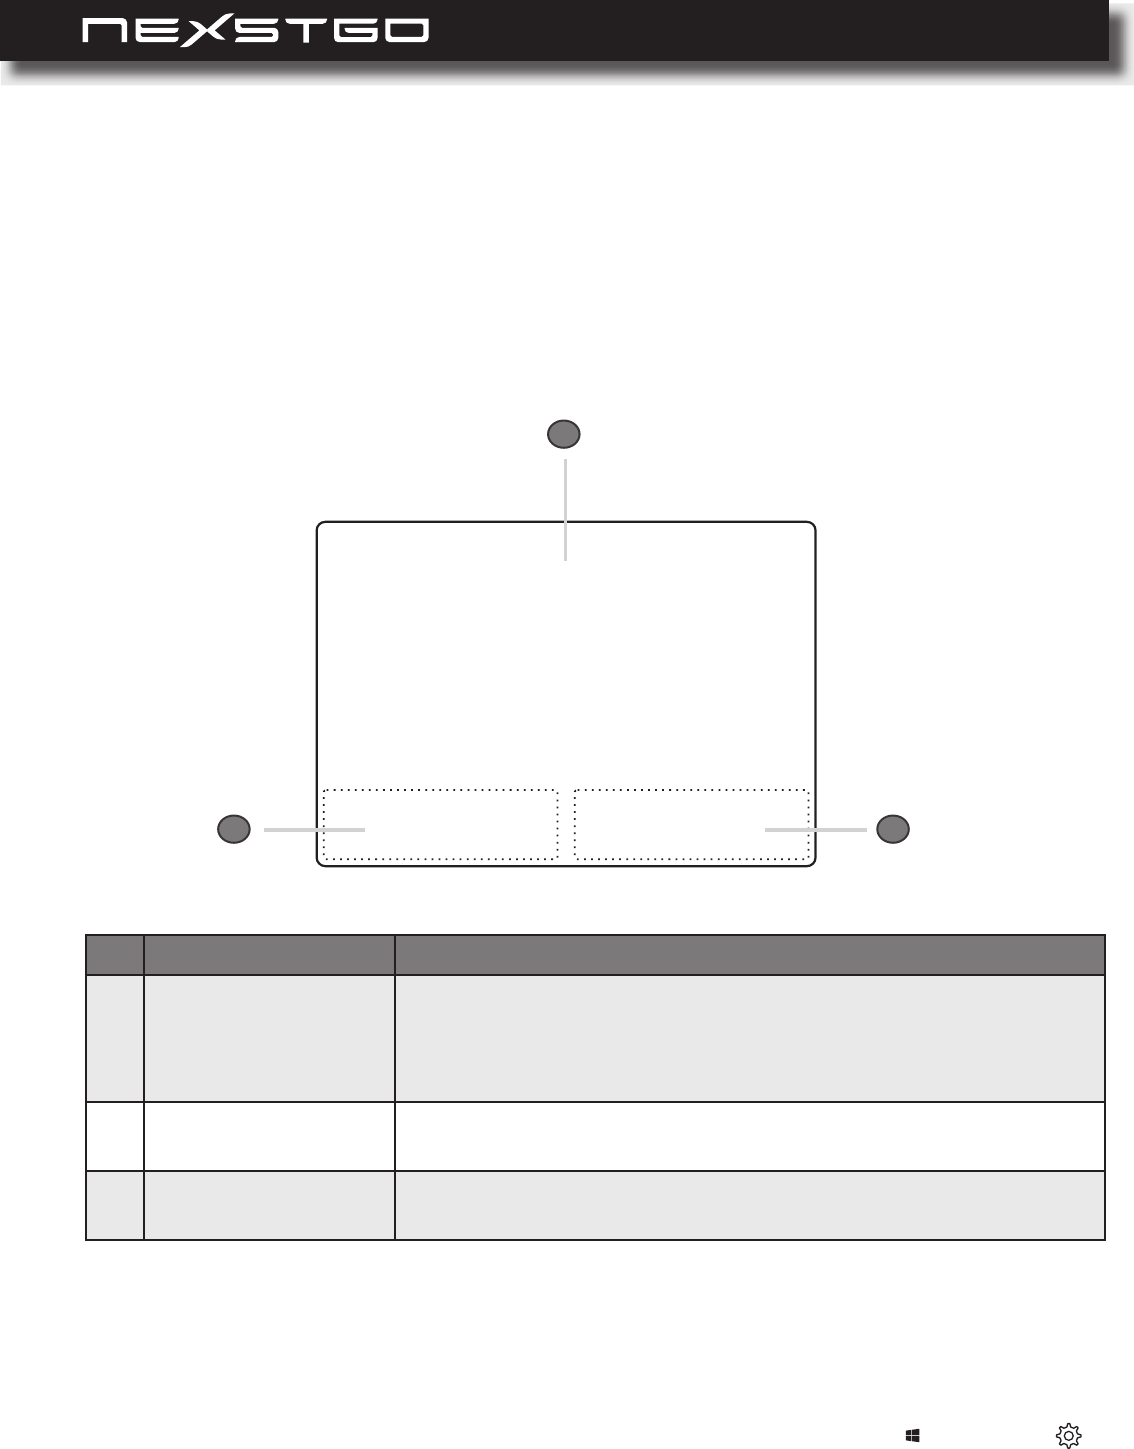
34 l
Touchpad Overview
You can use the touchpad to perform the same point and click actions as you would use a traditional
mouse. In addition, Windows 10 Precision Touchpad adds features, such as multi-nger gestures
that help you to operate the computer even more efciently.
Your computer supports Windows Precision Touchpad and all the related features. The table
below summarizes the default functions that can be performed using your touchpad. You can
customize the default gestures in the touchpad settings menu (Start menu > Settings >
).
Touchpad Basics
Using the Touchpad Gestures
No. Item
1 Touchpad
Move your nger across the touchpad to move the cursor on the
screen. Tapping on the touchpad is the same as clicking on the
left mouse button. For more advanced gestures, please refer to
“Using the Touchpad Gestures” on page 34.
2 Left touchpad button Press this area to select objects and execute function. It is
equivalent to the left button on a traditional computer mouse.
3 Right touchpad button Press this area to open contextual menus. It is equivalent to the
right button on a traditional computer mouse.
1
2 3
Using the Computer and Basic Settings
USER’S MANUAL
l 35
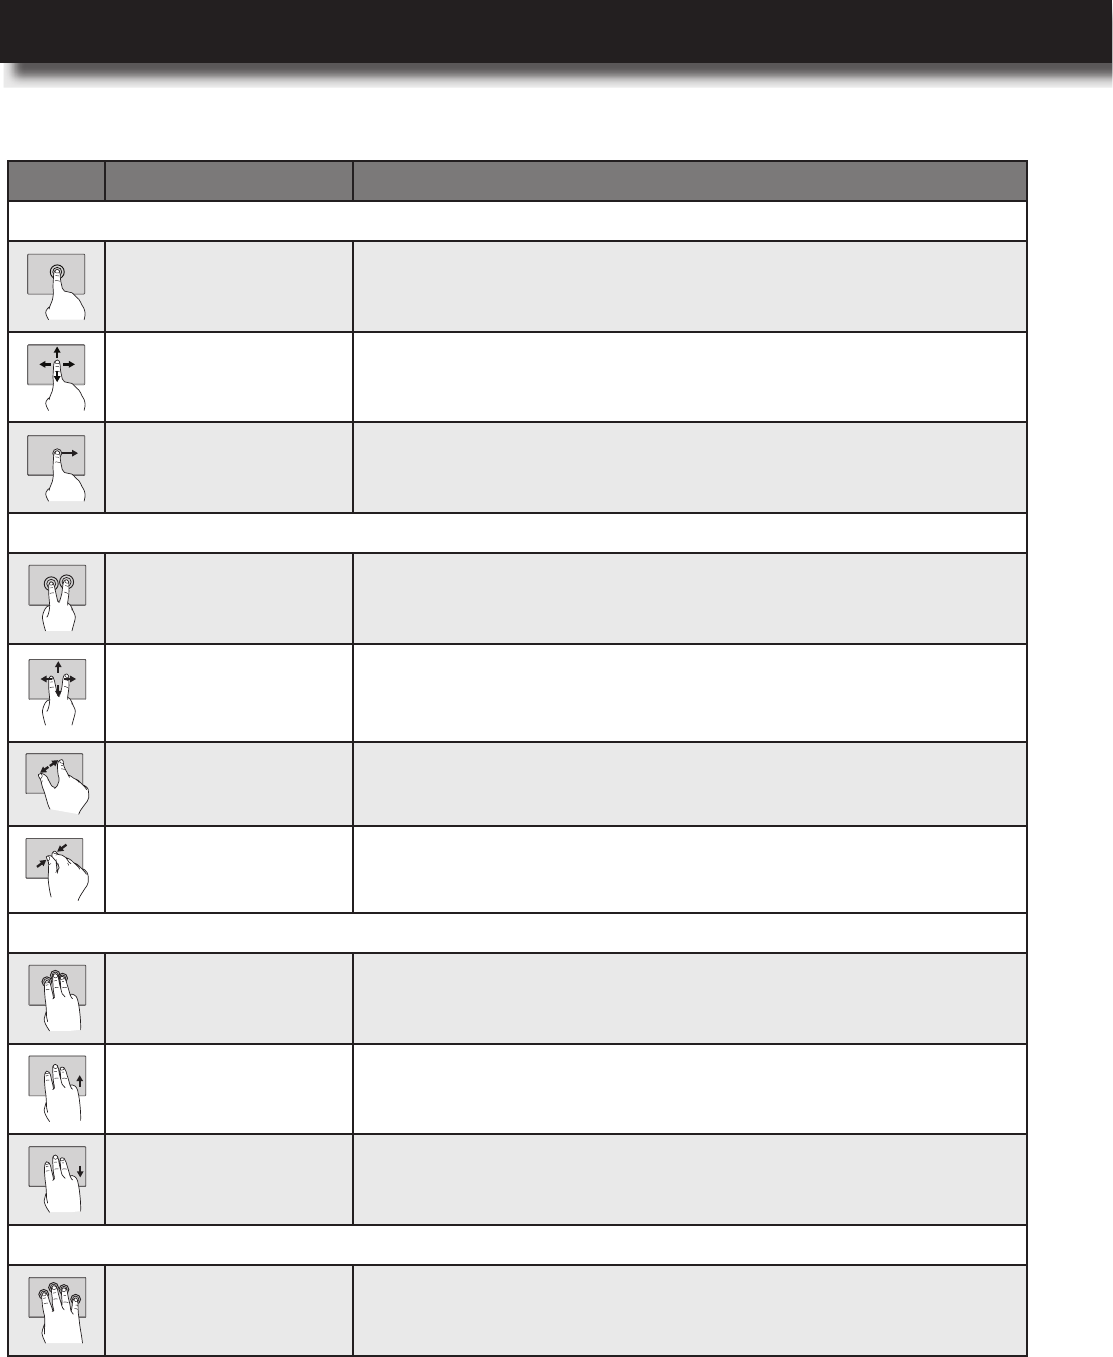
Action Function
1-nger actions:
Left-clicks or
Double-clicks
Tap once anywhere on the touchpad with one nger to select
an item or twice to open an item.
Moves cursor Press this area to open contextual menus. It is equivalent to
the right button on a traditional computer mouse.
Multi select Tap twice and then slide anywhere on the touchpad with one
nger to make a multi selection.
2-nger actions:
Right-clicks Tap once anywhere on the touchpad with two ngers to
display a shortcut menu.
Scrolls and pans
Put two ngers on the touchpad and move them up and down
or left and right to scroll while using apps that support vertical
and/or horizontal scrollbars. For example, a web browser.
Zooms in Put two ngers on the touchpad and move them farther apart
to zoom in.
Zooms out Put two ngers on the touchpad and pinch them together to
zoom out.
3-nger actions:
Activates Search bar Tap once anywhere on the touchpad with three ngers to
activate search bar.
Opens the task view Put three ngers on the touchpad and move up to view all
open windows.
Shows the desktop Put three ngers on the touchpad and move down to show
the desktop.
4-nger actions:
Opens Action Center Tap once anywhere on the touchpad with four ngers to open
the Action Center.
Using the Computer and Basic Settings
36 l
Power Management
In this section, you will nd information on how to use battery power and AC power to achieve the
optimal balance between performance and power consumption.
When your computer is up and running, it consumes power from the AC power adapter or from
the internal battery. While the AC power adapter is plugged in to the computer and to the electrical
outlet simultaneously, the battery starts charging automatically until the AC power adapter is
removed or the battery reaches a 100% of its power capacity. For battery charging purposes, your
computer comes with an AC power adapter and power cord. The AC power adapter converts the
AC power for computer use and the power cord supplies the electrical power for the AC power
adapter.
To start charging the battery, do the following:
1 Connect the power cord to the AC power adapter.
2 Connect the AC power adapter to the USB Type-C port on the computer.
3 Connect the power cord to an electrical outlet.
Connecting the AC Power Adapter
Using AC Power
When you are working with your computer away from the reach of the electrical outlets, your
computer depends on battery power to keep the system up and running. Different hardware
components inside your computer consume power at different rates. The more you use the most
power-consuming components, the faster the battery runs out of power. For information on saving
battery power, we recommend to use the Nexstgo Power Manager app. Please refer to “Nexstgo
Power Manager” on page 20 and “Power-Saving Modes” on page 38.
Using the Internal Battery
WARNING: Topreventelectricalshockandpersonalinjuries,useonlythesuppliedACpoweradapterandpower
cord.
NOTE: RecommendationsonusingtheACpoweradapterandpowercord:
−WhentheACpoweradapterisnotinuse,makesuretodisconnectitfromtheelectricaloutlet.
−AvoidbendingthepowercordandACpoweradaptercableexcessively.
Using the Computer and Basic Settings
USER’S MANUAL
l 37
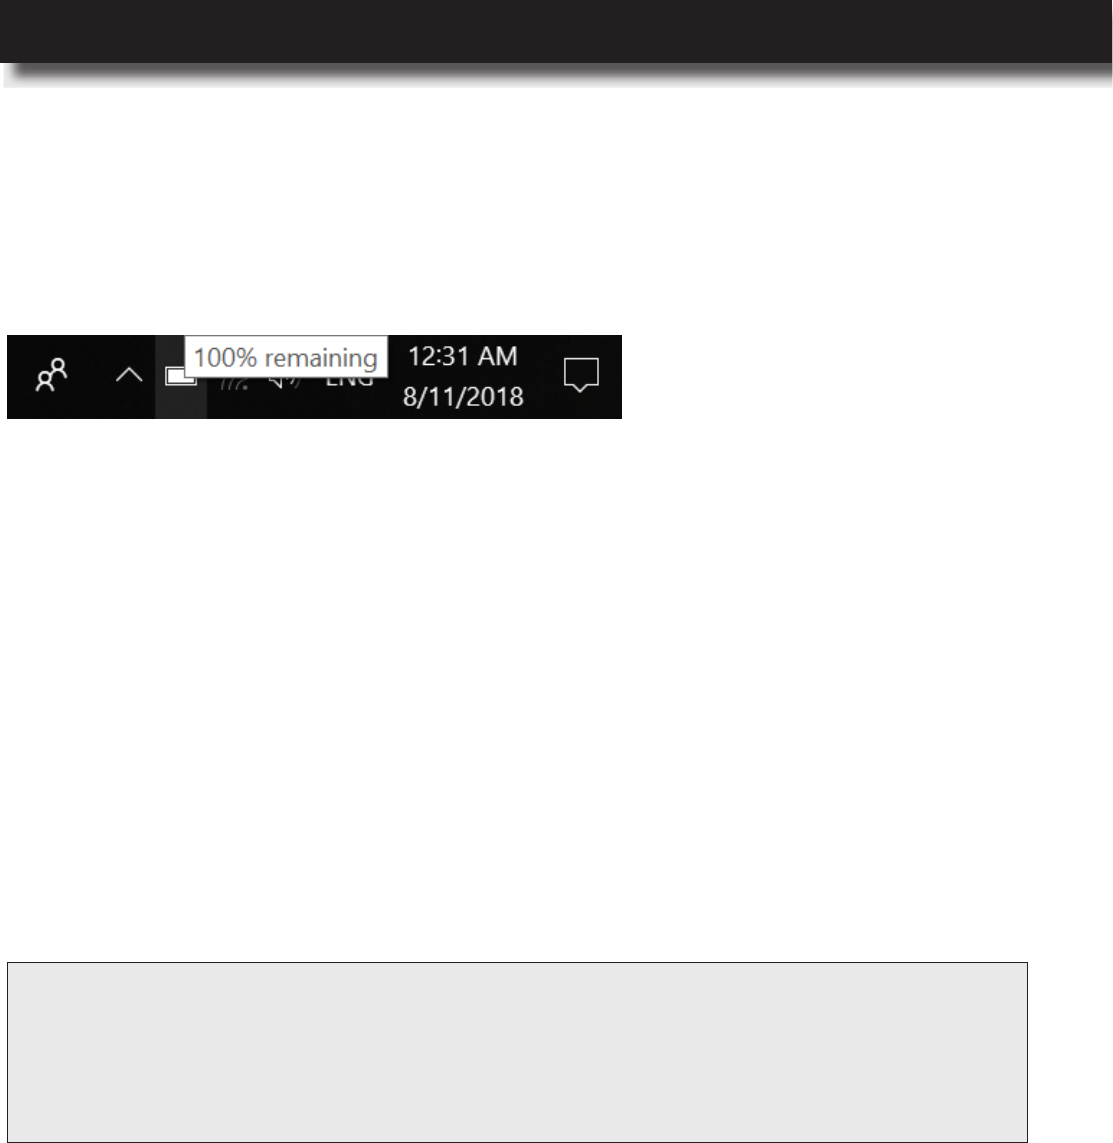
Move the cursor to the battery-status icon in the Windows notication area to check the remaining
battery power. The percentage displays the remaining battery power and how long you can use
your computer until you need to charge the battery again. In the following example, the battery is
fully charged:
When you see that the remaining battery power is too low, start charging the battery. If an
electrical outlet is available, follow the steps in “Connecting the AC Power Adapter” on page 28.
The charging time varies depending on the remaining battery power, environmental conditions,
and whether you are going to use the computer during charging or not. To monitor the battery
charging progress, you may check the battery power status any time through the battery-status
icon in the Windows notication area.
To achieve the optimal balance between the performance and power saving, we encourage you
to use the Nexstgo Power Manager app (please refer to “Nexstgo Power Manager” on page
20) or adjust the computer power plan using Windows utilities. To adjust the power plan using
Windows utilities, do the following:
With a full battery, the approximate working time of the computer can be up to 12 hours but the
actual battery life depends on many different factors. Some of them are listed as follows:
To start charging the battery, do the following:
1 Type “control panel” (without quotation marks) in search bar.
2 Click on the Control Panel in the Best match list.
3 Switch the view to Large icons or Small icons.
4 Click on the Power Options and then follow the onscreen instructions to customize the power
plan.
Monitoring the Battery Status
Charging the Battery
Managing the Battery Power
The apps that you are using. Some apps consume more battery power if they require to
access the storage drive frequently than others.
Computer settings, such as brightness. Maximum brightness consumes more battery power
than reduced brightness.
Availability of services. If you are using a wireless network with a poor signal, constantly
reconnecting to that network consumes more battery power.
NOTE: Recommendationsforchargingthebattery:
−Usethebatteryuntilthebatterypowerisdepleted.
−Beforeusingthebattery,makesuretochargethebatteryfully.
−UsetheNexstgo Power ManagerapporWindows10basedpower-savingfeaturesandmodes
tooptimizethepowerconsumption.
Using the Computer and Basic Settings
38 l
There are different power-saving modes available in Windows 10 for you to choose from. The
following is a brief introduction of each mode.
Power-Saving Modes
Sleep mode:
During sleep mode the computer saves your work to the memory while the storage drive
and the display are turned off. When your computer wakes up, your work is restored in a few
seconds.
Hibernation mode:
The advantage of the hibernation mode is that you can turn off your computer without the
need to save any les or exit any apps that are running. When the computer enters the
hibernation mode, all the information concerning the open les, folders, and apps are saved
to the storage drive, and then the computer turns off.
To put your computer to hibernation mode, set When I press the power button: to Hibernate
in Power Options menu. Please refer to the note in “Power button” on page 8.
If you put your computer into hibernation mode with the feature wake-up function disabled
(default), then the computer does not consume any power. If you have enabled the wake-up
function, then the computer consumes some amount of power.
Wireless function off:
If you are not using the wireless features, either wireless network or Bluetooth, then turn them
off to reduce power consumption.
To put your computer to sleep, open the Start menu , click Power, and then click
Sleep.
NOTE: Whenthecomputerwakesupfromthesleepmode,youaredirectedtothelockscreenandare
promptedtoenteraloginpassword.Ifyouwanttoremovethepasswordrequirement,openthe
Start menu ,clickSettings > Accounts > Sign-in options,andsettheRequire
sign-inparametertoNever.
Using the Computer and Basic Settings
USER’S MANUAL
l 39
Wireless Connections
Using Network Connections
In this section, you will nd information on connecting your computer to the wireless network.
Wireless networking is a method by which the data is transferred using radio waves only instead
of using cables.
Your computer is able to connect automatically to the available and remembered WLAN when
your location changes.
A wireless local area network (WLAN) covers relatively limited geographic area, such as home or
an ofce building. All devices that support the standard protocol 802.11 are usually compatible to
connect to such type of network.
Your computer is equipped with an internal wireless network card that helps you to establish
wireless connections and monitor connection status. To establish WLAN connection, do the
following:
Using the Wireless-LAN Connection
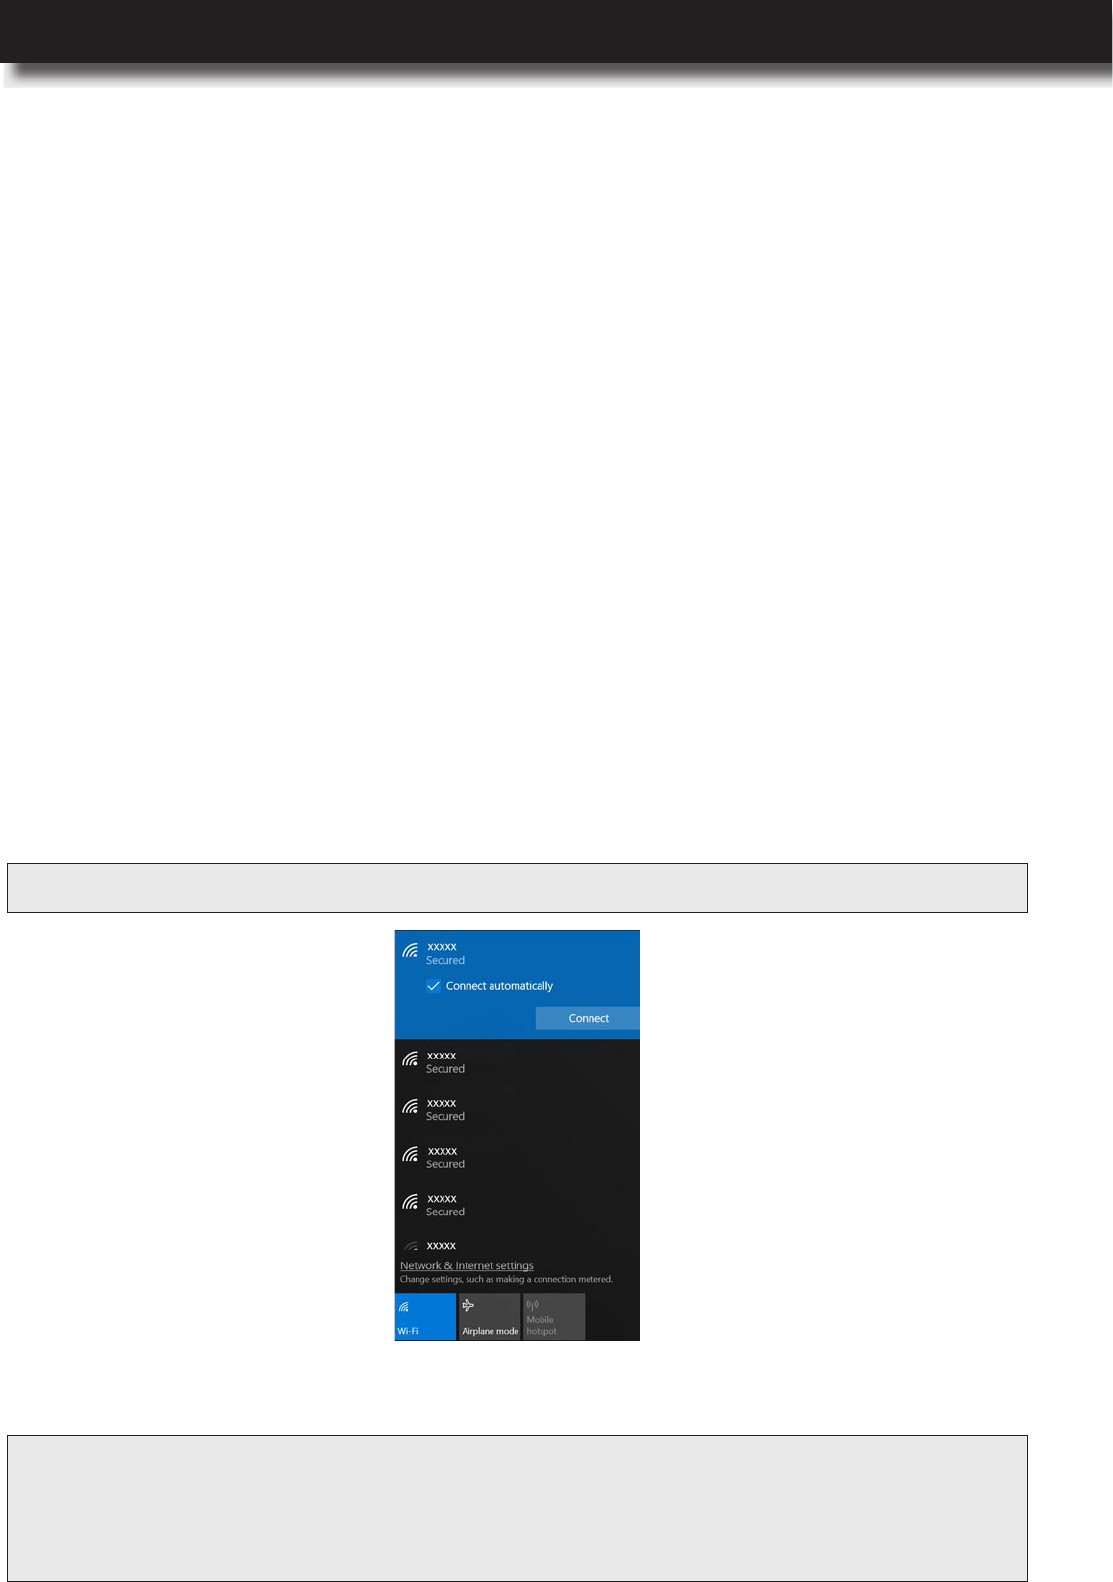
1 Click on the Internet access icon in the Windows notication area to open the wireless network
connection page.
2 Click on the Wi-Fi tab to turn on the WLAN function. When turned on, the tab becomes blue
color.
3 Select the network and double-click on it to perform the connection. Then wait until the
connection is established.
NOTE: Ifthewirelessnetworkyouwanttoconnecttoissecured,youarepromptedtoenterapassword.
NOTE: RecommendationsforWLAN:
− Toensurethebestwirelesssignal,makesuretherearenotanyobstaclesbetweenyourcomputerand
theWLANaccesspoint.
− Keepthelidofyourcomputeropenedslightlyover90°.
Using the Computer and Basic Settings
40 l
Bluetooth enables you to connect devices that are within a short distance from each other. Usually
Bluetooth is used in the following situations:
The Bluetooth connection is established and you can start exchanging information between your
computer and the connected device.
Nexstgo PRIMUS NX301 Bluetooth device
Creating a Bluetooth Connection
Connecting peripheral devices to a computer, such as Bluetooth printers, Bluetooth mouse/
keyboard, and more.
Exchanging data between portable devices and a personal computer.
Remotely communicating with Bluetooth-capable devices, such as cellphones.
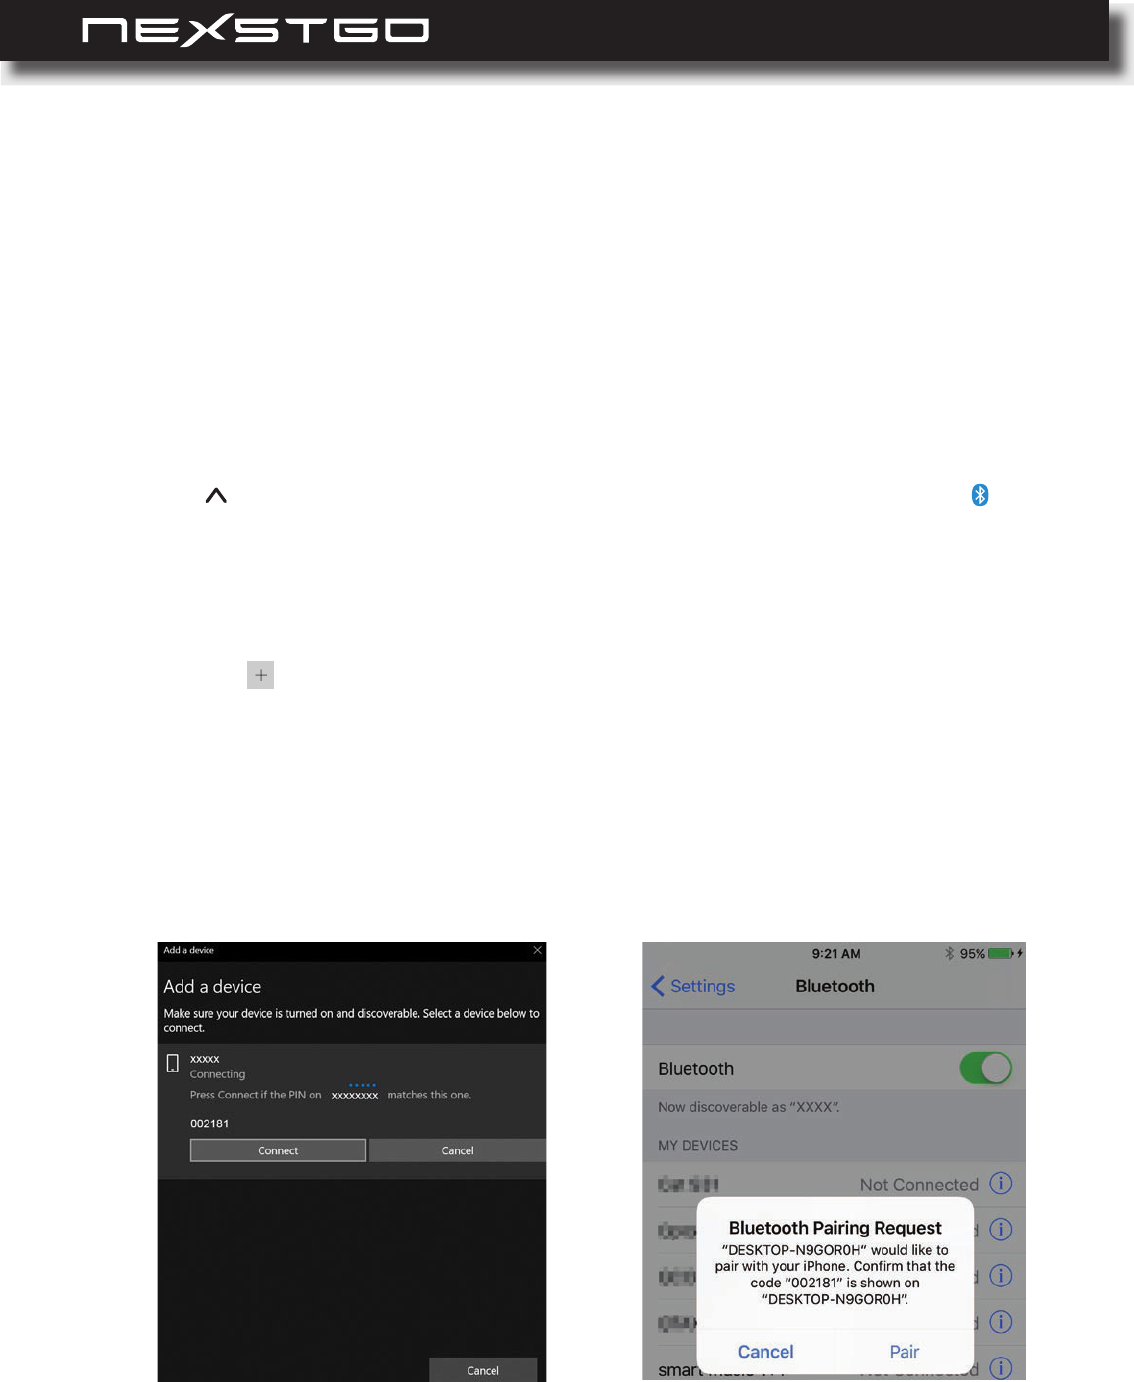
To set up Bluetooth connection between your computer and another Bluetooth device, do the
following:
1 Click on Show hidden icons in the Windows notication area and then click on Bluetooth
.
Bluetooth & other devices page opens.
2 Make sure the Bluetooth function is set to On and the device you want to connect to is located
nearby your computer.
3 Click on the icon. Add a device page opens.
4 Click on the device category you want to connect to, for example Bluetooth.Your computer
starts searching for compatible devices.
5 When the device is found, click on the device to initiate pairing.
6 Verify the pairing code on both devices and conrm the pairing.
Using the Computer and Basic Settings
USER’S MANUAL
l 41
To turn on the airplane mode, press the (F9) multimedia key on the keyboard. Press the (F9)
multimedia key again to turn off the airplane mode.
When you are in an airplane or in an area where using the mobile data is not allowed, you can
turn on airplane mode.
When the airplane mode is turned on, all your wireless connections are disabled automatically.
While in airplane mode, you can use other features of your computer, such as playing music,
watching downloaded videos, or other apps.
Using the Airplane Mode
WARNING: Toavoidhealthhazards,turnoffallwirelessconnectionsonyourdeviceinhealthcarefacilities
whenanyregulationspostedintheseareasinstructyoutodoso.Hospitalsorhealthcarefacilities
maybeusingequipmentthatcouldbesensitivetoexternalRFenergy.
Using the Computer and Basic Settings
42 l
Conguring Audio Settings
Using Audio Features
Your computer has the following audio features:
To mute/ unmute volume, adjust volume level, or mute/ unmute microphone, use the keyboard
multimedia keys. Please refer to “Multimedia Keys” on page 25.
To congure advanced audio settings, do the following:
Audio connector, 3.5 mm (0.14 inch) in diameter, audio input/output function
Built-in microphones
Four speakers
Your computer is also compatible with the following multimedia audio features:
High Denition (HD) Audio
Playback of MIDI and MP3 audio les
Recording and playback of PCM and WAV les
Recording from different sound sources
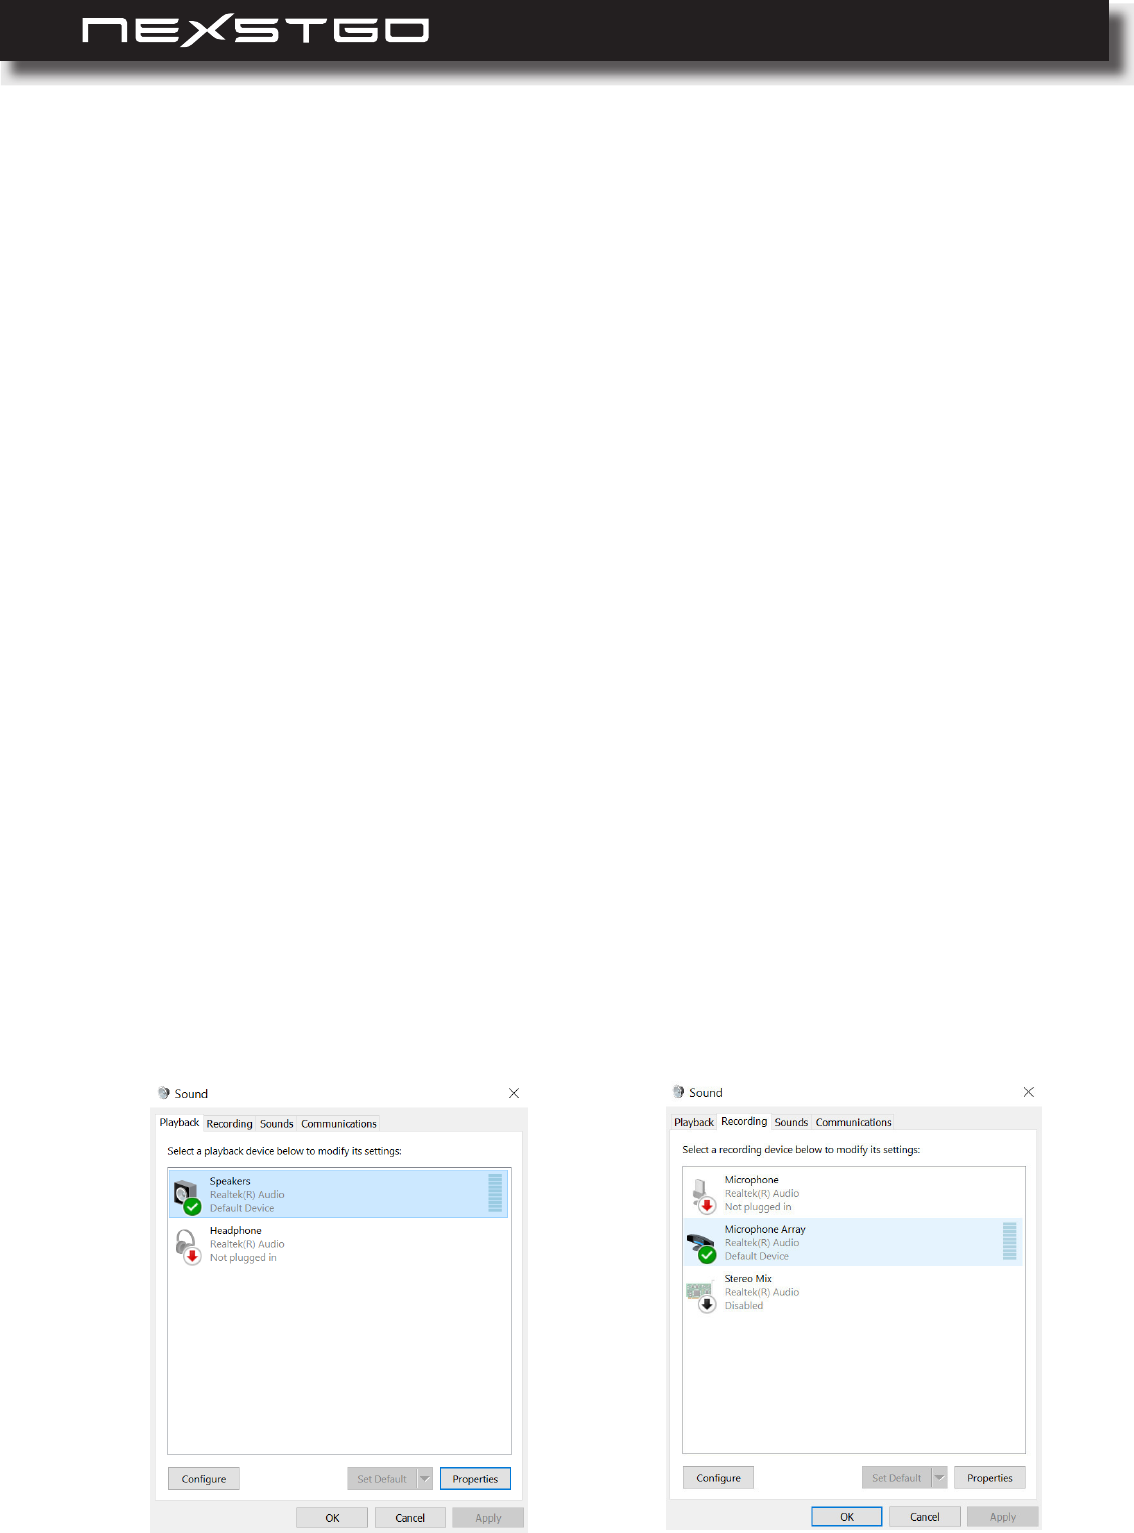
1 Type “control panel” (without quotation marks) in search bar.
2 Click on the Control Panel in the Best match list.
3 Switch the view to Large icons or Small icons.
4 Click on the Sound icon. The Sound app opens.
5 Click on any of the following tab:
– Speakers: Adjust the main volume, set the default format, and more.
– Microphone Array: Adjust the recording volume, congure the microphone effects, set the
default format, and more.
Using the Computer and Basic Settings
USER’S MANUAL
l 43
Using the Camera
Your computer has a built-in camera that enables you to capture images and record videos. You
can also use the integrated camera with other apps that enable you to hold video conferences,
and more.
To start using the camera, do the following:
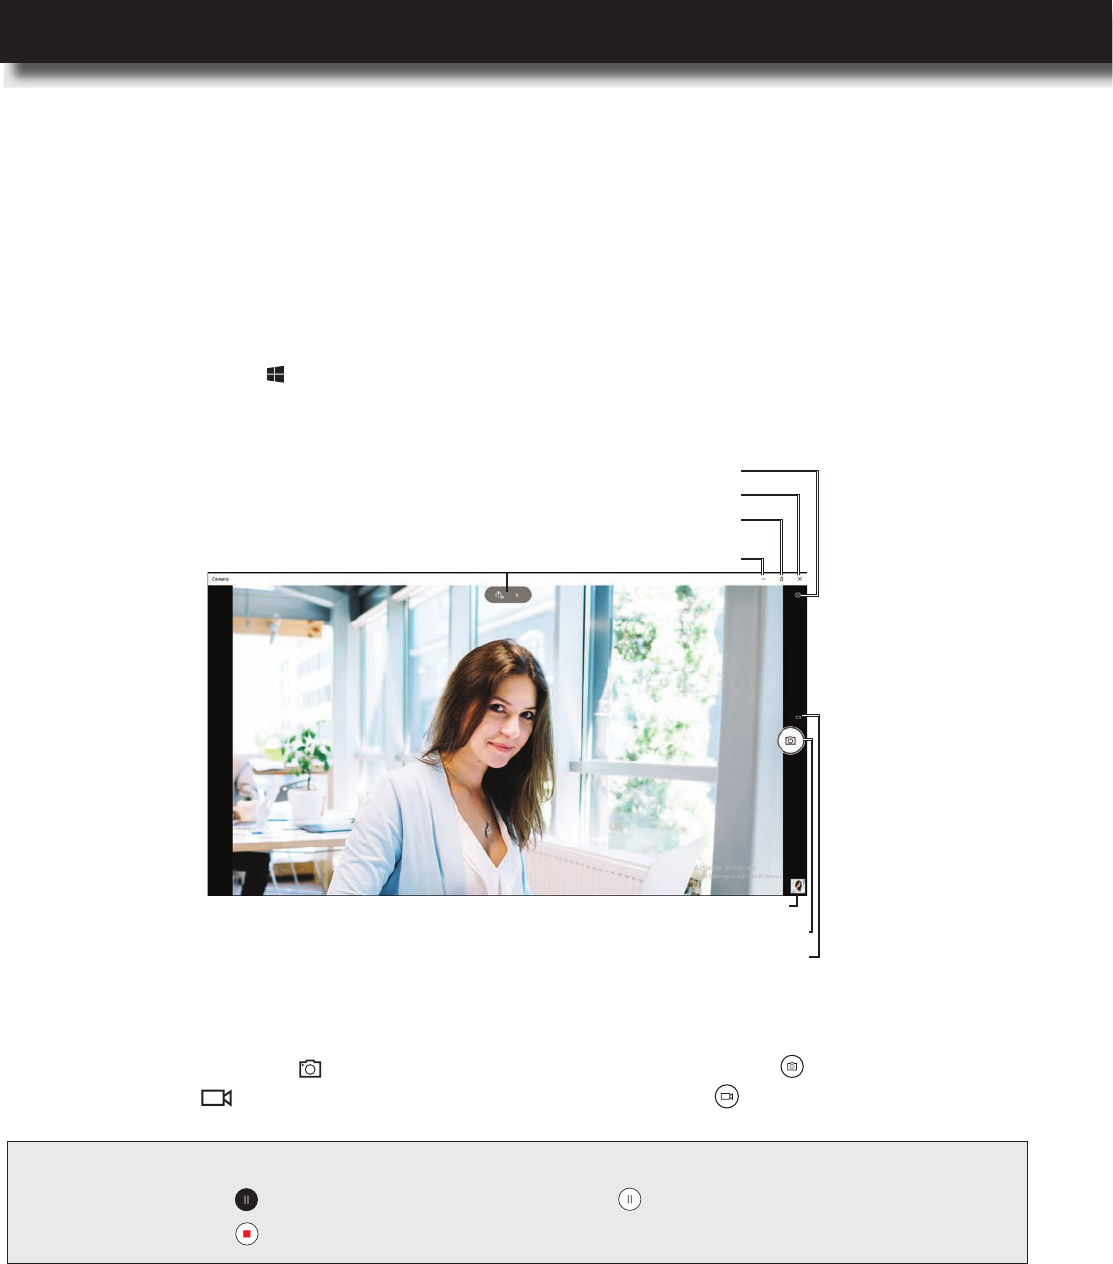
2 Use the onscreen controls to capture images, record videos, and congure settings.
– Shutter: Click on the to switch to the Photo mode or click on the to capture an image.
Click on the to switch to the Video mode and click on the to start recording a video.
– Photo timer: Toggle button that sets the countdown timer to 2 seconds, 5 seconds, 10
seconds time period, or to off when capturing images.
– Exposure compensation: Adjusts the exposure manually by making the images brighter
or darker.
– Settings: Congures the camera button behavior, selects the aspect ratio, framing grid, and
time lapse when capturing images, or congures the video recording parameters, icker
reduction, and more.
1 Open the Start menu and click on the Camera app. The image from the camera lens will be
displayed on the screen.
NOTE: Whilerecordingavideo,doanyofthefollowing:
− Clickonthe topauserecordingandthenclickonthe toresumerecording.
− Clickonthe tostoprecording.
Photo timer/ Exposure
compensation Minimize window
Maximize/ restore
window
Close window
Shutter (photo)
Shutter (video)
Previously captured image
Camera settings
Using the Computer and Basic Settings
44 l
Using a Media Card
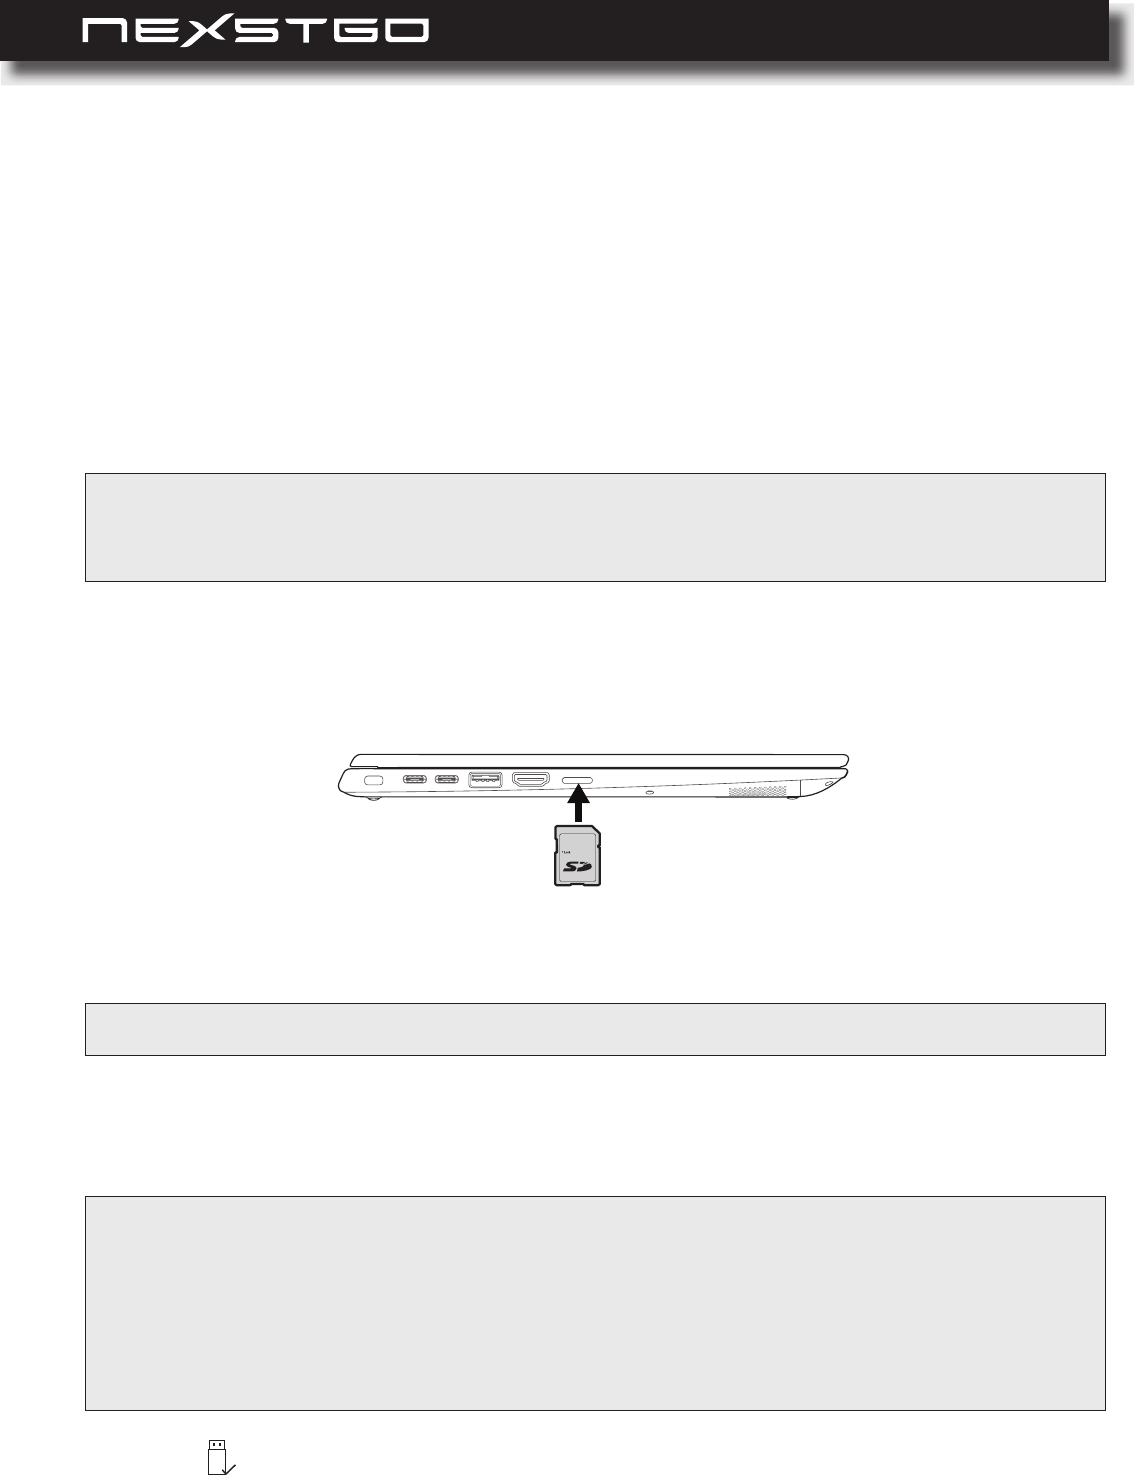
Your computer is equipped with a card reader slot and supports the following media cards:
To insert a media card, do the following:
To remove the media card, do the following:
Secure Digital (SD) card
Secure Digital eXtended-Capacity (SDXC) card
Secure Digital High-Capacity (SDHC) card
Inserting a Media Card
Removing a Media Card
WARNING: Topreventelectrical shock,beforeyou startinserting a mediacard tothecard reader,toucha
groundedmetalobjecttoreduceanystaticelectricityfromyourbody.Staticelectricitycoulddamage
thecard.
1 Locate the card reader slot on the left side of your computer.
2 Insert the media card into the slot with the gold contacts facing down, as shown below.
1 Click on Safely Remove Hardware and Eject Media in the Windows notication area.
3 Then, gently push the media card into the slot.
NOTE: Themediacardissoldseparately.
IMPORTANT:
− Toavoidthedataonthemediacardbecomingcorruptedorlost,stopthemediacardrstbeforeremovingit
fromthecardreaderslot.
− Toavoidthedataonthemediacardbecomingdamagedduringthedatatransferfromortothemediacard,do
notputthecomputertosleeporintohibernationmodeuntilthedatatransferiscomplete.
− Avoidremovingthemediacardwhilethecomputerisinsleeporhibernationmode.
Using the Computer and Basic Settings

USER’S MANUAL
l 45
2 Click on the media card to remove it safely.
You will shortly see a Safe to Remove Hardware message on the screen.
3 Remove the media card from the card reader slot.
Using the Computer and Basic Settings

46 l
There are different options to congure the display settings and personalize your computer.
The basic setting, such as brightness, can be increased or decreased using the keyboard
multimedia keys. Please refer to “Multimedia Keys” on page 32.
To congure more display settings, do the following:
1 Right-click on an empty space on the desktop and then click on the . The
settings page opens.
2 Adjust the display brightness, set the night light on or off, change the size of text, apps, and
other items, set the resolution, and display orientation.
To personalize your computer, do the following:
If you wish to congure more advanced display settings, you can do it using the ® Graphics
Control Panel app.
To access the ® Graphics Control Panel app, do the following:
1 Right-click on an empty space on the desktop and then click on Personalize. The settings
page opens.
2 Set a desktop background, personalize the Start menu, taskbar, action center, and title bars,
customize the lock screen background, apply a theme, and many more.
1 Right-click on an empty space on the desktop and then click on the Intel® Graphics Settings.
Intel HD® Graphics Control Panel page opens.
2 Click on the item.
Conguring the Advanced Settings
Using the Computer and Basic Settings

USER’S MANUAL
l 47
3 Modify any of the following items:
NOTE: Thedefaultdisplayisalwaysthebuilt-indisplay.Ifyouhaveconnectedanexternaldisplaytoyour
computerandwishtomodifyitsdisplaysettings,selectthecorrectdisplayrstintheSelectDisplay
menu.
– General Settings: Display resolution, refresh rate, or scaling.
– Color Settings: Brightness, contrast, hue, and saturation for red, green, and blue individually
or by all colors together.
– To modify the external display settings, connect the external display
rst. Please refer to “Connecting an External Display” on page 48.
– Custom Resolutions: Width, height, refresh rate, or underscan percentage.
IMPORTANT:
Alteringresolutionmay:
− Reducesystemstabilityandusefullifeofthesystemandchipset.
− Causethechipsetandothersystemcomponentstofail.
− Reducesystemperformance.
− Causeadditionalheatorotherdamage.
− Affectsystemdataintegrity.
Using the Computer and Basic Settings

48 l
In this section, you will nd information on how to connect an external display to your computer,
select a display mode, and change display settings. You can use as an external display a monitor
that helps you to expand workspace, projector for displaying a presentation, or TV for watching
movies or other multimedia les on a large screen. Your computer supports the following maximum
video resolutions:
4096 x 2304 pixels / 60 Hz, with an external display connected to the USB-C connector.
4096 x 2160 pixels / 24 Hz or 3840 x 2160 pixels / 30 Hz, with an external display connected
to the HDMI connector.
Do any of the following:
Open the Start menu and click on the Settings
device > Wireless display or dock.
Click on the Action center icon in Windows notication area. Then click Connect.
You can connect either a wired display or a wireless display. The wired display can be connected
to the HDMI connector or to the USB type-C connector by an appropriate cable. The wireless
display can be connected using Miracast® function.
To connect a wired display, do the following:
Connecting an External Display
NOTE: To congure the advanced display settings of the external display, please refer to “Conguring the
AdvancedSettings”onpage46.
NOTE: Beforeconnectingawirelessexternaldisplay,makesurebothyourcomputerandtheexternaldisplay
supportMiracast®function.
NOTE: Forwiredconnection,makesuretouseavideointerfacecablewithaferritecore.
Connecting a Wired External Display
Connecting a Wireless External Display
1 Connect one end of the HDMI or USB type-C cable to the external display and the other end
to your computer’s video port, such as HDMI port or USB type-C port respectively.
2 Connect the external display to an electrical outlet and power it on. If your computer cannot
detect the external display automatically, right-click on an empty space on the desktop, then
click on the .
Using the Computer and Basic Settings
USER’S MANUAL
l 49
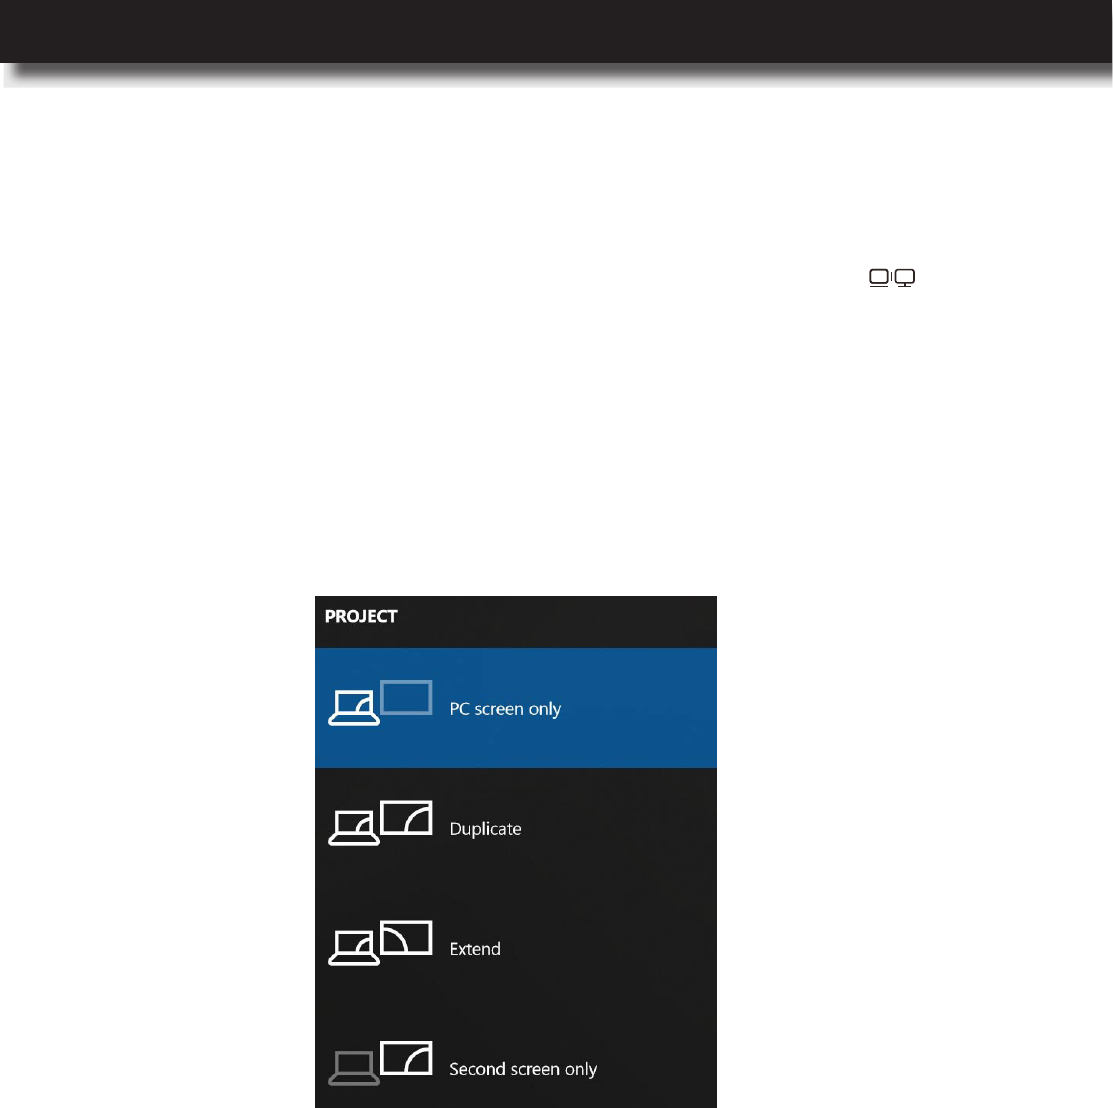
You can choose your preferred display mode when working with an external display. The options
include displaying your desktop and apps on the computer display, the external display, or both
simultaneously. To select a display mode, press the keyboard multimedia key (F8). The
following is a brief description of all the four display modes:
Connecting an External Display
PC screen only: Only your computer’s display is used, the external display is disabled.
The external display mirrors your computer’s video output.
Extend: The desktop of your computer is extended across the external display, allowing you
to have a desktop that spans across both displays. You can drag and move items between the
two displays.
Second screen only: Your computer’s display is disabled and only the external display is
used.
Using the Computer and Basic Settings

50 l
Accessibility Features
3
In this chapter, you can nd information on different accessibility features for users with hearing,
vision, or mobility limitations.
Keyboard Shortcuts
The table below includes keyboard shortcuts that can help to make computer easier to use:
For additional information on accessibility features, please refer to
https://www.microsoft.com/en-us/accessibility/windows.
Key Combination
+ u Opens Ease of Access Center.
Right Shift for 8 seconds Enables or disables the Filter Keys.
Shift for 5 times Enables or disables the Sticky Keys.
Left Alt + left Shift + PrtSc Enables or disables High Contrast.
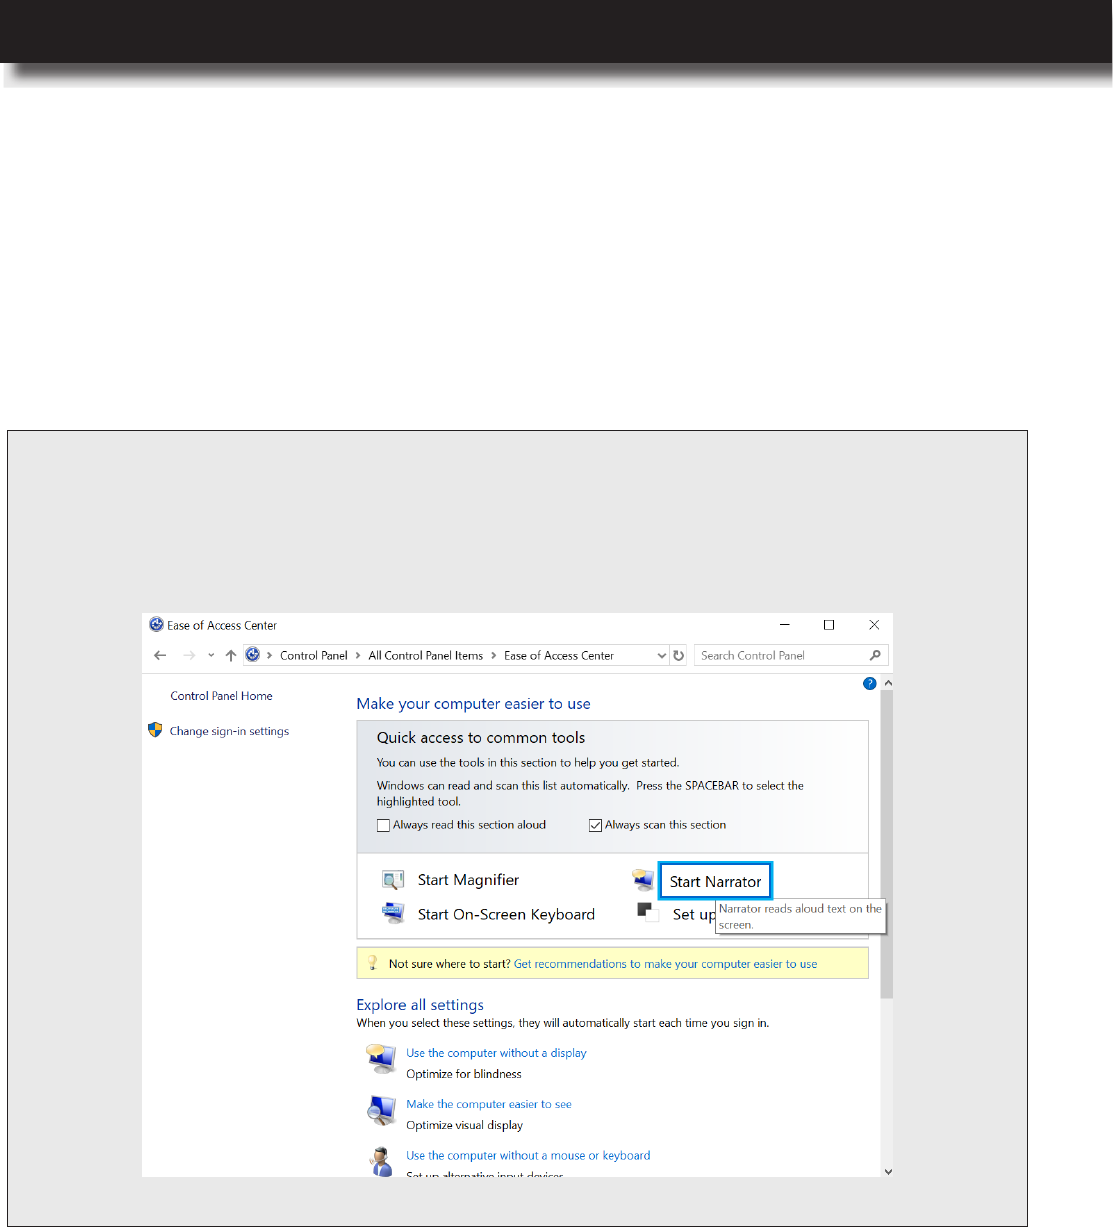
Using the Ease of Access Center
With the Ease of Access Center, you can make your computer more accessible based on your
needs. To open the Ease of Access Center, press the + u keys simultaneously.
Accessibility Features

USER’S MANUAL
l 51
Enable this feature if you wish the narrator to read all the elements on the screen, such as text
and buttons. You can congure the following settings:
Narrator
Magnier
Narrator: Enable or disable the narrator feature.
Voice: Select the voice, set the speed, pitch, and intonational pauses for the narrator.
Sound you hear: Enable or disable reading hints for controls and buttons and set the amount
of contextual reading for control and buttons. You can also set the order of contextual reading
for controls and buttons, and more.
Cursor and keys: Enable or disable highlighting the cursor and have insertion point follow
narrator. You can also congure activating keys on touch keyboard when you lift your nger off
the keyboard.
Braille: Before using this feature, you need to download the third party software that is required
to communicate with your braille display. Follow the onscreen instructions to download the
necessary software.
This feature helps you to make part or all of your screen bigger, so you can see things better. You
can congure the following settings:
Enable or disable the magnier feature and set the magnication zoom level.
Set the zoom level increments, decide when to start magnier feature,
invert colors, enable or disable bitmap smoothing, and collapse to magnifying glass icon.
Set the magnier mode and tracking options.
Keyboard shortcuts: Review the keyboard shortcuts.
Color lters and High contrast
This feature helps you to apply color lters so you can see things on the screen more clearly. You
can congure the following settings:
Apply color lters and select a lter.
High contrast: Select the high contrast theme that you like the most and click on the Apply
button to save the settings.
Closed captions
This feature helps you to customize how the closed captions appear in Windows and in some
Windows apps. You can congure the following settings:
Font: Select the caption color, caption transparency, caption style, caption size, and caption
effect. The result is visible in Preview pane.
Background and window: Select the background color, background transparency, window
color, and window transparency.
Accessibility Features

52 l
Keyboard
This feature helps you to congure the keyboard settings:
On-Screen Keyboard: Enable or disable the on-screen keyboard.
Sticky Keys: Enable or disable pressing one key at a time for keyboard shortcuts.
Toggle Keys: Enable or disable to hear a tone when you press the Caps Lock, Num Lock (not
supported in this model), and Scroll Lock keys.
Filter Keys: Enable or disable ignoring or slowing down brief or repeated keystrokes and
adjusting keyboard repeat rates.
Other Settings: Enable or disable shortcut underlines, displaying a warning message when
turning a setting on with a shortcut, making a sound when turning a setting on or off with a
shortcut.
Mouse
This feature helps you to congure the mouse settings:
Pointer size: Select the pointer size.
Pointer color: Select the pointer color.
Mouse keys: Enable or disable using numeric keypad to move mouse around the screen, and
more.
Accessibility Features
USER’S MANUAL
l 53
Other Options
Here is a list of additional options that you can congure to help you to make computer easier to
use:
Visual options: Enable or disable playing animations in Windows and showing Windows
background. You can also set the length when the notications are displayed on the screen,
adjust the cursor thickness, and customize visual notications for sound.
Audio options: Enable or disable mono audio.
NOTE: YoucanndsomeadditionalEaseofAccessfeaturesinControlPanel.ToopentheControlPanel,dothe
following:
a)Type“controlpanel”(withoutquotationmarks)insearchbar.TheControlPanelpageopens.
b)ClickontheEase of Access Centertab.
Accessibility Features
54 l
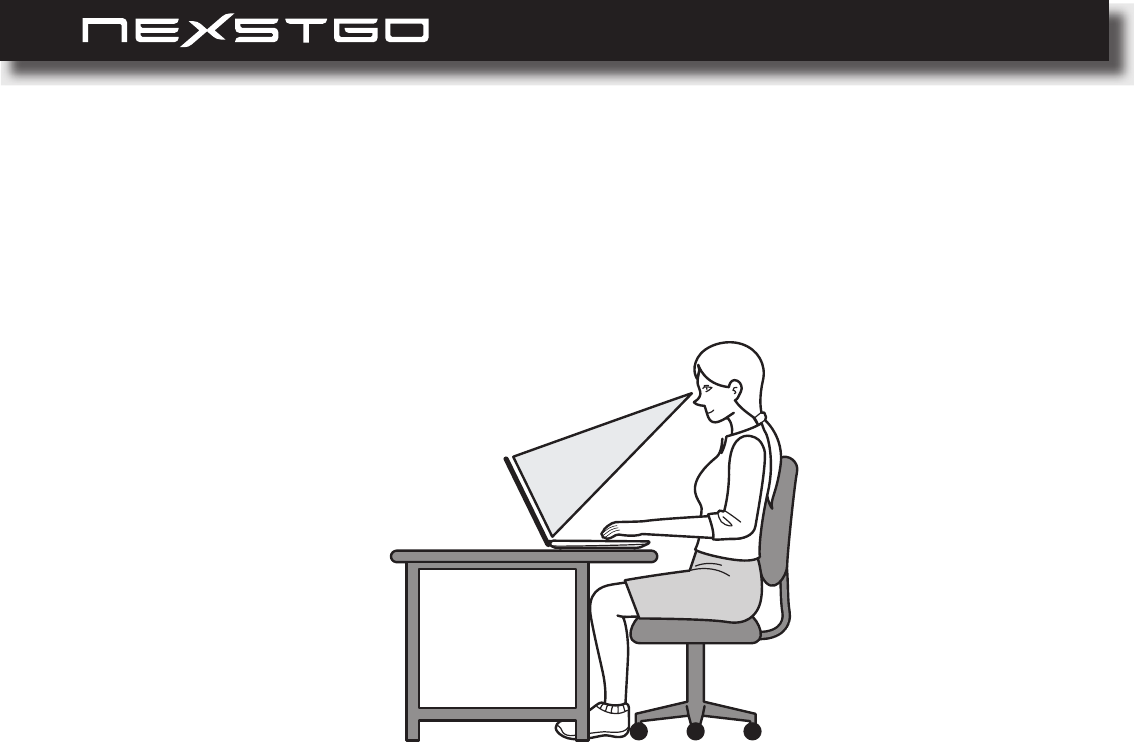
Ergonomic Considerations
You will be using your computer as a portable device in different environments. Take account of
the following ergonomic considerations to both stationary and portable environments, use healthy
work habits to maximize your performance and comfort when using the computer.
Positioning Your Computer
Place your computer directly in front of you.
Keep your forearms horizontal and wrists in a neutral, comfortable position.
Allow your upper arms hang naturally at your sides.
We recommend you to take breaks and stretch your body during a working session to avoid
strain to the tendons and muscles.
Posture
Viewing angle of the display
Room lighting
A poor posture can easily cause or increase the risk of back pain and over time damage spinal
structures. Therefore sit in a chair that has a good back support. If needed, adjust the level of
the chair so that your feet are at on the oor. Try to sit in a relaxed, upright posture and avoid
leaning far backwards.
To reduce eye strain, please adjust the monitor tilt angle. We recommend you to adjust also the
brightness settings of the display.
When working indoors, choose a location where windows and lights do not create glare and
reection on the display. If needed, purchase accessories that help to reduce glare. Good
lighting adds to your comfort and work effectiveness.
Accessibility Features