Nexstgo 9560NG Intel Wireless-AC 9560 User Manual 4
Nexstgo Company Limited Intel Wireless-AC 9560 4
Nexstgo >
Contents
- 1. 9560NGW- UserMan_Part 1_20190102
- 2. 9560NGW- UserMan_Part 2_20190102
9560NGW- UserMan_Part 2_20190102

USER’S MANUAL
l 55
General Cleaning Guidelines
We recommend to follow this list of suggestions when cleaning your computer or its peripherals.
In this chapter, you can nd information on how to clean the exterior of your computer.
Make sure not to spray any cleaning liquid onto the computer components directly. If you need
to use a cleaning liquid, spray the liquid onto a cloth instead.
If you notice any dust particles in the gaps between the keyboard keys, inside the ports, or
elsewhere, use a portable battery powered vacuum or try compressed air with a straw extension
to clean it up.
Be extra cautious when using any cleaning solvents; some people may develop an allergic
reaction towards the chemicals used in cleaning solvents, and some solvents can even damage
the case.
Avoid eating or drinking around the computer.
Taking Care of Your
Computer
4
Cleaning Your Computer
We recommend using the following cleaning tools:
Alcohol-free glass-cleaning uid.
Solution of water and mild soap.
Static-free cloth wipes.
Dry microber cleaning cloth.
CAUTION: Toavoidpermanentdamagetoyourcomputer,avoidusingstrongcleaningsolvents.Whenchoosing
a cleaning solvent, make sure it does not include the following ingredients: alcohol, acetone,
ammoniumchloride,methylenechloride,andhydracarbons.
Taking Care of Your Computer

56 l
Before starting to clean your computer, do the following:
Clean the sides, covers, keyboard, and touchpad with a soft microber cloth with one of the
cleaning solution as listed previously. Use additionally a portable battery powered vacuum or
compressed air with a straw extension if necessary to remove the dust particles.
Wipe gently the display using a lint-free cloth moistened in alcohol-free glass cleaner. Make sure
the display is completely dry before closing the lid.
Preparation for Cleaning
Cleaning the Sides, Covers, Keyboard, and Touchpad
Cleaning the Display
1 Turn off your computer.
2 Disconnect the AC power.
3 Disconnect all the peripherals.
Taking Care of Your Computer
USER’S MANUAL
l 57
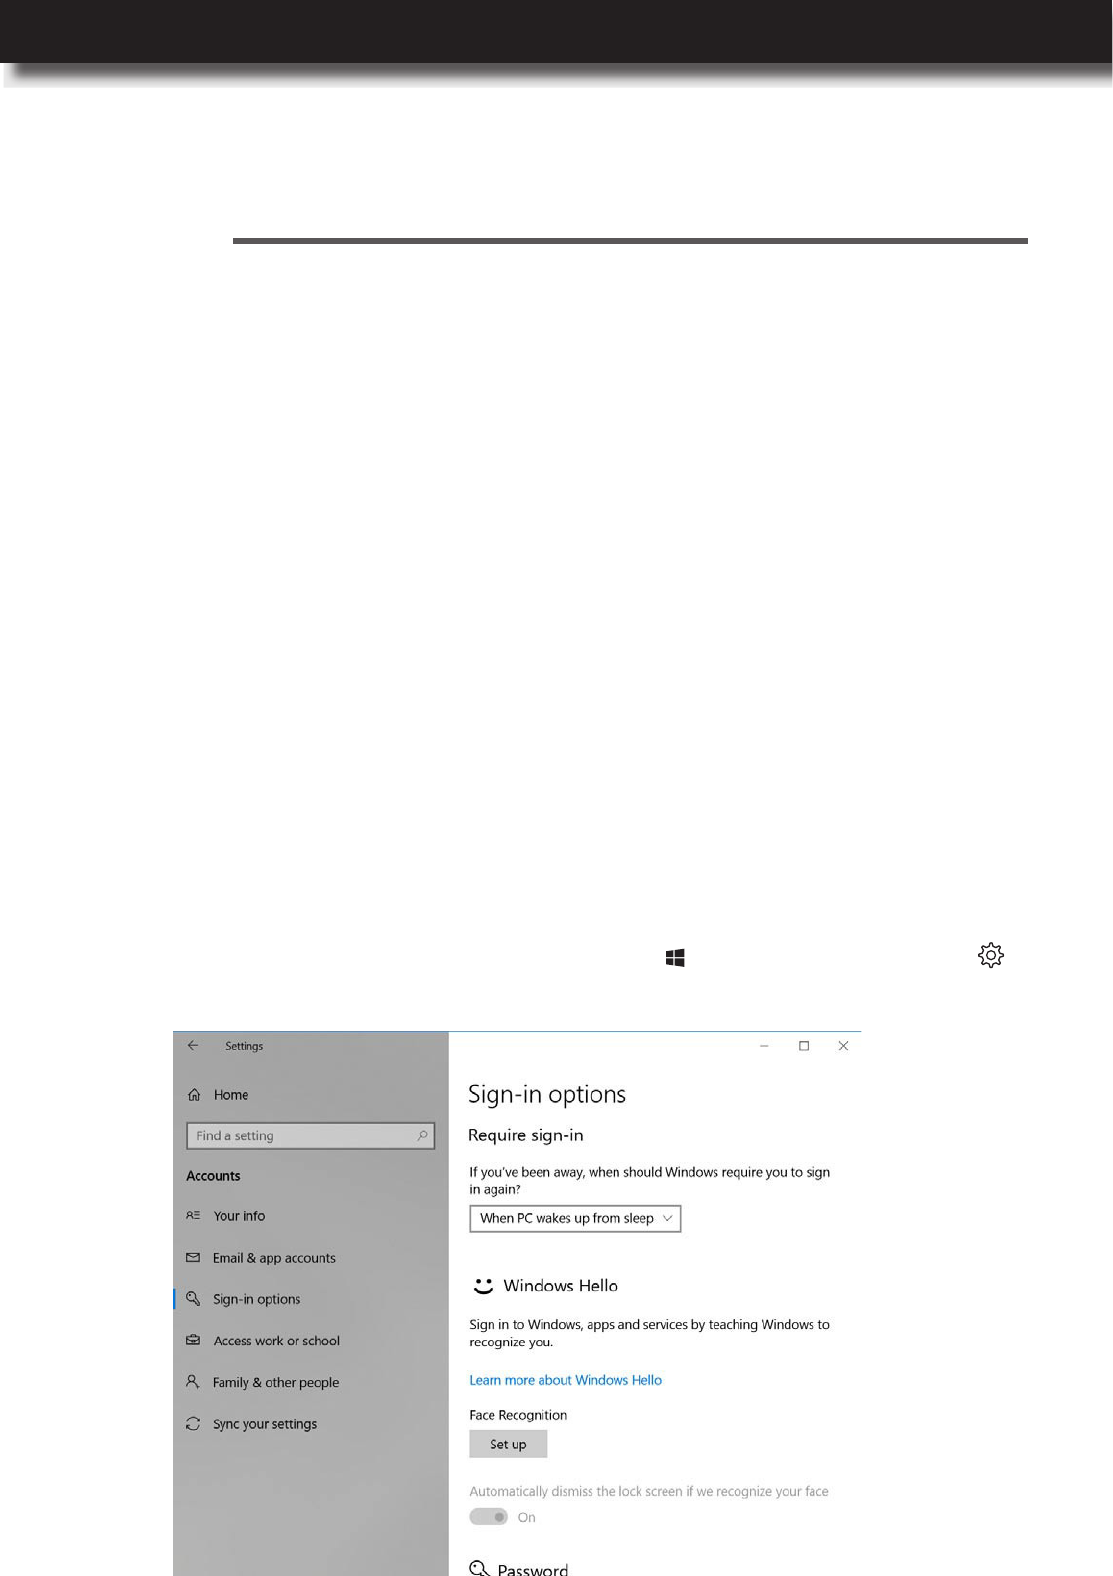
You can congure how your computer authorizes you. The default sign-in options include
password, PIN, or picture password. An alternative is to use Windows Hello features, such as
face recognition (optional).
To set up or modify sign-in credentials, open the Start menu and click on the Settings >
Accounts > Sign-in options. The following page opens:
Conguring Sign-In Options
Protecting Your Computer
5
Accessing the System
You can prevent unauthorized access to your computer by using passwords. After you set a sign-in
password during the initial computer setup, you are prompted to enter a correct password before
proceeding with login process. In addition to the sign-in password, you can authorize yourself
also using a face recognition (optional). To prevent access to the storage drive(s), you can set a
storage password in Setup Utility or encrypt the data on the storage drive(s) using BitLocker Drive
Encryption, and more.
In this chapter, you can nd information on how to protect your computer from unauthorized
access.
Protecting Your Computer
58 l
Creating or Modifying Default Sign-In Credentials
To create / remove or modify your sign-in password, PIN, or picture password, do the following:
a) In Password section, click on the Change button. Change your password page
opens.
b) Enter your current password and click on the Next button.
c) Enter a new password, conrm the new password, and set a password hint. Then click
on the Next button.
d) Click on the Finish button to complete modifying your sign-in password.
a) In PIN section, click on the Add button. You are prompted to enter the current sign-in
password.
b) Enter your current sign-in password and click on the OK button. You are prompted to
enter a new PIN and conrm the new PIN.
c) Enter a new PIN and conrm the new PIN. Check Include letter and symbols if needed
and then click on the OK button to complete creating a sign-in PIN.
d) To remove the sign-in PIN, click on the Remove button. Then click on the Remove
button again to conrm PIN removal. You are prompted to enter your sign-in password.
e) Enter your sign-in password and click on the OK button to complete removing your sign-
in PIN.
a) In Picture password section, click on the Add button. You are prompted to enter the
current sign-in password.
b) Enter your current sign-in password and click on the OK button.
c) Click on the Choose picture button to select your favorite picture. Your picture is displayed
on the screen.
d) Click on the Use this picture button to conrm the picture or click on the Choose new
picture button to select another picture and repeat the step.
e) Follow the onscreen instructions to set up your gestures. After done, click on the Finish
button to complete creating a sign-in picture password.
f) To remove the sign-in picture password, click on the Remove button.
1 Open the Sign-in options menu. Please refer to “Conguring Sign-In Options” on page 48.
2 Do any of the following:
– Modify Your Sign-In Password:
– Create or Remove a Sign-In PIN:
– Create or Remove a Sign-In Picture Password:
NOTE: Thesign-inpasswordcannotberemoved.
Protecting Your Computer

USER’S MANUAL
l 59
About Windows Hello
Setting Up Facial Recognition (Optional)
Windows Hello enables you to get instant access to your computer using facial recognition. Facial
recognition can replace the default sign-in password, sign-in PIN, and sign-in picture password.
To sign in to the system using facial recognition, do the following:
NOTE: Before using Windows Hello, make sure your computer supports facial recognition feature. Various
PRIMUSmodelssupportthesemethodsasoptionalfeatures.Pleasecheckyoursystemconguration,
andcontactNexstgoformoreinformationifneeded.
1 Open the Sign-in options menu. Please refer to “Conguring Sign-In Options” on page 57.
2 In Face Recognition section, click on the Set up button. Windows Hello setup page opens.
3 Click on the Get started button. You will see a self-image on the screen together with
instructions.
4 Follow the onscreen instructions until the setup is complete.
Protecting Your Computer
60 l
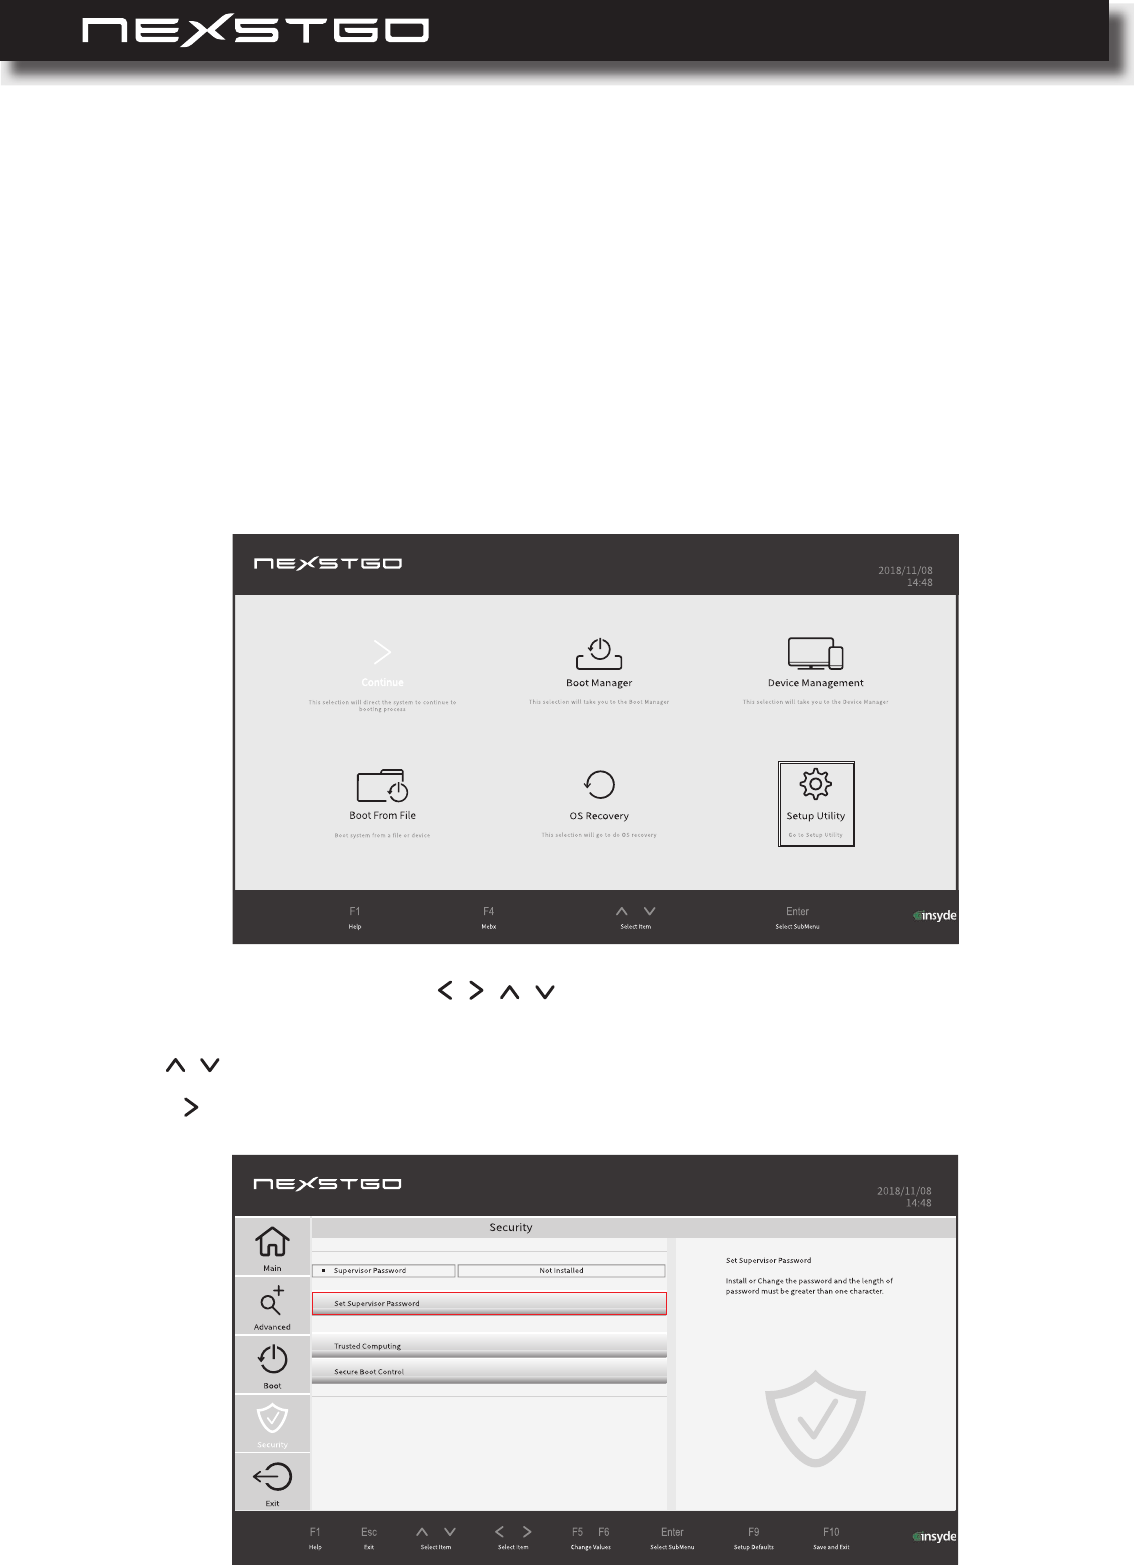
In Setup Utility, you can set up a supervisor password and power on password.
The supervisor password helps to protect system information stored in the Setup Utility. After
the supervisor password is established, you are prompted to enter a password each time you
want to open the Setup Utility. Unauthorized users are denied accessing the Nexstgo System
Conguration options.
To set up supervisor password, do the following:
Setting Up Passwords in Setup Utility
Setting Up a Supervisor Password
1 During system setup, press the F2 key to open the Nexstgo System Conguration utility.
2 Use the four-directional keys ( , , , ) on the keyboard to select Setup Utility and press
Enter key. The Setup Utility Main menu opens.
3 Use , keys to select Security.
4 Press key to select the Set Supervisor Password selection and press Enter key.
Protecting Your Computer

USER’S MANUAL
l 61
5 Enter a new password and conrm the password. Then click on the Yes button. You are
informed that changes have been saved after you press Save and Exit.
6 Click on the Ok button.
7 Press the F10 key and then click on the Yes button to exit saving changes. Setting up the
supervisor password is complete. Next time you open the Setup Utility, a Setup Conguration
Utility Password prompt appears. Enter the supervisor password to proceed.
8 To remove the supervisor password, repeat step 1. Then click on the Setup Utility tab and
enter the supervisor password when prompted.
9 Repeat steps 3 and 4. Then enter the current password leaving the new password elds
empty.
10 Click on the Yes button. You are informed that changes have been saved after you press
Save and Exit.
11 Repeat step 6.
12 Press the F10 key and then click on the Yes button to exit saving changes. Removing the
supervisor password is complete.
Protecting Your Computer
For increased security, the Windows operating system enables you to encrypt the hard drive
using Windows BitLocker Drive Encryption (BitLocker).
BitLocker can encrypt your entire hard drive, including all user, system, swap, and hibernation
les. It can also protect against unauthorized changes to your system, such as rmware-level
malware.
BitLocker uses the Trusted Platform Module (TPM) to provide advanced security protection for
your data and to ensure integrity checking of early boot components. Your PRIMUS system
already has a compatible TPM version that is required for using BitLocker.
To start encrypting your storage drive, do the following:
Using Windows BitLocker Drive Encryption
NOTE: IfyouarenotabletouseBitLocker,makesuretheTPMsupportisenabledintheNexstgo System
Conguration > Setup Utility > Security > Trusted Computing > TPM Support.For
moreinformationontheNexstgo System Congurationutility,pleasereferto“UsingtheNexstgo
SystemCongurationUtility”onpage57.
1 Open the Start menu and click to expand the Windows System folder.
2 Click on the File Explorer.
3 Choose the storage drive that you want to encrypt and right-click on it.
4 Click on the Turn on BitLocker item.
5 Choose where to save the recovery key. The options include Save to a Microsoft account,
Save to a le, or Print the recovery key. Follow the onscreen instructions on saving the
recovery key. When done, click on the Next button.
62 l
The TPM is a security hardware device on the system board that holds computer-generated
keys for encryption. The purpose of the TPM is to help to avoid attacks by hackers who aim to
capture passwords and encryption keys to sensitive data. The TPM provides the ability to run
applications more secure and to make transactions and communication more trustworthy. The
security features provided by the TPM involve the following: random number generation, hashing,
asymmetric key generation, and asymmetric encryption/decryption. Each individual TPM has its
unique signature initialized during the silicon manufacturing process that further enhances its
trust/security effectiveness. Each TPM must have an Owner before it can be used as a security
device.
Trusted Platform Module (TPM)
Protecting Your Computer
6 Choose how much of your drive to encrypt. The options include Encrypt used disk space only
and Encrypt entire drive. When done, click on the Next button.
7 Choose which encryption mode to use. The options include New encryption mode and
Compatible mode. When done, click on the Next button.
8 Check the Run BitLocker system check to ensure that BitLocker can read the recovery and
encryption keys correctly and then click on the Start encrypting button. The encryption
begins. The whole procedure might take a while depending on the size of the drive. While the
hard drive is being encrypted, you can keep working.
The TPM, when bundled with an optional security software package, can provide overall system
security, le protection features, and protect against email/privacy concerns.
To enable the TPM support and its associated features, do the following:
1 During system setup, press the F2 key to open the Nexstgo System Conguration utility.
2 Use the four-directional keys ( , , , ) on the keyboard to select Setup Utility and press
Enter key. The Setup Utility Main menu opens.
3 Use , keys to select Security.

USER’S MANUAL
l 63
Protecting Your Computer
5 After done, press the F10 key to save the modications.
4 Press key and use , keys to select Trusted Computing and enable the necessary
TPM settings.
If you plan to dispose of, sell, or hand your computer over to another person, make sure to delete
all the sensitive data, such as your personal les and installed software.
You can use the following options to delete data from the storage drive:
Unfortunately the methods described above only change the location of the data on the storage
drive but do not delete the data itself. Using third party software, it is sometimes possible to
restore the deleted data. There is a risk that people might read and misuse the critical data on
storage drives for unforeseen purposes.
Thus, to prevent leakage of data, it is important to ensure all the data is deleted from the storage
drive. You can destroy the storage drive physically by breaking it into pieces or magnetically by
means of strong magnetic power making data unreadable. We recommend to use the second
option. To erase quickly and easily all of the magnetic information stored on the drive, enable
item in
. For accessing and navigating the Nexstgo System
Conguration utility, please refer to “Using the Nexstgo System Conguration Utility” on page 57.
Deleting Data on the Storage Drive
Use the Nexstgo Backup and Recovery app to reset your computer to the factory default
values.
Format the storage drive to prepare it for initial use.
Move the data to the Recycle Bin and then empty the content of the Recycle Bin.

64 l
When you use the computer to access any apps that require Internet connection, you potentially
expose the computer to malware. Different malware, such as spyware, Trojan horses, viruses,
worms, and other malicious apps, can disable the operating system, apps, utilities, or cause them
to function unexpectedly.
Antivirus software can detect most of the malware, destroy them, and often repair any damage
that they have caused. To provide maximum protection against newly discovered malware, make
sure to keep the antivirus software up-to-date.
Your computer has Windows Defender Security Center preinstalled that also features virus and
threat protection. We strongly recommend that you continue to use an antivirus program in order
to provide full protection against malware.
Firewalls help to prevent unauthorized access to the system or network resources. A rewall can
be either a program installed on your computer and/or network, or a complete security solution
made up of hardware and software.
Usually there are two main types of rewalls to choose from:
When a rewall is installed on a system, all data entering or leaving the Internet, must pass
through the rewall. The rewall examines the data and blocks everything that does not meet the
specied security criteria.
Your computer has Windows Defender Security Center preinstalled that also features rewall and
network protection.
Using Antivirus Software
Using Firewall Software
Host-based rewalls that protect only the computer where they are installed on.
Network-based rewalls that are installed between DSL or cable modem and your home
network providing protection to all the computers connected on the network.
Protecting Your Computer
USER’S MANUAL
l 65
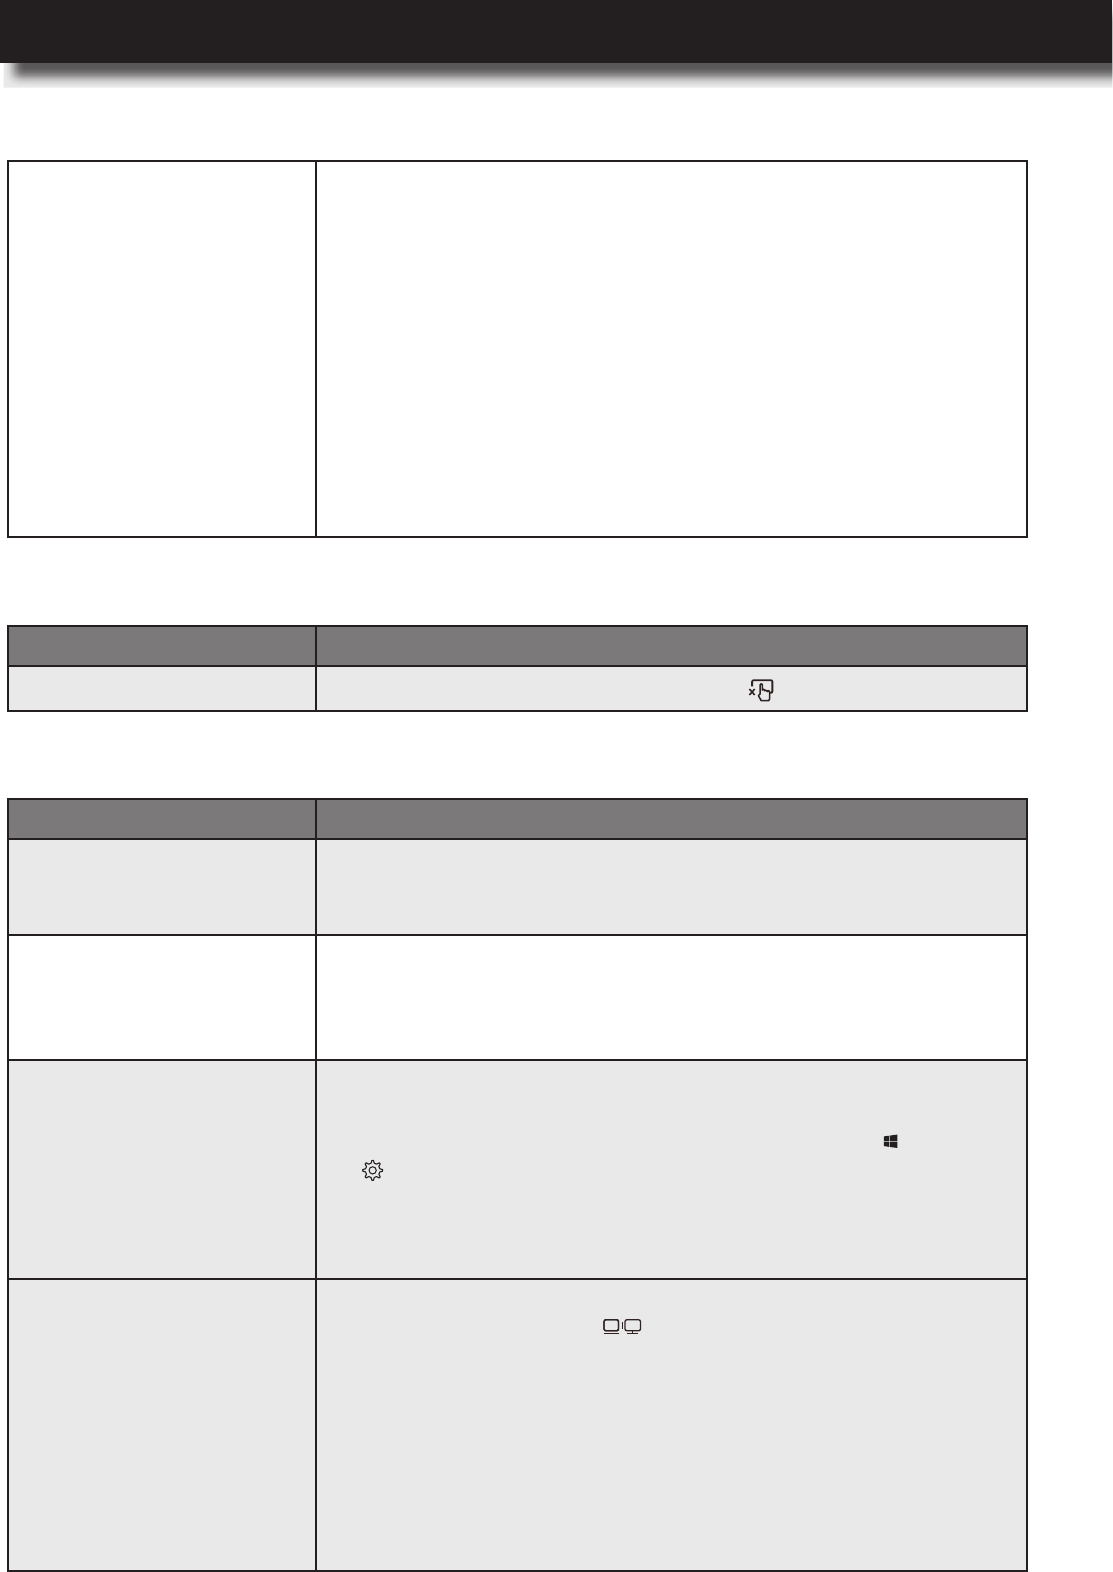
Protecting Your Computer
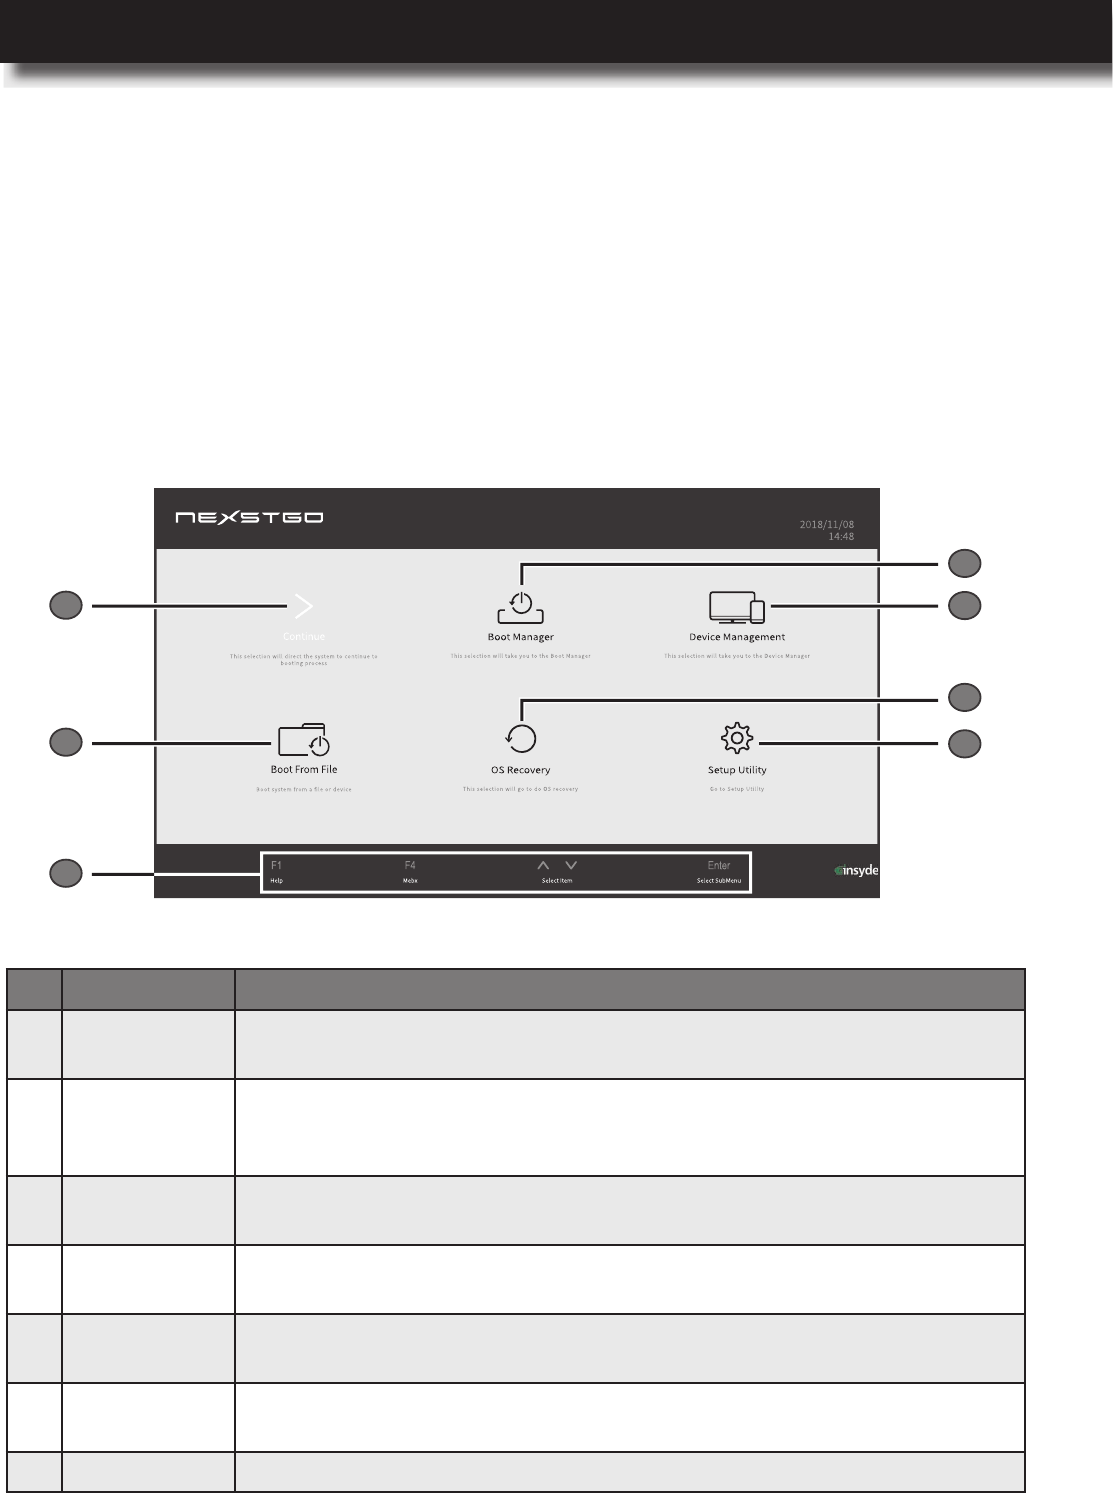
Utility
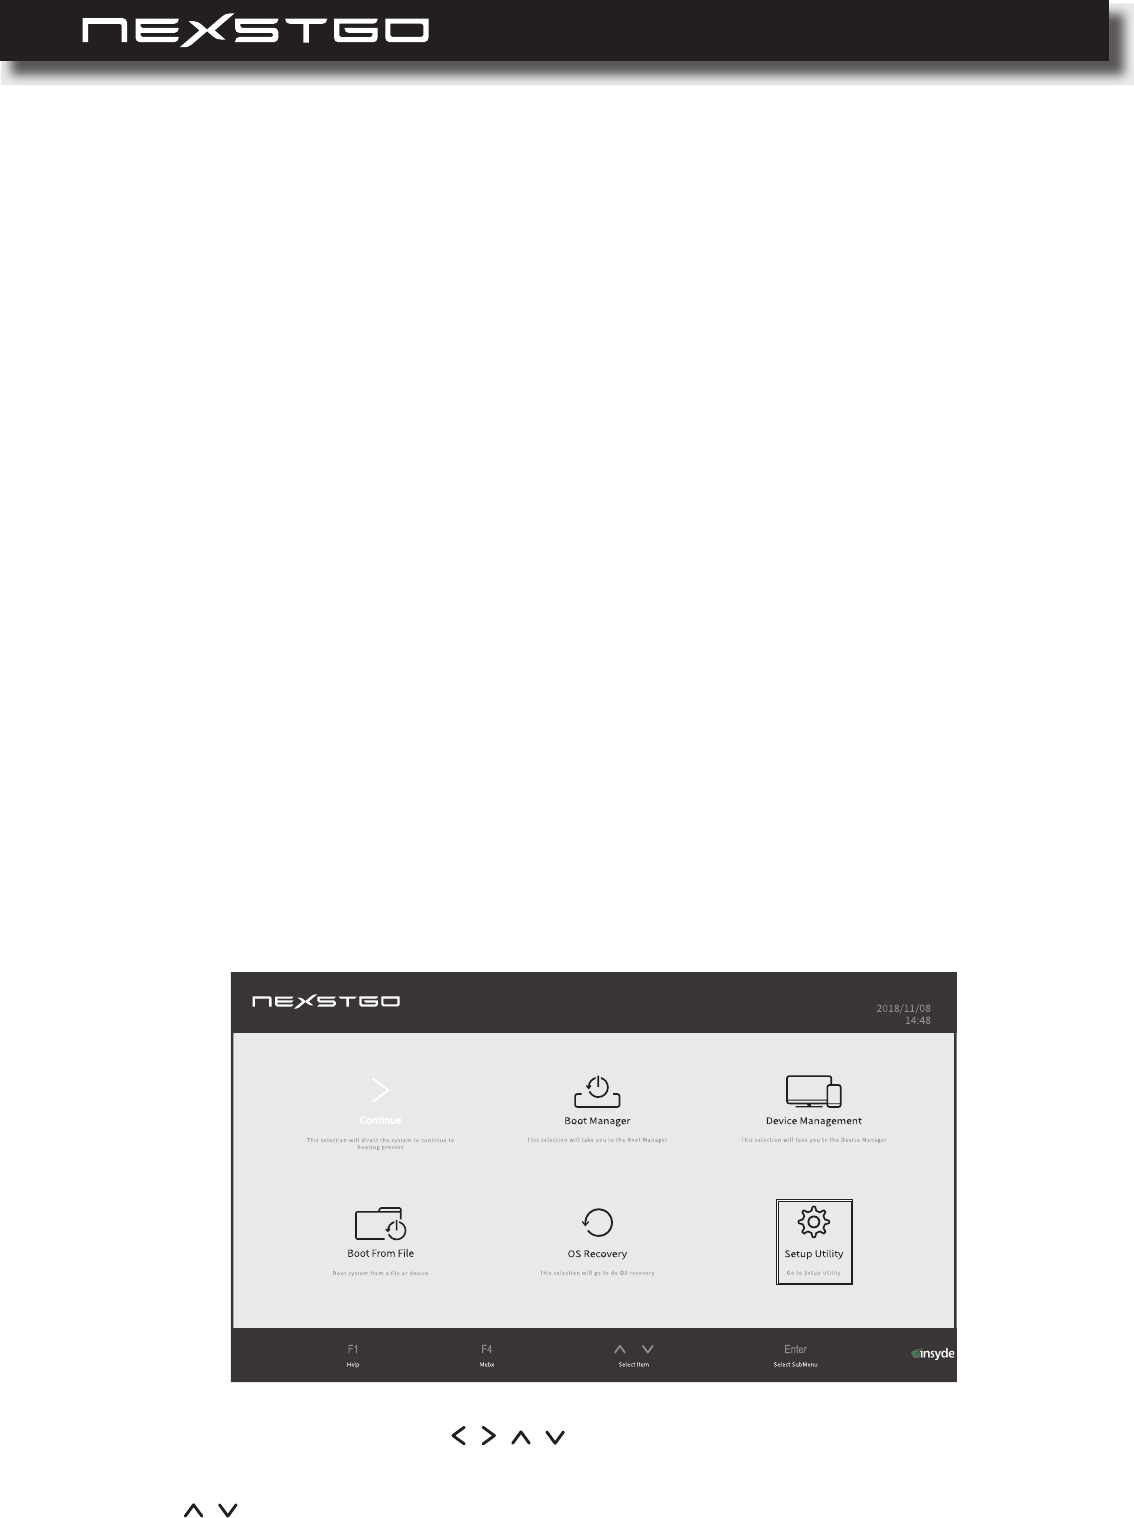
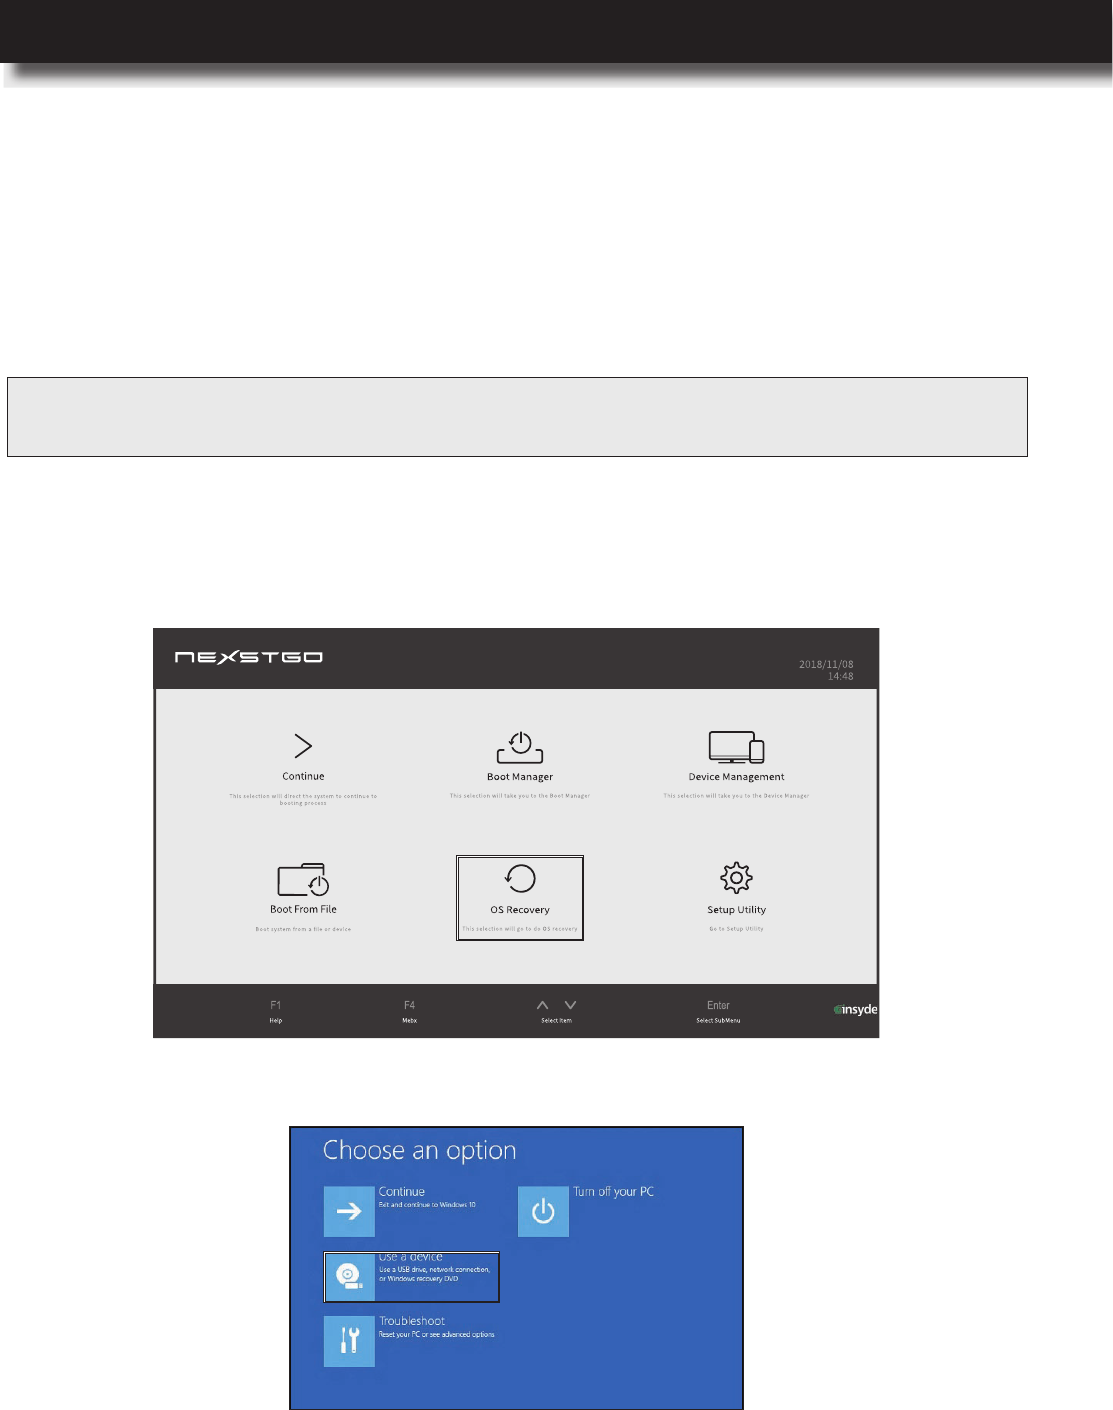
Using the Nexstgo System Conguration utility, you can set the boot order, manage devices,
set the boot location, recover the operating system, and congure system settings. To access
the Nexstgo System Conguration utility, press the F2 key during system setup. The utility page
opens:
1
2
3
4
5
6
7
No. Tab
1 OS Recovery
Opens the operating system recovery page. For reinstalling Windows 10,
please refer to “Using the Nexstgo System Conguration Utility” on page 65.
2 Boot Manager
Selects the boot device for loading the system. This boot selection is for
one time only. If you want to change the default boot device, you need to
modify the boot order in Setup Utility tab.
3Device
Management
Congures the network devices, checks for drivers’ health status, and
sets the primary video BIOS.
4 Setup Utility Provides an overview of the system parameters and congures
advanced settings, boot options, and security settings.
5Navigation
panel
Provides instructions on how to navigate the Nexstgo System
Conguration utility.
6 Boot From File Selects a storage device where is saved the boot le for loading the
system.
7 Continue Continues loading the operating system.
66 l
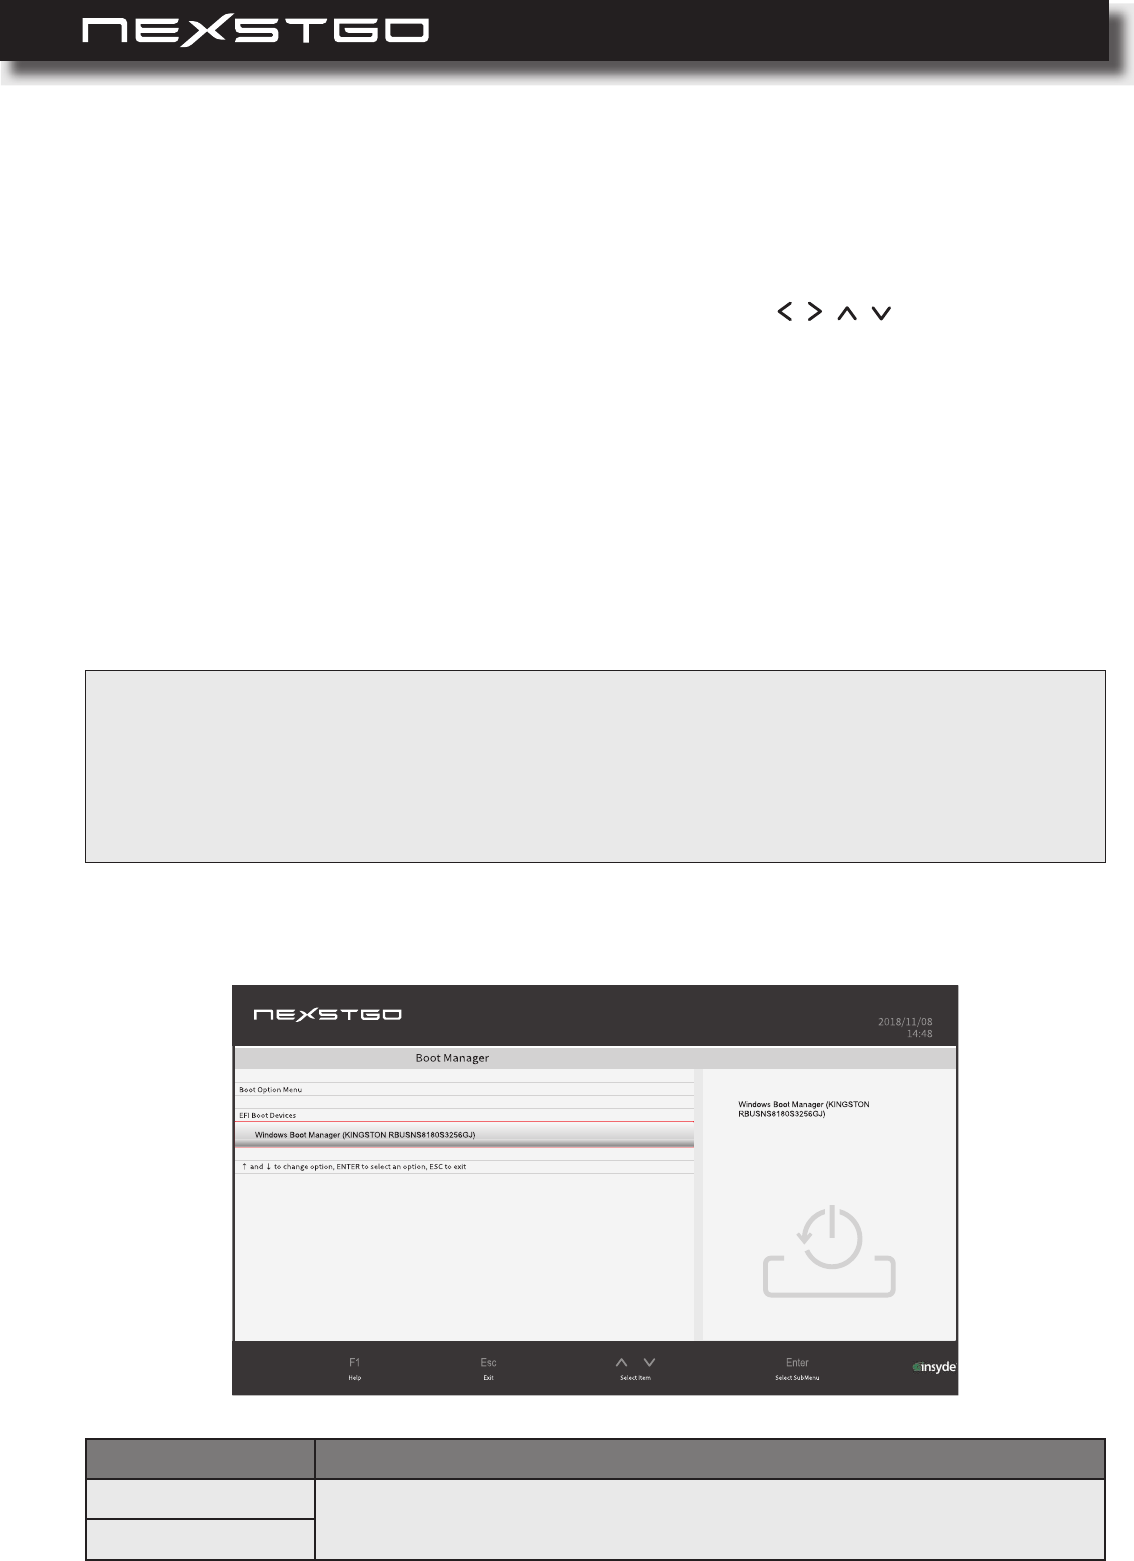
Item
Boot Option Menu
Select the boot device that you want to use for loading the operating system.
EFI Boot Devices
To navigate the utility menu, you can use both keyboard keys or the touchpad.
Do any of the following:
Nexstgo System Conguration Utility Navigation
Boot Manager
To select a tab or menu item: Use the four-directional keys ( , , , ) on the keyboard or
move your nger across the touchpad.
To enter a submenu or select an item parameter: Press the Enter key on the keyboard or
left-click/ tap once on the submenu or the item parameter.
To exit a submenu or menu item: Press the F2 key on the keyboard once or repeatedly if
necessary or click on the right touchpad button once or repeatedly if necessary.
Change values (Setup Utility only): Press the F5 or F6 keys on the keyboard.
Load defaults (Setup Utility only): Press the F9 key on the keyboard to load the default
values to the menu items.
Save and exit (Setup Utility only): Press the F10 key on the keyboard to save the values
and exit the Setup Utility.
NOTE:ThefollowingisalistoftabsthatexittheSystemCongurationutility.
− Tocontinueloadingtheoperatingsysteminanormalmode,selecttheContinuetab.
− Tomanuallyselectabootdeviceforloadingtheoperatingsystem,selecttheBootManagertab.
−Tomanuallyselectaleonthebootdeviceforloadingtheoperatingsystem,selecttheBootFromFiletab.
−Toreinstalltheoperatingsystem,selecttheOSRecoverytab.
Protecting Your Computer
USER’S MANUAL
l 67
Protecting Your Computer
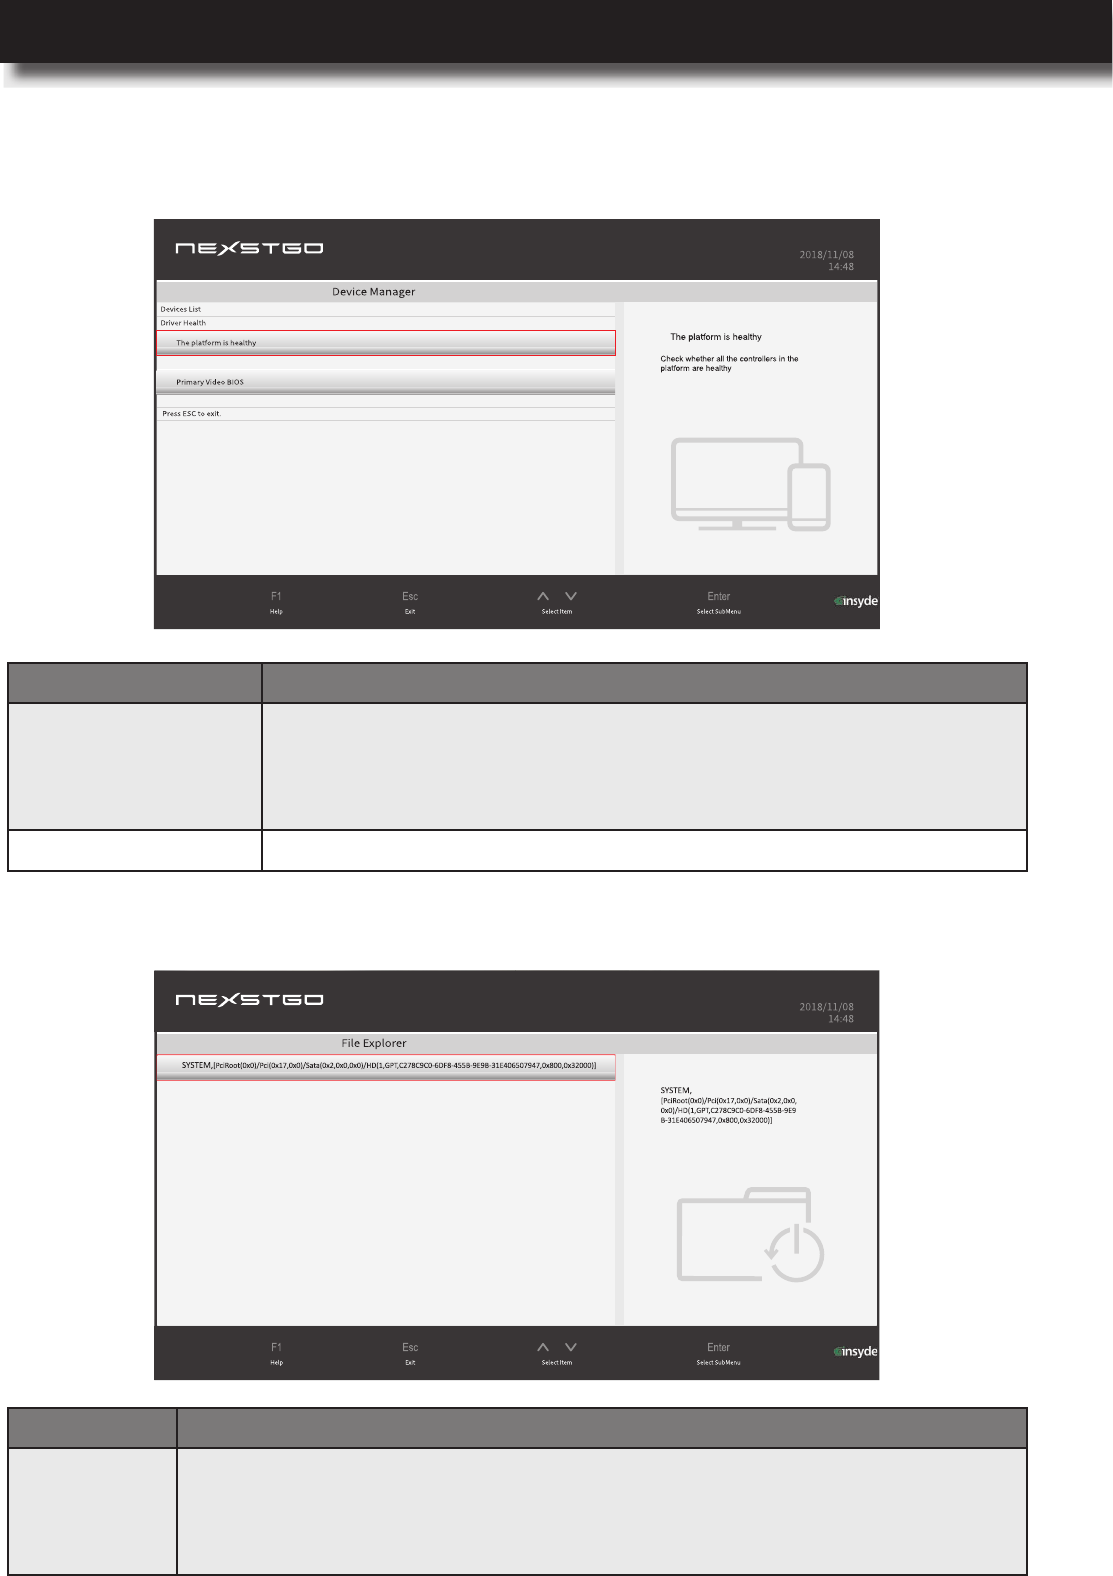
Device Manager
Boot From File
Item
Driver Health
Review the driver health status.
Enter the Driver Health item if you need to repair a driver with
specic controller or repair the whole platform until all modules
reach their terminal statuses.
Primary Video BIOS Not supported in this model.
Item
File Explorer
Select the boot le location for loading the operating system. The File Explorer
displays the folder paths from all the connected storage devices. If the boot le
was not selected correctly or has a problem, you will receive an error message
and will be directed back to the File Explorer.
68 l
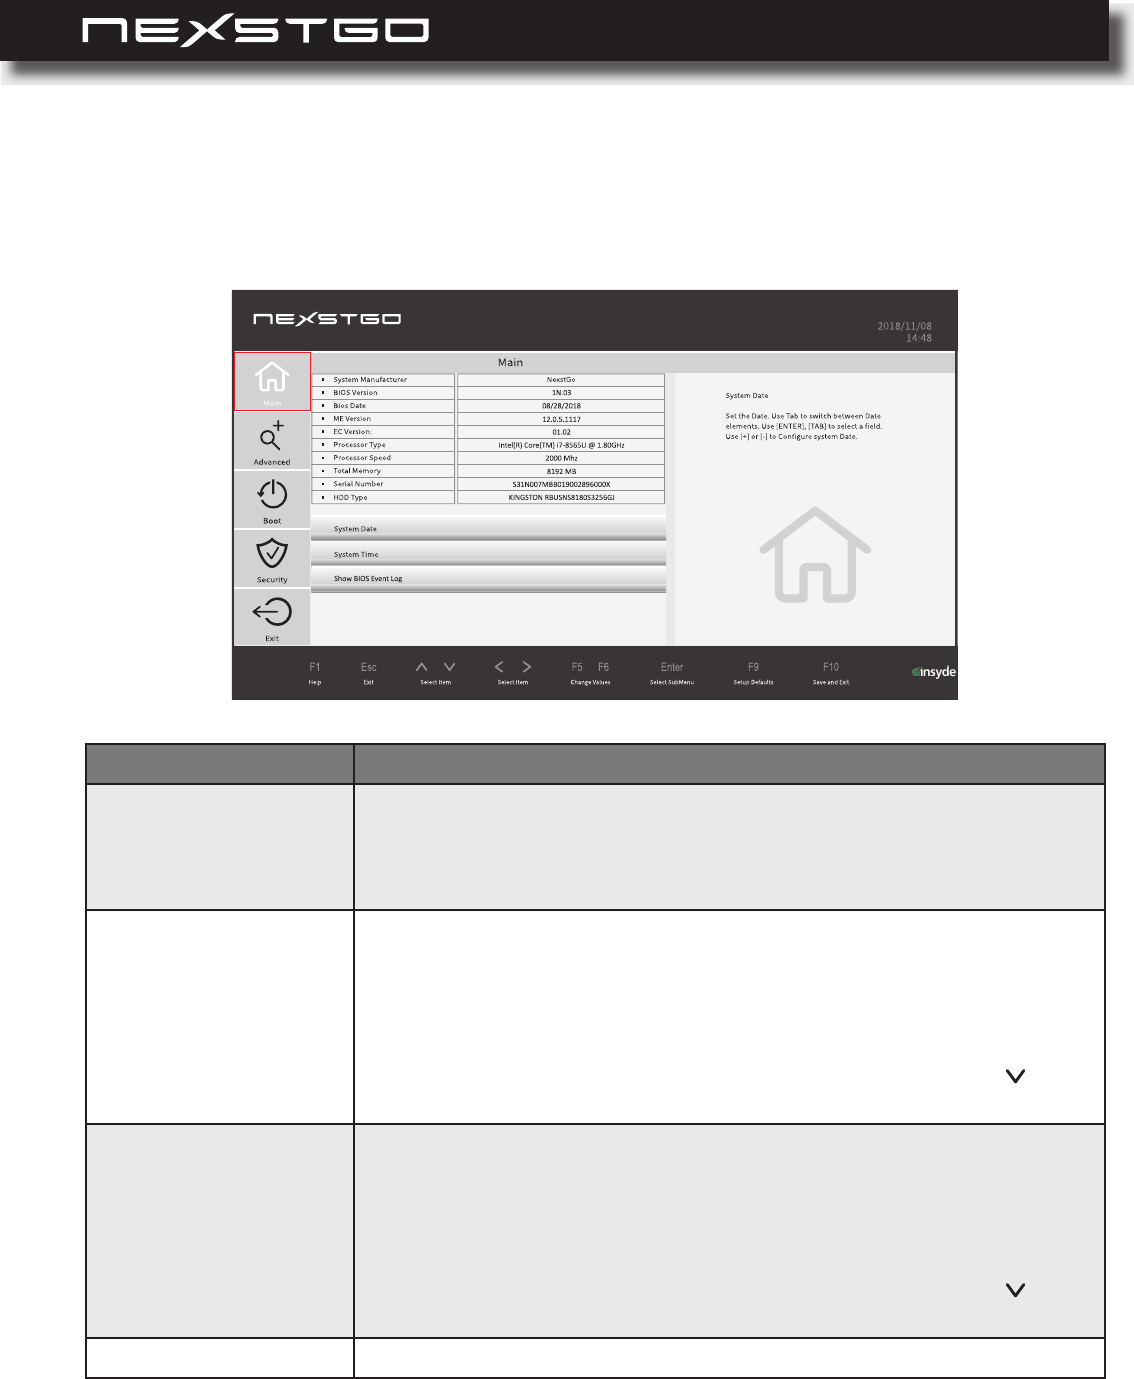
Setup Utility
Main Menu
Item
Main
Review the system parameters, such as system manufacturer,
BIOS version, BIOS date, ME version, EC version, processor type,
processor speed, total memory capacity, serial number, HDD type,
and HDD Type 1.
System Date
Set system date.
Use the Tab key on the keyboard or tap directly using the
touchpad to switch between the date elements.
Use the Enter key and the Tab key on the keyboard or tap
directly using the touchpad to select a eld.
Use the + key or the - key on the keyboard or tap on the
button using the touchpad to congure the system date.
System Time
Set system time.
Use the Tab key on the keyboard or tap directly using the
touchpad to switch between the time elements.
Use the Enter key and the Tab key on the keyboard or tap
directly using the touchpad to select a eld.
Use the + key or the - key on the keyboard or tap on the
button using the touchpad to congure the system time.
Show BIOS Event Log Select the Event Storage to show the events of it.
Protecting Your Computer
USER’S MANUAL
l 69
Protecting Your Computer
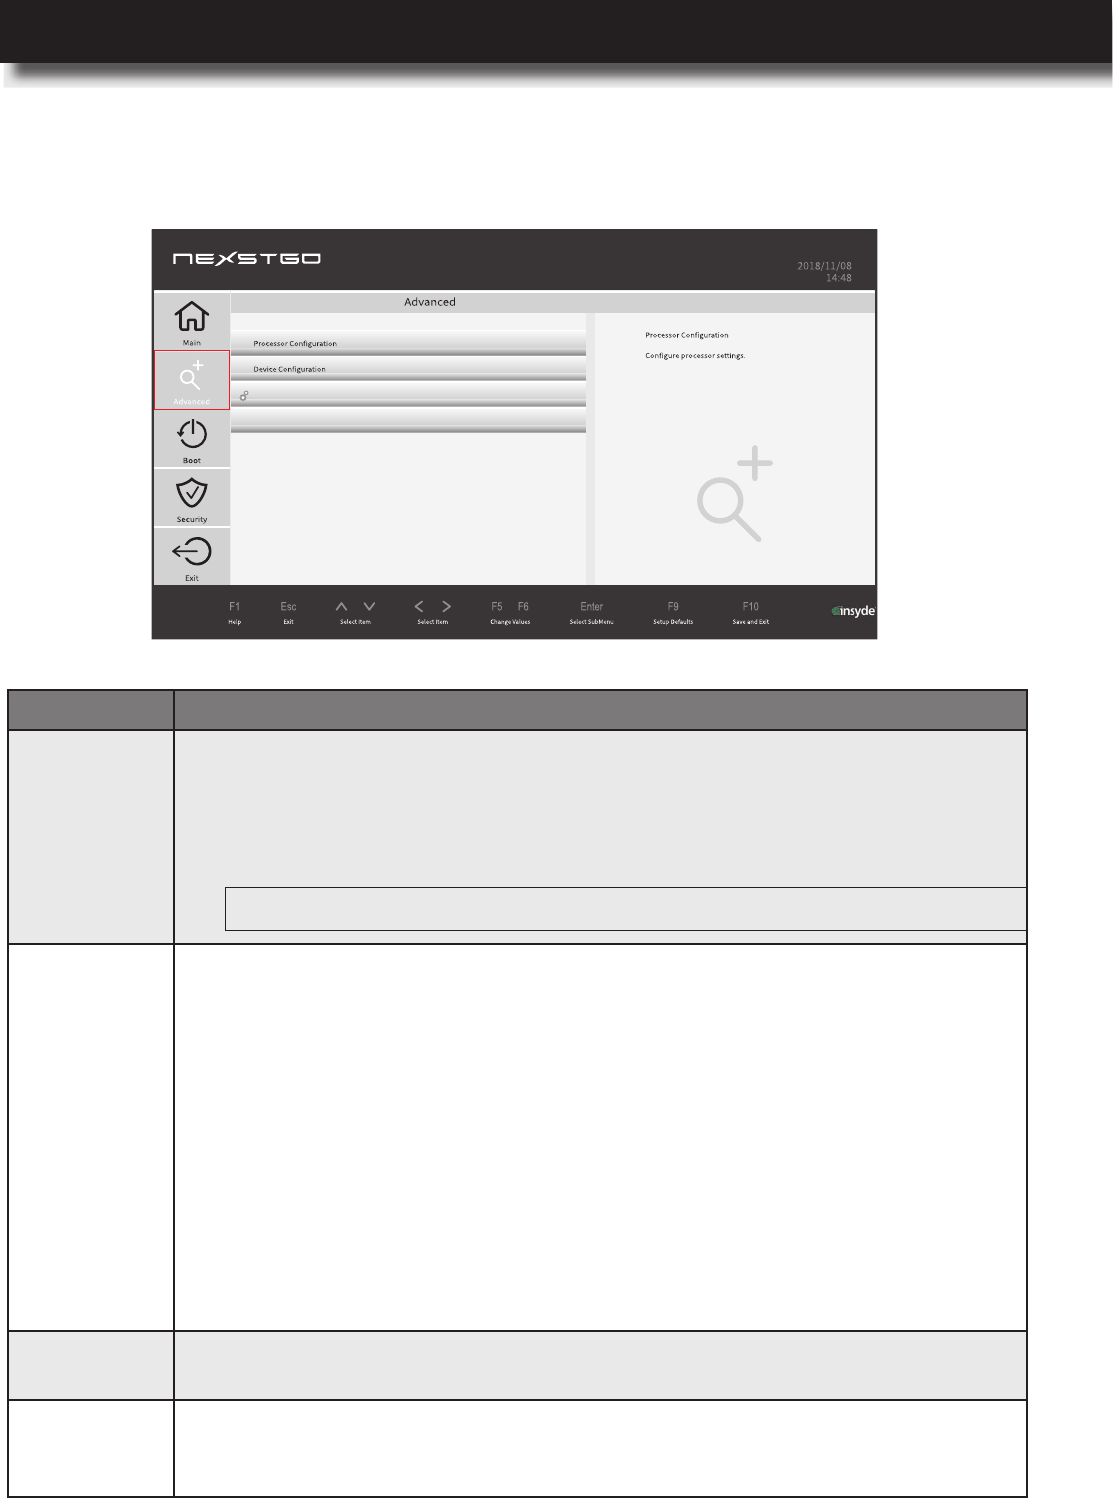
Advanced Menu
H2O Event Log ConfigManager
SATA
Item
Processor
Conguration
Intel Virtualization Technology: Enable to allow VMM utilizing the
additional hardware capabilities by Vanderpool Technology.
Intel VT-d: Enable to allow Directed I/O (VT-d) extend Intel’s Virtualization
Technology (VT) roadmap by providing hardware assists for virtualization
solution.
Device
Conguration
Set the default function of the Fn
lock key when the Fn lock key is activated. The available options include
Function Key or Multimedia Keys.
For example, if the Fn lock key is set to Multimedia Keys then the Fn lock
key depending multimedia keys (F1~F12) can be used if the Fn lock key is
on. If you want to use the Windows default functions F1~F12, you need to
toggle the Fn lock key to off.
Camera: Enable to allow using the camera.
Card Reader: Enable to allow using the card reader.
Touchpad: Enable to allow the touchpad.
USB Charger: Enable to allow USB charging for compatible devices using
the USB type-C port.
Microphone: Enable to allow using the microphone.
SATA Mode
Selection Set how SATA controller(s) operate.
H2O Event
Log Cong
Manager
Show all of the conguration pages.
NOTE:Modicationsrequireafullpowercycletotakeeffect.
70 l
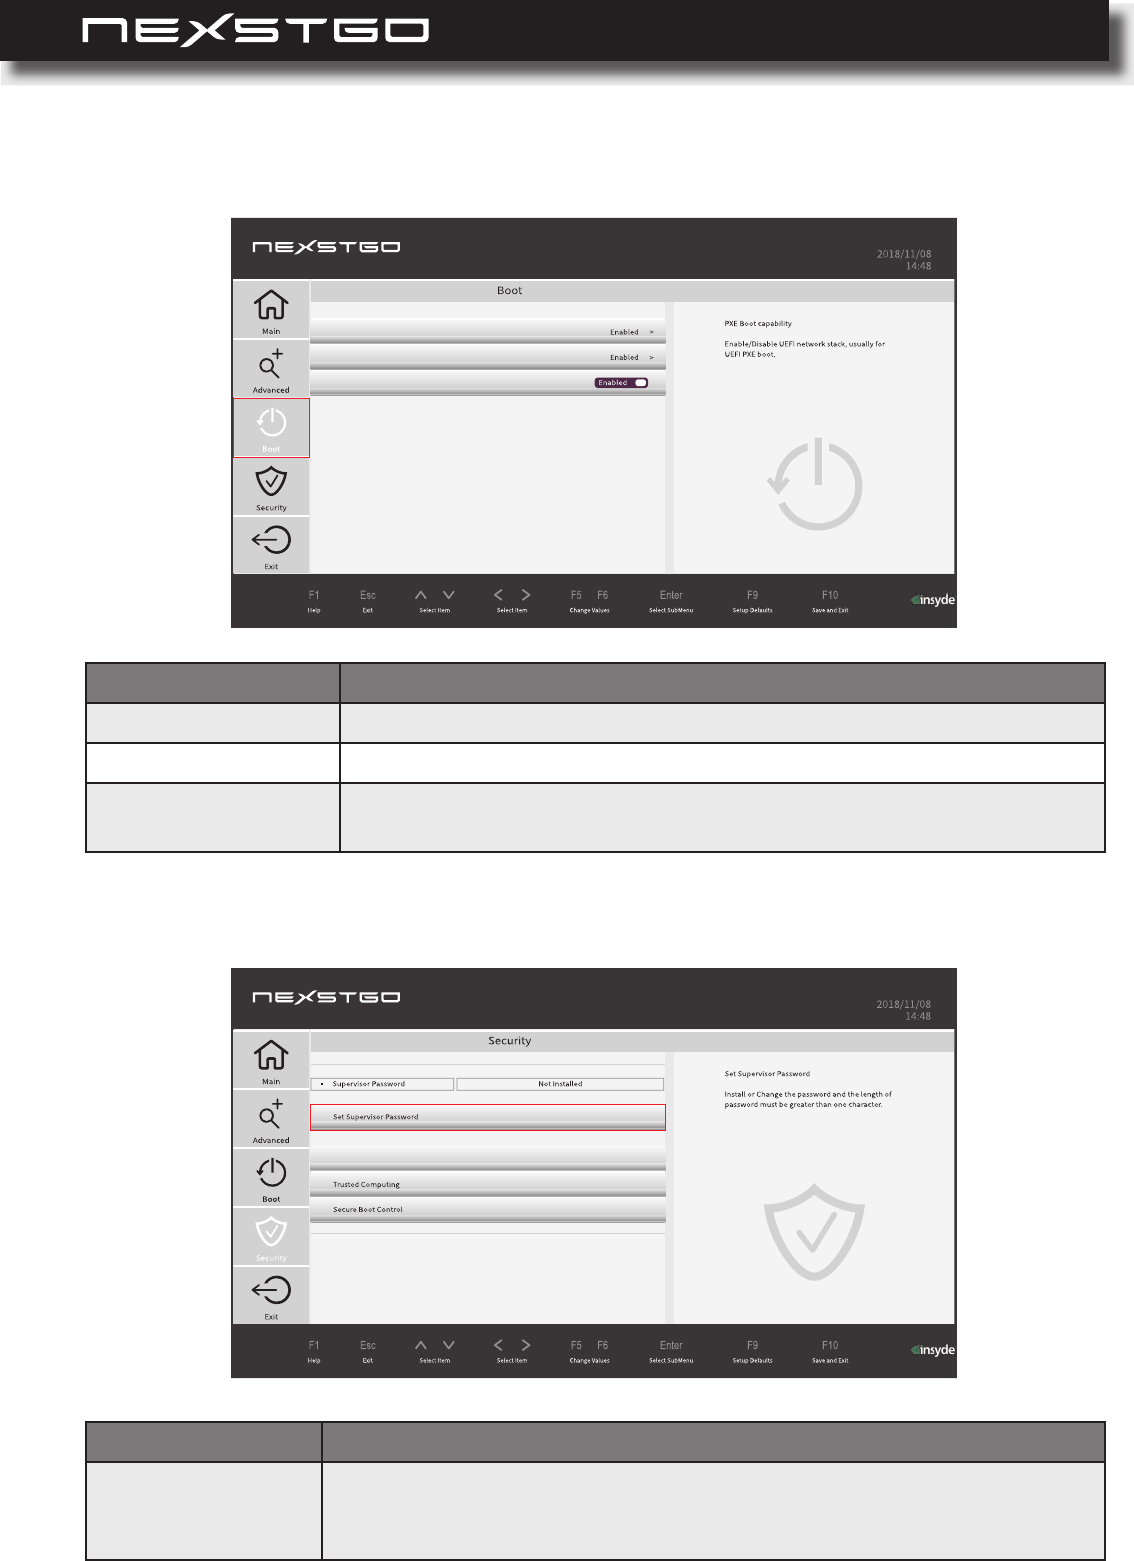
Boot Menu
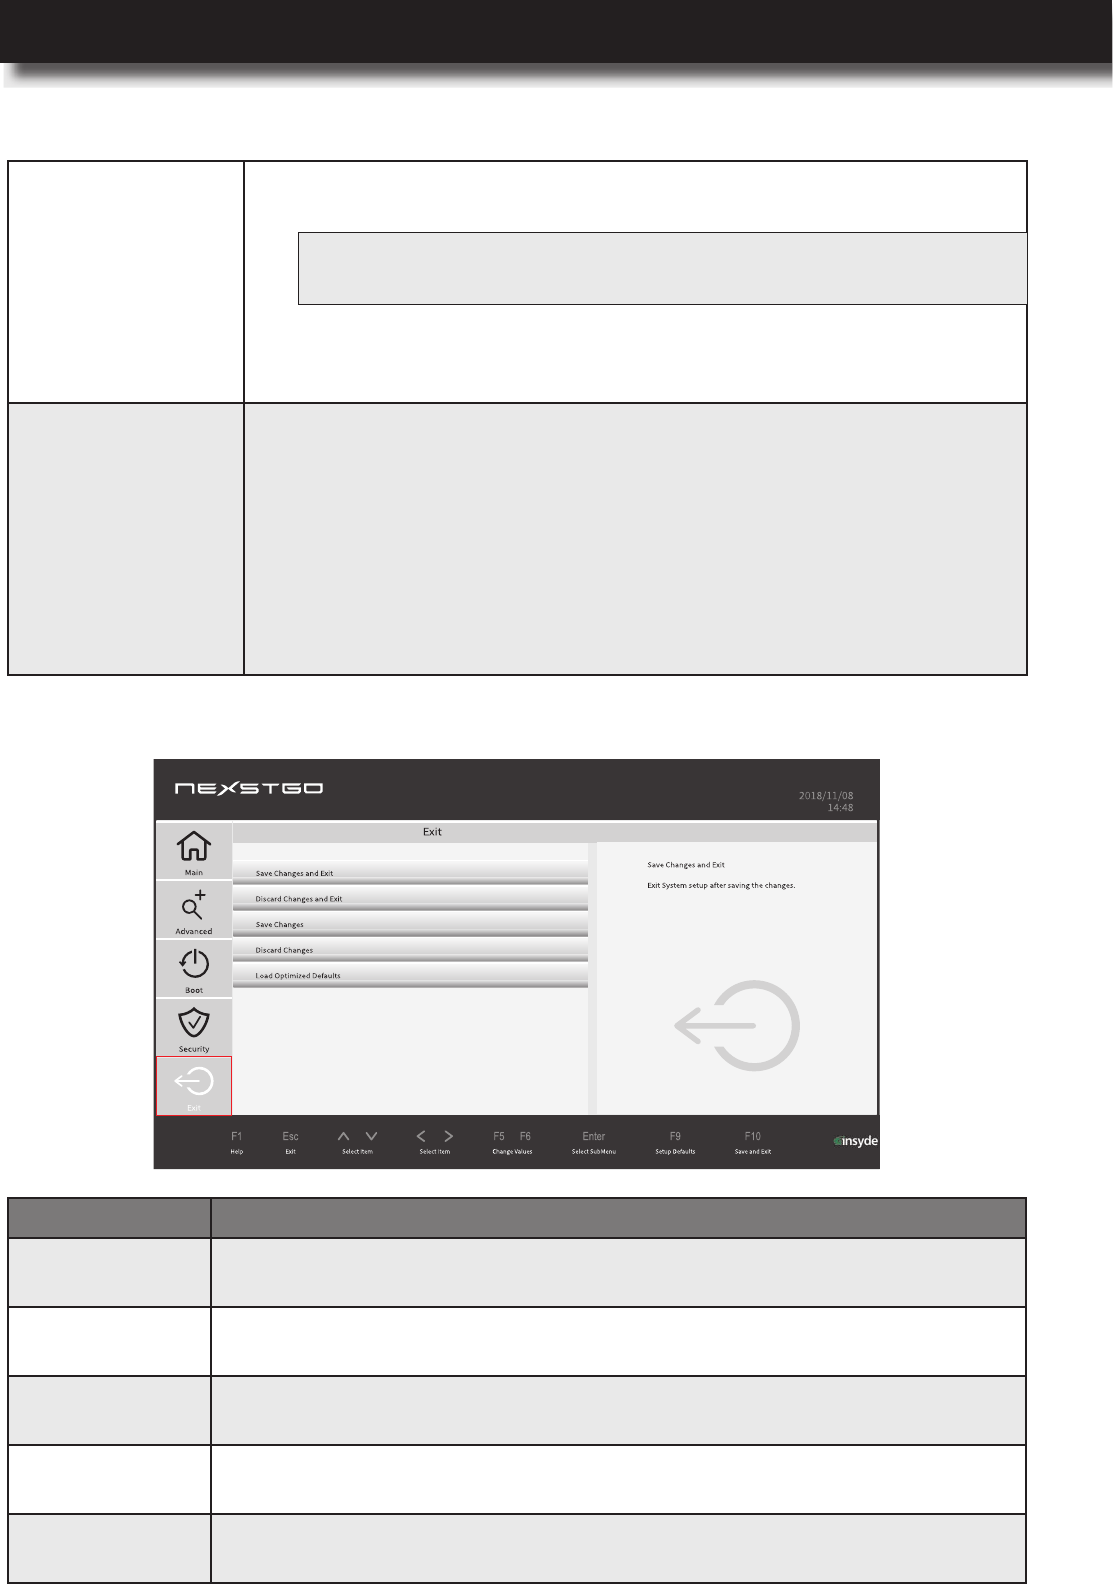
Security Menu
Item
Network Stack Enable/Disable UEFI network stack, usually for UEFI PXE boot.
PXE Boot capability Enable this feature if you want to use the PXE boot function.
Windows Boot
Manager
Enable/Disable Windows Boot Manager (KINGSTON
RBUSNS8180S3256GJ).
Item
Set Supervisor
Password
Set the supervisor password to control the access to the system conguration
settings. The password has to be greater than one character. Please refer
to “Setting Up a Supervisor Password” on page 60.
Network Stack
PXE Boot capability
Windows Boot Manager (KINGSTON RBUSNS8180S3256GJ) ...
StoragePassword Page
Protecting Your Computer
USER’S MANUAL
l 71
Protecting Your Computer
Trusted Computing
TPM Support:
Enable the TPM support for advanced crypto capabilities.
TPM State: Enable the TPM state to see pending TPM operations.
Pending TPM Operation: Set the pending TPM operation to TPM
Clear if you want to clear all data secured by TPM or to None if you
want to discard the selection.
Secure Boot Control
Secure Boot Control: Enable secure boot ow control to prevent
malicious apps and “unauthorized” operating systems from loading
during the system start-up process.
Enable to install all the
default secure keys, such as PK, KEK, db, and dbx set by the
manufacturer. Changes will take effect after you restart the system.
Clear Secure Boot Keys: Enable if you want to uninstall all the
default secure keys, such as PK, KEK, db, and dbx set by the
manufacturer. Changes will take effect after you restart the system.
NOTE: Modications to the TPM state will take effect after you restart the
computer.
Exit Menu
Item
Save Changes
and Exit
Select this option if you want to save all modications and exit the Nexstgo
System Conguration utility. The computer will automatically restart.
Discard Changes
and Exit
Select this option if you want to discard all modications and exit the Setup
Utility.
Save Changes Select this option if you want to save the modications but not to exit the
Setup Utility.
Discard Changes
Select this option if you want to discard the modications but not to exit the
Setup Utility.
Load Optimized
Defaults
Select this option to reset all values in Setup Utility to their factory defaults.

72 l
Device drivers are programs that control a specic type of device that is attached to your computer.
Each hardware component has its own driver which informs the operating system how to operate
that device. When you add new hardware component to your computer, the operating system
tries to install the device driver automatically using its built-in drivers library. If the driver cannot be
located, you are prompted to install the driver manually.
To download and update the device drivers, use the preinstalled Nexstgo Software Updater app.
Please refer to “Nexstgo Software Updater” on page 26.
Getting the Latest Drivers
NOTE: Asdevicedriversareprograms,likeanyotherleonyourcomputer,theymaysometimesgetcorrupted
andnotperformproperlyduetothecorruption.Werecommendtokeepthedevicedriversalwaysup-to-
datetoavoidmalfunctionofanyhardwarecomponents.
Protecting Your Computer
USER’S MANUAL
l 73
AdvancedConguration
You can backup your les to another device and restore them if the originals are lost, damaged,
or deleted. File backup can be performed just once or set to occur automatically. To congure le
backup settings, do the following:
Conguring File Backup
6
Backup Features
In this section, you will nd information on how to backup and recover your computer.
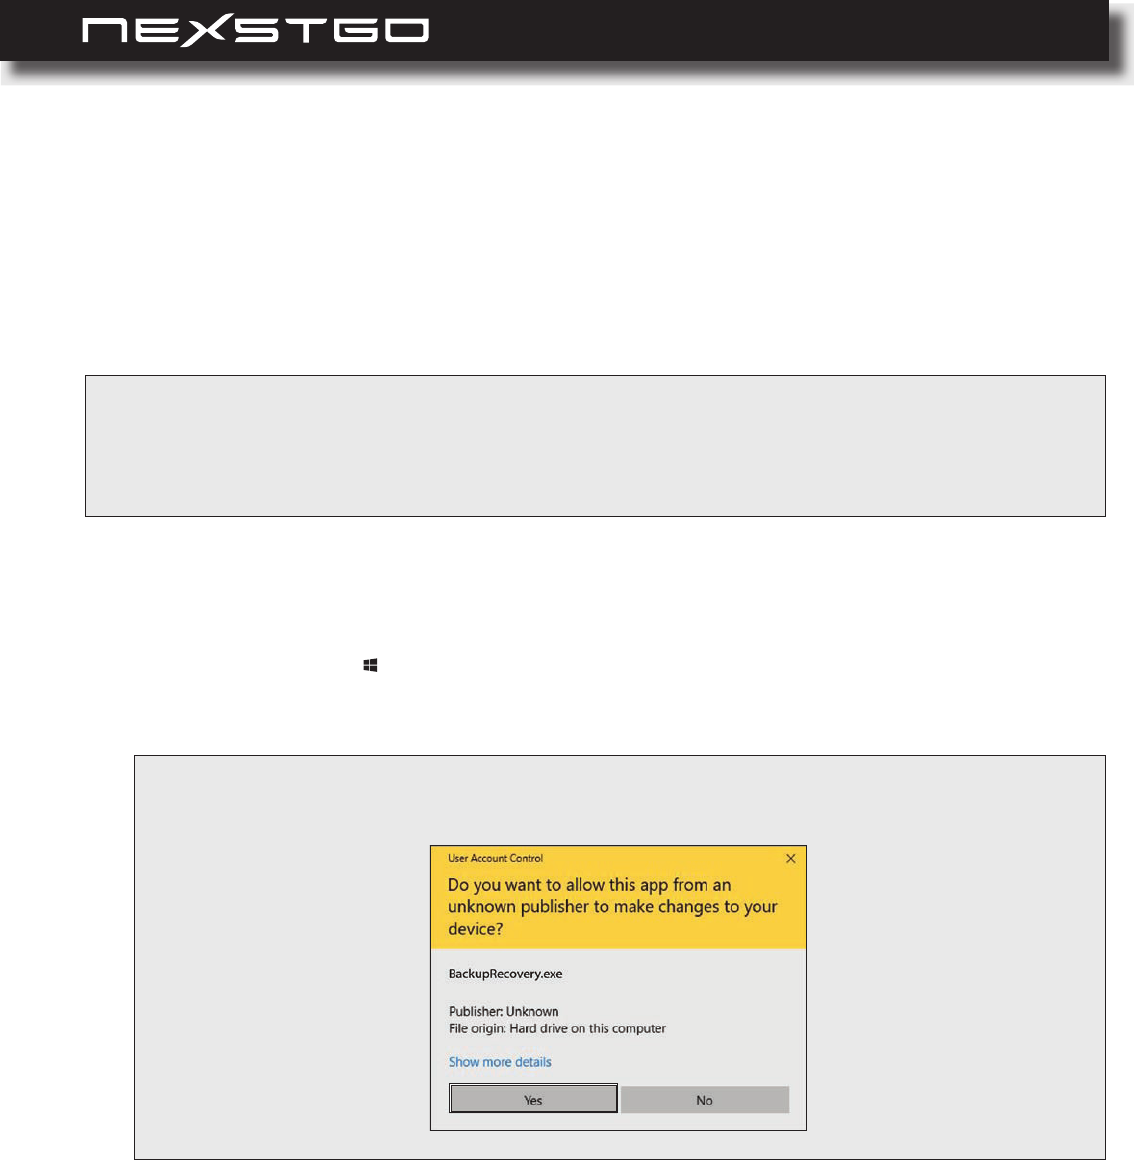
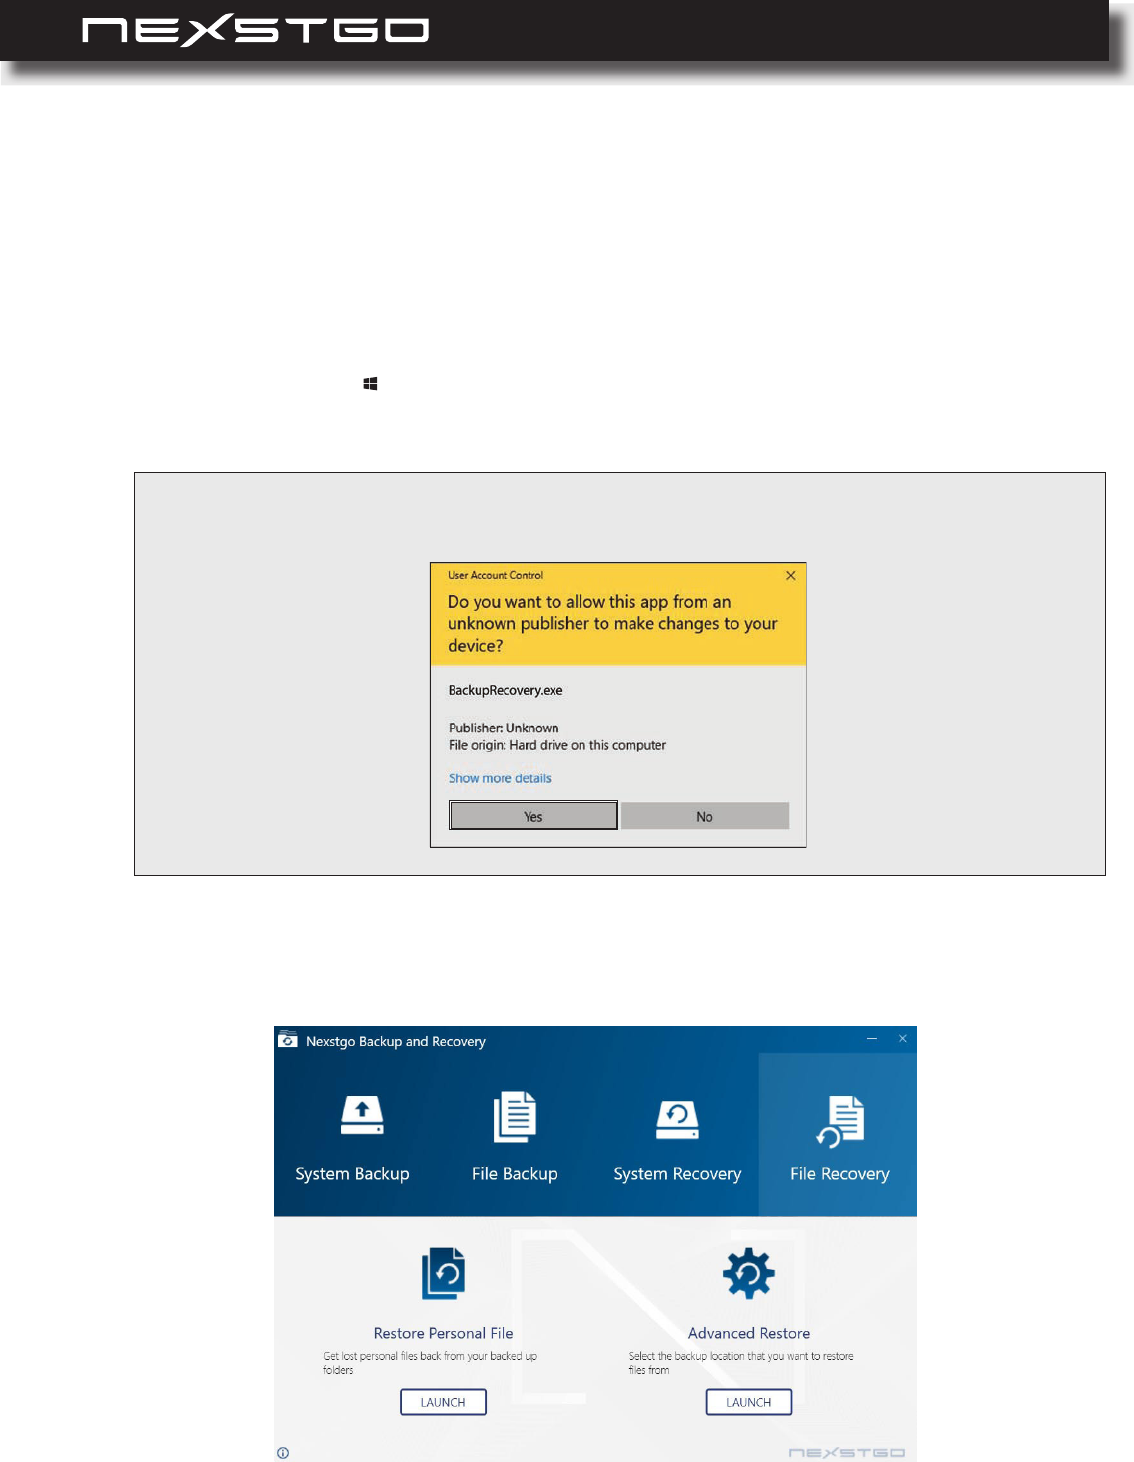
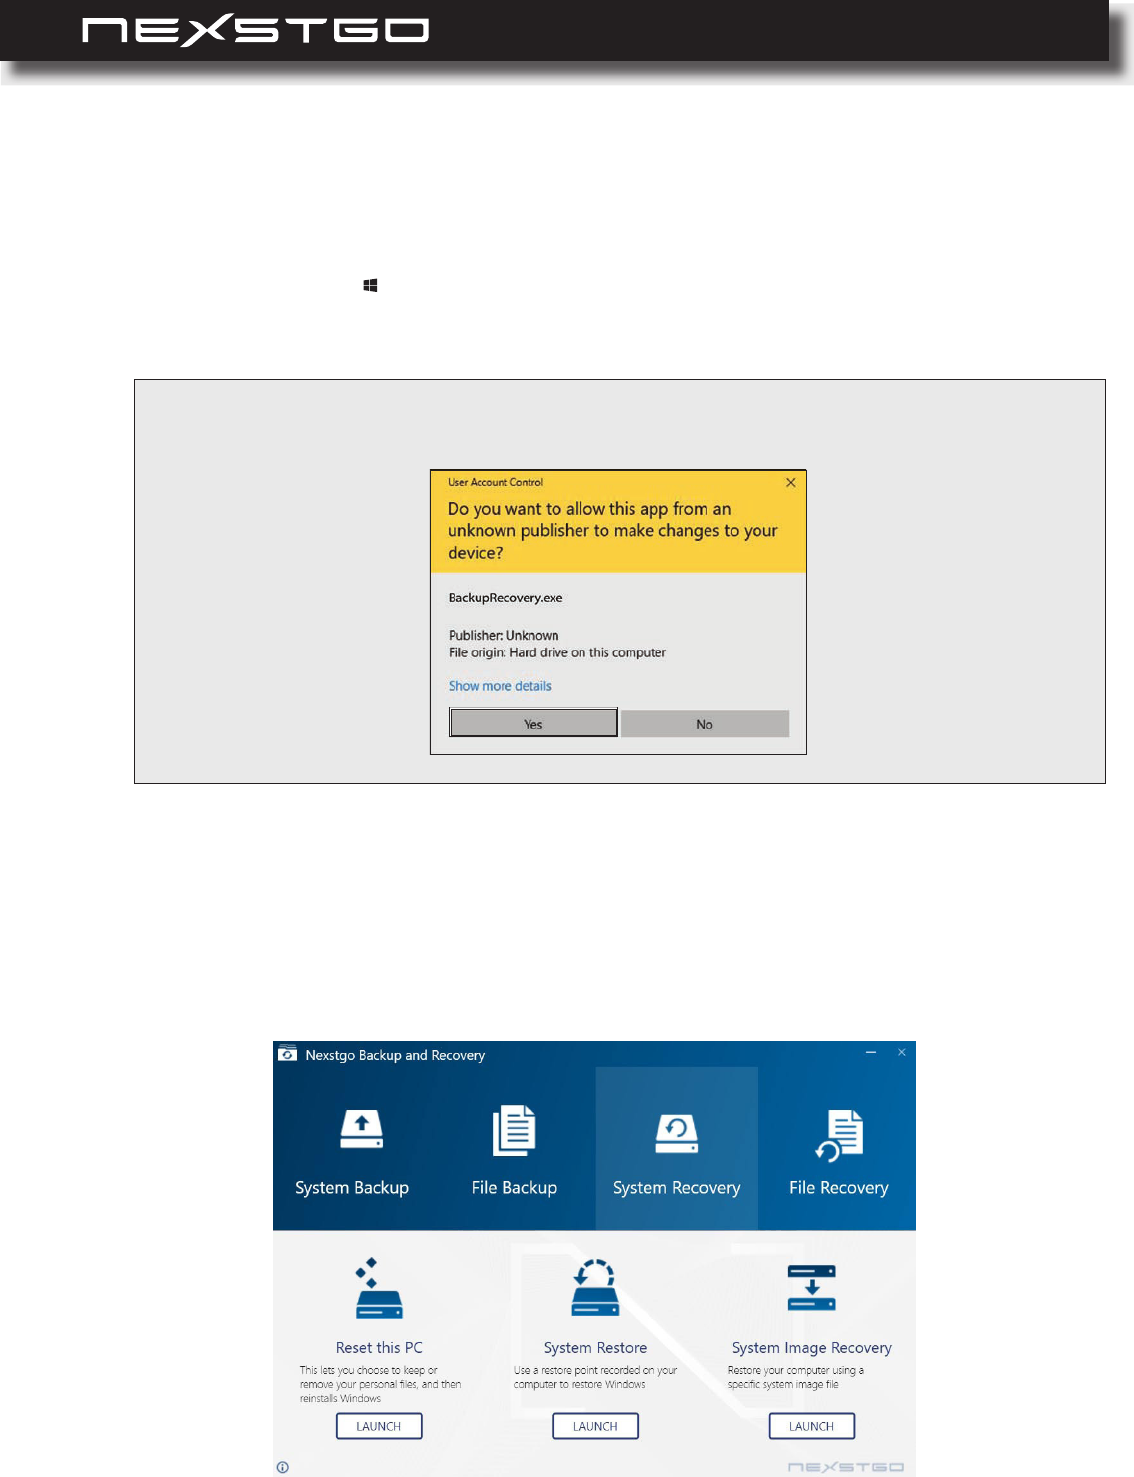
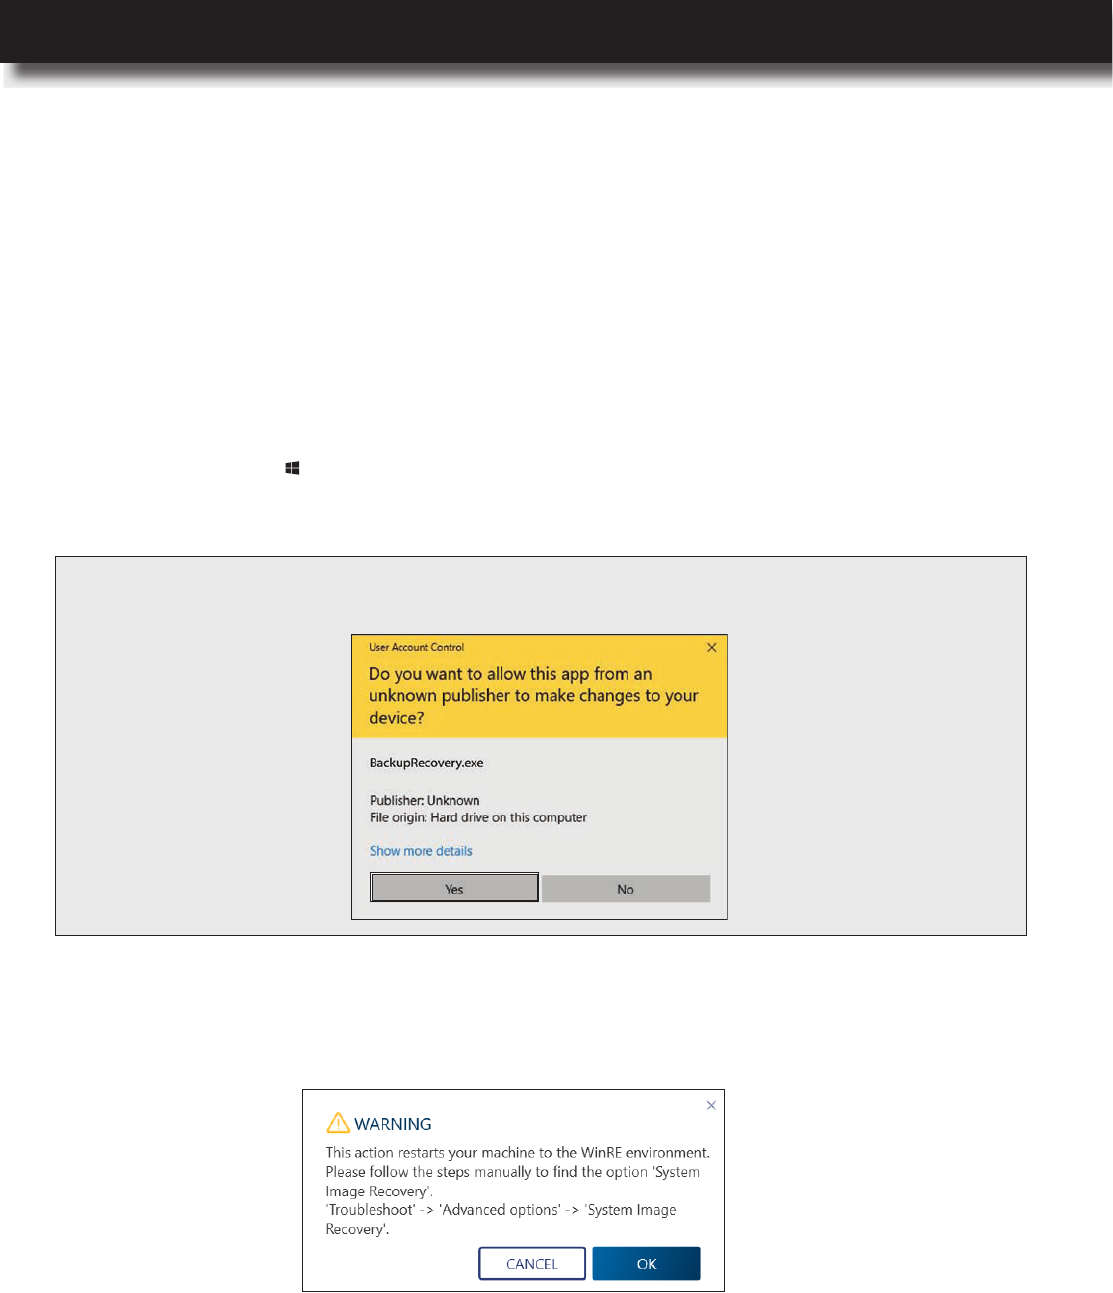
1 Open the Start menu and nd the Nexstgo group in the apps list.
2 Click on the Nexstgo Backup and Recovery app.
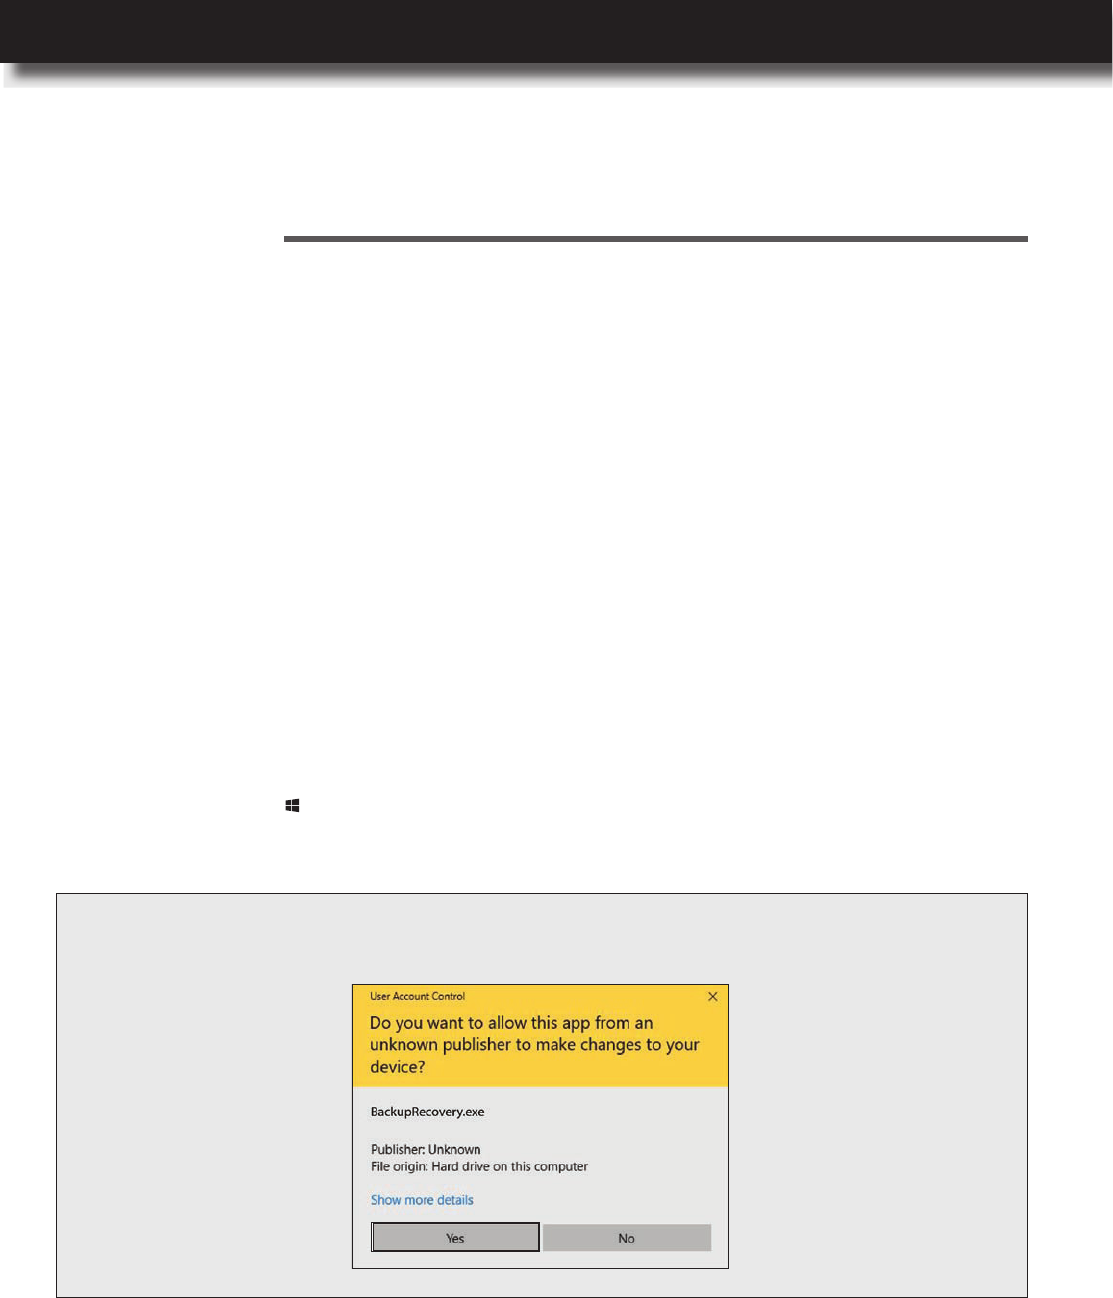
NOTE: You may be prompted to conrm opening an app from an unknown publisher. Click Yes to
continue.
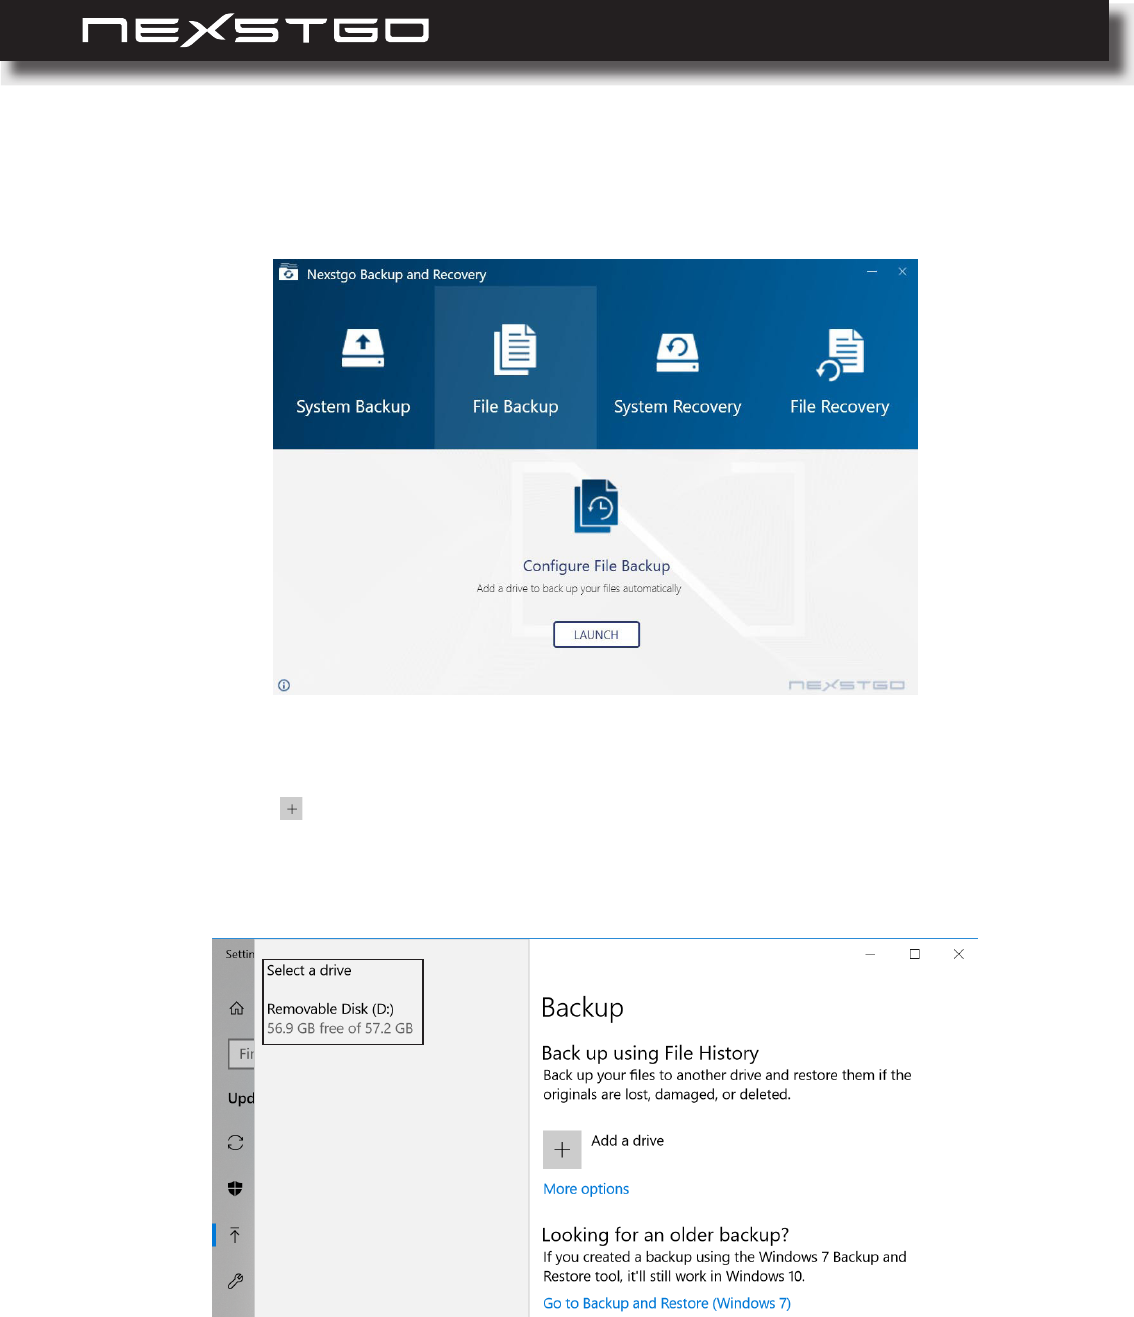
74 l
The Windows settings Backup page opens.
5 Click on the Add a drive option. You are prompted to select a destination for the
backup.
6 Click on the storage drive that you want to choose for saving backup les.
3 Click on the File Backup tab.
4 Click on the LAUNCH button.
AdvancedConguration
USER’S MANUAL
l 75
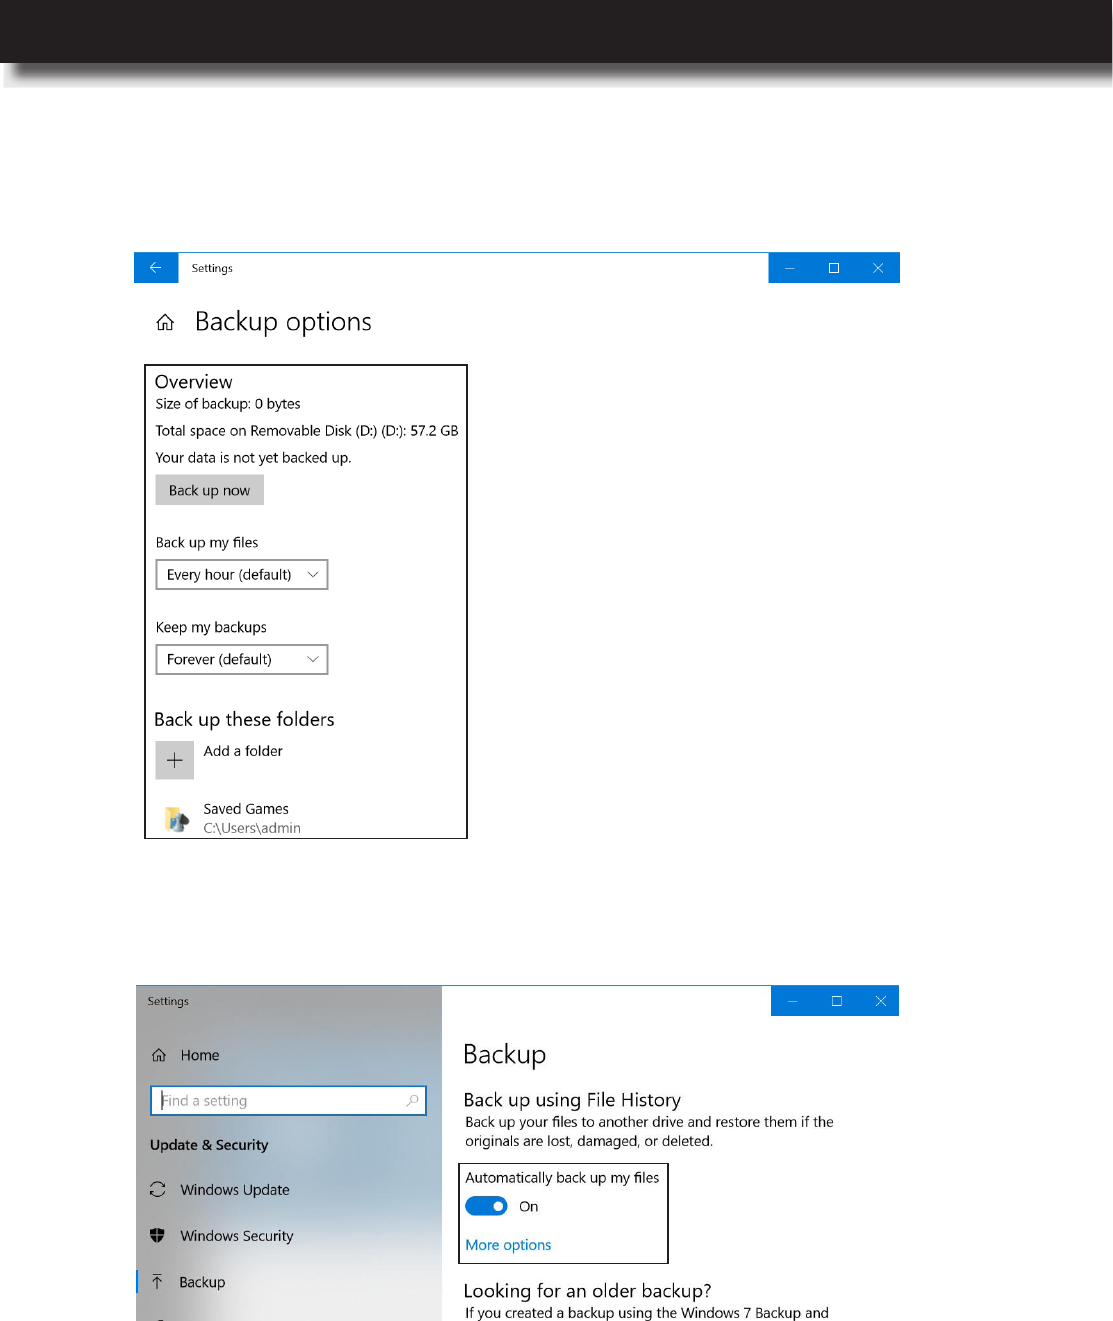
AdvancedConguration
8 Return to the Backup page. Set the option to On to enable
automatic backup.
7 Click on the More options link under Backup page to congure more backup options, such
as set the backup schedule, select the les and folders that you want to backup, and more.
76 l
Conguring System Backup
To backup the system, you can create a system restore point or create a recovery drive. The
restore point allows you to restore Windows to a point in the past, when it worked properly. The
purpose of the recovery drive is to provide a source when restoring the storage drive to the factory
default values if all other recovery methods have failed. As a precautionary measure, make sure
to create a restore point or recovery drive as early as possible.
IMPORTANT: Therecoverydriveiscomputerspecic.Onceyouhavecreatedarecoverydrive,youcannot
useittorestoreanothercomputer,neithercanyouusearecoverydrivefromanothercomputer
torestoreyourcomputer unlessthehardwarecomponentsand theoperating systemexactly
match.
Creating a System Restore Point
1 Open the Start menu and nd the Nexstgo group in the apps list.
2 Click on the Nexstgo Backup and Recovery app.
NOTE: You may be prompted to conrm opening an app from an unknown publisher. Click Yes to
continue.
To create a system restore point, do the following:
AdvancedConguration

USER’S MANUAL
l 77
AdvancedConguration
The System Protection tab opens on System Properties page.
5 Select the system storage drive.
6 Click on the button.
7 In the Restore Settings section, select Turn on system protection option.
8 In the Disk Space Usage section, set the maximum disk space used for system protection.
9 Click on the Apply button and then on the OK button to save the modications.
10 To create a system restore point right now, click on the Create button and follow the onscreen
instructions.
3 Click on the System Backup tab.
4 Select and click on the LAUNCH button.
78 l
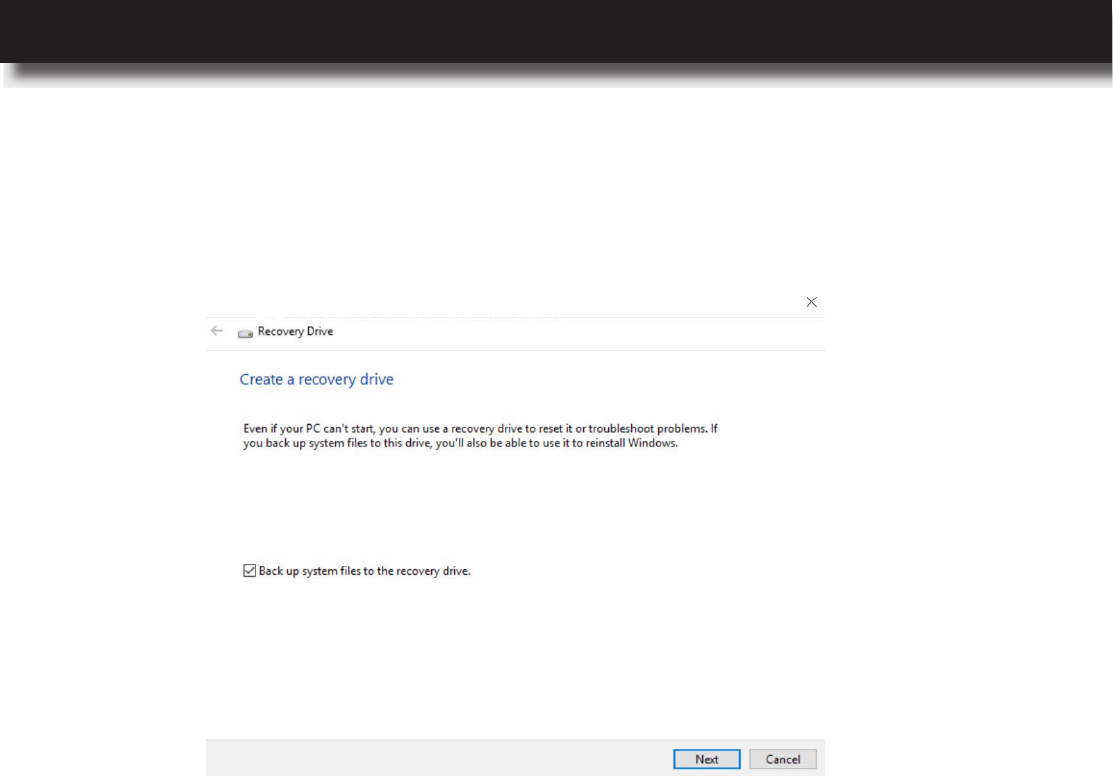
Creating a Recovery Drive
1 Open the Start menu and nd the Nexstgo group in the apps list.
2 Click on the Nexstgo Backup and Recovery app.
NOTE: You may be prompted to conrm opening an app from an unknown publisher. Click Yes to
continue.
3 Click on the System Backup tab.
4 Select and click on the LAUNCH button.
To create a system restore point, do the following:
AdvancedConguration
USER’S MANUAL
l 79
AdvancedConguration
6 Connect a USB storage disk to the computer with a minimum free space of 16 GB when
prompted and then click on the Next button. You will be informed that everything on the USB
storage drive will be deleted and recommended to backup any personal les.
7 Click on the Create button to start creating a recovery drive.
5 Make sure the option is checked and then
click on the Next button.
Creating a recovery drive may take up to several minutes. The system will notify you when the
recovery drive is done.
The Recovery Drive page opens.
80 l
Restoring Features
Restoring Personal Files and Folders
If you want to restore personal les or folders that have been backed up previously, do the
following:
1 Open the Start menu and nd the Nexstgo group in the apps list.
2 Click on the Nexstgo Backup and Recovery app.
NOTE: You may be prompted to conrm opening an app from an unknown publisher. Click Yes to
continue.
3 Click on the File Recovery tab.
4 Select Restore Personal File and click on the LAUNCH button.
AdvancedConguration
USER’S MANUAL
l 81
AdvancedConguration
Restoring the System
If your computer is not performing well, you need to repair or restore the system. To repair the
system, please refer to “Using Advanced Startup Options” on page 86. If the operating system
can be still loaded, you can try restoring Windows 10 to an earlier working state without affecting
your documents or reset the computer with or without removing your personal les, and then
reinstalling the Windows operating system. To restore the system if the operating system cannot
be loaded, please refer to “Recovering the Operating System if Windows 10 Fails to Start” on
page 87.
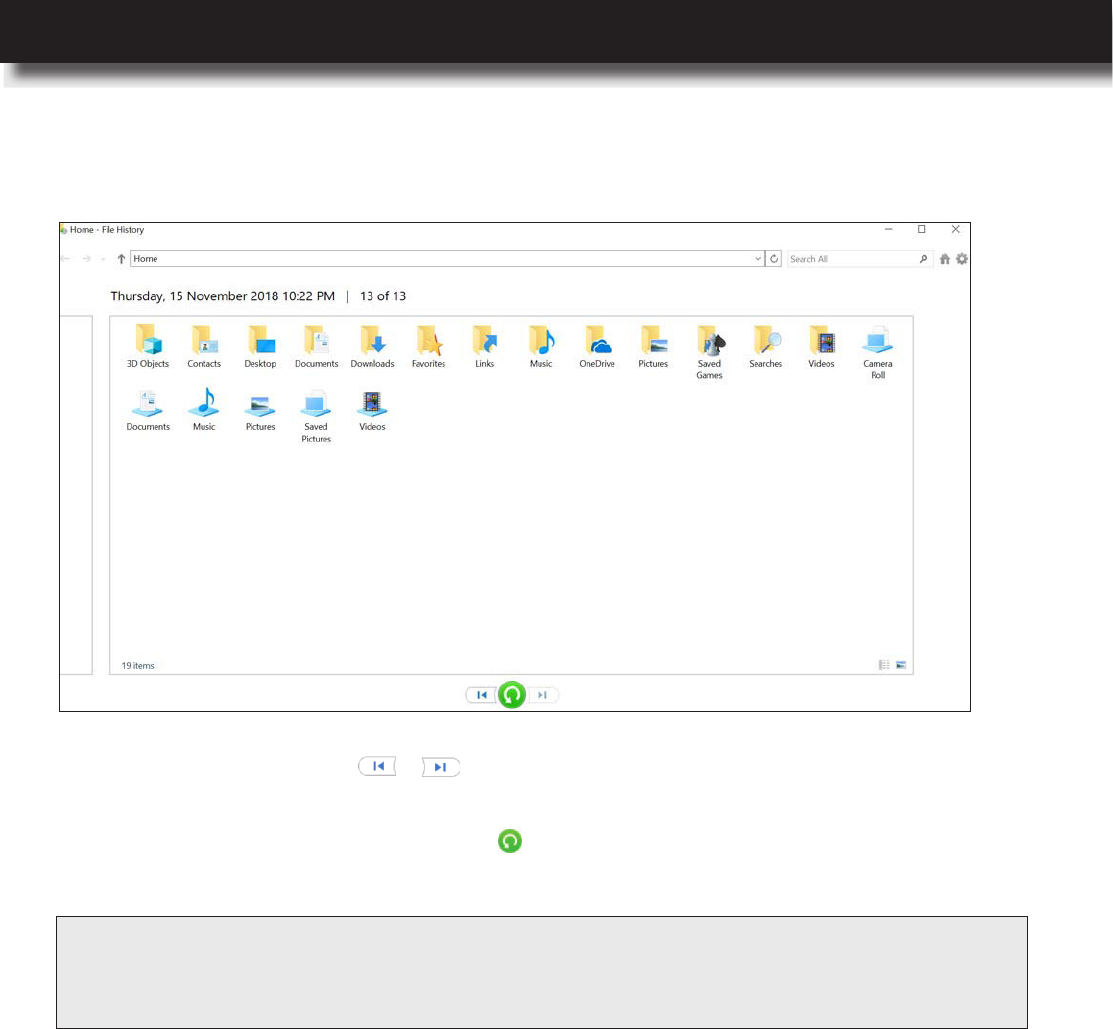
5 Use the navigation buttons / to select the backup date page and then select the
le(s) or folder(s) that you want to restore.
6 Click on the Restore to original location button and follow the onscreen instructions until
restoring your le(s) or folder(s) procedure is complete.
NOTE: Ifyouneedtousemoreadvancedrestoreoptions,clickontheAdvanced Restoretabin
Nexstgo Backup and Recoveryapp> File Recovery.Thisoptionenablesyoutouse
theWindows7backupandrestorefeatures.
The Home - File History page opens.

82 l
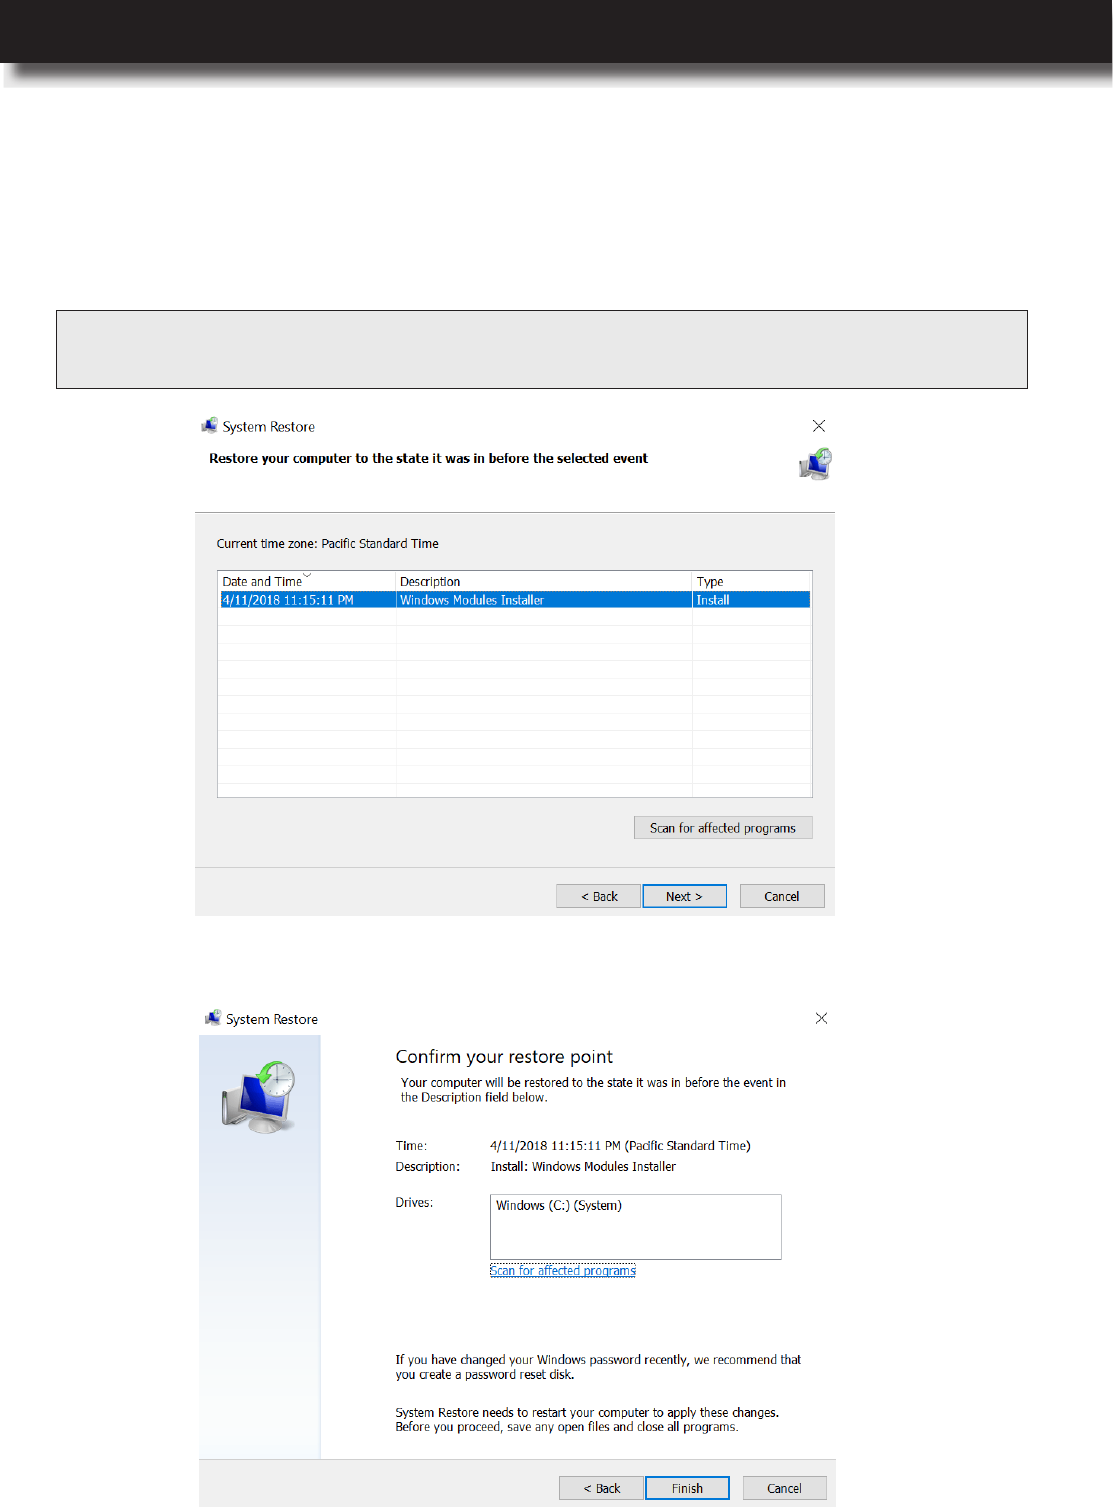
To restore the system from a restore point, do the following:
1 Open the Start menu and nd the Nexstgo group in the apps list.
2 Click on the Nexstgo Backup and Recovery app.
NOTE: You may be prompted to conrm opening an app from an unknown publisher. Click Yes to
continue.
Restoring the System to a Previous State
3 Click on the System Recovery tab.
4 Select System Restore and click on the LAUNCH button.
AdvancedConguration
USER’S MANUAL
l 83
AdvancedConguration
Wait until the system nishes restoring to an earlier working state.
7 Conrm your restore point and click on the Finish button.
The System Restore page opens.
5 Click on the Next button.
6 Select the system restore point that you want to use and then click on the Next button.
NOTE: ClickontheScan for affected programsbuttontoreviewanyprogramsthatwereinstalled
laterthantheselectedrestorepointwascreatedorremovedaftertherestorepointwascreated.
84 l
To restore the system from an image, do the following:
1 Open the Start menu and nd the Nexstgo group in the apps list.
2 Click on the Nexstgo Backup and Recovery app.
NOTE: You may be prompted to conrm opening an app from an unknown publisher. Click Yes to
continue.
Restoring the System From an Image
3 Click on the System Recovery tab.
4 Select System Image Recovery and click on the LAUNCH button.
5 Click on the OK button to continue.
You are informed that this action restarts the computer in WinRE environment.
AdvancedConguration
USER’S MANUAL
l 85
AdvancedConguration
3 Click on the System Recovery tab.
4 Select Reset this PC and click on the LAUNCH button.
5 Select one of the following depending on your needs:
– Removes the apps and settings, but keeps your personal les.
– Remove Everything: Removes all of your personal les, apps, and settings.
6 Follow the onscreen instructions to reinstall Windows operating system.
To reset your computer, do the following:
1 Open the Start menu and nd the Nexstgo group in the apps list.
2 Click on the Nexstgo Backup and Recovery app.
NOTE: You may be prompted to conrm opening an app from an unknown publisher. Click Yes to
continue.
Resetting the System
6 Click on the Use a device > tab.
7 Follow the onscreen instructions to complete restoring Windows operating system from an
image.
The Choose an option page opens.
86 l
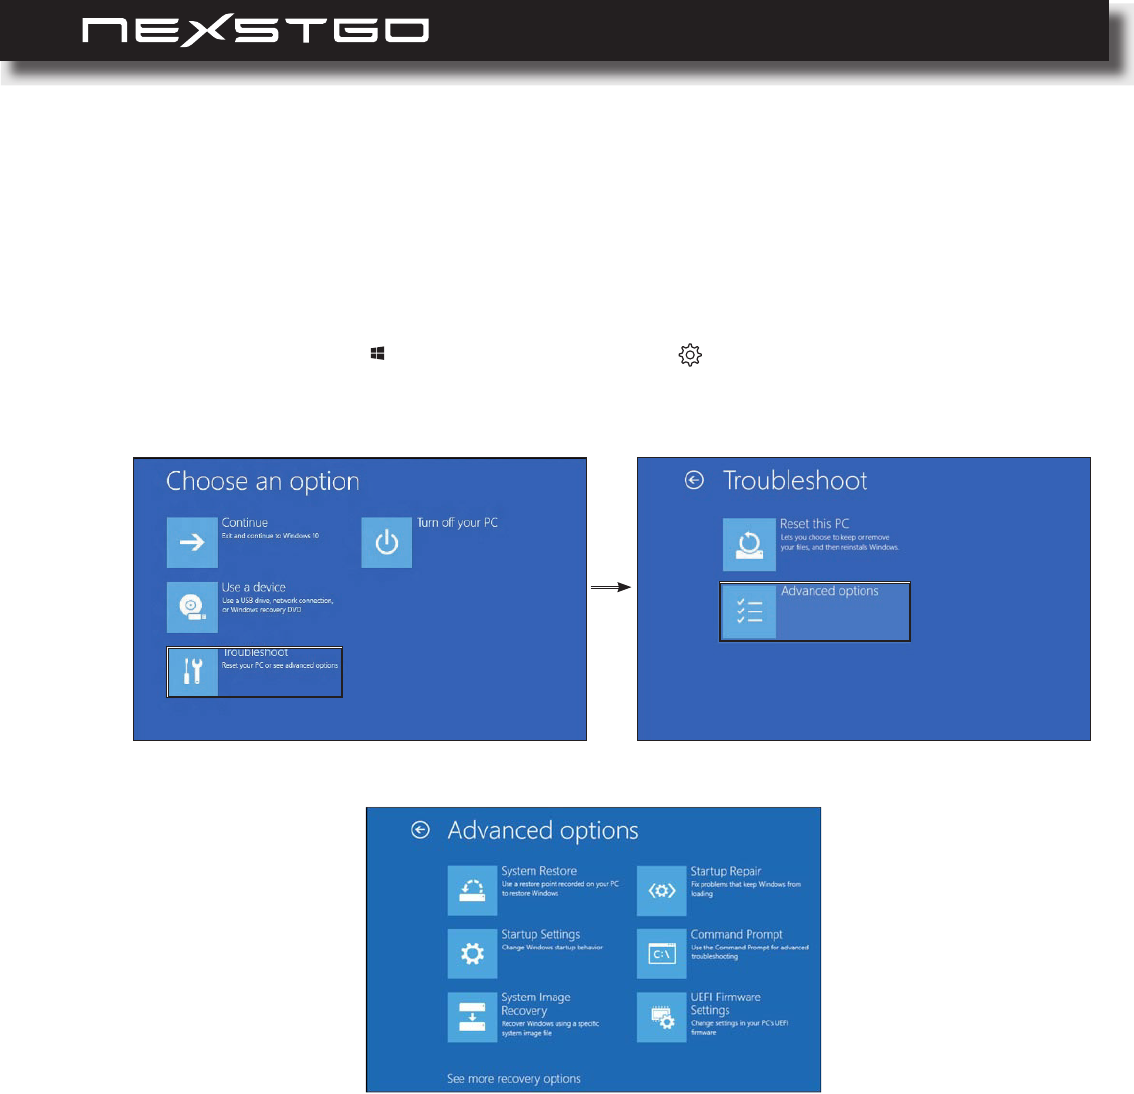
The Advanced options menu includes shortcuts to advanced troubleshooting tools and Windows
startup methods that can be used to repair important les, start Windows with the minimum
necessary processes, restore previous settings, and more.
To access and start using the Advanced options menu, do the following:
Using Advanced Startup Options
1 Open the Start menu and click on the Settings > Update & Security > Recovery >
Advanced startup > Restart now. The Choose an option page opens.
2 Click on the Troubleshoot > Advanced options.
The Advanced options page opens.
3 Click on any of the following:
– System Restore: Launches the System restore utility, which lets you x some types of
crashes and errors by restoring computer settings, drivers, and apps to the restore point
that was created earlier.
– System Image Recovery: Enables you to restore a backup image of your PC.
– Startup Repair: Launches Windows’ built-in startup repair tool, which can troubleshoot
and x startup problems automatically.
– Command Prompt: Restarts the computer and loads a Command Prompt window for
troubleshooting.
– UEFI Firmware Settings: Restarts the computer and loads Nexstgo System Conguration
utility for you to modify UEFI rmware settings.
– Startup Settings: Enables you to access alternative startup modes and tools, such as
Low-Resolution Video mode, Debugging mode, Boot Logging, and Safe Mode. Disable
driver signature enforcement, early-launch anti-malware protection, and automatic restart
on system failure.
AdvancedConguration
USER’S MANUAL
l 87
AdvancedConguration
The Windows recovery environment functions independently from the Windows 10 operating
system. It enables you to recover or repair the operating system even if Windows 10 fails to start.
After two unsuccessful attempts to boot the computer, Windows recovery environment starts
automatically. You can choose between recovery or repair.
To reinstall Windows operating system, do the following:
Recovering the Operating System if Windows 10 Fails to Start
1
Connect the storage device with the operating system installation program to your computer.
2 Start the computer and during system setup, press the F2 key to open the Nexstgo System
Conguration utility.
3 Click on the OS Recovery tab. Choose an option page opens.
5 Click on the device where you want to restore the operating system.
6 Follow the onscreen instructions to complete installing the operating system.
7 To install any missing drivers, please refer to “Installing and Updating Device Drivers” on
page 72.
4 Click on the Use a device option. Use a device page opens.
IMPORTANT: Reinstallingtheoperatingsystemwilldeleteallyourpersonaldatasavedontheinternalstorage
drive.
88 l
Troubleshooting
7
General Recommendations
In this chapter, you can nd information on possible solutions to problems that may occur when
using your computer.
Always keep your system up-to-date. This might resolve problems you face with your
computer.
– For checking and updating drivers and apps in your computer, please refer to “Nexstgo
Software Updater” on page 26.
– For monitoring and updating Windows operating system, do the following:
a) Click on the icon in the Windows notication
area.
The Windows Defender Security Center page opens.
b) Click on the
tab.
The Device performance & health page opens.
c) Review the status of Windows Updates.
NOTE: Bydefault,WindowsUpdatesaredownloadedandinstalledautomatically.
NOTE: For smoother computer performance, we also recommend to monitor the Storage capacity,
Devicedriver,andBatterylife.
Troubleshooting

USER’S MANUAL
l 89
Troubleshooting
Computer Becomes Unresponsive
Problems and Solutions
If you experience a problem with your computer, please refer to the instructions in this section to
nd a solution.
Always close open apps and windows you are not currently using.
Uninstall unused apps and empty the recycle bin regularly to free some space on the storage
drive.
Other methods for cleaning the space on the storage drive:
– Use the Disk Defragmenter (Control Panel (view by Large icons or Small icons) >
).
– Allow Windows automatically free up space by removing les you do not need, such as
temporary les and content in your recycle bin (Start menu > Settings > System >
Storage > Storage sense > On).
Back up your personal data regularly and make sure you have a backup of the system. Please
refer to “Advanced Conguration” on page 73.
Problem
Computer stops
responding
1 Press and hold the Power button for at least 3 seconds to turn
off the computer.
– If the computer is turned off, restart the computer by pressing
the Power button. If the computer is still not responding,
continue with step 2.
2 Remove all the external devices that are connected to the
computer and unplug the AC adapter. Wait for a few minutes
and restart the computer by pressing the Power button. If the
computer is still not responding, have the computer serviced.

90 l
Problems with Wireless Networks
Problems with the Keyboard
Wireless-LAN
Bluetooth
Problem
Computer cannot connect
to the wireless network
Make sure of the following:
WLAN function is enabled. Please refer to “Wireless
Connections” on page 39.
Airplane mode is off.
Your computer is within the range of the wireless router’s
signal.
Your computer is using the correct WLAN adapter driver. To
check the driver’s status, open the Start menu > Settings
> Network & Internet > Status > Change adapter options
> General. Make sure the Device status is This device is
working properly.
You have entered the connection parameters and password
correctly when connecting to a secured wireless router.
Problem
Liquid is spilled on the
keyboard
1 As the liquids conduct electricity, make sure that no liquid
creates a short circuit between you and the AC power adapter
(if in use).
2 Unplug the AC power adapter as quickly as possible.
3 Turn off the computer.
4 Wait until you are sure that all the liquid is dry before turning
on the computer. If the keyboard stops functioning, have the
computer serviced.
Problem
Computer cannot connect
to another Bluetooth device
Make sure of the following:
Bluetooth function is enabled. Please refer to “Bluetooth” on
page 40.
Bluetooth device is visible and discoverable.
You have conrmed the pairing codes in both your computer
and in the other device when making the connection.
Troubleshooting
USER’S MANUAL
l 91
Troubleshooting
Touchpad is not Functioning
Problems with the Screen
Problem
Touchpad is not functioning
Make sure the touchpad lock toggle key (F10) is not on.
Problem
The screen is blank when
the computer is turned on
The battery may have depleted. Connect the AC power adapter
to the computer and to the electrical outlet simultaneously. Please
refer to “Connecting the AC Power Adapter” on page 28.
The screen goes blank
suddenly
Check and modify (if necessary) the time period in minutes when the
display turns off in Control Panel (view by Large icons or Small
icons) > Power Options > Choose or customize a power plan >
Nexstgo > Change plan settings > Turn off the display:.
The screen is not readable
or distorted
Make sure of the following:
Your computer is using the correct display adapter driver.
To check the driver’s status, open the Start menu > Settings
Adapter > Properties > General. Make sure the Device status
is This device is working properly.
The screen resolution and color parameters are correctly set.
The external monitor
screen is blank
Make sure the external monitor is switched on. Then press the
keyboard multimedia key (F8) and select the display mode.
Please refer to “Selecting a Display Mode” on page 40.
If the problem remains, do the following:
1 Connect the external monitor to another computer to make
sure it is functioning.
2 Reconnect the external monitor to your computer.
3 Refer to the external monitor’s user manual or manufacturer’s
webpage to make sure that the resolution and refresh rates
are supported.
When using an external
keyboard, all or some of
the keys do not function
properly.
1 Turn off the computer.
2 Disconnect and reconnect the keyboard.
3 Turn on the computer and see if the problem is solved. If the
keyboard is still not functioning, make sure you have installed
the correct driver for the keyboard. To check the driver’s status,
do the following:
a) Open the Control Panel (view by Large icons or Small
icons) > Keyboard > Hardware tab.
b) Click on the external keyboard and then click on the
Properties button.
Make sure the Device status is This device is working
properly. If you see any other statuses, please refer to the
keyboard’s user manual for troubleshooting.

92 l
Problems with Audio
Problems with the Fingerprint Reader
Problems with the Battery
Problem
Sound is not audible
Make sure the audio mute toggle key (F1) is not on. Please
refer to “Audio mute toggle key” on page 11.
MIDI or wave sound does
not play correctly
Make sure the built-in audio device is functioning properly. To
check the audio device status, open the Control Panel (view by
Category) > Hardware and Sound > Devices and Printers >
Device Manager > Sound, video and game controllers.
The voice is not clear on
audio recordings made by
using the microphone input
Check the Enhance Voice Recognition feature in Control Panel
(view by Large icons or Small icons)
> Microphone Array > Microphone Effects.
The voice is not loud
enough on audio
recordings made by using
the microphone input.
Adjust the recording volume slider bar in Control Panel (view by
Large icons or Small icons)
Microphone Array > Recording Volume.
When headphones are
connected, speakers do
not produce sound
When you connect the headphones to the computer, the playback
is automatically redirected to the headphones. If you want to listen
to the sound from the speakers, set the speakers as the default
audio device in Control Panel (view by Category) > Sound >
Playback.
Problem
The surface of the
ngerprint reader is dirty,
strained, or wet, and you
fail to authenticate your
ngerprint
Gently clean the surface of the reader with a dry, lint-free cloth.
Problem
Battery depletes fast after
charging
Use the Nexstgo Power Manager app to save power consumption:
Congure the peak shift (selected models only) feature that
charges the battery only at peak-off hours.
Congure the battery charging thresholds.
Please refer to “Nexstgo Power Manager” on page 20.
Troubleshooting

USER’S MANUAL
l 93
Troubleshooting
Problems with the Internal Storage Drive
Problems with the Software
Problems with USB Devices
Problem
Opening folders and les
has become slow
The storage drive may have bad sectors. Use the Disk Defragmenter
utility to analyze and defragment (if necessary) the storage drive.
Open the Control Panel (view by Large icons or Small icons) >
.
System fails to load
Windows from the storage
drive
You may need to restore the operating system. Please refer to
“Restoring the System” on page 80 .
Problem
Third party app does not
install correctly or does not
function as expected
Make sure of the following:
The app is compatible with Windows 10.
Your computer has enough resource to run the app.
Your computer has the correct device drivers.
Problem
A compatible USB device
does not start charging
when connected to the
USB port
Make sure of the following:
The USB device is connected to the correct USB port (USB
type-A 3.1 port)
The USB charger function is enabled in Nexstgo System
.
Your computer has the correct device drivers.
The computer does not
recognize the USB device
Some external storage devices cannot be recognized by the
operating system automatically. If Windows fails to recognize the
USB device, download the device driver from the manufacturer’s
webpage and install manually.
The AC power adapter is
connected to the computer
but the battery does not
start charging
Make sure the AC power adapter is connected correctly to the
computer and to the electrical outlet. If charging does not start,
do the following:
a) Disconnect the AC power adapter from the electrical outlet.
b) Connect another electrical device to the power outlet, and
then check that you can use that electrical device. If the
outlet is working, disconnect the electrical device.
c) Reconnect the AC power adapter to the electrical outlet and
check if the battery has started to charge. If the battery is
still not charging, have the computer serviced.

94 l
Index
8
A
Accessibility Features 50
Ease of Access Center 50
Keyboard Shortcuts 50
Airplane mode 41
Antivirus Software 64
Audio Features 42
Audio Settings 42
F
Firewall Software 64
K
Keyboard 31
Multimedia Keys 32
Windows Keys 31
L
Labels 13
Company logo 13
Country of manufacture and company
name 13
Input current information 13
Model number 13
Opening the Label Door 13
Regulatory and safety information 13
Serial number 13
N
Network Connections 39
Wireless Connections 39
Add a Bluetooth Device 40
Bluetooth Connection 40
WLAN function 39
Nexstgo Software 17
Accessing Nexstgo Software 17
Nexstgo Backup and Recovery 18
Nexstgo Power Manager 20
BATTERY MAINTENANCE 20
PEAK SHIFT 20
Nexstgo Software Application Group 28
Nexstgo Software Updater 26
Nexstgo System Conguration Utility 65
Boot From File 67
B
Backup Features 73
File Backup 73
System Backup 76
Recovery Drive 78
Restore Point 76
C
Camera 43
onscreen controls 43
Deleting Data 63
Device Drivers 72
Getting the Latest Drivers 72
Display Settings 37
Advanced Settings 46
Intel HD® Graphics Control Panel 46
E
Ergonomic Considerations 54
External Display 48
Connecting an External Display 48
Connecting a Wired External Display 48
Connecting a Wireless External Display 48
Selecting a Display Mode 49
Duplicate 49
Extend 49
PC screen only 49
Second screen only 49
Index

USER’S MANUAL
l 95
Index
P
Power Management 36
AC Power 36
Charging the battery 36
Battery Status 37
Managing the Battery Power 37
Power-Saving Modes 38
Hibernation mode 38
Sleep mode 38
Wireless function off 38
Protecting Your Computer 57
Default Sign-In Credentials 57
Sign-In Password 58
Sign-In Picture Password 58
Sign-In PIN 58
Passwords in Setup Utility 60
Supervisor Password 60
Trusted Platform Module (TPM) 62
Windows BitLocker 62
Windows Hello 59
Facial Recognition 59
Fingerprint Authentication 59
R
Registering Your Computer 30
Restoring Features 80
Advanced Startup 86
Recovering the Operating System if
Windows 10 Fails to Start 87
Restoring Personal Files and Folders 80
Restoring the System 81
Resetting the System 84
Restoring the System From an Image 83
Restoring the System to a Previous
State 82
S
Specications 14
Graphics 14
Operating System 15
Platform 14
Processor 14
Webcam 14
Wireless Networking 14
T
Taking Care of Your Computer 55
Cleaning the Display 56
Cleaning the Sides, Covers, Keyboard,
and Touchpad 56
Cleaning Your Computer 56
General Cleaning Guidelines 55
Touchpad 26
Touchpad Gestures 34
1-nger actions 35
2-nger actions 35
3-nger actions 35
4-nger actions 35
Boot Manager 66
Device Manager 67
Setup Utility 68
FEDERAL COMMUNICATIONS COMMISSION INTERFERENCE STATEMENT
This equipment has been tested and found to comply with the limits for a Class B digital device,
pursuant to part 15 of the FCC Rules. These limits are designed to provide reasonable
protection against harmful interference in a residential installation. This equipment generates,
uses and can radiate radio frequency energy and, if not installed and used in accordance with
the instructions, may cause harmful interference to radio communications. However, there is
no guarantee that interference will not occur in a particular installation. If this equipment does
cause harmful interference to radio or television reception, which can be determined by
turning the equipment off and on, the user is encouraged to try to correct the interference by
one or more of the following measures:
-Reorient or relocate the receiving antenna.
-Increase the separation between the equipment and receiver.
-Connect the equipment into an outlet on a circuit different from that to which the receiver is
connected.
-Consult the dealer or an experienced radio/ TV technician for help.
CAUTION:
Any changes or modifications not expressly approved by the grantee of this device could
void the user's authority to operate the equipment.
RF exposure warning
This equipment must be installed and operated in accordance with provided instructions and
the antenna(s) used for this transmitter must be installed to provide a separation distance of
at least 20 cm from all persons and must not be co-located or operating in conjunction with
any other antenna or transmitter. End-users and installers must be provide with antenna
installation instructions and transmitter operating conditions for satisfying RF exposure
compliance.
Canada, Innovation, Science and Economic Development Canada (ISED) Notices
This device contains licence-exempt transmitter(s)/receiver(s) that comply
with Innovation, Science and Economic Development Canada’s licence-exempt
RSS(s). Operation is subject to the following two conditions:
(1) This device may not cause interference.
(2) This device must accept any interference, including interference that may cause
undesired operation of the device.
Avis du Canada, Innovation, Sciences et Développement économique Canada (ISED)
L’émetteur/récepteur exempt de licence contenu dans le présent appareil est
conforme aux CNR d’Innovation, Sciences et Développement économique Canada
applicables aux appareils radio exempts de licence. L’exploitation est autorisée aux
deux conditions suivantes :
(1) L’appareil ne doit pas produire de brouillage;
L’appareil doit accepter tout brouillage radioélectrique subi, même si le brouillage
est susceptible d’en compromettre le fonctionnement.
Users should also be advised that high-power radars are allocated as primary users (i.e.
priority users) of the bands 5250-5350 MHz and 5650-5850 MHz and that these radars
could cause interference and/or damage to LE-LAN devices.
Devraient également être informés les utilisateurs que les radars à haute puissance
sont désignés comme utilisateurs principaux (c.-à-utilisateurs prioritaires) des bandes
5250-5350 MHz et 5650-5850 MHz et que ces radars pourraient provoquer des
interférences et / ou endommager les appareils LE-LAN.
Radio Frequency (RF) Exposure Information
The radiated output power of the Wireless Device is below the Innovation, Science
and Economic Development Canada (ISED) radio frequency exposure limits. The
Wireless Device should be used in such a manner such that the potential for human
contact during normal operation is minimized.
This device has also been evaluated and shown compliant with the ISED RF
Exposure limits under mobile exposure conditions. (antennas are greater than 20cm
from a person's body).
Informations concernant l'exposition aux fréquences radio (RF)
La puissance de sortie rayonnée du dispositif sans fil est inférieure aux limites
d'exposition aux radiofréquences d'Innovation, Sciences et Développement
économique Canada (ISED). Le dispositif sans fil doit être utilisé de manière à
minimiser le potentiel de contact humain pendant le fonctionnement normal.
Cet appareil a également été évalué et montré conforme aux limites d'exposition
RF ISED dans des conditions d'exposition mobiles. (Les antennes sont à plus de 20
cm du corps d'une personne).