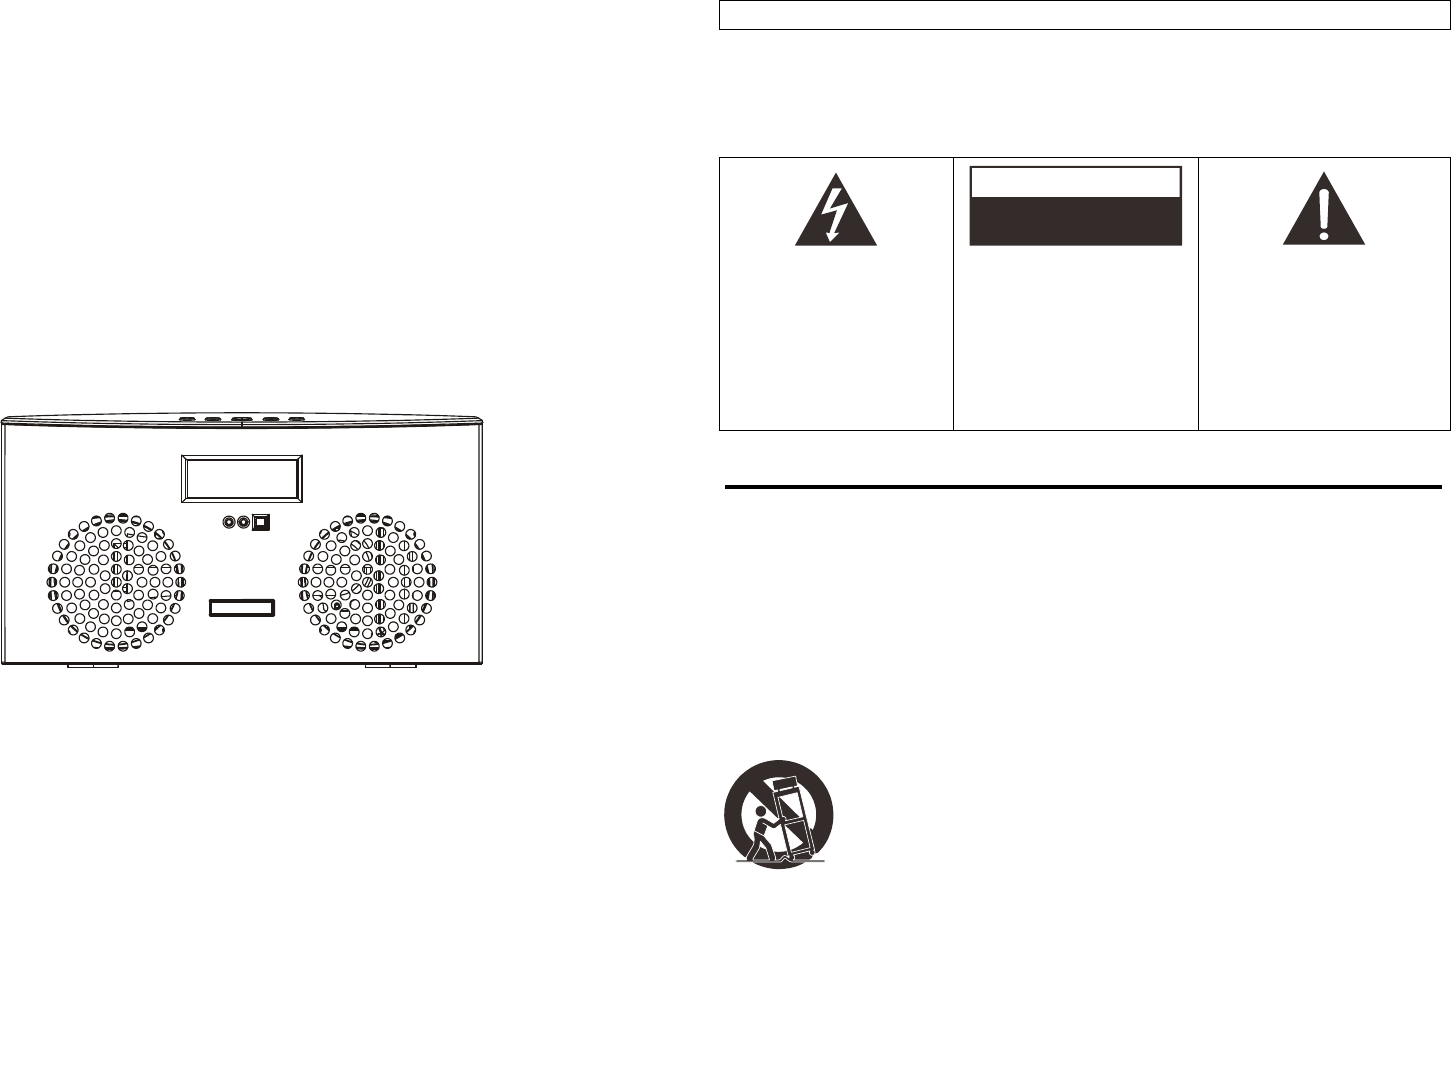
Ngai Lik Electronics BTU600 BLUETOOTH SPEAKER SYSTEM User Manual
Ngai Lik Electronics Enterprises Limited BLUETOOTH SPEAKER SYSTEM
User Manual

0 1
INSTRUCTION MANUAL
BLUETOOTH SPEAKER SYSTEM & PLL FM STEREO
RADIO & USB PORT & CARD SLOT
MODEL: BTU600AR
Please read following instructions prior to operating your unit.
Manufacturer of this unit follows a principle of continuous improvement and has no
responsibility for any changes that are made to the unit or any liability for these changes.
Thanks for your choice of our products.
WARNING
- CAUTION: USE OF ANY CONTROLS, ADJUSTMENTS, OR PROCEDURES OTHER THAN THOSE SPECIFIED HEREIN MAY
RESULT IN HAZARDOUS RADIATION EXPOSURE.
- CAUTION: DANGER OF EXPLOSION IF BATTERY IS INCORRECTLY REPLACED. REPLACE ONLY WITH THE SAME OR
EQUIVALENT TYPE.
- TO PREVENT FIRE OR SHOCK HAZARD, DO NOT USE THIS PLUG WITH AN EXTENSION CORD, RECEPTACLE OR OTHER
OUTLET UNLESS THE BLADES CAN BE FULLY INSERTED TO PREVENT BLADE EXPOSURE.
- WARNING: TO REDUCE THE RISK OF FIRE OR ELECTRIC SHOCK, DO NOT EXPOSE THIS APPLIANCE TO RAIN OR MOISTURE.
- WARNING: THE BATTERIES SHALL NOT BE EXPOSED TO EXCESSIVE HEAT SUCH AS SUNSHINE, FIRE OR THE LIKE.
The lightning flash with
arrowhead symbol, within an
equilateral triangle, is intended
to alert the user to the presence
of uninsulated "dangerous
voltage" within the product's
enclosure that may be of
sufficient magnitude to
constitute a risk of electric
shock to persons.
WARNING: TO REDUCE THE
RISK OF ELECTRIC SHOCK,
DO NOT REMOVE COVER
(OR BACK). NO
USER-SERVICEABLE PARTS
INSIDE. REFER SERVICING
TO QUALIFIED SERVICE
PERSONNEL.
The exclamation point within an
equilateral triangle is intended to
alert the user to the presence of
important operating and
maintenance (servicing)
instructions in the literature
accompanying the appliance.
IMPORTANT SAFETY INSTRUCTIONS
1) Read these instructions.
2) Keep these instructions.
3) Heed all warnings.
4) Follow all instructions.
5) Do not use this apparatus near water.
6) Clean only with dry cloth.
7) Do not block any ventilation openings. Install in accordance with the manufacturer's instructions.
8) Do not install near any heat sources such as radiators, heat registers, stoves, or other apparatus (including amplifiers) that
produce heat.
9) Do not defeat the safety purpose of the polarized or grounding-type plug. A polarized plug has two blades with one wider
than the other. A grounding type plug has two blades and a third grounding prong. The wide blade or the third prong are
provided for your safety. If the provided plug does not fit into your outlet, consult an electrician for replacement of the
obsolete outlet.
10) Protect the power cord from being walked on or pinch particularly at plugs, convenience receptacles, and the point where
they exit from the apparatus.
11) Only use attachments/accessories specified by the manufacturer.
12) Use only with the cart, stand, tripod, bracket, or table specified by the manufacturer, or sold with the apparatus. When a cart
is used, use caution when moving the cart/apparatus combination to avoid injury from tip-over.
13) Unplug this apparatus during lightning storms or when unused for long periods of time.
14) Refer all servicing to qualified service personnel. Servicing is required when the apparatus has been damaged in any way,
such as power-supply cord or plug is damaged, liquid has been spilled or objects have fallen into the apparatus, the
apparatus has been exposed to rain or moisture, does not operate normally, or has been dropped.
15) This appliance shall not be exposed to dripping or splashing water and that no object filled with liquid such as vases shall be
placed on the apparatus.
16) Rating label is located at the back of enclosure.
17) "CAUTION" mark is also located at the back of enclosure.
CAUTION
RISK OF ELECTRIC SHOCK
DO NOT OPEN
S3125A

2 3
FCC Warnings
WARNING: Changes or modifications to this unit not expressly approved by the party
responsible for compliance could void the user’s authority to operate the equipment.
NOTE: This equipment has been tested and found to comply with the limits for a Class B
digital device, pursuant to Part 15 of the FCC Rules. These limits are designed to provide
reasonable protection against harmful interference in a residential installation. This
equipment generates, uses, and can radiate radio frequency energy and, if not installed and
used in accordance with the instructions, may cause harmful interference to radio
communications. However, there is no guarantee that interference will not occur in a
particular installation. If this equipment does cause harmful interference to radio or television
reception, which can be determined by turning the equipment off and on, the user is
encouraged to try to correct the interference by one or more of the following measures:
Reorient or relocate the receiving antenna.
Increase the separation between the equipment and receiver.
Connect the equipment into an outlet on a circuit different from that to which the receiver
is connected.
Consult the dealer or an experienced radio/TV technician for help.
This equipment complies with FCC RF radiation exposure limits set forth an uncontrolled
environment. This transmitter must not be co-located or operating in conjunction with any
other antenna or transmitter.
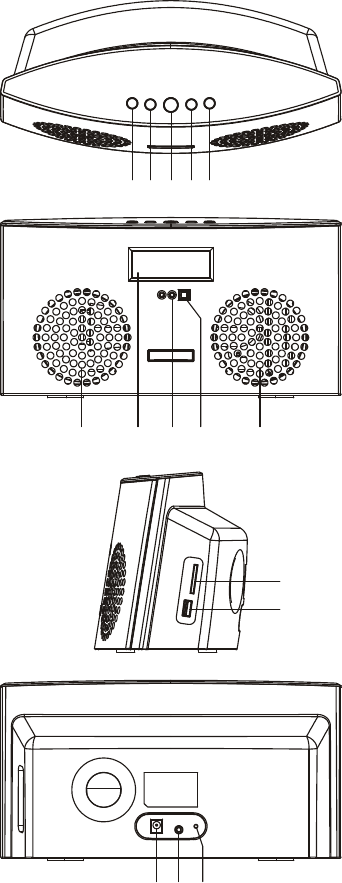
MAIN UNIT
1. PLAY/PAUSE/PAIR/SCAN
BUTTON
2. SOURCE BUTTON
3. POWER BUTTON
4. VOL- BUTTON
5. VOL+ BUTTON
6. SPEAKERS
7. LCD DISPLAY
8. BLUETOOTH INDICATOR
9. REMOTE SENSOR
10. SD/MMC CARD SLOT
11. USB PORT
12. DC IN JACK
13. AUX IN JACK
14. FM ANTENNA
12 3 45
6789 6
10
11
12 13 14

4 5
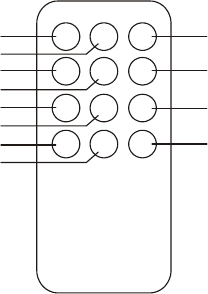
REMOTE CONTROL
1. POWER BUTTON
2. MUTE BUTTON
3. NEXT/FAST FORWARD BUTTON
4. VOL+ BUTTON
5. PREVIOUS/FAST BACKWARD
BUTTON
6. VOL- BUTTON
7. PLAY/PAUSE/PAIR/SCAN BUTTON
8. CLK BUTTON
9. SOURCE BUTTON
10. TUN+ BUTTON
11. TUN- BUTTON
12. MEM BUTTON
POWER SUPPLY
Plug the AC/DC adapter to the DC jack on the unit and to the main power.
HOW TO SET TIME
1. At the standby mode, press the CLK button on the remote once, the display lights up.
2. Press the CLK button once again in the display lighting, the hour flashes on the display.
3. Use the PREVIOUS/NEXT button on the remote to adjust the hour and press the CLK
button to confirm your setting.
4. The minute starts blinking on the display. Use the PREVIOUS/NEXT button on the remote
to adjust the minute and press the CLK button to confirm the time setting.
5. During playback, press the CLK button to check the current time, press the button again
to resume the previous display.
Note: The time only could be set at the standby mode.
BLUETOOTH OPERATING
This unit can receive stereo audio signal from a BLUETOOTH stereo audio source device.
1. Power on the unit by pressing the POWER button, switch to BLUETOOTH mode by
pressing SOURCE repeatedly, “PAIR” shows on the display.
2. LED indicator rapid blinking while it is pairing.
3. Pair and connect to F-3088 on the BLUETOOTH audio source device. If prompted for
passcode, enter “0000”.
4. Pairing successful (LED indicator lights solid blue), ready to stream music.
5. Press the PLAY/PAUSE/PAIR/SCAN button to pause/resume the playback.
6. During playback, press the PREVIOUS button once to go back the beginning of the
current track, press the PREVIOUS button twice continuously to skip to the previous
track.
7. During playback, press the NEXT button on the remote to skip to the next track.
8. Press and hold the PREVIOUS/NEXT button on the remote to search through the current
track forward or backward. Release the PREVIOUS/NEXT button to resume normal play.
Note:
Pairing mode is canceled about 1.5 minutes.
The above are generic steps to pair a BLUETOOTH device, for more specific instructions
on BLUETOOTH connectivity for your device, please consult your manufacturer’s
manual.
RE-CONNECT TO THE BLUETOOTH AUDIO SOURCE DEVICE
If the device is already paired with the F-3088, but became unconnected even with both
Bluetooth devices turned on. You can re-connect them by following steps:
1. Press and hold the PLAY/PAUSE/PAIR/SCAN button to re-link the audio source device.
The Bluetooth indicator will blink for about 1.5 minutes for connecting.
2. Select F-3088 on the audio source device for connecting. Bluetooth indicator will turn to
solid blue if the F-3088 and the device have been re-connected successfully.
FM RADIO
TUNING THE FM RADIO
1. Power on the unit, switch to the TUNER (radio) mode by pressing the SOURCE button
repeatedly.
2. Press the TUN+/TUN- button on the remote to fine tune radio station. Press and hold the
TUN+/- button on the unit to auto search radio station forward or backward from the
current frequency respectively (When an available station will be found, the unit will
broadcast it immediately and the searching will be stopped).
3. Press and hold the PLAY/PAUSE/PAIR/SCAN button to auto search the radio station from
the beginning of the frequency range to the end. During the scanning, the unit will store all
the available stations on the memory cell automatically as the presets (up to 20 stations).
STORING YOUR FAVORITE RADIO STATION
1. During playback, press the MEM button on the remote for storing the current station until
memory cell number flashes on the display.
2. Use the TUN +/- button on the remote or the PLAY/PAUSE/PAIR/SCAN button to select
the corresponding memory cell for storing the station.
3. Confirm your selection by pressing the MEM button again.
4. During radio playback, press the PLAY/PAUSE/PAIR/SCAN button repeatedly to recall
the stored stations.
MUTE THE UNIT
During playback, press the MUTE button on the remote to switch off the audio. Press the
button again to resume the audio.
VOLUME LEVEL ADJUSTMENT
Press the VOL+/- button to adjust the volume output level.
USB/CARD PLAYBACK
1. Power on the unit, insert an USB or a SD/MMC card into the unit.
2. Press the SOURCE button repeatedly to switch to USB or card mode. The playback will
start automatically.
3. Press the NEXT button on the remote to skip to the next track; press and hold to search
through the track forward.
4. Press the PREVIOUS button on the remote to skip to the previous track; press and hold
to search through the track backward.
1
2
3
4
5
6
7
8
9
1
0
11
12

6 7
AUDIO IN
1. Connect the AUX IN jack on the unit to an audio source, for example, DVD player with an
RCA cable.
2. Press the POWER button to turn the unit on.
3. Press the SOURCE button repeatedly to switch to AUX mode.
4. Use the native controls on the connected audio device to begin playing music through the
connected the unit.
TROUBLE SHOOTING
Symptom Possible Cause Solution
Radio sound distorted. 1. The station is not tuned in.
2. There is a poor signal in
the area.
1. Fine tune the station.
2. Reposition the unit.
No radio sound. 1. The unit is not in radio
mode.
2. The volume has been
muted or is on the
minimum setting.
1. Press the SOURCE button
repeatedly until switching to
radio mode.
2. Adjust the volume level or
press the MUTE button to
resume audio.
No sound at Bluetooth
mode
1. The Bluetooth device is
not paired with the unit.
2. The volume has been
muted or is on the
minimum setting.
1. Follow the instructions to
pair the Bluetooth device to
the unit.
2. Adjust the volume level or
press the MUTE button to
resume audio.
IMPORTANT SAFETY INSTRUCTIONS
The apparatus shall not be exposed to dripping or splashing and that no objects filled with
liquids, such as vases, shall be placed on the apparatus.
When the AC/DC adapter is used as the disconnect device, the disconnect device shall
remain readily operable. To be completely disconnected the power input, the AC/DC
adapter shall be disconnected from the mains completely.
No naked flame sources, such as lighted candles, should be placed on the apparatus.
Minimum distances 2.0cm around the apparatus for sufficient ventilation. The ventilation
should not be impeded by covering the ventilation openings with items, such as
newspapers, table-cloths, curtains, etc.
The use of apparatus is in tropical and/or moderate climates.
Attention should be drawn to the environmental aspects of battery disposal.
CAUTION: Danger of explosion if battery is incorrectly replaced. Replace only with the
same or equivalent type.
Battery shall not be exposed to excessive heat such as sunshine, fire or the like.
The marking plate is located at the back of the apparatus.