Nikko Co RP7460H Remote Control Toy Receiver User Manual iBoat E NAI
Nikko Co Ltd Remote Control Toy Receiver iBoat E NAI
Nikko Co >
User Manual
RDC-700500
Nikko MicroRadioControl System”iBoat”
-1- -2-
-4-
-3-
Features
Battery Characteristics and Recharging Tips
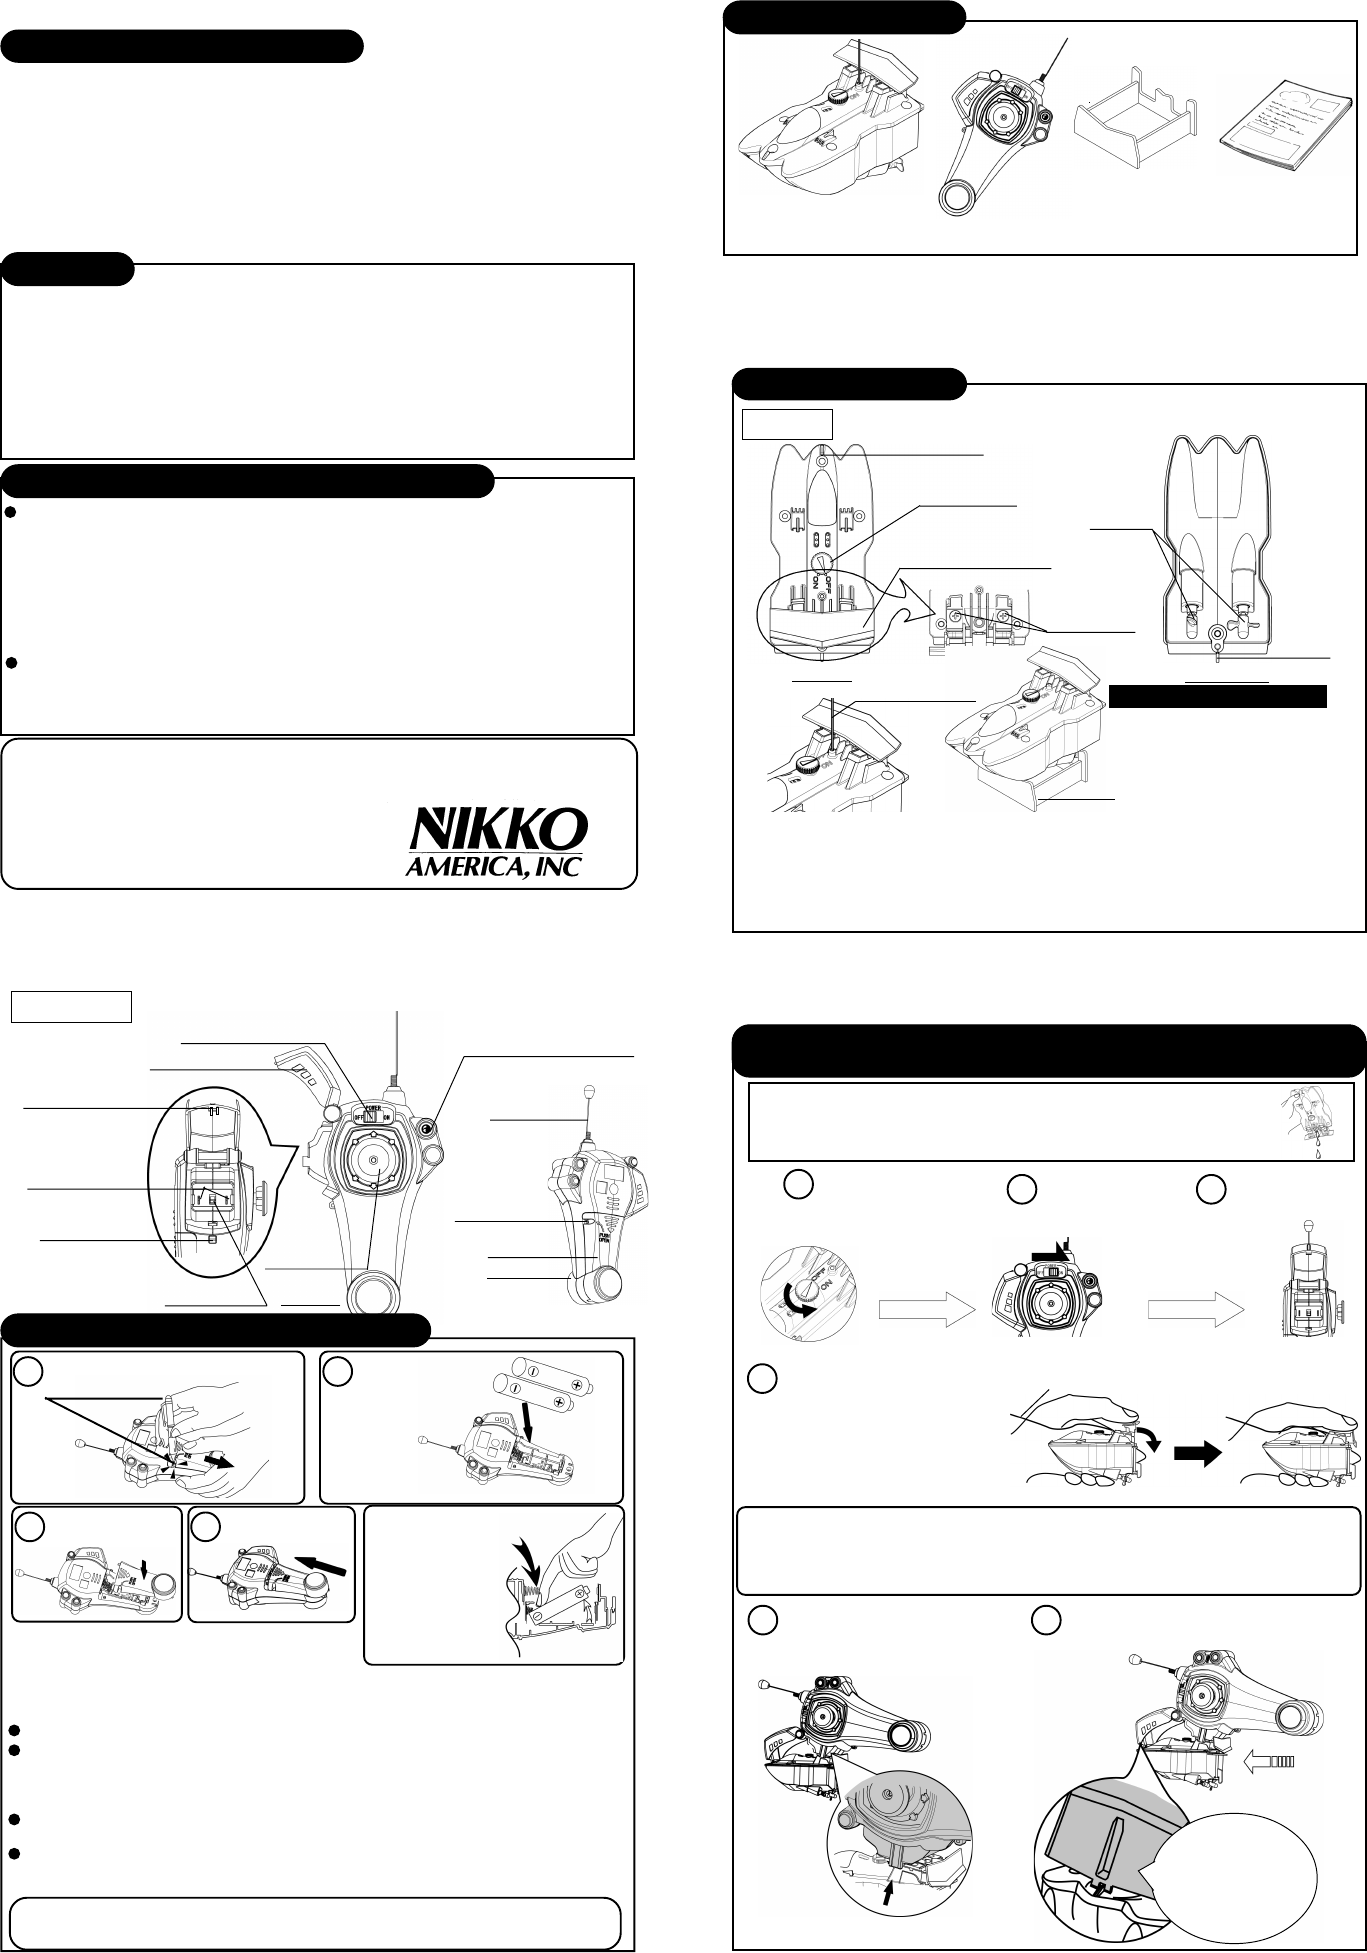
Names of the Parts
*The controller (transmitter) has a built-in battery recharger. Attach iBoat to the controller
for quick recharging and lasting power.
*A large volume, high-power nickel metal hydride battery is built into the boat.
*The single-stick controller enables forward-backward running, left-right turns, and stop-
ping with single-hand operations.
*Thank you for choosing NIKKO iBoat!
*Read this Manual of Instructions carefully to
the end before starting to play.
*Don’t throw away the box or this manual, but
keep them for future use.
*The actual product may differ slightly from the
illustrations.
Manual of Instructions
For ages 6 and over
Battery requirements:
Size "AA" "UM3" "R6"alkaline batteries x 2 (No other type of battery should be used)
When playing for the first time after purchase, or after
a long interval, the battery power may be weak. Even after recharging, the running
time can be relatively short. The battery will gradually regain power after 2 or 3 repeti-
tions of usage and recharging. Also, if you keep the iBoat power switch turned ON for
a long time, the battery power will be discharged. Make sure to turn OFF the power
switch immediately after use.
Center marker
Power switch
Wing (charger cover)
Top side
Screws
Bottom side
Rudder
iBoat
CONTROLLER
How to use the display stand:
Stand
receiver antenna
Use a ballpoint pen to open
the battery lid. Install 2 alkaline
batteries
Battery installation:
*Install the batteries in the controller.
(This product operates only with size "AA" "UM3" "R6"alalkaline batteries. If you use
manganese or other types of batteries, the nickel metal hydride battery built into the boat
may not be recharged fully. Be sure to use ONLY alkaline dry cell batteries.)
Make sure that the power switch of the controller is turned OFF.
Use a ballpoint pen, pencil or sharp tools to push the release button of the battery lid.
While pressing the button, slide the lid a little bit as shown in the diagram.
*Slide out the lid with your hand and detach.
*Be careful so that the pencil lead will not be broken.
Install 2 size "AA" "UM3" "R6"alkaline batteries, making sure that the (+) and (-) ends
are positioned properly.
Attach the battery lid again. Slide the lid back into position until the release button
clicks. (Lift up the rear end of the battery lid slightly to fit the lid into the groove as
shown in the diagram. Then, keep the lid flat and slide into the groove.)
Procedures for Recharging iBoat
(Remove dust or filth from the charger contacting point.)
Controller Power
switch ON
Open the charger
cover
Wing (charger cover) is opened
Push back with your thumb and slide to the position indicated in the diagram.
Fit the claw of the controller into
the hollow pit in the body of iBoat.
Slide iBoat forward until you hear a click.
Important Point
Make sure that the cen-
ter marker at the head of
the boat is fitted into the
center marker holder of
the controller as shown
in the diagram.
When recharging, make sure that iBoat on the under side of the controller. If iBoat is on
top of the controller, there is the danger that water might seep into the controller terminal
and cause short circuits.
Recharging
terminal
(iBoat side)
close the lid.
receiver antenna
When you are not playing,
keep iBoat on the display
stand.
Fit into the groove. To remove the
bottom battery
more easily, press
the minus (-) end
with your finger
and pull out the
plus (+) end.
Follow the correct procedures when recharging.
When the battery starts to run out of power, the LED lamp will grow dim.
Before recharging, wipe off all the water and dampness from
the boat. To remove the water remaining in the hull, turn the
boat over as shown.
Turn OFF the power
switch of the boat. (You
cannot recharge while
the power switch
of the boat is
turned ON.)
Before attaching the boat to the con-
troller, bend the antenna toward you
to keep it from getting in the way
when recharging.
If the product is used in low temperatures, the battery duration can be shorter than
normal. This is a characteristic feature of the battery and is not a defect. The situation
can be improved by recharging the battery immediately before playing. The battery
power tends to be weakened as time elapses.
12
3 4
123
4
5 6
The CONTROLLER is not waterproofing. However, if it
should accidentally be submersed in water, or if the internal
parts should get wet, remove the batteries immediately and
wait until the internal parts are completely dry. Reinstall the
batteries and resume operation.
Charger cover
Center marker holder
Recharging
terminal
(controller side)
release button
Power switch Recharging monitor
lamp (green LED)
Top side
Transmitter
antenna
Battery lid
Bottom side
safety hook
removal button
Control stick
How to Install the Controller Batteries
iBoat x 1 Controller x 1
Manual of
Instructions X 1
Contents of the Kit
Display stand
x 1
ATTENTION PARENTS
It is recommended that this toy and
all accessories be periodically ex-
amined for potential hazards and
that any potentially hazardous
parts be repaired or replaced.
IT IS A VIOLATION OF THE FCC REGULA-
TIONS TO REMODEL OR ALTER THIS DE-
VICE IN ANY WAY WITHOUT PERMISSION,
ANYONE WHO VIOLATES THE REGULA-
TIONS WILL LOSE THE RIGHT TO OPERATE
THE DEVICE.
Repair and Parts Department
Monday to Friday 8:30AM-5:30PM Central Time
Repair:(800)736-4556
Parts:(800)776-4556
Fax:(972)578-7059
e-mail:help@nikkoamerica.com
P_No.R700500NC030530
-5- -6-
-7- -8-
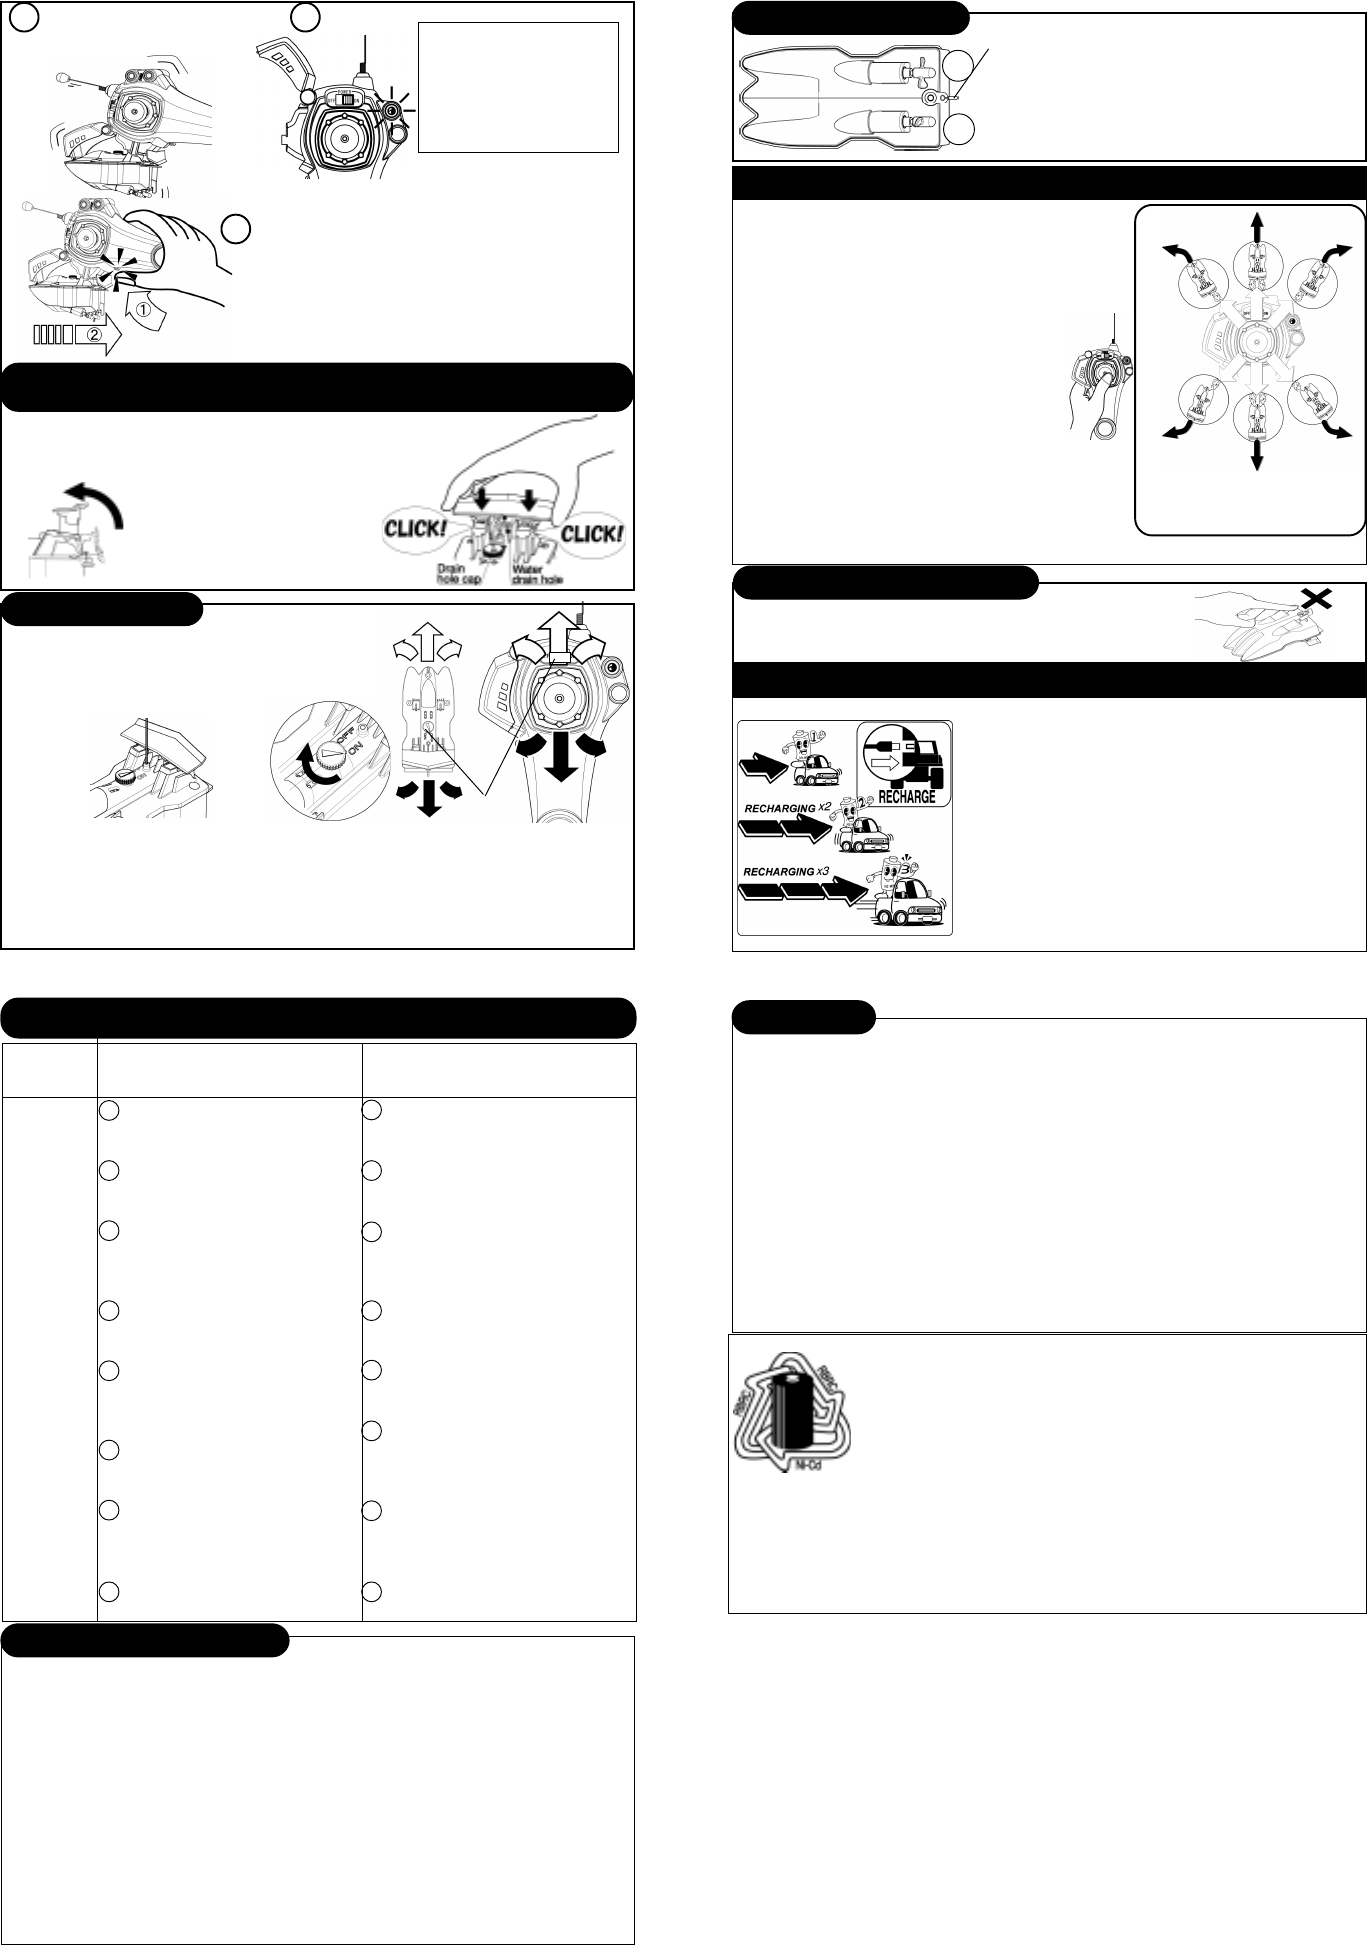
L
R
Steering Alignment Rudder If iBoat does not move straight forward or straight
backward, try adjusting the rudder on the bot-
tom side of iBoat. If the boat tends to go to the
right, move the rudder toward L. If the boat tends
to go to the left, move the rudder toward R.
*Be careful of the screws!
The screws are very dangerous when spinning.
Don’t bring your fingers near the screws!
If there is anything wrong with the boat movements, check the following:
What’s
wrong? Cause
1 The power switch on iBoat is in
the OFF position.
2 The boat is too far away from the
controller.
3 The (+) and (-) poles of the batter-
ies of the controller are positioned
in the wrong direction.
4 The metal tab touching the con-
troller battery is rusted.
5 The metal recharging terminals of
the controller or boat may be
rusted.
6 Either the controller batteries or
iBoat battery lack power.
7 There is another radio control boat
using the same band being oper-
ated nearby.
8 The antenna of the controller or
iBoat is bent.
Check and see
1 Turn ON the power switch on iBoat.
2 Shorten the distance between the
controller and iBoat.
3 Install the batteries in the right di-
rection.
4 Use sandpaper to remove the rust.
5 Use sandpaper to remove the rust.
6 Either change the controller batter-
ies with new ones or recharge iBoat
as necessary.
7 Play at a different time or in a differ-
ent place.
8 Straighten the antenna.
The boat
doesn’t
move or it
malfunc-
tions.
There is a safety hook on the controller to prevent iBoat
from falling off while recharging. When iBoat is fully
recharged, the green LED lamp will turn off. When
this has been confirmed, keep pressing the recharg-
ing release button on the side of the controller, and
pull iBoat toward you to detach it from the controller.
removal
button
The set-up is completed!
Check to see that iBoat does
not fall off.
The green LED lamp lights up.
The ordinary recharging
time is about 2 minutes.
(The LED lamp will go out
when recharging is com-
pleted.)
How to Operate
Power switch
* First, turn ON the controller power switch, and then turn ON the iBoat power switch.
* Tilt the controller stick in the direction you wish to move iBoat, and it will start moving.
* If either the antenna on iBoat or the controller is bent, the radio waves will not reach a
long distance. Straighten them before playing.
* When you finish playing, turn OFF the power switch of iBoat and the controller, and be
sure to remove the batteries from the controller.
Maintenance and Care
If the boat becomes dirty, use a slightly dampened cloth to wipe off the dirt and filth. Then
use a dry cloth to wipe of the moisture. You can also use a small brush to remove filth from
intricate parts.
To remove dust particles, tie a small bit of cloth to the tip of a toothpick, tweezers, etc. and
wipe off.
CAUTION! : BE SURE TO READ THE FOLLOWING PRECAUTIONS:
*DO NOT use chemicals. The body of the boat can melt and cause machine troubles.
*If you keep the boat in a place where the temperature is extremely hot or cold, or
where it is extremely humid (such as in a car or under direct sunlight), the boat can be
damaged and lead to machine troubles.
*Be sure to remove the batteries from the controller when storing the product away.
Keep this Manual of Instructions carefully for future use.
To play safely, observe the following:
*DO NOT operate iBoat where there are water plants, garbage, filth, or other obstacles.
Such obstacles may damage the screws.
*DO NOT play where the water current is strong or when the wind is blowing strongly.
*DO NOT play in ocean water, because salt water can cause rusting.
*DO NOT play in thunderstorms.
*NEVER touch the screws when they are spinning!
*Take iBoat out of the water before the battery power runs out.
*Bring the wing (charger cover) back to its normal position before operating iBoat. If you
operate iBoat with the wing in the recharging position, the recharging terminal can get
wet. This is very dangerous!
*The manufacturer prohibits the user to alter the specifications or to remodel the product
in any way. Those who violate this rule will be prohibited from operating iBoat.
iBoat is operated by use of radio waves. If you operate iBoat where it can be affected by
other radio waves, the boat may not respond correctly to your operations, or start to
move even though you are not operating it. In such cases, the boat is not broken.
Operate your boat in a different place or at a different time.
CAUTION!
When you have finished recharging, detach iBoat from
the controller and replace the recharger cover and wing.
CAUTION: Before starting to play, make sure
that the antenna is standing vertically upright. If
the antenna is bent to the left or right, it will affect
the balance.
* Operation Techniques *
For smooth cornering, move the stick slightly forward or
reverse and then slide it to the left or right. This will
enable smooth left/right turns. If you master this basic
technique, you will be able to make a letter “8”, slalom,
etc. This cornering technique will enable the
user to operate in small pools, etc.
Features of the controller
Single-stick controller enables single-hand
operation for all movements.
Operation mechanism
iBoat is propelled by a 2-motor 2-screw sys-
tem. When both screws turn at the same
speed, iBoat moves straight forward. When you oper-
ate the controller to move to the left/right, the motor on
the side you wish to advance stops to change the direc-
tion of the boat. If you want to turn right, the right screw
stops. If you want to turn left, the left screw stops.
Position of the stick
and the direction of
the boat.
7 8
9
CAUTION: Be sure to return the wing (charger cover) to its original
position before starting to operate iBoat.
If the wing is not fully returned to its proper position, water can
seep into the hull or recharging terminal and cause short circuits.
Improper replacement of the wing may damage the stopper clasp
as well. 2.Make sure that the drain
hole cap fits into the water
drain hole and push
straight down until the
clasp clicks and fits into po-
sition.
1.Lift the wing
up so that it
comes directly
over the re-
charging ter-
minal.
THE FCC WANTS YOU KNOW
THE RBRCTMSeal on the nickel cadmium battery
pack indicates that NikkoAmerica is voluntarily
participating in an industry program to collect and
recycle these batteries at the end of their useful life.
The RBRC program provides a convenient alternative
to disposing nickel-cadmium batteries into the trash or
municipal waste stream,which is illegal in some areas.
Nikko America's payments to RBRC makes it easy for you to drop
off the spent battery pack at local retailers who sell replacement
nickel-cadmium batteries.
You may also contact your local recycling center for information on
where to return the spent battery pack.RBRC is a trademark of the
Rechargeable Battery Recycling Corporation.
Extended Operating Time (follow-up recharging)
Recharge the battery once. Without using the
battery, recharge a second time. This ”follow-up
recharging” will lengthen the playing time.
Moreover, if you recharge the battery 3 times in a
row before use, the playing time will be extended
even more.
However, be careful NOT to recharge the battery
more than 3 times in a row.
Also, note that the battery duration differs depend-
ing on how you play.
This device complies with part 15 of the FCC Rules, Operation is sub-
ject to the following two conditions:
(1)This device may not cause harmful interference.
(2)This device must accept any interference received,including inter-
ference that may cause undesired operation.
Your R/C boat might cause TV or radio interference even when it is
operating properly.
To determine whether your R/C boat is causing the interference, turn
off your R/C boat.
If the interference goes away,your R/C boat is causing the interfer-
ence. Try to eliminate the interference by:
Moving your R/C boat away from the receiver.
Contacting your local store for help.
If you cannot eliminate the interference, the FCC re-
quires that you stop using your R/C boat.