Nikko Co TP6731H Radio Controlled Toy (Transmitter) User Manual 1 of 2
Nikko Co Ltd Radio Controlled Toy (Transmitter) Users Manual 1 of 2
Nikko Co >
Contents
- 1. Users Manual 1 of 2
- 2. Users Manual 2 of 2
Users Manual 1 of 2
1
Please read care ful ly before start ing to operate.
l
"Warning! use under the direct su per vi sion of an adult.
Please read care ful ly before start ing to operate.
"Warning! use under the direct su per vi sion of an adult.
Please read care ful ly before start ing to operate.
KEEP THE DISPLAYBOX AND THE MANUAL FOR FUTURE REF ER ENCE.
Use Ni-Cd battery pack(9.6V) and charger for this mod el.
l
l
l
PRINTED IN CHINA
IMPRIME EN CHINE
IMPRESO EN CHINA
English/Français/Español
l
l
FEATURES
l
BATTERY REQUIREMENTS
l
2-channel full function: Forward, re verse,
left/right turn and stop.
2 speed in forward running
2 speeds by transmitter op er a tion
Front and rear suspension sys tem
Rear wheel differential gear
The Headlights lightup when running
Transmitter: 1 x 9V(006P)battery
1 x NI-CD or NI-MH rechargeable
bat tery pack(9.6 V)
Vehicle:
1/10 RADIO CONTROL STREET CAR
Manual del Propietario
Manuel du lutilisateur
NOT RECOMMENDED FOR CHIL DREN
UN DER 8 YEARS OF AGE. AS WITH
ALL ELEC TRIC PROD UCTS, PRECAU-
TIONS SHOULD BE OB SERVED DUR-
ING HAN DLING AND USE TO PRE-
VENT ELEC TRIC SHOCK.
INPUT: 120VAC, 60HZ,
OUTPUT: 12VDC, 200mA
ATTENTION PARENTS
It is recommended that this toy
and all accessories be pe ri od i cal ly
ex am ined for potential haz ards and
that any po ten tial haz ard ous parts
be re paired or re placed.
CAUTION: ELECTRIC TOY
* Recharge the Battery
Before you Start to Operate
* Recharger la batterie avant d’allumer
* Recargue la bateria antes de em-
pezar a jugar
pezar a jugar
Owner’s Manual
:help@nikkoamerica.com
:help@nikkoamerica.com
:help@nikkoamerica.com
:help@nikkoamerica.com
:help@nikkoamerica.com
l
2
English
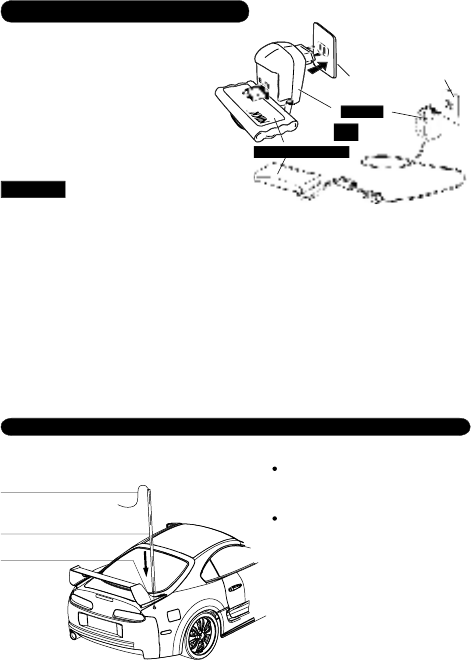
Household outlet
1. Join the connector of the charger to
the connector of the Ni-Cd battery
pack (9.6 V).
2. Plug the charger into an electrical out let.
3. Recharge for about 4-5 hours.
4. When the re charg ing is over, plug out the
charger from the elec tri cal outlet and de-
tach the con nec tors.
CAUTION:
n
n
n
n
n
n
n
n
n
RECHARGING
Charger
Ni-Cd battery pack (9.6 V)
Ni-Cd battery pack (9.6 V)
PREPARATION FOR START ING OP ER A TION
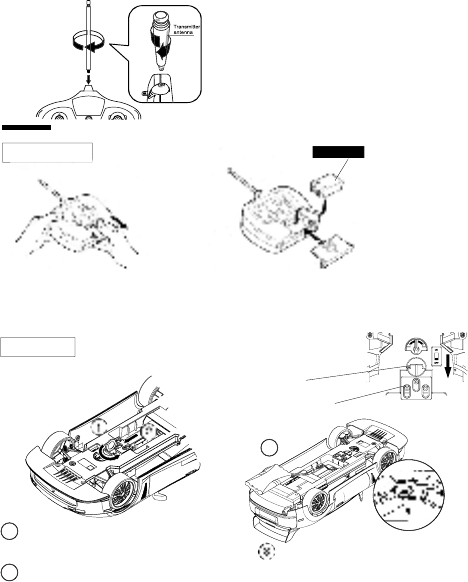
1. HOW TO ATTACH ANTENNA TUBE
Antenna tube
Antenna wire
Antenna tube holder
Pass the antenna wire through the
antenna tube, then insert the tube
into the an ten na tube holder.
If the antenna tube cannot be suc-
cess ful ly inserted into the antenna
tube holder, try hold ing the root of
the antenna wire with fingers of
one hand and ex tend ing the wire
with fin gers of the other hand.
* Note: Be careful not to pull an-
ten na wire too strong.
Do not charge Battery Pack immediately after
use.Wait until it is cooled before charging.
Avoid short circuits. Short circuits will cause over-
heating, burning of the cords and other
damages to the Battery Pack and Charger.
The Ni-CD Battery Charger should be used for
charging one Battery Pack . Do not use the
charger for charging other types of batteries and
battery packs.
Do not use the Charger as a direct current outlet for
other electrical appliances or machines.
Make sure that the Battery Pack and Charger are
kept out of the hands of infants and small
children while charging.
Do not charge near fires, where the temperature is
extremely high, or where it is wet or damp.
The charger will become slightly heated while
charging. Allow sufficient free space around the
Charger.
If the power of the battery pack is weak in spite of
proper charging. The batteries may be worn out
from repeated use. Replace it with a new Ni-CD
battery pack.
Dispose of use Ni-CD battery packs correctly.
Disconnect the supply before making or breaking
connections to the battery.
WARNING AGAINST RECHARGING NON-RE-
CHARGEABLE BATTERIES.
Please use this battery charger only for the char-
ger of the rechargeable battery pack.
The NI-CD battery pack should be recharged un-
der the supervision of an adult.
n
n
n
n
OR
* T h e n e w l y p u r c h a s e d N i - C d p a c k i s n o t
charged.Recharge before operate.
3
English
English
When installing a Ni-Cd battery pack, make sure
that the power switch of the vehicle is OFF.
Vehicle
Join the connectors of the vehicle
and the Ni-Cd pack.
Battery compartment lid
3. HOW TO INSTALL THE BAT TER IES
English
3. HOW TO INSTALL THE BAT TER IES
English
To remove the battery lid, press the
point marked “OPEN” and pull the
lid down ward.
One 9 volt (006P) battery
One 9 volt (006P) battery
Install battery making sure that (+) and (-) poles
are positioned properly.
* Dispose the used batteries sep a rate ly from
other trash.
Transmitter
2. HOW TO INSTALL TRANS MIT TER AN TEN NA
Place the transmitter an ten na into the
antenna hold er to screw it in clock-
wise.
Don’t install the antenna ex tend ed. It’s
dangerous.
If the antenna is not screwed in se-
cure ly, the vehicle may move er rat i-
cal ly. Screw the antenna securely.
English
English
English
English
Battery stopper
Use a coin to turn the battery stopper
to the "OPEN" position.
Let the battery compartment lid slide
forward a little with a pressure on to
the latch
2
1
3

4
English
Fit the battery case into the battery
com part ment of your vehicle and push
in all the way.
Press down the battery compartment lid
when Use a coin to turn the battery stop-
per
When you con nect the con nec tors. make cer tain the ve hi cle switch is in the "OFF"
po si tion.
Set connectors properly.(The con nec tors are designed to be connected in only one
way so that the pos i tive(+) and the neg a tive(-) ter mi nals are con nect ed ac cu rate ly.)
Disconnect the connectors immediately af ter a run.
When you disconnect the connectors, don't pull by the cords.
Avoid short circuits because it is very dan ger ous.
Remove all the batteries both from the ve hi cle and the transmitter after a run.
HOW TO PLAY
Extend the transmitter antenna.
You can control the vehicle at a long er dis-
tance by holding the trans mit ter higher with
the an ten na straight up.
Turn on the transmitter by op er at ing the
con trol stick. (The pow er in di ca tor will
light up.)
Battery compartment
5
4
5
Battery's Connector
Vehicle's Connector
2
1