Nikko Co TP8501 Radio Controlled Toy(Transmitter) User Manual Bike 3 bands FCC Eng
Nikko Co Ltd Radio Controlled Toy(Transmitter) Bike 3 bands FCC Eng
Nikko Co >
Users Manual
PT-24810
PRINTED IN MALAYSIA
IMPRIME EN MALAISIE
IMPRESO EN MALASIA
English / Français / Español
Owner's Manual
Manuel du lutilisateur
Manual del Propietario
• Recharge the Battery
Before You Start to Operate
• Recargue la bateria antes de
empezar a jugar
• Recharger la batterie avant d'allumer
ATTENTTION: JOUET ELECTRIQUE
Non recommandé pour les enfants de moins de 8 ans. Comme aves tous les appareils électriques, des précaut
ons doivent être observées pendant la manipulation et l'emploi pour éviter toute décharge électrique.
Entrée: secteur 120 VAC, 60 Hz seulement
Sortie: 12VDC 200mA
PARENTS ATTENTION
Il est recommandé de vérifier périodiquement l'absence de risque potentiel sur ce jouet et tous les
accessoires et de réparer o remplacer les pieces potentieliement dangereuses.
FEATURES
BATTERY REQUIREMENTS
Vehicle : Ni-Cd rechargeable
battery pack
(9.6V, 600mAh- 650mAh)
Transmitter : 1 x 9V(006P)battery
PRECAUCÓN: JUGETE ELÉCTRICO
No recomendado para niños de menos de 8 años de edad. AL igual que con todos los productos eléctricos,
para evitar un shock eléctrico, se deben observar precauciones especiales al manipular y usar este juguete.
Entrada: Solamente 120 VAC, 60 Hz.
Salida: 12 VDC, 200mA
ATENCIÓN PADRES
Se recomienca que este juguete y todos sus accesorios sean examinados periódicamente para tratar
de encontrar peligros potenciales provocados por piezas que necesiten ser reparadas o cambiadas.
PILES
Véhicule : a set de piles Ni-Cd
rechargeables
(9,6V, 600mAh- 650mAh)
Emetteur : 1 pile 006p(9V)
CARACTERISTIQUES
PILAS USADAS
Vehiculo : Pack de bateria 1x
NiCd recargable
(9,6V, 600mAh- 650mAh)
Transmisor : 1 pila de 9 V (006P)
CARACTERÍSTICAS
Lea estas instrucciones detenidamente antes de la utilización.
Guardar la caja y el manual para su consulta en el futuro.
Precautión! Úselo bajo la supervisión diercta de un adulto.
El producto real puede diferir ligeramente de las ilustraciones.
!
Lisez attentivement ce manuel avant de commencer à utiliser le véhicule.
Conservez la boîte d'exposition et le manuel pour toute référence ultérieure.
Attention! A utiliser sous la supervision directe d’un adulte.
La moto contenue dans l'emballage peut ne pas correspondre exactement aux illustrations.
Please read carefully before starting to operate.
Keep the display box and the manual for future reference.
Warning! Use under the direct supervision of an adult
Actual product may vary from illustration of this manual.
KMNA-BIKE3B
NM0-010306
9.6V
NIKKO
2-channel full function: Forward, left/ right turn and stop.
Electric Break System.
Beginner/ Expert setting is possible by changing the side bumper attachment position.
Front & rear suspension.
Fonction complète double canal: avant,
gauche/droite et arrêt.
Système de freinage électrique.
Il est possible de passer du mode débutant au mode expert en modifiant la position de la fixation
du pare-choc latéral.
Suspension avant arrière.
Función total en dos canales :
Adelante, giro izquierda/derecha y paro.
Sistema de frenado eléctrico.
Se puede configurar como principiante o experto cambiando la posición del parachoques lateral.
Suspensión delantera y trasera.
12VDC, 200mA
Sélecteur 3 bandes.
3 bands selector switch.
3 interruptor del selector de la banda.
3 BANDS
2
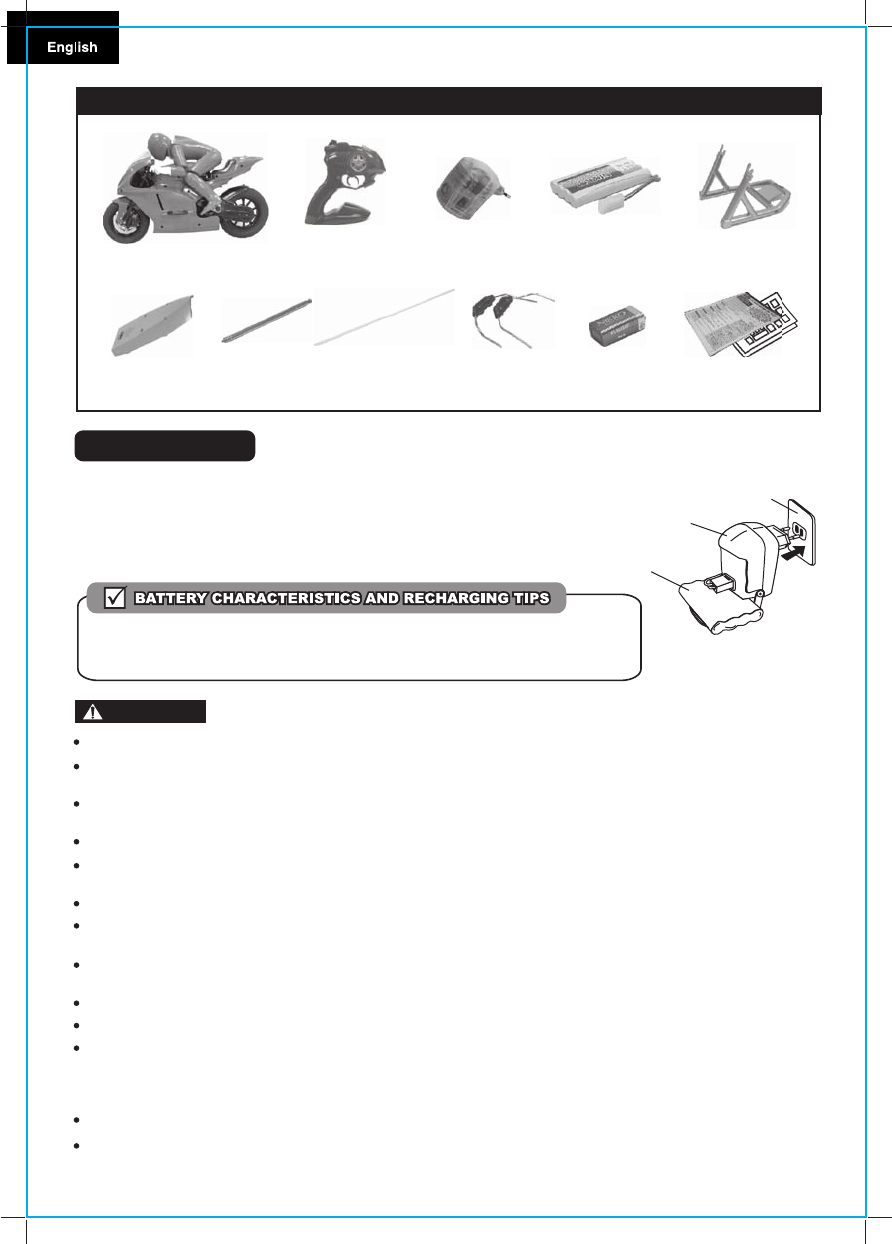
RECHARGING "WARNING! USE UNDER THE DIRECT SUPERVISION OF AN ADULT."
* The newly purchased Ni-Cd pack is not charged. Charge before operating.
1. Connect the connector of the charger to the connector of the Ni-Cd battery pack.
2. Plug the charger into an electrical outlet.
3. Recharge for about 4-5 hours.
4. When the recharging is over, plug out the charger from the
electrical outlet and detach the connectors.
When playing for the first time after purchase, or after a long interval, the battery power
may be weak. Even after recharging, the playing time can be relatively short. The
battery will gradually regain power after 2 or 3 repetitions of usage and recharging.
Household
socket
Ni-Cd
battery pack
Charger
CONTENTS
Transmitter
Transmitter
antenna
Antenna tube
9.6V Ni-Cd battery
9 V(006P) battery Manual & sticker
Charger
Motorbike
Battery lid
Stand
Side bumper
Do not charge Battery Pack immediately after use. Wait until it has cooled before charging.
Avoid short circuits. Short circuits will cause overheating, burning of the cords and other
damages to the battery Pack and Charger.
The Ni-Cd Battery Charger should be used for charging one Battery Pack. Do not use the
Charger for charging other type of batteries and battery packs
Do not use the Charger as a direct current outlet for other electrical appliances or machines.
Make sure that the Battery Pack and Charger are kept out of the hands of infants and small
children while charging.
Do not charge near fires, where the temperature is extremely high, or where it is wet or damp.
The charger will become slightly heated while charging. Allow sufficient free space around the
Charger.
If the power of the battery pack is weak in spite of proper charging, the batteries may be worn out
from repeated use. Replace it with a new Ni-Cd battery pack.
Dispose of used Ni-Cd battery packs correctly.
Disconnect the supply before making or breaking connections to the battery.
Only use batteries or accumulators of the recommended type or a similar type.
WARNING AGAINST RECHARGING NON-RECHARGEABLE BATTERIES.
Please use this battery charger only for the charge of the rechargeable battery pack.
The Ni-Cd battery pack should be charged under the supervision of an adult.
CAUTION
3
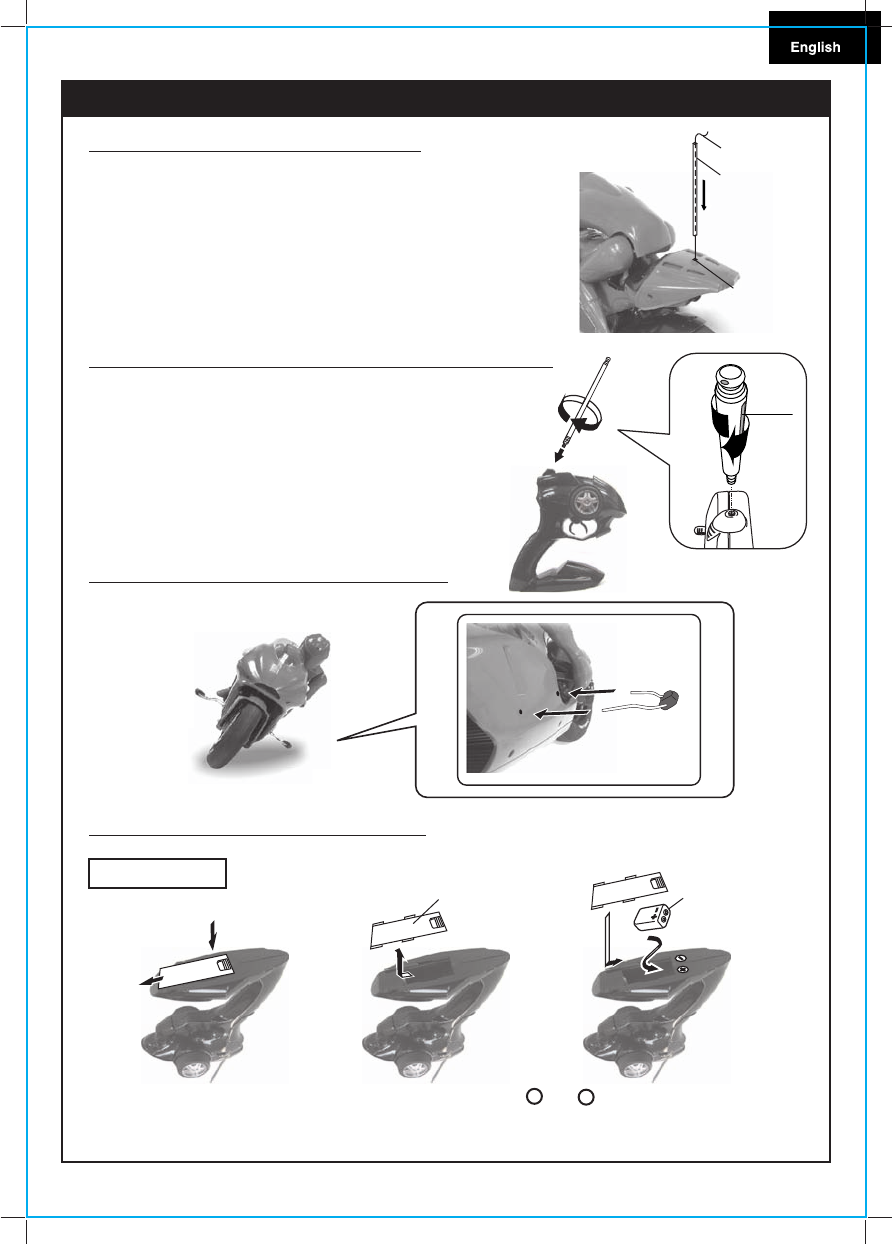
Insert the antenna wire through the antenna tube, then
insert the tube into the antenna tube holder.
If the antenna tube cannot be successfully inserted into the
antenna tube holder, try holding the root of the antenna
wire with one hand and extending the wire with the other
hand.
1. HOW TO ATTACH ANTENNA TUBE
* Precautions: Do not pull the antenna wire too strong.
PREPARATION FOR STARTING OPERATION
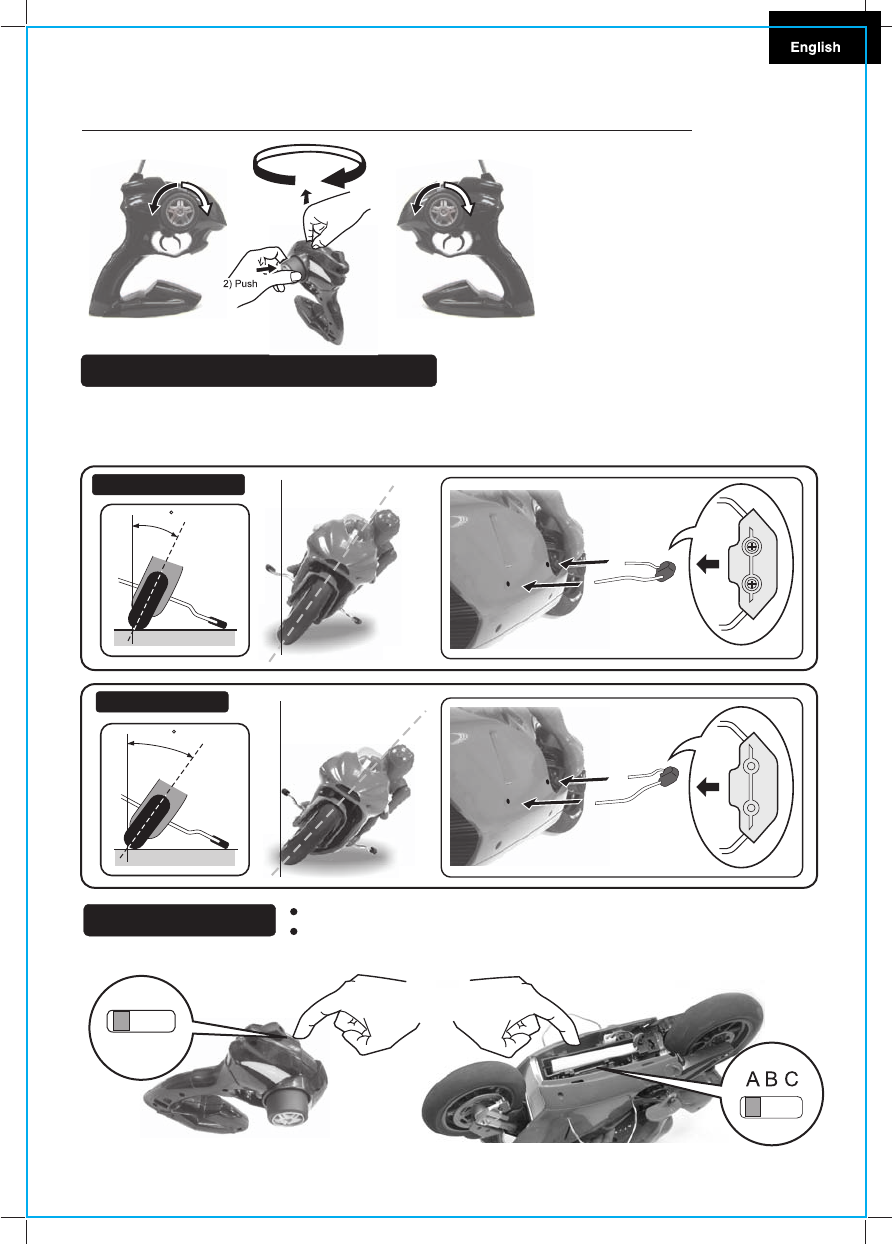
2. HOW TO INSTALL THE TRANSMITTER ANTENNA
Place the transmitter antenna into the antenna
holder and turn it clock-wise to screw it in position.
Do not extend the antenna when installing. It is dangerous.
If the antenna is not screwed in securely, the
motorbike may move erratically. Screw the antenna
securely.
Transmitter
antenna
Antenna wire
Antenna tube
Antenna tube
holder
4. HOW TO INSTALL THE BATTERIES
Transmitter
To remove the battery lid, press the
point marked “OPEN” and slide the lid
downward.
Make sure that the + and - poles are positioned correcting
when installing the batteries.
Press
Push
Battery lid One 006P (9V)
battery
* Dispose the used batteries separately from other trash.
3. HOW TO ATTACH THE SIDE BUMPER
4
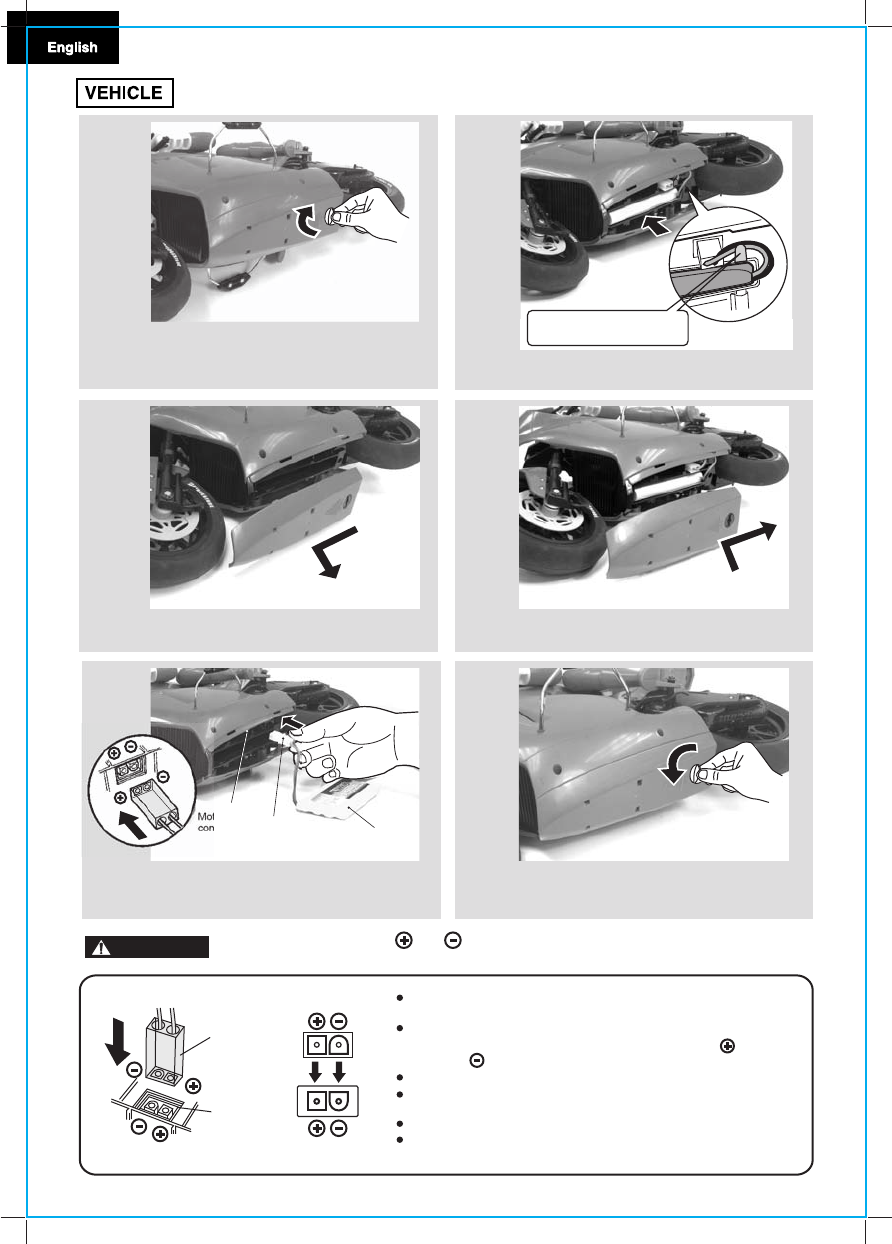
When installing a Ni-Cd battery pack, make sure that the power switch of the vehicle is OFF.
When you connect the connectors. Make sure the vehicle
switch is in the “OFF” position.
Fixed connectors properly.(The connectors are designed to be
connected in only one way so that the positive and the
negative terminals are connected accurately.)
Disconnect the connectors immediately after played.
When you disconnect the connectors, be careful do not pull the
wire too strongly.
Avoid short circuits because it is very dangerous.
Remove all the batteries both from the vehicle and the
transmitter after played.
4
5
6
1
2
3
Slide the battery lid and remove.
Connect the battery's connector to the
motorbike's connector.
Install the Ni-Cd battery into the motorbike.
Return the battery lid to its original position.
Turn the battery lid stopper to its original
position.
CAUTION Insert the connector (The and positions are as shown, do not connect wrongly.
Do not force in, it may cause short circuit; it is dangerous.)
Vehicle's
connector
Battery’s
Connectors
Vehicle's
connector
Battery’s
Connectors
Push and turn the battery stopper.
Motorbike's
connector Battery's
connector 9.6V Ni-Cd
battery
Put the connector cable into
the connector holder.
If you want to hold the transmitter with your
right hand, pull the tab (as shown) and push
in the steering control wheel until it
protrudes from the reverse side. You can
only control the vehicle from the side in
which the steering control wheel is
protruding. You can NOT control the
vehicle properly from the side in which the
steering wheel is stored away.
TRANSMITTER FOR BOTH RIGHT-HANDED AND LEFT-HANDED USERS
TURN OVER
RIGHT HANDED LEFT HANDED
The side bumpers attached to the right and left of the motorbike prevent overturn at bank angle
(inclination) to a certain degree when cornering.
There are two types of attachment available, so change to suit your purpose.
SIDE BUMPER EXPLANATION
BEGINNER MODE
EXPERT MODE
HOW TO PLAY Remove all objects on the playing surface before start.
Play in the Beginner Mode until you are still familiar with the controls.
1) Pull
EXPERT
BEGINNER
35
40
5
Band selector switch on transmitter Band selector switch on vehicle chassis
(1) Ensure that band selector switch on transmitter and vehicle are set to the same letter - A, B or C.
A B C
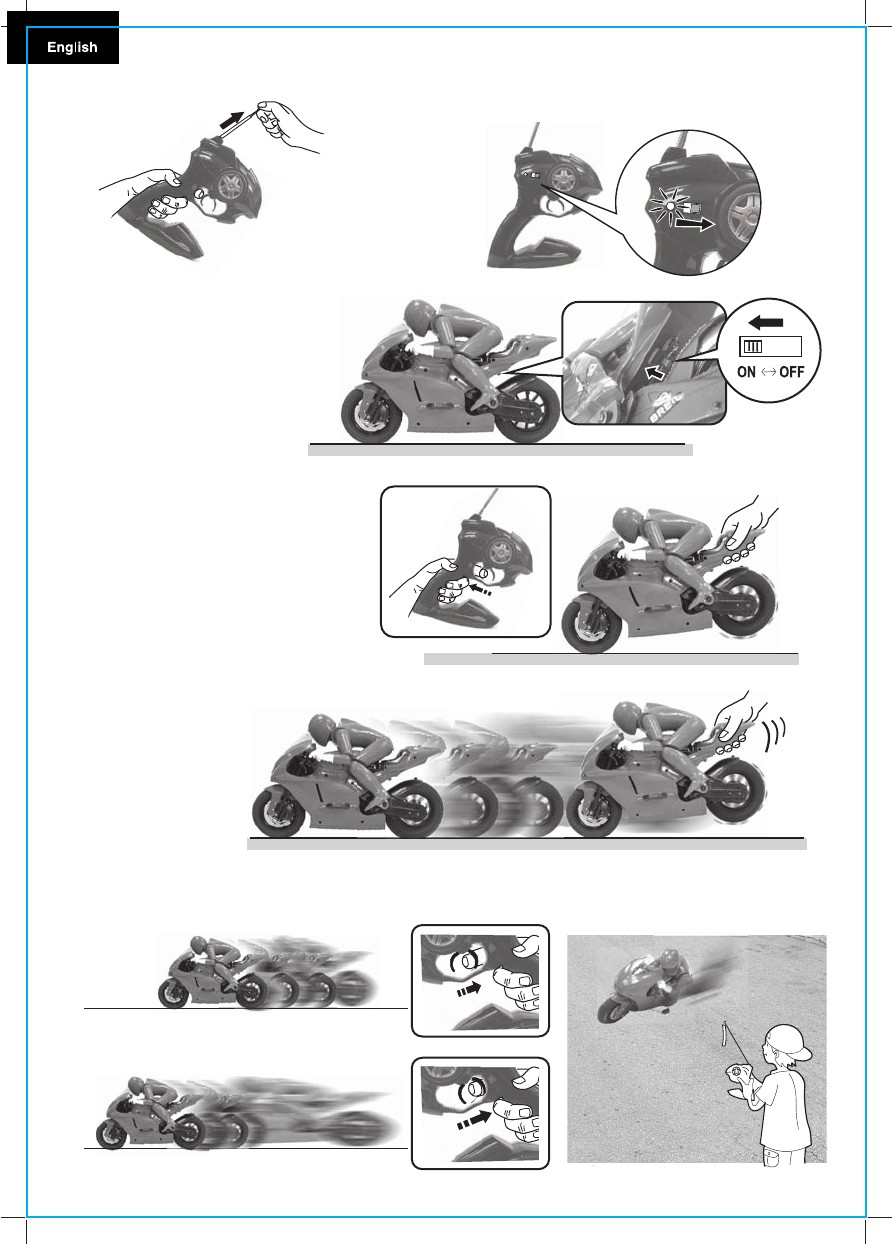
4. Turn ON the motorbike power switch.
Hold the transmitter with one hand,
and carry the motorbike with
another hand.
Then pull the speed trigger
slightly to turn the rear wheel.
(This preparation may help
to prevent overturn during start).
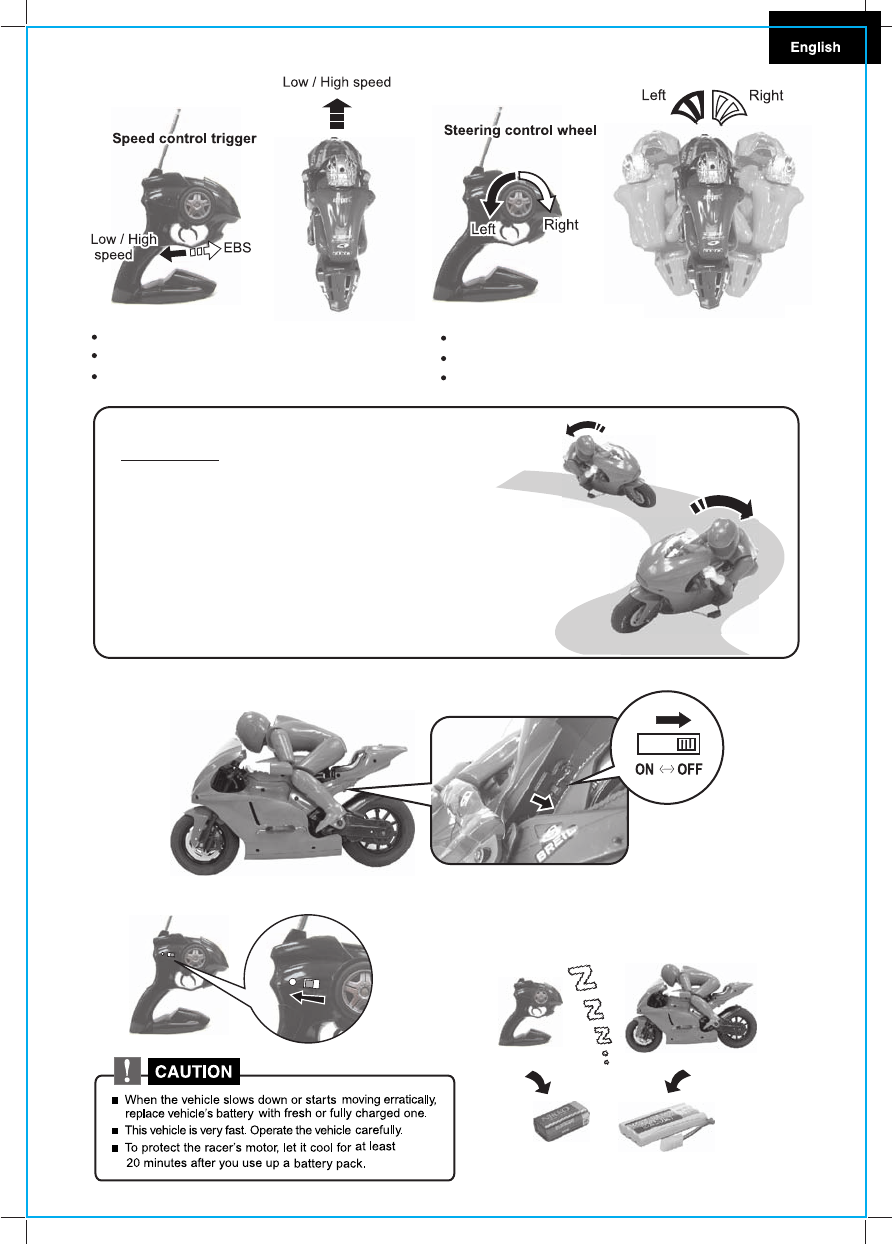
Start playing using the speed control trigger and steering control wheel.
The speed control trigger allows two-step speed control.
7.
6. Start the motorbike while pushing it forward.
Low speed
High speed
6
5.
3. Turn ON the power switch of the
transmitter. (The LED will light up.)
2. Extend the transmitter antenna.
(You can control farther by
lifting the transmitter higher)
10. To prevent damage from battery leakege,
remove all the batteries from transmitter
and vehicle after playing.
8. After playing, turn OFF the power switch of the vehicle.
9. Turn OFF the transmitter switch.
Turn wheel to clockwise for right turn.
Turn wheel to counterclockwise for left turn.
Release wheel to drive straight forward.
Pull trigger to drive Low / High speed.
Push trigger to EBS.
Release trigger to stop.
If you turn the steering wheel to the left or right,
the rider figure will shift its position in that
direction. This shift of balance will make the
motorbike bank (lean) in that direction. The
motorbike tends to move in the direction in
which it is banked. This use of the rider’s shift in
balance is the basic cornering technique.
CORNERING
7
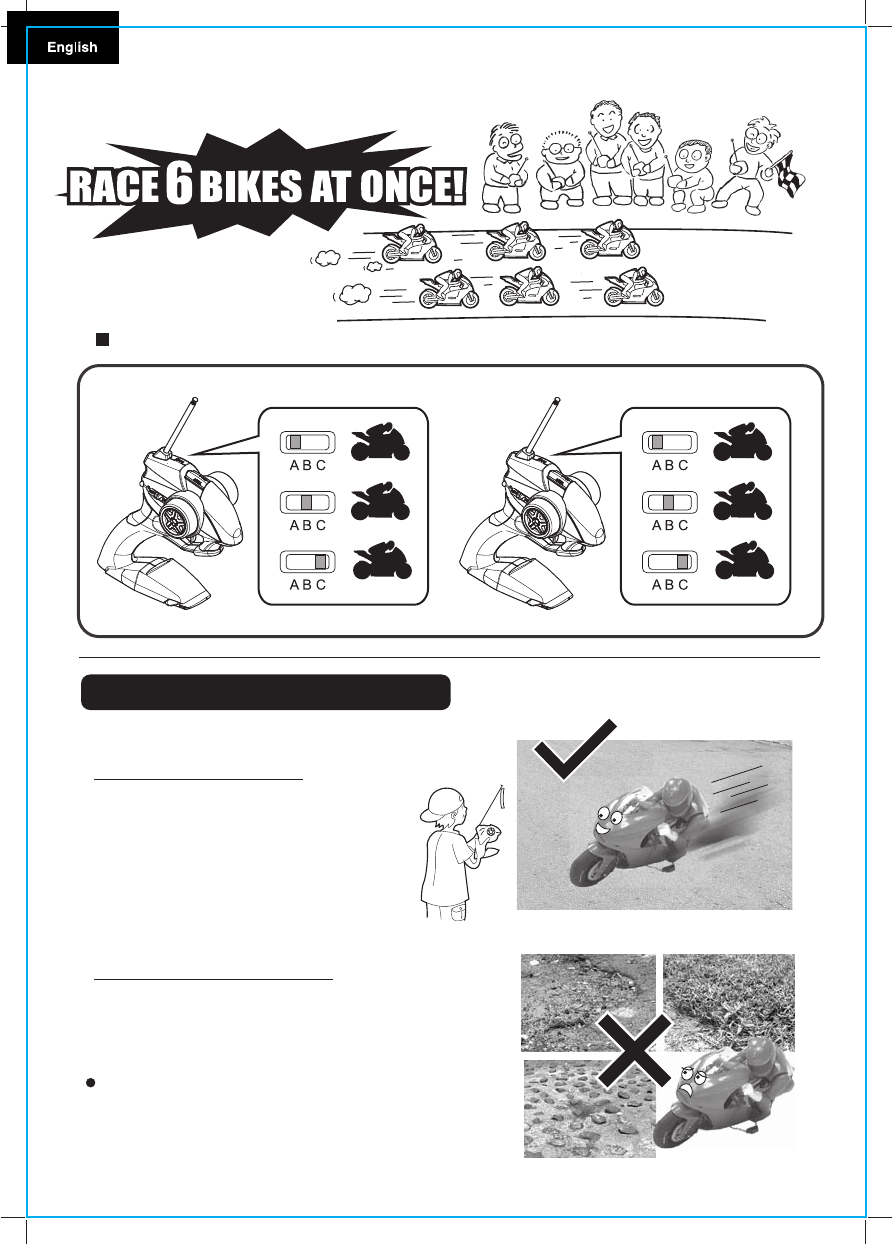
WHERE TO PLAY MOTORBIKE
Please select smooth surface for playing.
Roads suitable for playing :
Concrete without sand on the surface,
asphalt surface without holes
Roads not suitable for playing :
Sandy concrete surface, asphalt with holes,
unpaved area, tiled road.
Roads in poor condition normally cannot be used.
Normally the motorbike cannot run on roads in
poor condition.
Check the surface before playing.
8
49MHz
3 BANDS FOR FREQUENCY 27 MHz AND 49 MHz, ALLOWS UP TO 6 BIKES TO RACE AT ONCE.
A
B
C
27MHz
A
B
C
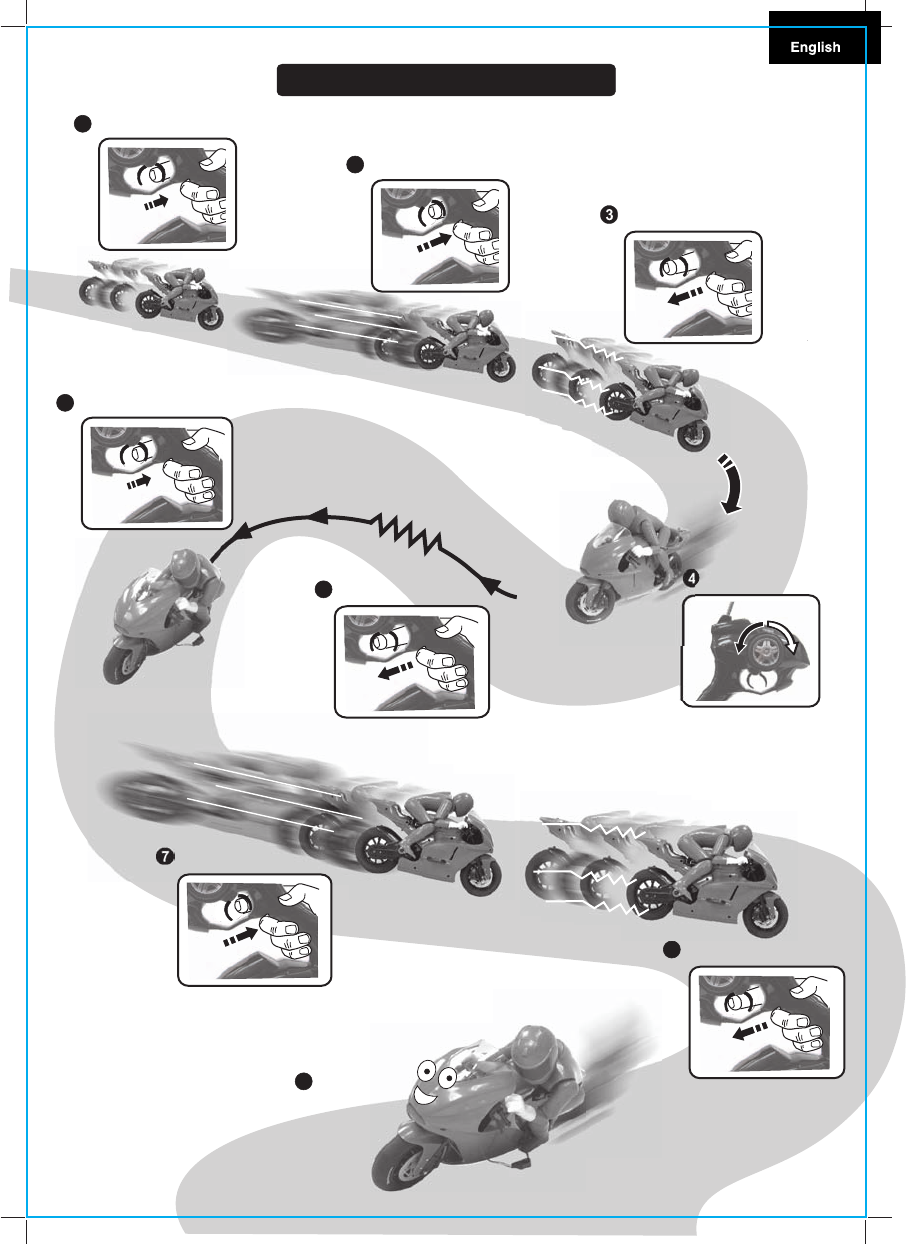
1Forward Start
4Steering (Right, Left)
5Cornering (EBS)
6Low Speed
8
High Speed
9Repeat . . .
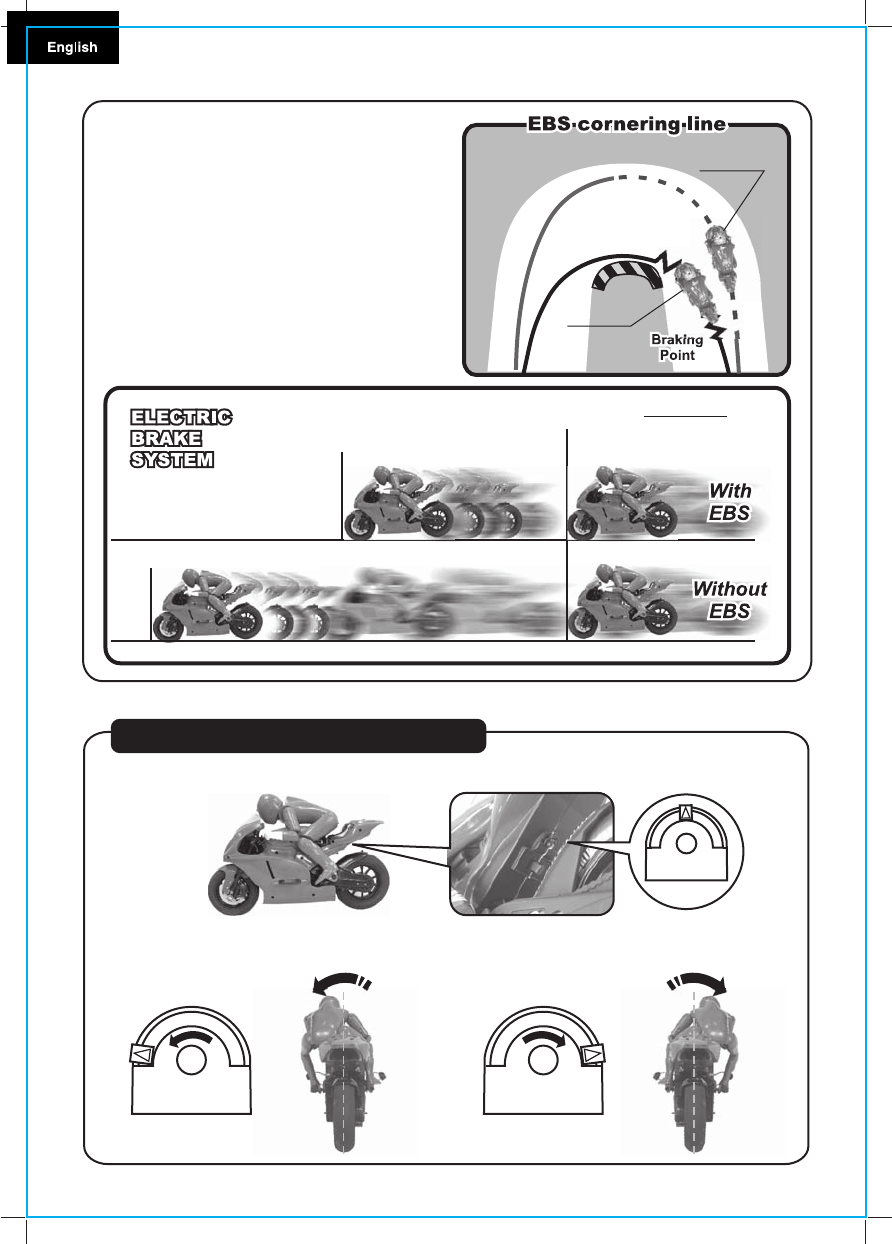
EXPERT MODE TECHNIQUE
Braking point
EBS speed reduction
EBS speed reduction
2High Speed
9
Adjust the steering alignment when the vehicle does not run straight forward.
TO ADJUST STEERING ALIGNMENT
Turn the steering alignment lever towards
“L” if the vehicle runs towards right. Turn the steering alignment lever towards
“R” if the vehicle runs towards left.
L RL R
L R
10
What is EBS (Electric Brake System)?
EBS is used to electronically stop a running
motor, and similar to an actual brake in a car, it
enables stopping within a short distance.
When the speed control trigger is pushed
forward to one side, EBS starts to work and
allows cornering in high speed. When
cornering using speed control trigger, a large
radius is normally required, but using EBS right
before cornering, the required radius is smaller.
Stop
Stop Start
MAX SPEED
Throttle Off
without EBS
with EBS
11
CAUTION
Check the batteries regularly for leakage.
Remove empty batteries from the toy.
Never try to charge non-rechargeable batteries.
Rechargeable batteries may only be charge under the supervision of an adult.
When inserting the batteries take care not to reverse their polarity.
Never use batteries of different manufacturers, and do not mix old and new batteries.
Use only the recommended batteries or batteries of equal quality.
Never short-circuit the terminals.
Rechargeable batteries which can be recharged must be removed from the toy prior to charging.
The side bumper will hit the road during cornering, and it may over turn. In such circumstances,
use the speed control trigger or steering control wheel to balance.
When the motorbike’s Ni-Cd battery pack power is low, the rider inclination becomes less, and
turning circle become smaller. In such case, recharge the Ni-Cd battery pack.
Due to battery characteristics, recharge at a warm location. If recharging at a cool location, the
power of the battery will be lower than usual and unable to achieve the specified running time.
Tire grip is very important during running. Dust causes imbalance running.
Wipe the tires with a piece of cloth before playing.
PRECAUTIONS DURING PLAYING
If the front wheel bumps into stones and holes, its movement may become shaky and unsteady.
Stop playing for a while and the motorbike will restore to its original state.
When carrying the motorbike, do not lift the rider. Always use both hands to carry from the
bottom of the motorbike.
Otherwise the rider’s hand may come out of the motorbike handle, or the motorbike attachment
may be damaged.
If rider’s hand is not on the handle, insert the pillow ball which is attached to the handle
onto the hole of the hand.
When not in use, mount the motorbike on the stand provided and keep it.
PRECAUTION
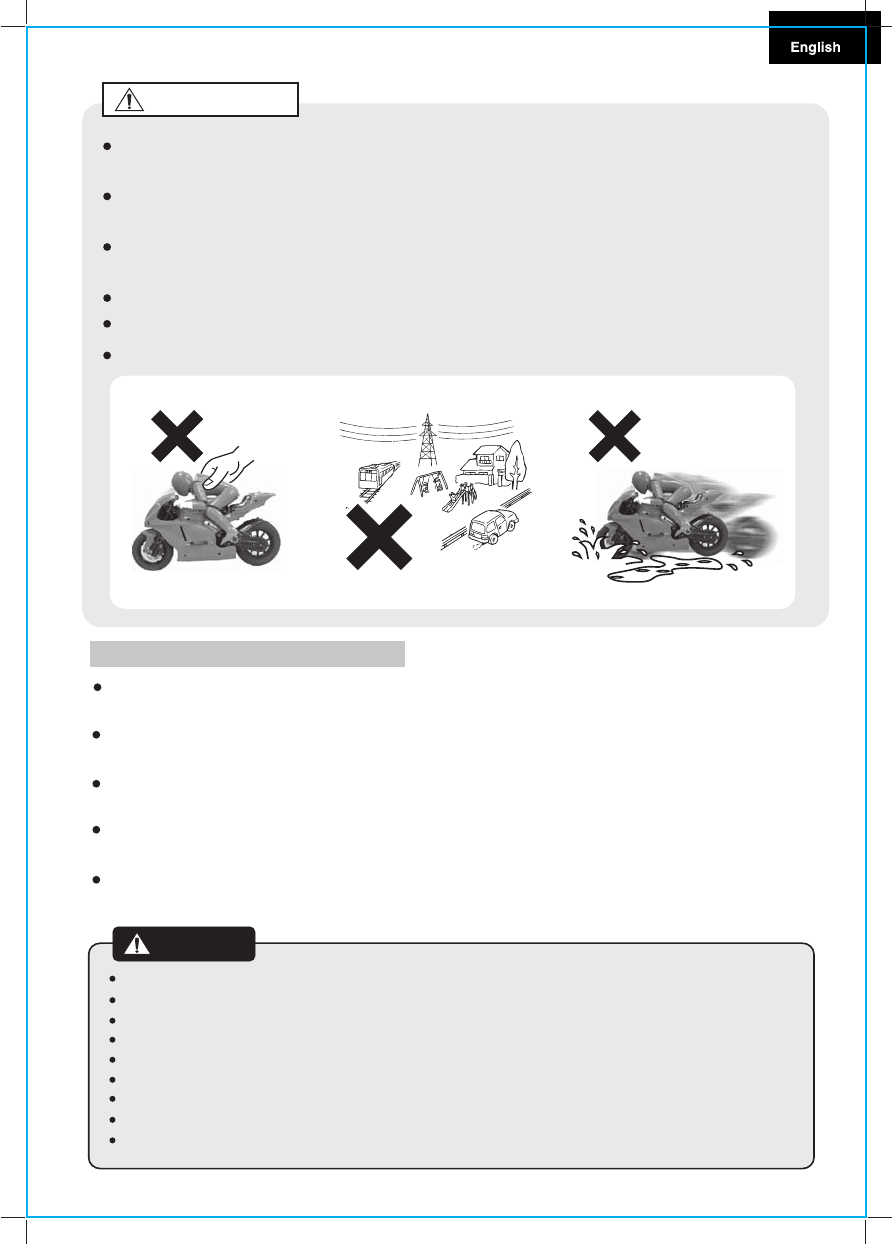
Do not bang it, or play it at water area. Otherwise, this may the damage motorbike.
Do not play it at locations where there are people or cars moving around. It is dangerous.
12
Select a SAFE place to operate your vehicle, Do not drive in the street. Avoid driving on SAND or through
puddles of WATER. These hazards can impair performance. Check the surface ahead of you and watch for
obstacles.
The radio receiver in your vehicle and transmitter are sensitive instruments. Do not leave Vehicle or Transmitter
near sources of HEAT or under DIRECT SUNLIGHT for long periods of time.
Avoid leaving Vehicle or Transmitter OUTSIDE OVERNIGHT. NIGHT DAMPNESS IS HARMFUL TO
INTERIOR MECHANISM.
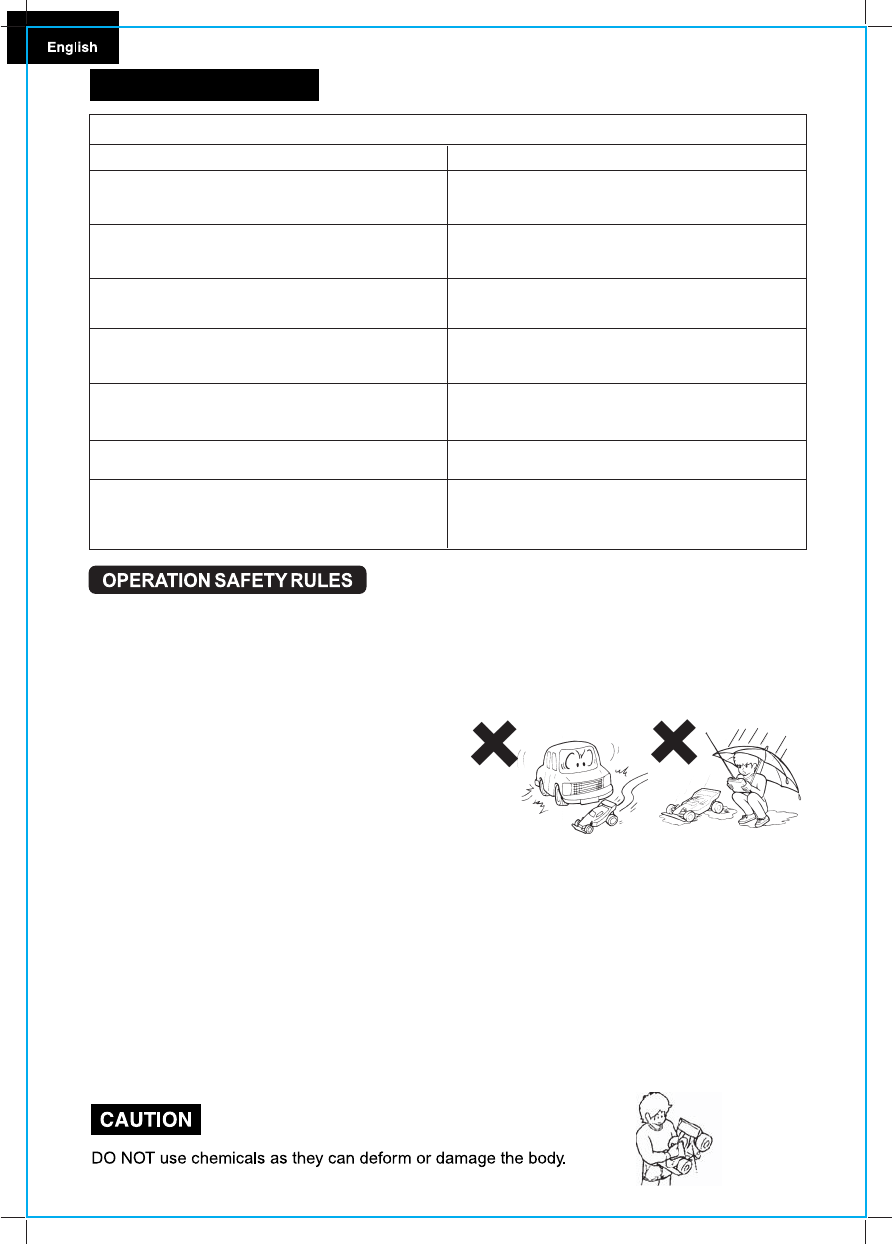
Cleaning and maintenance:
This toy vehicle needs periodic maintenance and cleaning.
Warning to the parents:
The charger for the Ni-Cd battery pack needs periodic inspection
to see that the lead wires, plugs, outer case, and other parts are
not damaged in any way. If any of the parts are damaged, do not use the charger until it is completely repaired.
Caution:
Keep out of reach of small children under 36 months old as there is danger of getting hurt.
CHANGES OR MODIFICATIONS NOT EXPRESSLY APPROVED BY THE MANUFACTURER FOR
COMPLIANCE COULD VOID THE USER’S AUTHORITY TO OPERATE THE EQUIPMENT.
RADIO INTERFERENCE:
Sometimes erratic behavior or loss of control of vehicle is the result of interference caused by high tension
wires, high voltage transformers, certain types of building, concrete walls or narrow places where RADIO
SIGNALS sent from your transmitter MAY BE SCATTERED thus making it DIFFICULT for your vehicle to
receive a GOOD RADIO SIGNAL.
If you encounter this type of behavior or loss of control, CHANGE TO A DIFFERENT LOCATION.
You will encounter INTERFERENCE if ANOTHER radio controlled vehicle or CB radio is operating in the
vicinity on your SAME FREQUENCY.
TROUBLE SHOOTING
Read the following troubleshooting guides when you have
trouble operating the motorbike.
The motorbike does not move
Cause Remedy
The power of the transmitter’s or Ni-Cd
battery pack is depleted.
Either replace the transmitter batteries, or
recharge the Ni-Cd battery pack.
Battery contact point is rusted.
Remove the rust from the battery contact
point with a sand paper.
The motorbike or transmitter power switch
is positioned to OFF.
Turn ON power switch.
A radio controlled car with the same
frequency is running nearby
Either move to another location or play later.
The transmitter antenna is not extend. Extend the transmitter antenna.
The ‘+’ and ‘-‘ ends of the transmitter
batteries are positioned in the wrong
Change the direction of batteries.
The transmitter distance between the
transmitter and the motorbike is too far.
Move the transmitter closer to the motorbike.
And, lift the transmitter antenna higher
to control farther.

English / Français / Español
NO HAGA funcionar su vehiculo en alfombras peludas gruesas.
Puede ser peligroso ya que las fibras de la alfombra pueden enrollarse en al eje y provocar el recalentamiento
EL FCC DESEA QUE USTED SEPA QUE
Este dispositivo cumple con la parte 15 de las Reglas del FCC . Su operación está sujeta a las siguientes dos condiciones:
(1) Este dispositivo no debe causar interferencia prejudicial.
(2) Este dispositivo acepta cualquier interferencia recibida, incluyendo interferencia que puede provocar operaciones indeseadas.
Su vehhiculo R/C (controlado por radio)puede causar interferencia de TV o radio, incluso en caso que esté operado propiamente.
Para determiner si es su vehiculo R/C el que está provocando la interferencia, desconecte su vehículo R/C.
Si la interferencia desaparencia desaparece, su vehiculo R/C está causando la interferencia. Trate de eliminar la interferencia mediante:
• Moviendo su vehículo R/C lejos del receptor afectado.
• Tenga contacto con su distribuidor local para solicitor consejos.
Si no puede eliminar la interferencia, el FCC require que usted deje de usar su vehículo R/C.
El sello RBRCä colocado en el paquete de pilas de niquel cadmio indica que Nikkon Ameraca está
Participando voluntariamente en un programa de la industria que recupera y recicla estas pilas al final
de su vida útil. El programa RBRC es una alternative conveniente a eliminar las pilas tirándolas
albasurero o entregarlas al servicio de recolección municipal, lo que es ilegal en ciertas zonas.
El pago que hace Nikko America a RBRC le facilita dejar los paquetes de pilas gastadas en los
negocios que venden pilas de niquel cadmio de reemplazo.
Puede también tener contacto con su centro de reciclado local para obtener mayor información sobre
el lugar al que debe llevar su paquete de pilas gastado.
RBRC es una marca registrada de la Corporación de Reciclado de Pilas Recargables.
35
DO NOT operate your vehicle on tick-piled carpets. It can be dangerous since the carpet fiber may twine
round a shaft and cause a motor overheated.
TM
THE RBRC Seal on the nickel cadmium battery pack indicates that Nikko America is voluntarily
participating in an industry program to collect and recycle these batteries at the end of their useful
life. The RBRC program provides a convenient alternative to disposing nickel-cadmium
batteries into the trash or municipal waste stream, which is illegal in some areas.
Nikko America's payments to RBRC makes it easy for you to drop off the spent battery pack at
local retailers who sell replacement nickel-cadmium batteries.
You may also contact your local recycling center for information on where to return the spent
battery pack. RBRC is a trademark of the Rechargeable Battery Recycling Corporation.
THE FCC WANTS YOU KNOW
This device complies with part 15 of the FCC Rules, Operation is subject to the following two conditions:
(1) This device may not cause harmful interference.
(2) This device must accept any interference received, including interference that may cause undesired operation.
Your R/C car might cause TV or radio interference even when it is operating properly.
To determine whether your R/C car is causing the interference, turn off your R/C car.
If the interference goes away, your R/C car is causing the interference.
Try to eliminate the interference by:
• Moving your R/C car away from the receiver.
• Contacting your local store for help.
If you cannot eliminate the interference, the FCC requires that you stop using your R/C car.
Níopérez PAS le véhicule sur un tapis à poils longs.Cela peut être dangereux parce que les poils du tapis
peuvent síenrouler autour díun arbre et provoquer la surchauffe du moteur.
TM
Líautocollant RBRC sur la batterie nickel-cadmium indique que Nikko America participle
volontairement au programmed u secteur díindustrie pour la collecte et le recyclage de ces batteries à la
fin de leur vie de service. Le programme RBRC offer une option de remplacement pratique à la mise au
rebut des batteries nickel-cadmium dans la poubelle ou dans le flux de dechets municipal, ce qui est
illégal dans certaines régions.
Les paiements de Nikko America à RBRC facilitent pour vous la dépose des batteries usées chez un
revendeur local vendant des batterie nickel-cadmium de remplacement.
Vous pouvez également contacter votre centre de recyclage local pour obtenir les addresses
auxquelles retourner les batteries usées.
RBRC est une marque de fabrique de Rechargeable Battery Recycling Corporation.
Ce dispositif est conforme à la Partie 15 des règles FCC. Le fonctionnement est soumis aux deux conditions suivantes:
(1) Ce dispositif ne provoquera pas d’interférences nuisibles.
(2) Ce dispositif peut être affecté par des interférences recues, y compris des interférences pouvant provoquer un fonctionnement indésirable.
Votre véhicule radioguidé peut provoquer des interférences sur un téléviseur ou une radio, même quand il fonctionne correctement. Pour
vérifier si cíest le véhicule redioguidé qui provoque les interférences, mettez-le hors tension. Si l’interférence disparaît, le véhicule en est la
cause. Essayez alors de l’éliminer comme suit:
• Eloignez votre véhicule radioguidé du récepteur.
• Consultez votre revender local.
Si líinterference ne peut pas être éliminée, les règles FCC exigent que vous arrêtiez díutiliser votre véhicule radioguidé.
Ce que FCC souhaite que vous sachiez