Nikon 2143EB 802.11b/g Transmitter Module User Manual
Nikon Corporation 802.11b/g Transmitter Module
UserManual.wiki
>
Nikon
>
2143EB User Manual
>
User Manual
Contents
1.
User Manual
2.
Installation Manual
User Manual
Navigation menu
Upload a User Manual
Namespaces
Wiki Guide
HTML
PDF
Info
Views
User Manual
Discussion / Help
Navigation

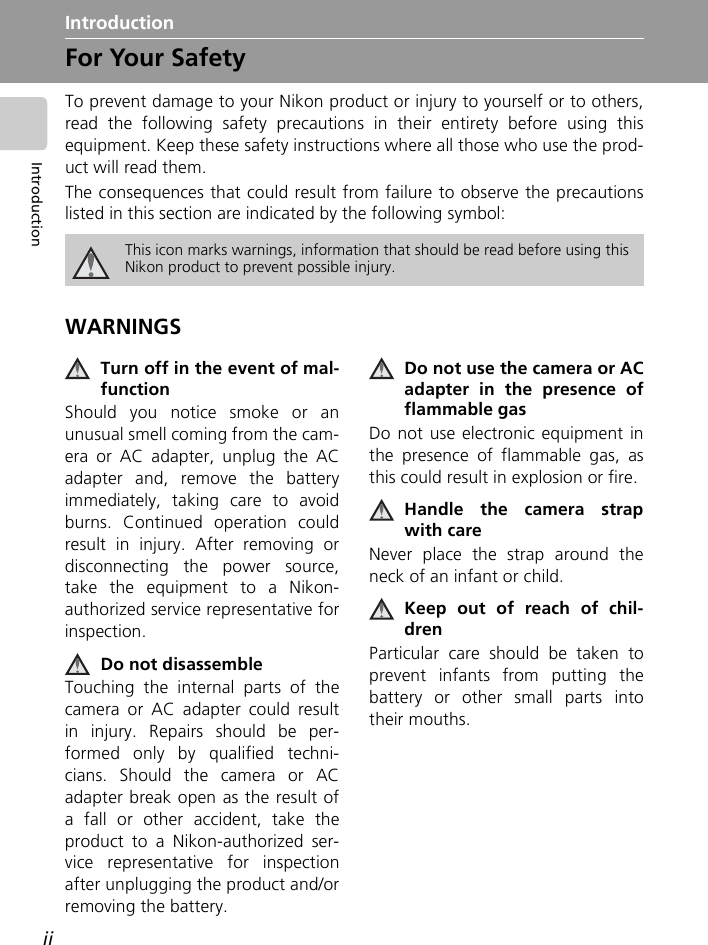
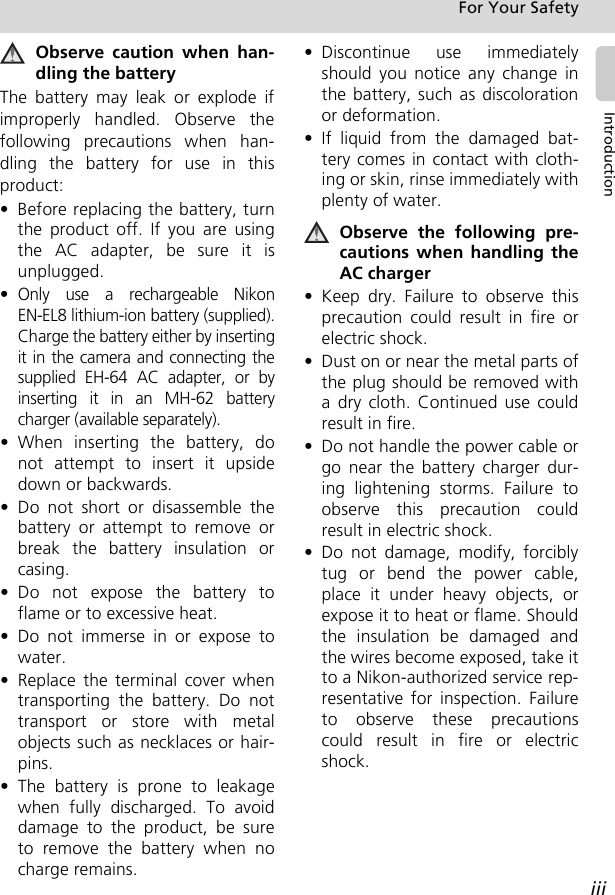
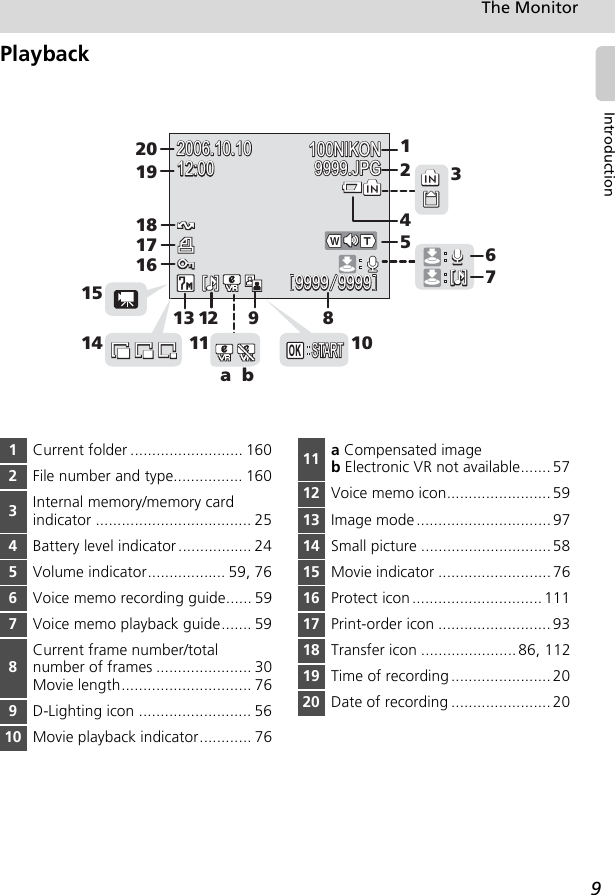
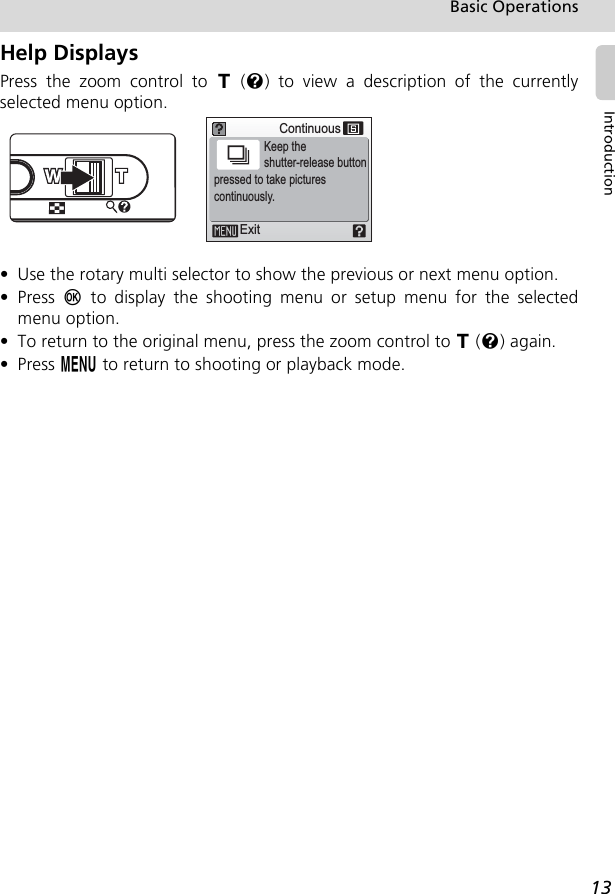
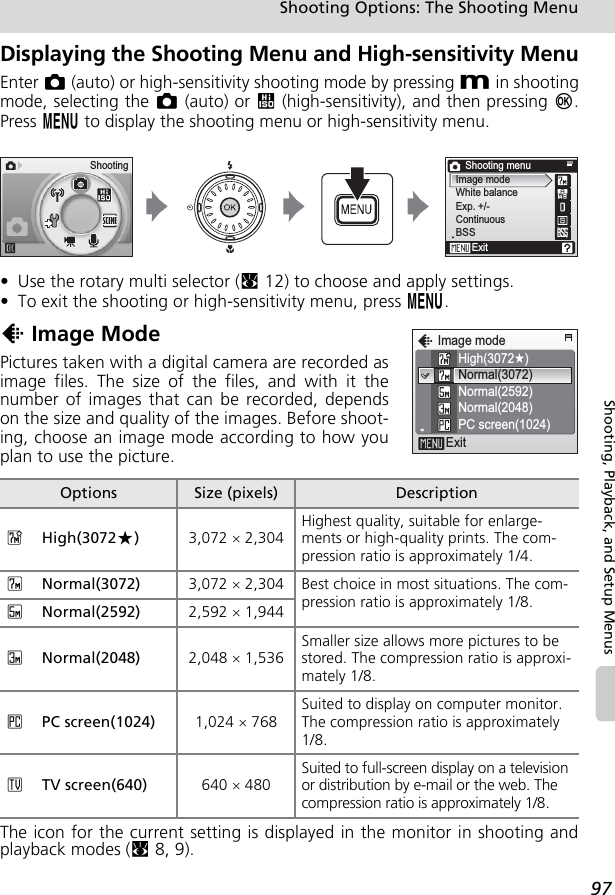
![1IntroductionAbout This ManualThank you for your purchase of a Nikon COOLPIX S7c digital camera. Thismanual has been written to help you enjoy taking pictures with your Nikondigital camera. Read this manual thoroughly before use, and keep it whereall those who use the product will read it.Symbols and ConventionsTo make it easier to find the information you need, the following symbolsand conventions are used:Notations• A Secure Digital (SD) memory card is referred to as a “memory card.”• The setting at the time of purchase is referred to as the “default setting.”• Menu items, options, and messages displayed in the camera monitor areshown in brackets ([ ]).Screen SamplesIn this manual, images are sometimes omitted from monitor display samplesso that monitor indicators can be more clearly shown.Illustrations and Screen DisplayIllustrations and text displays shown in this manual may differ from actualdisplay. kMemory CardsPictures taken with this camera can be stored in the camera’s internal memory or on remov-able memory cards. If a memory card is inserted, all new pictures will be stored on the mem-ory card and delete, playback, and format operations will apply only to the pictures on thememory card. The memory card must be removed before the internal memory can be format-ted or used to store, delete, or view pictures.This icon marks cautions, infor-mation that should be read before use to prevent damage to the camera.This icon marks tips, additional information that may be helpful when using the camera.This icon marks notes, informa-tion that should be read before using the camera.This icon indicates that more information is available else-where in this manual or in the Quick Start Guide.cljk](https://usermanual.wiki/Nikon/2143EB.User-Manual/User-Guide-700695-Page-15.png)

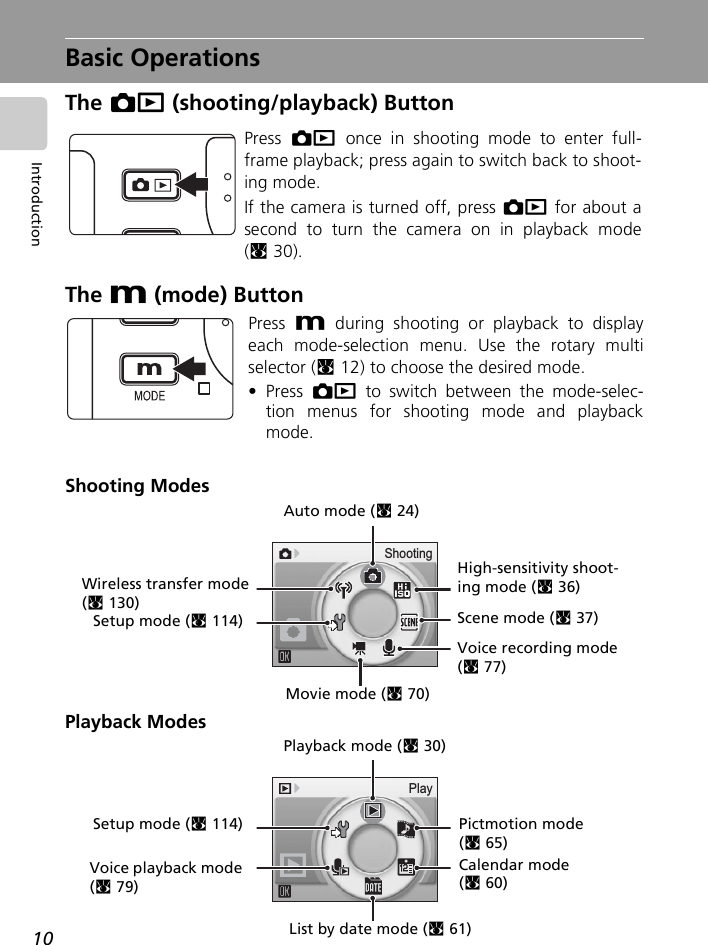
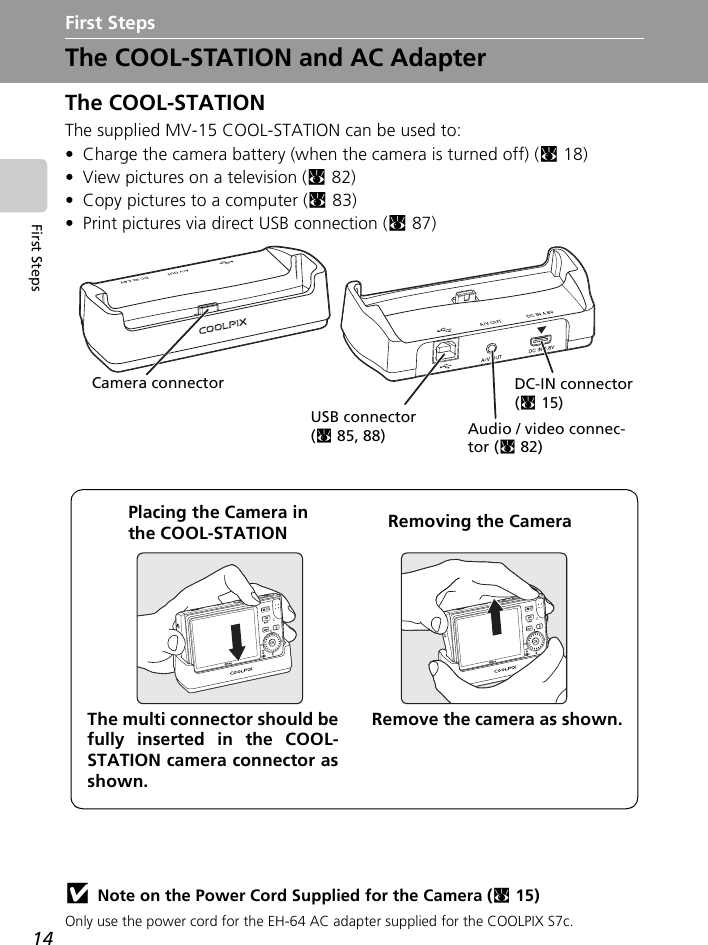

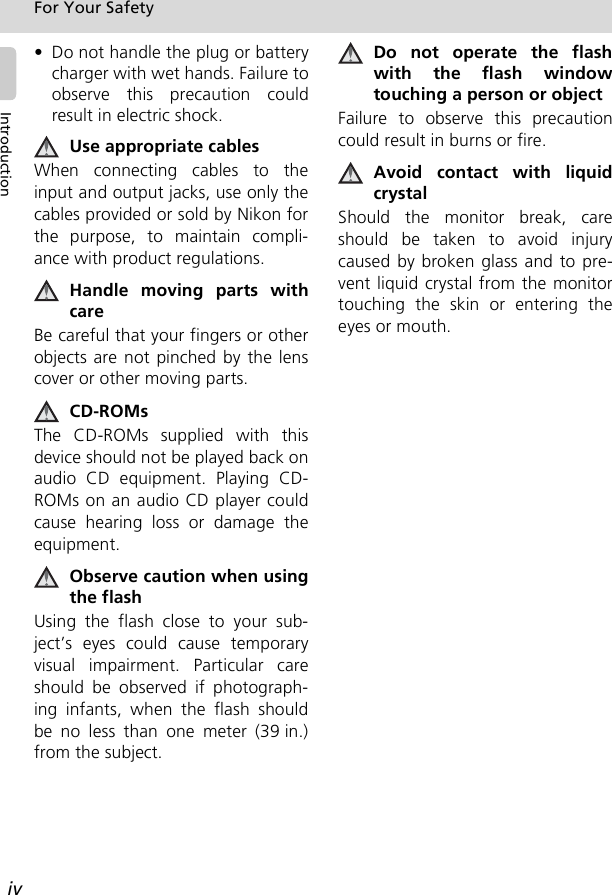
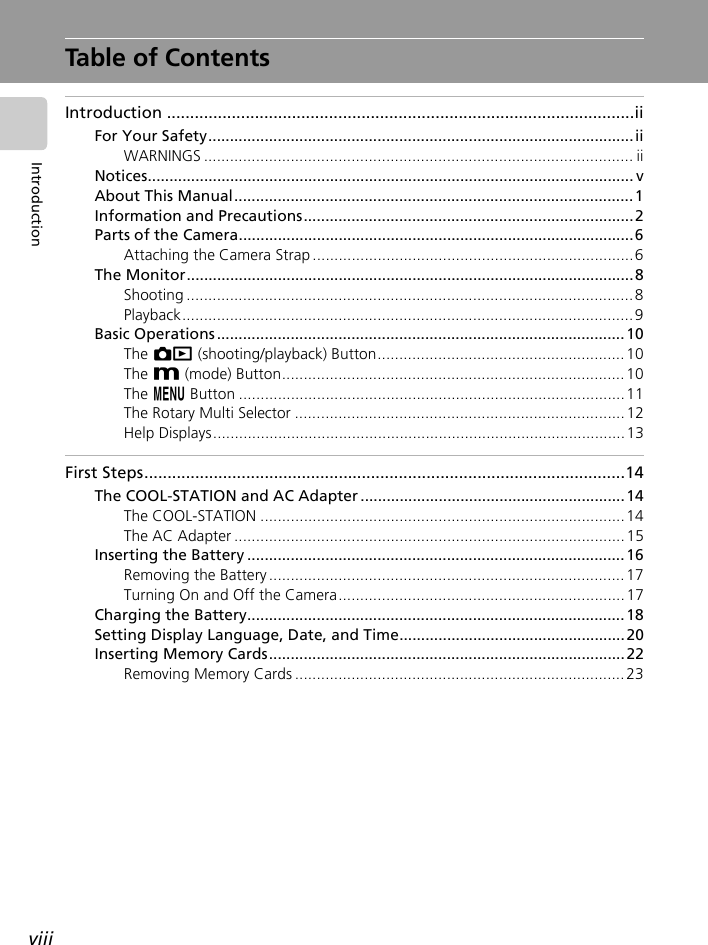
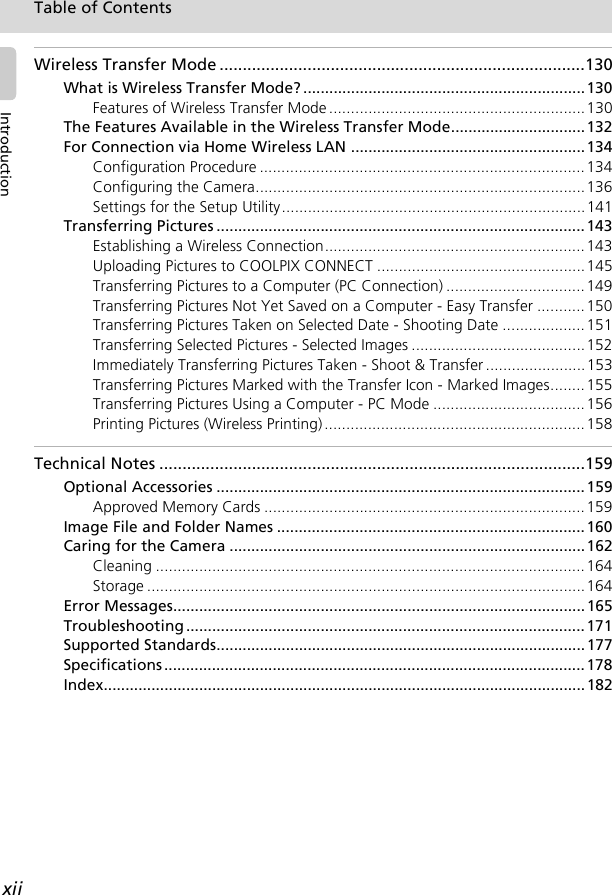
![20First StepsSetting Display Language, Date, and TimeA language-selection dialog is displayed the first time the camera is turnedon. 1Press the power switch to turn on thecamera.The power-on lamp (green) will light and the monitorwill turn on.2Use the rotary multi selector to choosethe desired language and press d.For information on using the multi selector, see “TheRotary Multi Selector” (c12).3Choose [Yes] and press d.If [No] is selected, the date and time will not be set.4Press d.The home time zone menu is displayed.If daylight saving time is in effect in the local timezone, see “Daylight Saving Time” on the next page.5Select your home time zone and press d.The date menu is displayed.DateSet time and date?NoYesXTime zoneLondon,CasablancaDaylightSavingXHome time zoneBackLondon,Casablanca](https://usermanual.wiki/Nikon/2143EB.User-Manual/User-Guide-700695-Page-34.png)
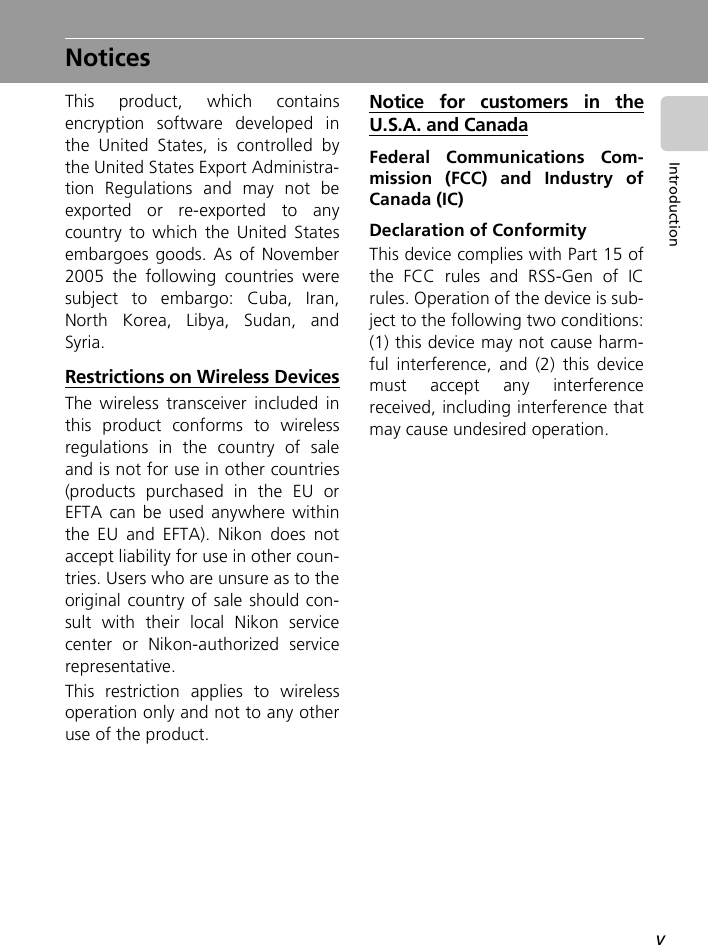
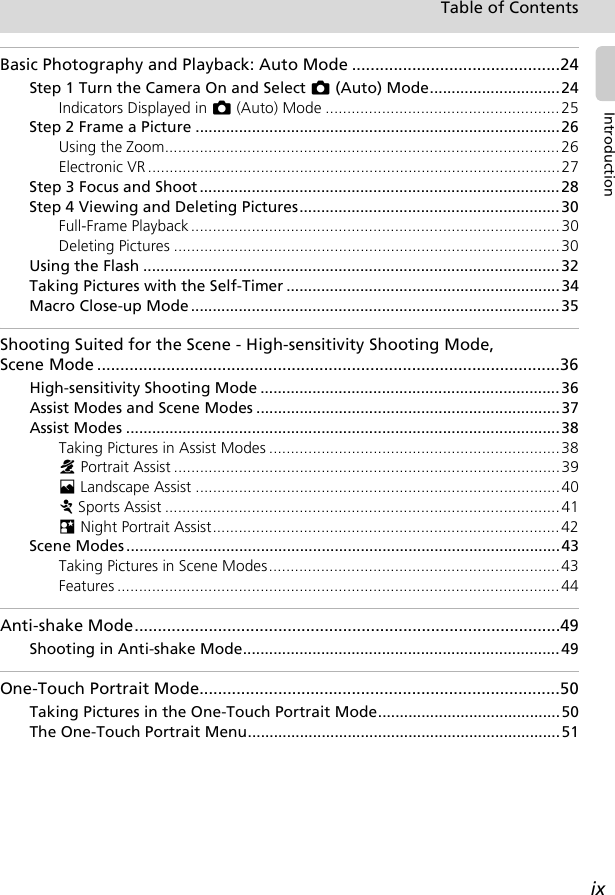
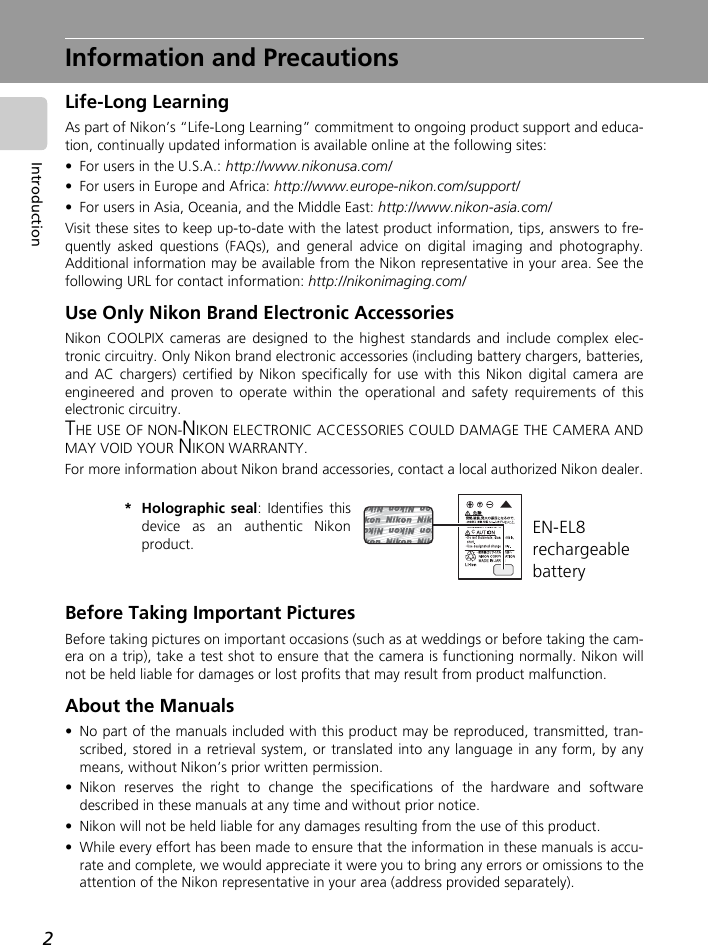
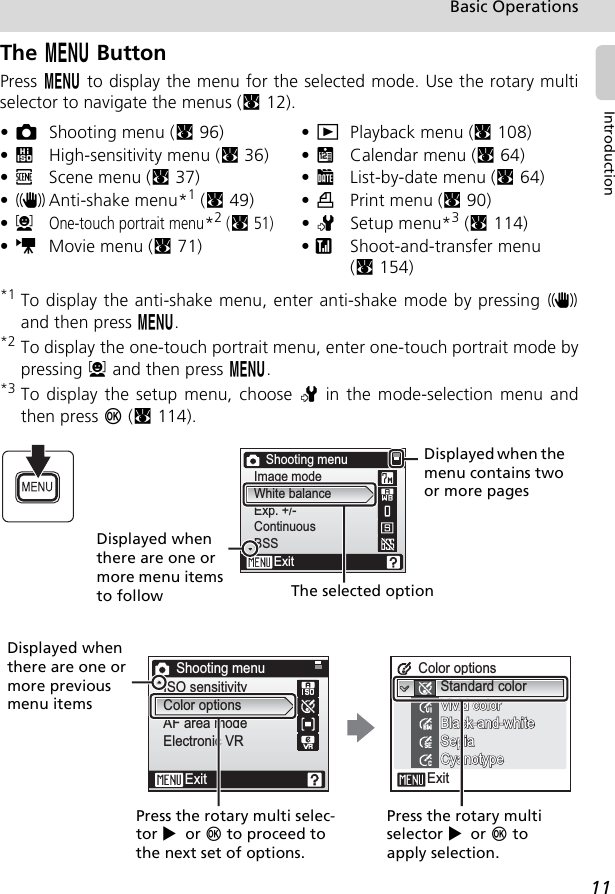
![21Setting Display Language, Date, and TimeFirst Steps6Edit the day ([D]) (order of the day,month, and year may differ in someareas) and press d.7Edit the month ([M]) and press d.8Repeat steps 6 and 7 to edit the year([Y]), hour, and minutes. Press d aftersetting each item.The row for setting the order in which the date is dis-played will blink.9Choose the order in which the day,month, and year are displayed and pressd.The settings are applied and monitor display returns toshooting mode.kDaylight Saving TimeIf daylight saving time is in effect, turn on [DaylightSaving] in the time zone menu in step 4and set the date.1 Use the rotary multi selector to choose [DaylightSaving].2Press d to enable daylight saving time (y).The d button toggles the daylight saving time option on and off.3 Use the rotary multi selector to return to step 4 and proceed to step 5.When daylight saving time ends, turn [DaylightSaving] off from the date menu (c117) in thesetup menu. The camera’s clock is automatically set back one hour.DateDMY010000200609DateDMY100000200609DateDMY100000200610DateDMY101015200610](https://usermanual.wiki/Nikon/2143EB.User-Manual/User-Guide-700695-Page-35.png)
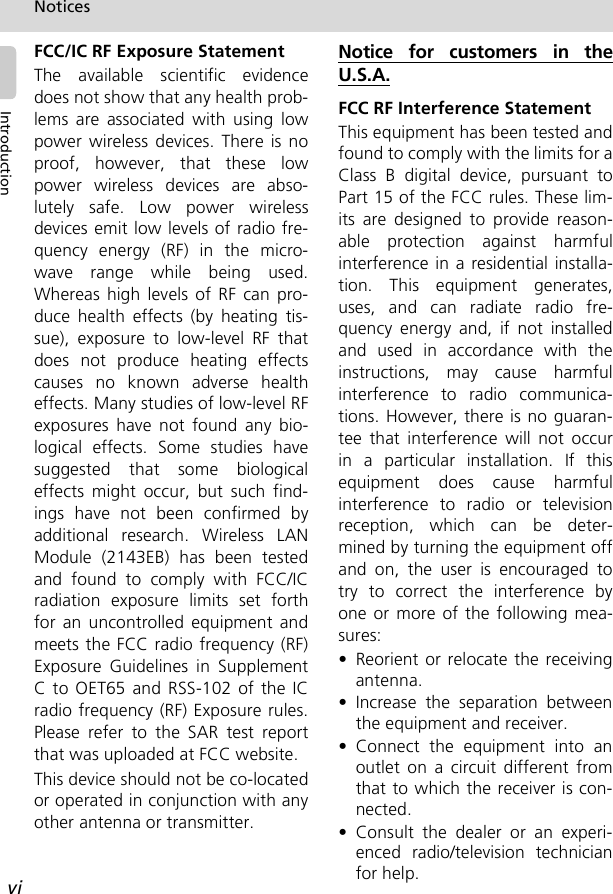
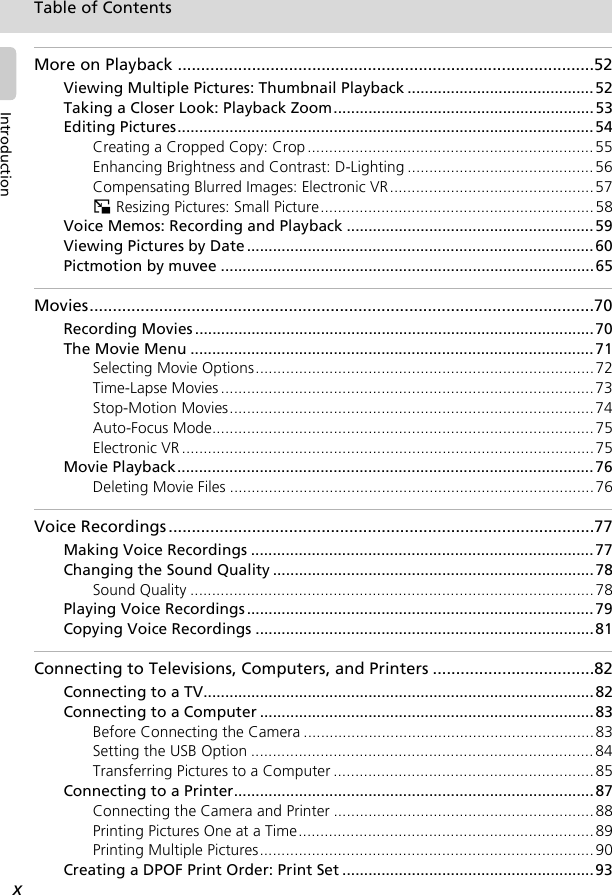
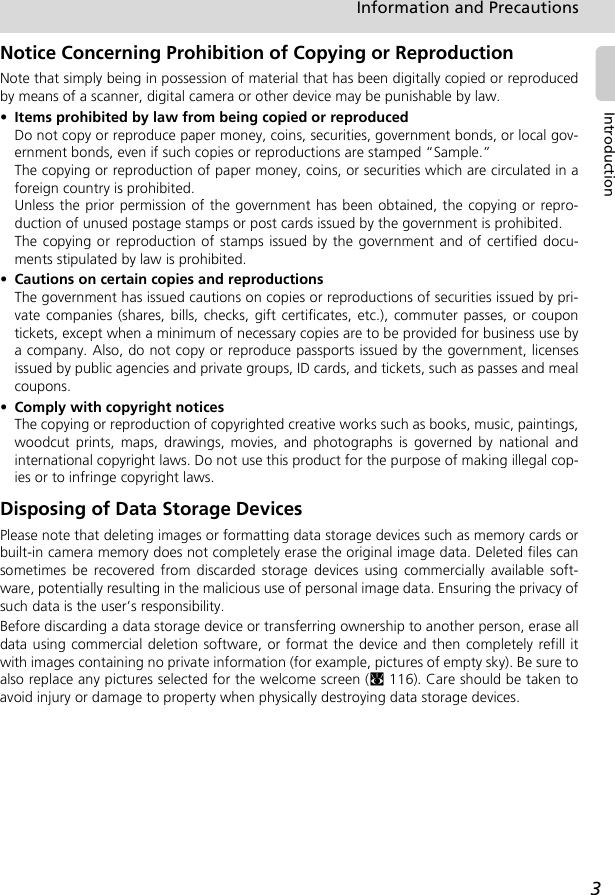
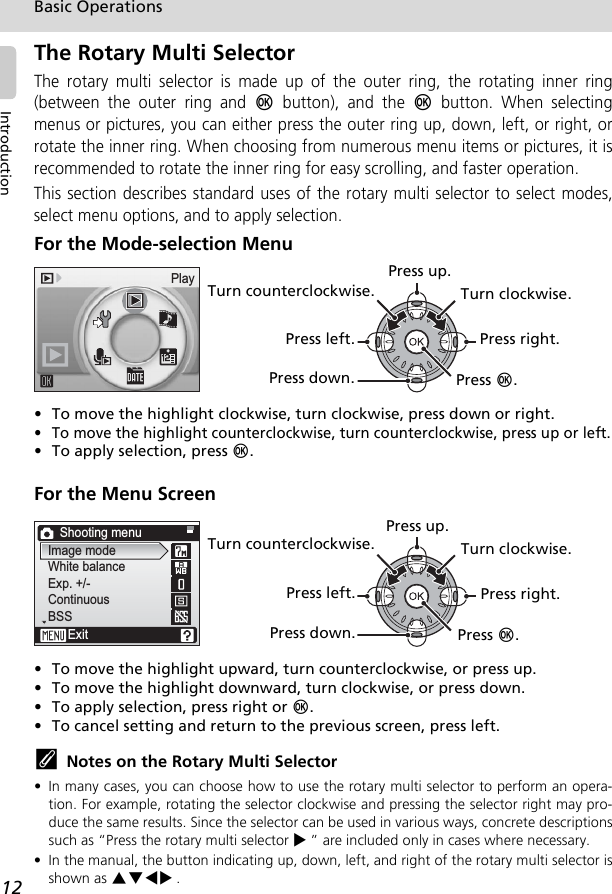
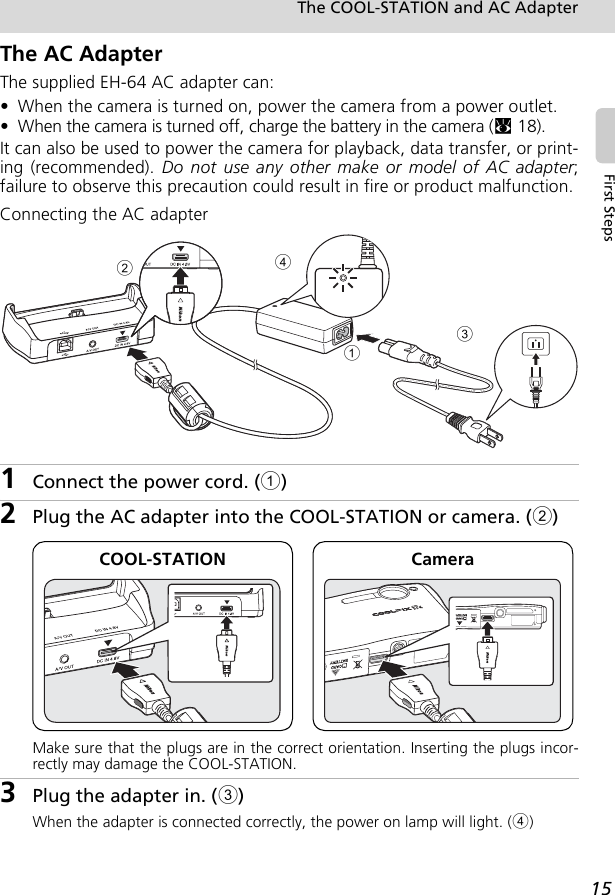
![23Inserting Memory CardsFirst StepsRemoving Memory CardsBefore removing memory cards, turn the cam-era off and confirm that the power-on and indi-cator lamps are off. Open the battery-chamber/memory card slot cover and press the card in (1)to partially eject the card (2). The card can thenbe removed by hand.jFormatting Memory CardsIf the message at right is displayed, the memory card must beformatted before use (c125). Note that formatting per-manently deletes all pictures and other data on the mem-ory card. Be sure to make copies of any pictures you wish tokeep before formatting the memory card.Use the rotary multi selector to choose [Format] and press d. Thescreen shown at right will be displayed. To start formatting, choose [Format] again and press d.•Do not turn the camera off or remove the battery or memory card until formattingis complete.• The first time you insert the memory cards used in other devices into the COOLPIX S7c, besure to format them with [Format] (c125).jThe Write Protect SwitchSD memory cards are equipped with a write protectswitch. Pictures cannot be recorded or deleted and thememory card cannot be formatted when this switch is inthe “lock” position. Unlock by sliding the switch to the“write” position.jMemory Cards• Use only Secure Digital memory cards.• Do not perform the following during formatting, while data are being written to or deletedfrom the memory card, or during data transfer to a computer. Failure to observe this pre-caution could result in the loss of data or in damage to the camera or memory card.- Eject the memory card- Remove the battery- Turn off the camera- Disconnect the AC adapter• Do not disassemble or modify.• Do not drop, bend, or expose to water or strong physical shocks.• Do not touch the metal terminals with your fingers or metal objects.• Do not affix labels or stickers to the memory card.• Do not leave in direct sunlight, closed vehicles, or areas exposed to high temperatures.• Do not expose to humidity or to corrosive gases.Card is not formattedNoFormatWrite protect switch](https://usermanual.wiki/Nikon/2143EB.User-Manual/User-Guide-700695-Page-37.png)
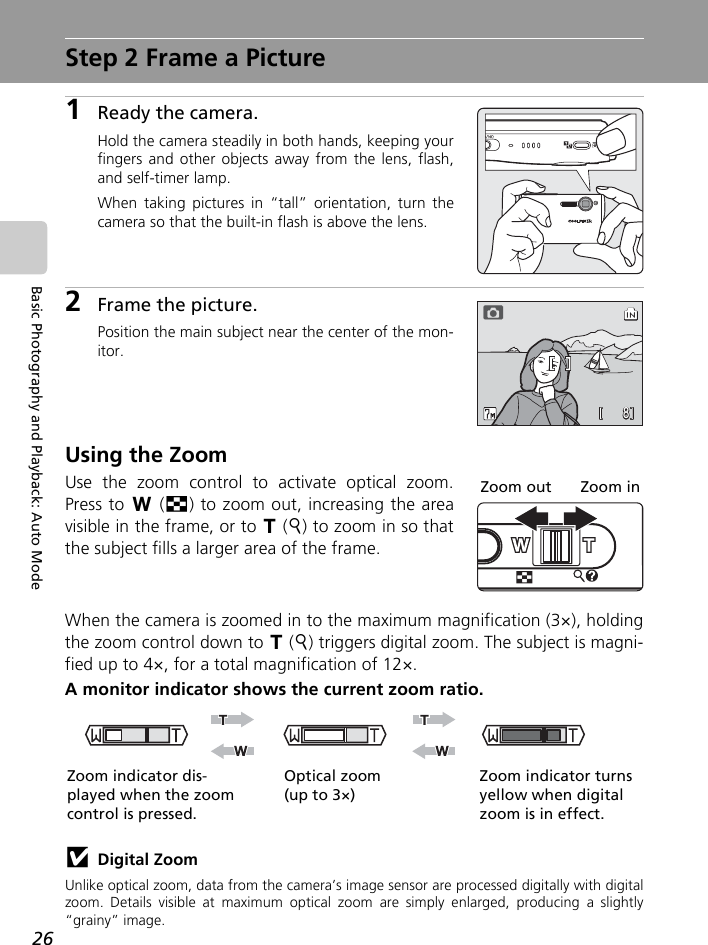
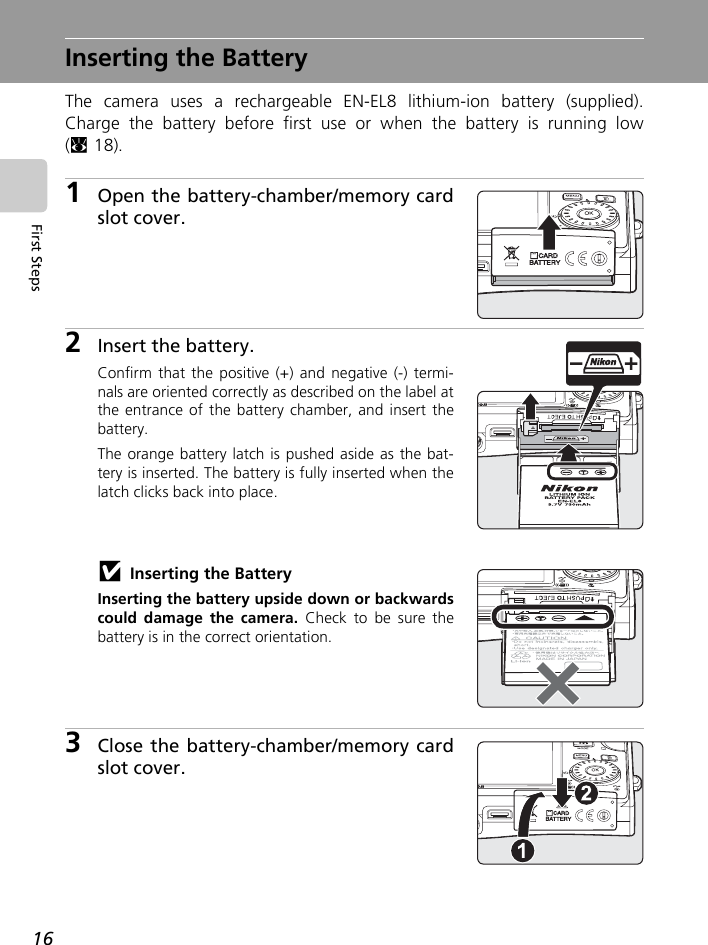
![27Step 2 Frame a PictureBasic Photography and Playback: Auto ModeElectronic VRElectronic VR (c106) will be enabled in L (auto)mode according to shooting conditions and may beapplied to blurred pictures when they are recorded(L is displayed in the monitor when shooting).Electronic VR can be set to [Off] in the [ElectronicVR] option of the shooting menu (c96).• [Electronic VR] is enabled in [Night portrait] and[Party/indoor] scene modes. Note that in these scene modes, [ElectronicVR] cannot be set to [Off].• [Electronic VR] can also be applied to pictures taken during playback(c57).lHigh-sensitivity Shooting ModeWith high-sensitivity shooting mode (c36), a higher sensitivity is set and the shutter speed isfaster than in L (auto) mode, reducing blurred pictures resulting from subject movement.This mode is also suited for reducing the effects of camera shake when taking pictures in darkplaces.lAnti-shake ModeWhen anti-shake mode (c49) is used, [Electronic VR] (c106) and [BSS] (best shot selector)(c104) are enabled to reduce effects of camera shake and blurred subjects, producing clearimages. With BSS enabled, the camera takes shots to a maximum of ten, they are compared,and the sharpest picture (picture with the highest level of detail) is saved. A higher sensitivityis set, and the shutter speed will be faster than in L (auto) mode. 88MMM](https://usermanual.wiki/Nikon/2143EB.User-Manual/User-Guide-700695-Page-41.png)
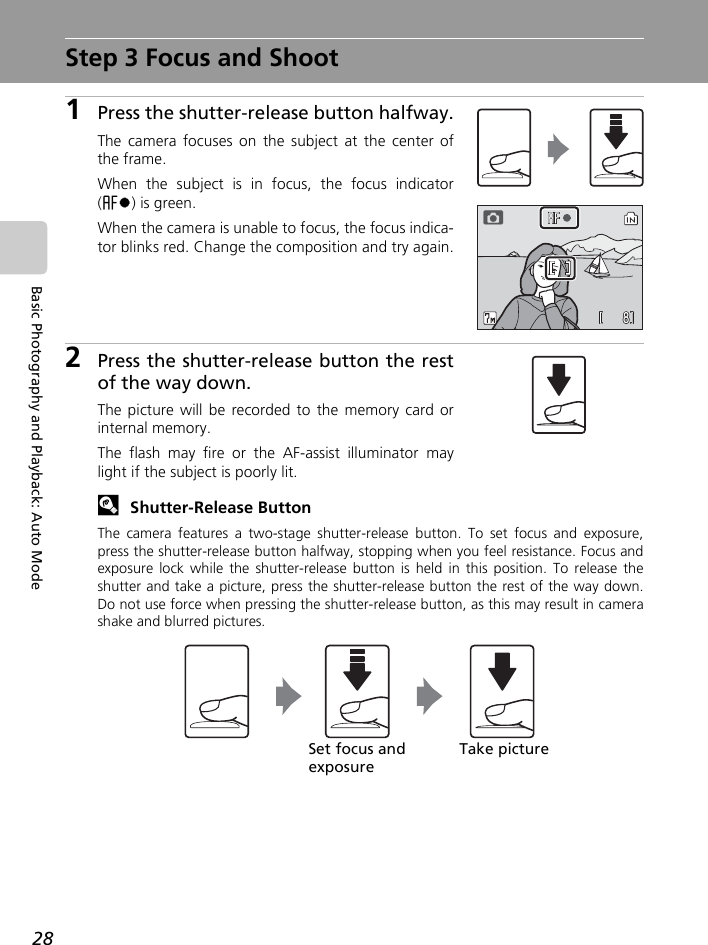
![29Step 3 Focus and ShootBasic Photography and Playback: Auto ModejDuring RecordingWhile pictures are being recorded, the y (wait) icon will be displayed, and the O (recordingto memory card) or M (recording to internal memory) icon will blink. Do not turn the cameraoff, eject the memory card, or remove or disconnect the power source while these icons aredisplayed. Cutting power or removing the memory card in these circumstances could result inloss of data or in damage to the camera or card.lFocus LockTo focus on off-center subjects when [Center] is selected for [AF area mode] (c106), usefocus lock as described below. Focus lock is also effective to situations where focusing is diffi-cult.*1Position the subject in the center of the frame.2Press the shutter-release button halfway.• Confirm that the focus indicator (p) is green.3Continue holding down the shutter-release buttonhalfway and recompose the picture.• Be sure that the distance between the camera andthe subject does not change.4Press the shutter-release button the rest of the waydown.* Focus lock is recommended in the following situations, where auto focus may not producethe desired results:• Subject is very dark• Objects of sharply differing brightness are included in the scene (e.g., the sun is behind thesubject and is in deep shadow)• No contrast between the subject and surroundings (e.g., when the subject is standing infront of a white wall, wearing a white shirt)• Several objects are at different distances from the camera (e.g., the subject is inside a cage)• Subject is moving rapidly88MMM88MMM88MMM](https://usermanual.wiki/Nikon/2143EB.User-Manual/User-Guide-700695-Page-43.png)
![30Basic Photography and Playback: Auto ModeStep 4 Viewing and Deleting PicturesFull-Frame PlaybackPress o.The last picture taken will be displayed.Use the rotary multi selector to view additional pictures.Rotate quickly to scroll rapidly to the desired picture.Pictures taken in “tall” orientation will be rotated auto-matically (c124). The rotating direction can bechanged (c112).Pictures may be displayed briefly at low resolution whilebeing read from the memory card or internal memory.Press o again to switch to shooting mode.Deleting Pictures1Press T to delete the picture currentlydisplayed in the monitor.2Use the rotary multi selector to select[Yes] and press d.To exit without deleting the picture, choose [No] andpress d.100NIKON100NIKON15:3015:3015:30100NIKON0004.JPG0004.JPG0004.JPG2006.10.102006.10.102006.10.1044OMM44NEEOErase 1 image?Erase 1 image?Erase 1 image?NoYesDone](https://usermanual.wiki/Nikon/2143EB.User-Manual/User-Guide-700695-Page-44.png)
![31Step 4 Viewing and Deleting PicturesBasic Photography and Playback: Auto ModekFull-Frame Playback ModeThe following options are available in full-frame playback mode.Quick Playback ZoomPressing the zoom control to v (k) during full-frame playbackzooms the current picture in 3×, with the center of the picturedisplayed in the monitor (Quick Playback Zoom) (c53).Press d to return to full-frame playback. In Quick Playback Zoom, even pictures displayed in “tall” ori-entation will be displayed in “wide” orientation.kViewing Pictures•When the camera is off, pressing o for one second will turn the camera on in playback mode.• Pictures stored in the internal memory can only be viewed if no memory card is inserted.kDeleting the Last Picture TakenIn shooting mode, press T to delete the last picture taken. Theconfirmation dialog shown at right will be displayed. Use therotary multi selector to choose [Yes] and press d.• To exit without deleting the picture, choose [No] and pressd.Option Press Description cPlayback zoom Zoom con-trol to v (k)Enlarge view of picture currently displayed in monitor up to about 10×.53View thumbnailsZoom con-trol to t (j)Display four, nine, sixteen or twenty-five picture thumbnails. 52Record/play voice memoRecord or play back voice memos up to 20 seconds in length. 59D-Lighting i (m)Enhance brightness and contrast in dark portions of pictures. 56Electronic VR dPress d while displaying a pic-ture to compensate a blurred image.57Play back movies dPress d while displaying a movie to play back movies. 76View playback menu mDisplay the playback menu. 108View playback mode menu DDisplay the playback mode-selec-tion menu. 10Switch to shooting mode oSwitch to the shooting mode selected last time. 30X3.0Erase 1 image?Erase 1 image?Erase 1 image?NoYes](https://usermanual.wiki/Nikon/2143EB.User-Manual/User-Guide-700695-Page-45.png)
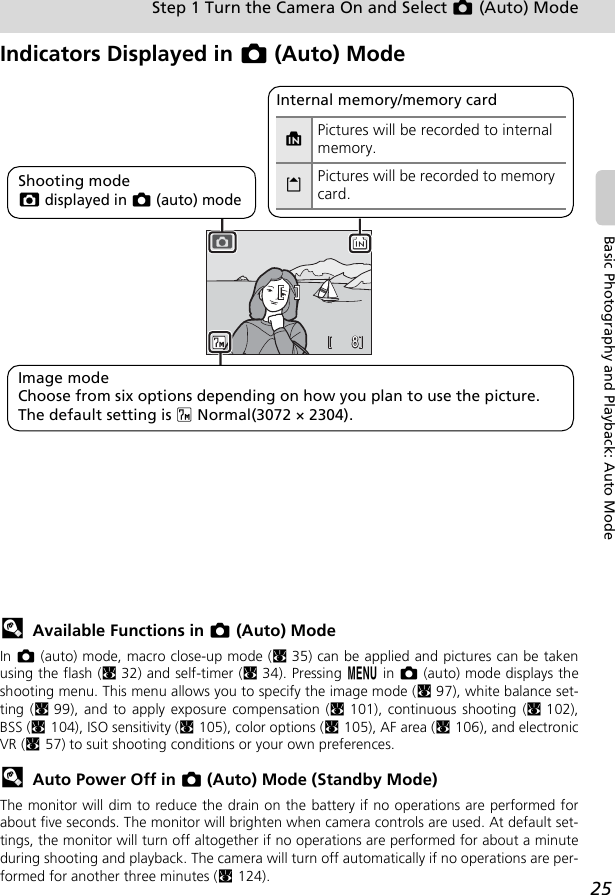
![32Basic Photography and Playback: Auto ModeUsing the FlashThe flash has a range of 0.3–7.5 m (1 ft.–24 ft.) when the camera is zoomedout all the way. With maximum optical zoom applied, the range is 0.3–4 m(1 ft.–13 ft.). The following flash modes are available:1Press J (flash mode).The flash menu is displayed.2Use the rotary multi selector to choosethe desired flash mode and press d.The icon for the selected flash mode is displayed atthe top of the monitor.When [Monitor settings] (c120) is set to [Auto info],the icon for the selected flash mode is only displayedfor five seconds after the setting is applied. When setto [Show info], the z icon will only be displayed forfive seconds after the setting is applied. All othericons will remain displayed.The flash mode applied in L (auto) mode and high-sensitivity shooting mode is stored in the camera’smemory even after the camera is turned off.If a setting is not applied by pressing d within fiveseconds, the selection will be cancelled.zAuto (default for L (auto) mode)Flash fires automatically when lighting is poor.AAuto with red-eye reductionReduces “red-eye” in portraits (c33).BOffFlash will not fire even when lighting is poor.JFill flashFlash fires whenever a picture is taken. Use to “fill-in” (illuminate) shadows and back-lit subjects.DSlow syncFlash illuminates main subject; slow shutter speeds are used to capture back-ground at night or under dim light.zzFlash88MMMzz](https://usermanual.wiki/Nikon/2143EB.User-Manual/User-Guide-700695-Page-46.png)
![34Basic Photography and Playback: Auto ModeTaking Pictures with the Self-TimerThe camera is equipped with a ten-second and three-second timer for self-portraits. When using the self-timer, mount the camera on a tripod (recom-mended) or rest it on a flat, level surface.1Press H (self-timer).The self-timer menu is displayed.2Use the rotary multi selector to choose[10s] or [3s] and press d.[10s] (10 seconds): suited for important occasions(such as weddings)[3s] (3 seconds): suited for preventing camera shakeThe mode selected for self-timer is displayed.If a setting is not applied by pressing d within five seconds, the selection will becancelled.3Frame the picture and press theshutter-release button halfway.Focus and exposure will be set.4Press the shutter-release buttonfully.The self-timer starts and the self-timer lampwill blink. The lamp stops blinking one sec-ond before the photograph is taken andremains lit until the shutter is released.The number of seconds remaining beforethe shutter is released is displayed in themonitor.To stop the timer before a picture is taken,press the shutter-release button again.Self-timer3s10s88MMHH101010M88MMHH101010M](https://usermanual.wiki/Nikon/2143EB.User-Manual/User-Guide-700695-Page-48.png)
![35Basic Photography and Playback: Auto ModeMacro Close-up ModeMacro close-up mode is used for taking shots of pictures as close as 4 cm(1.6 in.). Note that the flash may be unable to light entire subject at distancesof less than 30 cm (11.8 in.).1Press L (macro mode).The macro close-up menu is displayed.2Use the rotary multi selector to choose[ON] and press d.The macro close-up mode icon (F) is displayed.The monitor will return to the normal display for thecurrent mode if the setting is not applied by pressingd within five seconds.3Press the zoom control to v (k) or to t(j) to frame the picture.The camera can focus at distances as close as 4 cm(1.6 in.). Zoom is available when F (F) is green.4Press the shutter-release button fully.The macro close-up mode applied in L (auto) modeis stored in the camera’s memory even after the cam-era is turned off.kMacro Close-up ModeIn macro close-up mode, the camera focuses continuously, even when the shutter-releasebutton is not pressed halfway.Macro close-upMFFF](https://usermanual.wiki/Nikon/2143EB.User-Manual/User-Guide-700695-Page-49.png)
![36Shooting Suited for the Scene - High-sensitivity Shooting Mode, Scene ModeShooting Suited for the Scene - High-sensitivity Shooting Mode, Scene ModeHigh-sensitivity Shooting ModeHigh-sensitivity shooting mode offers the following features:• A higher sensitivity is set and the shutter speed will be faster than in L(auto) mode.• Camera shake or blurred subjects will be avoided even in poorly-lit rooms,in sunset, or in night view scenes.• This mode is suited for shooting in dark places compared with shooting inanti-shake mode (c49).1Enter high-sensitivity shootingmode by pressing D in shoot-ing mode, selecting K (use therotary multi selector), and thenpressing d.2Frame the subject and take thepicture.jNotes on High-sensitivity Shooting Mode• This mode reduces effects of camera shake or blurred subjects even in dark places; use of atripod is recommended when the shutter speed is low.• Pictures taken in this mode may become somewhat grainy.• Focus may not be precisely fixed in extremely dark places.lMenus for High-sensitivity ShootingPress m in high-sensitivity shooting mode to display the high-sensitivity menu. The samemenu items can be set as in the shooting menu (c96) for L (auto) mode. [ISO sensitivity]and [Electronic VR] are not available in high-sensitivity shooting mode.High sensitivity 88MMWW](https://usermanual.wiki/Nikon/2143EB.User-Manual/User-Guide-700695-Page-50.png)
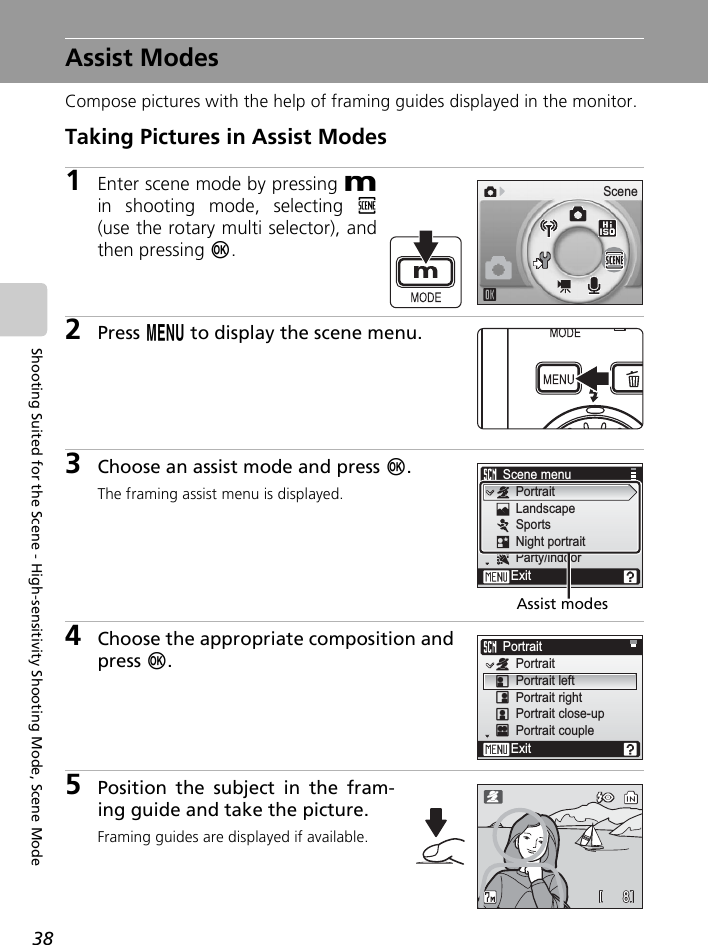
![37Shooting Suited for the Scene - High-sensitivity Shooting Mode, Scene ModeAssist Modes and Scene ModesThe camera offers a choice of fifteen “scene”options. Camera settings are automatically opti-mized for the selected subject type.Assist Modes (Four Options)The following modes offer framing assist options to help you compose your shots.Scene Modes (Eleven Options)The following modes allow you to take pictures optimized for a particularsubject type by simply choosing a scene mode and pressing the shutter-release button.lImage Mode and Exposure Compensation[Z Image mode] (c97) and [I Exp. +/–] (c101) can be setin the scene menu and framing assist menu. Changes made tothese settings apply to all shooting modes. Settings made forexposure compensation are reset when the camera is switchedto another mode.B PortraitUse for portraits. The main subject stands out clearly while the background details are softened, lending a sense of depth to the composition.E LandscapeUse for vivid landscape shots that enhance outlines, colors, and contrast in subjects such as skyscapes and forests.P SportsFast shutter speeds freeze fast-moving subjects for dynamic sports scenes.D Night portraitUse for a natural balance between the main subject and background lighting in portraits taken at night.C Party/indoor G Night landscape O CopyH Beach/snow M Close up L Back lightI Sunset N Museum F Panorama assistJ Dusk/dawn K Fireworks showBEPDIJGNKZIOLCMFExitPortraitScene menuImage modeExp. +/-Exit](https://usermanual.wiki/Nikon/2143EB.User-Manual/User-Guide-700695-Page-51.png)
![39Assist ModesShooting Suited for the Scene - High-sensitivity Shooting Mode, Scene ModeB Portrait AssistUse this mode for portraits in which the main sub-ject stands out clearly. Portrait subjects exhibitsmooth, natural-looking skin tones.1Other settings can be selected.2AF-assist illumination is automatically enabled for [Portrait].ku (AF-Assist Illumination)u stands for the AF-assist illumination, which has two options; [Auto] and [Off] (c123).Even when set to [Auto], the u indicator will not be displayed in the monitor.BPortraitCamera focuses on subject in the center of the monitor. No guides are dis-played in the monitor.NPortrait leftCompose shot with subject in left half of frame. Camera focuses on subject inside the framing guides.OPortrait rightCompose shot with subject in the right half of frame. Camera focuses on sub-ject inside the framing guides.PPortrait close-upCompose shot with subject’s face in top half of frame. Camera focuses on face inside the framing guides.QPortrait coupleCompose shot with two subjects side-by-side. Camera focuses on subjects inside the framing guides.CPortrait figureCompose shot in “tall” orientation. Camera focuses on subject inside the framing guides. Pictures taken in “tall” orientation are displayed in the same “tall” orientation in the monitor.CA1HOff1FOff uOff2](https://usermanual.wiki/Nikon/2143EB.User-Manual/User-Guide-700695-Page-53.png)
![40Assist ModesShooting Suited for the Scene - High-sensitivity Shooting Mode, Scene ModeE Landscape AssistUse this mode for vivid landscapes, cityscapes, andportraits featuring a landmark in the background.1Flash is set to z for [Group left] and [Group right]. Other settings can be selected.2Other settings can be selected.lFocusing at InfinityThe focus indicator (c28) is always green when the shutter-release button is pressed half-way when [Landscape], [Scenic view], or [Architecture] is selected for landscape assist mode.Note, however, that objects in the foreground may not always be in focus.ELandscapeCamera focuses at infinity. No guides are displayed in the monitor.SScenic viewUse to photograph distant skylines. Camera focuses at infinity. Match top of skyline with wavy yellow guide.UArchitectureUse to photograph buildings. Camera focuses at infinity. A grid is displayed in the monitor to help keep verticals and horizontals aligned with the frame.VGroup rightUse to compose portraits with portrait subjects to right and landmark or other objects in background at left of frame.WGroup leftUse to compose portraits with portrait subjects to left and landmark or other objects in background at right of frame.CB1HOff2FOff uOff](https://usermanual.wiki/Nikon/2143EB.User-Manual/User-Guide-700695-Page-54.png)
![41Assist ModesShooting Suited for the Scene - High-sensitivity Shooting Mode, Scene ModeP Sports AssistUse this mode for dynamic action shots that freezethe action in a single shot or record motion in aseries of pictures. No framing guides are displayed.lSports AssistWhen [Sports] or [Sport composite] is selected in sports assist mode, the camera focuses con-tinuously on the center of the frame, even when the shutter-release button is not pressedhalfway.PSportsPictures are taken continuously while the shutter-release button is pressed. When the image mode is E Normal(3072), camera takes 7 shots at about 1.4 frames per second. Camera focuses continuously even when the shutter-release button is not pressed halfway.XSport spectatorAs above, except that camera focuses at ranges of about 4.5 m (14.8 ft.) to infinity at maximum wide-angle zoom position and about 6 m (19.7 ft.) to infinity at maximum telephoto position.YSport compositeEach time shutter-release button is pressed, camera takes 16 shots in about 2.4 seconds and arranges them in four rows to form a single picture (f Normal (1600)). Camera focuses continuously even when the shutter-release but-ton is not pressed halfway.CB H Off FOff uOff](https://usermanual.wiki/Nikon/2143EB.User-Manual/User-Guide-700695-Page-55.png)
![42Assist ModesShooting Suited for the Scene - High-sensitivity Shooting Mode, Scene ModeD Night Portrait AssistUse this mode to achieve a natural balancebetween the main subject and background lightingin portraits taken at night. This mode offers thesame assist options as portrait assist mode (c39).• Electronic VR will be applied when shooting atslow shutter speeds (c106).1Fill flash with slow sync and red-eye reduction.2Other settings can be selected.3AF-assist illumination is automatically enabled for [Night portrait].Q: Use of a tripod is recommended.R: Noise reduction may be automatically applied as pictures taken arerecorded; results in increased recording times.CA1HOff2FOff uOff3QR](https://usermanual.wiki/Nikon/2143EB.User-Manual/User-Guide-700695-Page-56.png)
![43Shooting Suited for the Scene - High-sensitivity Shooting Mode, Scene ModeScene ModesTaking Pictures in Scene Modes1Enter scene mode by pressingD in shooting mode, selectingn (use the rotary multi selec-tor), and then pressing d.2Press m.3Choose a scene mode and press d.Three pages of scene modes are available, beginningwith [Party/indoor] and ending with [Panoramaassist].4Frame the subject and take thepicture.SceneHIJGScene menuExitBeach/snowSunsetDusk/dawnNight landscapeClose upScene modes88MMH](https://usermanual.wiki/Nikon/2143EB.User-Manual/User-Guide-700695-Page-57.png)
![46Scene ModesShooting Suited for the Scene - High-sensitivity Shooting Mode, Scene Mode1Other settings can be selected.1Other settings can be selected.K Fireworks show QSlow shutter speeds are used to capture the expanding burst of light from a firework.• Camera focuses at infinity. The AF indicator (c28) always lights; however, focus may not be set for near subjects, while the camera focuses at infinity.• [Exp +/-] cannot be applied.CB H Off FOff uOffO CopyProvides clear pictures of text or drawings on a white board or in print.• Camera focuses on subject in center of frame.• Use macro close-up mode (c35) to focus at short ranges. • Colored text and drawings may not show up well.CB1HOff1FOff1uAutoL Back lightUse when light is coming from behind your subject, throwing features or details into shadow. The flash fires automatically to “fill in” (illuminate) shadows. • Camera focuses on subject in center of frame.CJ H Off1FOff uAuto](https://usermanual.wiki/Nikon/2143EB.User-Manual/User-Guide-700695-Page-60.png)
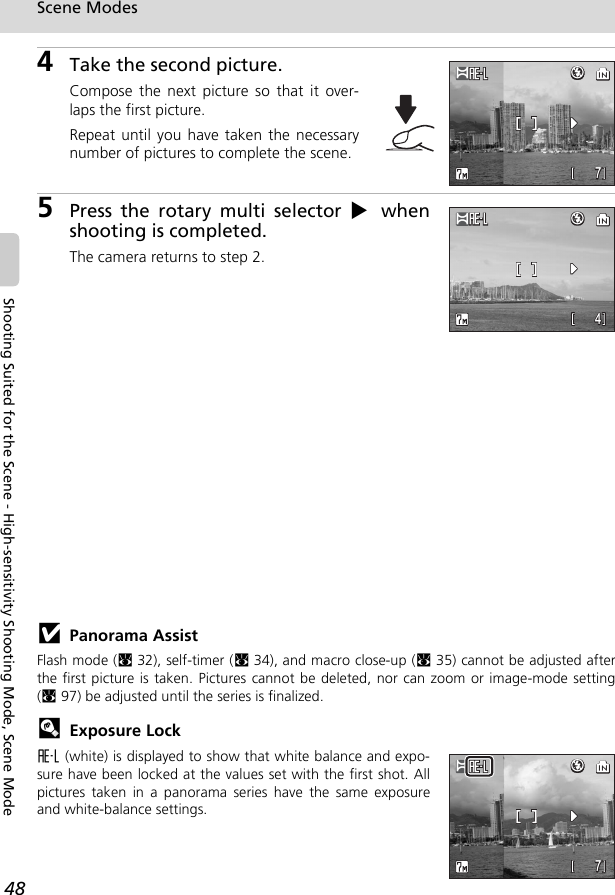
![47Scene ModesShooting Suited for the Scene - High-sensitivity Shooting Mode, Scene Mode1Other settings can be selected.Taking Pictures for a PanoramaThe camera focuses on the subject in the center of the frame. Use a tripodfor best results.1Use the rotary multi selector to choose[F Panorama assist] in the scene menuand press d.The yellow panorama direction icon (E) is displayed toshow the direction in which pictures will be joined.2Choose the direction and press d.Select how pictures will be joined together in the com-pleted panorama; right (V), left (U), up (S), or down (T).The panorama direction icon (E) is displayed to the direc-tion pressed, and changes to white when d is pressed. Set the flash (c32), self-timer (c34), and macro close-up mode (c35) in this step, if necessary.Press J to reselect the direction.3Take the first picture.The first picture is displayed in the first thirdof the monitor.F Panorama assistUse when taking a series of pictures that will later be joined to form a single pan-orama using PictureProject.CB1HOff1FOff1uAutoKOLNFScene menuExitMuseumPanorama assistBack lightCopyFireworks show88MMFBB88MMFBB](https://usermanual.wiki/Nikon/2143EB.User-Manual/User-Guide-700695-Page-61.png)
![49Anti-shake ModeAnti-shake ModeShooting in Anti-shake ModeAnti-shake mode offers the following features:• This mode reduces effects of camera shake or blurred subjects, and pro-duces clear images.• [Electronic VR] (c106) and [BSS] (best shot selector) are enabled. Elec-tronic VR compensates blurred images. BSS is on, camera takes shots to amaximum of ten, they are compared and sharpest picture (picture withhighest level of detail) is saved (c104).• The higher sensitivity is set and the shutter speed will be faster than in L(auto) mode.• Flash mode and self-timer are set to off.1Press d (F) (anti-shake).The camera enters anti-shake mode. Press again toreturn to the shooting mode selected with the mode-selection menu.2Frame the subject and take thepicture.When vibration is detected during shooting,automatic compensation is activated.When compensation is complete, new copyis stored. The L icon (c8) for the newcopy is displayed when played back.jNotes on Anti-shake Mode• Shutter speed is limited to a certain value for dark subjects.• Use of the high-sensitivity mode (c36) is recommended for shooting subjects in darkplaces.• Pictures taken in this mode may become somewhat grainy. • Even if [Date imprint] (c121) is enabled, the date will not be imprinted.lImage Mode and Exposure Compensation in Anti-shake ModeWhen m is pressed in anti-shake mode, the menu is displayed to enable set the imagemode (c97) or exposure compensation (c101). Settings made for exposure compensationare reset when the camera is switched to another mode.88MMWWBB](https://usermanual.wiki/Nikon/2143EB.User-Manual/User-Guide-700695-Page-63.png)
![51One-Touch Portrait ModeThe One-Touch Portrait MenuPress m in one-touch portrait mode to display the one-touch portraitmenu. In addition to image mode and exposure compensation, portraiteffects (reducing vividness of skin tones, softening overall image) can be set.1The options chosen in this menu are stored until [Reset all] (c127) is performed inthe setup menu.2The options chosen in this menu will be reset by switching to other shooting modes. jFace-Priority AF• The camera’s ability to detect faces depends on a variety of factors, including whether ornot the subject is facing the camera.• The camera focuses continuously until a face is detected.• If the yellow double border blinks when the shutter-release button is pressed halfway, thecamera was unable to focus. Release the button and try again.• If no face is recognized when the shutter-release button is pressed halfway, the camerafocuses on the center of the frame.• The camera may be unable to detect faces in the following situations:- When faces are partially hidden by sunglasses or other obstructions- When faces take up too much or too little of the framekSettings for One-Touch Portrait Mode• Flash: Changeable• Self-timer: Available• Macro close-up: OffZImage mode1Choose an image size and quality (c97).IExp. +/– 2Adjust exposure for very bright or very dark subjects (c101).BPortrait effect1Choose from [Normal], [Brighter] (reduces vividness of skin tones), and [Softer] (soft effect).](https://usermanual.wiki/Nikon/2143EB.User-Manual/User-Guide-700695-Page-65.png)
![52More on PlaybackMore on PlaybackViewing Multiple Pictures: Thumbnail PlaybackPress the zoom control to t (j) in full-frameplayback (c30) to display pictures in “contactsheets” of thumbnail images. The following opera-tions can be performed while thumbnails are dis-played:To Press Description cChoose pictures Use the rotary multi selector to choose pic-tures. 12Change number of pictures dis-playedxDisplay 4, 9, 16 or 25 picture thumbnails in the following order, when the zoom control is pressed to t (j): 4→9→16→25When the zoom control is pressed to v (k), the number of picture thumbnails changes reversely.–Cancel thumb-nail playback dCancel thumbnail playback and return to full-screen playback. 30D-Lighting i(m)Enhance brightness and contrast in dark por-tions of pictures. 56Delete picture TConfirmation dialog will be displayed. Choose [Yes] and press d to delete. 30View playback menu mDisplay the playback menu. 108View playback mode menu DDisplay the playback mode-selection menu. 10Switch to shoot-ing mode oSwitch to the shooting mode selected last time. 30](https://usermanual.wiki/Nikon/2143EB.User-Manual/User-Guide-700695-Page-66.png)
![53More on PlaybackTaking a Closer Look: Playback ZoomPressing the zoom control to v(k) during full-frameplayback (c30) zooms the current picture in 3×,with the center of the picture displayed in the moni-tor (Quick Playback Zoom).The guide in the lower right shows where the part of thepicture is enlarged. The part of the picture displayed ischanged by pressing the rotary multi selector GHIJ.With the zoom control in quick zoom playback, youcan enlarge pictures in the desired magnificationratio. While image is zoomed in, the zoom ratio isdisplayed on the monitor. The following operationscan be performed while pictures are zoomed in:jNote on Enlarging Vertically Taken ImagesVertically taken images (c124) cannot be rotated in quick playback zoom or zoom mode.Images can be displayed by pressing the zoom control to v (k) in full-frame playback. Pressagain to v (k) to display the image enlarged horizontally.To Press Description cZoom inZoom control to v (k)Zoom increases each time the zoom control is pressed to v (k), to a maximum of 10×. –Zoom outZoom control to t (j)Zoom decreases each time the zoom control is pressed to t (j). When the magnification ratio reaches 1×, the display returns to full-frame playback.–View other areas of picturePress the rotary multi selector GHIJ to scroll to areas of the picture not visible in the monitor.12Crop picture Crop current picture to contain only the por-tion visible in the monitor. 55Switch to full-frame playback dCancel playback zoom and return to full-screen playback. 30Delete picture TConfirmation dialog will be displayed. Choose [Yes] and press d to select. 30View playback menu mDisplay the playback menu. 108View playback mode menu DDisplay the playback mode-selection menu. 10Switch to shoot-ing mode oSwitch to the shooting mode selected last time. 30X3.0X4.0](https://usermanual.wiki/Nikon/2143EB.User-Manual/User-Guide-700695-Page-67.png)
![55Editing PicturesMore on PlaybackCreating a Cropped Copy: CropThis function is only available when N:u is displayed in the monitor withplayback zoom (c53) enabled. Cropped copies are stored as separate files.1Press the zoom control to v (k) to zoomin on the image.2Refine copy composition.Press the zoom control to v or t to adjust the zoomratio.Press the rotary multi selector GHIJ to scroll thepicture until only the portion you want to copy is visi-ble in the monitor.3Press the shutter-release button.The confirmation dialog will be displayed.4Use the rotary multi selector to choose[Yes] and press d.A new picture, containing only the portion visible inthe monitor, is created.Depending on the size of the original picture and the zoom ratio in effect at the time the copywas created, the camera will automatically select one of the following image-mode settingsfor cropped copies (unit: pixels).•d 2,592 × 1,944 • a 2,288 × 1,712 • e 2,048 × 1,536•f 1,600 × 1,200 • g 1,280 × 960 • h 1,024 × 768•i 640 × 480 • J 320 × 240 • K 160 × 120X4.0Save this imageSave this imageas displayed?as displayed?Save this imageas displayed?NoYes](https://usermanual.wiki/Nikon/2143EB.User-Manual/User-Guide-700695-Page-69.png)
![56Editing PicturesMore on PlaybackEnhancing Brightness and Contrast: D-LightingD-Lighting can be used to create copies with enhanced brightness and con-trast, brightening dark portions of a picture. Enhanced copies are stored asseparate files.1Display the desired picture in full-frame (c30) orthumbnail (c52) playback and press i (m).The results of D-Lighting enhancement can be confirmed in themonitor.2Use the rotary multi selector to choose[OK] and press d.A new copy with enhanced brightness and contrast iscreated.To cancel D-Lighting, choose [Cancel] and press d.D-Lighting copies can be recognized by the i icondisplayed during playback.D-LightingOKCancel100NIKON100NIKON15:3015:3015:30100NIKON2006.10.102006.10.102006.10.100003.JPG0003.JPG0003.JPG433 4OMMNEEDDO](https://usermanual.wiki/Nikon/2143EB.User-Manual/User-Guide-700695-Page-70.png)
![57Editing PicturesMore on PlaybackCompensating Blurred Images: Electronic VRVibration reduction is used to create a new image by compensating theblurred image. Created copies are stored as separated files.1Choose the desired image in full-frameplayback (c30).When the X indicator is displayed, vibration reduc-tion is not available.2Press d (F) (electronic VR).3Use the rotary multi selector to choose[OK] and press d.Compensated image is created.To cancel vibration reduction, choose [Cancel] andpress d.For compensated images, the L indicator is dis-played in the monitor during playback.jNote on Electronic VRIn addition to the restrictions described in “Restrictions on Picture Editing” (c54), electronicVR cannot be used for the following pictures:•Pictures taken with Multi-shot 16 (c102), with slow shutter speeds, or with other cameras.• Pictures with date imprint (c121).• Pictures with minor blur, or pictures that are badly blurred.100NIKON100NIKON15:3015:3015:30100NIKON0004.JPG0004.JPG0004.JPG2006.10.102006.10.102006.10.1044OMM44NEEOReduce blur?Reduce blur?Reduce blur?OKCancel100NIKON100NIKON15:3015:3015:30100NIKON0004.JPG0004.JPG0004.JPG2006.10.102006.10.102006.10.1044OMM44NEEO](https://usermanual.wiki/Nikon/2143EB.User-Manual/User-Guide-700695-Page-71.png)
![58Editing PicturesMore on PlaybackH Resizing Pictures: Small PictureCreate a small copy of the current picture. Small copies are stored as JPEGfiles with a compression ratio of 1:16. The following sizes are available.1Display the desired picture in full-frame(c30) or thumbnail (c52) playbackmode and press m.The playback menu is displayed.2Use the rotary multi selector to choose[Small pic.] and press d.3Choose the desired copy size and pressd.A confirmation dialog will be displayed.To cancel, press m.4Choose [Yes] and press d.A new, smaller copy is created.I 640×480 Suited to television playback.J 320×240 Suited to display on web pages.K 160×120 Suitable for e-mail attachments.Playback menuExitRotate imageSmall pic.CopySmall pic.320X240Exit640X480160X120YesNoCreate small picture file?Create small picture file?Create small picture file?](https://usermanual.wiki/Nikon/2143EB.User-Manual/User-Guide-700695-Page-72.png)
![59More on PlaybackVoice Memos: Recording and PlaybackUse the camera’s built-in microphone to record voice memos for picturesmarked with N:O in full-frame playback (c30).Recording Voice MemosA voice memo will be recorded while theshutter-release button is held down.Recording ends after about 20 seconds orwhen the shutter-release button is released.• Do not touch the built-in microphoneduring recording.• During recording, y and P blink inthe monitor display.Playing Voice MemosPress the shutter-release button while a pic-ture is displayed in full-frame playback toplay voice memo. Playback ends when thevoice memo ends or the shutter-releasebutton is pressed again.• Pictures with voice memos can be recog-nized by the N:P and P icons.• Use the zoom control to adjust playback volume. Press to t (j) to lowervolume, or to v (k) to raise volume.Deleting Voice MemosSelect a picture with a voicememo and press T. Use therotary multi selector tochoose [P] and press d.Only the voice memo will bedeleted.jVoice Memos• Voice memos are assigned the picture file name they are attached to with the three-letterextension “.WAV” (e.g., DSCN0015.WAV) (c160).• If a voice memo already exists for the current picture, it must be deleted before a new voicememo can be recorded.17s17s17sMMyPP100NIKON100NIKON15:3015:3015:30100NIKON2006.10.102006.10.100004.JPG0004.JPG0004.JPG2006.10.1044 44MMNEEDDPPPPMMErase 1 image?Erase 1 image?Erase 1 image?NoYes](https://usermanual.wiki/Nikon/2143EB.User-Manual/User-Guide-700695-Page-73.png)
![61Viewing Pictures by DateMore on PlaybackSelecting a Date in List-by-Date Mode1Enter list-by-date mode bypressing D, selecting L (usethe rotary multi selector) inplayback mode, and then press-ing d.Dates for which pictures exist will be listed.2Choose date and press d.Camera lists up to 30 dates. If pictures exist for morethan 30 dates, all pictures recorded earlier than mostrecent 29 dates will be listed together as [Others].The first picture for that date will be displayed full-frame.Press the zoom control in full-frame playback to t(j) to return to the date list.List by dateList by date10.10.2006 32509.10.200608.10.20062006.10.102006.10.1015:3015:302006.10.1015:3031 31OMMNEEO](https://usermanual.wiki/Nikon/2143EB.User-Manual/User-Guide-700695-Page-75.png)
![62Viewing Pictures by DateMore on PlaybackUsing Calendar Mode and List-by-Date ModejNotes on Calendar Mode and List-by-date Mode• Up to 9,000 pictures can be registered in calendar mode or in list-by-date mode. If morepictures exist, “*” is displayed next to the number. • Pictures taken with no date stamp are not listed in these modes. To Press Description cSelect date Use the rotary multi selector to select a date. –Select month (cal-endar mode only) xPress to t (j) to view previous month, press to v (k) to view following month. –Switch to full-frame playback dDisplay the first picture taken on the selected date. –Delete picture TPress after selecting a date, and a confirma-tion dialog will be displayed. Choose [Yes] and press d to delete all pictures taken on the selected date.30View calendar or list-by-date menu mDisplay the calendar or list-by-date menu. 64View playback mode menu DDisplay the playback mode-selection menu. 10Switch to shoot-ing mode oSwitch to the shooting mode selected last time. 30](https://usermanual.wiki/Nikon/2143EB.User-Manual/User-Guide-700695-Page-76.png)
![63Viewing Pictures by DateMore on PlaybackThe following operations are available when in full-frame playback:To Press Description cView other pic-turesUse the rotary multi selector to choose and view other pictures. 30Zoom in v(k)A maximum of 10× zoom in is available after using Quick Playback Zoom. 53Switch to calen-dar/list-by-date mode playbackt (j)Switch to the calendar or list-by-date mode selected before viewing in full-frame play-back.–Record/play voice memoRecord or play back voice memos up to 20 seconds in length. 59D-Lighting i (m)Enhance brightness and contrast in dark por-tions of pictures. 56Electronic VR dPress d while displaying a picture to com-pensate a blurred image. 57View movie dMovie playback will start. 76Delete picture TConfirmation dialog will be displayed. Choose [Yes] and press d to delete. 30View calendar or list-by-date menu mDisplay the calendar or list-by-date menu. 64View playback mode menu DDisplay the playback mode-selection menu. 10Switch to shoot-ing mode oSwitch to the shooting mode selected last time. 30](https://usermanual.wiki/Nikon/2143EB.User-Manual/User-Guide-700695-Page-77.png)
![64Viewing Pictures by DateMore on PlaybackCalendar Mode and List-by-Date Mode MenusPress m in either mode to display the following menus for only the pic-tures taken on the specified date.Print set c93Slide show c110Delete c111Protect c111Transfer marking c112Rotate image* c112Small picture* c58* During full-frame playback onlyThe procedure for selecting pictures in calendar or date list playback differsfrom that in full-frame playback.• In calendar or date list playback, the options apply to all pictures taken onthe currently selected date.• In full-frame playback, although the options apply only to the picture cur-rently displayed full frame, other pictures taken on the same date can beselected.jPrint Set and Transfer MarkingIf [Print set] or [Transfer marking] is selected from the menu for the calendar or date list whenprint or transfer marking already exists for dates other than the specified date, a confirmationdialog [Save print marking for other dates?] or [Save transfer marking for other dates?] will bedisplayed. Select [Yes] to add to the existing print or transfer marking. Selecting [No] removesthe existing print or transfer marking from all pictures in the internal memory or on the mem-ory card, ensuring that only pictures taken on the specific date are selected for printing ortransfer.lFull-Frame PlaybackWhen pictures are displayed full frame in calendar or list-by-date mode, the respective icon isdisplayed in the top left corner, and the date and time of recording are displayed in place ofthe folder name and file number and type.2006.10.102006.10.1015:3015:302006.10.1015:3031 31OMMNEEODate/timeCalendar mode/List-by-date mode](https://usermanual.wiki/Nikon/2143EB.User-Manual/User-Guide-700695-Page-78.png)
![65More on PlaybackPictmotion by muveePictmotion* creates slide show movies with custom transitions and back-ground music.It is only available when a memory card is inserted in the camera.* Pictmotion is powered by muvee Technologies.Creating a Pictmotion MovieThis section describes the easiest way to create a Pictmotion movie.1Enter Pictmotion mode by press-ing D in playback mode,selecting P (use the rotarymulti selector), and then press-ing d.2Choose M and press d.3Choose [All images] and press d.A Pictmotion movie using the ten most recent pic-tures (default setting) will be created.After the created Pictmotion movie is automaticallyplayed back, a confirmation dialog will be displayed.4Choose [Yes] and press d.The Pictmotion movie is saved and the monitor dis-play returns to that shown in step 2.Settings for saved Pictmotion movies cannot bechanged. If you wish to change the settings, deletethe Pictmotion movie and create a new Pictmotionmovie with the desired settings. Pictmotion by muveeAll imagesChoose dateConfirmPicture selectionSave Pictmotion?Save Pictmotion?Save Pictmotion?NoChange settingsYes](https://usermanual.wiki/Nikon/2143EB.User-Manual/User-Guide-700695-Page-79.png)
![66Pictmotion by muveeMore on PlaybackCreating a Custom Pictmotion Movie1Use the rotary multi selector to choose[Confirm] in the picture selection menu(c65, step 3) and press d.The check box is selected (y).2Choose [All images] or [Choose date] and press d.[All images]: Proceed to step 4[Choose date]: Proceed to step 33Select a date and press the shutter-release button.Choose a date and press d to mark (y).4Select pictures and press the shutter-release button.If [All images] is selected in step 2, all pictures will bedisplayed. If [Choose date] is selected, only picturestaken on the date selected in step 3 will be displayed.Choose pictures and press d to select (up to 30).Press the zoom control to v (k) to view selected pic-ture full-frame; press to t (j) to return to thumb-nail display.After the created Pictmotion movie is automatically played back, a confirmationdialog will be displayed.5Choose [Yes] and press d.The Pictmotion movie is saved.All imagesChoose dateConfirmPicture selectionChoose dateConfirmimages totalON/OFF10.10.2006 325509.10.200608.10.2006BackSelect imageConfirmON/OFFBack5/30[Choose date] Save Pictmotion?Save Pictmotion?Save Pictmotion?NoChange settingsYes](https://usermanual.wiki/Nikon/2143EB.User-Manual/User-Guide-700695-Page-80.png)
![67Pictmotion by muveeMore on PlaybackjNotes on Pictmotion• Pictmotion supports both still pictures and movie files; note, however, that in the case ofmovies only a small portion selected from the first 60 seconds of each movie will beincluded.• If the current memory card holds 20 Pictmotion movies, no additional movies can be cre-ated until an existing movie has been deleted.• The pictures in a Pictmotion movie are automatically protected when the movie is saved(c111).lPictureProject (Windows only)• The Windows version of the supplied PictureProject software can be used to transfer Pict-motion movies to a computer for viewing and to copy up to five three-minute customsound tracks to a memory card inserted in the camera; see the PictureProject ReferenceManual (on CD) for details.• Pictmotion movies can also be transferred to a computer using the [Easy Transfer (PM)] or[PC mode] option of wireless transfer mode (c130). lDeleting Pictmotion MoviesTo delete a Pictmotion movie, choose the desired movie file in the Pictmotion menu (c65,step 2), and press T. Protection (c111) is not removed when the Pictmotion is deleted.](https://usermanual.wiki/Nikon/2143EB.User-Manual/User-Guide-700695-Page-81.png)
![68Pictmotion by muveeMore on PlaybackOther Options for Pictmotion MoviesPressing m in the Pictmotion screen (c65, step 2) displays the Pictmotionsettings menu, while pressing it in the save confirmation dialog (c65, step 4)displays the change settings menu. The following options are available.Background MusicChoose from five preset music tracks and five user-defined tracks. Preset musictracks include [High-speed], [Emotional], [Natural], [Up-tempo], and [Relaxed].• Preset tracks can be played back by pressing the zoom control to v (k).User-defined tracks cannot be played back.•Music tracks from a computer will be added to the user-defined track list. Namesof the tracks are displayed in the list only when transferred from a computer.EffectsChoose from [Motion], [Moody], [Pro-slow], [Pro-fast], and [Classic].•Press the zoom control to v (k) to preview selected style on the left side of the monitor.Playback OrderRandom: Play back pictures in random order.Play in order: Play back pictures in order recorded.LoopRepeat music: Repeat background track until all pictures have beenplayed at least once (some pictures may be repeated).Repeat photos: Play background track once, repeating or omittingpictures as necessary.• In some cases, pictures may be shown repeatedly regardless of the setting.Selected ImagesThis option can only be set from the Pictmotion settings menu.Choose from 10, 20, 30 or [No auto select].For example, if [20 pictures] is selected, the last 20 pictures are chosen for thePictmotion movie. This number can be changed, however, when creating acustomized Pictmotion movie. When [Confirm] is selected in picture selectionscreen (c66, step 1), the number of pictures chosen in step 4 will be used.Background musicExitMotionRandomRepeat photos10 picturesHigh-speedBackground musicBackMotionRandomRepeat photosHigh-speedPictmotion settings menuChange settings menu](https://usermanual.wiki/Nikon/2143EB.User-Manual/User-Guide-700695-Page-82.png)
![69Pictmotion by muveeMore on PlaybackViewing Pictmotion Movies1Enter Pictmotion playback modeby pressing D in playbackmode, selecting P (use therotary multi selector), and thenpressing d.2Use the rotary multi selector to choosethe desired Pictmotion movie and pressd.3Choose [Play] and press d.Playback starts.If [Loop] is selected, the movie will repeat automati-cally. To select or deselect [Loop], choose [Loop] andpress d.Zoom control controls volume.To pause the movie, press d during playback.4Choose [End] and press d.Monitor returns to that shown in step 2.To resume playback, choose [Restart] and press d.Pictmotion by muveeLoopPlayPausePictmotionRestartEnd](https://usermanual.wiki/Nikon/2143EB.User-Manual/User-Guide-700695-Page-83.png)
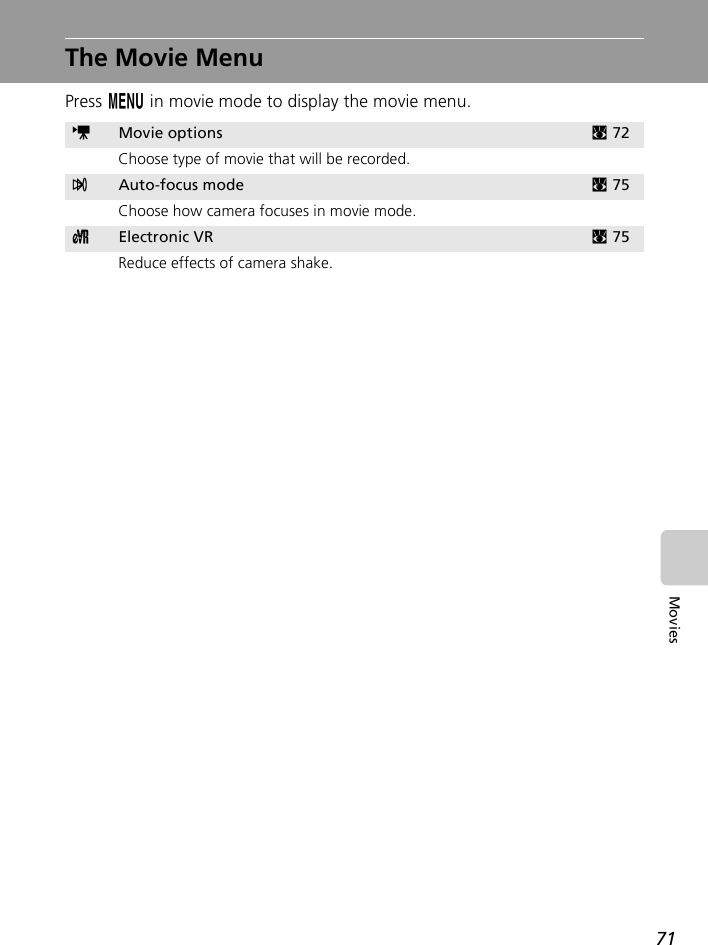
![73The Movie MenuMoviesTime-Lapse MoviesRecord flowers opening or butterflies emerging from cocoons. Charge thebattery before shooting begins.1Use the rotary multi selector to choose[Movie options] and press d.2Choose [Time-lapse movieA] and pressd.3Choose the interval between shots andpress d.4Press m.The camera returns to shooting mode.5Press the shutter-release button all the way down to start recording.Monitor turns off and indicator lamp blinks green between shots.Monitor reactivates automatically for the next shot.6Press the shutter-release button all the way down a secondtime to end recording.Recording will automatically stop if the internal memory or memory card becomesfull, or when a maximum of 1,800 frames (up to 60 seconds) have been recorded.SMovieExitMovie optionsAuto-focus modeElectronic VRMovie optionsExitTime-lapse movieStop-motion movieSet interval time30s1m5m10m30mExit149149149MM](https://usermanual.wiki/Nikon/2143EB.User-Manual/User-Guide-700695-Page-87.png)
![74The Movie MenuMoviesStop-Motion Movies1Use the rotary multi selector to choose[Movie options] > [Stop-motion movie]and press d.2Press m.The camera returns to shooting mode.3Press the shutter-release button to record the first frame.The recorded picture will be superimposed on the view through the lens.4Press the shutter-release button to record the second frame.The second frame will be superimposed on the first frame.The monitor turns off automatically if no operations are performed for 30 minutes(auto off), and recording ends.5Press d to end recording.Recording automatically ends when 1,800 pictures are taken.jTime-Lapse Movie and Stop-Motion Movie To prevent the camera from turning off unexpectedly during recording, use a fully chargedbattery.Movie optionsExitTime-lapse movieStop-motion movie](https://usermanual.wiki/Nikon/2143EB.User-Manual/User-Guide-700695-Page-88.png)
![75The Movie MenuMoviesAuto-Focus ModeChoose how the camera focuses in movie mode.Electronic VRChoose [On] to reduce the effects of camera shakein all movie modes except [Time-lapse movieA] and[Stop-motion movie].At settings other than [Off], an electronic VR indica-tor is displayed in the monitor (c8).kMovie File Names and Folder NamesSee “Image File and Folder Names” (c160).Option DescriptionZ Single AF (default)Camera focuses when shutter-release button is pressed half-way and locks at this position during shooting. a Full-time AFCamera focuses continuously, even when shutter-release but-ton is not pressed halfway.To prevent sound of camera focusing from interfering with recording, it is recommended to use [Single AF].LLcElectronic VRExitOnOff](https://usermanual.wiki/Nikon/2143EB.User-Manual/User-Guide-700695-Page-89.png)
![76MoviesMovie PlaybackIn full-frame playback (c30), movies are recog-nized by the T icon. To play a movie, display it infull-frame playback and press d.Use the zoom control to adjust playback volume.Press to t (j) to lower volume, or to v (k) toraise volume.Rotate the rotary multi selector to advance orrewind the movie at twice the normal speed.Playback controls appear at the top of the monitor.Press the rotary multi selector IJ to choose a con-trol, then press d to perform the selected opera-tion. The following operations are available:Deleting Movie FilesPress T during movie playback or when displayed infull-frame (c30) or thumbnail (c52) playbackmode. A confirmation dialog is displayed. Choose[Yes] and press d to delete the movie, or choose[No] and press d to return to the normal playbackdisplay without deleting the movie.To Press DescriptionRewind QRewind movie. Playback resumes when d is released.Advance UAdvance movie. Playback resumes when d is released.Pause RPause playback.While paused, use the rotary multi selector to advance or rewind the movie. The following operations can be performed while playback is paused.VRewind movie by one frame. Rewind continues while d is pressed.WAdvance movie by one frame. Advance continues while d is pressed.zResume playback.SEnd playback and return to full-frame playback.End SEnd playback and return to full-frame playback.100NIKON100NIKON15:3115:3115:31100NIKON2006.10.102006.10.102006.10.100010.MOV0010.MOV0010.MOV10s10s10sMMEESDuring playback4s4s4sMMVolume indicatorPausingErase 1 image?Erase 1 image?Erase 1 image?NoYes](https://usermanual.wiki/Nikon/2143EB.User-Manual/User-Guide-700695-Page-90.png)
![78Voice RecordingsChanging the Sound QualityPress m in voice recording mode to display the following sound qualityoptions.Sound QualityChoose the sound quality for the recording.* Movies can be as long as free space in the internal memory or on the memory cardallows (up to five hours). All figures are approximate. Maximum movie length varieswith make of memory card.jVoice Recordings• PictureProject cannot be used to transfer or play voice recordings. Select [Interface] > [Massstorage] for [USB], copy the files manually.• The copied files can be played back using QuickTime or any other WAV-compatible audioplayer.• Note that index points created with the camera cannot be used when voice recordings areplayed back on computers.Option DescriptionMaximum movie length*Internal memory Memory card14 MB 256 MBONormal Suited for longer recordings. 30 min. 36 sec. 5 hoursNHigh(default)Record with high quality sound. Note that sound will not be heard while fast for-warding or rewinding.11 min. 5 sec. 3 hours 14 min.](https://usermanual.wiki/Nikon/2143EB.User-Manual/User-Guide-700695-Page-92.png)
![80Playing Voice RecordingsVoice RecordingsOperations During PlaybackUse the zoom control to adjust playback volume. Press to t (j) to lowervolume, or to v (k) to raise volume.Rotate the rotary multi selector to advance or rewind the voice recording attwice the normal speed.Playback controls appear at the top of the monitor. Press the rotary multiselector IJ to choose a control, then press d to perform the selectedoperation. The following operations are available:lDeleting Sound FilesPress T during playback or after selecting a sound file (use the rotary multi selector). A confir-mation dialog will be displayed. To delete the file, choose [Yes] and press d. To cancel dele-tion, choose [No] and press d.To Press DescriptionRewind QRewind voice recording. Playback resumes when d is released.Advance UAdvance voice recording. Playback resumes when d is released.Skip to pre-vious index VSkip to previous index.Skip to next index WSkip to next index.PauseRzSPause playback.The following operations can be performed while playback is paused.Resume playback.End playback and return to full-frame playback.End SEnd playback and return to full-frame playback.](https://usermanual.wiki/Nikon/2143EB.User-Manual/User-Guide-700695-Page-94.png)
![81Voice RecordingsCopying Voice RecordingsCopy voice recordings between the internal memory and a memory card.This option is available only when a memory card is inserted.1Press m in the select sound file screen(c79, step 2).2Use the rotary multi selector to choosethe option and press d.MNO: Copy recordings from internal memory tomemory cardONM: Copy recordings from memory card to inter-nal memory3Choose the copy option and press d.[Selected files]: Proceed to step 4[Copy all files]: Proceed to step 54Choose the desired file and press d.Choose the desired file and press J to mark.A confirmation dialog will be displayed.5Choose [Yes] and press d.Copying starts.kVoice RecordingsThe COOLPIX S7c may be unable to play or copy sound files created with other make of cam-era.Copy sound filesExitCamera to cardCopy all filesExitSelected filesSelect sound filesExit Select003 10:0515.10.06001 10:3010.10.06002 11:0510.10.06004 13:2325.10.06005 15:0025.10.06NNN](https://usermanual.wiki/Nikon/2143EB.User-Manual/User-Guide-700695-Page-95.png)
![82Connecting to Televisions, Computers, and PrintersConnecting to Televisions, Computers, and PrintersConnecting to a TVConnect the camera to a television using the A/V cable to play back pictures on the television.1Turn off the camera.2Connect the COOL-STATION to the TV using the supplied A/V cable.Connect the yellow plug to the video-in jack on the TV, and the white plug to the audio-in jack.3Tune the television to the video channel.See the documentation provided with your television for details.4Place the camera in the COOL-STATIONand press o for more than one sec-ond to turn on the camera.The camera enters playback mode, and the picturestaken will be displayed on the television.While connected to the TV, the camera monitor willremain off.jConnecting an A/V CableWhen connecting the A/V cable, be sure that the camera connector is oriented correctly. Donot use force when connecting the A/V cable to the camera. When disconnecting the A/Vcable, do not pull the connector at an angle.jVideo ModeBe sure that the camera’s video mode setting conforms to the standard used by your television.The video mode setting is an option set from setup menu (c114) > [Interface] (c126) >[Video mode].WhiteYellow](https://usermanual.wiki/Nikon/2143EB.User-Manual/User-Guide-700695-Page-96.png)
![83Connecting to Televisions, Computers, and PrintersConnecting to a ComputerUse the USB cable and PictureProject software supplied with your camera tocopy (transfer) pictures to a computer.• You can play back pictures on a computer transferred via wireless LAN.See “Wireless Transfer Mode” (c130) for more information. Before Connecting the CameraInstalling PictureProjectBefore transferring pictures or movies to a computer, PictureProject must beinstalled. For more information on installing and using PictureProject, see theQuick Start Guide or the PictureProject Reference Manual (on CD).Confirming USB OptionThe following two methods can be used to transfer pictures from the camerato a computer:• Click [Transfer] in PictureProject.•Press E (d) on the camera.The method used will depend on your computer’s operating system and theUSB option selected in the camera’s setup menu.1This camera supports the USB options, [Mass storage] and [PTP] (default setting).Choose [PTP] to transfer pictures stored in the internal memory. Pictures cannot betransferred when [Mass storage] is chosen.2The camera’s E (d) button cannot be used to transfer pictures in the followingcases. Use the [Transfer] button in PictureProject.• When transferring pictures from the camera’s internal memory and [Mass storage]is selected in the USB menu.• When the memory card write-protect switch is in the “lock” position. Unlock bysliding the switch to the “write” position before transferring pictures.3If your computer is running Windows 2000 Professional, be sure to set the USBoption to [Mass storage]. If [PTP] is selected, the [Found New Hardware Wizard] willbe displayed when the camera is connected to the computer. Select [Cancel], closethe window, and disconnect the camera from the computer.Operating systemUSB mode1Camera E (d)button2PictureProject TransferbuttonWindows XP Home EditionWindows XP Professional Choose [Mass storage] or [PTP].Windows 2000 Professional3Choose [Mass storage].Mac OS X 10.3.9 or later Choose [PTP]. Choose [Mass storage] or [PTP].](https://usermanual.wiki/Nikon/2143EB.User-Manual/User-Guide-700695-Page-97.png)
![84Connecting to a ComputerConnecting to Televisions, Computers, and PrintersSetting the USB OptionSet the USB option in the setup menu (c114) on the camera before con-necting the camera to a computer or printer.1Display the setup menu bypressing D, selecting Z (usethe rotary multi selector), andthen pressing d.2Choose [Interface] and press d.3Choose [USB] and press d.4Choose [PTP] or [Mass storage] and pressd (c83).The setting is enabled.Press m to exit setup menu.Set upExitSet upFormat memoryLanguageInterfaceReset allFirmware versionInterfaceExitUSBVideo modeAuto transferUSBExitPTPMass storage](https://usermanual.wiki/Nikon/2143EB.User-Manual/User-Guide-700695-Page-98.png)
![85Connecting to a ComputerConnecting to Televisions, Computers, and PrintersTransferring Pictures to a Computer1Start a computer to which PictureProject has been installed.2Turn off the camera. 3Connect the COOL-STATION to the computer using the supplied USB cable.4Turn the camera on after placing it in theCOOL-STATION.At default PictureProject settings, PictureProject Trans-fer is launched immediately with recognition of cam-era connection.5Transfer pictures.Transfer using PictureProjectClick [Transfer] button in PictureProject Transfer.All pictures and movies marked for transfer are copied to the computer. Oncetransfer is complete, pictures are displayed in PictureProject.Transfer using the camera’s d (E) buttonWhile PictureProject Transfer is launched, press d (E) to copy pictures markedfor transfer (c86) to the computer. The following messages are displayed in thecamera monitor during transfer.Preparing to transferTransferring images tocomputer Transfer completed](https://usermanual.wiki/Nikon/2143EB.User-Manual/User-Guide-700695-Page-99.png)
![86Connecting to a ComputerConnecting to Televisions, Computers, and Printers6Disconnect the camera once transfer is complete.If the USB option is set to [PTP]Turn the camera off and disconnect the USB cable.If the USB option is set to [Mass storage]Remove the camera from the system as described below before turning thecamera off and disconnecting the USB cable.Windows XP Home Edition/Windows XP ProfessionalClick the [Safely Remove Hardware] icon in thetaskbar and select [Safely remove USB Mass Stor-age Device] from the menu displayed.Windows 2000 ProfessionalClick the [Unplug or Eject Hardware] icon in thetaskbar and select [Stop USB Mass Storage Device]from the menu displayed.MacintoshDrag the untitled camera volume (“NO_NAME”) tothe Trash.jConnecting the USB CableWhen connecting the USB cable, be sure that the connectors are oriented correctly. Do notuse force when connecting the USB cable. When disconnecting the USB cable, do not pull theconnector at an angle.kMarking Pictures for TransferWhen d is pressed while the camera is connected to a com-puter, pictures marked with the E icon during playback willbe transferred to the computer. As the default setting, all pic-tures are automatically marked for transfer. Two options con-trol transfer marking:• [Interface] > [Auto transfer] in the setup menu (c126):Choose [On] to mark all new pictures for transfer (defaultsetting).• [Transfer marking] in the playback menu (c112): Change marking for existing pictures.100NIKON100NIKON15:3015:3015:30100NIKON2006.10.102006.10.100004.JPG0004.JPG0004.JPG2006.10.1044 44OMMNEEO](https://usermanual.wiki/Nikon/2143EB.User-Manual/User-Guide-700695-Page-100.png)
![87Connecting to Televisions, Computers, and PrintersConnecting to a PrinterUsers of PictBridge-compatible (c177) printers can connect the cameradirectly to the printer and print pictures without using a computer.• To print pictures directly from the camera, configure the printer connectedto the computer as a profile device for wireless transfer mode (c130).You can also use the optional PD-10 wireless printer adapter in wirelesstransfer mode (c158).jBefore Connecting the CameraUse a fully charged battery or the supplied EH-64 AC adapter to prevent the camera fromturning off unexpectedly while connected.lPrinting PicturesIn addition to printing pictures transferred to a computer from your personal printer andprinting over a direct camera-to-printer connection, the following options are also availablefor printing pictures:• Insert a memory card into a DPOF-compatible printer’s card slot• Take a memory card to a digital photo labFor printing using these methods, specify the pictures and the number of prints each usingyour camera’s print set menu (c93).lImageLink-compatible PrintersUsers of ImageLink-compatible printers can connect the camera directly to the printer andprint pictures without using a computer. See “Connecting to a ImageLink-compatible Printer”(c95) and the documentation provided with your printer for details.Take picturesSelect pictures for printing using [Print set] option (c93)Connect to printer (c88)Print pictures one at a time (c89) Print multiple pictures (c90)Turn camera off and disconnect USB cable](https://usermanual.wiki/Nikon/2143EB.User-Manual/User-Guide-700695-Page-101.png)
![88Connecting to a PrinterConnecting to Televisions, Computers, and PrintersConnecting the Camera and Printer1Set the USB option (c84) to [PTP].2Turn off the camera.3Turn on the printer.Check printer settings.4Connect the COOL-STATION to the printer using the supplied USB cable.5Turn the camera on after placing it in theCOOL-STATION.When connected correctly, the PictBridge start-upscreen (1) will be displayed in the camera monitor.Then the picture will be displayed (2).jConnecting the USB CableWhen connecting the USB cable, be sure that the connectors are oriented correctly. Do not use force whenconnecting the USB cable. When disconnecting the USB cable, do not pull the connector at an angle.USBExitPTPMass storage44 44wwMMvOK12](https://usermanual.wiki/Nikon/2143EB.User-Manual/User-Guide-700695-Page-102.png)
![89Connecting to a PrinterConnecting to Televisions, Computers, and PrintersPrinting Pictures One at a TimeAfter connecting the camera to the printer correctly (c88), print pictures byfollowing the procedure below.1Use the rotary multi selector to choose apicture and press d.The PictBridge menu is displayed.To choose a picture from a list of six thumbnails, pressthe zoom control to t (j). Or, press to v (k) toswitch back to full-frame playback.2Choose [Copies] and press d.3Choose number of copies (up to 9) andpress d.4Choose [Paper size] and press d.5Choose the desired paper size and pressd.To specify paper size using printer settings, choose[Default] in the paper size menu and press d.44 44wwMMvOKPictBridgeStart printCopiesPaper sizeCopies4PictBridgeStart printCopiesPaper sizePaper sizeDefault3.5 x 5 in.](https://usermanual.wiki/Nikon/2143EB.User-Manual/User-Guide-700695-Page-103.png)
![90Connecting to a PrinterConnecting to Televisions, Computers, and Printers6Choose [Start print] and press d.7Printing starts.Monitor display returns to that shown in step 1 whenprinting is complete.To cancel before all copies have been printed, pressd.Printing Multiple PicturesAfter connecting the camera to the printer correctly (c88), print pictures byfollowing the procedure below.1Press m when a picture is displayed.The print menu is displayed.2Use the rotary multi selector to choose[Paper size] and press d.PictBridgeStart printCopiesPaper sizeCancelPrinting002/004Current print/total number of printsPrint menuPrint all imagesPrint selectionPaper sizeDPOF printing](https://usermanual.wiki/Nikon/2143EB.User-Manual/User-Guide-700695-Page-104.png)
![91Connecting to a PrinterConnecting to Televisions, Computers, and Printers3Choose the desired paper size and pressd.To specify paper size using printer settings, choose[Default] in the paper size menu and press d.4Choose [Print selection], [Print all images]or [DPOF printing] and press d.5Choose the pictures and number of cop-ies (up to 9) of each and press d.The current picture is shown at the center of the display.Select pictures and set the number of copies for each.Pictures selected for printing are recognized by the wicon and the number of copies to be printed. w is notdisplayed with pictures for which 0 copies have beenspecified and these pictures will not be printed.Press d when setting is complete.Paper sizeDefault3.5 x 5 in.Print menuPrint all imagesPrint selectionPaper sizeDPOF printingPrint selectionSelect pictures and specify the number of prints for each picture. Proceed to step 5.Print all imagesAll pictures stored in the internal memory or memory card are printed. Proceed to step 7.DPOF printingPrint pictures for which a print order has been created in [Print set] (c93).• The menu shown at right will be displayed.• To print, choose [Start print] and press d. Proceed to step 7.• To view the current print order, choose [Confirm] and press d. Proceed to step 6.DPOF printingCancelConfirm004 printsStart printPrint selectionBack4301.12.200612:00](https://usermanual.wiki/Nikon/2143EB.User-Manual/User-Guide-700695-Page-105.png)
![92Connecting to a PrinterConnecting to Televisions, Computers, and Printers6Check the selected pictures you wish toprint and press d.To modify selection, press m to return to the previ-ous screen. 7Printing starts.Monitor display returns to the print menu (step 2)when printing is complete.To cancel before all copies have been printed, pressd.jPaper SizeThe camera supports the following paper sizes: [Default] (the default paper size for the cur-rent printer), [3.5 × 5 in.], [5 × 7 in.], [Postcard], [100 × 150 mm], [4 × 6 in.], [8 × 10 in.],[Letter], [A3], and [A4]. Only sizes supported by the current printer will be displayed. To spec-ify paper size using printer settings, choose [Default] in the paper size menu.004 printsBack Print1 2 341234CancelPrinting002/004](https://usermanual.wiki/Nikon/2143EB.User-Manual/User-Guide-700695-Page-106.png)
![93Connecting to Televisions, Computers, and PrintersCreating a DPOF Print Order: Print SetThe [Print set] option in the playback menu is used to create digital “printorders” for printing on DPOF-compatible devices (c177). In addition to pictures themselves, shooting date and photo information(shutter speed, aperture, etc.) can also be printed.When the camera is connected to a PictBridge-compatible printer, picturescan be printed from the printer according to the DPOF print order you havecreated for pictures on the memory card. If the memory card is removedfrom the camera, you can create the DPOF print order for pictures in theinternal memory and print pictures according to the DPOF print order.1Press m in playback mode.The playback menu is displayed.2Use the rotary multi selector to choose[Print set] and press d.The print set menu is displayed.3Choose [Print selected] and press d.4Choose the pictures and number of cop-ies (up to 9) of each.The current picture is shown at the center of the display.Press IJ to select pictures and GH to set the num-ber of copies for each.Pictures selected for printing are recognized by the wicon and the number of copies to be printed. w is notdisplayed with pictures for which 0 copies have been specified and these pictureswill not be printed.Press d when setting is complete.Playback menuPrint setSlide showDeleteProtectTransfer markingExitPrint setDelete print setExitPrint selectedwPrint selectionBack4301.12.200612:00](https://usermanual.wiki/Nikon/2143EB.User-Manual/User-Guide-700695-Page-107.png)
![94Creating a DPOF Print Order: Print SetConnecting to Televisions, Computers, and Printers5Choose whether or not to also printshooting date and photo information.[Date]: Print date of recording on all pictures in theprint order.[Info]: Print shutter speed and aperture on all picturesin the print order. Note that this information is notprinted with direct connection to a printer.[Done]: Complete the print order and exit.Pictures selected for printing are recognized by thew icon displayed with playback.jPrint Set[Date] and [Info] are reset each time the print set menu is displayed.kDeleting All Print OrdersChoose [Delete print set] in step 3 and press d. Print orders for all pictures will be deleted.kNote on the Print Set [Date] OptionThe date and time printed on pictures with DPOF printingwhen [Date] in the print set menu is enabled are thoserecorded with the picture when it was taken. Date and timeprinted using this option are not affected when the camera’sdate and time setting are changed from the setup menu afterpictures are recorded.lDifferences Between Print Set and Date ImprintDate and time can only be printed on pictures using the [Date] option in the print set menuwhen pictures are printed from a DPOF-compatible printer (c177). Use the [Date imprint](c121) option in the setup menu to print the date on pictures from a printer that does notsupport DPOF (position of the date is fixed). When the date option for both [Print set] and[Date imprint] is enabled, only the date from the [Date imprint] option is printed, even when aDPOF-compatible printer is used.Print setExitInfoDateDone100NIKON100NIKON15:3015:3015:30100NIKON2006.10.102006.10.100004.JPG0004.JPG0004.JPG2006.10.1044 44OMMNEEwwO2006.10.1020 0 6.1 0 .102006.10.10](https://usermanual.wiki/Nikon/2143EB.User-Manual/User-Guide-700695-Page-108.png)
![95Connecting to Televisions, Computers, and PrintersConnecting to a ImageLink-compatible PrinterSee documentation provided with your printer for information on how tooperate the printer.1Attach the supplied PV-11 dock insert tothe printer.2Set the USB option (c84) to [PTP].3Turn the camera off and attach it to thedock insert.4Print pictures.Follow the procedures described in the printer manual.Removing the Dock InsertPlace your thumbs whereindicated, press, and lift.jNote on Connecting to an ImageLink-compatible PrinterThe monitor will dim auto-matically if no operations are performed for about one minute while the camera is connectedto an ImageLink printer. The camera will turn off if no operations are performed for anotherseven minutes.USBExitPTPMass storage](https://usermanual.wiki/Nikon/2143EB.User-Manual/User-Guide-700695-Page-109.png)

![98Shooting Options: The Shooting MenuShooting, Playback, and Setup MenuskImage Mode and the Number of Exposures RemainingThe following table lists the number of pictures that can be stored in internal memory and ona 256 MB memory card, together with the size of still pictures. Note that the number of pic-tures that can be stored will differ depending on the composition of the picture (due to JPEGcompression). In addition, this number may differ depending on the make of memory card,even if the capacity for the memory card is the same.* All figures are approximate. If the number of exposures remaining is 10,000 or more,the number of exposure remaining display shows [9999].lImage ModeThe image mode setting can also be applied from the scene, anti-shake, and one-touch por-trait menus. Changes made to the image mode setting from any of the three menus apply toall shooting modes.Setting Internal mem-ory (14 MB)256 MB mem-ory cardPrint size (printed at 300 dpi; cm/in.)FHigh(3072A)47026 × 19.5 cm / 10.4 ×7.8 in.ENormal(3072) 8 140 26 × 19.5 cm / 10.4 ×7.8 in.dNormal(2592) 11 190 22 × 16.5 cm / 8.8 ×6.6 in.eNormal(2048) 17 300 17 × 13 cm / 6.8 ×5.2 in.hPC screen(1024) 59 1,040 9 × 7 cm / 3.6 ×2.8 in.iTV screen(640) 112 1,960 5 × 4 cm / 2×1.6 in.](https://usermanual.wiki/Nikon/2143EB.User-Manual/User-Guide-700695-Page-112.png)
![99Shooting Options: The Shooting MenuShooting, Playback, and Setup Menusd White BalanceAdjust white balance based on the light source togive pictures the most realistic colors possible.Although the default setting, [Auto], can be usedunder most types of lighting, you can apply thewhite balance setting suited to a particular lightsource to achieve more accurate results.At settings other than [Auto], the icon for the current setting is displayed inthe monitor (c8).jFlash ModeAt white-balance settings other than [Auto] or [Flash], turn the flash off (B) (c32).eAutoWhite balance automatically adjusted to suit lighting conditions. Best choice in most situations.fWhite bal. presetNeutral-colored object used as reference to set white balance under unusual lighting conditions. See the next page for more information.gDaylightWhite balance adjusted for direct sunlight.hIncandescentUse under incandescent lighting.iFluorescentUse under most types of fluorescent lighting.jCloudyUse when taking pictures under overcast skies.lFlashUse with the flash.White balanceExitAutoDaylightDaylightIncandescentIncandescentFluorescentFluorescentWhite bal. presetWhite bal. presetDaylightIncandescentFluorescentWhite bal. preset](https://usermanual.wiki/Nikon/2143EB.User-Manual/User-Guide-700695-Page-113.png)
![100Shooting Options: The Shooting MenuShooting, Playback, and Setup Menusf Preset White BalancePreset white balance is used with mixed lighting or to compensate for lightsources with a strong color cast (for example, to make pictures taken under alamp with a red shade look as though they had been taken under white light).1Place a white or gray reference object under the lighting thatwill be used during shooting.2Use the rotary multi selector to choose[White bal. preset] in the white balancemenu, and press d.The camera zooms in.3Choose [Measure].To apply the most recently measured value for presetwhite balance, choose [Cancel] and press d.4Frame the reference object.5Press d.The shutter is released and the new white balance value is set.No pictures are recorded.kNote on Preset White BalanceRegardless of the flash mode selected, the flash will not fire when d is pressed in step 5. There-fore, the camera cannot measure a value for preset white balance for when the flash is used.White balanceExitAutoAutoDaylightDaylightAutoDaylightIncandescentIncandescentFluorescentFluorescentWhite bal. presetIncandescentFluorescentWhite bal. presetExitMeasureCancelWhite bal. presetExitMeasureCancelReference object frame](https://usermanual.wiki/Nikon/2143EB.User-Manual/User-Guide-700695-Page-114.png)

![102Shooting Options: The Shooting MenuShooting, Playback, and Setup Menusq ContinuousCapture a fleeting expression on a portrait subject,photograph a subject that is moving unpredictably,or capture motion in a series of pictures. Focus,exposure, and white balance are fixed at the valuesfor the first picture in each series.At settings other than [Single], the indicator for the current setting is dis-played in the monitor (c8).rSingleOne shot is taken each time shutter-release button is pressed.qContinuousPictures are taken continuously while the shutter-release button is pressed. When the image mode is E Normal(3072), camera takes 7 shots at about 1.4 frames per second.wMulti-shot 16Each time shutter-release button is pressed, camera takes 16 shots at about 1.6 frames per second and arrange them in a single picture d Normal(2592) pixels as shown at right.zIntvl timer shootingCamera takes pictures automatically at specified interval (up to 1,800 frames).ContinuousExitSingleContinuousMulti-shot 16Intvl timer shooting](https://usermanual.wiki/Nikon/2143EB.User-Manual/User-Guide-700695-Page-116.png)
![103Shooting Options: The Shooting MenuShooting, Playback, and Setup Menusz Interval Timer PhotographyPictures are taken automatically at specified intervals. Choose from intervalsbetween 30 seconds and 60 minutes. To prevent the camera from turningoff unexpectedly during recording, use a fully charged battery.1Use the rotary multi selector to choose[Intvl timer shooting] in the continuousmenu, and press d.2Choose interval between shots and pressd.3Press m.The camera returns to shooting mode.4Press the shutter-release button fully tostart recording.Monitor turns off and indicator lamp blinks greenbetween shots.The monitor turns on automatically right before thenext shot is taken.5Press the shutter-release button fully a second time to endrecording.Recording will end automatically if the internal memory or memory card becomesfull, or after 1,800 pictures are taken.ContinuousExitSingleContinuousMulti-shot 16Intvl timer shootingSet interval time30s1m5m10m30mExit88MMM](https://usermanual.wiki/Nikon/2143EB.User-Manual/User-Guide-700695-Page-117.png)
![104Shooting Options: The Shooting MenuShooting, Playback, and Setup MenusA Best Shot Selector (BSS)The “best shot selector” is recommended from situ-ations in which inadvertent camera movement canresult in blurred pictures, or when parts of theimage are prone to under- or overexposure.At [On] and [Exposure BSS] settings, the flash auto-matically turns off and focus, exposure, and white balance for all pictures aredetermined by the first picture in each series.The icon for the current setting is displayed in the monitor (c8).jNote on Best Shot SelectorBSS may not produce the desired results if the subject moves or the composition changeswhile the shutter-release button is fully pressed.AOnRecommended for taking pictures in poorly lit places, or in other situations where camera shake may occur. Camera takes shots while shutter-release but-ton is pressed, to a maximum of ten. These images are then compared and the sharpest picture (picture with highest level of detail) is saved.BOffOnly one picture is taken.wExposure BSSRecommended for high-contrast subjects, when it is diffi-cult to set exposure correctly.[Highlight BSS]: picture with smallest area of overexposure is selected.[Shadow BSS]: picture with smallest area of underexposure is selected.[Histogram BSS]: of pictures with least under- and over-exposure, camera chooses picture with overall exposure closest to optimum.Camera takes five shots each time shutter-release button is pressed, but only the picture that best meets the selected criterion is saved.BSSExitOnOffExposure BSSExposure BSSHighlight BSSShadow BSSHistogram BSSExit](https://usermanual.wiki/Nikon/2143EB.User-Manual/User-Guide-700695-Page-118.png)
![105Shooting Options: The Shooting MenuShooting, Playback, and Setup MenusW ISO SensitivitySensitivity is a measure of how quickly the camerareacts to light. The higher the sensitivity, the lesslight needed to make an exposure. Although a highISO rating is suited for taking pictures of subjects inaction or in poor lighting, high sensitivity is oftenassociated with “noise” -randomly spaced, brightly colored pixels concen-trated in dark parts of the image.[Auto] is equivalent to ISO 50 under normal conditions; when lighting is poorand the flash is off, the camera compensates by raising sensitivity to a maxi-mum of ISO 800 equivalent. Choose from values between ISO 50 and 1600equivalent.At settings other than [Auto], the current setting is displayed in the monitor(c8). If [Auto] is selected and the sensitivity is raised above an ISO 50 equiv-alent, the W icon will be displayed (c33).d Color OptionsMake colors more vivid or record pictures in mono-chrome.The effects of the selected option can be previewed in the monitor. At set-tings other than [Standard color], the icon for the current setting is displayedin the monitor (c8).eStandard colorUse for pictures exhibiting natural color.CVivid colorUse to achieve a vivid, “photoprint” effect.DBlack-and-whiteRecord pictures in black-and-white.BSepiaRecord pictures in sepia tones.ACyanotypeRecord pictures in cyan-blue monochrome.ISO sensitivityAuto50100200400ExitColor optionsExitStandard colorBlack-and-whiteBlack-and-whiteSepiaSepiaCyanotypeCyanotypeVivid colorVivid colorBlack-and-whiteSepiaCyanotypeVivid color](https://usermanual.wiki/Nikon/2143EB.User-Manual/User-Guide-700695-Page-119.png)
![106Shooting Options: The Shooting MenuShooting, Playback, and Setup Menusk AF Area ModeUse this option to determine where the camerafocuses.c Electronic VRWhen set to [Auto], the affects of camera shakeand blurred subjects are reduced while pictures aretaken under the following conditions: • Flash mode is set to B or D • Shutter speed is slow • [Single] is selected in the continuous shooting menuAt settings other than [Off], the icon for the current setting is displayed in themonitor (c8).jNotes on Electronic VR• The electronic VR may not work properly immediately after the camera is turned on or reac-tivated from standby mode.• The electronic VR does not work when the exposure time is faster than a certain value.• The electronic VR is less effective for when pictures are considerably blurred.• Blurred subjects cannot be compensated.nCenterCamera focuses on subject in center of frame.Center focus area is used.mManualPress the rotary multi selector GHIJ to select from 99 focus areas in the frame. Pictures can be taken while focus area selection screen is displayed.To end focus area selection and adjust the flash, macro close-up, and self-timer settings, press d. Press J to change selection.AF area modeExitCenterManualLLcElectronic VRExitAutoOff](https://usermanual.wiki/Nikon/2143EB.User-Manual/User-Guide-700695-Page-120.png)
![107Shooting Options: The Shooting MenuShooting, Playback, and Setup MenusRestrictions on Camera SettingsRestrictions apply to the following settings in L (auto) mode:Flash modeFlash turns off at [Continuous] settings of [Continuous] or [Multi-shot 16], or when [BSS] is on. Applied setting is restored when [Single] or [Intvl timer shooting] is selected, or [BSS] is turned off.Self-timerIf self-timer is on, only one shot will be taken when shutter is released, regardless of settings chosen for [Continuous] and [BSS]. Applied [Continuous] and [BSS] settings are restored when picture is taken or self-timer is turned off.ContinuousSelecting [Continuous], [Multi-shot 16], or [Intvl timer shooting] turns [BSS] off.Applied [BSS] setting is not restored when [Single] is selected.BSS[Continuous] is automatically set to [Single] when [On] or [Exposure BSS] is selected for [BSS].Applied setting is not restored when [BSS] is turned off.White balanceWhite balance is automatically set to [Auto] and cannot be adjusted when [Black-and-white], [Sepia], or [Cyanotype] is selected for [Color options].Applied white balance setting is restored when [Standard color] or [Vivid color] is selected.](https://usermanual.wiki/Nikon/2143EB.User-Manual/User-Guide-700695-Page-121.png)
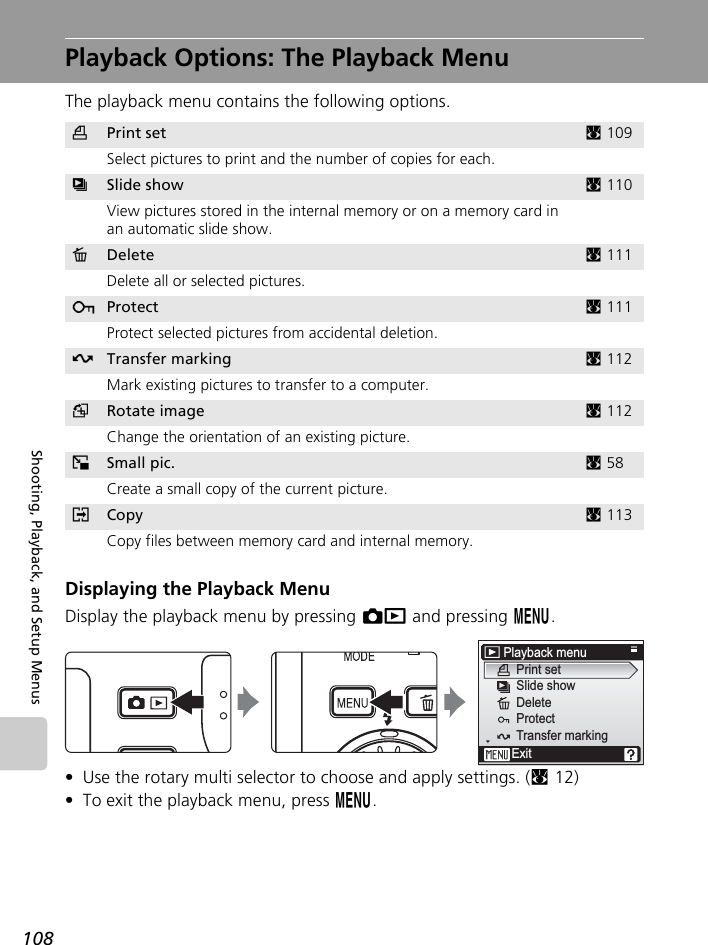
![109Playback Options: The Playback MenuShooting, Playback, and Setup MenusSelecting Multiple PicturesFollow the steps below to select multiple picturesfor a print set (c93), deletion (c111), protectionfrom deletion (c111), transfer (c112), rotate(c112), copying between internal memory andthe memory card (c113), or for the welcomescreen (c116). When pictures are selected, thescreen at right is displayed. The process for protect-ing multiple pictures is shown here as example.1Use the rotary multi selector to choose adesired picture.The current picture is displayed at the center of themonitor.Only one picture can be selected for [Rotate image]and [Welcome screen]. Proceed to step 3.2Press GH to select [ON] or [OFF] (or thenumber of copies).When [ON] is selected, the indicator for the specifiedfunction is displayed in the center of the current pic-ture. Repeat steps 1 and 2 to select additional pic-tures.3Press d.The setting is enabled.w Print SetCreate digital “print orders” for PictBridge printers(c177) and DPOF-compatible devices (c93).ProtectBack4301.12.200612:00ProtectBack4301.12.200612:00ProtectBack4301.12.200612:00DonePrint setDelete print setExitPrint selected](https://usermanual.wiki/Nikon/2143EB.User-Manual/User-Guide-700695-Page-123.png)
![110Playback Options: The Playback MenuShooting, Playback, and Setup Menusz Slide ShowPlay back pictures stored in the internal memory oron a memory card in an automated “slide show”.1Display the slide show menu; use therotary multi selector to choose [Start]and press d.To change the interval between pictures, choose[Frame intvl], select the desired interval time, andpress d before choosing [Start].To repeat the slide show automatically, enable [Loop]and press d before choosing [Start]. y will be added to the loop option whenenabled.2The slide show begins. While the slide show is in progress, the followingoperations can be performed:• Use the rotary multi selector to switch pictures.Continue rotating in either direction to fast forward(clockwise) or rewind (counterclockwise).• Press d to pause the slide show.The menu shown at right is displayed when the slideshow ends or is paused. Choose [Restart] and pressd to play the slide show again, or choose [End] tostop the slide show and return to the playback menu.jNotes on Slide Show• Only the first frame of movies (c76) included in slide shows is displayed.• Even if [Loop] is selected, the monitor will turn off automatically if no operations are per-formed for 30 minutes. The camera will turn off automatically if no operations are per-formed for another three minutes.Slide showExitLoopFrame intvlStartPauseSlide showExitLoopFrame intvlStartPauseRestartEndPausePausePause](https://usermanual.wiki/Nikon/2143EB.User-Manual/User-Guide-700695-Page-124.png)
![111Playback Options: The Playback MenuShooting, Playback, and Setup MenusA DeleteThe delete menu contains the options shownbelow.If no memory card is inserted in the camera, pic-tures in the internal memory will be deleted.If a memory card is inserted, pictures on the mem-ory card will be deleted.kNotes on Deletion• Once deleted, pictures cannot be recovered. Transfer important images to a computerbefore deletion.• Pictures marked with the D icon are protected and cannot be deleted.D ProtectProtect selected pictures from accidental deletion.Note, however, that formatting will delete pro-tected files (c125).See “Selecting Multiple Pictures” (c109) formore information on using this function.Protected pictures are recognized by the D icon (c9) displayed duringplayback.BErase selected imagesDelete selected pictures (c109).CErase all imagesDelete all pictures stored in the internal memory or on the memory card.• Choose [Yes] and press d in the confirmation dialog to delete all pictures.• To exit without deleting pictures, choose [No] and press d.DeleteErase all imagesExitErase selected imagesDeleteExitYesNoErasing all images( excluded)ProtectBack4301.12.200612:00](https://usermanual.wiki/Nikon/2143EB.User-Manual/User-Guide-700695-Page-125.png)
![112Playback Options: The Playback MenuShooting, Playback, and Setup MenusE Transfer MarkingChange transfer marking (E) for existing pictures.When the camera is connected to a computer withPictureProject installed via the supplied USB cable,pressing d transfers only the pictures marked witha E icon (c85, 155). At the default setting, allpictures are marked for transfer.Pictures selected for transfer are recognized by the E icon (c9).G Rotate ImageRecord pictures rotated 90° clockwise or counter-clockwise. Choose a file to be rotated in the picture selectionscreen (c109). To select the direction to rotatethe chosen picture, rotate the rotary multi selectorclockwise (or press J) or counterclockwise (orpress I) in the rotate image screen.When [Record orientation] (c124) is set to [Auto] (default setting), you canrotate (up to 180°) pictures taken in “tall” orientation by rotating the rotarymulti selector either clockwise or counterclockwise.Press d to record the orientation for the picture as shown in the rotateimage screen.EAll onMark all images for transfer.FAll offRemove transfer marking from all images.PSelect Image(s)Mark selected pictures for transfer in the picture selection screen (c109).Transfer markingAll offExitAll onSelect image(s)4301.12.200612:00Select imageBackRotate imageBack RotateRotate imageBack RotateRotate imageBack RotateRotate 90° counterclockwiseRotate 90° clockwise](https://usermanual.wiki/Nikon/2143EB.User-Manual/User-Guide-700695-Page-126.png)
![113Playback Options: The Playback MenuShooting, Playback, and Setup MenusL CopyCopy pictures between the internal memory and amemory card.First, select from the following options.Then, select the desired copy option.Choose [Selected images] (c109) to copy specificpictures in the internal memory or memory card. Tocopy all pictures, choose [All images].jNotes on Copying Pictures• If there is not enough space in the memory or on the memory card to receive the copy, anerror message will be displayed. Delete unwanted pictures or insert a new memory card (ifusing a memory card) before trying again.• The file format of images that can be copied is JPEG, MOV, or WAV.• Pictures taken with another make of camera or that have been modified on a computercannot be copied.kFile Names of Copied Pictures •When pictures are copied using the [Selected images] option, the newly copied pictures arenumbered consecutively from the largest number existing between the two memory sources.Ex: when the last number in the source memory is 32 (DSCN0032.JPG) and the last num-ber in the destination memory is 18 (DSCN0018.JPG), the copied pictures are assignednumbers starting from DSCN0033.• When pictures are copied using the [All images] option, all the pictures in the folder arecopied with the same file numbers. New folder numbers are assigned in ascending orderstarting from the largest folder number available. If a new folder cannot be created, thefolder is not copied and an error message will be displayed.kCopiesEdited copies have the same protection marking (c111) as the original but are not markedfor printing (c93) or transfer (c112).MNOCopy pictures from internal memory to memory card.ONMCopy pictures from memory card to internal memory.CopyExitCamera to cardAll imagesExitSelected images](https://usermanual.wiki/Nikon/2143EB.User-Manual/User-Guide-700695-Page-127.png)
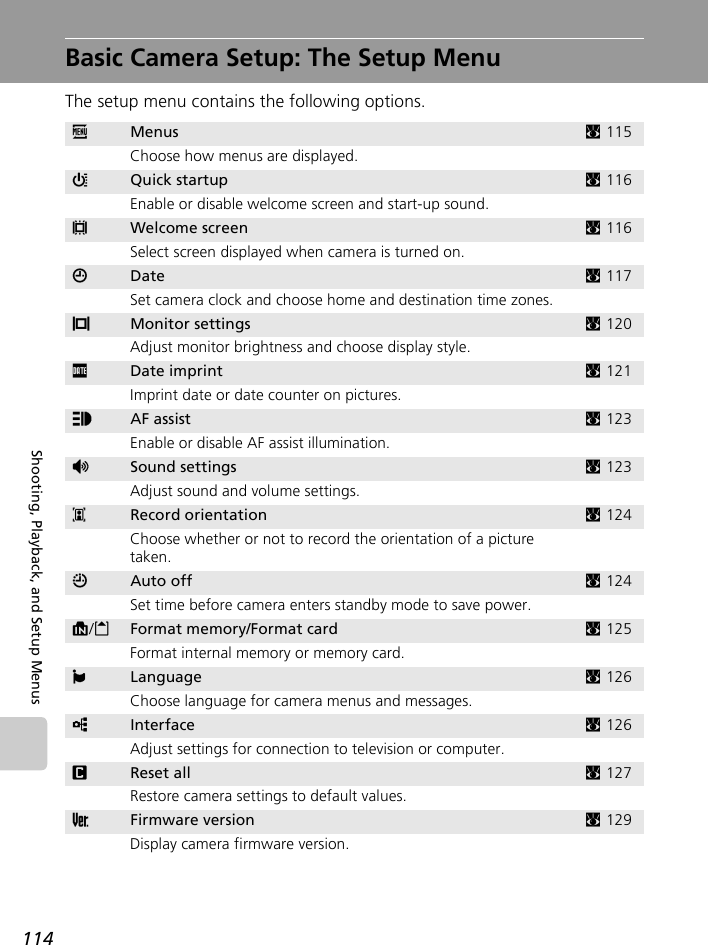
![115Basic Camera Setup: The Setup MenuShooting, Playback, and Setup MenusDisplaying the Setup MenuFirst, display the mode-selection menu by pressing D. Then select Z (usethe rotary multi selector), press d.• Use the rotary multi selector to choose and apply settings. (c12)• To exit the setup menu, press m.R MenusChoose whether the initial menus displayed for theshooting menu (c96), high-sensitivity (c97),scene menu (c37), movie menu (c71), one-touch portrait menu (c51), anti-shake menu(c49), playback menu (c108), and setup menu(displayed when m is pressed) (c114) use textor icons.When [Icons] is selected, all menu items can be displayed in a single pageand the highlighted menu name appears at the top of the monitor.Set upMenusQuick startupWelcome screenDateMonitor settingsExitSet upMenusExitTextIconsExitMenusSet upMenusQuick startupWelcome screenDateMonitor settingsExit[Text] [Icons]Menu names](https://usermanual.wiki/Nikon/2143EB.User-Manual/User-Guide-700695-Page-129.png)
![116Basic Camera Setup: The Setup MenuShooting, Playback, and Setup MenusH Quick StartupChoose [On] to disable the welcome screen andstart-up sound. The camera will be ready for shoot-ing as soon as it is turned on.Set to [Off] when enabling the welcome screen.V Welcome ScreenYou can select the welcome screen to be displayedwhen the camera is turned on.To set the welcome screen, [Quick startup] must beset to [Off].lWhen [Select an image] is SelectedIf you have already selected a welcome screen picture, you canselect a new one by following the confirmation dialog.NikonDisplays a welcome screen when the camera is turned on.Animation (default)Displays a short animation when the camera is turned on.Select an imageSelect a picture in the internal memory or on the memory card for the wel-come screen. The image used in the welcome screen is a copy of the selected picture and, therefore, is not affected if the original picture is deleted or the memory card is removed.1 Choose a picture in the picture selection screen.• See “Selecting Multiple Pictures” (c109) for more information.2 Press d.Quick startupOnOffExitWelcome screenExitNikonAnimationSelect an imageWelcome screenExitYesNoReplace currentimage?](https://usermanual.wiki/Nikon/2143EB.User-Manual/User-Guide-700695-Page-130.png)
![117Basic Camera Setup: The Setup MenuShooting, Playback, and Setup MenusW DateSet the camera clock and choose home and traveldestination time zones.Setting Travel Destination Time Zone1Use the rotary multi selector to choose[Time zone] and press d.The time zone menu is displayed.2Choose Y and press d.The date and time displayed on the monitor changesaccording to the region currently selected.If daylight saving time is in effect, use the rotary multiselector to choose [DaylightSaving] press d and thenpress G. The time is automatically advanced onehour.3Press J.The new city time zone menu is displayed.DateSet camera clock to current date and time.See “Setting Display Language, Date, and Time” (c20-21) for more informa-tion.Time zoneUseful when travelling. When Y (destination time zone) is selected, the time difference (c119) is automatically calculated and the date and time in the selected region are displayed.Date10.10.2006 15:30DateTime zoneExitDate10.10.2006 15:30DateTime zoneExit01.10.2006 10:00Time zoneExitTokyo, SeoulLondon,CasablancaDaylightSavingDaylightSavingTime zoneExitTokyo, SeoulLondon,CasablancaDaylightSavingDaylightSaving01.10.2006 18:00](https://usermanual.wiki/Nikon/2143EB.User-Manual/User-Guide-700695-Page-131.png)
![118Basic Camera Setup: The Setup MenuShooting, Playback, and Setup Menus4Choose the travel destination time zoneand press d.The setting is enabled.Press m to return to shooting or playback mode.While the travel destination time zone is selected, theY icon will be displayed in the monitor when thecamera is in shooting mode.jThe Clock BatteryThe clock battery charges when the main battery is installed or an AC adapter is connected,and can provide several days of backup power after about 10 hours of charging.kX (Home Time Zone)• To switch to the home time zone, choose X in step 2.• To change the home time zone, choose X in step 2 and perform the following steps forthe home time zone.kDaylight Saving TimeTo disable daylight saving time, turn [DaylightSaving] off (y) in the time zone menu.1 Use the rotary multi selector to choose X (home time zone) or Y (destination time zone)and press d.2 Choose [DaylightSaving].3Press d to turn off the check box (y).- The camera clock is automatically set back one hour.- Press d again to turn on the check box (y).4Press m.- The setting is enabled and the camera returns to shooting or playback mode.New city time zoneBackToronto, LimaEST:New York01.10.2006 05:00Time zoneExitEST:New YorkLondon,CasablancaDaylightSavingDaylightSaving](https://usermanual.wiki/Nikon/2143EB.User-Manual/User-Guide-700695-Page-132.png)
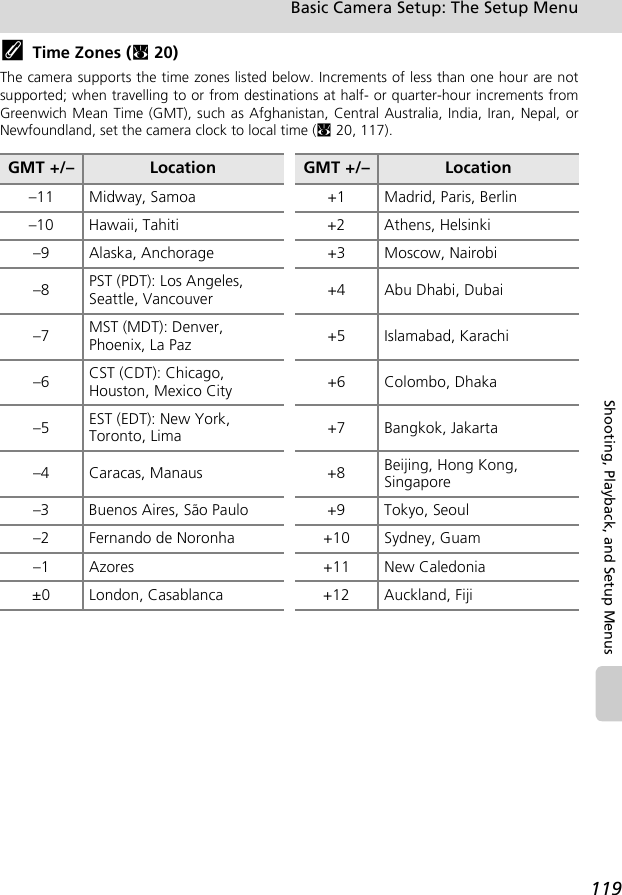
![120Basic Camera Setup: The Setup MenuShooting, Playback, and Setup MenusZ Monitor SettingsChoose whether or not to display information inthe monitor, and set the monitor brightness.Photo InfoThe following display options are available.See “The Monitor” (c8) for information on indicators in the monitor.Photo infoChoose information displayed in monitor during shooting and playback mode.BrightnessChoose from five settings for monitor brightness.Shooting mode Playback modeShow infoAuto infoThe current settings or operation guide is displayed for five seconds as in [Show info] above. After five seconds, display will be the same as [Hide info].Hide infoFraming gridMonitor settingsExitPhoto infoBrightness 488MMM100NIKON100NIKON15:3015:3015:30100NIKON0009.JPG0009.JPG2006.10.102006.10.100009.JPG2006.10.1044OMM44NEEOM88MMMIn L (auto) mode, a framing grid is displayed to help frame pictures; other current settings or operation guide is displayed for five seconds as in [Auto info] above.In other shooting modes, the cur-rent settings or operation guide is displayed as in [Show info] above.100NIKON100NIKON15:3015:3015:30100NIKON0009.JPG0009.JPG2006.10.102006.10.100009.JPG2006.10.1044OMM44NEEOThe current settings or opera-tion guide is displayed as in [Show info] above.](https://usermanual.wiki/Nikon/2143EB.User-Manual/User-Guide-700695-Page-134.png)
![121Basic Camera Setup: The Setup MenuShooting, Playback, and Setup Menusf Date ImprintDate and time of recording can be imprinted onpictures for printing this information from printersthat are not DPOF-compatible (c168).At settings other than [Off], the icon for the current setting is displayed in themonitor (c8).jDate Imprint• Imprinted dates form a permanent part of image data and cannot be deleted. • When [Date imprint] is set, [Electronic VR] will automatically be disabled even if set to[Auto] (c106). In L (auto) and scene modes, vibration reduction will not function evenfor conditions where it is normally applied. Note that enabling [Electronic VR] again will dis-able [Date imprint].• Even if [Date imprint] is enabled, the date will not be imprinted on pictures taken in anti-shake mode (c49). • Dates imprinted at an image-mode setting of [TV screen(640)] (c97) may be difficult toread. Choose [PC screen(1024)] or larger when using date imprint.• The date is recorded using the format selected in the setup menu’s [Date] item (c20, 117).kDate Imprint and Print SetWhen using DPOF-compatible devices, shooting date or photo information will be printed if[Date] or [Info] is selected in the print set menu (c93). See “Differences Between Print Setand Date Imprint” (c94) for more information on the difference between [Date imprint] and[Print set].DateDate is imprinted on the bottom right corner of pictures taken while this option is in effect.Date and timeDate and time are imprinted on the bottom right corner of pictures taken while this option is in effect.Date counterTime stamp shows number of days between date of recording and selected date.fDate imprintExitOffDateDate and timeDate counter](https://usermanual.wiki/Nikon/2143EB.User-Manual/User-Guide-700695-Page-135.png)
![122Basic Camera Setup: The Setup MenuShooting, Playback, and Setup MenusDate CounterPictures taken while this option is in effect are imprinted with the number ofdays remaining until, or the number of days elapsed since a specified date.Use it to track the growth of a child or count down the days until a birthdayor wedding.Sample date counter time stamps are shown below.Stored datesUp to three dates can be stored. To set, choose an option, press the rotary multi selector J, enter a date (c20), and press d. To select a different date, choose an option and press d.Display optionsChoose [Number of days], [Years and days], or [Yrs, mnths, days] and press d.fDate counterExit15.10.2006Number of days5Press d to display the stored dates option.Press d to display the display option.fStored datesExit15.10.2006--.--.----03.03.2006Display optionsNumber of daysYears and daysYrs, mnths, daysExit02/ 2006.10.0802/ 2006.10.0802/ 2006.10.08 02/ 2006.10.1202/ 20 06.1 0.1 202/ 2006.10.12Two days remaining Two days elapsed](https://usermanual.wiki/Nikon/2143EB.User-Manual/User-Guide-700695-Page-136.png)
![123Basic Camera Setup: The Setup MenuShooting, Playback, and Setup Menusu AF AssistIf [Auto] is selected, AF-assist illumination will beused to assist the focus operation when the subjectis poorly lit. Note that for some modes, AF-assist illuminationturns off automatically. To disable this function, choose [Off]. When set to [Off], the camera may beunable to focus if lighting is poor.h Sound SettingsAdjust the following sound settings.Button soundWhen [On] is selected, beep will sound once when operations are completed successfully, three times when error is detected.Shutter soundChoose shutter sound from [1], [2], [3], and [Off].VolumeChoose volume of shutter sound from [Loud], [Normal], and [Off].AF assistExitAutoOffButton soundShutter soundVolumeSound settingsExit](https://usermanual.wiki/Nikon/2143EB.User-Manual/User-Guide-700695-Page-137.png)
![124Basic Camera Setup: The Setup MenuShooting, Playback, and Setup MenusI Record OrientationChoose whether or not to record the orientation ofpictures taken in “tall” orientation.Choose [Auto] to record the picture’s orientationdetected by the camera’s sensor. The taken picturewill be automatically rotated when played back onthe camera monitor or with PictureProject. When[Off] is selected, the picture will be displayed in the same orientation as itwas taken.i Auto OffChoose the time allowed to elapse before the cam-era enters standby mode to save power (c25).The time options are 30 seconds, one minute, fiveminutes, and 30 minutes. The power-on lampflashes in standby mode. If no operations are per-formed for another three minutes, the camera turnsoff.jNotes on Auto OffThe monitor will remain on for a minimum of:• Three minutes when menus are displayed• Thirty minutes during continuous playback for slide shows and Pictmotion movies, or whenthe AC adapter is connectedExitAutoOffRecord orientationAuto offExit30s1m5m30m](https://usermanual.wiki/Nikon/2143EB.User-Manual/User-Guide-700695-Page-138.png)
![125Basic Camera Setup: The Setup MenuShooting, Playback, and Setup MenusM Format Memory/O Format CardFormat the internal memory or a memory card.Formatting the Internal MemoryIf no memory card is inserted, this option is labeled[Format memory] and formats internal memory.Remove the memory card from the camera to for-mat the internal memory.Formatting a Memory CardIf a memory card is inserted, the option is labeled[Format card] and formats the memory card.j Formatting Internal Memory and Memory Cards• Formatting the internal memory or memory cards permanently deletes all data. Be sure totransfer important pictures to a computer before formatting.• Do not turn the camera off, disconnect the AC charger, or remove the battery or memorycard during formatting.• The first time you insert the memory cards used in other devices into the COOLPIX S7c, for-mat them with [Format]. Repeated recording and deleting of pictures without regular for-matting reduces memory card performance.• Regular formatting of memory cards is recommended to maintain maximum performance.• [Format] is not available when the battery is low.Quick formatFormats only portions of the memory card containing data.FormatFormats the entire memory card including portions with no recorded data. [Format] takes longer than [Quick format].Format memoryWARNING!All images will be deleted!ExitFormatNoFormat cardExitQuick formatFormat](https://usermanual.wiki/Nikon/2143EB.User-Manual/User-Guide-700695-Page-139.png)
![126Basic Camera Setup: The Setup MenuShooting, Playback, and Setup Menusj LanguageChoose one of 20 languages for display of cameramenus and messages.k InterfaceAdjust settings for connection to a computer ortelevision.Czech PolishDanish PortugueseGerman Russian(default) FinnishSpanish SwedishFrench Simplified ChineseIndonesian Traditional ChineseItalian JapaneseDutch KoreanNorwegian ThaiUSBSelect [Mass storage] or [PTP] for connection to computer (c83) or printer (c88).Video modeChoose from [NTSC] and [PAL]. Auto transferChoose [On] to mark all new pictures for transfer to computer (c86).InterfaceExitUSBVideo modeAuto transfer](https://usermanual.wiki/Nikon/2143EB.User-Manual/User-Guide-700695-Page-140.png)
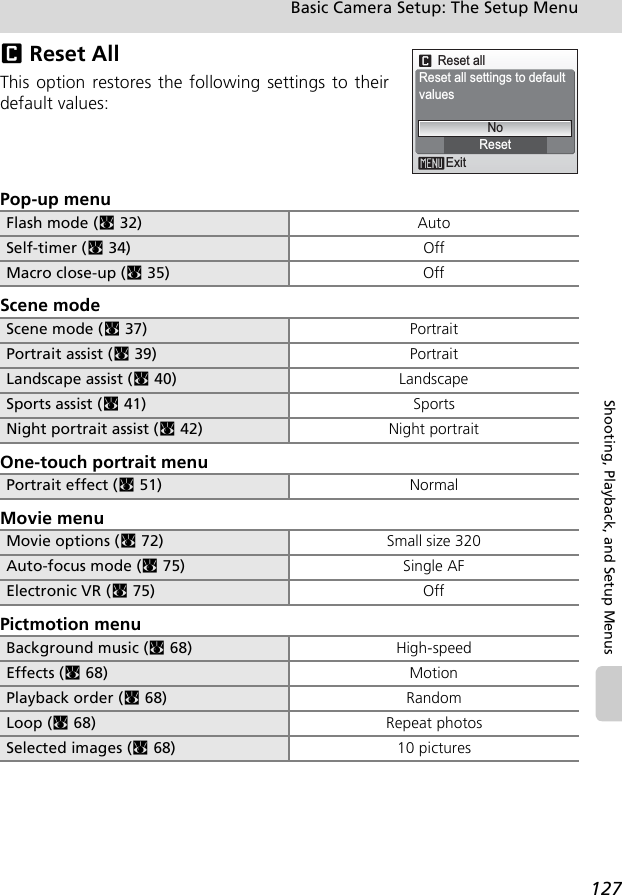
![129Basic Camera Setup: The Setup MenuShooting, Playback, and Setup Menus• Choosing [Reset all] also clears the current file number (c160) from the memory. Num-bering will continue from the lowest number available. To reset file numbering to “0001”,delete all pictures (c111) before selecting [Reset all].• Settings for [Date] (c117), [Date counter] (c122), [Language] (c126), [USB] (c126),and [Video mode] (c126) will remain unaffected even if [Reset all] is performed.B Firmware VersionView the current camera firmware version. The 12-digit number displayed below the firmwareversion is the camera’s MAC address.BackXX-XX-XX-XX-XX-XXMAC addressCOOLPIX S7c Ver. X.XMAC address](https://usermanual.wiki/Nikon/2143EB.User-Manual/User-Guide-700695-Page-143.png)
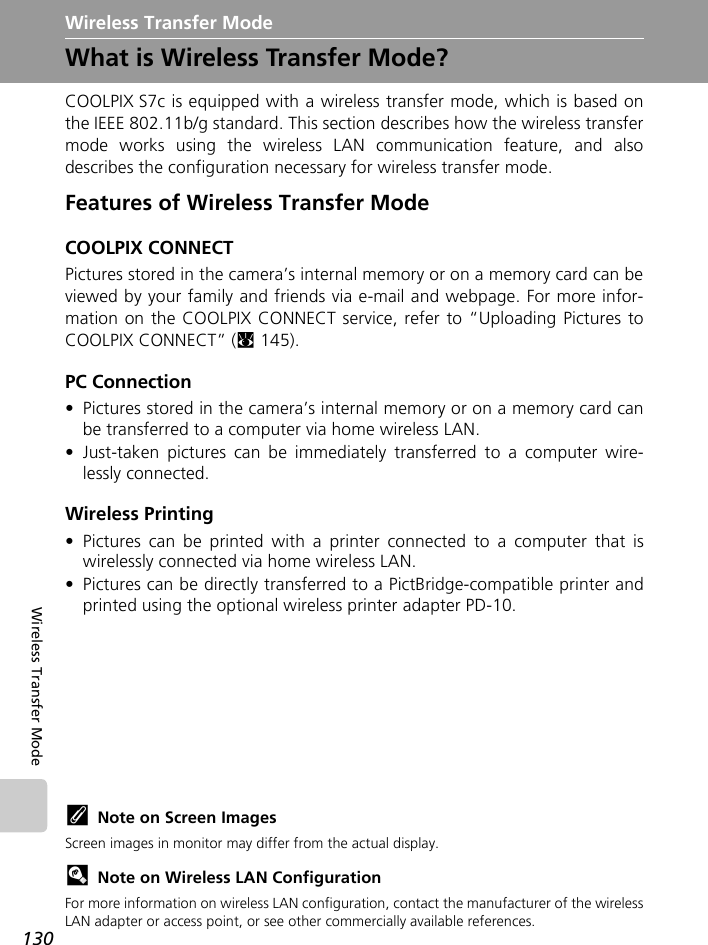
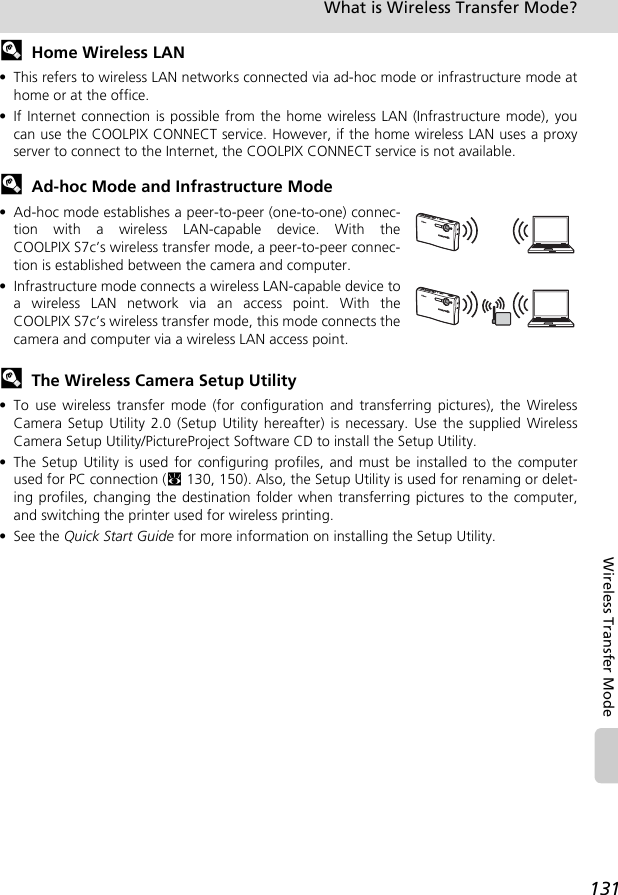
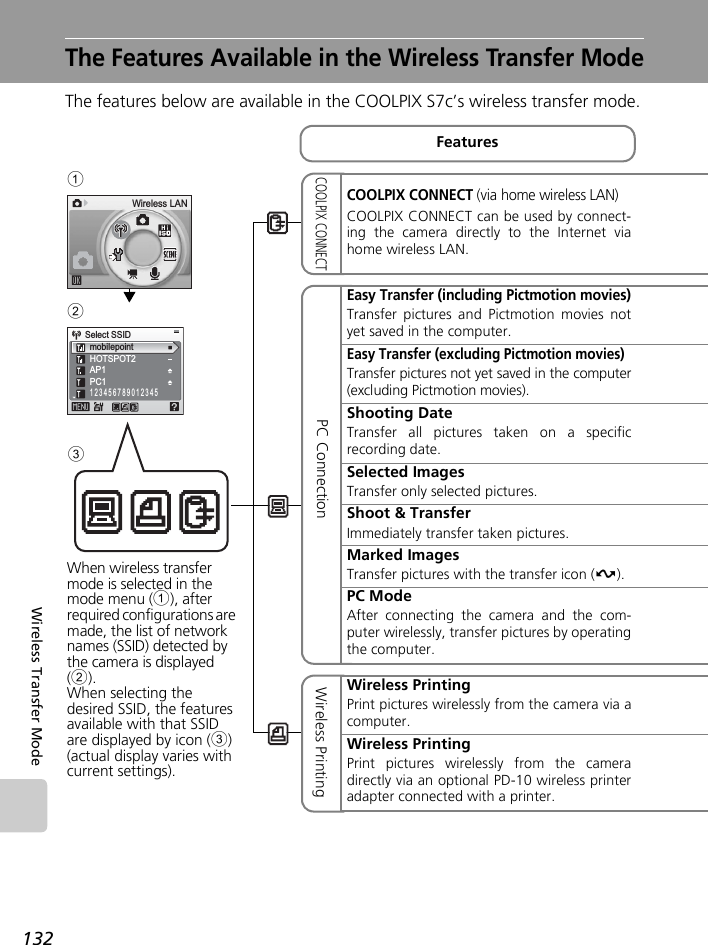

![134Wireless Transfer ModeFor Connection via Home Wireless LAN Connect to a home wireless LAN wirelessly and make necessary configura-tions for connecting to COOLPIX CONNECT (via home wireless LAN), con-necting to a computer wirelessly, and for wireless printing.Configuration ProcedureThis section gives a brief description about the procedure for creating a wire-less connection. See “Configuring the Camera” (c136) for details. 1Prepare a wireless LAN-capable computer.3Check that the USB setting is correctly selected in the cameraand the battery is not exhausted, and turn off the camera.4Connect the computer and camera using the USB cable.5Start the Setup Utility. 7Choose the profile type [Add Profile at Home WirelessLAN]. 2Install the Setup Utility to the computer.6Choose the action [Add profiles].](https://usermanual.wiki/Nikon/2143EB.User-Manual/User-Guide-700695-Page-148.png)
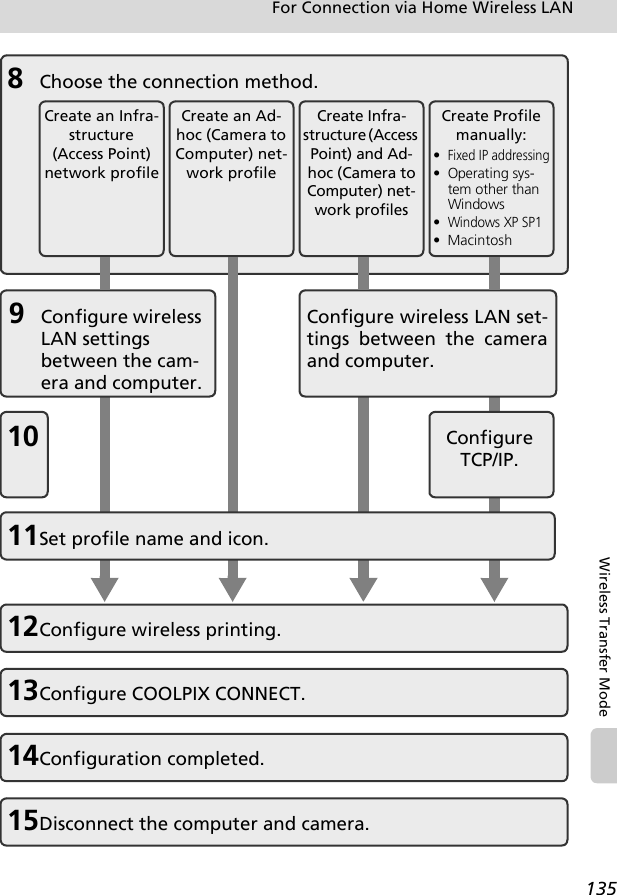
![136For Connection via Home Wireless LANWireless Transfer ModeConfiguring the CameraThis section describes the “Configuration Procedure” (c134) in detail. • To display more information on each step, click [Help]. To cancel configur-ing a profile device, click [Cancel].1Prepare a wireless LAN-capable computer.2Install the Setup Utility to the computer. Check whether the Setup Utility (c131) is installed on the computer used forconfiguring. 3Check that the USB setting is correctly selected in the cameraand the battery is not exhausted, and turn off the camera. Check the following before starting the Setup Utility on the computer. Afterchecking is complete, turn off the camera.• [Interface] > [USB] (c126) is set to [PTP].• The battery is fully charged or the supplied ACadapter is connected. If the battery runs out whileconfiguring a profile, settings will not be enteredcorrectly.4Connect the computer and camera using the USB cable.Place the camera in the COOL-STATION and connect to the computer using thesupplied USB cable. Then, turn on the camera.USBExitPTPMass storage](https://usermanual.wiki/Nikon/2143EB.User-Manual/User-Guide-700695-Page-150.png)
![137For Connection via Home Wireless LANWireless Transfer Mode5Start the Setup Utility.For the initial installation run, the Setup Utility will launch automatically wheninstallation is complete.From the second time, start the Setup Utility by following the procedure below:Windows: Start the computer and select [Start] > [All programs] > [WirelessCamera Setup Utility] > [Wireless Camera Setup Utility].Macintosh: Start the computer and open [Applications] > [Nikon Software] >[Wireless Camera Setup Utility] folder. Then double-click the [NkWire-lessSetup] icon.• Click [Next] after checking the contents shown inthe screen at right.6Choose the action [Add profiles].7Choose the profile type [Add Profile atHome Wireless LAN]. You can start configuration of infrastructure mode orad-hoc mode for the computer connected to the wire-less LAN.Set up for Public Wireless LAN is available only forT-Mobile HotSpot in United States.](https://usermanual.wiki/Nikon/2143EB.User-Manual/User-Guide-700695-Page-151.png)
![138For Connection via Home Wireless LANWireless Transfer Mode8Choose the connection method.Available profile types (see the list below) for yourwireless LAN will be displayed on screen. Select thedesired profile type and click [Next].When selecting [Create an Ad-hoc (Camera to Com-puter) network profile], proceed to step 11 (c139).If multiple wireless LAN devices are connected to thecomputer, choose a device from the pop-up menu.Select the desired configuration type from the optionslisted. Options displayed will differ depending on theselected wireless device.jNote on Choosing [Create an Ad-hoc (Camera to Computer) network profile] on Windows XP• When configuring a profile device using an ad-hoc network between the camera and com-puter, the computer’s fixed IP address (manually entered IP address) will be automaticallyset to “169.254.x.x”. When adding an infrastructure network later, set the computer toautomatically obtain an IP address. For the added network profiles, configure wireless set-tings between the camera and computer again. • [Create an Ad-hoc (Camera to Computer) network profile] cannot be selected if an infra-structure network has already been set up in your computer, or the fixed IP address is not“169.254.x.x”.Type of Profile DescriptionsInfrastructure (Access Point) network profileFor use when connecting the camera and com-puter via an infrastructure network. An infrastruc-ture network must be configured beforehand.Ad-hoc (Camera to Computer) network profileFor use when establishing a one-to-one connec-tion (when a wireless LAN access point is not avail-able) between the camera and computer.Infrastructure (Access Point) and Ad-hoc (Camera to Com-puter) network profilesRecommended for users of multiple wireless net-work profiles.Create Profile manuallyFor use with manual settings. Only [Create Profile manually] is available when:- configuration for wireless LAN network is not performed using the wireless network setting function (Zero Config) for Windows XP- using a Windows XP SP1 or Mac OS X operating system- your computer has a fixed IP address](https://usermanual.wiki/Nikon/2143EB.User-Manual/User-Guide-700695-Page-152.png)
![139For Connection via Home Wireless LANWireless Transfer Mode9Enter network settings.Enter the settings for connecting the camera and com-puter via a wireless network.When selecting [Create an Infrastructure (AccessPoint) network profile] or [Create Infrastructure(Access Point) and Ad-hoc (Camera to Computer) net-work profiles] in step 8, select a network name fromthe [Network Name (SSID)] list. This name will be usedwhen connecting the camera and computer.When selecting [Create Profile manually] in step 8,manually enter the same values set in the computer for all items except those thatare automatically provided. See “Settings for the Setup Utility” for reference(c141). When settings are complete, click [Next]. 10Configure TCP/IP.When selecting [Create Profile manually] in step 8, orif the screen in step 8 does not appear, manually enterthe address type and IP address, referring to thoseused in “Settings for the Setup Utility” (c141). When settings are complete, click [Next].11Set profile name and icon.Enter a profile name (up to 16 single-byte alphanu-meric characters).The entered profile name will appear in the selectionlist for the profile device (c144). We recommendselecting a name that will let you easily tell devicesapart, such as “Desktop-Home”.When settings are complete, click [Next].](https://usermanual.wiki/Nikon/2143EB.User-Manual/User-Guide-700695-Page-153.png)
![140For Connection via Home Wireless LANWireless Transfer Mode12Configure wireless printing.If a printer is connected to the computer, check [Cre-ate Wireless Printing Profile] and select the printer tobe used for wireless printing (c158).Enter a profile name (up to 16 single-byte alphanu-meric characters), select a printer, and click [Next].If no printers are connected to the computer, click[Next] without selecting a printer.13Configure COOLPIX CONNECT. If using COOLPIX CONNECT, enter the profile name for COOLPIX CONNECT.• Check [Create a COOLPIX CONNECT Profile] andenter a profile name (up to 16 single byte alphanu-merical characters) and click [Next].14Settings are complete. Select [Finish wizard] and click [Next]. 15Disconnect the computer and camera. Turn off the camera before removing it from the COOL-STATION.](https://usermanual.wiki/Nikon/2143EB.User-Manual/User-Guide-700695-Page-154.png)
![141For Connection via Home Wireless LANWireless Transfer ModeSettings for the Setup Utility When configuring a profile using the Setup Utility, refer to the description foreach item listed below. Settings are the same for Windows and Macintosh.* Mandatory itemsSettings DescriptionsNetwork name (SSID)*Enter the network ID for the computer. Choose a value dis-played. If multiple values are displayed, select one.Network type*Select [Ad-hoc] or [Infrastructure]. The camera and computer must be set to the same configuration.• Ad-hoc mode: This mode establishes a peer-to-peer (one-to-one) connection between the camera and computer.• Infrastructure mode: This mode connects the camera and computer via a wireless LAN access point.Channel Mandatory if [Ad-hoc] is selected for [Network type]. Select the same channel (1 to 11) set in the computer.AuthenticationSelect [Open System], [Shared Key], [WPA-PSK]* or [WPA2-PSK]* (* [Infrastructure] only). Select the same method set in the computer or access point.EncryptionAvailable methods for the camera differ depending on the selected authentication method (see below). Select the same method set in the computer or access point.Encryption key Enter the security key set in the computer or access point (unnecessary when [Encryption] is set to [None]).Key indexWhen [Encryption] is set to [WEP], and infrastructure mode is used, select the same key index set in the computer or access point (unnecessary when [Encryption] is set to [None], [TKIP] or [AES]). The default setting is [1].Selected authentica-tion methodAvailable security method(s) for the camera[Open System] [None], [WEP][Shared Key] [WEP][WPA-PSK] [TKIP][WPA2-PSK] [AES]](https://usermanual.wiki/Nikon/2143EB.User-Manual/User-Guide-700695-Page-155.png)
![142For Connection via Home Wireless LANWireless Transfer ModejWireless LAN ChannelsWireless LAN channels for the COOLPIX S7c are from 1 to 11. Make sure that the channel foryour computer’s wireless LAN device is set to a channel between 1 and 11 (inclusive).jMAC Address FilteringWhen MAC address filtering is enabled, only devices with an authorized MAC address canaccess the wireless LAN. Check the camera’s MAC address in [Firmware Version] of the setupmenu (c129) and add it to the authorized list.jPort NumberFor wireless communication, the UDP port number is “5353” and the TCP port number is“15740”. If the computer or access point has a firewall, the firewall settings may need to bechanged.lNotes on Profile Devices• Configure profiles for each computer using the Setup Utility and install the Setup Utility toeach computer to transfer (receive) pictures from the camera remotely. • You can configure a maximum of nine profile devices (computers, printers connected to acomputer, the optional PD-10 wireless printer adapter, etc.) in the camera. If nine havealready been configured and you want to add a new one, delete an unneeded profiledevice using the Setup Utility.• Start the Setup Utility while the camera is connected to a computer via USB cable, and youcan rename or delete profiles. Choose [Rename/Delete profiles] in the action selectionscreen of the Setup Utility and click [Next]. Then choose a profile you wish to rename ordelete and click [Rename] or [Delete]. You can also confirm the details of a profile by click-ing [View Profile]. Choose [Reset camera] in the action selection screen to delete all profiles(all address book contents are also deleted).Configure* Select [Auto] (default setting) or [Manual] for the method of setting the camera IP address.IP Address When [Configure] is set to [Manual], enter the IP address for the camera.Settings Descriptions](https://usermanual.wiki/Nikon/2143EB.User-Manual/User-Guide-700695-Page-156.png)
![143Wireless Transfer ModeTransferring PicturesEstablishing a Wireless Connection1Enter wireless transfer mode by pressingD in shooting mode, selecting n (usethe rotary multi selector), and thenpressing d.The wireless LAN start-up screen will be displayed andthe camera will search for available SSIDs.2Choose the SSID and press d.The SSIDs are listed in order of radio field strength.Wireless connection has not yet been established.The left icon of each SSID is indicated in red whenoutside the network area.The right icon indicates the type of the profile regis-tered to each SSID:Z (profiles with home wireless LAN information), -- (profiles with no information)Connection is attempted with the selected network (SSID) when picture transfer isattempted.3Choose the desired transfer or printingmethod and press d.When selecting [COOLPIX CONNECT], see “Upload-ing Pictures to COOLPIX CONNECT” (c145).When selecting [Wireless Printing], see “Printing Pic-tures (Wireless Printing)” (c158).When selecting other options, see “Transferring Pic-tures to a Computer (PC Connection)” (c149).If no operations are performed about three minutes, auto power off will takeeffect and the monitor turns off. Although auto power off will also take effectduring wireless transfer mode, transfer will continue.Wireless LANCancelSearching for SSIDSelect SSIDMy NetworkHOTSPOTFunction selection menuCOOLPIX CONNECTEasy Transfer (PM)Easy Trans. (no PM)Shooting dateSelected ImagesBack](https://usermanual.wiki/Nikon/2143EB.User-Manual/User-Guide-700695-Page-157.png)
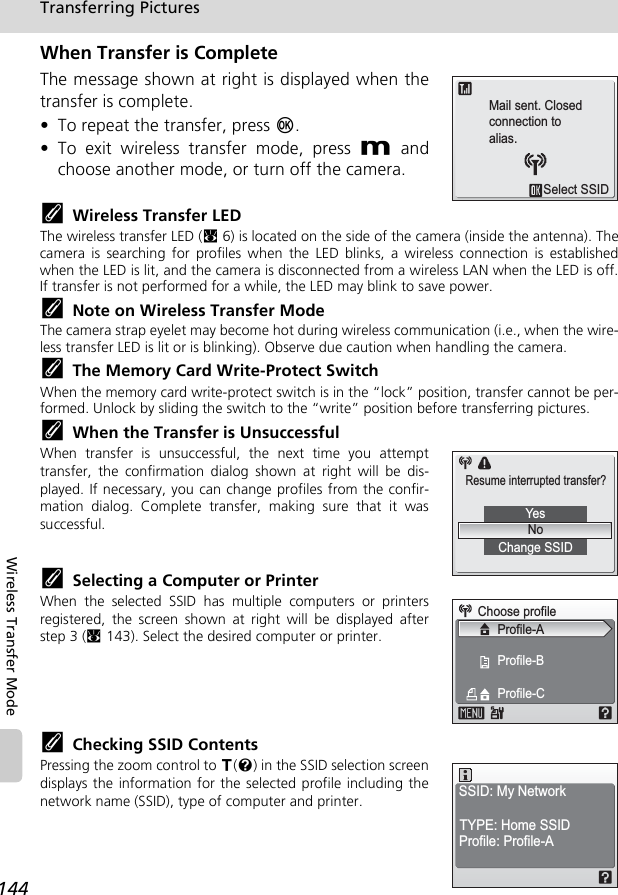
![145Transferring PicturesWireless Transfer ModeUploading Pictures to COOLPIX CONNECTTo use COOLPIX CONNECT, perform the following procedures.1Choose [COOLPIX CONNECT] in step 3 of“Establishing a Wireless Connection”(c143) and press d.2Enter your e-mail address correctly.Choose [Input] in the sender information entry screenand press d.Enter your e-mail correctly in the address screen andpress the shutter-release button. Then enter your(sender) name for the notification e-mail to recipientsand press the shutter-release button. For informationon how to enter characters, see “Entering Characterson the Camera” (c148).Function selection menuCOOLPIX CONNECTEasy Transfer (PM)Easy Trans. (no PM)Shooting dateSelected ImagesBackEnter your alias andemail addressInputCancelEnter sender infoEmailConfirmBack Deletexxx xxx. xxx@6411](https://usermanual.wiki/Nikon/2143EB.User-Manual/User-Guide-700695-Page-159.png)
![146Transferring PicturesWireless Transfer Mode3Choose [All images] or [Choose date]and press d.When choosing [All images], select the desired pic-tures (up to 30) and press d to mark. Then press theshutter-release button to apply selection.When choosing [Choose date], select the shootingdate and press d to mark. Then press the shutter-release button.Select the desired pictures (up to 30) and press d tomark. Then press the shutter-release button to applyselection.4Choose the size for the pictures to betransferred and press the shutter releasebutton.Choose the size for the pictures to upload and pressd to mark.Photoprint 1,600 × 1,200 pixelsPC size 1,024 × 768 pixelsTV size 640 × 480 pixelsAll imagesChoose datePicture selectionSelect imageConfirmON/OFFBack5/30Choose dateConfirmimages totalON/OFF10.10.2006 325509.10.200608.10.2006BackChoose sizePhotoprintPC sizeTV size](https://usermanual.wiki/Nikon/2143EB.User-Manual/User-Guide-700695-Page-160.png)
![147Transferring PicturesWireless Transfer Mode5Choose recipient e-mail address andpress the shutter-release button.Choose e-mail address and press d to mark.Choose [New] and press d to add recipients. Enter e-mail address correctly in the address screen and pressthe shutter-release button. For information on how toenter characters, see “Entering Characters on theCamera” (c148).6Choose [Yes] and press d.The screens for connecting to the access point and connecting to the wireless LANwill be displayed in order. To cancel transfer, press d.When the transfer is complete, the message shown atright will be displayed.Choose addressNewConfirmON/OFFBackxxx xxx. xxx@EmailConfirmBack Deletexxx xxx. xxx@6411Send mail?YesNoSend mailCancelConnecting to access pointConnecting to serverMail sent. Closedconnection toalias.Select SSID](https://usermanual.wiki/Nikon/2143EB.User-Manual/User-Guide-700695-Page-161.png)
![148Transferring PicturesWireless Transfer ModejEntering Characters on the CameraWhen using COOLPIX CONNECT service, you can set profileswith the camera, without using the Setup Utility. From thecamera you can enter characters for information such as thee-mail address (up to 64) and its (sender) name (up to 16), userID and password.• Rotate the rotary multi selector clockwise to enter characters(A to Z) in alphabetical order, or counterclockwise to enter inreverse order. • Press the rotary multi selector J to move the cursor right.• Press the rotary multi selector I to move the cursor left. Press T to delete all the charac-ters entered up to the cursor.•Press d to change the character type in the following order: uppercase characters →lowercase characters → numbers → symbols → uppercase characters, and so on.• Press the shutter-release button to apply selection and return to the previous screen. • Press the zoom control to v (l) to preview the enteredcharacters. Press m to return to the previous screen. lEditing Recipient’s E-mail Address• Using the Setup Utility to enter or edit e-mail addresses is easier. You can also enter or edita nickname for an e-mail address using the Setup Utility, making it easier to choose desti-nations on the camera.• To edit nicknames and e-mail addresses, connect the computer and camera, turn on thecamera, and start the Setup Utility. Then, choose [Edit address book] in the action selectionscreen, and click [Next].• Choose [Reset camera] in the action selection screen to clear all address book contents (allprofiles are also deleted).WEP keyConfirmBack DeleteABCDEFGHIJKLMNOPQRS2626WEP keyConfirmBack DeleteABCDEFGHIJKLMNOPQABCDEF2626](https://usermanual.wiki/Nikon/2143EB.User-Manual/User-Guide-700695-Page-162.png)
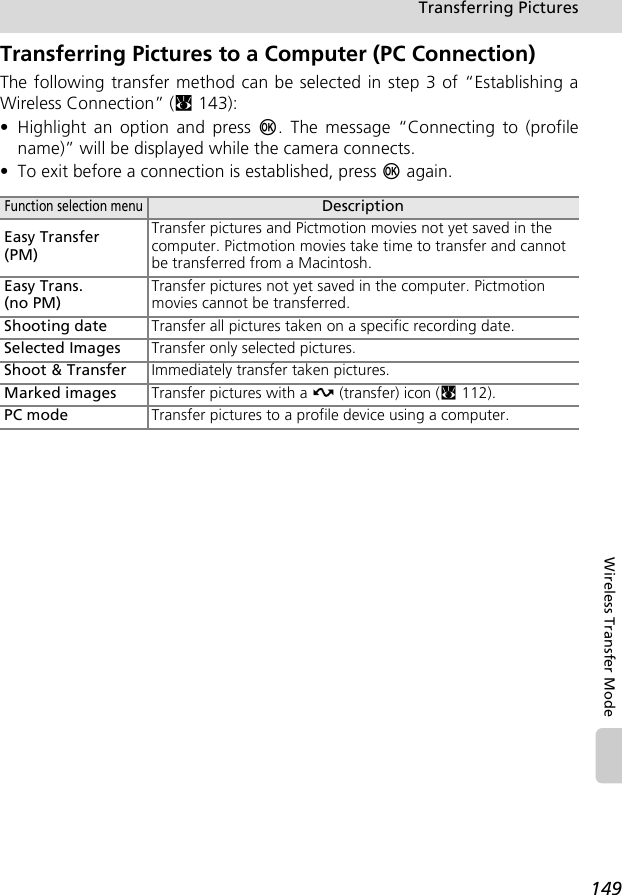
![150Transferring PicturesWireless Transfer ModeTransferring Pictures Not Yet Saved on a Computer -Easy Transfer1Use the rotary multi selector to choose[Easy Transfer (PM)] or [Easy Trans. (noPM)] in step 3 of “Establishing a WirelessConnection” (c143) and press d.When multiple computers are set as profiles for theinfrastructure network, the profile selection screen isdisplayed. Choose a profile and press d.2Transfer pictures.Pictures not yet saved on the computer will be trans-ferred after the camera and computer are connected.3When transfer is complete, press d toreturn to the SSID selection menu.To end wireless transfer mode, see “When Transfer isComplete” (c144).Function selection menuCOOLPIX CONNECTEasy Transfer (PM)Easy Trans. (no PM)Shooting dateSelected ImagesBackCancelMy NetworkConnecting toProfile-ACancel0002 / 0004Transferring imagesto computerSelect SSIDTransfer completed.Connection terminated.](https://usermanual.wiki/Nikon/2143EB.User-Manual/User-Guide-700695-Page-164.png)
![151Transferring PicturesWireless Transfer ModeTransferring Pictures Taken on Selected Date - ShootingDate1Use the rotary multi selector to choose[Shooting date] in step 3 of “Establishinga Wireless Connection” (c143) andpress d.When multiple computers are set as profiles for theinfrastructure network, the profile selection screen isdisplayed. Choose a profile and press d.2Select the shooting date.The shooting date menu will be displayed.• Select the desired shooting date and press J toapply selection. Multiple shooting dates can beselected.• The selected shooting date will be marked with then (wireless transfer) icon. Press J again to cancelthe selection (the n icon will disappear).• Press d to complete selection.3Transfer pictures taken on the selecteddates.4When transfer is complete, press d toreturn to the SSID selection menu.To end wireless transfer mode, see “When Transfer isComplete” (c144).jNote on Transferring Pictures with [Shooting Date]Pictures taken without the date and time set (c20, 117) cannot be chosen for transfer with[Shooting date].Function selection menuCOOLPIX CONNECTEasy Transfer (PM)Easy Trans. (no PM)Shooting dateSelected ImagesBackShooting dateConfirmON/OFF10.10.2006 32509.10.200608.10.2006Endimages total5CancelMy NetworkConnecting toProfile-ASelect SSIDTransfer completed.Connection terminated.](https://usermanual.wiki/Nikon/2143EB.User-Manual/User-Guide-700695-Page-165.png)
![152Transferring PicturesWireless Transfer ModeTransferring Selected Pictures - Selected Images1Use the rotary multi selector to choose[Selected Images] in step 3 of “Establish-ing a Wireless Connection” (c143) andpress d.When multiple computers are set as profiles for theinfrastructure network, the profile selection screen isdisplayed. Choose a profile and press d.2Select the pictures to transfer.The selected images menu will be displayed.• Select the pictures to transfer and press G to applyselection. Multiple pictures can be selected.• The selected picture will be marked with the nicon. Press H to cancel the selection (the n iconwill disappear).• Press d to complete selection.3Transfer the selected pictures.4When transfer is complete, press d toreturn to the SSID selection menu.To end wireless transfer mode, see “When Transfer isComplete” (c144).jNote on the n iconThe n icon displayed in step 2 will disappear once transfer is complete (picture selection iscleared each time transfer is completed).Function selection menuCOOLPIX CONNECTEasy Transfer (PM)Easy Trans. (no PM)Shooting dateSelected ImagesBackSelected ImagesEnd4301.12.200612:00CancelMy NetworkConnecting toProfile-ASelect SSIDTransfer completed.Connection terminated.](https://usermanual.wiki/Nikon/2143EB.User-Manual/User-Guide-700695-Page-166.png)
![153Transferring PicturesWireless Transfer ModeImmediately Transferring Pictures Taken - Shoot &Transfer 1Use the rotary multi selector to choose[Shoot & Transfer] in step 3 of “Establish-ing a Wireless Connection” (c143) andpress d.When multiple computers are set as profiles for theinfrastructure network, the profile selection screen isdisplayed. Choose a profile and press d.2Enter shooting mode.The shooting screen will be displayed.• The camera enters L (auto) mode automatically.• Press m in the shooting screen, and the shootand transfer menu will be displayed.3Take a picture.The just-taken picture will be transferred to the com-puter. The camera returns to shooting mode (screenin step 2) after transfer is complete. Note that pic-tures cannot be taken while pictures are being trans-ferred.• If a confirmation dialog is displayed, select [Yes] totransfer the picture. To cancel the transfer, select [No].Function selection menuShoot & TransferMarked imagesPC modeWireless PrintingBack88MMMCancelTransferring imagesto computer](https://usermanual.wiki/Nikon/2143EB.User-Manual/User-Guide-700695-Page-167.png)
![154Transferring PicturesWireless Transfer ModelChanging Settings for Shoot and TransferPress m in the shooting screen (for shoot and transfer) and the shoot and transfer menuwill be displayed.lSaving PicturesIf a communication error occurs while performing [Shoot & Transfer] with [Save Images] set to[Off], pictures taken are not saved. When taking pictures for important occasions, setting[Save Images] to [On] is recommended. Confirm Transfer Off (default) Immediately transfers pictures taken to the com-puter.OnDisplays a confirmation dialog prompting whether to transfer pictures taken to the com-puter each time a picture is taken.Save Images Off (default)Saves the picture taken only on the computer and not to the internal memory or on the memory card.On Saves the picture taken to the internal memory or on the memory card.Image Mode c97White Balance c99Exp. +/– c101ISO Sensitivity c105Color Options c105AF Area Mode c106Shoot & TransferConfirm TransferSave ImagesImage modeWhite balanceExp. +/-ExitShoot & TransferISO sensitivityColor optionsAF area modeExit](https://usermanual.wiki/Nikon/2143EB.User-Manual/User-Guide-700695-Page-168.png)
![155Transferring PicturesWireless Transfer ModeTransferring Pictures Marked with the Transfer Icon -Marked Images1Use the rotary multi selector to choose[Marked images] in step 3 of “Establish-ing a Wireless Connection” (c143) andpress d.2Transfer pictures.Pictures marked with the g (transfer) icon (c112)will be transferred.3When transfer is complete, press d toreturn to the SSID selection menu.To end wireless transfer mode, see “When Transfer isComplete” (c144).Function selection menuShoot & TransferMarked imagesPC modeWireless PrintingBackCancelMy NetworkConnecting toProfile-ASelect SSIDTransfer completed.Connection terminated.](https://usermanual.wiki/Nikon/2143EB.User-Manual/User-Guide-700695-Page-169.png)
![156Transferring PicturesWireless Transfer ModeTransferring Pictures Using a Computer - PC Mode1Use the rotary multi selector to choose[PC mode] in step 3 of “Establishing aWireless Connection” (c143) and pressd.When multiple computers are set as profiles for theinfrastructure network, the profile selection screen isdisplayed. Choose a profile and press d.2Connect the camera to a computer.The camera and computer will be connected.• When the selected computer has PictureProjectinstalled, it will be launched automatically. Totransfer pictures, click the [Transfer] button inPictureProject Transfer. See the PictureProject Ref-erence Manual (on CD) for details.• When the selected computer does not have PictureProject installed, drag anddrop pictures from the camera displayed on the computer.• Pictmotion movies can be transferred (Windows only).Function selection menuShoot & TransferMarked imagesPC modeWireless PrintingBackSelect SSIDMy NetworkConnected toProfile-A](https://usermanual.wiki/Nikon/2143EB.User-Manual/User-Guide-700695-Page-170.png)
![157Transferring PicturesWireless Transfer ModejMessage Displayed During TransferThe message shown at right is displayed in the monitor duringpicture transfer. The antenna icon indicates signal strength(5-levels). The icon changes to red when outside the networkarea. When signal strength is poor, remove any obstaclesbetween the camera antenna and computer (or access point).To cancel the current transfer, press d.jNote on the Camera’s d (E) ButtonPictures marked with the E icon cannot be transferred in wireless transfer mode using thecamera’s d (E) button.lSave Location of Transferred Images• Pictures transferred to the computer are saved to the following location.Windows XP: [Wireless Transfer] folder in [My Pictures] folderMacintosh: [Wireless Transfer] folder in [Picture] folder• A destination folder can be changed using the Setup Utility. Choose [Select destinationfolder] in the screen in step 6 (c137) and choose a destination folder. Connectionbetween the camera and a computer is not necessary for this operation.• When pictures are transferred wirelessly to a computer that has PictureProject installed, inmodes other than [PC mode], PictureProject automatically starts and the transferred pic-tures will be displayed. Note that the save location can be changed.• For computers without PictureProject installed, Explorer (for Windows) or Finder (for Macin-tosh) starts and the save location will be displayed. Note that the save location cannot bechanged.• If the camera is connected to a computer in [PC mode] without PictureProject installed,drag and drop pictures from the camera icon or drive displayed on the computer to thedesired save location.Cancel0002 / 0004Transferring imagesto computer](https://usermanual.wiki/Nikon/2143EB.User-Manual/User-Guide-700695-Page-171.png)
![158Transferring PicturesWireless Transfer ModePrinting Pictures (Wireless Printing)After selecting a profile or selecting [Function selec-tion menu] > [Wireless Printing], press d. The wire-less printing menu is displayed. To select multiple pictures and print, perform thesame procedures as for direct printing (c90).lSwitching the PrinterWhen using multiple printers, the printer can be switched by using the Setup Utility. Start theSetup Utility and choose [Select printer] in the action selection screen. Connecting the com-puter and camera is not necessary for switching the printer.lThe PD-10 Wireless Printer AdapterTo print pictures without connecting the printer to a computer, connect the PD-10 wirelessprinter adapter (available separately) (c133) to any PictBridge-compatible printer with a typeA (flat) USB connector.When printing pictures via the PD-10 for the first time, display the profile list by following theprocedures in “Establishing a Wireless Connection” (c143), and then follow the stepsbelow:1. Connect the PD-10 to the printer, turn on the printer and press the START button on thePD-10.2. Make sure that the LINK lamp on the PD-10 has turned greenish-yellow.3. Press the camera’s m button. The message “Connecting to wireless printer adapter” willbe displayed. Set up profiles on the camera and PD-10 as described in the PD-10 instructionmanual, starting from step 3. Once the profile is stored in the camera, pictures can be printed directly by selecting the PD-10 in the profile list and pressing d. For more information, consult the PD-10 instruction manual.Wireless PrintingPrint all imagesPrint selectionPaper sizeDPOF printing](https://usermanual.wiki/Nikon/2143EB.User-Manual/User-Guide-700695-Page-172.png)
![161Image File and Folder NamesTechnical Notes• Files copied using [Copy] > [Selected images] or [Copy sound files] >[Selected files] are copied to the current folder, where they are assignednew file numbers in ascending order starting from the largest file numberin memory. [Copy] > [All images] and [Copy sound files] > [Selected files]copy all folders from the source medium; file names do not change butnew folder numbers are assigned in ascending order starting from thelargest folder number on the destination medium (c113).• Pictmotion movies (c65) are stored under the “NKSS” folder in foldersnamed with a three-digit folder number followed by “PRJCT” (e.g.,“101PRJCT”). Each folder contains the picture and sound files for a singlePictmotion movie.• Folders can hold up to 200 pictures; if a picture is taken when the currentfolder contains 200 pictures, a new folder will be created by adding one tothe current folder number. If a picture is taken when the current folder isnumbered 999 and contains 200 pictures or a picture numbered 9999, nofurther pictures can be taken until the medium is formatted (c125) or anew memory card inserted.• Files for pictures taken when [Off] is selected for [Shoot & Transfer](c153) > [Save Images] in wireless transfer mode are named with thefour-digit identifier “STCN” and four-sequence numbers (e.g.,“STCN0001.JPG”).](https://usermanual.wiki/Nikon/2143EB.User-Manual/User-Guide-700695-Page-175.png)
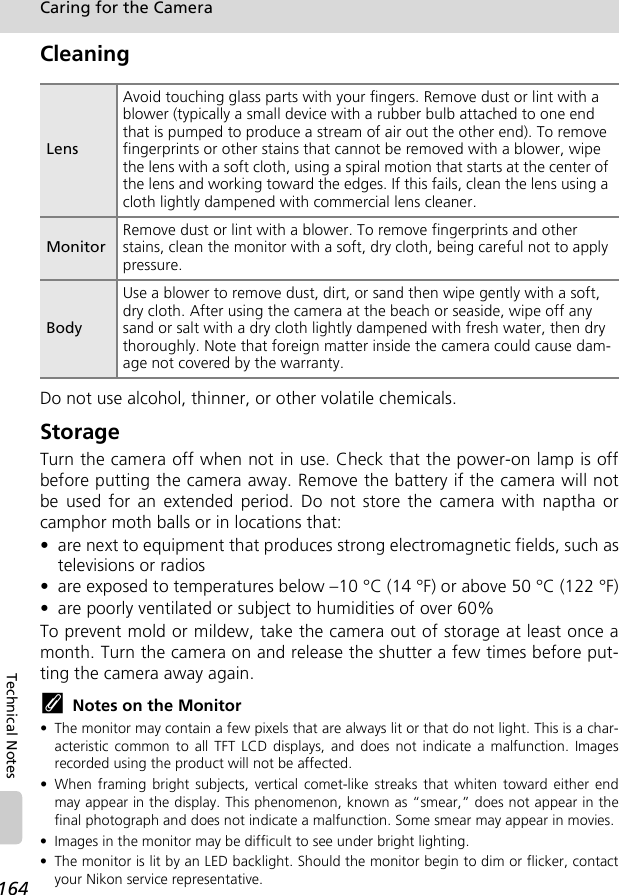
![165Technical NotesError MessagesThe following table lists the error messages and other warnings displayed inthe monitor, as well as the solutions for dealing with them.Display Problem Solution cS (blinks) Clock not set. Set clock. 117wBattery running low. Prepare to charge or change battery.14Warning!Battery exhaustedwBattery exhausted. Charge or change bat-tery.14p (● blinks red) Camera cannot focus. • Refocus.• Use focus lock.28, 29,106Warning!!please wait for the camera to finish recordingyCamera cannot perform other operations until recording is complete.Message clears from dis-play automatically when recording is complete.–Memory card is write protected.xWrite-protect switch is in “lock” position.Slide write-protect to “write” position.23No card present Pictmotion mode selected when no mem-ory card is inserted.Insert memory card. 22This card cannot be usedxError accessing memory card.• Use approved card.• Check that connectors are clean.• Confirm that memory card is correctly inserted.1592222Warning!This card cannot be readOCard is not format-tedOFormatNoMemory card has not been formatted for use in camera.Choose [Format] and press d to format card, or turn camera off and replace card.23](https://usermanual.wiki/Nikon/2143EB.User-Manual/User-Guide-700695-Page-179.png)
![166Error MessagesTechnical NotesOut of memoryM or OMemory card is full. •Choose smaller image size.• Delete pictures or sound files.•Insert new memory card.•Remove memory card and use internal memory.9723, 76, 802223Image cannot be savedM or OError occurred while recording picture.Format internal memory or memory card.125Camera has run out of file numbers.• Insert new memory card.• Format internal mem-ory or memory card.22125Cannot edit selected pic-ture.Select picture that sup-ports crop D-Lighting or small picture.54Picture cannot be used for welcome screen.Choose picture 640 × 480 pixels or larger.–Cannot copy picture. Delete pictures from des-tination.111Sound file cannot be saved M or OCamera has run out of file numbers.Select [Reset all] after either inserting new memory card or format-ting internal memory or memory card.22,125,127Image has already been modified. D-Lighting cannot be used.uImage cannot be enhanced using D-Lighting.Copies from D-Lighting, crop, or small picture option cannot be adjusted using D-Lighting.56Cannot record movie.Time out error while recording movie.Choose memory card with faster write speed.159Memory contains no imagesrNo pictures available for playback.––No sound file. No sound file available for playback.––Display Problem Solution c](https://usermanual.wiki/Nikon/2143EB.User-Manual/User-Guide-700695-Page-180.png)

![168Error MessagesTechnical NotesThis image has been retouched. Cannot retouch to reduce blur.Image cannot be com-pensated using vibration reduction.Copies from small pic-ture, crop, or vibration reduction option cannot be adjusted using vibra-tion reduction.57Communications errorEUSB cable disconnected during transfer or print-ing.If PictureProject displays error, click [OK] to exit. Resume operation after turning camera off and reconnecting cable.83, 88[USB] option incorrect. Choose correct [USB] option.83, 84PictureProject did not start.––No images are marked for transfersNo pictures selected for transfer.Select pictures for trans-fer in the playback menu and try again.86,112Transfer errorETransfer error. • Check battery level.• Check that USB cable is connected.2483System erroruError has occurred in camera’s internal cir-cuitry.Turn camera off, remove and reinsert battery, and turn camera on. If error persists, contact retailer or Nikon representative.17, 24Printer error check printer statusuRunning out of ink or printer error.Check printer. After checking the ink or solv-ing the problem, select [Resume] and press d to resume printing. (Depending on the error, [Resume] may not be available.)–Display Problem Solution c](https://usermanual.wiki/Nikon/2143EB.User-Manual/User-Guide-700695-Page-182.png)
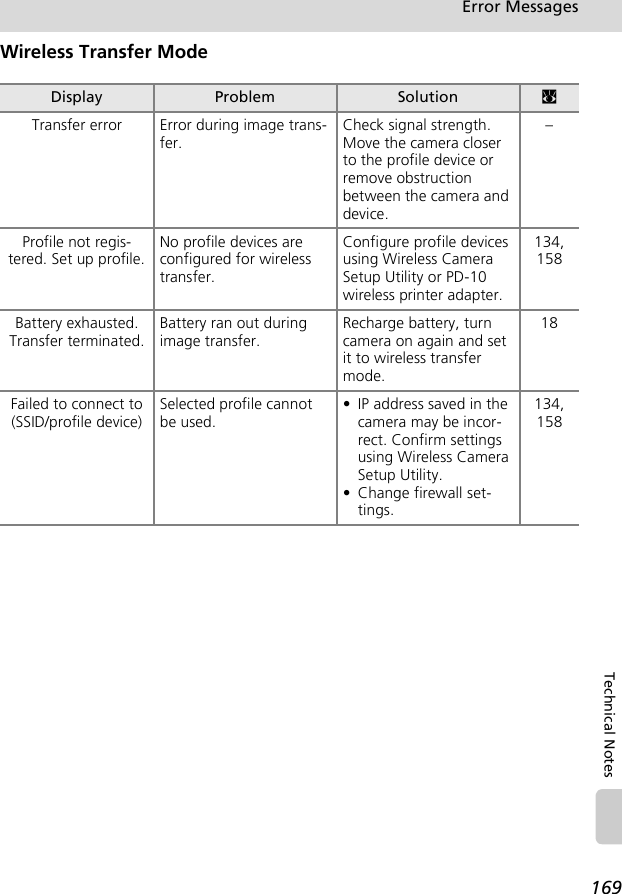
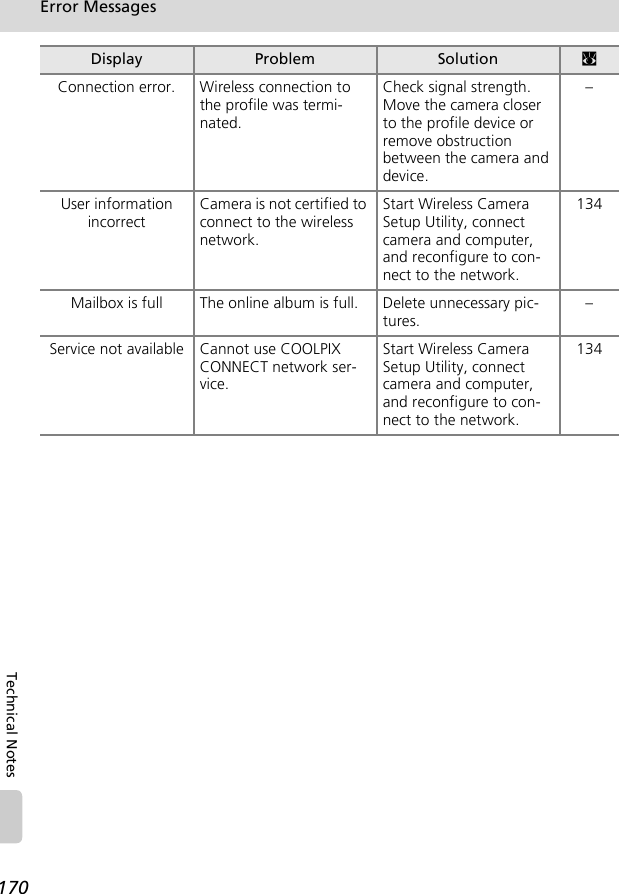
![171Technical NotesTroubleshootingIf the camera fails to function as expected, check the list of common prob-lems below before consulting your retailer or Nikon representative. Refer tothe page numbers in the right-most column for more information.Display, Settings and Power SupplyProblem Cause/Solution cMonitor is blank • Camera is off.• Battery is exhausted.• Standby mode for saving power: press the shutter-release button halfway.• Flash lamp blinks red: wait until flash has charged.• USB cable is connected.• A/V cable is connected.• Time lapse or interval timer photogra-phy in progress.242425, 28338382Monitor is hard to read • Adjust monitor brightness.• Monitor is dirty. Clean monitor.• Monitor has dimmed to save power. Monitor brightens when controls are used.12016425Camera turns off without warn-ing• Battery is low.• Camera has turned off automatically to save power.• Battery is cold.24163[Format memory] > [Format] option not availableBattery is low. 24,125Camera clock is not correct • Clock battery exhausted: recharge clock battery. Pictures recorded before clock has been set will have time stamp of “00.00.0000 00:00”; movies will be dated “01.09.2006 00:00.”• Check camera clock regularly against more accurate timepieces and reset as required.20117No indicators displayed in moni-tor[Hide info] is selected for [Photo info].Select [Show info].120[Date imprint] not available Camera clock has not been set. 20,117](https://usermanual.wiki/Nikon/2143EB.User-Manual/User-Guide-700695-Page-185.png)
![172TroubleshootingTechnical NotesElectronically Controlled CamerasIn extremely rare instances, unusual characters may appear in the monitor and the cameramay stop functioning. In most cases, this phenomenon is caused by a strong external staticcharge. Turn the camera off, remove and replace the battery, and then turn the camera onagain. In the event of continued malfunction, contact your retailer or Nikon representative.Note that disconnecting the power source as described above may result in the loss of anydata not recorded to internal memory or the memory card at the time the problem occurred.Data already recorded will not be affected.ShootingDate not appearing on pictures even when [Date imprint] is enabledDate does not appear on movies or on pictures taken using P, N, F, [Contin-uous], or when option other than [Off] is selected for [BSS].41, 45, 47, 70, 102, 104Camera settings reset Backup battery is exhausted; all settings were restored to their default values. 118Problem Cause/Solution cNo picture taken when shutter-release button is pressed• Camera is in playback mode: press o.• Menus are displayed: press m.• Battery is exhausted.• Flash lamp blinks: flash is charging.30112433Camera cannot focus • Subject is low in contrast, dominated by repeating geometric patterns, cov-ers too small an area of the frame, or contains many fine details, objects of sharply differing brightness, or objects at different distances from the cam-era. Use focus lock to focus on another subject at same distance.• Focus error. Turn camera off and then on again.2924Problem Cause/Solution c](https://usermanual.wiki/Nikon/2143EB.User-Manual/User-Guide-700695-Page-186.png)
![173TroubleshootingTechnical NotesPictures are blurred • Use flash.• Use anti-shake mode.•Use A.• Use tripod and self-timer.324910434Bright specks appear in pictures taken with flashFlash is reflecting off particles in air. Turn flash off.33Flash does not fire Flash is off. Note that flash turns off automatically in T modes other than [Time-lapse movieA] and [Stop-motion movie], some scene modes, when [Con-tinuous] or [Multi-shot 16] is selected for [Continuous], or when option other than [Off] is selected for [BSS].32,37,70,102,104Optical zoom cannot be used Optical zoom cannot be used while recording movies.70Digital zoom cannot be used Digital zoom is not available in assist modes, or when [Multi-shot 16] is selected for [Continuous].37,102[Image mode] not available [Image mode] cannot be adjusted when [Multi-shot 16] is selected for [Continu-ous].102No sound when shutter is released• [Off] is selected for [Sound settings] > [Shutter sound] in setup menu. •P or T mode is selected, option other than [Single] is selected for [Continuous], or option other than [Off] is selected for [BSS].12341, 70, 102, 104AF-assist illuminator does not light• [Off] is selected for AF assist option in camera setup menu.• AF-assist illuminator turns off auto-matically in some modes.12337Pictures appear smeared Lens is dirty. Clean lens. 164Colors are unnatural White balance does not match light source.99Randomly spaced bright pixels (“noise”) appear in imageShutter speed too slow. Noise can be reduced by:• Using flash• Fixing the sensitivity•Choosing scene mode with noise reduction3210539-47Problem Cause/Solution c](https://usermanual.wiki/Nikon/2143EB.User-Manual/User-Guide-700695-Page-187.png)
![174TroubleshootingTechnical NotesPlaybackPictures are too dark (underexposed)• Flash is off.• Flash window is blocked.• Subject is beyond flash range.• Adjust exposure compensation.• Subject is backlit. Select L ([Back light] scene mode) or use fill flash.32263210132, 46Pictures are too bright (overexposed)Adjust exposure compensation. 101Unexpected results when flash set to A (auto with red-eye reduction)In-Camera Red-Eye Fix may, in very rare cases, be applied to areas not affected by red-eye. Set flash to z (auto) or C (fill-flash) and try again. Note that red-eye reduction is the default setting for one-touch portrait, B, and D modes.32,39,42, 50Problem Cause/Solution cFile cannot be played back • File has been overwritten or renamed by computer or other make of camera.• Time lapse or interval timer photogra-phy in progress: pictures cannot be played back until recording is com-plete.–Cannot zoom in on picture Playback zoom cannot be used with movies, small pictures, or pictures that have been cropped to below 320 × 240.–Cannot record voice memo Voice memos cannot be appended to movies.76Cannot use crop, D-Lighting, or small picture optionsThese options cannot be used with mov-ies and may not be available with pic-tures created with other cameras. Select picture that supports crop, D-Lighting, or small picture.76, 54Cannot create new Pictmotion movieCamera may be unable to create Pictmo-tion movies using pictures recorded with other cameras. Other cameras may be unable to play Pictmotion movies cre-ated with COOLPIX S7c.–Problem Cause/Solution c](https://usermanual.wiki/Nikon/2143EB.User-Manual/User-Guide-700695-Page-188.png)
![175TroubleshootingTechnical NotesCustom Pictmotion background music tracks are not listedMemory card contains no background tracks. If background tracks were deleted when memory card was format-ted, copy tracks to card again.68Pictures not displayed on televi-sion• Choose correct video mode.• A/V cable and USB cable are both con-nected to the COOL-STATION: discon-nect USB cable.126–PictureProject does not start when camera is connected• Camera is off.• Battery is exhausted.• USB cable is not correctly connected.• Appropriate [USB] option is not selected.• Camera is not recognized by the com-puter.• Computer is not set to launch PictureProject automatically.See the supplied PictureProject Refer-ence Manual (on CD) (silver) for more information on PictureProject.24248384––Cannot mark pictures for transfer No more than 1,000 pictures can be marked for transfer. Use the [Transfer] button in PictureProject to transfer pic-tures.85Transfer marking does not appearPictures were marked for transfer using another model of camera. Mark pictures for transfer using COOLPIX S7c.86,112Cannot transfer pictures d cannot be used to transfer pictures from internal memory when [Mass stor-age] is selected for [USB] or if memory card is locked. Transfer pictures using the [Transfer] button in PictureProject.23,126Cannot transfer Pictmotion mov-ies• Pictmotion movies cannot be trans-ferred to Mac OS.•d cannot be used to transfer Pictmo-tion movies. Use the [Transfer] button in PictureProject.––Problem Cause/Solution c](https://usermanual.wiki/Nikon/2143EB.User-Manual/User-Guide-700695-Page-189.png)
![176TroubleshootingTechnical NotesWireless TransferProblem Cause/Solution cThe camera is not detected by the Wireless Camera Setup Util-ity.• Set the camera to L (auto) mode.• Select [PTP] for [Interface] > [USB] in the setup menu.24, 126SSID is not displayed. • Configure a profile device.• SSID is set to hide.• Signal strength is poor.• Move the camera closer to the access point or computer. • Remove obstruction between the camera and profile device. • Adjust the direction of the camera so it can receive a better signal. 134Connection to the access point or server failed.• A profile for home wireless LAN is set in the procedure for public wireless LAN.• Connect the computer and camera and start the Wireless Camera Setup Utility. Then choose the action [Rename/Delete profiles], choose the profile from the list, and click [View Profile] to confirm the information.142Wireless transfer was terminated during image transfer, and trans-fer failed.• Turn the camera off and on again, and try again. • Battery is running out. 17, 18Pictmotion movies were not wire-lessly transferred.• [Easy Trans. (no PM)] is selected in wireless transfer menu.• Pictmotion movies cannot be trans-ferred from a Macintosh.150](https://usermanual.wiki/Nikon/2143EB.User-Manual/User-Guide-700695-Page-190.png)

![178Technical NotesSpecificationsNikon COOLPIX S7c Digital CameraType Compact digital cameraEffective pixels 7.1 millionCCD 1/2.5-in. CCD; total pixels: 7.41 millionImage size (pixels) • 3,072 × 2,304 [High(3072A)/Normal(3072)]• 2,592 × 1,944 [Normal(2592)]• 2,048 × 1,536 [Normal(2048)]• 1,024 × 768 [PC screen(1024)]• 640 × 480 [TV screen(640)]Lens 3× Zoom-Nikkor ED lensFocal length F=5.8–17.4 mm (35-mm [135] camera-format equivalent: 35–105mm)f/-number F2.8–F5.0Construction 12 elements in 10 groupsDigital zoom Up to 4× (35-mm [135] camera-format equivalent: 420 mm)Autofocus (AF) Contrast-detect AFFocus range (from lens)• 30 cm (1 ft.)–∞• Macro close-up mode: 4 cm (1.6 in.)–∞ (wide zoom position)Focus-area selection Center, manual (99 focus area)AF-assist illumination Class 1 LED product (IEC 60825-1 Edition 1.2-2001); max. output: 1,600 µWVibration reduction ElectronicMonitor 3.0 in., 230,000-dot, wide viewing-angle low-temperature polysilicon TFT LCD with 5-level brightness adjustmentFrame coverage (shooting mode)Approximately 97% horizontal and 97% verticalFrame coverage (playback mode)Approximately 100% horizontal and 100% verticalStorageMedia Internal memory (14 MB); Secure Digital (SD) memory cardsFile system DCF, Exif 2.2, and DPOF compliantFile formats Compressed: JPEG-baseline-compliantMovies: QuickTime Audio files: WAV](https://usermanual.wiki/Nikon/2143EB.User-Manual/User-Guide-700695-Page-192.png)
![179SpecificationsTechnical NotesExposureMetering 256-segment matrix, center-weighted, spot, spot AF areaExposure control Programmed auto exposure with exposure compensation (–2.0 to +2.0 EV in steps of 1/3 EV)Range W: 0.0 to +15.9 EVT: +1.6 to +17.6 EVShutter Mechanical and charge-coupled electronic shutterSpeed 2–1/500 sAperture Electronically controlled ND filter selectionRange 2 steps (f/2.8 and f/7.9 [W])ISO sensitivityISO 50, 100, 200, 400, 800, 1600, Auto (auto gain to ISO 50–800 equivalent)Self-timer 10 seconds, 3 secondsBuilt-in flashRange W: 0.3–7.5 m / 12 in.–24 ft. 6 in.T: 0.3–4.0 m / 12 in.–13 ft.Flash control Sensor flash systemInterface USBVideo output Can be selected from NTSC and PALI/O terminals Multi connector (supports ImageLink)WirelessStandardsIEEE 802.11b/g (standard wireless LAN protocol), ARIB STD-T66 (standard for low power data communications systems)Communications protocolsIEEE 802.11g: OFDMIEEE 802.11b: DBPSK, DQPSK, CCKRange (line of sight) Approximately 20 m/67 ft. (varies with location)Operating frequency2412–2462 MHz (11 channels)Data rates* IEEE 802.11g: 6, 9, 12, 18, 24, 36, 48, and 54 MbpsIEEE 802.11b: 1, 2, 5.5, and 11 MbpsSecurity TKIP, 128/64-bit (104/40-bit) WEPAccess protocols Infrastructure/ad-hocSupported languagesCzech, Danish, German, English, Spanish, French, Indonesian, Italian, Dutch, Norwegian, Polish, Portuguese, Russian, Finnish, Swedish, Chinese (Simplified and Traditional), Japanese, Korean, ThaiPower sources • One rechargeable Nikon EN-EL8 lithium-ion battery (supplied)• EH-64 AC adapter (supplied)](https://usermanual.wiki/Nikon/2143EB.User-Manual/User-Guide-700695-Page-193.png)