Ninebot NB Ninebot miniPRO User Manual
Ninebot (Tianjin) Tech Co., Ltd. Ninebot miniPRO
UserManual.wiki
>
Ninebot
>
NB User Manual
User Manual
Navigation menu
Upload a User Manual
Namespaces
Wiki Guide
HTML
PDF
Info
Views
User Manual
Discussion / Help
Navigation
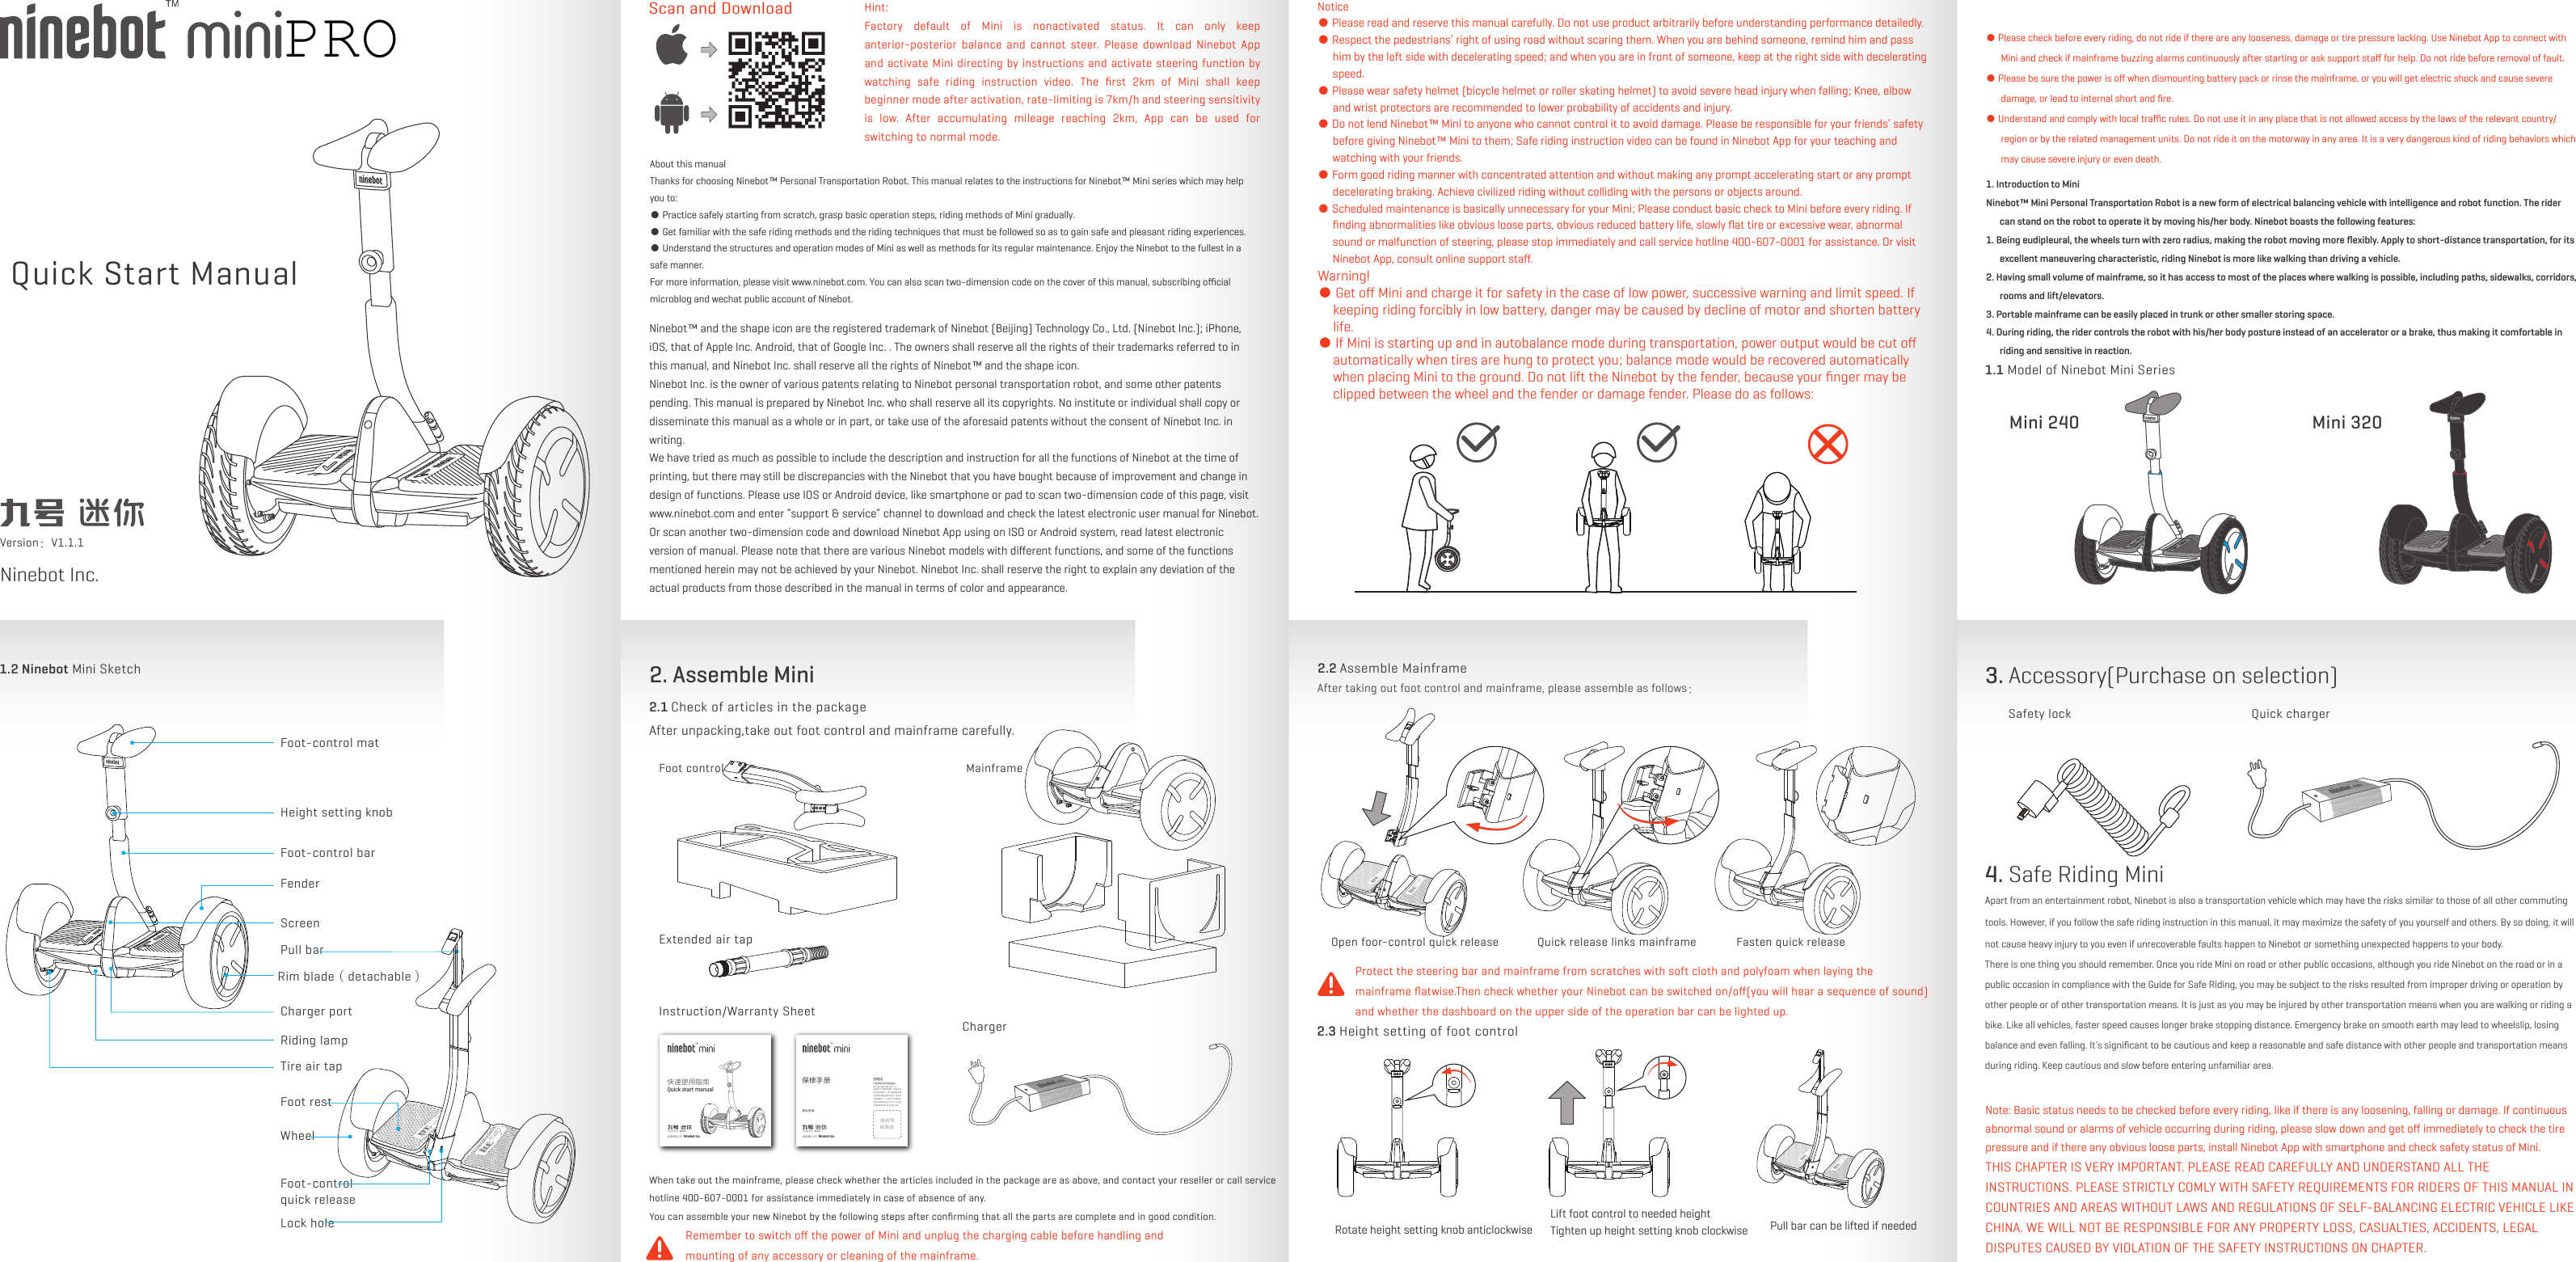
![10. Daily maintenanceYou can use a soft cloth (one used for wiping your glasses) dipped with small amount of water to wipe the mainframe of Ninebot to remove dirt on the surface of mainframe. The dirt that is hard to wipe out on the plastic surface can be scrubbed with toothbrush after coating it with toothpaste, and then clean it with wet cloth. Do not wash Ninebot with alcohol, gas, diesel, acetone or other corrosive and volatile chemical solvent. These substances may damage the appearance and internal structure of Ninebot. Scratches on plastic parts of vehicle can be polished by abrasive paper or other abrasive substances.Please dry Ninebot in the room and place it in a cool place. Do not store it in the open air for a long time. Exposure to sunshine and hot/cold outdoor environment will accelerate the aging of the appearance. Mini possesses water resistant function and can be used in light rain, but spray cleaning of pressure water gun is forbidden.Hint: When cleaning Ninebot, make sure that Ninebot is powered off, the charging cable is plugged out and the rubber cap on the charging port is tightly sealed. Or you may suffer electric shock or Ninebot may goes into trouble.Maintenance of battery packDo not place battery in high-temperature or low-temperature environment which is over 50℃ or below -20℃. Do not throw battery pack into fire. Other items for attention in maintenance of battery refer to nameplate of battery pack which is below vehicle.Battery of Mini can be used for riding over 20,000 km and still keeps excellent performance with great maintenance. Please try to use along with charge, do not exhaust all the power in the battery and then charge it in daily use. In addition, when using in high-temperature summer, battery pack can play high distance mileage and performance; and when using in environment below 0℃, endurance and performance of battery would decline. Typically, when temperature is -20℃, distance mileage may be half of normal temperature 25℃. Distance mileage of battery will recover when temperature rises.Hint: Typically, the fully charged battery, if mounted on the Ninebot Mini, will be exhausted within 120 to 180 days in the stand-by mode; And a low-power battery, if mounted on the Ninebot Mini, will be exhausted within 30 to 60 days in the stand-by mode. Remember to charge the battery after each riding. Or over draining of power may cause un-recoverable damage to the battery. Intelligent chips inside battery shall record charge-discharge condition of battery, damage causing by long-time discharge will not be covered under warranty. (Non-specialized person are forbidden to dismount battery pack randomly!)Must wear helmet when riding, recommend putting on kneecap, elbow guard and cuff.6. WarningWatch out for slipping when climbing slope.Watch out for space above your head/door frame. Avoid riding forcibly under low power (battery level indicator twinkles and buzzing alarms. ) 7. Prohibited Prohibit waggling back and forth substantially during riding.Prohibit multiplayer to ride one Mini meanwhile or ride holding children.Prohibit riding in pondingthat exceeds 2cm.Prohibit riding into motorway.SwitchTurn power on or off. Mini will automatically shut if not be used in 10 minutes after starting or mainframe is put down over 5 seconds.After starting lock mode with APP, mainframe will shake fiercely and buzzing alarm if anyone moves it. User’s smartphone will vibration alarm if Ninebot App operates on user’s smartphone meanwhile. Flicker of Bluetooth icon means Bluetooth is opened but not connect to smartphone; Bluetooth icon normally on means Ninebot App has connected with Mini.Mini will be restricted to low speed when rate-limiting icon is on. Foot rest will raise when accelerate. Default speed of rate-limiting mode is 7km/h and can be relieved or adjusted by App.Rate-limitingLED battery indictorLockBluetooth Every power grid means 20% dumb energy. Please stop and charge immediately if power is totally empty and flicker. You can see more accurate dumb energy and estimated riding mileage by App, when power is below 30%, Mini will decelerate gradually; when power is below 10%, speed will be limited to 7km/h.Pull the bar on power assistance mode (enter into power assistance mode when start up), push Mini flatly, this may help you push Mini easily under non-riding mode.Watch out for slipping on roads, do not accelerate or decelerate rapidly on slippery roads.Please keep proper speed (little quicker than walking) when pass deceleration strip or elevator threshold, do not try to pass deceleration strip with zero velocity, or you will fall due to slip or stuck of tires.Try to avoid passing step that is greater than 1cm or potholes pavement, please keep low-speed riding on rough pavement (3km/h~10km/h), bend your knees slightly makes you adapt rough pavement riding better. Prohibit trying riding to ascend and descend stairs.Prohibit riding on gradient that exceeds 15°; Especially rider’s weight is over 80kg, please be cautious and decelerate when climbing or descending.Over 15°Foot rest would uplift gradually if exceeds safety speed and mainframe would alarm. Please do not accelerate, or falling or severe damage may occur.011. Specifications Data and parameter labelled * differ with different models. No further notice if any alteration.Performance index Item Ninebot Mini-240 Ninebot Mini-320SizeWeightMajor parameterof mainframeParameter of battery packParameter ofelectromotorParameter ofstandard charger262x546611~86685About 12.5About 20About 15°About 28About 12.510055.563240300x2900x2400x21200x2320Break automatically under status like balance/over charge/undervoltage/temperature alarm. Connect App to test battery status.100~240VAC/50~60HzAbout 63About 1.1 About 1.970 120CCC,CELxW (mm)Mainframe height[1] (mm)Maximum load (kg)Net weight(kg)Maximum speed(km/h)Typical endurance[2] (km)Maximum gradeabilityBeginner mode Be relieved after 2-km accumulative riding. Applicative terrianMax. charging voltage (VDC)Nominal capacity (Wh)Intelligent BMS Safety certificationNominal input voltage(VAC)Nominal output voltage(VDC)Nominal current(A)Safety certificationNominal voltage(VDC)Nominal power(W)Nominal power(W)Maximum power(W)Harden pavement, flat dirt pavement, ramp that is below 15°, stair that is shorter than 1cm, channel that is narrower than 3cm.About 17 About 20CCC,CB,CE,FCC,PSE,ULCharging time(h)About 4.5 About 3.5(1) Mainframe height: refer to distance from ground to the highest end of mainframe. Since height of foot control is adjustable, mainframe height refers to height range from the lowest and highest point of adjusted foot control.(2) Typical endurance refers to: test under riding in full power, 70kg load, 25°C environmental temperature, 15km/h average speed on flat pavement.9. Application method of battery chargerMiddle deck Open middle deck cap Open rubber cap of charger portCharger cable hole12. After-sales and WarrantyYou can contact us by the following ways if you want to consult the issues relating to riding, maintenance and safety, or report the faults of your product to the manufacturer in the process of using Ninebot; we are at your service.There are the two-dimension codes for the official Wechat account and official microblog of Ninebot, you can subscribe by scanning them with your phone. We will provide value-base gifts and colorful activities irregularly for users who subscribe the official Wechat account and pay attention to the latest trends and activities of Ninebot, stay tuned!Official Microblog Official WebsiteQQ Group of Ninebot Club: 389793470 Wechat Service NumberNinebot Inc.Head office: F1, Building A-1, Northern Territory of Zhongguancun Science Park, Xixiaokou Road No.66, Haidian District, Beijing, ChinaTel:+86-010-84828002 Fax:+86-010-84828002-800Toll Free (China only): 400-607-0001(consultation, purchase and after-sales service)E-mail:info@ninebot.com (Consultation) Service@ninebot.com (After-sales service)Address of Manufacturer:Ninebot (Changzhou) Tech Co., Ltd. 16F-17F, 3th Bldg., 18 Changwu Road, Wujin Disct, Changzhou, Jiangsu, ChinaNinebot (Tianjin) Tech Co., Ltd. 11 Tianrui Rd. Auto Industrial Park,Wuqing disct., Tianjin, China.Product Standard:Q/320412NCZ001-2015Other safety certifications we have passed:UN38.3 Cell and battery pack have passed UN38.3 test and certification2014/30/EU EN 61000-6-3:2007+A1:2011, EN 60950-1:2006+A12:20112014/35/EU EN 60204-1:2006/AC:2010, EN 60950-1:2006/AC:2011, EN 60034-1:2010/AC:20102006/42/EC EN ISO 12100:2010, EN ISO 13849-1:2008/AC:2009, EN 62061:2005/AC:2010EMC ETSI EN 301 489-1 V1.9.2 (2011-09); ETSI EN 301 489-17 V2.2.1 (2012-09)RF ETSI EN 300 328 V1.8.1 (2012-06)Safety EN 60950-1: 2006+A11: 2009+A1: 2010+A12: 2011+A2: 2013SAR EN 62479: 2010FCC PART15C FCC Rules Part15.247REACH 2012/19/EUwww.ninebot.cnStep on foot rest with both feet meanwhile. Be relaxed, stand erectly and look straight ahead, avoid severe ooching.Touch foot control left and right to swerve.Step on foot rest with both feet, move centerof gravity forward or backward slowly to control back and forth.Please get in with other’s assistancefor your first ride.Step on foot rest with one foot, avoid touching foot control with your shank or knees and cause steering.Keep your feet and move your center of gravity to left foot slowly.1 2 35.Learn to ride (Do not touch foot control with your shank or knees when you get in, in case of rapid rotation or forwarding of mainframe may cause damage. )48. Icons on the dashboardSwitchLockBluetoothRate-limitingLED battery indictor](https://usermanual.wiki/Ninebot/NB/User-Guide-2969933-Page-2.png)