Ningbo EverFlourish Smart Technology EF26ULWFO WI-FI Smart Socket User Manual EMW202R EMW202T
Everflourish Electrical Co., Ltd. WI-FI Smart Socket EMW202R EMW202T
User manual
Instruction Manual for WI-FI Smart Socket
(APP: Jasco myTouchSmart APP )
Type: 26UL-WFO(Outdoor)
A. Function
1. The myTouchSmart APP Wi-Fi plug connects your home Wi-Fi network to your appliances
for easy control of home automation, energy saving and home security.
2. App controls any connected electrical appliances via your smart device. Wherever and
whenever you choose to control the on/off, timer setting and group setting. Applicable
for both IOS and Android system.
3. By refreshing the screen, you can see your plug‟s on/off status from the APP.
4. With push button, control power on/off manually.
5. Timer setting function via the APP is easy and convenient.
6. Available to add multiple Wi-Fi plugs to suit your need.
B. Connection
1. Download myTouchSmart from APP store or Google Play on your smart phone, open the
APP and follow the procedure to register your account with a valid email address.
2. Add new device to your smart phone by following the procedure demonstrated in the APP.
3. Once connected, you can either control the appliances via your smart phone or manually.
C. Setting Procedures
1. Find New Device
a) After downloading the APP and register your account, plug in the device to a main
plug, myTS LED flashes quickly continuously (few times per second).
b) Click “Find New Device”. Then, enter the Wi-Fi password if it is the first time to add
the device.
c) After searching, choose the device found, then click button “connect” to add the
device to your smart phone.
d) Click “ ”on home page to refresh the device status.
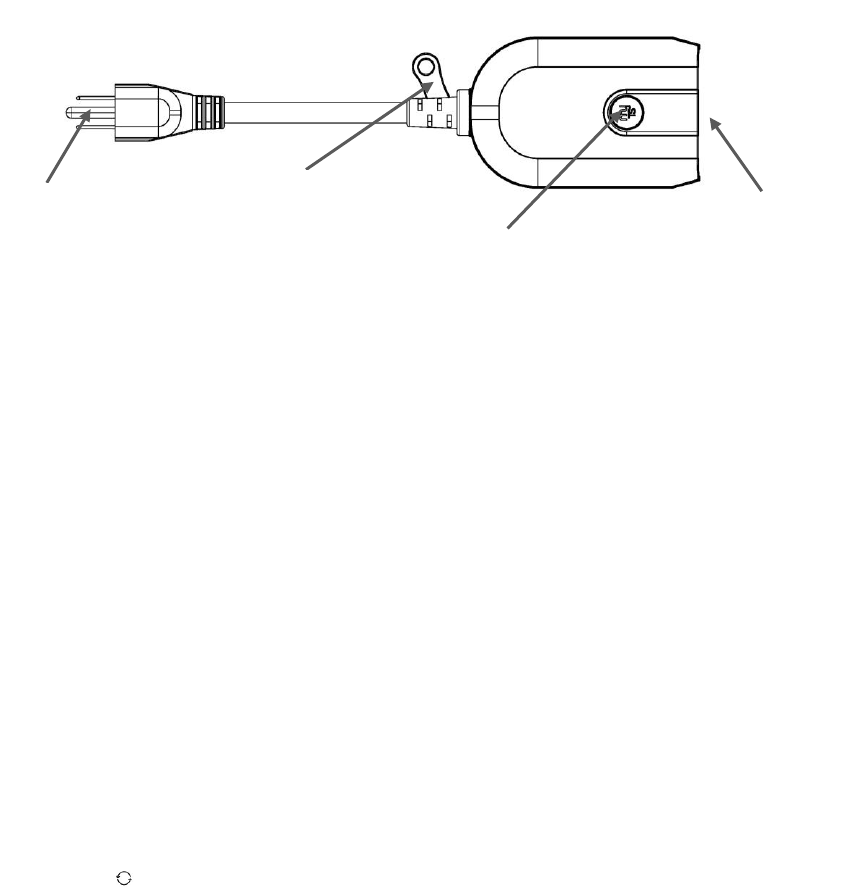
Outlet socket
Manual power on/off with
light indicator
Input plug
Hanging hole

2. Edit Device
a) Click the pen icon “ ”, then enter into „Edit device‟ page.
b) Change picture and device name.
c) View firmware version and MAC.
3. My programs Setting
a) Click “My programs” button, then “+ Add program” to add new program.
b) Click on the block with the Device ON / Device OFF to set your time.
c) Choose to repeat in weekly or only once.
d) Press “Save” to activate.
e) Repeat the same schedule to add more time settings.
4. Morning Setting
a) Click “Morning” button.
b) Click on the block with the Device ON / Device OFF to set your morning time.
c) Choose to repeat in which days.
d) Press “Save” to activate.
5. Evening setting
a) Click “Evening” button.
b) Click on the block with the Device ON / Device OFF to set your evening time.
c) Choose to repeat in which days.
d) Press “Save” to activate.
6. Countdown setting
a) Click “Countdown” button.
b) Scroll up and down to choose hour and minute to countdown.
c) Press “Start” to activate.
7. All programs setting
a) Click “All programs” button to review all timers.
b) Slide to activate/deactivate morning program, evening program and my programs.
c) Click “Delete” to delete timer.
8. Group Setting
Group Setting allows you to combine different devices into the same on/off timer. Ideal
for special occasion on/off control (eg. Going out for a holiday).
a) Go to “GROUP” icon on the first page.
b) Click “Add New Group”, choose icon for the group.
c) Click the pen icon “ ”, then enter into “Edit group” page to change picture and
group name.
d) Group program setting of my programs, Morning, Evening and Countdown is the
same as device program setting.
e) Click “Change device” on Programs page to replace the device in the group.
Group setting notes:
a) There must be above 2 devices added in the App.
b) Clink the bulb icon “ ” to control the devices on/off at the same time in one group.
9. Reset
a) Press and hold the manual button on the device for 10 seconds, the device will be
deleted automatically, then the device is free for any other new account to add.
b) To change user account to control the devise, click the pen icon “ ” of each device
to delete device, then the device is open for any other new account to add.
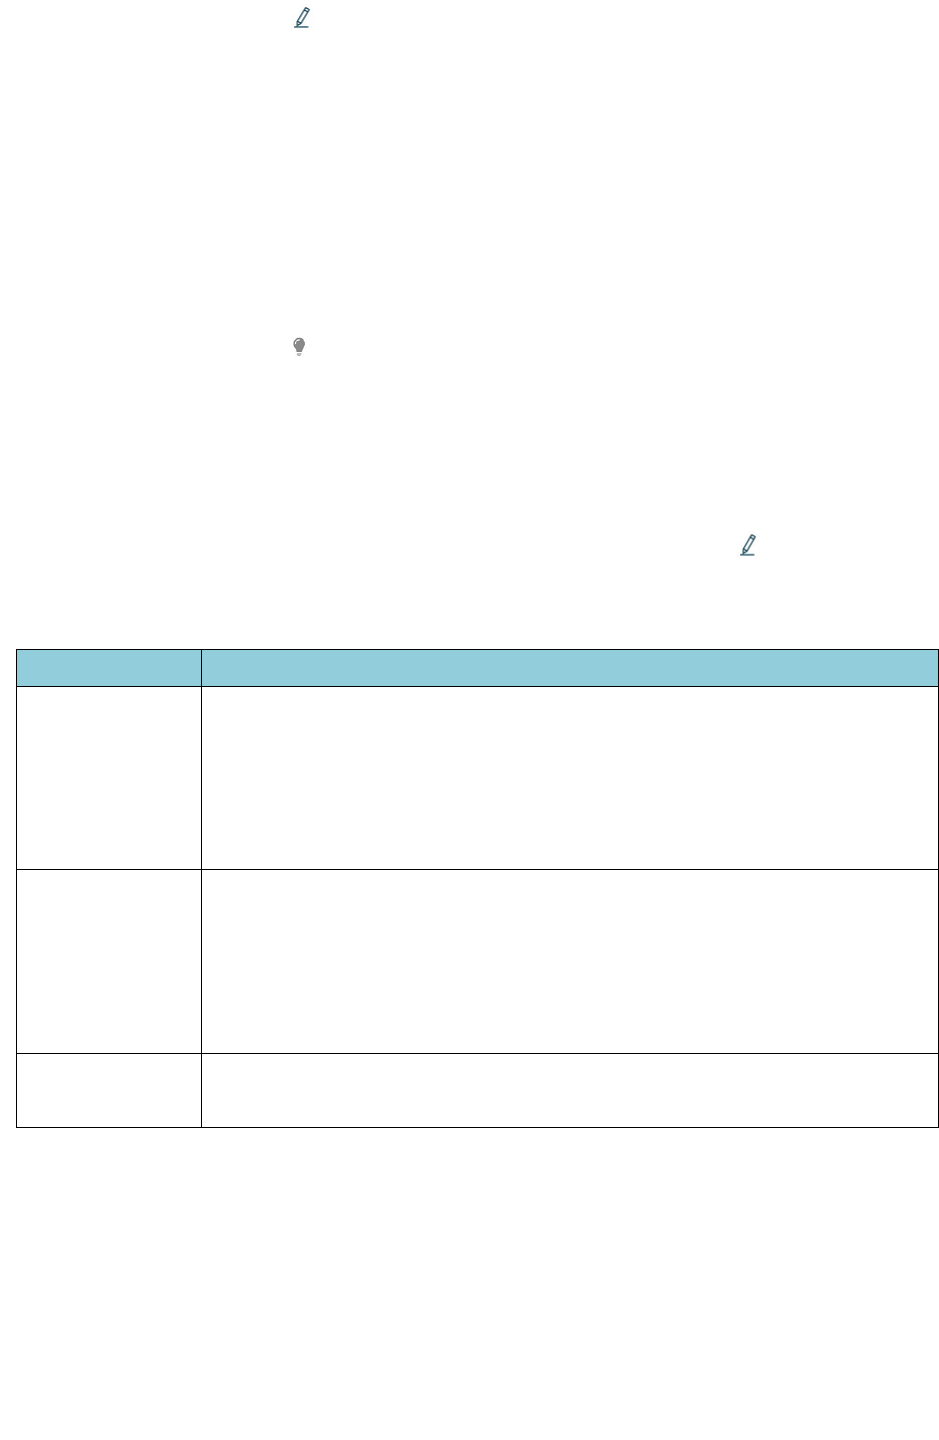
MyTS LED
Description
Flashes slowly
(once per
second)
- Smart plug is searching for the Wi-Fi network.
- Press and hold the button for 3 seconds until the LED flashes quickly
(few times per second), device enter into the connection mode.
- Follow the procedure on the APP to activate the new device and enter
the Wi-Fi password for connection.
Flashes quickly
(few times per
second)
- Device is in connection Mode.
- Follow the instruction “Find New Device” and enter the Wi-Fi
password for connection.
- When adding device successfully, the LED will stay ON or OFF,
without flashing.
On or OFF
- Power on /off status indicator.
- Connection successful (after connection mode as above).
D.FCC WARNING
This device complies with Part 15 of the FCC Rules. Operation is subject to the following
two conditions:
(1) this device may not cause harmful interference, and
(2) this device must accept any interference received, including interference that may
cause undesired operation.

Changes or modifications not expressly approved by the party responsible for
compliance could void the user's authority to operate the equipment.
This equipment has been tested and found to comply with the limits for a Class B digital
device, pursuant to part 15 of the FCC Rules. These limits are designed to provide
reasonable protection against harmful interference in a residential installation. This
equipment generates uses and can radiate radio frequency energy and, if not installed
and used in accordance with the instructions, may cause harmful interference to radio
communications. However, there is no guarantee that interference will not occur in a
particular installation. If this equipment does cause harmful interference to radio or
television reception, which can be determined by turning the equipment off and on, the
user is encouraged to try to correct the interference by one or more of the following
measures:
—Reorient or relocate the receiving antenna.
—Increase the separation between the equipment and receiver.
—Connect the equipment into an outlet on a circuit different from that to which the
receiver is connected.
—Consult the dealer or an experienced radio/TV technician for help.
IC WARNING
This device complies with Industry Canada’s licence-exempt RSSs. Operation is subject
to the following two
conditions:
(1) This device may not cause interference; and
(2) This device must accept any interference, including interference that may cause
undesired operation of the device.
The distance between user and products should be no less than 20cm
Le pré sent appareil est conforme aux CNR d'Industrie Canada applicables aux appareils
radio exempts de licence. L'exploitation est autorisé e aux deux conditions suivantes :
(1) l'appareil ne doit pas produire de brouillage, et
(2) l'utilisateur de l'appareil doit accepter tout brouillage radioé lectrique subi, mê me si le
brouillage est susceptible d'en compromettre le fonctionnement.
Cautions:
1. For safety, always switch off your appliances before connecting.
2. Whenever you change a Wi-Fi network, reconnection is required.
3. Do not plug in and out the device continually. Always wait for an interval of 10 seconds.
4. Let the switch hang downward so moisture doesn‟t accumulate in the outlet. Install cord
and unit above ground level at least 1FT/0.3M with receptacle in the downward
position. Not for water immersion or for use where directly exposed to water. Store
indoors when not in use.
Attention:
la distance entre l'utilisateur et les produits devraient être au moins 20 cm
The distance between user and products should be no less than 20cm

1. Pour votre sécurité, éteignez toujours vos appareils avant de les connecter.
2. Chaque fois que vous changez un réseau Wi-Fi, la reconnexion est nécessaire.
3. Ne pas brancher et débrancher l'appareil en permanence. Toujours attendre un intervalle
de 10 secondes
4. Laissez l'interrupteur pendre vers le bas pour que l'humidité ne s'accumule pas dans la
prise. Installez le cordon et l'unité au-dessus du niveau du sol à moins 1FT / 0,3M avec le
réceptacle vers le bas. Ne pas immerger dans l‟eau ou pour une utilisation directe avec l'eau.
Stocker à l'intérieur lorsqu'il n'est pas utilisé.
Specifications
1. 125V~ 60Hz, 15A Resistive, 1/2HP
2. 1875W, 15A (Resistive), 1250W, 10A (Tungsten)
3. Frequency: 2.4GHz (meets the requirements of IEEE802.11/b/g/n standard)
4. Compatible Platforms: Google Home (assistant), Amazon Echo
5. UL, FCC/IC certified
6. For outdoor use only
7. Operation temperature: -20~55℃.
System Requirements
1. Wi-Fi® router
2. iOS 10.0 and higher
3. Android 6.0 or later