Ningbo Litesun Electronics WIFI-009 Duplex Receptacle with WIFI function User Manual LQ 2 W1
Ningbo Litesun Electronics Co.,Ltd Duplex Receptacle with WIFI function LQ 2 W1
Contents
- 1. User Manual-LQ-2-W1-rev1
- 2. User Manual-LQ-2-W2-rev1
User Manual-LQ-2-W1-rev1

Model: LQ-2-W1
Quick Start for CE Smart Wi-Fi Plug Setup:
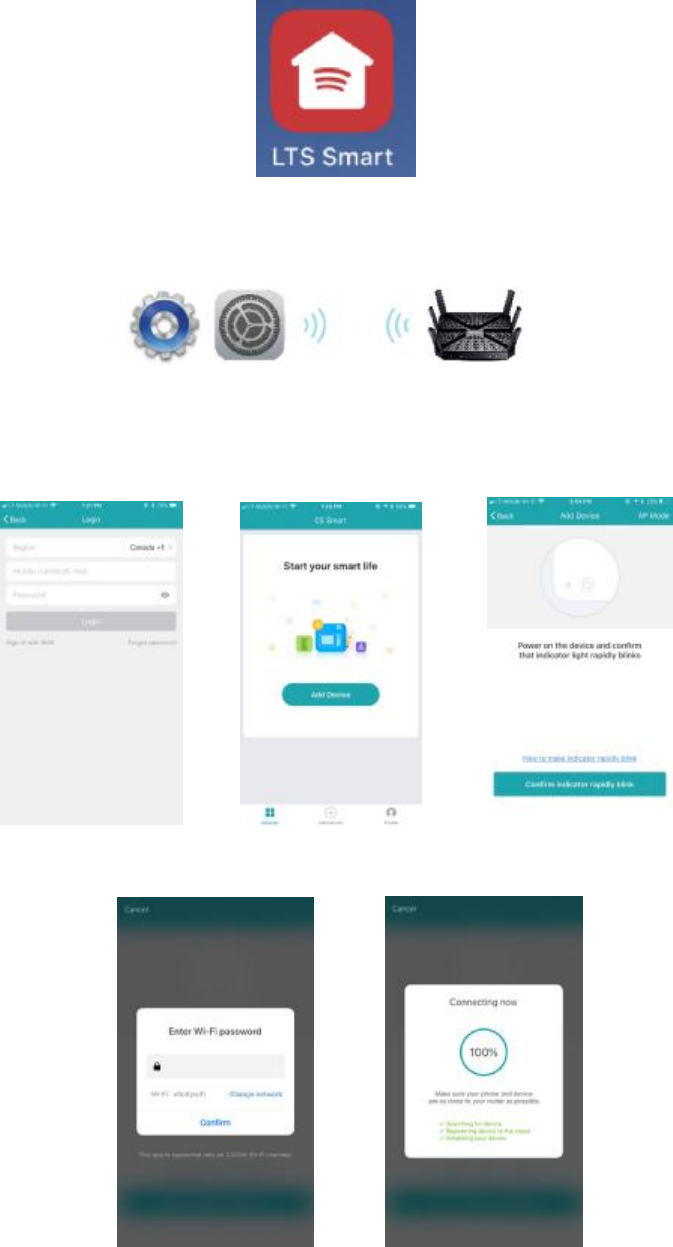
1. Download CE Smart app from the App Store or Google Play or scan QR code.
2. Connect mobile device to your 2.4GHz Wi-Fi network. Please note this Smart Plug can
only be connected via a 2.4GHz network.
3. Launch CE Smart and follow the in-app instructions to connect the Smart Plug to your
network.
a. Login to CE Smart b. Click Add Device c. Set rapid blink, click Confirm
d. Enter Wi-Fi password e. Connecting device

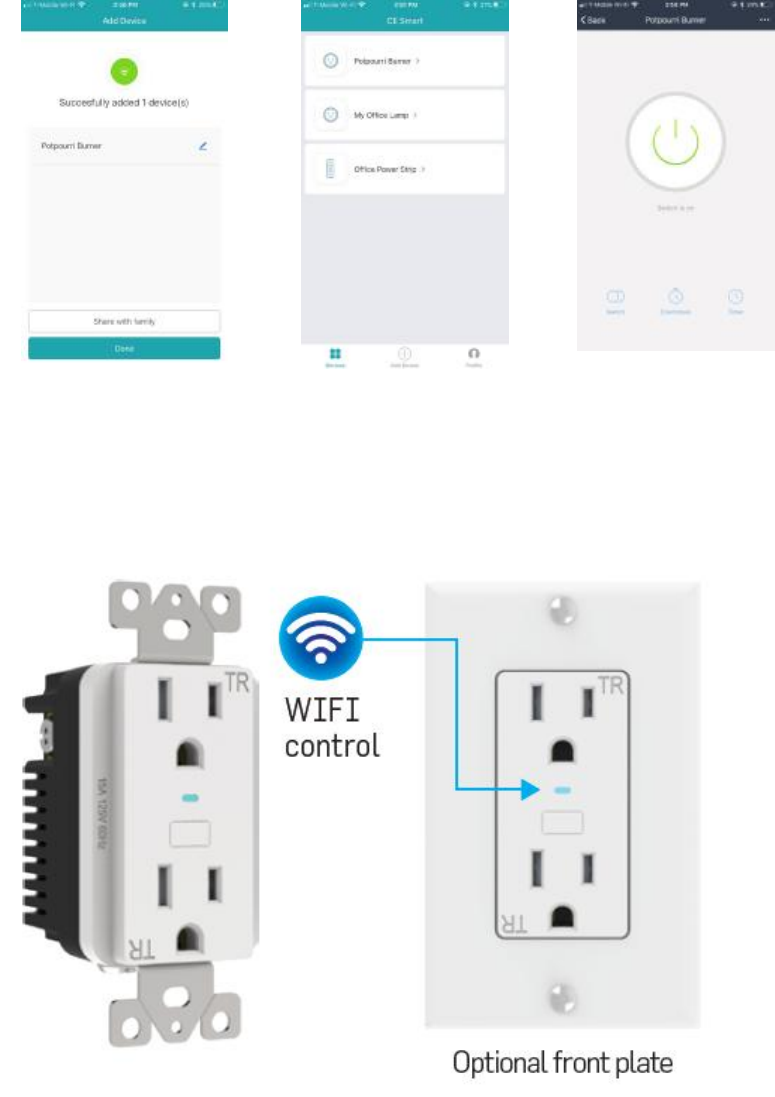
f. Edit Name, Share or Done g. Device Home Screen h. ON/OFF Control
After you have successfully set up the CE Smart app and your device(s) you may control them
remotely from your mobile device using a Wi-Fi or Cellular connection. Compatible with Alexa
Echo and Google Home.
Wi-Fi Smart Socket:
CE Smart App Reference Guide:
Register / Create an Account
Tap “Register” to create an account using your email address or mobile phone number.
Optionally you may tap Sign in with SMS to create a temporary account using your mobile
phone number.
• Tap Register to enter registration page.
• The system automatically recognizes your Region (country/code). You may also follow
the instructions to manually select your country code. Enter your email address or mobile
number (do not include dashes or spaces) and tap Login.
• If you enter your mobile number, you will get a verification code via text message. Enter
the verification code, create a password, and tap "Confirm" to finish your registration.
• If you enter your email, create a password and tap "Confirm" to finish your registration.
Login / Registered Account
• Tap “Login” to sign in to your account.
• Enter your previously registered email address or mobile number and password, and
then tap “Login”.
Login / Temporary Account / Sign in with SMS
• Tap “Sign in with SMS” if you want to create a temporarily login. Note: there is no
password and your login account will not be saved.
• Enter your mobile number (no dashes or spaces) and tap “Get”. You will receive a
verification code via text message.
• Enter the verification code and tap “Login”.
Forgot Password
• To reset Password, Tap “Forgot password”.
• Enter you email address or mobile number and tap “Next”.
• Enter the verification code received via text or email, then enter a new password, tap
"Confirm" to finish.
Add Device +
Normal Mode
• Enter the App, tap “+” Add Device in the center bottom of the page to enter device
connection page.
• There are two Wi-Fi network connection methods (Normal Mode and AP Mode.) Normal
Mode is the default and connects via your 2.4GHz Wi-Fi channel only. (Does not work
with 5GHz channel.) Normal mode allows you to connect several CE Smart devices at
the same time.
• For Normal Mode, please make sure the indicator light on the plug is set to flashing
rapidly (2 times per second).
• Press the Wi-Fi power button and hold for 5 seconds until blue indicator light starts rapid
flashing.
• Tap “Confirm indicator rapidly blink”.
• Enter your 2.4GHz Wi-Fi password and tap “Confirm” to enter the device connection
process.
• Device Connection Process will begin and connect device.
• Tap Done.
AP Mode (Access Point)
• Tap “AP Mode” in upper right screen.
• Connect your phone to 2.4GHz Wi-Fi.
• In AP Mode your device broadcasts a device name in your phone’s Wi-Fi Settings that
allows the Wi-Fi device to connect to your network. AP mode allows you to connect
devices one by one.
• Make sure the device’s indicator light is slowly flashing (1 time every 3 seconds).
Press and hold Wi-Fi power button for 8-10 seconds to set blue indicator light to fast
flashing. Press and hold again until blue indicator light slowly flashes.
• Tap “Confirm indicator slowly blink”.
• Enter your 2.4GHz Wi-Fi password and tap “Confirm”.
• Open Wi-Fi Settings to connect to Device’s Access Point Wi-Fi name.
• Locate then Tap the Wi-Fi device name, i.e. SmartLife_XXXX.
• Tap Connect.
• Go back to CE Smart app.
• Device Connection Process will begin and connect device.
• Tap Done.
Network Connection Process
The App goes through the process of trying to Connect Device, and displays a percentage on
the Connecting Now screen while connecting. When the percentage reaches 100% the
device should be successfully connected and registered to the cloud. The device default name
will appear on the screen. You may rename the device by tapping the pencil icon to edit. This
allows you to change to a better description of what the plug is controlling, for example, “Living
Room Lamp”. Tap “Done” or “Share with Family” to finish setup.
Troubleshooting Adding Device Failed
If your App interface failed to connect your plug to your mobile device, it means that the
network connection failed. Make sure you are connected to a 2.4GHz Wi-Fi channel. Try
connecting again or view help in the app.
Controlling Devices
After successfully configuration, the connected devices will be displayed on the home screen.
Tap the device name to enter its control page. Access to the control buttons is located in the
upper right corner of the screen “…” in addition to Switch, Countdown and Timer on main
screen.
Note: When device is offline or no longer connected, “Offline” will appear under the device
name. Tap “+ Add Device” and follow the on-screen instructions to re-connect the device.
Device Control Center Features
• Switch: Switch the outlet on and off remotely using Wi-Fi or Cellular connection.
• Countdown: Set a countdown timer to set your device to either turn on or turn off once.
• Timer: Set on and off schedules for each device. On and off schedules must be set up
individually. Make sure to set an off schedule for every on schedule.
Device Settings / …
To control your devices Tap “…” in upper right corner of device control screen.
• Modify Device Name> Set a custom name for your device.
• Device Sharing> Tap “Add” to share the device with family members; they must have
registered CE Smart app login name.
• Device Info> Displays your Device ID, IP address and Mac Address.
• Create Group> Create a group to control multiple devices simultaneously. A list of
available devices to group will be displayed. Only identical devices with same model

number may be grouped.
• Use Echo> Follow the on-screen instructions for how to set up voice control of your
device with the Alexa app using Amazon Echo to control a device.
• Send Feedback> Send feedback to the manufacturer.
• Check for Firmware Update> Display the latest version.
• Remove Device> Remove the device from the app. Note: this won’t delete the
customized device information; previously connected device information is stored.
• Restore Manufacturer Defaults> Delete the stored device information completely.
Profile
Tap “Profile” located at bottom of home screen.
Tap to set your name> Below are options available for set up:
Add Profile Picture, Nickname, Phone Number, Account location, Change Login
Password, Pattern Unlock, Logout
Device Sharing> Users sharing your device.
Message Center> Messages related to the app.
Use Echo> Display list of supported devices and set up instructions for Amazon Echo.
FAQ> Tap to view list of frequently asked questions
Feedback> Display feedback messages sent or send new feedback message.
About> Current app version. Rate Us: submit rating and/or review.
Settings> Turn on/off Sound, Vibrate, and Push Notifications, Clear Cache.
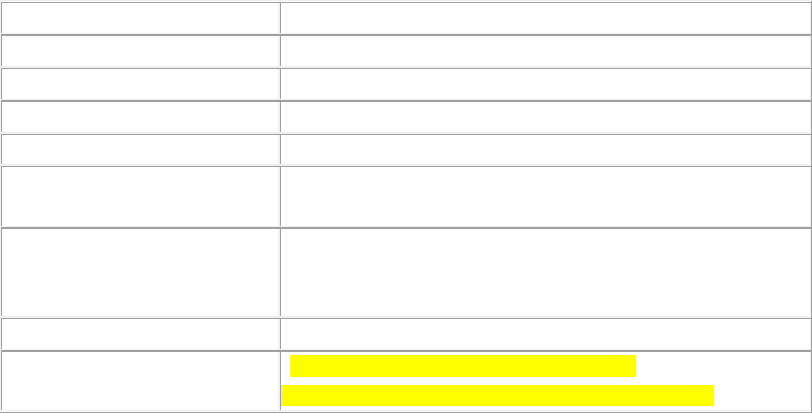
Specifications
Maximum Input Voltage (VAC) 125 VAC
Nominal Input Frequency (Hz) 60Hz
Maximum Output Power (Watts)
1875W
Maximum Line Current (Amps) 15A
Indoor Indoor Only
Network Requirements Wireless router supporting 2.4 GHz wireless band
Remote Control Devices through 3G, 4G or Wi-Fi
Smart Device Compatibility
Android smart mobile device running Android 4.1 or above
iPhone/iPad running iOS 8 or above
CE Smart App 1.0.1 or higher
Certifications ETL & CETL Listed, FCC
Standards Conforms to UL STD.498 and UL60730-1
Certified to CSA STD C22.2 NO 42 AND E60730-1
Caution:
This device complies with Part 15 of the FCC Rules / Innovation, Science and
Economic Development Canada’s licence-exempt RSS(s). Operation is subject to the
following two conditions: (1) this device may not cause harmful interference. (2) this
device must accept any interference received, including interference that may cause
undesired operation.
L’émetteur/récepteur exempt de licence contenu dans le présent appareil est
conforme aux CNR d’Innovation, Sciences et Développement économique Canada
applicables aux appareils radio exempts de licence. L’exploitation est autorisée aux
deux conditions suivantes :
1. L’appareil ne doit pas produire de brouillage;
2. L’appareil doit accepter tout brouillage radioélectrique subi, même si le brouillage
est susceptible d’en compromettre le fonctionnement.
Changes or modifications not expressly approved by the party
responsible for compliance could void the user's authority to operate the
equipment.
This equipment has been tested and found to comply with the limits for
a Class B digital device, pursuant to part 15 of the FCC Rules. These
limits are designed to provide reasonable protection against harmful
interference in a residential installation. This equipment generates
uses and can radiate radio frequency energy and, if not installed and
used in accordance with the instructions, may cause harmful interference
to radio communications. However, there is no guarantee that interference
will not occur in a particular installation. If this equipment does cause
harmful interference to radio or television reception, which can be
determined by turning the equipment off and on, the user is encouraged
to try to correct the interference by one or more of the following
measures:
—Reorient or relocate the receiving antenna.
—Increase the separation between the equipment and receiver.
—Connect the equipment into an outlet on a circuit different from that
to which the receiver is connected.
—Consult the dealer or an experienced radio/TV technician for help.
MPE Reminding
To satisfy FCC / IC RF exposure requirements, a separation distance of 20 cm or more
should be maintained between the antenna of this device and persons during device
operation.
To ensure compliance, operations at closer than this distance is not recommended.
L'antenne installée doit être située
de facon à ce que la population ne puissey être exposée à une distance de moin
de 20 cm. Installer l'antenne de facon à ce
que le personnel ne puisse approcher à 20 cm ou moins de la position centrale de l’
antenne.
La FCC des éltats-unis stipule que cet appareil doit être en tout temps éloigné d’au
moins 20 cm des personnes pendant son functionnement.
Made in China