Ningbo Lumiaudio Electronic Technology FLC Bluetooth ceiling speaker User Manual FLC 6BT FLC 6BTS manual
Ningbo Lumiaudio Electronic Technology LTD Bluetooth ceiling speaker FLC 6BT FLC 6BTS manual
User Manual
4 5
BLUETOOTH
CEILING
SPEAKER
FLC-6BT/FLC-6BTS
3. The speaker is now
connected and ready to
play music
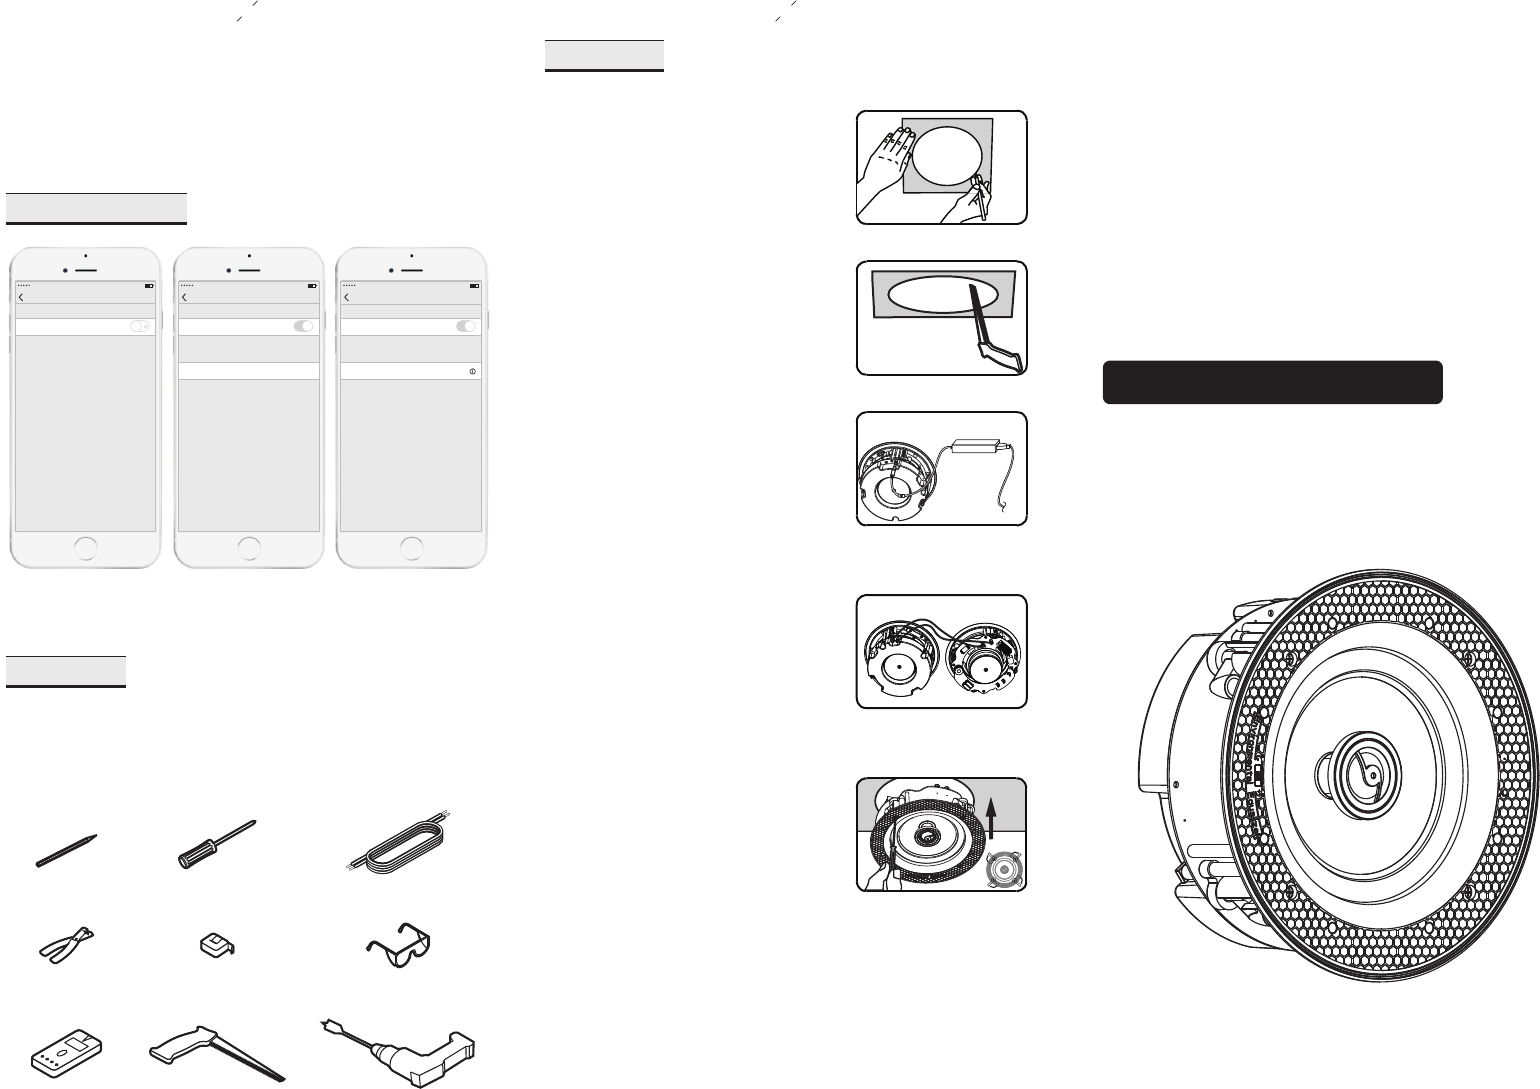
1. Select Bluetooth
setting on your device
Settings Bluet ooth
Bluetooth
Location accuracy and nearby services are
improved when Bluetooth is turned on.
15:10 50%
2. Turn on the Bluetooth
and pair with“BT Speaker”
Settings Bluet ooth
Bluetooth
Now dis coverabl e as “My iPhon e”.
15:10 50 %
DEVIC ES
BT Spea ker
To pair an Apple Watch with your iPhone,
go to the Apple Watch app.
Settings Bluetooth
Bluetooth
Now discoverable as “My iPhone”.
15:10 50%
DEVICES
BT Speaker
To pair an Apple Watch with your iPhone, go
to the Apple Watch app.
connected
Bluetooth Pairing
Preparation
Below you will find the necessary tools needed to install your
speaker. In addition, having a friend and a ladder will make the
installation much easier. We have included a cutout template in
the package that will assist you as well.
pencil
wire cutters
stud finder
screwdriver
measuring tape
cutting saw
speaker cable
protective eyewear
drill
Installation
Use a stud finder to locate an area
that is free of obstructions or studs.
Tape the cutout template onto the
surface and using a pencil mark the
location and area you will be cutting.
Step 1 - Draw the Cutting Hole
Connect the adapter to the power input.
Step 3 - Connect Speaker Wires
Step 2 - Cut the Hole
Cut along the line with an appropriate
tool, such as a standard cutting saw.
Pull the speaker wires and power
cable through the cutout.
+-+-
Step 4 - Install a Slave Speaker
(If using a slave in your installation)
Connect the master speaker to the
slave with speaker wire.
Caution: Please ensure that the polarity
is correct.
Tip: You can color code or mark each
wire to help you connect the wires
correctly.
Step 5 - Install the Speaker
Insert the speaker into the cutout
and use a screwdriver to lock 4 dog
leg mounts. Attach the magnetic grill
to the front of the ceiling speaker.
Consult the dealer or an experienced radio/TV technician for
help.
FCC Radiation Exposure Statement
This equipment complies with FCC radiation exposure limits set
forth for an uncontrolled environment. This equipment should be
installed and operated with minimum distance 20cm between
the radiator & your body.
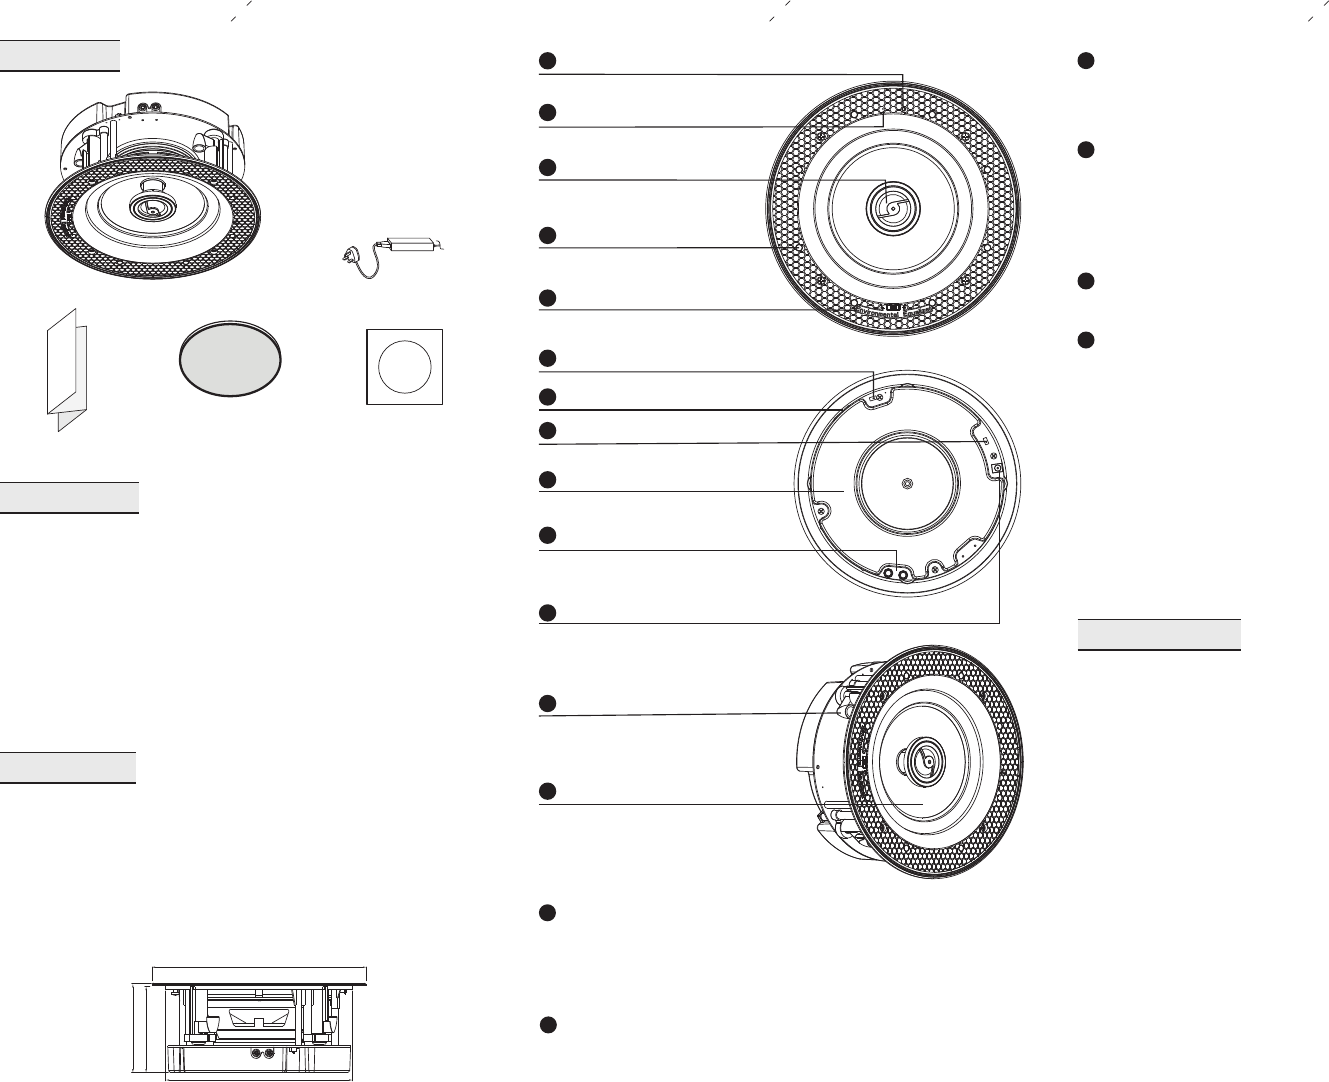
Packing List
1 2 3
USER
MANUAL
user manual speaker grill cutout template
speaker power adapter
Introduction
Note: The master speaker has an installed depth of 3.7”(95mm)
225
98
95
205
This Bluetooth Ceiling Speaker has a variety of inputs and
outputs as shown in the below:
Power Input – Connect the included Power Adapter to the Power
Input.
RCA Inputs – Connect to the RCA line output of devices such as
CD/DVD players.
Speaker Output –Drive a second slave speaker.
Connection Reset Button
Pivoting Tweeter
Environmental Equalizer
(+/-3db)
Built-in Amplifier
& Bluetooth Driver
Power Input 24V/2.5A
Speaker Output
R+ (Red) R- (Black)
Dog Leg Mounts (4)
6.5" (165mm)
Kevlar Woven Cone
Stereo/Mono
Volume Limit 50%/100%
LED Indicator
1
2
3
Magnets for Grill (8)
4
5
6
RCA Input
7
9
10
8
11
12
13
9Bluetooth Connection Pairing
Begin by applying power to the Master Speaker. The Bluetooth
status indicator on the speaker will blink BLUE to indicate it is
available to be paired to your device. Turn your device’s
Bluetooth function ON and select “BT-Speaker”. The BLUE light
will become steady and you will hear a tone indicating your
Bluetooth is successfully paired.
Note: If your device fails to pair, remove and re-insert the power
cable or press the reset button to restart the pairing process.
7RCA Input
Connect the RCA outputs of your device (CD/DVD) to the RCA inputs
found on the Master Speaker.
Caution: Please ensure the speaker is in close state before
connecting RCA audio.
Note: RCA audio and Bluetooth music will not work at the same time.
Volume Limit
8
Switch to set the volume limit to 50% or 100% on the speaker.
Stereo/Mono Switch
6
Please turn on“stereo”to open stereo mode when a slave speaker
is attached. If not, please switch to“mono”mode.
Caution: Use this switch slowly.
Connection Reset Button
1
If the speaker cannot be operated, long press the RESET button for 5
seconds to reset to factory settings.
Caution: Please ensure your speaker has power during reset, or the
speaker’s ability to operate will be damaged.
LED Indicator
2
Blue flash – Pairing mode
Steady blue – Connected
Steady green – RCA mode
Red flash – Standby
Quick red flash – Amplifier error
Tip: The amplifier has a built-in over and under voltage protection
along with short circuit and thermal protection.A failure in any of
these areas your amplifier will shut off automatically and restart once
power and/or the problem has been corrected.
Specifications
RMS Power 60W (30W Master/30W Slave)
Impedance( :8
Sensitivity (1W/1m): 90dB
Type: Class D (Digital)
Bluetooth System: Bluetooth V4.1
Bluetooth Range: >10m (33ft)
ID Device Name: BT Speaker
Power Input: DC 24V/2.5A
Frequency Response: 60Hz - 20kHz
:
ohm)
1. This device complies with Part 15 of the FCC Rules. Operation
is subject to the following two conditions:
(1) This device may not cause harmful interference.
(2) This device must accept any interference received, including
interference that may cause undesired operation.
2.Changes or modifications not expressly approved by the party
responsible for compliance could void the user's authority to
operate the equipment.
NOTE: This equipment has been tested and found to comply with
the limits for a Class B digital device, pursuant to Part 15 of the FCC
Rules. These limits are designed to provide reasonable protection
against harmful interference in a residential installation.
This equipment generates uses and can radiate radio frequency
energy and, if not installed and used in accordance with the
instructions, may cause harmful interference to radio
communications. However, there is no guarantee that interference
will not occur in a particular installation. If this equipment does
cause harmful interference to radio or television reception, which
can be determined by turning the equipment off and on, the user is
encouraged to try to correct the interference by one or more of the
following measures:
Reorient or relocate the receiving antenna.
Increase the separation between the equipment and receiver.
Connect the equipment into an outlet on a circuit different from
that to which the receiver is connected.
FCC Statement