No Wires Needed 10310308 User Manual 1
No Wires Needed 1
Contents
Bridge Manual
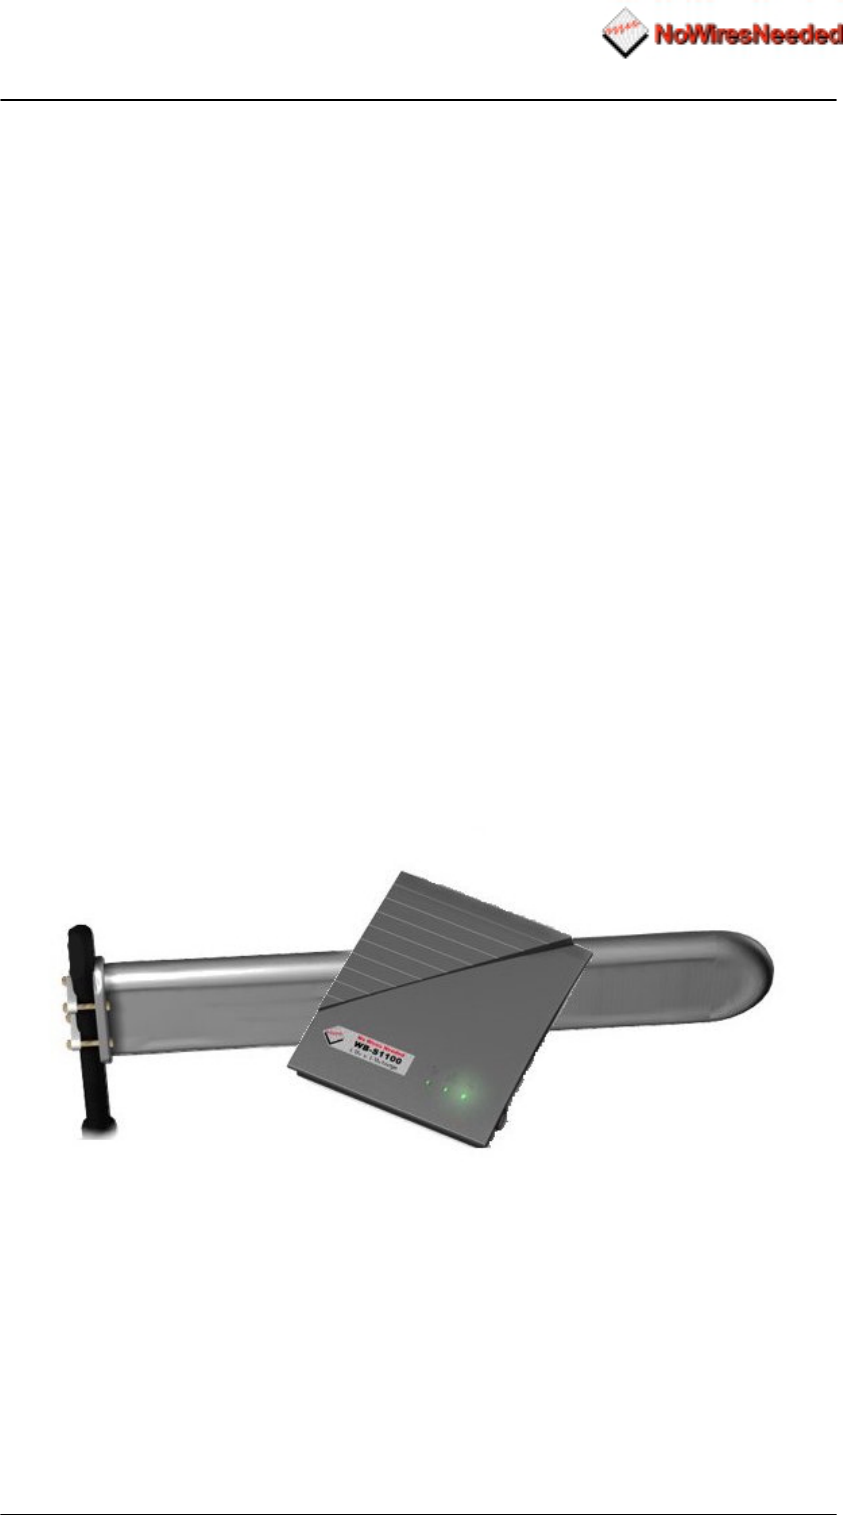
Wireless LAN to LAN bridge Manual
Page 112-10-99
No Wires Needed
WB-S1100 / WB-C1100
Wireless LAN to LAN bridge
User Manual
Version 2.1.1 – October 1999

Wireless LAN to LAN bridge Manual
Page 212-10-99
User manual
WB-S1100 / WB-C1100
Wireless LAN to LAN bridge
No Wires Needed
Jan Steenlaan 3-5
3723 BS Bilthoven
The Netherlands
www.nwn.com
Version 2.1.1 – October 1999

Wireless LAN to LAN bridge Manual
Page 312-10-99
Trade marks
Copyright © No Wires Needed
The publisher reserves the right to revise this publication and to make changes to any or all
parts of this manual at any time, without obligation to notify any person or entity of such
revisions or changes.
Swallow, Parrot, Pelican, AirLock, APCenter, ASBF and Connect are trademarks of No Wires
Needed. Other product and company names are registered trademarks or trademarks of their
respective holders.
Copyright statement
No part of this publication may be reproduced, stored in a retrieval system, or transmitted in
any form or by any means, whether electronic, mechanical, photocopying, recording, or
otherwise without the prior writing of the publisher.
Printed in Amsterdam, October 1999

Wireless LAN to LAN bridge Manual
Page 412-10-99
Statement of Year 2000 Compliance
Detailed information about our statement is published on our website.
http://www.nwn.com

Wireless LAN to LAN bridge Manual
Page 512-10-99
FCC Radiation Exposure Statement
This equipment complies with FCC radiation exposure limits set forth for an uncontrolled
environment. This equipment should be installed and operated with no less then the minimum
distance between your body, excluding hands, wrists, feet and ankles, and the antennas as
shown in the table below:
Effective Gain Omni antenna (2dBi) 20cm (7 inches)
Effective Gain Sector antenna (10dBi) 20cm (7 inches)
Effective Gain Dish Directional antenna (18dBi) 20cm (7 inches)
The above antennas are all to be mounted on the building exterior by professional antenna
installers.
Warning: It is the responsibility of the professional installer to ensure that when using the
outdoor antenna kits in the United States (or where FCC rules apply), only these antennas
mentioned in this manual are used. The use of any antenna other than those listed is
expressly forbidden in accordance with the FCC rules CFR47 part 15.204.
Note: Detached antennas, whether installed indoors or out, should be installed ONLY by
experienced antenna installation professionals who are familiar with local building and safety
codes and, wherever applicable, are licensed by the appropriate government regulatory
authorities.
Failure to do so may void the No Wires Needed Product Warranty and may expose the end
user to legal and financial liabilities. No Wires Needed and its resellers or distributors are not
liable for injury, damage or violation of government regulations associated with the installation
of detached antennas.

Wireless LAN to LAN bridge Manual
Page 612-10-99
Declaration of Conformity
This device complies with Part 15 of the FCC Rules. Operation is subject to the following two
conditions: (1) this device may not cause harmful interference, and (2) this device must
accept any interference received, including interference that may cause undesired operation.
No Wires Needed Parrot, Pelican,
WBS, WBC 1100
Tested To Comply
With FCC Standards
FOR HOME OR OFFICE USE

Wireless LAN to LAN bridge Manual
Page 712-10-99
1.0 INTRODUCTION .................................................................................................................8
2.0 HARDWARE INSTALLATION ..........................................................................................10
2.1 THE ANTENNA INSTALLATION ............................................................................................. 11
2.1.1 radiation diagram..................................................................................................... 11
2.1.2 Multi path .................................................................................................................12
2.1.3 Free space losses.................................................................................................... 14
2.1.4 Line of sight .............................................................................................................15
2.1.5 The link budget ........................................................................................................16
2.1.6 Mechanical installation of the antenna .................................................................... 17
2.1.7 Step by Step installation ..........................................................................................18
2.1.8 Lightening protection ............................................................................................... 19
2.2 BASIC ALIGNMENT OF THE ANTENNA .................................................................................. 20
2.3 CONFIGURATION OF THE BRIDGE UNITS.............................................................................. 23
Antenna settings......................................................................................................................... 24
2.4 FINE TUNING OF THE BRIDGE LINK...................................................................................... 25
The alignment............................................................................................................................. 25
2.5 INSTALLING THE BRIDGE UNIT ............................................................................................ 27
3.0 BCONFIG CONFIGURATION PROGRAM .......................................................................28
3.1 INSTALLATION................................................................................................................... 29
3.2 THE NETWORK CONFIGURATION......................................................................................... 30
Community string ....................................................................................................................... 31
Set a fixed IP address ................................................................................................................ 31
Change write community............................................................................................................ 31
3.3 THE DEVICE SETTINGS ...................................................................................................... 32
Encrypt link using AirLock™ security ......................................................................................... 32
Contention window..................................................................................................................... 32
ACK window............................................................................................................................... 33
Short retry limit ........................................................................................................................... 33
RTS/CTS threshold .................................................................................................................... 33
Long retry limit............................................................................................................................ 33
Fragmentation threshold............................................................................................................. 33
Antenna settings......................................................................................................................... 33
Regulatory domain ..................................................................................................................... 34
Area ..................................................................................................................................34
Channel...................................................................................................................................... 34
ED Threshold ............................................................................................................................. 34
Some other notes....................................................................................................................... 34
3.4 RESETTING THE BRIDGE .................................................................................................... 35
4.0 TROUBLESHOOTING ...................................................................................................... 36
Problem: Can not access the bridge settings via network.......................................................... 36
Problem: Low throughput on the link .......................................................................................... 36
Problem: Link drops away every now and then.......................................................................... 36
5.0 SPECS...............................................................................................................................37
5.1 BRIDGE SPECS.................................................................................................................. 37
Management and configuration.................................................................................................. 38
!NETWORK:SNMP AGENT WITH SUPPORT FOR MIB-II AND IEEE 802.11MIB ....................38
5.2 OMNI ANTENNA SPECS (ART NUMBER 10380125) .............................................................. 39
Features ..................................................................................................................................... 39
Description ................................................................................................................................. 39
Specifications ............................................................................................................................. 39
5.3 SECTOR ANTENNA SPECS (ART NUMBER 10380114) .......................................................... 40
Features ..................................................................................................................................... 40
Description ................................................................................................................................. 40
Specifications ............................................................................................................................. 40
5.4 DISH ANTENNA SPECS (ART NUMBER 10380103) ............................................................... 41
Description ................................................................................................................................. 41
Specifications ............................................................................................................................. 41
5.5 POWER SUPPLY SPECIFICATIONS ....................................................................................... 42
Wireless LAN to LAN bridge Manual
Page 812-10-99
1.0 Introduction
Thank you for purchasing the No Wires Needed Wireless LAN to LAN Bridge.
This manual will assist you with the installation and use of the bridge.
The package you have received contains the following items:
• WB-S1100 and/or WB-C1100
• User manual
• Diskette containing Bconfig™ software
• Antenna (if ordered)
A wireless bridge is used to create either a point-to-point or a point-to-
multipoint link between two or more local area networks.
The minimal set-up consists out of:
• 1 WB-S1100 (server)
• 1 WB-C1100 (client)
Due to the complexity of installing a wireless bridge, always make sure a
professional installs the bridge link. A professional installer not only provides
you with an optimised link; he also supplies you with a professional
mechanical installation.
The professional installer covers the following areas:
! Network link installation
! Mechanical installation
! Weather resistant installation
! Lightening proof installation
By covering all these areas the installer will provide you with a link that has
the highest possible uptime. He will also take away every possible chance of
damaging your network.
In order to establish a link between two or more networks, it is essential that
the antenna of the server and the antenna of the client are in line of sight.
Chapter 2 will define line of sight in depth and explains the installation of the
antennas.
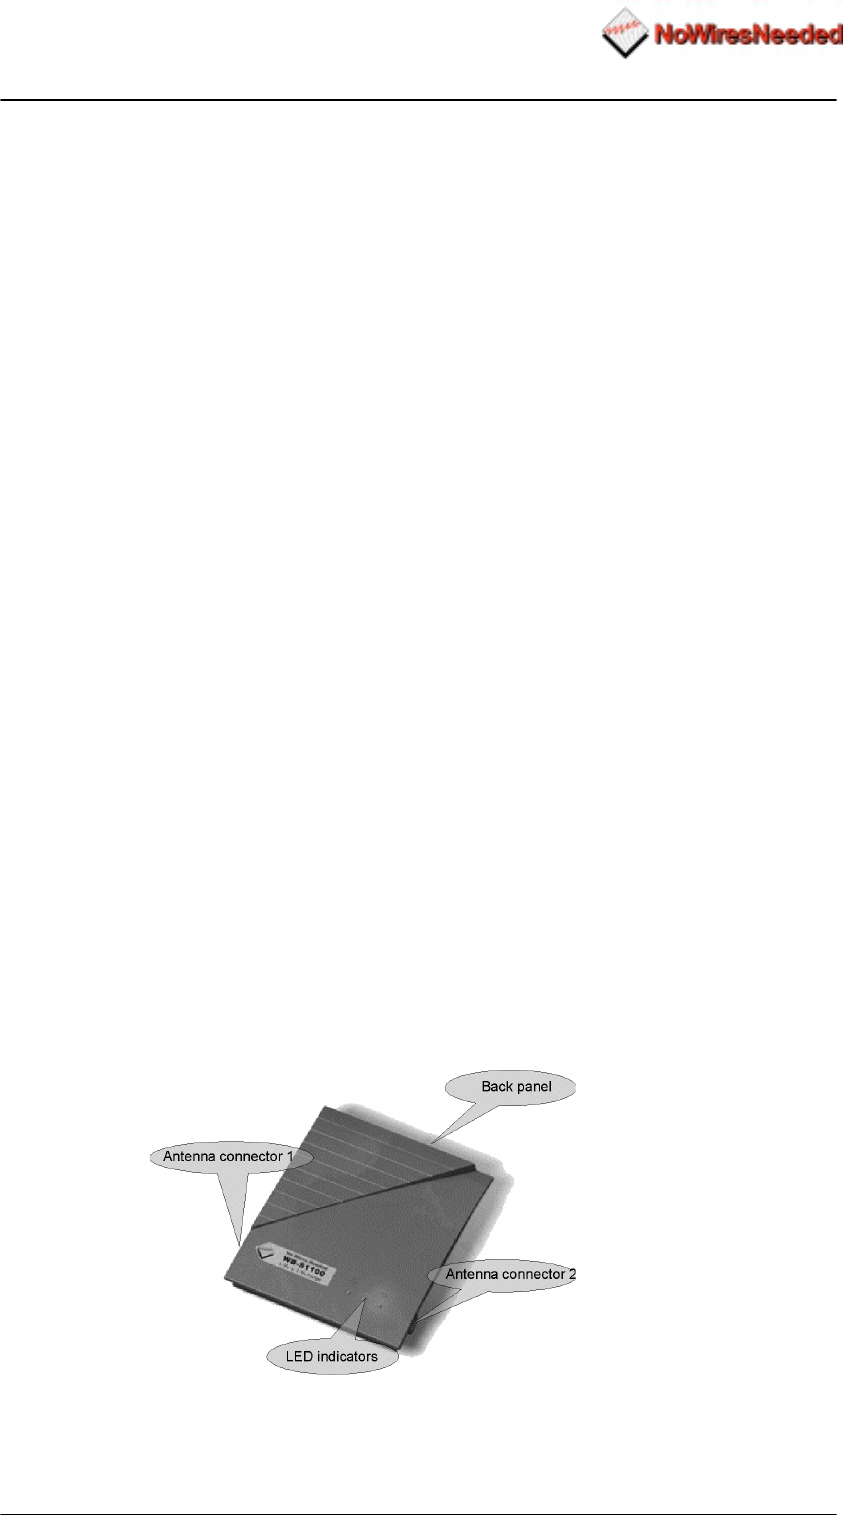
Figure 1.1:The bridge, the connectors and indicators

Wireless LAN to LAN bridge Manual
Page 912-10-99
HINT: Before you start, write down the MAC addresses of both units.
These addresses are located on the backside of the unit and are difficult
to access after installation.

Wireless LAN to LAN bridge Manual
Page 10 12-10-99
2.0 Hardware installation
This chapter describes:
• The installation of the antennas
• The installation and configuration of the WB-S1100 and the WB-C1100
units
• Connecting the antennas to the units
Before starting the installation, some understanding of antennas and their
behaviour is necessary. In the following chapter the most important
characteristics are explained. If you are not familiar with antenna technology
please take a few minutes to read this information and understand more
about antenna installation.
Wireless LAN to LAN bridge Manual
Page 11 12-10-99
2.1 The antenna installation
2.1.1 radiation diagram
The bridge units are supplied with a choice of three different antennas.
The type of antenna used depends on the type of link (point-to-point or point-
to-multipoint) and the required range. All antennas are directional by nature;
they cannot be made to radiate uniformly in all directions. Therefore,
antennas are designed with controlled properties to guide available RF
energy in the desired direction. This directivity multiplied by antenna
efficiency is gain. Gain is expressed in decibels relative to a hypothetical
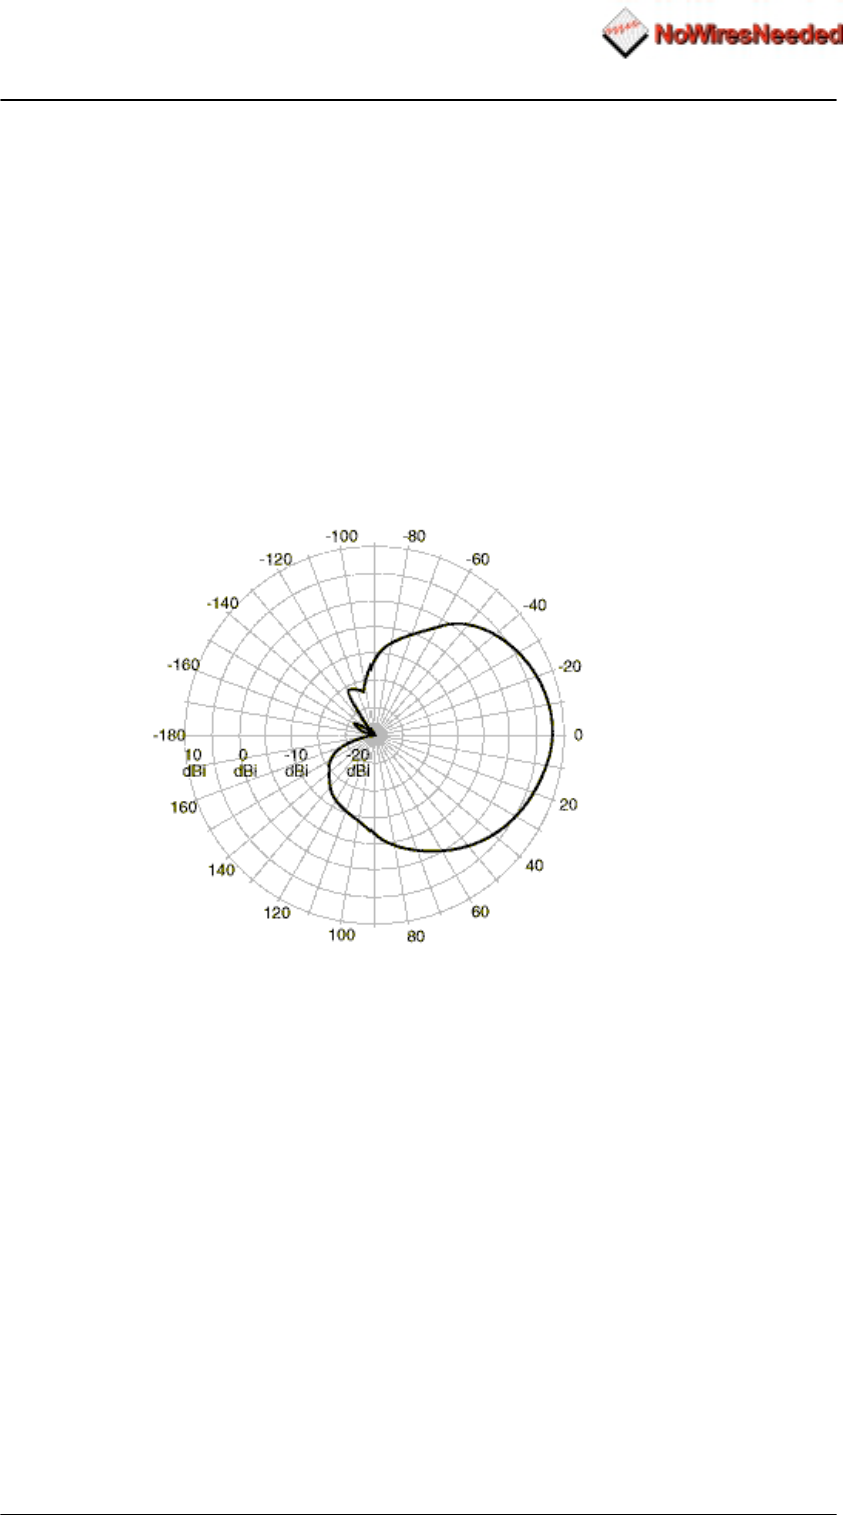
isotropic source that radiates uniformly over a spherical surface. Figure 1.1
displays this diagram versus the isotope. The gain of the isotropic source is
the unity or zero decibels.
Depending on the directive behaviour of an antenna and the site
requirements, the type of antenna is chosen.
This diagram displays the radiation power versus the direction. Figure 1.1
displays the radiation diagram of a patch antenna.
Figure 2.1,The radiation diagram of a patch antenna
The more directive an antenna is, the more gain an antenna has in one
specific direction.
Installing an omni directional antenna for a point-to-point link is useless,
unless the range between the two antennas is short. In such a case the
choice for an omni-directional antenna is a purely economical.

Wireless LAN to LAN bridge Manual
Page 12 12-10-99
2.1.2 Multi pathDirect Sequence technology is more sensitive for multi-path effects than the
traditional Frequency Hopping. Multi-path effects can be explained as
coherent signals (signals from the same source) arriving at the antenna at
different times due to the difference in path length. Several signals from the
same source meeting at the receiving antenna can arrive in phase, out of
phase or in between.
When the level of each incoming signal is included, the effects can be any of
the following:
Level Phase Result
Equal In Strong reception
Unequal In Good results
Equal Out Possible loss of receiption
Random Random Variable levels
The conductivity of the reflector and polarisation of the wave before reflection
primarily affect the level of the signal. Horizontal polarised signals, which are
parallel to the reflecting surface, will reflect almost totally without appreciable
loss at the point of bounce.
Vertically polarised signals are perpendicular to the reflecting surface, and will
either be totally reflected from a conductor, or will propagate along the
surface (depending on the angle of the arriving energy). Since radiated waves
penetrate lossy materials, energy can be lost to heat generation.
Refraction
The velocity of RF energy is delayed with prolonged passage through
dielectric materials that are denser than dry air. This is refraction, or the
change of direction of propagation. The time spent in the denser material
controls the degree of refraction and the resulting direction of the emerging
wave.
Diffraction
Perfect shadows that are cast by RF-opaque structures or objects are rare at
wireless system frequencies. Because of diffraction, energy scatters at the
edges of the obstruction. Diffraction is more pronounced in sharp or knife
edged corners. According to field theory, edges cause secondary radiation
when illuminated. This is generally independent of polarisation when the
scatterer is much longer than the impinging signal’s wavelength.
Diffraction forms a fuzzy signal source at the edges, which tends to fill in the
shadowed regions. The signal levels are low but often usable. These edges
can be corners of a building, window frames or large vehicles. Diffraction also
figures significantly in scattering at hilltops lying in the propagation path.
A choice of three antennas can be made; the table below describes the
characteristics of each. Fixed length cable is included. (cable and unique
connector loss is 4.5 dB)
Omni antenna Sector antenna Dish antenna
Gain (EIRP) 2 dBi 10 dBi 18 dBi
Alignment
accuracy Low Medium High
Multipath
sensitivity High Low Low
Size Small Medium Large
Costs Low Medium Medium
Range 1Km 3Km 6Km

Wireless LAN to LAN bridge Manual
Page 13 12-10-99
The gain of the antenna is directly linked to the range. According to the above
table, it is clear that a dish should only be chosen when a distance of 3km or
more needs to be covered.
Locating the antenna
Free space radiation patterns are the baseline performance criteria before
installation in the real world environment. Since sites are located on rooftops,
or on the side of buildings; many opportunities exist for interference from
chimneys, walls, masts, towers and other antennas. Although it is difficult to
predict level changes you can take steps to minimise pattern distortion.
Obstructions are either conducting or non-conducting. Conducting objects
create the most severe disturbances. Those near the resonant length of the
antennas, such as other antennas, behave as the parasitic elements of an
uncontrolled array, producing random nulls and lobes. Larger conducting
structures causes severe shadowing. The closer the spacing, the larger the
shadow.

Wireless LAN to LAN bridge Manual
Page 14 12-10-99
2.1.3 Free space losses
Spreading is the principal contributor to signal loss for line of sight
propagation. As a signal radiates it spreads or expands into a spherical
surface. The available RF power is distributed over this surface and weakens
with increasing range. The signal is reduced by 6 dB for every doubling
distance from the source. We compute the loss path between the source
radiators with spherical patterns using the following equation:
Lp(dB)= 92,45 + 20log10 F+20 LOG10d
Lp= Path loss
F= frequency in GHz
dB= decibels
d= Distance in kilometres
Example:
A distance of 6 kilometre provides a free space loss of –115,67 dB.
Wireless LAN to LAN bridge Manual
Page 15 12-10-99
2.1.4 Line of sight
Radio signals require a clear path between antennas. It is necessary to know
the requirements of a clear path (known as ‘line of sight’).
Line of Sight (LOS) means a bit more than the words say. Of course the first
condition for a LOS link is that the two antennas can be connected with an
imaginary straight string. There should never be any object blocking this line.
Achieving this with a short link is fairly easy. Long links, however, can cause
problems. As well as binoculars and a compass, a large calibrated tether
balloon can be used for determining line of site. Letting this balloon up on one
side until it is visible from the other side will tell you exactly the required
height for this link. Repeat this both side.
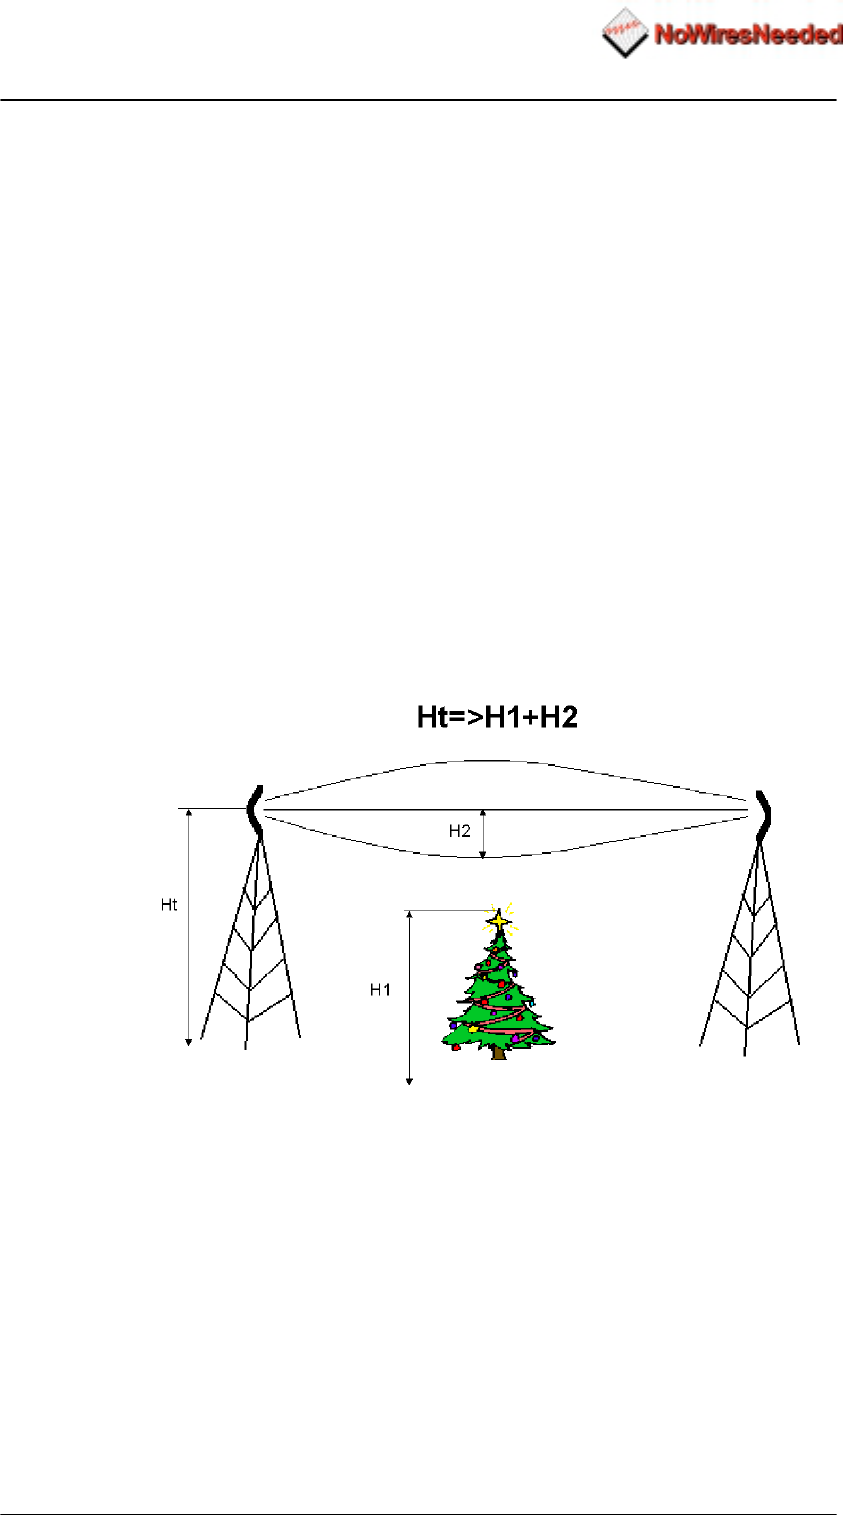
Besides the LOS there is the Fresnel zone. This zone is an elliptical area
immediately surrounding the visual path. It varies in thickness depending on
the length of the signal path and the frequency of the signal. The necessary
clearance for the fresnel zone can be calculated, and must be take in account
when determining the height of the antennas.
Figure 2.2
A rule of thumb for the clearance needed above and below the signal path
(H2) is that for every 1.5 km a clearance of 4 meter is necessary. A result of
this rule is that large distances need great heights.
Think about the following things if you have to determine the line of site:
− Trees grow leaves
− Make sure you have enough height

Wireless LAN to LAN bridge Manual
Page 16 12-10-99
2.1.5 The link budget
For each link a ‘link budget’ needs to be made. The link budget will calculate
the signal level through the link, and predicts the signal level at the receiver’s
side. Within the ‘link budget’ there are a few parameters that are influenced
by the location of the link. These are humidity and terrain roughness. The
length of the link has also got a major influence on the ‘link budget’.

Wireless LAN to LAN bridge Manual
Page 17 12-10-99
2.1.6 Mechanical installation of the antenna
A solid mechanical installation of the antenna is the base of a quality link. An
outdoor mounted antenna is exposed to extreme weather conditions. Metal
brackets oxidise, and vibrations will cause slack on connections. Therefore,
the mechanical connection between the antenna and its carrier needs to be
solid. Use locktite on screws. The connector between the cable and the
antenna needs to be sealed with threading tape. Corrosion on the connector
will cause signal losses due to changing impedance of the connection.
Outside mounted antennas are lightening-strike sensitive. Lightening strikes
always are common at highest and smallest point, typically an antenna. The
antenna cable will then conduct the enormous amount of energy towards the
bridge. If no lightening arrestor is placed in-between the antenna cable the
bridge unit will be damaged, or worse, set on fire. Therefore, always use a
lightening arrestor.
When placing the antennas the following points should be kept in mind:
• Place an omni antenna always risen above conducting objects
• Place a flat panel and Yagi antenna always on the edge of a roof or
mounted on a wall
• With an outdoor installation of the antenna always use a lightening
arrestor
• Make sure that the mounting of the antenna can handle high forces. Wind
can cause misalignment or even permanent damage
• Keep the cable length between the antenna and the bridge limited to the
minimum. Every meter of cable causes signal loss

Wireless LAN to LAN bridge Manual
Page 18 12-10-99
2.1.7 Step by Step installation
1. Determine the antenna location
• Line of sight
• Make sure your antenna fits the range
• No large conducting objects in the area
• No other antennas close
• When mounting on a pole: Let the antenna rise above the pole
• Remember that trees grow!!!
2. Mount the antenna
• It can never be too solid
• Use Locktite with screws
• Seal connectors with threading tape
• Use a lightening arrestor
3. After installation
• Double check

Wireless LAN to LAN bridge Manual
Page 19 12-10-99
2.1.8 Lightening protection
Lightening strikes can cause major damage on equipment and buildings. An
antenna placed on a roof is often the place of strike. Dish antennas mounted
against a wall are less risky. The cable conducts the lightening into the
building. Due to this behaviour an antenna installation requires dual
protection. The antenna needs to be grounded, and the cable requires a
surge protector.
Contact a local lightening specialist for advise on grounding. Below are some
general hints on lightening protection:
! Never mount an antenna though the roof, only on the roof
! Keep the antenna cable as much as possible out doors
! The cable shield needs to be grounded on the highest possible point, and
at the point of entering the building.
! Place a surge protector on the antenna connection at the bridge, and also
on the power supply of the bridge
Lightening protection is a profession. A specialist supplies a professional
installation that reduces the risks of damage caused by lightening strikes.
No Wires Needed advises to always use a professional lightening
specialist.
Wireless LAN to LAN bridge Manual
Page 20 12-10-99
2.2 Basic Alignment of the antenna
Due to its directive behaviour an antenna needs to be aligned. Alignment is
done by maximising the antenna signal and by minimising phase noise. The
phase noise directly influences bit error rate. The alignment is essential
because certain weather conditions can degrade the signal strength. To avoid
link dropouts with bad weather the antennas need to receive the strongest
signal possible with the lowest possible phase noise. In most situations a high
signal level means a low bit error rate, but it does not go without saying. In
some cases the lowest Bite Error Rate is reached at a signal strength level
that is not the highest possible.
The bridge has got a Radio Signal Strength Indicator (RSSI) and a SQ2
indicator. These indicators need to be used during alignment. Both indicators
are displayed at the same time.
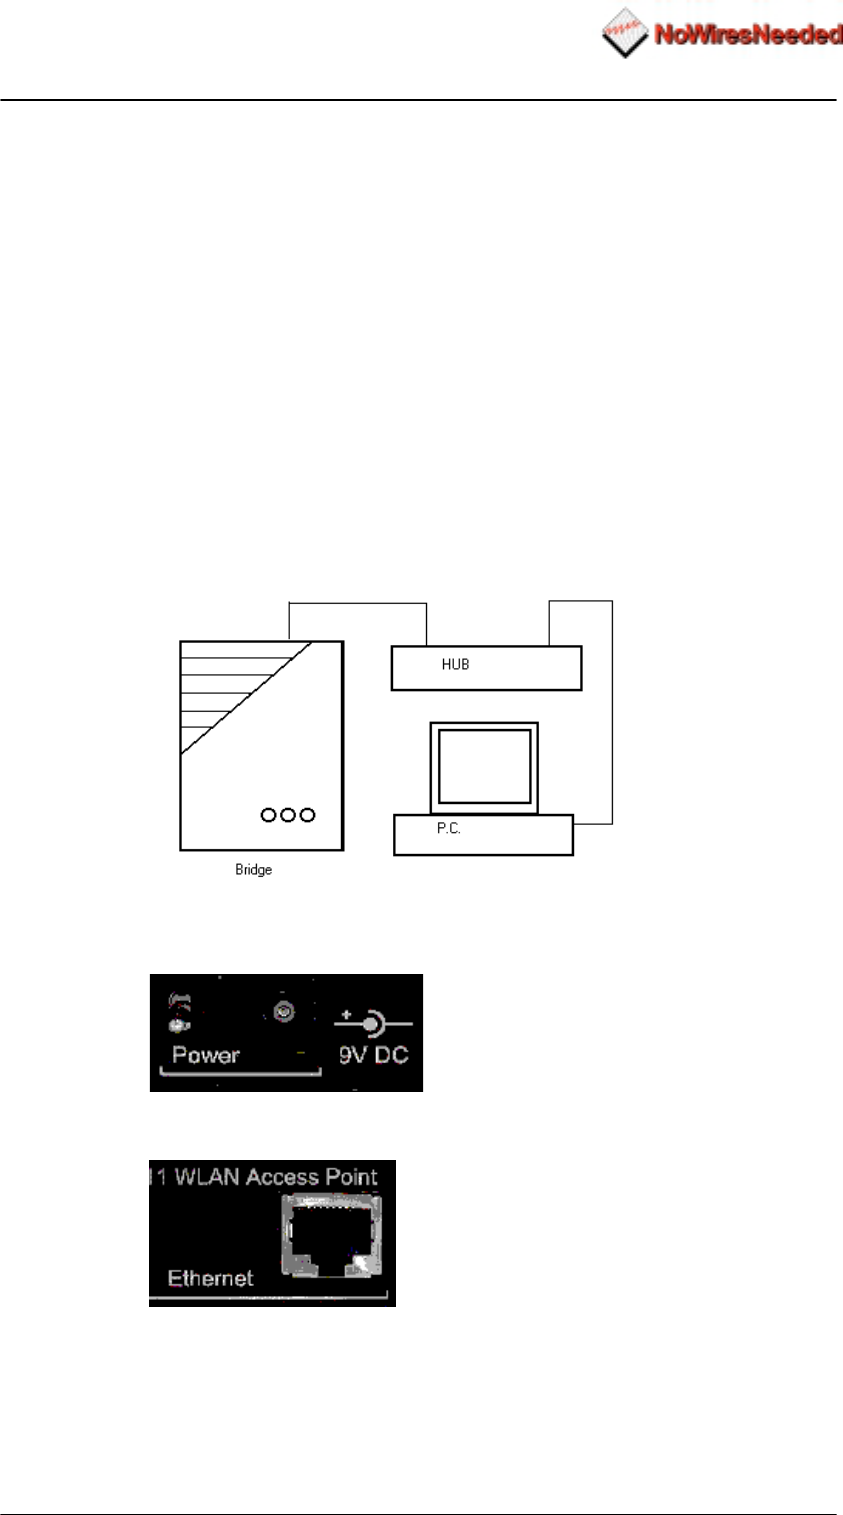
To be able to read the RSSI and SQ2 the bridge needs to be connected to a
computer via a small hub. This computer needs to be equipped with an
Ethernet card.
The set-up depicted in figure 2.3 needs to be made.
Picture 2.3 Interconnection during installation
Picture 2.4. The power connector
Picture 2.5. The Ethernet connector
Wireless LAN to LAN bridge Manual
Page 21 12-10-99
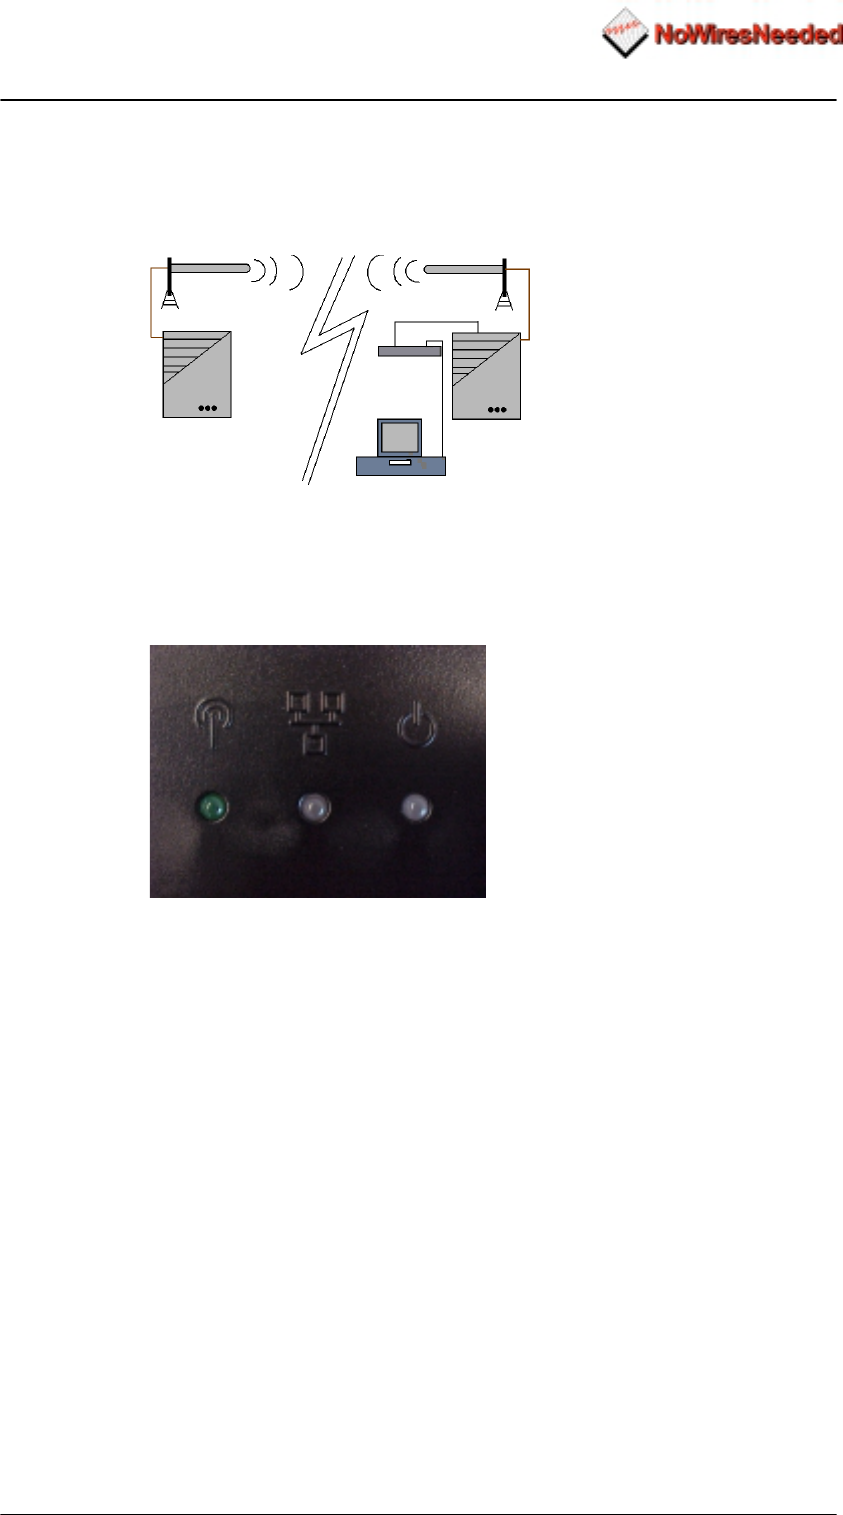
On the other side of the bridge, connect the antenna and bridge unit the
regular way. Always use the antenna connector 1 for this, the network does
not have to be connected to it. If you have a directive antenna, aim it at the
other antenna.
Figure 2.6
This diagram is based on a 10Base-T (RJ-45) connection. This connector is
located on the back side of the bridge unit. Picture 2.4 shows the Ethernet
connector. After interconnecting the units, they can be powered up. The
power switch is next to the power connector. See picture 2.3.
Figure 2.7. The led indicators
The LED indicators (fig.2.7) display the status of the bridge. The power LED,
on the right, displays the power status. Green means a correct power feed,
red indicates wrong firmware or power failure.
The LED in the middle displays the network status. If the bridge is connected
to a network it will light-up green, otherwise it will be red or off.
NOTE: The bridge unit is equipped with two antenna connectors (1 & 2).
Always use connector 1, Connector 2 is only used inspecial cases by an
experienced installer. For information about using the second antenna
option, please contact No Wires Needed.
The left hand side LED displays the radio link status. The client function of
this LED differs from the server. The radio link LED of the server will blink
as soon as it is transmitting a beacon, approximately 10 times per
second, even if there is no connection to the client. The client will blink
as soon as it receives a beacon.

Wireless LAN to LAN bridge Manual
Page 22 12-10-99
It is this function that is used for the first alignment. First, install the server
side of the bridge. Aim the server antenna (unless it is an onmi antenna)
towards the client side of the bridge. Then power up the server side.
Secondly, the client side needs to be installed. Aim the client antenna
towards the server side and power-up the client unit. This should result in a
blinking radio link LED at the client side. Please remember the server radio
link LED will always blink, while the client LED blinks only when it receives a
beacon. If the client radio link LED is not blinking realign the antennas (both
server and client side).
Wireless LAN to LAN bridge Manual
Page 23 12-10-99
2.3 Configuration of the bridge units
This chapter describes the configuration of the bridge during alignment. This
means that certain settings or parameters are not mentioned because they do
no effect the alignment of the antennas. Chapter 3 will give a clear description
of the meaning of each option, and when to change or use that option.
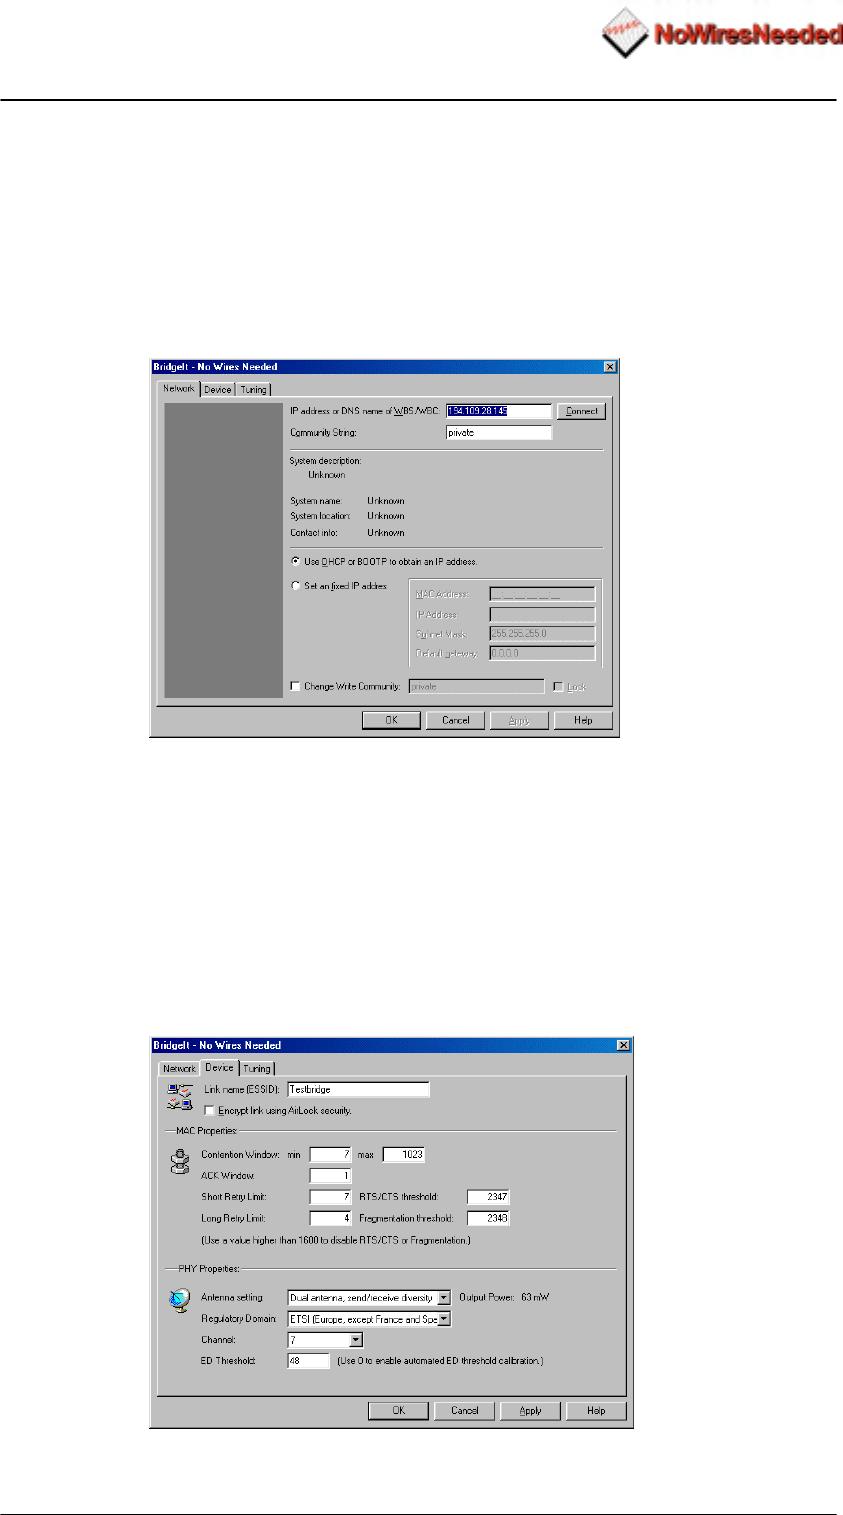
Start the Bconfig program. Firstly, the MAC address of the bridge unit
connected to the antenna needs to be entered. The MAC address can be
found on the backside label.
Figure 2.8
When the bridge is powered up for the first time, the top IP address field is
empty. To set an IP address select ‘Set a fixed IP address’; then enter the
MAC address, IP address, Subnet mask, and finally the default gateway. If
you have a DHCP server within your network you can select the DHCP
option, an IP address is then automatically assigned. If you prefer to use
DHCP because of its centralised administration, but want a fixed IP address
for the bridge unit, you can make a reservation for the MAC address in the
DHCP server.
After this information is entered press the ‘Connect’ button. Then the system
description will display the bridge name and firmware version.
After entering this information select the ‘Device’ tab. The following screen
will be displayed:
Figure 2.9

Wireless LAN to LAN bridge Manual
Page 24 12-10-99
In this menu the radio settings can be set. It contains the following options:
! SSID (name of the link, both sides need the same name)
! Encrypt using AirLock™
! MAC properties
! Contention window (use if more data goes upstream than
downstream)
! ACK window (use when large distances need to be covered)
! Short retry limit
! RTS/CTS threshold
! Long retry limit
! Fragmentation threshold
! Physical properties:
! Antenna settings
! Regulatory domain
! Channel
! ED threshold
Most of these settings do not require any changes for normal operations.
Point-to-point links up to 3 km do not need any changes from the default MAC
settings. If the distance exceeds 3 km, increase the minimum of the ACK
window to 10.
A new installation does require the SSID, Regulatory domain and Channel to
be set.
The SSID
This is the name of the bridge link. The client and the server need to have
the same name in this field (the only restriction for this setting).
The Regulatory domain
With reference to the table shown on page 35 The Regulatory Domain,
some countries have the FCC rules applied, other countries have the ETSI
rules applied with some minor changes as shown in the table.
Channel
This setting also needs to be the same on both sides of the bridge. This
setting becomes important if multiple bridge links are installed. It could be that
one bridge link will interfere with the other bridge link. By choosing another
channel, interference can be avoided. Within ETSI the available channel
settings are channel 1, 7, and 13. Within the FCC domain the available
channel settings are channel 1, 6 and 11.These channels are not interfering
and need to be used when bridges are co-located.
The other settings are described in chapter 3. These do not need to be
changed for normal use. If you do, however, change the settings and it has a
negative effect on the link quality, the settings can be changed back to the
original values without damaging the bridge.
Antenna settings
Make sure the antenna options selected match your set-up. The diversity
option will influence the performance if only one antenna is connected.
Wireless LAN to LAN bridge Manual
Page 25 12-10-99
2.4 Fine tuning of the bridge Link
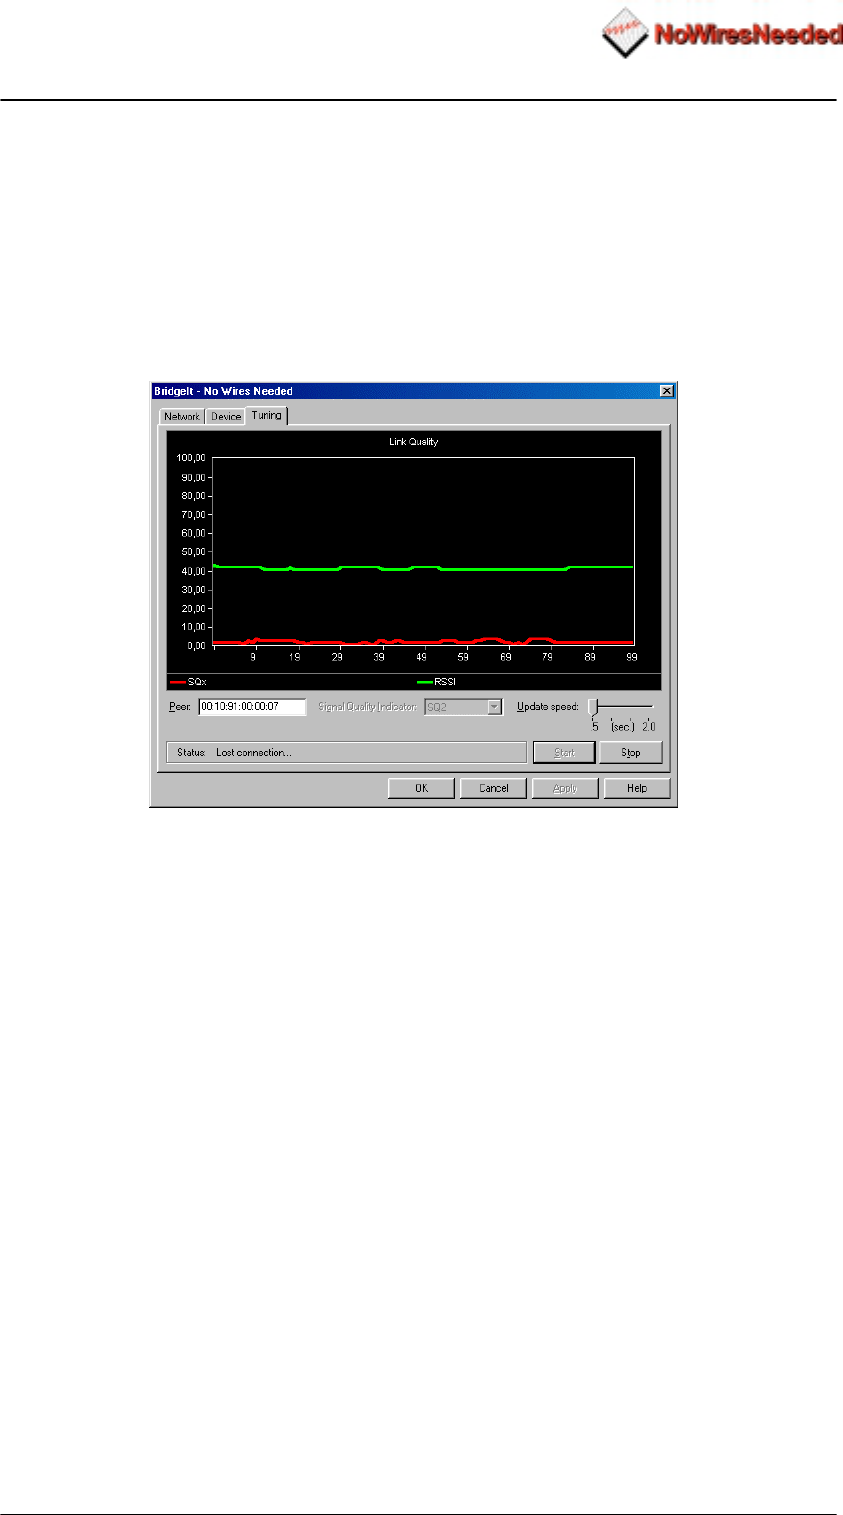
The link quality is measured via the Tuning tab. Two quality indicators are
displayed. These are:
! RSSI (radio signal strength indicator)
! SQ2 (indication for quality of received signal)
The tuning selection looks like this:
Figure 2.10
Two lines are displayed. The top one (green) represents the radio signal
strength indicator (RSSI), the other (red) represents the signal quality (SQ2).
Before the signal quality measurement can be started, the MAC address of
the other side of the bridge needs to be entered in the PEER field.
It is also possible to change the update speed of the measurements.
Remember: If this measurement is activated, no normal IP traffic is
possible.
So this mode can only be used during trouble-shooting and installation.
The status bar at the bottom of the screen shows the current status of the
link.
The alignment
The alignment is done by maximising the radio signal strength and minimising
the SQ2 indicator. Slowly turning the antenna left and right, up and down, will
affect the RSSI. Now start to peak this level.
After finding the peak level, monitor the SQ2 indicator. This indicator displays
the multipath effects. Now try to peak this indicator by again turning the
antenna very slowly in all directions. Once you have found the SQ2 signal
peak, monitor the RSSI indicator again and verify that it is still at an
acceptable level.
Repeat this procedure on both sides of the bridge several times.
Wireless LAN to LAN bridge Manual
Page 26 12-10-99
Figure 2.11
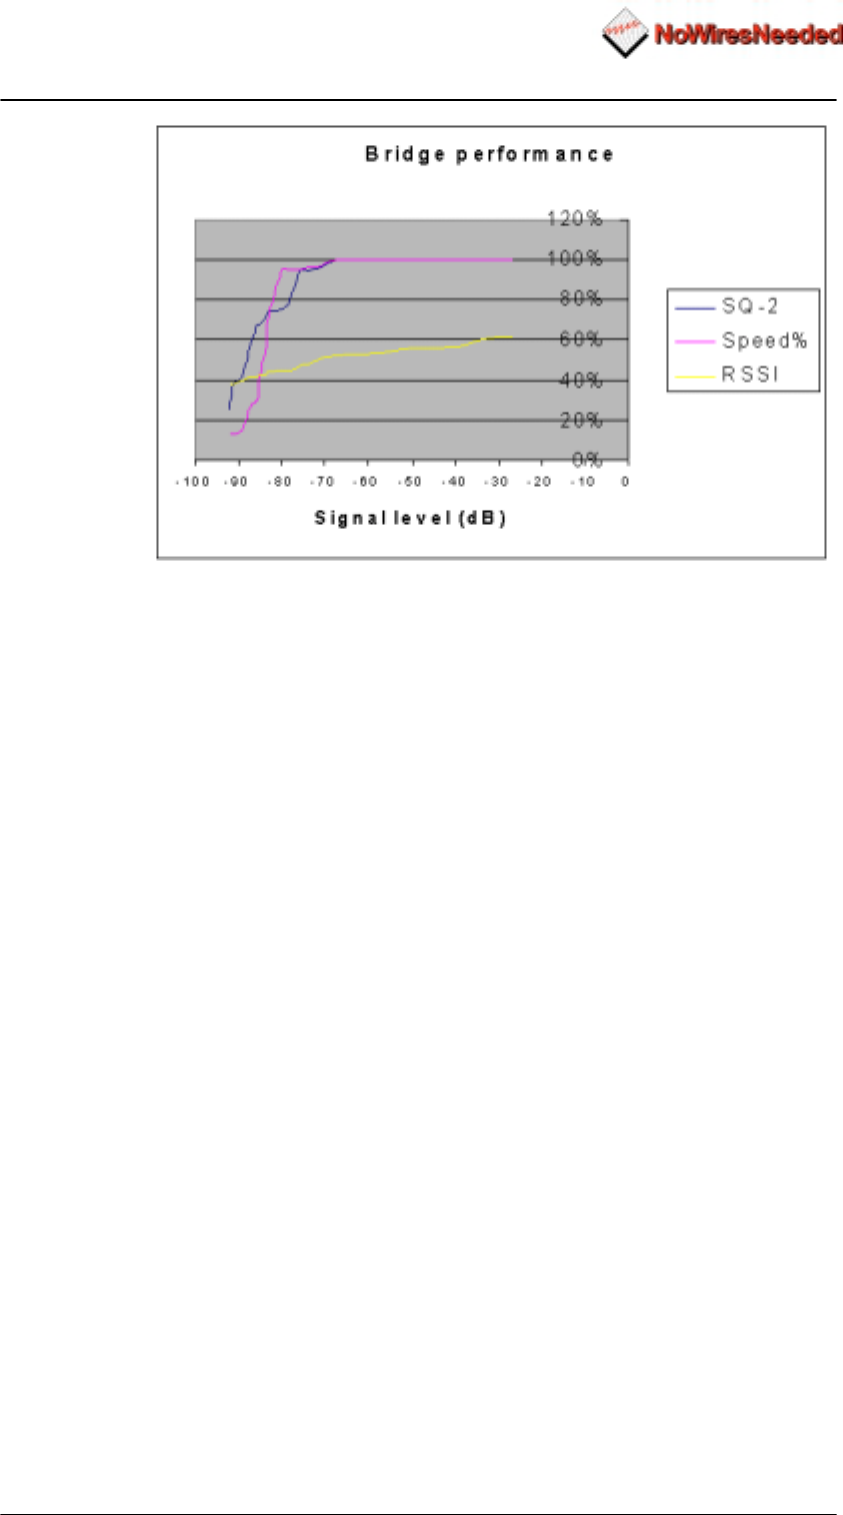
The chart below displays the signal level versus the RSSI, SQ2, and the
speed. Speed is displayed as a percentage of the maximum. If SQ2 displays
100%, the red line in the tuning screen displays 0. You can use this graph to
determine if the throughput fits the RSSI and SQ-2 value the tuning function
displays.

Wireless LAN to LAN bridge Manual
Page 27 12-10-99
2.5 Installing the bridge unit
The bridge unit should be installed in a dry and temperature controlled
location. The bridge units should not be exposed to hostile environments;
temperature should not drop below zero or exceed fifty degrees Celsius.
Preferably mount the unit inside; if that is not possible use the outdoor
housing. The housing supplied/advised by No Wires Needed contains a
heating element and a sensor.
The antenna is supplied with an antenna cable. Use this cable with your
installation. If for some reason this cable is too short, consult No Wires
Needed for another cable. If the cable is too long, do not cut the cable or roll
the cable. The length of the cable determines the characteristics of the
system.
Note:
If you cut the antenna cable the system will not perform according to
the specs. Modifying the cable will void NWN’s warranty. If for some
reason changing the antenna cable is unavoidable please contact NWN.

Wireless LAN to LAN bridge Manual
Page 28 12-10-99
3.0 BConfig configuration program
This chapter describes the configuration program of the bridge. This program
allows you to install and maintain your bridge link. It contains an excellent
performance monitor for fine-tuning and troubleshooting.
Within this chapter all options in the program are described together with the
circumstances in which it is useful to use these setting.
Wireless LAN to LAN bridge Manual
Page 29 12-10-99
3.1 Installation
Bconfig runs on any Windows 95/ 98 or Windows NT machine with TCP/IP
installed.
To install the Bconfig program, insert disk 1 into your disk drive and run the
Bconfig setup.exe. The set-up wizard will guide you through the installation
process.
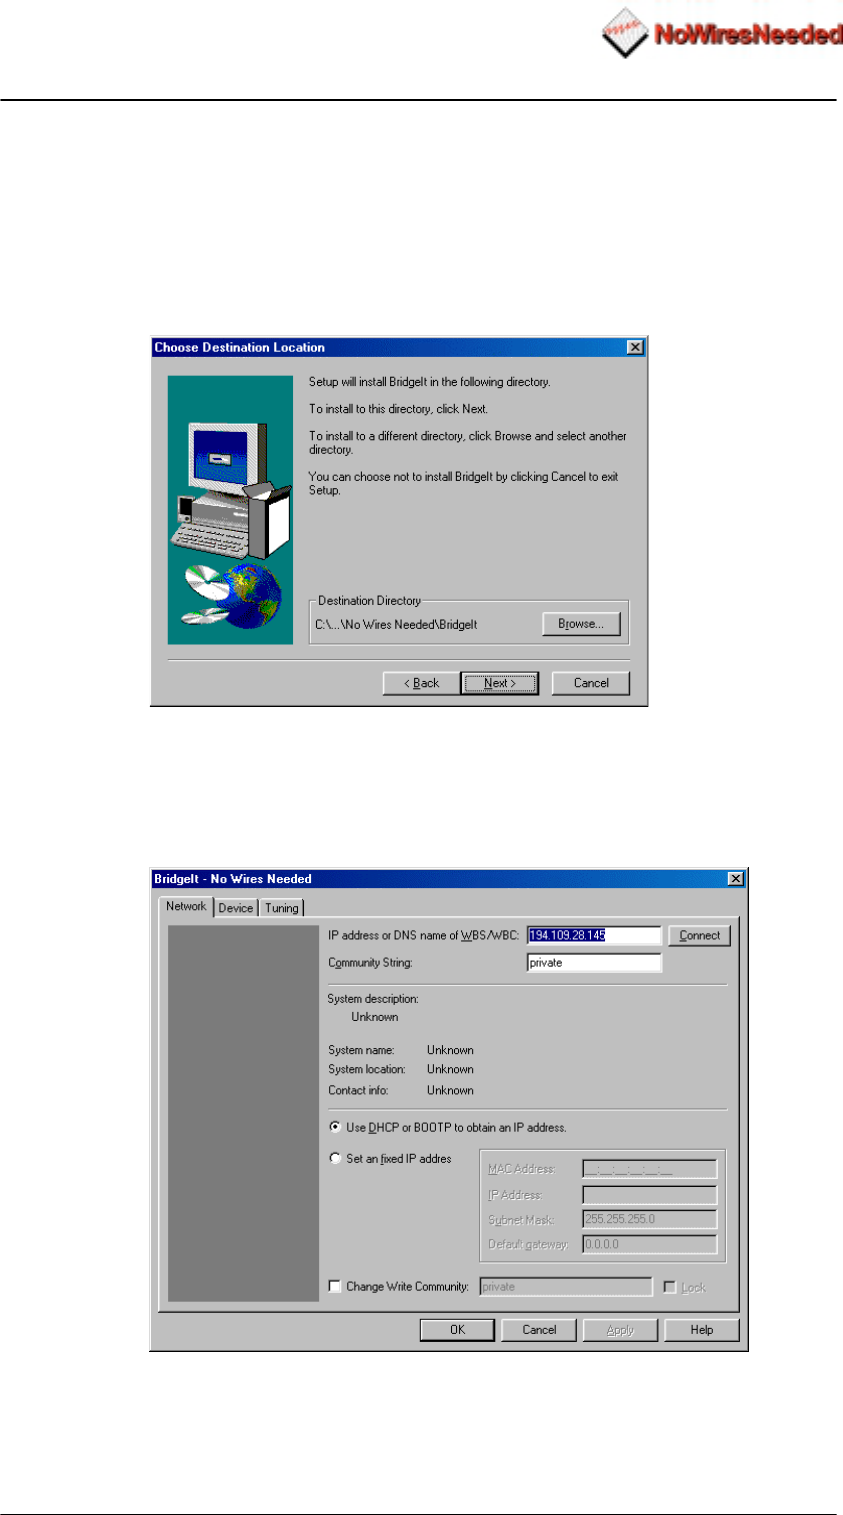
Figure 3.1
Select the directory you want to install BConfig in.
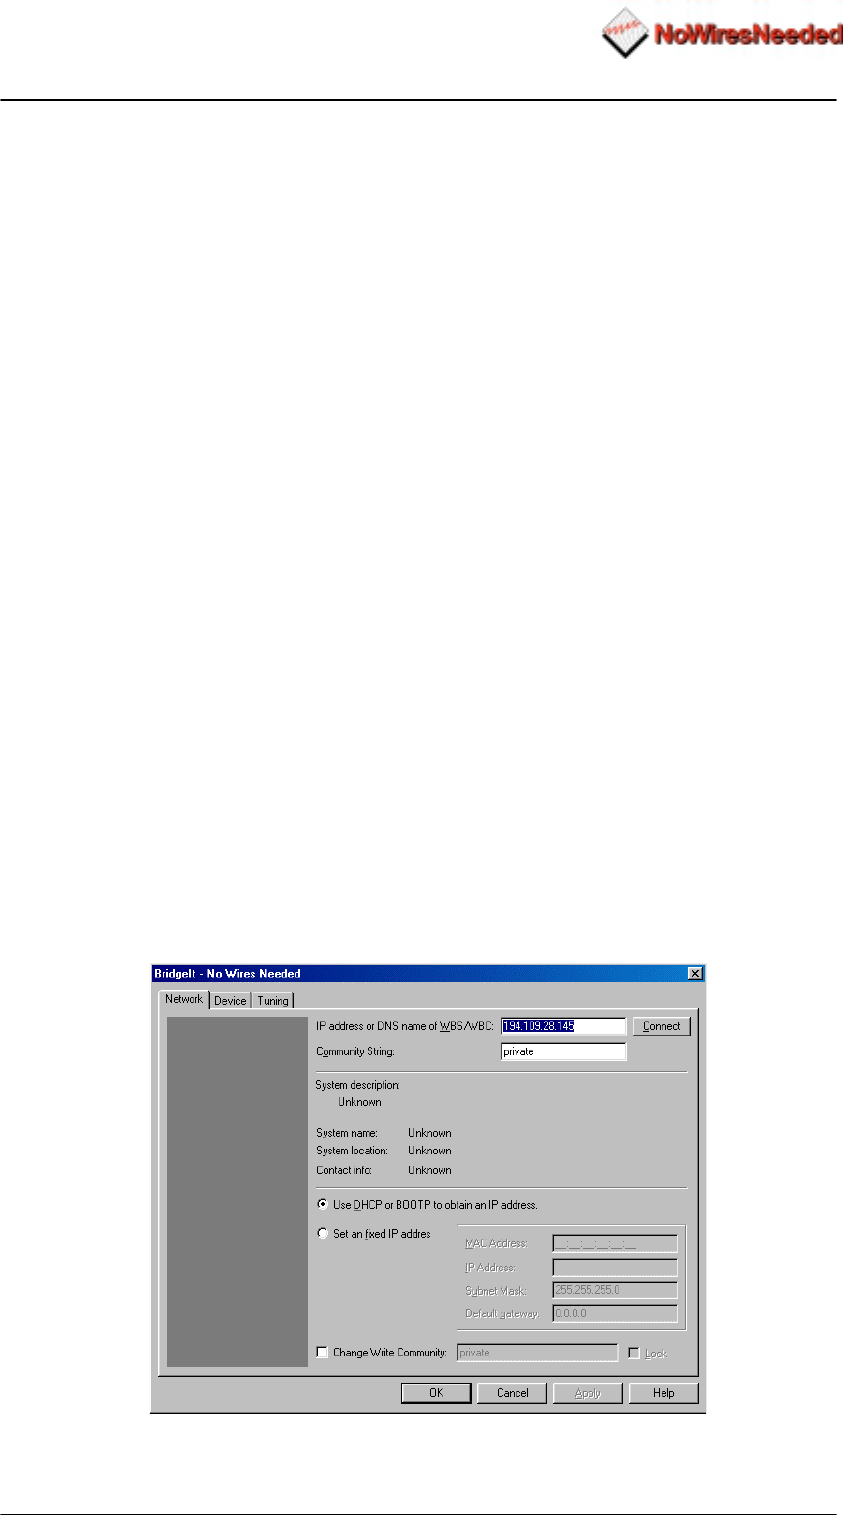
After installation is finished you can start the BConfig program. It will start at
the network screen. The network screen allows you to enter the MAC address
or the IP number of the bridge. It also allows you to set or change the
community string.
Figure 3.2
Wireless LAN to LAN bridge Manual
Page 30 12-10-99
3.2 The network configuration
The Network configuration screen.
The bridge can be configured before it is actually installed. The configuration
consists of two parts, the wireless settings and the network settings.
The network settings contain the following parameters:
• IP address (DHCP or manual)
• Sub-net mask
• Default route/ gateway
• Community string (password)
• Lock (remote management on/off)
If an IP address is already set, only the IP address needs to be entered at the
top field (IP address or DNS name of WBS/WBC). Click the Connect button to
continue. The system description will then be shown, the MAC address etc.
If the bridge is connected for the first time, two situations are possible. The
first situation is when you have the bridge connected to a network without a
DHCP server, and the second situation is where there is a DHCP server
installed in the network.
If a DHCP server is used in the network where the bridge is installed, first
check the IP address it has been assigned. Then enter that number at the
network screen and press Connect. This will display the MAC address, sub-
net mask, and default gateway.
If no DHCP server is running select ‘Set an fixed IP address’. Then enter the
MAC address and the IP address manually. Also, the sub-net mask and
default gateway has to be entered. Press Connect. The network side of the
bridge unit is now configured. Repeat this procedure on both sides of the
bridge.
Figure 3.3

Wireless LAN to LAN bridge Manual
Page 31 12-10-99
Below you find a summary of all settings in the network settings part.
IP address or DNS name of WBS/WBC:
The configured bridge can be accessed via this field.
Community string
The password protection on the bridge settings.
Use DHCP or BOOTP to obtain an IP address.
If a DHCP server is installed, an IP address can automatically be assigned to
the bridge.
Set a fixed IP address
With this option an IP address can be manually set. First the MAC address
needs to be entered. If an IP address is already configured, it will appear after
entering the MAC address. Sub-net mask and default gateway can also be
entered in to this field.
Change write community
This option allows you to change the password of the bridge unit. If the
LOCK field is flagged, the bridge can not be accessed via the network. It can
only be configured directly.
Wireless LAN to LAN bridge Manual
Page 32 12-10-99
3.3 The device settings
The radio setting can influence the performance of the link. After installation it
is essential to go through each parameter and determine the best settings.
Some parameters are related to each other, this means that the best
combination needs to be found. Pay special attention during fine-tuning to the
ED the threshold, ACK window, and the contention window.
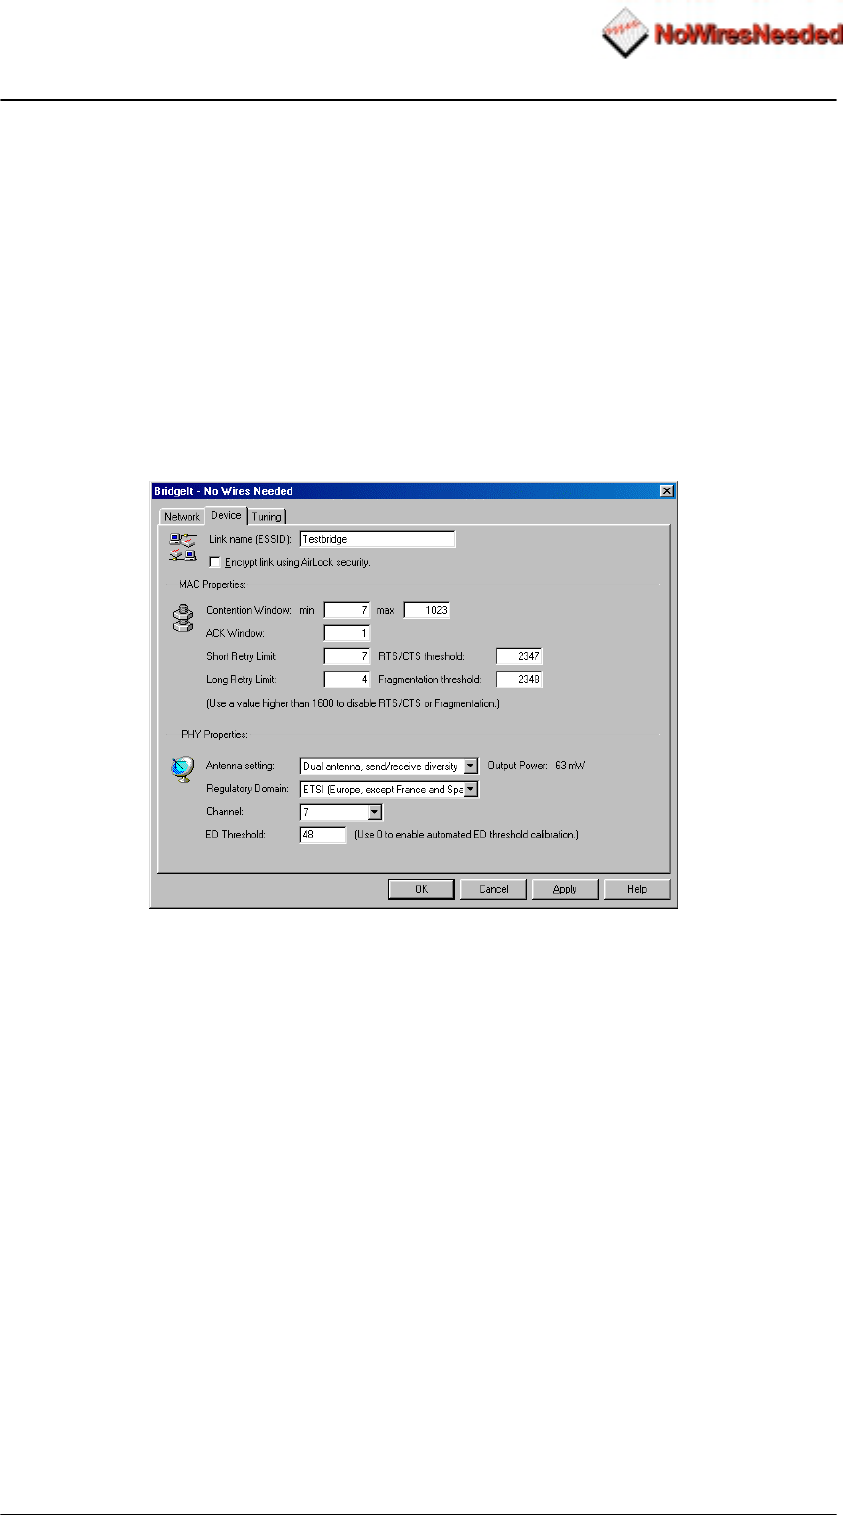
In the Device tab the following parameters can be set:
• SSID (name of the link)
• Security algorithm used (AirLock™ or none)
• Radio channel (preferred 1, 7 or 13)
• Bit rate (Auto, 2 Mbps, 5,5 Mbps, 10 Mbps)
• Antenna settings
• Access control setting (MAC address client )
Figure 3.4
Link Name (ESSID)
The link name is the link ID. Both sides of the bridge need to have the same
name. This name can be considered the general link name.
Encrypt link using AirLock™ security
This option allows you to switch the security on or off. It is advised to have
AirLock™ always switched on. Airlock™ provides you superior security and
protects you against preaking, eavesdrops, hacking etc. The appendix
contains the AirLock™ white paper.
Contention window
The contention window default is 31 to 1023. This is the back-off window
expressed in slot time. 1 means 1slot time, which equals 20 microsecond.
This parameter may need to be manipulated when the traffic is out of balance
or if the link is set to point-to-multipoint. Out of balance means more data
upstream then downstream, or vice versa. Having the diversity option
selected with in the antenna field will also creates some extra requirements
for the contention window. Diversity makes the radio listen to both antennas.
This does not happen at the same time; it will constantly switch between the
two antennas. So it will listen 1 slot time to antenna 1 and the next slot time to
antenna 2. This means that theoretically it can take 50% more time to receive
the right signal. Therefore increase the minimum value of the contention
window when using diversity.

Wireless LAN to LAN bridge Manual
Page 33 12-10-99
ACK window
This is the waiting time for the acknowledgement, again expressed in slot
time. 1 unit is 1slot time (roundtrip) and represents 3 km. Increase this
number for large distances. 2 represents 6 km, 3 represents 9 km etc. It will
not harm the link if the ACK window is larger than the corresponding distance.
To fine tune the throughput, increase the number, measure the throughput,
and then start to decrease the ACK window while monitoring the throughput.
An excellent way of measuring the throughput is the program called
‘Bricks’.
Short retry limit
The short retry limit sets the number of retries for packets smaller than the
number defined in the RTS/CTS threshold field.
RTS/CTS threshold
Packages longer than this value will be transmitted via ‘request to send/ clear
to send’ routine. This method of transmitting provides an extremely secure
and reliable link, but will slow it down significant. Since the reliability of the
link without RTS/CTS communication is already outstanding it is advised to
use this option only if complex and hostile environments.
Long retry limit
The long retry limit sets the number of retries for packets longer than the
number defined in the RTS/CTS threshold field.
Fragmentation threshold
This value sets the threshold where above which the packets will be
fragmented.
Antenna settings
The bridge contains two antenna ports. With this option you can select the
following options:
! Receive and send on antenna 1
! Receive and send on antenna 2
! Receive on 1 send on 2
! Antenna diversity
Be very careful selecting the right antenna setting. Having diversity switched
on while only one antenna is connected will harm the performance of the link.
Also make sure that the contention window is not below 31 if diversity is
switched on.

Wireless LAN to LAN bridge Manual
Page 34 12-10-99
Regulatory domain
Some countries have the FCC rules applied, other countries have the ETSI
rules applied with some minor changes as shown in the table. Examples are
France and Spain. In these countries some channel settings are not allowed.
Regulatory
Domain Area Permissible
Channels Bridge
Predefined
channels
FCC United States 1 – 11 1, 6, 11
DOC Canada 1 – 11 1, 6, 11
ETSI Europe except
Spain and France 1 – 13 1, 7, 13
SPAIN Spain 10 10
FRANCE France 10 10
MKK Japan 14 14
Channel
The options displayed in this field are the allowed channels with in the chosen
regulatory domain. Use this option if multiple bridges are co-located or an
indoor wireless network is installed. With the channel settings, interference of
other equipment working in the same frequency band can be avoided.
ED Threshold
ED threshold allows you to kill background noise. If there is interference from
other weaker signals on the same frequency, the ED threshold can be used
for reducing the influence of this noise. If it is set to 0, the unit will adjust itself.
64 represents the highest sensitivity possible. 1 represents the lowest
sensitivity.
The tuning tab of the Bconfig program displays the RSSI. The RSSI
parameter displays the signal strength, which corresponds with the ED
Threshold. For example, if the RSSI displays an average of 44, adjust the ED
Threshold to 40. This way you optimise the receiver to the link signal.
As the noise level with in the link goes up, the ED threshold needs to go
down.
Some other notes
Fine tuning a link requires knowledge of the IEEE 802.11. For every link there
can be an optimal configuration found. Understanding the influence of each
parameter is essential to find this optimal configuration. Experiment and
monitor each change to reach this configuration.
Wireless LAN to LAN bridge Manual
Page 35 12-10-99
3.4 Resetting the bridge
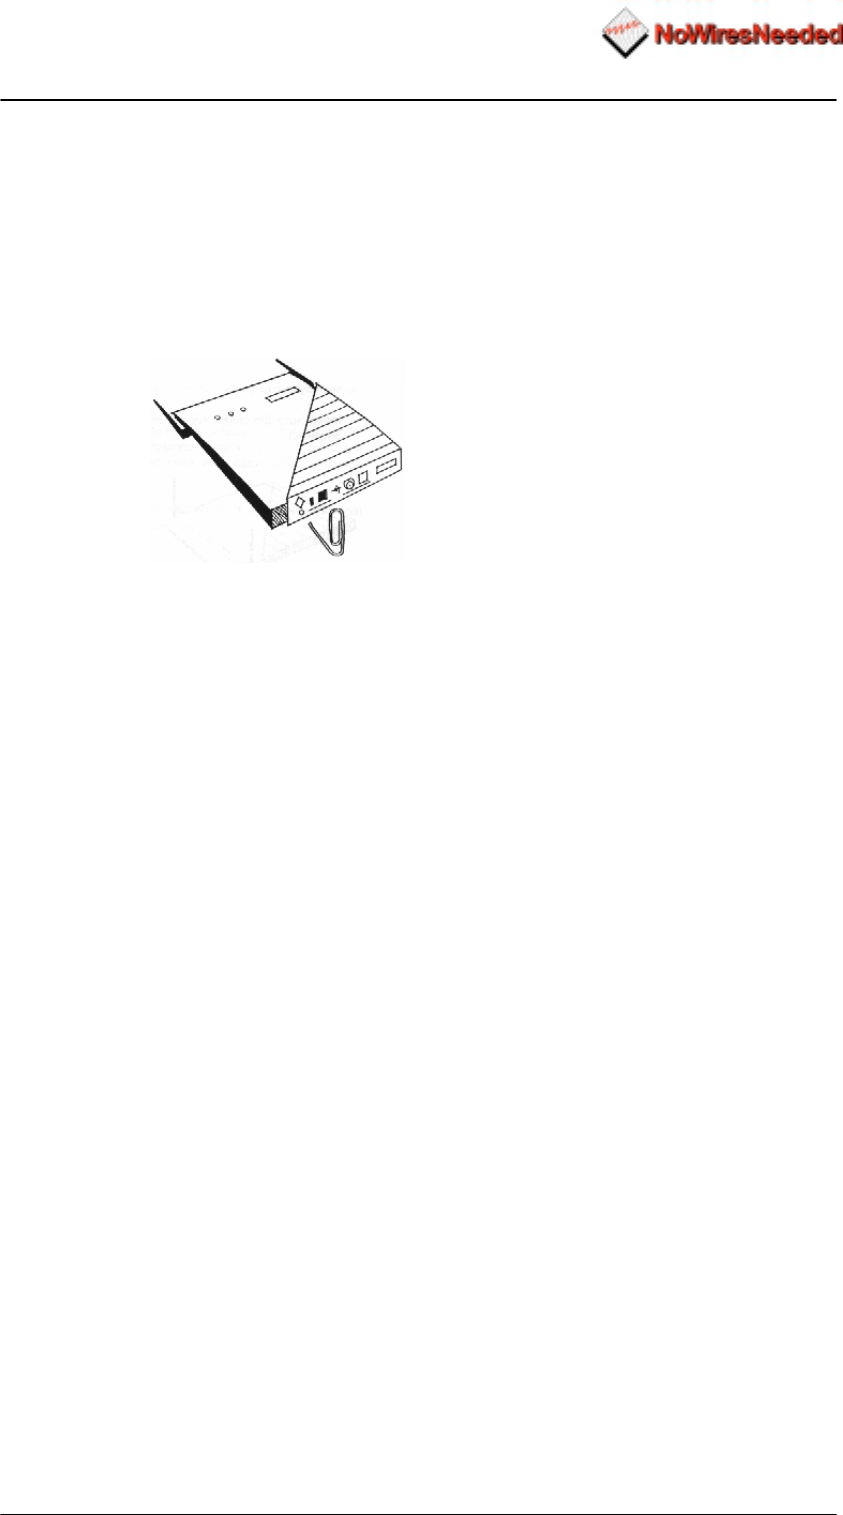
You can reset the wireless bridge unit’s settings to factory defaults by pushing
a paperclip in the little hole, next to the power switch, while switching the
bridge unit on.
When you push a paperclip in the reset hole while the bridge unit is switched
on, only the lock set by BConfig is deactivated.
Figure 2.5

Wireless LAN to LAN bridge Manual
Page 36 12-10-99
4.0 Troubleshooting
This chapter displays the common problems that can occur while
setting up a bridge link. If your problem is not related to any of the
below mentioned problems please contact your reseller. If you are
the reseller, contact No Wires Needed.
Problem: No connection between the networks
If the radio LED of the client is not blinking:
! Check if both sides are powered up.
! Check if the distance range does not exceed the range
! Check if the channel settings on both sides are the same
! Check if antenna is connected or cable is not broken
! Check if antennas are in line of sight (NO obstacles are
allowed!!)
! Check if no other device is transmitting on the same frequency.
You can do this by changing the frequency settings on both
sides.
! Bring the ED threshold down
If the radio LED of the client is blinking:
! Check if the SSID of both bridges are the same
Problem: Can not access the bridge settings via network
! Check if SUBNET mask and default gateway is set according the
network the bridge is connected to. (to do this you need to connect
direct to the unit, see configuration for alignment)
! Check if the unit has got an IP address (again use the first alignment
setup)
Problem: Low throughput on the link
! Check if the average of SQ2 is below 5 (go to monitor screen in
Bconfig setting)
! Check if the ACK time fits the range.
! Check if the network card of the PC you are measuring with can
handle the throughput.
Problem: Link drops away every now and then
! Check the antenna alignment
! Check the line of sight (trees)
! Check antenna mounting
If this not results into a stable link, please contact your reseller.

Wireless LAN to LAN bridge Manual
Page 37 12-10-99
5.0 Specs
5.1 Bridge specs
Standards compliance:
• IEEE 802.11 standard for wireless LAN
• Compliant with ETS 300 328 and ETS 300 826
• (CE marked)
• in USA compliant with FCC (47 CFR) Part15C, Section 15.247
• all major networking standards (including IP, IPX)
Security:• AirLock™ Access control, 128 bit encryption, No key management
Radio/ modem:
• Frequency range: 2.4-2.483,5 GHz
• Supported bit rates: 11 Mbps / 5.5 Mbps (as well as interoperable with
IEEE 802.11 Direct Sequence Spread Spectrum compliant devices that
support1 Mbps and 2 Mbps)
• Modulation:
1.0Mbps DBPSK
2.0 Mbps DQPSK
5.5 / 11 Mbps CCK
• Number of Channels:
Europe: 13 (3 non-overlapping)
US: 11 (3 non-overlapping)
France: 4 (1 non-overlapping)
• Transmit power:
Dish Antenna 0dBm
Yagi Antenna 7dBm
Omni Antenna 16dBm
• Range:
Omni antenna: Max. 1km @ 11 Mbps
Yagi Antenna: Max. 3km @ 11 Mbps
Dish antenna: Max. 6km @ 11 Mbps
• Antenna system: A variety of antennas can be attached for any specific
situation
• ASBF™ Automatic link speed optimiser.
Wireless LAN interface:
• Standards: IEEE 802.11CSMA /CA
Network Interfaces:
! Standards: IEEE 802.3 CSMA/CD Supports 1024 Mac addresses
! Connection type: 10Base2 (BNC) and 10Base-T(RJ-45)
! Mobility: Seamless roaming across cell boundaries
Mechanical:
! Dimensions: 180 x 220 x 40 mm
Environmental:
! Temperature Range: 0 - 40 °C operating
Temperature 95% humidity (non-condensing)
(US) AC 110V 60 Hz to 9VDC converter Included
(Europe) AC 240V 50Hz to 9VDC converter Included

Wireless LAN to LAN bridge Manual
Page 38 12-10-99
Management and configuration
! Network:SNMP agent with support for MIB-II and IEEE 802.11MIB
! LEDs: -Ethernet connection
-RF activity
-Power
! Utility software included
Wireless LAN to LAN bridge Manual
Page 39 12-10-99
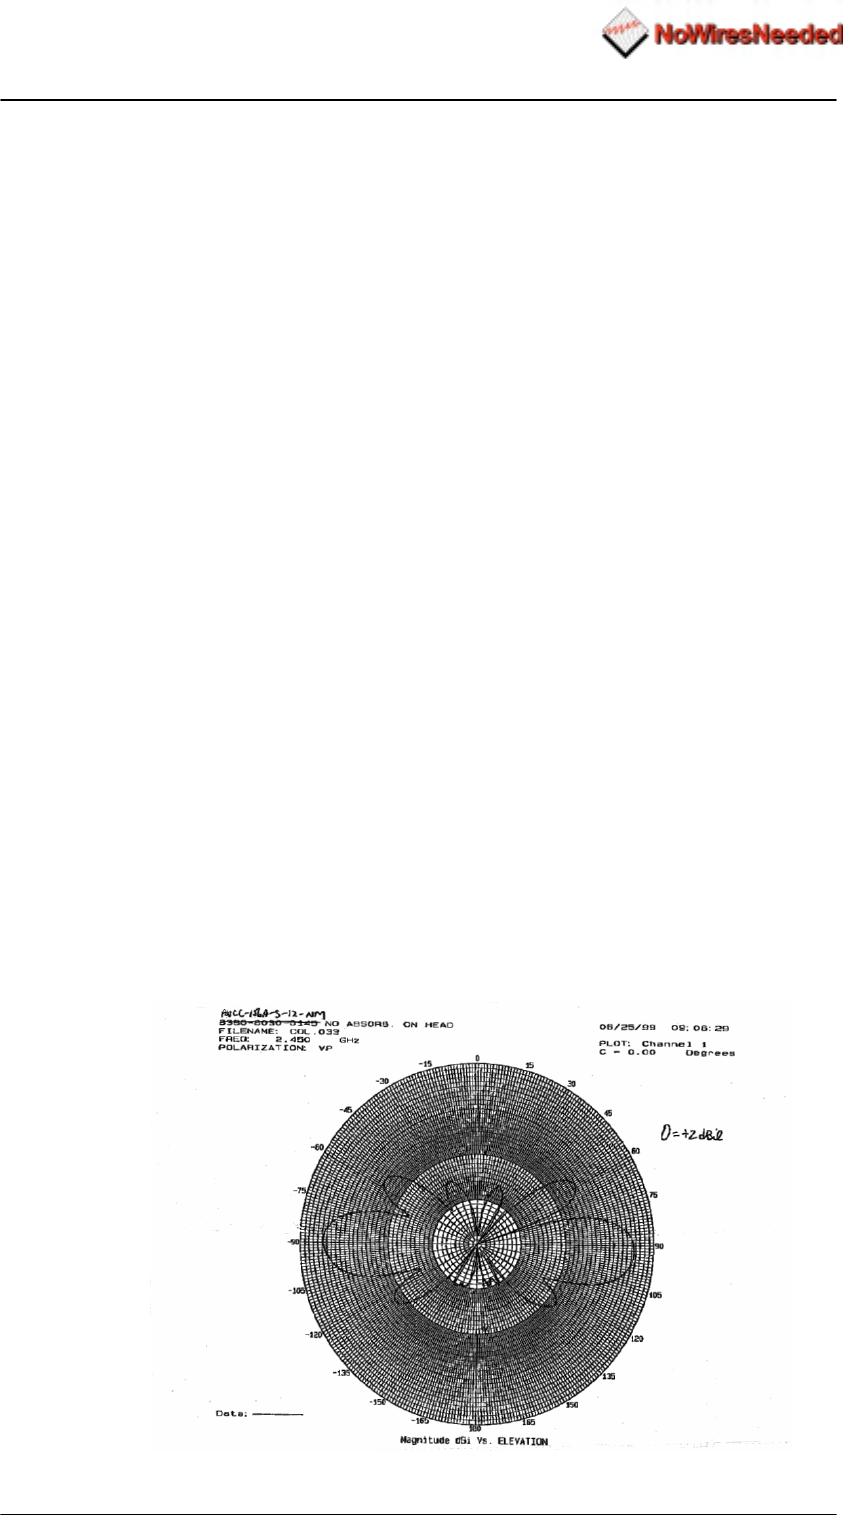
5.2 Omni antenna specs (Art number 10380125)
Due to ETSI limitations the Omni antenna can only be used with the following
bridges within Europe:
! WB-S1100 standard range Art code: 10370225 & 10370124
! WB-C1100 standard range Art code: 10370125 & 10370226
Features
! Light weight – slim profile
! Patented Printed circuit technology
! Watertight Ultrasonic and O-ring sealed
! Groundplane Independent
! Stainless steel hardware
Description
The omni antenna consists of vertical polarised collinear arrays utilising a
patented printed circuit technology for the radiating elements. This rugged
antenna is housed in a UV stable ultrasonically bonded polycarbonate
random. Installation is easy due to the small footprint, mounting system and
the convenient pigtail connection. The Omni antenna is groundplane
independent and can be mounted in any direction. Mounting bracket and
fixed length cable is included. (cable and unique connector loss is 4.5 dB)
Specifications
Frequency 2400- 2500 Mhz
Peak gain 7 dBi typical
Beamwidth – 3dB 22 degrees
Polarisation Vertical
Nominal impedance 50 Ohm
VSWR 2.0:1 Max
RF power average 50 W
Length 40 cm
Pigtail 12” N-female
EIRP 2 dBi typical
Wireless LAN to LAN bridge Manual
Page 40 12-10-99
5.3 Sector antenna specs (Art number 10380114)
Due to ETSI limitations the sector antenna can only be used with the
following bridges within Europe:
! WB-S1100 Medium range Art code: 10370214 & 10370113
! WB-C1100 Medium range Art code: 10370114 & 10370215
Features
! UV stable material
! Maximum gain
! Low profile housing
! Sable performance across the band
! Easy mounting
Description
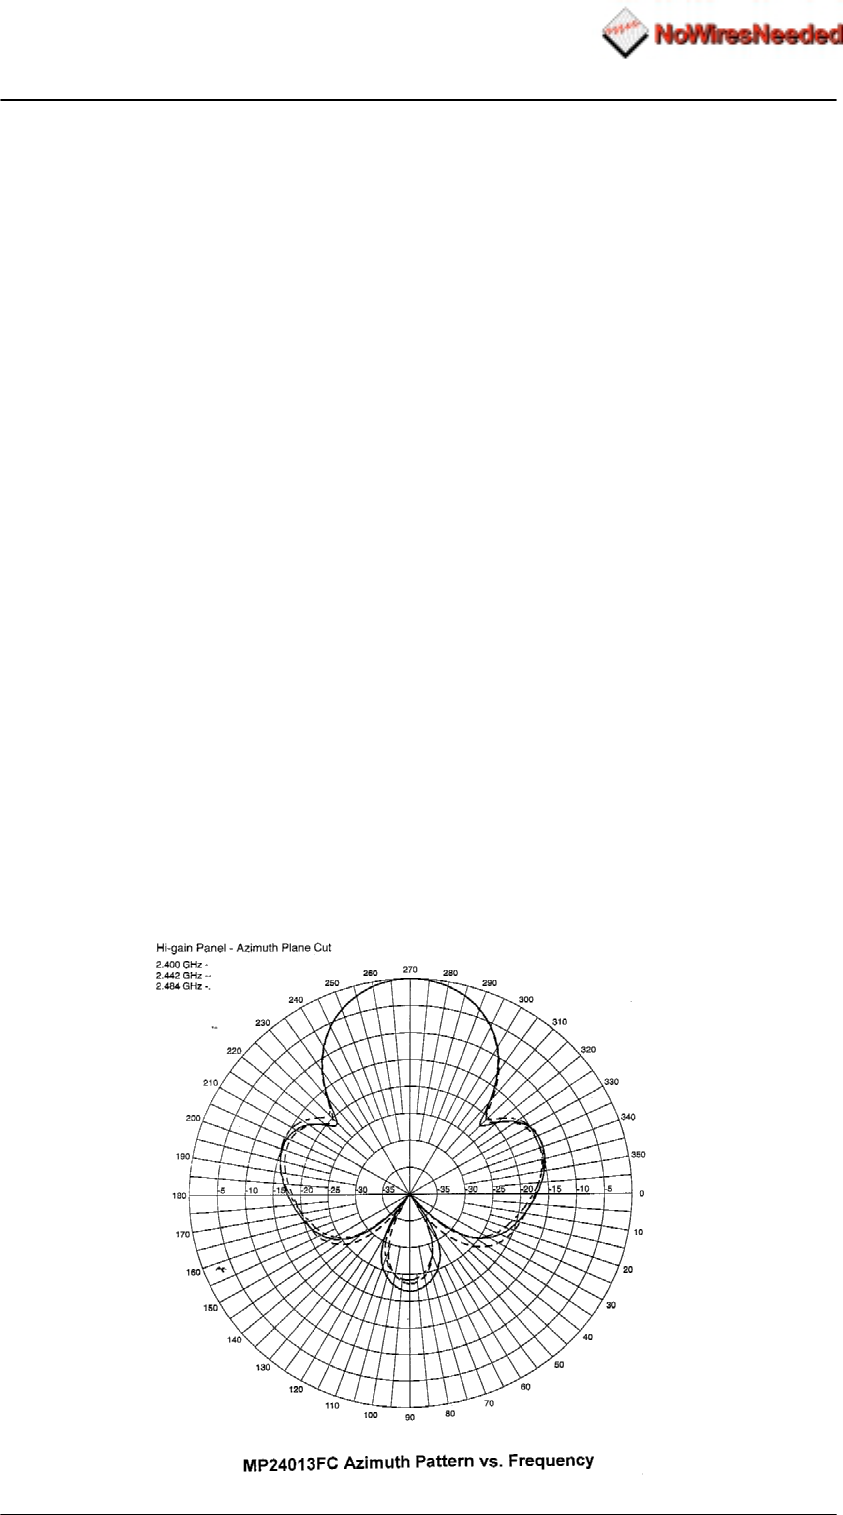
The sector antenna is designed to cover frequencies between 2300 and 2500
MHz with a VSWR of less that 1.5:1. The small and low profile housing
provides a maximum gain of 13 dBi. Easy mounting allows you to apply the
antenna in a wide variety of locations. Mounting bracket and fixed length
cable is included. (cable and unique connector loss is 4.5 dB)
Specifications
Frequency 2300- 2500 Mhz
Peak gain 13 dBi typical
Beamwidth – 3dB H 35 degrees
Polarisation Vertical
Nominal impedance 50 Ohm
VSWR 1.5:1 Max
RF power average 20 W
Dimentions 220 x 200 x 28 mm
Pigtail Female TNC
EIRP 10 dBi typical
Wireless LAN to LAN bridge Manual
Page 41 12-10-99
5.4 Dish antenna specs (Art number 10380103)
Due to ETSI limitations the dish antenna can only be used with the following
bridges within Europe:
! WB-S1100 long range Art code: 10370102 & 10370203
! WB-C1100 long range Art code: 10370103 & 10370204
Features
! Strong and recyclable ABS
! Metal parts are stainless steel
! Exceptional design
! Increased performance in bandwidth and gain
! Fast and easy installation
Description
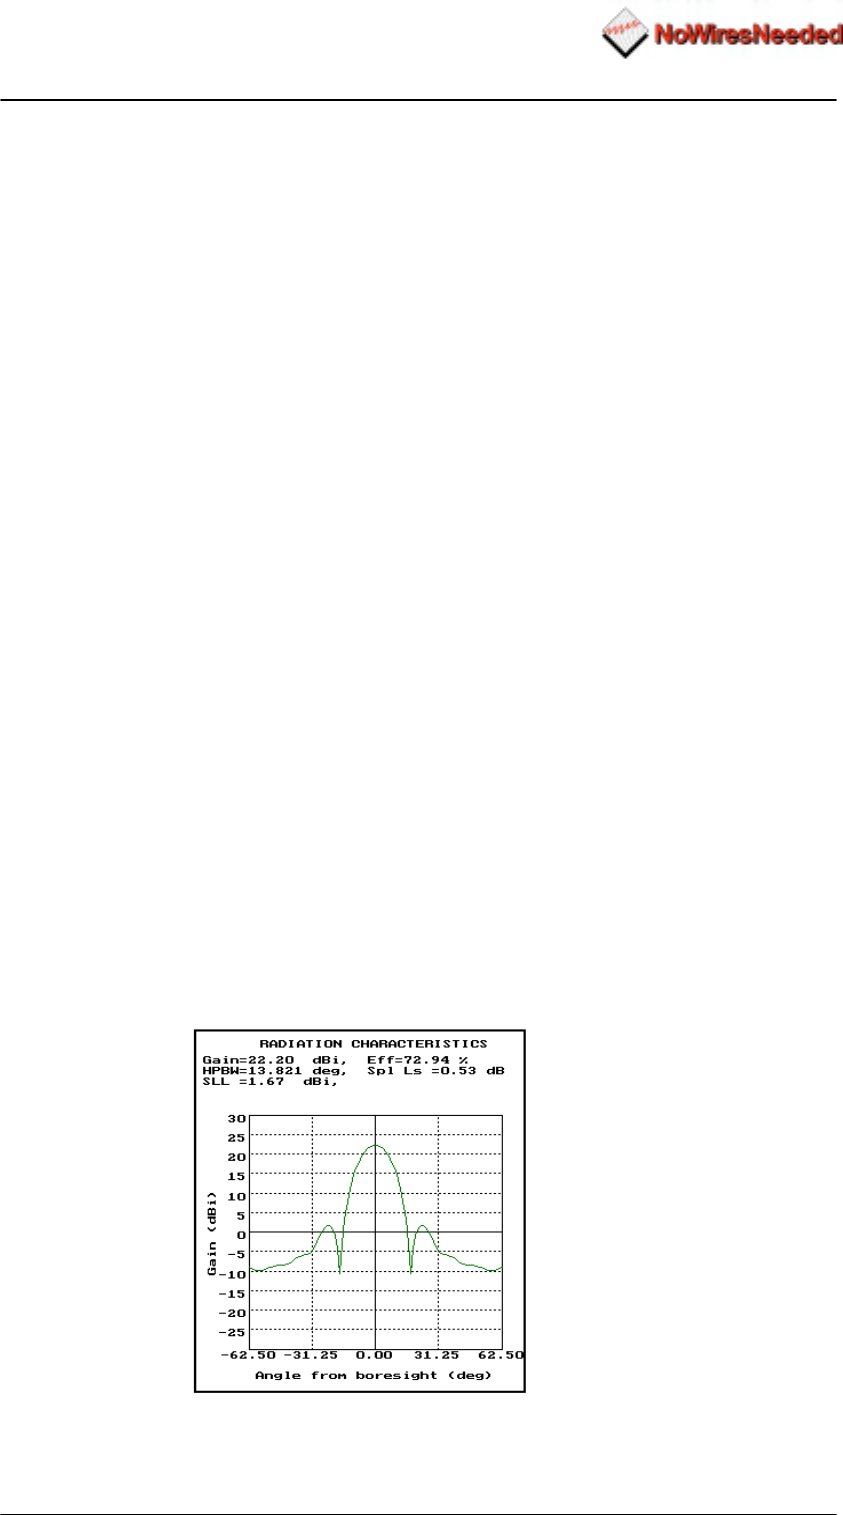
The dish antenna is optimised for use with the No Wires Needed wireless
LAN to LAN bridge. It can withstand the harshest environments of snow,
wind, rain, and ice. The dish is supplied with galvanised clamps for pole
mount or wall mount. Mounting bracket and fixed length cable is included.
(cable and unique connector loss is 4.5 dB)
Specifications
Frequency 2300- 2500 Mhz
Peak gain 22,2 dBi typical
Beamwidth – 3dB 13,8 degrees
Polarisation Linear
Nominal impedance 50 Ohm
VSWR 1,8:1 Max
RF power average 50 W
Dish diameter 620mm
Pigtail Female N
Dish material ABS plast UV resistant
Radome material ABS plast UV resistant
Metal hardware Stainless steel
Temperature -40 to +80 degrees
Weight 2,5 Kg
EIRP 18 dBi typical

Wireless LAN to LAN bridge Manual
Page 42 12-10-99
5.5 power supply specifications
• AC input range 90~264VAC/0.5A
• Inrush current cold start,<60A peak @ 230VAC
• Hold up time 10ms @ full load, nominal line
• Overload protectionpulsing mode, auto recovery
• Over voltage protection 110%~145%
• Operating temperature 0-30°C @ 100%, 40°C @ 50% load
• Withstand voltage I/P-O/P:3KVAC, I/P-FG:1.5KVAC, 1min.
• Safety standards UL 1950, CSA 22.2, TUV EN60950
• EMC standards EN55022, EN50082-1
• Humidity 20%~90% RH
• Length of output cable 120cm (typical)
• Plug of DC output 5.5ϕx2.1ϕx11mm, center “+”
• Type No. MA15-090,
• Output 9V, 1.67A,
• Tol. ±5%,
• R&N 90mV
• Eff. 70%,
• P.p. 26

Wireless LAN to LAN bridge Manual
Page 43 12-10-99