Nokia Solutions and Networks FMHOMN0041 Home Outdoor Modem User Manual Name Use Short Name
Nokia Solutions and Networks Oy Home Outdoor Modem Name Use Short Name
Manual

FastMile Rel.17.10
FastMile Home Outdoor Modem
User Manual
DN09218237
Issue 03 Draft 28.11.2017

FastMile Home Outdoor Modem User Manual
Disclaimer
Release 17.10
DN09218237, Issue 03
Draft 28.11.2017
© 2017 Nokia
2
Disclaimer
The information in this document applies solely to the hardware/software product (“Product”) specified herein, and only as
specified herein. Reference to “Nokia” later in this document shall mean the respective company within Nokia Group of
Companies with whom you have entered into the Agreement (as defined below).
This document is intended for use by Nokia's customers (“You”) only, and it may not be used except for the purposes defined in
the agreement between You and Nokia (“Agreement”) under which this document is distributed. No part of this document may
be used, copied, reproduced, modified or transmitted in any form or means without the prior written permission of Nokia. If You
have not entered into an Agreement applicable to the Product, or if that Agreement has expired or has been terminated, You
may not use this document in any manner and You are obliged to return it to Nokia and destroy or delete any copies thereof.
The document has been prepared to be used by professional and properly trained personnel, and You assume full
responsibility when using it. Nokia welcomes your comments as part of the process of continuous development and
improvement of the documentation.
This document and its contents are provided as a convenience to You. Any information or statements concerning the suitability,
capacity, fitness for purpose or performance of the Product are given solely on an “as is” and “as available” basis in this
document, and Nokia reserves the right to change any such information and statements without notice. Nokia has made all
reasonable efforts to ensure that the content of this document is adequate and free of material errors and omissions, and Nokia
will correct errors that You identify in this document. Nokia's total liability for any errors in the document is strictly limited to the
correction of such error(s). Nokia does not warrant that the use of the software in the Product will be uninterrupted or error-free.
NO WARRANTY OF ANY KIND, EITHER EXPRESS OR IMPLIED, INCLUDING BUT NOT LIMITED TO ANY WARRANTY OF
AVAILABILITY, ACCURACY, RELIABILITY, TITLE, NON-INFRINGEMENT, MERCHANTABILITY OR FITNESS FOR A
PARTICULAR PURPOSE, IS MADE IN RELATION TO THE CONTENT OF THIS DOCUMENT. IN NO EVENT WILL NOKIA
BE LIABLE FOR ANY DAMAGES, INCLUDING BUT NOT LIMITED TO SPECIAL, DIRECT, INDIRECT, INCIDENTAL OR
CONSEQUENTIAL OR ANY LOSSES, SUCH AS BUT NOT LIMITED TO LOSS OF PROFIT, REVENUE, BUSINESS
INTERRUPTION, BUSINESS OPPORTUNITY OR DATA THAT MAY ARISE FROM THE USE OF THIS DOCUMENT OR THE
INFORMATION IN IT, EVEN IN THE CASE OF ERRORS IN OR OMISSIONS FROM THIS DOCUMENT OR ITS CONTENT.
This document is Nokia proprietary and confidential information, which may not be distributed or disclosed to any third parties
without the prior written consent of Nokia.
Nokia is a registered trademark of Nokia Corporation. Other product names mentioned in this document may be trademarks of
their respective owners.
Copyright © 2017 Nokia. All rights reserved.
Important Notice on Product Safety
This product may present safety risks due to laser, electricity, heat, and other sources of danger.
Only trained and qualified personnel may install, operate, maintain or otherwise handle this product and only after
having carefully read the safety information applicable to this product.
The safety information is provided in the Safety Information section in the “Legal, Safety and Environmental
Information” part of this document or documentation set.
Nokia is continually striving to reduce the adverse environmental effects of its products and services. We would like to
encourage you as our customers and users to join us in working towards a cleaner, safer environment. Please recycle product
packaging and follow the recommendations for power use and proper disposal of our products and their components.
If you should have questions regarding our Environmental Policy or any of the environmental services we offer, please contact
us at Nokia for any additional information.

FastMile Home Outdoor Modem User Manual
Table of contents
Release 17.10
DN09218237, Issue 03
Draft 28.11.2017
© 2017 Nokia
3
Table of contents
1 Introduction .................................................................................................................................... 9
1.1 Scope ........................................................................................................................................ 9
1.2 Who Should Read this Manual ................................................................................................. 9
1.3 How this manual is organized ................................................................................................... 9
1.4 Acronyms .................................................................................................................................. 9
2 Home Outdoor Modem Overview ............................................................................................... 10
2.1 Product Overview ................................................................................................................... 10
2.2 Functional Overview ............................................................................................................... 10
2.3 Variants Overview ................................................................................................................... 10
2.3.1 Variants ............................................................................................................................. 10
2.4 Key Characteristics ................................................................................................................. 11
2.4.1 LTE .................................................................................................................................... 11
2.4.2 Ethernet ............................................................................................................................. 11
2.4.3 Power supply ..................................................................................................................... 11
2.4.4 TR-069 .............................................................................................................................. 11
2.5 Interface/Ports ........................................................................................................................ 11
2.6 LED Status .............................................................................................................................. 12
2.7 Power Source ......................................................................................................................... 13
2.8 Performance ........................................................................................................................... 13
2.8.1 Throughput ........................................................................................................................ 13
2.8.2 Power Consumption .......................................................................................................... 13
2.9 Certifications ........................................................................................................................... 14
3 Installation Procedure ................................................................................................................. 15
3.1 Safety Information ................................................................................................................... 15
3.2 Package Contents .................................................................................................................. 15
3.3 Home Outdoor Modem Installation Prerequisites ................................................................... 15
3.3.1 Lightning protection ........................................................................................................... 16

FastMile Home Outdoor Modem User Manual
Table of contents
Release 17.10
DN09218237, Issue 03
Draft 28.11.2017
© 2017 Nokia
4
3.4 Home Outdoor Modem installation ......................................................................................... 16
3.4.1 Selecting the Home Outdoor Modem mounting location using Installation App ............... 16
3.4.2 Mounting Instructions ........................................................................................................ 24
3.4.3 Connectivity and power up sequence ............................................................................... 32
3.4.4 Managing Home Outdoor Modem through Management app .......................................... 35
4 Troubleshooting ........................................................................................................................... 37
4.1 Common Problems during Installation and startup Phase ..................................................... 37
4.1.1 Home Outdoor Modem is not registered. .......................................................................... 37
4.1.2 Home Outdoor Modem registration fails at Controller....................................................... 37
4.1.3 Home Outdoor Modem is registered to a wrong BS/Cell .................................................. 37
4.1.4 Home Outdoor Modem installation application cannot connect to the Controller ............. 38
4.1.5 Home Outdoor Modem cannot form the LTE connection by using the narrow-beam. ..... 39
4.1.6 Cable between Home Outdoor Modem and Home Router not properly connected ......... 41
4.1.7 SIM is not inserted............................................................................................................. 41
4.1.8 Invalid PIN ......................................................................................................................... 42
4.1.9 Home Outdoor Modem is not able to attach to LTE Network due to Incorrect APN ......... 42
4.2 Common Problems during Execution Phase .......................................................................... 43
4.2.1 Home Outdoor Modem Provisioning is not successful after reboot/factory reset ............. 43
4.2.2 Home Outdoor Modem firmware upgrade to latest build failed ........................................ 43
4.2.3 Home Outdoor Modem is not able to communicate with Controller after firmware upgrade
44
4.2.4 Home Outdoor Modem detached from network ................................................................ 44
5 Appendix A: Factory Settings .................................................................................................... 45
6 Appendix B Specifications ......................................................................................................... 46
7 Appendix D FCC Compliance Statement................................................................................... 47

FastMile Home Outdoor Modem User Manual
List of figures
Release 17.10
DN09218237, Issue 03
Draft 28.11.2017
© 2017 Nokia
5
List of figures
Figure 1 Front and Back view of Home Outdoor Modem ................................................................ 10
Figure 2 Interfaces/Ports at Home Outdoor Modem - 1 .................................................................. 12
Figure 3 Interfaces/Ports at Home Outdoor Modem - 2 .................................................................. 12
Figure 4 Welcome Screen ............................................................................................................... 17
Figure 5 Need Location ................................................................................................................... 17
Figure 6 Phone Calibration .............................................................................................................. 18
Figure 7 Finding Location ................................................................................................................ 19
Figure 8 Find QR code .................................................................................................................... 19
Figure 9 Scan the QR code ............................................................................................................. 20
Figure 10 Set FastMile Controller Address ....................................................................................... 20
Figure 11 Check the contents............................................................................................................ 21
Figure 12 Insert the SIM .................................................................................................................... 22
Figure 13 Finding nearest tower ........................................................................................................ 23
Figure 14 Check Mount Type ............................................................................................................ 24
Figure 15 Wall Selection .................................................................................................................... 25
Figure 16 Setting Direction ................................................................................................................ 25
Figure 17 Bottom view of Wall Mounting Anchor .............................................................................. 26
Figure 18 Install Mount ...................................................................................................................... 26
Figure 19 Earth connection with Wall-mount and Poll-mount Configuration ..................................... 27
Figure 20 Connect cable ................................................................................................................... 27
Figure 21 Tilt Home Outdoor Modem ................................................................................................ 28
Figure 22 Lock Home Outdoor Modem ............................................................................................. 28
Figure 23 Install the Pole ................................................................................................................... 29
Figure 24 Pole Mount Option............................................................................................................. 29
Figure 25 Bottom view of Pole Mount ............................................................................................... 30
Figure 26 Setting Direction ................................................................................................................ 30
Figure 27 Tilt the Home Outdoor Modem .......................................................................................... 31

FastMile Home Outdoor Modem User Manual
List of figures
Release 17.10
DN09218237, Issue 03
Draft 28.11.2017
© 2017 Nokia
6
Figure 28 Lock Home Outdoor Modem ............................................................................................. 31
Figure 29 Power sequence of Home Outdoor Modem through Home Router .................................. 32
Figure 30 Ethernet Adapter Assembly .............................................................................................. 32
Figure 31 Connect Cable ................................................................................................................... 33
Figure 32 Plug in Home Router ......................................................................................................... 34
Figure 33 Testing Connection ........................................................................................................... 34
Figure 34 Software Update Available ................................................................................................ 35
Figure 35 Install Updates ................................................................................................................... 36
Figure 36 Connection ........................................................................................................................ 36
Figure 37 Cell re-assignment during Home Outdoor Modem Installation Procedure ....................... 40

FastMile Home Outdoor Modem User Manual
List of tables
Release 17.10
DN09218237, Issue 03
Draft 28.11.2017
© 2017 Nokia
7
List of tables
Table 1 Manual contents .................................................................................................................. 9
Table 2 Acronyms ............................................................................................................................ 9
Table 3 Interfaces/ports of Home Outdoor Modem ........................................................................ 12
Table 4 LED Status ........................................................................................................................ 13
Table 5 LTE throughput.................................................................................................................. 13
Table 6 Home Outdoor Modem Certifications ................................................................................ 14
Table 7 Package contents of Home Outdoor Modem .................................................................... 15
Table 8 Factory settings ................................................................................................................. 45
Table 9 Specifications .................................................................................................................... 46

FastMile Home Outdoor Modem User Manual
Introduction
Release 17.10
DN09218237, Issue 03 Draft
28.11.2017
© 2017 Nokia
8
Summary of changes
Changes between document issues are cumulative. Therefore, the latest document issue
contains all changes made to previous issues.
Changes between issues 01 and 02
Valid for FastMile 17.6. Updated the supported bands in section 2.3.2 LTE
Key Characteristics.
Changes between issues 02 and 03
Valid for FastMile 17.10. Several minor changes.

FastMile Home Outdoor Modem User Manual
Introduction
Release 17.10
DN09218237, Issue 03 Draft
28.11.2017
© 2017 Nokia
9
1 Introduction
1.1 Scope
The purpose of this document is to primarily provide installation requirements and
procedures for Nokia FastMile Home Outdoor Modem.
1.2 Who Should Read this Manual
This document is intended for persons installing and troubleshooting the equipment.
1.3 How this manual is organized
#
Chapter
Contents
1
Introduction
Introduces the FastMile Home Outdoor Modem (ODU);
defines the purpose, scope, and intended audience of this
document; explains how information is organized in this
document.
2
Home Outdoor Modem
Overview
This chapter presents brief overview of Home Outdoor
Modem.
3
Installation Procedure
This chapter presents detailed installation steps and startup
procedure for Home Outdoor Modem
4
Troubleshooting
This chapter lists down common problems faced during
various phases. It also contains their resolutions.
Table 1 Manual contents
1.4 Acronyms
The acronyms below are fundamental to the information provided in this guide.
Acronym
Expanded
ACS
Auto Configuration Server
CPE
Customer Premises Equipment
IDU
Indoor Unit of CPE (same as Home Router)
NTE
Network Termination Equipment (same as Home Outdoor Modem, ODU)
ODU
Outdoor Unit of CPE (same as Home Outdoor Modem, NTE)
PoS
Point of sales
PoSApp
Point of sales Application
LTE
Long Term Evolution
LTTH
LTE to the home
LTTH-C
FastMile Controller
SIM
Subscriber Identity module
Table 2 Acronyms
FastMile Home Outdoor Modem User Manual
Home Outdoor Modem Overview
Release 17.10
DN09218237, Issue 03 Draft
28.11.2017
© 2017 Nokia
10
2 Home Outdoor Modem Overview
This chapter provides an overview of Home Outdoor Modem.
2.1 Product Overview
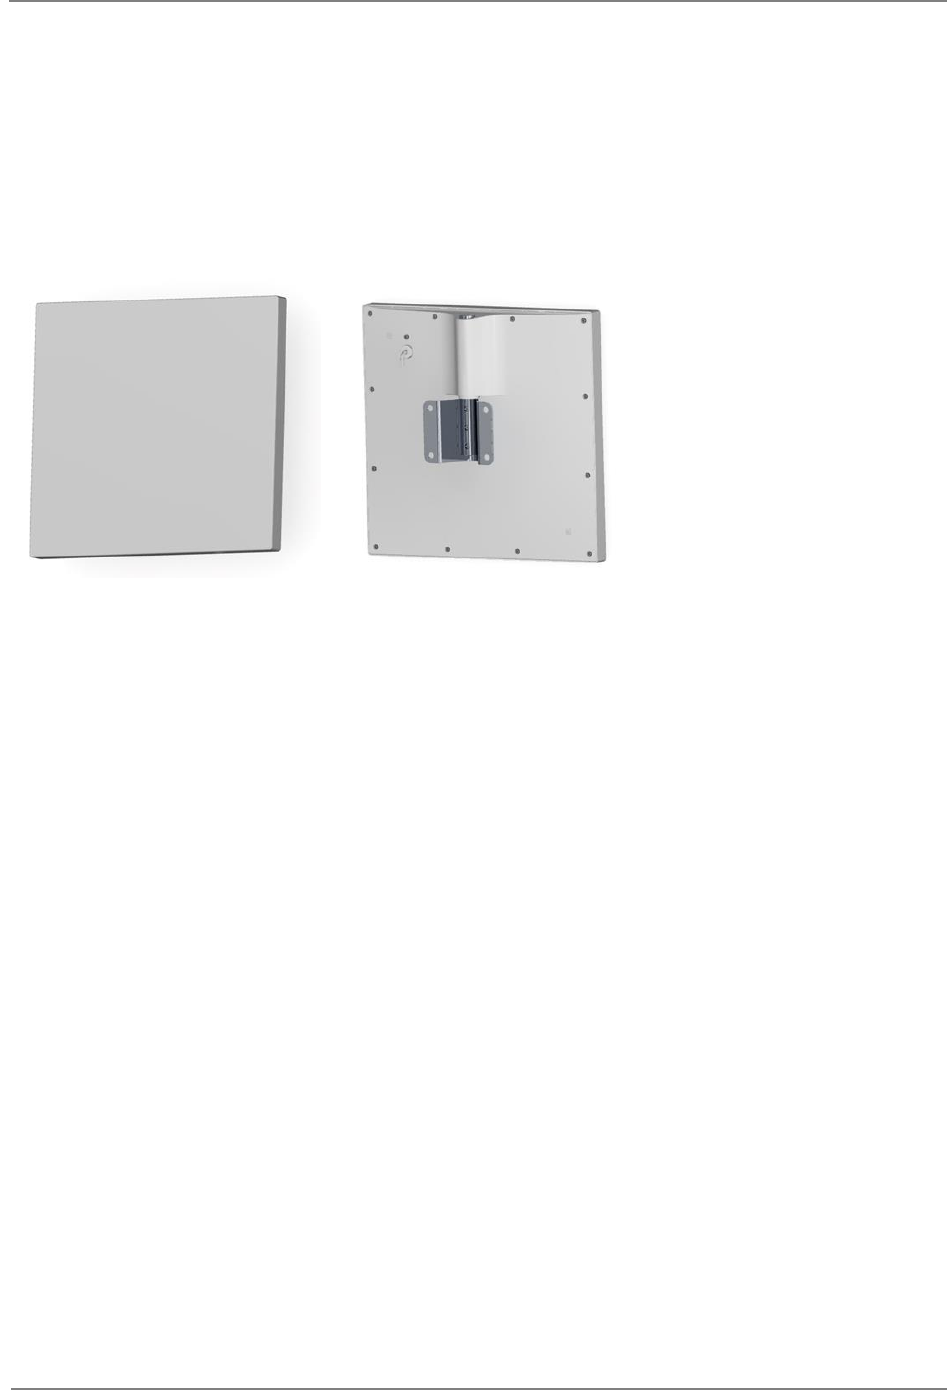
Home Outdoor Modem is the Outdoor Unit of Nokia FastMile solution, the purpose of which
is to provide the last mile broadband connection using LTE technology.
Figure 1 Front and Back view of Home Outdoor Modem
The Home Outdoor Modem includes high-gain beam forming antenna and LTE modem
providing the LTE broadband access to the network. Home Outdoor Modem is capable of
sustaining outdoor environmental conditions.
2.2 Functional Overview
The Nokia FastMile Home Outdoor Modem wireless broadband access to meet end users’
networking needs. The FastMile Home Outdoor Modem lets operators use LTE to offer fixed
wireless broadband
The FastMile Home Outdoor Modem is easy to install and user-friendly to operate. The
smart phone installation application makes sure the modem is deployed in the optimal
location.
The FastMile Home Outdoor Modem supports remote management capability, allowing
management and health monitoring of the devices from FastMile Controller management
system.
2.3 Variants Overview
2.3.1 Variants model number
FMHOM0007A Band 41 with Arctic operating temperature range (-30°C to 65°C)
FMHOM0007 Band 41 with Standard operating temperature range (-20°C to
65°C)

FastMile Home Outdoor Modem User Manual
Home Outdoor Modem Overview
Release 17.10
DN09218237, Issue 03 Draft
28.11.2017
© 2017 Nokia
11
Above variants retain a common FCCID: 2AL7J-FMHOMN0041 for Band 41 operation
Key Characteristics
2.3.2 LTE
LTE 3GPP Release 9 Compliant, UE Category 4
Transmit avg power: Max +23dBm +/-2.7dB
FastMile 17.10: Supported Band 41
Antenna Characteristics:
3x3 dual polarized antenna array
Electronical beam steering +/- 45o horizontally
14.5 dBi peak antenna gain
2.3.3 Ethernet
Supports 1GbE WAN Interface
Supports IEEE802.3 1000BASE-T
Supports CAT5e/6 unshielded twisted pair cable
Supports IEEE802.3az Energy efficient Ethernet
2.3.4 Power supply
The Home Outdoor Modem is powered via PoE from the Home Router or PoE injector.
WAN Port supports PoE+ as per IEEE802.3 at type-2
2.3.5 TR-069
Supports device management using TR-069 Amendment 5.
Supports configuration management, diagnostics and monitoring at Home Outdoor Modem.
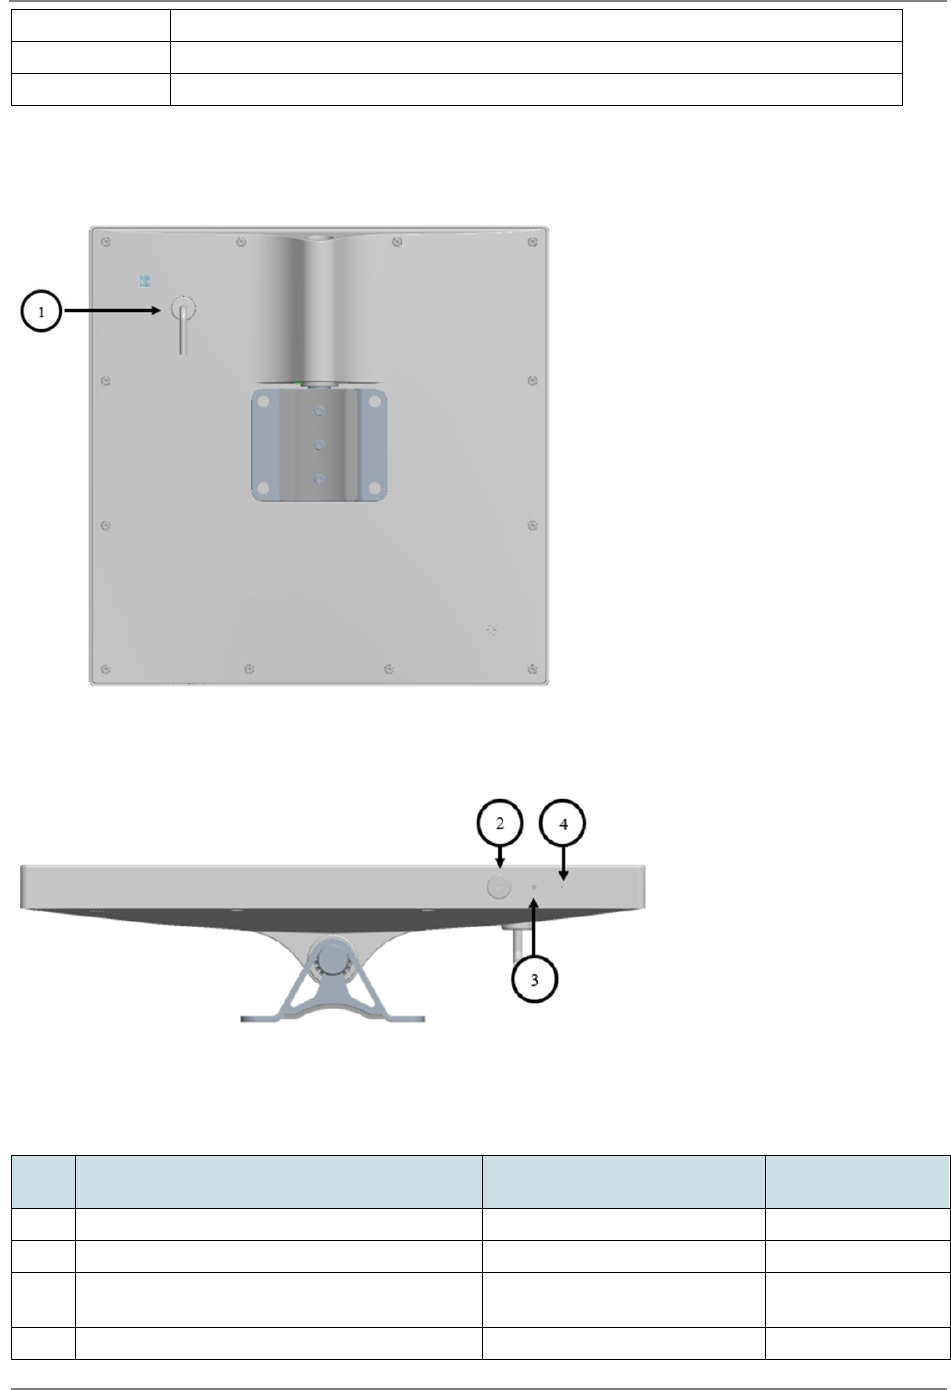
2.4 Interface/Ports
#
Interface/port
1
1Gbps Ethernet port (PoE+ PD WAN)
FastMile Home Outdoor Modem User Manual
Home Outdoor Modem Overview
Release 17.10
DN09218237, Issue 03 Draft
28.11.2017
© 2017 Nokia
12
2
SIM Slot (Nano/4FF SIM)
3
Reset Button
4
LED Indicator
Table 3 Interfaces/ports of Home Outdoor Modem
Figure 2 Interfaces/Ports at Home Outdoor Modem - 1
Figure 3 Interfaces/Ports at Home Outdoor Modem - 2
2.5 LED Status
#
Stage
LED
Blink rate
1
Power-On, Early Boot
WHITE(Non-Flashing)
No Blink
2
Successful Start
GREEN(Non-Flashing)
No Blink
3
Issue at Home Outdoor Modem (resulting
to no service)
Flashing ORANGE
2Hz
4
SW update is available
Flashing Green
0.5Hz

FastMile Home Outdoor Modem User Manual
Home Outdoor Modem Overview
Release 17.10
DN09218237, Issue 03 Draft
28.11.2017
© 2017 Nokia
13
5
Pressing ‘Reset to Factory Defaults’
button (or) Reset done programmatically
Flashing ORANGE for 1 Sec
2Hz
Table 4 LED Status
2.6 Power Source
The Home Router (IDU) and Home Outdoor Modem (ODU) are connected together with a
CAT 5e/ 6 that provides power from the Home Router to the Home Outdoor Modem through
PoE+.
2.7 Performance
2.7.1 Throughput
2.7.1.1 LTE
Use case
UDP UL
UDP DL
UDP Bi-dir
(UL/DL)
TCP UL
TCP DL
TCP Bi-dir
(UL/DL)
Throughput
achieved (Mbps)
46
145
46/145
45.5
142
45.5/ 142
Table 5 LTE throughput
• Data rates can have a margin of 2-3 % error.
• Packet Length used is 1460 B in case of UDP, Window is 128k in case of TCP.
• The data rates are for IPv4 cases.
2.7.1.2 Ethernet
Ethernet 1000BASE-T, throughput as per standard is max 1000Mbps. The Ethernet link gets
negotiated at 1000Mbps when Home Router is connected to it. The end to end throughput
achieved is 145/46 Mbps (restricted by LTE Throughput).
2.7.2 Power Consumption
Power consumption at full throughput: ~2.2Watts
Power consumption at Low LTE Signal Level: ~4.5Watts

FastMile Home Outdoor Modem User Manual
Home Outdoor Modem Overview
Release 17.10
DN09218237, Issue 03 Draft
28.11.2017
© 2017 Nokia
14
2.8 Certification details
Certification
Remarks
FCC certification on TDD Band 41
For US operation
Table 6 Home Outdoor Modem Certification

FastMile Home Outdoor Modem User Manual
Installation Procedure
Release 17.10
DN09218237, Issue 03 Draft
28.11.2017
© 2017 Nokia
15
3 Installation Procedure
This chapter describes the pre-requisites for Home Outdoor Modem Installation. The chapter
also guides us with the step by step installation procedure along with the dependencies on
each step.
3.1 Safety Information
• Professional installation is recommended for Home Outdoor Modem. If the user plans to
install the Home Outdoor Modem himself, safety instructions should be take care of.
• Use only FastMile Home Router or Nokia approved PoE Injectors for powering the Home
Outdoor Modem.
• Do not POWER ON the Home Outdoor Modem before assembling the entire setup.
• Maintain at least 50 cm distance from the front face of the Home Outdoor Modem while
the system is operating.
• Install at a minimum height of 2.5 meters from the ground plane
• WARNING: Lightning Danger: Since cables from external environment may connect to
the system and they are exposed to lightning, do not work on equipment or cables during
periods of lightning activity.
3.2 Package Contents
Sales Item No
Item
Quantity
1
Home Outdoor Modem Unit
1
2
Ethernet Adapter
1
3
Wall Mounting Anchor
1
4
Pole Mounting Anchor (Optional)
1
Table 7 Package contents of Home Outdoor Modem
Note: If one or more item(s) mentioned above is missing or damaged, please contact
customer support.
3.3 Home Outdoor Modem Installation Prerequisites
• Installation person should have the knowledge on installing the Unit.
• Valid SIM needs to be inserted in the Home Outdoor Modem before mounting to the pole
or wall.
• All the devices should be available and registered on operator’s Point of Sales location.
• Mechanical tools are required (not included) for mounting the Home Outdoor Modem.

FastMile Home Outdoor Modem User Manual
Installation Procedure
Release 17.10
DN09218237, Issue 03 Draft
28.11.2017
© 2017 Nokia
16
• Mobile apps requirements: iPhone or Android phones with hardware compass
▪ iPhone iOS needs to be 9 or above
▪ Android OS needs to be 5.0 Lollipop or above.
3.3.1 Lightning protection
• If you are installing the Home Outdoor Modem above roof level, check that lightning rods
are above the planned install location.
• If outside cable length is less than 10 meters, no protection is required. If there is long
outside cabling, we recommend installing PoE+ capable surge protectors.
• Use only properly earthed wall socket for powering the Home Router power adaptor (or
PoE+ injector).
3.4 Home Outdoor Modem installation
The FastMile Home Outdoor Modem can be installed by using the Mobile Installation App
and following the below mentioned steps.
3.4.1 Selecting the Home Outdoor Modem mounting location using
Installation App
Mobile Installation App helps to select the best wall/pole for mounting the Home Outdoor
Modem. Mobile Installation App can also be used to perform the initial Cell selection for
Home Outdoor Modem installation.
Follow the below ordered steps for Home Outdoor Modem installation using Mobile
Installation App:
Step 1:
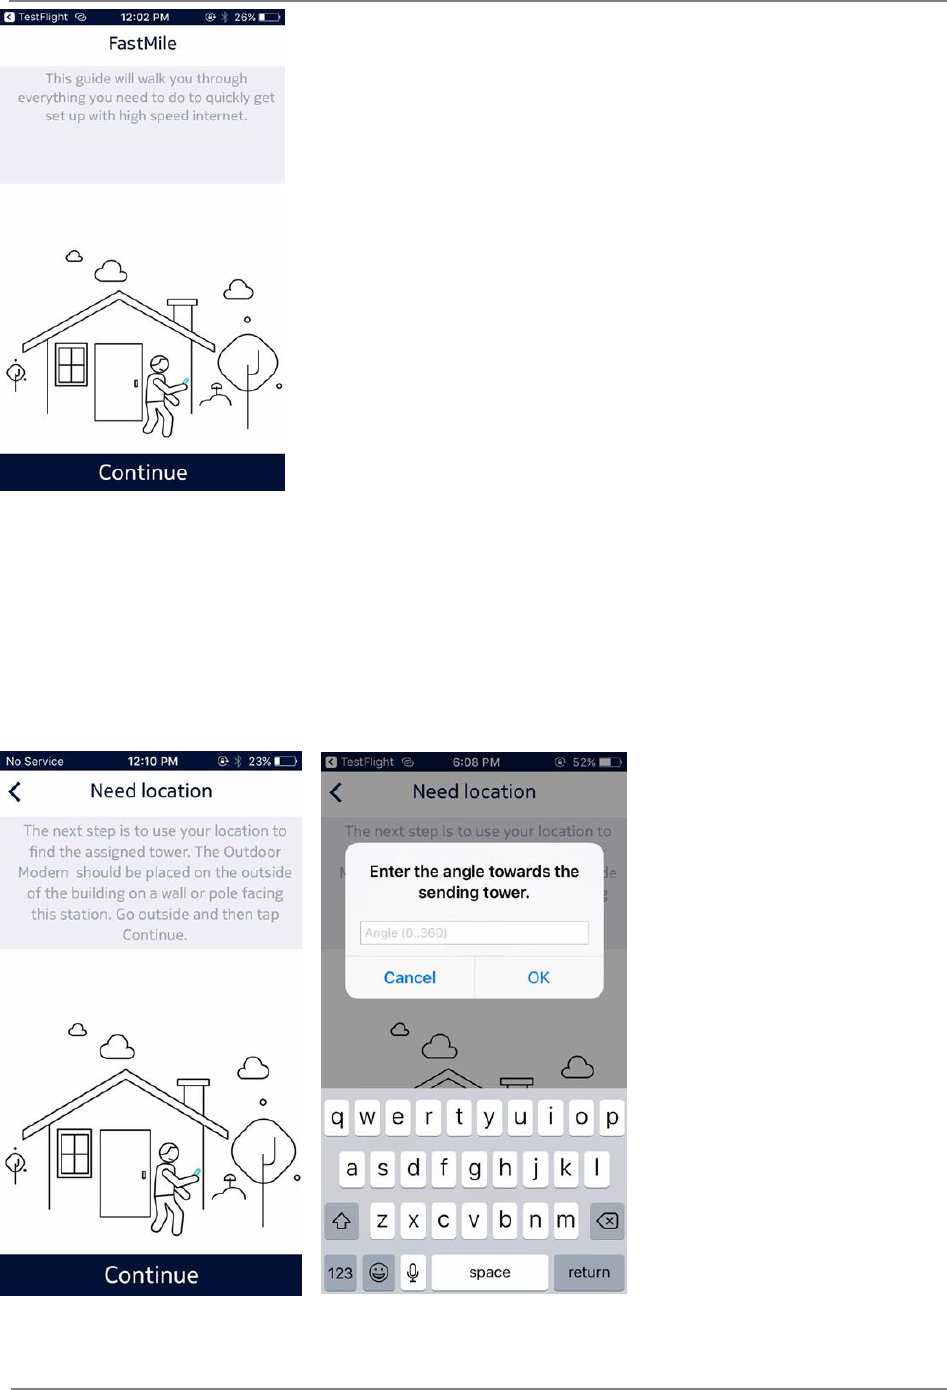
Open Installation App on your phone. To run this App, the phone should be connected to
internet. A Welcome screen will appear.
FastMile Home Outdoor Modem User Manual
Installation Procedure
Release 17.10
DN09218237, Issue 03 Draft
28.11.2017
© 2017 Nokia
17
Figure 4 Welcome Screen
Tap on Continue button present on the screen to start Home Outdoor Modem installation
procedure.
Step 2:
• The Installation App finds the current installation location of the Home Outdoor Modem
using GPS and the assigned tower using Controller.
Figure 5 Need Location
FastMile Home Outdoor Modem User Manual
Installation Procedure
Release 17.10
DN09218237, Issue 03 Draft
28.11.2017
© 2017 Nokia
18
• The App may ask for an initial angle towards the sending tower. You may choose to
provide the angle that will help in installation or you may Cancel the request that will
make the App choose the default angle.
• Tap on Continue button present on the screen to go to next screen.
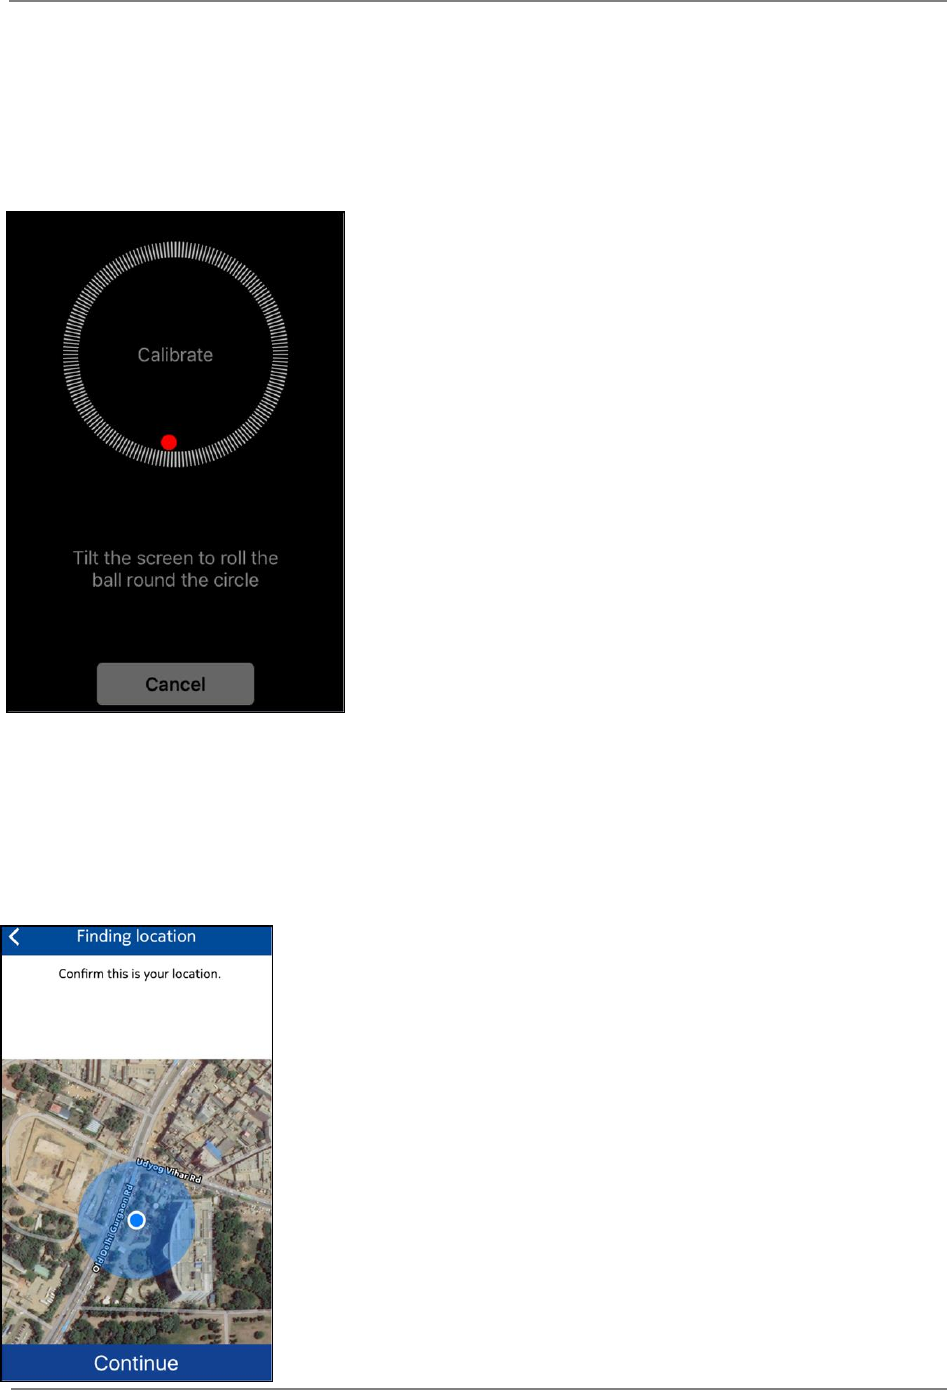
• The Installation App now provides an option to perform calibration on the phone.
Figure 6 Phone Calibration
• The calibration step is recommended but not mandatory. User can also skip this step by
just clicking the Cancel button present on the screen.
• After completion of calibration, the next screen on the App asks to confirm the current
location of the user.
FastMile Home Outdoor Modem User Manual
Installation Procedure
Release 17.10
DN09218237, Issue 03 Draft
28.11.2017
© 2017 Nokia
19
Figure 7 Finding Location
• Verify the location shown by the App and tap on Continue button present on the screen
to move further.
Step 3:
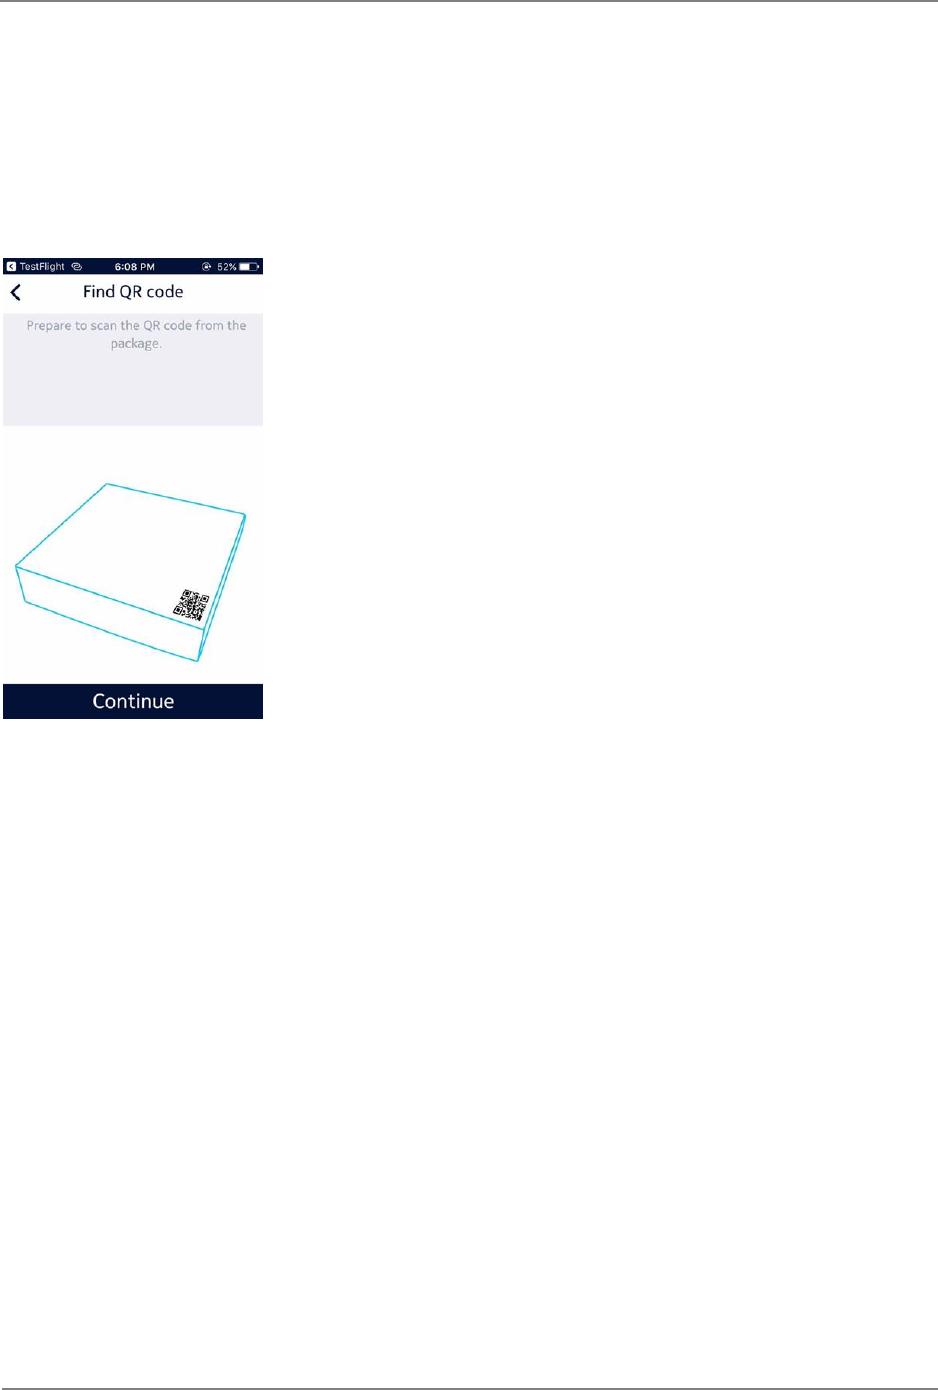
• Now the App asks to scan the QR code of the Home Outdoor Modem to link the Home
Outdoor Modem with the App.
Figure 8 Find QR code
• Tab the Continue button on the screen when you are ready with the QR code printed on
the Home Outdoor Modem package to start the scan procedure.
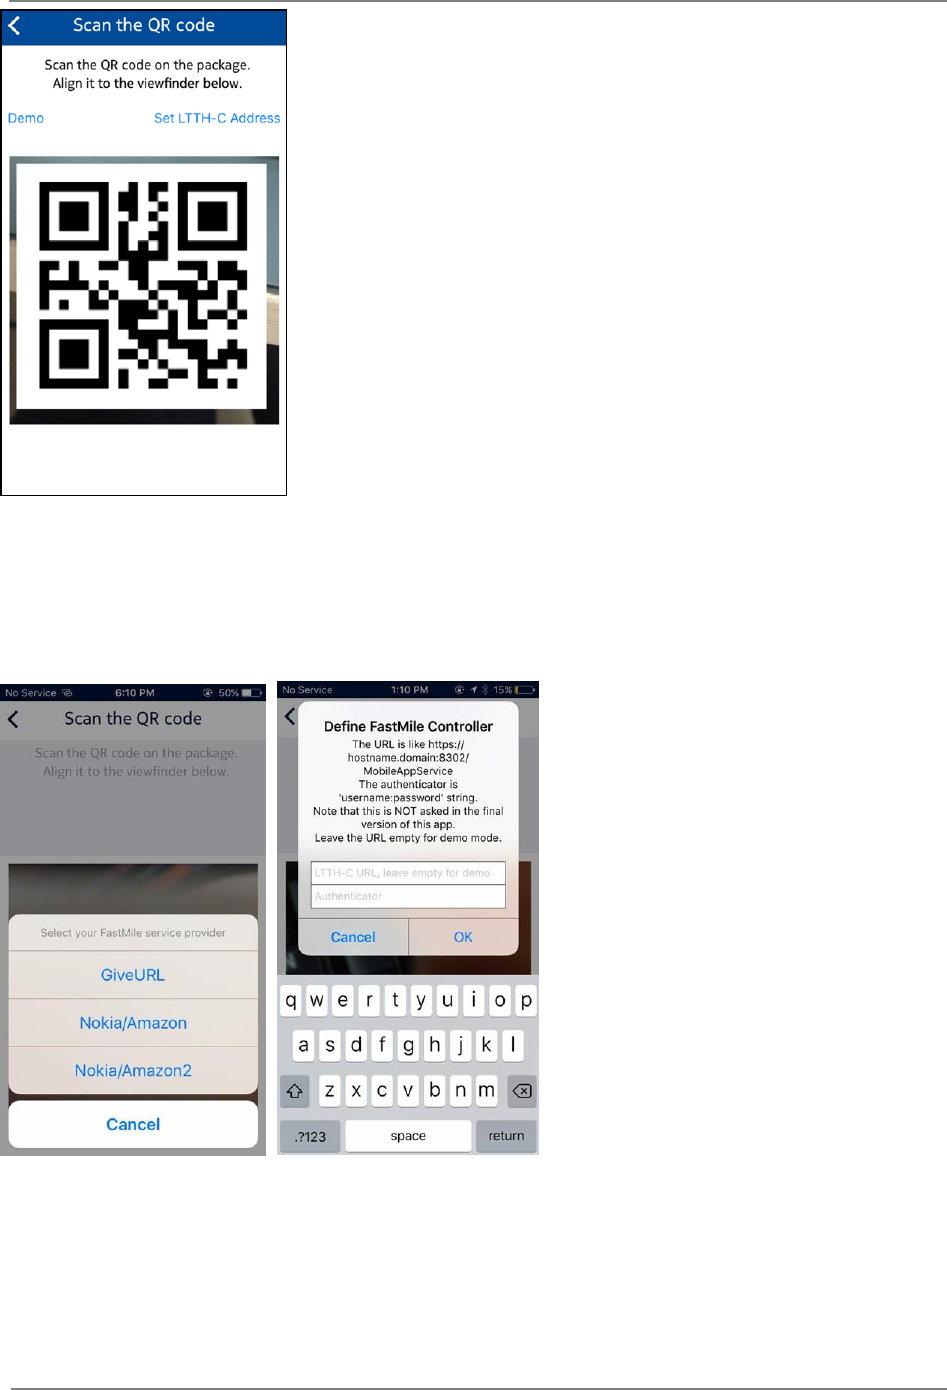
• A new screen with Viewfinder will then be available to scan the QR code.
• On current screen, a viewfinder is available so that user can align the QR code and scan
it.
FastMile Home Outdoor Modem User Manual
Installation Procedure
Release 17.10
DN09218237, Issue 03 Draft
28.11.2017
© 2017 Nokia
20
Figure 9 Scan the QR code
Step 4:
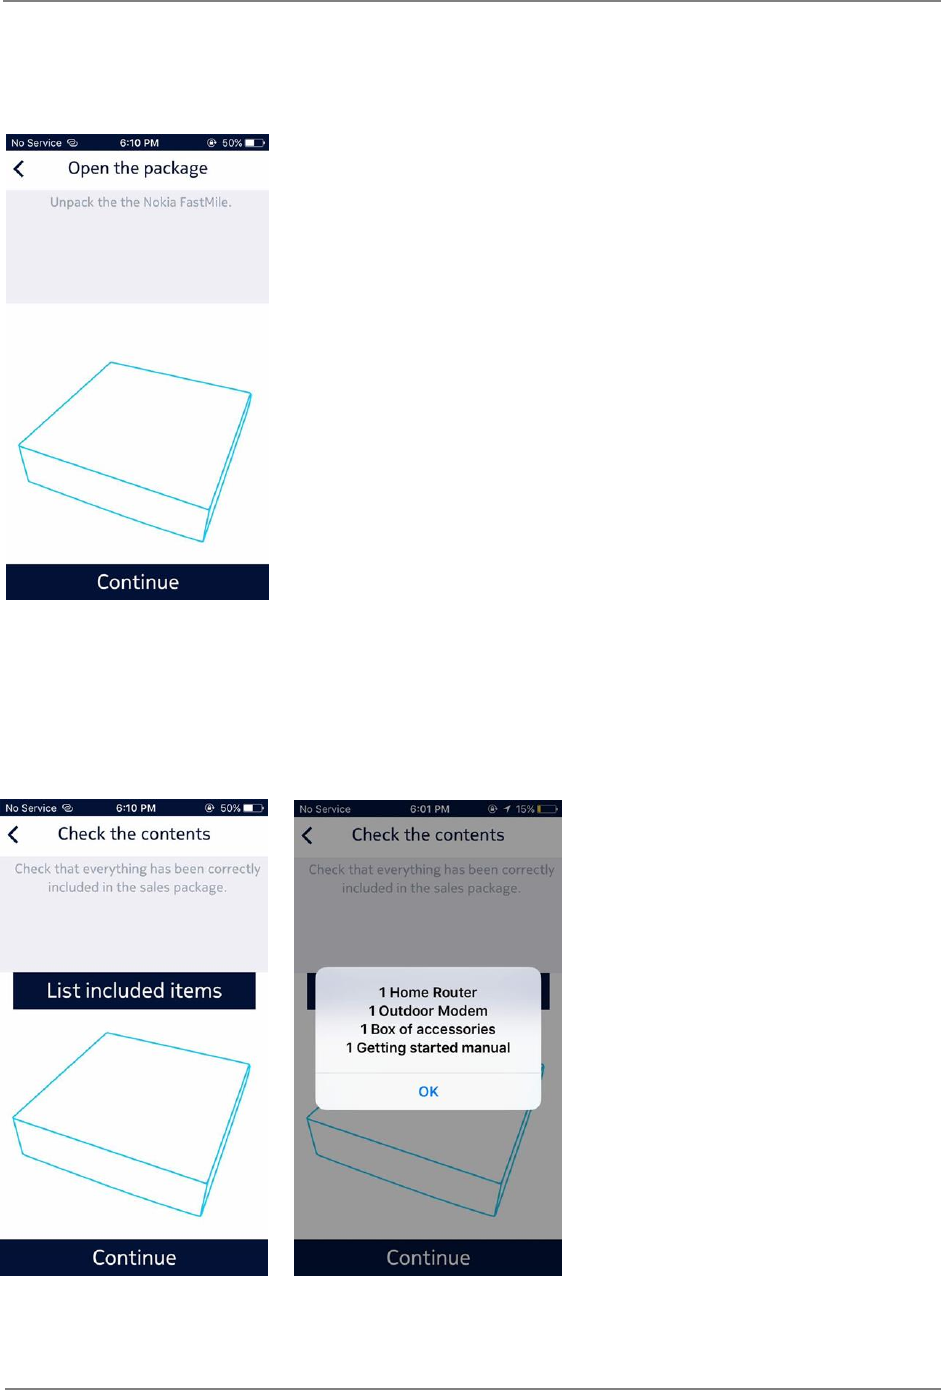
• The App now provides an option to connect the Home Outdoor Modem with FastMile
Controller.
Figure 10 Set FastMile Controller Address
• Select “GiveURL” option to provide FastMile Controller Address manually. A popup
screen will appear prompting the user to input the FastMile Controller address.
• Provide the FastMile Controller URL on the Pop Up Screen and click OK to continue
further.
FastMile Home Outdoor Modem User Manual
Installation Procedure
Release 17.10
DN09218237, Issue 03 Draft
28.11.2017
© 2017 Nokia
21
Step 5:
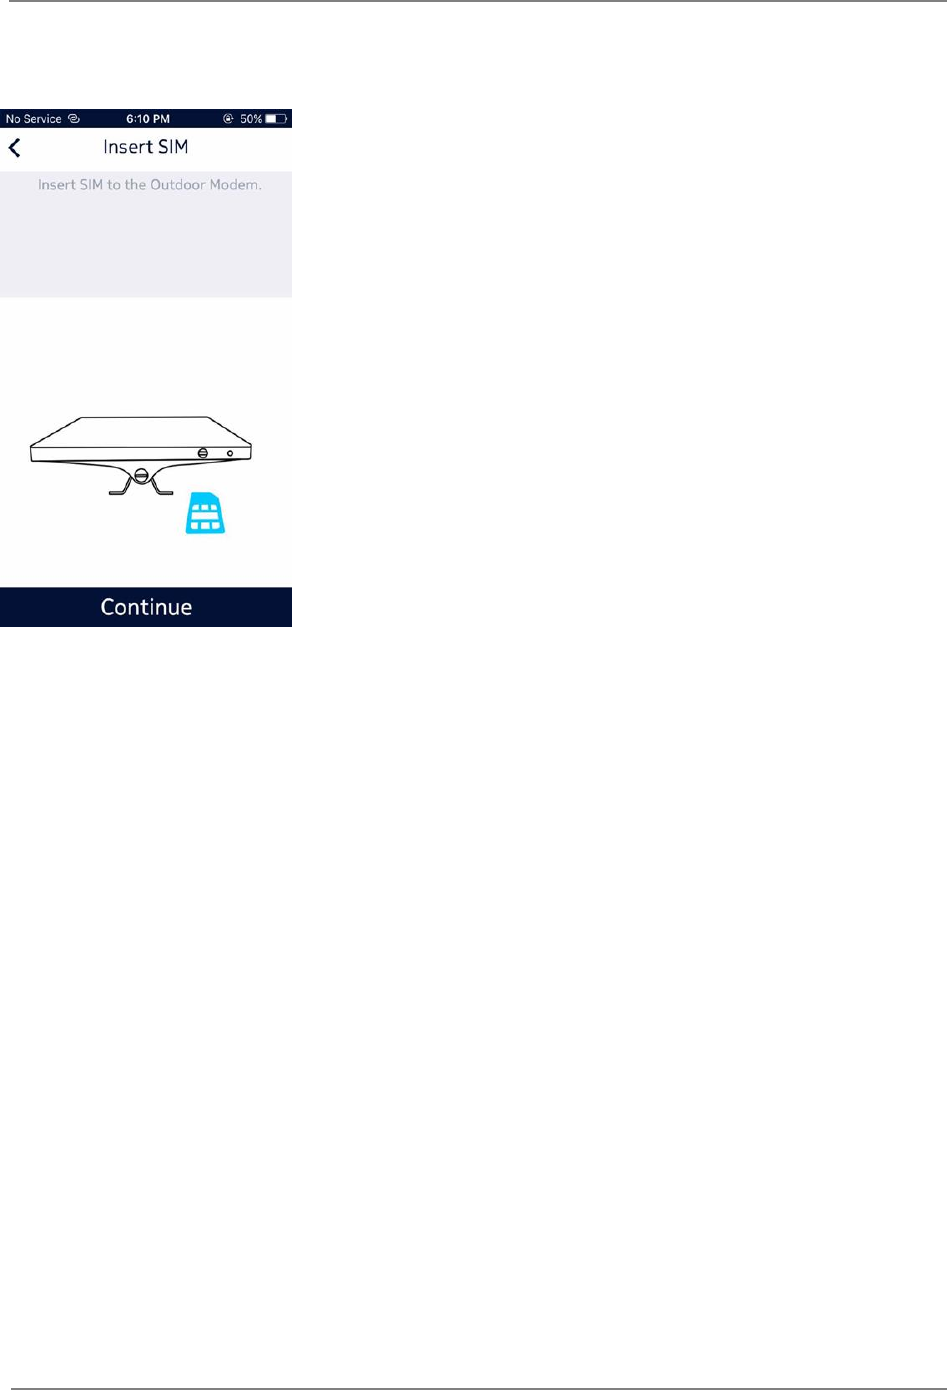
• The Installation App now instructs the user to open the package and unpack the FastMile
Home Outdoor Modem device.
Figure 3 8: Open the package
• Tap on Continue button to go to next screen after opening the package.
• The next screen presents a list of contents that should be present in the package and
asks the user to verify his package contents.
Figure 11 Check the contents
• Tap on Continue button after verification to proceed further.
FastMile Home Outdoor Modem User Manual
Installation Procedure
Release 17.10
DN09218237, Issue 03 Draft
28.11.2017
© 2017 Nokia
22
Step 6:
• At this step, the App instructs the User to insert SIM card in Home Outdoor Modem.
Figure 12 Insert the SIM
• The SIM slot is present in the back side of the Home Outdoor Modem (refer section 2.2
for the SIM slot).
• After Inserting the SIM in the appropriate slot in Home Outdoor Modem, click on
Continue button to go to next screen.
• Now the App tries to find the nearest tower on which Home Outdoor Modem has been
registered.
• Screen shows the direction and cell ID of tower with respect to the user’s current location
on map view.

FastMile Home Outdoor Modem User Manual
Installation Procedure
Release 17.10
DN09218237, Issue 03 Draft
28.11.2017
© 2017 Nokia
23
Figure 13 Finding nearest tower
• Now user has to find a better place on the premises that best faces the tower. Turn
towards the direction of the tower and click on Continue.
• The Red circle turns green when user aligns in the direction of the tower.
• If any obstacle like large building or wall is coming in between the tower direction and
current location, then user can try the following:
▪ Try different angle or location in the premises to face towards the tower.
▪ Or user can change the tower by clicking on “Try another tower”.
• As the Red circle turns Green, click on Continue button to go to next step.
FastMile Home Outdoor Modem User Manual
Installation Procedure
Release 17.10
DN09218237, Issue 03 Draft
28.11.2017
© 2017 Nokia
24
3.4.2 Mounting Instructions
After Selecting the cell and position on the premises, user needs to choose the mounting
type for Home Outdoor Modem.
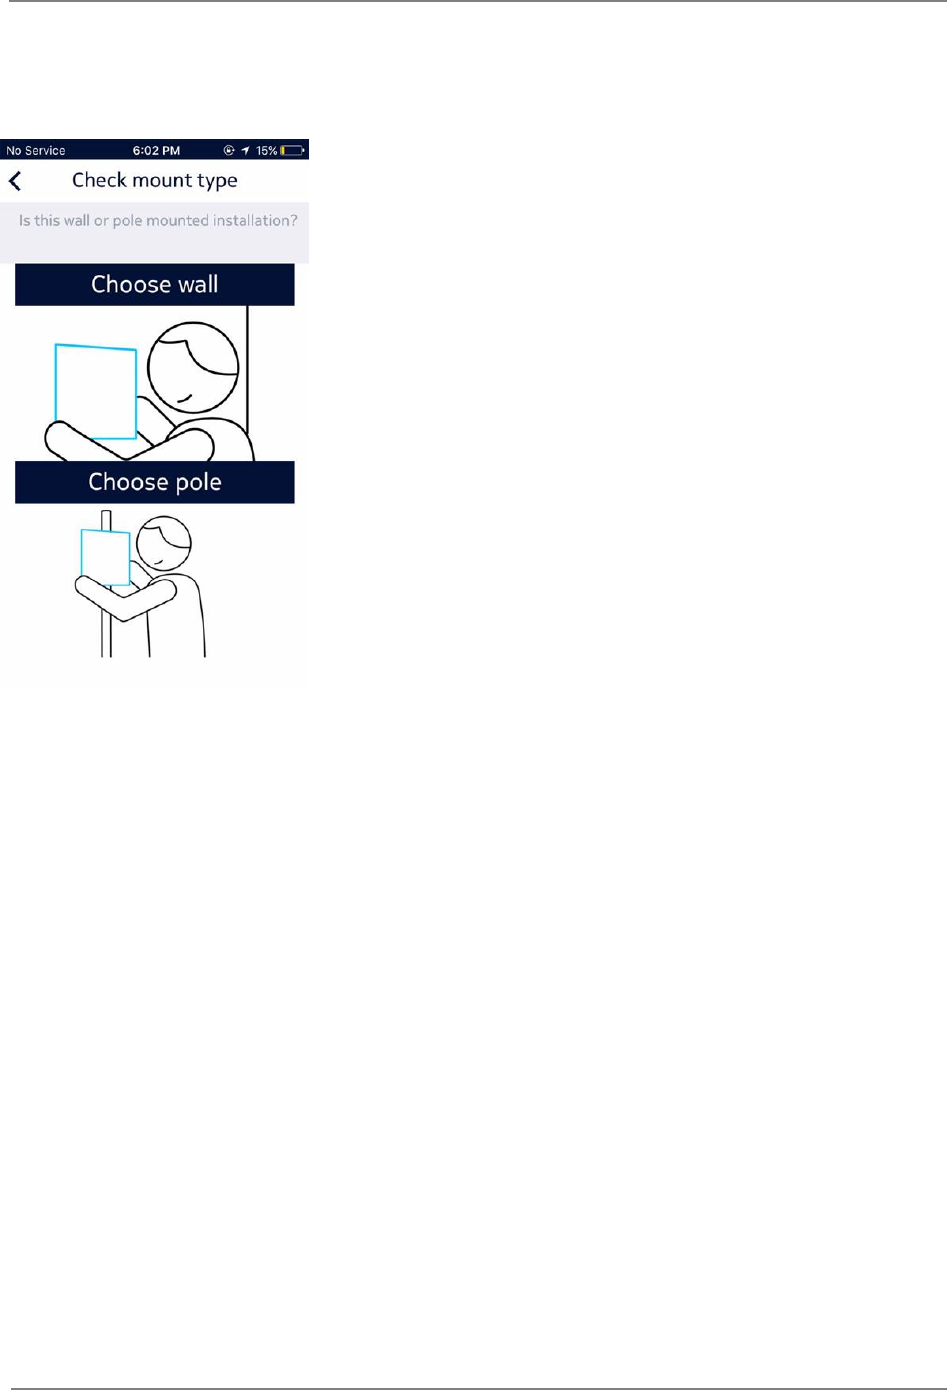
Figure 14 Check Mount Type
User needs to select one of the following two mounting types suitable to the location in the
premises where it has to install the Home Outdoor Modem.
1. Wall mount: Follow the instructions in section 3.4.2.1
2. Pole mount: Follow the instructions in section 3.4.2.2
3.4.2.1 Wall Mount Option
Step 1:
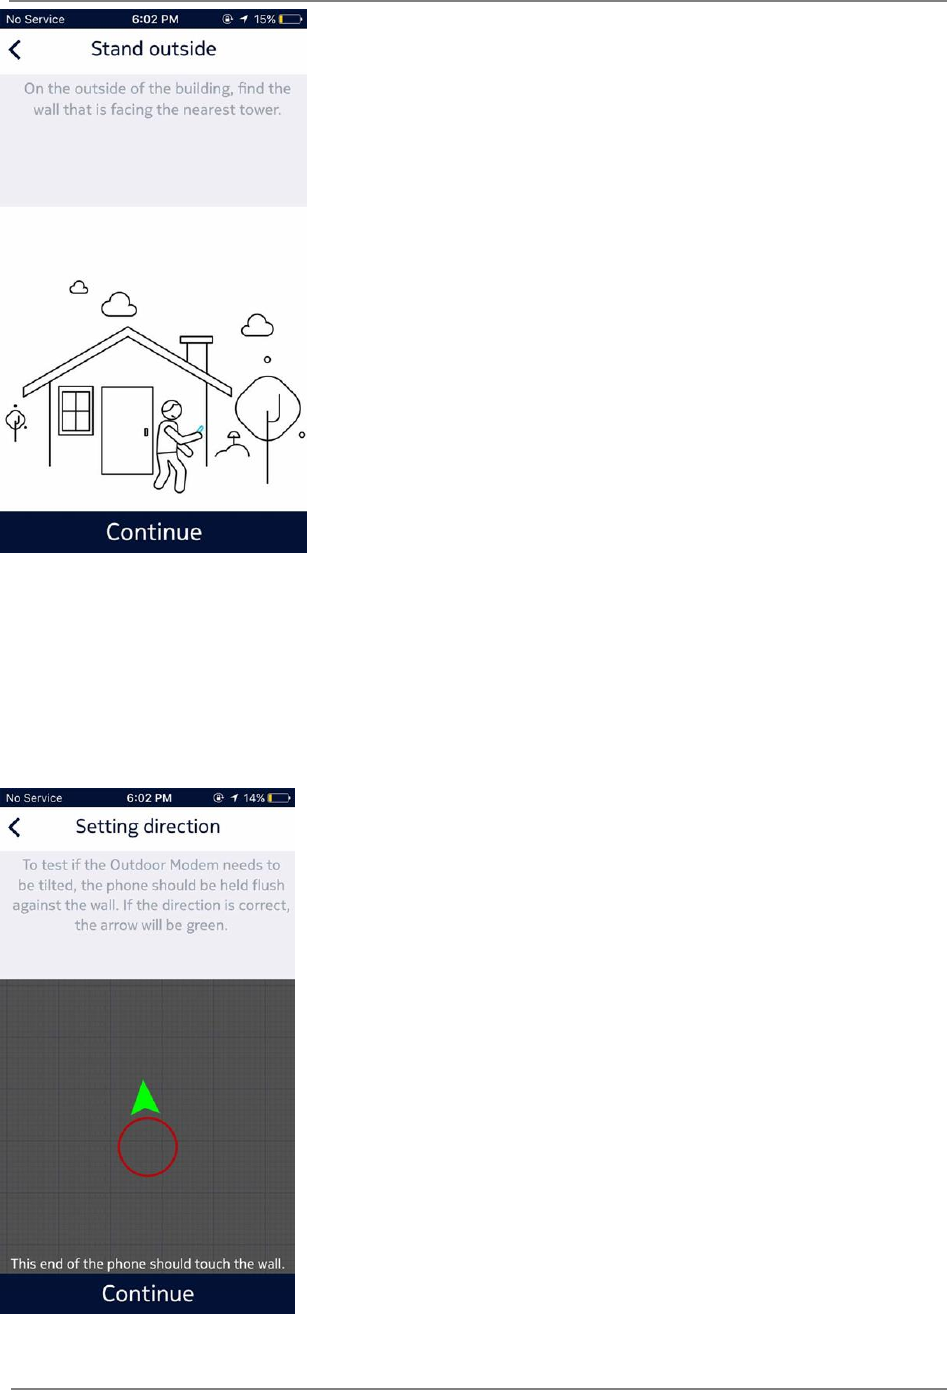
• In this step Installation App asks user to select the wall on the outside of the building
which is facing towards the tower.
• Installation App also instructs the user to move phone towards the wall in a particular
manner to calculate the angle between the selected wall and the tower.
FastMile Home Outdoor Modem User Manual
Installation Procedure
Release 17.10
DN09218237, Issue 03 Draft
28.11.2017
© 2017 Nokia
25
Figure 15 Wall Selection
• After selecting the wall, click on Continue to go to next step.
Step 2:
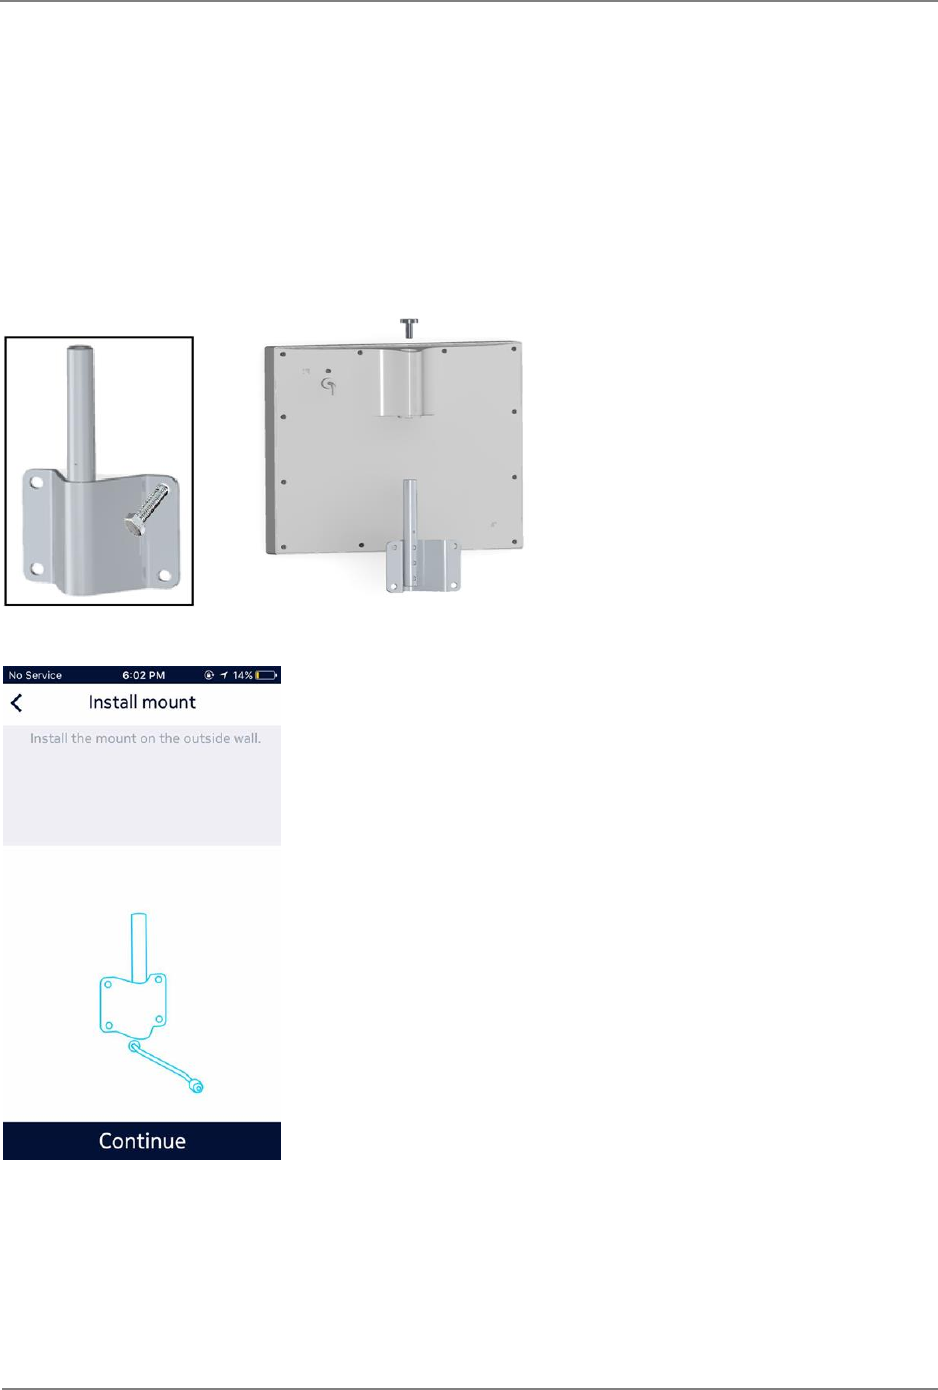
• A map view will appear on the screen. In this Screen Installation app instructs the user to
hold the phone against the wall and turn slowly to get in direction of the selected tower.
Figure 16 Setting Direction
FastMile Home Outdoor Modem User Manual
Installation Procedure
Release 17.10
DN09218237, Issue 03 Draft
28.11.2017
© 2017 Nokia
26
• When user aligns in the direction of tower the arrow becomes Green, it depicts that user
can mount the Home Outdoor Modem on wall in this direction.
• After getting direction click on Continue button to go to Next Step.
Step 3:
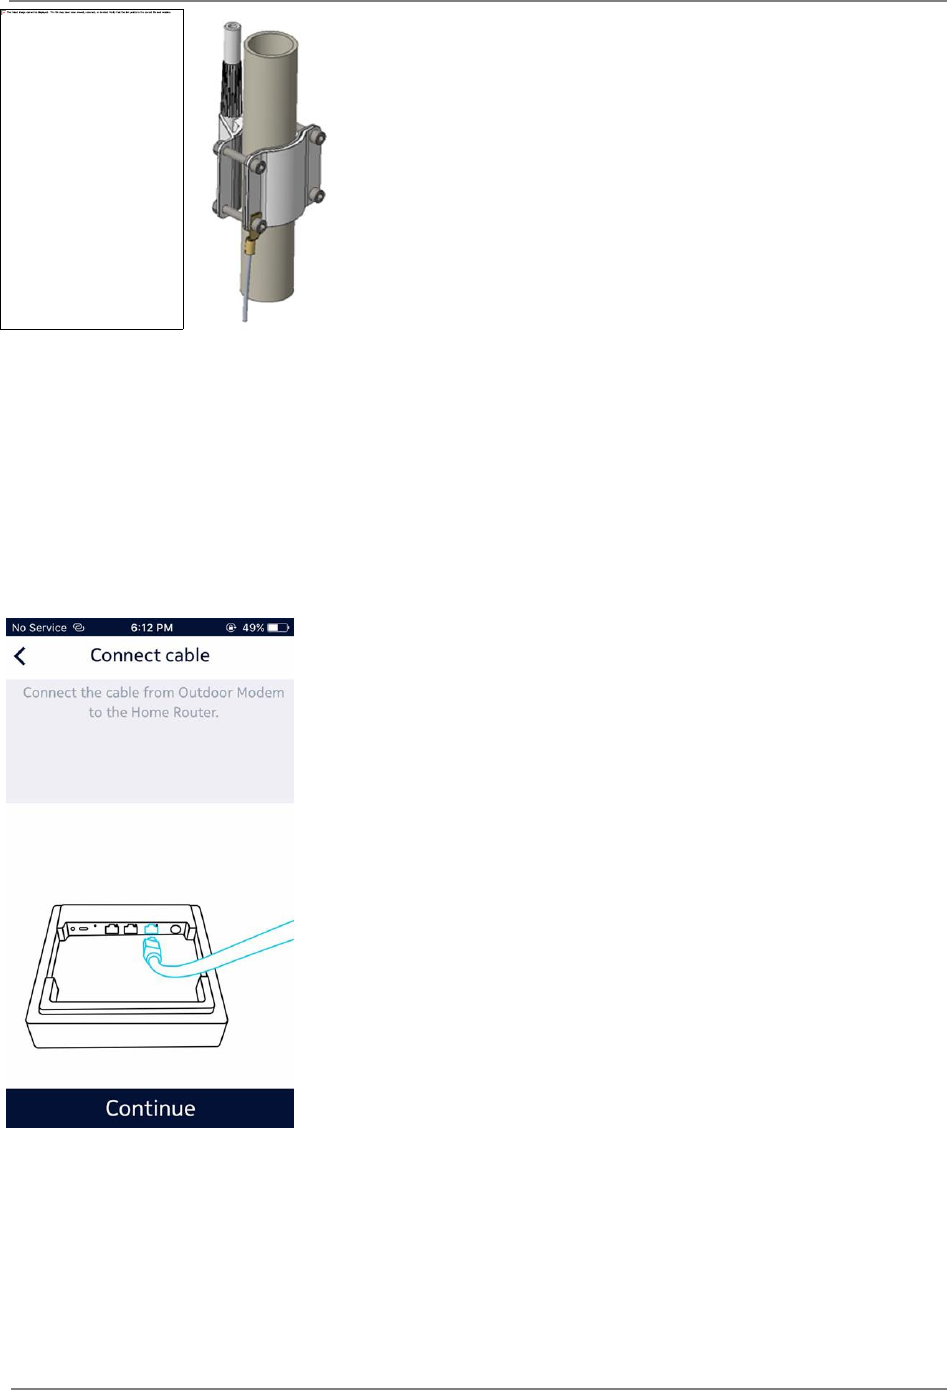
• Now Installation App asks the user to install the mount outside the selected wall.
• Fix the Wall Mounting Anchor to the wall using four bolts.
Bolts are not included, select suitable bolts depending on the wall material.
Figure 17 Bottom view of Wall Mounting Anchor
Figure 18 Install Mount
• Once the Mounting Anchor is fixed to the wall, mount the unit to the wall as per the
above figure and tighten the screw.
FastMile Home Outdoor Modem User Manual
Installation Procedure
Release 17.10
DN09218237, Issue 03 Draft
28.11.2017
© 2017 Nokia
27
Figure 19 Earth connection with Wall-mount and Poll-mount Configuration
• The pole anchor needs to be properly grounded by connecting the anchor bolts to the
earthing pit.
• Do not paint on the Home Outdoor Modem.
• Always mount the anchor to the wall using all four screws.
• Once the mounting done, click on Continue button to go to next screen.
Figure 20 Connect cable
• Place the Home Outdoor Modem on the mount.
• Connect the cable (Power over Ethernet cord) between Home Outdoor Modem and
Home Router.
• After connecting, click on Continue button to go to next screen.
FastMile Home Outdoor Modem User Manual
Installation Procedure
Release 17.10
DN09218237, Issue 03 Draft
28.11.2017
© 2017 Nokia
28
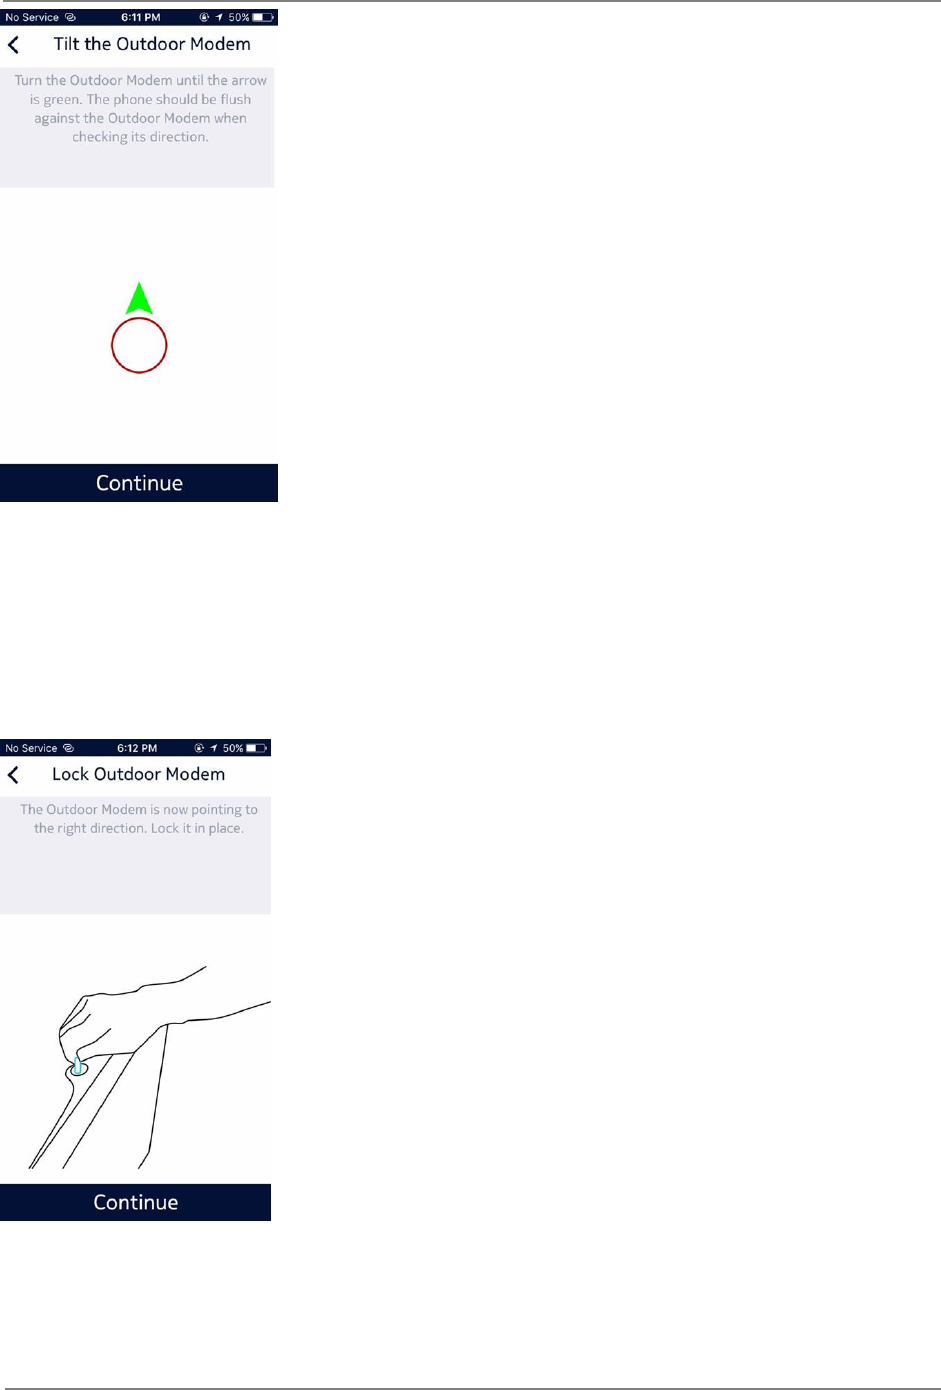
Figure 21 Tilt Home Outdoor Modem
• In this screen Installation App suggest the user to tilt the Home Outdoor Modem.
• This tilt angle is calculated by the Installation App on the basis of selected wall location
and the tower.
• After tilting the Home Outdoor Modem, click on Continue to go to next screen.
Figure 22 Lock Home Outdoor Modem
• Installation App instructs the user to lock the Home Outdoor Modem on the mount and
go inside the building.
• Home Outdoor Modem Wall mounting is now completed.
FastMile Home Outdoor Modem User Manual
Installation Procedure
Release 17.10
DN09218237, Issue 03 Draft
28.11.2017
© 2017 Nokia
29
3.4.2.2 Pole Mount Option
Step 1:
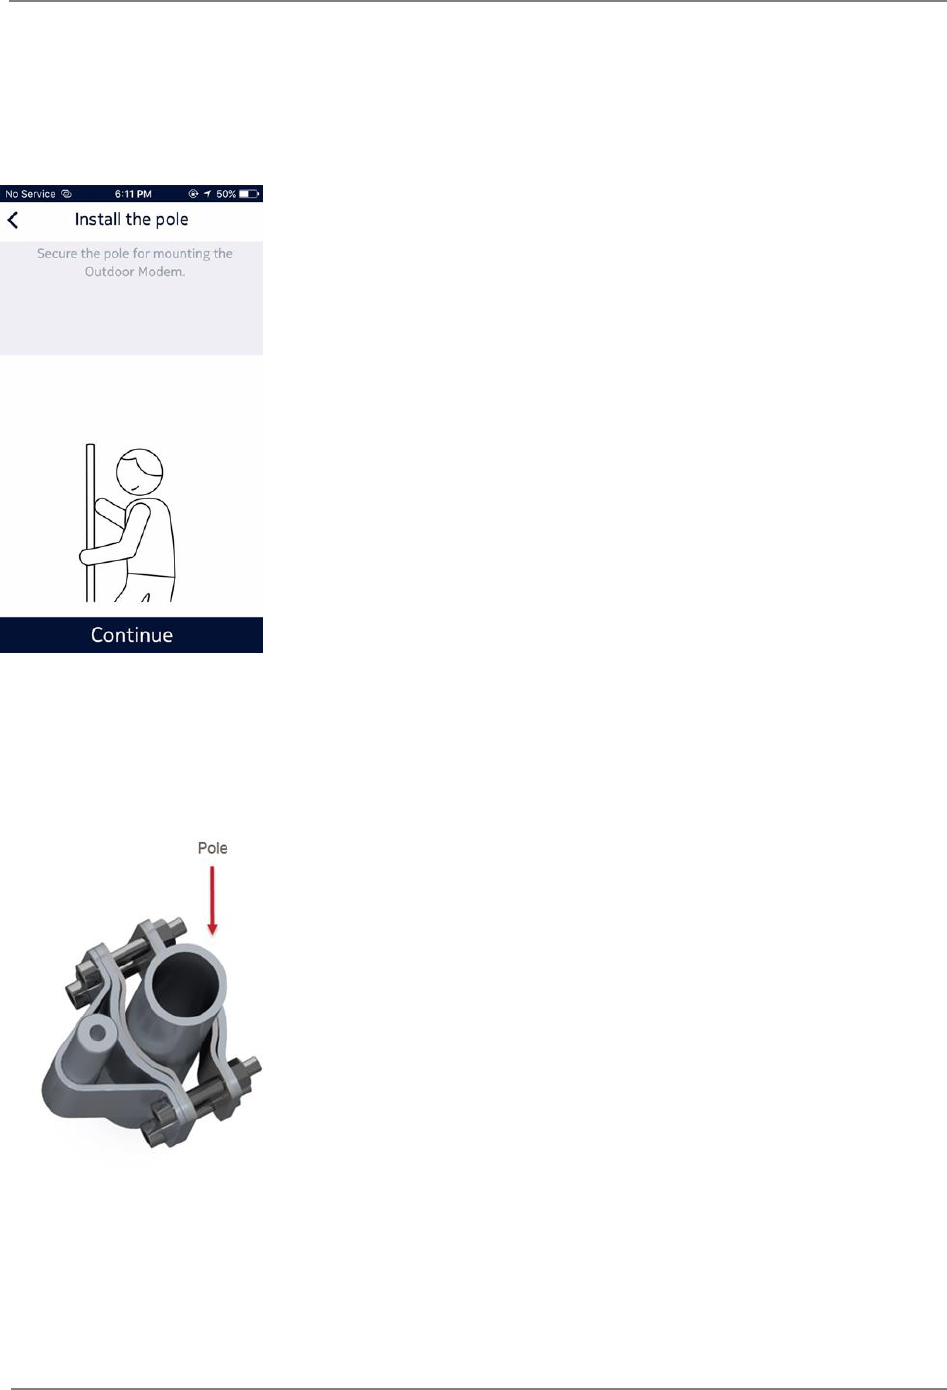
• Installation App asks the user to select or install a pole outside the building for mounting
Home Outdoor Modem.
Figure 23 Install the Pole
• The diameter of the pole should be in the range of absolute min 30mm – absolute max
80mm.The recommended minimum diameter would be 35mm for a maximum height of
4m provided the pole is well grounded (fixed). Fix the Pole Mounting Anchor to the pole
using four bolts and nuts as shown in the figure below.
Figure 24 Pole Mount Option
• Once the Mounting Anchor is fixed to the pole, mount the Home Outdoor Modem unit to
the pole as shown in the figure below.
FastMile Home Outdoor Modem User Manual
Installation Procedure
Release 17.10
DN09218237, Issue 03 Draft
28.11.2017
© 2017 Nokia
30
Figure 25 Bottom view of Pole Mount
• Installation App also instructs the user to move phone towards the pole mounted Home
Outdoor Modem in a particular manner to calculate the angle between the Home
Outdoor Modem on the pole and the tower.
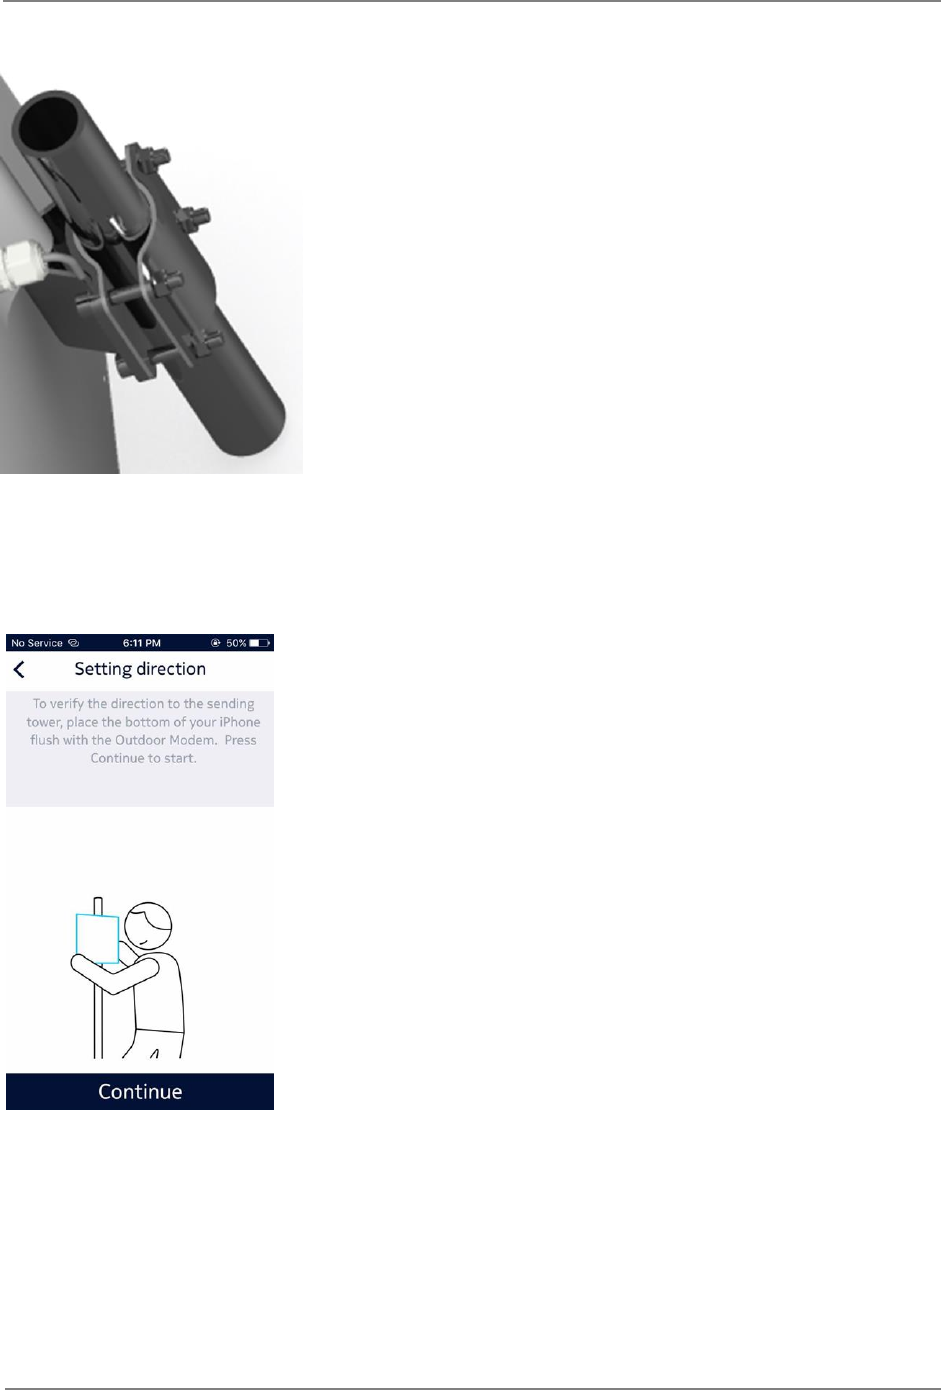
Figure 26 Setting Direction
• Once the Home Outdoor Modem pole mounting done, click on Continue button to go to
next step.
Step 2:
• The Installation App instructs the user to hold the phone against the Home Outdoor
Modem and turn slowly to get the direction of the selected tower.
FastMile Home Outdoor Modem User Manual
Installation Procedure
Release 17.10
DN09218237, Issue 03 Draft
28.11.2017
© 2017 Nokia
31
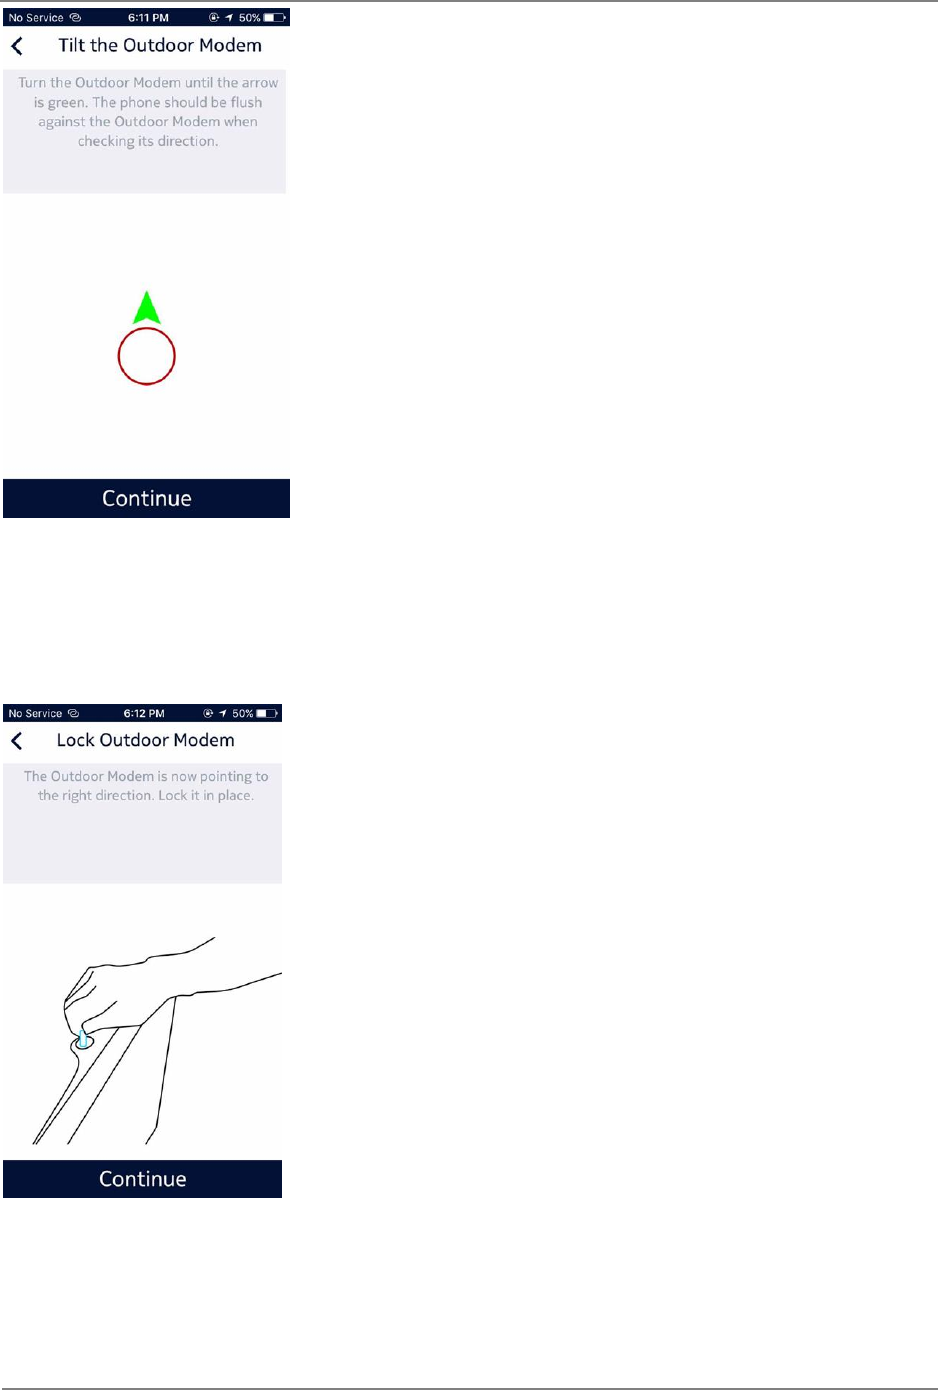
Figure 27 Tilt the Home Outdoor Modem
• When user aligns in the direction of tower the arrow becomes Green, it depicts that user
can mount the Home Outdoor Modem on pole in this direction.
• After getting direction click on Continue button to go to Next Step.
Figure 28 Lock Home Outdoor Modem
• The Installation App now instructs the user to lock the Home Outdoor Modem on the
pole.
• Home Outdoor Modem pole mounting is now completed.
FastMile Home Outdoor Modem User Manual
Installation Procedure
Release 17.10
DN09218237, Issue 03 Draft
28.11.2017
© 2017 Nokia
32
3.4.3 Connectivity and power up sequence
The Installation App now guides the user to provide Connectivity to the Home Outdoor
Modem Unit and power it ON.
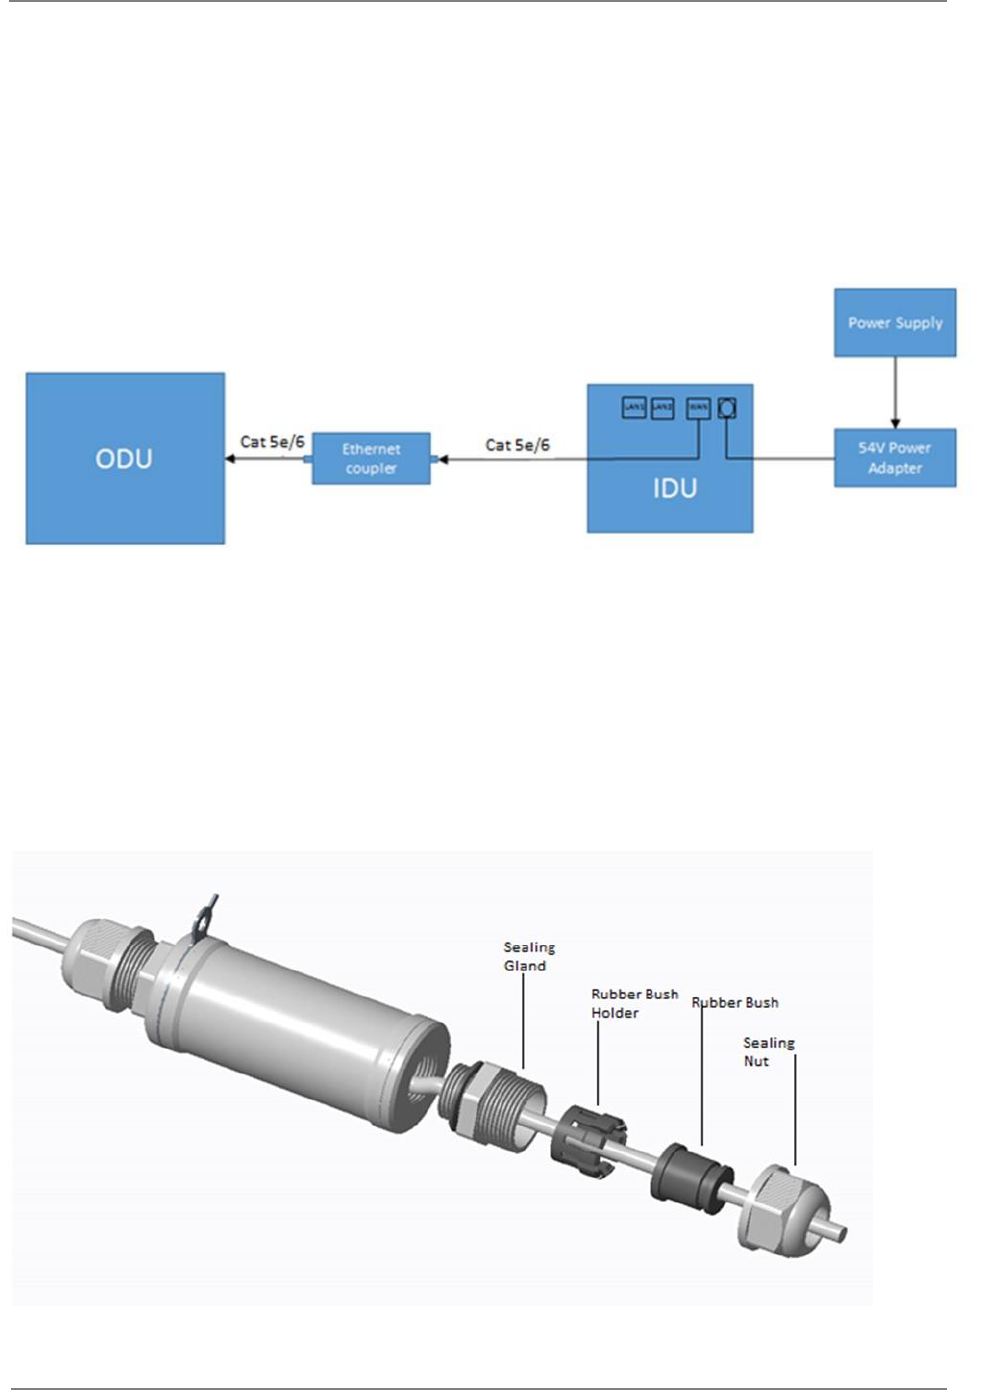
Connect the WAN port of Home Router to the one side of Ethernet Adapter through Cat5e/6
cable. Connect another side of Ethernet Adapter to Home Outdoor Modem using RJ45
connector. Connect the power port of Home Router unit to 54V power adapter output. Turn
on the AC mains switch after completing the setup.
Figure 29 Power sequence of Home Outdoor Modem through Home Router
3.4.3.1 Ethernet Adapter assembly instruction
1. Remove any one side Sealing Nut and Rubber Bush from the Sealing gland of Ethernet
Adapter assembly.
Figure 30 Ethernet Adapter Assembly
FastMile Home Outdoor Modem User Manual
Installation Procedure
Release 17.10
DN09218237, Issue 03 Draft
28.11.2017
© 2017 Nokia
33
2. Insert the Ethernet Wire to the Sealing Nut, Rubber bush and Rubber bush Holder.
3. Connect the RJ45 connector to the one side of Ethernet Adapter inside of Seal.
4. Fix the rubber bush to the Rubber Bush Holder and then fix it to the Sealing Gland. Fix
the Sealing Nut to Sealing Gland.
5. Repeat Step-1 to Step-4 for another side of Ethernet Adapter assembly.
3.4.3.2 Connection to Home Router
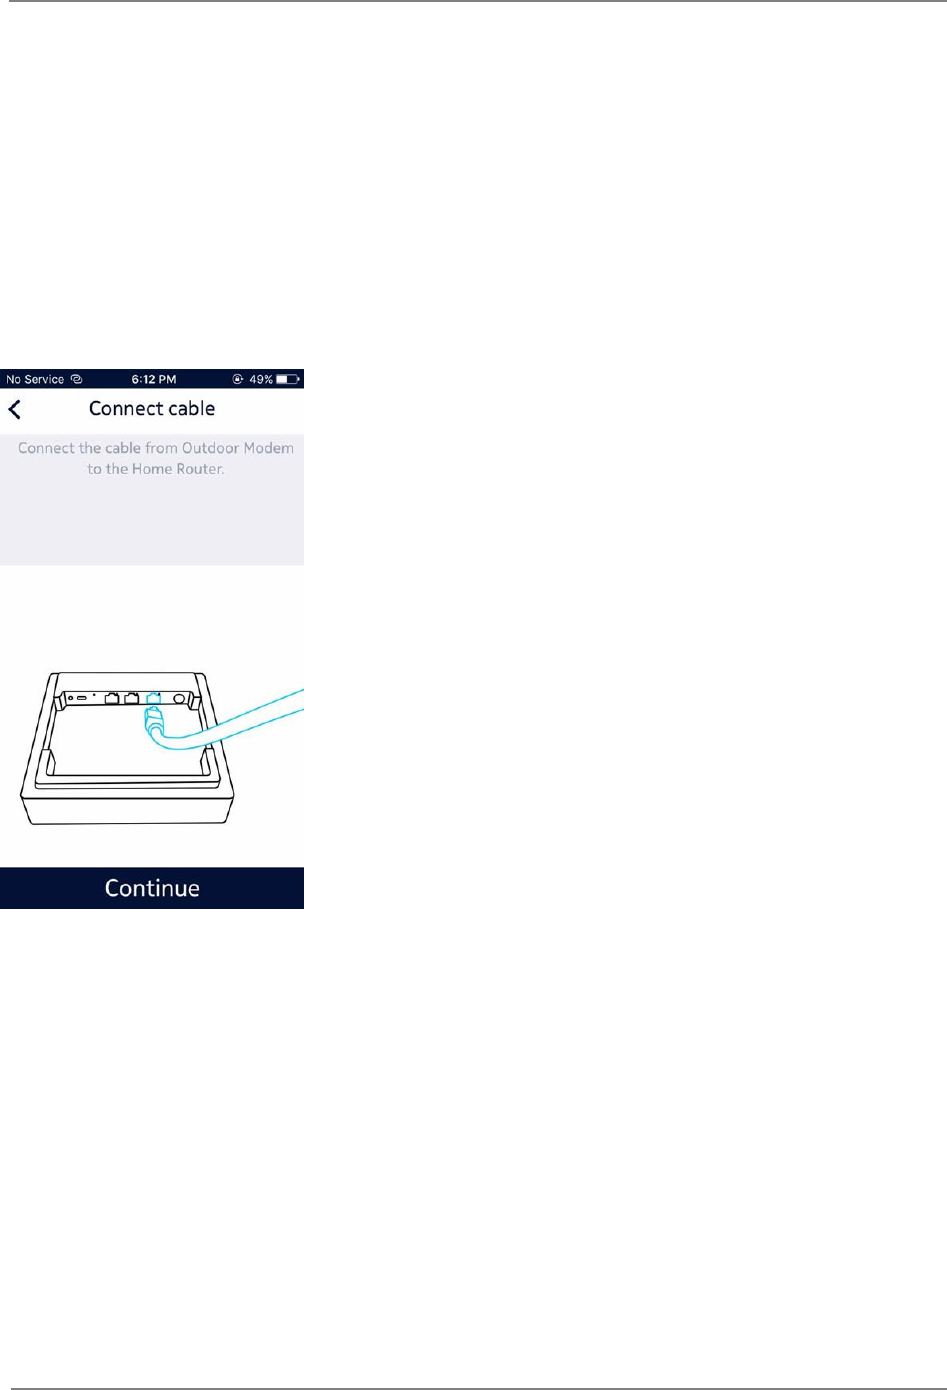
Connect the Ethernet Cable from Home Outdoor Modem to Home Router for Power Supply
and Connection Establishment.
Figure 31 Connect Cable
3.4.3.3 Power Up Sequence
Connect Power Cable to the Home Router to Power UP both Home Router and Home
Outdoor Modem devices and complete the setup.
FastMile Home Outdoor Modem User Manual
Installation Procedure
Release 17.10
DN09218237, Issue 03 Draft
28.11.2017
© 2017 Nokia
34
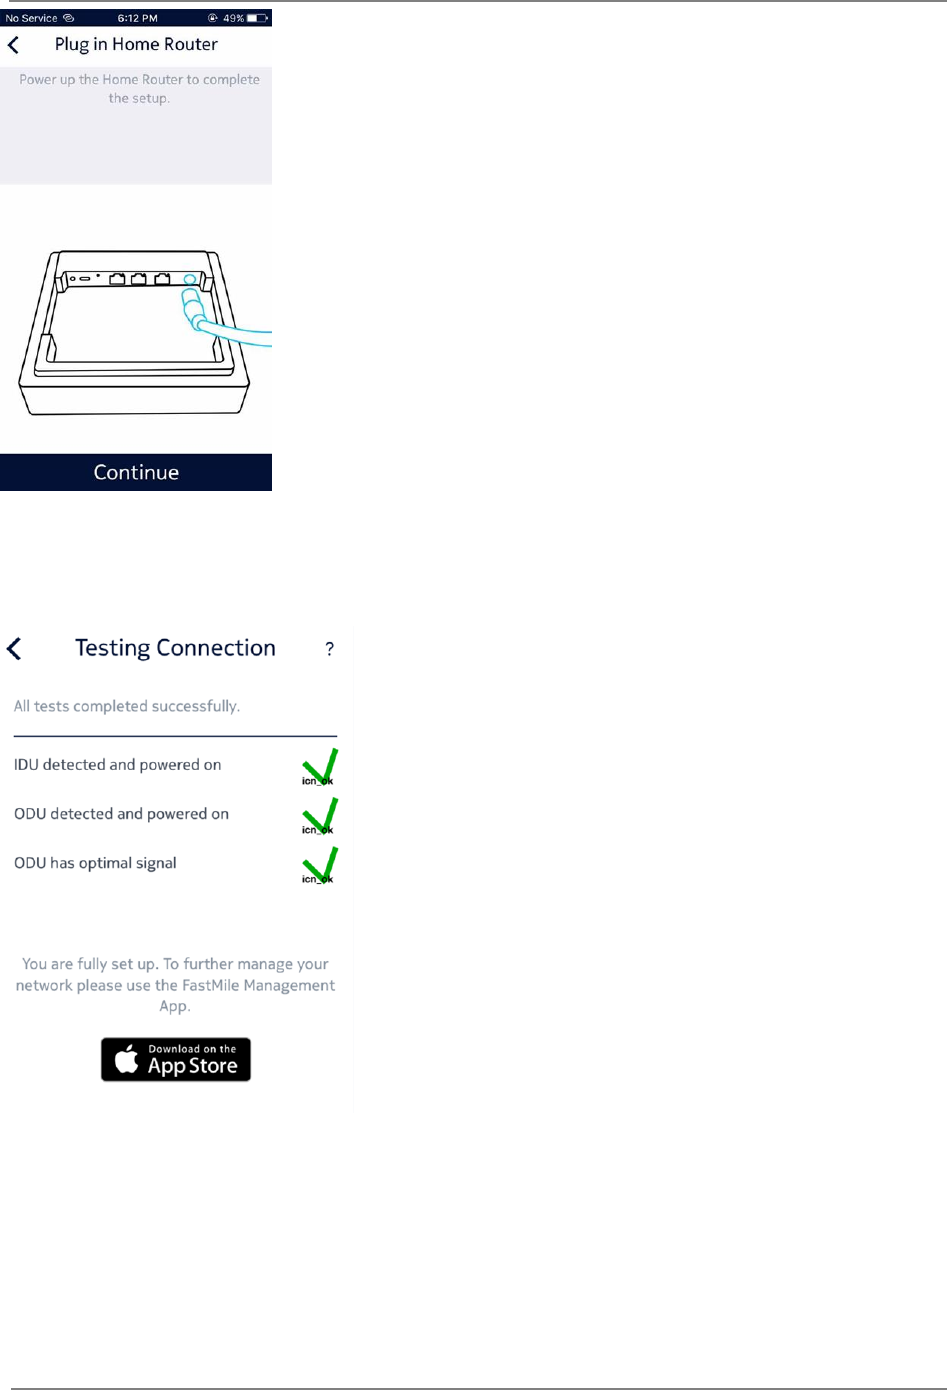
Figure 32 Plug in Home Router
Once the connectivity and Power up scenario has been completed, the Installation App
shows the status of Installation procedure.
Figure 33 Testing Connection
All Green Ticks shows that Home Outdoor Modem installation has been completed
successfully.

FastMile Home Outdoor Modem User Manual
Installation Procedure
Release 17.10
DN09218237, Issue 03 Draft
28.11.2017
© 2017 Nokia
35
3.4.4 Managing Home Outdoor Modem through Management app
Once the Home Outdoor Modem is properly installed on the wall/pole outside the premises
and connected with the Home Router, you need to manage the Home Outdoor Modem
device.
You are provided with one more phone application, the Management app. With the help of
this app, you can perform the following actions on Home Outdoor Modem:
• Firmware upgrade of Home Outdoor Modem
• Check Home Outdoor Modem connectivity with the LTE network.
These actions are described in the below sub-sections.
3.4.4.1 Home Outdoor Modem Firmware Upgrade
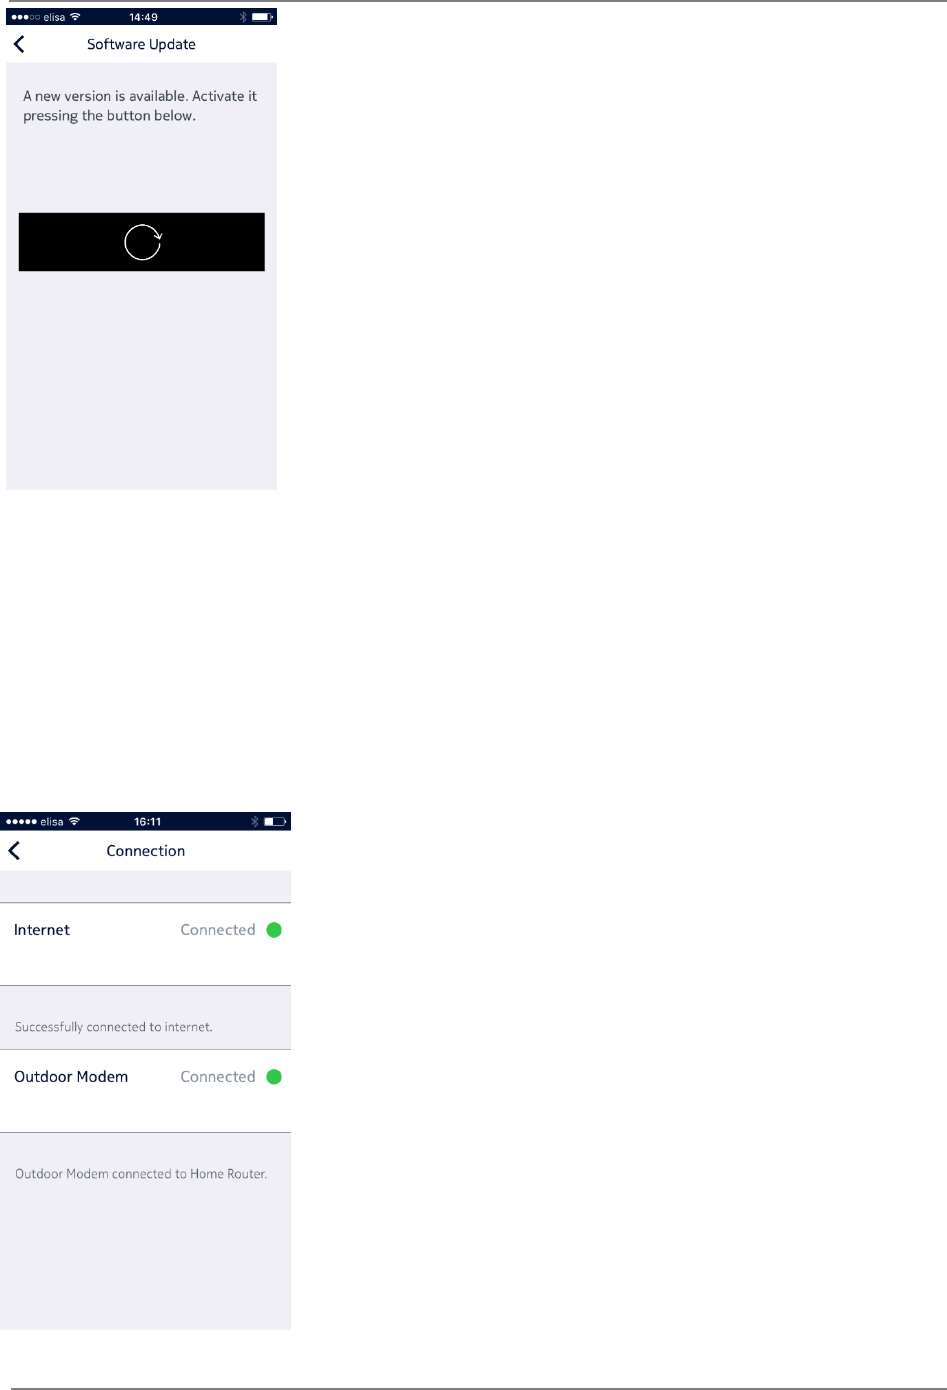
• Management app shows the latest available Software Updates for both Home Outdoor
Modem and Home Router.
Figure 34 Software Update Available
• You can check for the updated version available by clicking the Update available. You
can install and activate the latest software updates by clicking “Restart CPE and Update”
button on screen.
FastMile Home Outdoor Modem User Manual
Installation Procedure
Release 17.10
DN09218237, Issue 03 Draft
28.11.2017
© 2017 Nokia
36
Figure 35 Install Updates
3.4.4.2 Home Outdoor Modem Connectivity
Management app shows the connectivity between the Home Outdoor Modem and LTE
network on Connection screen. If Home Outdoor Modem is not connected with LTE network,
then Internet connection changes from Green to Red in Management app.
Management app also shows connectivity between Home Outdoor Modem and Home
Router. If connectivity between Home Outdoor Modem and Home Router is lost, then Home
Outdoor Modem connection changes from Green to Red in Management app.
Figure 36 Connection

FastMile Home Outdoor Modem User Manual
Troubleshooting
Release 17.10
DN09218237, Issue 03 Draft
28.11.2017
© 2017 Nokia
37
4 Troubleshooting
This chapter contains the common issues along with their resolutions that a user might face
while installing/familiarizing with Home Outdoor Modem.
4.1 Common Problems during Installation and startup
Phase
4.1.1 Home Outdoor Modem is not registered.
Root cause(s):
Registration is not done for the Home Outdoor Modem. BS/Cell must be assigned for each
Home Outdoor Modem before given to customer. This registration typically happens in Point-
of-Sales (PoS).
Indication(s) to user:
When install App asks Controller the BS location for a given Home Outdoor Modem,
Controller gives a <status> with error code 2, “NTE is not registered”. The application
indicates this error code as "NTE not registered".
Resolution(s):
Home Outdoor Modem must be returned to PoS for registration.
4.1.2 Home Outdoor Modem registration fails at Controller
Root cause(s):
Incorrect HW version or Product Class is provided while Registering Product Category at
Controller.
Indication(s) to user:
Home Outdoor Modem is not present under ‘Find CPE’ tab at Controller.
Resolution(s):
Rectify HW version and/or Product Class value while Registering Product Category at
Controller and Perform Home Outdoor Modem Reboot or Factory Reset.
4.1.3 Home Outdoor Modem is registered to a wrong BS/Cell
Root cause(s):
Error in providing the right input in the registration (e.g., street address of the Home Outdoor
Modem installation location). As a result, Home Outdoor Modem cannot create (proper) LTE
connection to the assigned BS/Cell by using narrow-beam antenna.

FastMile Home Outdoor Modem User Manual
Troubleshooting
Release 17.10
DN09218237, Issue 03 Draft
28.11.2017
© 2017 Nokia
38
Indication(s) to user:
Error is seen only after the system is installed.
LEDs in Home Outdoor Modem and Home Router show an error. LEDs at both Home
Router and Home Outdoor Modem will be Flashing (2Hz) orange.
Smartphone application shows error "Cannot connect to the assigned cell".
The signal strength is too low. LEDs in Home Outdoor Modem and Home Router may
indicate this.
Resolution(s):
Visit Point-of-Sales or call Service Desk to re-register the Home Outdoor Modem for a new
BS/cell.
Given the new, right registration input, the Controller must be able to cancel the previous
registration (BS-CPE mapping), release the capacity reservation for the CPE from the wrong
BS/cell, and make a new registration (BS-CPE mapping).
When Home Router is installed (again) after re-registration, it boots and creates the initial
connection to the Controller. The Controller commands the Home Router to switch to reset-
to-factory-defaults. After that the Installation procedure between the CPE and Controller
continues normally with BS/cell assignment by the Controller to CPE and CPE antenna
alignment to the right BS/cell.
Note: In the worst case it will be necessary to re-install the Home Outdoor Modem to a
different wall after re-registration.
4.1.4 Home Outdoor Modem installation application cannot connect
to the Controller
Root cause(s):
The Home Outdoor Modem installation application needs IP (internet) connection to connect
to Controller, but internet connection is not available.
Indication(s) to user:
The Home Outdoor Modem installation application shows "Cannot connect to LTTH-C".
Resolution(s):
Arrange internet connection for the Home Outdoor Modem installation application (3G, 4G,
LTE).
Home Outdoor Modem cannot connect to the Controller
Root cause(s):
Home Outdoor Modem needs IP (internet) connection to connect to Controller and tries to
connect during the first-time boot by using antenna wide-beam mode but with no success.

FastMile Home Outdoor Modem User Manual
Troubleshooting
Release 17.10
DN09218237, Issue 03 Draft
28.11.2017
© 2017 Nokia
39
The LTE/FastMile network field strength is most likely too weak for the Home Outdoor
Modem location. This may be due to the Home Outdoor Modem being located on the wrong
wall/pole or an operator’s network plan is having coverage gap.
Another cause for this could be that the Controller is temporarily down.
Indication(s) to user:
LEDs is Home Outdoor Modem and Home Router show an error. LEDs at both Home Router
and Home Outdoor Modem will be Flashing (2Hz) orange.
Smartphone application shows error message "Cannot connect to LTTH-C".
Resolution(s):
Home Outdoor Modem restart may help to fix "Controller-is-down" case.
If connection is not successful in the wide beam mode, the Home Outdoor Modem tries to
scan in the narrow beam mode.
If Home Outdoor Modem appears to be installed to a wrong wall/pole, the installation
process is re-done.
If the root cause is the gap in the network coverage, the operator must do network re-
planning/adjustments to serve the Home Outdoor Modem location.
If the Controller is down, operator needs to bring up the same to establish connection
between Home Outdoor Modem and Controller.
4.1.5 Home Outdoor Modem cannot form the LTE connection by
using the narrow-beam.
4.1.5.1 Automatic cell re-assignment during Home Outdoor Modem installation
is possible
Root cause(s):
Any reason why service can not be provided using the original Cell Id allocation.
Indication(s) to user:
In the ‘setODUState’ message the Home Outdoor Modem indicates to Controller that the
Home Outdoor Modem cannot connect to the assigned cell in the initial setup phase but the
Home Outdoor Modem could connect to another cell.
LEDs at both Home Router and Home Outdoor Modem will be Flashing (2Hz) orange.
Resolution(s):
The Home Outdoor Modem scans the tunable range for cell candidates using narrow beam
and picks up best available cell. The Home Outdoor Modem sends the ‘setODUState’
message with the new cell candidate. If the candidate cell is suitable based on the Controller
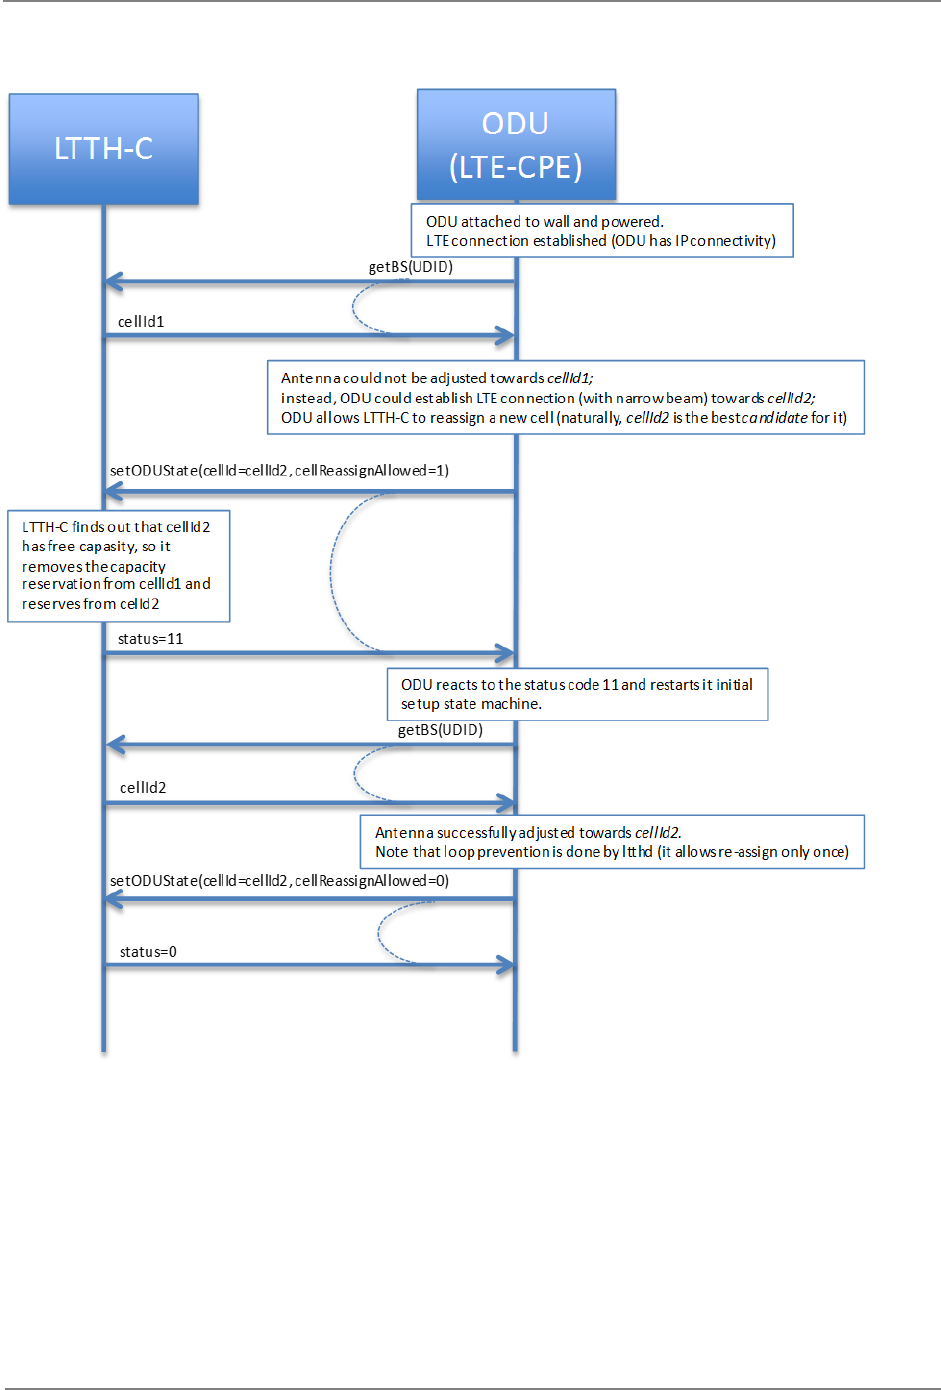
FastMile Home Outdoor Modem User Manual
Troubleshooting
Release 17.10
DN09218237, Issue 03 Draft
28.11.2017
© 2017 Nokia
40
assessment, the Controller re-assigns a new cell for the Home Outdoor Modem. The Home
Outdoor Modem shall start with factory-default behavior (i.e. get a new Cell Id to be used).
Figure 37 Cell re-assignment during Home Outdoor Modem Installation Procedure
4.1.5.2 Other cell re-selection cases
Root cause(s):
Home Outdoor Modem is placed to the wrong wall.
The manual tilt is at a wrong position.
The serving cell may be down.

FastMile Home Outdoor Modem User Manual
Troubleshooting
Release 17.10
DN09218237, Issue 03 Draft
28.11.2017
© 2017 Nokia
41
Indication(s) to user:
LEDs in Home Outdoor Modem and Home Router show error. LEDs at both Home Router
and Home Outdoor Modem will be Flashing (2Hz) orange.
Smartphone application shows error message "Cannot connect to assigned cell".
Home Outdoor Modem informs Controller about its state, “cannot connect” in a HTTP/JSON
‘request’ message.
Resolution(s):
If serving cell is down, the Controller must get information from the network management
system (NetAct) of the root cause (“cell is down”). The Controller gives a ‘response’ with
reason “cell is down” to Home Outdoor Modem’s ‘request’ “cannot connect”. If possible
(according to the capacity plan), Controller re-allocates another Cell Id to Home Outdoor
Modem.
If the manual tilt is wrong another tilt angle is manually adjusted. Home Outdoor Modem
restart is needed in this case.
If Home Outdoor Modem appears to be installed to a wrong wall, the installation process is
re-done.
4.1.6 Cable between Home Outdoor Modem and Home Router not
properly connected
Root cause(s):
There are problems with PoE cable between Home Outdoor Modem and Home Router. The
cable is not properly connected to Home Router and/or Home Outdoor Modem side or the
cable is broken.
Indication(s) to user:
LED in Home Router shows error. LED at Home Router will be Flashing (2Hz) orange.
LED in Home Outdoor Modem is dead (no power!).
Smartphone application shows error "Cannot connect to NTE, check cable".
Resolution(s):
Fix cabling issues.
4.1.7 SIM is not inserted
Root cause(s):
SIM is not in place in the Home Outdoor Modem. SIM must be installed before Home
Outdoor Modem is set up.

FastMile Home Outdoor Modem User Manual
Troubleshooting
Release 17.10
DN09218237, Issue 03 Draft
28.11.2017
© 2017 Nokia
42
Indication(s) to user:
LEDs in Home Outdoor Modem and Home Router show error.
Smartphone application shows error "No SIM" or "SIM error".
Resolution(s):
Insert/re-insert SIM in Home Outdoor Modem. Note: the Home Outdoor Modem is in the wall
already!
Home Outdoor Modem restart is needed for SIM detection.
4.1.8 Invalid PIN
Root cause(s):
If SIM has a PIN, the PIN must be defined in Home Outdoor Modem variant pre-
configuration (i.e. factory-configured). When PIN configured in Home Outdoor Modem differs
from PIN in SIM, LTE connection is not established.
Indication(s) to user:
LEDs is Home Outdoor Modem and Home Router show error. LEDs at both Home Router
and Home Outdoor Modem will be Flashing (2Hz) orange.
Smartphone application shows error "SIM PIN error".
Resolution(s):
Use smartphone application to change the SIM PIN with the help of SIM PUK.
4.1.9 Home Outdoor Modem is not able to attach to LTE Network
due to Incorrect APN
Root cause(s):
Default APN at Home Outdoor Modem is different than LTE Network’s APN. Default APN
block at Home Outdoor Modem is left blank.
Indication(s) to user:
Home Outdoor Modem LED status is blinking orange.
Resolution(s):
This is a factory configuration issue. Contact vendor for Factory Configuration Updation.

FastMile Home Outdoor Modem User Manual
Troubleshooting
Release 17.10
DN09218237, Issue 03 Draft
28.11.2017
© 2017 Nokia
43
4.2 Common Problems during Execution Phase
4.2.1 Home Outdoor Modem Provisioning is not successful after
reboot/factory reset
Root cause(s):
While updating config file cpe.variant.conf/ltthd.variant.conf files at
opt/Nokia/var/common/data/, some extra text is added in file.
Incorrect value of a parameter is provided in Config File.
Indication(s) to user:
Home Outdoor Modem LED remains solid orange.
Resolution(s):
Verify any extra/missing text by comparing it with any working setup or from backup files if
taken.
Verify the values in Config Files for essential parameters.
4.2.2 Home Outdoor Modem firmware upgrade to latest build failed
Root cause(s):
Reboot given to Home Outdoor Modem before flashing gets completed.
Indication(s) to user:
In cpe.variant file, older build version is shown.
Resolution(s):
Verify boot file status at opt/Nokia/var/common/data before giving reboot to Home Outdoor
Modem. Its value should be 1.
Home Outdoor Modem LED status should be changed to blinking green after flashing get
completed. Reboot should be given after that.
Alternatively software update status can be checked from command, cpe_ctrl
swupdatestatus. When output of this command is 1, reboot should be given only after that.

FastMile Home Outdoor Modem User Manual
Troubleshooting
Release 17.10
DN09218237, Issue 03 Draft
28.11.2017
© 2017 Nokia
44
4.2.3 Home Outdoor Modem is not able to communicate with
Controller after firmware upgrade
Root cause(s):
Controller URLs (connection management/JSON) are wrong in ltthd.variant.conf file at
/opt/Nokia/var/common/data/ after firmware upgrade.
Indication(s) to user:
Home Outdoor Modem LED status changed to blinking orange.
Resolution(s):
Controller URL should be changed as per available set up both for connection Management
server & JSON URL.
4.2.4 Home Outdoor Modem detached from network
Root cause(s):
LTE cell goes down.
Indication(s) to user:
Home Outdoor Modem LED status changed to blinking orange.
Resolution(s):
Perform Factory reset on Home Outdoor Modem (see Appendix A: Factory Settings).
If another cell is available at Controller, Home Outdoor Modem will attach on that cell
automatically through Cell-Reassignment.
If Problem persists, contact operator.

FastMile Home Outdoor Modem User Manual
Appendix A: Factory Settings
Release 17.10
DN09218237, Issue 03 Draft
28.11.2017
© 2017 Nokia
45
5 Appendix A: Factory Settings
You can return the Home Outdoor Modem to its factory settings. Use the end of a paper clip
or a similar object to press and hold the Reset button on the back of the unit for at least five
seconds.
The router resets and returns to the factory configuration settings shown in the following
table.
FEATURE
Default Behavior
LTE Login
User login URL
User name (case-sensitive)
Login password (case-sensitive)
Ethernet
WAN IP
192.168.254.1
Subnet mask
255.255.255.0
DHCP server
Enabled
DHCP range
192.168.254.66 to 192.168.254.126
DHCP starting IP address
192.168.254.66
DHCP ending IP address
192.168.254.126
Table 8 Factory settings

FastMile Home Outdoor Modem User Manual
Appendix B Specifications
Release 17.10
DN09218237, Issue 03 Draft
28.11.2017
© 2017 Nokia
46
6 Appendix B Specifications
FEATURE
DESCRIPTION
Altitude
≤ 2000m
Dimension
406x406x30mm at the edges and 80mm at the hinge location
Weight
3 kg
Operating temperature
-30°C to 65°C (Arctic variant)
-20°C to 65°C (Standard variant)
Storage temperature
-40°C to 85°C
Operating humidity
0% to 93% non-condensing
IP Rating
IP65 Ingress
Power consumption
<9W
Table 9 Specifications

FastMile Home Outdoor Modem User Manual
Appendix D FCC Compliance Statement
Release 17.10
DN09218237, Issue 03 Draft
28.11.2017
© 2017 Nokia
47
7 Appendix D FCC Compliance Statement
FCC ID: 2AL7J-FMHOMN0041
Valid only for Band 41 usage.
1) This device may not cause harmful interference, and
2) This device must accept any interference received, including Interference that may
cause undesired operation.
FCC Caution!!!
• Any changes or modifications not expressly approved by the party responsible for
compliance could void the user's authority to operate this equipment.
• This equipment should be installed at a minimum height of 2.5 meters from the ground
plane and operated with minimum distance 50 cm between the radiator & your body.
This equipment generates, uses and can radiate radio frequency energy and, if not installed
and used in accordance with the instructions, may cause harmful interference to radio
communications. However, there is no guarantee that interference will not occur in a
particular installation.
If this equipment does cause harmful interference to radio or television reception, which can
be determined by turning the equipment off and on, the user is encouraged to try to correct
the interference by one or more of the following measures:
• Reorient or relocate the receiving antenna.
• Increase the separation between the equipment and receiver.
• Connect the equipment into an outlet on a circuit different from that to which the receiver
is connected
• Consult the dealer or an experienced radio/TV technician for help.
For more information, please contact your local Nokia support.