Nokia Lumia 610 Users Manual
610 to the manual a8574c7c-45e8-4a16-9349-127ff3dd1107
2015-01-21
: Nokia Nokia-Lumia-610-Users-Manual-349274 nokia-lumia-610-users-manual-349274 nokia pdf
Open the PDF directly: View PDF ![]() .
.
Page Count: 74
- <GRAPHIC>
- <GRAPHIC>
- DECLARATION OF CONFORMITY
- DECLARATION OF CONFORMITY
- We, NOKIA CORPORATION, declare under our sole responsibility that the product TFE-4 is in conform...
- http://www.nokia.com/phones/declaration_of_conformity/
- <GRAPHIC>
- Copyright © 2004 Nokia. All rights reserved.
- US Patent No 5818437 and other pending patents. Tegic Communications, Inc. All rights reserved.
- Nokia, Nokia Connecting People, and Navi wheel
- Bluetooth is a registered trademark of Bluetooth SIG, Inc.
- Nokia operates a policy of continuous development. Nokia reserves the right to make changes and i...
- 9362625 / Issue 1
- Table of contents
- For your safety
- For your safety
- Read these simple guidelines. Breaking the rules may be dangerous or illegal. Further detailed in...
- <GRAPHIC>
- <GRAPHIC>
- <GRAPHIC>
- <GRAPHIC>
- <GRAPHIC>
- <GRAPHIC>
- <GRAPHIC>
- <GRAPHIC>
- <GRAPHIC>
- <GRAPHIC>
- <GRAPHIC>
- Network services
- About accessories
- 1. Using a remote SIM card with Bluetooth wireless technology
- 1. Using a remote SIM card with Bluetooth wireless technology
- 1. Using a remote SIM card with Bluetooth wireless technology
- The car kit phone supports Bluetooth wireless technology and Bluetooth SIM access profile.
- Bluetooth wireless technology Bluetooth wireless technology is an international standard for wire...
- Bluetooth SIM Access Profile Bluetooth SIM Access Profile is an industry standard which allows a ...
- You have switched on a compatible mobile phone supporting the Bluetooth SIM Access Profile standa...
- <GRAPHIC>
- When the car ignition is switched on, a wireless connection is established between the compatible...
- With Bluetooth SIM Access Profile, the car kit phone combines the advantages of a fixed installed...
- If desired, a separate car SIM card can be inserted in the car kit phone. This SIM card can be us...
- If you use Bluetooth technology functions regularly, you can deactivate the option "Authorisation...
- 2. General information
- 2. General information
- Overview of the car kit phone equipment
- Overview of the car kit phone equipment
- Your car kit phone is made up of several components, which are described below:
- <GRAPHIC>
- 1. Radio unit TFE-4
- <GRAPHIC>
- Special features
- Special features
- For enhanced safety and operating comfort of wireless communication in the vehicular environment,...
- Accessing a remote SIM card via Bluetooth SIM Access Profile technology
- Voice dialling
- Voice commands
- Voice recorder
- Copying contact entries from your mobile phone
- Multi-user capability
- Switchover to wireless headset
- Switchover to wireless headset
- <GRAPHIC>
- To be able to use this feature, you will first need to pair the compatible wireless headset and t...
- In principle, a wireless headset with Bluetooth technology can only establish one Bluetooth wirel...
- If you have already established a Bluetooth SIM Access Profile wireless connection to a compatibl...
- Quick access to the contact entries
- Quick access to the contact entries
- <GRAPHIC>
- To find a particular contact entry, with the display in standby, scroll with
- Before you can use this feature you will have to make entries for contacts in the car kit phone. ...
- You may assign up to 5 phone numbers to any name entered in your contacts. For further informatio...
- Mobile data services using Bluetooth wireless technology
- Using a car SIM card
- Comfortable volume regulation with Navi wheel
- Before putting your phone into operation
- Before putting your phone into operation
- Please read the information set out below before putting your car kit phone into operation:
- The phone is automatically switched on with the car’s ignition.
- Check your car kit phone equipment regularly to ensure that it is correctly mounted and is workin...
- Using a car SIM card
- Using a remote SIM card
- Using a remote SIM card
- You can operate the car kit phone using a remote SIM card under the following conditions:
- The remote SIM card is inserted in a compatible mobile phone which supports Bluetooth wireless te...
- The remote SIM card is inserted in a compatible mobile phone which supports Bluetooth wireless te...
- To access the remote SIM card, the compatible mobile phone first has to be paired with the car ki...
- The compatible mobile phone is on, sufficient battery power is available and Bluetooth wireless t...
- Stickers in the sales package
- Access codes required for the car SIM card
- 3. Your car kit phone
- 3. Your car kit phone
- Display SU-11
- Display SU-11
- <GRAPHIC>
- <GRAPHIC>
- You may adjust the display illumination to optimise performance. For further information, see
- Display indicators
- Call indicators
- General indicators
- Indicators for recorder functions
- Indicators for Bluetooth functions
- Notification indicators
- Basic components of the CUW-3 input device
- 4. Getting started
- 4. Getting started
- Installing the car SIM card
- Installing the car SIM card
- The car kit phone can be used with a separate, own car SIM card. In this case, you will need to i...
- Keep all miniature SIM cards out of the reach of small children.
- The SIM card and its contacts can easily be damaged by scratches or bending, so be careful when h...
- Switch off the car’s ignition before inserting the SIM card.
- Switch off the car’s ignition before inserting the SIM card.
- Gently press the catch on the radio unit casing (1) to open and lift the cover (2).
- Slide the SIM card holder (3) as shown to unlock it.
- Open the SIM card holder by lifting it upwards on one side as depicted in figure (4)
- Carefully insert the SIM card into the holder (5). Make sure that the SIM card is inserted proper...
- Push the SIM card holder down into its original position and lock it into place by sliding it in ...
- Switching on/off and off mode
- Switching on/off and off mode
- If wireless phone use is prohibited or when it may cause interference or danger, switch your car ...
- Switching on the car kit phone
- Switching on the car kit phone
- To switch on your car kit phone, simply turn the ignition key. Your car kit phone is connected to...
- Initial operation, a SIM card has not been assigned to the active user profile
- Initial operation, a SIM card has not been assigned to the active user profile
- If you have not assigned a SIM card to the car kit phone or to the active user profile, you will ...
- Operation using a remote SIM card The car kit phone will automatically begin searching for a comp...
- Operation using a remote SIM card The car kit phone will automatically begin searching for a comp...
- Using the car SIM card If the message
- Remote SIM card assigned to active user profile
- Remote SIM card assigned to active user profile
- If you have already assigned the SIM card inserted in a compatible mobile phone to the active use...
- If you use Bluetooth technology functions regularly, e.g. to copy contact entries to the car kit ...
- However, if you have not saved the PIN code belonging to the SIM card installed in the compatible...
- Reconnect remote SIM card
- The car SIM card will only be assigned to the active user profile as long as the car ignition is ...
- Assign SIM card
- Car SIM card assigned to active user profile
- Switching off the phone
- Off mode
- Off mode
- <GRAPHIC>
- Press and hold
- When the car kit phone is in off mode, an established wireless Bluetooth SIM Access Profile link ...
- If the wireless Bluetooth SIM Access Profile link between the car kit phone and the compatible mo...
- 5. Call functions
- 5. Call functions
- Voice dialling
- Voice dialling
- <GRAPHIC>
- Before using voice dialling, note that:
- Before using voice dialling, note that:
- Voice tags are not language dependent. They are dependent on the speaker's voice.
- Voice tags are not language dependent. They are dependent on the speaker's voice.
- Voice tags are sensitive to background noise. Record them and make calls in a quiet environment.
- When recording a voice tag or making a call by saying a voice tag, speak clearly into the microph...
- Very short names are not accepted. Use long names and avoid similar names for different numbers.
- You must say the name exactly as you said it when you recorded it. This may be difficult in, for ...
- Before you can use this feature you will have to record voice tags for numbers stored in the car ...
- To voice dial a number, press
- To indicate that it has recognised the voice tag, your car kit phone will play back the voice tag...
- Dialling from the contacts (name search)
- Redialling
- Using the NaviTM
- List of favourites
- List of favourites
- This list may contain up to 12 name tags you have assigned to phone numbers. For further informat...
- You can call the list from the standby display quickly and easily.
- Call waiting service
- Options during a call
- Options during a call
- The following options are available to you during an active call:
- Send DTMF
- To view the list of options:
- Press
- Send DTMF
- Mute call
- Contacts
- Accepting or refusing an incoming call
- 6. Using the menu
- 6. Using the menu
- The Nokia 610 car kit phone offers you an extensive range of functions, which are grouped in menus.
- Accessing a menu function
- List of menu functions
- List of menu functions
- n
- n
- n
- n
- n
- n
- Set time and date
- Set time and date
- Call settings
- Phone settings
- Voice mailbox
- GPRS modem
- Security settings
- Equaliser settings
- Restore factory settings
- n
- n
- n
- n
- 7. Menu functions
- 7. Menu functions
- Messages
- Messages
- <GRAPHIC>
- Remember that traffic safety comes first. Don’t use a hand- held phone while driving and only use...
- When sending messages via the SMS network service, your car kit phone may display the words
- Inbox
- Inbox
- <GRAPHIC>
- Any short messages sent to your car kit phone are shown in the order in which they are received.
- If you have established a Bluetooth SIM Access Profile connection to a compatible mobile phone, a...
- Unread text messages are indicated by
- A flashing SMS indicator
- If you have received more than one text message:
- Select the
- Your car kit phone comes with a number of options for handling the message selected.
- Press
- Call
- Reply with template
- Save as template
- Erase
- Message settings
- Message settings
- To be able to send short messages, you first need to make some settings on your car kit phone.
- Message centre number
- Reply via same centre (network service)
- View templates
- View templates
- Your car kit phone can save up to 10 templates to be sent as short messages. Five standard templa...
- Send
- Erase
- Call register
- Call register
- <GRAPHIC>
- The phone registers missed and received calls only if the network supports these functions and if...
- In these lists you can view up to 10 of the last calls made to your phone or received or up to 10...
- Three options are available for each of the items in the call register:
- Select an entry in the desired list and press
- Missed calls
- Received calls
- Dialled numbers
- Contacts
- Contacts
- <GRAPHIC>
- For each user profile, up to 500 names can be stored in the car kit phone memory together with nu...
- If the number of contact entries to be copied from the memory of a compatible mobile phone via Bl...
- You can assign up to five phone numbers for each name. When you select a name from the contact en...
- Searching for names and numbers
- Searching for names and numbers
- You can access the list of names and phone numbers quickly from the standby display:
- Scroll with
- For further information, see
- Erasing contact entries
- Querying the memory status
- Tone settings
- Settings
- Settings
- <GRAPHIC>
- To make any of the settings below, select the
- Setting the time and date
- Call settings
- Call settings
- This option lets you set a variety of call features. To make call settings, with the display in s...
- Select the
- Own number sending (network service)
- Call divert (network service)
- Call divert (network service)
- With
- Your car kit phone offers you a wide variety of options to choose from:
- Divert all voice calls
- Divert if out of reach
- To make call divert settings, with the display in standby:
- You can select any of four options for each of the divert features offered:
- Activate
- Automatic answer
- Call waiting (network service)
- Phone settings
- Phone settings
- Select this option to customise your car kit phone settings.
- Display text language
- Display backlighting
- Cell info display
- When this function is activated, information about the radio cell you are currently using will be...
- Network selection
- Power down timer
- Power down timer
- Your car kit phone comes with a power down delay that keeps your phone in service for the period ...
- The original factory setting for the power down timer is zero minutes. The power down delay is li...
- Remember that your car kit phone runs off the car battery. When setting the power down timer, tak...
- To set the power down timer, with the display in standby:
- A message on the display will notify you that the power down timer has been set.
- Voice mailbox
- Voice mailbox
- Your service provider may offer you a voice mailbox service, which you have to install before you...
- Entering your voice mailbox number
- Listening to voice messages
- GPRS modem settings (network service)
- GPRS modem settings (network service)
- You can use your car kit phone as a modem to enable GPRS connectivity. Note, however, that you wi...
- Before you can use GPRS:
- You need to subscribe to the GPRS service of your network operator or service provider.
- To set up a GPRS access point, with the display in standby:
- Select the
- For further information and to download modem driver software for your computer and/or laptop com...
- Charges for GPRS and related applications
- Security settings
- Security settings
- For some security settings (for example, when calls are limited to closed user groups or fixed di...
- PIN code request (available for car SIM card only)
- PIN code change (available for car SIM card only)
- Closed user group
- Fixed dialling numbers (only available for the car SIM card)
- Fixed dialling numbers (only available for the car SIM card)
- You can restrict your outgoing calls to selected phone numbers, if this function is supported by ...
- If you wish to use this feature when accessing the SIM card of a compatible mobile phone connecte...
- You can choose from three options for this function when using the car SIM card installed in your...
- Off
- To set up fixed dialling numbers, with the display in standby:
- Select the
- For further information, see
- Equaliser settings
- Equaliser settings
- Your car kit phone supports a variety of options for output over a loudspeaker:
- Direct connection to the SP-2 loudspeaker supplied in the sales package.
- Connection to compatible car radio loudspeakers via the audio line-in of your car radio. You will...
- To make the desired setting, with the display in standby:
- Select the
- Restore factory settings
- Voice tags
- Voice tags
- <GRAPHIC>
- <GRAPHIC>
- Voice tags are not language dependent. They are dependent on the speaker's voice.
- Voice tags are not language dependent. They are dependent on the speaker's voice.
- Voice tags are sensitive to background noise. Record them and make calls in a quiet environment.
- When recording a voice tag or making a call by saying a voice tag, make sure to speak clearly int...
- Very short names are not accepted. Use long names and avoid similar names for different numbers.
- You must say the name exactly as you said it when you recorded it. This may be difficult in, for ...
- Voice dialling
- Voice dialling
- You can assign voice tags to phone numbers and your car kit phone will automatically try to dial ...
- Recording a new voice tag
- Voice tag list
- Voice dial a number
- Voice dial a number
- <GRAPHIC>
- If you are using a compatible headset with Bluetooth technology, press the key on the headset to ...
- When an application using the GPRS connection is sending or receiving data, you cannot make a cal...
- Voice commands
- Voice commands
- You have a selection of phone functions which can be activated by saying a voice command. A voice...
- Play
- Recording voice commands
- Recording voice commands
- This option allows you to record a voice command (one or more words acting as a spoken command) a...
- With the display in standby, scroll with
- The voice command list includes the phone functions listed for voice commands. Each function on t...
- Play voice commands
- You can use a shortcut to access the list of voice commands direct from the standby display:
- Press
- Executing a voice command
- Recorder
- Recorder
- <GRAPHIC>
- Obey all local laws governing recording of calls. Do not use this feature illegally.
- You can make up to 10 recordings as long as you do not exceed an overall recording time of five m...
- New recordings are automatically saved in the memory. When the memory is full, the message
- Press and hold
- You can easily play back your recordings using a voice command. Say the voice command and your ca...
- Before you can use this shortcut, you will have to assign a voice command to this function in you...
- Record
- Record
- This option allows pieces of speech to be recorded and automatically saves the recording.
- To make a recording, with the display in standby:
- Scroll with
- If you are engaged in an active call and wish to make a recording:
- All tape recordings are stored and numbered (e.g. tape 1). To view the list of recordings, with t...
- Select the
- Two options are available for the recordings:
- Scroll to the desired option and press
- Play
- Delete
- Bluetooth wireless technology
- Bluetooth wireless technology
- <GRAPHIC>
- Since devices with Bluetooth technology communicate using radio waves, your car kit phone and the...
- The car kit phone supports Bluetooth SIM Access Profile technology for wireless access to the rem...
- If you wish to use this function, make sure that both the car kit phone and the other device supp...
- Activating and deactivating Bluetooth
- Searching for accessories with Bluetooth technology
- Searching for accessories with Bluetooth technology
- This feature allows you to search for accessories which support Bluetooth wireless technology, e....
- To begin searching, with the display in standby, scroll with
- The car kit phone will now begin to search for accessories supporting Bluetooth wireless technolo...
- Scroll with
- A wireless headset with Bluetooth technology can only be found by the car kit phone if there is n...
- For further information on searching for devices with Bluetooth technology, see
- If you wish to start Bluetooth pairing with a selected device supporting Bluetooth technology:
- Press
- Pairing using a Bluetooth passcode
- Pairing using a Bluetooth passcode
- To create a connection using Bluetooth wireless technology, you will need to exchange Bluetooth p...
- If the devices have been successfully paired, you will not need to repeat this procedure when est...
- If a fixed passcode is not supplied with a device with Bluetooth technology (e.g. a mobile phone)...
- If the car kit phone has found a compatible mobile phone which supports the Bluetooth SIM Access ...
- The wireless connection using Bluetooth SIM Access Profile technology meets the high security req...
- If the compatible mobile phone supporting Bluetooth SIM Access Profile technology should itself g...
- View active devices with Bluetooth technology
- View paired devices
- View paired devices
- You can view a list of Bluetooth wireless technology paired devices by selecting this option. Som...
- To view the list of paired devices, with the display in standby, scroll with
- Note that the latest pairing will be listed at the top.
- Create connection
- Delete pairing
- Request authorisation
- Edit Bluetooth name
- Edit Bluetooth name
- Select this option to change the name of the device with Bluetooth technology which is paired wit...
- To view the list of paired devices, with the display in standby, scroll with
- Scroll with
- If you have selected
- To delete characters in the name, press
- The car kit phone’s Bluetooth name
- The car kit phone’s Bluetooth name
- Use this option to change your car kit phone’s Bluetooth device name, which is shown to others. T...
- To view the name of the car kit phone scroll with
- Car kit phone visibility
- Car kit phone visibility
- In order to be able to establish a Bluetooth wireless connection between two compatible devices w...
- Make sure that the Bluetooth function is activated in all compatible devices with Bluetooth techn...
- You can activate or deactivate the visibility of the car kit phone. The factory setting is on.
- To change the visibility of your car kit phone, with the display in standby, scroll with
- Even if you car kit phone’s visibility has been activated, it will not be visible for other Bluet...
- Second Bluetooth connection
- Second Bluetooth connection
- This setting is required if your car kit phone is to be visible for other devices with Bluetooth ...
- When this setting is selected, the car kit phone will be visible for other Bluetooth devices for ...
- When your car kit phone is not connected to a compatible device using Bluetooth wireless technolo...
- To access this option, with the display in standby, scroll with
- User data
- User data
- The car kit phone can store and administrate data or settings under two different user data profi...
- The indicator for the currently active user profile is shown in the status row of the display. If...
- Download contacts
- Download contacts
- You can use this feature to copy contact entries from the car SIM card inserted in the car kit ph...
- This feature is important because you do not have direct access to the contact entries stored on ...
- With the display in standby, press
- If you are operating your car kit phone using a remote SIM card, the contacts stored in the compa...
- If you are operating your car kit phone using the car SIM card inserted in the radio unit, three ...
- Scroll with
- Paired devices with Bluetooth technology
- Car SIM card
- Searching for devices that support Bluetooth technology
- Change user
- Change user
- You may save two user profiles in your car kit phone to be used as desired. The settings for each...
- <GRAPHIC>
- With the display in standby, press
- Scroll with
- You may be prompted to enter the PIN code belonging to the remote SIM card.
- You may change whether the PIN code of the remote SIM card is to be saved at any time desired by ...
- If you should change the PIN code of the remote SIM card in the mobile phone at a later time, the...
- User settings
- User settings
- This feature lets you make the desired settings for the active user profile and the contacts to b...
- With the display in standby, press
- The following options are available for selection:
- Scroll with
- Assign SIM card
- Assign SIM card
- An active user profile always has a SIM card assigned to it. When personalising user profile 1 or...
- To assign a new SIM card to the car kit phone, select one of the following options:
- Names of paired devices,
- Scroll with
- Names of paired devices
- Names of paired devices
- If you select a mobile phone from the list of paired mobile phones, the car kit phone will establ...
- The car kit phone will then ask if you wish to save the PIN code you have just entered for a late...
- If the operating voltage is interrupted, the PIN code of the remote SIM card stored in the car ki...
- Car SIM card
- Search for Bluetooth phone
- View active SIM card
- Download settings
- 8. Receiving and forwarding business cards and calendar items
- 8. Receiving and forwarding business cards and calendar items
- You can receive or forward data such as business cards or calendar notes from or to a compatible ...
- Receiving a business card or calendar item
- 9. Data transmission
- 9. Data transmission
- GPRS (General Packet Radio Service)
- HSCSD (High Speed Circuit Switched Data)
- HSCSD (High Speed Circuit Switched Data)
- The car kit phone enables you to use GSM high-speed data services (network service).
- You can use high-speed functionality when your car kit phone is connected to a compatible compute...
- For information on the availability of and subscription to high- speed data services, please cont...
- Reference information
- Reference information
- Remember that the safety of operating a motor vehicle in traffic requires the full attention of a...
- Cellular transmission
- Cellular transmission
- Your car kit phone employs the data transmission capabilities of the GSM network to send faxes, s...
- GSM data capabilities of your car kit phone
- GSM data capabilities of your car kit phone
- We recommend that you move the car to a location where the strongest possible cellular signal can...
- Cellular data communications are subject to a number of factors that may cause interference:
- Noise
- Handovers
- Dead spots and dropouts
- Low signal strength
- Low signal strength
- Due to either distance from a base station or obstacles between your car kit phone and the base s...
- Data and fax transmission will work best when the car is stationary as this ensures that the sign...
- Check the signal strength on your car kit phone display. If the cellular signals are not strong e...
- 10. Installation
- 10. Installation
- Your Nokia 610 car kit phone
- Your Nokia 610 car kit phone
- The Nokia 610 car kit phone is designed for installation in motor vehicles. The sales package con...
- <GRAPHIC>
- The Nokia 610 car kit phone may only be installed by a qualified service technician using the app...
- Note that the instructions contained in this installation guide are general guidelines which appl...
- For important safety information and/or instructions on the operation, care and maintenance of yo...
- Safety first
- Safety first
- The basic safety guidelines set out below are to be observed when installing the car kit phone.
- Make sure that the car ignition is off and disconnect the car battery before beginning with the i...
- Make sure that the car ignition is off and disconnect the car battery before beginning with the i...
- Do not smoke when working on the car. Make sure that there is no source of fire or flame nearby.
- Take care not to cause damage to electrical cables, fuel or brake lines or safety equipment durin...
- Make sure not to impact the steering or braking systems or other key systems essential for proper...
- RF signals may affect improperly installed or inadequately shielded electronic systems in motor v...
- The car kit phone may only be used at an operating voltage of 12 V with the minus pole earthed. F...
- Do not operate your car kit phone off the car battery for a longer period of time, i.e. with the ...
- In order to comply with RF exposure requirements for mobile transmitting devices, a minimum separ...
- Mounting
- Mounting
- <GRAPHIC>
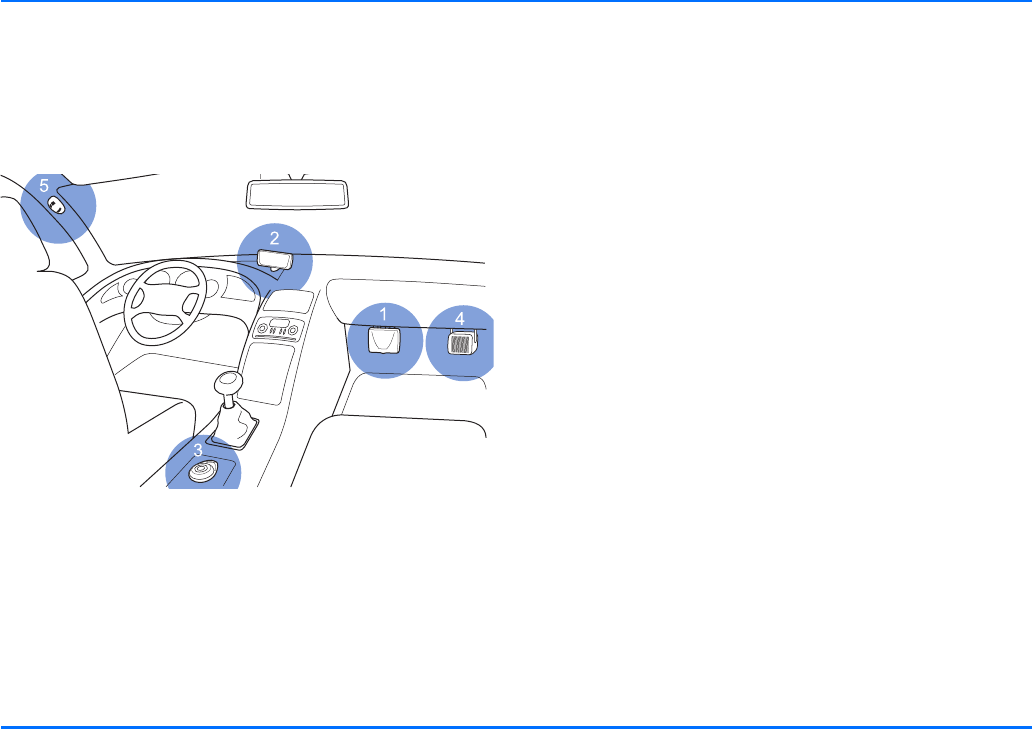
- Radio unit TFE-4 (Pos.1)
- Radio unit TFE-4 (Pos.1)
- We recommend that you mount the radio unit TFE-4 at a less visible position in the car interior. ...
- When mounting the radio unit, use the bracket which is included in the scope of supply: the unit ...
- Make sure to mount the radio unit in such a way that a connection using Bluetooth technology can ...
- When installing the radio unit, make sure to mount the bracket in such a way that the unit slides...
- <GRAPHIC>
- Display SU-11 (Pos.2)
- Display SU-11 (Pos.2)
- The mount for the display unit is to be fixed to the dashboard or to any other location in the co...
- Your service technician may be able to provide you with information on alternatives for mounting ...
- Remember that all equipment must be mounted so that it does not interfere with the operation of t...
- <GRAPHIC>
- Input device CUW-3 (Pos.3)
- Loudspeaker SP-2 (Pos.4)
- Microphone HFM-8 (Pos.5)
- Microphone HFM-8 (Pos.5)
- Use of any other microphone than the microphone supplied with the car kit phone (HFM-8) may impac...
- Mount the handsfree microphone approx. 30 cm from the user’s head, and position it so that it poi...
- Use the double-sided adhesive tape supplied to fix the microphone as this will prevent noise from...
- If the mute radio cable has been connected, when you accept an incoming call or when an outgoing ...
- System cable PCU-4 (Pos.6)
- GSM antenna (Pos.7) (not included in the scope of supply)
- Equaliser settings
- Equaliser settings
- Your car kit phone supports a variety of options for output over a loudspeaker:
- Direct connection to the SP-2 loudspeaker supplied in the sales package.
- To make the desired settings, select the
- Function test
- Scope of supply
- 1. Using a remote SIM card with Bluetooth wireless technology
- 11. Care and maintenance
- 11. Care and maintenance
- 11. Care and maintenance
- 11. Care and maintenance
- Your car kit phone is a product of superior design and craftsmanship and should be treated with c...
- Keep the car kit phone and all its parts and enhancements out of the reach of small children.
- Keep the car kit phone and all its parts and enhancements out of the reach of small children.
- Keep the car kit phone dry. Precipitation, humidity, and all types of liquids or moisture can con...
- Do not use or store the car kit phone in dusty, dirty areas. Its moving parts can be damaged.
- Do not store the car kit phone in hot areas. High temperatures can shorten the life of electronic...
- Do not store the car kit phone in cold areas. When it warms up (to its normal temperature), moist...
- Do not attempt to open the car kit phone. Non-expert handling may damage it.
- Do not drop, knock or shake the car kit phone. Rough handling can break internal circuit boards.
- Do not use harsh chemicals, cleaning solvents or strong detergents to clean the car kit phone.
- Do not paint the car kit phone. Paint can clog the moving parts and prevent proper operation.
- Use only an approved antenna. Unauthorised antennas, modifications or attachments could damage th...
- All of the above suggestions apply equally to your car kit phone or any enhancement. If any of th...
- 12. Important safety information
- 12. Important safety information
- Traffic safety
- Operating environment
- Electronic devices
- Potentially explosive atmospheres
- Vehicles
- Vehicles
- Only qualified personnel should service the phone or install the car kit phone in a vehicle. Faul...
- Check regularly that all wireless phone equipment in your vehicle is mounted and operating properly.
- Do not store or carry flammable liquids, gases or explosive materials in the same compartment as ...
- For vehicles equipped with an air bag, remember that an air bag inflates with great force. Do not...
- Failure to observe these instructions may lead to suspension or denial of telephone services to t...
- Emergency calls
- 11. Care and maintenance
- 13. Technical data
- 14. Glossary
- 11. Care and maintenance
User’s Guide
Installation Guide
Nokia 610 Car Kit Phone
9362625
Issue 1

2 Copyright © 2004 Nokia. All rights reserved.
DECLARATION OF CONFORMITY
We, NOKIA CORPORATION, declare under our sole responsibility that
the product TFE-4 is in conformity with the provisions of the following
Council Directive: 1999/5/EC. A copy of the Declaration of Conformity
can be found at:
http://www.nokia.com/phones/declaration_of_conformity/
Copyright © 2004 Nokia. All rights reserved.
Reproduction, transfer, distribution or storage of part or all of the
contents of this document in any form without the prior written
permission of Nokia is prohibited.
US Patent No 5818437 and other pending patents.
Tegic Communications, Inc. All rights reserved.
Nokia, Nokia Connecting People, and Navi wheel are trademarks or
registered trademarks of Nokia Corporation. Other products and
company names mentioned herein may be trademarks or tradenames
of their respective owners.
Bluetooth is a registered trademark of Bluetooth SIG, Inc.
Nokia operates a policy of continuous development. Nokia reserves the
right to make changes and improvements to any of the products
described in this document without prior notice.
Under no circumstances shall Nokia be responsible for any loss of data
or income or any special, incidental, consequential or indirect damages
howsoever caused.
The contents of this document are provided “as is”. Except as required
by applicable law, no warranties of any kind, either express or implied,
including, but not limited to, the implied warranties of merchantability
and fitness for a particular purpose, are made in relation to the
accuracy, reliability or contents of this document. Nokia reserves the
right to revise this document or withdraw it at any time without prior
notice.
The availability of particular products and services may vary by region.
Please check with the Nokia dealer nearest to you.
9362625 / Issue 1

Table of contents
Copyright © 2004 Nokia. All rights reserved. 3
Table of contents
For your safety . . . . . . . . . . . . . . . . . . . . . . . . . . . .5
Network services . . . . . . . . . . . . . . . . . . . . . . . . 6
About accessories . . . . . . . . . . . . . . . . . . . . . . . 6
Using a remote SIM card with Bluetooth
wireless technology . . . . . . . . . . . . . . . . . . . . . . . .7
General information. . . . . . . . . . . . . . . . . . . . . . . . 9
Overview of the car kit phone equipment . . . . 9
Special features . . . . . . . . . . . . . . . . . . . . . . . . 10
Before putting your phone into operation . . . 13
Stickers in the sales package . . . . . . . . . . . . . 14
Access codes required for the car SIM card . . 14
Your car kit phone . . . . . . . . . . . . . . . . . . . . . . . .15
Display SU-11 . . . . . . . . . . . . . . . . . . . . . . . . . 15
Basic components of the CUW-3 input device 17
Getting started . . . . . . . . . . . . . . . . . . . . . . . . . . .19
Installing the car SIM card . . . . . . . . . . . . . . . 19
Switching on/off and off mode . . . . . . . . . . . . 20
Call functions . . . . . . . . . . . . . . . . . . . . . . . . . . . .24
Voice dialling . . . . . . . . . . . . . . . . . . . . . . . . . . 24
Dialling from the contacts
(name search) . . . . . . . . . . . . . . . . . . . . . . . . . . 24
Redialling . . . . . . . . . . . . . . . . . . . . . . . . . . . . . 25
Using the NaviTM wheel to make a call . . . . . 25
List of favourites . . . . . . . . . . . . . . . . . . . . . . . 25
Call waiting service . . . . . . . . . . . . . . . . . . . . . 26
Options during a call . . . . . . . . . . . . . . . . . . . . 26
Accepting or refusing an incoming call . . . . . 27
Using the menu . . . . . . . . . . . . . . . . . . . . . . . . . . 28
Accessing a menu function . . . . . . . . . . . . . . . 28
List of menu functions . . . . . . . . . . . . . . . . . . . 28
Menu functions . . . . . . . . . . . . . . . . . . . . . . . . . . 31
Messages . . . . . . . . . . . . . . . . . . . . . . . . . . . . . 31
Call register . . . . . . . . . . . . . . . . . . . . . . . . . . . 33
Contacts . . . . . . . . . . . . . . . . . . . . . . . . . . . . . . 35
Tone settings . . . . . . . . . . . . . . . . . . . . . . . . . . 36
Settings . . . . . . . . . . . . . . . . . . . . . . . . . . . . . . . 37
Voice tags . . . . . . . . . . . . . . . . . . . . . . . . . . . . . 46
Recorder . . . . . . . . . . . . . . . . . . . . . . . . . . . . . . 49
Bluetooth wireless technology . . . . . . . . . . . . 51
User data . . . . . . . . . . . . . . . . . . . . . . . . . . . . . . 56
Receiving and forwarding business cards and
calendar items . . . . . . . . . . . . . . . . . . . . . . . . . . . 61
Receiving a business card or calendar item . . 61
Data transmission . . . . . . . . . . . . . . . . . . . . . . . . 62
GPRS (General Packet Radio Service) . . . . . . . 62
HSCSD (High Speed Circuit Switched Data) . 62
Reference information . . . . . . . . . . . . . . . . . . . 62
Installation. . . . . . . . . . . . . . . . . . . . . . . . . . . . . . 64
Your Nokia 610 car kit phone . . . . . . . . . . . . . 64
Safety first . . . . . . . . . . . . . . . . . . . . . . . . . . . . 65

Table of contents
4 Copyright © 2004 Nokia. All rights reserved.
Mounting . . . . . . . . . . . . . . . . . . . . . . . . . . . . . 65
Equaliser settings . . . . . . . . . . . . . . . . . . . . . . . 68
Function test . . . . . . . . . . . . . . . . . . . . . . . . . . . 68
Scope of supply . . . . . . . . . . . . . . . . . . . . . . . . . 68
Care and maintenance . . . . . . . . . . . . . . . . . . . . .69
Important safety information . . . . . . . . . . . . . . . .70
Traffic safety . . . . . . . . . . . . . . . . . . . . . . . . . . 70
Operating environment . . . . . . . . . . . . . . . . . . 70
Electronic devices . . . . . . . . . . . . . . . . . . . . . . 70
Pacemakers . . . . . . . . . . . . . . . . . . . . . . . . . . . . 70
Potentially explosive atmospheres . . . . . . . . . 70
Vehicles . . . . . . . . . . . . . . . . . . . . . . . . . . . . . . . 71
Emergency calls . . . . . . . . . . . . . . . . . . . . . . . . 71
To make an emergency call . . . . . . . . . . . . . . . 71
Technical data . . . . . . . . . . . . . . . . . . . . . . . . . . .72
Glossary . . . . . . . . . . . . . . . . . . . . . . . . . . . . . . . .73
For your safety
Copyright © 2004 Nokia. All rights reserved. 5
For your safety
Read these simple guidelines. Breaking the rules may be
dangerous or illegal. Further detailed information is given in
this user’s guide.
OFF MODE
If wireless phone use is prohibited or when it may
cause interference or danger, switch your car kit
phone over to off mode. To do so, with ignition on,
press and hold . Also remember to switch your
mobile phone off if necessary.
ROAD SAFETY COMES FIRST
Remember that the safety of operating a motor
vehicle in traffic requires the full attention of all
motorists. Only use your car kit phone if traffic
conditions permit safe use and check if local laws/
regulations restrict the use of mobile phones while
driving.
INTERFERENCE
All wireless phones may get interference, which could
affect performance.
OFF MODE WHEN REFUELLING
Switch your car kit phone over to off mode at a
refuelling point. Don’t use near fuel or chemicals. Also
remember to switch your mobile phone off if
necessary.
OFF MODE NEAR BLASTING
Switch your car kit phone over to off mode where
blasting is in progress. Observe restrictions, and follow
any regulations or rules. Also remember to switch your
mobile phone off if necessary.
QUALIFIED INSTALLATION AND SERVICE
Only a qualified professional may install or repair
phone equipment.
CONNECTING TO OTHER DEVICES
When connecting to any other device using Bluetooth
wireless technology, read the relevant user’s guide for
detailed safety instructions. Do not connect
incompatible products.
EMERGENCY CALLS
Ensure the phone is switched on and in service.
aPress and hold until Make an emergency call? is
shown on the display. Confirm by pressing .
aConfirm the security inquiry Yes by pressing or
cancel by selecting No with and pressing .
Give your location. Do not end the call until told to do
so.
CALLING
Ensure that the car’s ignition is on and that the car kit
phone is using either the SIM card from a compatible
mobile phone or the car SIM card. Select the desired
phone number from the contacts or use the NaviTM
wheel to enter the number, then press . To end a
call, press . To answer a call, press .
Network services
6 Copyright © 2004 Nokia. All rights reserved.
ANTENNA
In order to comply with RF exposure requirements for
mobile transmitting devices, a minimum distance of
20 cm must be maintained between the antenna and
all persons.
FUSE REPLACEMENT
Replace a blown fuse with a fuse of the same type and
size. Never use a fuse with a higher rating!
Network services
The car kit phone described in this guide is approved for use in
the (E)GSM 900 and GSM 1800 networks.
A number of features included in this guide are called Network
Services. These are special services that you arrange through
your wireless service provider. Before you can take advantage of
any of these Network Services, you must subscribe to them
through your service provider and obtain instructions for their
use from your service provider.
Select network services such as call diverting from the related
menu of the car kit phone. The chosen settings will then be
automatically transmitted to the network operator for
configuration of the service. Network service settings are not
stored in the car kit phone or on the SIM card.
xSome networks may not support all language-dependent
characters and/or services.
About accessories
Warning!
Use only accessories approved by the phone manufacturer for
use with this particular phone model. The use of any other types
may invalidate any approval or warranty applying to the phone
and may be dangerous.
For availability of approved accessories, please check with your
dealer.
Using a remote SIM card with Bluetooth wireless technology
Copyright © 2004 Nokia. All rights reserved. 7
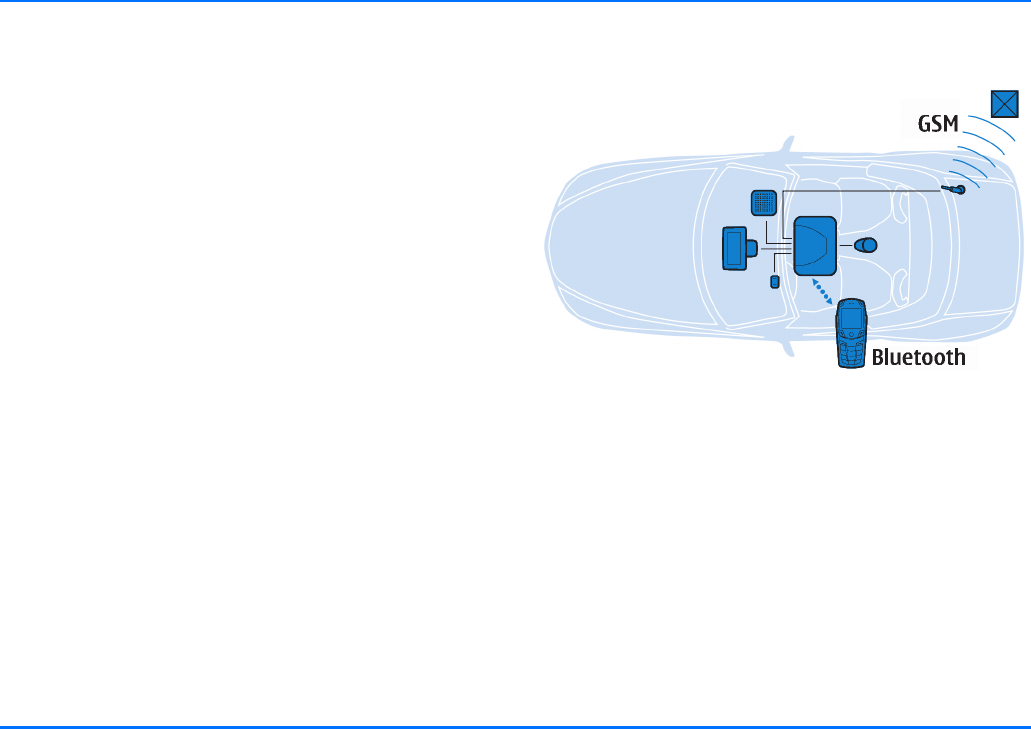
1. Using a remote SIM card with
Bluetooth wireless technology
The car kit phone supports Bluetooth wireless technology and
Bluetooth SIM access profile.
yBluetooth wireless technology
Bluetooth wireless technology is an international standard
for wireless short-range communication, allowing you to
establish a wireless radio connection between your car kit
phone and a compatible device supporting Bluetooth
wireless technology within a maximum range of 10 metres.
Such devices may include, for example, a compatible mobile
phone, laptop computer or wireless headset. The wireless
connection between the compatible devices established via
Bluetooth technology is free of charge for the user.
yBluetooth SIM Access Profile
Bluetooth SIM Access Profile is an industry standard which
allows a device, e.g. a car kit phone, which supports
Bluetooth wireless technology to access a SIM card in a
compatible mobile phone over a wireless link. The car kit
phone is then able to read and write data from/to the
remote SIM card inserted in the compatible mobile phone
and to log into the GSM network. A separate SIM card
inserted in the car kit phone is not required in this case.
You have switched on a compatible mobile phone supporting
the Bluetooth SIM Access Profile standard, a valid SIM card is
inserted in the compatible mobile phone, Bluetooth wireless
technology has been activated, the compatible mobile phone
has been paired with the car kit phone and you get into your
car.
How the GSM/Bluetooth wireless connection works
When the car ignition is switched on, a wireless connection is
established between the compatible mobile phone and the car
kit phone via Bluetooth SIM Access Profile. The car kit phone
requests the compatible mobile phone to log out of the GSM
wireless network and to deactivate the mobile phone
components required for the GSM connection. The car kit phone
then uses Bluetooth SIM Access Profile to access the SIM card
inserted in the compatible mobile phone (remote SIM card) and
utilises this card’s profile to log into the GSM network. Now the
car kit phone handles all incoming and outgoing calls and
messages while accessing the SIM card of the compatible
mobile phone.

Using a remote SIM card with Bluetooth wireless technology
8 Copyright © 2004 Nokia. All rights reserved.
With Bluetooth SIM Access Profile, the car kit phone combines
the advantages of a fixed installed car phone such as excellent
audio quality, use of a compatible, external GSM antenna and
optimum ease of operation with the advantages of a car kit
installation, e.g. use of the SIM card inserted in a compatible
mobile phone or access to the relevant contact data.
And all this time the compatible mobile phone can conveniently
be located in the user’s briefcase; there is no need for it to be
inserted in a cradle for operation. The wireless Bluetooth SIM
Access Profile connection between the car kit phone and the
compatible mobile phone is upheld either until the compatible
mobile phone is moved out of range (e.g. when the user leaves
the car) or until the user breaks the connection by pressing a
button on the compatible mobile phone to change back to
standard operation of the mobile or to switch off the phone.
If desired, a separate car SIM card can be inserted in the car kit
phone. This SIM card can be used when the wireless link to the
compatible mobile phone established via Bluetooth technology
is interrupted or if the car kit phone is to be operated using a
permanent car SIM card.
yIf you use Bluetooth technology functions regularly, you can
deactivate the option "Authorisation request" in the
compatible mobile phone. Then connections between the
devices via Bluetooth wireless technology can conveniently
be made automatically without separate acceptance or
authorisation. To do so, scroll to the menu item View paired
devices and select the option Request authorisation and set
it to Off. For further information, see the user’s guide
applicable for the compatible mobile phone with Bluetooth
technology that you are using.
For information on compatible mobile phones, see the Nokia
website: http://www.nokia.com.
General information
Copyright © 2004 Nokia. All rights reserved. 9
2. General information
Overview of the car kit phone equipment
Your car kit phone is made up of several components, which are
described below:
Car kit phone equipment
1. Radio unit TFE-4
The radio unit is an (E)GSM 900 / 1800 car telephone with
Bluetooth wireless technology which supports a cable link
to a compatible external GSM antenna and further
compatible external devices.
2. Display SU-11
The separate display comes with generously sized, easy-to-
read fonts, convenient user-customisable display
positioning and configurable backlighting, allowing display
texts to be easily read.
3. Input device CUW-3
The input device comprises a set of function elements, the
Navi wheel and four keys. The input device is specially
designed so that accessing key telephone functions is made
easier for the user, allowing intuitive operation.
4. Loudspeaker SP-2
A separate loudspeaker is provided for top-quality audio
transmission of the acoustic signals from your car kit phone
and voice transmission when calls are made. Should you
wish to use the loudspeakers belonging to your car radio
instead, please ask the service technician who is to install
your car kit phone for professional assistance as the car kit
phone may not be compatible with your system.
5. Microphone HFM-8
The handsfree microphone supplied in the sales package has
been tailormade for the vehicular environment. State-of-
the-art technologies geared for effective echo and noise
suppression in automotive systems enable quality results
even in poor conditions. Selecting a suitable mounting
location may also enhance the performance of the device.
For further information, see “Installation” on page 64.
Special features
10 Copyright © 2004 Nokia. All rights reserved.
6. System cables PCU-4
A set of cables is included for connection to the power
supply and the ignition system and to mute the radio.
7. GSM antenna (not included in the scope of supply)
A compatible external GSM antenna is required for
connection to the car kit phone.
Car kit phone equipment and cable connections
Special features
For enhanced safety and operating comfort of wireless
communication in the vehicular environment, this car kit phone
is equipped with a variety of special features tailored for
automotive applications. A number of these extras are sketched
below:
Accessing a remote SIM card via
Bluetooth SIM Access Profile technology
This feature allows the car kit phone to access the remote SIM
card in a compatible mobile phone. For further information, see
“Using a remote SIM card with Bluetooth wireless technology”
on page 7.
xTo be able to use this feature, you will first need to pair the
compatible mobile phone with the car kit phone via
Bluetooth wireless technology. For further information, see
“Bluetooth wireless technology” on page 51.
Voice dialling
Voice dialling is a convenient way to
select certain numbers from the
contacts, which are then automatically
dialled. You may choose as many as 12
of your contact entries and train voice tags to initiate a phone
call. To make a voice call from the standby display, just press
the key on the input device and speak the desired voice tag.
xBefore you can use this feature you will have to record voice
tags for contact entries stored in the car kit phone’s
Special features
Copyright © 2004 Nokia. All rights reserved. 11
contacts. For further information, see “Voice dialling” on
page 24 and “Voice dialling” on page 46.
Voice commands
You have a selection of phone functions
which can be activated by saying a voice
command. As many as three voice tags
for the voice commands can be added.
You can activate the voice command in the same way as
making a call by using a voice tag. With the display in standby,
press the key on the input device and speak the voice
command for the desired function.
xBefore you can use this feature you will have to record
command tags for the desired functions in the car kit phone.
For further information, see “Voice commands” on page 48.
Voice recorder
This feature acts as a dictaphone,
allowing you to record personal voice
memos. You may make up to 10
recordings for a total of five minutes’
recording time. To start recording from the standby display,
press and hold the key on the input device. To play a
recorded speech memo, you may either use a personal voice
command (e.g. Play memo!) or select the option Play in the
Record menu.
Copying contact entries from your mobile phone
If you have a compatible mobile phone
that supports Bluetooth wireless
technology, this feature allows you to
copy contact entries from the mobile
phone to the car kit phone.
To download the contacts from your compatible mobile, you
may either use a personal voice command (e.g. Copy contacts!)
or select the option Download contacts in the User data menu.
For further information, see “Download contacts” on page 56.
Multi-user capability
This feature lets you store personal
entries or phone settings under two
different user data profiles. For example,
now contact entries, voice tags for voice
dialling and voice commands or ringing tones for two users can
be saved and then accessed from the car kit phone. Just activate
your personal user profile to access your data. For further
information, see “Change user” on page 58.
Switchover to wireless headset
This feature supports use of compatible
headsets with Bluetooth technology.
You can switch calls over from handsfree
mode, where the car kit phone’s
microphone and loudspeaker system is used, to a wireless
headset that is comfortable and easy to use. Press to switch
incoming or ongoing calls over to your wireless headset.

Special features
12 Copyright © 2004 Nokia. All rights reserved.
xTo be able to use this feature, you will first need to pair the
compatible wireless headset and the car kit phone and
establish a wireless connection between the two devices via
Bluetooth technology. For further information, see
“Bluetooth wireless technology” on page 51.
xIn principle, a wireless headset with Bluetooth technology
can only establish one Bluetooth wireless connection to
another compatible device supporting Bluetooth
technology. Therefore, to switch over to a wireless headset
with Bluetooth technology, you may need to break an
existing Bluetooth wireless connection, for example, to a
mobile phone.
xIf you have already established a Bluetooth SIM Access
Profile wireless connection to a compatible mobile phone
and wish to switch over to a compatible wireless headset
with Bluetooth technology, the additional Bluetooth
wireless connection to the headset has to be established
from the car kit phone. This can be conveniently done using
a voice command. For further information, see “Voice
commands” on page 48.
Quick access to the contact entries
A shortcut feature has been provided to
make it easier for you to find a desired
phone number in the contact entries and
make a call.
aTo find a particular contact entry, with the display in
standby, scroll with to the first letter of the name as
entered in the contacts and press .
aScroll with to the desired name and press to dial
the number.
xBefore you can use this feature you will have to make
entries for contacts in the car kit phone. For further
information, see “Download contacts” on page 56.
yYou may assign up to 5 phone numbers to any name entered
in your contacts. For further information, see “Contacts” on
page 35.
Mobile data services using Bluetooth wireless technology
Your car kit phone comes with a convenient feature allowing
you to connect compatible external devices such as a
compatible laptop computer to the car kit phone using
Bluetooth wireless technology.
This means that you can now utilise GSM data services such as
GPRS or HSCSD for mobile Internet access for a compatible
laptop in the car.
Using a car SIM card
You can also operate the car kit phone using a separate car SIM
card that is inserted in the radio unit.
For further information, see “Getting started” on page 19.

Before putting your phone into operation
Copyright © 2004 Nokia. All rights reserved. 13
Comfortable volume regulation with Navi wheel
Regulate the volume of the ringing tone
notifying you of an incoming call simply
by scrolling with as needed.
You can also adjust the loudspeaker volume during an ongoing
call with .
Before putting your phone into operation
Please read the information set out below before putting your
car kit phone into operation:
xThe phone is automatically switched on with the car’s
ignition.
When you switch off your car’s ignition, the car kit phone
will not be switched off automatically: it remains in service
for the period of time that has been set using the power
down timer function. For further information, see “Power
down timer” on page 41.
xCheck your car kit phone equipment regularly to ensure that
it is correctly mounted and is working properly.
Using a car SIM card
To operate your car kit phone with a separate car SIM card, you
will need to insert a valid car SIM card in the radio unit. For
further information, see “Installing the car SIM card” on
page 19.
Using a remote SIM card
You can operate the car kit phone using a remote SIM card
under the following conditions:
pThe remote SIM card is inserted in a compatible mobile
phone which supports Bluetooth wireless technology and
the Bluetooth SIM Access Profile standard. For information
on compatible mobile phones, see the Nokia website:
http://www.nokia.com.
pTo access the remote SIM card, the compatible mobile
phone first has to be paired with the car kit phone via
Bluetooth wireless technology. For further information, see
“Pairing using a Bluetooth passcode” on page 52.
pThe compatible mobile phone is on, sufficient battery power
is available and Bluetooth wireless technology is activated.

Stickers in the sales package
14 Copyright © 2004 Nokia. All rights reserved.
Stickers in the sales package
The stickers that come with your car kit phone are important for
service and related purposes.
aAttach sticker to your warranty card.
Access codes required for the car SIM card
pPIN code (4-8 digits):
The PIN (Personal Identification Number) protects your car
SIM card against unauthorised use. The PIN code is usually
supplied with the SIM card.
Some service providers may allow you to switch off the
prompt requesting you to enter the PIN at power on.
pPIN2 code (4-8 digits):
The PIN2 code may be supplied with the car SIM card and is
required to access some functions.
pPUK and PUK2 codes (8 digits):
The PUK (Personal Unblocking Key) code is required to
change a blocked PIN code. The PUK2 code is required to
change a blocked PIN2 code.
xIf these codes have not been supplied with your car SIM
card, please contact your service provider.
Your car kit phone
Copyright © 2004 Nokia. All rights reserved. 15
3. Your car kit phone
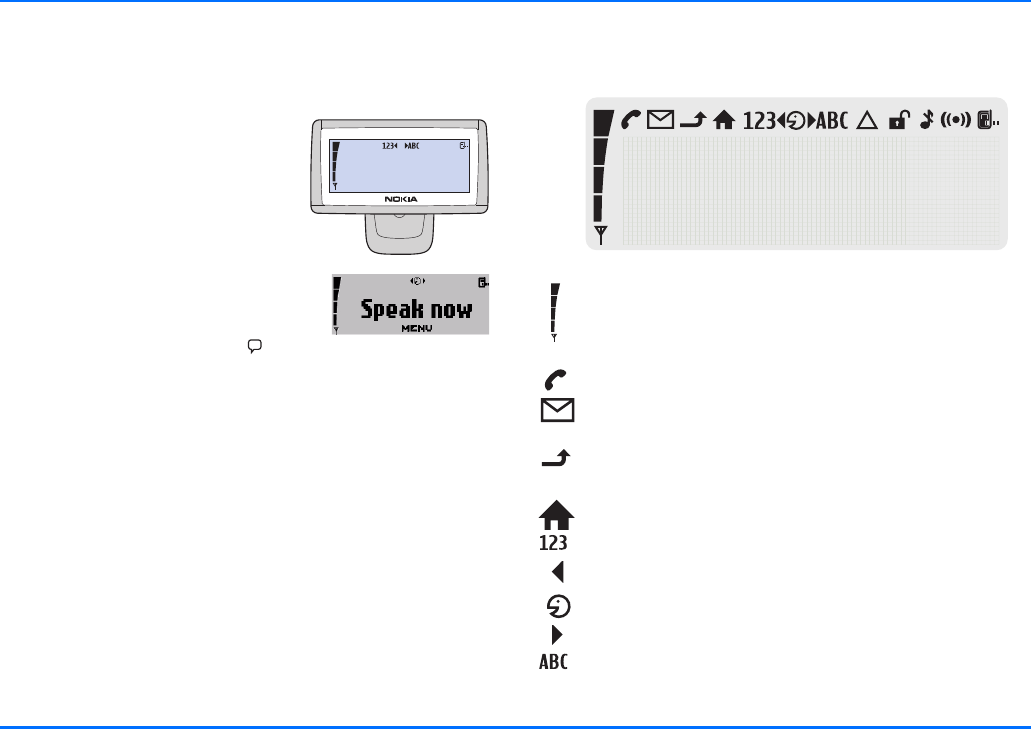
Display SU-11
When the car kit phone is ready for
use and no characters have as yet
been entered, the standby display
as depicted in the figure is shown.
In addition the logo of the network
operator is show.
If you wish to activate a function
using a voice tag, you will first have
to call the voice display. To do so
from the standby display, press .
You may adjust the display illumination to optimise
performance. For further information, see “Display
backlighting” on page 40.
Display indicators
The indicators described below may be shown on the display.
Shows the signal strength of the cellular network at the
current location. The higher the bar, the stronger the
signal.
Indicates an ongoing call.
You have received one or more text messages.
Indicates unread text messages.
The call diverting feature is on (network service).
See “Call divert (network service)” on page 38.
The home zone service is active (network service).
You may enter numbers.
Turn the Navi wheel to the left.
You may speak now.
Turn the Navi wheel to the right.
You may enter letters.
Display SU-11
16 Copyright © 2004 Nokia. All rights reserved.
Shows that roaming is active.
The network has deactivated the encryption function.
The ringing tone is switched off.
Bluetooth wireless technology is activated, see
“Bluetooth wireless technology” on page 51.
User profile 1 is in use.
See “Change user” on page 58.
User profile 2 is in use.
See “Change user” on page 58.
Additional indicators may be displayed:
Call indicators
Indicates an active voice call.
Indicates that a voice call has been disconnected.
Voice calls have been switched over to the headset.
Data communication is active.
Fax communication is active.
Indicates an active GPRS connection.
Indicates an inactive GPRS connection.
The call is on hold.
General indicators
Indicates a manual network search.
Indicates unread text messages. If this indicator is
flashing, the memory is full.
Indicates a business card is being forwarded.
This setting is active.
Headset volume can be adjusted.
Ringing tone volume can be adjusted.
Loudspeaker volume can be adjusted.
Backlighting can be adjusted.
Indicators for recorder functions
Recorder function is on.
The tape is being played back.

Basic components of the CUW-3 input device
Copyright © 2004 Nokia. All rights reserved. 17
Indicators for Bluetooth functions
Device with Bluetooth technology has been paired with
the car kit phone.
Bluetooth wireless technology is activated.
Notification indicators
Indicates that an item has been erased.
Indicates that your entry is incorrect or not permissible.
O.K. (confirms a setting or selection made).
Indicates additional information.
Indicates a warning or a caution.
Your message is being sent (does not indicate that the
message has been received).
Basic components of the CUW-3 input
device
The function selectors include four keys
and a Navi wheel. Depending on the
setting selected, you may choose from
the following options:
Press and hold
– the emergency call function is active.
For further information, see
“To make an emergency call” on page 71.
Press
– to accept an incoming call.
– to display the list of the last 10 phone numbers you
have called.
– to start dialling a number.
Press and hold
– to delete text, numbers or other entries.
– to return to the standby display.
Basic components of the CUW-3 input device
18 Copyright © 2004 Nokia. All rights reserved.
Navi wheel
Turn the Navi wheel to adjust the volume of the ringing
tone of an incoming call or the loudspeaker volume
during an ongoing call. You can also use the Navi wheel
to scroll within a menu.
In the standby display, turn the N
avi
wheel to the left
to activate input of a phone number. If you are in the
voice display, turning the Navi wheel to the left will scroll
through the voice commands and allow you, for example,
to select one to be replayed.
In the standby display, turn the N
avi
wheel to the right
to search for a contact entry in alphabetical order. If you
are in the voice display, turning the Navi wheel to the
right will scroll through the voice tags you have trained
for voice dialling a number and allow you, for example, to
select one to be replayed
.
Press the Navi wheel
to access a function in a particular context:
– to start the menu and select an item.
– to select an item from a list.
– to start options and select an item.
This key activates the following functions from the standby
display:
aPress to switch off the ringing tone.
An incoming call is indicated by a flashing display.
aPress and hold to put the car kit phone in off mode. Press
again to return to the standby display.
aPress to switch incoming or ongoing calls from your car kit
phone over to a compatible, paired headset and back as
desired.
xTo restart the car kit phone, press and hold for longer
than 10 seconds.
This key activates the following voice functions from the
standby display:
aPress to activate voice dialling and voice commands.
aPress and hold to activate recording (also during ongoing
calls).
Press
– to end a call.
– to delete a character or number entered.
– to return to the previous menu item or display.
Getting started
Copyright © 2004 Nokia. All rights reserved. 19
4. Getting started
Installing the car SIM card
The car kit phone can be used with a separate, own car SIM
card. In this case, you will need to insert a SIM card in the radio
unit.
Caution!
Keep all miniature SIM cards out of the reach of small children.
xThe SIM card and its contacts can easily be damaged by
scratches or bending, so be careful when handling, inserting
or removing the card.
aSwitch off the car’s ignition before inserting the SIM card.
aGently press the catch on the
radio unit casing (1) to open and
lift the cover (2).
aSlide the SIM card holder (3) as
shown to unlock it.
aOpen the SIM card holder by
lifting it upwards on one side as
depicted in figure (4).
aCarefully insert the SIM card into
the holder (5). Make sure that the
SIM card is inserted properly and
that the golden contact area on
the card is facing you.
aPush the SIM card holder down
into its original position and lock it
into place by sliding it in the
direction indicated by the arrow.
Close the cover of the radio unit
and check to make sure it catches.
Switching on/off and off mode
20 Copyright © 2004 Nokia. All rights reserved.
Switching on/off and off mode
Caution!
If wireless phone use is prohibited or when it may cause
interference or danger, switch your car kit phone over to off
mode. The car kit phone is then deactivated, even if the car
ignition is on.
Switching on the car kit phone
To switch on your car kit phone, simply turn the ignition key.
Your car kit phone is connected to the ignition system, so that
turning the ignition on automatically switches your car kit
phone on. Depending on the SIM card in use when the car kit
phone was last used, different prompts will be displayed:
Initial operation, a SIM card has not been assigned to the
active user profile
If you have not assigned a SIM card to the car kit phone or to
the active user profile, you will be prompted to select the
desired display language to be used in the car kit phone for the
active user profile. Then you can choose whether you wish to
use the active user profile with the car SIM card or a remote
SIM card, i.e. the SIM card installed in a compatible mobile
phone.
pOperation using a remote SIM card
The car kit phone will automatically begin searching for a
compatible mobile phone which supports Bluetooth
wireless technology and the Bluetooth SIM Access Profile
standard. Select the desired device from the list of devices
found and pair it with your car kit phone using a Bluetooth
SIM Access Profile passcode. For further information, see
“Pairing using a Bluetooth passcode” on page 52.
If you are prompted to enter a PIN code, enter the PIN code
of the remote SIM card installed in the compatible mobile
phone. This will appear on the display as ****. Press to
confirm. The car kit phone will then ask if you wish to save
the PIN code for a later automatic authorisation.
If the devices have been paired successfully and the PIN
code has been correctly entered, the remote SIM card of the
compatible mobile phone selected will be assigned user
profile 1. The car kit phone then asks whether you wish to
copy the contact entries stored on the remote SIM card and
in the compatible mobile phone to the car kit phone
memory. Afterwards, the car kit phone accesses the SIM
card installed in the compatible mobile phone to log into
the GSM radio network.
If no compatible mobile phone is shown in the list of devices
with Bluetooth SIM Access Profile, you can select the car
SIM card if it has been installed in the radio unit. The car kit
phone will then use this SIM card for operation. For further
information, see “Installing the car SIM card” on page 19.
pUsing the car SIM card
If the message SIM rejected appears on the display although
a SIM card has been properly inserted into the radio unit,
contact your network operator or service provider.
If you are prompted to enter a PIN code, enter the PIN code
belonging to the car SIM card. This will appear on the
display as ****. Press to confirm.

Switching on/off and off mode
Copyright © 2004 Nokia. All rights reserved. 21
If the PIN code has been entered correctly, the car SIM card
will be assigned user profile 1. The car kit phone then asks if
you wish to copy the contact entries stored on the car SIM
card to the car kit phone memory.
yThe car kit contact entries represent those in the internal
car kit phone memory and not those on the car SIM card in
use.
Remote SIM card assigned to active user profile
If you have already assigned the SIM card inserted in a
compatible mobile phone to the active user profile in the car kit
phone, when the car ignition is switched on the car kit phone
will use Bluetooth wireless technology to automatically search
for the compatible mobile phone in which the SIM card was
installed the last time the car kit phone was used. If this device
is found in the list of devices with Bluetooth technology and
you have activated the automatic PIN code entry, i.e. no further
authorisation request is required, the car kit phone will
automatically log in to the GSM network via the SIM card of the
compatible mobile phone. In this case, you will not be prompted
for input when switching on the car ignition as login is done
automatically.
yIf you use Bluetooth technology functions regularly, e.g. to
copy contact entries to the car kit phone memory from a
compatible mobile phone, you can deactivate the option
"Authorisation request" in the compatible mobile phone.
Now connections between the devices via Bluetooth
wireless technology can conveniently be made
automatically without separate acceptance or
authorisation. To do so, scroll to the menu item View paired
devices and select the option Request authorisation and set
it to Off. For further information, see the user’s guide
applicable for the compatible mobile phone with Bluetooth
technology that you are using.
However, if you have not saved the PIN code belonging to the
SIM card installed in the compatible mobile phone, you will
have to enter the PIN code each time the car ignition is
switched on.
If the remote SIM card of the compatible mobile phone has
been assigned to the active user profile but is not found, the car
kit phone will display the following list of options.
pReconnect remote SIM card
The search for the remote SIM card assigned to the active
user profile will be repeated.
pChange user
This feature lets you change the active user profile. For
further information, see “Change user” on page 58.
pUse car SIM for this session
The car SIM card can be assigned to the active user profile
temporarily.
yThe car SIM card will only be assigned to the active user
profile as long as the car ignition is turned on. If the
compatible mobile phone should not be within range for a
Bluetooth wireless connection, for example, you can use the
car SIM card inserted in the radio unit to temporarily access
your standard user profile. If you switch off the ignition and
switch it on again, the car kit phone will automatically
Switching on/off and off mode
22 Copyright © 2004 Nokia. All rights reserved.
begin to search for the remote SIM card of the compatible
mobile phone.
pAssign SIM card
Either a remote SIM card or the car SIM card can be assig-
ned to the active user profile.
Car SIM card assigned to active user profile
If you have assigned a car SIM card, i.e. the SIM card inserted in
the radio unit, to the active user profile in the car kit phone and
the message SIM rejected appears on the display although a
SIM card has been properly inserted into the radio unit, contact
your network operator or service provider.
If you are prompted to enter a PIN code, enter the PIN code
belonging to the car SIM card. This will appear on the display as
a series of asterisks ****. Press to confirm.
If the PIN code has been entered correctly, the car kit phone
logs into the GSM radio network using the car SIM card. The car
kit phone then asks if you wish to copy the contact entries on
the car SIM card to the car kit phone memory, if no contact
entries have as yet been saved in the car kit phone memory.
yThe car kit contact entries represent those in the internal
car kit phone memory and not those on the car SIM card in
use.
Switching off the phone
When you switch off your car’s ignition, the car kit phone will
not be switched off automatically: it remains in service for the
period of time that you have set using the power down timer. If
you are engaged in an active call the car kit phone will not
automatically switch off at the end of this time. The power
down timer will not start to count down until after the active
call is over.
xThe factory setting for the power down timer is zero
minutes.
Off mode
To change over to off mode when your
car’s ignition is switched on:
aPress and hold .
aThen press and hold .
When your car kit phone is in off mode, the display as
depicted in the figure above is shown.
aTo put your car kit phone back into service, press .
aFollow the instructions shown on the display.
yWhen the car kit phone is in off mode, an established
wireless Bluetooth SIM Access Profile link between the car
kit phone and the compatible mobile phone remains active.
This means that the GSM transmitter and receiver

Switching on/off and off mode
Copyright © 2004 Nokia. All rights reserved. 23
components of the compatible mobile phone stay switched
off.
xIf the wireless Bluetooth SIM Access Profile link between
the car kit phone and the compatible mobile phone is
interrupted (e.g. if the compatible mobile phone is moved
out of range when the user leaves the car), the GSM
transmitter and receiver components of the compatible
mobile phone are automatically switched on again and the
mobile phone logs into the GSM network using its SIM card.
In this case, when wireless phone use is prohibited or when
it may cause interference or danger, ensure that the car kit
phone is changed over to off mode and be sure to switch off
the compatible mobile phone.
Call functions
24 Copyright © 2004 Nokia. All rights reserved.
5. Call functions
Voice dialling
You can make a phone call simply by
saying a voice tag that has been added
to a number in the contacts. Name tags
may be added to up to 12 of the numbers
stored in your contacts. Any spoken word (or words) such as the
name of a person can be used as a voice tag to voice dial a call.
Before using voice dialling, note that:
pVoice tags are not language dependent. They are dependent
on the speaker’s voice.
pVoice tags are sensitive to background noise. Record them
and make calls in a quiet environment.
pWhen recording a voice tag or making a call by saying a
voice tag, speak clearly into the microphone.
pVery short names are not accepted. Use long names and
avoid similar names for different numbers.
xYou must say the name exactly as you said it when you
recorded it. This may be difficult in, for example, a noisy
environment or during an emergency, so you should not rely
solely upon voice dialling in all circumstances.
xBefore you can use this feature you will have to record voice
tags for numbers stored in the car kit phone’s contacts. For
further information, see “Voice tags” on page 46.
aTo voice dial a number, press and the message Speak now
will appear on the display.
aSay the voice tag belonging to the desired number loudly
and clearly.
To indicate that it has recognised the voice tag, your car kit
phone will play back the voice tag as recorded and then
automatically dial the number assigned to it 1.5 seconds later.
Dialling from the contacts
(name search)
You can call a number simply by
selecting a name from the contact
entries:
aWith the display in standby, scroll with to the desired
letter of the alphabet in the contacts and press to
open the list of names beginning with this letter.
aScroll with to the desired name and press to dial
the number stored with the name.
xYou can assign as many as five phone numbers to an entry
in the contacts with different symbols used to differentiate
the entries. If no other symbol is selected, the first number
saved under a name is indicated with (General). Other
number types used to differentiate entries are (Mobile),
(Home), (Office) and (Fax).
Redialling
Copyright © 2004 Nokia. All rights reserved. 25
To call any one of the other numbers
stored for a name:
aPress and scroll with to the desired symbol or
phone number.
aPress to dial the number.
Redialling
To redial a number you have recently dialled, you can view a list
of up to 10 numbers that you have last called.
aWith the display in standby, press .
aScroll with to the desired number or name.
aPress to dial the number.
Using the NaviTM wheel to make a call
You can use the Navi wheel to enter a phone number and make
a call.
aWith the display in standby, scroll with to the first
number in the phone number and press to select it.
aRepeat this step for the other numbers making up the
desired number until the complete phone number is shown
on the display.
aPress to dial the number.
List of favourites
This list may contain up to 12 name tags you have assigned to
phone numbers. For further information, see “Voice dialling” on
page 24. It is provided for your convenience to allow you to
quickly access numbers you frequently call.
yYou can call the list from the standby display quickly and
easily.
aPress .
aScroll with to the desired entry and press to
select it.
aFollow the instructions shown on the display.
aPress to dial the number.

Call waiting service
26 Copyright © 2004 Nokia. All rights reserved.
Call waiting service
If the function Call waiting is activated,
You will be notified of any incoming call
while you have another call in progress.
This feature will allow you to accept this
call (network service).
The following settings are available for this feature:
pActivate
This option will activate the call waiting service.
pCancel
This option will deactivate the call waiting function.
pCheck status
Select this option if you wish to know whether or not this
service is currently active for your car kit phone (network
query).
aPress to accept an incoming call while you are engaged
in an active call. The first call will then be placed on hold.
aPress to switch between the active call and the call on
hold.
aPress to end the currently active call and return to the
call on hold.
For further information, see “Settings” on page 37.
Options during a call
The following options are available to you during an active call:
pSend DTMF
pMute
pContacts
To view the list of options:
aPress during an active call.
aScroll with to the desired option and press to
select it.
Send DTMF
DTMF tone strings can be used to send passwords or to access
your answerphone, for example.
aScroll with to the desired number and press to
select it.
aRepeat this step to select the other numbers in the string.
When a number has been selected, it is immediately sent as a
DTMF tone.
aPress to exit this option.
yPressing returns to the call display.
Any call in progress will remain active.

Accepting or refusing an incoming call
Copyright © 2004 Nokia. All rights reserved. 27
Mute call
If desired, you can mute a call in
progress by selecting the option Mute,
which switches off the microphone. The
message Muted then appears on the
display.
aPress to unmute the microphone.
Contacts
During a call, you may wish to view contact entries to check a
number, for example, or to give the caller a particular number.
To view contacts:
aScroll with to the contact entries.
aPress to exit the contacts.
Accepting or refusing an incoming call
aPress to accept an incoming call and, when finished,
press to end it.
aPress to refuse an incoming call.
If the function Divert if busy has been activated (network
service) and your incoming calls are directed to another number
such as your voice mailbox number, any call you have refused
will also be diverted to this number. For more information, see
“Call divert (network service)” on page 38.

Using the menu
28 Copyright © 2004 Nokia. All rights reserved.
6. Using the menu
The Nokia 610 car kit phone offers you an extensive range of
functions, which are grouped in menus.
Accessing a menu function
To access the menu from the standby display, press . You
can then navigate the menu using the following keys:
Turn the Navi wheel to the left to scroll up through a list
of options.
Turn the Navi wheel to the right to scroll down through a
list of options.
Press the Navi wheel to select a desired option.
Press this key to delete an entry made. Or press this key to
return to the previous menu level (see the list of menu
functions). Press and hold this key to clear the display and
return to the standby display.
List of menu functions
P Messages
tInbox
tCall
tReply with template
tSave as template
tDelete
tCopy to phone
tMessage settings
tMessage centre number
tReply via same centre
tView templates
tSend
tDelete
P Call regist.
tMissed calls
tReceived calls
tDialled numbers
P Contacts
tSearch
tDelete
tMemory status
P Tones
tRinging volume
tRinging tone

List of menu functions
Copyright © 2004 Nokia. All rights reserved. 29
tWarning tones
P Settings
tSet time and date
tSet the time
tTime format
tSet the date
tDate format
tCall settings
tMy number sending
tSet by network
tOn
tOff
tCall divert
tDivert all voice calls
tDivert if busy
tDivert if not answered
tDivert if out of reach
tDivert if not available
tCancel all diverts
tAutomatic answer
tOff
tOn
tCall waiting
tActivate
tCancel
tCheck status
tPhone settings
tLanguage
tBacklight settings
tCell info display
tOn
tOff
tNetwork selection
tAutomatic
tManual
tPower down timer
tVoice mailbox
tListen to voice messages
tVoice mailbox number
tGPRS modem
tSecurity settings
tPIN code request
tChange PIN code
tClosed user group
tDefault
tOn
tOff
tFixed dialling
tOn
tOff
tNumber list
tEqualiser settings
tLoudspeaker
tRadio loudsp.
tRestore factory settings

List of menu functions
30 Copyright © 2004 Nokia. All rights reserved.
P Voice
tVoice tags
tNew voice tag
tList of voice tags
tPlay
tChange
tDelete
tVoice commands
tNew voice command
tList of voice commands
tPlay
tChange
tDelete
P Recorder
tRecord
tPlay
tDelete
P Bluetooth
tSearch for audio enhancem.
tView active devices
tView paired devices
tCreate connection
tDelete pairing
tRequest authorisation
tEdit Bluetooth name (accessory)
tBluetooth name (car kit phone)
tAllow second connection
tVisibility
P User data
tDownload contacts
tChange to user 1/2
tSettings for user 1/2
tAssign SIM card
tView active SIM card
tDownload settings
tSIM and phone mem.
tSIM memory
tPhone memory
Menu functions
Copyright © 2004 Nokia. All rights reserved. 31
7. Menu functions
Messages
You can receive and read short text
messages on your car kit phone and
either call the sender back or send an
answering SMS using a message
template (network service). However, before you can send your
own short messages, you will have to make some necessary
Message settings.
xRemember that traffic safety comes first. Don’t use a hand-
held phone while driving and only use the features offered
by your car kit phone when traffic conditions permit this.
xWhen sending messages via the SMS network service, your
car kit phone may display the words Message sent. This is
only an indication that the message has been sent by your
car kit phone to the message centre number programmed
into your phone. This does not mean that the message has
been received at the intended destination.
Inbox
When you have received an SMS, the
indicator and the number of new
messages are shown on the display along
with the notification 1 new message
received.
Any short messages sent to your car kit phone are shown in the
order in which they are received.
yIf you have established a Bluetooth SIM Access Profile
connection to a compatible mobile phone, all short
messages received by the car kit phone are automatically
forwarded to this compatible mobile phone.
Unread text messages are indicated by , whilst read text
messages are indicated by the symbol.
A flashing SMS indicator means that the message memory
is full. To be able to send or receive a new message, you will first
have to delete some of the old ones.
If you have received more than one text message:
aSelect the Messages menu and press to open it.
aSelect the Inbox option and press to view the list of
messages.
aScroll with to the desired message and press to
read it.
aScroll with to either browse through the message or
display the message itself, the sender or sender’s phone
number, and the date and time the message was received.
Your car kit phone comes with a number of options for handling
the message selected.
aPress .
aScroll with to the desired option and press to
select it.

Messages
32 Copyright © 2004 Nokia. All rights reserved.
Call
Select this option to make a call to the sender’s phone number.
Reply with template
You can reply to a short message using a template that you
have prepared yourself. Select the option Reply with template
to view the list of the templates stored in your car kit phone.
Save as template
This convenient option lets you save a received SMS as a
template. To use the template, select the option Reply with
template to view the list and send the message.
Erase
Select this option to delete a short message.
Message settings
To be able to send short messages, you first need to make some
settings on your car kit phone.
Message centre number
You receive this number from your service provider.
yThis option saves the phone number of the message centre,
which you need to send text messages.
Reply via same centre (network service)
Replies to short messages are typically handled by the SMS
centre which the sender subscribes to. Selecting Reply via same
centre will allow the recipient of your message to send you a
reply via your message centre.
To make these settings, with the display in standby:
aPress .
aScroll with to the menu item Message settings and
press to select it.
aScroll with to the desired option and press to
select it.
aFollow the instructions on the display.
View templates
Your car kit phone can save up to 10 templates to be sent as
short messages. Five standard templates come with your car kit
phone; you may save 5 further templates taken from short
messages sent to you. The following options are available:
Call register
Copyright © 2004 Nokia. All rights reserved. 33
Send
The template selected will be sent.
Erase
Use this option to erase any templates that you have taken from
short messages sent to you and then saved.
To view the list of text message templates, with the display in
standby:
aPress .
aScroll with to the Messages menu and press to
view the options.
aScroll with to View templates and press to view
the list.
aScroll with through the list of templates and press
to select the desired template.
aPress to confirm the selection.
aScroll with to the desired option and press to
select it.
aFollow the instructions shown on the display.
yWhile you may erase the templates you have saved from
short messages sent to you, please note that you cannot
delete the 5 standard templates stored in the car kit phone
memory.
Call register
The phone registers the phone numbers
of missed, received, and dialled calls and
the time and date of your calls.
xThe phone registers missed and received calls only if the
network supports these functions and if the phone is
switched on and within the network’s service area.
yIn these lists you can view up to 10 of the last calls made to
your phone or received or up to 10 numbers you have last
dialled. They are provided for your reference. The most
current item is shown at the top of the list.
Three options are available for each of the items in the call
register: Call, Time of call or Delete.
aSelect an entry in the desired list and press .
aScroll with to the desired option and press to
select it.
aFollow the instructions shown on the display.

Call register
34 Copyright © 2004 Nokia. All rights reserved.
Missed calls
To view a list of up to 10 of the latest registered calls, with the
display in standby:
aPress .
aScroll with to the Call regist. menu and press to
open it.
aScroll with to Missed calls and press to view the
list.
aScroll with through the list.
aPress and hold to return to the standby display.
Received calls
To view a list of up to 10 registered numbers of the latest calls
you have received, with the display in standby:
aPress .
aScroll with to the Call regist. menu and press to
open it.
aScroll with to Received calls and press to view
the list.
aScroll with through the list.
Dialled numbers
You can use a shortcut to view the list of up to 10 of the last-
dialled numbers with the display in standby: press and hold .
Alternatively, to view the list of last-dialled numbers, with the
display in standby:
aPress .
aScroll with to the Call regist. menu and press to
open it.
aScroll with to Dialled numbers and press to view
the list.
aScroll with through the list.
Contacts
Copyright © 2004 Nokia. All rights reserved. 35
Contacts
All of the entries you make in the
contacts are saved in the internal car kit
phone memory. You can also copy
entries from a SIM card or a compatible
mobile phone that supports Bluetooth wireless technology to
your car kit phone. For further information, see “Download
contacts” on page 56.
For each user profile, up to 500 names can be stored in the car
kit phone memory together with numbers for each name. For
further information, see “Querying the memory status” on
page 36.
xIf the number of contact entries to be copied from the
memory of a compatible mobile phone via Bluetooth
wireless technology should exceed the available space in
the car kit phone memory, not all of the entries will be
copied.
You can assign up to five phone numbers for each name. When
you select a name from the contact entries, for example, to
make a call, the general number is used by default unless you
select another number.
Searching for names and numbers
You can access the list of names and phone numbers quickly
from the standby display:
aScroll with to the first letter of the desired name and
press to select it.
aYou can now view all the names stored in your contacts list
which start with the letter selected. They are listed in
alphabetical order.
aScroll with to the desired name in the list.
aTo make a call to this person, press .
aTo end the call, press .
aTo return to the standby display, press .
For further information, see “Dialling from the contacts (name
search)” on page 24.
Erasing contact entries
You can erase one or more names and the related numbers from
the contacts.
aWith the display in standby, select the Contacts menu and
press to open the contacts.
aScroll with to Add contact and press to select
this option.
aScroll with to the desired option and press to
select it.
aFollow the instructions shown on the display.
Tone settings
36 Copyright © 2004 Nokia. All rights reserved.
Querying the memory status
This option allows you to view the free storage space in the car
kit phone memory (in %).
With the display in standby:
aSelect the Contacts menu and press .
aScroll with to the item Memory status and press
to select it.
aYou can now view the memory status on the display.
Tone settings
You can choose the desired ringing tone
for incoming calls, change the volume,
and switch warning tones on or off as
desired.
yUse the Navi wheel to regulate the volume of the
ringing tone when the car kit phone is ringing to notify you
of an incoming call or to change the loudspeaker volume
during a call in progress.
aSelect Tones and press to open the menu.
aScroll with to the desired option and press to
select it.
aFollow the instructions shown on the display.
Ringing volume
This option sets the loudspeaker volume for an incoming call.
Ringing tone
This option offers you a range of ringing tones to choose from.
Select the one you would like to have notify you of an incoming
call.
Warning tones
This option lets you activate or deactivate special notification
tones.
Settings
Copyright © 2004 Nokia. All rights reserved. 37
Settings
You may customise a number of the
settings in your car kit phone.
aTo make any of the settings below, select the Settings menu
from the standby display and press to open it.
Setting the time and date
aScroll with to the Time settings item and press
to select it.
aScroll with to Set the time and press to select
this option.
aScroll with to set the hour. Press to take over the
setting and continue with the minutes.
aRepeat the above step to set the minutes.
aRepeat the above procedure to access the options Time
format, Set the date, and Date format to make the desired
settings.
Call settings
This option lets you set a variety of call features. To make call
settings, with the display in standby:
aSelect the Settings menu and press to open it.
aScroll with to the Call settings item and press to
select it.
Own number sending (network service)
pSet by network
This will activate the setting you have agreed with your
network operator.
pOn
Selecting this option will activate your caller ID: the person
you are calling will then be able to view your car kit phone
number.
pOff
If you do not wish your number to be sent to the called
party, use this option to deactivate your caller ID.
aScroll with to the desired option and press to
select it.

Settings
38 Copyright © 2004 Nokia. All rights reserved.
Call divert (network service)
With Call divert you can direct your incoming calls to another
number, for example, to your voice mailbox number. For details,
contact your service provider.
Your car kit phone offers you a wide variety of options to
choose from:
pDivert all voice calls
This option will divert all incoming voice calls.
pDivert if busy
Select this option to divert voice calls when your number is
busy or when you reject an incoming call.
pDivert if not answered
This option will divert all voice calls you fail to answer.
pDivert if out of reach
Select this option to divert voice calls when you are out of
reach of the network.
pDivert if not available
This option will divert all voice calls you receive when you
are not available.
pCancel all diverts
Use this option to cancel any active divert options.
To make call divert settings, with the display in standby:
aSelect the Settings menu and press to open it.
aScroll with to the Call settings item and press to
select it.
aScroll with to Call divert and press to select this
option.
aScroll with to the desired function and press to
select it.
You can select any of four options for each of the divert
features offered:
pActivate
This option lets you select the number you wish to direct
diverted voice calls to: your voice mailbox or any other
number.
pCancel
Select this option for any call divert feature that is not to be
activated.
pCheck status
This option allows you to check the status of a call divert
feature.
pDelay
Select this option to set the time period after which an
incoming voice call is to be diverted if not answered.
yThe original factory setting for the delay time is 5 seconds.
Active call diverts are shown by an indicator on the display.
For further information, see “Display indicators” on page 15.

Settings
Copyright © 2004 Nokia. All rights reserved. 39
Automatic answer
This feature will cause any incoming call to be automatically
answered after the first ring whenever your car kit phone is on
and off mode is not active. You can switch this feature on or off
as desired.
To activate the automatic answer function, with the display in
standby:
aSelect the Settings menu and press to open it.
aScroll with to the Call settings item and press to
select it.
aScroll with to Automatic answer and press to
select this option.
aScroll with to the desired setting On or Off and press
to select it.
Call waiting (network service)
If the function Call waiting is activated, you will be notified of
any incoming call while you have another call in progress. This
feature will allow you to accept this call.
aPress to accept an incoming call while you are engaged
in an active call. The first call will then be placed on hold.
aPress to switch between the active call and the call on
hold.
aPress to end the currently active call and return to the
call on hold.
You may choose from three options for this function:
pActivate
This option will activate the call waiting service.
pCancel
This option will deactivate the call waiting function.
pCheck status
Select this option if you wish to know whether or not this
service is currently active for your car kit phone (network
query).
To activate call waiting, with the display in standby:
aSelect the Settings menu and press to open it.
aScroll with to the Call settings item and press to
select it.
aScroll with to Call waiting and press to select
this option.
aScroll with to the desired setting and press to
select it.

Settings
40 Copyright © 2004 Nokia. All rights reserved.
Phone settings
Select this option to customise your car kit phone settings.
Display text language
This option allows you to select the language that display texts
are to be shown in. If Automatic is selected, the phone selects
the language according to the information stored on the SIM
card.
To set the display text language, with the display in standby:
aSelect the Settings menu and press to open it.
aScroll with to the Phone settings item and press
to select it.
aScroll with to Language and press to select this
option.
aScroll with to the desired language and press to
select it.
Display backlighting
You can adjust the brightness of the display’s backlighting for
better viewing comfort. To adjust the backlighting, with the
display in standby:
aSelect the Settings menu and press to open it.
aScroll with to the Phone settings item and press
to select it.
aScroll with to Backlight settings and press to
select this option.
aScroll with to the desired backlighting setting and
press to select it.
Cell info display
When this function is activated, information about the radio
cell you are currently using will be shown on the display.
However, you can only use this network service if the phone is
booked into a cellular network based on Micro Cellular Network
(MCN) technology.

Settings
Copyright © 2004 Nokia. All rights reserved. 41
Network selection
The cellular network to which your car kit phone is to be
connected can be selected either manually or automatically.
pAutomatic
Your car kit phone will automatically select a suitable
available cellular network in the area.
pManual
You can view a list of available cellular networks and select
any network that has a roaming agreement with your home
network operator. The car kit phone stays in manual mode
until the automatic mode is selected or another SIM card is
inserted into the phone.
To select the desired cellular network, with the display in
standby:
aSelect the Settings menu and press to open it.
aScroll with to the Phone settings item and press
to select it.
aScroll with to Network selection and press to
select this option.
aScroll with to the desired network and press to
select it.
aFollow the instructions shown on the display.
Power down timer
Your car kit phone comes with a power down delay that keeps
your phone in service for the period of time set even when the
car’s ignition has been switched off. After you have switched off
the ignition, the car kit phone remains in operation for the time
set in the Power down timer. If you are engaged in an active call
when the ignition is switched off, the power down timer will
not begin the countdown until the active call has ended.
yThe original factory setting for the power down timer is zero
minutes. The power down delay is limited to a maximum
delay time of 24 hours.
xRemember that your car kit phone runs off the car battery.
When setting the power down timer, take care not to drain
your car battery.
To set the power down timer, with the display in standby:
aSelect the Settings menu and press to open it.
aScroll with to the Phone settings item and press
to select it.
aScroll with to Power down timer and press to
select this option.
aScroll with to set the time as desired.
aPress to activate the timer.
A message on the display will notify you that the power down
timer has been set.

Settings
42 Copyright © 2004 Nokia. All rights reserved.
Voice mailbox
Your service provider may offer you a voice mailbox service,
which you have to install before you can receive voice
messages. To access this mailbox you may need to save the
number to your car kit phone. Your service provider will give
you further information on this service and let you know the
number of your voice mailbox.
The voice mailbox features are available for the active device
that is currently accessing the SIM card data.
Entering your voice mailbox number
You will obtain the number of your voice mailbox from your
service provider upon subscription to this service. To enter it in
your car kit phone, with the display in standby:
aSelect the Settings menu and press to open it.
aScroll with to Voice mailbox and press to select
this option.
aScroll with to Voice mailbox number and press
to select this option.
aUse the Navi wheel number editor to enter the number.
aIf you should select an incorrect number, press to delete
it.
aTo save the number, press "OK" in the Navi wheel number
editor or press .
Listening to voice messages
To listen to voice messages, with the display in standby:
aSelect the Settings menu and press to open it.
aScroll with to the Voice mailbox item and press
to select it.
aScroll with to Listen to voice messages and press
to select this option.
yPress and hold to dial your voice mailbox direct.
GPRS modem settings (network service)
You can use your car kit phone as a modem to enable GPRS
connectivity. Note, however, that you will need a GPRS access
point before you can do so. Contact your network operator or
service provider for information.
Before you can use GPRS:
pYou need to subscribe to the GPRS service of your network
operator or service provider.
pFor the relevant information on the availability of GPRS and
the necessary settings, contact your network operator or
service provider.
pThe settings required to use GPRS applications have to be
saved to your car kit phone.
To set up a GPRS access point, with the display in standby:
aSelect the Settings menu and press to open it.
aScroll with to the GPRS modem item and press
to select it.
Settings
Copyright © 2004 Nokia. All rights reserved. 43
aTo set up a new GPRS access point or to change an existing
one, press again.
aPress to open the option Edit access point? and enter
the alphanumeric characters of the GPRS access point using
the Navi wheel text editor to enter the characters.
aTo save the name of the access point, press "OK" in the Navi
wheel text editor or press .
aIf you have made a mistake in selecting a character, press
to delete it. Press and hold this key if you wish to erase
the complete entry.
For further information and to download modem driver
software for your computer and/or laptop computer, visit the
Nokia website at www.nokia.com.
Charges for GPRS and related applications
You may be charged for GPRS data transmission or for an
application which uses GPRS. For details of charges, contact
your network operator or service provider.
Security settings
Caution!
For some security settings (for example, when calls are limited
to closed user groups or fixed dialling numbers), you may find
that, in some networks, emergency calls to certain numbers
(e.g. 112 or other official emergency call numbers) are blocked.
You may first need to turn off these features before you can
make an emergency call.
PIN code request (available for car SIM card only)
Use this option to set the car kit phone to ask for the PIN code
of the car SIM card installed in the radio unit whenever the
phone is switched on. Remember that some providers do not
allow the PIN code request function to be deactivated.
PIN code change (available for car SIM card only)
This option lets you change the PIN code of the car SIM card
installed in the radio unit of your car kit phone. Remember that
these codes may only include the numbers 0 to 9.
For further information, see “PIN code” on page 73.

Settings
44 Copyright © 2004 Nokia. All rights reserved.
Closed user group
This is a network service which specifies the group of people
you can call or who can call you. For further information,
contact your network operator or service provider.
You can choose from three options for this function:
pDefault
The settings made by your service provider are active.
pOn
The closed user group service is active.
pOff
The closed user group service is deactivated.
Fixed dialling numbers
(only available for the car SIM card)
You can restrict your outgoing calls to selected phone numbers,
if this function is supported by your car SIM card. To save and
edit the numbers on this list, you need the PIN2 code.
yIf you wish to use this feature when accessing the SIM card
of a compatible mobile phone connected to your car kit
phone via Bluetooth SIM Access Profile technology, you will
have to make the corresponding settings in the compatible
mobile phone. For further information, see the user’s guide
applicable for the compatible mobile phone with Bluetooth
technology that you are using.
You can choose from three options for this function when using
the car SIM card installed in your car kit phone:
pOff
The fixed dialling numbers function is deactivated.
pNumber list
This option allows you to view the phone numbers that may
be used for outgoing calls.
pOn
The fixed dialling numbers function is active.
To set up fixed dialling numbers, with the display in standby:
aSelect the Settings menu and press to open it.
aScroll with to the Security settings item and press
to select it.
Settings
Copyright © 2004 Nokia. All rights reserved. 45
aScroll with to Fixed dialling and press to select
this option.
aScroll with to the desired option and press to
select it.
aFollow the instructions shown on the display.
For further information, see “Access codes required for the car
SIM card” on page 14.
Equaliser settings
Your car kit phone supports a variety of options for output over
a loudspeaker:
pDirect connection to the SP-2 loudspeaker supplied in the
sales package.
pConnection to a compatible car radio loudspeaker over an
additional relay that switches audio output over to the
loudspeaker (not included in the scope of supply). Please ask
the service technician who is to install your car kit phone for
professional assistance.
pConnection to compatible car radio loudspeakers via the
audio line-in of your car radio. You will need to adjust the
audio level suitably if this option is selected.
To make the desired setting, with the display in standby:
aSelect the Settings menu and press to open it.
aScroll with to the Equaliser settings and press to
select it.
aScroll with to Loudspeaker or Radioloudsp. and press
to select the desired option.
Restore factory settings
You can reset all of the menu settings to the original factory
settings.
With the display in standby:
aSelect the Settings menu and press to open it.
aScroll with to the Restore factory settings and press
to select it
aFollow the instructions shown on the display.
Caution!
If you have erased a setting, you cannot undo this operation.
The data is irretrievably lost.
Voice tags
46 Copyright © 2004 Nokia. All rights reserved.
Voice tags
Before recording voice tags or using
voice dialling, you will need to be aware
of some essential facts:
pVoice tags are not language dependent. They are dependent
on the speaker’s voice.
pVoice tags are sensitive to background noise. Record them
and make calls in a quiet environment.
pWhen recording a voice tag or making a call by saying a
voice tag, make sure to speak clearly into the microphone.
pVery short names are not accepted. Use long names and
avoid similar names for different numbers.
xYou must say the name exactly as you said it when you
recorded it. This may be difficult in, for example, a noisy
environment or during an emergency, so you should not rely
solely upon voice dialling in all circumstances.
Voice dialling
You can assign voice tags to phone numbers and your car kit
phone will automatically try to dial the number when it
recognises the tag.
Recording a new voice tag
This option lets you record a new voice tag, assign it to a phone
number, and save it in the car kit phone memory. You may save
up to 12 voice tags with the related numbers per user profile in
your car kit phone. A voice tag can be any spoken word (or
words) such as the name of a person.
aTo record a New voice tag, select the Voice menu in the
standby display and press to open it.
aScroll with to the item Voice tags and press to
select it.
aScroll with to New voice tag and press to select
this option.
aScroll with to the desired name in the contacts and
press to select it.
aScroll with to the desired number for which you wish
to record the voice tag and press to select it.
aPress again and you will be prompted to speak the
voice tag you have selected for this entry.
aTo do so, follow the instructions shown on the display.
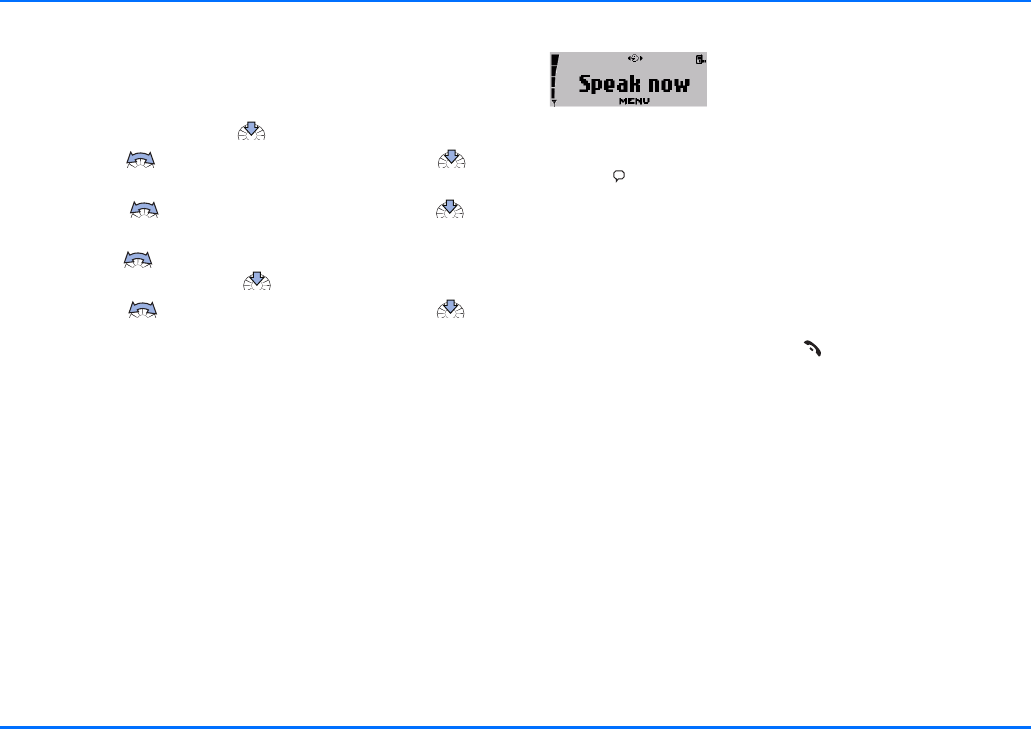
Voice tags
Copyright © 2004 Nokia. All rights reserved. 47
Voice tag list
You can use this option to check all of the voice tags saved in
your car kit phone memory and to edit the list:
aTo edit the list of voice tags, select the Voice menu in the
standby display and press to open it.
aScroll with to the item Voice tags and press to
select it.
aScroll with to List of voice tags and press to
select this option.
aScroll with to the desired name in the contacts which
you wish to edit and press to select it.
aScroll with to the desired option and press to
select it.
aFollow the instructions shown on the display.
pPlay
This option will play back the voice tag as recorded.
pChange
You can replace any voice tag by a new one. Select this
option and say the new voice tag.
pDelete voice tag?
Select this option to erase a voice tag and make room in the
memory for a new voice tag.
Voice dial a number
To voice dial a number:
aPress .
The message Speak now will appear on the display.
aSay the voice tag belonging to the desired number loudly
and clearly.
Your car kit phone will play back the voice tag and
automatically dial the number assigned to it 1.5 seconds
later.
aTo cancel voice dialling, press .
yIf you are using a compatible headset with Bluetooth
technology, press the key on the headset to activate it
before speaking the voice tag.
xWhen an application using the GPRS connection is sending
or receiving data, you cannot make a call using voice
dialling. To make a call using a voice tag, you must first end
the application using the GPRS connection.

Voice tags
48 Copyright © 2004 Nokia. All rights reserved.
Voice commands
You have a selection of phone functions which can be activated
by saying a voice command. A voice tag may be assigned to as
many as three of the commands on the list. You can activate
the voice command in the same way as making a call using a
name tag. Three functions are available:
pPlay
This option lets you play black selected recordings. The last
made recording will be played back first. Press while
listening to a recording to skip it and go to the next one.
pDownload contacts
You can use this feature to copy contact entries from a
compatible mobile which supports Bluetooth wireless
technology or from the SIM card installed in the compatible
mobile phone to the car kit phone memory. If a wireless
Bluetooth SIM Access Profile link has been established, the
contact entries stored on the compatible mobile phone will
automatically be downloaded.
pConn. to Bluetooth headset
This option allows you to establish a wireless link to a
compatible paired headset which supports Bluetooth
technology. The option Search for audio accessories can be
used to call the list of active or paired devices. For further
information, see “Searching for accessories with Bluetooth
technology” on page 51.
Recording voice commands
This option allows you to record a voice command (one or more
words acting as a spoken command) and assign it to a function
in the list of voice commands.
aWith the display in standby, scroll with to the Voice
menu and press to open it.
aScroll with to the item Voice commands and press
to select it.
aScroll with to the New voice command and press
to view the list.
aScroll with to the desired function for which you wish
to record a voice command and press to select it.
aPress again and you will be prompted to speak the
voice tag you have selected for this entry.
aFollow the instructions shown on the display.
The voice command list includes the phone functions listed for
voice commands. Each function on the list can be checked and
edited using the options below:
pPlay voice commands
This option will play back the voice command as recorded.
pChange
You can record a new voice command for a selected entry,
replacing the existing one.
pDelete voice command?
Select this option to erase a voice command and make room
in the memory for a new one.
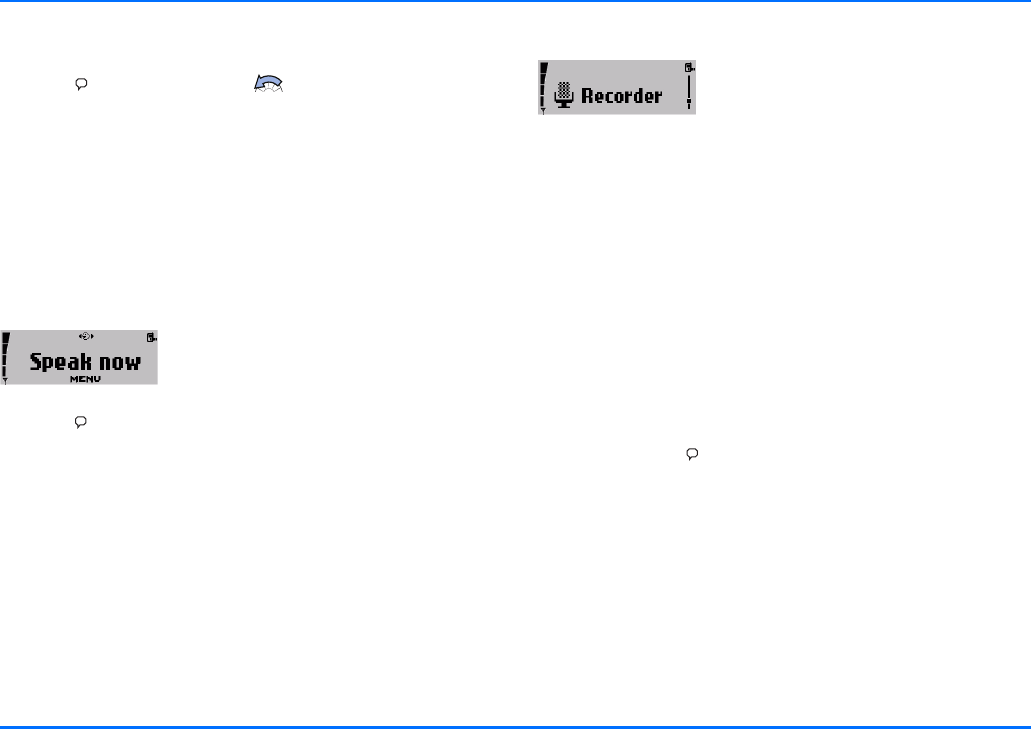
Recorder
Copyright © 2004 Nokia. All rights reserved. 49
You can use a shortcut to access the list of voice commands
direct from the standby display:
aPress and scroll left with .
aYou can now view the list of Voice commands.
aFollow the instructions shown on the display.
Executing a voice command
xWhen an application using the GPRS connection is sending
or receiving data, you cannot execute a voice command. To
do so, you must first end the application using the GPRS
connection.
To execute a voice command,
aPress .
The message Speak now will appear on the display.
aSay the voice command loudly and clearly.
Your car kit phone will play back the voice command and
automatically perform the function assigned to it 1.5 seconds
later.
Recorder
The tape recorder feature allows you to
record pieces of speech, sounds or an
active phone call. This is especially useful
if you need to note information during a
call: for example, you can record a name or a number to be
written down later.
xObey all local laws governing recording of calls. Do not use
this feature illegally.
You can make up to 10 recordings as long as you do not exceed
an overall recording time of five minutes. Each recording is
saved together with the running number, the length and time of
the call.
New recordings are automatically saved in the memory. When
the memory is full, the message No memory to save rec. will be
shown on the display. To be able to make new tape recordings,
you will first have to erase some old ones.
aPress and hold to begin recording during a phone call.

Recorder
50 Copyright © 2004 Nokia. All rights reserved.
yYou can easily play back your recordings using a voice
command. Say the voice command and your car kit phone
will begin with the recording last made. With you can
skip to the next recording.
yBefore you can use this shortcut, you will have to assign a
voice command to this function in your car kit phone. For
further information, see “Voice commands” on page 48.
Record
This option allows pieces of speech to be recorded and
automatically saves the recording.
To make a recording, with the display in standby:
aScroll with to the Recorder menu and press to
open it.
aScroll with to Record and press to select this
option.
aFollow the instructions shown on the display.
If you are engaged in an active call and wish to make a
recording:
aPress and hold to start recording.
aTo end the recording, press .
All tape recordings are stored and numbered (e.g. tape 1). To
view the list of recordings, with the display in standby:
aSelect the Recorder menu and press to open it.
aScroll with to the desired recording and press to
select it.
Two options are available for the recordings: Play and Delete.
aScroll to the desired option and press to select it.
aFollow the instructions shown on the display.
Play
You can play back a selected recording.
Delete
You can use this option to erase a recording in order to make
room for new tapes.

Bluetooth wireless technology
Copyright © 2004 Nokia. All rights reserved. 51
Bluetooth wireless technology
Bluetooth wireless technology is an
international standard for wireless
short-range communication, allowing
you to establish a wireless connection
between your car kit phone and a compatible device supporting
Bluetooth wireless technology. Such devices may include, for
example, mobile phone, a laptop computer or a wireless
headset.
Since devices with Bluetooth technology communicate using
radio waves, your car kit phone and the other device do not
need to be in direct line-of-sight. The two devices only need to
be within a maximum of 10 metres of each other, although the
connection can be subject to interference from obstructions
such as the car body or from other electronic devices.
The car kit phone supports Bluetooth SIM Access Profile
technology for wireless access to the remote SIM card of a
compatible mobile phone and the Bluetooth headset feature for
wireless connection of a compatible headset.
yIf you wish to use this function, make sure that both the car
kit phone and the other device supporting Bluetooth
technology are switched on. There may be restrictions on
using such devices in some countries. Check with your local
authorities. The connection via Bluetooth wireless
technology is not subject to separate charges.
Activating and deactivating Bluetooth
The Bluetooth function is always activated in your car kit
phone. However, in other devices with Bluetooth technology,
e.g. mobile phones, Bluetooth may have to be activated or
deactivated in the device. Make sure that Bluetooth is active in
all devices supporting Bluetooth wireless technology that you
wish to use with your car kit phone.
For further information, see the user’s guide applicable for the
device with Bluetooth technology that you are using.
Searching for accessories with Bluetooth
technology
This feature allows you to search for accessories which support
Bluetooth wireless technology, e.g. a cordless headset with
Bluetooth technology in your car:
aTo begin searching, with the display in standby, scroll with
to the Bluetooth menu and press to open it.
aScroll with to Search for audio enhancem. and press
to select this option.
The car kit phone will now begin to search for accessories
supporting Bluetooth wireless technology. Devices responding
to this interrogation will be shown on a list, with the device
found last listed at the bottom.
aScroll with through the list.
xA wireless headset with Bluetooth technology can only be
found by the car kit phone if there is no active Bluetooth
wireless connection from the wireless headset to another
compatible device supporting Bluetooth technology. There-

Bluetooth wireless technology
52 Copyright © 2004 Nokia. All rights reserved.
fore, to switch over to a wireless headset with Bluetooth
technology, you may need to break an existing Bluetooth
wireless connection, for example, to a mobile phone.
yFor further information on searching for devices with Blue-
tooth technology, see “Download contacts” on page 56 and
“User settings” on page 58.
If you wish to start Bluetooth pairing with a selected device
supporting Bluetooth technology:
aPress .
Pairing using a Bluetooth passcode
To create a connection using Bluetooth wireless technology,
you will need to exchange Bluetooth passcodes with the device
you are connecting to for the first time. This operation is called
pairing. The Bluetooth passcode is a 1- to 16-character-long
numeric code.
If the devices have been successfully paired, you will not need
to repeat this procedure when establishing further Bluetooth
wireless connections between the devices. Some devices come
with a fixed Bluetooth passcode that is supplied with the
device. Please refer to the user’s guide that is applicable for the
accessory that you are using. When prompted by the car kit
phone, enter this passcode.
If a fixed passcode is not supplied with a device with Bluetooth
technology (e.g. a mobile phone) or the passcode prompt does
not appear on the car kit phone display, you can make up a
suitable passcode. When prompted, enter this passcode into the
two devices sharing a Bluetooth connection. Then follow the
instructions shown on the displays of the two devices.
If the car kit phone has found a compatible mobile phone which
supports the Bluetooth SIM Access Profile standard, you will be
prompted to enter a special Bluetooth passcode. In this case,
the car kit phone will show a randomly chosen 16-character-
long numeric code on the display, which you now have to key
into the compatible mobile phone to be paired with the car kit
phone. Note that you will have to be prepared to do this quickly.
This passcode is used only once and you do not have to
memorise it.

Bluetooth wireless technology
Copyright © 2004 Nokia. All rights reserved. 53
yThe wireless connection using Bluetooth SIM Access Profile
technology meets the high security requirements demanded
for Bluetooth technology. For this reason, use of a 16-
character-long numeric code is mandatory when two
devices are to be paired with Bluetooth SIM Access Profile
technology.
yIf the compatible mobile phone supporting Bluetooth SIM
Access Profile technology should itself generate a random
16-character-long numeric passcode, you can use this
passcode if desired. To do so, within 3 seconds delete the
Bluetooth passcode on the car kit phone display by pressing
and then enter the 16-character-long numeric code
from the mobile phone into the car kit phone using the Navi
wheel number editor.
View active devices with Bluetooth technology
To show the currently active devices with Bluetooth technology
that are sharing a connection with your car kit phone, with the
display in standby:
aScroll with to the Bluetooth menu and press to
open it.
aScroll with to View active devices and press to
select this option.
If desired, you can end an existing Bluetooth wireless
connection between two devices in this menu.
View paired devices
You can view a list of Bluetooth wireless technology paired
devices by selecting this option. Some of the options below may
be available depending on the status of the device or the
connection:
aTo view the list of paired devices, with the display in
standby, scroll with to the Bluetooth menu and press
to open it.
aScroll with to View paired devices and press to
select this option.
aThe list of paired devices will be shown on the display. Scroll
with to the desired compatible device and press
to select it.
aScroll with to the desired option and press to
select it.
aFollow the instructions shown on the display.
xNote that the latest pairing will be listed at the top.
Create connection
This option establishes a wireless connection to a paired device
with Bluetooth technology.
Delete pairing
Select this option to remove a device from the list of paired
devices with Bluetooth technology.

Bluetooth wireless technology
54 Copyright © 2004 Nokia. All rights reserved.
Request authorisation
You can define whether the connection from the paired device
is to be established automatically (No) or whether the car kit
phone is to ask for authorisation before pairing (Yes) when the
device to be paired comes within Bluetooth range of the car kit
phone.
Edit Bluetooth name
Select this option to change the name of the device with
Bluetooth technology which is paired with your car kit phone.
Use the Navi wheel text editor to make the desired changes.
aTo view the list of paired devices, with the display in
standby, scroll with to the Bluetooth menu and press
to open it.
aScroll with to View paired devices and press to
select this option.
aThe list of paired devices will be shown on the display. Scroll
with to the desired compatible device and press
to select it.
aScroll with to Bluetooth name and press to
select this option.
aThe name of the device selected will appear on the display.
Press to confirm the selection.
aThe message Edit Bluetooth name? is shown on the display.
aScroll with to the desired option Yes or No and press
to select it.
If you have selected Yes, the Bluetooth name currently in use
will be displayed.
aTo delete characters in the name, press .
aUse the Navi wheel text editor and scroll with to
select the desired characters and press to enter them.
aWhen you have finished entering the desired name, press
to save it.
aThe message Entry completed? will appear on the display.
Press to confirm.

Bluetooth wireless technology
Copyright © 2004 Nokia. All rights reserved. 55
The car kit phone’s Bluetooth name
Use this option to change your car kit phone’s Bluetooth device
name, which is shown to others. The factory setting is Nokia
610.
aTo view the name of the car kit phone scroll with to
the Bluetooth menu and press to open it.
aScroll with to Bluetooth name and press to
select this option.
aThe name of the car kit phone will appear on the display.
Press to confirm the selection.
aThe message Edit Bluetooth name? is shown on the display.
aScroll with to the desired option Yes or No and press
to select it.
aUse the Navi wheel text editor to change the Bluetooth
name of the car kit phone as desired.
Car kit phone visibility
In order to be able to establish a Bluetooth wireless connection
between two compatible devices with Bluetooth technology,
the visibility of the Bluetooth devices must first be activated.
yMake sure that the Bluetooth function is activated in all
compatible devices with Bluetooth technology to be used
and that the visibility has been set to "Shown to all". For
further information, see the user’s guide applicable for the
compatible device with Bluetooth technology that you are
using.
You can activate or deactivate the visibility of the car kit phone.
The factory setting is on.
aTo change the visibility of your car kit phone, with the
display in standby, scroll with to the Bluetooth menu
and press to open it.
aScroll with to Visibility and press to select this
option.
aScroll with to the desired option On or Off and press
to select it.
yEven if you car kit phone’s visibility has been activated, it
will not be visible for other Bluetooth devices if it is part of
an existing Bluetooth wireless connection. To make your car
kit phone visible while is it engaged in an existing Bluetooth
wireless connection, select the option Allow second
connection.
Second Bluetooth connection
This setting is required if your car kit phone is to be visible for
other devices with Bluetooth technology while it is being used
in an existing Bluetooth SIM Access Profile wireless connection
to a compatible mobile phone. This feature interrupts the
existing Bluetooth SIM Access Profile wireless link for a short
time so that, during this interval, other devices with Bluetooth
technology (e.g. a laptop) can request a wireless connection via
Bluetooth technology, before the car kit phone then
automatically re-establishes the Bluetooth SIM Access Profile
connection to the compatible mobile phone.

User data
56 Copyright © 2004 Nokia. All rights reserved.
yWhen this setting is selected, the car kit phone will be
visible for other Bluetooth devices for a period of time of 30
seconds before the original Bluetooth wireless connection is
re-established.
yWhen your car kit phone is not connected to a compatible
device using Bluetooth wireless technology, its visibility for
other Bluetooth devices depends on the setting made in the
Visibility menu. In this case, it is not necessary to select the
second Bluetooth connection option, for example, in order
to establish a wireless connection from a device such as a
laptop with Bluetooth technology to the car kit phone.
aTo access this option, with the display in standby, scroll with
to the Bluetooth menu and press to open it.
aScroll with to Allow second connection and press
to select this option.
aScroll with to the desired option Yes or No and press
to select it.
User data
The car kit phone can store and administrate data or settings
under two different user data profiles. A user profile, for
example, includes contact entries, name tags and voice
commands or car kit phone settings. Now two users sharing the
car can access their personalised user data using the same SIM
card simply by activating their personal user profile.
yThe indicator for the currently active user profile is shown in
the status row of the display. If user profile 1 is active, a
small black phone icon is shown; user profile 2 is indicated
by a small white phone icon if active. One of the user
profiles is active in the car kit phone at all times. When the
car kit phone is put into service for the first time, user
profile 1 is active.
Download contacts
You can use this feature to copy contact entries from the car
SIM card inserted in the car kit phone or from a compatible
mobile phone supporting Bluetooth wireless technology to the
car kit phone memory.
yThis feature is important because you do not have direct
access to the contact entries stored on a car SIM card
inserted in the car kit phone. To access these numbers, you
first need to copy them into the car kit phone memory.
Follow the instructions shown on the display.
aWith the display in standby, press to access these
settings.

User data
Copyright © 2004 Nokia. All rights reserved. 57
aScroll with to the User data menu and press to
open it.
aScroll with to Download contacts and press to
select this option.
If you are operating your car kit phone using a remote SIM card,
the contacts stored in the compatible mobile phone will be
copied direct to the car kit phone. For further information, see
“User settings” on page 58.
If you are operating your car kit phone using the car SIM card
inserted in the radio unit, three options will be available for
selection: View paired devices, Car SIM card and Search for
Bluetooth devs..
aScroll with to the desired option and press to
select it.
Paired devices with Bluetooth technology
aScroll with to the compatible mobile phone with
Bluetooth technology (name will be displayed in the list of
paired devices) whose contacts you wish to download via
the wireless Bluetooth connection to the car kit phone
memory.
aPress to begin copying the entries.
yIf you use Bluetooth technology functions regularly, you can
deactivate the option "Authorisation request" in the
compatible mobile phone. Then connections between the
devices via Bluetooth wireless technology can conveniently
be made automatically without separate acceptance or
authorisation. To do so, scroll to the menu item View paired
devices and select the option Request authorisation and set
it to Off. For further information, see the user’s guide
applicable for the compatible mobile phone with Bluetooth
technology that you are using.
Car SIM card
aPress to copy the contacts from the car SIM card
inserted in the radio unit to the car kit phone memory.
Searching for devices that support Bluetooth technology
aScroll with to the option Search for Bluetooth devs.
and press to select it, if you wish to carry out the
download from a device that has not yet been paired with
the car kit phone.

User data
58 Copyright © 2004 Nokia. All rights reserved.
Change user
You may save two user profiles in your car kit phone to be used
as desired. The settings for each user profile may be customised
to suit the particular needs of the user. The currently active
profile is shown on the display at all times using two indicators:
User 1
User 2
aWith the display in standby, press to access the menu.
aScroll with to the User data menu and press to
open it.
aScroll with to the option Change to user 1 or Change
to user 2 and press to select it.
aThe user profile selected will be activated.
You may be prompted to enter the PIN code belonging to the
remote SIM card.
yYou may change whether the PIN code of the remote SIM
card is to be saved at any time desired by selecting the
menu item Assign SIM card. For further information, see
“Assign SIM card” on page 58.
xIf you should change the PIN code of the remote SIM card in
the mobile phone at a later time, the wrong PIN code of the
remote SIM card will be used the next time you switch on
the car kit phone if this option has been activated. You will
then be prompted by the car kit phone to enter the changed
PIN code. Please note that you may only repeat this twice
before the SIM card will be blocked.
User settings
This feature lets you make the desired settings for the active
user profile and the contacts to be downloaded using Bluetooth
wireless technology. A user profile will be personalised as soon
as you have assigned a SIM card to it. You may assign either the
car SIM card or a remote SIM card as desired.
aWith the display in standby, press to access the menu.
aScroll with to User data and press to select this
item.
aScroll with to Settings for user 1 or Settings for user
2 and press to select this item.
The following options are available for selection: Assign SIM
card, View active SIM card and Download settings.
aScroll with to the desired option and press to se-
lect it.
Assign SIM card
yAn active user profile always has a SIM card assigned to it.
When personalising user profile 1 or 2 for the first time,
observe the information set out in “Getting started” on
page 19.
To assign a new SIM card to the car kit phone, select one of the
following options:
aNames of paired devices, Car SIM card and Search for
Bluetooth devs.
aScroll with to the desired option and press to se-
lect it.

User data
Copyright © 2004 Nokia. All rights reserved. 59
Names of paired devices
If you select a mobile phone from the list of paired mobile
phones, the car kit phone will establish a Bluetooth SIM Access
Profile connection to the paired mobile phone and you may be
prompted to enter the PIN code belonging to the remote SIM
card installed in the paired mobile phone.
The car kit phone will then ask if you wish to save the PIN code
you have just entered for a later automatic connection or
whether it is to request authorisation the next time a Bluetooth
wireless link is to be made.
xIf the operating voltage is interrupted, the PIN code of the
remote SIM card stored in the car kit phone will be erased
from the memory. If you decide to save the PIN code, you
should be aware that this is done at your own risk.
Car SIM card
If you select this option, the car SIM card inserted in the radio
unit will be assigned to the active user profile. If the feature
requesting you to enter the PIN code at power on is active, you
will be prompted to enter the PIN of the car SIM card.
xSome service providers may allow you to switch off the
prompt requesting you to enter the PIN at power on. Check
with your service provider.
Search for Bluetooth phone
Select this option to assign a remote SIM card installed in a
compatible mobile phone that has not yet been paired with the
car kit phone to the active user profile. The car kit phone will
then search only for mobile phones with Bluetooth SIM Access
Profile technology which are in range and will display the
related names in the list of Bluetooth devices. Select a device,
pair it with the car kit phone and proceed as described in
“Names of paired devices” on page 59.
View active SIM card
Select this option to view the name of the compatible mobile
phone whose remote SIM card is assigned to the active user
profile.

User data
60 Copyright © 2004 Nokia. All rights reserved.
Download settings
You can copy contact data from any compatible mobile phone
that supports Bluetooth wireless technology to your car kit
phone. Your car kit phone offers you three convenient options:
pSIM and phone mem.
This is the default setting that lets you copy both the
contact data from the mobile’s SIM card and from the
phone memory to the car kit phone memory.
pSIM memory
Select this option should you wish to download only the
contact data from your mobile phone’s SIM card to the car
kit phone.
pPhone memory
This option copies the entries stored in the phone memory
of your mobile to the car kit phone memory.

Receiving and forwarding business cards and calendar items
Copyright © 2004 Nokia. All rights reserved. 61
8. Receiving and forwarding
business cards and
calendar items
You can receive or forward data such as business cards or
calendar notes from or to a compatible mobile phone either via
Bluetooth wireless technology or in the form of a short
message.
Receiving a business card or calendar item
If you have received a business card or calendar note via
Bluetooth wireless technology or in the form of a short
message, you may select any of four options:
aPress to view the list of options.
View
This option allows you to view the business card or calendar
note received.
Save (for business cards only)
Select this option to save a business card in the car kit phone
memory. If a wireless Bluetooth SIM Access Profile link has
been established to a compatible mobile phone, the business
card will automatically be forwarded to the compatible mobile
phone.
Forward
You can forward a business card or calendar note that you have
received to a compatible device using Bluetooth wireless
technology or as a short message.
To forward a business card or calendar note:
aPress to confirm receipt of the message.
aScroll with to Forward and press to select this
option.
aScroll with to the desired transmission technology via
Bluetooth or Via text message and press to select it.
aScroll with to the compatible device which you wish
to send the message to and press to select it.
Save and Forward (for business card only)
Select this option to save a received business card in the car kit
phone memory and to forward it simultaneously to a
compatible mobile device using Bluetooth wireless technology
or as a short message. For further information see “Forward” on
page 61.
Discard
Select this option if you do not wish to save a business card or
calendar note.

Data transmission
62 Copyright © 2004 Nokia. All rights reserved.
9. Data transmission
GPRS (General Packet Radio Service)
GPRS is a technology that allows the car kit phone to be used
for sending and receiving data over the mobile network
(network service). GPRS as such is a data bearer that enables
wireless access to data networks such as the Internet.
Before you can use GPRS technology, you will need to subscribe
to the GPRS service. For details on the availability of and
subscription to the GPRS service, contact your network operator
or service provider.
For further information, see “GPRS modem settings (network
service)” on page 42.
HSCSD (High Speed Circuit Switched Data)
The car kit phone enables you to use GSM high-speed data
services (network service).
You can use high-speed functionality when your car kit phone
is connected to a compatible computer via Bluetooth wireless
technology and when the modem drivers supporting high-speed
data software are installed on the computer and selected as an
active modem. Modem driver software and installation help can
be found at the Nokia website: http://www.nokia.com.
For information on the availability of and subscription to high-
speed data services, please contact your network operator or
service provider.
Reference information
xRemember that the safety of operating a motor vehicle in
traffic requires the full attention of all motorists. Only use
the data transmission features offered by your car kit phone
if traffic conditions permit safe use, and check if local laws/
regulations restrict the use of mobile phones while driving.
Cellular transmission
Your car kit phone employs the data transmission capabilities of
the GSM network to send faxes, short messages, and e-mails
and to establish connections with remote computers (network
services).
GSM data capabilities of your car kit phone
We recommend that you move the car to a location where the
strongest possible cellular signal can be obtained. A stronger
signal allows more efficient data transmission.
Cellular data communications are subject to a number of
factors that may cause interference:
Noise
Radio interference from electronic equipment and devices or
from surrounding traffic may impact the transmission quality.
Handovers
As the car kit phone user moves from one network cell to
another, the signal strength of the channel drops and the
cellular telephone exchange may hand the user over to a
different cell and frequency where the signal is stronger. A cell

Reference information
Copyright © 2004 Nokia. All rights reserved. 63
handover may also occur when the user is stationary due to
varying cellular traffic loads. Such handovers may cause delays.
Dead spots and dropouts
Dead spots are areas where radio signals cannot be received.
Dropouts occur when the car kit phone user passes through an
area where the radio signal is blocked or reduced by geographic
or man-made obstructions such as hills or high buildings. The
consequences may be interruptions in service or the connection
may fail.
Low signal strength
Due to either distance from a base station or obstacles between
your car kit phone and the base station, the radio signal
strength from a cell site may not be strong or stable enough to
provide a reliable cellular connection for trouble-free reception
or transmission. Therefore, to ensure the best possible
communication, remember to take the following points into
consideration when using your car kit phone:
Data and fax transmission will work best when the car is
stationary as this ensures that the signal strength will remain
constant. Attempting cellular communication while in a moving
vehicle is not recommended. Fax transmission is more easily
impaired than data or short message transmission.
Check the signal strength on your car kit phone display. If the
cellular signals are not strong enough to support a voice call,
data connection should not be attempted until you can find a
location with better reception.

Installation
64 Copyright © 2004 Nokia. All rights reserved.
10. Installation
Your Nokia 610 car kit phone
The Nokia 610 car kit phone is designed for installation in motor
vehicles. The sales package contains a convenient handsfree
feature which allows you to make calls without holding the
phone to your ear, a separate input device for ease of use and
an easy-to-read display.
Car kit phone equipment installation in the cockpit
xThe Nokia 610 car kit phone may only be installed by a
qualified service technician using the approved original
Nokia parts supplied in the sales package. Please note that
non-observance of this requirement will result in loss of
warranty. End users should remember that the car kit phone
comprises complex technical equipment that requires
professional installation using special tools and expert
know-how.
xNote that the instructions contained in this installation
guide are general guidelines which apply for the installation
of the car kit phone in an automobile. However, due to the
wide variety of car types and models available on the
market, this guide cannot consider the individual technical
requirements relevant for any particular vehicle. Contact
the vehicle manufacturer for further detailed information
about the vehicle in question. For information on
installation locations for the car kit phone equipment, visit
the Nokia website at http://www.nokia.com.
For important safety information and/or instructions on the
operation, care and maintenance of your car kit phone, see
“Important safety information” on page 70 and “Care and
maintenance” on page 69.
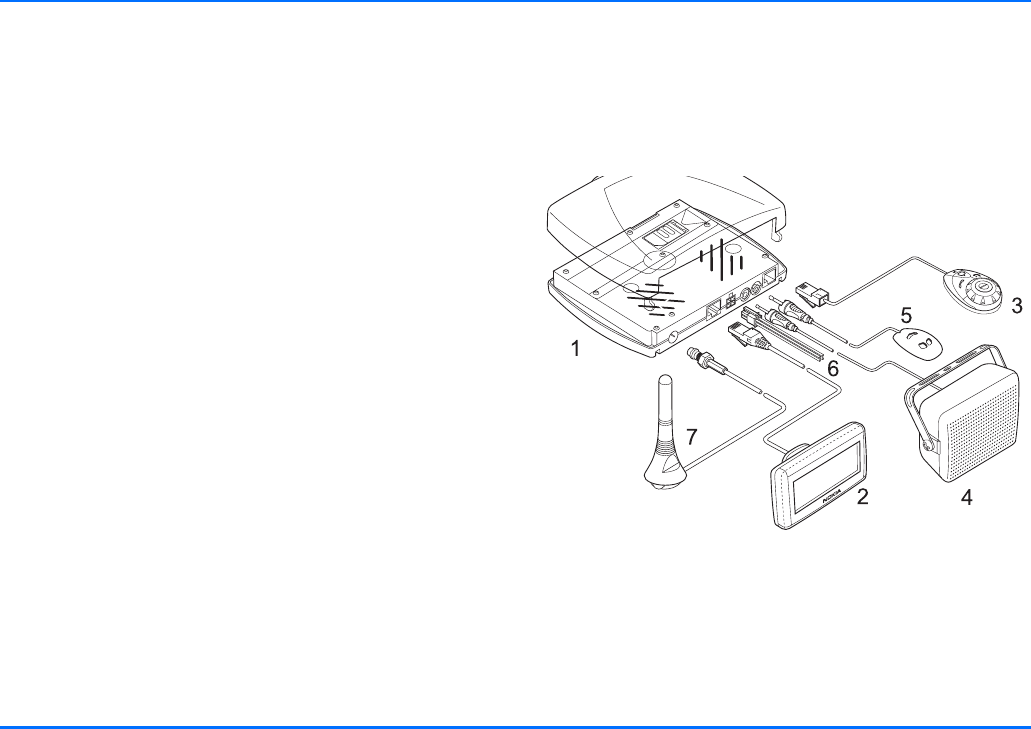
Safety first
Copyright © 2004 Nokia. All rights reserved. 65
Safety first
xThe basic safety guidelines set out below are to be observed
when installing the car kit phone.
pMake sure that the car ignition is off and disconnect the car
battery before beginning with the installation work and
ensure that it cannot be reconnected inadvertently.
pDo not smoke when working on the car. Make sure that
there is no source of fire or flame nearby.
pTake care not to cause damage to electrical cables, fuel or
brake lines or safety equipment during installation work.
pMake sure not to impact the steering or braking systems or
other key systems essential for proper operation of the car
when installing car kit phone equipment. Check to make
sure that deployment of the airbag is not blocked or
impaired in any way.
pRF signals may affect improperly installed or inadequately
shielded electronic systems in motor vehicles (e.g. electronic
fuel injection systems, electronic anti-skid braking systems,
electronic speed control systems, airbag systems). Should
you note a fault or change in the operation of such a
system, contact your car dealer.
pThe car kit phone may only be used at an operating voltage
of 12 V with the minus pole earthed. Failure to observe this
requirement may result in damage to the car’s electronics
system.
pDo not operate your car kit phone off the car battery for a
longer period of time, i.e. with the engine switched off, as
this may cause your battery to run dry.
pIn order to comply with RF exposure requirements for
mobile transmitting devices, a minimum separation
distance of 20 cm must be maintained between the antenna
and all persons.
Mounting
Nokia 610 car kit phone
Radio unit TFE-4 (Pos.1)
We recommend that you mount the radio unit TFE-4 at a less
visible position in the car interior. However, ensure that the unit
is installed to permit easy access to the SIM card so that it can
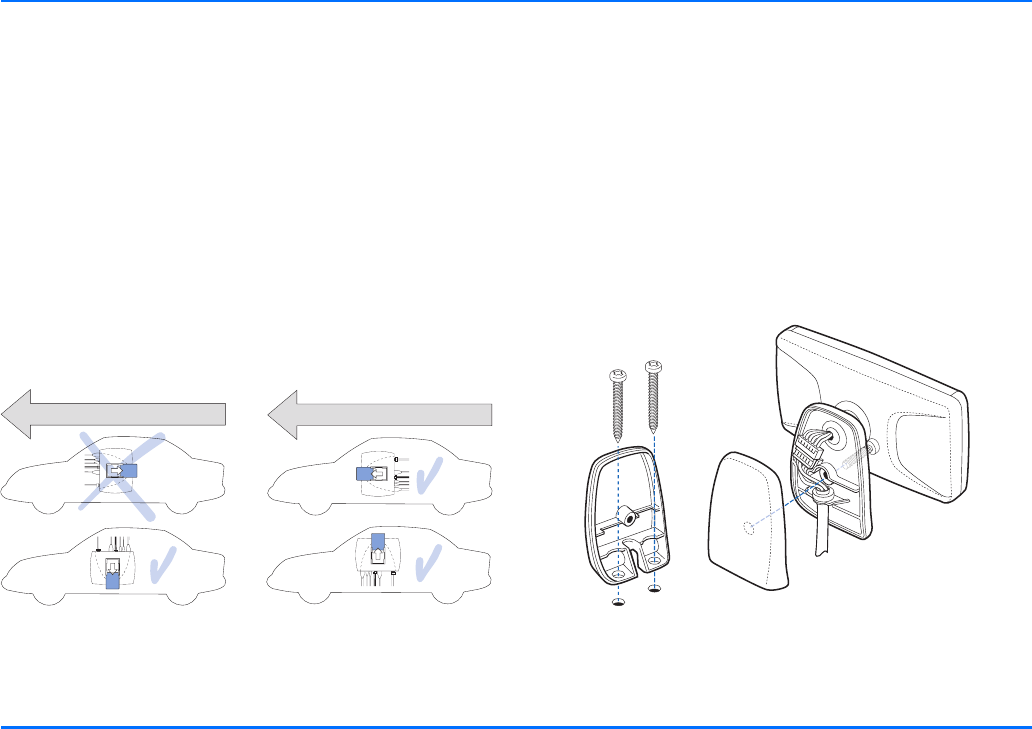
Mounting
66 Copyright © 2004 Nokia. All rights reserved.
be changed if necessary and make sure that the cables for the
microphone and loudspeaker will reach the places you intend to
mount these components.
When mounting the radio unit, use the bracket which is
included in the scope of supply: the unit will clip securely onto
the bracket if mounted correctly.
xMake sure to mount the radio unit in such a way that a con-
nection using Bluetooth technology can be established to a
compatible device.
xWhen installing the radio unit, make sure to mount the bra-
cket in such a way that the unit slides into place towards
the front of the car or is mounted sideways. Otherwise the
unit may break loose if you have an accident and cause in-
jury or damage.
How to mount the radio unit in the car
Display SU-11 (Pos.2)
The mount for the display unit is to be fixed to the dashboard or
to any other location in the cockpit area where the display is
clearly visible for the user but does not impair control or
operation of the vehicle.
Your service technician may be able to provide you with
information on alternatives for mounting the display unit
suitably in your vehicle without requiring boreholes. You will
find further information on suitable mounting locations at the
Nokia website http://www.nokia.com.
Remember that all equipment must be mounted so that it does
not interfere with the operation of the vehicle.
How to mount the display

Mounting
Copyright © 2004 Nokia. All rights reserved. 67
Input device CUW-3 (Pos.3)
The input device comes with a mount that is to be fixed in a
suitable location where it is easily accessible for the user.
However, take particular care to ensure that the input device
will not interfere with the driver’s operation of the vehicle.
Make sure that the cable will reach to the radio unit for
connection.The best location to mount the input device is
horizontally on the console between the driver’s and front
passenger’s seats.
Loudspeaker SP-2 (Pos.4)
To ensure good acoustic quality, mount the loudspeaker so that
it is pointed in the user’s direction. We recommend that you
mount the loudspeaker a minimum distance of 1 metre away
from the microphone to avoid feedback. The loudspeaker output
of the car kit phone is direct current free.
Microphone HFM-8 (Pos.5)
xUse of any other microphone than the microphone supplied
with the car kit phone (HFM-8) may impact the
transmission quality.
Mount the handsfree microphone approx. 30 cm from the user’s
head, and position it so that it points towards the user’s mouth.
Experience has shown that the best locations are near the
rearview mirror or to the left of the sun visor. Check to make
sure the microphone does not impair control or operation of the
vehicle. We recommend that you keep the microphone a
minimum distance of 1 metre away from the car kit phone
loudspeaker to avoid feedback.
Use the double-sided adhesive tape supplied to fix the
microphone as this will prevent noise from the car body being
transmitted into the interior. Take care to mount the
microphone so that it is not exposed to air streams from the
vents. Do not lay the microphone cable in the heating,
ventilation or AC system.
If the mute radio cable has been connected, when you accept
an incoming call or when an outgoing call is established, the
system will automatically mute your car radio and the call will
be switched over to the car kit phone loudspeaker.
System cable PCU-4 (Pos.6)
The system cable connects the car kit phone to the car’s
electronics system. See the wiring diagram for exact
instructions.
xWhen laying the cables, take care to position them so that
they are located as far as possible from the electronics
systems installed in your car in order to avoid
electromagnetic interference.
Ensure that cables are placed so that they will not be
subjected to mechanical wear and tear (e.g. not laid under
car seats or over sharp edges).

Equaliser settings
68 Copyright © 2004 Nokia. All rights reserved.
GSM antenna (Pos.7)
(not included in the scope of supply)
Your car kit phone is designed to be connected to an external
GSM antenna. However, if your car is equipped with a
compatible radio/GSM antenna with a frequency separating
filter, this may be used instead.
If your car does not come with a GSM antenna, please contact
your dealer for information on the best location for mounting
and for the relevant installation guidelines.
Equaliser settings
Your car kit phone supports a variety of options for output over
a loudspeaker:
pDirect connection to the SP-2 loudspeaker supplied in the
sales package.
pConnection to a compatible car radio loudspeaker over an
additional relay that switches audio output over to the
loudspeaker (not included in the scope of supply).
pConnection to the compatible car radio loudspeakers via the
line-in input of your car radio. You will need to adjust the
audio level suitably if this option is selected.
aTo make the desired settings, select the Settings menu.
aScroll with to the item Equaliser settings and press
to select it.
aScroll with to the desired option and press to
select it.
Function test
After your car kit phone has been installed, it needs to be
checked to ensure that it is working properly. When testing the
operation of the equipment, also check that it has been
mounted so that it in no way impairs the driver during
operation of the vehicle.
xTo make a wireless connection between your car kit phone
and a compatible accessory with Bluetooth technology,
ensure that the devices are within the range necessary for
Bluetooth transmission. Remember that external devices
need to be supplied with sufficient power for this feature
(check the battery pack).
Scope of supply
pRadio unit TFE-4
pDisplay SU-11
pInput device CUW-3
pLoudspeaker SP-2
pMicrophone HFM-8
pSystem cable PCU-4

Care and maintenance
Copyright © 2004 Nokia. All rights reserved. 69
11. Care and maintenance
Your car kit phone is a product of superior design and
craftsmanship and should be treated with care. The suggestions
below will help you to fulfil any warranty obligations and to
enjoy this product for many years.
pKeep the car kit phone and all its parts and enhancements
out of the reach of small children.
pKeep the car kit phone dry. Precipitation, humidity, and all
types of liquids or moisture can contain minerals that will
corrode electronic circuits.
pDo not use or store the car kit phone in dusty, dirty areas. Its
moving parts can be damaged.
pDo not store the car kit phone in hot areas. High
temperatures can shorten the life of electronic devices,
damage batteries, and warp or melt certain plastics.
pDo not store the car kit phone in cold areas. When it warms
up (to its normal temperature), moisture can form inside,
which may damage electronic circuit boards.
pDo not attempt to open the car kit phone. Non-expert
handling may damage it.
pDo not drop, knock or shake the car kit phone. Rough
handling can break internal circuit boards.
pDo not use harsh chemicals, cleaning solvents or strong
detergents to clean the car kit phone.
pDo not paint the car kit phone. Paint can clog the moving
parts and prevent proper operation.
pUse only an approved antenna. Unauthorised antennas,
modifications or attachments could damage the car kit
phone and may violate regulations governing radio devices.
All of the above suggestions apply equally to your car kit phone
or any enhancement. If any of them is not working properly,
take it to your nearest qualified service facility. The personnel
there will assist you and, if necessary, arrange for service.

Important safety information
70 Copyright © 2004 Nokia. All rights reserved.
12. Important safety information
Traffic safety
Remember that the safety of operating a motor vehicle in
traffic requires the full attention of all motorists. Only use the
features offered by your car kit phone if traffic conditions
permit safe use.
Remember: road safety always comes first!
Operating environment
Remember to follow any special regulations in force in any area
and always switch off your car kit phone whenever it is
forbidden to use it, or when it may cause interference or
danger.
Electronic devices
Most modern electronic equipment is shielded from radio
frequency (RF) signals. However, certain electronic equipment
may not be shielded against the RF signals from your car kit
phone.
Pacemakers
Pacemaker manufacturers recommend that a minimum
separation distance of 20 cm be maintained between the
vehicle antenna and a pacemaker to avoid potential
interference with the pacemaker. These recommendations are
consistent with the independent research by and
recommendations of Wireless Technology Research.
If you have any reason to suspect that interference is taking
place, switch your car kit phone over to off mode immediately.
Potentially explosive atmospheres
Switch your car kit phone over to off mode, see “Off mode” on
page 22, when in any area with a potentially explosive
atmosphere and obey all signs and instructions. Sparks in such
areas could cause an explosion or fire resulting in bodily injury
or even death.
Users are advised not to use the car kit phone when at a
refuelling point. Remember to observe the restrictions on the
use of radio equipment in fuel depots (fuel storage and
distribution areas), chemical plants or where blasting
operations are in progress.
Areas with a potentially explosive atmosphere are often, but
not always, clearly marked. They include below deck on boats,
chemical transfer or storage facilities, vehicles using liquified
petroleum gas (such as propane or butane), areas where the air
contains chemicals or particles such as grain, dust or metal
powders, and any other area where you would normally be
advised to turn off your vehicle engine.
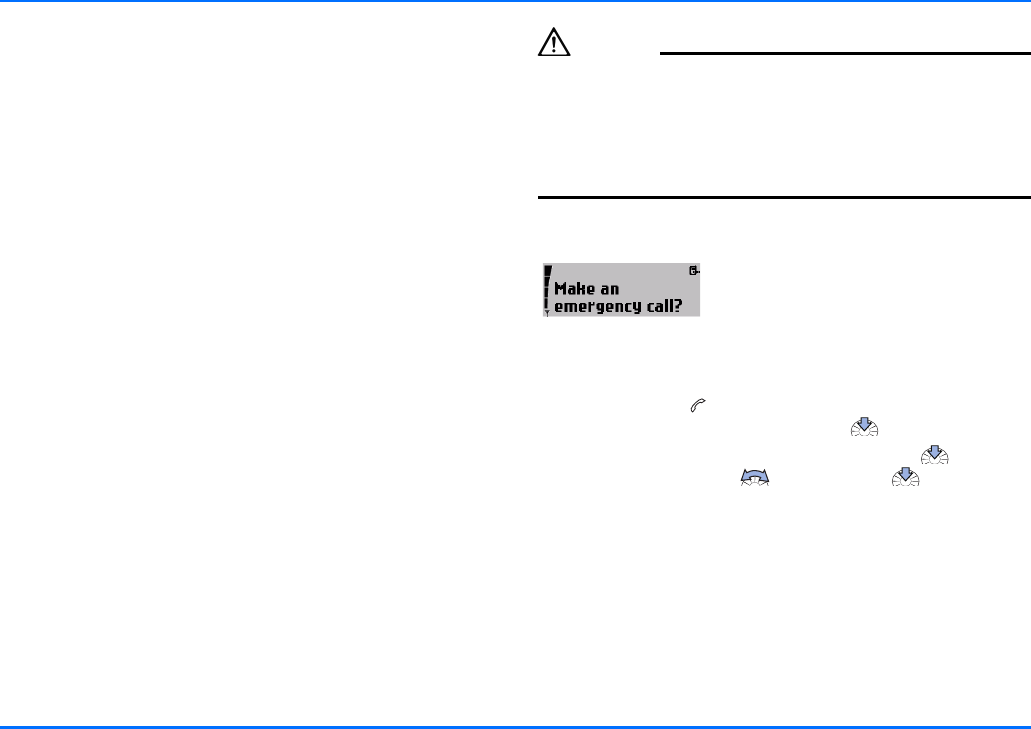
Vehicles
Copyright © 2004 Nokia. All rights reserved. 71
Vehicles
Only qualified personnel should service the phone or install the
car kit phone in a vehicle. Faulty installation or service may be
dangerous and may invalidate any warranty which may apply to
the unit.
Check regularly that all wireless phone equipment in your
vehicle is mounted and operating properly.
Do not store or carry flammable liquids, gases or explosive
materials in the same compartment as the phone, its parts or
accessories.
For vehicles equipped with an air bag, remember that an air bag
inflates with great force. Do not place objects, including both
installed or portable wireless equipment in the area over the air
bag or in the air bag deployment area. If in-vehicle wireless
equipment is improperly installed and the air bag inflates,
serious injury could result.
Failure to observe these instructions may lead to suspension or
denial of telephone services to the offender, or legal action or
both.
Emergency calls
Emergency calls may not be possible on all wireless phone
networks or when certain network services and/or phone
features are in use. Check with local service providers.
Caution!
This car kit phone, like any wireless phone, operates using radio
signals, wireless and landline networks as well as user-
programmed functions. Because of this, connections in all
conditions cannot be guaranteed. Therefore, you should never
rely solely upon any wireless phone for essential
communications (e.g. medical emergencies).
To make an emergency call
If the phone or car ignition is not on,
switch it on. Check for adequate signal
strength.
Some networks may require that a valid
SIM card is properly inserted in the
phone.
aPress and hold until Make an emergency call? is shown
on the display. Confirm by pressing .
aConfirm the security inquiry Yes by pressing or cancel
by selecting No with and pressing .
When making an emergency call, remember to give all the
necessary information as accurately as possible. Remember that
your car kit phone may be the only means of communication at
the scene of an accident - do not cut off the call until given
permission to do so.
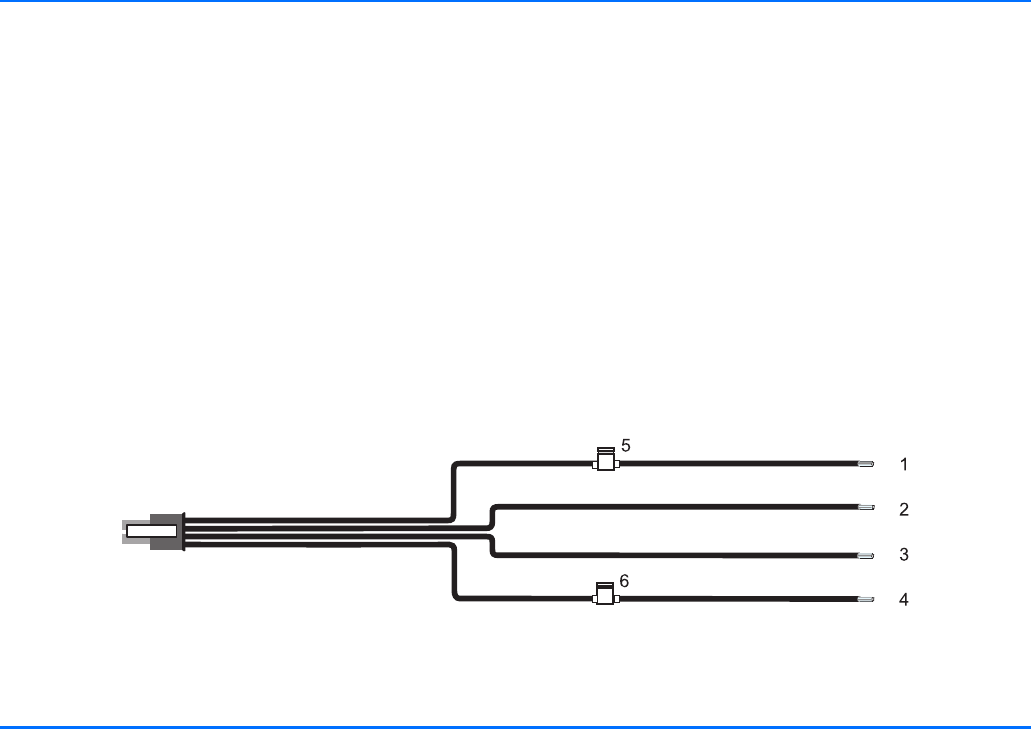
Technical data
72 Copyright © 2004 Nokia. All rights reserved.
13. Technical data
Battery voltage
12.6 V DC (10.8 – 16 V DC)
Negative potential to ground (GND).
Current consumption
1.5 A maximum (off mode 1 mA)
Transmitting power
EGSM 900: 3.2 mW – 2 W
DCS 1800: 1.0 mW – 1 W
System cable PCU-4
System cable wiring
1. +12V car battery +, red
2. Ground (car battery -), black
3. Car radio mute, yellow
4. Car ignition sense, blue
5. 2A fuse
6. 1A fuse

Glossary
Copyright © 2004 Nokia. All rights reserved. 73
14. Glossary
Bluetooth SIM Access Profile
SIM Access Profile is an international de-facto Bluetooth
standard which allows wireless access to the remote SIM card
of a compatible mobile phone using Bluetooth technology.
Car SIM card
The car SIM card is inserted in the SIM card reader in the Nokia
car kit phone.
DTMF tones
You can use DTMF (Dual Tone Multi-Frequency) tones to
communicate with voice mailboxes, computerised telephony
systems, etc. The tones can be selected by using the Navi wheel
number editor to scroll to the numbers 0-9.
GPRS
GPRS (General Packet Radio Service) enables wireless data
transmission. For wireless access to data networks, you will
need a GPRS access point from your network operator or service
provider. For further information, see “GPRS (General Packet
Radio Service)” on page 62.
GSM
GSM, the Global System for Mobile Communication, is the
technical standard for mobile radio networks.
HSCSD
HSCSD (High Speed Circuit Switched Data) makes data
connections faster for attractive GSM data services. For further
information, see “HSCSD (High Speed Circuit Switched Data)”
on page 62.
IMEI
The IMEI is the serial number of your device and is supplied with
the car kit phone.
PIN code
The PIN (Personal Identification Number) is a 4- to 8-digit code
which protects your SIM card from unauthorised use. The PIN
code is supplied with the SIM card. For further information, see
“Access codes required for the car SIM card” on page 14.
PUK code
The PUK (Personal Unblocking Key) is an 8-digit code which is
required to change a disabled PIN code.
The PUK code is supplied with the SIM card. If you lose the code
or it has not been provided with the SIM card, contact your
network operator.
Remote SIM card
The remote SIM card is inserted in the SIM card reader of the
compatible mobile phone connected to the car kit phone over a
Bluetooth SIM Access Profile wireless connection.

Glossary
74 Copyright © 2004 Nokia. All rights reserved.
SIM card
The SIM (Subscriber Identity Module) card contains all the
information the cellular network needs to identify the network
user. The SIM card also contains security-related data.
SMS
The network service SMS (Short Message Service) allows you to
send short text messages (of up to 160 characters) to mobile
phones and to receive short text messages from other mobile
users if this service is enabled.
SMSC number
The SMSC (Short Message Service Centre) number is needed for
sending of short messages.
