Nortel Networks ASPRO NETWAVE AIRSURFER PRO WLAN PC CARD, MODEL 1100-600 User Manual 01 PR PCUG
Nortel Networks NETWAVE AIRSURFER PRO WLAN PC CARD, MODEL 1100-600 01 PR PCUG
Users manual

AIRSURFER® PRO
WIRELESS LAN PC CARD
IEEE 802.11 Standard Compliant
USER’S GUIDE
®

FCC NOTICE
This equipment has been tested and found to comply with the limits for a Class B digital device,
pursuant to Part 15 of the FCC Rules. These limits are designed to provide reasonable protection
against harmful interference in a residential installation. This equipment generates, uses and can
radiate radio frequency energy and, if not installed and used in accordance with the instructions,
may cause harmful interference to radio communications. However, there is no guarantee that
interference will not occur in a particular installation. If this equipment does cause harmful
interference to radio or television reception, which can be determined by turning the equipment
off and on, the user is encouraged to try to correct the interference by one or more of the
following measures:
• Reorient or relocate the receiving antenna.
• Increase the separation between the equipment and receiver.
• Connect the equipment into an outlet on a circuit different from that to which the receiver is
connected.
• Consult the dealer or an experienced radio/TV technician for help.
Changes or modifications not expressly approved in writing by Netwave Technologies, Inc. may
void the user’s authority to operate this equipment.
This device complies with RSS-210 of Industry and Science Canada. Operation is subject to the
following two conditions: (1) this device may not cause interference, and (2) this device must
accept any interference, including interference that may cause undesired operation of the device.
Netwave reserves the right to make improvements and/or changes in the products and programs
described in this User’s Guide at any time without notice.
The software described in this User’s Guide is furnished under a license and may be used or copied
only in accordance with such license.
©1998 Netwave Technologies, Inc. All rights reserved. Neither this publication nor any part of
this publication may be copied, photocopied, reproduced, translated or reduced to any electronic
medium or machine readable form without the prior written permission of Netwave.
Netwave® and AirSurfer® are a trademarks of Netwave Technologies, Inc. All other trademarks
used in this publication are the property of their respective trademark holders.

CONTENTS
QUICK INSTALLATION GUIDE FOR WINDOWS 95
................. 1
QUICK INSTALLATION GUIDE FOR WINDOWS NT
................. 3
INTRODUCTION
................................................................ 5
Software .......................................................................... 6
Introduction to Netwave Networking ............................... 6
HARDWARE INSTALLATION
............................................. 11
Unpacking and Inspection ............................................. 11
Package Contents ......................................................... 11
Additional Requirements ............................................... 12
Netwave AirSurfer PC Card Installation ........................ 12
Inserting the AirSurfer PC Card .................................... 12
Removing the AirSurfer PC Card .................................. 13
SYSTEM SETUP AND CONFIGURATION
.............................. 15
Netwave AirSurfer Networks ......................................... 15
How to Modify the SSID ................................................ 16
Card and Socket Services............................................. 18
NETWORK DRIVER INSTALLATION
.................................... 19
Network Drivers............................................................. 19
Installation for Microsoft Windows 95............................ 20
Installation for Microsoft Windows NT ........................... 22
NETWORK DRIVER REMOVAL
.......................................... 25
NETWAVE AIRSURFER PRO UTILITIES
............................... 31
Planning the Netwave Site ............................................ 32
DIAGNOSTICS AND TROUBLESHOOTING
........................... 41
AirSurfer PC Card LED Indicators................................. 41
Troubleshooting ............................................................ 41

APPENDIX A: Glossary of Netwave Terms
.......................... 45
APPENDIX B: 24-Hour Global Suport Services
..................... 53
APPENDIX C: Limited Warranty
......................................... 55
APPENDIX D: Software License Agreement
......................... 59
APPENDIX E: Specifications
............................................. 61

1
Netwave
®
AirSurfer
®
PRO PC Card User’s Guide
QUICK INSTALLATION FOR WINDOWS 95
1. Boot your PC and wait until Windows 95 is up and running.
NOTE
If you have previously installed an AirSurfer
®
or an
AirSurfer Plus
®
PC Card on your computer please follow
the instructions in the Network Driver Removal section of
this manual before proceeding with the installation.
2. Insert your AirSurfer Pro Wireless LAN PC Card into your
PCMCIA Slot.
3. Windows 95 will automatically detect your card and display a
“New Hardware Found” dialog box, identifying the “Netwave
AirSurfer PRO Wireless LAN PC Card”.
4. Insert the AirSurfer Wireless LAN PC Card Windows 95/NT
Installation disk into your 3_ floppy drive (A:).
5. Click “Next”.
6. Select the “Netwave AirSurfer Wireless LAN in 802.11 Mode
Adapter” option.
7. If Windows 95 asks for the Windows 95 CD-ROM, enter the path
to the Windows 95 setup files—either the drive letter of your CD-
ROM drive or the directory of your Windows CAB files (these are
often in C:\WINDOWS\OPTIONS\CABS).
8. If Windows 95 asks for the ASPNDIS3.SYS file, enter “A:”.
9. If you are running Novell’s IntraNetware Client 32, place the
IntraNetware Installation CD in your CD-ROM drive when
prompted.
10. Windows 95 will now ask you to restart. Select “No”.
11. Click the Start button, select Settings, Control Panel.

2
Netwave
®
AirSurfer
®
PRO PC Card User’s Guide
Quick Installation Guide for Windows 95
12. Double click the “Network” icon.
13. Within the Configuration tab, select the “Netwave AirSurfer
Wireless LAN in 802.11 Mode Adapter” item in the network
components list and click on Properties.
14. Select the Advanced tab, and select the appropriate values for your
SSID (default = “Default SSID”) and DS Preferred Channel
(default = “1”). If you do not know which values to choose, contact
your network administrator. Improper values will result in a failure
to communicate with the wireless LAN. Select the “Network
Mode” to “Ad Hoc” or “Infrastructure” dependent upon the type
of network you are using. Change other parameters only as directed
by the network administrator.
15. After changing the “Netwave AirSurfer Wireless LAN in 802.11
Mode Adapter” configuration, click OK.
16. Go to the Protocol tab. Add the appropriate protocol(s) for your
network.. Contact your network administrator if you have any
questions regarding protocols on your network. Follow the
prompts for the Windows 95 setup files to add protocols to your
setup. Click “OK”.
17. Click “OK” in the Networks dialog box.
18. Click “Yes” when prompted to restart your computer.
19. When Windows 95 restarts, the AirSurfer PRO Adapter will be
operational. Look for the green link integrity LED on the AirSurfer
PRO PC Card. This indicates a connection with an 802.11-
compliant Direct Sequence Access Point (when setup in
Infrastructure mode) or another 802.11 Direct Sequence Wireless
LAN Adapter (when setup in Ad Hoc mode).
NOTE
If you experience any difficulties with installation, see the
Diagnostics and Troubleshooting section of this manual
for more detailed instructions and troubleshooting notes.

3
Netwave
®
AirSurfer
®
PRO PC Card User’s Guide
Quick Installation Guide for Windows 95
QUICK INSTALLATION FOR WINDOWS NT
WORKSTATION 4.0
1. Boot your PC and wait until Windows NT Workstation 4.0 is up
and running.
NOTE
If you have previously installed an AirSurfer or an
AirSurfer Plus PC Card on your computer please follow
the instructions in the Network Driver Removal section of
this manual before proceeding with the installation.
2. Insert your AirSurfer Pro Card into your PC Card Slot.
3. Insert the AirSurfer Wireless LAN PC Card Windows 95/NT
Installation disk into your 3_ floppy drive (A:).
4. Click the Start button, select Settings, Control Panel.
5. Double click the “Network” icon.
6. Click on the Adapters tab.
7. Click Add.
8. When the Network Adapter Option List has been built, click on
“Have Disk”, then type in A: when prompted.
9. Select the “Netwave AirSurfer Wireless LAN in 802.11 Mode
Adapter” option.
10. When the Netwave adapter configuration dialog box appears, select
the appropriate values for your SSID (default = “Default SSID”)
and DS Preferred Channel (default = “1”). If you do not know
which values to choose, contact your network administrator.
Improper values will result in a failure to communicate with the
wireless LAN. Select the “Network Mode” to “Ad Hoc” or

4
Netwave
®
AirSurfer
®
PRO PC Card User’s Guide
“Infrastructure” dependent upon the type of network you are
using. Change other parameters only as directed by the network
administrator.
11. Click OK. The appropriate files will then be copied to your laptop.
12. Go to the Protocol tab. Add the appropriate protocol(s) for your
network.. Contact your network administrator if you have any
questions regarding protocols on your network. (You will most
likely need your NT Workstation Setup CD to add protocols to
your setup. Click “OK”.
13. Click “Yes” when prompted to restart your computer.
14. When Windows NT restarts, the AirSurfer PRO Adapter will be
operational. Look for the green link integrity LED on the AirSurfer
PRO PC Card. This indicates a connection with an 802.11-
compliant Direct Sequence Access Point (when setup in
Infrastructure mode) or an other 802.11 Direct Sequence Wireless
LAN Adapter (when setup in Ad Hoc mode).
NOTE
If you experience any difficulties with installation, see the
Diagnostics and Troubleshooting section of this manual
for more detailed instructions and troubleshooting notes
Quick Installation Guide for Windows NT Workstation 4.0
5
Netwave
®
AirSurfer
®
PRO PC Card User’s Guide
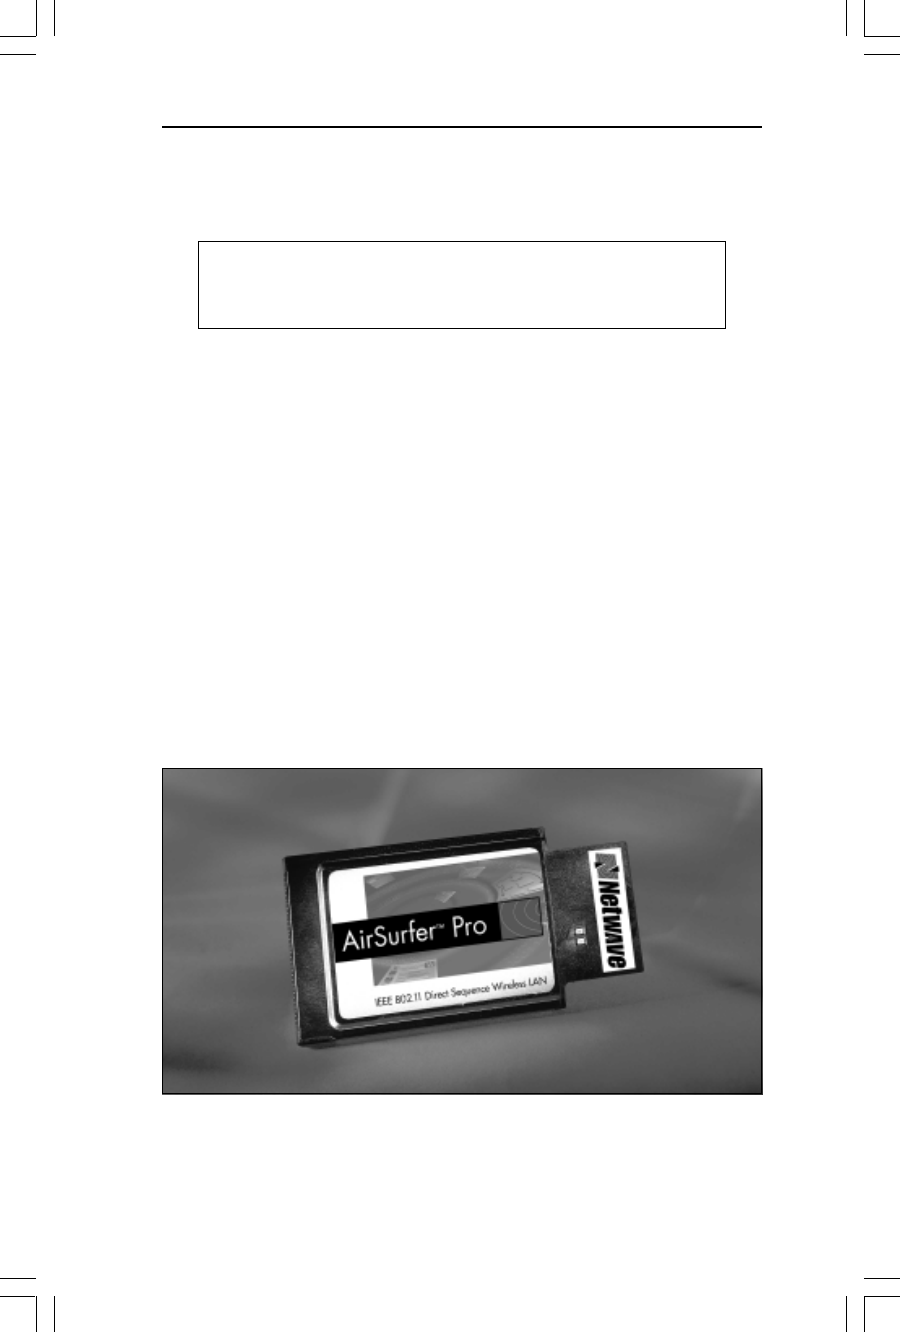
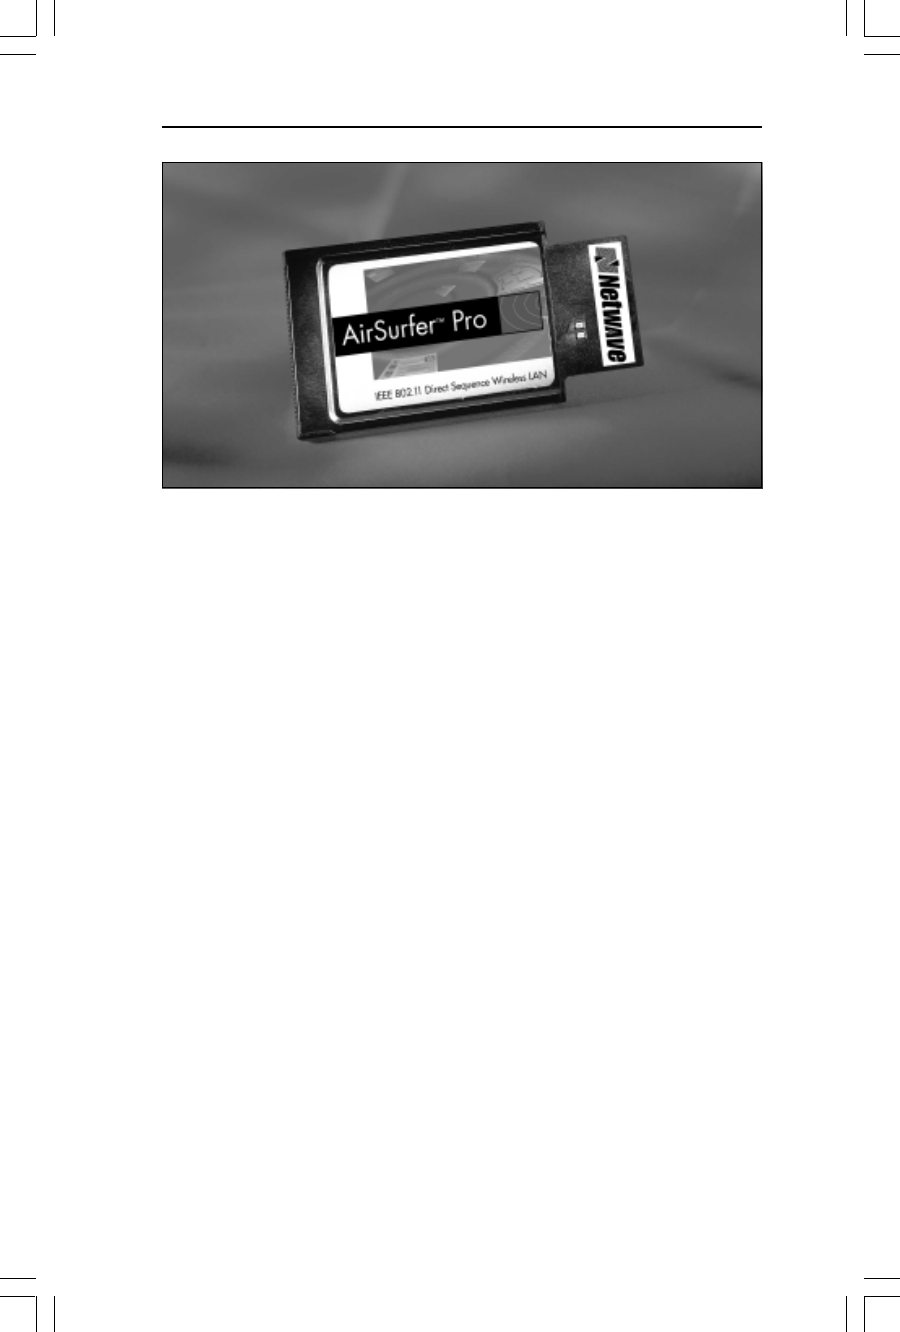
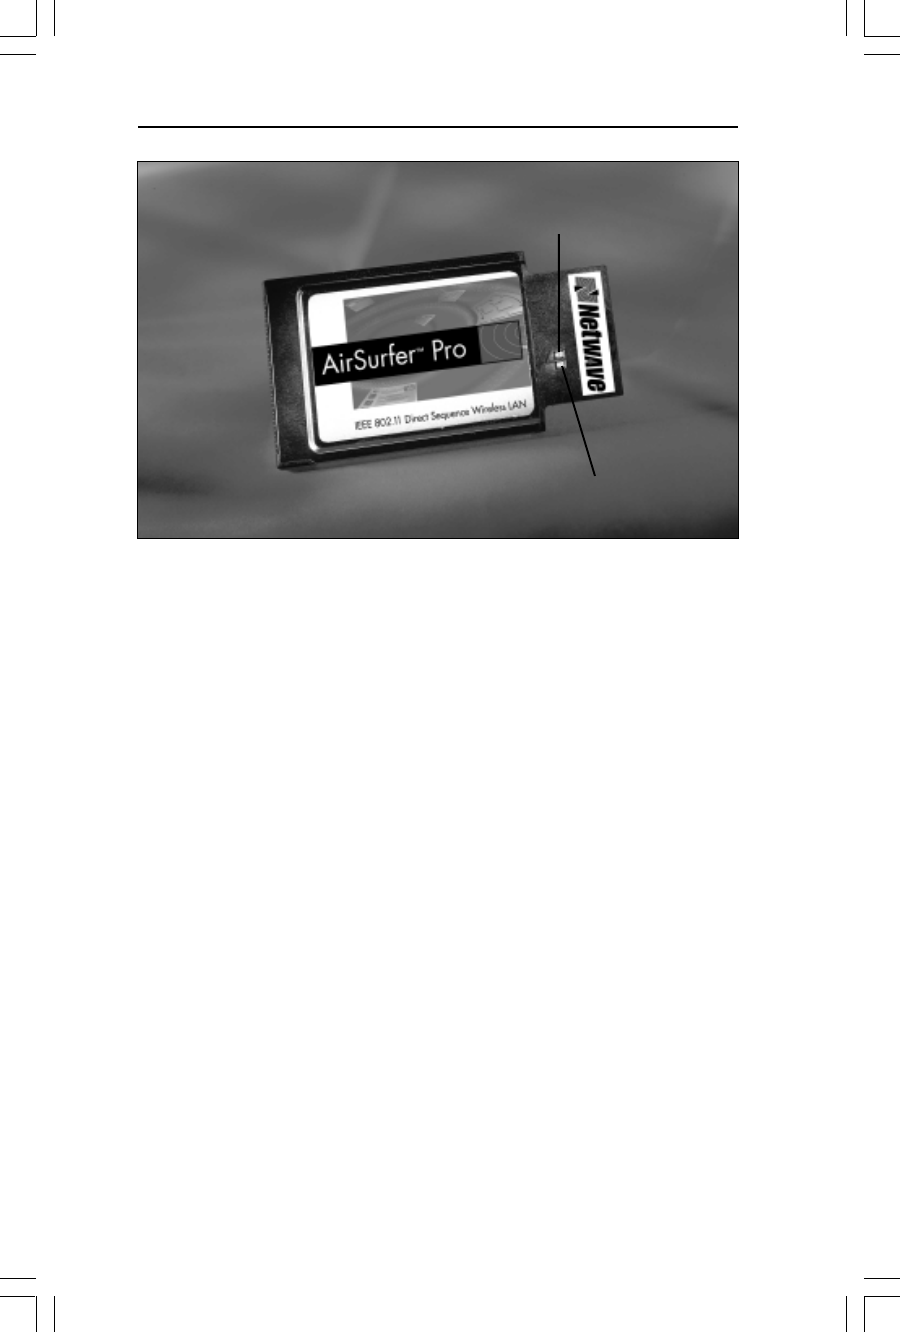
The Netwave AirSurfer PRO PC Card, shown in Figure 1, allows wireless
connection of a PCMCIA-capable laptop, notebook, or other portable
computer to an IEEE 802.11 industry standard local area network (LAN)
utilizing DS radios. Netwave supports fully wireless networking or wireless
access to a cable-based network (access to a wired network requires a
separate companion product called the AirSurfer PRO Access Point).
The Airsurfer PRO products support the highest data rates permitted under
the IEEE 802.11 specification. The AirSurfer PRO PC Card connects to the
computer internally upon insertion into a PCMCIA slot conforming to the
Personal Computer Memory Card International Association’s (PCMCIA)
PC Card Standard, Release 2.1.
The Netwave AirSurfer PRO PC Card is compatible with Type II and larger
PC Card slots.
Figure 1. Netwave AirSurfer PRO PC Card
NOTE
This manual applies to the following adapter type: AirSurfer Pro.
INTRODUCTION

6
Netwave
®
AirSurfer
®
PRO PC Card User’s Guide
SOFTWARE
NDIS3 drivers for Microsoft Windows 95 and Microsoft Windows NT are
included on the “For Windows 95/NT Installation” disk. An NDIS4 driver
for Microsoft Windows CE and Windows 98 and an ODI driver will be
available from Netwave’s website in a future release.
Operation with server-based networks requires one or more AirSurfer PRO
Access Point units (sold separately) for connection to the wired network.
See the Network Driver Installation section for instructions on how to
configure and use the AirSurfer PRO PC Card with each network operating
system.
In addition to the Installation Program, the AirSurfer PRO PC Card
includes additional software on the Netwave Utilities Disk for PC Card
configuration, diagnostics and network management. See the section
Netwave Utilities for information on this software.
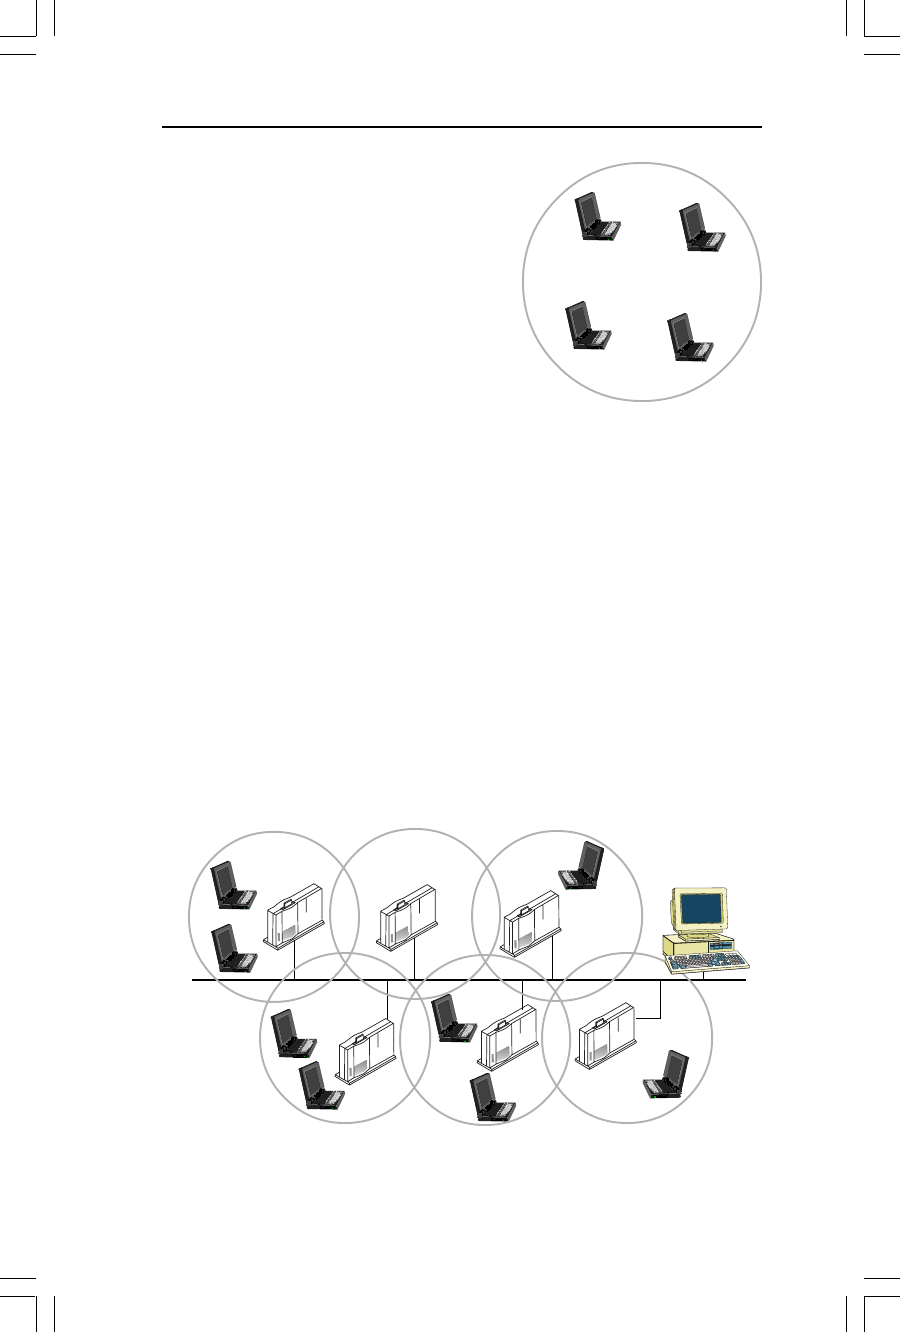
INTRODUCTION TO NETWAVE NETWORKING
Netwave’s AirSurfer PRO PC Card and its companion unit the AirSurfer
PRO Access Point (sold separately), provide freedom from network cabling
for users of “Independent” or “Ad Hoc” networks or “Infrastructure”
networks implemented with Access Points and using peer-to-peer and
server-based local area networks. There are several ways wireless networking
can occur:
AirSurfer PRO Direct Sequence Spread Spectrum Products
The Netwave Airsurfer PRO PC Card and AirSurfer Pro Access Point use an
RF transmission technique known as Direct Sequence Spread Spectrum
(DSSS), often abreviated as DS. DSSS modulation has the effect of sup-
pressing radio frequency interference in the same frequency band.
NOTE
IEEE 802.11 DS Product will only interoperate with other
DS type IEEE 802.11 products.
The IEEE 802.11 DSSS service is a channelized service which uses channels
1 through 11 in the U.S. and Canada, channels 1 through 13 in Europe,
channel 10 and 11 in Spain, channels 10 through 13 in France and channel
14 in Japan.
Introduction
7
Netwave
®
AirSurfer
®
PRO PC Card User’s Guide
Mobile User’s PC Cards must be set to the
same channel as the Access Points to which
they are connected. Access Points may be co-
located in the same area to accommodate
more users. When Access Points are
colocated, they should be set to channels
separated by at least five channels (eg: Access
Point #1 set to Channel 1, Access Point #2
set to channel 6, Access Point #3 set to
channel 11). Upon completion of installa-
tion, the AirSurfer PRO PC Card is initially set to default channel 1.
Independent networking without an Access Point: This is a purely wireless,
standalone network set up between two or more workstations equipped with
an AirSurfer PRO PC Card. Peer-to-peer network software such as
Microsoft Windows 95 or Microsoft NT is required. This is also called an
“ad hoc” network because it can be set up for a specific but temporary task,
such as a meeting of the Finance Committee, then dissolved when the task is
complete.
“Infrastructure” networking with either peer-to-peer or server-based
networking with an Access Point: The AirSurfer PRO Access Point
provides wireless access to an existing wired network. This could be a peer-
to-peer network running, for example, Windows 95, or a server-based
network such as Novell NetWare. The wireless Netwave workstation must
have the corresponding network software to communicate on the wired
Netwave Workstations (with AirSurfer PRO PC Cards Installed)
Introduction
SERVER BASED (WIRED)
NETWORK
ACCESS POINT SERVER
AD HOC
NETWORK
8
Netwave
®
AirSurfer
®
PRO PC Card User’s Guide
Introduction
Site Survey Utility
A Site Survey utility is provided to assist with the process of
determining the optimum number and location of Access Points
for your environment. See the section Netwave Utilities for information on
this procedure.
Netwave Utilities
The Netwave Utilities supplied on the Netwave Utilities Disk are designed
to facilitate Netwave network design and operation.
▲
The Site Survey utility assists you in planning and installing a
Netwave wireless network. The Connection Quality utility provides
information about the connection quality of the Netwave wireless
network.
▲
The Site Survey utility monitors not only the signal strength, but also
the availability of the AirSurfer PRO Access Point, and the traffic on
the wired LAN.
network, and it must be configured to communicate with the Access Point.
This is also called an “infrastructure” network because the wireless portion
of the network interacts with an existing cabled network.
On a network with multiple AirSurfer PRO Access Points installed, the
mobile user can roam freely within the Extended Service Area (ESA) of the
Access Points without losing connection to the wired network. An Extended
Service Area is the total area of coverage of all Access Points in the network
with the same SSID.
Transmission Range
The transmission range of the Netwave AirSurfer PRO PC Card is approxi-
mately 100 meters (about 300 feet) indoors, and up to 500 meters in an
open environment. AirSurfer Plus Access Point range is also about 100
meters. Building structure and electrical interference may affect transmis-
sion, resulting in a range of more or less than 100 meters. These factors
should be considered and tested when planning a Netwave network, and
especially before permanently installing any AirSurfer PRO Access Points.

9
Netwave
®
AirSurfer
®
PRO PC Card User’s Guide
▲
The AirSurfer Properties utility allows you to configure your Netwave
Adapter for different SSID (networks) in real time without rebooting
your computer.
NOTE
The Netwave Utilities require Windows 95 or NT.
For a complete description of the Netwave Utilities and how to use them,
see the section Netwave Utilities.
The Netwave Access Point
For information on installation and operation of the Netwave Access Point,
see the Netwave Access Point User’s Guide supplied with that product.
Introduction

10
Netwave
®
AirSurfer
®
PRO PC Card User’s Guide

11
Netwave
®
AirSurfer
®
PRO PC Card User’s Guide
HARDWARE INSTALLATION
Follow the instructions in this section to unpack and install the Netwave
AirSurfer PRO PC Card hardware.
UNPACKING AND INSPECTION
After opening the Netwave AirSurfer PRO PC Card box, remove the
contents and make certain that all components are included and that none
have been damaged during transportation. Retain the packing materials in
case you have to return the unit for service.
PACKAGE CONTENTS
Use the following list to check the contents of the package:
▲
Netwave AirSurfer PRO PC Card
▲
Netwave AirSurfer PRO PC Card User’s Guide
▲
Product Registration Card
▲
License Agreement envelope containing a 3.5-inch Installation and
Utilities Diskettes
NOTE
Please fill out the Product Registration Card supplied with
the AirSurfer PRO PC Card and return it immediately. Your
information will be entered into our support database.

12
Netwave
®
AirSurfer
®
PRO PC Card User’s Guide
INSERTING THE AIRSURFER PRO PC CARD
1. Power down the computer. For Windows 95, see the Quick
Installation Guide.
2. Grasp the PC Card by the edges with the Netwave logo facing
upward and the 68-pin connector next to the insert slot.
ADDITIONAL REQUIREMENTS
To operate the Netwave AirSurfer PRO PC Card on a network, you will
need the following:
1. For independent networking without an Access Point, at least one
other Netwave workstation running the same supported network
operating system. See the section on Network Driver Installation for
information about systems for which drivers are supplied.
2. For wireless access to an existing wired network, a Netwave
AirSurfer PRO Access Point (sold separately) attached to the
network and the appropriate workstation driver software for
connection to the network. See the section on Network Driver
Installation for information about systems for which drivers are
supplied.
NETWAVE AIRSURFER PRO PC CARD INSTALLATION
The AirSurfer PRO PC Card is compatible with Type II and larger PC Card
slots. Installation and removal procedures vary on different computers.
CAUTION
If you are using Card and Socket Services on your
PC Card computer, the computer can be powered on or off
when you insert or remove the AirSurfer Plus PC Card. If
you are not using Card and Socket Services, the computer
should always be turned OFF whenever the AirSurfer Plus
PC Card is inserted into or removed from the PC Card slot.
Windows 95 always uses Card and Socket Services, but
always "stop" the PC Card before removing it from the
computer.
Hardware Installation
13
Netwave
®
AirSurfer
®
PRO PC Card User’s Guide
Hardware Installation
3. Insert the card into a PC Card slot and push it in until it is firmly
seated. The PC Card default is slot or socket 1. See your computer
documentation for slot information. To change the default setting,
use the Netwave Installation Program or see the System Setup and
Configuration section.
4. Turn the computer back on.
REMOVING THE AIRSURFER PRO PC CARD
1. Power down the computer.
2. Follow the PC Card removal instructions specified in the
documentation for your computer.
Figure 1. Netwave AirSurfer PRO PC Card

14
Netwave
®
AirSurfer
®
PRO PC Card User’s Guide
15
Netwave
®
AirSurfer™ PRO PC Card User’s Guide
NETWAVE AIRSURFER NETWORKS
Netwave’s AirSurfer PRO PC Card provides standalone wireless networking
or, with the addition of a Netwave Access Point, access to existing wired
networks. The wired network can be a peer-to-peer network OS such as
Microsoft Windows 95 or server-based running software such as Microsoft
Windows NT. Wireless access to and interaction with these networks is
managed through a network identifier called an SSID. The Netwave
Installation Program will use the default SSID value of “Default SSID”
under the “Install” option or allow you to modify the SSID settings under
the “Custom” option. Every LAN accessible by the AirSurfer PRO PC Card
is identified by an SSID string. SSIDs allow for the deployment of multiple
independent wireless LANs in the same shared location.
Network users can change SSID numbers in the Netwave Installation
Program. Access Point SSIDs can be changed by the Network Administrator
using utilities supplied with the Access Point.
Individual network users can indicate which of the available SSIDs or
networks they want to access from their workstation by including the SSID
keyword in their network configuration file along with the SSID number of
the network they wish to access.
System Setup and Configuration
SERVER BASED (WIRED)
NETWORK
ACCESS POINT SERVER
SYSTEM SETUP AND CONFIGURATION

16
Netwave
®
AirSurfer™ PRO PC Card User’s Guide
System Setup and Configuration
Netwave Network Guidelines
NOTE
In order for a mobile unit to roam seamlessly from one
Access Point to another, the SSIDs of the AirSurfer PRO
PC Card and the Access Point must be the same, and the
Access Points must be installed on the same logical
Ethernet segment.
To avoid login confusion, use different SSID strings for
Access Points belonging to different Netwave networks
that may or may not be on the same logical Ethernet
segment. This will prevent a mobile unit from connecting
to the wrong Access Point.
The SSID keyword is placed in the configuration file for your network
driver. PROTOCOL.INI is the configuration file for the NDIS driver. You
can have one SSID listed at a time. The software will attempt to connect to
the stated SSID.
To connect to a wired network through a Netwave Access Point, the
AirSurfer PRO PC Card must be configured with the same SSID number as
the Access Point. The factory default SSID is “default SSID”.
Appropriate network software must also be installed and loaded on the
Netwave PC Card workstation before a connection to a network can be
established.
For additional information on default and custom settings and the use of
keywords in configuration files, see the heading Driver Parameters later in
this section.
HOW TO MODIFY THE SSID
SSID is a Netwave security feature. Only mobile units and Access Points
with the same SSID number can communicate with each other.
Setting the SSID with the Installation Program
1. Choose CUSTOM install and specify whether or not the workstation
is connected to the network via an Access Point (Y or N).
2. Enter the SSID (it must match the SSID of the network the users
wish to access).
17
Netwave
®
AirSurfer™ PRO PC Card User’s Guide
SSID = Johnny’s Group
The network SSID will be computed by the installer program and
displayed in the SSID field. This SSID setting will be incorporated
into the driver configuration file (PROTOCOL.INI for the NDIS3
driver).
Setting the SSID Temporarily with the AirSurfer PRO
Properties Utility
1. Run the Windows-based utility AirSurfer PRO Properties (see the
Netwave Utilities section).
2. Tab to the Network SSID field (or press Alt+N) and change the
SSID string, then choose Connect (or press Alt+C),
Netwave SSID Settings for Netwave Networks with and without an Access
Point
SSID = Marketing
SSID = Jerry’s Pad
System Setup and Configuration
SSID = Engineering

18
Netwave
®
AirSurfer™ PRO PC Card User’s Guide
System Setup and Configuration
OR
3. Select a different SSID (network) from the list at the bottom of the
screen (press Alt+D to go to the list field), and choose connect.
If you use the AirSurfer Plus Properties utility to modify the SSID,
do not reboot your computer. The new SSID will remain effective
only until you reboot. After rebooting, the SSID used will be the one
defined in the driver configuration file.
Setting the SSID Manually Using a Keyword
Edit the PROTOCOL.INI file with the SSID of the network the users wish
to access.
The PROTOCOL.INI file is usually in the C:\WINDOWS directory.
The factory default SSID setting is “Default SSID”. SSID strings may be
from 0 to 32 characters. After modifying the SSID manually, you must reboot
the computer.
CARD AND SOCKET SERVICES
The Personal Computer Memory Card International Association
(PCMCIA) has developed two software specifications governing the use of
PCMCIA cards (also called PC Cards) in personal computer systems. The
software components that implement these specifications are called Socket
Services and Card Services. This software supports the ability of PCMCIA-
aware device drivers (known as clients) to share PC Cards, sockets (also
called slots), and system resources. Card and Socket Services provide a
centralized resource in support of the common functionality required by
different clients.
Netwave recommends that Card and Socket Services be used with the
AirSurfer PRO PC Card. If your PCMCIA computer is not equipped with
Card and Socket Services, ask your computer manufacturer or dealer for
details on how to obtain them.

19
Netwave
®
Airsurfer
®
PRO PC Card User’s Guide
NETWORK DRIVER INSTALLATION
This section provides detailed installation instructions for the network
drivers supplied on the Netwave Network Drivers Disk. These instruc-
tions are designed to be used for manual installation without the
Netwave Installation Program. Read the section System Setup and
Configuration before attempting to install and load a network driver.
NETWORK DRIVERS
The Netwave AirSurfer PRO PC Card supports an NDIS3 network
driver. An ODI driver will be available on our web site in the near future.
An NDIS4 driver supporting Windows CE and Windows 98 will also be
available soon on our web site. To determine which of these drivers you
need for your networking environment, find your network operating
system in the alphabetical listing by vendor in this section under the
heading “Installing Network Drivers.” Examples of network operating
systems referenced are Microsoft NT and Microsoft Windows 95.
The network driver installation instructions in this section are designed
to be used with AirSurfer PRO PC Card factory-default settings. For a
detailed technical discussion of the parameters required for configuration
of your PC Card, see the section System Setup and Configuration.
Installing Network Drivers
An alphabetical listing by vendor of network operating systems supported
by the AirSurfer PRO PC Card follows. Under each listing are instruc-
tions for installing the PC Card driver as part of your initial installation
for that type of network.
See the section System Setup and Configuration for information on
installation and configuration procedures that may be required prior to
driver installation.

20
Netwave
®
Airsurfer
®
PRO PC Card User’s Guide
Network Driver Installation
INSTALLATION FOR WINDOWS 95
1. Boot your PC and wait until Windows 95 is up and running.
NOTE
If you have previously installed an AirSurfer
®
or an
AirSurfer Plus
®
PC Card on your computer please follow
the instructions in the Network Driver Removal section of
this manual before proceeding with the installation.
2. Insert your AirSurfer Pro Wireless LAN PC Card into your
PCMCIA Slot.
3. Windows 95 will automatically detect your card and display a
“New Hardware Found” dialog box, identifying the “Netwave
AirSurfer PRO Wireless LAN PC Card”.
4. Insert the AirSurfer Wireless LAN PC Card Windows 95/NT
Installation disk into your 3_ floppy drive (A:).
5. Click “Next”.
6. Select the “Netwave AirSurfer Wireless LAN in 802.11 Mode
Adapter” option.
7. If Windows 95 asks for the Windows 95 CD-ROM, enter the path
to the Windows 95 setup files—either the drive letter of your CD-
ROM drive or the directory of your Windows CAB files (these are
often in C:\WINDOWS\OPTIONS\CABS).
8. If Windows 95 asks for the ASPNDIS3.SYS file, enter “A:”.
9. If you are running Novell’s IntraNetware Client 32, place the
IntraNetware Installation CD in your CD-ROM drive when
prompted.
10. Windows 95 will now ask you to restart. Select “No”.
11. Click the Start button, select Settings, Control Panel.
12. Double click the “Network” icon.

21
Netwave
®
Airsurfer
®
PRO PC Card User’s Guide
Network Driver Installation
13. Within the Configuration tab, select the “Netwave AirSurfer
Wireless LAN in 802.11 Mode Adapter” item in the network
components list and click on Properties.
14. Select the Advanced tab, and select the appropriate values for your
SSID (default = “Default SSID”) and DS Preferred Channel
(default = “1”). If you do not know which values to choose, contact
your network administrator. Improper values will result in a failure
to communicate with the wireless LAN. Select the “Network
Mode” to “Ad Hoc” or “Infrastructure” dependent upon the type
of network you are using. Change other parameters only as directed
by the network administrator.
15. After changing the “Netwave AirSurfer Wireless LAN in 802.11
Mode Adapter” configuration, click OK.
16. Go to the Protocol tab. Add the appropriate protocol(s) for your
network.. Contact your network administrator if you have any
questions regarding protocols on your network. Follow the
prompts for the Windows 95 setup files to add protocols to your
setup. Click “OK”.
17. Click “OK” in the Networks dialog box.
18. Click “Yes” when prompted to restart your computer.
19. When Windows 95 restarts, the AirSurfer PRO Adapter will be
operational. Look for the green link integrity LED on the AirSurfer
PRO PC Card. This indicates a connection with an 802.11-
compliant Direct Sequence Access Point (when setup in
Infrastructure mode) or another 802.11 Direct Sequence Wireless
LAN Adapter (when setup in Ad Hoc mode).
NOTE
If you experience any difficulties with installation, see the
Diagnostics and Troubleshooting section of this manual
for more detailed instructions and troubleshooting notes.

22
Netwave
®
Airsurfer
®
PRO PC Card User’s Guide
Network Driver Installation
INSTALLATION FOR WINDOWS NT WORKSTATION 4.0
1. Boot your PC and wait until Windows NT Workstation 4.0 is up
and running.
NOTE
If you have previously installed an AirSurfer‘ or an
AirSurfer Plus‘ PC Card on your computer please follow
the instructions in the Network Driver Removal section of
this manual before proceeding with the installation.
2. Insert your AirSurfer Pro Card into your PC Card Slot.
3. Insert the AirSurfer Wireless LAN PC Card Windows 95/NT
Installation disk into your 3_ floppy drive (A:).
4. Click the Start button, select Settings, Control Panel.
5. Double click the “Network” icon.
6. Click on the Adapters tab.
7. Click Add.
8. When the Network Adapter Option List has been built, click on
“Have Disk”, then type in A: when prompted.
9. Select the “Netwave AirSurfer Wireless LAN in 802.11 Mode
Adapter” option.
10. When the Netwave adapter configuration dialog box appears, select
the appropriate values for your SSID (default = “Default SSID”)
and DS Preferred Channel (default = “1”). If you do not know
which values to choose, contact your network administrator.
Improper values will result in a failure to communicate with the
wireless LAN. Select the “Network Mode” to “Ad Hoc” or
“Infrastructure” dependent upon the type of network you are
using. Change other parameters only as directed by the network
administrator.
23
Netwave
®
Airsurfer
®
PRO PC Card User’s Guide
Network Driver Installation
11. Click OK. The appropriate files will then be copied to your laptop.
12. Go to the Protocol tab. Add the appropriate protocol(s) for your
network.. Contact your network administrator if you have any
questions regarding protocols on your network. (You will most
likely need your NT Workstation Setup CD to add protocols to
your setup. Click “OK”.
13. Click “Yes” when prompted to restart your computer.
14. When Windows NT restarts, the AirSurfer PRO Adapter will be
operational. Look for the green link integrity LED on the AirSurfer
PRO PC Card. This indicates a connection with an 802.11-
compliant Direct Sequence Access Point (when setup in
Infrastructure mode) or an other 802.11 Direct Sequence Wireless
LAN Adapter (when setup in Ad Hoc mode).
NOTE
If you experience any difficulties with installation, see the
Diagnostics and Troubleshooting section of this manual
for more detailed instructions and troubleshooting notes

24
Netwave
®
Airsurfer
®
PRO PC Card User’s Guide

25
Netwave
®
Airsurfer
®
PRO PC Card User’s Guide
NETWORK DRIVER REMOVAL
This section provides detailed instructions on the removal of the AirSurfer®
and AirSurfer Plus® drivers from your Windows 95 and NT systems. Please
follow the instructions completely. If you have any questions regarding the
loading or removal of network drivers in your system, please contact your
network administrator.
AirSurfer Driver Removal Instructions For Windows 95
Netwave AirSurfer® and AirSurfer Plus® products both operate with our
2.5x and our 2.60 drivers. Removal procedures are different, however,
depending on the driver you have loaded. To determine which driver you
have please do the following:
1. Click on you Start Button, select the Find submenu, select the Files
or Folders option.
2. Type in ASA*.*
3. If the system finds files named ASANDIS3.SYS and
ASAVXD.VXD you have the 2.60 drivers installed. Proceed to the
2.60 Driver Removal for Windows 95 section.
4. If the system fails to find the files named above, type in CNW*.*
5. If the system finds files name CNWNDIS3.VXD, you have the
2.54 (or lower) drivers installed. Proceed to the 2.5x Driver
Removal for Windows 95 section.
2.60 Driver Removal For Windows 95/NT
1. Begin by shutting down card socket services for the Netwave PC
card.
a. Click the PC Card icon in the taskbar.
b. Click the “Stop AirSurfer” button, then REMOVE the card
from the slot when prompted. (Removal of the card is essential
at this point!)

26
Netwave
®
Airsurfer
®
PRO PC Card User’s Guide
Network Driver Removal
1. Click on the “Start” button, go to “Settings”, “Control Panel”,
“Network”, highlight the Netwave AirSurfer Plus Wireless LAN in
Netwave Mode adapter, and click remove.
2. For Windows 95 (assuming 95 is installed in the WINDOWS
directory):
Delete these files: C:\WINDOWS\SYSTEM\ASA*.*
Delete these files: C:\WINDOWS\INF\NETASA.INF
Delete these files: C:\WINDOWS\INF\DRVDATA.BIN
and DRVIDX.BIN (for Win95 versions 9.5.00b or later)
Run sysedit:
a. Select the SYSTEM.INI window;
b. Menu select: Search, Find, and enter “ASA”.
c. Delete the line that reads “device=ASAVXD.VXD”
d. Menu select: File, Save
e. Menu select: File, Exit
1. For Windows NT (assuming NT is installed in the WINNT
directory):
Delete these files: C:\WINNT\SYSTEM32\DRIVERS\ASA*.*
2. Click “Run” and type “regedit” to open the registry editor.
The user is advised to consult their network administrator for assistance
while performing any modifications to the Windows 95/NT Registry.
Removing any settings other than the instructions listed below can make
your Windows 95/NT system unusable.
a. Menu select: Edit, Find, and enter “netwave”.
b. Delete any entries that are found (by pressing the DEL key)
NOTE: If the “found” selections show up in the right portion of the
window, press F6 to toggle to the left window, then press the DEL key.
c. Press F3 to continue searching (deleting all found entries).
d. Menu select: Edit, Find, and enter “asandis”.
e. Delete any entries that are found (by pressing the DEL key)
NOTE: If the “found” selections show up in the right portion of the
window, press F6 to toggle to the left window, then press the DEL key.

27
Netwave
®
Airsurfer
®
PRO PC Card User’s Guide
f. Press F3 to continue searching (deleting all found entries).
g.Menu select: File, Exit
1. Delete the C:\NETWAVE directory
2. Delete the Netwave AirSurfer Program Group
For Windows 95: from C:\WINDOWS\START
MENU\PROGRAMS
For Windows NT: from C:\WINNT\PROFILES\ALL
USERS\PROGRAMS
3. Delete the ASASTA32.EXE file
For Windows 95: from C:\WINDOWS\START
MENU\PROGRAMS\STARTUP
For Windows NT: Hit Ctrl-Alt-Del, Select Task Manager, Click
on the Process tab,
Highlight ASASTA32.EXE, click End Process, Yes, then Close
Task Manager,
Delete the file from C:\WINNT\PROFILES\ALL
USERS\PROGRAMS\STARTUP
4. SHUT DOWN the PC, do not warm boot or use restart from the
shut down menu. The reason for this is to let Windows 95/NT
“clean” the registry while shutting down.
2.5x Driver Removal for Windows 95
1. Begin by shutting down card socket services for the Netwave PC
card.
a. Click the PC Card icon in the taskbar.
b. Click the “Stop AirSurfer” button, then REMOVE the card
from the slot when prompted. (Removal of the card is essential at
this point!)
1. Remove the Card from Windows Network definition.
a. Click on Windows Start Button, then Settings, and then
Control Panel.
Network Driver Removal

28
Netwave
®
Airsurfer
®
PRO PC Card User’s Guide
b. Double click on the Network icon to open Network dialog box.
c. Single click on the Xircom Netwave Credit Card Adapter then
click on remove. Select “Yes” to confirm deletion of this
Netwave adapter.
1. For Windows 95 (assuming 95 is installed in the WINDOWS
directory):
Delete these files: C:\WINDOWS\SYSTEM\CNW*.*
Delete the file C:\WINDOWS\INF\NETCNW.INF
2. Run sysedit:
a. Select the SYSTEM.INI window;
b. Menu select: Search, Find, and enter “CNW”.
c. Delete the line that reads “device=CNWVXD.386”
d. Menu select: File, Save
e. Menu select: File, Exit
1. For Windows NT (assuming NT is installed in the WINNT
directory):
Delete the file C:\WINNT\SYSTEM32\DRIVERS\CNW*.*
2. Remove card configurations from the Windows/NT registry
The user is advised to consult their network administrator for
assistance while performing any modifications to the Windows 95/
NT Registry. Removing any settings other than the instructions
listed below can make your Windows 95/NT system unusable.
a. Click on Windows Start Button
b. Click “Run” and type “regedit” to open the registry editor.
c. Double click on the “HKEY_LOCAL_MACHINE” folder.
d. Double click on the folder “Enum”
ii. Double click on the folder “PCMCIA”
iii.Place focus (click) on the folder “XIRCOM-
CREDITCARD-NETWAVE-F441”
iv. Press “delete” key on the keyboard and click “yes” to confirm
deletion.
Network Driver Removal

29
Netwave
®
Airsurfer
®
PRO PC Card User’s Guide
a. Double click on the “HKEY_LOCAL_MACHINE” folder
i. Double click on the folder “System”
ii. Double click on the folder “CurrentControlSet”
iii.Double click on the folder “Services”
iv. Double click on the folder “Class”
v. Double click on the folder “Net”
vi. Under the folder “Net” find which folder contains informa-
tion in the right window which references “DriverDescription”.
This description would contain “Xircom CreditCard Netwave
Adapter”. Place focus (click) on this folder under “Net” and
press “delete” on the keyboard and click “Yes” to confirm
deletion.
a. Close the registry
1. Run sysedit;
a. Select the SYSTEM.INI window;
b. Menu select: Search, Find, and enter “CNW”.
c. Delete the line that reads “device=CNWNDIS3.VXD”
d. Menu select: File, Save
e. Menu select: File, Exit
1. Delete the C:\XIRCOM directory
2. Delete the Xircom CreditCard Program Group from
C:\WINDOWS\START MENU\PROGRAMS\
3. SHUT DOWN the PC, do not warm boot or use restart from the
shut down menu. The reason for this is to let Windows95 “clean”
the registry while shutting down.
Network Driver Removal

30
Netwave
®
Airsurfer
®
PRO PC Card User’s Guide
31
Netwave
®
Airsurfer
®
PRO PC Card User’s Guide
NETWAVE AIRSURFER PRO UTILITIES
This section provides information on utilities supplied with the AirSurfer
PRO PC Card. The Netwave Utilities include Netwave Control Panel and
Netwave Connection Agent. These are designed to facilitate Netwave
network design and operation. In particular, these utilities
•Assist you in planning and installing an AirSurfer PRO wireless network.
•Provide information about the link quality of the AirSurfer PRO
wireless network.
•Allow you to configure your AirSurfer PRO PC Card for different
SSIDs (networks), in real time without rebooting your computer.
•Provide notification of loss of network services when you move out of
range of your AirSurfer PRO network and restoration of the connec-
tion when you move back into range.
NOTE
The Netwave AirSurfer PRO Utilities require Windows 95
or Windows NT.
The Netwave AirSurfer PRO Utilities include “client” utilities that can be
used to configure the Netwave mobile workstation itself, and “client/server”
utilities that support the link between the workstation and a NetWare server
on the wired network. A brief description of these two types of utilities
follows.
Netwave Control Panel
The Netwave AirSurfer PRO Utilities setup program NWSETUP
installs the Netwave Control Panel and Netwave Connection
Agent Client on your mobile unit. It adds icons to the Netwave AirSurfer
Program Group for the Netwave Control Panel, Site Survey, Connection
Quality, and AirSurfer Properties utilities, described later in this section.
The Netwave Control Panel places a toolbar on the screen for single-click
access to the utilities in the Program Group.
32
Netwave
®
Airsurfer
®
PRO PC Card User’s Guide
Netwave AirSurfer PRO Utilities
The Netwave Control Panel Toolbar
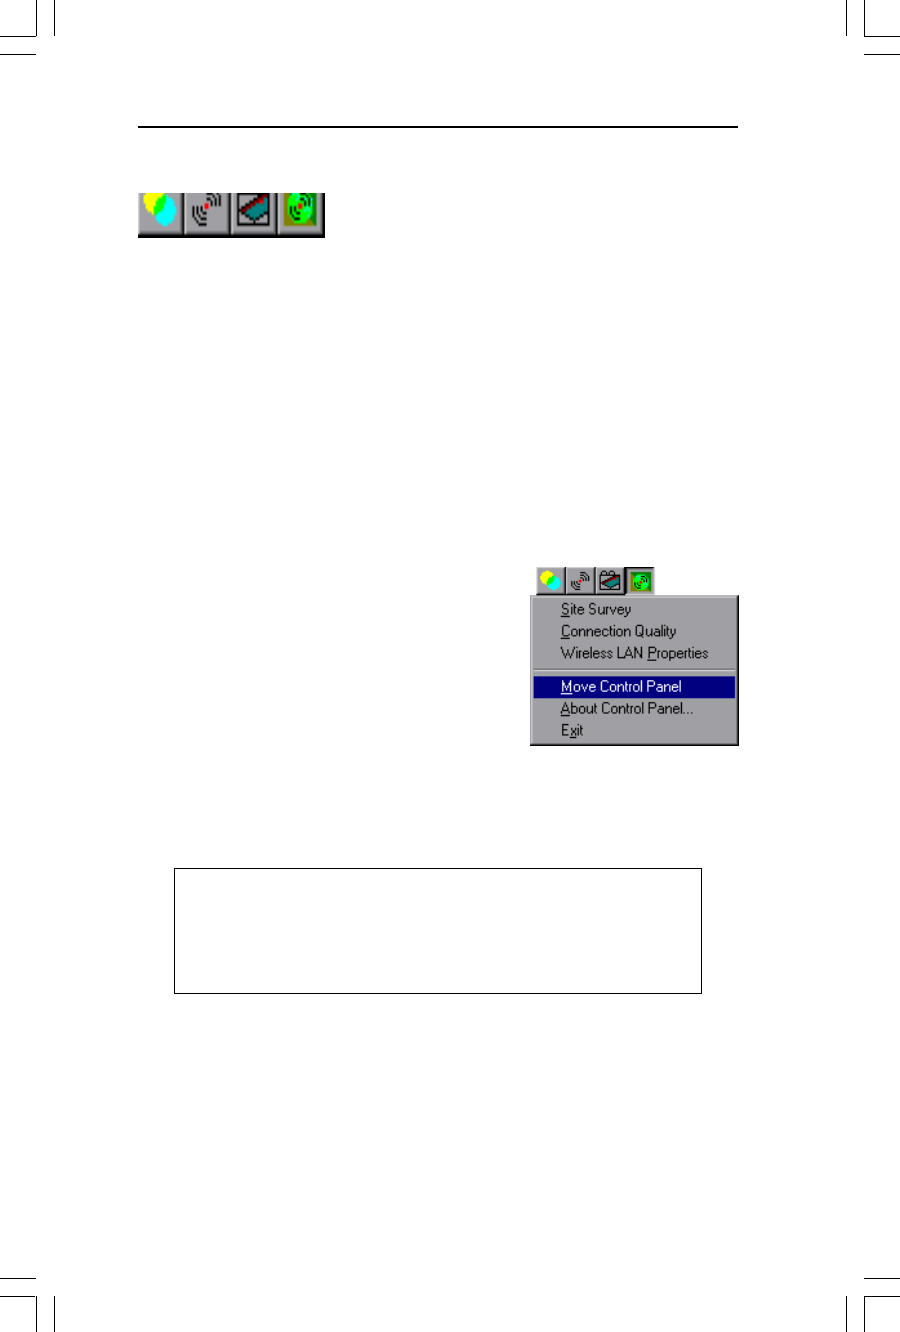
To activate the Netwave Control Panel toolbar,
double click on the Netwave Control Panel icon
in the Netwave PC Card Program Group. A toolbar with four icons will
appear at the top of the screen. The name of the utility will pop up when
the cursor is placed over the icon for that utility.
This toolbar can be moved around the screen, but it will always float on top
of all other windows, for easy access to the Netwave AirSurfer PRO Utilities.
Each Netwave Control Panel utility can be launched by clicking once on the
appropriate icon in the toolbar. They can also be run by double clicking the
icon in the Program Group or using the menu that displays on the toolbar
when the Control Panel icon is clicked. The name Netwave Control Panel
refers both to the toolbar and to the entire “suite” of Netwave AirSurfer
PRO Utilities.
Moving the Toolbar
To move the toolbar, click on the Netwave
Control Panel icon (the button farthest to the
right on the toolbar) to display a menu.
Choose “Move Netwave Control Panel” from
the menu. A miniature title bar will appear
across the top of the toolbar. Place the cursor
on the title bar, hold down the mouse button and drag the toolbar to the
location of your choice, then release the mouse button. The new location
will be saved. To remove the title bar, click “Move Netwave Control Panel”
again on the menu.
NOTE
The Control Panel utilities can also be added to the
Microsoft Office toolbar. See your Microsoft Office user
documentation for instructions.
PLANNING THE AIRSURFER SITE
For more detailed information on site planning and installation, see the
AirSurfer PRO Planning and Installation Guide supplied with the Netwave
Access Point. The following is an overview of site planning using the Site
Survey utility.

33
Netwave
®
Airsurfer
®
PRO PC Card User’s Guide
Netwave AirSurfer PRO Utilities
What is a Sit e Survey?
A site survey is part of the planning process for installing an AirSurfer PRO
wireless LAN at your site using the Netwave Access Points to connect to
your wired network. It will help you determine how many Access Points are
needed at their optimal placement for the best wireless connection in your
desired area. Before starting the site survey, some preliminary site evaluation
and calculations have to be done. Both the initial site survey and later
evaluations of results can be facilitated with the Site Survey
utility provided on the AirSurfer PRO Utilities Disk supplied with the
AirSurfer PRO PC Card.
Site Survey Preliminary Requirements
The following items are needed for an AirSurfer PRO site survey:
•A set of blueprints or floor plans of your building environment
•A Netwave AirSurfer PRO Access Point connected to a power outlet
(the Access Point does not need to be connected to the wired LAN to
conduct a site survey)
•AirSurfer PRO PC Card hardware and software (including the Site
Survey utility) installed in your portable computer
•AC power extension cord
Additional items such as a ladder, drawing tools, or paper and scissors may
be needed, depending on the planning and site survey methods chosen.
Refer to the Netwave AirSurfer PRO Planning and Installation Guide for
wireless network planning and installation instructions.
34
Netwave
®
Airsurfer
®
PRO PC Card User’s Guide
The AirSurfer Site Survey Utility
The AirSurfer Site Survey utility helps Netwave users to:
•See the link quality between the mobile unit and the Access Point
•Determine how many Access Points are needed to cover the desired
service area, and where they should be placed
•Verify wireless link quality after the initial installation, and make
adjustments to optimize coverage and minimize interference due to
building structure and materials or other radio devices.
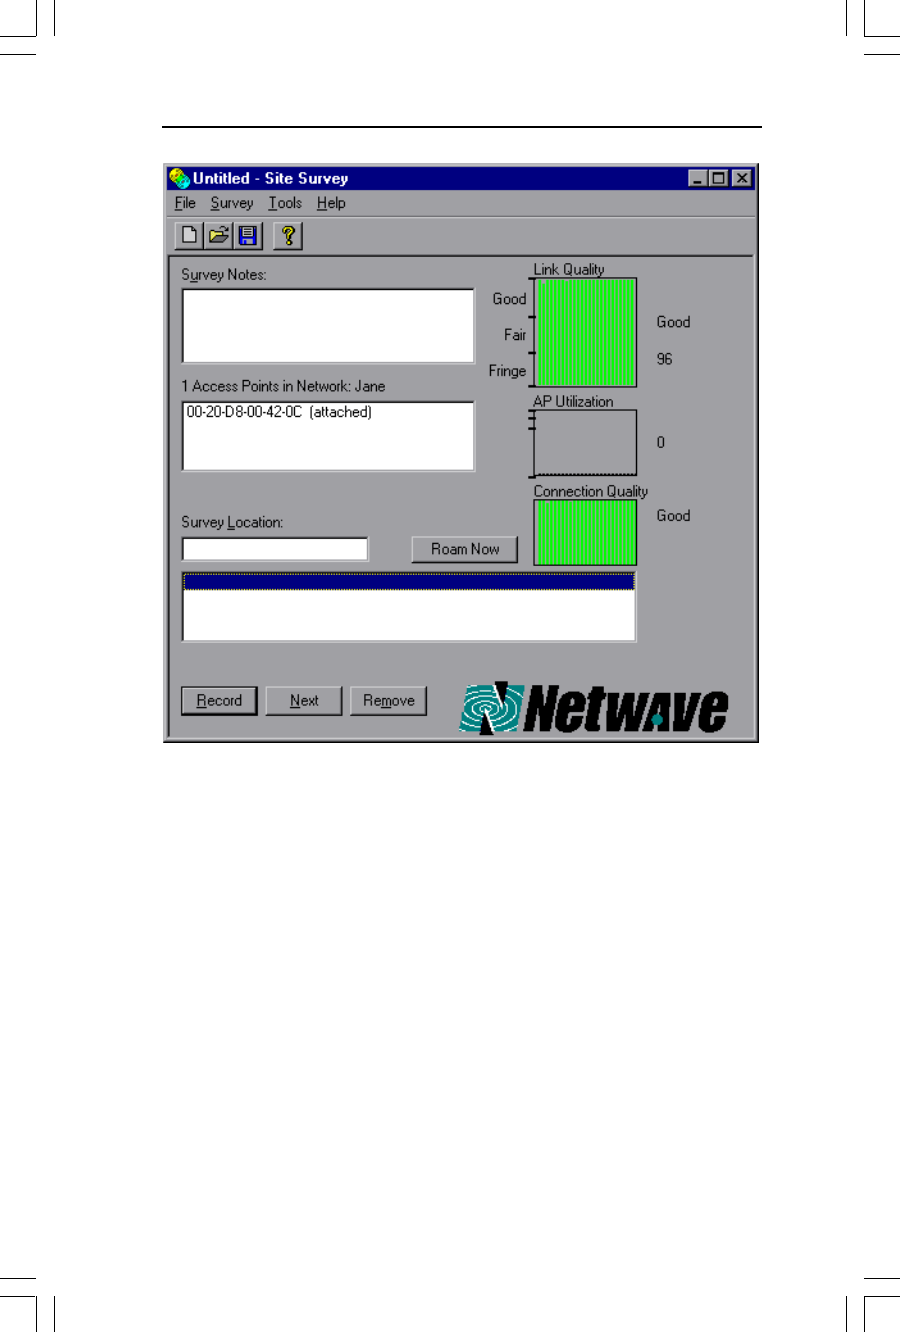
A ROAM NOW function is included. This permits the user to force the
mobile unit to roam and select the Access Point which provides the best
performance.
To start the Site Survey utility, click the leftmost button on the
Netwave Control Panel toolbar, or double-click the Site Survey
icon in the Netwave AirSurfer Program Group.
Netwave Site Survey is a tool to help plan the installation of a Netwave
network. It displays a list of all the Access Points the AirSurfer PRO
PC Card has access to in the SSID (network) it is configured for, providing
there is more than one Access Point in that SSID.
If your mobile unit is registered with an Access Point, you will see the link
quality updated in a bar gauge on the right side of the Site Survey window as
you move around an Access Point’s Basic Service Area. A numeric value,
description, and color are also shown.
Green Good link quality between the mobile unit and attached Access
Point. For best results, Link quality should register “good” most of
the time at the locations where the AirSurfer Plus PC Card will be
used to access the wired LAN.
Yellow Fair link quality between mobile unit and Access Point. Link
quality is less strong, but unit is functional and performance is
acceptable. Further weakening could be due to distance from the
Access Point, obstacles (such as steel, brick, concrete), or radio
interference. If the gauge consistently displays only “fair” link
quality, consider adding an Access Point in that area, or relocating
Access Points to improve coverage.
Netwave AirSurfer PRO Utilities
35
Netwave
®
Airsurfer
®
PRO PC Card User’s Guide
Red “On-the-fringe” link quality between the mobile unit and attached
Access Point. Link quality is very weak because the mobile unit is
close to the edge of the Access Point’s coverage area or because of
obstacles (steel, brick, concrete) or radio interference. If the gauge
consistently displays “fringe” quality, an additional Access Point is
recommended for that area.
You can record the link quality at a particular location in your site by
clicking Record. A dialog box pops up as the link quality is sampled once a
second for ten seconds. Click OK when the sampling is complete to record
the link quality and the survey list at the bottom of the window. Or click
Cancel at any time to stop sampling. If you click Cancel at the end of the
sampling, the average link quality is not added to the list.
Site Survey Screen
Netwave AirSurfer PRO Utilities

36
Netwave
®
Airsurfer
®
PRO PC Card User’s Guide
To survey your site, make a list of key locations within the Access Point
coverage area you will survey, record the link quality at each one, then save
the survey in a file. Later you can open the file in Site Survey or with a
spreadsheet or word processor. Site Survey can also print a survey report.
You may want to take notes about the placement of the Access Point for a
results comparison later. Repeat this process for each Access Point coverage
area you want to survey.
Using the AirSurfer Site Survey Utility
Before performing a site survey, the AirSurfer PRO PC Card must be
installed on the mobile unit and a AirSurfer PRO Access Point must be
positioned and powered on. Refer to the AirSurfer PRO Planning and
Installation Guide for additional instructions for wireless network planning
and installation.
1. Choose File/New
2. Click in the Survey Location box or Press Alt+L.
3. Type the name of the first location in your survey.
4. Click Next or press Alt+N to add the location to the list. (If you
use Alt+N, the cursor will stay in the Survey Location box, ready
for entry of the next location.)
5. When you have added all the locations you want to survey, choose
File/Save to save the survey.
6. Proceed to one of the locations on the list and highlight it.
7. Press Enter or Alt+R to choose the Record button and check the
link quality.
8. Press enter to accept the measurement when it is done. The link
quality and registered AP are saved in the list for that location.
9. Press Alt +N to go to the next location.
10. Repeat steps 6 through 9 until your survey is finished.
11. Enter notes in the Survey Notes box if you want to record some
details about your setup for the survey.
Netwave AirSurfer PRO Utilities
37
Netwave
®
Airsurfer
®
PRO PC Card User’s Guide
12. Choose File/Save to save your survey. (If you choose File+Save As
you can save the survey in a new file and leave the original, blank
file with all the locations ready for another survey. You might want
to do several surveys with Access Points in different locations and
compare the results.)
13. Move on to the next Basic Service Area, with the AirSurfer Plus
Access Point, and repeat steps 1 through 12 for that area.
You can always record a new measurement at an existing location in your list
by selecting that location then choosing Record. Click Cancel if you don’t
want to replace the measurement. There is a blank item at the end of the list
for new measurements. If you choose the last item then choose Record, a
new measurement is added to the list.
AirSurfer Connection Quality
The AirSurfer Connection Quality utility indicates the quality of the
wireless connection between the AirSurfer PRO PCCard in the portable
PC and the AirSurfer PRO Access Point with which it is connected. Quality can be
affected by distance, radio interference, and how “busy” the Access Point is. A
ROAM NOW button is included to enable the user to force the unit to
roam and select the Access Point which provides the best performance.
This utility can be run in the background, so the user can check the
connection quality to the network at any point while moving around in the
Netwave service area.
When you first run AirSurfer Connection Quality, you will see a window
that shows the connection quality, the Access Point your mobile unit is
registered with, and SSID. The window will display green, yellow, or red
depending on the connection quality which is a factor that determines when
a mobile unit will be “handed-off” to the next Access Point that provides
better connection.
Green indicates a good connection between the mobile unit and Access
Point. The connection quality should be green most of the time at
the locations where the AirSurfer PRO PC Card will be used to
access the wired LAN.
Netwave AirSurfer PRO Utilities

38
Netwave
®
Airsurfer
®
PRO PC Card User’s Guide
Yellow indicates fair connection quality between the mobile unit and
Access Point. Connection quality is less strong, but unit is func-
tional and performance acceptable. Further weakening could be
due to distance from Access Point, obstacles (steel, brick, concrete),
radio interference, or how busy the Access Point is. If the window
consistently displays yellow, consider adding an Access Point in
that area, or relocating Access Points to improve coverage.
Red indicates poor connection quality between the mobile unit and
Access Point. Connection quality could be poor because the mobile
unit is close to the edge of the Access Point’s coverage area, because
of obstacles (such as steel, brick, concrete), radio interference, or
because the Access Point’s utilization is high. If the window
consistently displays red, an additional Access Point is recom-
mended for that area.
Cyan (light blue) indicates that the mobile unit is configured to operate
in “ad hoc” mode and another mobile unit is detected in range.
The window displays this message: “Netwave ad hoc network in
range” and the SSID number.
If you minimize the window into an icon, you will see a square of the
appropriate color with the connection quality description inside: good, fair,
poor. Using the minimized display, you can keep the utility running and
visually check the connection quality at any time. To return to the standard
window, double click on the icon or click once on the toolbar icon. Win-
dow position and state (minimized, maximized) are saved automatically
when you exit the program.
AirSurfer Properties
The AirSurfer Properties utility allows you to change the SSID
settings for the AirSurfer PRO PC Card without rebooting your
PC. You may create independent service areas (networks) by entering an
SSID string that will be used by all members of the independent wireless
network.
You may connect to an SSID (network with Access Points) by entering the
SSID for that wireless network segment. If there are several AirSurfer PRO
groups within an organization, you can switch from one group to another
on the fly, simply by changing to the SSID of the new group, or selecting it
from a stored list, without having to modify configuration files or reboot the
computer.
Netwave AirSurfer PRO Utilities

39
Netwave
®
Airsurfer
®
PRO PC Card User’s Guide
NOTE
If the Access Points for the new SSID you select in the
ASP Properties window are on a different Ethernet
segment from the Access Point you are currently con-
nected to, you may not be able to log on to that network
segment. Also, while you can change the SSID , ASP
Properties does not allow you to select a particular
Access Point to connect to.
To make a list of frequently used SSIDs, type in the SSID, then click Add.
Your settings will be added to the list at the bottom of the window. When
you click Close, the list is saved.
To use an SSID in the list, select the SSID you want and click Connect. The
utility will connect you to that SSID. (If you double-click a SSID, you will
be connected and the utility will close).
If you enter an invalid SSID, you will get a message box telling you the
proper range. If you select an SSID already saved in the list, the SSID will
also appear in the corresponding fields above.
The AirSurfer Surf Start Utility
The Airsurfer Surf Start Utility is placed in the startup folder so it is loaded
automatically when Windows 95 starts. Surf Start is a utility that resides in
the WIN95 system tray on the task bar. It indicates visually the quality of
the wireless connection. Double-clicking on the Surf Start icon will launch
the more detailed AirSurfer Connection Quality Utility.
Netwave AirSurfer PRO Utilities

40
Netwave
®
Airsurfer
®
PRO PC Card User’s Guide

41
Netwave
®
Airsurfer
®
PRO PC Card User’s Guide
DIAGNOSTICS AND TROUBLESHOOTING
This section describes LED indicators, a diagnostic utility that can be used
to verify AirSurfer PRO PC Card operation, and basic troubleshooting
measures. For error messages, see Appendix B.
AIRSURFER PRO PC CARD LED INDICATORS
LED indicators on the antenna of the AirSurfer PRO PC Card will operate
when: (1) the card is inserted into a PC Card slot, (2) the computer is
powered on, and (3) a network driver has been loaded.
Green (solid) indicates connection to an AirSurfer PRO Access Point
Green (flashing) indicates connection to an independent “ad hoc”
AirSurfer PRO network (NOT used with Access Point).
Amber Intermittent ON indicates the driver has been loaded and
there is no transmit or receive activity on the AirSurfer
PRO segment of the network. Rapidly flasing indicates
transmit and receive activity on the AirSurfer PRO
segment of the network.
TROUBLESHOOTING
Problem: The Green LED flashes once on power-up, but does not stay on
or intermittently flash.
Either your Network Drivers are not properly loaded or your AirSurfer
Wireless PC Card adapter parameters are not configured properly for your
network.
Driver Installation Troubleshooting
Your drivers will not load properly if your AirSurfer PRO card resources
have a conflict. Ensure that there are no resource conflicts.
For Windows 95:
1. Click the Start button, select Settings, Control Panel.
2. Double click the System icon.
3. Click on the Device Manager tab
42
Netwave
®
Airsurfer
®
PRO PC Card User’s Guide
Diagnostics and Troubleshooting
AirSurfer PRO Network Activity
NETWAVE NETWORK ACTIVITY (AMBER)
ACCESS POINT LINK (SOLID GREEN) OR
AD HOC NETWORK LINK (FLASHING GREEN)
4. Double click on the Network Adapters option
5. Double click on the “Netwave AirSurfer Wireless LAN in 802.11
Mode Adapter”
6. Check in the Device Status box to see if the device is working
properly
7. If not, click on the Resources tab
8. In the Conflicting device list, verify that there are no resource
conflicts with the Input/Output range, the Interrupt Request or
the two Memory Range settings.
9. If there are, for each conflict, highlight the category (e.g. Input/
Output Range), then click Change Setting. Scroll on the value
selection until the Conflict Information window indicates that “No
devices are conflicting.” Again, do this for each conflict.
For Windows NT Workstation 4.0:
1. Click the Start button, select Administrative Tools, Diagnostics
2. The first window displays the resource usage for IRQs. Ensure that
there are no conflicts. If there are, note the conflict, and look for
unused IRQs.

43
Netwave
®
Airsurfer
®
PRO PC Card User’s Guide
3. Click on the “I/O” button. Again, ensure that there are no con-
flicts. Note any, and the open I/O ranges.
4. Click on the “Memory” button. Again, ensure that there are no
conflicts. Note any, and the open Memory ranges.
5. Click “OK”
6. To change the resource use of your AirSurfer Wireless PC Card
adapter, click on Start, Settings, Control Panel
7. Double click the Network icon
8. Select the Adapter tab.
9. Highlight the “Netwave AirSurfer Wireless LAN in 802.11 Mode
Adapter” and click on Properties.
10. Make any required changes to your IRQ, I/O, or Memory Ranges.
11. Click “OK”
12. Restart your computer.
If there are no device conflicts, your adapter drivers may have not installed
properly. Please follow the removal instructions in the Network Driver
Removal section of this manual, and follow the installation instructions for
your operating system.
Card Configuration Troubleshooting
If your adapter has the incorrect wireless network settings, it will fail to
communicate. Ensure that the configuration is correct. If you do not know
your SSID and PYH Parameter settings, please contact your network
administrator. These settings must match the other wireless resources—
Access Points (Infrastructure Mode) or other wireless network adapters (Ad
Hoc)—in order to work properly.
For Windows 95:
1. Click the Start button, select Settings, Control Panel.
2. Double click the Network icon.
3. Highlight the “Netwave AirSurfer Wireless LAN in 802.11 Mode
Adapter” and click on Properties.
Diagnostics and Troubleshooting

44
Netwave
®
Airsurfer
®
PRO PC Card User’s Guide
4. Ensure that the SSID and PHY Parameters are set correctly. Make
any changes, if necessary.
5. Click “OK”
6. Restart your computer.
For Windows NT Workstation 4.0:
1. Click on Start, Settings, Control Panel
2. Double click the Network icon
3. Select the Adapter tab.
4. Highlight the “Netwave AirSurfer Wireless LAN in 802.11 Mode
Adapter” and click on Properties.
5. Ensure that the SSID and PHY Parameters are set correctly. Make
any changes, if necessary.
6. Click “OK”
7. Restart your computer.
If you continue to have problems, please contact Netwave Technical
Support department at (925) 737-1613 or at support@netwave-
wireless.com.
Network drivers are loaded but the PC Card cannot access the network.
1. Verify that the PC Card is configured with the same SSID as the
Access Point through which it is attempting to access the network,
or as the other workstations on the ad hoc standalone network you
wish to connect to.
2. Be sure the PC Card is an authorized user of the Access Point
through which it is attempting to connect. If “User Authentica-
tion” has been enabled on the Access Point, the PC Card’s
Ethernet address must be on the User List of the Access Point.
The amber LED on the AirSurfer PRO PC Card is not blinking, or no
LEDs are blinking.
Reboot the computer.
Diagnostics and Troubleshooting

45
Netwave
®
AirSurfer™ PRO PC Card User’s Guide
APPENDIX A:␣
GLOSSARY OF NETWAVE TERMS
Access Point A Netwave device providing access to a
wired network from workstations with
AirSurfer PRO PC Cards installed.
Ad hoc (independent) network A standalone AirSurfer PRO network
consisting of two or more AirSurfer
PRO workstations but no AirSurfer
PRO Access Point and, therefore, no
connections to a wired network. An ad
hoc AirSurfer PRO network generally
requires peer-to-peer network software
such as Windows for Workgroups or
Windows 95. See Peer-to-peer network
and Server-based network.
AirSurfer LAN A cordless local area network technol-
ogy designed by Netwave for mobile
computing users who want cable-free
access to a corporate network or the
ability to set up a temporary cordless
network at any time or place.
AirSurfer PRO PC See AirSurfer PRO workstation.
AirSurfer PRO PC Card Netwave’s cordless network adapter,
using PC Card technology, and
designed for cable-free networking
among standalone workstations or
cordless access to a wired network
through a AirSurfer PRO Access Point.
AirSurfer PRO workstation An IBM PC desktop or portable
computer with AirSurfer PRO
PC Card hardware and AirSurfer PRO
software installed.

46
Netwave
®
AirSurfer™ PRO PC Card User’s Guide
Card Services PCMCIA-compliant software that
interfaces with Socket Services and
automatically provides management of
system resources (such as interrupts and
memory windows) for PC Cards
initialized in a PCMCIA computer.
Configuration utility A Netwave utility program designed to
facilitate initialization of an AirSurfer
PRO PC Card in any PCMCIA
environment. Also called a resource
manager. The AirSurfer PRO version
of this program is designated
ASPCFG.EXE.
Driver software See Network driver.
Ethernet address See IEEE address.
IEEE address A unique hardware address assigned
through the IEEE to each and every
device that can be attached to an
Ethernet network. This address consists
of six hexadecimal numbers, sometimes
separated by spaces or dashes, for
example, AE-34-2C-1D-69-F1. It is
sometimes referred to as the hardware,
MAC, network, or Ethernet address.
IEEE 802.11 Standard A standard developed by the Institute
of Electrical and Electronic Engineers
which defines the requirements for
implementation of wireless LANs.
Independent Network See Ad Hoc (Independent) Network.
Installation program A Netwave utility designed to facilitate
AirSurfer PRO PC Card configuration
and installation of network driver
software.
Appendix A: Glossary of Terms

47
Netwave
®
AirSurfer™ PRO PC Card User’s Guide
Keyword A text string used with a value in a
configuration file, to set a parameter for
the AirSurfer PRO PC Card. Keywords
are only required when the factory-
default value of the parameter cannot be
used in a particular PCMCIA environ-
ment. These parameters can be set with
the AirSurfer Installation Program or
manually by including the required
keyword and setting in the appropriate
driver configuration file (for example the
PROTOCOL.INI file for the NDIS
driver).
MAC layer The media access control (MAC) layer or
data link layer of the ODI reference
model is the interface to higher software
levels. The AirSurfer PRO MAC layer
provides an asynchronous data delivery
service that is equivalent to the service
provided by Ethernet. It is a best effort
datagram delivery service with low delay
that supports typical bursty LAN
applications such as file access, client/
server applications, printing, and email.
Mobile Unit See AirSurfer PRO Workstation.
NDIS The Microsoft Network Driver Interface
Specification (NDIS) defines a hardware-
independent MAC-layer network device
driver. The AirSurfer PRO NDIS driver
conforms to version 3 of this specifica-
tion.
Network driver The software that makes it possible for a
network adapter card such as the
AirSurfer PRO PC Card to operate on a
network.
Appendix A: Glossary of Terms

48
Netwave
®
AirSurfer™ PRO PC Card User’s Guide
Network operating system (NOS) The software that provides
management of local area network
operations and services. Examples of
network operating systems are
Microsoft Windows NT and Novell
NetWare.
ODI The Open Data-Link Interface (ODI)
network driver specification from
Novell allows several protocols to run
simultaneously on one LAN adapter.
OSI reference model A seven-layer scheme describing the
various functions required for network
and computer communications. OSI
stands for Open Systems Interconnec-
tion, which is the International
Standards Organization’s (ISO)
program for standardization of data
communications.
PCMCIA The Personal Computer Memory Card
International Association (PCMCIA) is
a standards organization that has
developed standards for a “PC Card”
that fulfills the same function as the AT
bus on standard desktop computers: it
provides universal, non-proprietary
expansion capability.
Peer-to-peer network A network consisting only of worksta-
tions and peripheral devices, with no
centralized, dedicated server. An
example of peer-to-peer network
operating system is Microsoft Windows
95. In AirSurfer networks, if a peer-to-
peer network does not include access to
a wired network through an AirSurfer
PRO Access Point is called an ad hoc
or standalone network. See Ad hoc
network, Server-based network.
Appendix A: Glossary of Terms

49
Netwave
®
AirSurfer™ PRO PC Card User’s Guide
Physical layer The physical layer is the lowest level of
the OSI reference model for data
communications. It includes transmis-
sion media such as cabling or, in the
case of AirSurfer, radio waves.
Netwave’s AirSurfer technology has
been designed to provide a level of
reliability at the physical level compa-
rable to that of wired LAN adapters.
Resource manager See Configuration utility.
ROAM NOW A function button which permits the
operator to force the mobile unit to
roam and select the Access Point which
provides the best performance at the
moment the button is pressed.
Roaming This is a feature of an AirSurfer
network that allows the AirSurfer user
to move about freely within range of
the other AirSurfer workstations or
Access Points on the network, without
losing connection to the network. In a
network with multiple AirSurfer PRO
Access Points, for example, a “roaming”
user can move out of range of one
network-attached AirSurfer PRO
Access Point and into range of another
AirSurfer PRO Access Point without
being disconnected.
Appendix A: Glossary of Terms

50
Netwave
®
AirSurfer™ PRO PC Card User’s Guide
Server-based network A server-based network is a local area
network on which network processing
and storage are located on a dedicated
workstation or “server” to which other
devices on the network are connected. In
AirSurfer PRO terminology, a server-
based AirSurfer PRO network, by
definition, must include at least one
AirSurfer PRO Access Point giving
Netwave workstations access to the wired
network on which the server is located. A
AirSurfer PRO network that does not
include an Access Point is called an “ad
hoc” network. See also Peer-to-peer
network and Ad hoc network.
Service area An AirSurfer PRO Access Point con-
nected to a wired network provides a
service area with a radius of 100 meters
(approximately 300 feet) indoors and up
to 500 meters in an open environment
around the Access Point. A PC equipped
with an AirSurfer PRO PC Card can
access the wired network from within
that service area. Additional Access
Points can be added to the network to
provide a larger service area. PC users
can “roam” from one service area to
another without losing connection to the
network
Socket Services A PCMCIA BIOS-level interface that
hides the hardware implementation from
PC Card vendors’ drivers. It identifies
the number of PCMCIA sockets in the
computer and detects when a card is
inserted into or removed from a socket.
Appendix A: Glossary of Terms

51
Netwave
®
AirSurfer™ PRO PC Card User’s Guide
Spread spectrum A radio technology used by AirSurfer
products that transmits and receives
over a bandwidth of several megahertz,
allowing for avoidance of both interfer-
ence and eavesdropping through a
technique known as Direct Sequence
Spread Spectrum. Spread-spectrum
radio can penetrate walls and other
solid obstacles. Netwave products have
been approved to operate in the
sections of the radio spectrum used by
the AirSurfer products.
SSID/ESSID Service Set Identifier. An identification
string of 1 to 32 characters defining a
logical network. If the users are
operating with an Access Point, the
logical network is defined by an
Extended SSID (ESSID).
Transmission range The maximum distance from an
AirSurfer PRO Access Point or
AirSurfer PRO PC Card at which
communication with another Access
Point or PC Card can still be expected
to occur. This distance can be made
greater or less by environmental factors
such as building structure or the
presence of electrical interference. The
indoor range of the AirSurfer PRO
PC Card and Access Point is approxi-
mately 100 meters (300 feet) indoors
and up to 500 meters in an open
environment.
Appendix A: Glossary of Terms

52
Netwave
®
AirSurfer™ PRO PC Card User’s Guide
Wired LAN A local area network in which compo-
nents (workstations, servers, printers,
bridges, routers, etc.) are connected by
cabling.
Wired network A transmission network, such as a
telephone system or local area com-
puter network, in which transmission
occurs over physical wires or cables
connecting the components.
Wireless Without cables or wires. Generally used
to refer to communication operations
in which transmission occurs by radio
and not through a system of wires
connecting transmission devices. See
Cordless.
Appendix A: Glossary of Terms

53
Netwave
®
AirSurfer™ PRO PC Card User’s Guide
APPENDIX B:
24-HOUR GLOBAL SUPPORT SERVICES
Customer First
Netwave Technologies, Inc. is committed to delivering complete Customer
Satisfaction. We endeavor to make all of our products reliable, easy to
install, and easy to use. If you need additional technical assistance after
reading the user documentation and README file, Netwave Technologies
provides global access to a wide range of service and support offerings.
Telephone numbers and electronic addresses for worldwide access to
Netwave service and support are listed on the following pages.
www.netwave-wireless.com
Our website provides access to current network drivers and associated
software, driver installation instructions, technical bulletins, and a wide
variety of company and product information.
Call In
You may also speak with a Support Engineer during the local Technical
Support hours listed.
Internet E-mail
If you have a connection to the Internet, you can leave a message for a
Support Engineer at support@netwave-wireless.com.
NOTE
Please fill out and return the Product Registration Card
supplied with the product. Your information will be
entered into our support database.

54
Netwave
®
AirSurfer™ PRO PC Card User’s Guide
Appendix B: 24-hour Global Support Services
Netwave Technologies, Inc. Worldwide Access
www.netwave-wireless.com
The Americas and Asia-Pacific
Netwave Technologies, Inc.
6663 Owens Drive
Pleasanton, California 94588
Direct Line to Technical Support
925-737-1617 Technical Support
(8 a.m. to 5 p.m. U.S. Pacific Time)
925-847-8744 Fax to Technical Support
support@netwave-wireless.com
Europe, Middle East, and Africa
Netwave Technologies, Ltd.
Brooklands House
65 Park Street
Camberley
Surrey GU15 3HE
United Kingdom
Phone (in UK): +44-1276-671707
Fax: +44-1276-676676

55
Netwave
®
AirSurfer™ PRO PC Card User’s Guide
APPENDIX C: LIMITED WARRANTY
Warranties
As the original purchaser, you receive these warranties from
NetwaveTechnologies, Inc.:
Hardware
Your AirSurfer PRO Wireless LAN PC Card, including any AirSurfer
PRO AC power supply component(s) (collectively, “Products”), will be
free from defects in material and workmanship and will perform in
substantial compliance with your user’s manual(s) accompanying the
Products for a period of five years of your date of purchase as long as you
properly use the products.
Software
Software accompanying these Products (including driver, utility software,
etc.) and the magnetic media containing the software are warranted to
perform in substantial compliance with the specifications contained in
your user’s manual(s) for two years from your purchase date. Our
warranty does not cover or provide you with rights to upgrades or
updates.
You are responsible for your choice of applications programs or related
reference materials. Given the wide range of third party hardware and
applications software products you might use our software with, you
understand that Netwave does not warrant the compatibility or the
uninterrupted or error free operation of our software.
Upon our confirmation of a covered defect or failure, at our option we will
repair or replace the affected item or will refund your purchase price if repair
or replacement is not possible or practical. Replacement products or repaired
items may be a new or a refurbished item. Our warranty on items serviced
under warranty will be five years for hardware and, two years for software,
90 days from return to you of software/magnetic media or the remainder of
the original warranty, whichever is longer. Repair, replacement, or refund
are the exclusive remedies available to you from Netwave for products and
software.

56
Netwave
®
AirSurfer™ PRO PC Card User’s Guide
Appendix C: Limited Warranty
Your Obligations
Your warranty rights will be honored provided you
1. Read and follow your user’s manual(s) for installation, setup,
software setup, and operating guidelines,
2. Use the Products and software only in suitable physical or operating
environments as described in your user’s manual(s) and for purposes
for which the Products and software are intended.
Warranty Service
If you think there is a problem or defect with your purchased item, your
point of contact will be
In the U.S.A.
Netwave’s Technical Support department at (925) 737–1613
or email support@netwave-wireless.com.
Outside the U.S.A.
Contact your local Netwave supplier or Netwave regional office
or email support@netwave-wireless.com.
Your Netwave contact will discuss your problem to confirm the defect. If
warranty or return service is needed, you’ll receive a Return Material
Authorization (RMA) number.
Ship your return Product, with the RMA number clearly visible on the
outside of the shipping package, to:
From the U.S.A.
Netwave Technical Support
6663 Owens Drive
Pleasanton, CA 94588
RMA # _______________
From outside the U.S.A.
Contact your local Netwave supplier or Netwave regional center
for shipping instructions.

57
Netwave
®
AirSurfer™ PRO PC Card User’s Guide
Returned Products must include all other components from your original
package, including the Product and any power adapters, software diskettes,
and user manual(s). Be sure to enclose a copy of your purchase receipt or
other proof of purchase confirming that you are the original purchaser.
LIMITATIONS
Our warranty is subject to the following limitations:
a. We do not cover or accept liability for any injury, damage or failure
caused by misuse, abuse, acts of Nature, accidents (e.g., dropping the
Products or software diskettes), electrical mishaps, causes beyond our
control, or claims by other than the original purchaser.
b. We will not honor, and will consider our warranty voided, if there
has been any (1) tampering with the Product’s external label or serial
number, (2) attempt to open the Product’s case, (3) attempted or
actual repair by anyone other than an authorized Netwave techni-
cian, or (4) installation or use with any AC power supply
component(s) other than the original Netwave AC power supply
components(s) provided in the product package.
DISCLAIMER
THIS LIMITED WARRANTY IS THE ONLY WARRANTY WE MAKE
FOR THE PRODUCT AND SOFTWARE. TO THE EXTENT AL-
LOWED BY LAW, NO OTHER WARRANTY APPLIES, WHETHER
EXPRESS, IMPLIED, OR STATUTORY, INCLUDING ANY WAR-
RANTY OF MERCHANTABILITY, OF FITNESS FOR A
PARTICULAR PURPOSE, OR OF NON-INFRINGEMENT.
NETWAVE WILL NOT BE LIABLE OR RESPONSIBLE FOR ANY
INCIDENTAL, CONSEQUENTIAL, OR SPECIAL DAMAGES (e.g.,
LOST PROFITS, LOSS OF OR DAMAGE TO ANY COMPUTER
EQUIPMENT OR RELATED DATA).
Additional Rights
Some states or countries do not allow exclusion or limitation of incidental or
consequential damages, or limitations on the length of an implied warranty,
so the above limitations or exclusions may not apply to you. Our warranty
gives you specific legal rights, and you may also have other rights which vary
from state to state or country to country.
Appendix C: Limited Warranty

58
Netwave
®
AirSurfer™ PRO PC Card User’s Guide

59
Netwave
®
AirSurfer™ PRO PC Card User’s Guide
APPENDIX D:
SOFTWARE LICENSE AGREEMENT
Netwave Technologies grants you a nonexclusive license to use the copies of
software programs supplied with this product on the following terms:
YOU MAY:
a. Use the software program on any computer or network but only in
conjunction with any Netwave hardware product;
b. Permit any other individuals to use the software program either
directly or on a computer network, but only if there is no more than
one user for each Netwave hardware product in use in conjunction
with such use;
c. Make only those number of backup and archival copies of the
software program in machine readable form as are essential to backup
use of the software program, provided that you reproduce all
proprietary notices on each copy.
YOU MAY NOT:
a. Modify, translate, reverse engineer, decompile, disassemble, create
derivative works based on, or copy (except for archival purposes) the
program or the accompanying documentation;
b. Rent, transfer, sublicense or grant any rights in the program or
accompanying documentation (including any time-sharing arrange-
ment) in any form to any other person without the prior written
consent of Netwave;
c. Remove any proprietary notices, labels, or marks on the program and
accompanying documentation.
Failure to comply with any of the above restrictions will terminate this
license. This is not a sale. Title and copyrights to the program and accompa-
nying documentation and any copies remain with Netwave except that title
to software programs shipped by Netwave through an agreement with
another manufacturer is owned and retained by the original manufacturer

and no title to the intellectual property contained in such programs is
transferred hereunder. The human readable code of the software program
(source code), including the source code of programs shipped by Netwave
through an agreement with another manufacturer, is not sublicensed
hereunder.
U.S. GOVERNMENT RESTRICTED RIGHTS
The SOFTWARE and documentation are provided with RESTRICTED
RIGHTS. Use, duplication, or disclosure by the Government is subject to
restrictions as set forth in subparagraph (c)(l)(ii) of the Rights in Technical
Data and Computer Software clause at DFARS 252.227-7013, or subpara-
graphs (c)(l) and (c)(2) of the Commercial Computer Software-Restricted
Rights at 48 CFR52.227-19, as applicable. Contractor/manufacturer is
Netwave Technologies, Inc., 6663 Owens Drive, Pleasanton, California
94588.
This Agreement is governed by the laws of the State of California.
Appendix E: Software License Agreement

APPENDIX E: SPECIFICATIONS
AIRSURFER PRO PC CARD SPECIFICATIONS
Size: 4.0 in x 2.13 in x 0.20 in
(101.6 mm x 54.0 mm
x 5.0 mm)
Weight: 1.6 oz (45 g)
Operating Temperature Range: 32 °F to 131 °F
(0 °C to 55 °C)
Storage Temperature Range: -4 °F to 149 °F
(-20 °C to 65 °C)
Humidity: 95% maximum
noncondensing
Memory Size: 128K SRAM packet buffer
Transmission Range (indoors): 50 m to 100 m
(200 to 300ft indoors)
(1500 - 2000 in open space)
FCC Certification
47CFR PART 15, Class B
ETSI Certification
TO BE OBTAINED
CE MARK
TO BE OBTAINED

G 800–1020–001