Northfield Telecommunications d b a Advanced Wireless Communications AWR8000 Two-Way Radio User Manual
Northfield Telecommunications, Inc. d/b/a Advanced Wireless Communications Two-Way Radio
Contents
- 1. Users Manual
- 2. User Manual
User Manual
AWR Advantage
User manual
AWR8000
AdvancedwirelessCommunication
THANK YOU!
ThankyouforyourpurchaseofAdvancedWirelessCommunications’
AWR8000two‐wayradio.Thisportabletwo‐wayradioisabusinessgrade
device.Treatitwithcare,andyouwillenjoyyearsofreliableoperation.
The manual is applicable to the following model:
AWR8000
Product Safety and RF Exposure for Portable Two-Way Radios Compliance with
RF Energy Exposure Standards
NOTICE: This radio is intended for use in occupational/controlled applications where
users have been made aware of the potential for exposure and can exercise control over
their exposure. This radio device is NOT authorized for general population, consumer or
similar use.
BEFOREUSINGTHISRADIO,READTHETRAININGMATERIALBELOWWHICHCONTAINS
IMPORTANTOPERATINGINSTRUCTIONSFORSAFEUSAGEANDRFENERGYAWARENESSAND
CONTROLINFORMATIONFORCOMPLIANCEWITHRFENERGYEXPOSURELIMITSINAPPLICA‐
BLENATIONALANDINTERNATIONALSTANDARDS.
Federal Communication Commission (FCC) Regulations
The FCC has established limits for safe exposure to radio frequency (RF) emissions from
portable two-way radios. The FCC requires manufacturers to demonstrate compliance
with RF exposure limits before portable two-way radios can be marketed in the U.S.
When two-way radios are approved for occupational/controlled environment exposure
limits, the FCC requires users to be fully aware of, and exercise control over, their
exposure. Awareness and control of RF exposure can be accomplished by the use of
labels, or by education and training through appropriate means such as information and
instructions in user manuals or safety booklets. Your Advanced Wireless Commu-
nications’ two-way radio has an RF exposure information label in the battery
compartment. The training material below includes useful information about RF exposure
and helpful instructions on how to control your RF exposure. Your Advanced Wireless
Communications two-way radio is designed and tested to comply with a number of
national and international standards and guidelines (listed below) regarding human
exposure to RF electromagnetic energy. In terms of measuring RF energy for compliance
with FCC exposure guidelines, your radio radiates measurable RF energy only while it is
transmitting (during talking), not when it is receiving (listening) or in standby mode.
AWR approved accessories, antennas, and device combinations comply with the
similar accessory that contains no metallic components.
Compliance and Control Guidelines and Operating Instructions for Portable Two-Way
Radios To control your exposure and ensure compliance with the occupational/controlled
environment exposure limits, always adhere to the following procedures:
*Transmit no more than 50% of the time. To transmit (talk), push the PushTo-Talk (PTT)
button. To receive calls, release the PTT button. Transmitting 50% of the time or less is
important since the radio generates measurable RF energy exposure only when
transmitting (in terms of measuring standards compliance).
* For body-worn operation, always place the radio in an AWR approved belt-clip or
occupational/controlled environment RF exposure limits. Using non-AWR approved
accessories may result in exposure levels which exceed the FCC’s
occupational/controlled environment RF exposure limits. AWR-approved accessories
m of 2.5 cm from the body when transmitting.
have been tested and comply with FCC RF exposure requirements.
*If you are not using a body-worn accessory and are not using the radio held in front of
the face, ensure the radio is kept at a minimu
Keeping the radio at a proper distance is important since RF exposure decreases with
increasing distance from the antenna.
*Use only FCC-approved, supplied or replacement headsets, batteries, and accessories
intended for use with this radio. Use of non-FCC approved headsets, batteries and
accessories may exceed FCC RF exposure guidelines.
FCC License Information
Your Advanced Wireless Communications radio operates on communications
frequencies which are subject to FCC (Federal Communications Commission) Rules &
Regulations. FCC Rules require that all operators using Private Land Mobile radio
Hold the radio in a vertical position in front of face with the microphone (and the other parts of
the radio, including the antenna) at least one inch (2.5 cm) away from the nose. Keeping the
radio at the proper distance is important because RF exposures decrease with distance from the
antenna. Antenna should be kept away from eyes.
frequencies obtain a radio license before operating their equipment. Application for
license must be made on FCC form 601, and schedules D, E, and G.
FAX: Forms can be obtained by fax from the FCC Fax-On-Demand system. Call
1-202-418-0177 from your fax machine and request document number 000600 for the
form, schedules, and instructions.
MAIL: Forms can be ordered by telephone, and will be sent to you by first class mail. Call
the FCC Forms Hotline at 1-800-418-FORM (1-800-418-3676).
INTERNET: Form 601 and instructions can be downloaded from the FCC Forms website
at: http://www.fcc.gov/Forms/Form601/601.html
Before filling out your Form 601 application Technical Data section, you must
decide which frequency (or frequencies) you will operate on.
Questions? Call the FCC for license application questions at 1-888-CALL-FCC
(1-888-225-5322).
If you have any questions, call Advanced Wireless Communications at 1-800475-5852
Notices to The User
This device complies with Part 15 of the FCC Rules. Operation is subject to the
following two conditions:
(1) this device may not cause harmful interference, and
(2) this device must accept any interference received, including interference that may
cause undesired operation.
One or more of the following statements may be applicable:
FCC WARNING
This equipment generates or uses radio frequency energy. Changes or modifications to
this equipment may cause harmful interference unless the modifications are expressly
approved in the instruction manual. The user could lose the authority to operate this
equipment if an unauthorized change or modification is made.
IC RSS warning
This device complies with Industry Canada licence-exempt RSS standard (s).
Operation is subject to the following two conditions: (1) this device may not cause
interference, and (2) this device must accept any interference,including interference
that may cause undesired operation of the device.
Le présent appareil est conforme aux CNR d'Industrie Canada applicables aux
appareils radio exempts de licence.
L'exploitation est autorisée aux deux conditions suivantes:
(1) l'appareil ne doit pas produire de brouillage, et
(2) l'utilisateur de l'appareil doit accepter tout brouillage radioélectrique subi, même si le
brouillage est susceptible d'en compromettre le fonctionnement.
Under Industry Canada regulations, this radio transmitter may only operate using an
antenna of a type and maximum (or lesser) gain approved for the transmitter by
Industry Canada. To reduce potential radio interference to other users, the antenna
type and its gain should be so chosen that, the equivalent isotropically radiated power
(e.i.r.p.) is not more than that necessary for successful communication.
Conformément à la réglementation d'Industrie Canada, le présent émetteur radio peut
fonctionner avec une antenne d'un type et d'un gain maximal (ou inférieur) approuvé
pour l'émetteur par Industrie Canada. Dans le but de réduire les risques de brouillage
radioélectrique à l'intention des autres utilisateurs, il faut choisir le type d'antenne et son
gain de sorte que la puissance isotrope rayonnée équivalente (p.i.r.e.) ne dépasse pas
l'intensité nécessaire à l'établissement d'une communication satisfaisante.
This radio transmitter (identify the device by certification number, or model number if
Category II) has been approved by Industry Canada to operate with the antenna types
listed below with the maximum permissible gain and required antenna impedance for
each antenna type indicated. Antenna types not included in this list, having a gain
greater than the maximum gain indicated for that type, are strictly prohibited for use with
this device.
Le présent émetteur radio (identifier le dispositif par son numéro de certification ou son
numéro de modèle s'il fait partie du matériel de catégorie I) a été approuvé par Industrie
Canada pour fonctionner avec les types d'antenne énumérés ci-dessous et ayant un
gain admissible maximal etl'impédance requise pour chaque type d'antenne. Les types
d'antenne non inclus dans cette liste,
ou dont le gain est supérieur au gain maximal indiqué, sont strictement interdits pour
l'exploitation de l'émetteur.
IC Radiation Exposure Statement:
This equipment complies with IC RF radiation exposure limits set forth for an
uncontrolled environment. This transmitter must not be co-located or operating in
conjunction with any other antenna or transmitter.
IC exposition aux radiations:
Cet équipement est conforme avec IC les limites d'exposition aux rayonnements
définies pour un contrôlé environnement.
Cet émetteur ne doit pas être co-localisés ou fonctionner en conjonction avec une autre
antenne ou émetteur.
Hold the radio in a vertical position in front of face with the microphone (and the other parts of
the radio, including the antenna) at least one inch (2.5 cm) away from the nose. Keeping the
radio at the proper distance is important because RF exposures decrease with distance from the
antenna. Antenna should be kept away from eyes.
INFORMATION TO THE DIGITAL DEVICE USER REQUIRED BY THE FCC
This equipment has been tested and found to comply with the limits for a Class B digital
device, pursuant to Part 15 of the FCC Rules. These limits are designed to provide
reasonable protection against harmful interference in residential installations. This
equipment generates, uses and can generate radio frequency energy and, if not installed
and used in accordance with the instructions, may cause harmful interference to radio
communications. However, there is no guarantee that the interference will not occur in a
particular installation. If this equipment does cause harmful interference to radio or
television reception, which can be determined by turning the equipment off and on, the
user is encouraged to try to correct the interference by one or more of the following
measures:
·Increase the separation between the equipment and receiver.
·Connect the equipment to an outlet on a circuit different from that to which the receiver
is connected.
·Consultwiththedealerfortechnicalassistance.
SAFETY INFORMATION:
Your wireless portable two-way radio has been designed using a low power transmitter.
When the PTT switch is pressed, the radio generates radio frequency (RF)
electromagnetic energy (EME). This radio is designed to comply with the FCC Report
and Order FCC 96-326 (August, 1996).
User Safety Information
PLEASE READ THIS IMPORTANT INFORMATION BEFORE USING YOUR
ADVANCED WIRELESS COMMUNICATIONS PORTABLE TWO-WAY RADIO.
◊ To avoid electromagnetic interference, turn off your radio in places where posted
notices instruct you to do so. Hospitals or health care facilities may be using equipment
that is sensitive to external RF energy. When traveling on aircraft, turn off your radio
when the airline crew instructs you to do so.
◊ When in vehicles equipped with an air bag, do not place a portable radio in
the airbag deployment area.
◊ Turn off your radio prior to entering any area with a potentially explosive
atmosphere. Do not remove, install, or charge batteries in such areas.
◊ To avoid possible interference with blasting operations, turn off your radio
when you are near electrical blasting caps.
◊ Do not expose the radio to direct sunlight for long periods of time. Do not
placetheradioindirectcontactwithanyheatingsource.
◊ Please observe the following safety precautions when setting up and using this
product.
·Heat sources - Keep the product away from heat sources such as radiators, stoves,
heaters, and other heat-generating products.
·Water and moisture - Do not use the product in or near water or in high moisture areas
such as a bathroom.
CARING FOR THIS PRODUCT
To ensure you receive the maximum benefit from using this product, please observe the
following guidelines.
·Cleaning - Use a damp cloth. Do not use liquid cleaning agents, benzene, thinner, or
aerosols.
·Repair - Do not attempt to repair the product or modify the circuitry by yourself. Only
replacement parts that are recommended by Advanced Wireless Communications (AWC)
should be used. You can contact AWC at 1-800-4755852.
·Do not scratch hard objects against the LCD display as this may cause damage.
GETTING ACQUAINTED
PRODUCT INPSECTION
Thank you for your purchase of Advanced Wireless Communications AWR4000 Portable
Two-way Radio. Before use, please inspect the product as follows. First check the
shipping carton for any signs of damage. If any damage has occurred, please contact
your dealer or Advanced Wireless Communications immediately. Confirm the supplied
product against the packing slip to assure accuracy.

PACKAGING CONTENTS:
Part Number Item Qty.
1 Radio 1
2 Battery 1
3 Single Charger 1
4 Charger adapter 1
5 User Manual 1
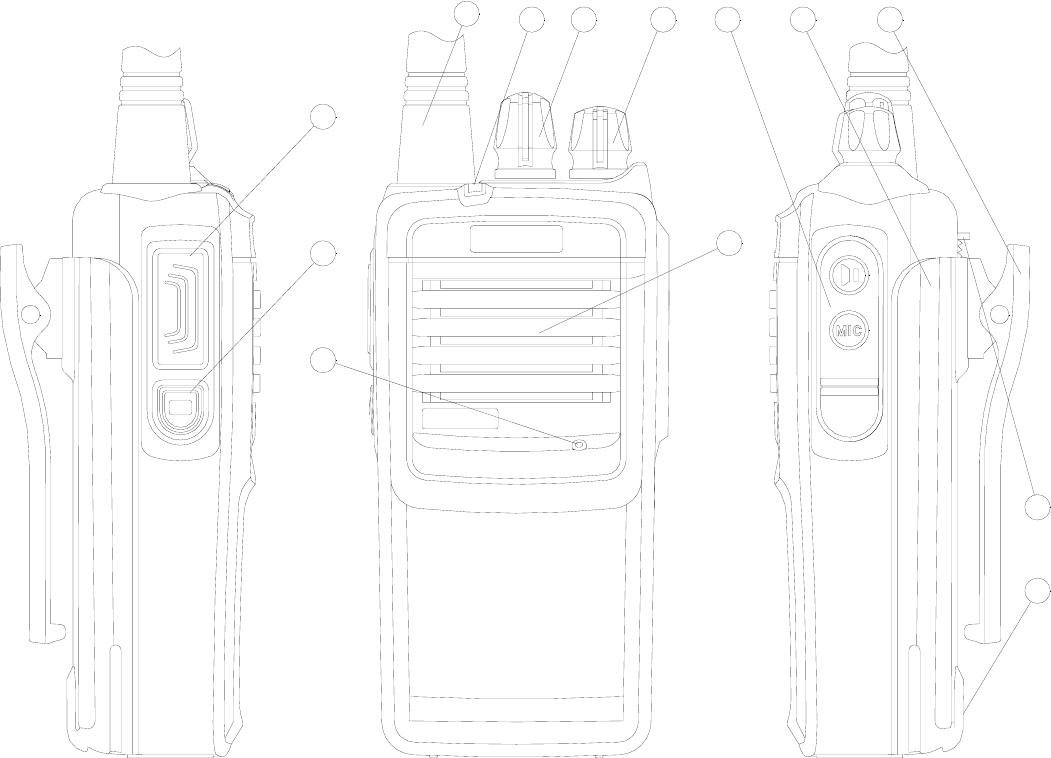
RADIO VIEW
1
5
6
7
23411
910
8
12
13
1. Antenna
2. LED Indicator
3. Channel Knob
4. Power switch/ Volume Knob
5. SF 1, Programmable function 1 key ( default: PTT )
6. SF 2, Programmable function key,( Default: Monitor @long press, Scan @short
press)
7. Microphone
8. Speaker
9. Head set Jack /Programming Cable Jack
10. Battery
11. Battery Latch
12. Belt Clip
13. Charger Terminal
Programmable Auxiliary Functions
The SF keys can be programmed with the functions below, Please contact
your dealer for further details on these functions.
None
Squelch Off
Monitor
Monitor Momentary
Scan
Call Tone
DTMF Call1
DTMF Call2
GETTING STARTED
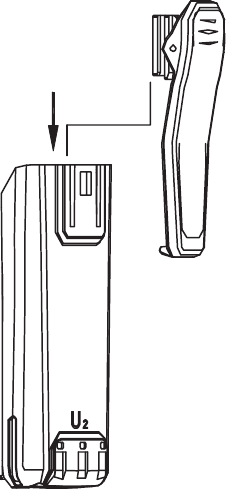
IN STALLING THE BELT CLIP
1. Align the grooves of the belt clip
those of the battery.
2. Press the belt clip downwards until
the belt clip tab locks.
Note: attach the belt clip before installing
the battery.
Figure 2
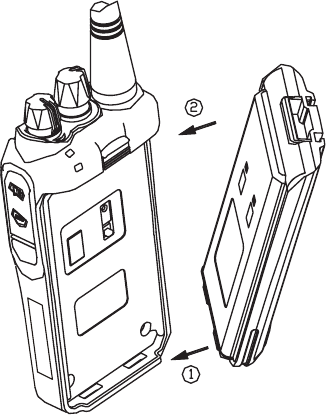
INSTALLING THE BATTERY
1. Turn off the radio.
2. Insert the tabs at the bottom of the battery into the slots at the bottom of the radio
chassis.
3. Press the top of the battery towards the radio until a click is heard.(See Figure 1)
Figure 3
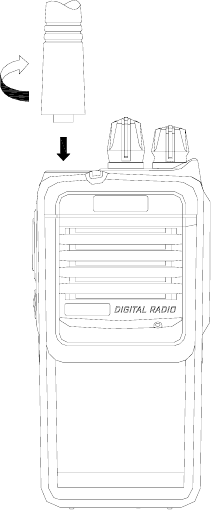
INSTALLING THE ANTENNA
1. Insert the threaded end of the antenna into the connector on top of the radio.
2. Turn the antenna clockwise to tighten.
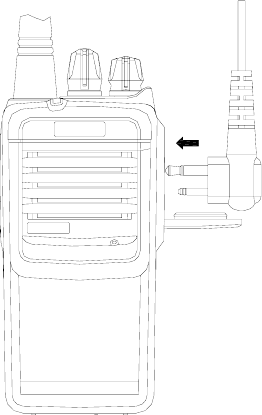
INSTALLING THE EXTERANL EARPIECE/MICROPHONE
1. Open (not remove) the accessory cover.
2. Plug the audio accessory firmly into the accessory jack.
Note: Using the radio with audio accessory may affect the waterproof performance of the
radio.

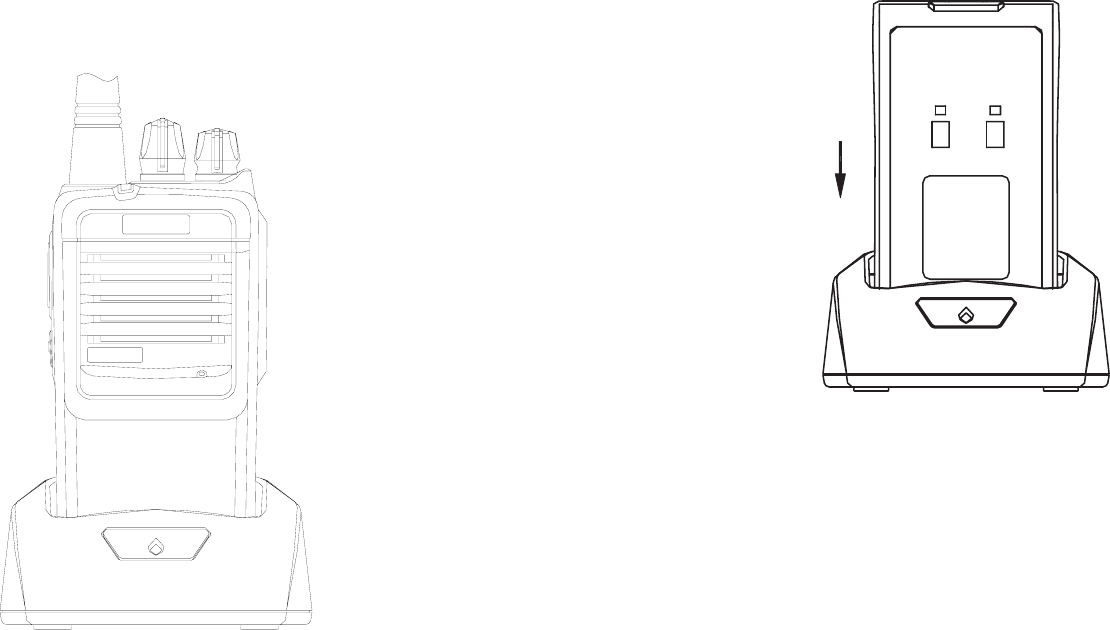
CHARGING THE BATTERY
When you will hear a voice prompt “please charge”, then you need to recharge
the battery.
For optimum battery life, do not charge the battery for prolonged periods after it
is fully charged.
Charger LED will indicate the charging status.
Charger LED Status
Flashing Red Error
Steady Red Battery is charging
Steady Green Battery is fully charged
CAUTION
·To avoid risk of fire or injury, do not attempt to charge non-rechargeable batteries.
Please turn off the unit while charging.
·Replace only batteries with the same or equivalent type recommended by the
manufacturer.
·Please dispose of old, defective batteries in an environmentally friendly manner in
accordance with the relevant laws and regulations.
·Donotdisposethisproductasunsortedmunicipalwaste.Collectionofsuchwasteseparately
forspecialtreatmentisnecessary.
·Do not expose equipment and accessories to open flames, such as lighted candles, etc.
·To reduce the risk of electric shock, do not expose equipment to rain or moisture.
Basic Operations
Turn On/Off the Radio
To turn the radio on, rotate the “Power/Volume” knob clockwise. An alert tone indicates
that the self-test of the radio completed successfully. The LED glows green during
power-up.
To turn the radio off, rotate the “Power/Volume” knob counterclockwise until a click is
heard.
Adjust the Volume
Rotate the “Power/Volume” knob to adjust the volume.
Select Channel
The radio provides 16 conventional channels. Some of the channels may be not
programmed and, therefore, not used. Please contact your dealer for more details.
Rotate the “Channel Selector” knob to select the wanted channel.
Transmit
1. Turn on the radio.
2. Rotate the “Channel Selector” knob to select the wanted channel.
3. Make sure there is no activity on the channel.
4. Press the PTT button and speak into the microphone with your mouth 1- 2 inches
away from the radio. The LED glows red during transmission.
5. Release the PTT button to finish transmission.
Receive
1. Turn on the radio.
2. Rotate the “Channel Selector” knob to select the wanted channel.
3. Adjust the volume.
4. When CTCSS/CDCSS or squelch tail elimination feature is set by your dealer:
• No squelch tail will be heard at the end of a received transmission when the
courtesy tone is disabled.
• A beep tone sounds at the end of a received transmission when the courtesy
tone is enabled.
• Please contact your dealer for more details.
VOX Operation
When hands-free operation is desired, your radio can be activated by voice alone using
the VOX feature when you speak through an accessory that is connected to your radio.
Connecting a VOX Headset
1. Turn off your radio.
2. connect the VOX accessory to your radio and turn the radio on.
Note: Pressing the PTT button disables VOX.
BLUETOOTH HEADSET OPERATION
For using the Bluetooth function, you must make your radio to pair your headset firstly.
Pairing
Your headset enter the pairing state
Note: See your headset operation manual for detail
Press and hold "Side Key" to switch on the radio,After hearing channel voice
and "di di di" tone , release the "Side Key", Press PTT key, then the blue LED
indicator will quickly flash, the radio enter the pairing state.
When the pairing is success, the radio will sound a prompt tone, and the blue
LED will end the quickly flash and keep flashing every 3 seconds.
Connecting
Once your radio had paired your blue headset, you do not need to pair again
when you want to use the bluetooth operation next time. But you still need to
connect your bluetooth headset with your radio.
Press and hold "Side Key" to switch on the radio, after hearing channel voice
and "di di di" tone, release the "Side Key". Then press side key again, the blue
LED indicator will flash once every 6 seconds. the radio enter the connecting
state.
Turn on your bluetooth headset, the headset enter standby and connecting
state.
When the connecting is success, the radio will sound a prompt tone, and the
blue LED will flash once every 3 seconds.
Make a call
Double-click the bluetooth headset Answer Key twice, the radio will enter
transmit state, you can talk to the headset to make a call,
Also, you can press the radio PTT, speak to headset and make a call.
Disenable the Bluetooth headset connecting
Swith off your bluetooth headset and disconnect the bluetooth connecting.
Or Swith off your radio to disenable the bluetooth connecting.
Monitoring a Channel
Monitoring allows you to check for activity on a channel. AWR Advantage have
three monitor mode. You can choice a mode according to your usage habit or
scene.
Squelch Off
In this mode, the speaker is unmuted in any condition so as to receive any
sound on the current channel. When audio signal is received on the channel,
audio will be heard. Otherwise, background noise will be heard.
Operation: Press and hold the Monitor key to enter this mode, and release
the key to exit.
Monitor toggle
In this mode, the receiving party can receive incoming calls from the
transmitting party regardless of CTCSS/CDCSS condition. If the carrier
condition is not satisfied, the receiving party will fail to receive any incoming
calls.
Operation: Press the Monitor key to enter this mode, and press it again to
exit.
Monitor Momentary
Refer to Monitor toggle.
Operation: Hold down the programmed monitor key continuously to enter
this mode, and release the key to exit.
Scanning
You can scan up to 16 channels and frequencies. When the radio detects
activity, it stops scanning and locks in on the active channel. This allows you
to talk and listen to the person transmitting without changing channels.
1. To start scanning, briefly press the key programmed as “Scan”. the radio
begins to scan the channels.
When the radio detects activity, it stops on that channel.
2. To talk to the person transmitting without switching channels, press PTT
within 5 seconds. If no transmission occurs within 5 seconds, scanning resumes.
Note: these timers can be changed by the programming software.
3. To stop scanning, briefly press “Scan” Key.
If you press PTT while the radio is scanning, the radio transmits on the channel
you were on before you started scanning.
Without Priority Channel
Providing that there is a scan list with 6 channels and all channels
are non-prioritized, the normal scan operation would proceed in the
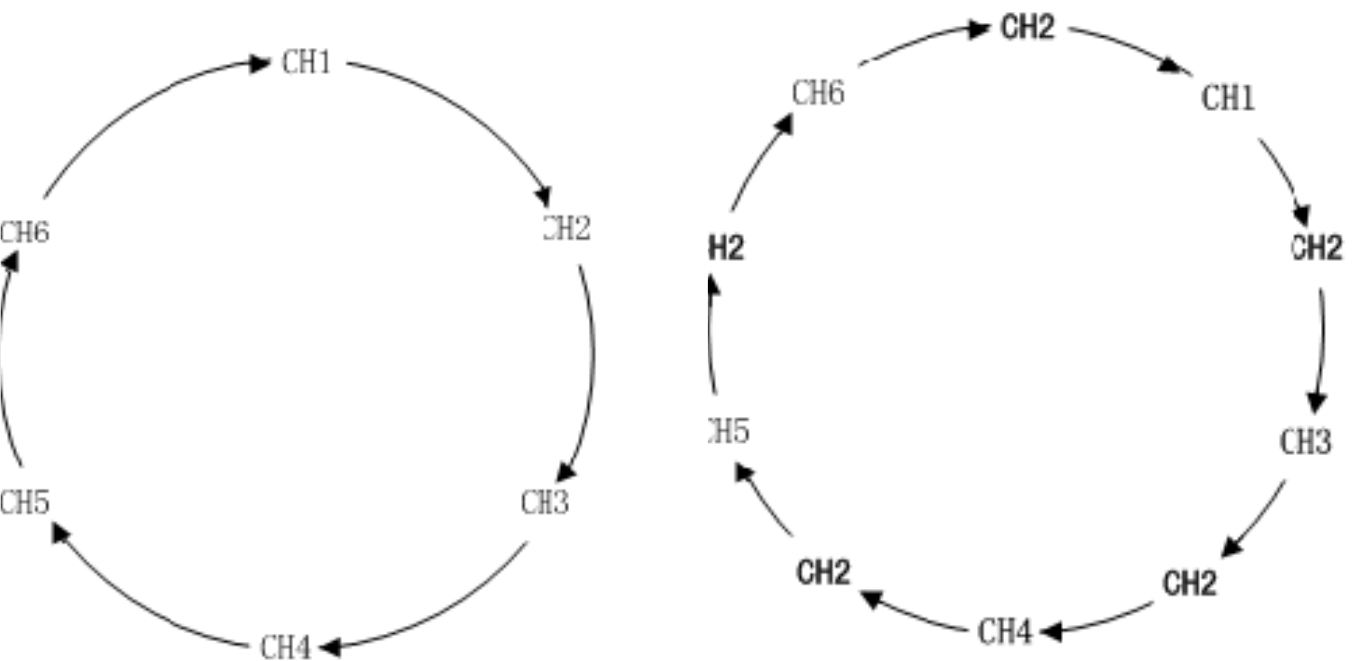
following sequence, as shown in Figure 1.
Figure 1 Normal Scan Sequence Figure 2 Priority Scan Sequence
With Priority Channel
If you prioritize Channel 2 as Priority 1, the scan operation would proceed in
the following sequence, as shown in Figure 2.
This function enables users to scan the most frequently used channel so that
messages will not be missed. The priority channel is programmed by the
dealer via programming software. Contact your dealer for details.
Note: Even though the radio remains on a non-priority channel, activities on
the priority channel are still under monitoring. The radio will switch to the
priority channel once any activity is detected.
Power-on Scan
If Power-on Scan is enabled by your dealer, the radio will automatically enter
scan mode when it switch on.
The radio is always in scan mode until you switch off the radio.
WIRELESS CLONING
The AWR8000 is capable of Wireless Cloning. For details on this function, contact
Advanced Wireless Communications at 800-475-5852.
Advanced features
Busy Channel Lockout (BCL)
When the BCL feature is enabled, you are prevented from transmitting on a channel that
is already in use. Press the PTT on a channel that is already in use, the radio will sound
alert tone and turn back to the receive mode.
Time-Out-Timer (TOT)
The Time-Out-Timer(TOT) is used to prevent someone from using the same channel for
a long time and to prevent the radio from damage due to continuous transmission.
If the transmission exceeds the preset time, transmission will be inhibited and a beep
tone will sound. To stop the beep tone, release the [PTT] key .Press the [PTT] key again
to resume transmitting.
Battery Save
When enabled, the Battery Save feature is automatically activated once the situation that
no activity on the channel and no operation performed, lasts for 10-12 seconds. This will
extend operation time.
Pressing any key or receiving a signal will restore the radio to normal operation and exit
from Battery Save.
Low battery Alert
When the battery voltage goes below a preset value, a “please charging” voice will sound
and then the radio stops transmitting.
This feature is designed to automatically remind you of recharging or replace the
battery.
Scrambler
This feature means that your conversation is secrecy.
If Scrambler is set on the current channel, only the radio set Scrambler active can receive
you, the radio not set only get a noise voice.
Compander
Companding is a feature that allows further improvement of voice quality. It compresses
your voice at transmission, and expands it when receiving while simultaneously reducing
extraneous noise. However, to enjoy this benefit, all transmitting and receiving radios
must have this feature activated.

TROUBLESHOOTING
See below for some common problems and their remedies. DO NOT attempt any repairs
yourself. This will invalidate your warranty.
PROBLEM POSSIBLE CAUSES / REMEDIES
Can’t turn the radio on
• Check that the battery is correctly
installed and has been fully charged.
Can’t communicate with other radios
• For this and all other issues contact
Advanced Wireless Communications at
1-800-475-5852 or visit
www.advancedwireless.com for more
information.
VOX function is not working
• Check the headset is correctly plugged
in and is compatible with the radio

2016AdvancedwirelessCommunication.Allrightsreserved.