Novatel Wireless CDP06PS Pocket Spider CDPD modem User Manual PocketSpider g
Novatel Wireless Inc. Pocket Spider CDPD modem PocketSpider g
Revised manual for correspondence reference 1256

CONFIDENTIAL AND PROPRIETARY INFORMATION
Do not duplicate or distribute without express permission from Nextcell Inc.
© 2000 Nextcell, Inc.
PocketSpider®
CDPD MODEM
USER’S MANUAL
for
Windows CE 3.0
Nextcell, Inc.
661 E. 18th Street
Plano, TX 75074-5601
Document Number: CDP0601PB003 Revised: January 22, 2001

CDPD0601PB003
CONFIDENTIAL AND PROPRIETARY INFORMATION
Do not duplicate or distribute without express permission from Nextcell, Inc.
i
CONTENTS
SECTION SUBJECT
1.0 INTRODUCTION
2.0 CDPD BASICS
2.1 Registering with a Carrier
2.1.1 Activating Your Service
2.1.2 Registration
2.1.3 CDPD Charges
3.0 INSTALLATION AND SETUP
3.1 Battery Operation
3.2 Compact Flash Memory Card Installation
3.3 Setup
4.0 MONITORING MODEM STATUS
4.1 LCD Display
4.1.1 Operational Status
4.1.2 Battery Low Indication
4.2 Handheld Device Screen
5.0 BATTERY AND CHARGER
5.1 Battery Installation and Removal
5.2 Initial Set up
5.3 Charger Operation
6.0 TECHNICAL SUPPORT
SAFETY AND REGULATORY INFORMATION
WARRANTY
APPENDICES
AREMOTE INSTALLATION PROCESS
BABBREVIATIONS AND DEFINITIONS
CADVANCED USER TOOLS

CDPD0601PB003
CONFIDENTIAL AND PROPRIETARY INFORMATION
Do not duplicate or distribute without express permission from Nextcell, Inc.
1
PocketSpider® USER'S MANUAL
1.0 INTRODUCTION
Welcome to the world of wireless data. Your PocketSpider® is a compact, wireless data
modem that uses the Cellular Digital Packet Data (CDPD) wireless communication
system, allowing you to transfer data on the go (i.e., without wires). Wireless IP
(Internet Protocol) supports browser-based applications, giving you feature rich
capability with the Internet in your hand.
With this modem, you are taking advantage of the latest development in wireless data
technology. The PocketSpider Modem offers the convenience of wireless data, the
benefits of the CDPD network, ease of use, and minimal power consumption.
The PocketSpider is the first wireless IP (CDPD) modem designed exclusively for a
compact flash slot. With the power of wireless data and GPS, Nextcell is revolutionizing
the world of PocketPC®, Palm, and handheld PC devices.
This User’s Manual describes the use of the PocketSpider Modem with a Handheld PC
(H/PC) device. The PocketSpider is compatible with Windows CE version 3.0 (e.g.,
Pocket PC). Please read all instructions carefully before installing your PocketSpider
modem into your H/PC.
Your PocketSpider kit includes the following:
• PocketSpider
• Battery Pack (Li ion)
• Battery Charger
• Charger Base
• Wall transformer (AC adapter) for charger
• Compact Flash card with installation software
• User's Manual
2.0 CDPD BASICS
CDPD, short for Cellular Digital Packet Data, is also known as "Wireless IP." It is a data
transmission technology developed for use on cellular phone frequencies. CDPD uses
unused cellular channels (in the 800- to 900-MHz range) to transmit data in packets.
This technology offers data transfer rates of up to 19.2 Kbps, quicker call set up, and
better error correction than using modems on an analog cellular channel. CDPD is
based on TCP/IP, the same protocols that power the Internet.

CDPD0601PB003
CONFIDENTIAL AND PROPRIETARY INFORMATION
Do not duplicate or distribute without express permission from Nextcell, Inc.
2
2.1 Registering With a Carrier
Just as you would do with a cell phone, you must first register for service with a local
CDPD carrier.
2.1.1 ACTIVATING YOUR SERVICE
The PocketSpider will work with any CDPD carrier. Decide which carrier offers the best
plan to meet your CDPD needs, then register with that carrier.
Typically, two service carriers will be available to a CDPD user. One will be known as
the A-side carrier and the other is known as the B-side carrier. You may register with
the A-side carrier, the B-side carrier, or both of the carriers.
2.1.2 REGISTRATION
When you register with a CDPD carrier, the carrier should give you the following
information:
•Internet Protocol (IP) address
•Carrier Side Identification (Either A or B)
•Service Provider Network Identifier (SPNI) Number
Be sure to record this information. This information may be needed in order to receive
customer service and/or technical support.
You will be assigned a specific Internet Protocol (IP) address to use with your modem.
Your carrier should also indicate whether they are the A-side carrier or the B-side
carrier, and provide you with their SPNI number
Your cellular carrier may also provide you with additional information that is needed for
use with your third-party protocol stack(s). Consult your protocol stack documentation
for information regarding stack configuration and use.
The cellular carrier has the responsibility to warn you of any changes the carrier may
make to its operations and/or procedures that would effect your usage of the service.
You will be advised of your right to issue a complaint to the FCC regarding these
changes.
2.1.3 CDPD CHARGES
For information about your CDPD charges, you will need to contact your CDPD carrier
service. Charges will vary according to the CDPD service provider you choose and the
plan you select. Most carriers will offer several CDPD plans that vary in rates and
structure. Your carrier should explain these items to you in detail when you consult them
about registration.
3.0 INSTALLATION AND SETUP

CDPD0601PB003
CONFIDENTIAL AND PROPRIETARY INFORMATION
Do not duplicate or distribute without express permission from Nextcell, Inc.
3
The PocketSpider Modem is an easy-to-use product that requires very little set up. This
manual explains how to install and setup your PocketSpider Modem. The software
installation can be accomplished in two ways: (1) using a compact flash card, or (2)
input from a host computer to the handheld device. Use of a compact flash as
described below is the commonly used approach, and the alternative "remote"
installation approach is provided as Appendix A to this manual.
3.1 Battery Operation
The PocketSpider derives all its power from a self-contained battery pack, thereby
ensuring no adverse effects on battery life of the host H/PC device. Prior to using the
PocketSpider, charge the new battery for at least 2 hours. Details on the battery
charger and charging process are provided in Section 5 of this manual.
The Li ion (Lithium ion) battery is composed of Lithium, the lightest metal and the metal
that has the highest electrochemical potential. Because of its light-weight and high
energy density, Lithium-Ion batteries are ideal for portable devices. Lithium-Ion
batteries have no memory effect or poisonous metals, and they have long battery life.
Once charged, clip the battery into the back of the PocketSpider housing and you are
ready to go.
The PocketSpider should operate for several hours under normal transmit and receive
operating conditions, although sustained transmitting inherently reduces the time
between charge. In the event of a low battery, either remove and insert a second
charged battery, or remove the battery pack, recharge, and reinsert the pack into the
PocketSpider.
3.2 Compact Flash Memory Card Installation
1. Insert the setup memory card into Window CE device.
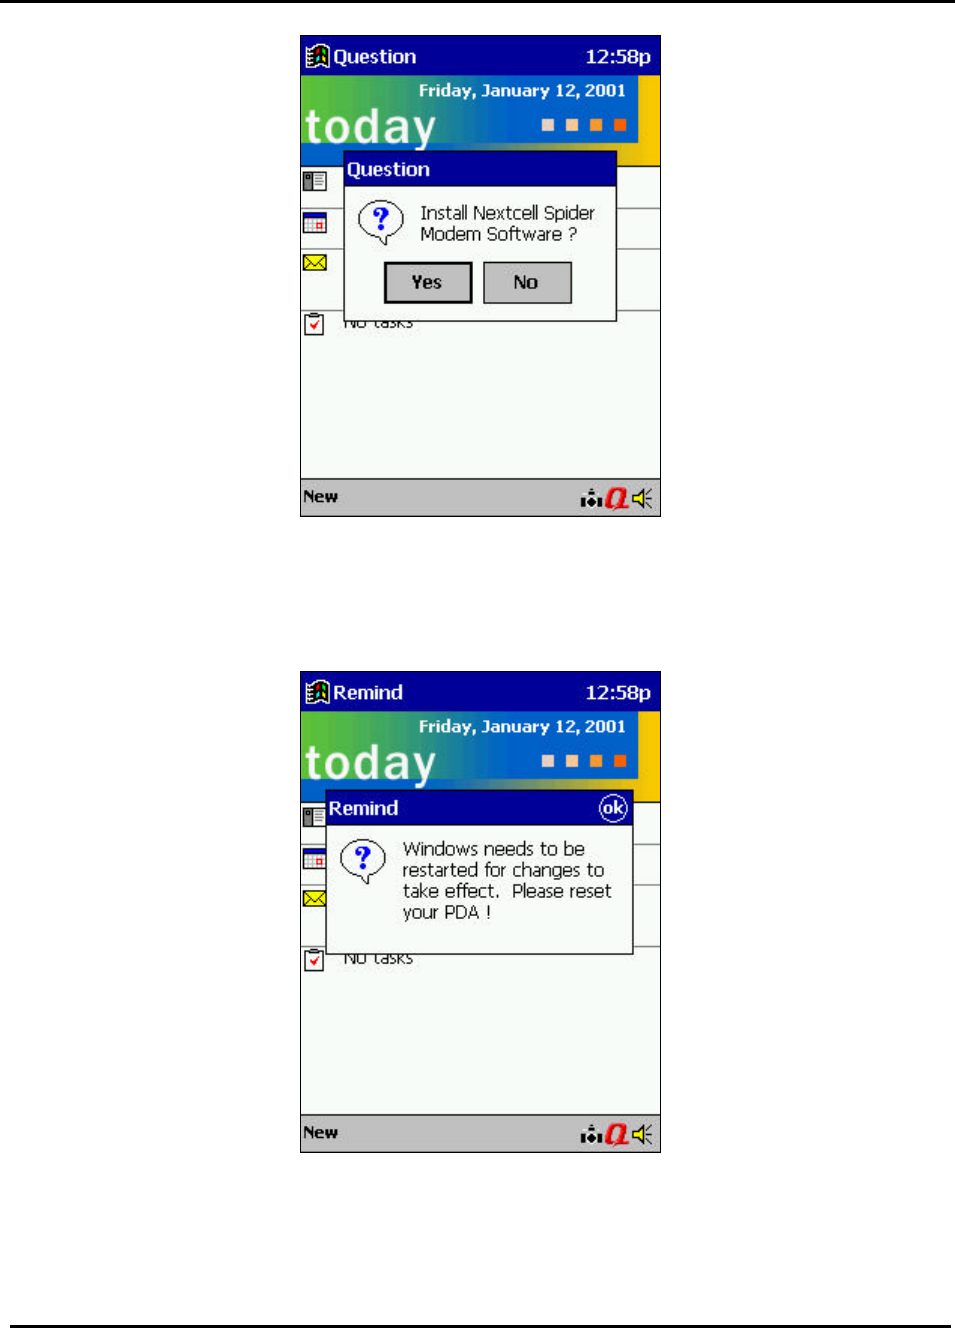
2. “Autorun” on the compact flash card should run automatically on your
Pocket PC device. The screen will ask if installation of the Nextcell Spider
Modem software is desired. Click “Yes” to continue.

CDPD0601PB003
CONFIDENTIAL AND PROPRIETARY INFORMATION
Do not duplicate or distribute without express permission from Nextcell, Inc.
4
3. After installation is complete, click “ok” to close the install application and
reset the Pocket PC device.
4. After reset is complete, Setup is required before running PocketSpider
modem.

CDPD0601PB003
CONFIDENTIAL AND PROPRIETARY INFORMATION
Do not duplicate or distribute without express permission from Nextcell, Inc.
5
3.3 Setup
This section explains how to setup the PocketSpider Modem for use with the Windows
CE 3.0 platform. The purpose of this application is to setup the PocketSpider and create
an appropriate dial-up networking entry. This section describes only the basic
PocketSpider parameters required for registering the modem with the CDPD carrier.
For information on setting additional parameters, see the Modem Setup application.
This should also be run when switching from one PocketSpider Modem to another or
when network parameters are changed.
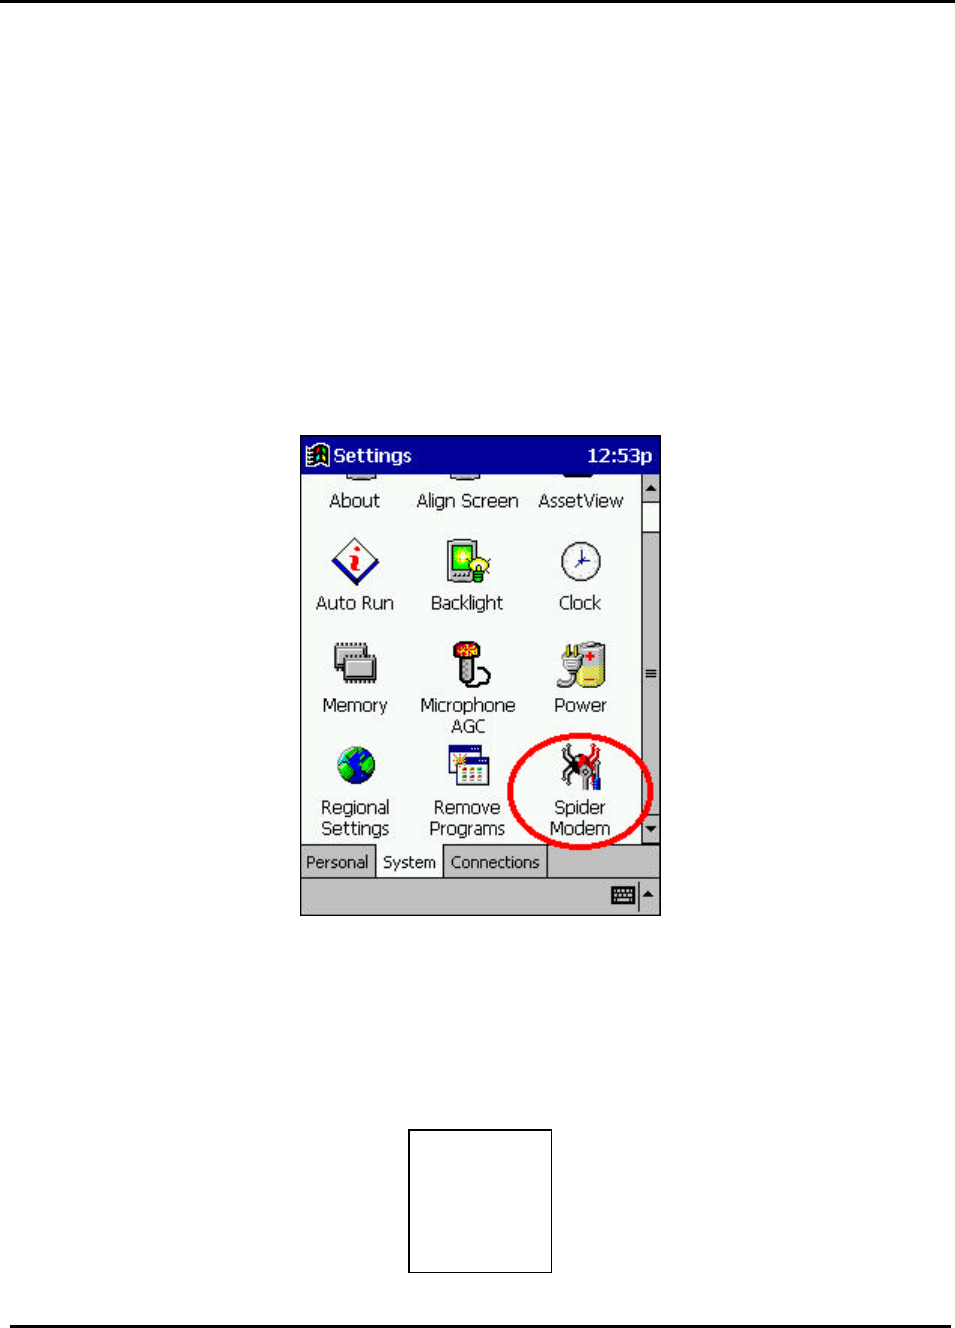
1. Access the PocketSpider Modem Setup application by choosing Spider
Modem icon from the Start > Settings > System.
2. PocketSpider Modem configuration information will be displayed when
the General tab (lower left screen) is clicked. The PocketSpider Setup
application for Windows CE generates this information automatically, and
no manual user entry is required.
Note: Click “ok” to save any new values or changes.

CDPD0601PB003
CONFIDENTIAL AND PROPRIETARY INFORMATION
Do not duplicate or distribute without express permission from Nextcell, Inc.
6
3. The Network tab is used to set up and save the CDPD network information
into the modem. Select the Network tab to setup your CDPD Service
Provider information. Enter Modem’s IP address, Primary DNS,
Secondary DNS (Optional), Carrier Preference, and additional
PocketSpider Modem parameters.
4. The Channel Scan tab is used to configure the modem scan for the
CDPD network setting. These settings are then used by the modem to
connect to the CDPD network. Select Channel Scan tab to setup the
PocketSpider Modem scan channel settings.
5. The RAS Entry tab (lower right) is used to create an entry to dial up the
CDPD network. After selecting the tab, enter your choice of RAS name;
but note that Windows CE 3.0 limits the RAS entry name to 20 characters.
Click on Create New RAS Entry button (the application may overwrite an
existing RAS entry with the same entry name).

CDPD0601PB003
CONFIDENTIAL AND PROPRIETARY INFORMATION
Do not duplicate or distribute without express permission from Nextcell, Inc.
7
4.0 MONITORING MODEM STATUS
Operational status information is provided on the PocketSpider device and on the H/PC
device screen.
4.1 LCD Display
The PocketSpider contains an LCD that shows basic information for the unit's operation
and battery charge condition.
4.1.1 OPERATIONAL STATUS
• SD RD (Send Data Receive Data) is the default code when the PocketSpider is
installed on the host H/PC device.
• NEXTCELL is displayed when the Spider Launch Manager utility is connecting.
• The window will display the following:
o SD Send Data
o RD Receive Data
o IDLE Not connected, not trying (default)
• The following will appear when the Spider Launcher icon is clicked on the H/PC
screen:
o TRYING
o CONNECTED
• CH indicates the channel number
• If no activity after 10 seconds, the LCD will power down to conserve battery life.
• The LCD will reappear when there is new data activity.
• If the LCD is "OFF", click the button on the top left corner of the PocketSpider:
o 1st click shows screen power connected
o 2nd click goes to:
§ SIG Signal Strength (RSSI)
§ BAT Battery Low
o 3rd click goes back to 1st click (shows screen power connected)
o 4th click goes back to 2nd click
• If the LCD is "ON", it is the same as the 2nd click above (i.e., SIG, BAT)

CDPD0601PB003
CONFIDENTIAL AND PROPRIETARY INFORMATION
Do not duplicate or distribute without express permission from Nextcell, Inc.
8
4.1.2 BATTERY LOW INDICATION
The LCD shows two basic conditions related to the battery:
• CONNECTED
• LOW BATTERY
When LOW BATTERY is displayed:
• Shut down operation
• Close the Spider MGR on the H/PC or physically remove the PocketSpider from
the H/PC device.
• Remove discharged battery
• Insert a charged battery
4.2 Handheld Device Screen
The Spider Modem Manager application displays on the H/PC screen the current/real-
time status of the Modem.
1. To access the Spider Modem Manager, choose “Spider Modem” from
Start menu. When Spider Modem application runs for the first time after
its installation, “Select RAS Connection” pops up asking user which entry
to connect. Select “Pocket Spider I” from the drop-down list and click on
Connect button.
2. Spider Modem Manager will then detect PocketSpider by opening its port.
Once Spider Modem Manager opens its port successfully, the
PocketSpider is activated to search for CDPD channels and get it
connected to the Network (Internet). The PocketSpider is successfully
connected when “Complete registration” message is displayed under
Modem Status (shown figure below).

CDPD0601PB003
CONFIDENTIAL AND PROPRIETARY INFORMATION
Do not duplicate or distribute without express permission from Nextcell, Inc.
9
3. The PocketSpider Modem Manager application is designed to display the
most important status information to the user. When any data is passing to
and from the PocketSpider, such as surfing the Internet and sending
emails, Send traffic (red) and Receive traffic (blue) lines will become
active (shown figure above).

CDPD0601PB003
CONFIDENTIAL AND PROPRIETARY INFORMATION
Do not duplicate or distribute without express permission from Nextcell, Inc.
10
5.0 BATTERY AND CHARGER
The PocketSpider is powered by a single rechargeable 0.700 A/hr Lithium Ion 3.6 VDC
cell installed on the back of the device. A PocketSpider Battery Charger is the only
device to be used for recharging these batteries. Only Nextcell chargers and Nextcell
batteries should be used in ANY PocketSpider device.
5.1 Battery Installation and Removal
The battery and self-contained case clips in the back of the PocketSpider device. To
remove the battery, depress the clip at the top and gently remove the battery.
5.2 Initial Set Up
1. Attach the power cord to the charger.
2. Plug the power cord in to a standard 110 VAC outlet.
3. The Green LCD should illuminate. This LCD has two purposes:
a. Indicates that the charger is ready to accept a battery, or
b. Indicates that the current charge cycle is over.
4. Insert a battery and let charge at least 2 hours or until green light
illuminates.
NOTE
• Do not leave batteries in the charger for more than 8
hours.
• Do not leave the battery in the charger if the charger
is not plugged into an electrical outlet via the 110 VAC
wall mounted transformer supplied with the unit.
The charger was designed to operate from a standard 110 VAC 60 Hz electrical outlet.
The charger should continue to operate as low as 85 VAC and as high as 120 VAC. The
wall transformer should be able to supply approximately 12 VDC at 0.5 A. The power
connector is a standard 2.1 mm DC power jack (center positive).
The charger has built-in surge arrestors, but serious overload conditions could result in
damage to the circuitry.
5.3 Charger Operation
1. Insert a battery into the charger. The Green LCD should turn off and the
Red LCD should illuminate.
Do not remove the battery from the charger or unplug the charger until the
Green LCD illuminates.
2. The charger has the following modes of operation:
a. When the battery is first inserted, the charger checks to determine if
the battery is severely discharged. If the battery voltage is below

CDPD0601PB003
CONFIDENTIAL AND PROPRIETARY INFORMATION
Do not duplicate or distribute without express permission from Nextcell, Inc.
11
0.5 VDC, then the charger will consider the battery to be defective
and will not attempt to charge the battery.
b. If the battery is between 0.5 VDC and 2.5 VDC, the charger will
drop to trickle charge mode and attempt to bring the battery up to a
useable voltage without inducing any cell damage.
c. When the charger gets above 2.5 VDC but is below 4.0 VDC the
charger enters a "bulk charge" state. During this phase of the
charge cycle, the charger will output a constant current of 0.45 A
until the battery voltage reaches 4.0 VDC.
d. When the battery voltage reaches 4.0VDC, a top-off charge timer
starts. This timer will run for approximately 1.5 hours.
e. When the top-off timer expires, the Red LCD will turn off and the
Green LCD will illuminate, indicating that the battery may be
removed.
NOTE
If the battery is removed prior to the completion of the
charge cycle, or if power is lost during the charge cycle, then
unplug the charger and then plug it back in to reset the
charger.
If power to the charger is lost and reapplied prior to completion of charging, the green
light will illuminate indicating the charger is ready for a new cycle. In such instances,
remove and reinsert the battery into the charger to initiate a new charge cycle.
6.0 TECHNICAL SUPPORT
For problems stemming from your network access, contact your CDPD carrier service.
For technical support and customer service dealing with the modem itself, contact
Nextcell by any of the following methods:
Web site: www.nextcell.com
Phone: 972-578-CDPD 972-578-2373
Email: techsupport@nextell.com
Before you contact Technical Support, please have your modem’s Equipment Identifier
(EID) number ready for the Technical Support representative. If you did not record the
EID number, you can find this number in the PocketSpider Modem window, shown
previously in Section 3.3.

CDPD0601PB003
CONFIDENTIAL AND PROPRIETARY INFORMATION
Do not duplicate or distribute without express permission from Nextcell, Inc.
12
SAFETY AND REGULATORY INFORMATION
The equipment certifications appropriate to your device are marked on the device and
product specific information. The use of the equipment is subject to the following
conditions:
FCC COMPLIANCE STATEMENT
This device complies with Part 15b of the FCC Rules. Operation is subject
to the following two conditions: (1) This device may not cause harmful
interference, and (2) this device must accept any interference received,
including interference that may cause undesired operation.
This device also complies with FCC Part 22.
FCC RF EXPOSURE COMPLIANCE
The CDPD modem module has been tested for FCC RF exposure hand
SAR compliance in a typical hand-held, hand-operated electronic
organizer/PC. In order to comply with FCC RF exposure requirements
the CDPD modem module must be operated in a hand-held and hand-
operated electronic organizer, PC, or similar products. The use of this
device in any other type of host configuration may not comply with
FCC RF exposure requirements and should be avoided. During
operation, a 20cm separation distance should be maintained between
the antenna and the user’s/bystander’s body (excluding hands,
wrists, feet, and ankles) to ensure FCC RF exposure compliance.
CAUTION
Changes or modifications without the express consent of Nextcell, Inc.
voids the user’s authority to use the equipment.
This equipment has been tested and found to comply with the limits pursuant to Part 15
Subpart B and Part 22 of the FCC rules. These limits are designed to provide
reasonable protection against harmful interference in an appropriate installation. This
equipment generates, uses, and can radiate radio frequency energy and, if not used in
accordance with instructions, can cause harmful radiation to radio communication.
However, there is no guarantee that interference will not occur in a particular
installation. If the equipment does cause harmful interference in radio and television
reception, which can be determined by turning the equipment on and off, the user is
encouraged to try to correct the interference by one or more of the following measures:
• Reorient or relocate the receiving antenna
• Increase the separation distance between the equipment and the receiver
• Contact Nextcell, Inc. Technical Support for assistance.

CDPD0601PB003
CONFIDENTIAL AND PROPRIETARY INFORMATION
Do not duplicate or distribute without express permission from Nextcell, Inc.
13
NEXTCELL, INC. 12-MONTH LIMITED WARRANTY
Nextcell, Inc. warrants the products that it manufactures to be free from defects in materials and
workmanship for a period of 12 months from the date of shipment from Nextcell. This warranty is limited
to the original purchaser of the product and is not transferable.
During the 12-month warranty period, Nextcell will repair or replace, at its option, any defective products
or parts at no additional charge provided that the product is returned, shipping prepaid, to Nextcell. The
purchaser is responsible for insuring any product so returned and assumes the risk of loss during
shipping. All replaced parts become the property of Nextcell.
During the 12-month warranty period, Nextcell will also provide any software updates/upgrades, at its
option, at no additional charge. Any additional hardware that may be required to support the upgrade will
be quoted as an option on request by the customer.
Equipment add-ons, software modules, or software upgrades purchased or provided at no charge for
existing equipment are warranted for the length of the existing equipment warranty, extended warranty or
90 days (whichever is less).
THIS LIMITED WARRANTY DOES NOT EXTEND TO ANY PRODUCTS WHICH HAVE BEEN
DAMAGED AS A RESULT OF ACCIDENT, MISUSE, ABUSE, OR AS A RESULT OF SERVICE OR
MODIFICATION BY ANYONE OTHER THAN NEXTCELL.
EXCEPT AS EXPRESSLY SET FORTH ABOVE, NO OTHER WARRANTIES ARE EXPRESSED OR
IMPLIED, INCLUDING BUT NOT LIMITED TO, ANY IMPLIED WARRANTIES OF MERCHANTABILITY
AND FITNESS FOR A PARTICULAR PURPOSE, AND NEXTCELL EXPRESSLY DISCLAIMS ALL
WARRANTIES NOT STATED HEREIN. AS WARRANTED ABOVE THE PURCHASER’S SOLE
REMEDY SHALL BE REPAIR OR REPLACEMENT AS PROVIDED ABOVE. UNDER NO
CIRCUMSTANCES WILL NEXTCELL BE LIABLE TO THE PURCHASER OR ANY USER FOR ANY
DAMAGES, INCLUDING ANY INCIDENTAL OR CONSEQUENTIAL DAMAGES, EXPENSES, LOST
PROFITS, LOST SAVINGS, OR OTHER DAMAGES ARISING OUT OF THE USE OF OR INABILITY TO
USE THE PRODUCT.

CDPD0601PB003
CONFIDENTIAL AND PROPRIETARY INFORMATION
Do not duplicate or distribute without express permission from Nextcell, Inc.
14
APPENDIX A
REMOTE INSTALLATION PROCESS
Establish CE Service
Before installing your modem, ensure that "Windows CE Services" (Microsoft
ActiveSync, or similar) is installed on the host computer to connect to your Pocket PC.
To determine the availability of Windows CE Services, look in the Programs folder of
the Start Menu.
Windows CE Service is available if the Programs folder contains a sub-folder Microsoft
Windows CE Services, Microsoft ActiveSync, or similar. If the services are not
installed, please consult your H/PC (Handheld or Pocket PC) manual and install
Windows CE Services on the host computer.
1. Using the appropriate cable, normally furnished with your H/PC, connect the
H/PC to the appropriate COM port of the host computer.
2. Refer to then Nextcell website http://www.nextcell.com .
3. Download the Spider Tools to your host computer and follow on-screen
directions. A "Main Menu" screen such as shown below should appear.

CDPD0601PB003
CONFIDENTIAL AND PROPRIETARY INFORMATION
Do not duplicate or distribute without express permission from Nextcell, Inc.
15
APPENDIX B
ABBREVIATIONS AND DEFINITIONS
AAmpere
AT (Command)
Ahr Ampere hour
BAT "Battery Low"
CDPD Cellular Digital Packet Data
CD-ROM Compact Disk - Read Only Memory
CF Compact Flash
COM Communications (port)
DNS Domain Name Server
EID Equipment Identification Number
EMI Electromagnetic Interference
FCC Federal Communications Commission
H/PC Handheld/PC
Hz Hertz; cycles per second
IP Internet Protocol (address)
ISP Internet Service Provider
LCD Light Emitting Diode
MGR "Manager"
RAS Remote Access Service
RD "Receive Data"
RSSI Receive Signal Strength Indicator
SD "Send Data"
SIG Signal Strength
SPNI Service Provider Network Identifier
TCP/IP Transport Control Protocol/Internet Protocol
UL Underwriter's Laboratory
VDC Voltage Direct Current
VAC Voltage Alternating Current

CDPD0601PB003
CONFIDENTIAL AND PROPRIETARY INFORMATION
Do not duplicate or distribute without express permission from Nextcell, Inc.
16
APPENDIX C
ADVANCED USER TOOLS
The PocketSpider Modem AT test application allows users to view or modify advanced
settings for the PocketSpider. It is not usually necessary to modify these advanced
settings, as the default settings are adequate for most uses. Please contact Nextcell
Technical Support or visit our website if more information is needed.
Please see the Nextcell web site http://www.nextcell.com for the AT Command set.