Novatel OM 20000122 SPAN CPT Receiver User Manual To The 17ca2d67 Ca76 4660 8666 741e29aab57e
User Manual: Novatel OM-20000122 to the manual
Open the PDF directly: View PDF ![]() .
.
Page Count: 57
- Customer Support
- Notices
- Introduction
- SPAN-CPT Installation
- SPAN-CPT Operation
- SPAN-CPT Dual-Antenna
- NovAtel Firmware and Software
- Technical Specifications
- Replacement Parts
- Frequently Asked Questions
SPAN-CPT™
User Manual
OM-20000122 Rev 8 March 2014

2SPAN-CPT User Manual Rev 8
SPAN-CPT Receiver User Manual
Publication Number: OM-20000122
Revision Level: Rev 8
Revision Date: March 2014
This manual reflects SPAN-CPT Firmware Version OEM060400RN0000.
Warranty
NovAtel Inc. warrants that its GNSS products are free from defects in materials and workmanship,
subject to the conditions set forth on our web site: www.novatel.com/products/warranty/ and for the
following time periods:
SPAN-CPT™ receiver One (1) Year
GPS Antenna™ Series One (1) Year
Cables and Accessories Ninety (90) Days
Software Warranty One (1) Year
Return instructions
To return products, refer to the instructions at the bottom of the Warranty page: www.novatel.com/
products/warranty/.
Proprietary Notice
Information in this document is subject to change without notice and does not represent a commitment
on the part of NovAtel Inc. The software described in this document is furnished under a licence
agreement or non-disclosure agreement. The software may be used or copied only in accordance with
the terms of the agreement. It is against the law to copy the software on any medium except as
specifically allowed in the license or non-disclosure agreement.
No part of this manual may be reproduced or transmitted in any form or by any means, electronic or
mechanical, including photocopying and recording, for any purpose without the express written
permission of a duly authorized representative of NovAtel Inc.
The information contained within this manual is believed to be true and correct at the time of publication.
NovAtel, SPAN and OEM6 are registered trademarks of NovAtel Inc.
NovAtel Connect and SPAN-CPT are trademarks of NovAtel Inc.
All other product or brand names are trademarks of their respective holders.
Manufactured and protected under U.S. patents:
© Copyright 2014 NovAtel Inc. All rights reserved. Unpublished rights reserved under International copyright laws.
NovAtel Patents KVH Technology Patents
#5,101,416
#5,390,207
#5,414,729
#5,495,499
#5,736,961
#5,809,064
#6,184,822 B1
#6,608,998 B1
#6,728,637 B2
#6,922,167 B2
#6,243,409 B1
#6,664,923 B1
#6,721,657 B2
#6,750,816 B1
#7,193,559 B2
#7,738,536 B2
#7,738,606 B2
#7,346,452
#7,885,317 B2
#5,444,534
#5,481,358
#5,512,904
#5,552,887
#5,739,944
#5,768,462
#6,041,149
#6,134,356
#6,351,310 B1
#6,370,289 B1
#6,429,939
#6,441,779
#6,466,596
#6,542,651
#6,594,020
#6,718,097
#6,763,153
#6,836,334
#6,856,300
#6,864,347
#6,891,622
#7,120,323

SPAN-CPT User Manual Rev 8 3
Table of Contents
Customer Support 7
Notices 8
1 Introduction 11
1.1 Fundamentals of GNSS+INS ................................................................................................ 11
1.2 System Components............................................................................................................. 12
1.3 Related Documents and Information .................................................................................... 12
1.4 Conventions .......................................................................................................................... 12
2 SPAN-CPT Installation 13
2.1 Required Equipment ............................................................................................................. 13
2.1.1 Manuals ....................................................................................................................... 13
2.1.2 SPAN-CPT Hardware.................................................................................................. 13
2.2 Hardware Set Up .................................................................................................................. 14
2.2.1 Mount the Antenna ...................................................................................................... 15
2.2.2 Mount the SPAN-CPT ................................................................................................. 15
2.2.3 Connect the GNSS Antenna........................................................................................ 16
2.2.4 Connect Power ............................................................................................................ 16
2.2.5 Connect a Computer to the SPAN-CPT ...................................................................... 17
2.2.6 Connect the I/O Strobe Signals ................................................................................... 17
2.2.7 CAN Bus...................................................................................................................... 18
2.2.8 Odometer Connection ................................................................................................. 18
3 SPAN-CPT Operation 20
3.1 Definition of Reference Frames Within SPAN ...................................................................... 20
3.1.1 Local Level Frame ....................................................................................................... 20
3.1.2 SPAN Body Frame ...................................................................................................... 21
3.1.3 Enclosure Frame ......................................................................................................... 22
3.1.4 Vehicle Frame .............................................................................................................22
3.2 Communicating with the SPAN-CPT System ....................................................................... 23
3.2.1 Use NovAtel Connect to Communicate ....................................................................... 23
3.2.2 INS Window in NovAtel Connect ................................................................................. 24
3.3 Software Configuration ......................................................................................................... 25
3.3.1 GNSS Configuration .................................................................................................... 25
3.3.2 SPAN IMU Configuration............................................................................................. 25
3.4 Real Time Operation............................................................................................................. 26
3.4.1 System Start-Up and Alignment Techniques............................................................... 27
3.4.2 Navigation Mode.......................................................................................................... 29
3.4.3 Vehicle to SPAN-CPT Frame Angular Offsets Calibration Routine............................. 29
3.4.4 SPAN-CPT Wheel Sensor........................................................................................... 30
3.5 Azimuth Sources on a SPAN System ................................................................................... 30
3.5.1 Course Over Ground ................................................................................................... 30
3.5.2 Inertial Azimuth............................................................................................................ 31
3.5.3 ALIGN Azimuth............................................................................................................ 31
3.6 Data Collection...................................................................................................................... 32
3.7 Data Collection for Post-Processing ..................................................................................... 33
3.8 Variable Lever Arm ............................................................................................................... 34
3.9 Enabling L-Band ................................................................................................................... 34
3.9.1 NovAtel CORRECT™ with TerraStar™ ...................................................................... 34
3.9.2 Veripos Marine Subscriptions...................................................................................... 35
3.9.3 OmniSTAR ..................................................................................................................35

4SPAN-CPT User Manual Rev 8
Table of Contents
4 SPAN-CPT Dual-Antenna 37
4.1 Installation ............................................................................................................................ 37
4.2 Configuring SPAN with ALIGN on SPAN-CPT..................................................................... 38
4.2.1 Alignment on a Moving Vessel - Aided Transfer Alignment ........................................ 39
4.2.2 Alignment on a Stationary Vehicle - Aided Static Alignment....................................... 39
4.2.3 Unaided Alignment...................................................................................................... 39
4.2.4 Automatic Alignment Mode - Automatic Alignment (default)....................................... 40
4.3 SPAN ALIGN Attitude Updates ............................................................................................ 40
5 NovAtel Firmware and Software 41
5.1 Firmware Updates and Model Upgrades.............................................................................. 41
5.1.1 Firmware Updates....................................................................................................... 41
5.1.2 Model Upgrades.......................................................................................................... 42
5.2 Authorization Code ............................................................................................................... 42
5.3 Updating or Upgrading Using the WinLoad Utility ................................................................ 43
5.3.1 Transferring Firmware Files ........................................................................................ 43
5.3.2 Using the WinLoad Utility............................................................................................ 44
5.4 Updating using SoftLoad Commands................................................................................... 45
5.4.1 Working with S-Records ............................................................................................. 46
5.5 Upgrading Using the AUTH Command ................................................................................ 47
5.5.1 Upgrade Procedure..................................................................................................... 47
5.6 Key Firmware Commands .................................................................................................... 47
A Technical Specifications 48
A.1 SPAN-CPT Technical Specifications ................................................................................... 48
A.2 SPAN-CPT Mechanical Drawings........................................................................................ 50
A.3 SPAN-CPT Cable................................................................................................................. 52
B Replacement Parts 55
B.1 SPAN-CPT System .............................................................................................................. 55
B.2 Accessories and Options .....................................................................................................55
C Frequently Asked Questions 56

SPAN-CPT User Manual Rev 8 5
Figures
1 Primary and Secondary Lightning Protection ..................................................................... 10
2 SPAN-CPT Receiver ............................................................................................................ 13
3 Typical SPAN-CPT Set Up .................................................................................................. 14
4 SPAN-CPT Enclosure Mounting ......................................................................................... 15
5 Battery Isolator Installation .................................................................................................. 17
6 I/O Strobe Signals ............................................................................................................... 17
7 Kistler WPT .......................................................................................................................... 18
8 Local Level Frame (ENU) ..................................................................................................... 20
9 SPAN-CPT Center of Navigation ......................................................................................... 22
10 Vehicle Frame ...................................................................................................................... 22
11 SPAN-CPT - Dual Antenna Installation ............................................................................... 38
12 WinLoad’s Open Window .................................................................................................... 44
13 Open File in WinLoad .......................................................................................................... 44
14 COM Port Setup .................................................................................................................. 44
15 Searching for Card .............................................................................................................. 45
16 Authorization Code Window ................................................................................................ 45
17 Upgrade Process Complete ................................................................................................ 45
18 SPAN-CPT Side and Perspective View ............................................................................... 50
19 SPAN-CPT Top, Front and Bottom View ............................................................................ 51
20 SPAN-CPT Development Terminated Cable ...................................................................... 52

6SPAN-CPT User Manual Rev 8
Tables
1 Cable Modification for Kistler WPT Cable ........................................................................... 19
2 Cable Modification for SPAN-CPT Cable ............................................................................ 19
3 Full Mapping Definitions ...................................................................................................... 21
4 Inertial Solution Status......................................................................................................... 27
5 Logs with Azimuth data ....................................................................................................... 31
6 Solution Parameters ............................................................................................................32
7 Hardware Specification for SPAN-CPT ............................................................................... 48
8 GNSS Performance for SPAN-CPT ..................................................................................... 48
9 KVH IMU Sensor Specifications .......................................................................................... 48
10 Electrical and Environmental Specifications........................................................................ 49
11 Power Specifications ........................................................................................................... 49
12 SPAN-CPT 60723108 - KVH Development Terminated Cable Pin-Out .............................. 52
13 SPAN-CPT 60723107 - KVH Standard Un-terminated Cable Pin-Out................................ 54

SPAN-CPT User Manual Rev 8 7
Customer Support
NovAtel Knowledge Base
If a technical issue is encountered, browse the NovAtel Web site at www.novatel.com/support/search/.
Use this page to search for general information about GNSS and other technologies, information about
NovAtel hardware and software and installation and operation issues.
Before Contacting Customer Support
Before contacting NovAtel Customer Support about a software problem, perform the following steps:
1. Log the following data to a file on your computer for 15 minutes:
RXSTATUSB once
RAWEPHEMB onchanged
RANGEB ontime 1
BESTPOSB ontime 1
RXCONFIGA once
VERSIONB once
RAWIMUSXB onnew
INSPVASB ontime 1
INSCOVSB ontime 1
INSUPDATEB onchanged
IMUTOANTOFFSETSB onchanged
2. Send the data file to NovAtel Customer Support, using either the NovAtel FTP site at
ftp://ftp.novatel.ca/ or through the support@novatel.com e-mail address.
3. You can also issue a FRESET command to the receiver to clear any unknown settings.
If a hardware problem is encountered, send a list of the troubleshooting steps taken and results.
Contact Information
Use one of the following methods to contact NovAtel Customer Support:
The FRESET command erases all user settings. Record the configuration settings
before sending the FRESET command to simplify reconfiguration.
Call the NovAtel Hotline at 1-800-NOVATEL (U.S. & Canada)
or +1-403-295-4500 (international)
Fax: +1-403-295-4501
E-mail: support@novatel.com
Web site: www.novatel.com
Write: NovAtel Inc.
Customer Support Department
1120 - 68 Avenue NE
Calgary, AB
Canada, T2E 8S5

8SPAN-CPT User Manual Rev 8
Notices
The following notices apply to the SPAN-CPT.
FCC Notices
This device complies with part 15 of the FCC Rules. Operation is subject to the following two conditions:
(1) this device may not cause harmful interference, and (2) this device must accept any interference
received, including interference that may cause undesired operation.
SPAN-CPT complies with the radiated and conducted emission limits for a Class B digital device. The
Class B limits are designed to provide reasonable protection against harmful interference in a residential
installation.
The equipment listed generates, uses, and can radiate radio frequency energy and, if not installed and
used in accordance with the instructions, may cause harmful interference to radio communications.
However, there is no guarantee that interference will not occur in a particular installation. If this
equipment does cause harmful interference to radio or television reception, which can be determined by
turning the equipment off and on, the user is encouraged to try to correct the interference by one or more
of the following measures:
• Re-orient or relocate the receiving antenna
• Increase the separation between the equipment and the receiver
• Connect the equipment to an outlet on a circuit different from that to which the receiver is
connected
• Consult the dealer or an experienced radio/TV technician for help
Industry Canada
SPAN-CPT Class B digital apparatuses comply with Canadian ICES-003.
SPAN-CPT appareils numérique de la classe B sont conforme à la norme NMB-003 du Canada.
CE Notice
The enclosures carry the CE mark.
"SPAN-CPT is in compliance with the essential requirements and other relevant provisions of Directive
1999/5/EC."
In order to maintain compliance with the limits of a Class B digital device, it is required to
use properly shielded interface cables (such as Belden #9539 or equivalent) when using
the serial data ports, and double-shielded cables (such as Belden #9945 or equivalent)
when using the I/O strobe port.
Changes or modifications to this equipment, not expressly approved by NovAtel Inc., could
result in violation of FCC, Industry Canada and CE Marking rules and void the user’s
authority to operate this equipment.

Notices
SPAN-CPT User Manual Rev 8 9
WEEE Notice
If you purchased your SPAN-CPT product in Europe, please return it to your dealer or supplier at the end
of its life. The objectives of the European Community's environment policy are, in particular, to preserve,
protect and improve the quality of the environment, protect human health and utilise natural resources
prudently and rationally. Sustainable development advocates the reduction of wasteful consumption of
natural resources and the prevention of pollution. Waste electrical and electronic equipment (WEEE) is a
regulated area. Where the generation of waste cannot be avoided, it should be reused or recovered for
its material or energy. WEEE products may be recognized by their wheeled bin label ( ).1
Lightning Protection Installation and Grounding
Procedures
What is the hazard?
A lightning strike into the ground causes an increase in the earth's potential which results in a high
voltage potential between the center conductor and shield of the coaxial cable. This high voltage
develops because the voltage surge induced onto the center conductor lags in time behind the voltage
surge induced onto the shield.
Hazard Impact
A lightning strike causes the ground potential in the area to rise to dangerous levels resulting in harm to
personnel or destruction of electronic equipment in an unprotected environment. It also conducts a
portion of the strike energy down the inner conductor of the coax cable to the connected equipment.
Actions to Mitigate Lightning Hazards
1. Do not install antennas or antenna coaxial cables outside the building during a lightning storm.
2. It is not possible to avoid over-voltages caused by lightning, but a lightning protection device may be
used to shunt a large portion of the transient energy to the building ground reducing the over-voltage
condition as quickly as possible.
3. Primary lightning protection must be provided by the operator/customer according to local building
codes as part of the extra-building installation.
4. To ensure compliance with clause 7 "Connection to Cable Distribution Systems" of EN 60950-1,
Safety for Information Technology Equipment, a secondary lightning protection device must be used
for in-building equipment installations with external antennas. The following device has been
approved by NovAtel Inc.:
Polyphaser - Surge Arrestor DGXZ+24NFNF-A
If this device is not chosen as the primary lightning protection device, the device chosen must meet
the following requirements:
• UL listed, or equivalent, in country of installation (for example, TUV, VDE and so on) for
lightning surge protection
• The primary device must be capable of limiting an incoming surge to 10kV
5. The shield of the coaxial cable entering the building should be connected at a grounding plate at the
building's entrance. The lightning protection devices should have their chassis grounded to the same
ground near to the building's entrance.
1.Visit the NovAtel Web site at www.novatel.com through Products | WEEE and RoHS for more infor-
mation on WEEE.
Only qualified personnel, electricians as mandated by the governing body in the country of
installation, may install lightning protection devices.
10 SPAN-CPT User Manual Rev 8
Notices
6. The primary and secondary lightning protections should be as close to the building's entrance as
possible. Where feasible they should be mounted onto the grounding plate itself (refer to the
following figure).
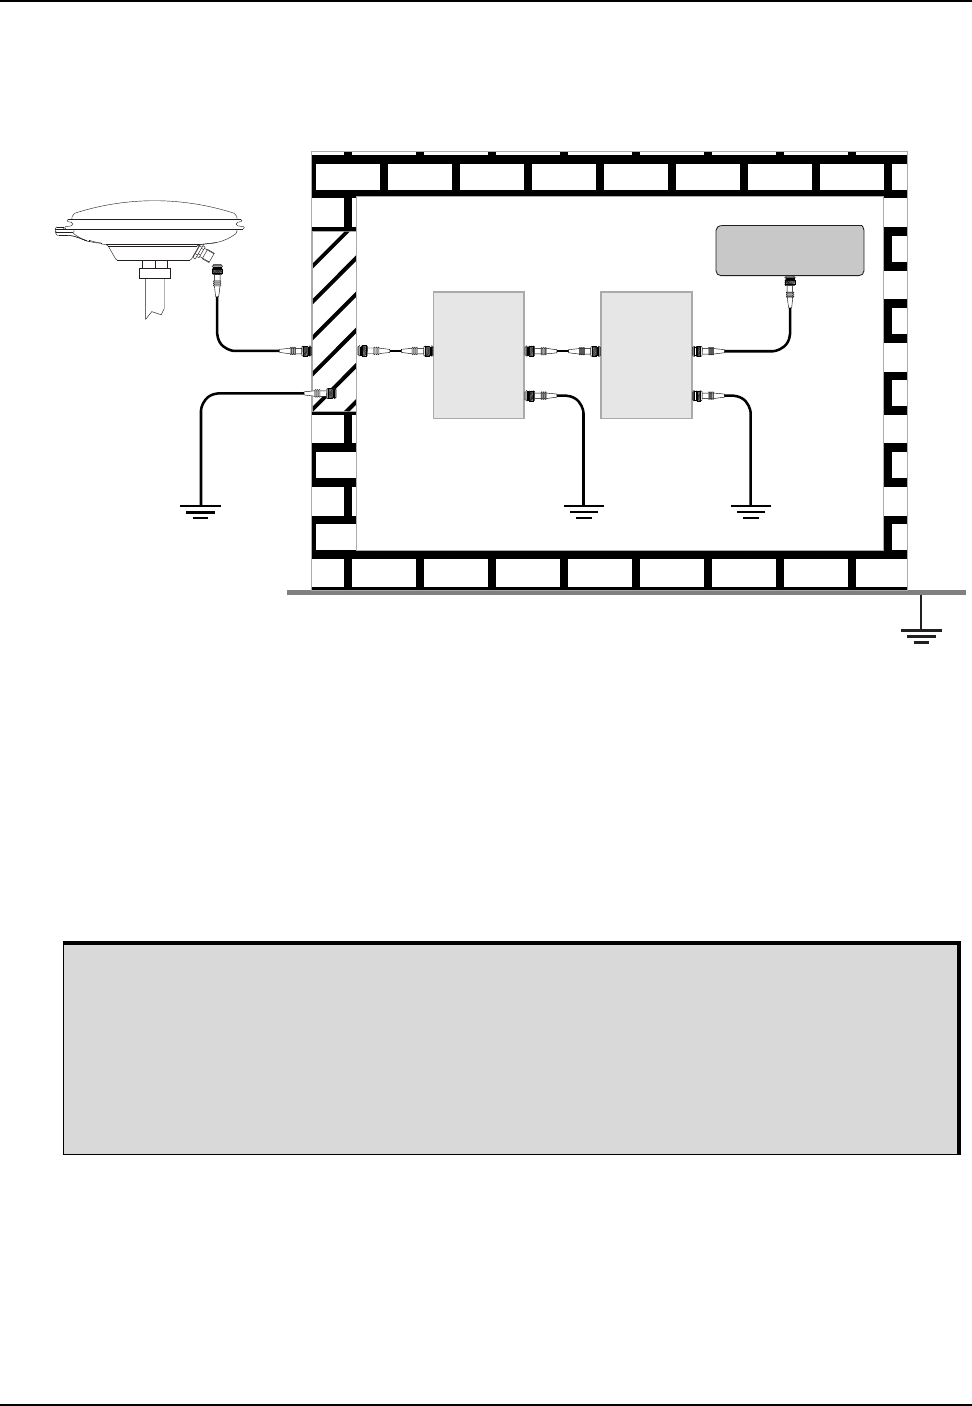
Figure 1: Primary and Secondary Lightning Protection
These installation instructions are the minimum requirements for receiver and antenna installations.
Where applicable, follow the electrical codes for the country of installation. Examples of country codes
include:
• USA National Electrical Code (NFPA 70)
• Canada Canadian Electrical Code (CSA C22)
• UK British Standards Institute (BSI 7671)
Ref # Description
1 Primary lightning protection device
2 Secondary lightning protection device
3 External antenna
4 GNSS Receiver
5 To ground
6 Grounding plate or grounding point at the building’s entrance
Acceptable choices for Earth Grounds, for central buildings, are:
• Grounded interior metal cold water pipe within five feet (1.5 m) of the point where it
enters the building
• Grounded metallic service raceway
• Grounded electrical service equipment enclosure
• Eight-foot grounding rod driven into the ground (only if bonded to the central
building ground by #6, or heavier, bonding wire)
6
12
5
555
4
3

SPAN-CPT User Manual Rev 8 11
Chapter 1 Introduction
NovAtel's SPAN® (Synchronized Position Attitude Navigation) technology brings together two different
but complementary positioning and navigation systems: GNSS and an Inertial Navigation System (INS).
By combining the best aspects of GNSS and INS into one system, SPAN technology offers a solution that
is more accurate and reliable than either GNSS or INS alone. The combined GNSS+INS solution has the
advantage of the absolute accuracy available from GNSS and the continuity of INS through traditionally
difficult GNSS conditions.
SPAN-CPT combines GNSS and Inertial Measurement Unit (IMU) hardware inside a single enclosure for
simple installation and operation. NovAtel’s OEM6® receiver is the processing engine of SPAN-CPT and
the IMU components are manufactured by KVH Industries. Commercial components are used in
SPAN-CPT to offer the same benefits of other SPAN products, but with fewer export restrictions.
1.1 Fundamentals of GNSS+INS
GNSS positioning observes range measurements from orbiting Global Positioning System Satellites.
From these observations, the receiver computes position and velocity with high accuracy. NovAtel GNSS
positioning systems are highly accurate positioning tools. GNSS, however, does have some significant
restrictions which limit its usefulness in some situations. GNSS positioning requires line of site view to at
least four satellites simultaneously. If this criteria is met, differential GNSS positioning can be accurate to
within a few centimetres. If however, some or all the satellite signals are blocked, the accuracy of the
position reported by GNSS degrades substantially or may not be available at all.
An INS uses forces and rotations measured by an IMU to calculate position, velocity and attitude. This
capability is embedded in the firmware of the SPAN-CPT. Forces are measured by accelerometers in
three perpendicular axes within the IMU and the gyros measure angular rotation rates around those
axes. Over short periods of time, inertial navigation gives very accurate acceleration, velocity and attitude
output. The INS must have prior knowledge of its initial position, initial velocity, initial attitude, Earth
rotation rate and gravity field. Since the IMU measures changes in orientation and acceleration, the INS
determines changes in position and attitude, but initial values for these parameters must be provided
from an external source. Once these parameters are known, an INS is capable of providing an
autonomous solution with no external inputs. However, because of errors in the IMU measurements that
accumulate over time, an inertial only solution degrades with time unless external updates such as
position, velocity or attitude are supplied.
The SPAN-CPT system’s combined GNSS+INS solution integrates the raw inertial measurements with
all available GNSS information to provide the optimum solution possible in any situation. By using the
high accuracy GNSS solution, IMU errors can be modeled and mitigated. Conversely, the continuity and
relative accuracy of the INS solution enables faster GNSS signal reacquisition and Real Time Kinematic
(RTK) solution convergence.
The advantages of using SPAN-CPT technology are its ability to:
• Provide a full attitude solution (roll, pitch and azimuth)
• Provide continuous solution output (in situations when a GNSS-only solution is impossible)
• Provide faster signal reacquisition and RTK solution resolution (over stand alone GNSS because
of the tightly integrated GNSS and INS filters)
• Output high rate (up to 100 Hz) position, velocity and attitude solutions for high dynamic
applications, see also Logging Restriction on page 33.
• Use raw phase observation data (to constrain INS solution drift even when too few satellites are
available for a full GNSS solution)

12 SPAN-CPT User Manual Rev 8
Chapter 1 Introduction
1.2 System Components
The SPAN-CPT system consists of the following components:
• SPAN-CPT Integrated GNSS+INS receiver – This receiver has 3 accelerometers, 3 gyroscopes
(gyros) and a NovAtel OEM6 receiver. Excellent acquisition and reacquisition times allow the
receiver to operate in environments where very high dynamics and frequent interruptions of
signals can be expected.
• A GNSS antenna
• Computer software – Real time data collection, status monitoring and receiver configuration is
possible through the NovAtel Connect™ software utility (refer to SPAN-CPT Configuration with
NovAtel Connect on page 25).
1.3 Related Documents and Information
This manual contains sufficient information about the installation and operation of the SPAN-CPT system.
It is beyond the scope of this manual to provide details on service or repair. Contact your local NovAtel
dealer for any customer service related inquiries, see Customer Support on page 7.
The SPAN-CPT utilizes a comprehensive user interface command structure that requires
communications through its communication (COM) ports. For information about the INS-specific
commands and logs, see the SPAN on OEM6 Firmware Reference Manual (OM-20000144). For
descriptions of the other commands and logs available with SPAN-CPT, refer to the OEM6 Family
Firmware Reference Manual (OM-20000129). Both of these manuals are available on the NovAtel
website at www.novatel.com/support/manuals/. It is recommended that these documents be kept
together for easy reference.
SPAN-CPT system output is compatible with post-processing software from NovAtel's Waypoint®
Products Group. Visit our Web site at www.novatel.com for details.
1.4 Conventions
The following conventions are used in this manual:
Information that supplements or clarifies text.
A caution that actions, operation or configuration may lead to incorrect or improper use of
the hardware.
A warning that actions, operation or configuration may result in regulatory noncompliance,
safety issues or equipment damage.
SPAN-CPT User Manual Rev 8 13
Chapter 2 SPAN-CPT Installation
This chapter contains instructions and tips to setup your SPAN-CPT system.
2.1 Required Equipment
• A SPAN-CPT integrated GNSS+INS receiver
• A quality, dual frequency GNSS antenna such as the GPS-702-GGL or 42G1215A-XT-1-Cert
• See the NovAtel website (www.novatel.com/antennas) for information on a variety of quality
antennas available to meet your form factor and performance needs.
• An antenna cable with a TNC male connector at the receiver end, such as NovAtel’s GPS-C016
model
• A power supply of +9 to +18 VDC
• An interface cables for the multi-purpose I/O connector on the SPAN-CPT. The interface cables
can be NovAtel cables (see SPAN-CPT Cable on page 52) or custom built cables (see Appendix
A, Technical Specifications on page 48 for the multi-purpose I/O connector pin outs).
• A Windows® based computer with a USB or serial port
• A radio link (if the application requires real time differential operation)
2.1.1 Manuals
The following additional manuals may be required for reference and are available from www.novatel.com/
support/manuals/.
•SPAN on OEM6 Firmware Reference Manual (OM-20000144)
•OEM6 Family Firmware Reference Manual (OM-20000129)
•OEM6 Family Installation and Operation Manual (OM-20000128)
2.1.2 SPAN-CPT Hardware
The SPAN-CPT receiver contains an OEM6 receiver and an IMU containing 3 accelerometers and 3
gyroscopes. Communication is done using either the COM or USB ports through the multi-I/O connector.
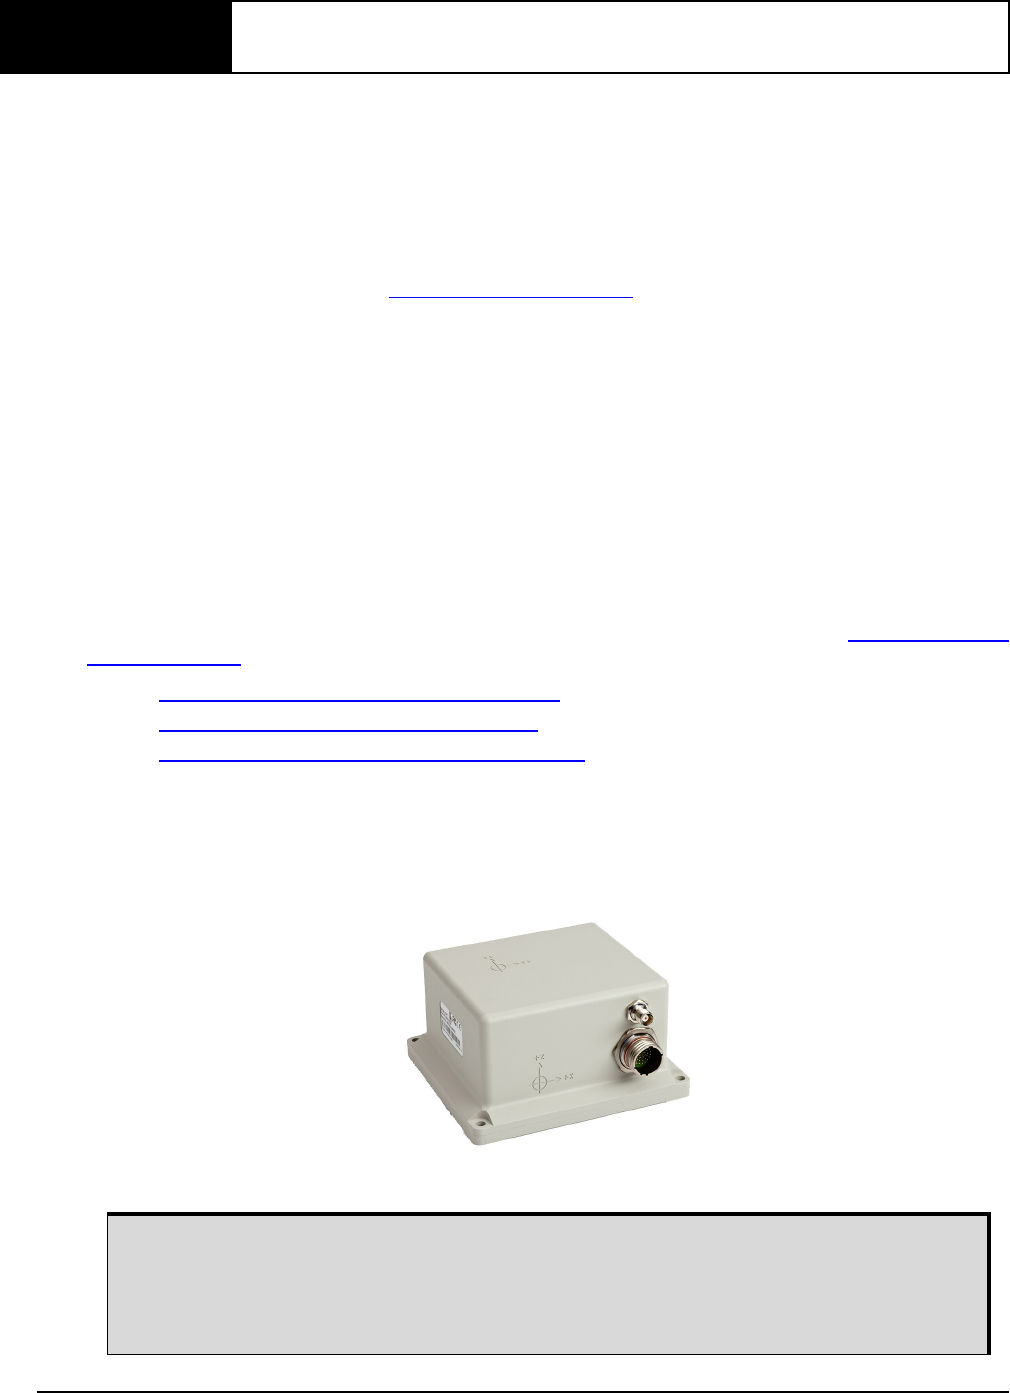
Figure 2: SPAN-CPT Receiver
The sections that follows outline how to set up the system’s parts and cables. Refer to Appendix A,
Technical Specifications on page 48 for details.
Use a USB cable to log raw data - Serial communication is sufficient for configuring and
monitoring the receiver through Hyperterminal or NovAtel Connect. USB is required if
using a post-processing application requiring 100 Hz IMU data. We also recommend
using NovAtel Connect to collect the data. Refer to Data Collection on page 32 and Data
Collection for Post-Processing on page 33 for instructions.
14 SPAN-CPT User Manual Rev 8
Chapter 2 SPAN-CPT Installation
2.2 Hardware Set Up
Complete the following steps to set up the NovAtel SPAN system.
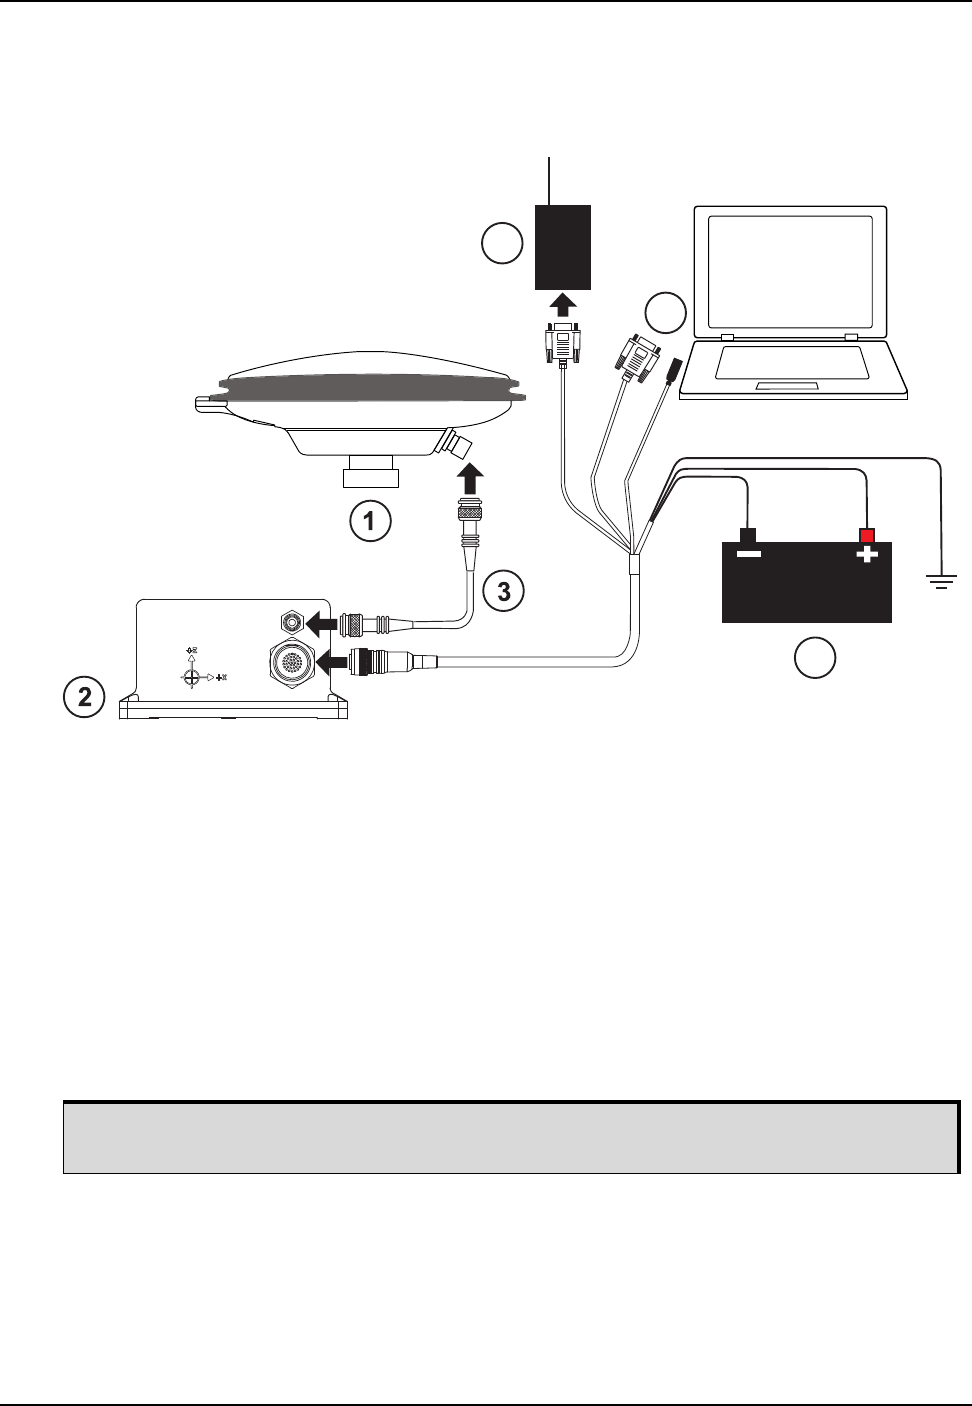
Figure 3: Typical SPAN-CPT Set Up
1. Mount the GNSS antenna, as described in Mount the Antenna on page 15.
2. Mount the SPAN-CPT, as described in Mount the SPAN-CPT on page 15.
3. Connect the GNSS antenna to the SPAN-CPT, as described in Connect the GNSS Antenna on
page 16.
4. Connect power to the SPAN-CPT, as described in Connect Power on page 16.
5. Connect a computer to the SPAN-CPT, as described in Connect a Computer to the SPAN-CPT on
page 17.
6. Connect the serial port on the user supplied radio device (optional for real-time differential operation)
to the COM2 port available on the multi-purpose I/O connector.
7. Connect the I/O strobe signals (optional), as described in Connect the I/O Strobe Signals on
page 17.
NovAtel recommends biasing unused inputs to their default states.
4
6
5
Radio
(optional for
Real Time Differential
operation)
(COM2)

SPAN-CPT Installation Chapter 2
SPAN-CPT User Manual Rev 8 15
2.2.1 Mount the Antenna
For maximum positioning precision and accuracy, as well as to minimize the risk of damage, ensure the
antenna is securely mounted on a stable structure that will not sway or topple. Where possible, select a
location with a clear view of the sky to the horizon so each satellite above the horizon can be tracked
without obstruction. The location should also be one that minimizes the effect of multipath interference.
Ensure the antenna cannot move due to dynamics.
For a discussion on multipath, refer to An Introduction to GNSS on the NovAtel website.
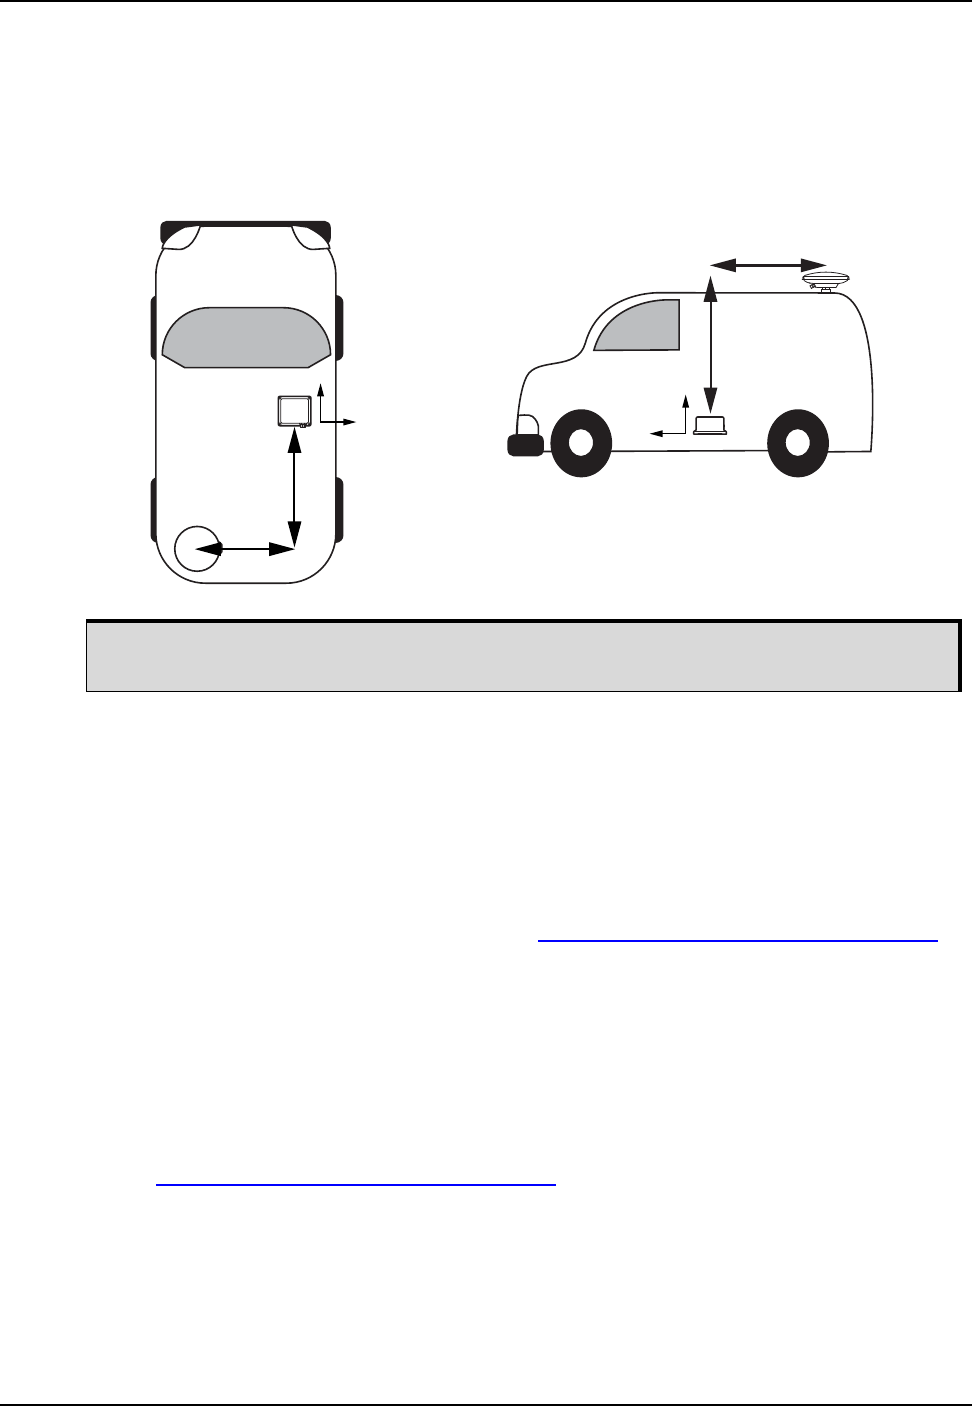
2.2.2 Mount the SPAN-CPT
Mount the SPAN-CPT in a fixed location where the distance from the SPAN-CPT to the GNSS antenna
phase center is constant. Ensure the SPAN-CPT orientation, with respect to the vehicle and antenna, is
also constant.
For attitude output to be meaningful, the SPAN-CPT should be mounted so the positive Z-axis marked on
the SPAN-CPT enclosure points up and the Y-axis points forward through the front of the vehicle, in the
direction the vehicle is moving.
Figure 4: SPAN-CPT Enclosure Mounting
Also, it is important to measure the distance from the SPAN-CPT to the antenna (the Antenna Lever
Arm), on the first usage, on the axis defined on the SPAN-CPT enclosure. See also Appendix A,
Technical Specifications on page 48 for dimensional drawings of the SPAN-CPT.
Ensure the SPAN-CPT and GNSS antenna cannot move due to dynamics and that the distance and
relative direction between them is fixed.
The closer the antenna is to the SPAN-CPT, the more accurate the position solution. Also,
your measurements when using the SETIMUTOANTOFFSET command must be as accurate
as possible or at least more accurate than the GNSS positions being used. For example, a
10 cm error in recording the antenna offset results in at least a 10 cm error in the output.
Millimeter accuracy is preferred.
The offset from the SPAN-CPT to the antenna and/or a user point device, must remain
constant especially for RTK or DGNSS data. Ensure the SPAN-CPT, antenna and user
point device are bolted in one position perhaps by using a custom bracket.
Z
Y
X

16 SPAN-CPT User Manual Rev 8
Chapter 2 SPAN-CPT Installation
2.2.3 Connect the GNSS Antenna
Connect the antenna cable from the connector on the GNSS antenna to the antenna port on the
SPAN-CPT. See Typical SPAN-CPT Set Up on page 14.
For best performance, use a high quality coaxial cable. An appropriate coaxial cable is one that matches
the impedances of the antenna and receiver (50 ohms) and has a line loss that does not exceed 10.0 dB.
If the limit is exceeded, excessive signal degradation may occur and the receiver may not meet
performance specifications.
If your application requires the use of cable longer than 30 m, refer to application note APN-003 RF
Equipment Selection and Installation, available at www.novatel.com/support/manuals/.
2.2.4 Connect Power
The SPAN-CPT receiver requires an input supply voltage of +9 VDC to +18 VDC. The receiver has an
internal power module that does the following:
• filters and regulates the supply voltage
• protects against over voltage, over current, and high temperature conditions
• provides automatic reset circuit protection
Power input pins are located on the multi-purpose I/O connector. Be sure to connect the power with the
correct polarity and ensure the power source is within specifications. See Appendix A, Technical
Specifications on page 48 for the multi-purpose I/O connector pin out and the power input requirements.
There is always a drop in voltage between the power source and the power port due to cable loss.
Improper selection of wire gauge can lead to an unacceptable voltage drop at the SPAN-CPT system. A
paired wire run represents a feed and return line. Therefore, a 2 m wire pair represents a total wire path
of 4 m. For a SPAN-CPT system operating from a 12 V system, a power cable longer than 2.1 m (7 ft.)
should not use a wire diameter smaller than 24 AWG.
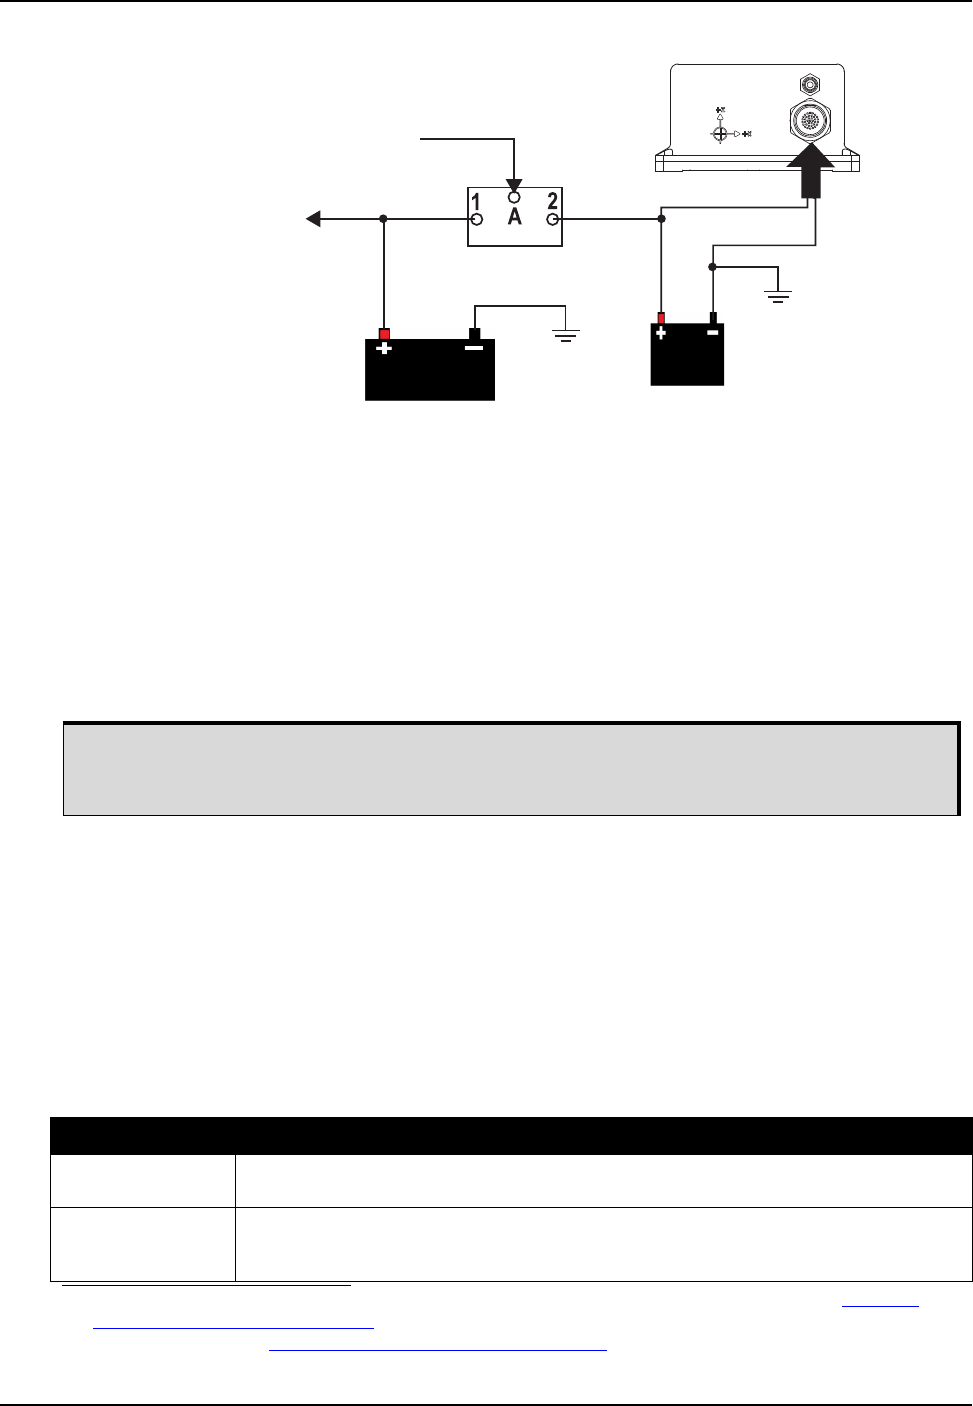
If the SPAN-CPT is installed in a vehicle, NovAtel recommends a backup battery be placed between the
receiver and its voltage supply to act as a power buffer. When a vehicle engine is started, power can dip
or cut out to ancillary equipment causing the receiver and IMU to lose lock and calibration settings.
The SPAN-CPT can supply power for the antenna Low Noise Amplifier (LNA) through the
antenna port center conductor. The SPAN-CPT provides +5 VDC ±5% at a maximum of 100
mA.
NovAtel offers several coaxial cables to meet your GNSS antenna interconnection
requirements, including 5, 15 and 30 m antenna cable with TNC connectors on both ends
(NovAtel part numbers GPS-C006, GPS-C016 and GPS-C032).
The power supply used to power the SPAN-CPT must be monotonic during power on to
ensure internal logic blocks are initialized appropriately and proceed to valid operating
states. If the power supply is not monotonic during power on, the accelerometer status in
the IMU status may show a failure and the accelerometer measurements in the RAWIMUS
log will be zero (see the RAWIMUS log description in the SPAN on OEM6 Family Firmware
Reference Manual (OM-20000144)). Power cycling with a monotonic power up clears this
error state.
The SPAN-CPT contains a breaker which can be tripped if using an incorrect power supply.
Manually power cycle the SPAN-CPT to reset the breaker and reconnect to a properly
supported power supply.
SPAN-CPT Installation Chapter 2
SPAN-CPT User Manual Rev 8 17
Figure 5: Battery Isolator Installation
2.2.5 Connect a Computer to the SPAN-CPT
SPAN-CPT has a multi-purpose I/O connector that contains pins for the COM1 serial port, COM2 serial
port and USB port. Refer to Appendix A, Technical Specifications on page 48 for the pin definitions of the
multi-purpose I/O connector.
To use a USB connection, connect the USB port pins on the multi-purpose I/O connector to the USB port
on the computer.
To use a serial connection, connect the COM1 or COM2 port pins on the multi-purpose I/O connector to
the serial port on the computer.
2.2.6 Connect the I/O Strobe Signals
The SPAN-CPT has several I/O strobe signals enabling it to be part of an interconnected system
composed of devices that need to be synchronized with each other. For example, connect the SPAN
system to an aerial camera in such a way that the SPAN system records its position whenever the shutter
button is pressed.
The SPAN-CPT supports the strobe signals described in Table 6, I/O Strobe Signals. These signals are
accessed from the multi-purpose I/O connector on the SPAN-CPT. See Appendix A, Technical
Specifications on page 48 for information on signals, wiring and pin-out information of the multi-purpose
I/O connector.
Figure 6: I/O Strobe Signals
from Vehicle
Alternator
to Vehicle Electrical
System
Vehicle Main
Battery
Auxiliary
Battery
Battery Isolator
By default, COM1 operates as an RS-232 serial port. To change COM1 to operate as an
RS-422 serial port, tie together the RS-422 select pins (7 and 8) on the multi-purpose I/O
connector.
Signal Descriptiona
a. For information about the SETMARK1OFFSET and TAGGEDMARK1PVA commands, refer to the SPAN on
OEM6 Firmware Reference Manual (OM-20000144). For information about the other commands and logs in
this table, refer to the OEM6 Family Firmware Reference Manual (OM-20000129).
Event1
(Mark 1)
An input signal for which a pulse greater than 150 ns triggers certain logs to be generated.
Polarity is configurable using the MARKCONTROL command.
PPS
(Pulse Per Second)
A time synchronization output. This is a pulse where the leading edge is synchronized to
receiver calculated GNSS Time. The polarity, period and pulse width can be configured
using PPSCONTROL command.
18 SPAN-CPT User Manual Rev 8
Chapter 2 SPAN-CPT Installation
2.2.7 CAN Bus
The SPAN-CPT has a CAN Bus controller that supports physical layer signals and low level messages
specified in the appropriate sections of the J1939 and ISO11783 standards. Manufacturers can also
create messages specific to their application without violating these standards. To facilitate manufacturer
messages, NovAtel provides an Application Program Interface (API). To obtain information about this
API, contact NovAtel Customer Support.
The CAN Bus port is available on the multi-purpose I/O connector on the SPAN-CPT. See Appendix A,
Technical Specifications on page 48 for information on signals, wiring and pin-out information of the
multi-purpose I/O connector.
2.2.8 Odometer Connection
The SPAN-CPT provides a wheel sensor input for a Distance Measurement Instrument (DMI) through the
multi-purpose I/O connector. Refer to SPAN-CPT Wheel Sensor on page 30 for additional details.
2.2.8.1 Odometer Requirements
SPAN-CPT is compatible with any wheel sensor meeting the following requirements:
• Input range less than or equal to 45 KHz
• Input duty cycle is symmetric 40%-60%
• Active input voltage is greater than or equal to 2.5 VDC with a maximum input voltage of 50 VDC
• Inactive voltage is less than or equal to 1 VDC
• Input current is approximately 3.5 mA at 5 VDC with a maximum of 5 mA at 50 VDC
• Ensure input current does not exceed 5 mA. There is a current limiting diode that can dissipate
800 mW on the input opto-isolator
• Quadrature, pulse and direction type odometers are compatible
An example of a SPAN-CPT compatible odometer is the CWPTA411 from Kistler (www.kistler.com). A
transducer traditionally fits to the outside of a non-drive wheel. A pulse is then generated from the
transducer which is fed directly to the ODO connector on the IMU cable.
SPAN-CPT powers the odometer. See SPAN-CPT Cable on page 52 for the pin outs of the SPAN-CPT
cable. Connect the appropriate pins to the chosen odometer. If the Kistler WPT is chosen, first modify the
cable at the WPT end. The cable modifications are shown in Table 1, Cable Modification for Kistler WPT
Cable and Table 2, Cable Modification for SPAN-CPT Cable on page 19.
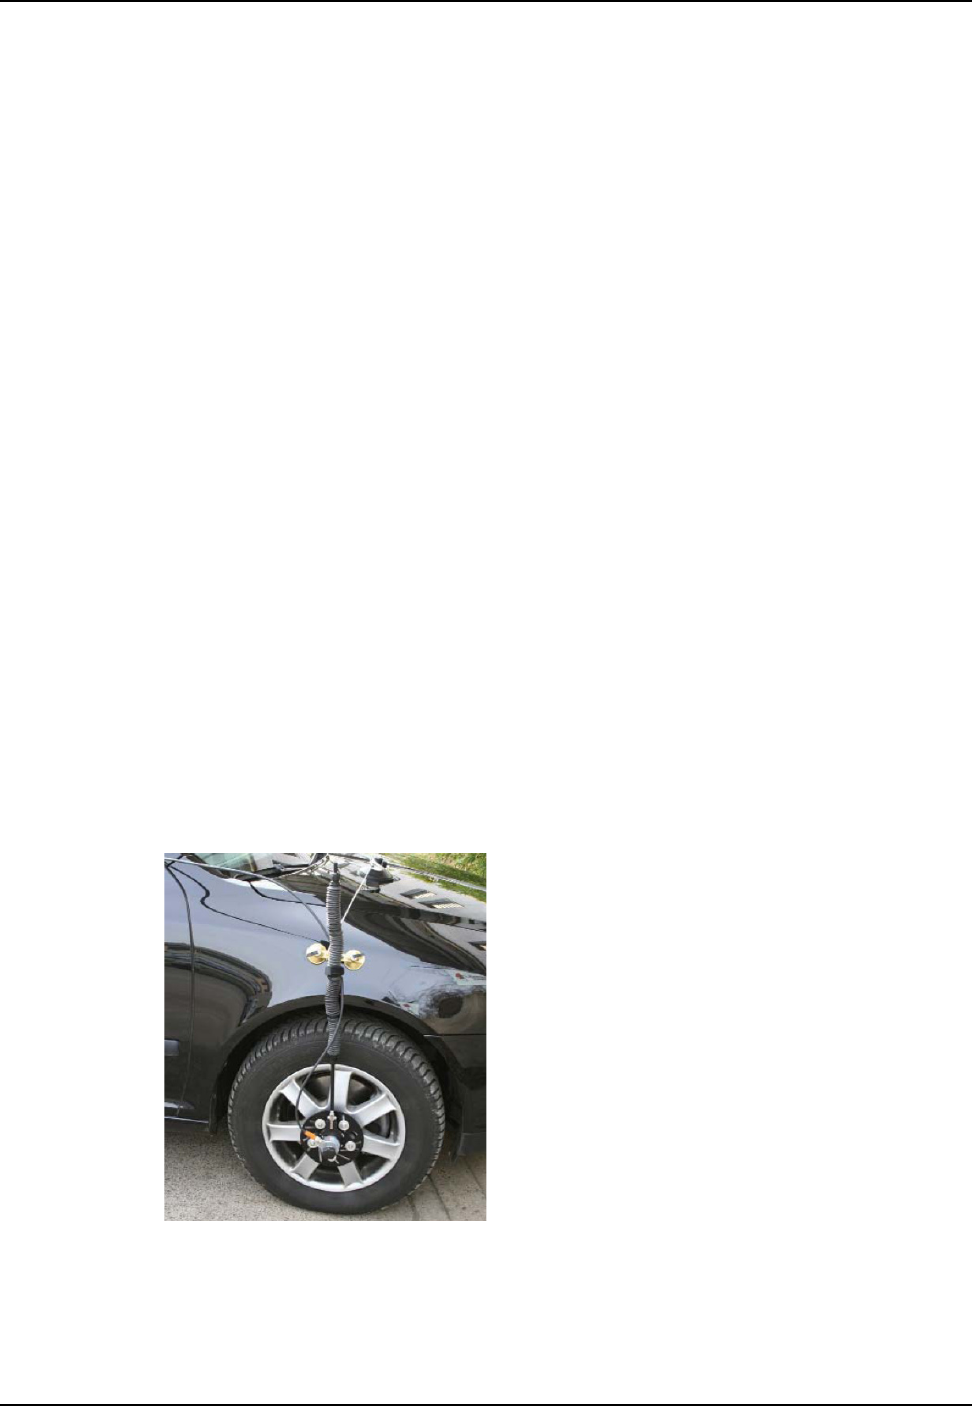
Figure 7: Kistler WPT
The Wheel Pulse Transducer (WPT)
mounts to the wheel lug nuts via
adjustable mounting collets. The
torsion protection rod, which
maintains rotation around the wheel
axis, affixes to the vehicle body with
suction cups. Refer to the Kistler
WPT (part number CWPTA411) user
manual for mounting instructions
(www.kistler.com).

SPAN-CPT Installation Chapter 2
SPAN-CPT User Manual Rev 8 19
Table 1: Cable Modification for Kistler WPT Cable
Table 2: Cable Modification for SPAN-CPT Cable
8-pin M12 Connector on
the Kistler Cable (part # CWPTA41) a
a. This modification is for the Kistler WPT 8-pin M12-plug
cable number 14865.
Female DB9
Connector
Pin 1 GND Pin 5
Pin 2 +UB (Input Power) Pin 9
Pin 3 Signal A Pin 6
Pin 4 Signal A inverted Pin 7
Pin 5 Signal B Pin 3
Pin 6 Signal B inverted Pin 1
Pin 7 Reserved No change
Pin 8
Kistler provides an M12 to DB9 cable for use with the WPT. However, certain revisions of
this cable do not bring through all four signal inputs. The SPAN-CPT odometer interface
requires all four signal inputs to operate correctly. See your WPT documentation for cable
details.
Pin Wires on SPAN-CPT-KVH Terminated or
Unterminated Cable
Male DB9 Connector
18 ODO SIGNAL B INV Pin 1
NONE Pin 2
17 ODO SIGNAL B Pin 3
NONE Pin 4
14 GND Pin 5
15 ODO SIGNAL A Pin 6
16 ODO SIGNAL A INV Pin 7
NONE Pin 8
13 INPUT POWER Pin 9
20 SPAN-CPT User Manual Rev 8
Chapter 3 SPAN-CPT Operation
Before operating the SPAN-CPT system, ensure that the installation and set up instructions in Chapter 2,
SPAN-CPT Installation on page 13 were completed.
Use the NovAtel Connect software to configure receiver settings and to monitor data in real time,
between a rover SPAN-CPT system and base station.
SPAN-CPT system output is compatible with post-processing software from NovAtel's Waypoint Products
Group. For information about Waypoint, visit our Web site at www.novatel.com/products/software/
waypoint-products/.
3.1 Definition of Reference Frames Within SPAN
The reference frames most frequently used throughout this manual are:
• Local Level Frame
•SPAN Body Frame
• Enclosure Frame
• Vehicle Frame
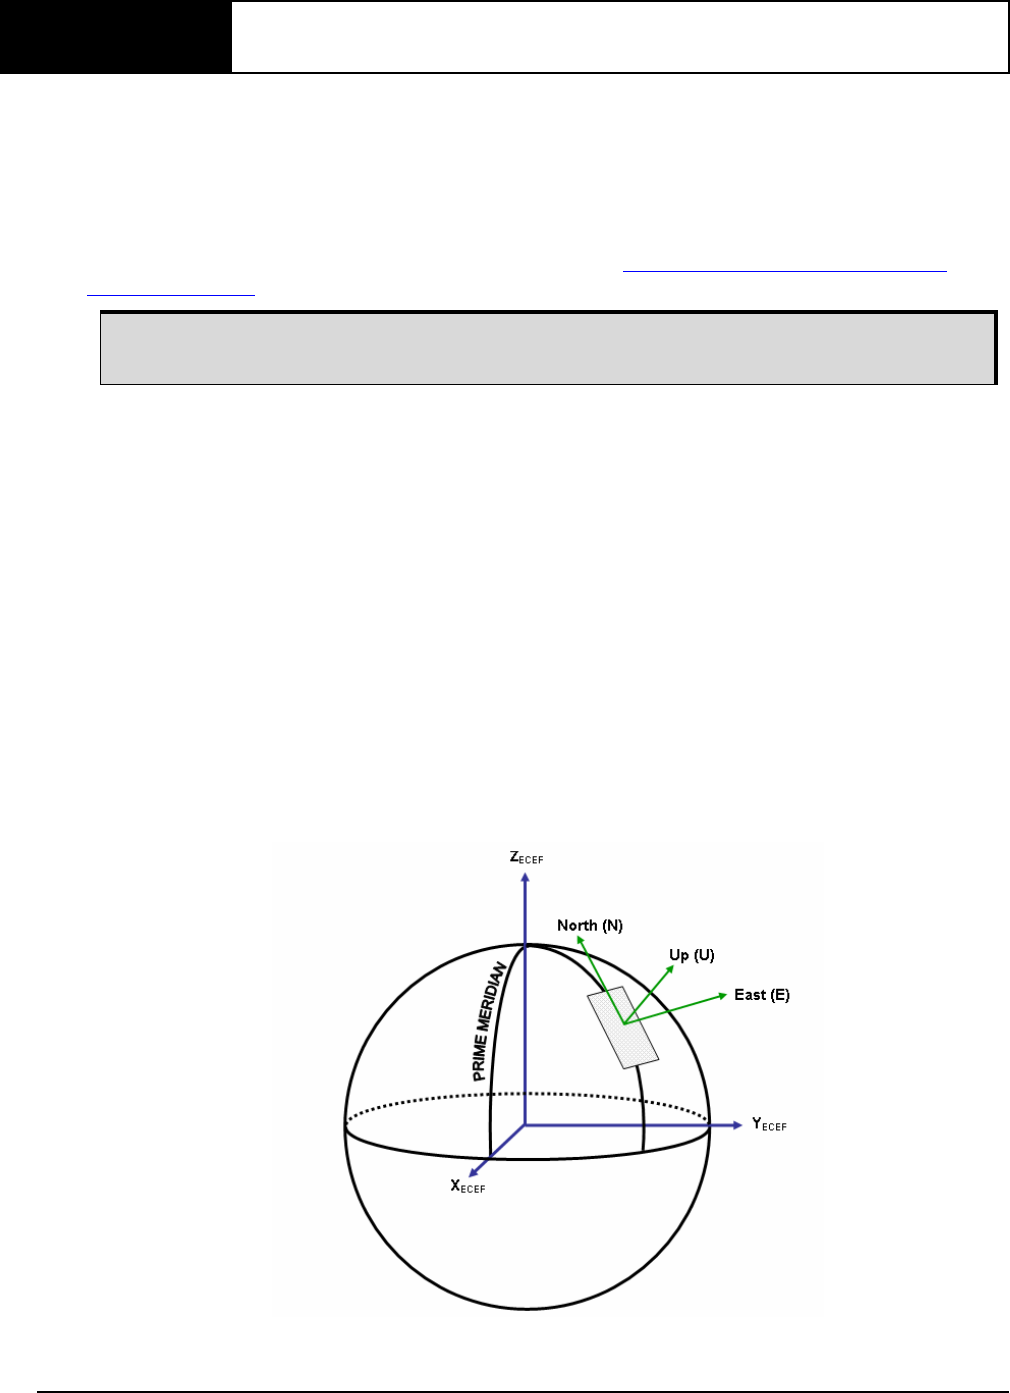
3.1.1 Local Level Frame
The definition of the local level coordinate frame is as follows:
• z-axis pointing up (aligned with gravity)
• y-axis pointing north
• x-axis pointing east
Figure 8: Local Level Frame (ENU)
Ensure the computer’s Control Panel Power Settings are not set to go into Hibernate or
Standby modes. Data is lost if one of these modes occur during a logging session.

SPAN-CPT Operation Chapter 3
SPAN-CPT User Manual Rev 8 21
3.1.2 SPAN Body Frame
The definition of the SPAN body frame is as follows:
• z-axis pointing up (aligned with gravity)
• y-axis defined by how user has mounted the IMU
• x-axis defined by how user has mounted the IMU
To determine the SPAN x-axis and y-axis, see Table 3, Full Mapping Definitions on page 21. This frame
is also known as the computation frame and is the frame where all the mechanization equations are
computed.
Table 3: Full Mapping Definitions
Mapping SPAN Frame
Axis SPAN Frame IMU Enclosure
Frame Axis
IMU Enclosure
Frame
1
XY
YZ
ZX
2
XZ
YY
Z-X
3
XZ
YX
ZY
4
XX
YZ
Z-Y
5
(default)
XX
YY
ZZ
6
XY
YX
Z-Z
Z
X
Y
X
Y
Z
Z
X
Y
Z
Y
X
Z
X
Y
Y
Z
X
Z
X
Y
X
Z
Y
Z
X
Y
Z
X
Y
Z
X
Y
Y
X
Z
22 SPAN-CPT User Manual Rev 8
Chapter 3 SPAN-CPT Operation
3.1.3 Enclosure Frame
The definition of the enclosure frame is defined on the SPAN-CPT and represents how the sensors are
mounted in the enclosure. If the SPAN-CPT is mounted with the z-axis (as marked on the SPAN-CPT)
pointing up, the enclosure frame is the same as the SPAN frame.
The origin of this frame is not the enclosure center, but the Center of Navigation (sensor center).
Figure 9: SPAN-CPT Center of Navigation
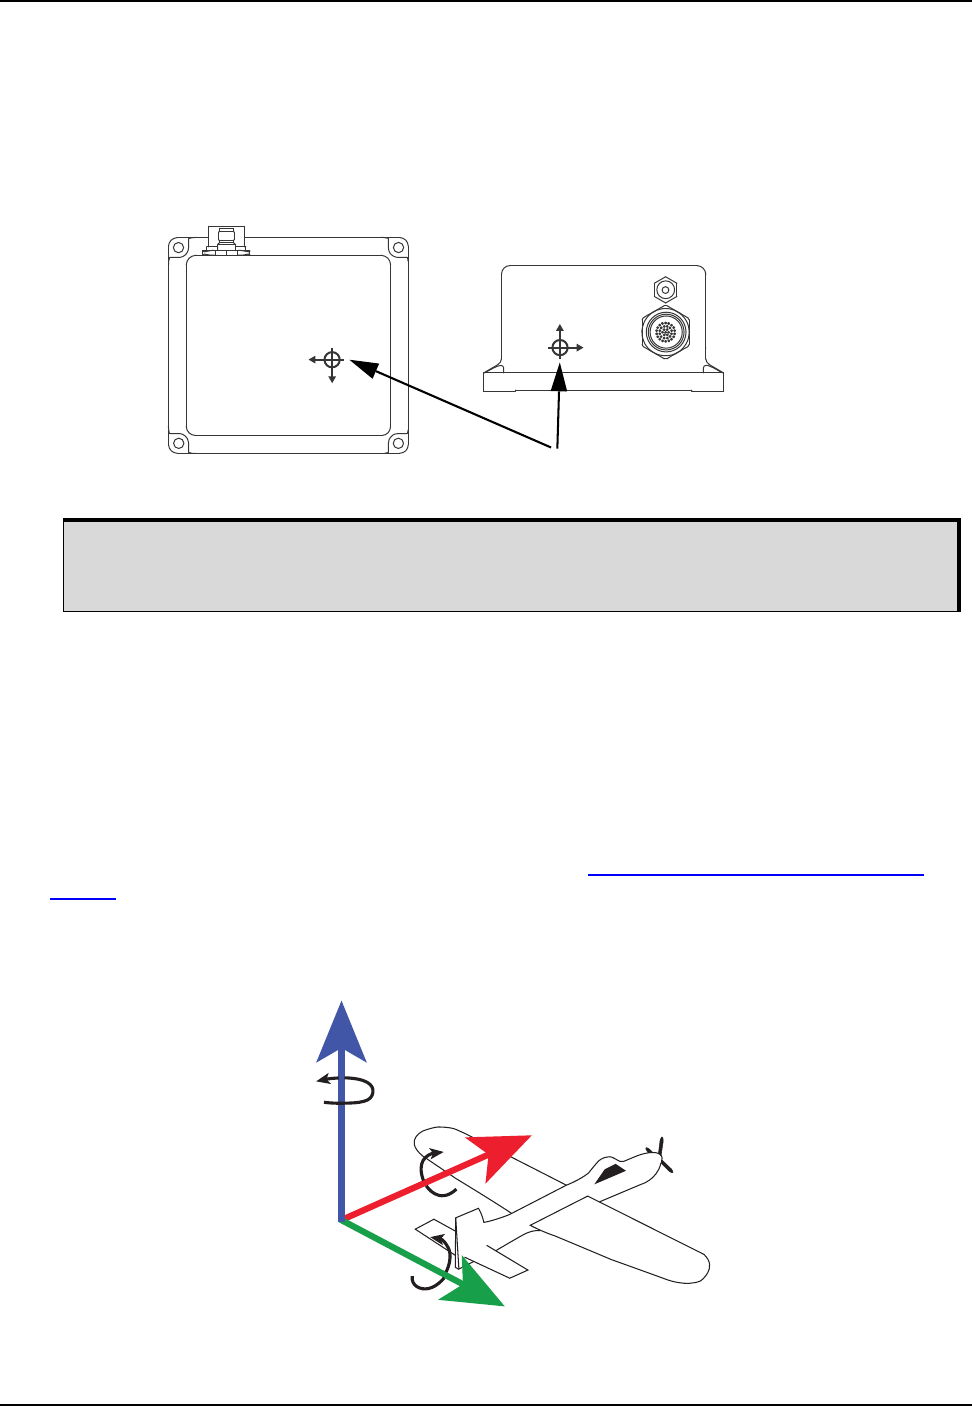
3.1.4 Vehicle Frame
The definition of the vehicle frame is as follows:
• z-axis points up through the roof of the vehicle perpendicular to the ground
• y-axis points out the front of the vehicle in the direction of travel
• x-axis completes the right-handed system (out the right-hand side of the vehicle when facing
forward)
Use the VEHICLEBODYROTATION command to enter the rotation into the system and use the
RVBCALIBRATE command to calculate this rotation. See the SPAN on OEM6 Firmware Reference
Manual (OM-20000144) for information about these commands.
Figure 10: Vehicle Frame
Although the SPAN-CPT is a rugged product, the gyros inside are sensitive and can be
damaged by environmental shocks such as vibration, bumps and rapid temperature
changes.
+X
+Y
+X
+Z
Center of Navigation indicators
Z
Y
X
SPAN-CPT Operation Chapter 3
SPAN-CPT User Manual Rev 8 23
3.2 Communicating with the SPAN-CPT System
After the receiver is connected to a computer, antenna and power supply, install the NovAtel PC Utilities
(NovAtel Connect and Convert). The installation instructions are in the SPAN-CPT Quick Start Guide.
(Alternatively, use a terminal emulator program such as HyperTerminal to communicate with the
receiver.) For information about using NovAtel Connect, refer to the NovAtel Connect Help file. The Help
file is accessed by choosing Help from the main menu in NovAtel Connect or press F1 when the cursor is
in a window.
3.2.1 Use NovAtel Connect to Communicate
NovAtel Connect is a Windows application that provides a Graphical User Interface (GUI) to set up and
monitor the operation of the SPAN system.
Start NovAtel Connect on the computer to enable communication.
1. Launch NovAtel Connect from the Start menu folder specified during the installation process. The
default location is Start | All Programs | NovAtel Connect 1.x.x | NovAtel Connect.
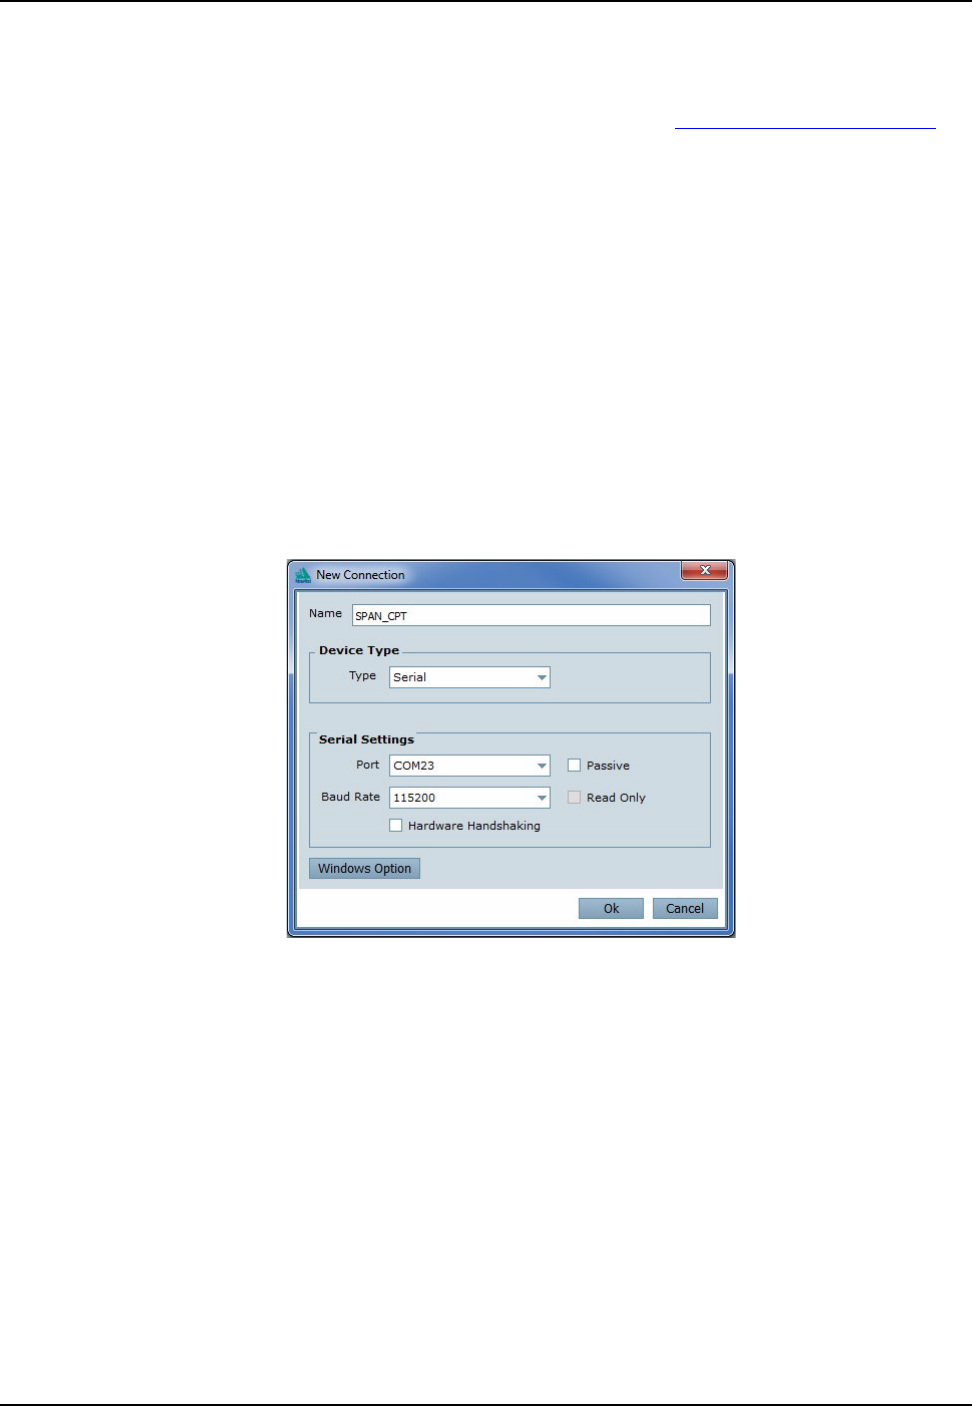
2. To define a new connection, select New Connection from the Device menu.
The New Connection window appears.
If a connection is already defined, or if connections were imported from a previous version of NovAtel
Connect, choose Open Connection and skip to step 9.
3. Enter a name for the connection.
4. Select Serial or USB from the Type drop down list.
5. Select the computer port the SPAN-CPT is connected to from the Port drop down list.
6. If you selected Serial, select 115200 from the Baud Rate drop down list.
7. If you selected Serial, clear the Hardware handshaking check box.
8. Click the OK button to save the new device settings.
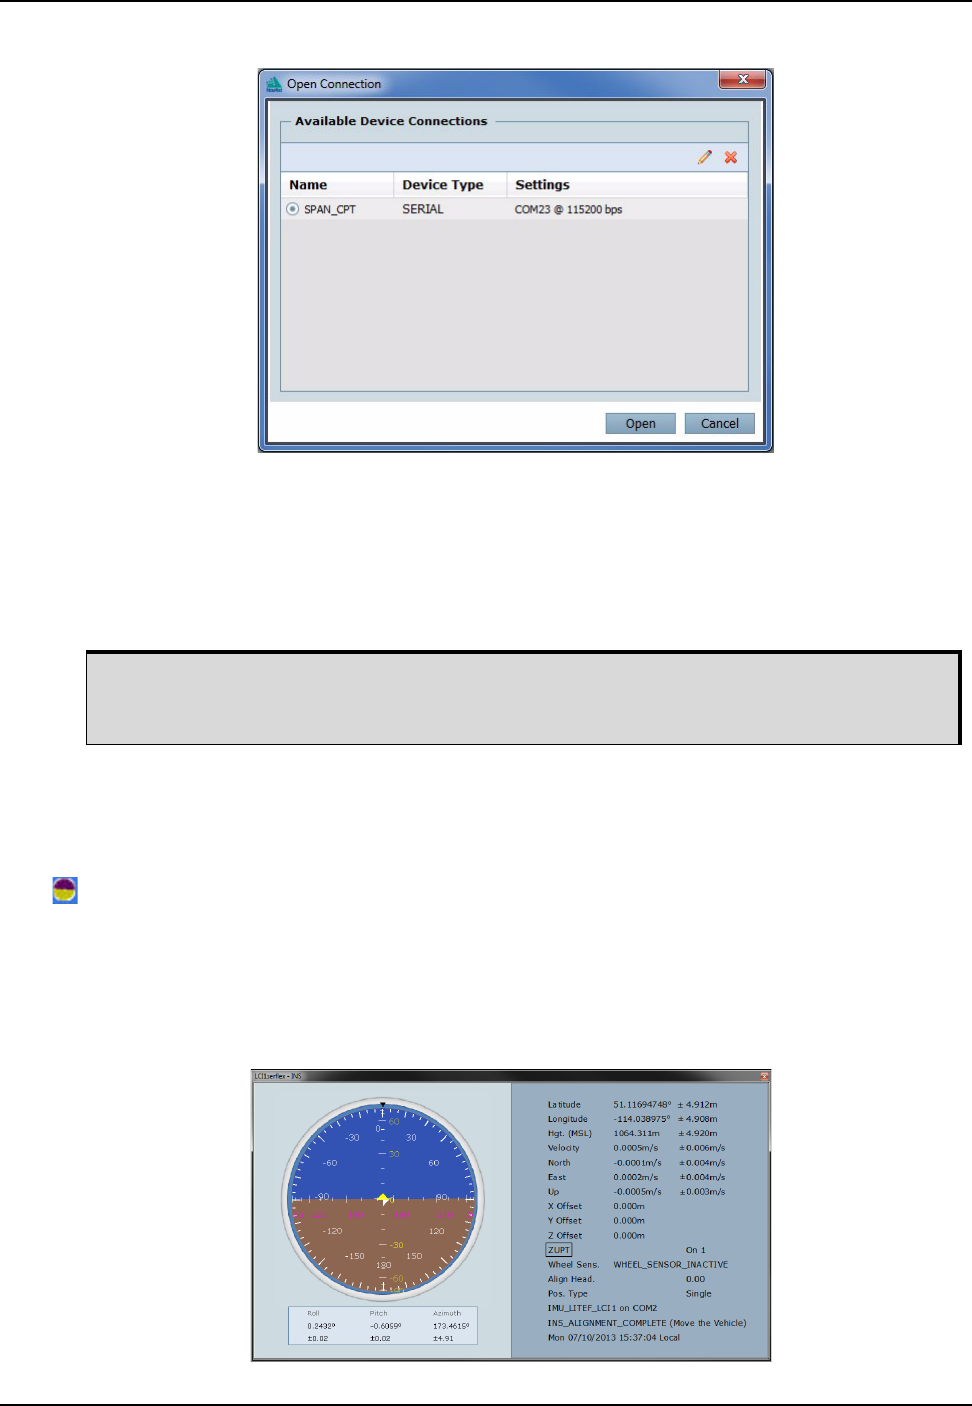
9. Select the new configuration from the Available Device Connections area of the Open Connection
window.
24 SPAN-CPT User Manual Rev 8
Chapter 3 SPAN-CPT Operation
10. Click the Open button to open SPAN-CPT communications.
As NovAtel Connect establishes the communication session with the receiver, a progress box
displays.
11. Select Tools | Logging Control from the NovAtel Connect main menu to control the receiver’s logging
to files and serial ports. Refer to the NovAtel Connect online Help for more information.
12. Use the Console window to enter commands.
3.2.2 INS Window in NovAtel Connect
The INS Window in NovAtel Connect is described below. Refer to the NovAtel Connect online help for
more details.
INS Window: The Position, Velocity and Attitude (roll, pitch and azimuth) sections display data from
the INSPVA log along with standard deviations calculated from the INSCOV log. Information in the
ZUPT (Zero Velocity Update) section reflects the current INSZUPT command setting. The receiver
uses the X,Y and Z Offset fields to specify an offset from the IMU, for the output position and velocity
of the INS solution, as specified by the SETINSOFFSET command or the NovAtel Connect SPAN
wizard. The INS Configuration/Status section displays the IMU type, IMU Status and local date/time
information. The dial is a graphical display of the Roll, Pitch and Azimuth values indicated by an
arrow on each axis.
To save the receiver configuration to Non-Volatile Memory (NVM), ensure that all
windows, other than the Console window, are closed in NovAtel Connect and then use
the SAVECONFIG command.
SPAN-CPT Operation Chapter 3
SPAN-CPT User Manual Rev 8 25
3.3 Software Configuration
3.3.1 GNSS Configuration
The GNSS configuration can be set up for different accuracy levels such as single point, SBAS, DGPS
and RTK (RTCA, RTCM, RTCM V3 and CMR). The SPAN-CPT can also be set up for L-Band. Refer to
the OEM6 Family Installation and Operation Manual (OM-20000128) for details on DGPS, RTK, L-Band
or SBAS setup and operation.
With no additional configuration, the system operates in single point mode.
3.3.2 SPAN IMU Configuration
You can configure the IMU portion of the SPAN system using software commands or the NovAtel
Connect software utility.
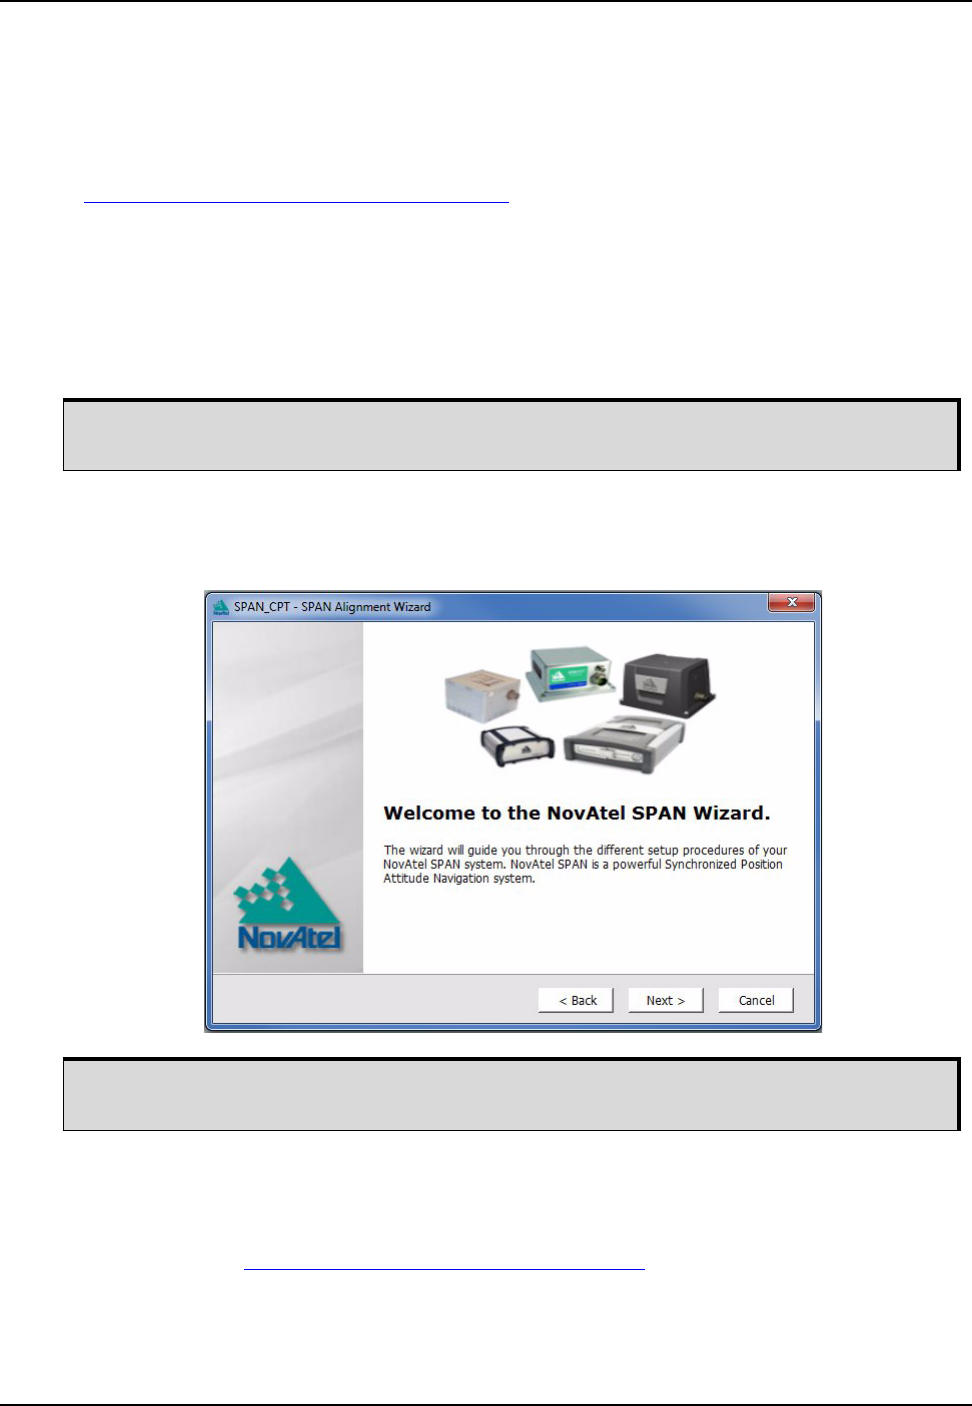
3.3.2.1 SPAN-CPT Configuration with NovAtel Connect
1. Select Wizards | SPAN Alignment from the NovAtel Connect toolbar. This wizard moves through the
steps required to complete an alignment and configure the receiver port to accept IMU data.
3.3.2.2 SPAN-CPT Configuration using Command Line
Follow these steps to enable INS as part of the SPAN system using software commands:
1. Issue the SETIMUTOANTOFFSET command to enter the distance from the SPAN-CPT to the GNSS
antenna. See the SPAN on OEM6 Firmware Reference Manual (OM-20000144) for information
about the SETIMUTOANTOFFSET command.
A GNSS antenna must be connected and tracking satellites for operation.
The NovAtel Connect screen shots in this manual may differ from your version of NovAtel
Connect.
26 SPAN-CPT User Manual Rev 8
Chapter 3 SPAN-CPT Operation
The offset between the antenna phase center and the IMU navigation center must remain constant
and be known accurately. The X, Y and Z positive directions are clearly marked on the SPAN-CPT
enclosure. The SETIMUTOANTOFFSET parameters are in metres:
SETIMUTOANTOFFSET x_offset y_offset z_offset [x_stdev] [y_stdev]
[z_stdev]
The standard deviation fields are optional and the distances are measured from the IMU navigation
center to the antenna phase center.
A typical RTK GNSS solution is accurate to a few centimetres. For the SPAN-CPT system to have
this level of accuracy, the offset must be measured to within a centimetre. Any offset error between
the two systems directly affects the output position. For example, a 10 cm error recording this offset
will result in at least a 10 cm error in the output.
3.4 Real Time Operation
SPAN-CPT operates through the OEM6 command and log interface. Commands and logs specifically
related to SPAN-CPT operation are documented in the SPAN on OEM6 Firmware Reference Manual
(OM-20000144).
Real time operation notes:
• Inertial data does not start until FINESTEERING time status is reached, and therefore, the
SPAN-CPT system does not function unless a GNSS antenna is connected with a clear view of
the sky.
• The inertial solution is computed separately from the GNSS solution. The GNSS solution is
available from the SPAN-CPT system through the GNSS specific logs even without SPAN
running. The integrated GNSS+INS solution is available through special INS logs documented in
the SPAN on OEM6 Firmware Reference Manual (OM-20000144).
• The IMU solution is available at the maximum rate of output of the SPAN-CPT (100 Hz). Because
of this high data rate, a shorter header format was created. These shorter header logs are
defined with an S (RAWIMUSB rather than RAWIMUB). We recommend using these logs
instead of the standard header logs to save throughput on the COM port.
Status of the inertial solution can be monitored using the inertial status field in the INS logs, Table 4,
Inertial Solution Status on page 27.
This example assumes a default mounting configuration and shows an -X offset, -Y offset
and +Z offset.
Z Offset
Y Offset
Y Offset
X Offset
Y
Z
Y
X

SPAN-CPT Operation Chapter 3
SPAN-CPT User Manual Rev 8 27
Table 4: Inertial Solution Status
3.4.1 System Start-Up and Alignment Techniques
The system requires an initial attitude estimate to start the navigation filter. This is called system
alignment. On start-up the system has no position, velocity or attitude information. When the system is
first powered up, the following sequence of events happens:
1. The first satellites are tracked and coarse time is solved.
2. Enough satellites are tracked to compute a position.
3. Receiver “fine time” is solved, meaning the time on board the receiver is accurate enough to begin
timing IMU measurements.
4. Raw IMU measurements begin to be timed by the receiver and are available to the INS filter. They
are also available in the RAWIMU, RAWIMUS, RAWIMUX, and RAWIMUSX logs. The INS Status
field changes from INS_INACTIVE through DETERMINING_ORIENTATION and
WAITING_INITIALPOS during this period.
5. The inertial alignment routine starts and the INS Status field reports INS_ALIGNING.
6. When the kinematic alignment is completed and the INS Status field changes to
INS_ALIGNMENT_COMPLETE. The system transitions to navigation mode.
Binary ASCII Description
0INS_INACTIVE IMU logs are present, but the alignment routine has not started;
INS is inactive.
1INS_ALIGNING INS is in alignment mode.
2INS_HIGH_VARIANCE
The INS solution is still being computed but the azimuth solution
uncertainty has exceed the threshold. The default threshold is 2
degrees.a The solution is still valid but you should monitor the
solution uncertainty in the INSCOV log. You may encounter this
state during times when the GNSS, used to aid the INS, is
absent.b
3INS_SOLUTION_GOOD The INS filter is in navigation mode and the INS solution is good.
6INS_SOLUTION_FREE
The INS filter is in navigation mode and the GNSS solution is
suspected to be in error.
This may be due to multipath or limited satellite visibility. The
inertial filter has rejected the GNSS position and is waiting for the
solution quality to improve.
7INS_ALIGNMENT_COMPLETE
The INS filter is in navigation mode, but not enough vehicle
dynamics have been experienced for the system to be within
specifications.
8DETERMINING_ORIENTATION INS is determining the IMU axis aligned with gravity.
9WAITING_INITIALPOS The INS filter has determined the IMU orientation and is awaiting
an initial position estimate to begin the alignment process.
a. This value is configured using the INSTHRESHOLDS command. See the SPAN on OEM6 Firmware
Reference Manual (OM-20000144) for more information.
b. See also question #5 in Appendix C, Frequently Asked Questions on page 56.

28 SPAN-CPT User Manual Rev 8
Chapter 3 SPAN-CPT Operation
7. The solution is refined using updates from GNSS. Once the system is operating within specifications
and after some vehicle movement, the INS Status field changes to INS_SOLUTION_GOOD. This
indicates that the estimated azimuth standard deviation is below 2 degrees. If it increases above 2
degrees, the status changes to INS_HIGH_VARIANCE.
3.4.1.1 Default Kinematic Alignment
A kinematic alignment is the default alignment routine for SPAN-CPT.
If the system is mounted as recommended with the z-axis pointing up and the y-axis aligned with the
forward direction of the vehicle, then no additional configuration is required to complete a moving
alignment.
The kinematic alignment begins when the receiver has a good GNSS position, fine time is solved, the
configuration parameters have been set and a GNSS velocity of at least 5 m/s (~ 18 km/h) is observed.
During kinematic alignment, keep the vehicle roll at less then 10°. Straight line driving is best.
The moving alignment transfers the GNSS course over ground pitch and azimuth to the attitude of the
IMU. This alignment routine is best suited for ground vehicles where the direction of travel is coincident
with the forward axis of the vehicle and the roll of the vehicle is close to zero. The fast alignment routine
may not be suitable for some marine or airborne applications, where the direction of travel may be
different from the forward axis of the vehicle because of factors like a crab angle.
If SPAN-CPT is installed with the IMU axes NOT aligned with the vehicle, then additional configuration is
needed to complete the moving alignment. These settings can be set graphically using the INS
configuration wizard in the NovAtel Connect utility or through the command interface by issuing the
following commands:
1. Specify which IMU axis is most closely aligned with gravity using the SETIMUORIENTATION com-
mand. See the SPAN on OEM6 Firmware Reference Manual (OM-20000144) for a description of this
command and Table 3, Full Mapping Definitions on page 21 for the number corresponding to each
orientation. For example, if the z-axis of the SPAN-CPT is pointing up, send this command:
SETIMUORIENTATION 5
2. Specify the angular offset from the vehicle frame to the SPAN frame (known as the vehicle/body
rotation or RVB) using the VEHICLEBODYROTATION command. Details of this command are in the
SPAN on OEM6 Firmware Reference Manual (OM-20000144).
Following the example started above, if the SPAN-CPT is installed rotated so that the y-axis points
out the right side of the vehicle instead of forward, enter this command:
VEHICLEBODYROTATION 0 0 -90
The accuracy of the initial attitude depends on the dynamics of the vehicle and the accuracy of the
angles input in the VEHICLEBODYROTATION command. The alignment is only an estimate of the attitude
of the vehicle and as the vehicle experiences dynamics, the accuracy of the attitude solution improves.
Once the attitude accuracy has converged the INS status changes to “INS_SOLUTION_GOOD”.
The azimuth standard deviation threshold can be changed using the INSTHRESHOLDS
command. See the SPAN on OEM6 Firmware Reference Manual (OM-20000144) for
information about this command.
5 m/s is the default alignment velocity. If a different alignment velocity is required, it can be
changed using the SETALIGNMENTVEL command. See the SPAN on OEM6 Firmware
Reference Manual (OM-20000144) for more information.
Angular rotations are difficult to visualize, so if you have complex rotations or some other
axis that +Z pointing up, use the NovAtel Connect SPAN wizard for assistance with these
settings.

SPAN-CPT Operation Chapter 3
SPAN-CPT User Manual Rev 8 29
3.4.1.2 Manual Alignment
If the attitude of your vehicle (roll, pitch, azimuth) is known, enter the attitude information using the
SETINITATTITUDE command. Details of this command are in the SPAN on OEM6 Firmware Reference
Manual (OM-20000144).
3.4.1.3 Dual Antenna Alignment
SPAN can also use information available from a NovAtel Dual Antenna ALIGN® solution to perform an
alignment. Refer to Chapter 4, SPAN-CPT Dual-Antenna on page 37 for details.
3.4.2 Navigation Mode
Once the alignment routine has successfully completed, SPAN enters navigation mode.
SPAN computes the solution by accumulating velocity and rotation increments from the IMU to generate
position, velocity and attitude. SPAN models system errors by using a filter. The GNSS solution, phase
observations and automatic zero velocity updates (ZUPTs) provide updates to the filter. Peripheral
updates can also be supplied; wheel sensor for displacement updates or an external receiver for heading
updates.
Following the alignment, the attitude is coarsely defined, especially in heading. Vehicle dynamics,
specifically turns, stops and starts, allow the system to observe the heading error and allows the heading
accuracy to converge. The amount of dynamics required for filter convergence vary by the alignment
quality, IMU quality, and maneuvers performed. The INS Status field changes to INS_SOLUTION_GOOD
once convergence is complete. If the attitude accuracy decreases, the INS Status field changes to
INS_HIGH_VARIANCE. When the accuracy converges again, the INS status continues as
INS_SOLUTION_GOOD.
3.4.3 Vehicle to SPAN-CPT Frame Angular Offsets Calibration Routine
Kinematic fast alignment requires the angular offset between the vehicle and the SPAN-CPT frame is
known approximately. If the angles are simple (that is, a simple rotation about one axis), the values can
easily be entered manually through the VEHICLEBODYROTATION command. If the angular offset is more
complex (rotation is about 2 or 3 axis), then the calibration routine may provide a more accurate
estimation of the values.
The steps for the calibration routine are:
1. Apply power to the SPAN-CPT (see Appendix A, Technical Specifications on page 48).
2. Configure the SPAN-CPT (see SPAN IMU Configuration on page 25).
3. Ensure an accurate lever arm is entered into the system.
4. Allow the system to complete an alignment (see the System Start-Up and Alignment Techniques on
page 27).
5. Enable the vehicle to body calibration using the RVBCALIBRATE ENABLE command. See the SPAN
on OEM6 Firmware Reference Manual (OM-20000144).
6. Start to move the system under good GNSS conditions. Movement of the system under good GNSS
conditions is required for the observation of the angular offsets.
Vehicle speed must be greater than 5 m/s (18 km/hour) for the calibration to complete. Drive straight
on a level surface if possible.
7. When the solved angles are verified (after approximately 30 seconds), the calibration stops and the
VEHICLEBODYROTATION log provides the solved values. Log VEHICLEBODYROTATION using
the ONNEW trigger to monitor the progress of the calibration.

30 SPAN-CPT User Manual Rev 8
Chapter 3 SPAN-CPT Operation
The rotation parameters can be saved in NVM for use on startup in case a fast alignment is required
in the future. Each time the SPAN-CPT is re-mounted, this calibration should be performed again.
See System Start-Up and Alignment Techniques on page 27 for details on alignment.
3.4.4 SPAN-CPT Wheel Sensor
The SPAN-CPT system supports wheel sensor inputs, integrated via the SPAN-CPT. The SPAN-CPT
accepts TTL-level input pulses from a wheel sensor through the multi-pin connector. See Appendix A,
Technical Specifications on page 48 for specifications on the wheel sensor interface.
3.4.4.1 Wheel Sensor Update Logic
The wheel sensor information is sent to the SPAN-CPT along with the raw IMU data.
The SPAN filter uses sequential TIMEDWHEELDATA logs to compute a distance traveled between
update intervals (1 Hz). This information is used to constrain free inertial drift during times of poor GNSS
visibility. The filter also contains a state for modeling the circumference of the wheel as it may change
due to hardware changes or environmental conditions.
The modeled wheel circumference is available in the WHEELSIZE log. Information on how the wheel
sensor updates are being used is available in the INSUPDATE log.
3.5 Azimuth Sources on a SPAN System
The SPAN system use three different methods to calculate the azimuth.
• Course Over Ground
• Inertial Azimuth
• Align Azimuth
3.5.1 Course Over Ground
The course over ground azimuth is determined using the position delta between two position solutions
computed by the GNSS receiver. This is the simplest way to compute an azimuth and is done using
either the GNSS solution or the INS solution. This method does not work when the vehicle is stationary
as any position difference is due to position error and the computed azimuth is meaningless.
Course over ground azimuth is of greatest advantage in aerial or marine environments where the actual
direction of travel may not match the forward axis of the aircraft/boat due to winds or currents. This effect
is known as the crab angle. Course over ground azimuth is a great way to compute the offset if another
means of computing the vehicle azimuth are available.
Course over ground azimuths are available in several different velocity logs. See Table 5, Logs with
Azimuth data on page 31.
After the RVBCALIBRATE ENABLE command is entered, there are no vehicle body rotation
parameters present and a kinematic alignment is NOT possible. Therefore this command
should only be entered after the system has performed either a static or kinematic
alignment and has a valid INS solution.
The solved rotation values are used only for a rough estimate of the angular offsets
between the SPAN-CPT and vehicle frames. The offsets are used when aligning the system
while in motion (see System Start-Up and Alignment Techniques on page 27). The angular
offset values are not applied to the attitude output, unless the
APPLYVEHICLEBODYROTATION command is enabled.

SPAN-CPT Operation Chapter 3
SPAN-CPT User Manual Rev 8 31
3.5.2 Inertial Azimuth
The inertial azimuth computed by the SPAN inertial navigation filter. It uses the sensors in the IMU to
compute the azimuth of the IMU (this can be rotated to another reference if desired). For more
information, see the APPLYVEHICLEBODYROATION and VEHICLEBODYROTATION commands in the
SPAN on OEM6 Firmware Reference Manual (OM-20000144).
This azimuth is the one provided in the majority of the INS logs available to a SPAN user. See Table 5,
Logs with Azimuth data on page 31.
3.5.3 ALIGN Azimuth
On SPAN systems with dual antennas, an azimuth is available from the dual antenna baseline. This is
the same azimuth that is used as an update to the SPAN solution. It is noisier than the inertial azimuth
and is available at a much lower rate, but will have a stable mean. This azimuth is computed from the
master antenna to the rover antenna based on how the antennas are oriented on the vehicle.
There is a specific subset of logs that output this azimuth. See Table 5, Logs with Azimuth data on
page 31.
Table 5: Logs with Azimuth data
Log Log
Format Azimuth Source
INSPVA / INSPVAS / INSPVAX NovAtel Inertial
INSATT / INSATTS / INSATTX NovAtel Inertial
PASHR NMEA Inertial
INSSPD NovAtel Course Over Ground
Computed using the INS solution only
BESTVEL NovAtel Course Over Ground
From the best system solution which could be either
GNSS or INS
GPVTG NMEA Course Over Ground
From the best system solution which could be either
GNSS or INS
HEADING NovAtel ALIGN
GPHDT NMEA ALIGN

32 SPAN-CPT User Manual Rev 8
Chapter 3 SPAN-CPT Operation
3.6 Data Collection
The INS solution is available in the INS specific logs with either a standard or short header. Other
parameters are available in the logs shown in Table 6, Solution Parameters:
Table 6: Solution Parameters
The position, velocity and attitude are available together in the INSPVA and INSPVAS logs.
The inertial solution is available up to a rate of 100 Hz. Data can be requested at a specific rate up to the
maximum IMU output rate or can be triggered by the mark input trigger at rates up to 20 Hz.
The GNSS-only solution is still available through the GNSS-only logs such as RTKPOS and PSRPOS.
When running SPAN-CPT, rates of non-INS logs should be limited to a maximum rate of 5 Hz. Refer to
the OEM6 Family Firmware Reference Manual (OM-20000129) for more details on these logs. INS-only
data logging and output can be at rates of up to the rate of the IMU data.
Specific logs need to be collected for post-processing (see Data Collection for Post-Processing on
page 33).
Parameter Log
Position INSPOS or INSPOSS
INSPVA or INSPVAS
INSPOSX or INSPVAXa
a. These logs contain variance information and are therefore large logs.
Use a low logging rate (<20 Hz) only.
Velocity INSVEL or INSVELS
INSSPD or INSSPDS
INSPVA or INSPVAS
INSVELX or INSPVAXa
Attitude INSATT or INSATTS
INSPVA or INSPVAS
INSATTX or INSPVAXa
Solution Uncertainty INSCOV or INSCOVS
The highest rate to request GNSS logs (RANGE, BESTPOS, RTKPOS, PSRPOS and so
on) while in INS operation is 5 Hz. If the receiver is not running INS, GNSS logs can be
requested at rates up to 20 Hz.
Ensure all windows, other than the Console, are closed in NovAtel Connect before using
the SAVECONFIG command to save settings in NVM. Otherwise, unnecessary data logging
occurs and may overload the system.

SPAN-CPT Operation Chapter 3
SPAN-CPT User Manual Rev 8 33
To store data from a SPAN-CPT, connect a computer. The computer should be equipped with a data
storage device such as a Compact Flash Card, CD or USB stick.
3.7 Data Collection for Post-Processing
Some operations such as aerial measurement systems do not require real time information from
SPAN-CPT. These operations are able to generate the position, velocity or attitude solution post-mission
in order to generate a more robust and accurate solution than is possible in real time.
In order to generate a solution in post-processing, data must be simultaneously collected at a base
station and each rover. The following logs must be collected in order to successfully post-process data:
From a base:
• RANGECMPB ONTIME 1
• RAWEPHEMB ONCHANGED
• GLOEPHEMERISB ONCHANGED (if using GLONASS)
From a rover:
• RANGECMPB ONTIME 1
• RAWEPHEMB ONCHANGED
• GLOEPHEMERISB ONCHANGED (if using GLONASS)
• RAWIMUSXB ONNEW
• IMUTOANTOFFSETSB ONCHANGED
• VEHICLEBODYROTATIONB ONCHANGED
Post-processing is performed through the Waypoint Inertial Explorer® software package available from
the NovAtel Waypoint Products Group. Visit our Web site at www.novatel.com/products/software/
waypoint-products/ for details.
Logging Restriction
Logging excessive amounts of high rate data can overload the system. When configuring
the output for SPAN, NovAtel recommends that only one high rate (>50 Hz) message be
configured for output at a time. It is possible to log more than one message at high rates,
but doing so could have negative impacts on the system. Also, if logging 100 Hz data,
always use the binary format and, if possible, the short header binary format (available on
most INS logs).
For optimal performance, log only one high rate output at a time. These logs could be:
• Raw data for post processing
RAWIMUXSB ONNEW (100 Hz)
- RAWIMU logs are not valid with the ONTIME trigger. The raw IMU observations
contained in these logs are sequential changes in velocity and rotation. As
such, you can only use them for navigation if they are logged at their full rate.
See details of these logs in the SPAN on OEM6 Firmware Reference Manual
(OM-20000144).
• Real time INS solution
INSPVASB ONTIME 0.01 (maximum rate equals the IMU rate)
- Other possible INS solution logs available at high rates are: INSPOSSB,
INSVELSB and INSATTSB
The highest rate to request GNSS logs (RANGE, BESTPOS, RTKPOS, PSRPOS and so
on) while in INS operation is 5 Hz. If the receiver is not running INS, GNSS logs can be
requested at rates up to 20 Hz.

34 SPAN-CPT User Manual Rev 8
Chapter 3 SPAN-CPT Operation
3.8 Variable Lever Arm
The variable lever arm concept arose to support applications in which the IMU is no longer rigidly fixed to
the vehicle, but rather on a gimballed mount. This creates an issue where the input lever arm offsets to
the GNSS antenna are no longer correct, because the IMU can rotate on its mount, while the antenna
remains fixed.
The use of the variable lever arm functionality requires that the device to which the IMU is attached be
able to send its gimbal rotation angles back to SPAN. These angles are used to re-calculate the lever arm
at the rate that they are received. SPAN is also able to output a gimballed solution at the rate the gimbal
angles are received. Refer to SPAN on OEM6 Firmware Reference Manual (OM-20000144) for details.
3.9 Enabling L-Band
L-Band equipped receivers can achieve sub-metre position accuracy using correction data received from
geostationary satellites. To use the L-Band corrections, an L-Band-capable receiver model and antenna
are required (refer to our web site www.novatel.com/products/gnss-antennas for information on NovAtel
L-Band-capable antennas).
For more information on L-Band positioning, refer to:
• NovAtel Application Notes: APN-061 NovAtel CORRECT with TerraStar, APN-062 NovAtel
CORRECT with Veripos (service dependent) or APN-051 Positioning Modes of Operation
available from www.novatel.com/support/search/items/Application%20Note
•the OEM6 Family Firmware Reference Manual (OM-20000129) for log/command details
• visit www.novatel.com/support
• visit www.novatel.com/products/novatel-correct
3.9.1 NovAtel CORRECT™ with TerraStar™
A subscription is required to use the TerraStar service. To obtain a subscription, contact your local
NovAtel sales representative or visit www.novatel.com/products/novatel-correct. The receiver’s TerraStar
Product Activation Code (PAC) or the NovAtel product serial number (PSN) is needed to obtain a
subscription. To obtain the receiver-specific PAC, enter the following command:
log terrastarinfo
This log displays the PAC in the first field following the log header and also displays the status of your
subscription.
To activate a subscription, the receiver must be powered and tracking an L-Band TerraStar satellite prior
to the planned activation time. Use the ASSIGNLBANDBEAM command to configure the receiver to track
the TerraStar satellite.
To confirm tracking of an L-Band signal, log the L-Band tracking status information by entering the
following command:
log lbandtrackstata
If receiving TerraStar service, the sixth field following the header (tracking status word) of the
LBANDTRACKSTAT log will be 00c2, as shown in the following example:
#LBANDTRACKSTATA,COM1,0,73.5,FINESTEERING, 1769,328196.000,00000000,
29fd,12602;1,"98W",1539902500,1200,974c,00c2,0,-316.186,43.842,
4.3840,61.920,1088,2,2, 138176,79,0.0001*3e43cb7d
The latest services and coverage can be obtained from www.terrastar.net. For additional
information on TerraStar activation, contact NovAtel Customer Service at www.novatel.com/
support or download the APN-061 NovAtel CORRECT with TerraStar from:
www.novatel.com/support/search/items/Application%20Note.

SPAN-CPT Operation Chapter 3
SPAN-CPT User Manual Rev 8 35
3.9.2 Veripos Marine Subscriptions
A subscription is required to use the Veripos services. Contact Veripos sales at www.veripos.com/
support.html to obtain a Service Access License (SAL) number. To activate the service, contact the
Veripos Help Desk at +44 (0) 1224 527 104 or visit www.veripos.com/support.html. Provide the SAL
number and the receiver's Veripos Serial Number (VSN). To obtain the receiver-specific VSN, enter the
following command:
log veriposinfo
The log displays the VSN in the first field following the log header and also displays the status of your
subscription.
To activate a subscription, the receiver must be powered and tracking an L-Band Veripos satellite prior to
the planned activation time. Use the ASSIGNLBANDBEAM command to configure the receiver to track
the Veripos satellite.
3.9.3 OmniSTAR
A subscription is required to use the OmniSTAR service. To obtain a subscription, contact OmniSTAR at
1-888-883-8476 or 713-785-5850. Provide the receiver’s OmniSTAR serial number (which is different
from the NovAtel serial number). To obtain the OmniSTAR serial number, enter the following command:
log lbandinfo
The log displays the L-Band serial number in the fifth field following the log header. The log also provides
the status of your subscription. Refer to the LBANDINFO log in the OEM6 Family Firmware Reference
Manual (OM-20000129) for more information.
To activate the subscription, the receiver must be powered and tracking an L-Band satellite. When
advised by OmniSTAR of the appropriate satellite frequency and data link rate for your location, use the
ASSIGNLBAND command to configure your receiver.
Example:
assignlband omnistar 1557855 1200
To confirm tracking of an L-Band signal, log the L-Band status information by entering the following
command:
log lbandstat
Subscriptions to the Veripos Apex and Ultra marine services must be obtained directly from
Veripos. A unit with a marine subscription can not be switched to a land subscription and
vice versa.
The latest services and coverage can be obtained from www.veripos.com. For additional
information on Veripos activation, contact NovAtel Customer Service at www.novatel.com/
support or download the APN-062 NovAtel CORRECT with Veripos from:
www.novatel.com/support/search/items/Application%20Note.
OmniSTAR® service is not supported for OEM6 products sold after October 24, 2013. If
unsure whether the receiver is OmniSTAR capable, contact NovAtel Sales at
www.novatel.com/where-to-buy/sales-offices, NovAtel Customer Support at
www.novatel.com/support or visit www.novatel.com/products/novatel-correct.
The latest frequencies can be obtained from: www.omnistar.com.

36 SPAN-CPT User Manual Rev 8
Chapter 3 SPAN-CPT Operation
If receiving OmniSTAR HP, the fifth field of the LBANDSTAT log should be 00c2, as shown in the
following example:
LBANDSTAT COM1 0 81.0 FINESTEERING 1596 235136.000 00000000 d1c2 5968
<1557854678 48.98 1098.9 0.00 00c2 0000 153860 545 0 0000 0201 154019
68000000 00000000
Refer to the NovAtel application note APN-051 Positioning Modes of Operation for OmniSTAR specifics.

SPAN-CPT User Manual Rev 8 37
Chapter 4 SPAN-CPT Dual-Antenna
NovAtel's ALIGN® heading technology generates distance and bearing information between a “master”
and one or more “rover” receivers. This feature is ideal for those wanting relative directional heading,
separation heading between two objects or heading information with moving base and pointing
applications. Heading applications can be applied over various markets, including machine control,
unmanned vehicles, marine and agricultural markets.
SPAN-CPT dual-antenna provides the hardware necessary to run an ALIGN baseline with a SPAN-CPT
and a second receiver. From any of the SPAN-CPT COM ports, the ALIGN baseline solution can be
logged along with the standard OEM6 logs.
With the SPAN-CPT, the ALIGN GNSS baseline can be used to assist the initial alignment of the SPAN
solution. In addition, the ALIGN baseline solution aids the heading solution from the SPAN-CPT if the
heading drifts due to slow or constant dynamics.
ALIGN is capable of a 10 Hz heading output rate when integrated with SPAN-CPT.
4.1 Installation
The hardware for SPAN-CPT is installed in a manner similar to other SPAN systems. Some points to
consider during installation are:
1. Install the SPAN-CPT and the two antennas in the vehicle such that the relative distance between
them is fixed.
2. The antennas should be mounted where the view of the satellites are not obstructed by any part of
the vehicle. As heading accuracy is dependent on baseline length, mount the antennas as far apart
as possible. A minimum separation distance of 1 metre is recommended.
3. The lever arms or distance from the SPAN-CPT to the antennas needs to be fixed and accurately
measured using the coordinate axes defined on the outside of the SPAN-CPT. The baseline between
the two antennas does NOT need to be aligned with the vehicle axes or with the axes of the
SPAN-CPT.
4. Both receivers need to be powered and connected to each other via COM2 before sending any
configuration commands. It does not matter which receiver is powered on first or how long they are
both powered before sending commands.
The SPAN-CPT and the FlexPak6 need to be set up as shown in the example in Figure 11, SPAN-CPT -
Dual Antenna Installation on page 38.
SPAN-CPT dual-antenna operation requires the dedicated use of the COM2 port for
communication between receivers.
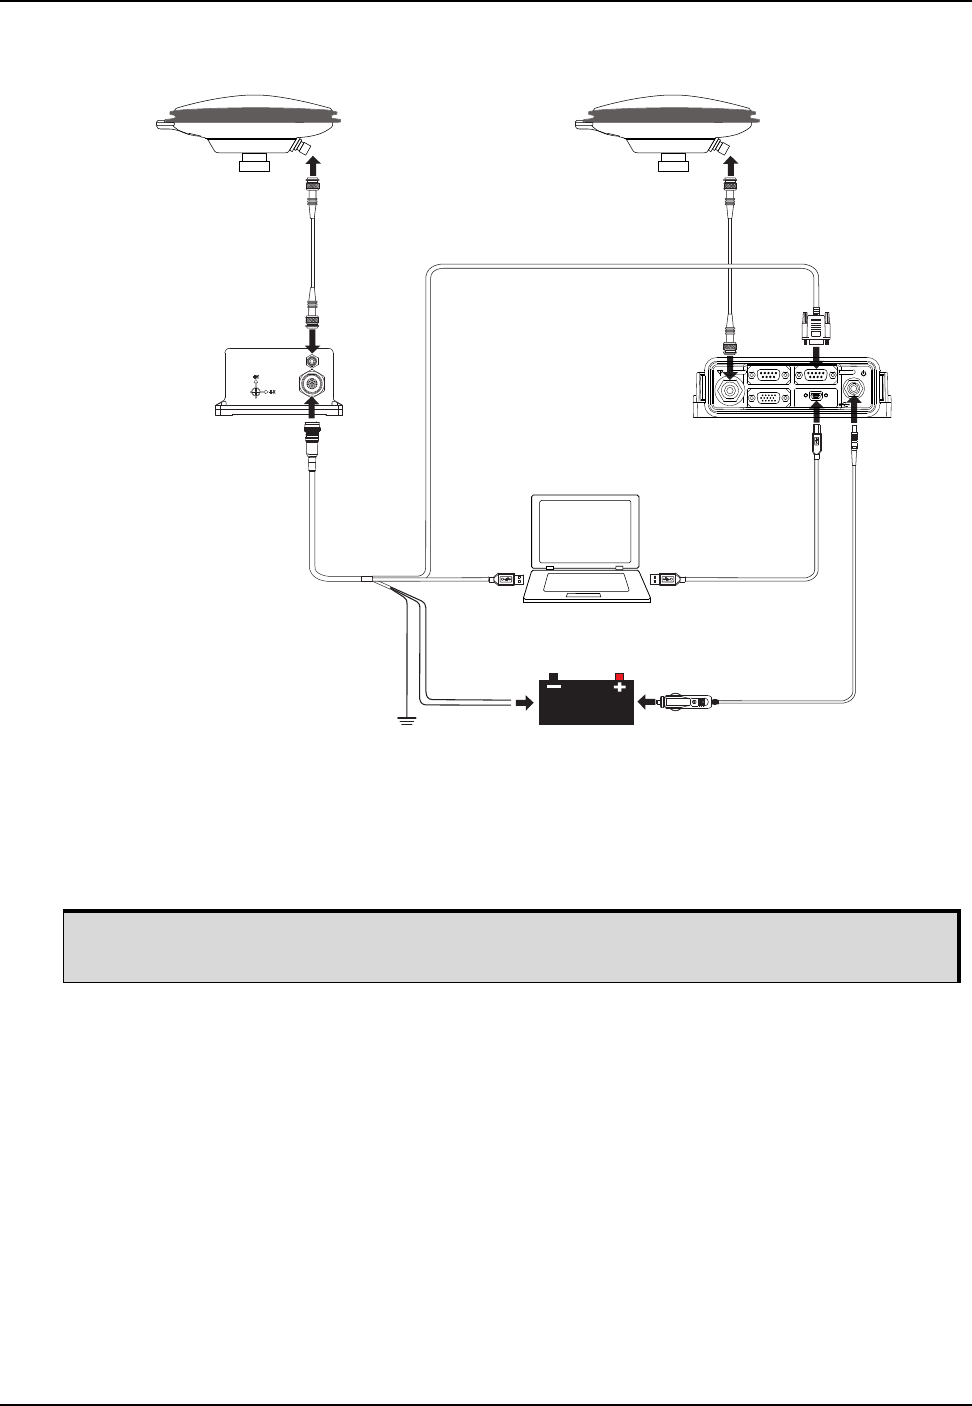
38 SPAN-CPT User Manual Rev 8
Chapter 4 SPAN-CPT Dual-Antenna
Figure 11: SPAN-CPT - Dual Antenna Installation
4.2 Configuring SPAN with ALIGN on SPAN-CPT
Before configuring the ALIGN solution, the two receivers MUST both be powered on and connected
directly between COM2 of the SPAN receiver and COM2 of the second receiver through either a null
modem cable or an appropriate radio connection.
To enable the dual-antenna ALIGN solution to aid the INS alignment and provide heading updates, the
offset between the antennas and the IMU must be known. This is achieved by entering lever arms to both
antennas, using the SETIMUTOANTOFFSET and SETIMUTOANTOFFSET2 commands.
To configure SPAN with ALIGN Aiding:
1. Enter the lever arm from the SPAN-CPT to the primary antenna (primary antenna is connected to the
SPAN-CPT) using the SETIMUTOANTOFFSET command.
Abbreviated ASCII example:
SETIMUTOANTOFFSET 0.54 0.32 1.20 0.03 0.03 0.05
2. Enter the lever arm from the SPAN-CPT to the secondary antenna (secondary antenna is connected
to the OEM6 receiver) using the SETIMUTOANTOFFSET2 command.
Abbreviated ASCII example:
SETIMUTOANTOFFSET2 0.54 2.32 1.20 0.03 0.03 0.05
COM 1
I/O
COM 2
Primary GNSS Antenna Secondary GNSS Antenna
Connect COM2 to COM2
Secondary
Receiver
(Rover)
SPAN
Receiver
(Master)
USBUSB
Power Supply
The rover receiver must be an ALIGN-capable model, such as D2S-Z00-000, running the
latest OEM6 firmware version.

SPAN-CPT Dual-Antenna Chapter 4
SPAN-CPT User Manual Rev 8 39
Alternately, the angular offset between the dual-antenna baseline (from primary GNSS antenna to
secondary GNSS antenna) and the IMU frame forward axis is entered directly via the EXTHDGOFFSET
command.
Refer to the SPAN on OEM6 Firmware Reference Manual (OM-20000144) for the syntax of the above
commands.
As with all ALIGN-capable products, the GNSS baseline solution is available from the GPHDT and
HEADING logs. For INS heading, use INSATT or INSPVA.
The SPAN system can be configured for different alignment routines depending on the motion conditions
experienced during the alignment period. For example, in marine applications, the dynamics required for
either a coarse or kinematic alignment cannot be guaranteed, so a different alignment routine is required.
The different alignment routines are described in the following sections.
4.2.1 Alignment on a Moving Vessel - Aided Transfer Alignment
This alignment routine is the preferred dual antenna alignment method. It is used if the alignment mode is
set to AIDED_TRANSFER using the ALIGNMENTMODE command, and can be used if the alignment
mode is set to AUTOMATIC.
If your vehicle is not stationary during the alignment, such as may be the case on a ship, use the Aided
Transfer Alignment routine. This alignment method uses the ALIGN baseline solution to perform an
instantaneous alignment of the vehicle attitude.
The alignment happens instantaneously after the receiver establishes communication with the IMU and
computes a verified, fixed integer, ALIGN solution. The INS status changes to
INS_ALIGNMENT_COMPLETE or INS_SOLUTION_GOOD, depending on the variances of the ALIGN
solution, and the measured lever arm/external heading offset.
To guarantee the use of this alignment mode, the configuration command ALIGNMENTMODE must be sent
to the receiver:
ALIGNMENTMODE AIDED_TRANSFER
4.2.2 Alignment on a Stationary Vehicle - Aided Static Alignment
An alternative to the aided transfer alignment, the ALIGN heading can be used as a seed for a coarse
static alignment. In this mode, the standard coarse alignment routine runs given the initial azimuth value.
As with the transfer alignment, the first verified fixed RTK solution is used to provide the alignment seed
after which the coarse alignment (INS_ALIGNING) begins. After the coarse alignment is complete, the
INS status changes to INS_ALIGNMENT_COMPLETE. After the attitude accuracy has converged, the
INS status changes to INS_SOLUTION_GOOD. This alignment mode is useful if the initial vehicle roll is
more than 20 degrees.
To use this alignment mode, the configuration command ALIGNMENTMODE must be sent to the receiver.
ALIGNMENTMODE AIDED_STATIC
4.2.3 Unaided Alignment
The unaided alignment sets the SPAN system to use only single antenna alignment options (static,
kinematic or manual alignment).
To use this alignment mode, the configuration command ALIGNMENTMODE must be sent to the receiver.
ALIGNMENTMODE UNAIDED
We recommend entering the lever arms rather than entering the angular offset as this is
easier to measure and will lead to better overall accuracy.

40 SPAN-CPT User Manual Rev 8
Chapter 4 SPAN-CPT Dual-Antenna
4.2.4 Automatic Alignment Mode - Automatic Alignment (default)
Automatic Alignment Mode Selection is the default setting for a SPAN receiver. This mode is designed to
allow alignment of the system as quickly as possible, using either an aided transfer alignment (Alignment
on a Moving Vessel - Aided Transfer Alignment on page 39); a kinematic alignment (Default Kinematic
Alignment on page 28); or a manual alignment (Manual Alignment on page 29).
The first available technique will be used, regardless of its relative quality. If you wish to guarantee a
specific technique is used, or use an aided static alignment, you must select the desired alignment mode
manually. No additional configuration is required to use this alignment routine.
4.3 SPAN ALIGN Attitude Updates
The INS heading updates are used to help constrain the azimuth drift of the INS solution whenever
possible. This is of the greatest value with lower-quality IMUs and in environments with low dynamics
where the attitude error is less observable. Slow moving marine or train applications are good examples
of the intended use. By providing an external heading source, the solution drift can be constrained in
these environments.
You can monitor the heading update status as outlined in the INSUPDATE command in the SPAN on
OEM6 Firmware Reference Manual (OM-20000144).

SPAN-CPT User Manual Rev 8 41
Chapter 5 NovAtel Firmware and Software
Download the most recent versions of the NovAtel firmware and receiver software from the NovAtel
website at www.novatel.com/support/firmware-downloads.
OEM6 Firmware and Software
NovAtel Connect PC Utilities Software Bundle
Bundled PC Utilities software includes:
• NovAtel Connect (a GUI interface)
• Connection Import (imports connection profiles)
• Convert (converts receiver data logs into different formats)
• USB Drivers and Window Signing
Firmware and Software included
• SoftLoad firmware
• WinLoad software utility
5.1 Firmware Updates and Model Upgrades
A local NovAtel dealer can provide all the information needed to upgrade or update a receiver. Refer to
www.novatel.com/where-to-buy for contact information or contact sales@novatel.com or
support@novatel.com directly.
5.1.1 Firmware Updates
Firmware updates are firmware releases that include fixes and enhancements to the receiver
functionality. Firmware updates are released occasionally on the NovAtel web site as they become
available. New firmware must be loaded into the receiver through one of the COM ports. Once loaded,
the receiver reboots and begins operating with the new firmware.
Refer to Transferring Firmware Files on page 43 for descriptions of the Update and OEM
versions.
The NovAtel Connect PC Utilities bundle can be download from the Downloads section of
www.novatel.com/support/search/.
WinLoad and SoftLoad instructions follow.
Direct access to a serial COM port on the SPAN-CPT is required.
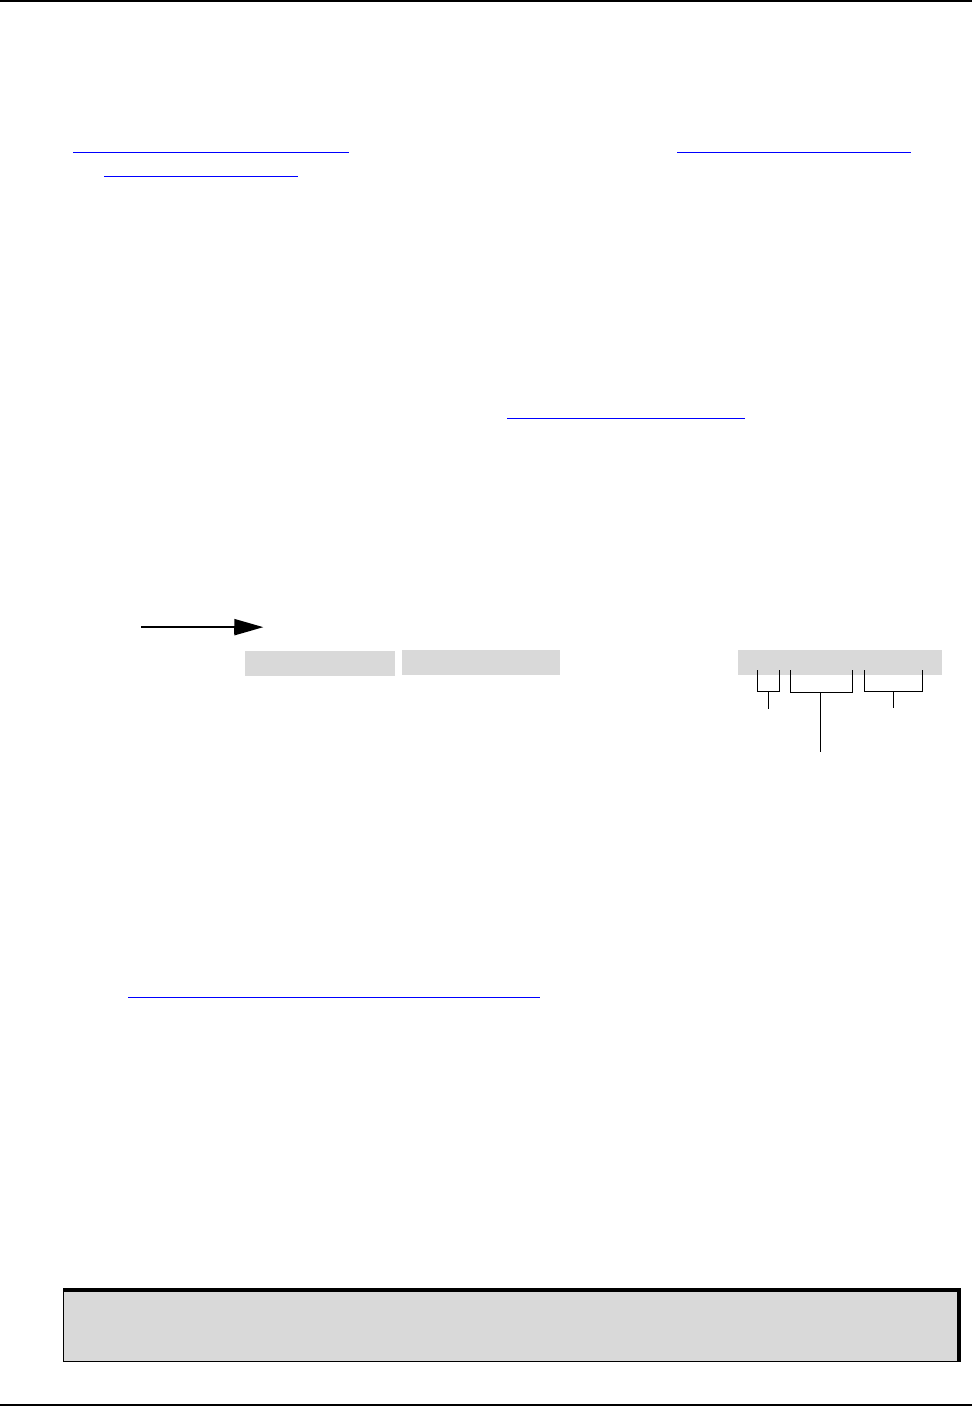
42 SPAN-CPT User Manual Rev 8
Chapter 5 NovAtel Firmware and Software
5.1.2 Model Upgrades
Model upgrades enable purchased receiver features.
Contact a local NovAtel dealer to assist in selecting the upgrade options that best suit your GNSS needs
at www.novatel.com/where-to-buy. Contact NovAtel Customer Support www.novatel.com/support/ or
email support@novatel.com directly to request a temporary upgrade authorization code for trial
purposes.
The receiver stores the firmware in Non-Volatile Memory (NVM), which allows model upgrades to be
performed without returning the receiver to the dealer. Model upgrades can be applied to the receiver
with an authorization code and the AUTH command.
5.2 Authorization Code
An authorization code, commonly known as an auth-code, is required to upgrade and possibly update a
SPAN-CPT. Auth-codes are obtained by contacting NovAtel Customer Support. Upon contact, NovAtel
Customer Support requires:
• the receiver model number
• the receiver serial number
• the receiver firmware version
Enter the LOG VERSION command to determine the receiver model, serial number and firmware version.
Example:
After determining the appropriate model and firmware version the authorization code (auth-code) is
issued. The auth-code is required to unlock the features on the new model type.
To upgrade to a new model with the same firmware version, use the AUTH command with the issued
auth-code (if required), as outlined in Updating or Upgrading Using the WinLoad Utility on page 43.
To upgrade to a new model with a higher firmware version, the new firmware .HEX file needs to be
loaded into the receiver using the WinLoad utility program. WinLoad and the firmware .HEX files can be
found at www.novatel.com/support/firmware-downloads. Refer to Updating or Upgrading Using the
WinLoad Utility on page 43 for use instructions.
Firmware version OEM060200RN0000 (also known as firmware version 6.200) and later contain the
Firmware Signature feature. This firmware feature removes the authorization code dependency on the
firmware version and eliminates the need to obtain an auth-code when downloading the latest version of
signed firmware.
If updating from a version before 6.200 to a signed 6.200 version, an authorization code is required.
Auth-codes not required when loading signed firmware.
In version OEM060200RN0000, the receiver serial number and the software model are built into the
signature in the firmware file. Once the 6.200 signed firmware is installed with a signature auth-code,
future firmware updates no longer require a new unique auth-code.
An authorization code is still required if the software model changes for temporary trial
upgrades or purchased permanent upgrades.
PRODUCT
FIRMWARE
RELEASE
INDICATOR
FAMILY
NUMBER
SERIALMODEL
NUMBER NUMBER
FIRMWARE
VERSION
GPSCARD “D2LR0RTTRA” “BFN11230026” “OEM628-1.00” “OEM060200RN0000”
ENTER

NovAtel Firmware and Software Chapter 5
SPAN-CPT User Manual Rev 8 43
The new download package includes a signed firmware file type that uses an extension designated as
“.shex” (example OEM060200RN0000.shex), as well as the latest Winload utility and What’s New file
containing firmware update change details.
5.3 Updating or Upgrading Using the WinLoad Utility
WinLoad is the simplest and most common way to update or upgrade a receiver.
5.3.1 Transferring Firmware Files
To proceed with an update or possibly an upgrade, obtain the latest version of firmware by downloading
the (OEM Version) for your product from www.novatel.com/support/firmware-downloads/.
Types of Firmware Files
•OEM Version - NovAtel Customer Service may generate and provide the required authorization
code. Authorization codes are obtained by contacting support@novatel.com or at
www.novatel.com/Support/.
The OEM version is named OEMXXXX.EXE, where XXXX is the firmware version.
For convenience, copy the update file to a GNSS sub-directory (for example, C:\GNSS\LOADER).
If the firmware update file is password protected, NovAtel Customer Support provides the required
password. After copying the file to a computer, perform the following steps to extract the files:
Syntax: [filename] [password] (if required)
where filename is the name of the compressed file (but not including the .EXE extension) and
password if the password is required for extraction.
Example: OEM060000RN0000.hex
In the above example, a window appears asking for a password.
The self-extracting archive produces the following files:
winload.exe WinLoad utility program
howto.txt Instructions on how to use the WinLoad utility
whatsnew.rtf Information on the changes made in the firmware since the last revision
x..x.hex Firmware version upgrade file, where x..x defines the product name and release
(e.g., OEM060000RN0000.hex)
The files are extracted to unzip/program files/NovAtel Inc/x.xxx Full Update Disk, where x.xxx is the
firmware version.
Prior to firmware version OEM060200RN0000, authorization codes depended on the
software model, the firmware version and the serial number of the receiver. The
authorization code changed if any of the three items changed. This is no longer the case.
NovAtel has an online video tutorial that explains firmware uploading at www.novatel.com/
support/videos.
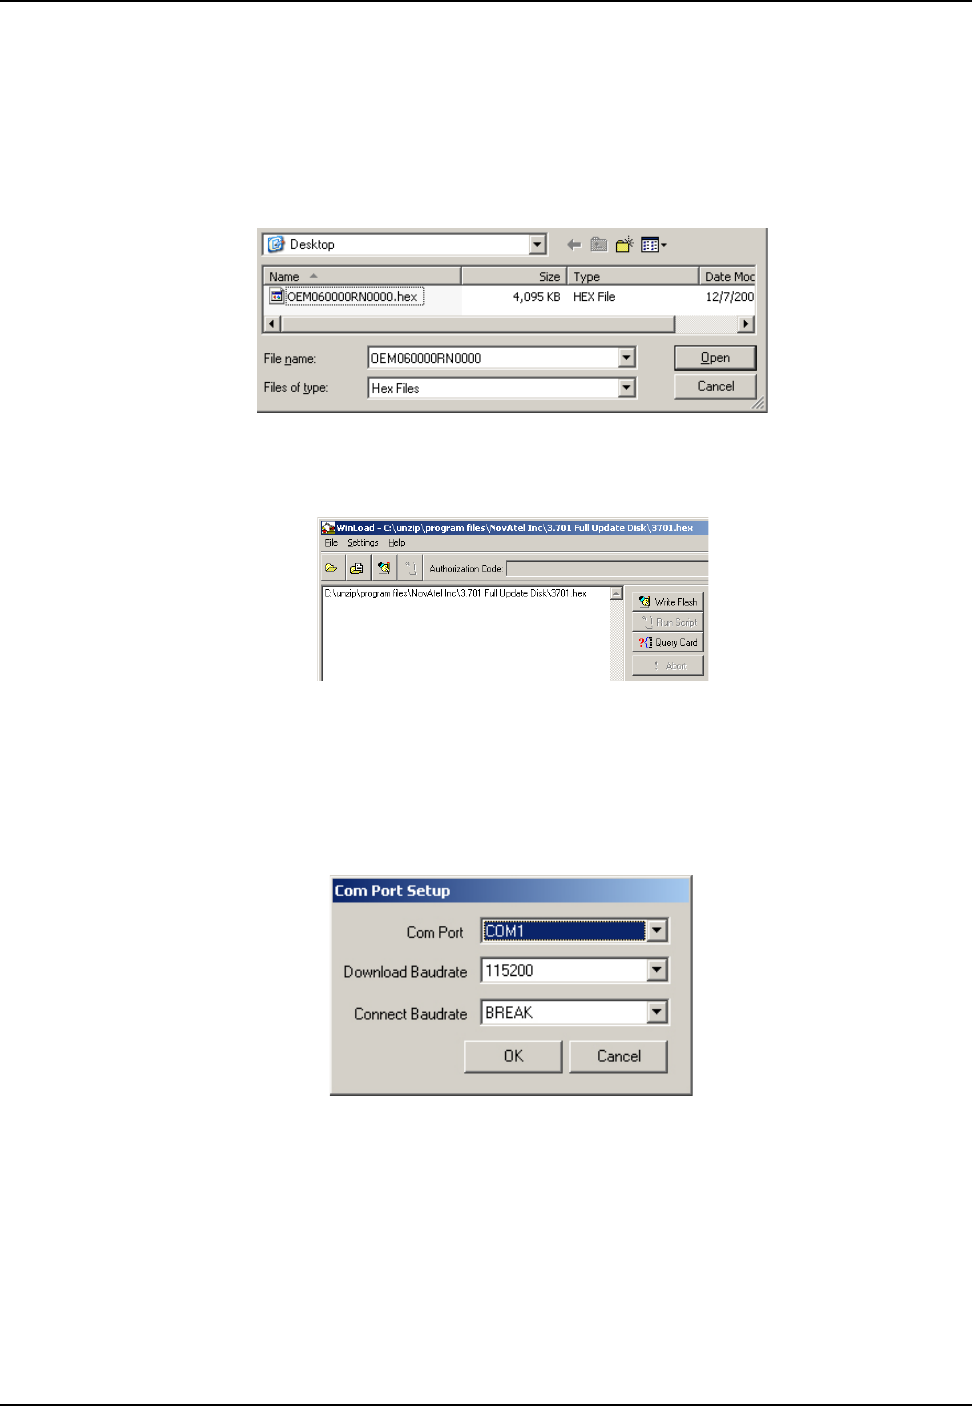
44 SPAN-CPT User Manual Rev 8
Chapter 5 NovAtel Firmware and Software
5.3.2 Using the WinLoad Utility
If opening WinLoad for the first time, ensure the file and communications settings are correct.
Open a File to Download
Select File | Open. Navigate to the file to open (Figure 12, WinLoad’s Open Window).
Figure 12: WinLoad’s Open Window
When a file is selected, the filename appears in the main WinLoad display area and in the title bar
(Figure 13, Open File in WinLoad).
Figure 13: Open File in WinLoad
Communications Settings
To set the communications port and baud rate, select Settings | COM Settings. Choose the computer port
to use from the Com Port drop down list and the baud rate from the Download Baudrate drop down list.
Set the baud rate as high as possible (the default of 115200 and is preferred).
Figure 14: COM Port Setup
Downloading Firmware
1. Select the file to download according to Open a File to Download on page 44.
2. Ensure the file path and name are displayed in main display area (see Figure 13, Open File in
WinLoad on page 44).
3. Click Write Flash to download the firmware.
4. When Searching for card appears in the main display, power cycle the receiver.
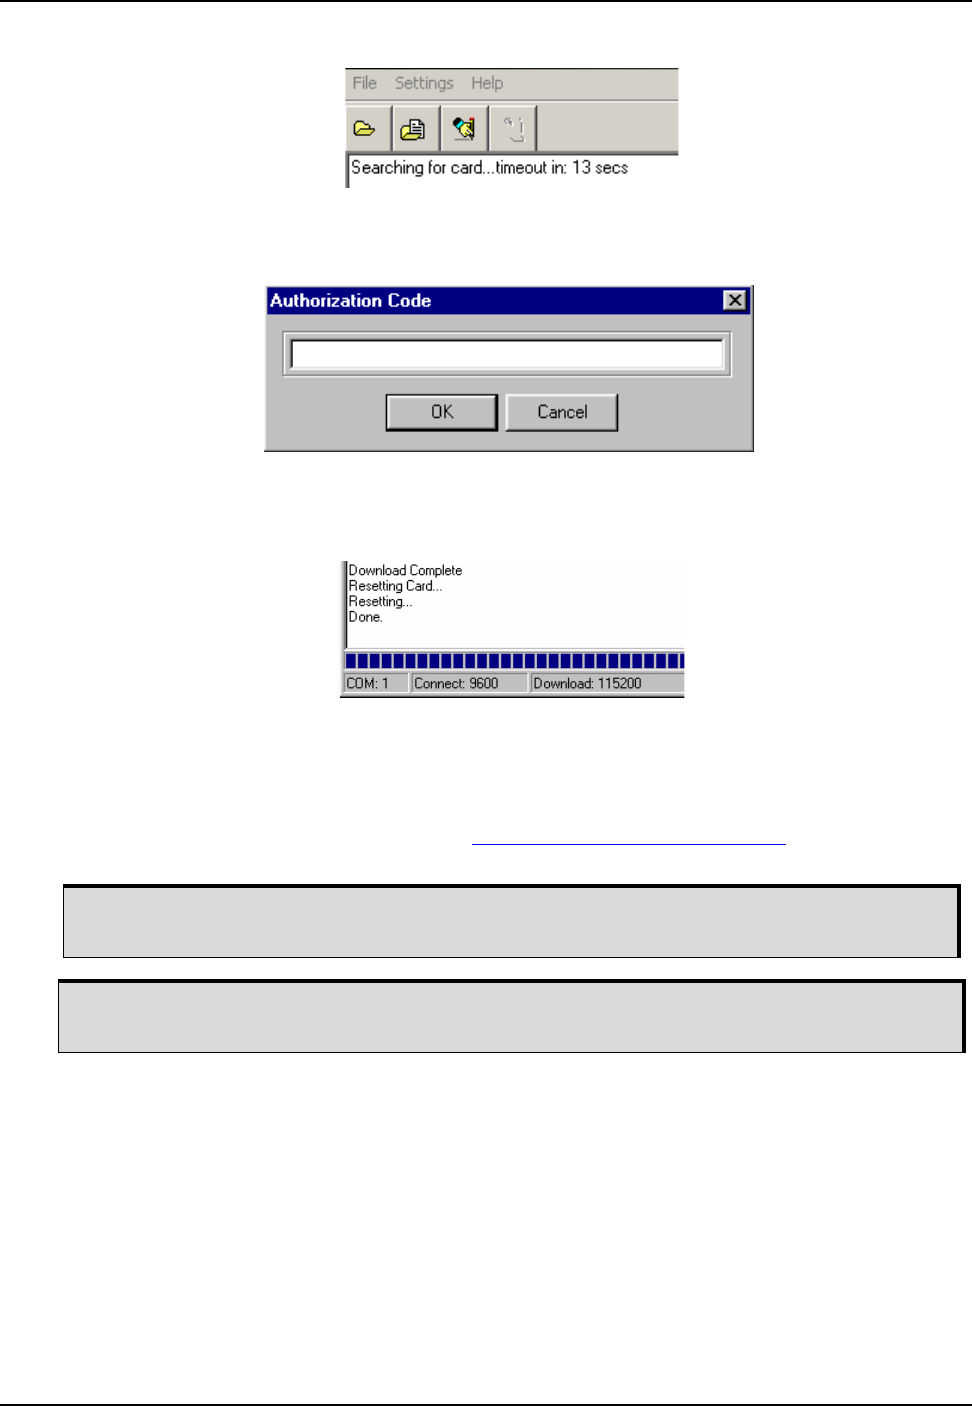
NovAtel Firmware and Software Chapter 5
SPAN-CPT User Manual Rev 8 45
Figure 15: Searching for Card
5. If the Authorization Code window appears, enter the auth-code and click OK. See Authorization
Code on page 42 for further information about the Authorization Code.
Figure 16: Authorization Code Window
6. The receiver finishes the download and then resets. The process is complete when Done appears in
the main display area.
Figure 17: Upgrade Process Complete
7. Close WinLoad.
5.4 Updating using SoftLoad Commands
Refer to the SOFTLOADFILE command in the OEM6 Firmware Reference Manual (OM-20000129) for
details.
1. Open a connection to any port on the receiver (COM or USB COM port) with a user Application
Programming Interface (API).
2. Request the SOFTLOADSTATUSA log using the following command:
LOG SOFTLOADSTATUSA ONCHANGED
3. Initialize SoftLoad with a SOFTLOADRESET command. This command stops all tracking on the
receiver to ensure sufficient memory is available for the loading process. A RXSTATUSEVENTA log
reports a SoftLoad In Progress status.
Use SoftLoad if automated loading is required or the platform used to communicate with the
receiver is not supported by WinLoad or a connection is only possible through USB.
Refer to Types of Firmware Files on page 43 for details on updating versus upgrading.

46 SPAN-CPT User Manual Rev 8
Chapter 5 NovAtel Firmware and Software
4. Open the *.shex firmware file.
5. Send each line of the *.shex file to the receiver in a SOFTLOADSREC command. The S-Records
must be enclosed by quotation marks:
SOFTLOADSREC "<S-RECORD>"
6. Send the SOFTLOADCOMMIT command.
7. During the loading process, SOFTLOADSTATUSA logs report the load status. Wait for the
SOFTLOADSTATUSA to indicate loading is complete.
8. Reset the receiver by entering RESET or FRESET command or power cycling.
9. Once the receiver resets, the new version of firmware is active.
5.4.1 Working with S-Records
• Records beginning with S0, S5 and S7 should be passed to the receiver directly using the
SOFTLOADSREC command. These records contain meta data about the firmware image.
• Records beginning with S3 form the actual firmware image and can be converted to
SOFTLOADDATA binary commands. Aside from the header, each pair of characters forms the
ASCII representation of binary byte. The format is as follows:
• Multiple S3 records can be packaged into a single SOFTLOADDATA command as long as the data
from one S3 record follows immediately after the previous record, up to a maximum of 4096
bytes of data. That is, the address must equal the previous address plus the previous data
length. The "offset" field remains the address of the first S3 record and the "data" and "data
length" are updated to include the new data.
• The hex file data may contain many gaps and jumps. For example, in most NovAtel hex files data
for address 0x000_00000 is stored near the very end of the file.
If using NovAtel Connect, close all windows before using the SOFTLOADSREC command
to avoid failure. Only the Console and ASCII Message windows may remain open.
To significantly decrease data transfer time, NovAtel recommends creating a batch file to
automatically send each line of SOFTLOADSREC. Contact NovAtel Customer Support for
assistance creating SoftLoad batch files.
Signature auth-codes are maintained internally by the receiver and do not need to be re-
entered. Refer to Section 5.2, Authorization Code on page 42 for details on obtaining any
auth-code.
The SoftLoad process can be cancelled safely at any time during the process using the
RESET command.
S3 LL AAAAAAAA DDDDDDDD...DDDDDDDD CC
Check Sum. One's compliment of all other bytes
Little Endian Data. These bytes are copied into the "data" field of the
SOFTLOADDATA command
4 - Byte Address. Set this as the value of "offset" in the SOFTLOADDATA command
Length.This is the hexadecimal number of character pairs to follow in the record. This value minus 4 bytes
for the address and 1 byte for the check sum is copied into the "data length" field of the SOFTLOADDATA
command
Header

NovAtel Firmware and Software Chapter 5
SPAN-CPT User Manual Rev 8 47
5.5 Upgrading Using the AUTH Command
The AUTH command authorizes the enabling (unlocking) of model features. The AUTH command is used
to upgrade a new OEM6 family model, available with the same firmware version as the current model.
This command only functions with a valid auth-code assigned by www.novatel.com/support/.
The upgrade can be performed directly through the NovAtel Connect command line or from any other
communications program.
5.5.1 Upgrade Procedure
1. Power up the receiver and establish communications (refer to the SPAN-CPT Quick Start Guide for
instructions).
2. Issue the LOG VERSION command to verify the current model, firmware version and serial number
(refer to Authorization Code on page 42 for instructions on obtaining).
3. Issue the AUTH command, followed by the auth-code and model type (refer to Authorization Code on
page 42 for details on obtaining any auth-code). The syntax is as follows:
auth <your auth-code here>
where auth is a command that enables model upgrades and auth-code is the upgrade
authorization code, expressed as follows:
XXXXXX,XXXXXX,XXXXXX,XXXXXX,XXXXXX,MODEL,EXPDATE
where:
• Each X character is a case-insensitive ASCII character.
• The MODEL string is a maximum of 15 characters long and represents the model enabled by the
auth-code.
• The EXPDATE string is the auth-code’s expiry date, in YYMMDD format
Example:
auth 7WBMBK,887CB6,K5J3FH,5DF5P2,42PW8G,D1SB0GTT0,121211
When the AUTH command is executed, the receiver reboots. Issuing the LOG VERSION command
confirms the new upgrade model type and firmware version number.
If communicating using NovAtel Connect, the communication path must be closed and reopened using
the Device menu.
5.6 Key Firmware Commands
Refer to the for OEM6 Family Firmware Reference Manual (OM-20000129) for the details of these
commands.
auth
log Version
reset
softloadsrec
Refer to Types of Firmware Files on page 43 for details on updating versus upgrading.

48 SPAN-CPT User Manual Rev 8
Appendix A Technical Specifications
This appendix details the technical specifications of the SPAN-CPT.
A.1 SPAN-CPT Technical Specifications
Table 7: Hardware Specification for SPAN-CPT
Table 8: GNSS Performance for SPAN-CPT
Table 9: KVH IMU Sensor Specifications
PHYSICAL
SPAN-CPT Enclosure Size 152.0 mm L X 168.0 mm W X 89.0 mm H
SPAN-CPT Weight 2.28 kg
CONNECTORS
Power and I/O MIL-DTL-38999 Series 3
RF Antenna Connector TNC Female
HORIZONTAL POSITION ACCURACY (RMS)
Single Point L1/L2 1.2 m
SBAS 0.6 m
DGPS 0.4 m
NovAtel CORRECT
PACE Refer to www.novatel.com/products/novatel-correct/novatel-correct-
ppp/ for the latest PPP performance specifications
TerraStar
RT-2 Refer to www.novatel.com/products/novatel-correct/correct-rtk/ for
the latest RTK performance specifications.
DATA RATES
GNSS Measurement 20 Hz
GNSS Position 20 Hz
IMU Measurement 100 Hz
INS Solution 100 Hz
PERFORMANCE - FIBER OPTIC GYROS
Bias Offset ± 20 °/hr
Turn On To Turn On Bias Repeatability (Compensated) ± 3 °/hr
In Run Bias Variation, At Constant Temperature 1 °/hr @ 1σ
Scale Factor Error (Total) 1500 ppm, 1σ
Scale Factor Linearity 1000 ppm, 1σ
Temperature Dependent SF Variation 500 ppm, 1σ
Angular Random Walk 0.0667 °/√hr @ 1σ
Max Input ± 375 °/sec

SPAN-CPT User Manual Rev 8 49
Table 10: Electrical and Environmental Specifications
Table 11: Power Specifications
PERFORMANCE - ACCELEROMETERS
Bias Offset ± 50 mg
Turn On To Turn On Bias Repeatability ± 0.75 mg
In Run Bias Variation, At Constant Temperature 0.25 mg @ 1σ
Temperature Dependent Bias Variation 0.5 mg/°C @ 1σ
Scale Factor Error (Total) 4000 ppm, 1σ
Temperature Dependent SF Variation 1000 ppm, 1σ
Accel Noise 55 μg/√Hz @ 1σ
Bandwidth 50 Hz
Max Input ±10 g
ELECTRICAL
Input Power 9 - 18 VDC
Power consumption 16 W (Max)
Start Up Time (Valid Data) <5 secs
ENVIRONMENTAL
Temperature, operational -40°C to +65°C
Temperature, non-operational -50°C to +80°C
Vibration, operational 6 g rms, 20 Hz - 2 KHz
Vibration, non-operational 8 g rms, 20 Hz - 2 KHz
Shock, operational 7g 6-10 msec, 1/2 sine
Shock, non-operational 60 g 6-10 msec, 1/2 sine
Altitude -1000 to 50,000 ft
Humidity 95% at 35°C, 48 hrs
MTBF ≥ 10,500 hours
POWER
Vin Ripple 0.5 V pk-pk Max
I in-rush 5 A maximum for duration; no longer than 4.5 ms @12 V
I steady-state 1.2 A typical @ 12 V
Chassis GND (pin-37) connect to system chassis
Voltage should rise monotonically to nominal level within 10 ms
Odometer Power 9 to 18 VDC @ 0-100 mA (output from Pin 13 and Pin 14)
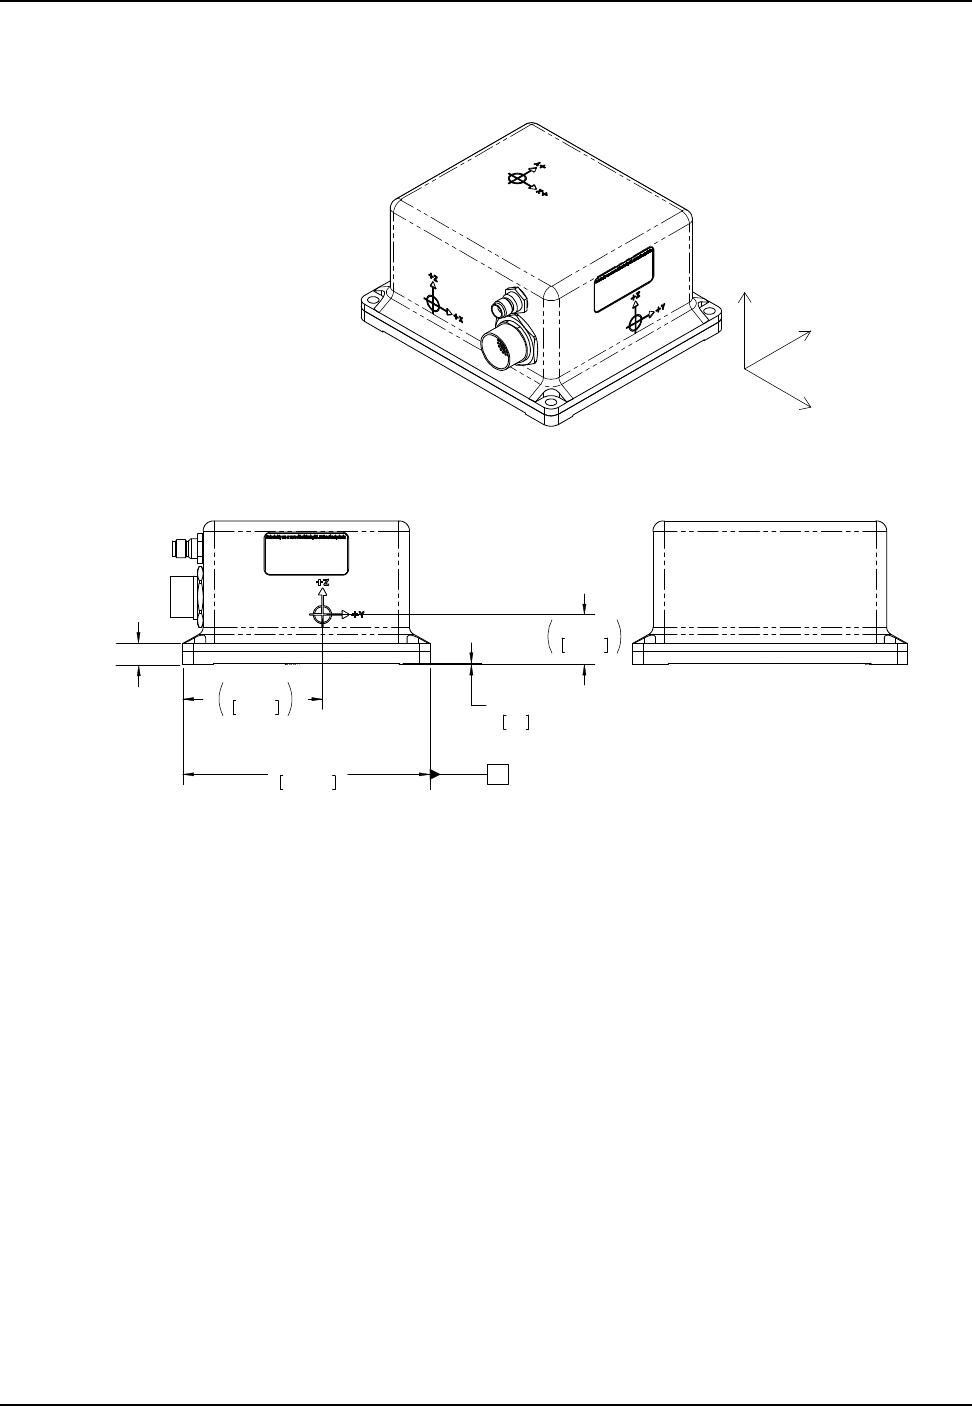
50 SPAN-CPT User Manual Rev 8
A.2 SPAN-CPT Mechanical Drawings
Figure 18: SPAN-CPT Side and Perspective View
+Z
+Y
+X
C
3.39
86.1
.8
.03
152.4
4X
6.00
1.22
30.9
Note: All dimensions are in
inches [mm]
.51 [13.0]
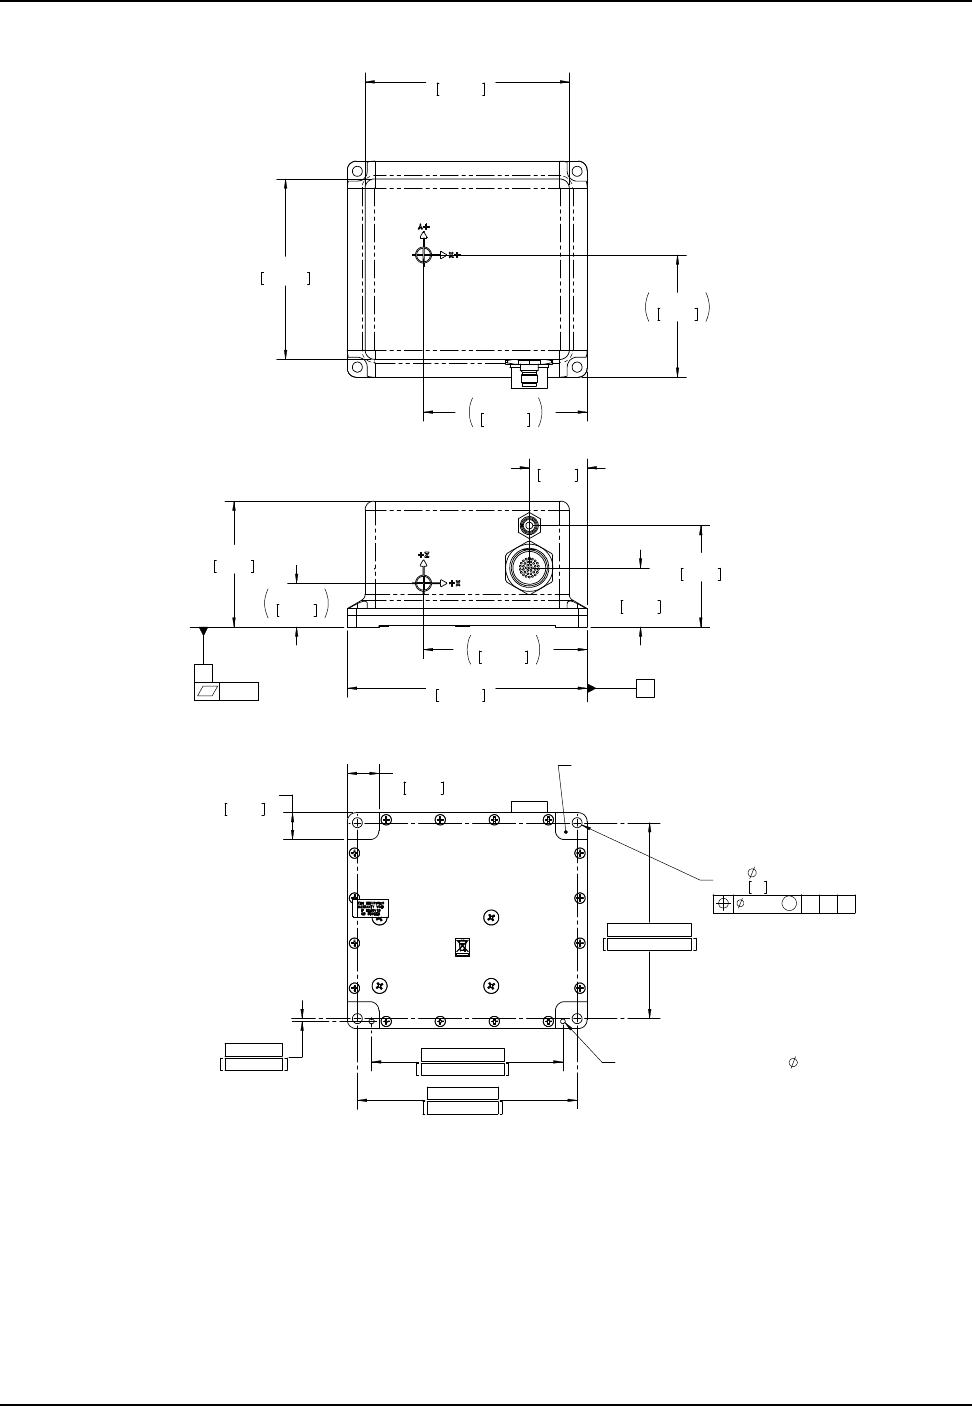
SPAN-CPT User Manual Rev 8 51
Figure 19: SPAN-CPT Top, Front and Bottom View
5.310
134.9
.002
A
B
3.50
88.9
41.8
1.65
4.55
71.6
2.82
1.61
40.9
169.3
6.66
115 . 5
1.22
30.9
3.39
5.01
127.3
144.2
5.6
8
86.1
4.55
115. 5
.125 DOWEL PINSALIGNMENT HOLES FOR
(UNPAINTED)
4X MOUNTING SURFACE
.015
M
A B C
19.1
22.4
.88
.75
4X
6.104
155
2
4X
.080
5.440
138.2
4X
.277
7
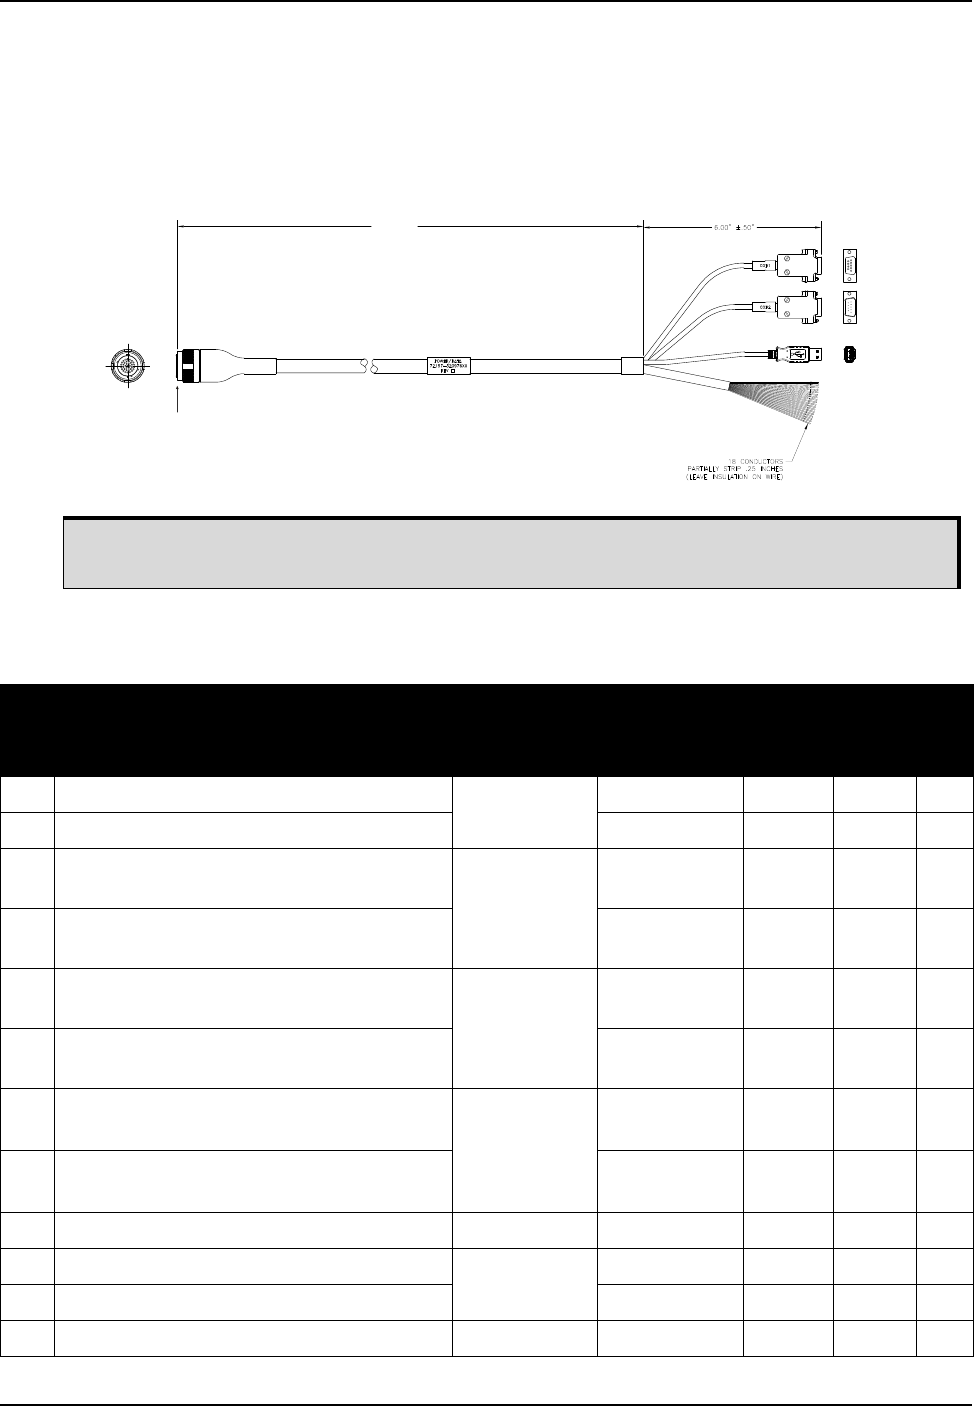
52 SPAN-CPT User Manual Rev 8
A.3 SPAN-CPT Cable
The NovAtel part numbers for the SPAN-CPT cables are:
• KVH Development Terminated Cable - 60723108
• KVH Standard Unterminated Cable - 60723107
Figure 20: SPAN-CPT Development Terminated Cable
The SPAN-CPT cable also has a green ground line not shown in the drawing. The green
ground line is grounded to the SPAN-CPT connector and enclosure.
DB9 FEMALE
DB9 MALE
140 CM
Connector type: MIL-DTL-38999 Series 3
I/O on SPAN-CPT: Part # D38999/24FD35PA
Mating Connector: Part # D38999/26FD35SA
Table 12: SPAN-CPT 60723108 - KVH Development Terminated Cable Pin-Out
Pin Function Wire Pair Wire Color
Female
DB9 to
COM1
Male
DB9 to
COM2
USB
1 Power Return Red / Green Green
2 9-18 VDC Power Input Red
3 COM1 RS-422 TX (+) / RS-232 TX from
Receiver Red / Black
Red 2
4 COM1 RS-422 TX (-) / RS-232 RTS from
Receiver Black 8
5 COM1 RS-422 RX (+) / RS-232 RX to
Receiver White / Black
White 3
6 COM1 RS-422 RX (-) / RS-232 CTS to
Receiver Black 7
7 RS-422 Select In
Tie together with pin 8 to select RS-422 White / Violet
White
8 RS-422 Select Out
Tie together with pin 7 to select RS-422 Violet
9 COM1 Signal Ground Grey 5
10 USB D (+) Blue / Black Blue 3
11 USB D (-) Black 2
12 USB Signal Ground Violet 4

SPAN-CPT User Manual Rev 8 53
13 Odometer Power White-Red /
White-Black
White-Red
14 Odometer Power Return White-Black
15 ODO SIGA White-Brown /
White-Black
White-Brown
16 ODO SIGA Inverted White-Black
17 ODO SIGB White-Orange
/ White-Black
White-Orange
18 ODO SIGB Inverted White-Black
19 COM2 RS-232 TX from Receiver Red 3
20 COM2 RS-232 RX to Receiver White 2
21 COM2 RS-232 RTS from Receiver Orange 7
22 COM2 RS-232 CTS to Receiver Brown 8
23 No Connection
24 No Connection
25 COM2 Signal Ground Black 5
26 IMU RS-232 TX Diagnostics White-Orange
27 IMU RS-232 RX Diagnostics White-Yellow
28 IMU RS-232 Diagnostics Signal Ground White-Blue
29 PPS from Receiver White-Red
30 EVENT1 to Receiver White-Brown
31 Receiver Signal GND White-Black
32 CAN2L Receiver Black / Green Black
33 CAN2H Receiver Green
34 CAN2 Signal Ground White-Green
35 No Connection
36 No Connection
37 Chassis GND Green
Table 12: SPAN-CPT 60723108 - KVH Development Terminated Cable Pin-Out (continued)
Pin Function Wire Pair Wire Color
Female
DB9 to
COM1
Male
DB9 to
COM2
USB

54 SPAN-CPT User Manual Rev 8
Table 13: SPAN-CPT 60723107 - KVH Standard Un-terminated Cable Pin-Out
Pin Function Wire Pair Wire Color
1 Power Return White / Black White
2 9-18 VDC Power Input Black
3 COM1 RS-422 TX (+) / RS-232 TX from Receiver White / Black Black
4 COM1 RS-422 TX (-) / RS-232 RTS from Receiver White
5 COM1 RS-422 RX (+) / RS-232 RX to Receiver White / Black Black
6 COM1 RS-422 RX (-) / RS-232 CTS to Receiver White
7 RS-422 Select In
Tie together with pin 8 to select RS-422 White
8 RS-422 Select Out
Tie together with pin 7 to select RS-422 White
9 COM1 Signal Ground White
10 USB D (+) White / Black Black
11 USB D (-) White
12 USB Signal Ground White
13 Odometer Power White / Black White
14 Odometer Power Return Black
15 ODO SIGA White / Black Black
16 ODO SIGA Inverted White
17 ODO SIGB White / Black Black
18 ODO SIGB Inverted White
19 COM2 RS-232 TX from Receiver White
20 COM2 RS-232 RX to Receiver White
21 COM2 RS-232 RTS from Receiver White
22 COM2 RS-232 CTS to Receiver White
23 No Connection
24 No Connection
25 COM2 Signal Ground White
26 IMU RS-232 TX Diagnostics White
27 IMU RS-232 RX Diagnostics White
28 IMU RS-232 Diagnostics Signal Ground White
29 PPS from Receiver White / Black White
30 EVENT1 to Receiver Black
31 Receiver Signal Ground White
32 CAN2L Receiver White / Black White
33 CAN2H Receiver Black
34 CAN2 Signal Ground White
35 N/C
36 N/C
37 Chassis Ground White

SPAN-CPT User Manual Rev 8 55
Appendix B Replacement Parts
The following is a list of the replacement parts available. If assistance or additional components are
required, contact the local NovAtel dealer or Customer Service.
B.1 SPAN-CPT System
B.2 Accessories and Options
Part Description NovAtel Part
KVH Enclosure 80023524
KVH Standard Unterminated Cable 60723107
KVH Development Terminated Cable 60723108
SPAN-CPT Quick Start Guide GM-14915124
SPAN-CPT User Manual OM-20000122
SPAN on OEM6 Family Firmware Reference Manual OM-20000144
OEM6 Family Firmware Reference Manual OM-20000129
Part Description NovAtel Part
Optional NovAtel GNSS Antennas:
High Performance L1/L2/L-Band Antenna GPS-702L
High Performance L1/L2/GLONASS Antenna GPS-702-GG
High Performance L1/L2/GLONASS/L-Band Antenna GPS-702-GGL
Compact L1/L2 Antenna 42G1215A-XT-1-Cert
Compact L1/L2/L-Band Antenna 2G1215A-XT-1-3-Cert
Compact L1/L2/GLONASS/L-Band Antenna 42G0XX16A4-XT-1-1-Cert
Optional RF Antenna Cable:
5 metres GPS-C006
15 metres GPS-C016
30 metres GPS-C032
22 cm interconnect adapter cable GPS-C002

56 SPAN-CPT User Manual Rev 8
Appendix C Frequently Asked Questions
1. Why don’t I hear sound from the SPAN-CPT?
The SPAN-CPT does not make noise. Check that the multi-purpose I/O cable is connected properly.
Check the input power supply. A minimum of 12 V should be supplied to the system for stable
SPAN-CPT performance. The supply should also be able to output at least 16 W over the entire
operating temperature range.
2. Why is the INS solution status ‘INS_INACTIVE’?
The INS alignment routine does not begin until the system has solved for time. This requires that an
antenna is attached and satellites are visible to the system. Verify that time is solved by checking the
time status in the header of any standard header SPAN log such as BESTPOS. When the time status
reaches FINESTEERING the inertial filter starts and the INS begins attempting to align.
3. How can I access the inertial solution?
The INS/GNSS solution is available from a number of specific logs dedicated to the inertial filter. The
INSPOS, INSPVA, INSVEL, INSSPD and INSATT logs are the most commonly used logs for
extracting the INS solution. These logs can be logged at any rate up to the rate of the IMU data (100
Hz). Further details on these logs are available in SPAN on OEM6 Firmware Reference Manual
(OM-20000144) .
4. Can I still access the GNSS-only solution while running SPAN?
The GNSS-only solution is still available when running SPAN. Logs such as PSRPOS and RTKPOS
are still available. The best available GNSS-only solution is available in the BESTGNSSPOS log.
Any non-INS logs should be logged at a maximum rate of 5 Hz when running SPAN. Only INS
specific logs (documented in the SPAN on OEM6 Firmware Reference Manual (OM-20000144)
should be logged at rates higher than 5 Hz when running SPAN.
5. What will happen to the INS solution when I lose GNSS satellite visibility?
When GNSS tracking is interrupted, the INS solution bridges through the gaps with what is referred
to as free inertial navigation. The IMU measurements are used to propagate the solution. Errors in
the IMU measurements accumulate over time to degrade the solution accuracy. For example, after
one minute of GNSS outage, the horizontal position accuracy is approximately 8.4 m. The SPAN
solution continues to be computed for as long as the GNSS outage lasts, but the solution uncertainty
increases with time. This uncertainty can be monitored using the INSCOV log.
6. All the accels measurements in my RAWIMUS logs are zero and the IMU status shows one or all
accels are failing. What is wrong?
Ensure a monotonic power supply on power up of your SPAN-CPT receiver. See Connect Power on
page 16 for more information.
7. The SPAN-CPT will not start /power on?
The SPAN-CPT is connected to an incorrect power supply and the internal breaker has tripped. Shut
down and disconnect the SPAN-CPT and reconnect to an properly supported power supply. Reapply
power to the SPAN-CPT.

OM-20000122 Rev 8 March 2014
