OBO PRO 2 DT-201K 2.4GHz Digital Wireless Stereo Headphones Kit User Manual
OBO PRO.2 INC. 2.4GHz Digital Wireless Stereo Headphones Kit Users Manual
Users Manual
DT‐201KDigitalWirelessStereoHeadphoneKit
Operation Instructions: English
Instructions pour l’utilisation: Français
Modo de empleo: Español
Bedienungsanleitung: Deutsch
使用說明書: 繁體中文 (Instruction Manual: Traditional Chinese)
使用说明书 简体中文(Insrutcion Manual: Simplified Chinese)
Product Main Features
z 2.4GHz, wireless digital transmission: it allows freer and more personalized music listening and
movie watching without interfering in neighboring people.
z USB / Analog (3.5mm & 6.3mm pins): double audio input, it facilitates bundled applications of all
kinds of players.
z 30 meters effective reception distance: You could proceed with your activity while listening to the
music indoor.
z One Digital Transmitter (DT-T20): it allows usage of several pairs of headphones for audio
reception (it requires optional purchase of DT-201 digital wireless headphones)
z Low Power Consumption Headphone: regular alkaline battery (1.5V AAA x2) may sustain more
than 20 hours.
z Large Size Headphone of 40mm Speaker Unit: heavy and distinct bass sound, clear and bright
mediant and treble, it reproduces hi-fidelity of the mediant-bass effects and the original audio
sound.
z Rechargeable Batteries are adopted for Transmitter: it could sustain 3-6 hours and make
convenient outdoor usage.
z The transmitter could be directly linked to USB port by using USB connection cable for power
supply purpose or one could choose to use USB power adaptor and link it to USB connection
cable for power supply.
z Automatic Sleeping Device: after the audio source terminates for about 10 minutes, the
headphone and transmitter will be shut off automatically.
z Applicable to any type of player with USB connection port and audio source output port with ψ
3.5mm plug pin or ψ6.3mm plug pin such as TV set, Audio Equipment, DVD/CD Player, Desktop
Computer, Handheld Computer, iPod, iPhone, MP3 and Cellular Phones, etc.
z 耗電量低,一般鹼性電池(1.5V AAA x2)可以使用 20 小時以上。(重覆)
z Low Power Consumption Headphone: regular alkaline battery (1.5V AAA x2) may sustain more
than 20 hours.
z 採用大口徑 40mm 喇叭單元,低音渾厚分明,中高音清澈、明亮,忠實呈現出中低音效果及原
音的重現。(重覆)
z Large Size Headphone of 40mm Speaker Unit: heavy and distinct bass sound, clear and bright mediant and treble,
it reproduces hi-fidelity of the mediant-bass effects and the original audio sound.
z 自動睡眠裝置,音源中斷約 10 分鐘後,耳機自動關機。(重覆)
z Automatic Sleeping Device: after the audio source terminates for about 10 minutes, the
headphone and transmitter will be shut off automatically.
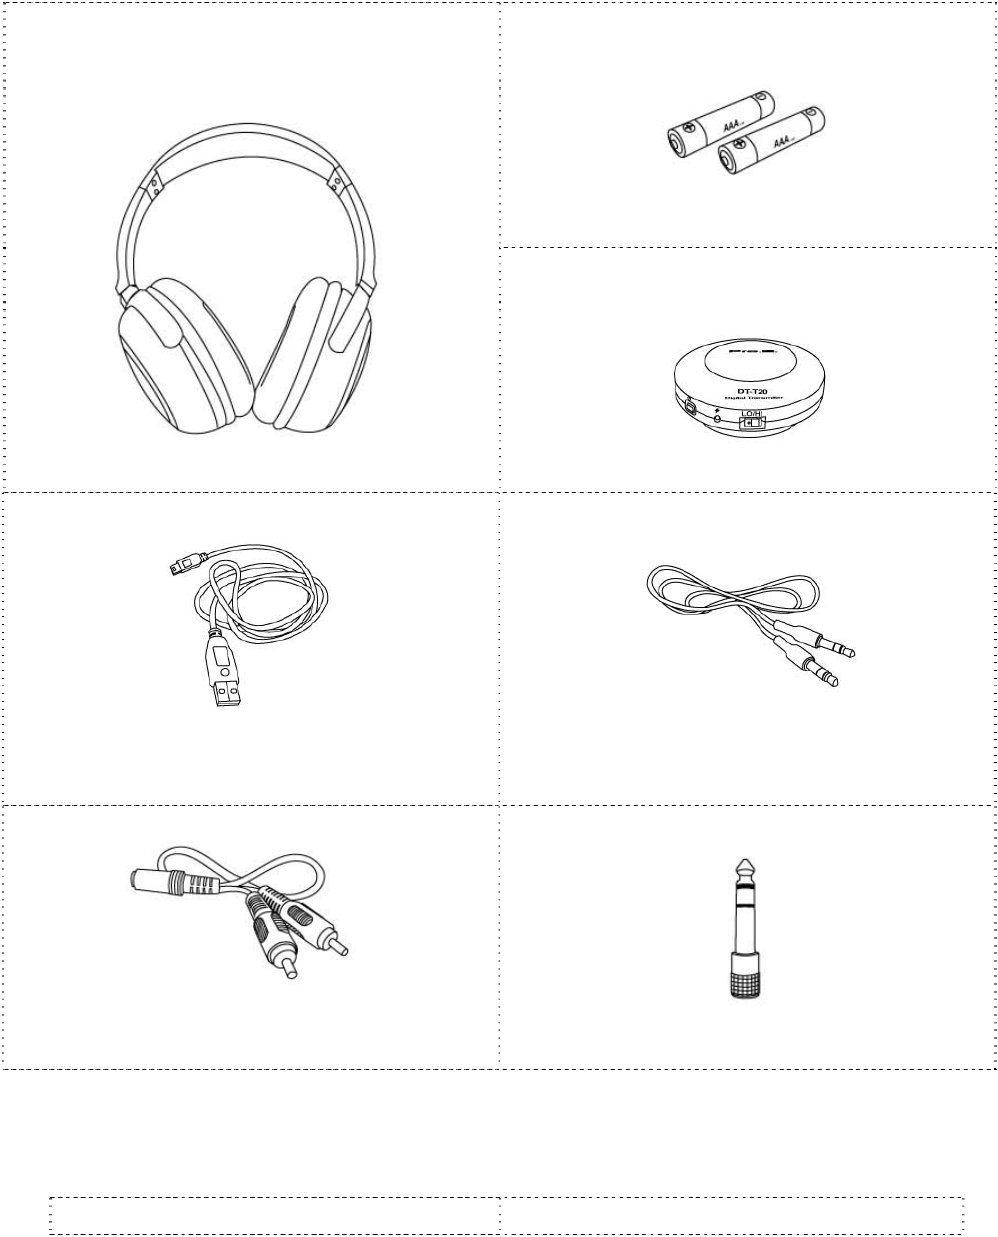
Components and Accessories
Alkaline Battery 1.5V AAA x 2.
DT-201 Digital Wireless Headphone
DT-T20 Digital Transmitter
USB Connection Cable
ψ3.5mm Plug Pin with Double Head Connection
Cable
RCA Audio Source Adaptor Cable
ψ3.5mm→ψ6.3mm Adaptor
Parts Location and Function
z DT-T20 Digital Transmitter
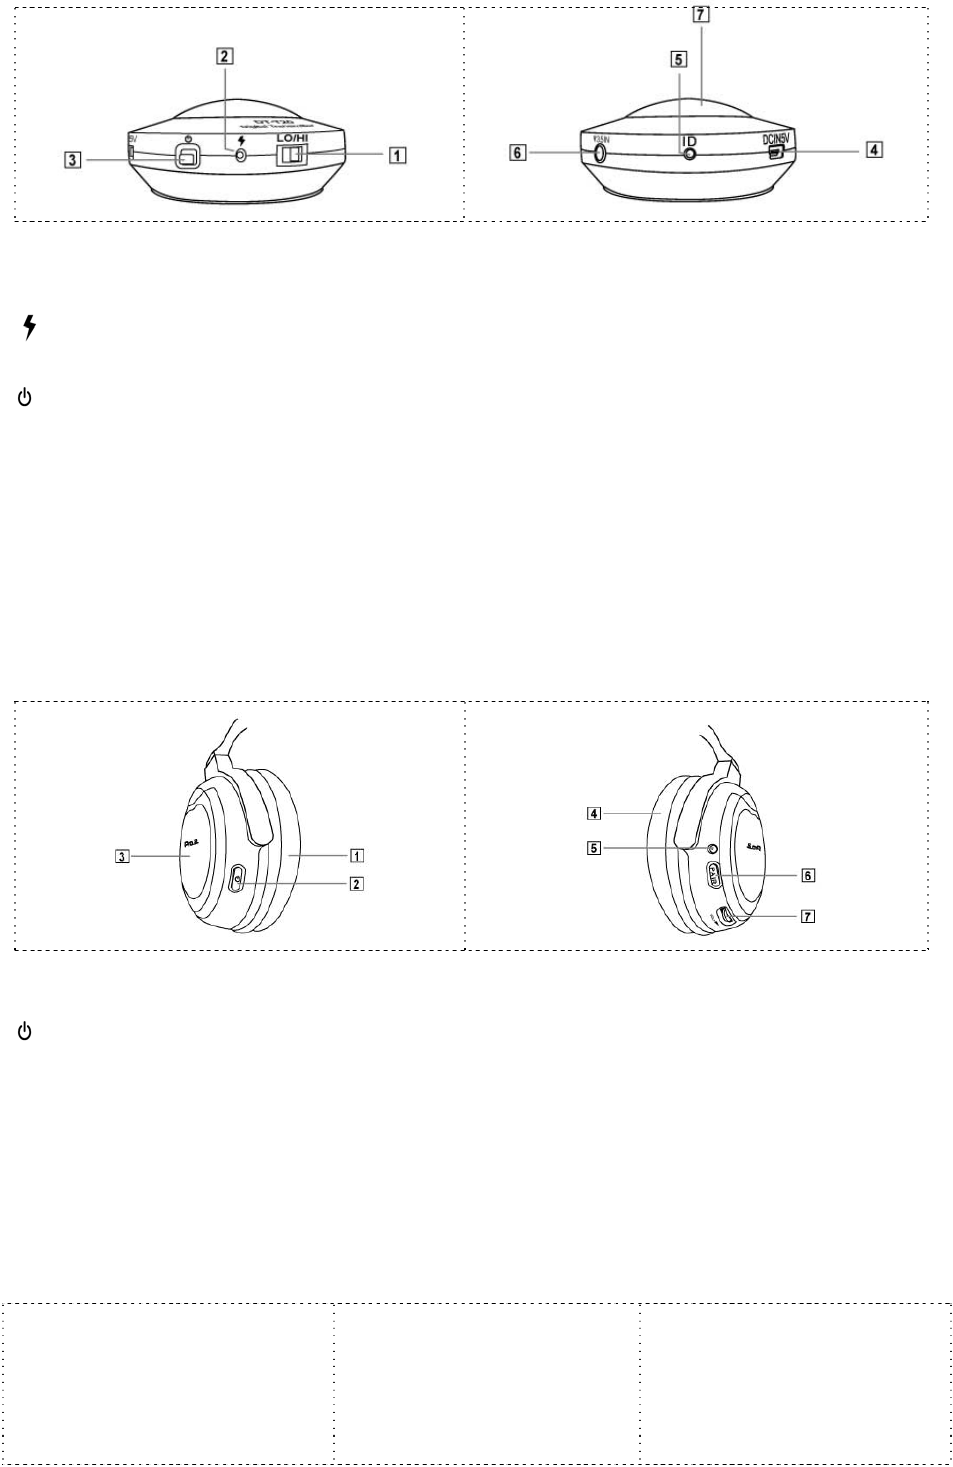
1. LO/HI:Frequency Transmit Strength Adjust Button, LO Effective Distance about 10 meters, HI
Effective Distance about 30 meters, Higher HI Power Consumption
2. :Battery Charging Indicator: Indicator will light up red while charging, it will turn off when charging
completes.
3. :Power Switch, press and hold lightly for 3 seconds to turn on or shut off.
4. DC IN 5V:USB Connection Port for power charging, or being used simultaneously for power
charging and audio source input operation.
5. ID:Frequency Verification Push Button, it is used for verifying with headphone frequency.
6. ψ3.5 IN:ψ3.5mm Audio Source Input Hole
7. Power and Frequency Verification Indicator (Blue): After turning on the power, if the audio source
cable is not connected, it will blink in slow pace, if connected, it lights up continuingly.
z DT-201 Digital Wireless Headphone
1. Ear Pad (Left)
2. : Power Switch, press and hold lightly for 3 seconds to turn on or shut off.
3. Battery Cover: please use AAA 1.5V*2 alkaline batteries
4. Ear Pad (Right)
5. Power and Frequency Verification Indicator (Green): it blinks in slow pace after turning on the
power, it keeps on lighting up after frequency verification completes.
6. PAIR: Frequency Verification Push Button, it is used for frequency verifying with the transmitter.
7. VOL: Volume Adjust Button to adjust the volume level.
z Battery Inserting (Installation)
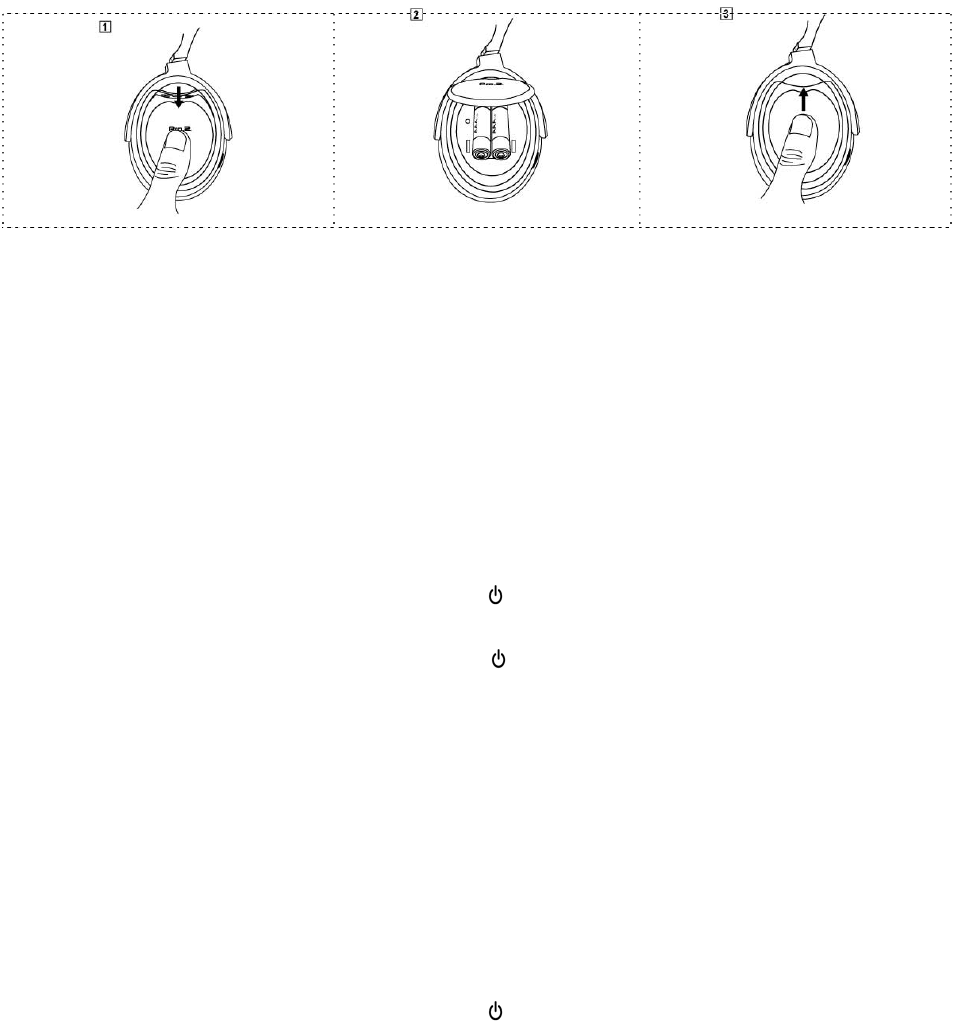
1. Pressing down lightly the battery cover and opening the cover.
2. Inserting the batteries (AAA 1.5V x 2 Alkaline Batteries)
3. Restoring the battery cover and pushing up lightly and close up the battery cover.
Transmitter and Headphone Frequency Verification as well as Usage (Connecting and
Listening the Headphone Kit 原英文暫保留,與中文原意不全符合)
z Frequency verification for transmitter and the headphone has already been completed before
delivery from the factory, please follow the operation instructions below:
a. Connecting the transmitter with connection cable to the player device (iPod, iPhone, MP3, PC, NB,
etc., proceed to input audio source and confirm that the player has been turned on for music
playing.
b. Pressing lightly on the transmitter power switch ( ) for 3 seconds to turn on the transmitter power,
now, the power and frequency verification indicator (Blue) will light up continuingly.
c. Pressing lightly on the headphone power switch ( ) for 3 seconds to turn on the headphone power,
now, the power and frequency verification indicator (Green) will light up continuingly.
d. Wearing on properly the headphone and enjoying cozily and happily the wireless freedom and
relaxation.
z If there are other factors of requirement to add more headphones for using transmitter concurrently,
it will be necessary to proceed with the frequency verification between the transmitter and the
headphone, please follow the operation procedure below:
a. Connecting the transmitter with connection cable to the player device (iPod, iPhone, MP3, PC, NB,
etc., proceed to input audio source and confirm that the player has been turned on for music
playing.
b. Pressing lightly on the transmitter power switch ( ) for 3 seconds to turn on the transmitter power,
now, the power and frequency verification indicator (Blue) will be kept constant on.
c. Using pen tip to press lightly on the transmitter frequency verification button (ID) for 3 seconds,
now, the power and frequency verification indicator (Blue) will blink in quick pace.
d. Press lightly on the headphone power switch for 3 seconds to turn on headphone power, now, the
power and frequency verification indicator (Green) will blink in slow pace.
e. Hand-pressing on the headphone frequency verification push button (PAIR) to proceed the
frequency verification (pairing) operation with the transmitter (for about more than 3 seconds), until
one hears the “bi” sound in the headphone and the transmitter frequency verification indicator has
been kept constant on, it indicates that frequency verification (pairing) has been completed.
f. When it has been connected for frequency verification, if the frequency verification indicator blinks
in slow pace, it indicates it is in the progress of channel searching, quick blinking means in the
progress of frequency verifying, if it is constant on, it represents the frequency verification has
been completed and the device is ready for use.
z Other Instructions:
a. After completing the frequency verification and the product is set to normal use, when the audio
source stops playing, the power and pairing indicator will blink in slow pace; if the audio source
turns to normal playing, the indicator will be reset to constant on.
b. After completing the frequency verification, if the device is enabled for re-operation after being
turned off, it is not necessary to perform the frequency verification and the device is ready for
direct use by turning it on.
c. When stopping using, please turn off both the power switches of the transmitter and headphone to
avoid unnecessary power consumption.
d. When the transmitter is connected at the same time to USB connection cable and ψ3.5mm plug
pin double head connection cable, theψ3.5mm IN connection cable (ψ3.5 IN 之 ψ3.5mm 連接
線? 中文語意不明確) will be selected with priority for audio input; the USB connection cable input
will then be automatically transferred into charging function.
e. When using on TV, DVD player, please use RCA audio adaptor connection cable to connect to ψ
3.5mm plug-pin double-head connection cable for connecting the transmitter to proceed with audio
input.
Troubleshooting
z Weak headphone volume or no sound at all
a. Adjusting headphone volume switch
b. Checking whether the audio source playing is stopped or the volume is too small.
c. Moving the headphone near to the wireless transmitter
d. Performing the frequency verification between the headphone and transmitter once again
z Headphone indicator (Green) is not on
a. Shutting off the headphone power and restart it.
b. Replacing batteries (AAA 1.5V*2 Alkaline Batteries)
z Headphone connection can not be set up (Indicator blinks)
a. Moving the headphone near to the wireless transmitter
b. Making sure whether the connection of the wireless transmitter and the audio source player are
properly connected and whether the audio source is playing normally.
c. Shutting off the headphone power and restart it.
z Transmitter indicator (Blue) is not on
a. Confirming that the wireless transmitter has been properly connected to PC or NB via the USB
transmission
b. When using ψ3.5mm plug pin double head connection cable to perform the audio source input,
the indicator is still not on
c. Using USB connection cable to perform the charging by connecting to PC or NB or plugging the
USB power adaptor in the AC socket for charging
Precautions
z It may impact your hearing when wearing the headphone with high volume or for long-time usage
z Do not use and store the device in high temperature, high humidity and dusty places and keep the
device at a place not reachable by children under three.
z Do not drop off or hit with force to prevent from the damage of the internal circuit board
z Do not place heavy object or apply pressure on the headphone, otherwise, it may be deformed in
shape after long-time storage.
z Using soft cloth for wiping when it gets dirty, do not wipe with chemical organic solvent
z Dirtiness or dust on all kinds of plugs will impact the transmission quality of the audio source,
please use soft cloth for clean wiping.
z Do not use when it is stained by water, it could only be reused after it has been completely dried.
z Aging may occur if the ear pad has been stored for long time or because of wearing.
Federal Communication Commission Interference Statement
This equipment has been tested and found to comply with the limits for a Class B digital
device, pursuant to Part 15 of the FCC Rules. These limits are designed to provide
reasonable protection against harmful interference in a residential installation.
This equipment generates, uses and can radiate radio frequency energy and, if not installed
and used in accordance with the instructions, may cause harmful interference to radio
communications. However, there is no guarantee that interference will not occur in a
particular installation. If this equipment does cause harmful interference to radio or television
reception, which can be determined by turning the equipment off and on, the user is
encouraged to try to correct the interference by one of the following measures:
. Reorient or relocate the receiving antenna.
. Increase the separation between the equipment and receiver.
. Connect the equipment into an outlet on a circuit different from that to which the receiver is
connected.
. Consult the dealer or an experienced radio/TV technician for help.
FCC Caution: To assure continued compliance, any changes or modifications not expressly
approved by the party responsible for compliance could void the user's authority to operate
this equipment. (Example - use only shielded interface cables when connecting to computer
or peripheral devices).
This device complies with Part 15 of the FCC Rules. Operation is subject to the following two
conditions:
(1) This device may not cause harmful interference, and (2) This device must accept any
interference received, including interference that may cause undesired operation.
FCC Radiation Exposure Statement
This equipment complies with FCC RF radiation exposure limits set forth for an uncontrolled
environment. This equipment should be installed and operated with a minimum distance of 20
centimeters between the radiator and your body.
This transmitter must not be co-located or operating in conjunction with any other antenna or
transmitter.
The antennas used for this transmitter must be installed to provide a separation distance of at
least 20 cm from all persons and must not be co-located or operating in conjunction with any
other antenna or transmitter.