OBSERVA Telecom QCI4NU POE ROUTER User Manual 2AI24QCI4NU Quick Start Guide
OBSERVA Telecom POE ROUTER 2AI24QCI4NU Quick Start Guide
User Guide
LTECPESQI4N4
QuickStartGuide
FCC ID: 2AI24QCI4NU
FCC ID: 2AI24SQO14
Issue01
Date2016‐08
Contents
1AboutThisDocument...............................................................................................................2
2DevicePanel..............................................................................................................................3
3WhatYouNeed.........................................................................................................................3
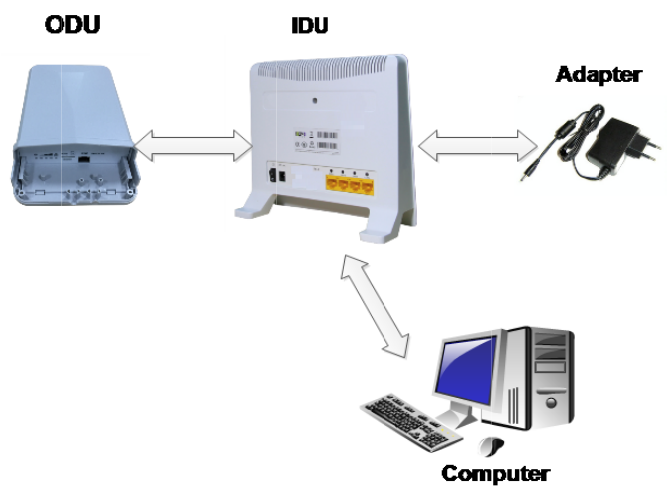
4HowItWorks.............................................................................................................................4
5SetUptheHardware.................................................................................................................5
5.1ChooseaLocation.........................................................................................................5
5.2InsertaSIMCardtotheSlot.........................................................................................6
5.3Outdoor(SQO14)LEDBehavior....................................................................................7
5.4ConnecttheSQO14totheQCI4NU..............................................................................8
5.5ConnecttheQCI4NU.....................................................................................................8
5.6MounttheSQO14.........................................................................................................9
5.6.1Polemounting...................................................................................................9
6ConnecttotheInternet..........................................................................................................11
7Wireless...................................................................................................................................13
7.1TurntheWirelessOnoroff.........................................................................................13
8Troubleshooting......................................................................................................................14
8.1PowerLED...................................................................................................................14
8.2RESETButton...............................................................................................................14
8.3LTELED........................................................................................................................15
8.4Wi‐FiLED.....................................................................................................................15
8.5ETHERNET1‐4LEDs.....................................................................................................16
9FCCRegulations.......................................................................................................................17
1 AboutThisDocument
ThedocumentwillserveasaquickstartguideforLTEdevicemodelSQI4N4.TheSQI4N4
2
Figu
Figu
3
Ens
u
includestw
o
detailedinf
o
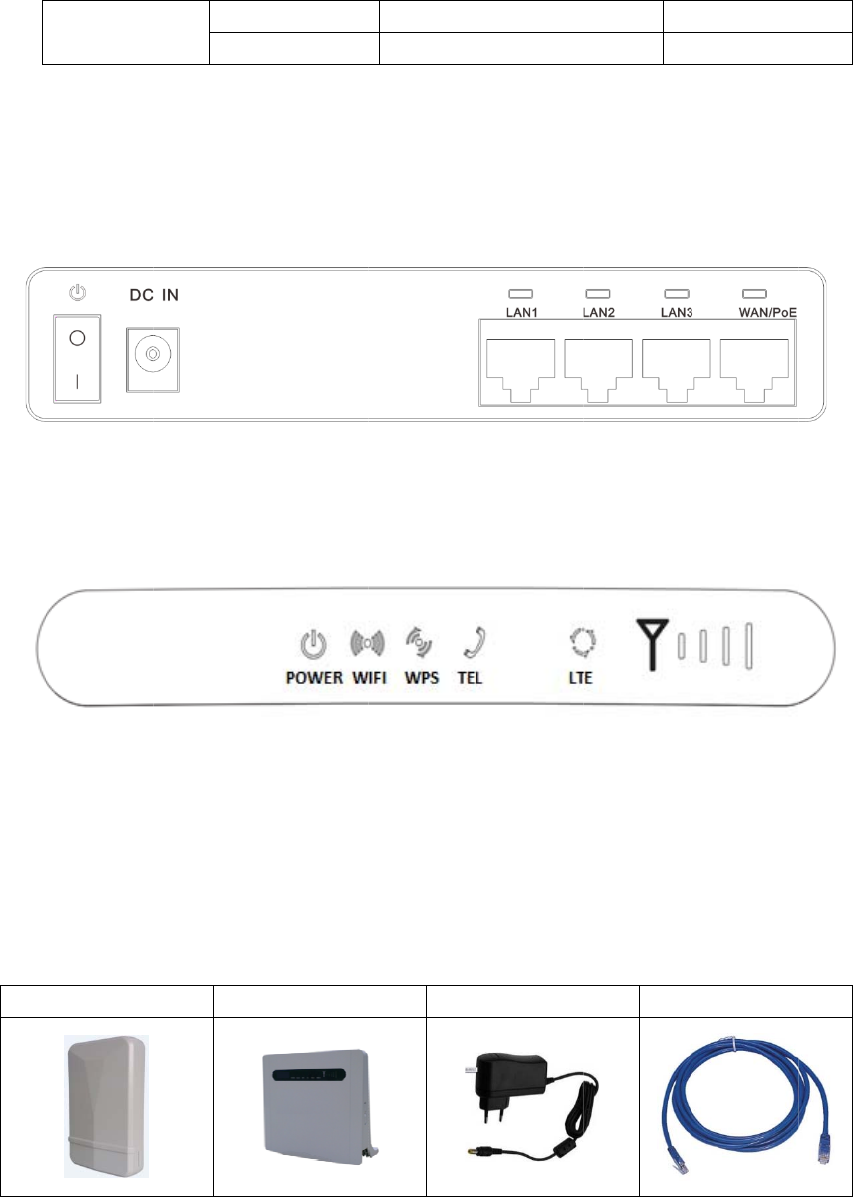
LTECPESQ
Devic
re2‐1QCI4
N
re2‐2QCI4
N
What
u
rethatyou
h
SQO14
o
parts,anin
o
rmation.
I4N4 Indo
o
Out
d
ePan
e
N
URearPane
N
UFrontPan
e
You
N
h
aveeveryth
doorunitan
d
o
rUnit
d
oorUnit
e
l
l.
e
l.
N
eed
ingrequired
t
QCI4NU
d
anoutdoo
r
FCCID:2
A
FCCID:2
A
Figure2‐1
Figure2‐2
t
oproperlys
PO
W
r
unit.Please
A
I24QCI4NU
A
I24SQO14
etupyourd
e
W
ERSUPPLY
seefollowin
g
M
M
e
vice.
Ethe
r
g
matrixsho
w
odel:QCI4N
U
odel:SQO14
r
netCABLE
w
sfor
U
4
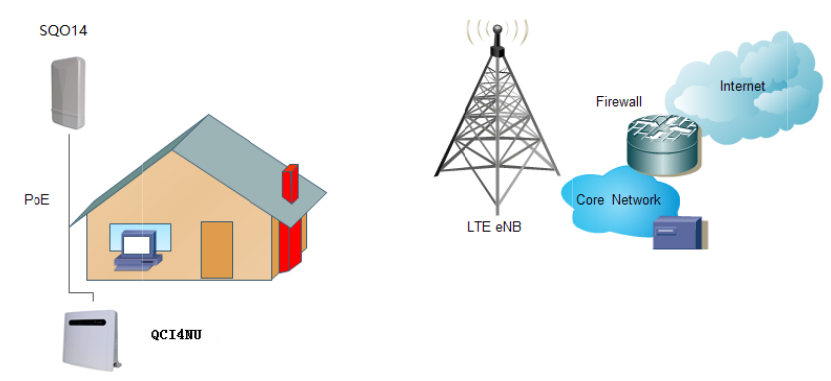
Figu
1.
2.
3.
4.
This
Inte
How
I
re4‐1LANa
n
TheSQO14
TheSQO14
TheQCI4N
U
TheQCI4N
U
QuickStart
rnet.
I
tWo
r
n
dWAN.
connectsto
t
isconnected
U
functionsa
s
U
alsoserves
a
Guideshow
s
r
ks
t
heLTEnetw
o
totheQCI4
N
s
aLAN&Wi
‐
a
stelephone
s
youhowto
Figure4‐1
o
rk.
N
U.
‐
Fiaccessga
t
adapter.
setupyour
t
ewa
y
.
SQO14andQCI4NUino
r
r
dertoacces
sthe

5 SetUptheHardware
CAUTION
Beforeyoubegin,ensurethatyouarefamiliarwithallsafetyandaccidentpreventionprocedures
necessaryforworkingatheightsandwithelectricity.
DoNOTinstalltheSQO14duringalightningstorm.
5.1 ChooseaLocation
TheSQO14canbemountedonapoleorantennamastoronawallusingthesuppliedbracket
mount.
ChooseamountingpointthatissturdyenoughtoholdtheSQO14,evenduringhighwinds.
WhenchoosingalocationtoinstalltheSQO14,rememberthattheSQO14’sfrontpanel
shouldpointtowardsyourserviceprovider’snearestbasestation.Youdonotneedtobe
abletoseethebasestationfromtheSQO14’sposition.However,ifyouexperience
difficultieswithsignalreception,aLineofSight(LoS)connectionmayprSQO14cebetter
results.
ItissuggestedthatyoutransporttheSQO14toitsintendedinstallationlocationinits
originalprotectivepackaging.
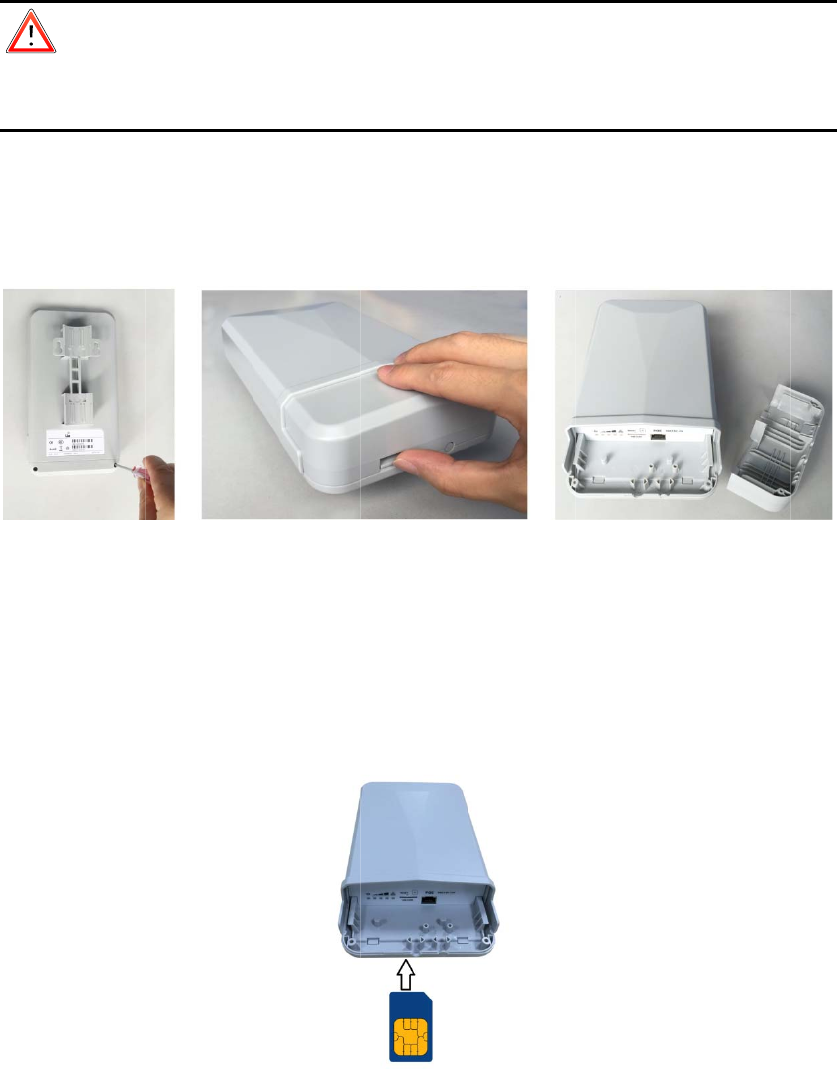
Ma
k
con
n
Ste
p
Figu
Ste
p
Figu
Ste
p
5.2 In
s
CAUTION
k
esuretheS
n
ectthePoE
p
1Removet
h
re5‐1Remo
v
p
2Insertyo
u
re5‐2Insert
p
3Alignand
s
ertaSI
M
QO14istur
n
cableyoudo
h
ecoverfro
m
v
ethecover.
u
rSIMcard.
SIMCard.
putthecove
M
Card
t
n
edoffbefor
thisstep.O
t
m
theSQO14
.
rtoprotecti
t
t
otheS
eyouinsert
t
herwise,the
.
Figure5‐2
Figure5‐1
t
intheSQO
1
lo
t
yourSIMca
r
SIMcardm
a
1
4.
r
d.Itisreco
m
a
ybedamag
e
m
mendedto
e
d.
NOT
5.3 Outdoor(SQO14)LEDBehavior
WhensetuptheOutdoorUnit,theLEDwillhavethefollowingbehavior.
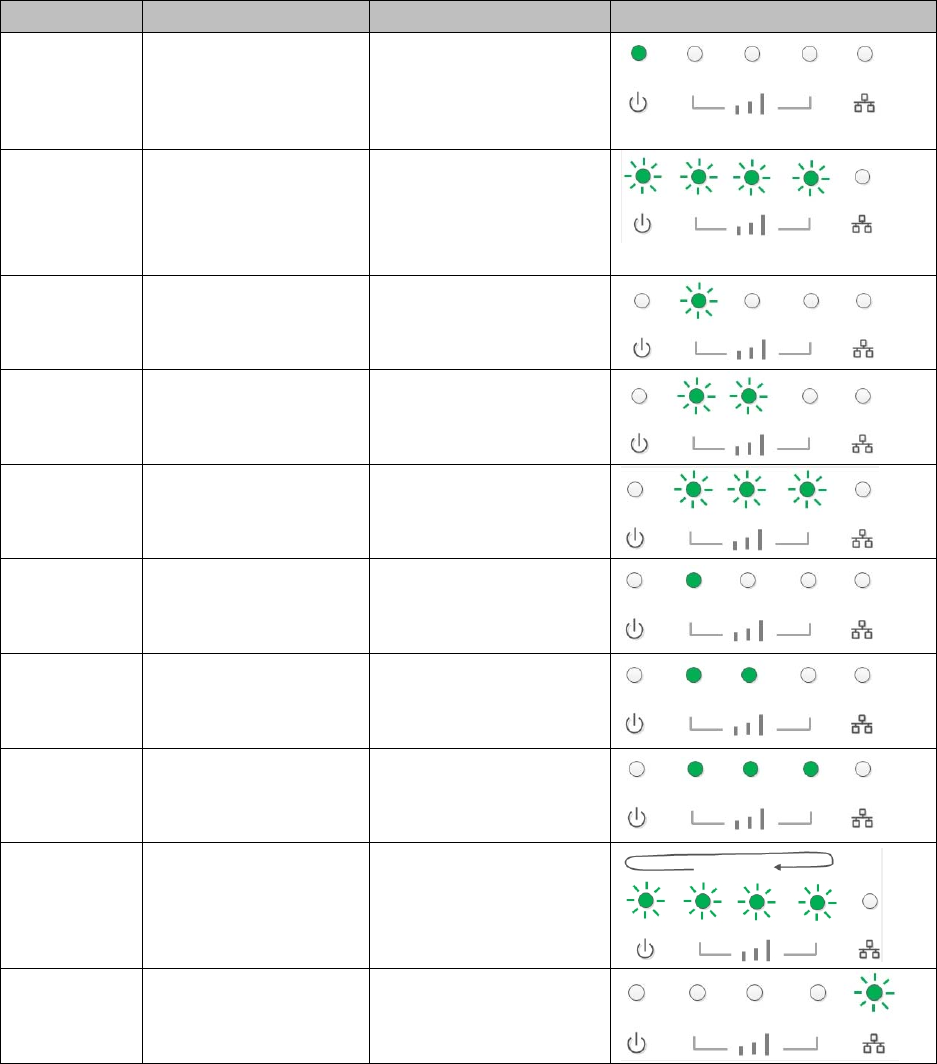
CPE State Description LED Behavior LED illustration
Power On Power supply normal Power LED on
Detect with no
SIM card
After CPE power on,
detecting no SIM card
Power LET and three signal
strength LEDs blinking
together, the frequency is 2
times per second.
Scanning the
LTE network
Scanning the LTE network The first signal strength LED
blinking
Network
Authentication
CPE is authenticating Two signal strength LEDs
blinking
Getting IP
Address
CPE getting IP address from
LTE network
Three signal strength LEDs
blinking
Signal Strength
weak
Signal strength is weak Only first signal strength LED
on, the other two off
Signal Strength
good
Signal strength is good Two signal strength LEDs on
Signal Strength
strong
Signal strength is strong Three signal strength LEDs on
Firmware
Upgrading
CPE starting the firmware
upgrading
The first four LEDs blinking
alternately
LAN connected With local LAN connected LAN LED indicator flashing
Lay
SQ
O
The
Sign
Ify
o
Lea
v
Toc
o
Ste
p
Ste
p
cabl
Ste
p
Figu
NO
T
5.4 Co
n
aCAT5eEth
e
O
14location.
maximumdi
alattenuati
o
o
uintendto
v
ethecablel
o
o
nnecttheC
A
p
1Openthe
p
2Feedthe
e
etotheSQO
p
3Putthec
o
5.5 Co
n
re5‐3QCI4N
U
T
E:Makesur
e
n
nectt
h
e
rnetcable(
n
stanceofth
e
o
nmayresult
usecableti
e
o
oseuntilaf
t
A
T5eEthern
e
coverofSQ
O
e
ndoftheC
A
14.
o
verontheS
Q
n
nectt
h
U
Hardware
C
e
youhavein
h
eSQO
1
n
otincluded
e
CAT5ecabl
e
ifyouuseca
e
sorother
m
t
eryoufinish
e
tcable:
O
14bytakeo
A
T5eEthern
e
Q
O14housin
h
eQCI4
N
C
onnections.
sertedyour
S
1
4toth
e
)fromyour
i
e
islimitedto
bleextende
r
m
ethodstos
installingth
e
fthescrews
e
tcablethro
u
gandtwistt
N
U
Figure5‐2
S
IMcardinto
e
QCI4N
U
i
ntendedQC
I
100meters.
r
stocovera
g
ecurethec
a
e
QCI4NUan
d
onthehousi
n
u
ghtherubb
e
hescrew.
theSQO14.
U
I
4NUlocatio
n
g
reaterdista
n
a
ble,donot
t
d
SQO14.
n
g.
e
r,andconn
e
n
toourinte
n
ce.
t
ightenthe
m
e
cttheend
o
nded
m
yet.
o
fthe

Step1ConnecttheCAT5eEthernetcablewhichisalreadyconnectedtotheSQO14tothe
QCI4NU’sRJ‐45PoEport.
CAUTION
DonotconnectacomputeroraswitchdirectlytotheQCI4NU’sPoEportduetothehighPoE
power.
Step2ConnectthesuppliedpoweradaptertotheQCI4NU.ThePOWERLEDshinesasteady
greenonceconnected.
Step3ConnecttheincludedEthernetcablefromthecomputertooneoftheQCI4NU’s
ETHERNETports.
Step4ConnectananalogphonetothePHONEporttouseVoIP.ThePHONELTEshouldlighton.
5.6 MounttheSQO14
SeetheinstallationinstructionstomounttheSQO14correctly.
5.6.1 Polemounting
Pole diameter type: The mounting pole diameter is Φ25 and Φ45MM;
If the pole diameter is less thanΦ30, you need to add a C-type ring to make sure the device can be
mounted on the pole.
The specific mountingsteps are as follows:
1. Using a screwdriver to loosen the metal hose clamps,through the terminal equipment mounting
hole, the metal hose clamps and the pole is fixed;
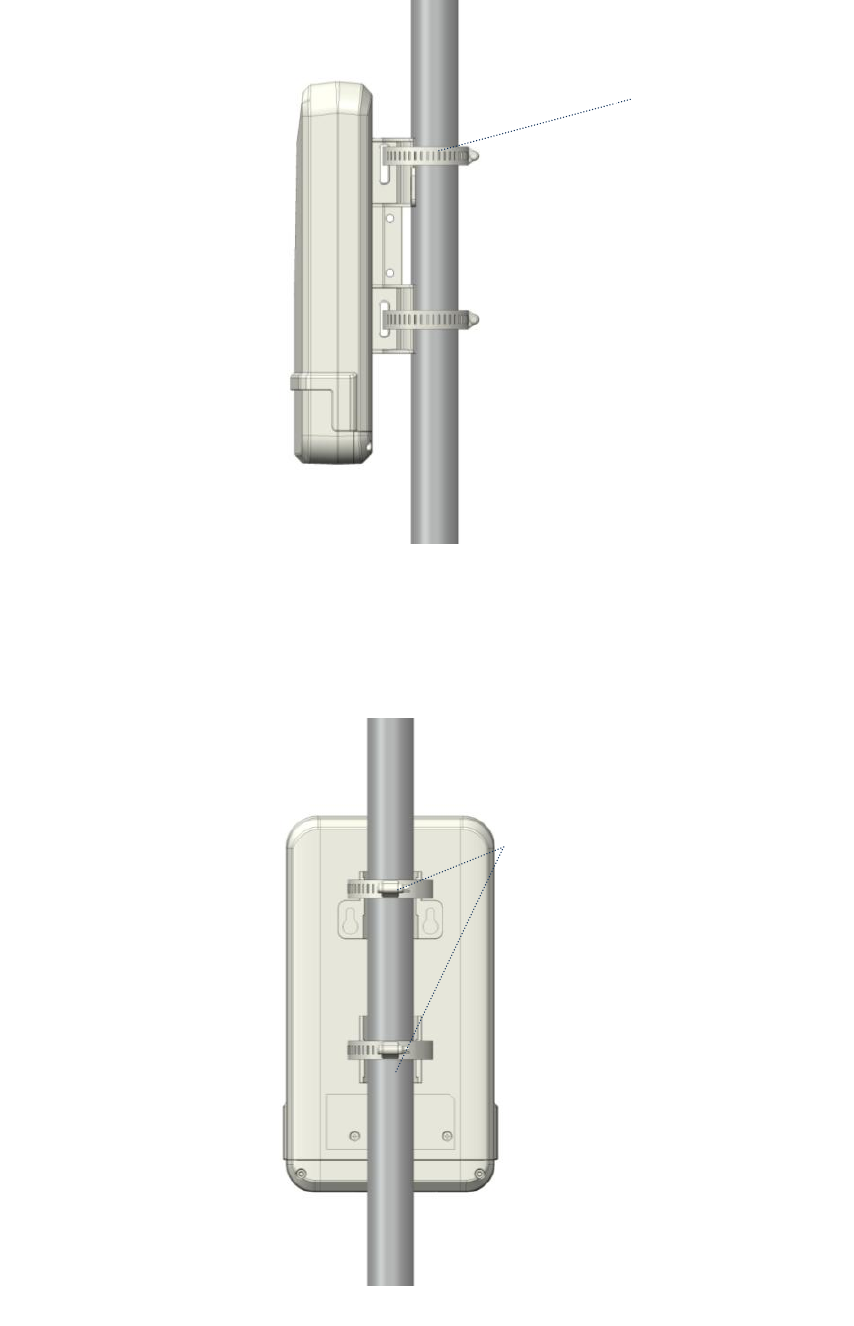
Figure5‐3 pole typemounting A
2. Using a screwdriver to lock the metal hose clamps, fixed terminal equipment.(Using software to enable
terminal equipment aligned in the direction of the base station, achieve the best effect.)
Figure5‐4 pole typemounting B
Note:(terminalequipmentcableoutletmustbeinstalleddownwarddirection.)
Metal hose clamps
Using a screwdriver to lock
the metal hose clamps
3. If the diameter of pole between 25mm and 30mm, it’s needed to use the rubber C-type ring to add the diameter
of the pole.
Figure5‐5C-type ring
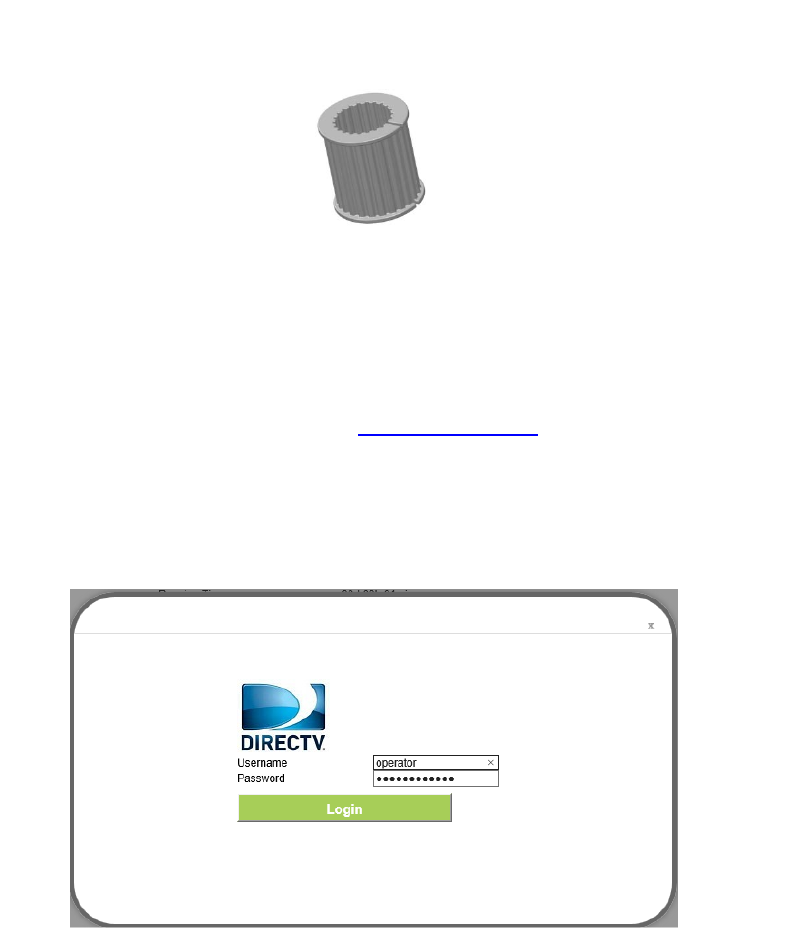
6 ConnecttotheInternet
Step1OpenawebbrowserandentertheURLhttp://192.168.100.1ofindoorunit
Step2EnterthedefaultUsernameandPassword.ClickLogin.(Fieldsarecase‐sensitive.)
Figure6‐1LoginScreen.
Figure6‐1
NOTE
Iftheloginscreendoesnotopen,makesureinternetbrowser’sproxysettingsdisabled.Your
computershouldalsobesettogetanIPaddressautomaticallyfromtheLTERouterDHCPServer,
192.168.100.100to254.

Figu
Ifth
can
n
re6‐2Main
S
eLTESignal
n
otacquireL
T
S
creen
Bar&Intern
T
ESignal.To
c
etIconsloc
a
c
hecksignal,
Figure6‐2
a
tedaboveo
f
gotoNetw
o
f
thepagea
r
o
rkMenu
r
egrayedou
t
t
,itmeanst
h
h
atit
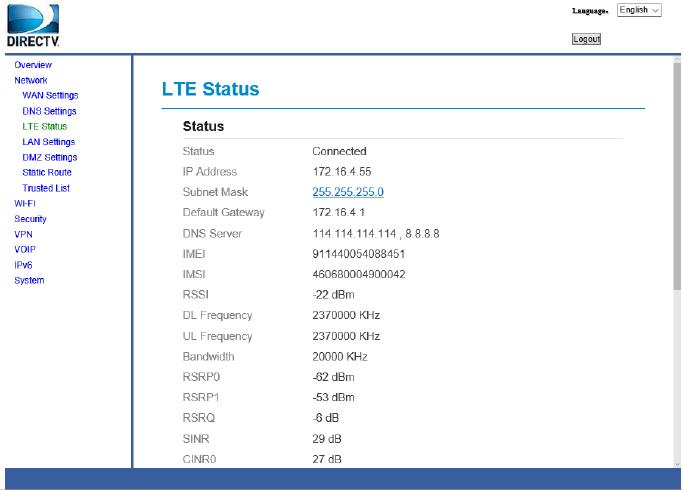
Figure6‐3Network
Figure6‐3
IftheSINRisbelow10db,replanningorrepositioningoftheoutdoor(SQO14)antennais
required.
Note:SINRthresholdparametersis≥10db
7 Wireless
7.1 TurntheWirelessOnoroff
Step1TheWIFIissettodefaultasON.
Step2YoucanalsopresstheWIRELESSOn/Offbuttonforonesecondandreleaseit.

8
Use
Figu
Tabl
LED
PW
R
Ifth
Ste
p
Ste
p
def
e
Figu
Tor
e
che
c
Bas
e
def
e
Trou
b
thissectioni
8.1 Po
w
re9‐1Powe
r
e9‐1Power
R
epowerLED
p
1Powerad
a
p
2Ifthepro
b
e
ctive,please
8.2 RE
S
re9‐2RESET
e
setthedev
i
c
ktheother
L
e
donthefo
e
ct.
b
lesho
o
fyouhavep
r
w
erLE
D
r
LEDSymbol
LEDDefiniti
o
COL
O
Blue
isoff,pleas
e
a
pterMUST
b
b
lemstillper
s
contactyou
r
S
ETBu
t
Button
i
cetodefaul
t
L
EDs.
llowingdefi
n
o
ting
r
oblemswit
h
D
o
n
O
R
e
check.
b
epluggedi
n
s
ists,device
h
r
localvendo
t
ton
t
,pressthe
R
n
itionsofth
e
h
yourLTEDe
v
Figure8‐1
STAT
OFF
Stea
d
n
todevice.
h
ardwareco
m
r.
Figure8‐2
R
ESETbutton
e
otherLED
s
v
ice.
US
d
yOn
m
ponentor
p
untilthepo
s
,itcandia
g
DES
C
NoP
o
Pow
e
p
oweradapt
e
werLEDbe
g
g
noseifther
C
RIPTION
o
werSupply
e
ron
e
rmaybe
g
instoblink.
e’sanyhard
Then
ware

8.3 LT E LED
Figure9‐3LTELEDSymbol
Figure8‐3
Table9‐2LTELEDDefinition
LEDCOLORSTATUSDESCRIPTION
LTEBlueSteadyOnInLTEnetwork
BlinkingLTEscan,connect,completeLTEconnectivity
OFFNoaccessinLTEnetwork
IftheLTELEDisofforblinkingcontinuously,pleasecheck:
Step1PoEcableMUSTbeconnectedbetweenQCI4NUandSQO14device.
Step2Re‐powerontheQCI4NUdevice.
Step3WaituntiltheLEDindicatorsteadies.
Step4Iftheproblemstillpersists,devicehardwarecomponentmaybedefective,pleasecontact
ourtechnicalsupport.
8.4 WiFiLED
Figure9‐4WIFILEDSymbol
Figure8‐4
Table9‐3WLANLEDDefinition
LEDCOLORSTATUSDESCRIPTION
WIFIBlueOFFWLAN function disable
BlinkingData transmission through WLAN
SteadyOnWLAN function enable
IftheWIFILEDisoff,pleasecheck:
WIFI:EnablewirelessfunctionandallconfigurationparametersMUSTbecorrect.SeetheWIFI
configurationformoreinformation.
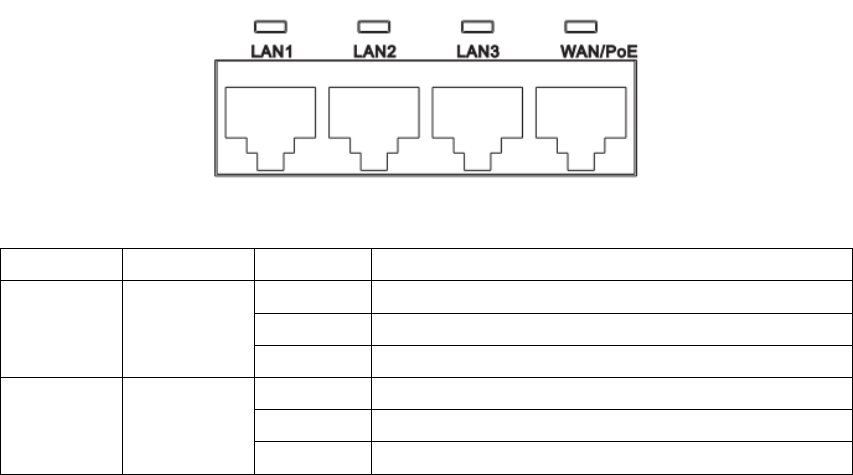
8.5 ETHERNET14LEDs
Figure9‐6ETHERNET1~3LEDsSymbol
Figure8‐5
Table9‐5ETHERNET1‐3LEDsDefinition
LEDCOLORSTATUSDESCRIPTION
LAN1~LAN3GreenSteadyOnEthernet connection is normal
BlinkingEthernet interface data being transmitted
OFFEthernet connection is not established
WAN/POEGreenSteadyOnWAN connection is normal
BlinkingWAN interface data being transmitted
OFFWAN connection is not established
IftheLEDisoff,pleasecheck:
Step1TheLANcableMUSTbeconnectedbetweendeviceandPC.
Step2NICfunctiononthePCMUSTbeenabled.
Step3Iftheproblemstillpersists,devicehardwarecomponentmaybedefective,pleasecontact
yourlocalvendor.
Indoor LTE CPE
Online Help
Index
1GettingStarted..........................................................................................................................5
1.1WelcometotheCPE..................................................................................................5
1.2ComputerConfigurationRequirements....................................................................5
1.3LoggingIntotheWebManagementPage................................................................5
2Overview...................................................................................................................................6
2.1ViewingtheSystemInformation...............................................................................6
2.2ViewingtheVersionInformation..............................................................................7
2.3ViewingCPUUsage...................................................................................................7
2.4ViewingMemoryUsage............................................................................................8
2.5ViewingLANStatus...................................................................................................8
2.6ViewingWi‐FiStatus.................................................................................................9
2.7ViewingWANStatus.................................................................................................9
2.8ViewingThroughputStatistics................................................................................10
2.9ViewingDeviceList.................................................................................................10
3NetworkSetting......................................................................................................................11
3.1WANSetting............................................................................................................11
3.1.1NetworkMode................................................................................................11
3.1.2MTUSetting.....................................................................................................11
3.1.3SettingConnectODU.......................................................................................12
3.1.4WANNetworkParametersSetting..................................................................12
3.2Outdoor4GStatus...................................................................................................13
3.3LANSetting..............................................................................................................14
3.3.1SettingLANHostParameters..........................................................................14
3.3.2ConfigurationtheDHCPServer.......................................................................15
3.3.3BundledAddressList.......................................................................................16
3.4DMZSettings...........................................................................................................17
3.5StaticRoute.............................................................................................................18
3.5.1AddStaticRoute..............................................................................................18
3.5.2ModifyStaticRoute.........................................................................................18
3.5.3DeleteStaticRoute..........................................................................................19
4Wi‐Fi........................................................................................................................................19
4.1WLANSetting..........................................................................................................19
4.1.1SettingGeneralParameters.............................................................................19
4.1.2WPSSettings...................................................................................................20
4.2SettingSSIDProfile..................................................................................................20
4.3AccessManagement...............................................................................................22
4.3.1SettingtheAccessPolicy.................................................................................22
4.3.2ManagingtheWi‐FiAccessList.......................................................................23
4.4WDS.........................................................................................................................24
5Security...................................................................................................................................25
5.1MACFiltering..........................................................................................................25
5.1.1EnablingMACFilter.........................................................................................25
5.1.2DisablingMACFilter........................................................................................26
5.1.3SettingAllowaccessnetworkwithintherules................................................26
5.1.4SettingDenyaccessnetworkwithintherules................................................26
5.1.5AddingMACFilteringrule...............................................................................27
5.1.6ModifyingMACFilteringrule..........................................................................27
5.1.7DeletingMACFilteringrule.............................................................................28
5.2IPFiltering...............................................................................................................28
5.2.1EnablingIPFiltering.........................................................................................28
5.2.2DisablingIPFiltering........................................................................................28
5.2.3SettingAllowaccessnetworkoutsidetherules..............................................29
5.2.4SettingDenyaccessnetworkoutsidetherules...............................................29
5.2.5AddingIPFilteringrule....................................................................................30
5.2.6ModifyingIPFilteringrule...............................................................................30
5.2.7DeletingIPFilteringrule..................................................................................31
5.3URLFiltering............................................................................................................31
5.3.1EnablingURLFiltering.....................................................................................31
5.3.2DisablingURLFiltering....................................................................................32
5.3.3AddingURLFilteringlist..................................................................................32
5.3.4ModifyURLFilteringlist..................................................................................32
5.3.5DeletingURLFilteringlist................................................................................33
5.4PortForwarding.......................................................................................................33
5.4.1AddingPortForwardingrule...........................................................................33
5.4.2ModifyingPortForwardingrule......................................................................34
5.4.3DeletingPortForwardingrule.........................................................................35
5.5UPnP........................................................................................................................35
6VPNSetting.............................................................................................................................36
7VOIP.........................................................................................................................................36
7.1ViewVOIPInformation...........................................................................................36
7.2ConfiguringSIPServer.............................................................................................37
7.3ConfiguringSIPAccount..........................................................................................38
8System.....................................................................................................................................38
8.1Maintenance...........................................................................................................38
8.1.1Restart.............................................................................................................38
8.1.2Reset................................................................................................................39
8.1.3BackupConfigurationFile...............................................................................39
8.1.4UploadConfigurationFile...............................................................................40
8.2VersionManager.....................................................................................................40
8.2.1ViewingVersionInfo.......................................................................................40
8.2.2VersionUpgrade..............................................................................................41
8.3FTPautoupgrade....................................................................................................41
8.4TR069......................................................................................................................42
8.5Date&Time............................................................................................................43
8.6DDNS.......................................................................................................................45
8.7Diagnosis.................................................................................................................46
8.7.1Ping..................................................................................................................46
8.7.2Traceroute.......................................................................................................47
8.8Syslog.......................................................................................................................48
8.8.1Local................................................................................................................48
8.8.2Network...........................................................................................................49
8.9Account...................................................................................................................50
8.10RemoteWEBAccess................................................................................................51
8.11Logout.....................................................................................................................52
9FAQs........................................................................................................................................52

1 GettingStarted
1.1 WelcometotheCPE
Inthisdocument,theLTE(LongTermEvolution)CPE(customerpremisesequipment)willbe
replacedbytheCPE.CarefullyreadthefollowingsafetysymbolstohelpyouuseyourCPEsafely
andcorrectly:
Additionalinformation
Optionalmethodsorshortcutsforanaction
Potentialproblemsorconventionsthatneedtobespecified
1.2 ComputerConfigurationRequirements
Foroptimumperformance,makesureyourcomputermeetsthefollowingrequirements.
ItemRequirement
CPUPentium500MHzorhigher
Memory128MBRAMorhigher
Harddisk50MBavailablespace
Operatingsystem
Microsoft:WindowsXP,WindowsVista,orWindows7
Mac: Mac OS X10.5 or hi
g
her
Displayresolution1024x768pixelsorhigher
Browser
InternetExplorer7.0orlater
Firefox3.6orlater
Opera10orlater
Safari5orlater
Chrome9orlater
1.3 LoggingIntotheWebManagementPage
UseabrowsertologintothewebmanagementpagetoconfigureandmanagetheCPE.
ThefollowingproceduredescribeshowtouseacomputerrunningWindowsXPandInternet
Explorer7.0tologintothewebmanagementpageoftheCPE.
1. ConnecttheCPEproperly.
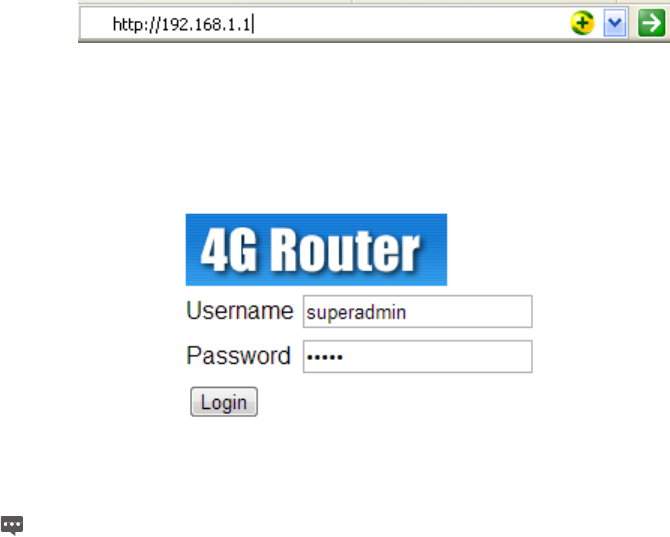
2. LaunchInternetExplorer,enterhttp://192.168.1.1intheaddressbar,andpressEnter.As
showninFigure1‐1.
Figure1‐1
3. Entertheusernameandpassword,andclickLogIn.
Youcanlogintothewebmanagementpageafterthepasswordisverified.AsshowninFigure1‐2.
Figure1‐2
Thedefaultusernameandpasswordarebothadmin.
ToprotectyourCPEfromunauthorizedaccess,changethepasswordafteryourfirst
login.
TheCPEsupportsdiagnosticfunction.Ifyouencounterproblems,pleasecontact
customerserviceforthespecificusingmethod.
Toensureyourdatasafety,itisrecommendedthatyouturnonthefirewall,and
conserveyourloginandFTPpasswordcarefully.
2 Overview
2.1 ViewingtheSystemInformation
ToviewtheSystemInformation,performthefollowingsteps:
1. ChooseOverview;
2. IntheSystemInformationarea,viewthesystemstatus,suchasRunningtime.Asshownin
Figure2‐1.
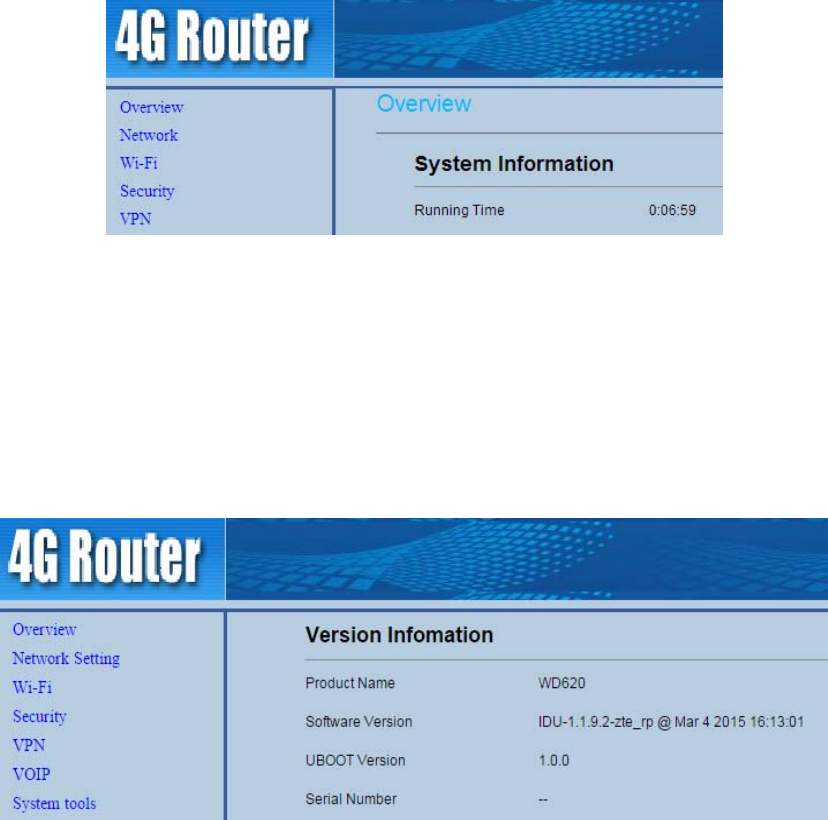
Figure2‐1
2.2 ViewingtheVersionInformation
ToviewtheVersionInformation,performthefollowingsteps:
1. ChooseOverview;
2. IntheVersionInformationarea,viewtheversioninformation,suchasProductname,
Softwareversion,Firmwareversion,UBootversion.AsshowninFigure2‐2.
Figure2‐2
2.3 ViewingCPUUsage
ToviewtheCPUusage,performthefollowingsteps:
1. ChooseOverview;
2. IntheCPUUsagearea,viewtheCPUusageinformation,suchasCurrentCPUusage,Max
CPUusage,MinCPUusage.AsshowninFigure2‐3.
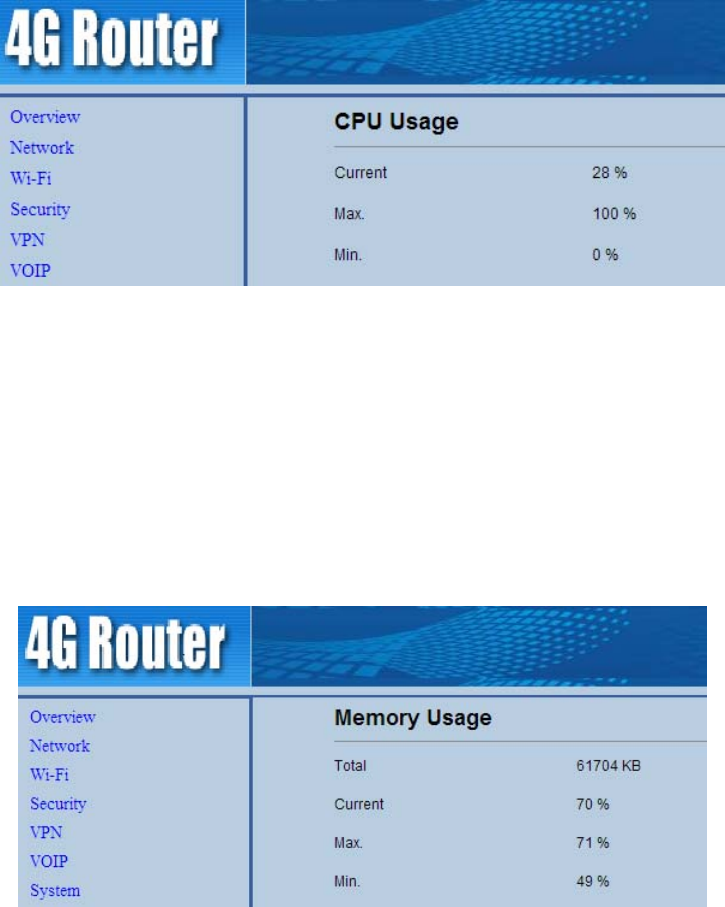
Figure2‐3
2.4 ViewingMemoryUsage
Toviewthememoryusage,performthefollowingsteps:
1. ChooseOverview;
2. IntheMemoryUsagearea,viewthememoryusageinformation,suchasTotalmemory,
Currentmemoryusage,MaxmemoryusageandMinmemoryusage.AsshowninFigure
2‐4.
Figure2‐4
2.5 ViewingLANStatus
ToviewtheLANstatus,performthefollowingsteps:
1. ChooseOverview;
2. IntheLANStatusarea,viewtheLANstatus,suchasMacaddress,IPaddressandSubnet
mask.AsshowninFigure2‐5.
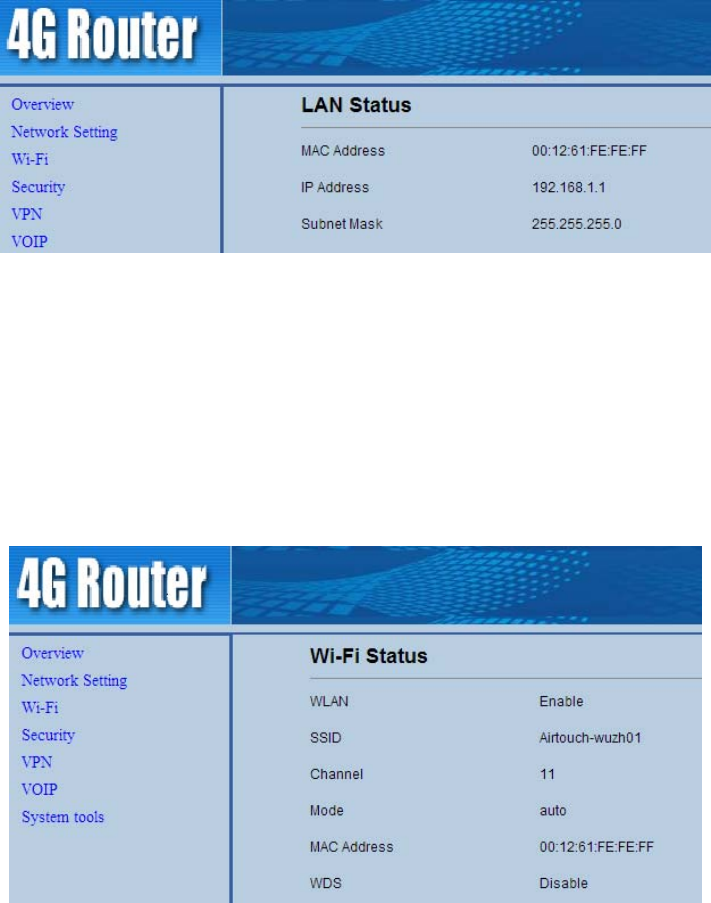
Figure2‐5
2.6 ViewingWi‐FiStatus
ToviewtheWi‐Fistatus,performthefollowingsteps:
1. ChooseOverview;
2. IntheWi‐FiStatusarea,viewtheinformationaboutWi‐Fistatus,SSID,ChanelNO.,MAC
addressandWDSstatus.AsshowninFigure2‐6.
Figure2‐6
2.7 ViewingWANStatus
ToviewtheWANstatus,performthefollowingsteps:
1. ChooseOverview;
2. IntheWANStatusarea,viewtheinformationaboutWAN,suchasConnectMode,MAC
Address,IPAddress,SubnetMask,Gateway,DNSServer,Onlinetime,DL&ULDataRate.As
showninFigure2‐7.
Figure2‐7
2.8 ViewingThroughputStatistics
Toviewthethroughputstatistics,performthefollowingsteps:
1. ChooseOverview;
2. IntheThroughputStatisticsarea,viewthethroughputstatistics,suchasWANthroughput
andLANthroughput.AsshowninFigure2‐8.
Figure2‐8
2.9 ViewingDeviceList
Toviewthedevicelist,performthefollowingsteps:
1. ChooseOverview;
2. IntheDeviceListarea,viewthedeviceinformationwhichconnecttotheCPE,suchas
Devicename,Macaddress,IPaddressandLeasetime.AsshowninFigure2‐9.
Figure2‐9
3 NetworkSetting
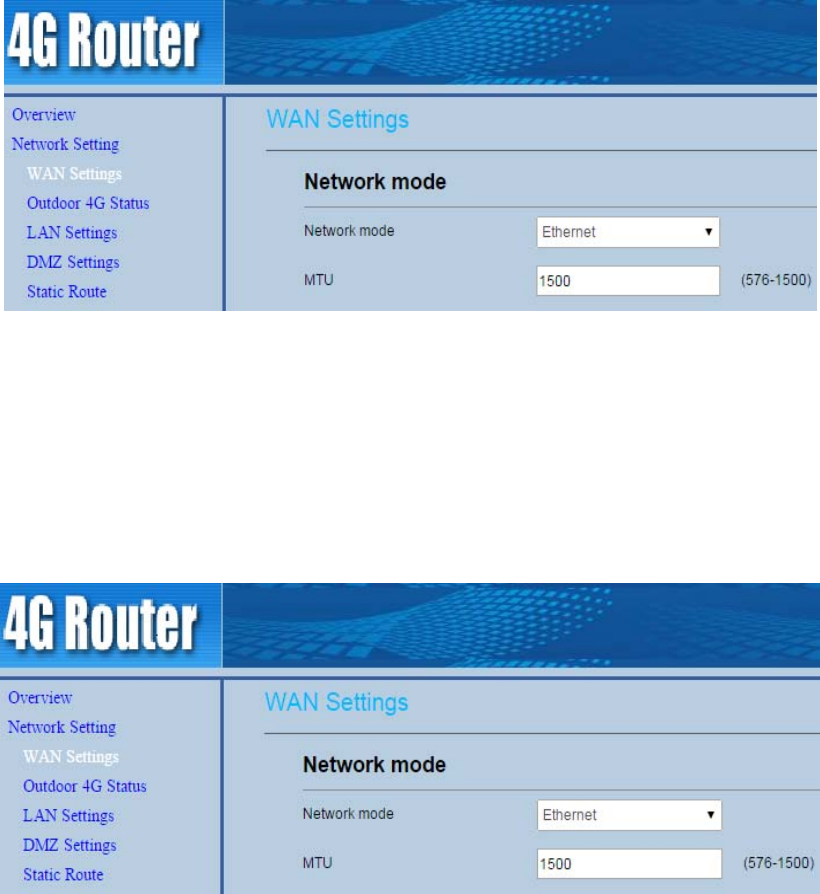
3.1 WANSetting
3.1.1 NetworkMode
Tosetthenetworkmode,performthefollowingsteps:
1. ChooseNetworkSetting>WANSettings;
2. IntheNetworkModearea,selectamodebetweenLTEandEthernet;
3. ClickSubmit.AsshowninFigure3‐1.
Figure3‐1
3.1.2 MTUSetting
TosettheWANMTUsize,performthefollowingsteps:
1. ChooseNetworkSetting>WANSettings;
2. IntheNetworkmodearea,youcanconfiguretheMTUsize;
3. ClickSubmit.AsshowninFigure3‐2.
Figure3‐2
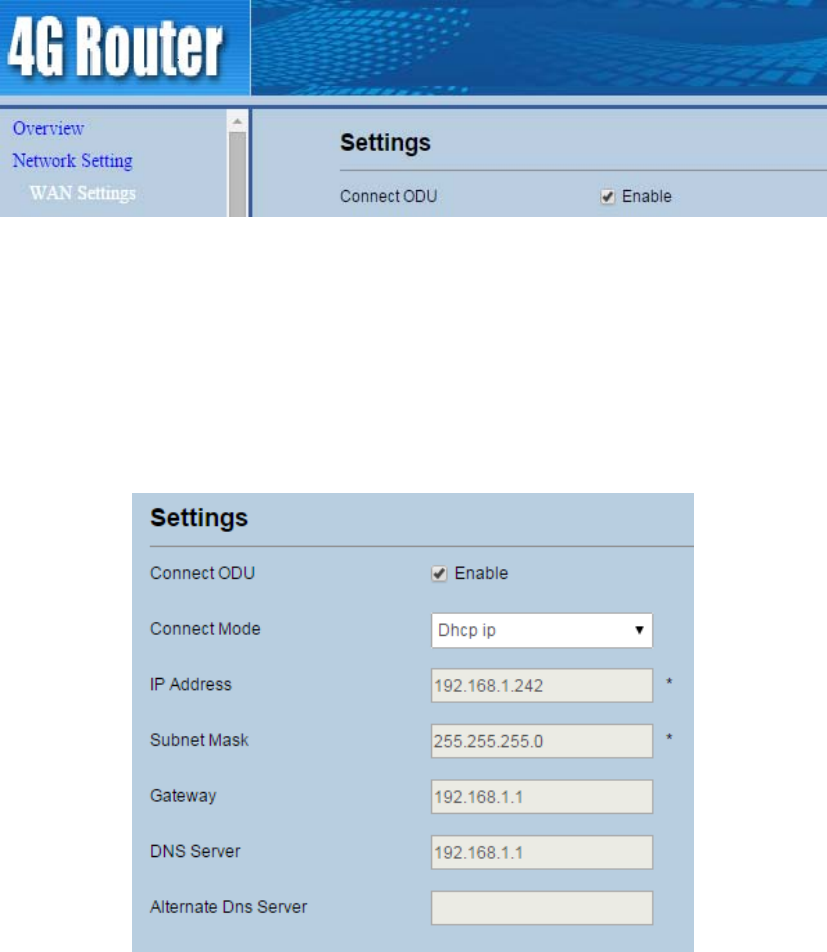
3.1.3 SettingConnectODU
TosettheWANconnectODU,performthefollowingsteps:
1. ChooseNetworkSetting>WANSettings;
2. IntheSettingsarea,enableConnectODU;
3. ClickSubmit.AsshowninFigure3‐3.
Figure3‐3
3.1.4 WANNetworkParametersSetting
SetWANconnectmodeasDHCP,performthefollowingsteps:
1. ChooseNetworkSetting>WANSettings;
2. IntheSettingsarea,SetconnectmodeasDHCPIP;
3. ClickSubmit.AsshowninFigure3‐4.
Figure3‐4
SetWANconnectmodeasStaticIP,performthefollowingsteps:
1. ChooseNetworkSetting>WANSettings;
2. IntheSettingsarea,SetconnectmodeasStaticIP;
3. SettingIPaddress,Subnetmask,GatewayandDNS;
4. ClickSubmit.AsshowninFigure3‐5.
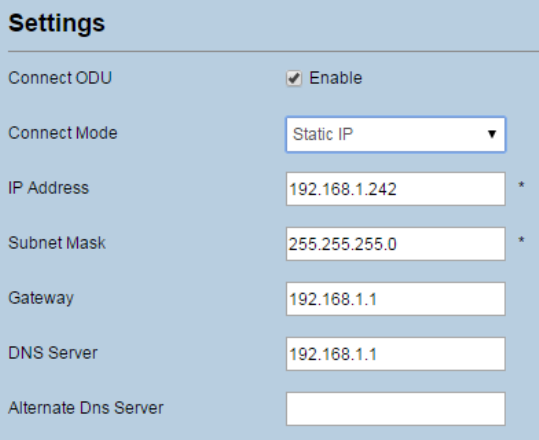
Figure3‐5
3.2 Outdoor4GStatus
Toviewtheoutdoor4Gstatus,performthefollowingsteps:
1. ChooseNetworkSetting>Outdoor4GStatus;
2. IntheOutdoor4GStatusarea,youcanalsoviewthenetworkinformationsuchasconnect
mode,IMSI,RSSI,frequency,DL&ULMCS,RSRP,RSRQ,CINR,SINR,TxPower,CellID,PCI,
MCCandMNC.AsshowninFigure3‐6.
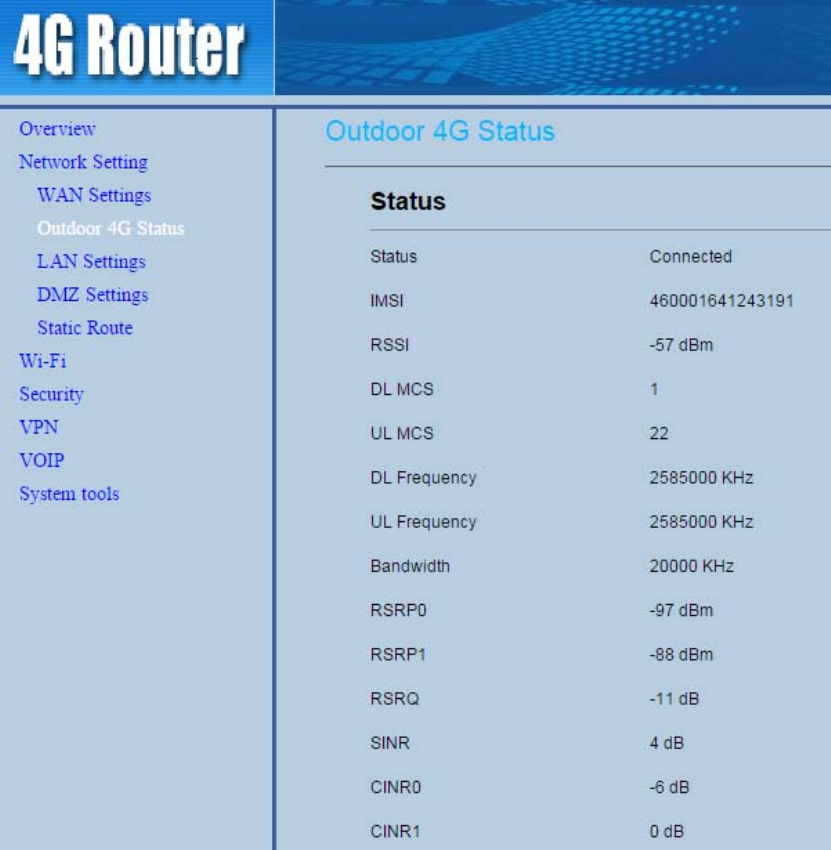
Figure3‐6
3.3 LANSetting
3.3.1 SettingLANHostParameters
Bydefault,theIPaddressis192.168.1.1withasubnetmaskof255.255.255.0.Youcanchange
thehostIPaddresstoanotherindividualIPaddressthatiseasytoremember.MakesurethatIP
addressisuniqueonyournetwork.IfyouchangetheIPaddressoftheCPE,youneedtoaccess
thewebmanagementpagewiththenewIPaddress.
TochangetheIPaddressoftheCPE,performthefollowingsteps:
1. ChooseNetworkSetting>LANSettings.
2. IntheLANHostSettingsarea,setIPaddressandsubnetmask.
3. IntheDHCPSettingarea,settheDHCPservertoEnable.
4. ClickSubmit.AsshowninFigure3‐7.
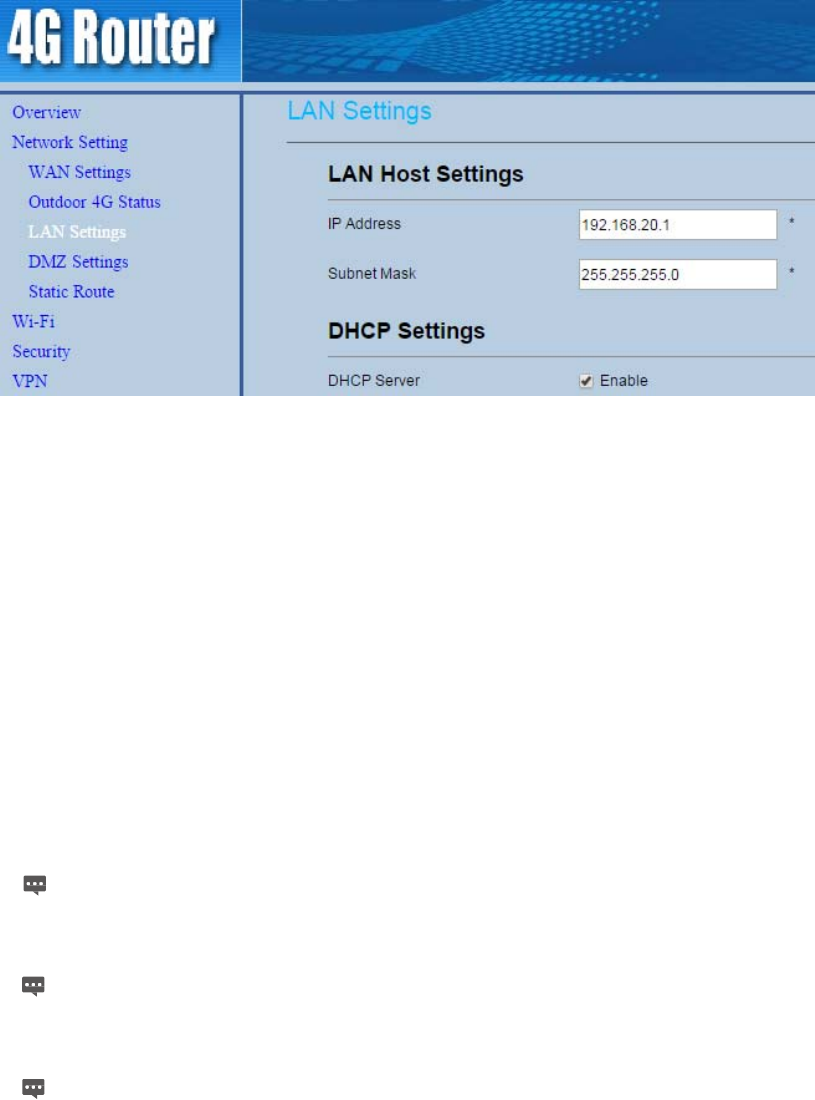
Figure3‐7
3.3.2 ConfigurationtheDHCPServer
DHCPenablesindividualclientstoautomaticallyobtainTCP/IPconfigurationwhentheserver
powerson.YoucanconfiguretheCPEasaDHCPserverordisableit.WhenconfiguredasaDHCP
server,theCPEautomaticallyprovidestheTCP/IPconfigurationfortheLANclientsthatsupport
DHCPclientcapabilities.IfDHCPserverservicesaredisabled,youmusthaveanotherDHCPserver
onyourLAN,oreachclientmustbemanuallyconfigured.
ToconfigureDHCPsettings,performthefollowingsteps:
1. ChooseNetworkSetting>LANSettings.
2. SettheDHCPservertoEnable.
3. SetStartIPaddress.
ThisIPaddressmustbedifferentfromtheIPaddresssetontheLANHostSettingsarea,but
theymustbeonthesamenetworksegment.
4. SetEndIPaddress.
ThisIPaddressmustbedifferentfromtheIPaddresssetontheLANHostSettingsarea,but
theymustbeonthesamenetworksegment.
5. SetLeasetime.
Leasetimecanbesetto1to10,080minutes.Itisrecommendedtoretainthedefault
value.
6. ClickSubmit.AsshowninFigure3‐8.
Figure3‐8
3.3.3 BundledAddressList
YoucanbindanIPaddresstoadevicebasedonitsMACaddress.ThedevicewillreceivethesameIP
addresseachtimeitaccessestheDHCPserver.Forexample,youcanbindanIPaddresstoanFTP
serverontheLAN.
Toaddanitemtothesetuplist,performthefollowingsteps:
1. ChooseNetworkSetting>LANSettings.
2. ClickAddlist.
3. SettheMACaddressandIPAddress.
4. ClickSubmit.AsshowninFigure3‐9.
Figure3‐9
Tomodifyaniteminthesetuplist,performthefollowingsteps:
1. ChooseNetworkSetting>LANSettings.
2. Choosetheitemtobemodified,andclickEdit.
3. SettheMACaddressandIPAddress.
4. ClickSubmit.AsshowninFigure3‐10.

Figure3‐10
Todeleteaniteminthesetuplist,performthefollowingsteps:
1. ChooseNetworkSetting>LANSettings.
2. Choosetheitemtobedeleted,andclickDelete.
3.4 DMZSettings
Ifthedemilitarizedzone(DMZ)isenabled,thepacketssentfromtheWANaredirectlysenttoa
specifiedIPaddressontheLANbeforebeingdiscardedbythefirewall.
TosetDMZ,performthefollowingsteps:
1. ChooseNetworkSetting>DMZSettings.
2. SetDMZtoEnable.
3. (Optional)SetICMPRedirecttoEnable.
4. SetHostaddress.
ThisIPaddressmustbedifferentfromtheIPaddresssetontheLANHost
Settingspage,buttheymustbeonthesamenetworksegment.
5. ClickSubmit.AsshowninFigure3‐11.
Figure3‐11
3.5 StaticRoute
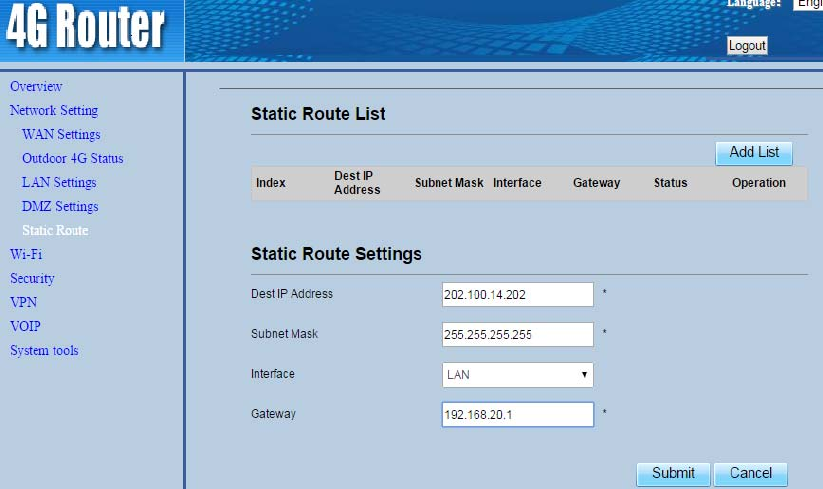
3.5.1 AddStaticRoute
Toaddastaticroute,performthefollowingsteps:
1. ChooseNetworkSetting>StaticRoute.
2. ClickAddlist.
3. SettheDestIPaddressandSubnetmask.
4. SelectanInterfacefromthedrop‐downlist.
5. IfyouselectLANastheinterface,youneedsetaGateway.
6. ClickSubmit.AsshowninFigure3‐12.
Figure3‐12
3.5.2 ModifyStaticRoute
Tomodifyanaccessrestrictionrule,performthefollowingsteps:
1. ChooseSecurity>StaticRoute.
2. Choosetheitemtobemodified,andclickEdit.
3. Repeatsteps3through5inthepreviousprocedure.
4. ClickSubmit.AsshowninFigure3‐13.
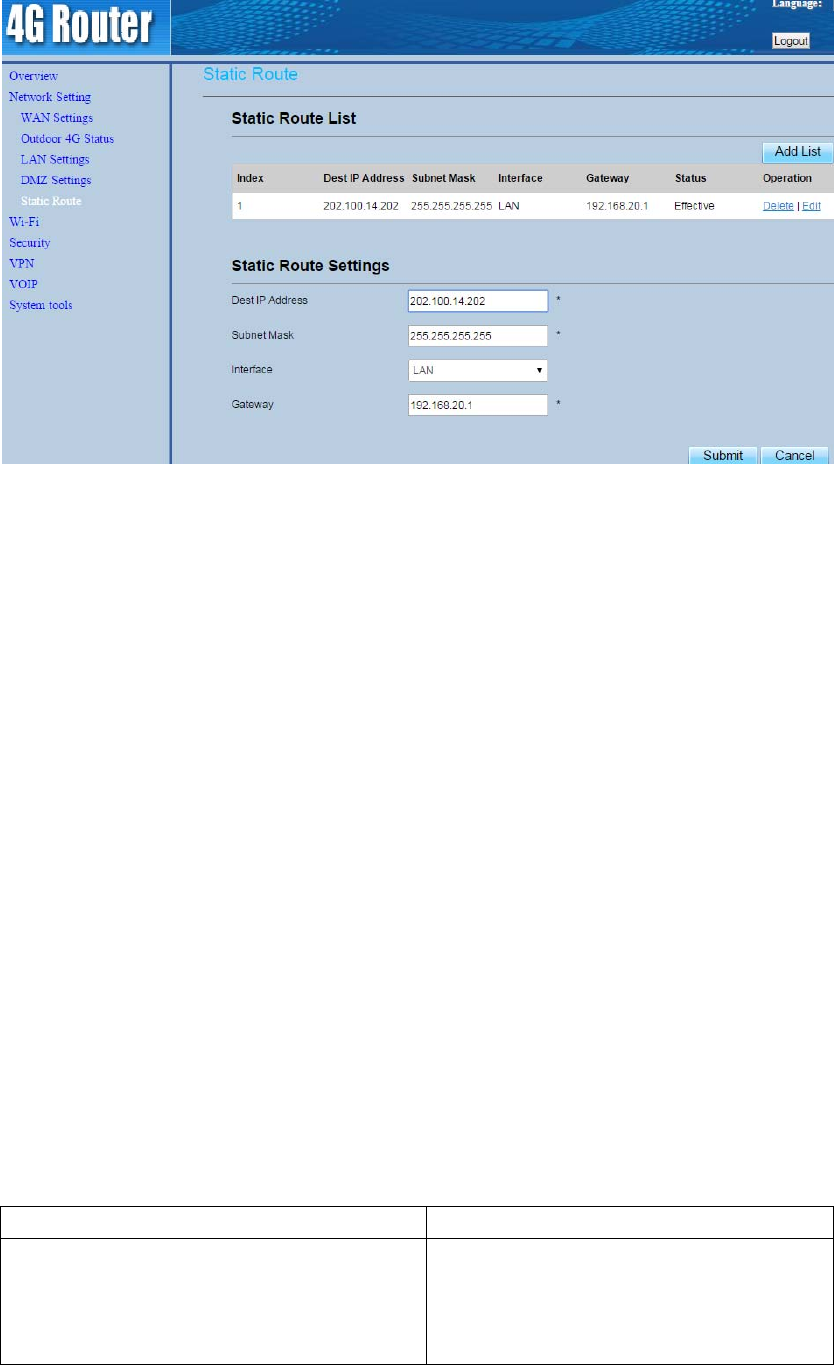
Figure3‐13
3.5.3 DeleteStaticRoute
Todeleteastaticroute,performthefollowingsteps:
1. ChooseSecurity>StaticRoute.
2. Choosetheitemtobedeleted,andclickDelete.
4 Wi‐Fi
4.1 WLANSetting
ThisfunctionenablesyoutoconfiguretheWi‐Fiparameters.
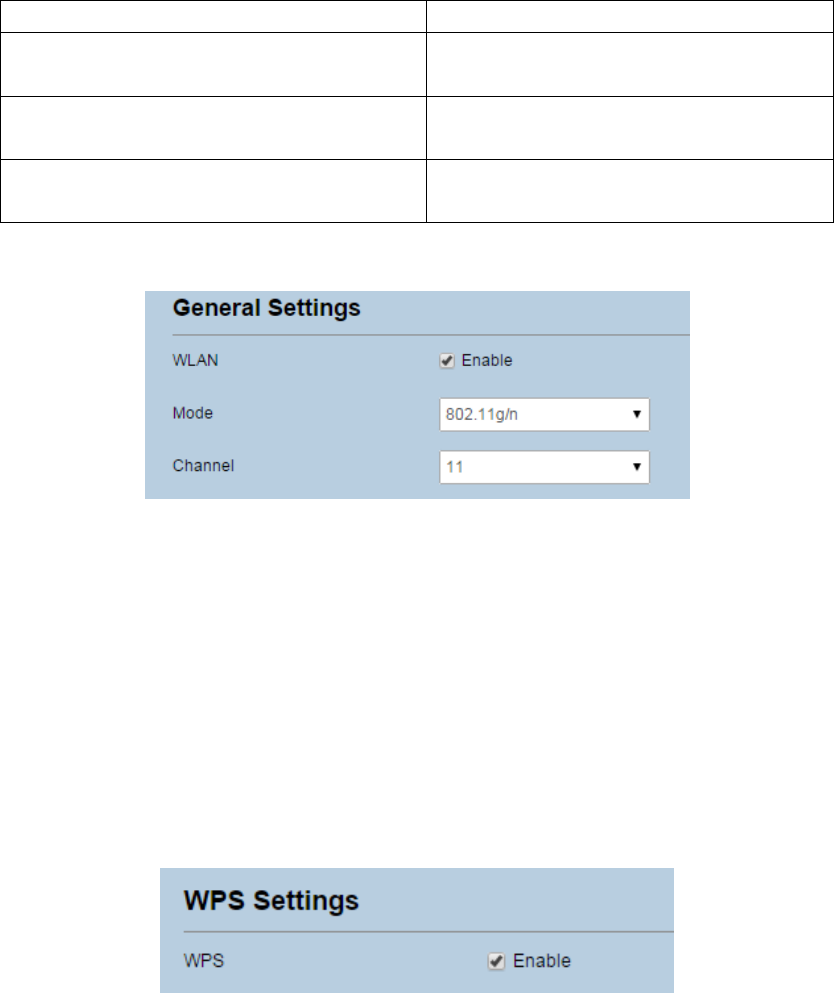
4.1.1 SettingGeneralParameters
ToconfigurethegeneralWi‐Fisettings,performthefollowingsteps:
1. ChooseWi‐Fi>Wi‐FiSettings.
2. IntheGeneralSettingsarea,setWLANtoEnable.
3. SetModetooneofthevaluesdescribedinthefollowingtable:
ParameterValueDescription
802.11b/g/nTheWi‐FiclientcanconnecttotheCPEin
802.11b,802.11g,or802.11nmode.Ifthe
clientconnectstotheCPEin802.11nmode,
theAdvancedEncryptionStandard(AES)
encryption mode is required.
802.11b/gTheWi‐FiclientcanconnecttotheCPEin
802.11bor802.11gmode.
802.11bTheWi‐FiclientcanconnecttotheCPEin
802.11bmode.
802.11gTheWi‐FiclientcanconnecttotheCPEin
802.11gmode.
4. SettheChannelNo.from1to11.
5. ClickSubmit.AsshowninFigure4‐1.
Figure4‐1
4.1.2 WPSSettings
Wi‐FiProtectedSetup(WPS)enablesyoutosimplyaddawirelessclienttothenetwork
withoutneedingtospecificallyconfigurethewirelesssettings,suchastheSSID,security
modeandpassphrase.YoucanuseeithertheWPSbuttonorPINtoaddthewirelessclient.
ToconfigureWi‐FiWPSsettings,performthefollowingsteps:
1. ChooseWi‐Fi>WPSSettings.
2. SetWPStoEnable.
3. ClickSubmit.AsshowninFigure4‐2.
Figure4‐2
4.2 SettingSSIDProfile
AfteryouconfiguretheCPEontheSSIDProfilepage,theWi‐FiclientconnectstotheCPE
basedonpresetrules,improvingaccesssecurity.
ToconfiguretheCPEontheSSIDProfilepage,performthefollowingsteps:
1. ChooseWi‐Fi>Wi‐FiSettings.
2. SetSSID.
TheSSIDcancontain1to32ASCIIcharacters.Itcannotbeemptyandthelastcharacter
cannotbeablankcharacter.Inaddition,theSSIDcannotcontainthefollowingspecial
characters:/'="\&

TheWi‐FiclientconnectstotheCPEusingthefoundSSID.
3. SetMaximumnumberofdevices.
ThisparameterindicatesthemaximumnumberofWi‐FiclientsthatconnecttotheCPE.
Amaximumof32clientscanconnecttotheCPE.
4. SetHideSSIDbroadcasttoEnable.
IftheSSIDishidden,theclientcannotdetecttheCPE'sWi‐Fiinformation.
5. SetAPisolationtoEnable.
TheclientscanconnecttotheCPEbutcannotcommunicatewitheachother.
6. SetSecurity.
IfSecurityissettoNONE(notrecommended),Wi‐FiclientsdirectlyconnecttotheCPE.
Thissecuritylevelislow.
IfSecurityissettoWEP,Wi‐FiclientsconnecttotheCPEinweb‐basedencryption
mode.
IfSecurityissettoWPA‐PSK,Wi‐FiclientsconnecttotheCPEinWPA‐PSKencryption
mode.
IfSecurityissettoWPA2‐PSK,Wi‐FiclientsconnecttotheCPEinWPA2‐PSKencryption
mode.Thismodeisrecommendedbecauseithasahighsecuritylevel.
IfSecurityissettoWPA‐PSK&WPA2‐PSK,Wi‐FiclientsconnecttotheCPEin
WPA‐PSK&WPA2‐PSKencryptionmode.
7. Settheencryptionmode.
If…SetstoDescription
WEPAuthenticationmode Sharedauthentication:Theclient
connectstotheCPEinshared
authenticationmode.
Openauthentication:Theclientconnects
totheCPEinopenauthenticationmode.
Both:TheclientconnectstotheCPEin
sharedoropenauthenticationmode.
Encryptionpassword
length
128bit:Only13ASCIIcharactersor26hex
characterscanbeenteredintheKey1to
Key4boxes.
64bit:Only5ASCIIcharactersor10hex
characterscanbeenteredintheKey1to
Key4boxes.
Current
passwordindex
Thisvaluecanbesetto1,2,3,or4.Afterakey
indexisselected,thecorrespondingkeytakes
effect.
WPA‐PSKWPA‐PSKOnly8to63ASCIIcharactersor8to64hex
characterscanbeentered.
WPAencryptionThisvaluecanbesettoTKIP+AES,AES,or
TKIP.
WPA2‐PSK(reco
mmended)
WPA‐PSKOnly8to63ASCIIcharactersor8to64hex
characterscanbeentered.
WPAencryptionThisvaluecanbesettoTKIP+AES,AES,or
TKIP.
WPA‐PSK&
WPA2‐PSK
WPA‐PSKOnly8to63ASCIIcharactersor8to64hex
characterscanbeentered.
WPAencryptionThisvaluecanbesettoTKIP+AES,AES,or
TKIP.
8. ClickSubmit.AsshowninFigure4‐3.
Figure4‐3
4.3 AccessManagement
4.3.1 SettingtheAccessPolicy
ThisfunctionenablesyoutosetaccessrestrictionpoliciesforeachSSIDtomanageaccessto
theCPE.
ToconfigureWi‐FiMACcontrolsettings,performthefollowingsteps:
1. ChooseWi‐Fi>AccessManagement.
2. IntheWLANAccessListSettingsarea,setAccessPolicy.
TheaccesspolicycanbesettoDisable,BlacklistorWhitelist.
IfSSID'sMACAccessissettoDisable,accessrestrictionsdonottakeeffect.
IfSSID'sMACAccessissettoBlacklist,onlythedevicesthatarenotintheblacklist
canconnecttotheCPE.
IfSSID'sMACAccessissettoWhitelist,onlythedevicesinthewhitelistcan
connecttotheCPE.
3. ClickSubmit.AsshowninFigure4‐4.
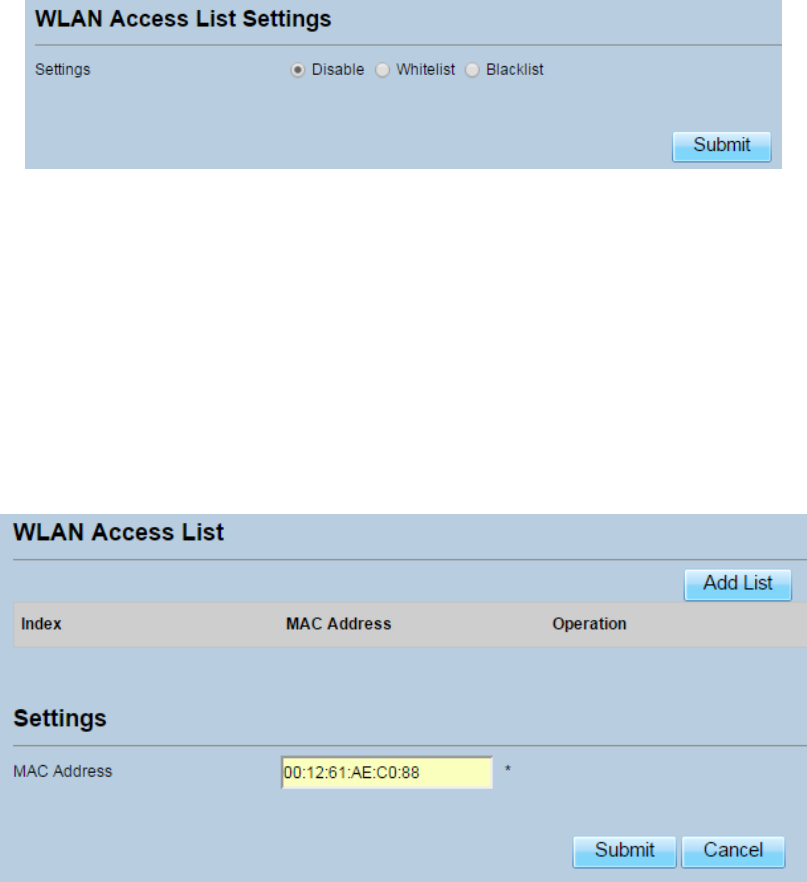
Figure4‐4
4.3.2 ManagingtheWi‐FiAccessList
ThisfunctionenablesyoutosettheSSIDaccesspoliciesbasedonMACaddresses.
ToaddanitemtotheWi‐Fiaccesslist,performthefollowingsteps:
1. ChooseWi‐Fi>AccessManagement.
2. ClickAdd.
3. SetMACaddress.
4. ClickSubmit.AsshowninFigure4‐5.
Figure4‐5
TomodifyanitemintheWi‐Fiaccesslist,performthefollowingsteps:
1. ChooseWi‐Fi>AccessManagement.
2. ClickEditMACList.
3. Choosetheitemtobemodified,andclickEdit.
4. SetMACaddress.
5. SetoneoftheSSIDtoEnabletomaketheMACaddresstakeeffectfortheSSID.
6. ClickSubmit.AsshowninFigure4‐6.
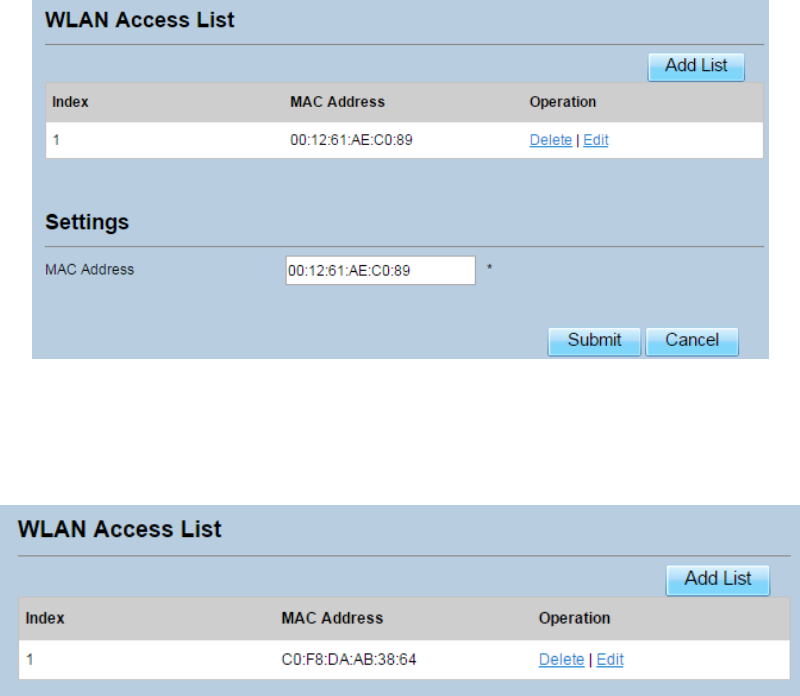
Figure4‐6
TodeleteanitemfromtheWi‐Fiaccesslist,performthefollowingsteps:
1. ChooseWi‐Fi>AccessManagement.
2. Choosetheitemtobedeleted,andclickDelete.AsshowninFigure4‐7.
Figure4‐7
4.4 WDS
TheCPEsupportsthewirelessdistributionsystem(WDS).AllWi‐FidevicesinaWDSmustbe
configuredtousethesameradiochannel,encryptionmode,SSID,andencryptionkey.You
cansettheWDSencryptionmodetoNONEorWPA/WPA2.IfyousettheWDSencryption
modetoNONE,theWi‐FiclientscanuseNONEorWEPencryptionmode.IfyousettheWDS
encryptionmodetoWPA/WPA2‐PSK,theWi‐FiclientscanuseWPA/WPA2‐PSKencryption
mode.AfterWDSisenabled,disableDHCPonCPEsthatarenotdirectlyconnectedtothe
WANport.
IfWDSisenabled,theWPSfunctionwillnottakeeffect.IfthechannelissettoAuto,you
needtosetthechannel.
ToconfiguretheWDS,performthefollowingsteps:
1. ChooseWi‐Fi>WDS.
2. SetWDStoEnable.
3. SetWDSModeasRepeaterMode;
4. ClickScan.
Fromthesearchresults,choosetheSSIDofthenetworkingdevice.
5. SetSecurity.
WPA‐PSKcancontain8to63ASCIIcharactersor64hexcharacters.
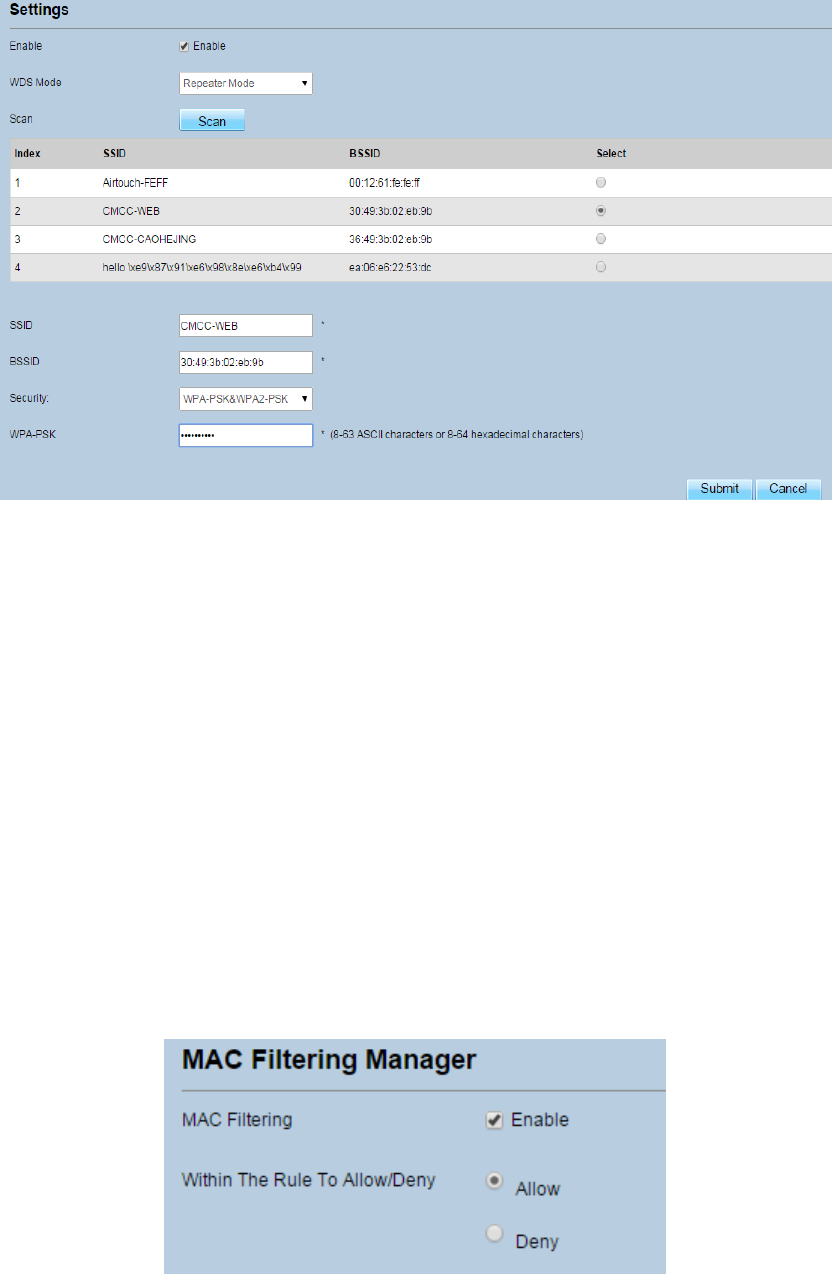
6. ClickSubmit.AsshowninFigure4‐8.
Figure4‐8
5 Security
5.1 MACFiltering
ThispageenablesyoutoconfiguretheMACaddressfilteringrules.
5.1.1 EnablingMACFilter
ToenableMACaddressfilter,performthefollowingsteps:
1. ChooseSecurity>MACFiltering
2. SetMACfilteringtoEnable.
3. ClickSubmit.AsshowninFigure5‐1.
Figure5‐1
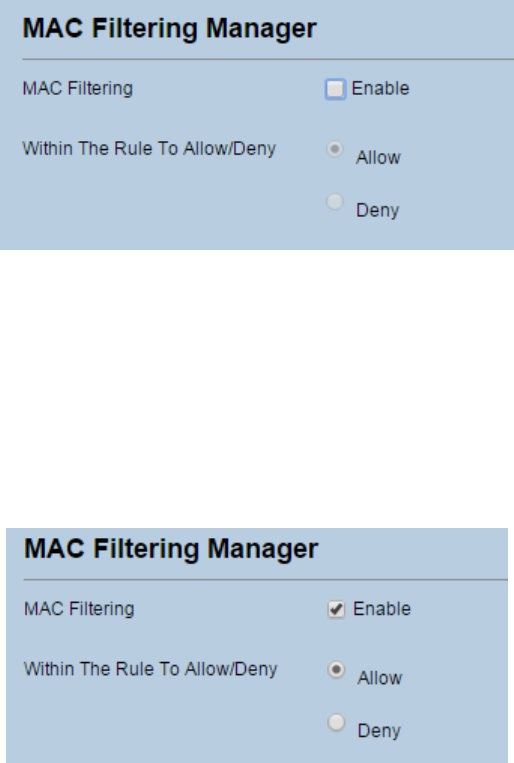
5.1.2 DisablingMACFilter
TodisableMACaddressfilter,performthefollowingsteps:
1. ChooseSecurity>MACFiltering
2. SetMACfilteringtoDisable.
3. ClickSubmit.AsshowninFigure5‐2.
Figure5‐2
5.1.3 SettingAllowaccessnetworkwithintherules
Tosetallowaccessnetworkwithintherules,performthefollowingsteps:
1. ChooseSecurity>MACFiltering.
2. SetAllowaccessnetworkwithintherules.
3. ClickSubmit.AsshowninFigure5‐3.
Figure5‐3
5.1.4 SettingDenyaccessnetworkwithintherules
Tosetdenyaccessnetworkwithintherules,performthefollowingsteps:
1. ChooseSecurity>MACFiltering.
2. SetDenyaccessnetworkwithintherules.
3. ClickSubmit.AsshowninFigure5‐4.
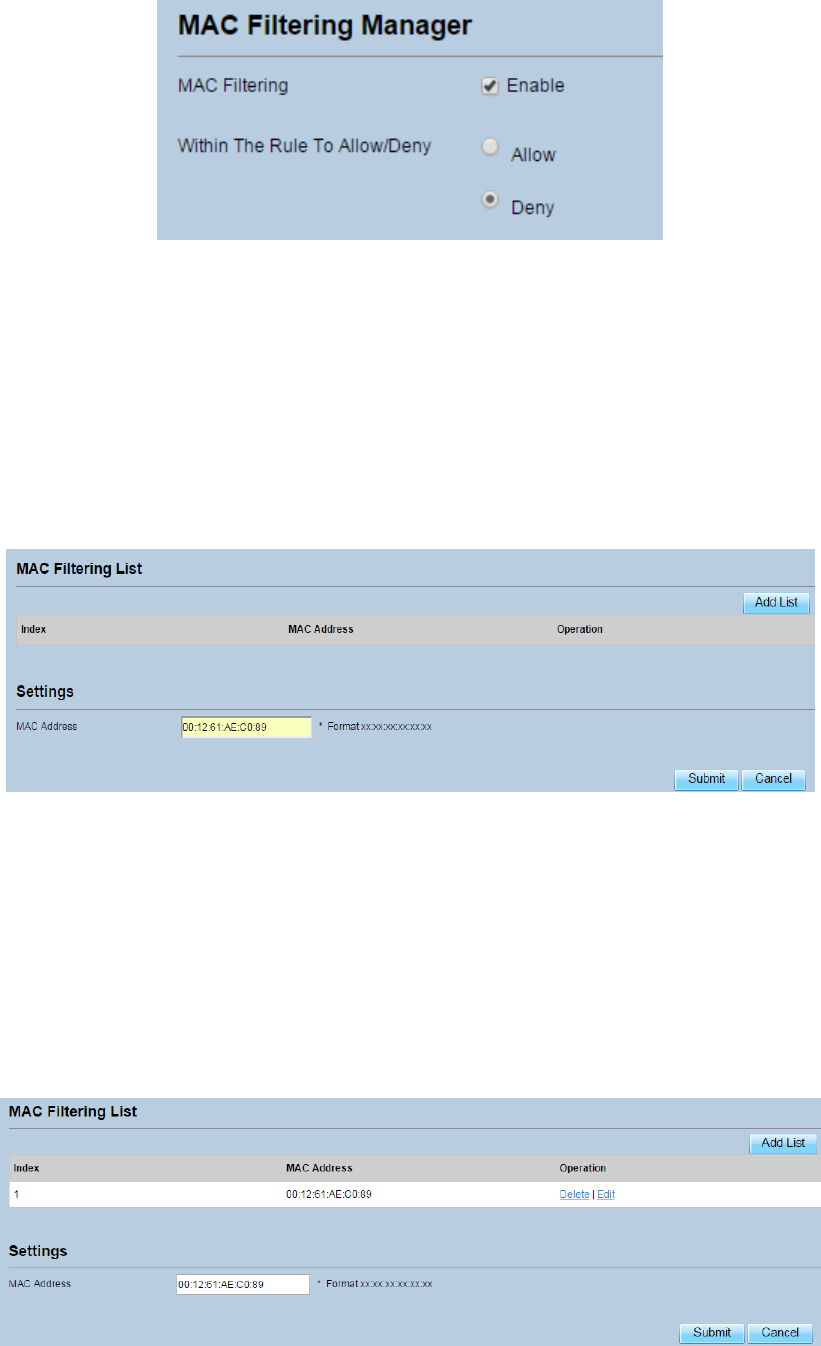
Figure5‐4
5.1.5 AddingMACFilteringrule
ToaddaMACfilteringrule,performthefollowingsteps:
1. ChooseSecurity>MACFiltering.
2. ClickAddlist.
3. SetMACaddress.
4. ClickSubmit.AsshowninFigure5‐5.
Figure5‐5
5.1.6 ModifyingMACFilteringrule
TomodifyaMACaddressrule,performthefollowingsteps:
1. ChooseSecurity>MACFiltering.
2. Choosetheruletobemodified,andclickEdit.
3. SetMACaddress.
4. ClickSubmit.AsshowninFigure5‐6.
Figure5‐6
5.1.7 DeletingMACFilteringrule
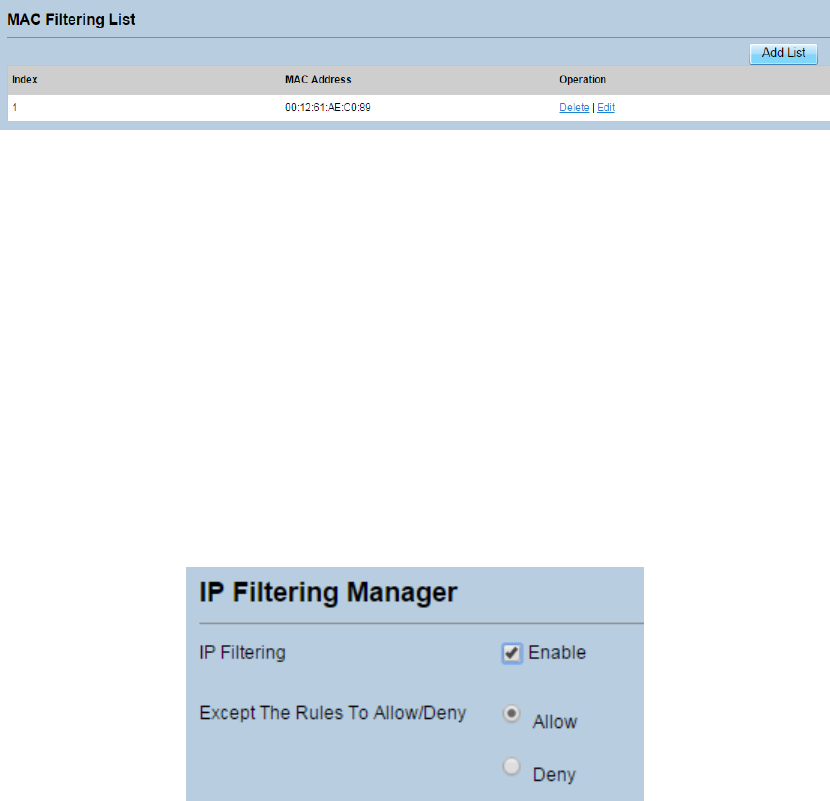
TodeleteaMACaddressfilterrule,performthefollowingsteps:
1. ChooseSecurity>MACFiltering.
2. Choosetheruletobedeleted,andclickDelete.AsshowninFigure5‐7.
Figure5‐7
5.2 IPFiltering
DataisfilteredbyIPaddress.ThispageenablesyoutoconfiguretheIPaddressfilteringrules.
5.2.1 EnablingIPFiltering
ToenableIPFiltering,performthefollowingsteps:
1. ChooseSecurity>IPFiltering.
2. SetIPFilteringEnable.
3. ClickSubmit.AsshowninFigure5‐8.
Figure5‐8
5.2.2 DisablingIPFiltering
TodisableIPFiltering,performthefollowingsteps:
1. ChooseSecurity>IPFiltering.
2. SetIPFilteringDisable.
3. ClickSubmit.AsshowninFigure5‐9.
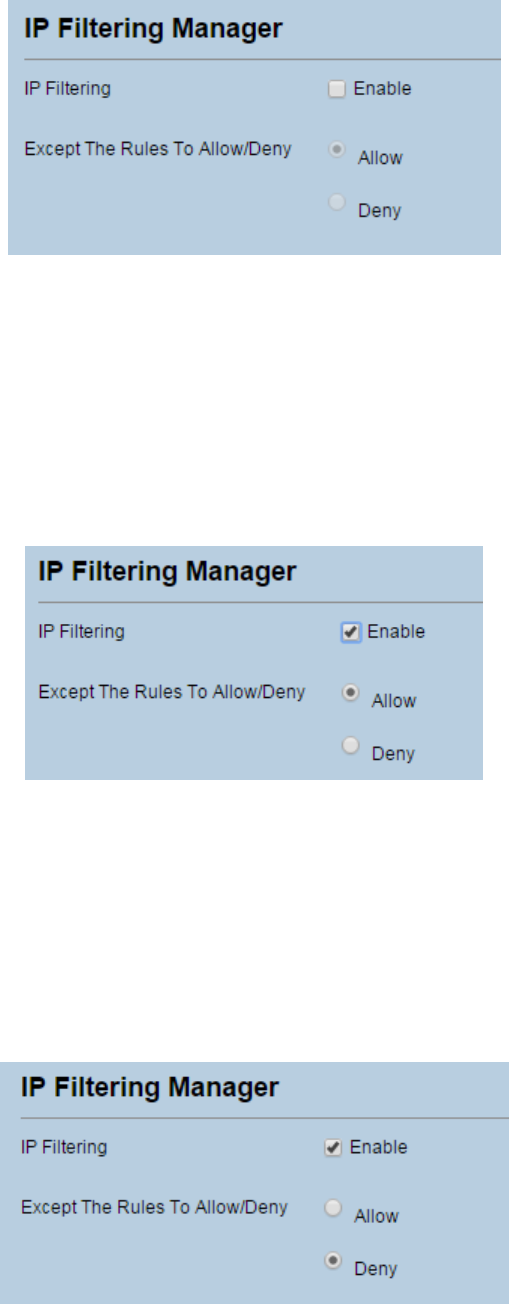
Figure5‐9
5.2.3 SettingAllowaccessnetworkoutsidetherules
Tosetallowaccessnetwork,performthefollowingsteps:
1. ChooseSecurity>IPFiltering.
2. SetAllowaccessnetworkoutsidetherules.
3. ClickSubmit.AsshowninFigure5‐10.
Figure5‐10
5.2.4 SettingDenyaccessnetworkoutsidetherules
Tosetallowaccessnetwork,performthefollowingsteps:
1. ChooseSecurity>IPFiltering.
2. SetDenyaccessnetworkoutsidetherules.
3. ClickSubmit.AsshowninFigure5‐11.
Figure5‐11
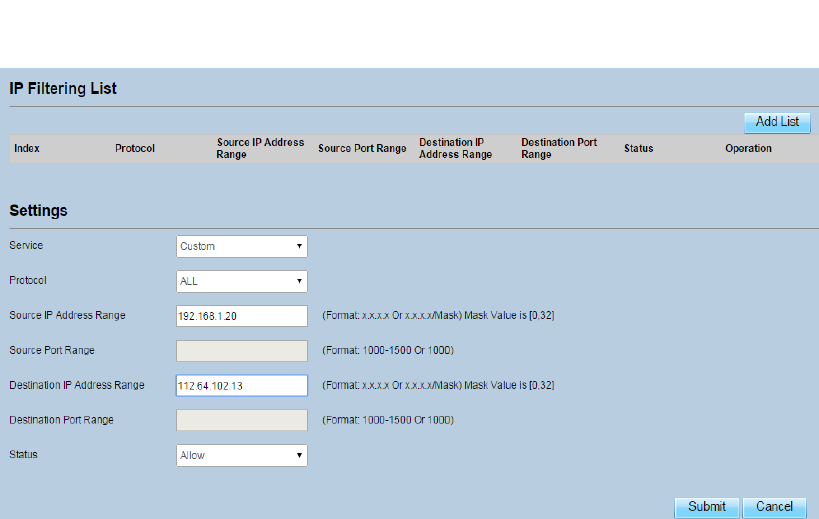
5.2.5 AddingIPFilteringrule
AddanIPaddressfilteringrule,performthefollowingsteps:
1. ChooseSecurity>IPFiltering.
2. ClickAddlist.
3. SetService.
4. SetProtocol.
5. IntheSourceIPAddressRangebox,enterthesourceIPaddressorIPaddresssegmentto
befiltered.
6. IntheSourceportrangebox,enterthesourceportorportsegmenttobefiltered.
7. IntheDestinationIPAddressRangebox,enterthedestinationIPaddressorIPaddress
segmenttobefiltered.
8. IntheDestinationportRangebox,enterthedestinationportorportsegmenttobe
filtered.
9. IntheStatusbox,chooseastatustherulewillbeexecuted.
10. ClickSubmit.AsshowninFigure5‐12.
Figure5‐12
5.2.6 ModifyingIPFilteringrule
TomodifyanIPfilteringrule,performthefollowingsteps:
1. ChooseSecurity>IPFiltering.
2. Choosetheruletobemodified,andclickEdit.
3. Repeatsteps3through9inthepreviousprocedure.
4. ClickSubmit.AsshowninFigure5‐13.
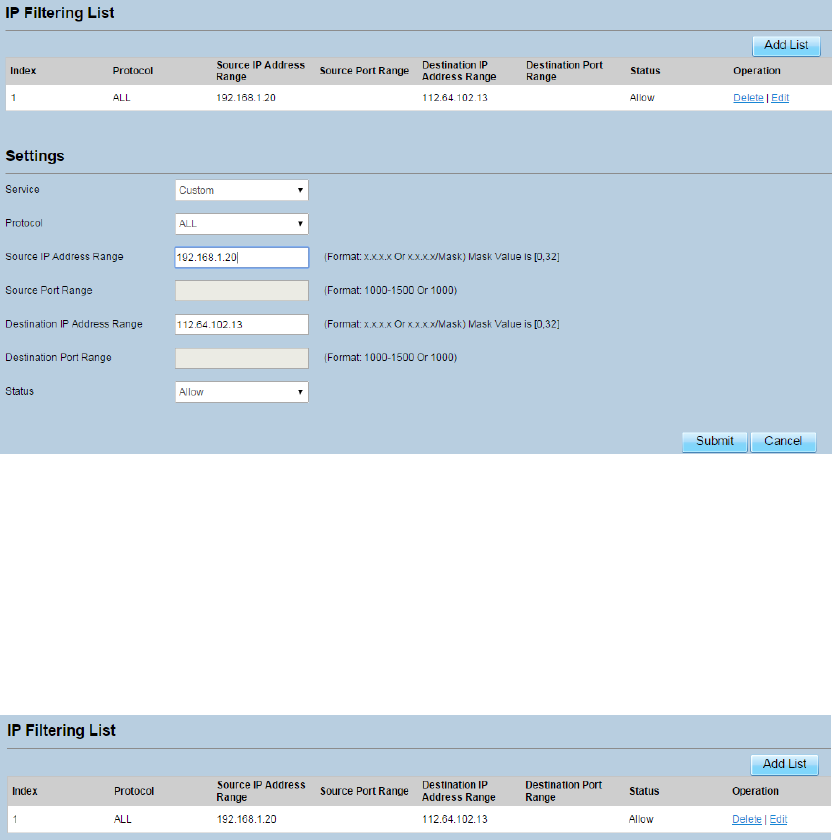
Figure5‐13
5.2.7 DeletingIPFilteringrule
TodeleteanIPaddressfilteringrule,performthefollowingsteps:
1. ChooseSecurity>IPFiltering.
2. Choosetheruletobedeleted,andclickDelete.AsshowninFigure5‐14.
Figure5‐14
5.3 URLFiltering
Dataisfilteredbyuniformresourcelocator(URL).ThispageenablesyoutoconfigureURLfiltering
rules.
5.3.1 EnablingURLFiltering
ToenableURLFiltering,performthefollowingsteps:
3. ChooseSecurity>URLFiltering.
4. SetURLFilteringtoEnable.
5. ClickSubmit.AsshowninFigure5‐15.
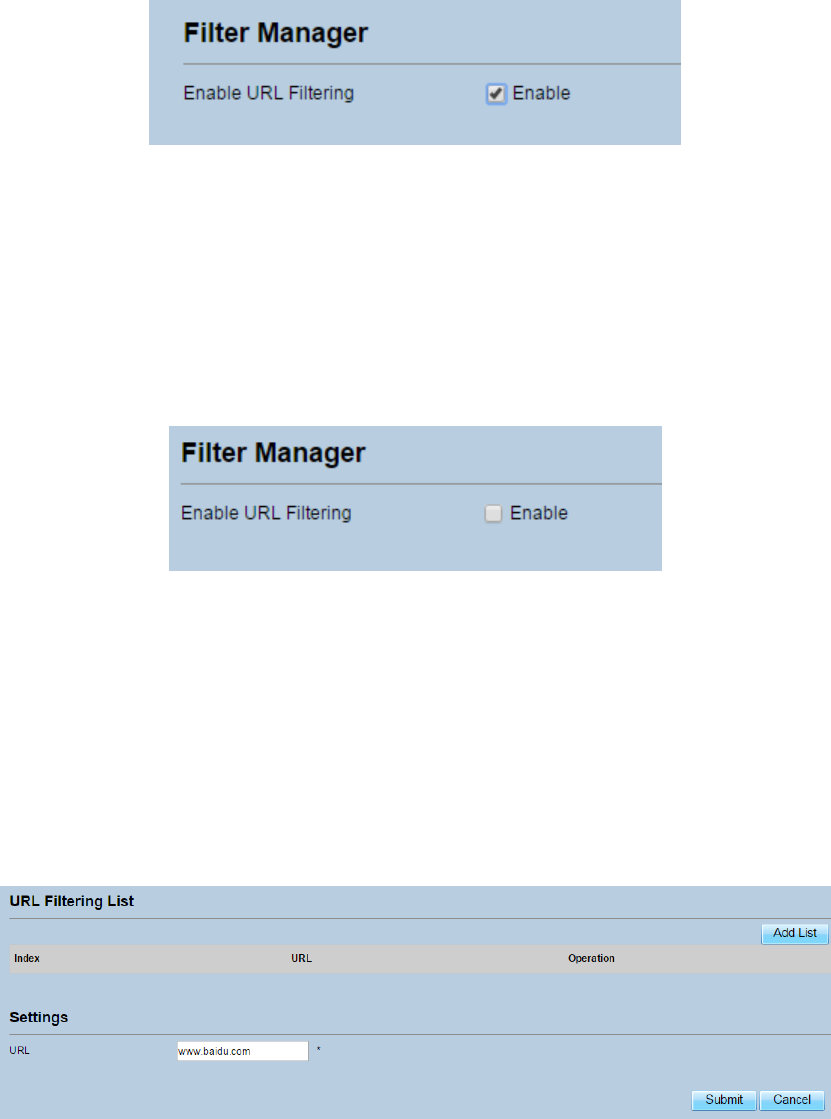
Figure5‐15
5.3.2 DisablingURLFiltering
TodisableURLFiltering,performthefollowingsteps:
1. ChooseSecurity>URLFiltering.
2. SetURLFilteringtoDisable.
3. ClickSubmit.AsshowninFigure5‐16.
Figure5‐16
5.3.3 AddingURLFilteringlist
ToaddaURLfilteringlist,performthefollowingsteps:
1. ChooseSecurity>URLFiltering.
2. ClickAddlist.
3. SetURL.
4. ClickSubmit.AsshowninFigure5‐17.
Figure5‐17
5.3.4 ModifyURLFilteringlist
TomodifyaURLfilteringrule,performthefollowingsteps:
1. ChooseSecurity>URLFiltering.
2. Choosetheruletobemodified,andclickEdit.

3. SetURLaddress.
4. ClickSubmit.AsshowninFigure5‐18.
Figure5‐18
5.3.5 DeletingURLFilteringlist
TodeleteaURLlist,performthefollowingsteps:
1. ChooseSecurity>URLFiltering.
2. Choosetheitemtobedeleted,andclickDelete.AsshowninFigure5‐19.
Figure5‐19
5.4 PortForwarding
Whennetworkaddresstranslation(NAT)isenabledontheCPE,onlytheIPaddressontheWANside
isopentotheInternet.IfacomputerontheLANisenabledtoprovideservicesfortheInternet(for
example,workasanFTPserver),portforwardingisrequiredsothatallaccessestotheexternal
serverportfromtheInternetareredirectedtotheserverontheLAN.
5.4.1 AddingPortForwardingrule
Toaddaportforwardingrule,performthefollowingsteps:
1. ChooseSecurity>PortForwarding.
2. ClickAddlist.
3. SetService.
4. SetProtocol.
5. SetRemoteportrange.
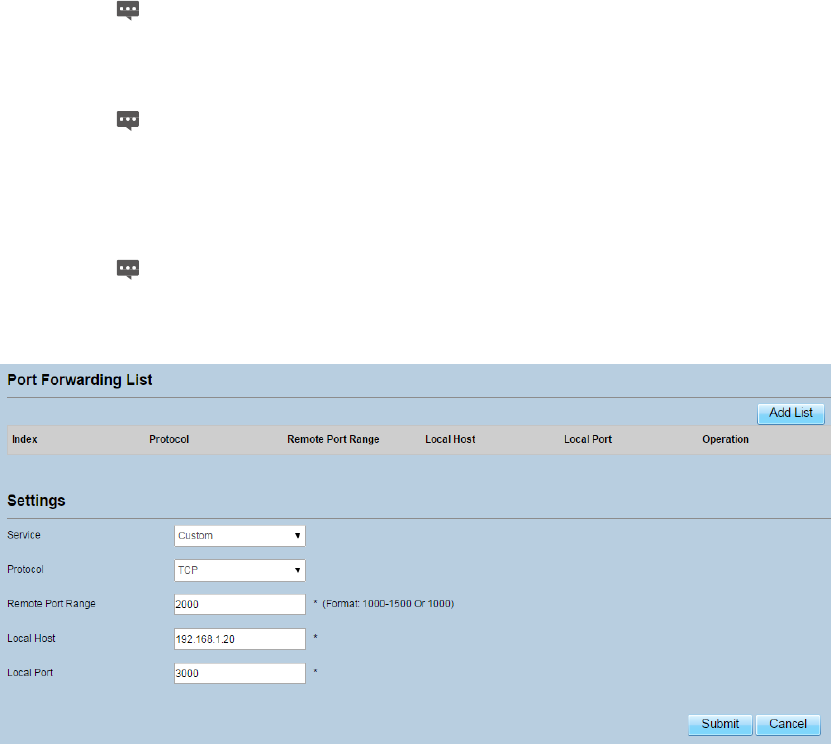
Theportnumberrangesfrom1to65535.
6. SetLocalhost.
ThisIPaddressmustbedifferentfromtheIPaddressthatissetontheLAN
HostSettingspage,buttheymustbeonthesamenetworksegment.
7. SetLocalport.
Theportnumberrangesfrom1to65535.
8. ClickSubmit.AsshowninFigure5‐20.
Figure5‐20
5.4.2 ModifyingPortForwardingrule
Tomodifyaportforwardingrule,performthefollowingsteps:
1. ChooseSecurity>PortForwarding.
2. Choosetheitemtobemodified,andclickEdit.
3. Repeatsteps3through7inthepreviousprocedure.
4. ClickSubmit.AsshowninFigure5‐21.
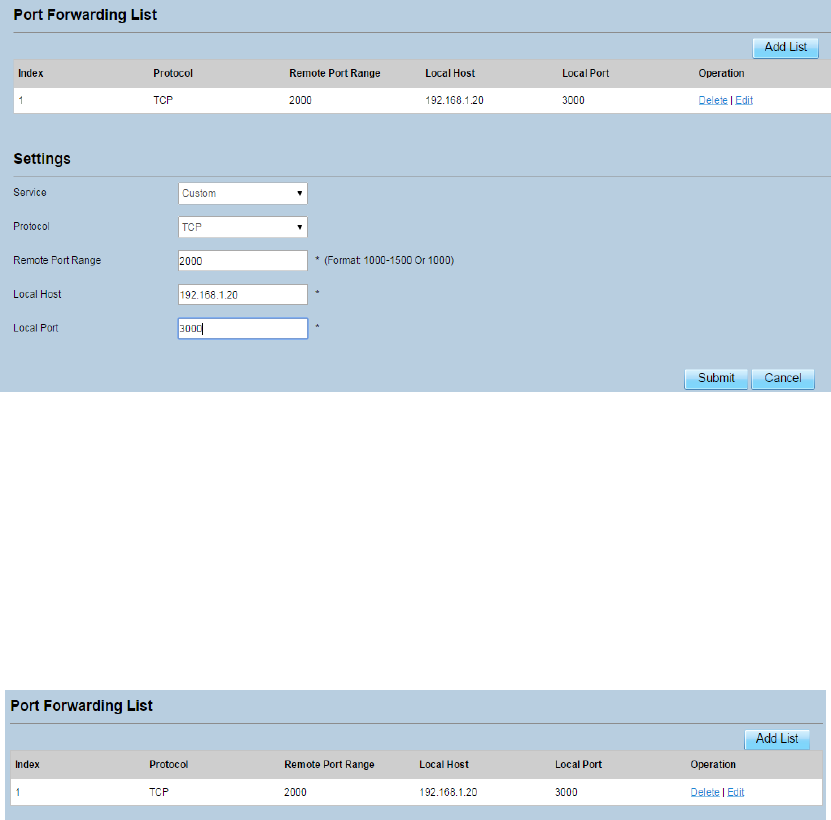
Figure5‐21
5.4.3 DeletingPortForwardingrule
Todeleteaportforwardingrule,performthefollowingsteps:
1. ChooseSecurity>PortForwarding.
2. Choosetheitemtobedeleted,andclickDelete.AsshowninFigure5‐22.
Figure5‐22
5.5 UPnP
Onthispage,youcanenableordisabletheUniversalPlugandPlay(UPnP)function.
ToenableUPnP,performthefollowingsteps:
1. ChooseSecurity>UPnP.
2. SetUPnPtoEnable.
3. ClickSubmit.AsshowninFigure5‐23.
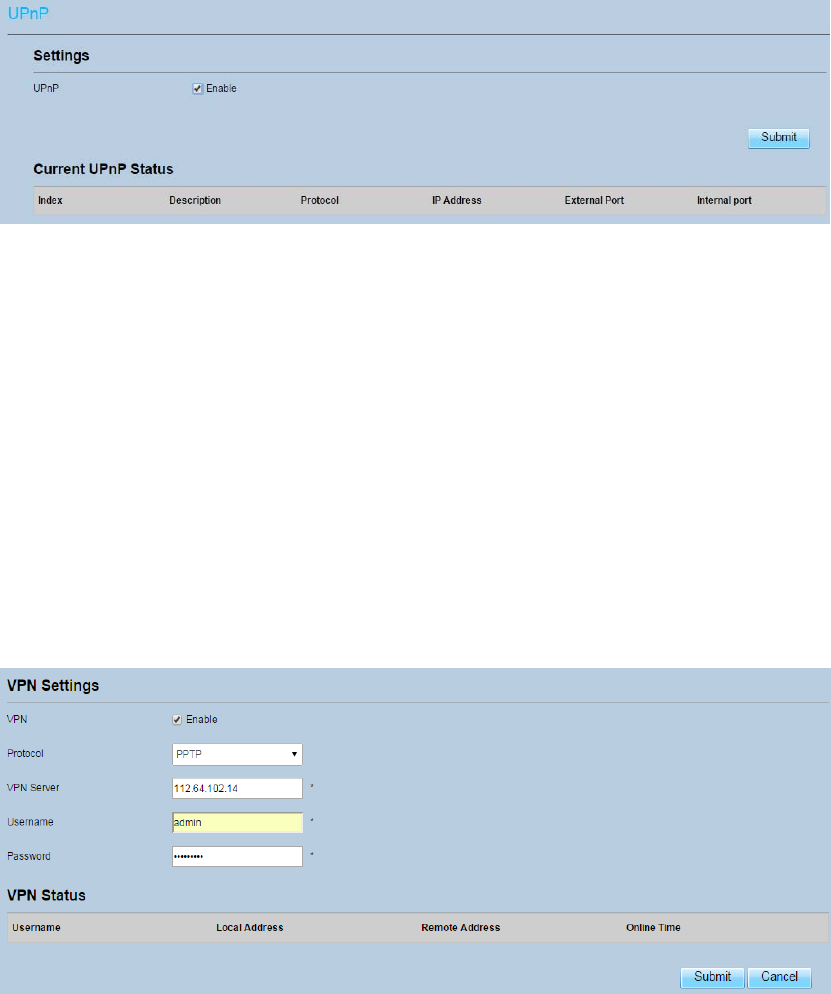
Figure5‐23
6 VPNSetting
Thisfunctionenablesyoutoconnectthevirtualprivatenetwork(VPN).
ToconnecttheVPN,performthefollowingsteps:
1. ChooseVPNSetting.
2. IntheVPNSettingarea,enableVPN.
3. SelectaprotocolfromProtocoldrop‐downlist.
4. EnterUsernameandPassword.
5. ClickSubmit.
6. YoucanviewthestatusinVPNStatusarea.AsshowninFigure6‐1.
Figure6‐1
7 VOIP
TheCPEsupportsvoiceservicesbasedontheSessionInitiationProtocol(SIP)andenablesvoice
serviceinterworkingbetweentheInternetandPublicSwitchedTelephoneNetworks(PSTNs).
7.1 ViewVOIPInformation
ToviewVOIPinformation,performthefollowingsteps:
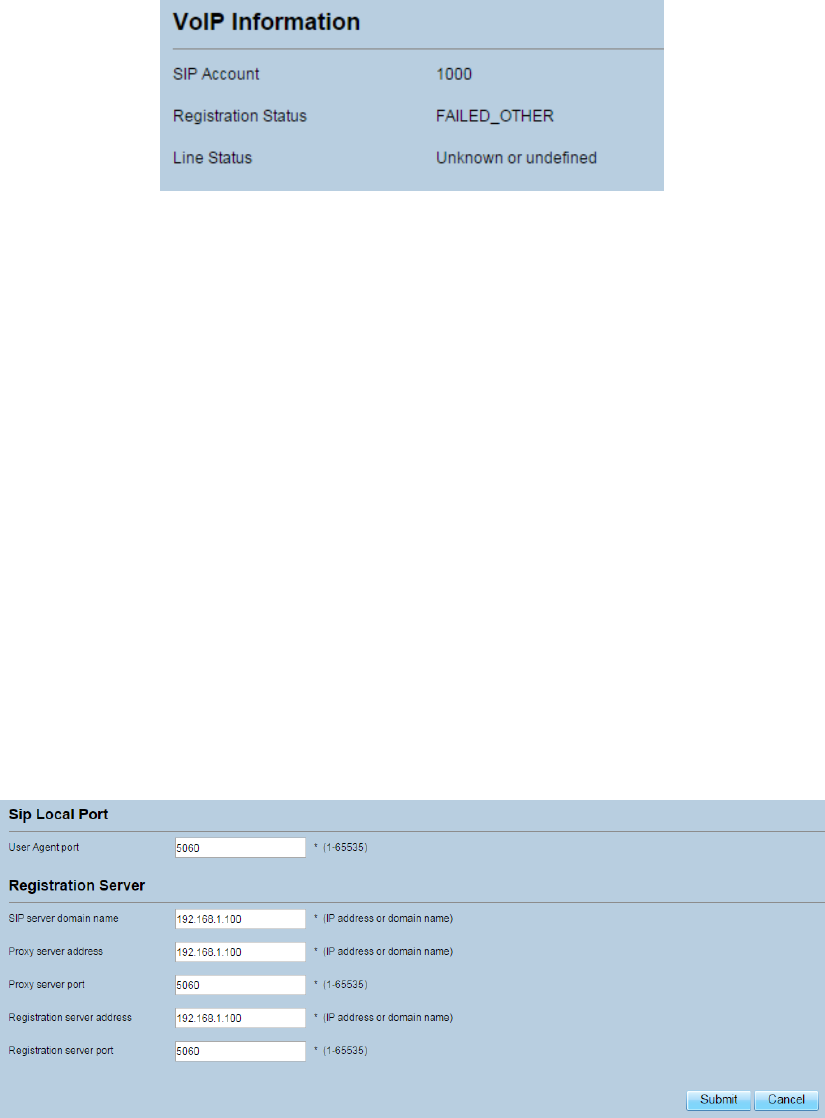
1. ChooseVOIP>VOIPInformation;
2. ViewtheVOIPinformation,suchastheSIPaccountandstatusoftheSIPregistrationserver.
AsshowninFigure7‐1.
Figure7‐1
7.2 ConfiguringSIPServer
TosettheSIPserverparameters,performthefollowingsteps:
1. ChooseVOIP>SIPServer;
2. IntheUserAgentportbox,entertheportoftheSIPaccountprovidedbyyourservice
provider.
3. IntheSIPserverdomainnamebox,enterthedomainnameoftheSIPserver.
4. IntheProxyserveraddressbox,entertheaddressoftheproxyserverprovidedbyyour
serviceprovider,forexample,192.168.1.10.
5. IntheProxyserverportbox,entertheportoftheproxyserverprovidedbyyourservice
provider,forexample,5060.Thevaluerangesfrom1to65535.
6. IntheRegistrationserveraddressbox,entertheaddressoftheregistrationserver
providedbyyourserviceprovider,forexample,192.168.1.11.
7. IntheRegistrationserverportbox,entertheportoftheregistrationserverprovidedby
yourserviceprovider,forexample,5060.Thevaluerangesfrom1to65535.
8. ClickSubmit.AsshowninFigure7‐2.
Figure7‐2
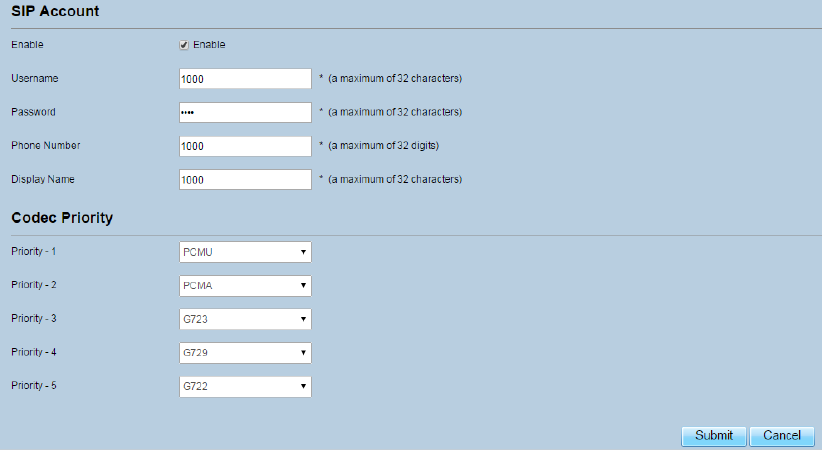
7.3 ConfiguringSIPAccount
BeforeconfiguringSIPaccounts,makesurethattheregistrationserverhasbeenproperly
configured.
ToconfigureSIPaccount,performthefollowingsteps:
1. ChooseVoIP>SIPAccount.
2. SetSIPAccountEnable.
3. IntheUsernameandPasswordboxes,entertheusernameandpasswordoftheSIP
accountprovidedbyyourserviceprovider.
4. InthePhoneNumberbox,entertheSIPPhonenumberprovidedbyyourservice
provider.
5. IntheDisplayNamebox,enterthedisplaynameprovidedbyyourserviceprovider.
6. IntheCodecPriorityarea,setthecodecpriority.
7. ClickSubmit.AsshowninFigure7‐3.
Figure7‐3
8 System
8.1 Maintenance
8.1.1 Restart
ThisfunctionenablesyoutorestarttheCPE.SettingstakeeffectonlyaftertheCPErestarts.To
restarttheCPE,performthefollowingsteps:
1. ChooseSystem>Maintenance.
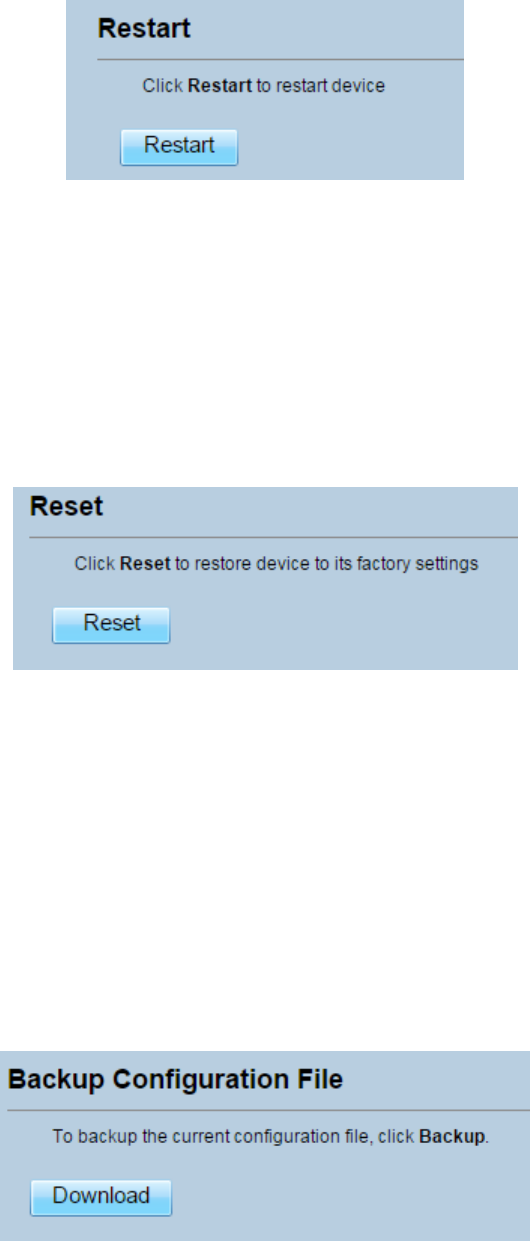
2. ClickRestart.AsshowninFigure8‐1.
TheCPEthenrestarts.
Figure8‐1
8.1.2 Reset
ThisfunctionenablesyoutorestoretheCPEtoitsdefaultsettings.
TorestoretheCPE,performthefollowingsteps:
1. ChooseSystem>Maintenance.
2. ClickReset.AsshowninFigure8‐2.
TheCPEisthenrestoredtoitsdefaultsettings.
Figure8‐2
8.1.3 BackupConfigurationFile
Youcandownloadtheexistingconfigurationfiletobackitup.To doso:
1. ChooseSystem>Maintenance.
2. ClickDownloadontheMaintenancepage.
3. Inthedisplayeddialogbox,selectthesavepathandnameoftheconfigurationfiletobe
backedup.
4. ClickSave.AsshowninFigure8‐3.
Theprocedureforfiledownloadingmayvarywiththebrowseryouareusing.
Figure8‐3
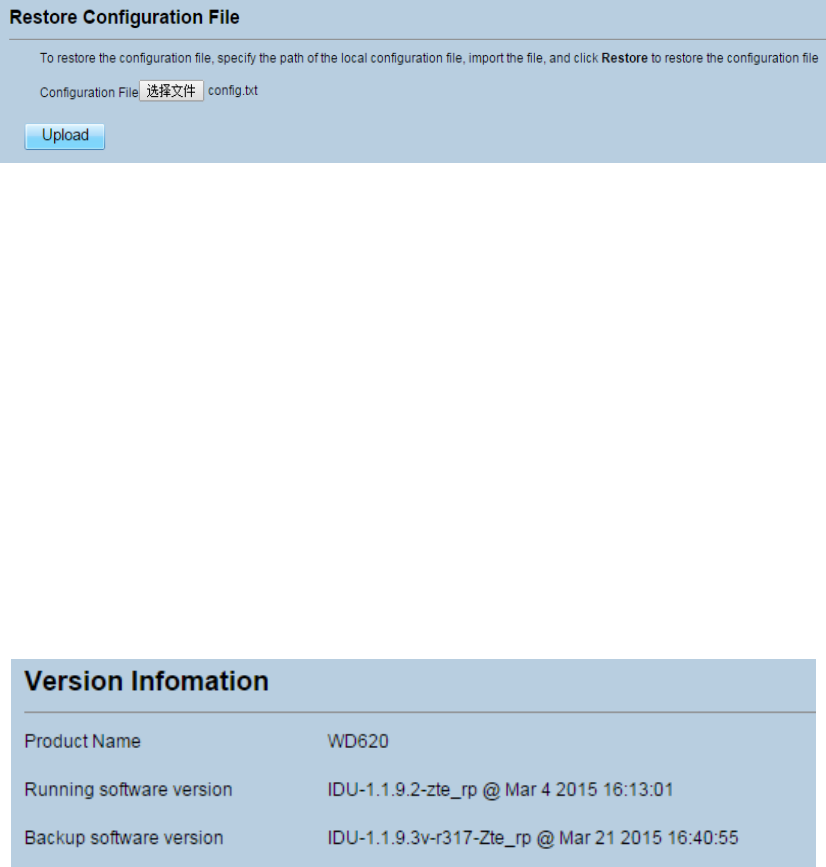
8.1.4 UploadConfigurationFile
YoucanuploadabackedupconfigurationfiletorestoretheCPE.Todoso:
1. ChooseSystem>Maintenance.
2. ClickBrowseontheMaintenancepage.
3. Inthedisplayeddialogbox,selectthebackedupconfigurationfile.
4. ClickOpen.
5. Thedialogboxchoses.IntheboxtoberightofConfigurationfile,thesavepathandname
ofthebackedupconfigurationfilearedisplayed.
6. ClickUpload.AsshowninFigure8‐4.
TheCPEuploadsthebackedupconfigurationfile.TheCPEthenautomaticallyrestarts.
Figure8‐4
8.2 VersionManager
ThisfunctionenablesyoutoupgradethesoftwareversionoftheCPEtothelatestversion.Itis
recommendedthatyouupgradethesoftwarebecausethenewversion,certainbugshavebeen
fixedandthesystemstabilityisusuallyimproved.
8.2.1 ViewingVersionInfo
Toviewtheversioninfo,performthefollowingsteps:
1. ChooseSystem>VersionManager.
2. IntheVersionInfoarea,youcanviewtheproductnameandsoftwareversion.Asshownin
Figure8‐5.
Figure8‐5
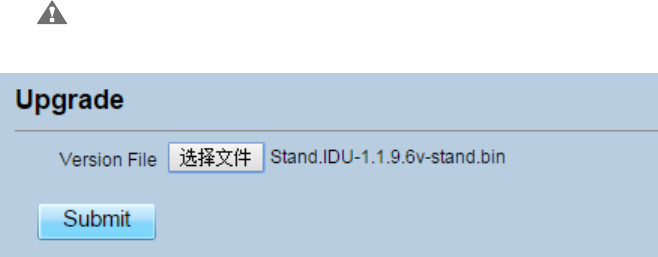
8.2.2 VersionUpgrade
Toperformanupgradesuccessfully,connecttheCPEtoyourcomputerthroughanetworkcable,
savetheupgradefileonthecomputer,andmakesuretheCPEisnotconnectedtoanythingother
thanapoweradapterandthecomputer.
Toperformanupgrade,performthefollowingsteps:
1. ChooseSystem>VersionManager.
2. IntheVersionUpgradearea,clickBrowse.Inthedisplayeddialogbox,selectthetarget
softwareversionfile.
3. ClickOpen.Thedialogboxchoses.Thesavepathandnameofthetargetsoftwareversion
filearedisplayedintheUpdatefilefield.
4. ClickSubmit.
5. Thesoftwareupgradestarts.Aftertheupgrade,theCPEautomaticallyrestartsandrunsthe
newsoftwareversion.AsshowninFigure8‐6.
Duringanupgrade,donotpowerofftheCPEordisconnectitfromthe
computer.
Figure8‐6
8.3 FTPautoupgrade
Toperformaftpautoupgradesuccessfully,makesuretheCPEisconnectedtotheInternet.
Toperformaftpautoupgrade,performthefollowingsteps:
1. ChooseSystem>FTPautoupgrade.
2. EnableFTPautoupgrade.
3. IfyouwanttochecknewfirmwareafterconnecttoInternet,youneedtoenabletheitemof
ChecknewfirmwareafterconnecttoInternet.
4. SetaftpaddresstotheUpgradefolderbox.
5. SetVersionfile.
6. SetUsernameandPassword.
7. SettheIntervalofcheckingnewfirmware.
8. SetStarttime.
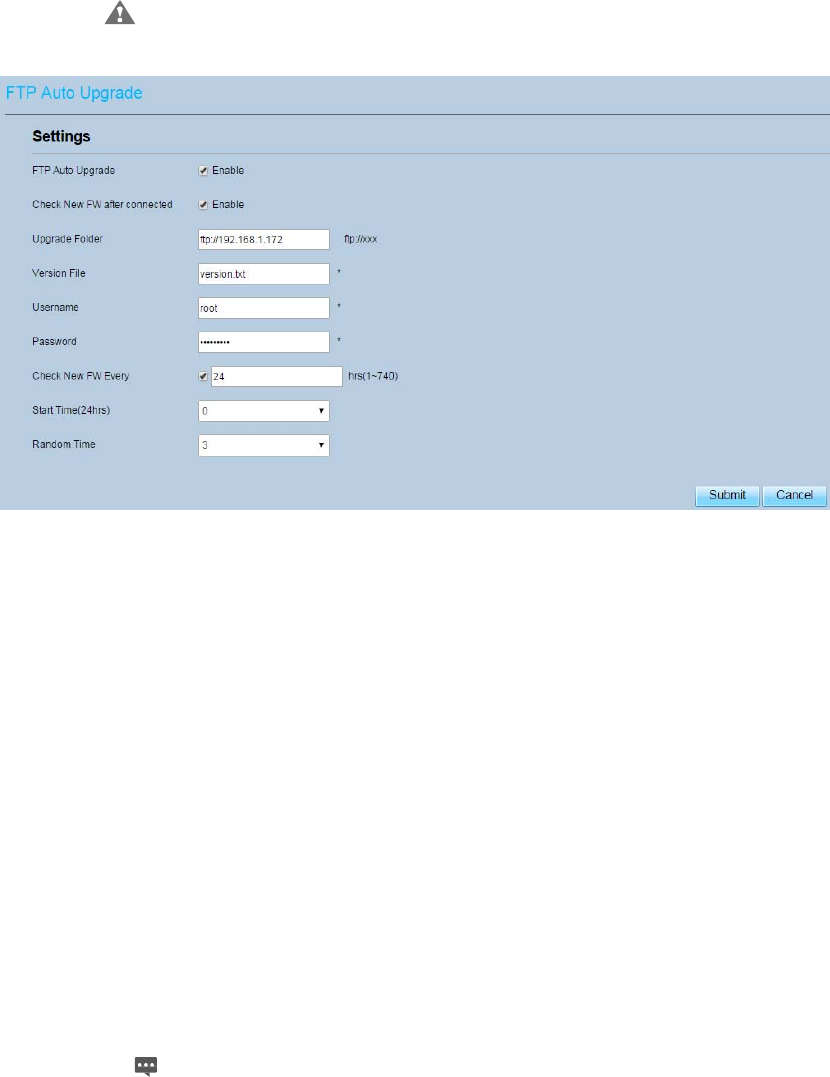
9. SetRandomtime.
10. ClickSubmit.AsshowninFigure8‐7.
TheCPEwillautomaticallyupgradeaccordingtothesetting.Duringanupgrade,
donotdisconnectthepowersupplyoroperatetheCPE.
Figure8‐7
8.4 TR069
TR‐069isastandardforcommunicationbetweenCPEsandtheauto‐configurationserver(ACS).If
yourserviceproviderusestheTR069automaticserviceprovisionfunction,theACSautomatically
providestheCPEparameters.IfyousettheACSparametersonboththeCPEandACS,thenetwork
parametersontheCPEareautomaticallysetusingtheTR‐069function,andyoudonotneedtoset
otherparametersontheCPE.
ToconfiguretheCPEtoimplementtheTR‐069function,performthefollowingsteps:
1. ChooseSystem>TR‐069Settings.
2. SetacsURLsource.Therearetwomethods,suchasURLandDHCP.
3. IntheACSURLbox,entertheACSURLaddress.
4. EnterACSusernameandpasswordfortheCPEauthentication.
TousetheCPEtoaccesstheACS,youmustprovideausernameand
passwordforauthentication.Theusernameandthepasswordmustbethe
sameasthosedefinedontheACS.
5. IfyousetPeriodicinformtoEnable,setPeriodicinforminterval.
6. Setconnectionrequestusernameandpassword.
7. ClickSubmit.AsshowninFigure8‐8.
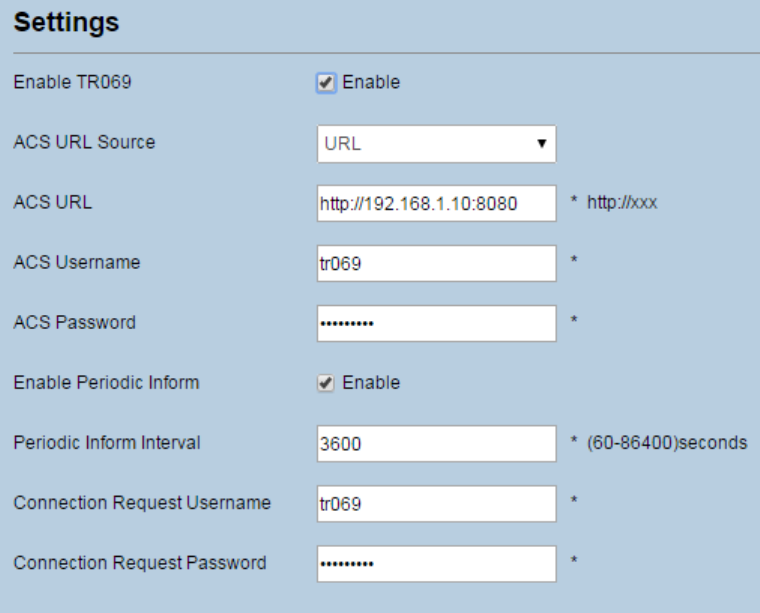
Figure8‐8
8.5 Date&Time
Youcansetthesystemtimemanuallyorsynchronizeitwiththenetwork.IfyouselectSyncfrom
network,theCPEregularlysynchronizesthetimewiththespecifiedNetworkTimeProtocol(NTP)
server.Ifyouenabledaylightsavingtime(DST),theCPEalsoadjuststhesystemtimeforDST.
Tosetthedateandtime,performthefollowingsteps:
1. ChooseSystem>Date&Time.
2. SelectSetmanually.
3. SetLocaltimeorclickSynctoautomaticallyfillinthecurrentlocalsystemtime.
4. ClickSubmit.AsshowninFigure8‐9.
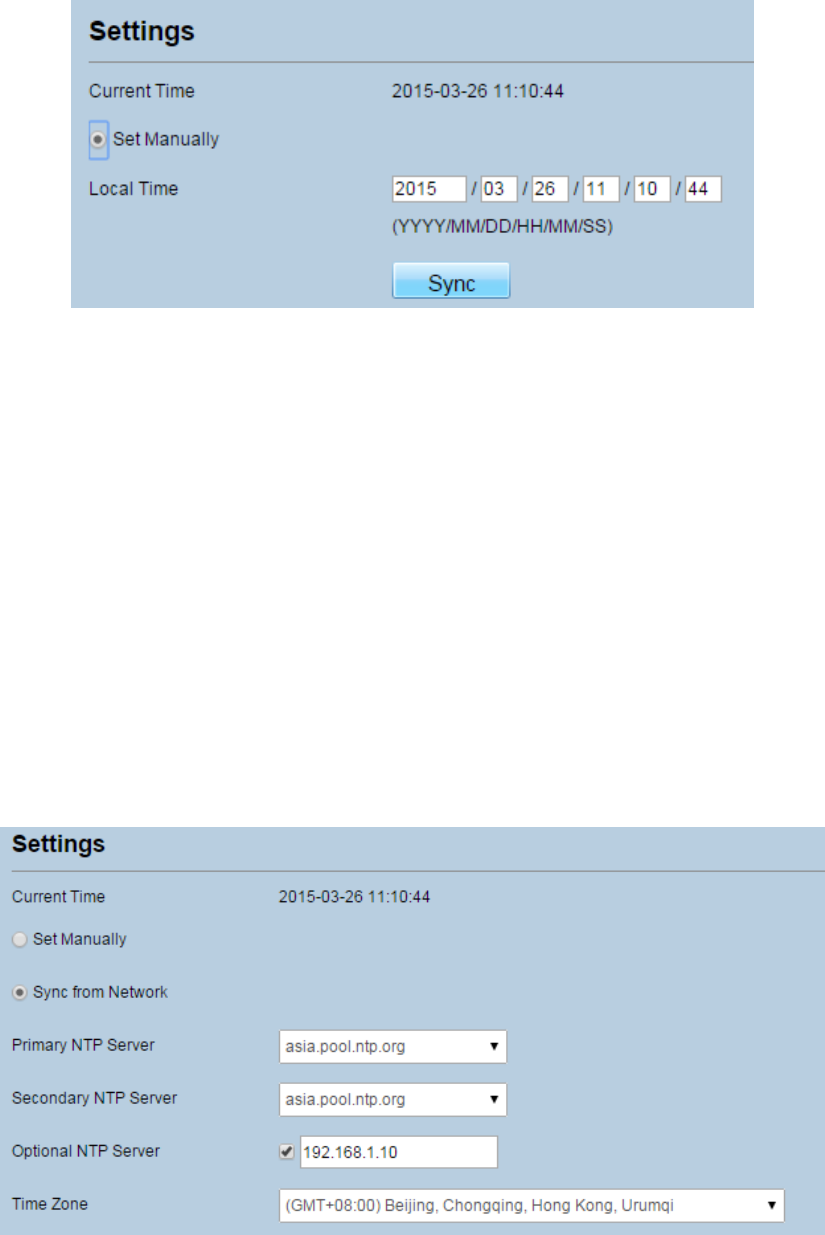
Figure8‐9
Tosynchronizethetimewiththenetwork,performthefollowingsteps:
1. ChooseSystem>Date&Time.
2. SelectSyncfromnetwork.
3. FromthePrimaryNTPserverdrop‐downlist,selectaserverastheprimaryserverfortime
synchronization.
4. FromtheSecondaryNTPserverdrop‐downlist,selectaserverastheIPaddressofthesecondary
serverfortimesynchronization.
5. Ifyoudon’twanttouseotherNTPserver,youneedtoenableOptionalntpserver,andseta
serverIPaddress.
6. SetTimezone.
7. ClickSubmit.AsshowninFigure8‐10.
Figure8‐10
TosetDST,performthefollowingsteps:
1. ChooseSystem>Date&Time.
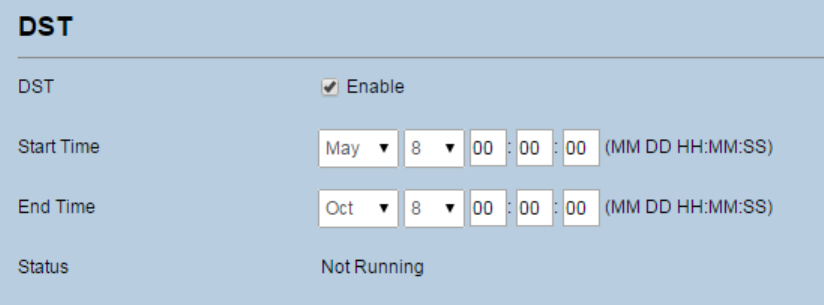
2. SetDSTenable.
3. SetStartTimeandEndTime.
4. ClickSubmit.AsshowninFigure8‐11.
Figure8‐11
TheCPEwillautomaticallyprovidetheDSTtimebasedonthetimezone.
8.6 DDNS
DynamicDomainNameServer(DDNS)serviceisusedtomaptheuser'sdynamicIPaddresstoa
fixedDNSservice.
ToconfigureDDNSsettings,performthefollowingsteps:
1. ChooseSystem>DDNS.
2. SetDDNStoEnable.
3. InServiceprovider,chooseDynDNS.orgororay.com.
4. EnterDomainnameandHostname.Forexample,ifthedomainnameprovidedbyyourservice
provideristest.customtest.dyndns.org,entercustomtest.dyndns.orgasDomainname,andtest
asHostname.
5. EnterUsernameandPassword.
6. ClickSubmit.AsshowninFigure8‐12.
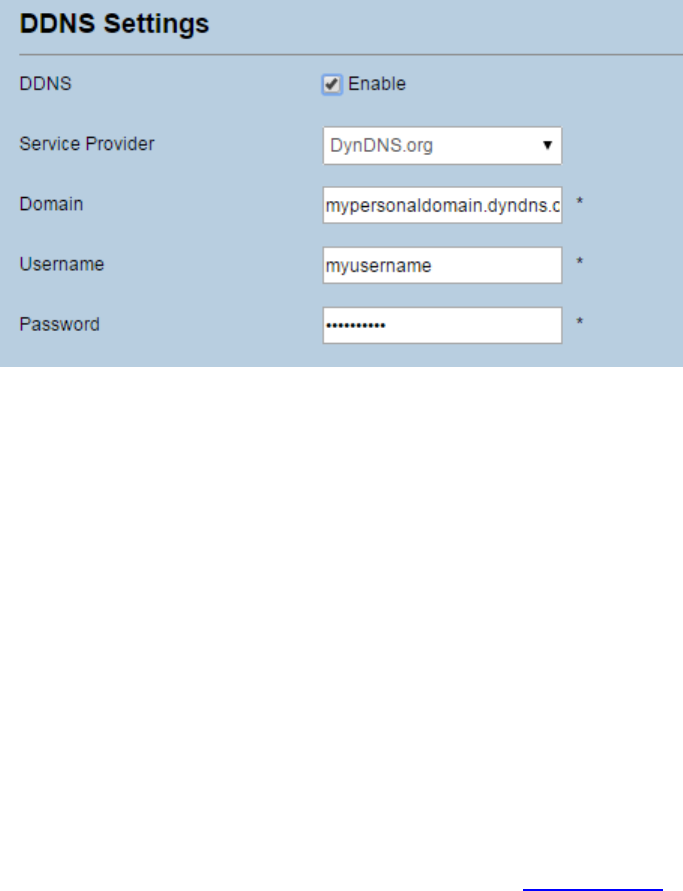
Figure8‐12
8.7 Diagnosis
IftheCPEisnotfunctioningcorrectly,youcanusethediagnosistoolsontheDiagnosispageto
preliminarilyidentifytheproblemsothatactionscanbetakentosolveit.
8.7.1 Ping
IftheCPEfailstoaccesstheInternet,runthepingcommandtopreliminarilyidentifytheproblem.To
doso:
1. ChooseSystem>Diagnosis.
2. IntheMethodarea,selectPing.
3. EnterthedomainnameintheTargetIPordomainfield,forexample,www.google.com.
4. SetPacketsizeandTimeout.
5. SetCount.
6. ClickPing.AsshowninFigure8‐13.
Waituntilthepingcommandisexecuted.TheexecutionresultsaredisplayedintheResultsbox.
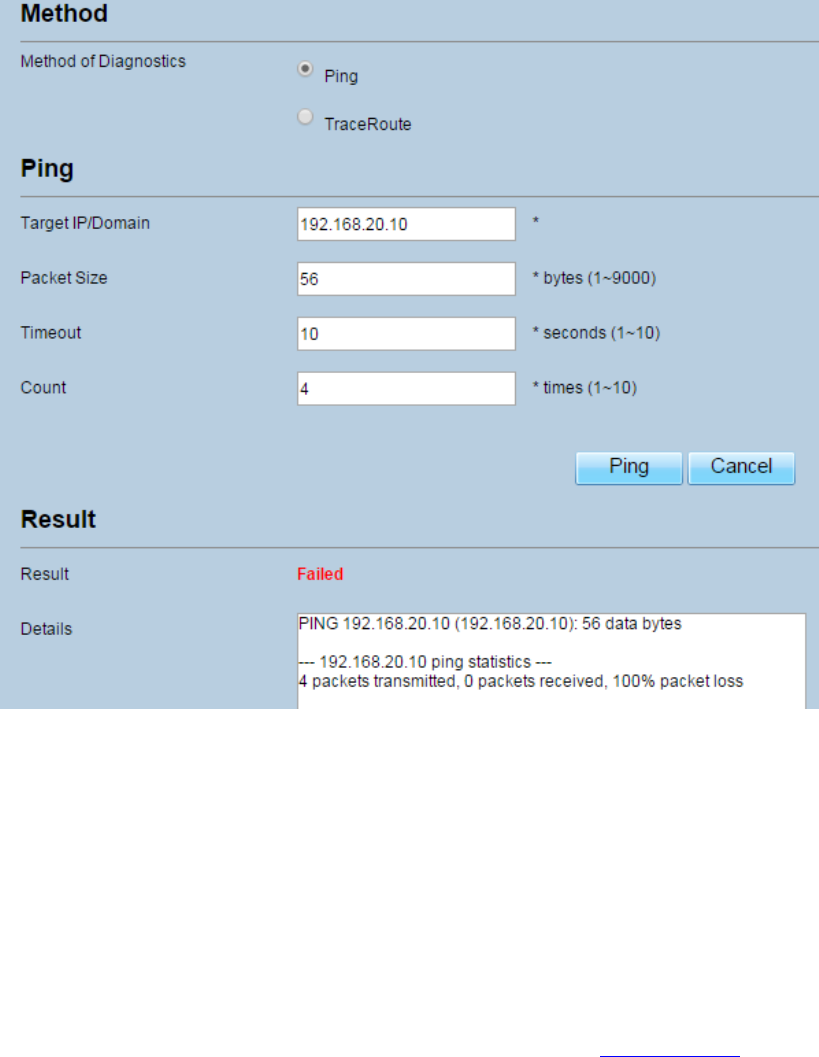
Figure8‐13
8.7.2 Traceroute
IftheCPEfailstoaccesstheInternet,runtheTraceroutecommandtopreliminarilyidentifythe
problem.Todoso:
1. ChooseSystem>Diagnosis.
2. IntheMethodarea,selectTraceroute.
3. EnterthedomainnameintheTargetIPordomainfield.Forexample,www.google.com.
4. SetMaximumhopsadTimeout.
5. ClickTraceroute.AsshowninFigure8‐14.
Waituntilthetracerouecommandisexecuted.TheexecutionresultsaredisplayedintheResults
box.

Figure8‐14
8.8 Syslog
Thesyslogrecorduseroperationsandkeyrunningevents.
8.8.1 Local
Tosetthesyslogtolocal,performthefollowingsteps:
1. ChooseSystem>Syslog.
2. IntheSettingarea,setthemethodtoLocal.
3. IntheLeveldrop‐downlist,selectaloglevel.
4. ClickSubmit.AsshowninFigure8‐15.
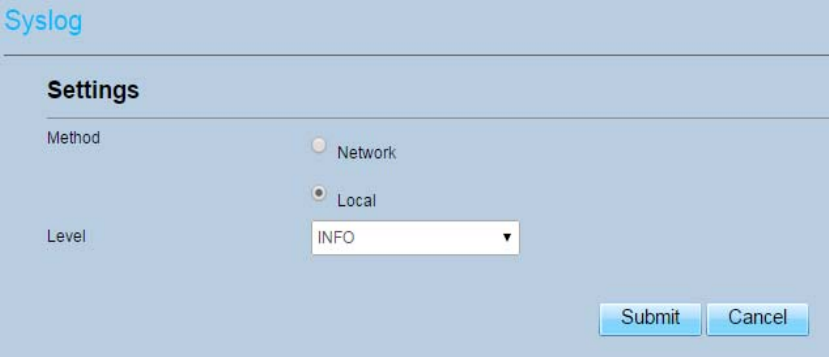
Figure8‐15
Viewinglocalsyslog
Toviewthelocalsyslog,performthefollowingsteps:
1. IntheKeywordbox,setakeyword.
2. ClickPull,theresultboxwilldisplay.
8.8.2 Network
Tosetthesyslogtonetwork,performthefollowingsteps:
1. ChooseSystem>Syslog.
2. IntheSettingarea,setthemethodtoNetwork.
3. IntheLeveldrop‐downlist,selectaloglevel.
4. IntheForwardIPaddressbox,setaIPaddress.
5. ClickSubmit.AsshowninFigure8‐16.
Thesyslogwilltransmittosomeclienttodisplaythroughnetwork.
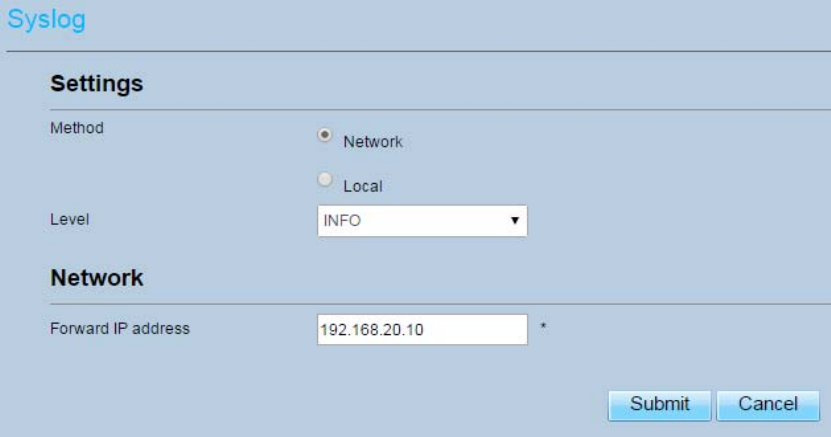
Figure8‐16
8.9 Account
Thisfunctionenablesyoutochangetheloginpasswordoftheuser.Afterthepasswordchanges,
enterthenewpasswordthenexttimeyoulogin.
Tochangethepassword,performthefollowingsteps:
1. ChooseSystem>Account.
2. Selecttheusername,ifyouwanttochangethepasswordofnormaluser,youneedtoset
EnableUserenable.
3. Enterthecurrentpassword,setanewpassword,andconfirmthenewpassword.
4. NewpasswordandConfirmpasswordmustcontain5to15characters.
5. ClickSubmit.AsshowninFigure8‐17.
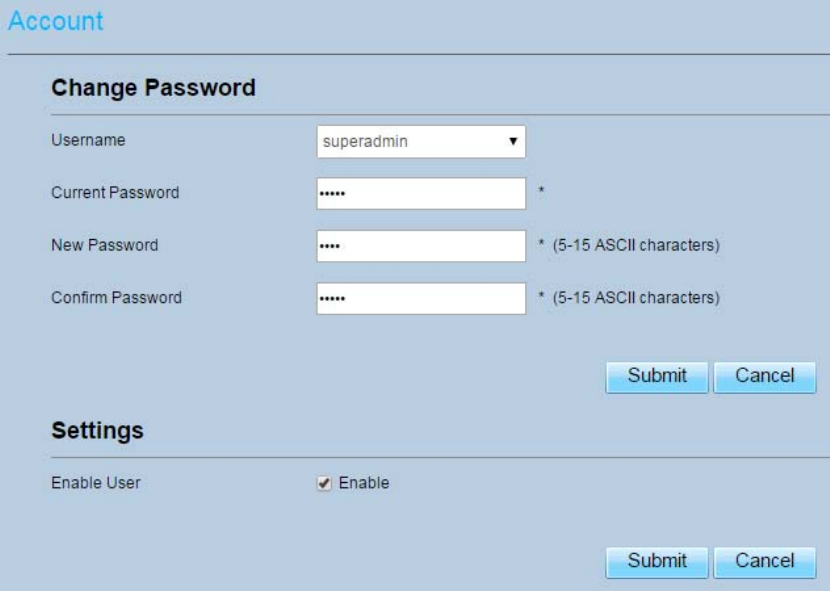
Figure8‐17
8.10 RemoteWEBAccess
ToconfiguretheparametersofWEB,performthefollowingsteps:
1. ChooseSystem>RemoteWEBAccess.
2. SetHTTPenable.IfyousetHTTPdisable,youwillcan’tloginthewebmanagementpage
withtheHTTPprotocolfromWANside.
3. SetHTTPport.Ifyouwanttochangetheloginport,youcansetanewportinthebox,the
defaultHTTPportis80.
4. SetHTTPSenable.IfyouwanttologinthewebmanagementpagewiththeHTTPSprotocol
fromWANside,youneedtoenabletheHTTPS.
5. IfyouwanttologinthewebmanagementpageformtheWAN,youneedtoEnable
AllowingloginfromWAN.
6. SettheHTTPSport.
7. ClickSubmit.AsshowninFigure8‐18.
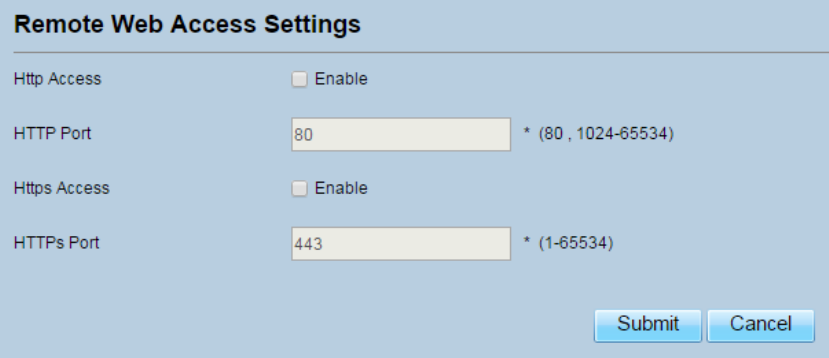
Figure8‐18
8.11 Logout
Tologoutthewebmanagementpage,performthefollowingsteps:
1. ChooseSystemandclickLogout
2. Itwillbacktotheloginpage.
9 FAQs
ThePOWERindicatordoesnotturnon.
MakesurethatthepowercableisconnectedproperlyandtheCPEispoweredon.
MakesurethatthepoweradapteriscompatiblewiththeCPE.
FailstoLogintothewebmanagementpage.
MakesurethattheCPEisstarted.
VerifythattheCPEiscorrectlyconnectedtothecomputerthroughanetworkcable.Ifthe
problempersists,contactauthorizedlocalservicesuppliers.
TheCPEfailstosearchforthewirelessnetwork.
Checkthatthepoweradapterisconnectedproperly.
CheckthattheCPEisplacedinanopenareathatisfarawayfromobstructions,suchas
concreteorwoodenwalls.
CheckthattheCPEisplacedfarawayfromhouseholdelectricalappliancesthatgenerate
strongelectromagneticfield,suchasmicrowaveovens,refrigerators,andsatellitedishes.
Iftheproblempersists,contactauthorizedlocalservicesuppliers.
ThepoweradapteroftheCPEisoverheated.
TheCPEwillbeoverheatedafterbeingusedforalongtime.Therefore,powerofftheCPE
whenyouarenotusingit.
CheckthattheCPEisproperlyventilatedandshieldedfromdirectsunlight.
Theparametersarerestoredtodefaultvalues.
IftheCPEpowersoffunexpectedlywhilebeingconfigured,theparametersmayberestored
tothedefaultsettings.
Afterconfiguringtheparameters,downloadtheconfigurationfiletoquicklyrestoretheCPE
tothedesiredsettings.
FCC Regulations
Thisdevicecomplieswithpart15oftheFCCRules.Operationissubjecttothefollowing
twoconditions:(1)Thisdevicemaynotcauseharmfulinterference,and(2)thisdevice
mustacceptanyinterferencereceived,includinginterferencethatmaycauseundesired
operation.
ThisequipmenthasbeentestedandfoundtocomplywiththelimitsforaClassBdigital
device,pursuanttopart15oftheFCCRules.Theselimitsaredesignedtoprovide
reasonableprotectionagainstharmfulinterferenceinaresidentialinstallation.This
equipmentgenerates,usesandcanradiateradiofrequencyenergyand,ifnotinstalled
andusedinaccordancewiththeinstructions,maycauseharmfulinterferencetoradio
communications.However,thereisnoguaranteethatinterferencewillnotoccurina
particularinstallation.Ifthisequipmentdoescauseharmfulinterferencetoradioor
televisionreception,whichcanbedeterminedbyturningtheequipmentoffandon,the
userisencouragedtotrytocorrecttheinterferencebyoneormoreofthefollowing
measures:
—Reorientorrelocatethereceivingantenna.
—Increasetheseparationbetweentheequipmentandreceiver.
—Connecttheequipmentintoanoutletonacircuitdifferentfromthattowhichthe
receiverisconnected.
—Consultthedealeroranexperiencedradio/TVtechnicianforhelp.
Caution:
Changesormodificationsnotexpresslyapprovedbythemanufacturercouldvoidtheuser’s
authoritytooperatetheequipment.
ThisequipmentcomplieswiththeFCCRFradiationexposurelimitssetforthforanuncontrolled
environment.Thisequipmentshouldbeinstalledandoperatedwithaminimumdistanceof20cm
betweentheradiatorandanypartofyourbody.Theantennasmustnotbeco‐locatedwithother
transmitterantennas.