OCULII VISDAR-RADAR This device is a K-band radar unit providing analog signals to an end user. User Manual
OCULII LLC This device is a K-band radar unit providing analog signals to an end user. Users Manual
OCULII >
Users Manual
OCULII LLC
830 A Space Drive • Beavercreek , Ohio 45434
Phone: (937) 912-9261 • Email: info@oculii.com • Web: www.oculii.com
VISDAR Transmitter Module
User And Installer Manual
Contents:
1) FCC/IC Manual Statements …….. 2-3
2) Overview ......… 3
3) Description ..….... 3-4
4) Minimum Connections ..…… 5
5) Expansion Connections ..…… 6
6) Basic Setup Components …….. 7
7) Basic Setup Procedure …….. 8-10
8) FCC RF Exposure Statement ……. 10
VISDAR Transmitter Module
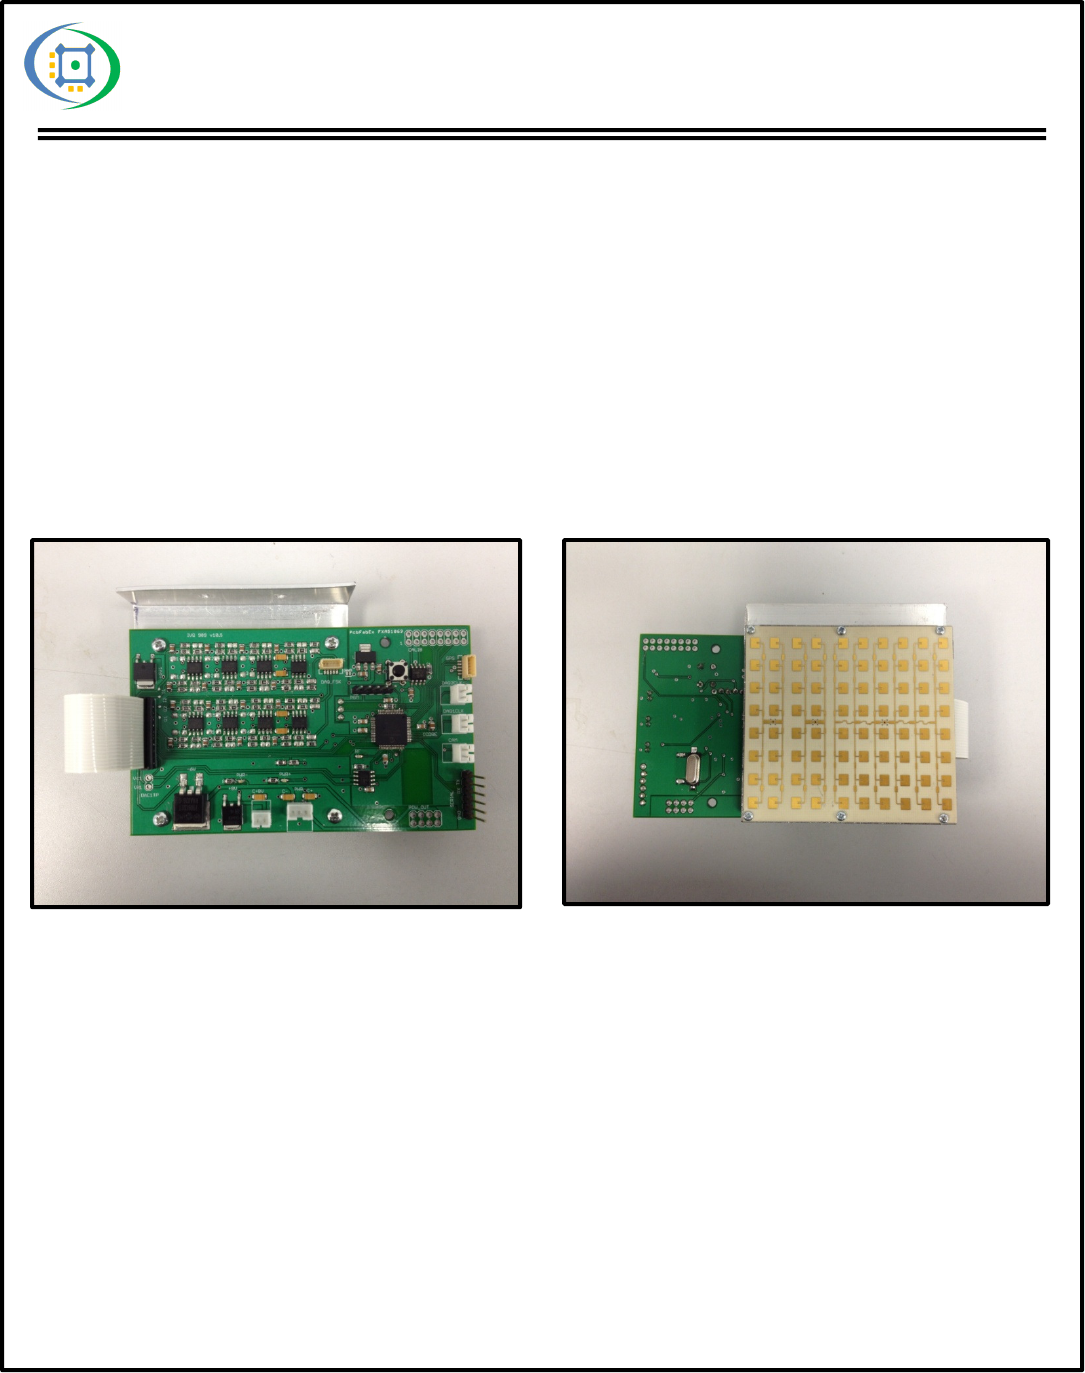
Component Side
VISDAR Transmitter Module
Radar Side
1
January 2013

OCULII LLC
FCC/IC Manual Statement
2
830 A Space Drive • Beavercreek , Ohio 45434
Phone: (937) 912-9261 • Email: info@oculii.com • Web: www.oculii.com
FCC ID: RB7-VISDAR-RADAR
IC: 10770A- VISDARRADR
Model: VISDAR RADAR
This device complies with Part 15 of FCC Rules. Operation is subject to the following two
conditions: (1) this device may not cause harmful interference, and (2) this device must accept any
interference received, including interference that may cause undesired operation.
Changes or modifications not expressly approved by OCULII LLC could void the user's authority to
operate the equipment.
This device complies with Industry Canada licence-exempt RSS standard(s). Operation is subject to
the following two conditions: (1) this device may not cause interference, and (2) this device must
accept any interference, including interference that may cause undesired operation of the device
Le présent appareil est conforme aux CNR d'Industrie Canada applicables aux appareils radio
exempts de licence. L'exploitation est autorisée aux deux conditions suivantes : (1) l'appareil ne doit
pas produire de brouillage, et (2) l'utilisateur de l'appareil doit accepter tout brouillage
radioélectrique subi, même si le brouillage est susceptible d'en compromettre le fonctionnement
Module Manufacturers
A note to module manufacturers (responsible parties); module manufacturers are cautioned that all of
the same labeling requirements apply not only to the module itself, but these statements and labeling
requirements are required to be outlined IN DETAIL such that the OEM or installer has the correct
information to properly label the final product and place the proper user manual statements in the final
product manual.
OEMs employing modules
A note to module installers (OEMs, etc.); incorporating a radio module into a final product and being
able to apply the certification numbers (approvals) to the final product means that the product is in
adherence to all relevant requirements and restrictions, including antenna-to-user and collocation
separation distances, manual statements and labeling requirements.
If the FCC identification number is not visible when the module is installed inside another device,
then the outside of the device into which the module is installed must also display a label referring to
the enclosed module. This exterior label can use wording such as the following: ‘‘Contains Transmitter
Module FCC ID: RB7-VISDAR-RADAR”.

OCULII LLC
This device is a K-band (24.075GHz - 24.175GHz ) radar unit used for providing analog signals to an
end user which can in turn be used to determine the range, range-rate, and angle of arrival of moving
objects within the device’s field of view. The device is comprised of three main components. The
first is an OEM K-band transceiver with integrated transmit and receive antennas. The second part is
a radar signal conditioning and calibration board which provides the required filtering of the radar
output signals as well as provides the digital instructions for programming the OEM radar. The last
part is a single power to dual power supply converter chip which provides the dual supply voltages
needed for the analog filters and radar power.
This device is set to operate in the K-band. The radar unit is an OEM device with a single integrated
transmit antenna and two integrated receive antennas. Antenna patterns for the transmit and receive
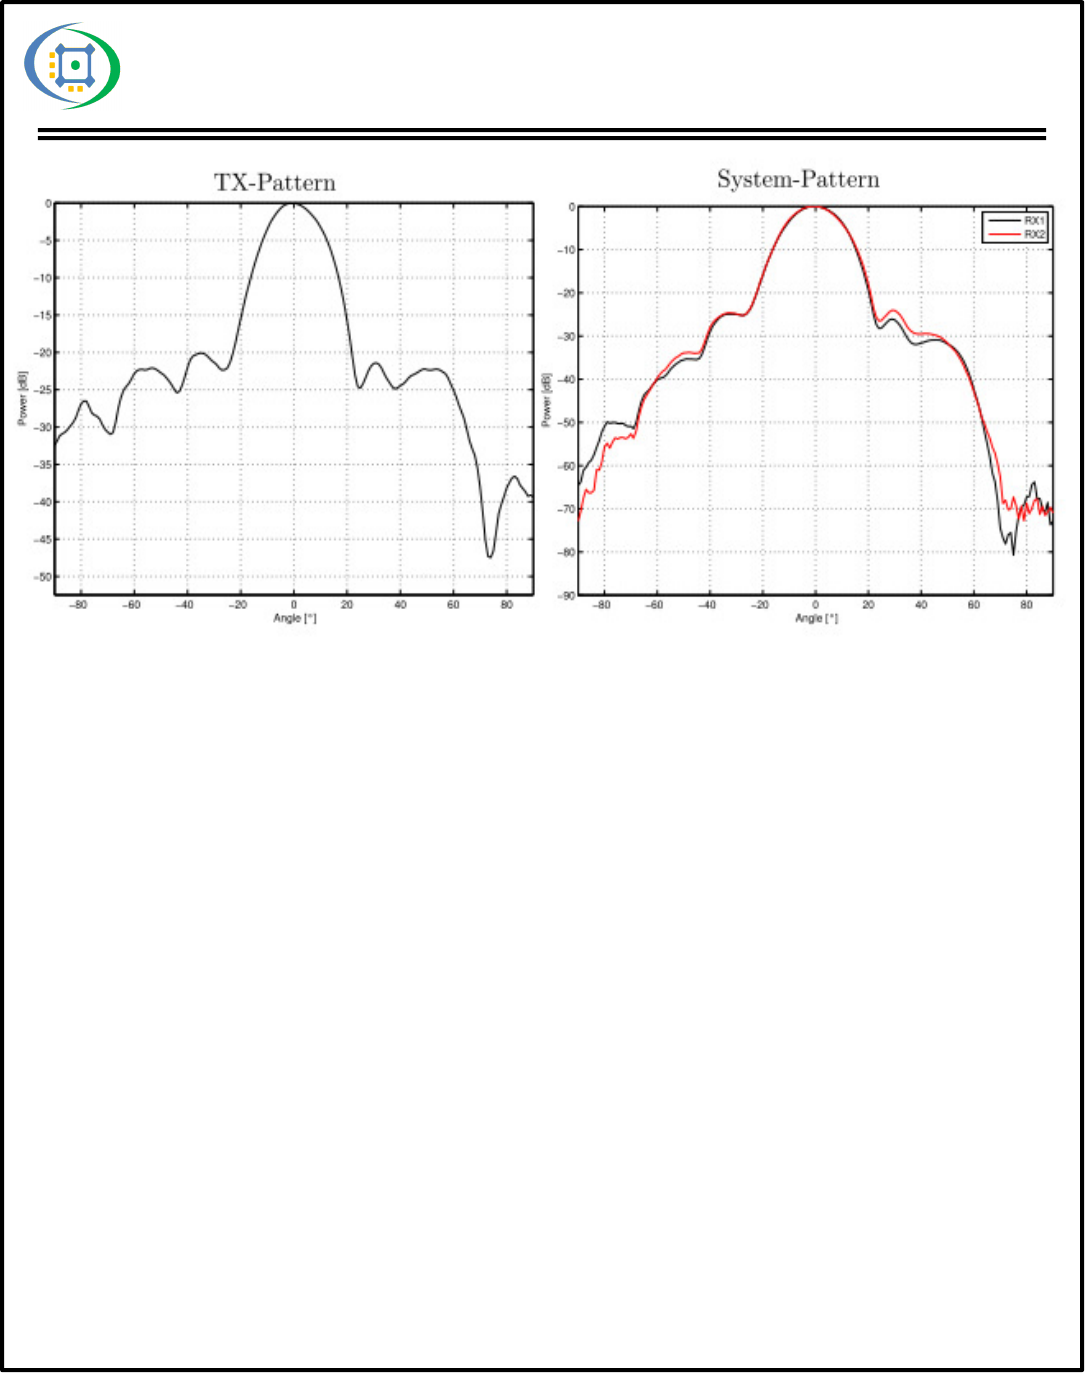
antennas can be seen in Figures 1. An attached companion board provides a parallel network of
analog filters to condition the two sets of raw quadrature-phase and in-phase radar outputs from the
two receivers. This companion board also provides a microprocessor to program the OEM radar in
order to provide temperature compensation for the device, provide external clocking signals required
for an end user’s data acquisition device, provide a serial user interface to provide feedback from the
device, and to provide the inputs to the digital to analog converters which drive the OEM radar’s
VCO. Finally, the device has an external inline single supply to dual supply converter which takes in
a 12V source (battery or OEM AC/DC converter) and converts that 12V supply into a ±12V supply,
which is required to power both the radar and the parallel conditioning filters. Once powered the
device will adjust the tuning voltage based on the device temperature to grantee the device will meet
the FCC guidelines. Temperature compensating will continuously be performed every ten seconds in
order to keep the device within the allotted band.
Overview
Description
3
830 A Space Drive • Beavercreek , Ohio 45434
Phone: (937) 912-9261 • Email: info@oculii.com • Web: www.oculii.com
The Industry Canada certification label of a module shall be clearly visible at all times when
installed in the host device, otherwise the host device must be labeled to display the Industry
Canada certification number of the module, preceded by the words "Contains transmitter module",
or the word "Contains", or similar wording expressing the same meaning, as follows:
“Contains transmitter module IC: 10770A- VISDARRADR”.
The applicant for equipment certification of the module shall provide with each unit of the module
either a label such as described above, or an explanation and instructions to the user as to the host
device labeling requirements.
OCULII LLC
830 A Space Drive • Beavercreek , Ohio 45434
Phone: (937) 912-9261 • Email: info@oculii.com • Web: www.oculii.com 4
Figure 1: Radar transmitter and receiver patterns.
OCULII LLC
Minimum Connections:
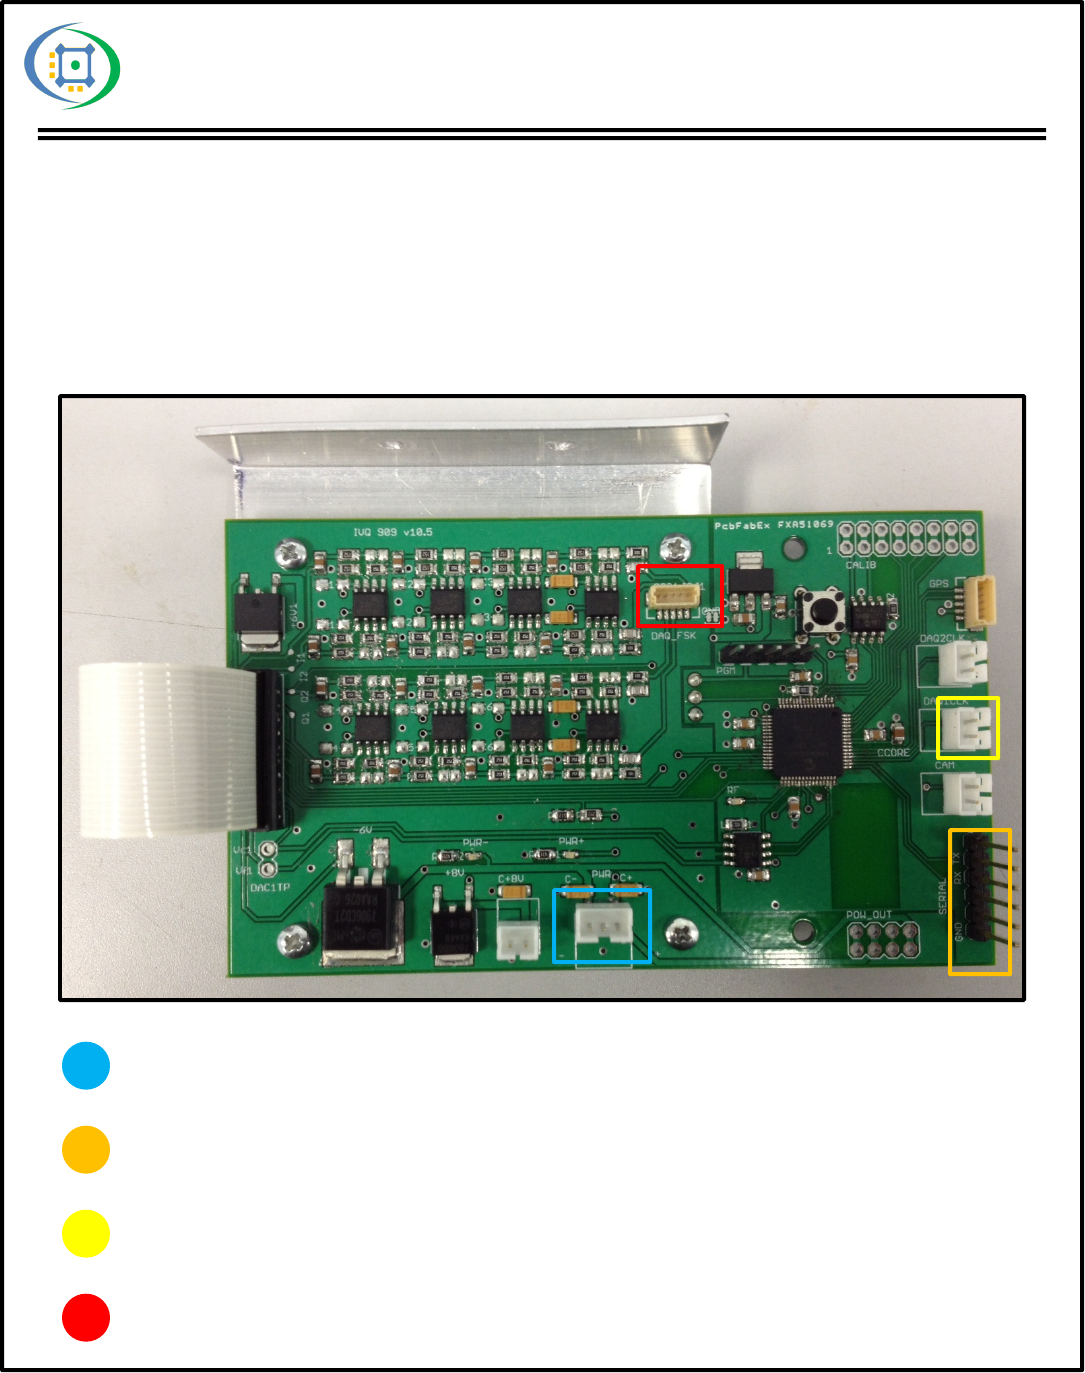
The following are the minimum number of connections required to produce data from the radar unit.
These connections will provide power the unit, the analog signal data, the timing for the analog data,
and an interface for the user to start and stop the device.
Dual Power Supply Input: [-12V, GND, +12V] from left to right providing the differential
power required for the analog signal conditioning and powering the radar unit.
Serial Interface Input / Output: Provides the user with a means of controlling the radar
unit.
Sampling Clock Output: Provides the sample timing for the radar signals. 3.3V active high
signal can be used to trigger and external DAC for collecting the analog signals.
Analog Signal Output: [GND, Q2, Q1, I2, I1] from left to right providing the analog output
from the radar.
830 A Space Drive • Beavercreek , Ohio 45434
Phone: (937) 912-9261 • Email: info@oculii.com • Web: www.oculii.com 5
OCULII LLC
Expansion Connections:
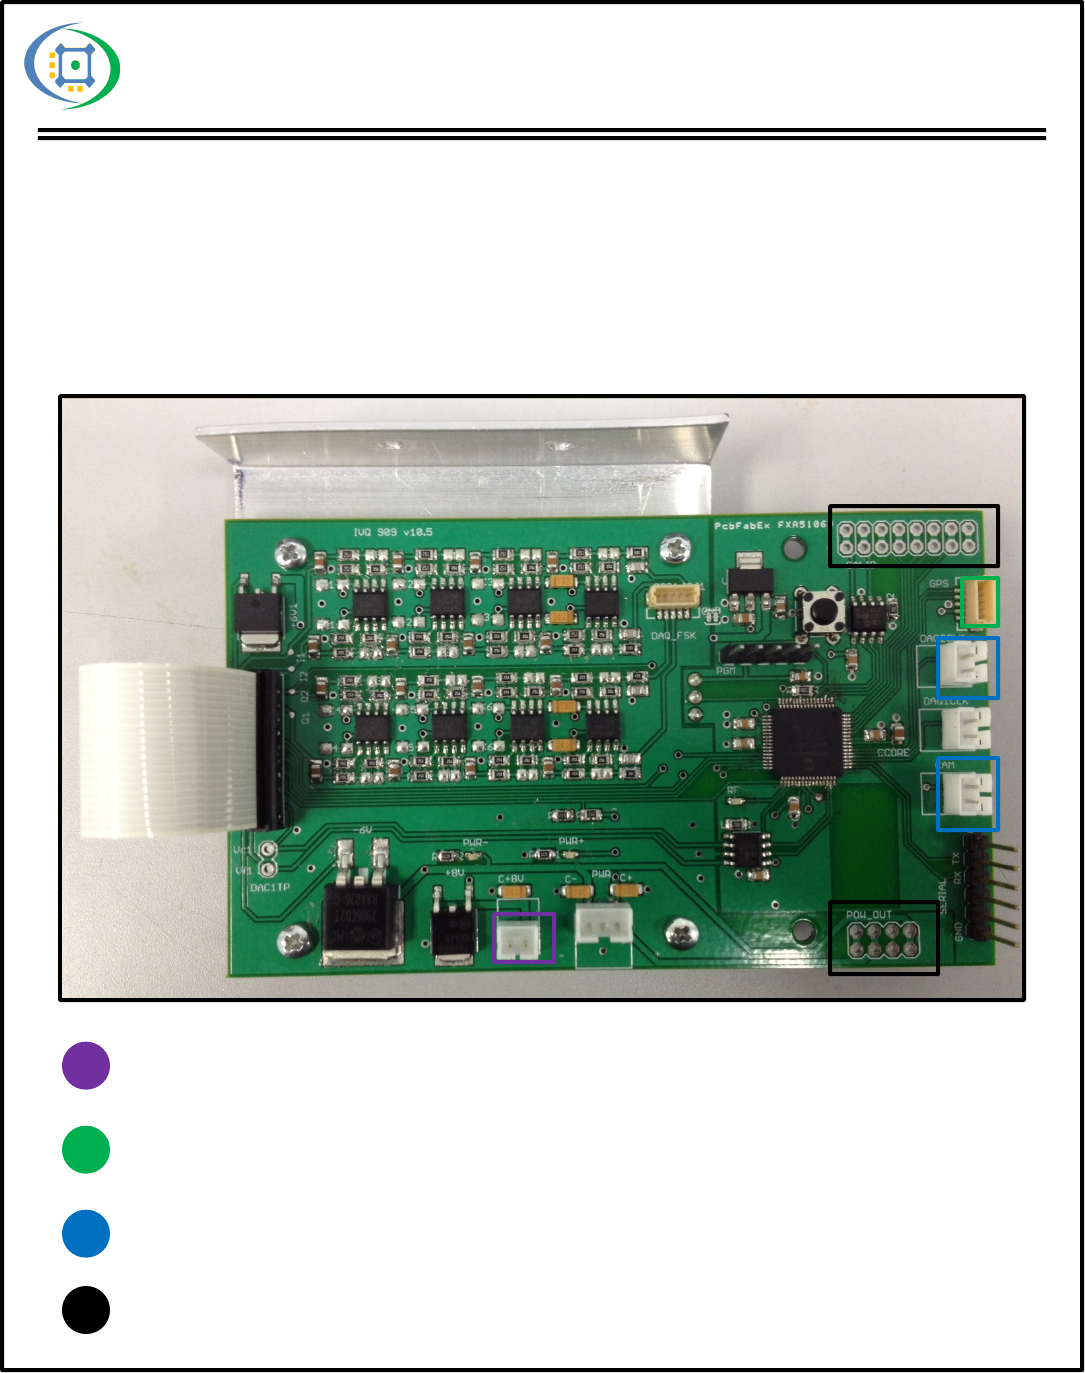
The following are additional connections on the component side of the board that can be used for
future expansion of the device, including: two additional clock lines for external triggering, an
additional serial communications port and an eight volt regulated output.
Eight Volt Regulated Output: [GND, +8V] from left to right providing a regulated 8V
output for peripheral expansion.
Additional Serial Interface Input / Output: Provides an additional serial interface for future
device expansion.
Additional Triggering Clocks: Provides additional triggering outputs for peripheral
triggering (e.g. video camera triggers, additional DAC triggers).
Internal Calibration Pins: Provides I/O to a secondary radar for in lab calibration.
830 A Space Drive • Beavercreek , Ohio 45434
Phone: (937) 912-9261 • Email: info@oculii.com • Web: www.oculii.com 6
OCULII LLC
830 A Space Drive • Beavercreek , Ohio 45434
Phone: (937) 912-9261 • Email: info@oculii.com • Web: www.oculii.com
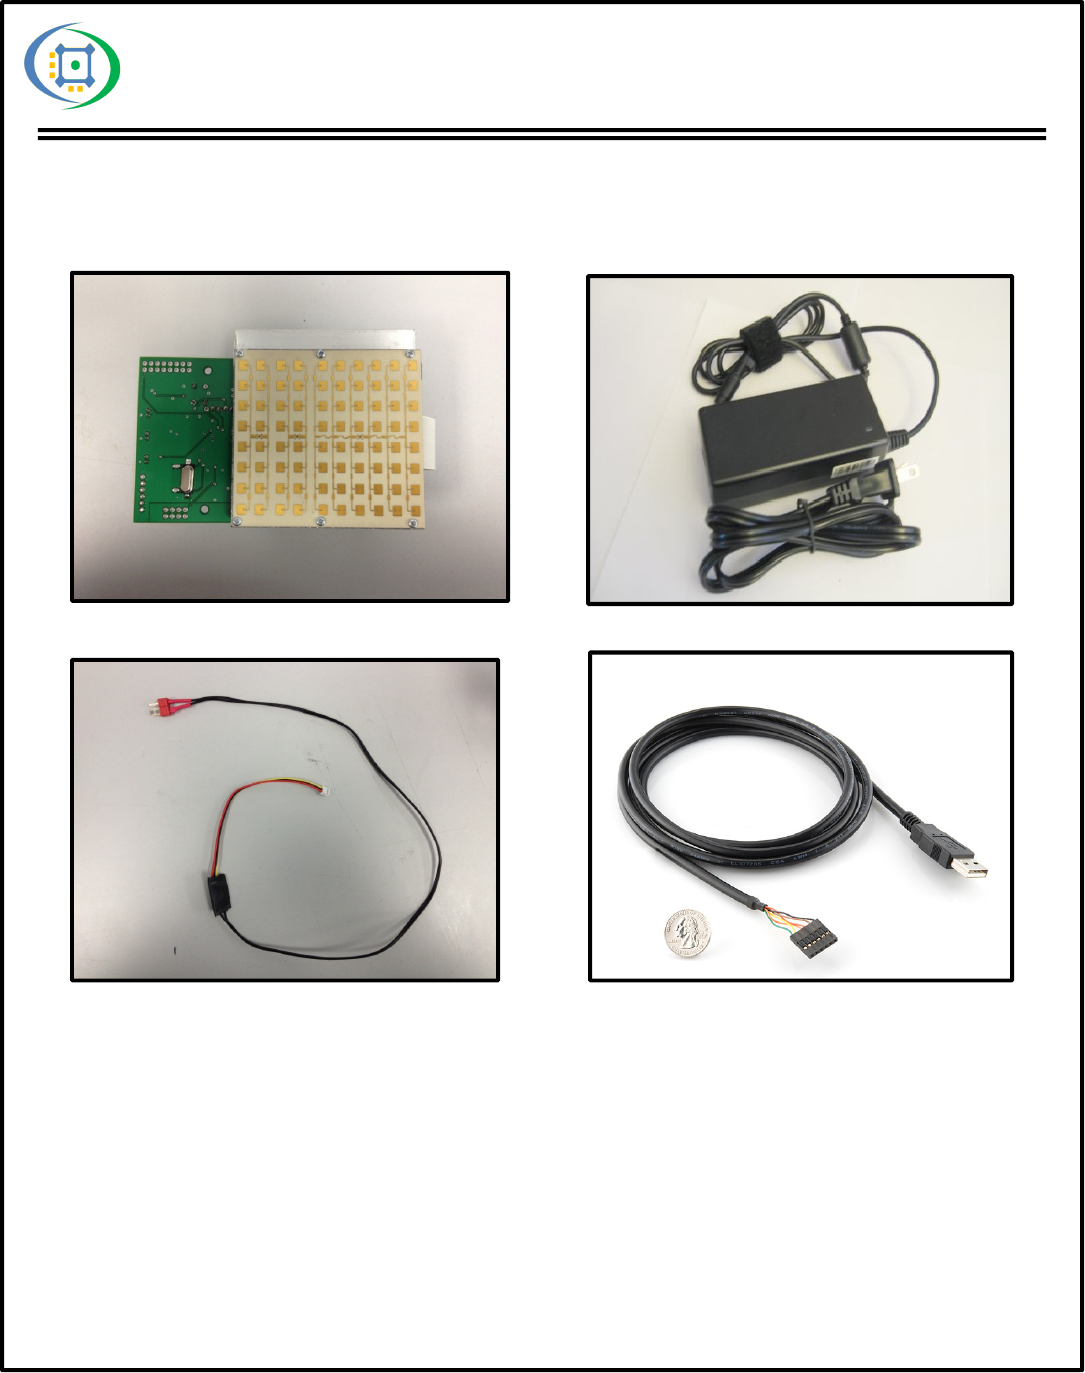
Radar Module
Singe To Dual Supply Adapter Serial To USB Adapter
7
Power Source (Option: 12V Battery)
Basic Setup Components:
OCULII LLC
830 A Space Drive • Beavercreek , Ohio 45434
Phone: (937) 912-9261 • Email: info@oculii.com • Web: www.oculii.com
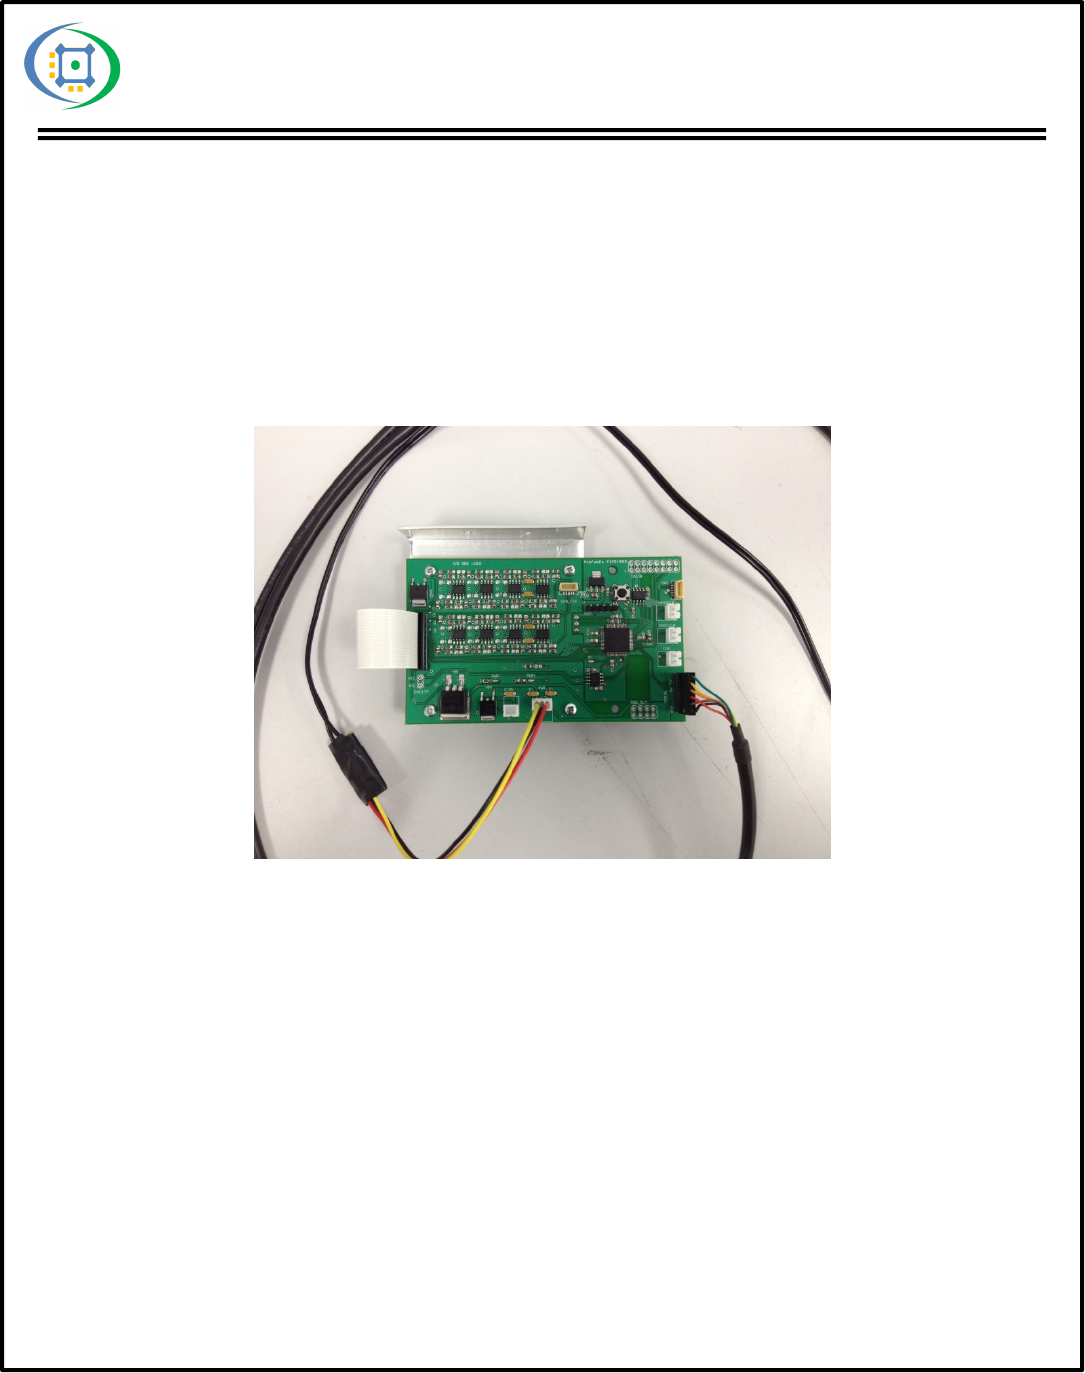
Step 1: Connect the single supply to dual supply adapter and the serial to USB adapter to the
component side of the module. The single supply to dual supply connector uses a three pin polarized
JST connector and plugs in on the lower center of the board and labeled “PWR”. The serial to USB
adapter plugs into a row of male headers on the lower right side of the module labeled “SERIAL”.
The black wire on the cable should be oriented downwards as seen in Figure 2.
Figure 2: Power supply and serial to USB adapter installation.
Step 2: Connect the other end of the serial to USB adapter into a source PC with the appropriate
USB to serial drivers. From a serial terminal on that PC (eg. hyperterminal, realterm) open the USB
to serial port to allow commands to be sent.
8
Basic Setup Procedure:
OCULII LLC
830 A Space Drive • Beavercreek , Ohio 45434
Phone: (937) 912-9261 • Email: info@oculii.com • Web: www.oculii.com
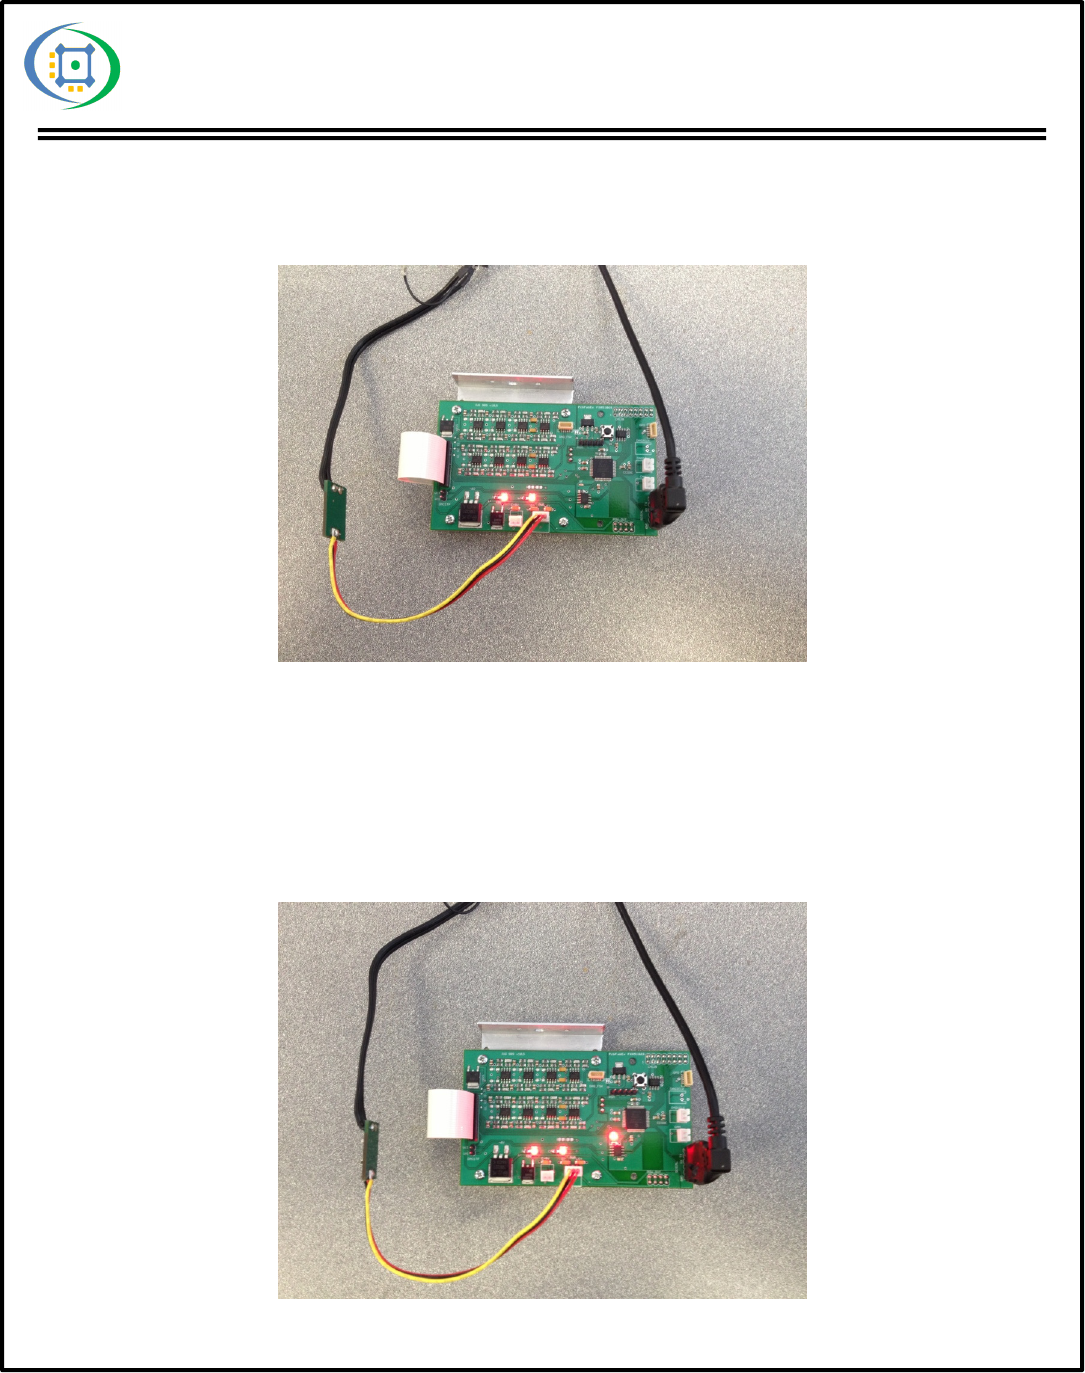
Step 3: Plug in the power source (either a 12V wall supply or a 12V battery) to the single to dual
supply adapter. Two red power LEDs should illuminate as seen in Figure 3.
Figure 3: Device with power LEDs activated.
Step 4: From this point, the device can be switched between standby and operating modes using the
serial terminal. To move from the standby mode to the operating mode an ‘s’ must be sent over the
serial channel and to move from the operating mode to standby mode an ‘x’ over the serial channel.
In operating mode an additional LED will activate as seen in Figure 4.
Figure 4: Device with power LEDs and operating mode LED activated.
9

OCULII LLC
830 A Space Drive • Beavercreek , Ohio 45434
Phone: (937) 912-9261 • Email: info@oculii.com • Web: www.oculii.com
Step 5: When finished, unplug the power cable from the single to dual supply adapter, disconnect the
USB to serial converter, and remove the cabling from the device.
10
This transmitter complies with FCC RF radiation exposure limits set forth for an uncontrolled
environment.
This transmitter should be installed and operated with a minimum distance of 20 centimeters between
the radiator and your body.
FCC RF Radiation Exposure Statement: