OKIN Refined Electric Technology JLDK-18 Wireless remote handset User Manual
OKIN Refined Electric Technology Co., Ltd. Wireless remote handset
User Manual

OKIN Refined Electric Technology Co., Ltd
Page 1 of 4
Operating Manual of Remote Hand Control
Connect diagram please see the drawing:”System Diagram-Scape Bed Controls”
“System Diagram-Scape Bed Controls”
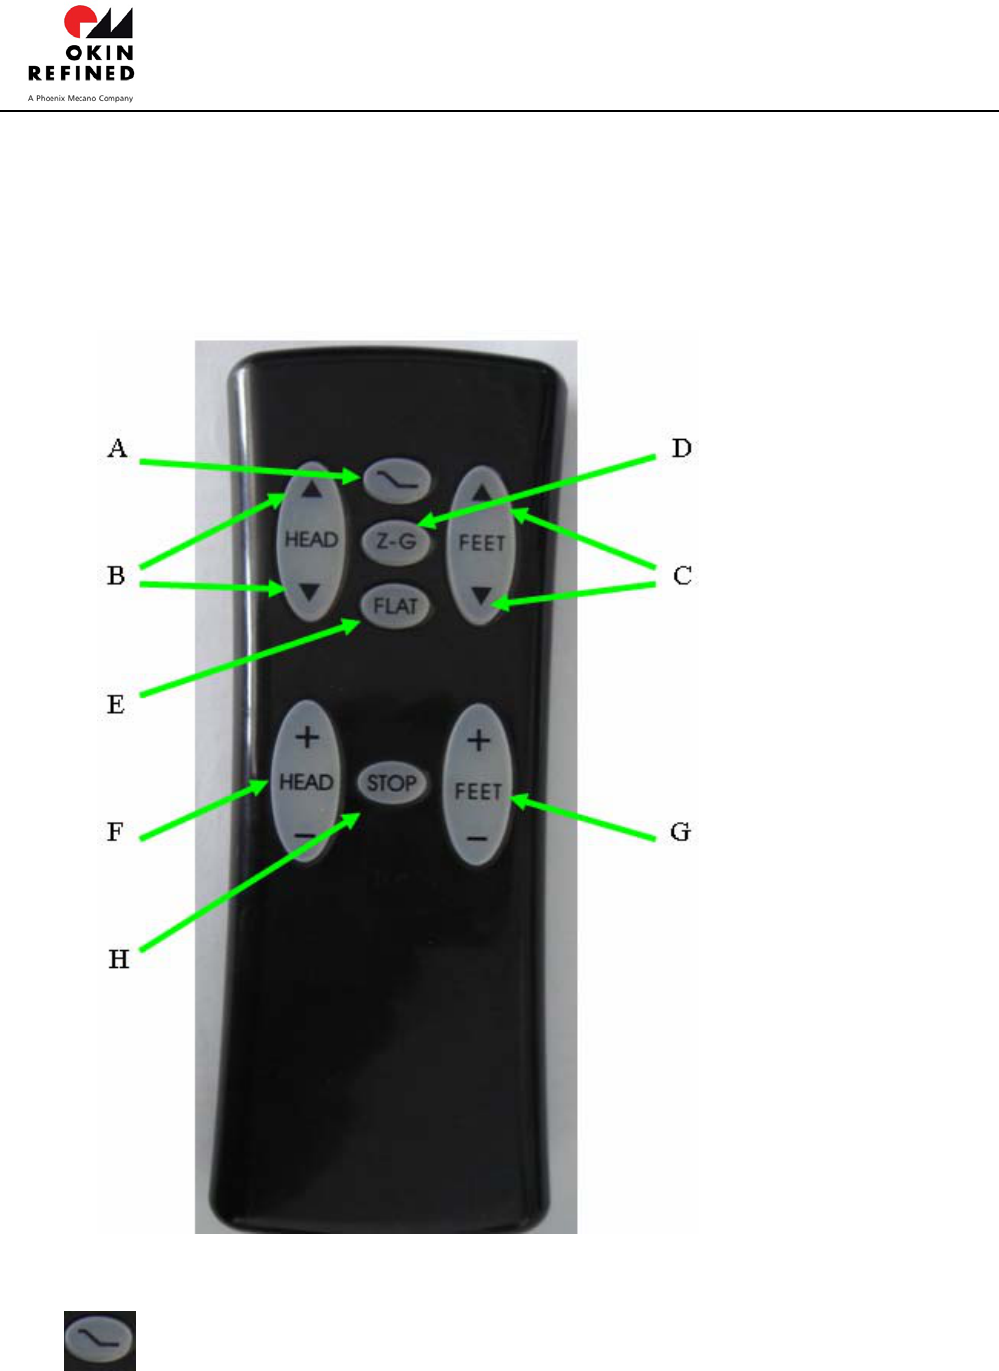
1、Interface of the Handset
2、Button description
A. Reading/TV Position button:Press the button and the head motor will move up to
the highest and stop, at the same time, the foot motor will touch bottom and stop. You can
press any button to stop action during moving.

OKIN Refined Electric Technology Co.,Ltd
Page 2 of 4
B. HEAD button:Press and hold the button, the head motor will go up or down.
C. FEET button:Press and hold the button, the foot motor will go up or down.
D. Z-G button: Press the button, the head and foot motor will move simultaneously
and do not stop until return to the position of the system set. You can press any button to
stop action during moving.
Optional:The Z-G button can be set as a memory button by user. See point 4.
E. FLAT button:Press the button, the head and foot motor will move down to the flat
position simultaneously. You can press any button to stop action during moving.
F. HEAD Massage button:Press the button + or -,you can open the head vibrator and
control the vibrating range(+Stronger, -Weaker). The vibrating range is divided into 3
levels and the default vibrating time is 10min.
G. FEET Massage button:Press the button, you can open the foot vibrator and control
the vibrating intensity (+Stronger, -Weaker). The vibrating intensity is divided into 3 levels
and the default vibrating time is 10min.
H. STOP button:Press the button, you can stop the head and foot vibrator and the
massage system will close.
Note:The vibrating intensity of the head vibrator is a little stronger than the foot vibrator.
3、Wireless Matching operation
Before use the whole system, user need match the handset with control box.
Step 1: Connect the whole system according to “System Diagram-Scape Bed Controls”
Step 2: Power off the system, plug off the mains cable with power socket;
Step 3: Take out the dry batteries of handset, set up DIP switch to a desired channel. Then
install the batteries;
Step 4: Power on the control box;

OKIN Refined Electric Technology Co.,Ltd
Page 3 of 4
Step 5: Press and hold up button and up button until backlight LED flashing. Loose
the two buttons and LED continue flashing and search with control box, once LED stop flashing
the matching is successful, which means the control box and the handset can work together.
All matching set up process must finish in 30sec after power on control box.
Notes:USB cable only use for synchronized operation of two beds.
4、Memory operation:
Z-G button can be set as a memory button by user.
Step 1: Adjust the head position and feet position until your like position;
Step 2: Press and hold the button for 1sec, backlight LED start flashing;
Step 3: loose button, during next 1sec, press button, LED stop flashing. Then
memory operation is successful.
FCC STATEMENT: FCC ID:PCU-JLDK.18
1. This device complies with Part 15 of the FCC Rules. Operation is subject to the following two
conditions:
(1) This device may not cause harmful interference.
(2) This device must accept any interference received, including interference that may cause
undesired operation.
2. Changes or modifications not expressly approved by the party responsible for compliance
could
void the user's authority to operate the equipment.
NOTE: This equipment has been tested and found to comply with the limits for a Class B digital
device, pursuant to Part 15 of the FCC Rules. These limits are designed to provide reasonable
protection against harmful interference in a residential installation.
This equipment generates uses and can radiate radio frequency energy and, if not installed and
used in accordance with the instructions, may cause harmful interference to radio
communications.

OKIN Refined Electric Technology Co.,Ltd
Page 4 of 4
However, there is no guarantee that interference will not occur in a particular installation. If this
equipment does cause harmful interference to radio or television reception, which can be
determined by turning the equipment off and on, the user is encouraged to try to correct the
interference by one or more of the following measures:
Reorient or relocate the receiving antenna.
Increase the separation between the equipment and receiver.
Connect the equipment into an outlet on a circuit different from that to which the receiver is
connected.
Consult the dealer or an experienced radio/TV technician for help.