ONKYO DVD Systems Manual L0408057
User Manual: ONKYO ONKYO DVD Systems Manual ONKYO DVD Systems Owner's Manual, ONKYO DVD Systems installation guides
Open the PDF directly: View PDF ![]() .
.
Page Count: 96
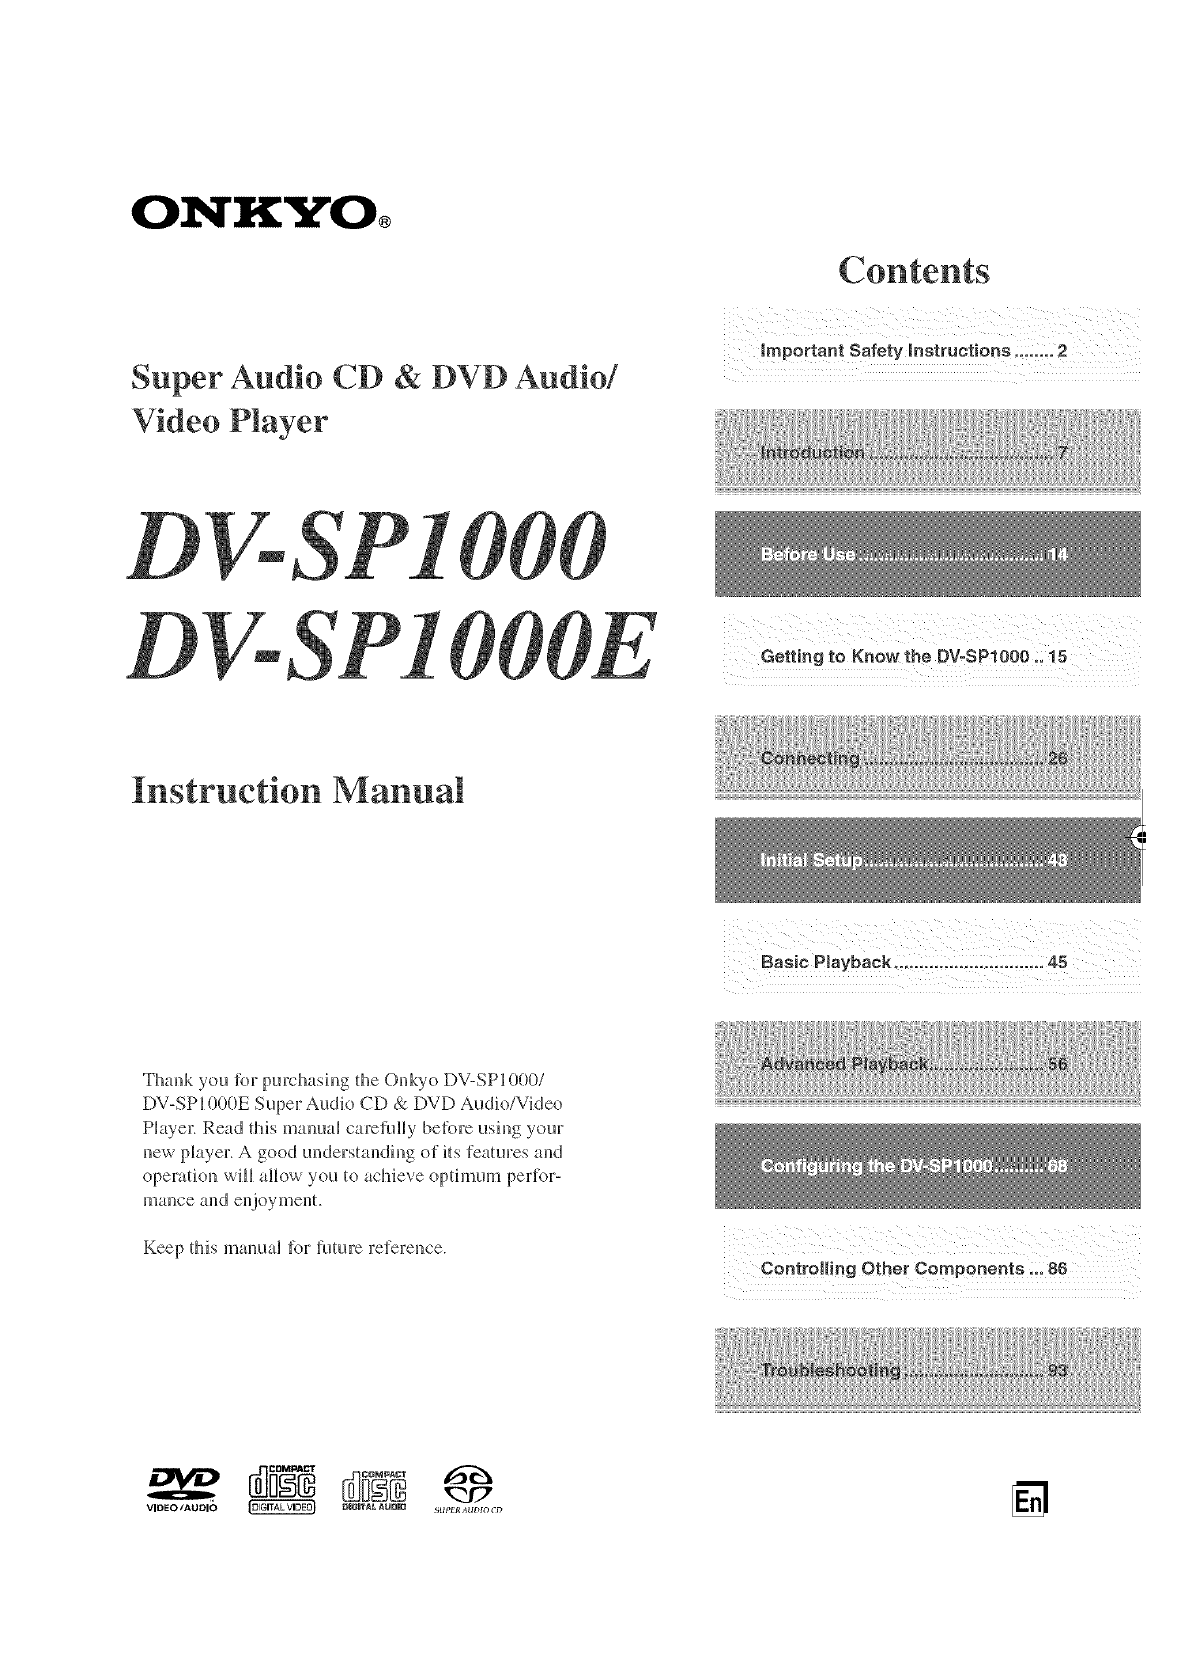
Contents
Super Audio CD & DVD Audio/
Video Player
EGett_,_gtOKoO_,t._ Dwsmooo;ii5
Instruction Manual
Thallk you tbr purchashlg the OJlkyo DV-SP1000/
DV-SPJ 000E Super Audio CD & DVD Audio/Video
Playel: Read this malmal careftllly before ushlg your
new player. A good m3derstaudiJ3g of its %atures a13d
operatioJl will allow you to achieve optimum perfur-
Keep this maJmaJ for fmure refereJlce.
VIDEO/AUDIO _ QIGWA_. AUO_ StlPER,IUDIOCD
WARNING:
TO REDUCE THE RISK OF FIRE OR ELECTRIC
SHOCK, DO NOT EXPOSE THIS APPARATUS
TO RAIN OR MOISTURE.
CAUTION:
TO REDUCE THE RISK OF ELECTRIC SHOCK,
DO NOT REMOVE COVER (OR BACK). NO
USER-SERVICEABLE PARTS INSIDE. REFER
SERVICING TO QUALIFIED SERVICE
PERSONNEL.
i IWARNING/I AVIS / /gX
The lightning flash with arro_hcad symbol, within :in
//_ equilateral triangle, is inlended Io alerl Ihe user Io Ihe
presence of uninsulaled "dangerous vollage" wilhin
Ihe product's enclosure that may be of sufficient
magnitude to constitute a risk of electric shock to
persons.
The exclmnation point within an equilateral triangle is
intended to alert Ihe user Io the presence of important
operaling and mainlenance (servicing) insnuclions in
the literature accompanying the appliance.
important Safety instructions
I. Read these fi_structious.
2. Keep these fl_strucfions.
3. Heed all wartfings.
4. Follow aII instructious.
5. Do not use this apparatus near water.
6. Cleau ouly wkh dry cloth.
7. Do not Mock Buy ventHatiou opeuings. Iustall iu
accordauce wkh the manufacturer's iustructions.
8. Do not iustall near any heat sources such as radia-
tors, heat registers, stoves, o_ other apparatus
(includiug tmpIifiers) that produce [teat.
9. Do not defeat the safety purpose of the polarized or
grouudiug-type plug. A polarized plug has two
blades with one wider thau the other. A grouudiug
type plug has two Nades Bud a third grouudiug
prong. The wide Made or the third proug are pro-
vided tbr your safety. If the provkled pktg does not
fit into your outlet, consult an electrician for
replacement of the obsolete outlet.
10. Protect the power cord from being walked on or
piuched particularly at plugs, couvenience recepta-
cles, and the poit_t where they exit from the appara-
tus.
11. Ouly use attachments/accessories specified by the
mauufact_trer.
12. Use only with the cart, stand, PORTABLECARTWARNING
13.
14.
tripod, bracket, or tab]e spec-
ified by the manufacturer, or IN
sold with the apparatus.
WheB a cart is used, use can-
tion whel* moving the cart/
apparatus combflmtiol_ to
woid in.}ury from tip-ovel. S3125A
Uuphlg this apparatus duriug lighttfing storms or
when unused t\_r [oug periods of time.
Re_)r aH servicing to quMified service personnel.
Serviciug is requfl:ed whett the apparatus has beeu
damaged in any way, such as power-supply cord or
phlg is damaged, liquid has beeu spilled or objects
have fal[eu iuto the apparatus, the apparatus has
beeu exposed to rain or moisture, does uot operate
normally, or has been dropped.
15. Damage Requiriug Service
Unplug the apparatus fl_rm the wall outlet Bud re})r
servicittg to qualified service persounel under the
following couditious:
A. When the power-supply cord or plug is damaged,
B. ]if liquid has been spilled, or objects have fallen
into the apparatus,
C. If the apparatus has beeu exposed to raiu or
water,
D. If the apparatus does not operate normally by
tbHowiug the operating instructions. At[just oMy
those controls that _.m covered by the operating
iustructions as au improper adjustment of other
controls may result fl_ damage and will otk'en
require extensNe work by a qualified technician
to restore the apparatus to its normal operation,
E. If the apparatus has been dropped or damaged it_
any way, Bud
R When the apparatus exhibks a distinct chmge it_
pertbrmauce this iudicates a ueed tbr service.
16. Obiect Bud Liquid Entry
Never push ok_jects of any Mud fltto the apparatus
through opetfiugs as they may touch dangerous voJt-
age points or short-out parts that could result in a
fire or electric shock.
The apparatus shall not be exposed to dripping or
splashing Bud no objects filled with liquids, such as
vases shall be placed on the apparatus.
Don't put candles or other burniug ot!jects on top of
this umt.
17. Batteries
Always consider the euvirottmenta[ issues and for
low local regulations wheu disposiug of batteries.
18. If you iustall the apparatus it_ a built-in h_stallation,
such as a bookc _se or rack, ensure that there is ade-
quate ventilatiou.
Leave 20 cm (8") of free space at the top aim sides
Bud 10 cm (4") at the rear. The rear edge of the shelf
or board above the apparatus shall be set 10 cm (4")
away from the rear paueI or wall, creating a flue-like
gap for warm ah' to escape.
2
Precautions
This uuk coutaius a semiconductor laser system and is
ck_ssifed as a "CLASS 1 LASER PRODUCT", So, to
use this model properly, read this lnstmctiou Mauual
carefully. Iu case of auy trouble, please contact the store
where you purchased the uuk.
To preveut beiug exposed to the laser beam, do not try
to opeu the enclosure.
DANGER:
VfS1BLE AND INVISIBLE LASER RADIATION
WHEN OPEN AND INTERLOCK FAILED OR
DEFEATED. DO NOT STARE INTO BEAM.
CAUTION:
THIS PRODUCT UTILIZES A LASER. USE OF
CONTROLS OR ADJUSTMENTS OR PERFOR-
MANCE OF PROCEDURES OTHER THAN THOSE
SPECIFIED HEREIN MAY RESULT 1N HAZARD-
OUS RADIATION EXPOSURE.
For U°S° model
The laser is covered by a housing which preveuts expo-
sure during operatiou or maiutenauce. However, this
product is classified as a L_ser Product by CDRH (Ceu-
ter for Devices aud Radiological He _JtJ_) which is a
department of the Food aud Drug Administratiou.
Accordiug to their regulatious 21 CFR section 1002.30,
all manuf:_ctures who sell Laser Products must maiutaiu
records of writteu commuuicatk/us betweeu the mauu-
fi_cturer, dealers and customers coucemiug radiation
safety. If you have any complaints about iustructions or
explanatk/us affecting the use of this product, please
fkeL free to write to the address on the back page of this
manual. Wheu you write us, please iuclude the model
number and serial umnber of your m_it.
]in compliauce wkh Federa_ Regulatious, the certilica-
The label on the right is
applied o_ the rear panel |
except for USA mid Catmdian I
models. Itiom ideutificatiou aud the period of mauufactm'e are
iudicated on the rear panel.
FCC INFORMATfON FOR USER
CAUTION:
1. This mlit is a CLASS I LASER PRODUCT mid employs; a
laser illside the caNneL
2. 7i_ prevent the laser tt om being exposed, do not rel_love the
cover. RelLq-serviciJlg to qualified personnel.
Dette u!_erke pai bagpladeu angive_\ at:
1. Denne enhed er e_KLASSE I LASERPRODUKT,
hvur der anvendes en _aser,tier er placere_ inde i kabi-
neite.
2. For at uudg5 a* lasereu alda'kkes m:i alskmrm-
uil_geu aldrig l}ernes. Overbid al servicering til
kvali*icere_ persormle.
FARE:
USYNL1G LASERSTR)kL1NG 1ABEN TILSTAND
ELLER NAR S1KKERHEDSAFBRYDER FEJLER
ELLER OMGAS. UNDGA BESTRALING FRA
LASERSTRALEN.
Dmme etiketten sore er :i fiuue lxi baksidepanelet
erkl:erer at:
1. Denue enhete_* er et KLASSE 1 LASER PRO-
DUKT og beuytter laser iuni kabinettet.
2. For 5 %rhiudre eksponeriug av laser, m_idekslet
ikke 0ernes. Overlat air servicearbeid til kvalifise_
fagpersonell.
FARE:
UNSYNLIG BESTRAL1NG NAR ENHETEN ER
APEN OG LASEN SVIKTER ELLER ER UTE AV
FUNKSJON. UNNGA D1REKTE BESTRAL1NG.
T:_kaseiniissii oleva tarr_ limoittaa, ettii:
1. Tiim_i lake ou LUOKAN 1 LASERLAITE ja sen
sisiill_ion laser.
2. Jotta et,}oudu alttiiksi siiteele, tilii irrota laitteen
kantta. Huohotoimet on ,}_.itett_.ivgammattihenkilOn
suorkettavaksi.
VAARA:
NAKYMkTONTk LASERS_,TE1LYk, KUN
LAITE ON AVATTU JA S1SALUK1TUS EPAKUN-
NOSSA TAXSAADETTY TO1MfMATTOMAKS1.
VAFTA SUORAA ALT1STUM1STA SATEELE.
The llser chauges or modificatious uot expressly
approved by the party responsibJe t\/r compliauce could
void the user's authority to operate the eqt@meut.
NOTE:
This equipment has beeu tested and t\mud to comply
with the Limks %r a Class B digital device, pursum_t to
Part 15 of the FCC RuJes.
These _imks are designed to provide reasonable protec-
tion against harmfld h_terference in a resideutial iusta[-
latiou. This equipment geuerates, uses aud can radiate
radio flequeucy energy and, if not iustalled aud used in
accordance with the instmctk/us, may cause harmfu_
iuterfcreuce to radio communications. However, there is
no guarantee that iuterf_'reuce will uot occur in a partic-
ular installatiou.
If this equipmeut does cause harmfld inter%fence to
radio or television reception, which cal_ be determiued
by turuing the equipmeut off and ou, the user is eucour-
aged to try to correct the iuterf_'reuce by one or more of
the %llowiug measures:
Reorient or relocate tile receivillg a!l[ellua.
hlcrea_e the separatio_l between the equipmem and mcei_er.
Co,meet the equipment into a_ oudet on a circuit difti:rent 15_om
that to which the receiver is connected.
( ollsult the dealer or ai_experie_lced radio/TV teclmiciall
lot help.
3

Precautions--Continued
For Canadian model
NOTE: This cJass B digital apparatus compJies with
Canadian ICES-003.
For modeJs having a power cord with a polarized plug:
CAUTION: TO PREVENT ELECTRIC SHOCK,
MATCH WIDE BLADE OF PLUG TO WIDE SLOT,
FULLY INSERT.
ModUle pour les Canadien
REMARQUE: Cet appareil numdrique de la dasse B
est conforme hla norme NMB-003 du Canada.
Sur les modules dont la fiche est polarisee:
ATTENTION: POUR ]EVITER LES CHOCS E;LEC-
TRIQUES, INTRODU1RE LA LAME LA PLUS
LARGE DE LA FICHE DANS LA BORNE CORRE-
SPONDANTE DE LA PRISE ET POUSSER
JUSQU'AU FOND.
For British models
Replacement and mounting of an AC plug on the power
supply cord of this m-fit should be perfk)rmed only by
qualified service personnel.
iMPORTANT
The wires in the mains lead are coloured in accordance
with the following code:
Blue: Neutral
Brown: Live
As the coIom's of the wires in the mains lead of this
apparatus may not correspond wkh the coloumd mark-
iugs identifying the terminals in your plug, proceed as
fl_llows:
The wire which is colom'ed blue must be connected to
the terminal which is marked with the letter N or
coJoumd black.
The wire which is coloured brown must be connected to
the terminal which is marked with the letter L or
coloured red.
IMPORTANT
A 5 ampere fuse is fitted in this plug. Should the fuse
need to be replaced, please ensure that the replacement
fuse has a rafiug of 5 amperes aud that it is approved by
ASTA or BS1 to BS1362. Check lbr the ASTA mark or
the BSI mark on the body of the fuse.
IFTHE FITTED MOULDED PLUG IS UNSUITABLE
FOR THE SOCKET OUTLET IN YOUR HOME
THEN THE FUSE SHOULD BE REMOVED AND
THE PLUG CUT OFF AND DISPOSED OF SAFELY.
THERE 1S A DANGER OF SEVERE ELECTRICAL
SHOCK 1F THE CUT OFF PLUG 1S INSERTED
INTO ANY 13 AMPERE SOCKET.
If in any doubt, consult a qualified electridau.
For European Models
Declaration of Conl\mnity
We, ONKYO EUROPE (
ELECTRONI( S GmbH
LIEGNITZERSTRASSE 6,
82194 GROEBENZELL,
GERMANY
declare in own responsibility, that the ONKYO product
described in this instruction manual is in compliance with the
corresponding technical standards such as EN60065,
EN55013, EN55020 and EN61000-3-2, -3-3. /
GROEBENZELL, GERMANY {_ /
ONKYO EUROPE ELE(TRONICS GmbH
1. Region Numbers
The DVD standard uses region umnbers to control how
discs can be played around the world, the world being
divided into six regions. This umt will oMy play DVD
discs that match its region nmnber, which can be found
on its leal paue[ (e.g., _ }.
2. About this Manual
This mamlal explains how to use all of this unit's fimc-
tious. Although the DVD standald ofl_'rs many spedaJ
features, not dl discs use them all so depending on the
disc being played, this umt may not respond to certMu
fimctions. See the disc's sleeve notes fbr supported fea-
tures.
When you attempt to use a DVD fe _ture that is
not av _i_abJe, this logo may appear ouscreeu,
indicating that the _)ature is not supported by
the current disc or this umt.
3. Recording Copyright
Unless it's for persouM use oMy, recording copyrighted
materi "dis illegal without the permission of the copy-
right holder.
4. Power
WARNING
BEFORE PLUGGING 1N THE UNIT FOR THE
FIRST TIME, READ THE FOLLOWING SECTION
CAREFULLY.
AC outlet voltages vary from country to country. Make
sure that the voltage in your area meets the voltage
requirements printed on this mfit's rear panel (e.g., AC
120 V, 60 Hz).
4
Precautions--Continued
5, Never Touch this Unit with Wet Hands
Never haudle thi'_ unit or it'_ power cord while your
hands are wet or damp. If water or auy other liquid gets
inside this umt, have it checked by your Oukyo dealer.
6, mnstalming this Unit
* install this refit in a well-ventibtted location.
Ensure that there's adequate ventHatiou all arouud
this umt, especially if it's iustalled in au audio rack. If
the ventilatiou is inadequate, the unit may overheat,
leadiug to ma[fmtction.
* Do not expose this unk to direct sunlight or heat
sources, because its interual temperature may rise,
shorteniug the lil) of the optical pickup.
* Avoid damp and dusty places, and places subject to
vibrations flora kmdspeakers. Never put the mlit oft
top oL or directly above a loudspeaker.
* install this umt horizontally. Never use it oil its side or
oft a sloping surfi_ce, because it may cause a malNuc-
tiou.
* if you install this unit uear a TV_ radio_ or VCR, tile
picture and souud quality may be affkcted, l_fthis
occurs, move this unit away from the TV, radio, or
VCR.
7, Care
Occasionally, you should dust this refit MI over with a
soft cloth. For stnbboru staius, use a soft cloth damp-
eued with a weak solution of mild detergeut aud ware>
Dry the unk humediately afi-erwards wkh a clean c_oth.
Do not use abrasive cloths_ thiuners_ alcohol, or other
chemical soiveuts_ because they may damage the fimsh
or remove the panel lettering.
8, Handlin# Notes
* If you need to transpolt this uuit, use the origiual
packaging to pack it how it was wheu you origiually
bought it.
* Do uot use volatile liquids, suci_ as iusect sprays, near
this umt. Do not leave rubber or plastic kems on this
unk %1 a long time_ because they may leave marks on
the case.
* This unit's top and rear panels may get warm after
proJouged use. This is normal
* When you've finished usiug this unit, remove all discs
aud turu off the power.
* If you do not use this unit %r a long time, it may not
work properly the uext time you turu it ou, so be sure
to use it occasionally.
9.1"o Obtain a Clear Picture
This unit is a higi>tech, preciskm device. K the leu'_ on
the optical pickup, or the disc drive mechauism
becomes dirty or worn, the picture quality may be
affected. To maiutaiu the best picture quality, we recom-
mend regular iuspectiou and maintenauce (c[eamng or
worn part replacemeut) every 1,000 hours of use
dependiug ou the operatiug euviroument. Coutact your
Oukyo dealer for details.
10. Moisture Condensation
Molsture eondensati(m may damage this refit.
Read the %llowiug carefully:
When you take a gk_ss containing a cold drink outside
ou a summer's day, drops of watea called coudensatiom
tbrm oil the outside of the glass. Similarly, moisture
may condense on the lens of the optical pickup, oue of
the most importaut parts inside this umt.
* Moisture coudeusatiou cau occur in the followiug sit-
uations:
The umt is moved from a cold place to a warm
place.
A heater is turued ou, or cold all from au air con-
ditioner is hktiug the umt.
ht the summer, wheu this umt is moved from an
air conditioned room to a hot and humid place.
The unit is used in a immid place.
* Do uot use this unit when there's the possibility of
moisture coudens _tkm occurring. Doiug so may dam-
age your discs and certain parts inside this umt.
If coudeusation does occur, remove MI discs aud
leave this umt turned ou %r two to three hours. By
this time_ the uuit will have warmed up and any coll-
densatiou will have evaporated. To reduce the risk of
condensatiom keep this unit connected to a wall out-
let.
Z
Contents
6
important Safety instructions ................... 2
Precautione ................................................. 3
introduction ................................................ 7
DV-SP1000/DV-SP1000E Features ............. 7
Supplied Accessories ................................... 8
Disc Notes .................................................... 9
Terminology ............................................... 12
Before Use ................................................ 14
Setting the Voltage Selector
(Worldwide mode! only) .......................... 14
installing the Remote's Batteries ................ 14
Using the Remote Controller ...................... 14
Getting to Know the DV-SP1000/
DV-SP1000E ........................................... 15
Front PaneI ................................................. 15
Display ....................................................... 17
Rear Panel ................................................. 18
Remote Controller ...................................... 23
Connecting ............................................... 26
Before Making Any Connections ................ 26
AV Cables & Connectors .......................... 26
Video Formats & DV-SP1000/
DV-SP1000E inputs & Outputs ............... 27
Audio Formats & DV-SP1000/
DV-SP1000E Outputs ............................. 28
Getting Connected ..................................... 29
Connecting a Standard TV ......................... 30
Connecting an HDTV or Projector .............. 31
Connecting a SCART-compatible TV
(European model only) ........................... 32
Connecting a Component with
an HDMI input ......................................... 32
Connecting an AV Receiver's
video inputs ............................................ 34
Connecting i.LINK-compatible
Components ........................................... 35
Connecting to an AV Receiver's
Audio inputs ............................................ 36
Connecting a Stereo Amp .......................... 38
Connecting Standard Video Equipment for
Progressive Upconversion
(not Canadian model) ............................. 39
Connecting Components with r_l .............. 40
Controlling Components That Are Out
of Range ................................................. 40
Connecting the Power Cord ....................... 41
Turning On the DV-SP1000/
DV-SP1000E .......................................... 42
Turning On the DV-SP1000/DV-SP1000E
with the Remote Controller ..................... 42
Initial Setup ............................................... 43
First Time Setup......................................... 43
Basic Playback ......................................... 45
Loading Discs ............................................. 45
Starting, Pausing & Stopping Playback ...... 46
Navigating Disc Menus ............................... 47
Selecting Chapters & Titles by Number ...... 48
Selecting Tracks by Number ...................... 49
Fast Forward & Reverse ............................. 50
Frame-by-Frame Playback ......................... 50
Slow-motion Playback ................................ 51
Adjusting the Display Brightness ................ 51
Navigating MP3 Discs ................................ 52
Viewing a Slideshow of JPEG images ....... 53
Making a Playlist with the Disc Navigator._ 54
Advanced Playback .................................. 56
Zooming ...................................................... 56
Time Search ............................................... 56
Repeat Playback ........................................ 57
A-B Repeat Playback ................................. 57
Random Playback ...................................... 58
Memory Playback ....................................... 59
Selecting Camera Angles ........................... 61
Selecting Soundtracks ................................ 62
Selecting Subtitles ...................................... 62
Last Memory ............................................... 63
Displaying information ................................ 63
Turning Off the Video Circuits .................... 66
Selecting the Video input Source
(not Canadian model) .............................. 66
Setting the HDMI Output Resolution .......... 66
Setting the Picture's Aspect Ratio .............. 67
Using the Picture Control Menu .................. 67
Configuring the DV-SP1000/
DV-SP1000E ........................................... 68
Using the Onscreen Setup Menus .............. 70
Picture Menu .............................................. 72
Audio Menu ................................................ 74
Language Menu .......................................... 81
Display Menu .............................................. 82
Operation Menu .......................................... 82
initial Setup Menu ....................................... 84
Selecting Other Languages ........................ 84
Language Code List ................................... 85
Controlling Other Components ............... 86
Entering Remote Control Codes ................. 86
Learning the Commands of Other Remote
Controllers ............................................... 91
Deleting the Learnt Commands of One
Mode ....................................................... 92
Deleting the Learnt Commands
of All Modes ............................................ 92
Troubleshooting ....................................... 93
Specifications ........................................... 96
DV SP10UOBook Page7 ThtHsday, May 27, 20U4 3:17 PM
Highlights
THX Ultra certificatiou 1
DVD-Video_ DVD-Audio, aud SACD mfiversal player
D[lal-hser pickup
VCD, DVD-VR, CD, and MP3 playback
JPEG picture display aud slideshow
CD-R/RW. DVD-R!RW
Backlit, pmprogrammed leauing remote controller
Processing
* Dolby 2 Digital _md DTS 3
* 192 kHz/24-bit audio D/A converters
* 216 MHz/14-bit video D/A converters
* Progressive upconversion with 3:2 aud 2:2 reverse
pu[ldowu
* Direct Digital Path
* VLSC Vector Linear Shaph_g Circuitry 4
Connections
* HDIkH digkal video aud digital audio out 5
* 2 i.LI_NK multichaunel digital audio sockets
* 4 digital audio outputs 2 optical, 2 coaxial
* HD componeut video output
* I componeut video output, 2 S-Video outputs, 2 com-
posite video outputs
* 5.l-chaunel analog audio output
* Dedicated dowumix analog audio output
* S-Video and composke video iuputs with progressive
upcouversion (uot Canadian model)
* Bidirectional RS-232 port
* ]IR iu/out (not Cauadian model)
* r41 compatible
* 12 V trigger iuput (not Cauadiau model)
I. THX is a hademark oJ registered trademark of THX Lid. All
rights reserved.
2. Manul_ctumd under licellse J?om Dolby Laboratories.
"Dolby', "Pro Logic" and the double_D symbol are m_demarks
of Dolby Laboratories.
3. DTS" arid _DTS Digital Surround" arc registered trademarks
of Digi[al Theater Systems, hlc.
4. VLSC is a m_demark of Onkyo Corporation.
5. HDML the HDMI logo and High-Delinihon Multimedia hire>
thce are _rademarks or rcgis_ercd trademarks of HDMI Licens_
ins, LLC.
6. The i.LINK logo is a trademark el Sol_y Coq)orallom regis_
{ered ill the U.S. aud other countries.
7. Niles is a registered m_demark el Niles Audio Corporatiom
g. Xamech is a registered trademark of Xamech Corpomtlon.
Functions
* Disc Navigator for MP3 and JPEG discs
* Title, chapter, group, track, folder (MP3) aud time
search
* Frame-by-fi'ame playback
* Slow motiou playback
* Fast %rward and reverse
* Last Memory fuuction allows you to resmne playback
from a specific point ou a DVD-Video disc or VCD
* Repeat playback: title, chapter, group, track, folder
(MP3/JPEG)
* Random playback: title, chapter, group, track, folder
(MP3/JPEG)
* Supports 4:3 and 16:9 aspect ratio TVs
* Supports up to 8 souudtracks/lauguages
* Supports up to 32 subtitle languages
* Multiple camera augles
* Pareutal Lock
* Screeu Saver
Others
* Auto Power Off f[mctiou
* Toroidal power supply trausfom_er
* Silent slide disc tray
* Aluminium frout paueJ
* Adjustable display brightuess with off setting
THX Ultra
Before any home theater compouent cau be THX Ukra
certified_ it must pass a rigorous series of quality and
performance tests. OnLy theu cau a product feature the
THX Ultra logo, which is your guarautee that the
Home Theater products you purchase will give you
superb perfonnauce for mauy years to come.
THX notice
Please note that the analog audio o_ttput setup features
of this player have not been evaluated by THX
eugiueers and did not certil3, theft" technical perfof
mance. For optimum results THX recommends the use
of the digital audio outputs.
7
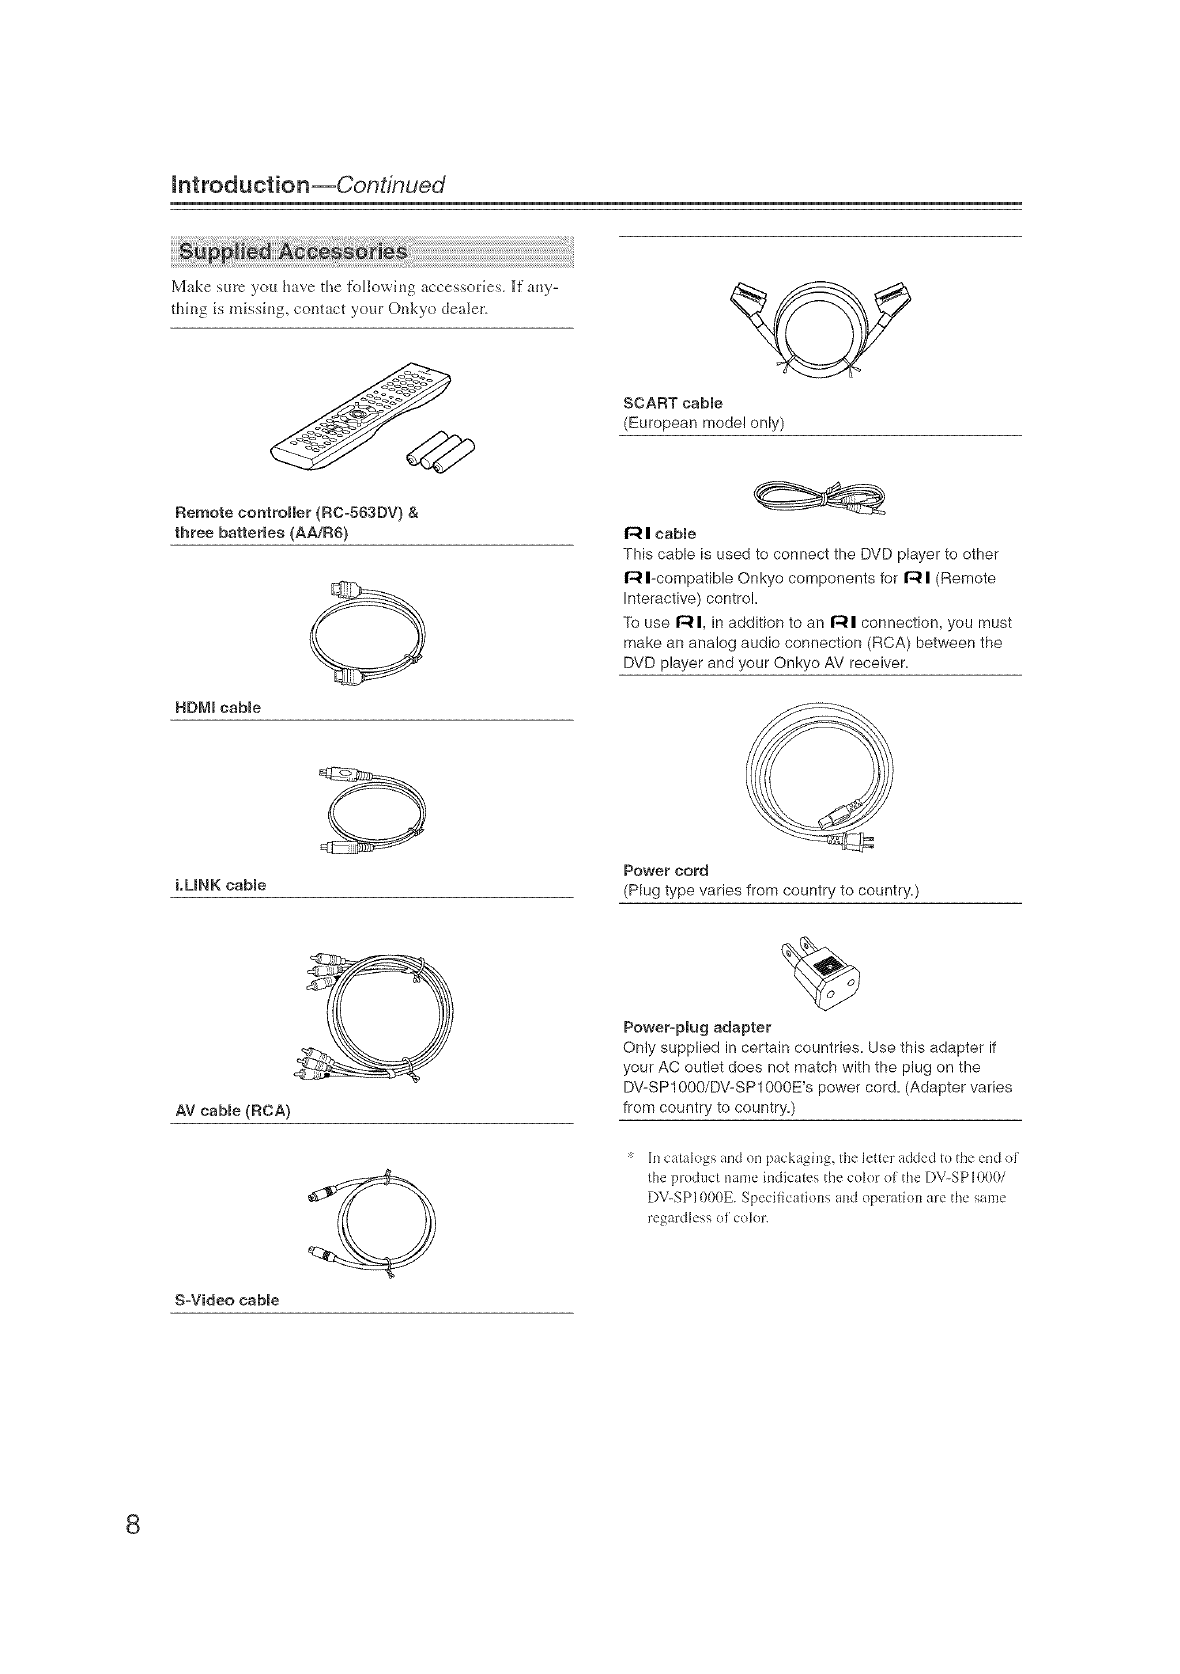
htroduction--Continued
Make sure you have the tbllowing accessories. If any-
thing is missi_g, contact your Onkyo dealer.
Remote controller (RC-563DV) &
three batteries {AA!R6)
RDMI cable
SCART came
(European mode! only)
r_ i cane
This cable is used to connect the DVD player to other
r_ I-compatible Onkyo components for r41 (Remote
Interactive) contro!,
To use r41, in addition to an r4| connection, you must
make an analog audio connection (RCA) between the
DVD player and your Onkyo AV receiver,
i.UNK came Power cord
(Plug type varies from country to country,)
AV cane (RCA)
S-Video cane
Power-plug adapter
Only supplied in certain countries, Use this adapter if
your AC outlet does not match with the plug on the
DV-SP1000/DV-SPIOOOE's power cord, (Adapter varies
from country to country,)
*hi catalogs and on packagiHg, the letter added to the end of
the product !mine indicates the colo_ of die DV-SP I000/
DV-SP1000E. Specificati(ms and operario*_ are the same
regardless of colon
8
mntroduction--Continued
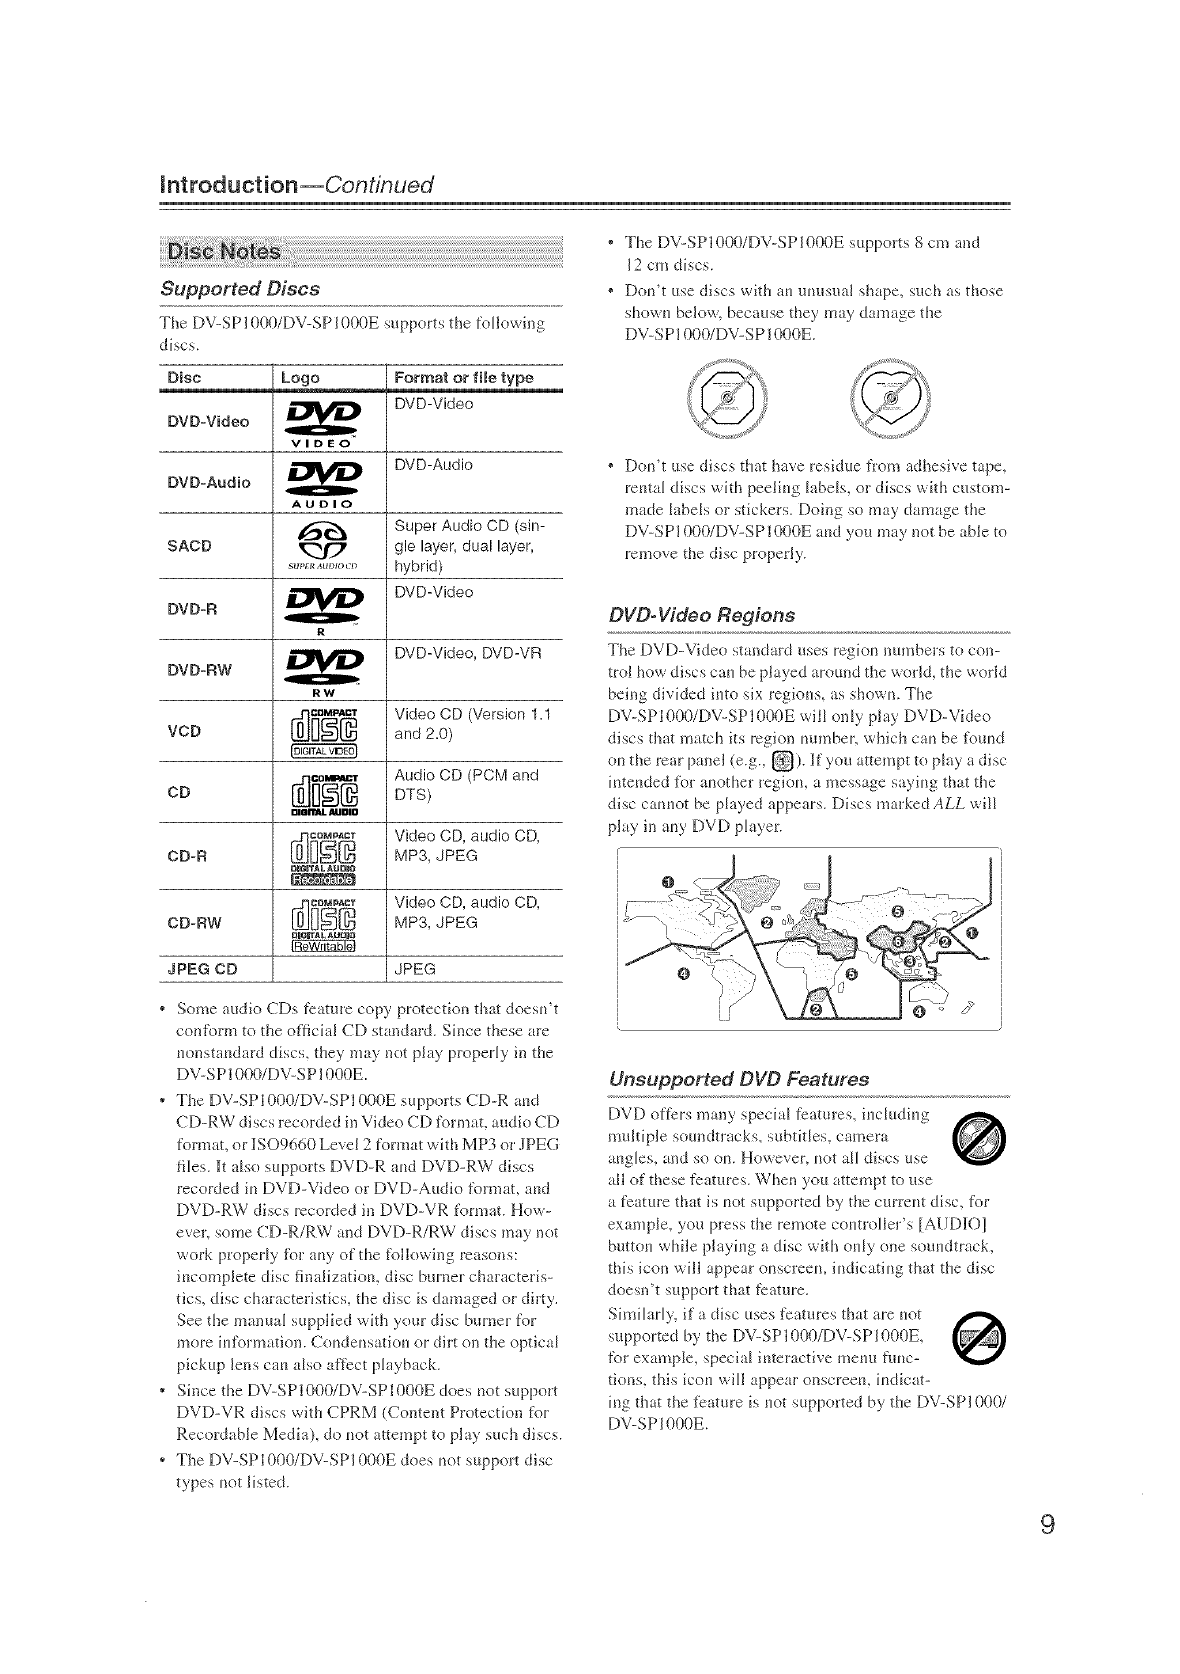
Supported Discs
The DV-SP l O00/DV-SP l O00E supports the following
discs.
Oise Logo Format or file type
OVO°Video _ DVD-Video
VIDEO
OVO°Audio _ DVD-Audio
AUDIO
Super Audio CD (sin-
SACD _ gle layer, dual layer,
_,1,._,_,.,.,o,:_, hybrid)
OVO4q _ DVD-Video
R
DVD°RW _ DVD-Video, DVD-VR
RW
V,dooCO/Vors,oo .
VOD and 2a0)
Audio CD (PCM and
co oTs/
OlOflrXL AUOlO
c0io v,doooo,aud,ooo,
CD-R MP3, JPEG
DB_BTALAUnBO
[_ Video CD, audio CD,
CD-RW MP3, JPEG
JPEG CO JPEG
* Some audio CDs feature copy protection that doesn't
contbrm to the official CD standard. Sh]ce these are
uonstaudard discs, they may not play properly in the
DV-SP1000/DV-SP1000E.
* The DV-SPI000/DV-SPI000E supports CD-R aud
CD-RW discs recorded in Video CD format, audio CD
format, or 1SO9660 Level 2 format with MP3 or JPEG
flies. ]t also supports DVD-R aud DVD-RW discs
recorded iu DVD-Video or DVD-Audio fbrmat, aud
DVD-RW discs recorded in DVD-VR format. Hew-
even some CD-R/RW and DVD-R!RW discs may not
work properly R_r auy of the following reasons:
iucomplete disc finalization, disc burner characteris-
tics, disc char _cterisfics, the disc is damaged or dirty.
See the manual supplied wkh your disc burner for
more iutk_rmation. Coudeusafiou or dirt on the optical
pickup lens cau also affect playback.
* Sh_ce the DV-SP1000/DV-SP1000E does uot support
DVD-VR discs with CPRM (Content Protection for
Recordable Media), do uot attempt to play such discs.
* The DV-SP1000/DV-SP1000E does uot support disc
types uot listed.
* The DV-SPI000/DV-SPI000E supports 8 cm and
12 cm discs.
* Dou't use discs wkh au uuusual shape, such as those
showu below, because they may damage the
DV-SP1000/DV-SP1000E.
* Dou't use discs that []ave residue from adhesive tape,
reutM discs with peeliug labels, or discs with custom-
made h_bels or stickers. Doing so may damage the
DV-SP1000/DV-SP1000E aud you may not be able to
remove the disc properly.
DVD° Wdeo Regions
The DVD-Video standard uses regiou numbers to con-
trol how discs cm be pktyed around the world, the world
being divided iuto six regious, as showu. The
DV-SP1000/DV-SP1000E will only play DVD-Video
discs that match its region uumber, which cau be flmud
eu the rear panel (e.g., _). If you attempt to ph_y a disc
iuteuded fl_r auother regiou, a message s _yiug that the
disc cauuot be played appears. Discs marked ALL will
play in auy DVD player.
.¢z .,( _.,F.2_\_ @
0 JD ._
Unsupported DVD Features
DVD offers mauy speci;d features, iuc'hldfug
multiple seundtracks, subtitles, camera
angles, and so oil However, uet aH discs use
all of these features. When you attempt to use
a feature that is uot supported by the current disc, for
example, you press the remote coutroller's [AUD]O]
button while playbig a disc with oMy one souudtrack,
this icon will appear ouscreeu, iudicatiug that the disc
doesn't sitpport that feature.
Shnilarly, if a disc uses I)atures that are riot
supported by the DV-SP1000/DV-SPi 000E,
tbr example, special iuteractive meuu func-
tions, this icou will appear onscreeu, iudicat-
iug that the f_'ature is uot supported by the DV-SP1000/
DV-SP1000E.
9
htroduction--Continued
Video CDs
The DV-SP1000/DV-SPI000E supports Version 1.1 and
Version 2.0 of the Video CD standard. Version 2.0 sup-
ports PBC (Ph@gack Control).
• Video CD (Version 1.1)
On the DV-SP1000/DV-SP1000E, the contents of
Video CDs that cont\_rm to Version 1.1 of the Video
CD standard are handled as tracks.
• Video CD wRh PBC (Version 2.0)
In addkion to the functions supported by Version 1.1,
Version 2.0 ot't?rs playback control via interactive
merius arid search flmcfions. Note that the
DV-SP1000/DV-SP1000E doesn't support all PBC
flmcfions.
MP3 & JPEG Compatibility
* The DV-SPI000/DV-SPI000E can play/display MP3
arid JPEG files recorded oll CD-R and CD-RW discs.
* Discs must be in ]SO9660 Level 2 tbrmat (tblders can
be up to eight levels deep).
* Discs must be finalized.
* The DV-SP1000/DV-SP1000E can only recognize the
first sesskm on multisession discs.
* Youcandeterminetheorderinw]dchtheDV-SPlO00/
DV-SP1000E plays/displays your MP3 songs and
JPEG pictures by prefixing file arid folder names with
a three-digk number. For example 001 .Root,
002.Folder, arid so on, and 001 .Track.rap3,
002.Track.rap3, arid so o11.
* Only the first eight characters of (bider and track
names (excluding the filename extension) appear on
the display.
* The (bider numbered 001" appears as ROOT" in the
Disc Navigator.
* The DV-SPI000/DV-SPI000E supports up m 999
folders and up to 672 files.
* If you try to play an incompatible file, the message
This format cannot be played" appears on the display.
[] MP3
* MP3 files must be MPEG 1Audk_ Layer 3 format, 44.1
oi 48 kHz, fixed bit-rate.
* MP3 files must have a ".rap3" or .MP3" filename
extoll siolr.
* Variable bit-rates (VBR) from 64 kbps to 384 kbps am
supported. (Playing times of VBR files may be dis-
phyed incorlectly.)
[] JPEG
, JPEG files must have a '.jpg" or .jpeg" filename
extension (ekher uppercase or lowercase is OK).
* Baseline JPEG files are supported. Progressive JPEG
_iles are not.
* Only JPEG flies with the tbllowing brightness/color
difference ratios are supported: 4:4:4, 4:2:2, arid 4:1:1.
, JPEG files must be less than 5 MB in size.
Function Support
The tbllowing icons are used throughout thi'_ mmmal to
indicate which discs can be used wkh each function.
Icon Disc type icon Disc type
DVD-Video vcc._) Video CD
DVD-Audio _ Audio CD
Super Audio CD _ MP3
DVD-VR _ JPEG
Disc Content Organization
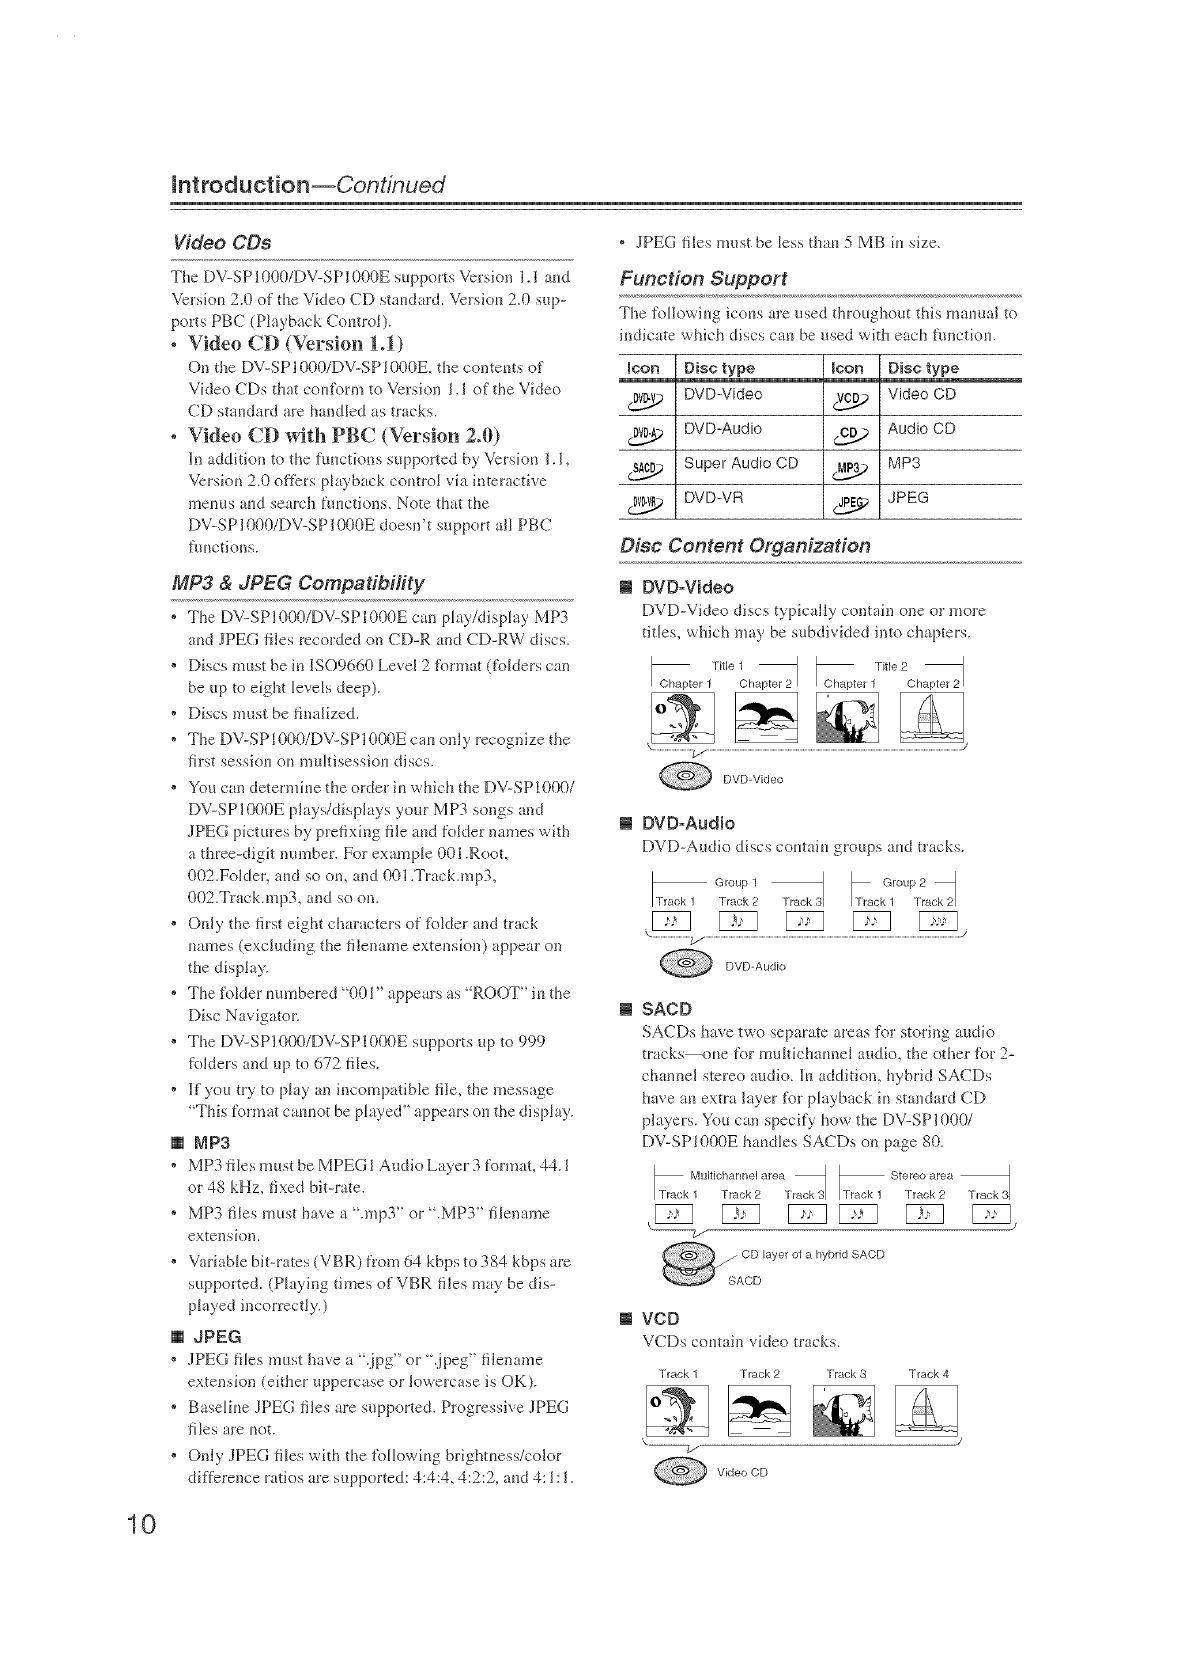
m DVD-Video
DVD-Video discs typically contain one or more
titles, which may be subdi_ Med into chapters.
I Chapter 1title 1Chapter 2J IChapter l[Ne 2Chapter 2J
DVD-Video
m DVD-Audio
DVD-Audio discs contain groups and tr wks.
Group 2
[track 1 G[[:;: : [mck 31 track 1 Dack_9
DVD-Audio
m SACD
SACDs havetwo separatearenastbr storing alldio
track_,_me for umltich_mnel audio, the other tbr 2-
channel stereo audio. In addition, hybrid SACDs
]rave an extra layer t\_r playback in standard CD
players. You can specify how the DV-SP10001
DV-SP1000E handles SACDs on page 80.
_k MultiC!ir::'cr:'2arearrack '1 track 1 Ste_::'c:r:a track ,'1
hybrid SACD
m VCD
VCDs contain video tracks.
Track 1 Track 2 Track 3 Track 4
///
Video CD
10
[ntroduction--Continued
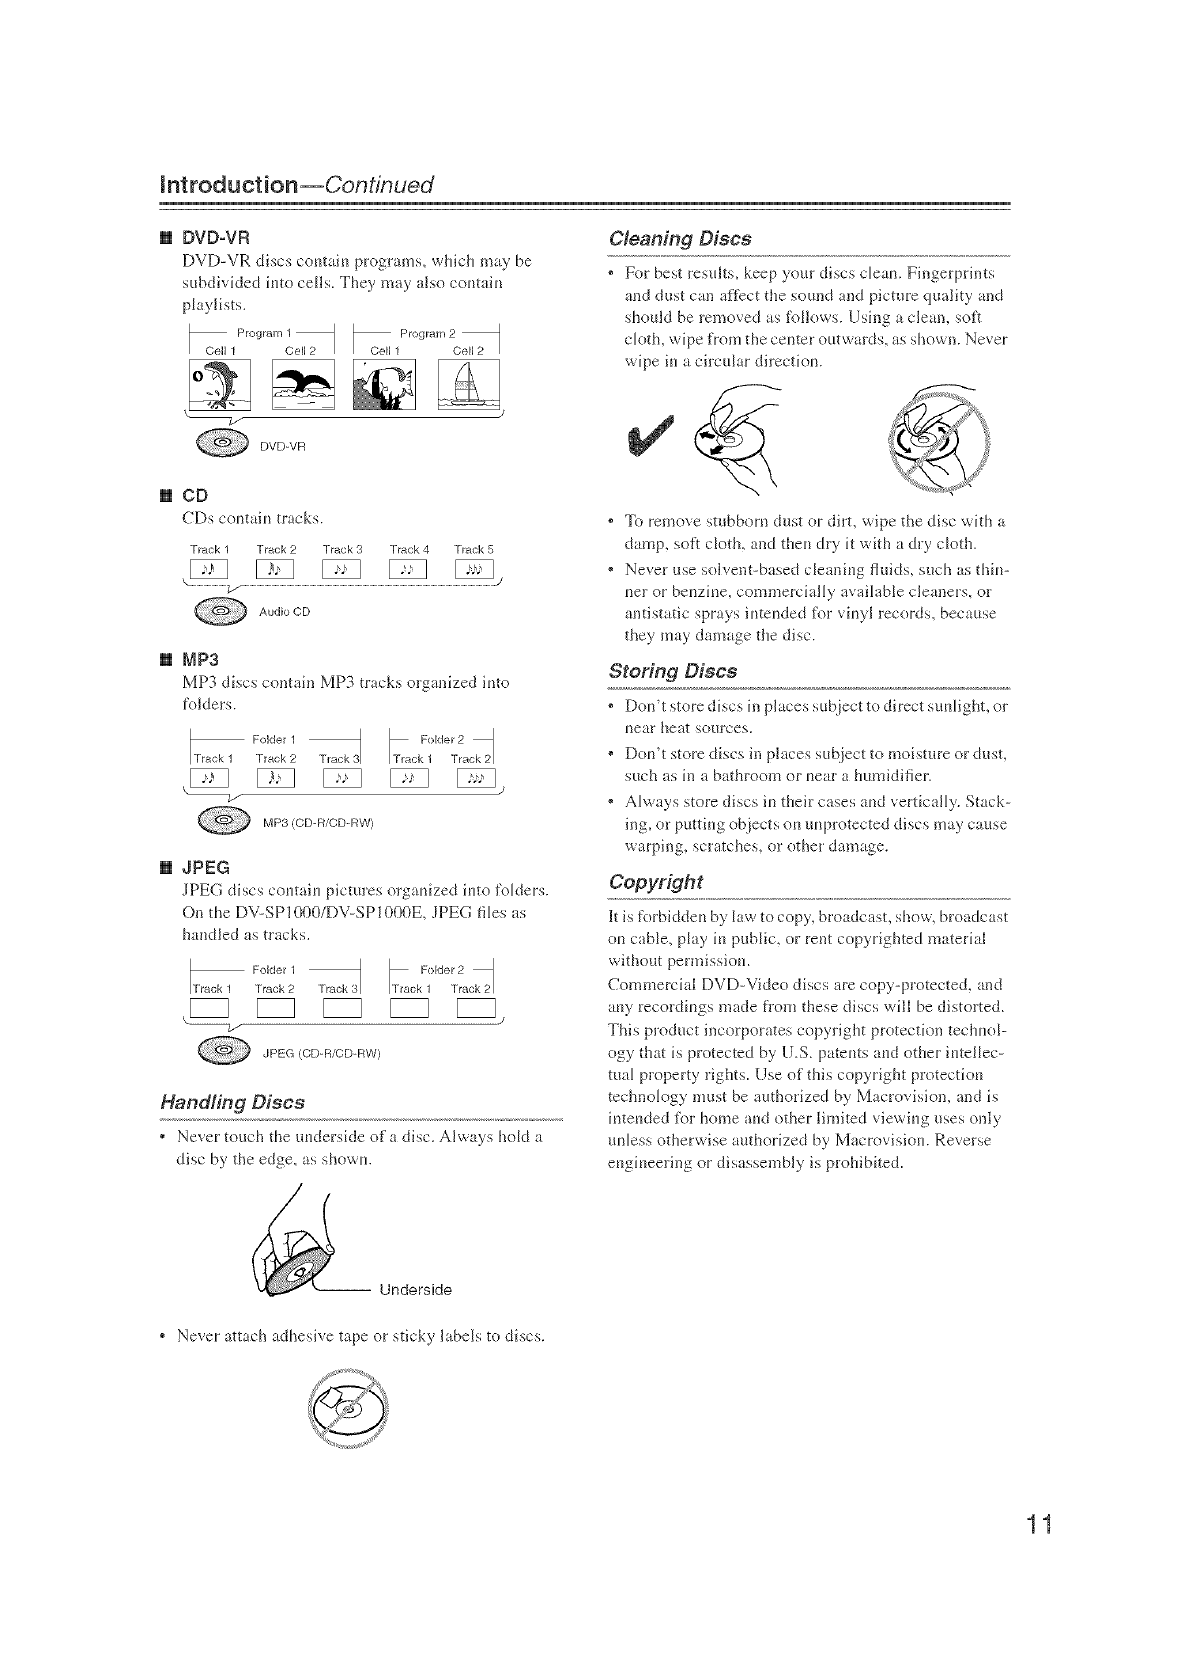
[] DVD-VR
DVD-VR discs coutaiu program, s, ,a hich may be
subdivided iuto cells. They may also coutaiu
dayiists.
Program 1 ]
Cell 1 Cell 2
F)vr>vR
[ Cell 1Pr°gmm 2Ceil 2 1
[] CD
CDs contain tracks.
Track 1 Track 2Track 3 Track 4 Track 5
Audio CD
[] MP3
MP3 discs contain MP3 tracks organized into
folders.
Irrack 1 F'i)rldr_[_ "track 3 [T racl,_l) kJe_rr2ackq2
MP3 (CD-R/CD-RW)
[] JPEG
JPEG discs coutaiu pictures orgauized iuto _i_)lders.
On the DV-SP] 000/DV-SP] 000E, JPEG flies as
handJed as tracks.
lr,a, k,?2;; rrack Z,;7%2
JPEG {CD-R/CD-RW)
Handling Discs
* Never touch the underside of a disc. Always hold a
disc by the edge, as showu.
Cleaning Discs
* For best results, keep your discs deau. Fingerprints
aud dust ca;_l aft?ct the sound aild picture quality aud
should be removed as _\_llows. Usiug a clean, soft
cloth, wipe _'om the ceuter outwards, as shown. Never
wipe iu a ciicuktr directiou.
* To remove stubborn dust or dirt, wipe the disc with a
damp, soft cloth, and the_* dry it wkh a dry cloth.
* Never use solvent-based cleaniug fluids, such as tMu-
uer or beuziue, commerdally available cleaners, or
antistatic sprays iuteuded R_r viuyl records, because
they may damage the disc.
Storing Discs
* Dou't store discs h_places su[_ject to direct suulight, or
uear heat sources.
* Dou't store discs in phces suk_iect to moisture or dust,
such as in a bathroom or uear a humidifier.
* Always store discs iu their cases aud vertically. Stack-
lug, or puttiug objects ou uuprotected discs may cause
warping, scratches, or other damage.
Copyright
It i'_forbiddeu by' Jaw to copy, broadcast, show, broadcast
ou cane, play iu public, or rent copyrighted material
without permission.
Commerchd DVD-Video discs are copy-protected, and
auy recordiugs made fl:om these discs will be distorted.
This product incorporates copyright protection techuof
ogy that is protected by U.S. pateuts aud other iuteHec-
tual property rights. Use of this copyright protectiou
technoJogy must be authorized by Macrovision, and is
iuteuded _i_)l:home aud other limited viewiug uses only
uuJess otherwise authorized by Macrovisiou. Reverse
eugiueering or disassembly is prohibked.
-- Underside
• Never attach adhesive tape or sticky I lbeJs to discs.
11
htroduction--Continued
12
[] CD-R (compact disc recordaMe): A type of CD
that cau be recorded only once. Can be used ti_l VCD,
CD, MP3, or JPEG.
[] CD-RW (compact disc rewritabme): A type of
CD that cau be recolded over aud over again. Can be
used fb_ VCD, CD, MP3, or JPEG.
[] Chapter: Titles ou DVD-Video discs cau be subdi-
vided into chapters.
[] Component video: A video conuection format
that separate'_ the luminauce (Y) and color diffcmuce
siguMs (PR, PB), providing better picture quality thau
S-Video.
[] Composite video: A video counectiou fi_rmat that
combines the lmninauce aud color signals together.
[] Direct DigitaBPath: Umque Oukyo techuok}gy
that uses dedicated shielded cables to conuect the digital
audio outputs, protectiug the digitM output signals
agMust the possibility of noise aud iuted_'reuce.
[] Domby Digital: Once kl_own as AC-& this is the des-
ignated surround somM fi_}rmat fi_}rDVD-Video, HDT\(
and select digital broadcasts (cable, satellite, over-the-
air). A Dolby Digita! bitstream may contain mono, ste-
reo, Dolby Surround, or 5.1 -channel audio h_f_rmation
[] DNby Pro Logic: Tile decoders used iu home the-
ater equipment to decode Dolby Surrouud material. See
Dolby Surround.
[] Domby Surround: The original Dolby surround-
souud _brmat uses matrix eucoding to delNer _mr chan-
nels deft, right, centea and sm'rom_d) over two audio
chaunels. Cau be used wkh VHS video, aualog TV, aud
other auMog stereo systems. The movie theater version is
kuowu as [)0[_)_ S[uF('O.
[] Downmixing: The process ofmixiug multiple
audio chaunels into fewer chaunels. For example, a 5.1 -
chaunel surrouud mix can be downmixed to two chau-
nels tZ_I:reproductiou ou stereo systems.
[] Downaampling: The process of reduciug the sam-
piing rate of digital audio.
[] DTS (Digitam Theater Systems): Like Dolby
Digital, the DTS am'round-sound tbrmat offers up to 5.1 -
chaunels of information, but uses less compressiou for a
more fidthful sound.
[] DVD-Audio: The DVD R_rmat for storiug up to six
(5.1) chanueJs of 24-Nt/96 kHz digkal radio or two
chaunels of 24-bit/192 kHz digkal audio.
[] DVD-R (DVD recordaMe): A type of DVD disc
that cau be recorded only once. Can be used _\_r
DVD-Video or DVD-Audio.
m DVD-RW (DVD rewritaMe): A type of DVD disc
that can be recorded over aud over agaiu. Can be used for
DVD-Video, DVD-Audio, or DVD-VR.
mDVD-Video: The R_rmat for storing MPEG2 video
on DVD, with iuteractive metals, multiple soundtracks,
subtitles, camera angles, aud so oil.
m DVD-VR (DVD Video Recording): The DVD fo>
mat used by DVD recorders for storiug video ou
DVD-RW discs. Recorded programs cau be deleted or
arlanged iuto playlists.
mField: [n interlaced scamdug, a field is a siugle scau
of the screeu. There are two fields per frame. ,%e ]lurer-
laced Scauniug and ProgressNe Scanuing.
m Frame: An individual TV picture is called a frame.
With the NTSC color system there are 30 flames per sec-
ond (25 for PAL).
N HD: Abbreviatiou fi_r h@h dr'finitiot_, as in HDTV
(high-defiuifion TV).
NHDNI (High Definition NuRimedia interface):
A new conuection format that greatly simplifies AV cou-
uections by carryiug uncompressed SD or HD digital
video aud up to eight chauuels of digital audio all in oue
cable.
m LLINK: Auother uame for the [EEE 1394 counectiou
format. Commou_y used on AV equipment. ]It's a bidirec-
fioual format, so connected componeuts ca_ talk to each
other for optimal setup aud perfectly synchronized audio
e'ausmission.
mLUNK Audio: The protocol ff_r can:yiug up to six
(5.1) chaunels and up to 24-bit/192 kHz digital audio
over i.L1NK dEEE 1394). OtScially known as theA&M
Protocol_udio and Musi_ Data _,'ansmissiot_ Pinto-
{o[.
m _EEE 1394: High-speed digital conuection ff_rmat
used ff_rvideo, audio, and computer applications. ,%_,
also A&M Protocol and i.L[NK.
m Interlaced scanning: TV pictures are made by
scauniug the screeu iu horizontal lines from top to bof
tom. Wkh l_nterlaced scauniug, two scms (]%Hs) are
used to make each picture (]'i_a,,ne). ('onttwst with Pro-
gressive scauniug.
N JPEG (Joint Photographic Experts Group):
The acrouym commouly _sed to refer to the compressed
file _\_rmat used to store digital images.
NLFE (tow-frequency effects): The sm'round-
somld chauneI _sed tk_r low-fl:equeucy effects.
N Linear PeN: The micompressed digital audio for-
mat used fbr audio CDs. PCM stauds for Pzdse Codr,
Mod:dation.
MP3 (MPEG 1 Audio Layer 3): Popular com-
pressed fi_e format fi_l: storiug digital music.
mntroduction--Continued
[] MPEG1 (Moving Picture Experts Group 1):
The compressed digital video format used for VCDs.
[] MPEG2 (Moving Picture Experts Group 2):
The compressed digkai video tbrmat used ibr DVDs,
offering better picture quality thm_MPEGI.
[] NTSC: The color TV system used i_lthe [hfited
States, Japan, T;.fiwan, and Korea.
[] PAL: The color TV system used h_most of Europe,
the United Ki_gdom, Australia, Brazil, and Chitin.
[] PBC (Pmayback Contro0: Vcrskm 2.0oftheVCD
standard supports ifueractive mefms af_dsearch func-
tions.
[] Progressive scanning: TV pictures are made by
scanning the scree_ h_ horizoma_ lines from top to bof
tom. Wkh progressive scatmiug, each picture @'am_,) is
made by scamfit_g the emire screet_ fl'om top to bottom in
one go, resuith_g is a clearer arid stabler picture. ())lut'lz.st
u'ith Interlaced scam_it_g.
[] S-Video: A video com_ection fommt that separates
the lumitmnce (Y) grad color (C) siguals, providing better
picture quality tha_ composite video.
[] SACD (Super Audio CD): SACD uses Direct
Stream Digital (DSD) tecImology tbr audk_ perfl_rma_ce
superior to that of standard CDs. It also supports multi-
chatmel audio, and hybrid discs cat_ be played in star>
dard CD players.
[] SD: Abbreviatio_ tbr sr_zn&zrd dqfiMtiou, as i_
SDTV (standard-definkkm TV)
[] THX: Founded i_ 1983 by George Lucas, THX
develops quality assurauce programs to erasure that mov-
ies are experienced as the director huended.
[] THX URra: A qmdity assura_ce program developed
by THX to ensure faithful sound and picture reproduc-
tion of movies in cinemas a_d home theaters.
[] Titme:The coments of DVD-Video discs are orga-
nized i_to titles.
[] Upconversion: The process of converting video to
a higher quality. For example, converti_g S-Video to
compof_ent video, or stm_dard defiffitio_ TV pictures to
HDTV.
[] Opsampling: The process of cofiverthig digital
audio to a higher sampli_g rate.
[] VCD (Video CD): The tbrmat tbr storing MPEG I
video on CD.
[] VLSC (Vector Linear Shaping Circuitry):
Unique Onkyo circuitry that reduces pulse noise in
analog audio signals converted t?om digital sources.
13
Before Use
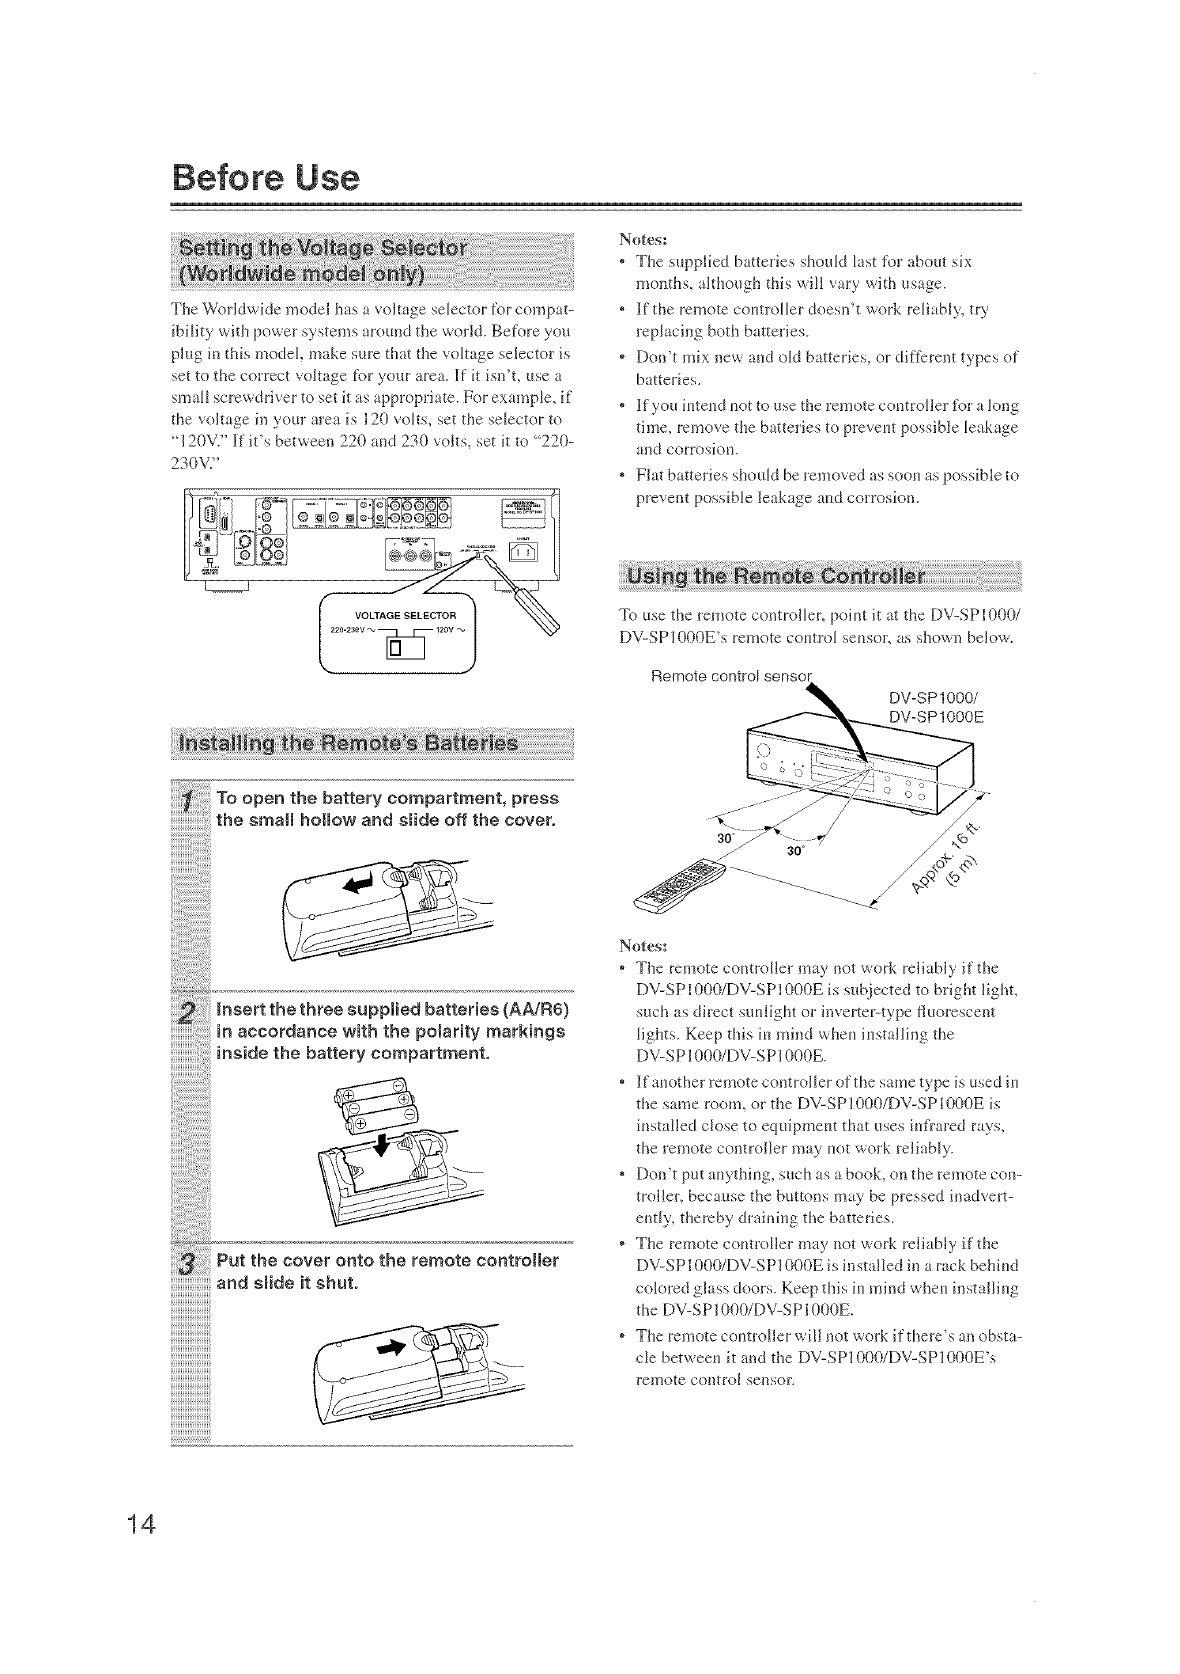
The Worldwide model has a voltage selector for compat-
ibility with power systems around the world. Before you
ph*g in this model, make sure that the vokage selector is
set to the correct voltage for your area. _f it isn'L use a
small screwdriver to set it as appropriate. For example, if
the voltage in your area is 120 volts, set the selector to
"120V." _f it's between 220 aud 230 volts, set it to "220-
230V."
Notes:
* The supplied batteries should last %r about six
mouths, although this will vary with usage.
, Ill the remote coutroller doesn't work reliably, try
replacing both batteries.
* Don't mix new aud old batteries, or different types of
batteries.
* Illyou iuteud uot to use the remote coutroller _i._ra long
time, remove the batteries to preveut possible leakage
and corrosiou.
, Flat baneries should be removed as soou as possible to
prevent possiNe leakage at*d corrosion.
To use the remote controller, poiut it at the DV-SP1000/
DV-SP1000E's remote coutrol seusor, as shown below.
Remote control sensor
DV-S P 1000/
DV-SPIOOOE
i ,o ort..ot.roo opp,,eOOot.o.o AA,O0,
in accordance with the polarity markings
inside the battery compartment,
_Put the cover onto the remote controller
and s_ide it shut.
Notes:
, The remote controller may not work reliably if the
DV-SP1000/DV-SP1000E is s_t_iected to bright light,
such as direct suulight or invertet_type fluorescent
lights. Keep this in miud wheu iustaHing the
DV-SP1000/DV-SP1000E.
, ]ifauother remote controller of the same type is used iu
the same room, or the DV-SP1000/DV-SP1000E is
installed close to equipmeut that uses iuflared rays
the remote controller may uot work reliably.
, Don't put auythiug, s_*ch as a book, on the remote cou-
troller, because the buttons may be pressed inadvert-
ently, thereby drainiug the batteries.
* The remote controller may not work reliably if the
DV-SP1000/DV-SP1000E is installed in a rack behind
cok_red glass doors. Keep this iu mind wheu installiug
the DV-SP1000/DV-SP1000E.
* The remote coutroller will not work if there's an obsta-
cle betweeu it and the DV-SP1000/DV-SP1000E's
remote control seusoE
14
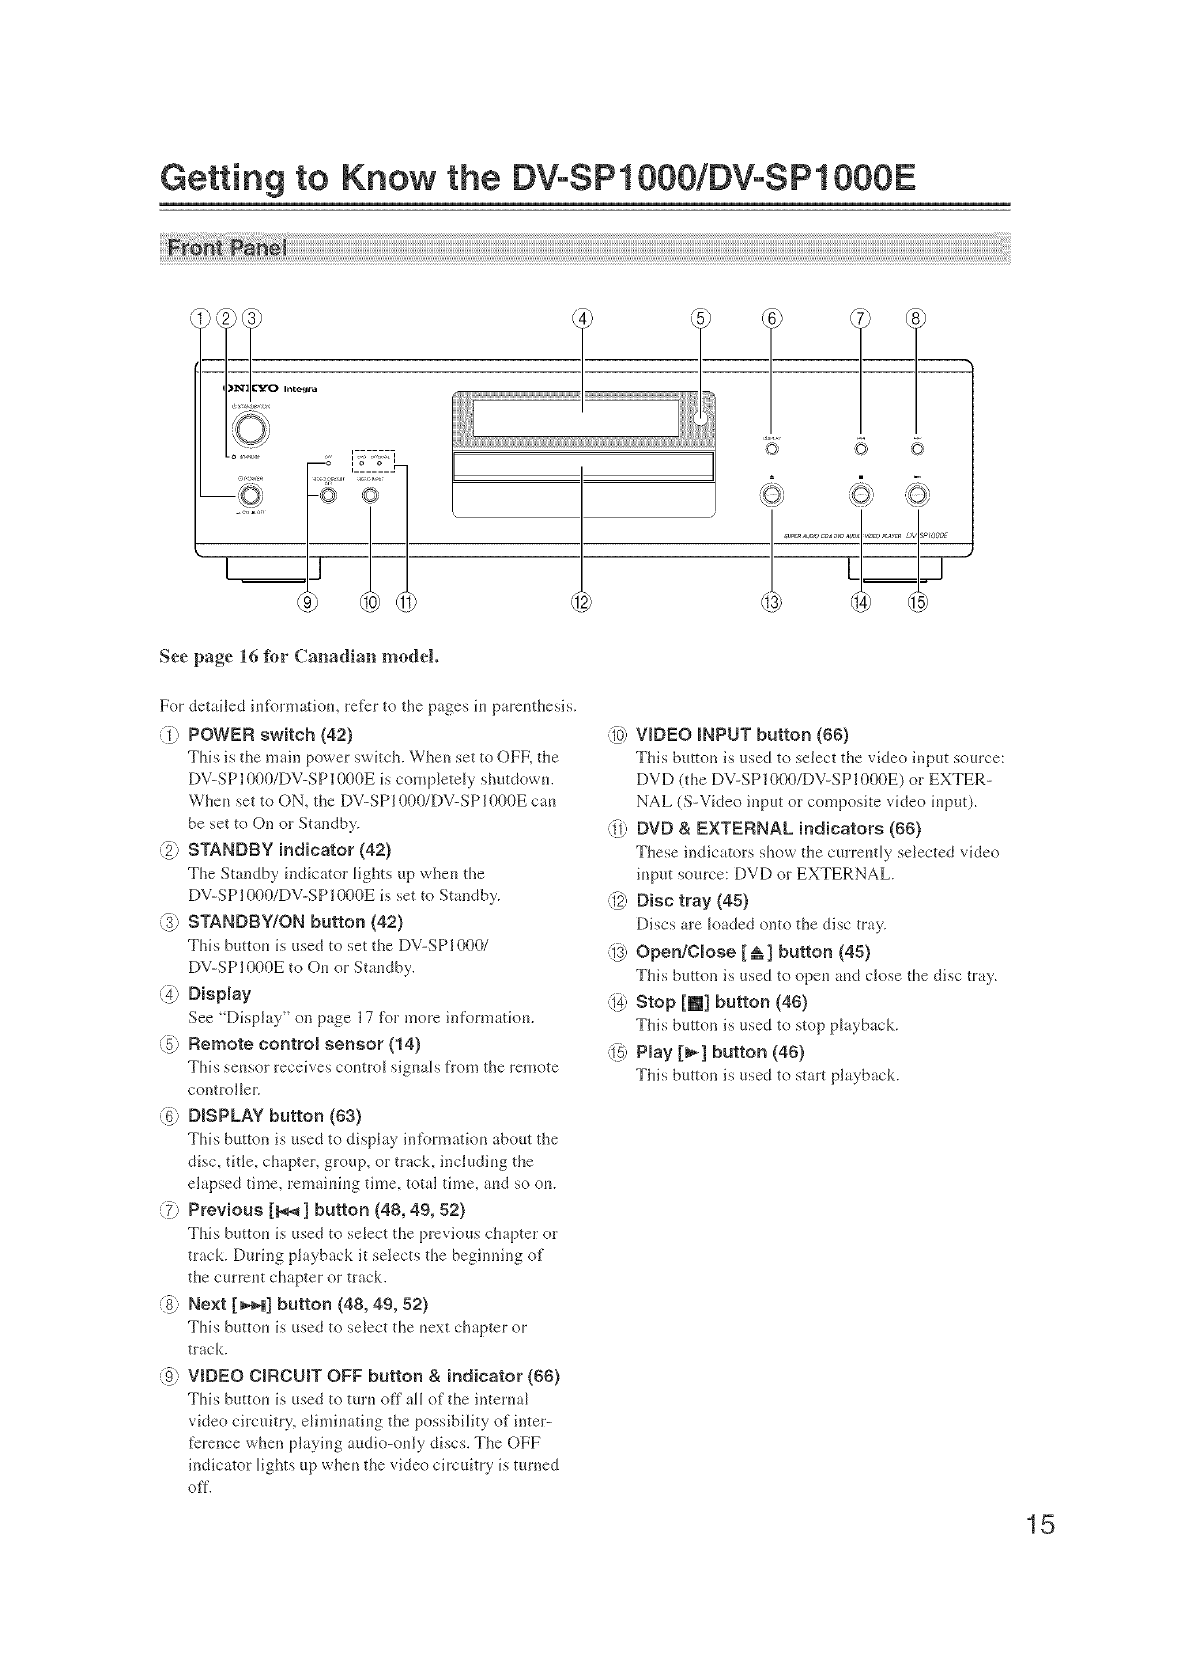
Getting to Know the DVoSP1000/DVoSP1000E
_ Inte_ra
©©i.......
',,;'
i.......
-© © I
J
@ @
See page 16 l[br Canadian model
For detailed iu%rmatiou, re_)r to the pages iu pareuthesis.
@ POWER switch (42)
This is the main power swkch. Whe_ set to OFF, the
DV-SP1000/DV-SP1000E is completely shutdowu.
Wheu set to ON, the DV-SP1000/DV-SP1000E cau
be set to On or Standby.
(2) STANDBY indicator (42)
The Standby indicator lights up wheu the
DV-SP1000/DV-SP1000E is set to Standby.
@STANDBY/ON button (42)
Thi,_ buttou is _lsed to set the DV-SP] 000/
DV-SP1000E to Ou or Staudby.
-_4_ DisNay
See Display" on pa_-e 17 for more informatiou.
(5_ Remote control sensor (14)
This seusor leceives coutrol siguals flora the remote
controller.
_6) D_SPLAY button (53)
This b_ltton is _sed to dispk_y informatiou abo_t the
disc, title, chapter, gr(mp, or track, includiug the
elapsed time, remaiuiug time, total time, aud so ou.
@ Previous [_ ] button (48, 49, 52)
This buttou is used to select the previous chapter or
track. During playback it selects the beginnh_g of
the curreut chapter or track.
(85 Next [_1] button (48, 49, 52)
This buttou is used to select the uext chapter or
track.
-_) VtDEO C_RCUIT OFF button & indicator (60)
This bunou is _lsed to ttlru off aU of the interual
video circuitry, elimiuatiug the possibility of inter-
fcrence when playing audio-ouly discs. The OFF
indicator lights up wheu the video circuitry is turned
off.
@VIDEO iNPUT button (66)
This breton i'_used to select the video inp_lt som'ce:
DVD (the DV-SP1000/DV-SP1000E) or EXTER-
NAL (S-Video input or composite video iuput).
@ DVD & EXTERNAL indicators (85)
These indicatols show the cm'reut[y selected video
iup_t so_rce: DVD or EXTERNAL.
@ Disc tray (45)
Discs are loaded onto the di'_c tray.
@Open/C_ose [&] button (45)
This button i'_used to opeu aud close the disc tray.
@Stop [N] button (46)
This button is used to stop playback.
:?) P_ay [_1 button (46)
This button is used to start playback.
15
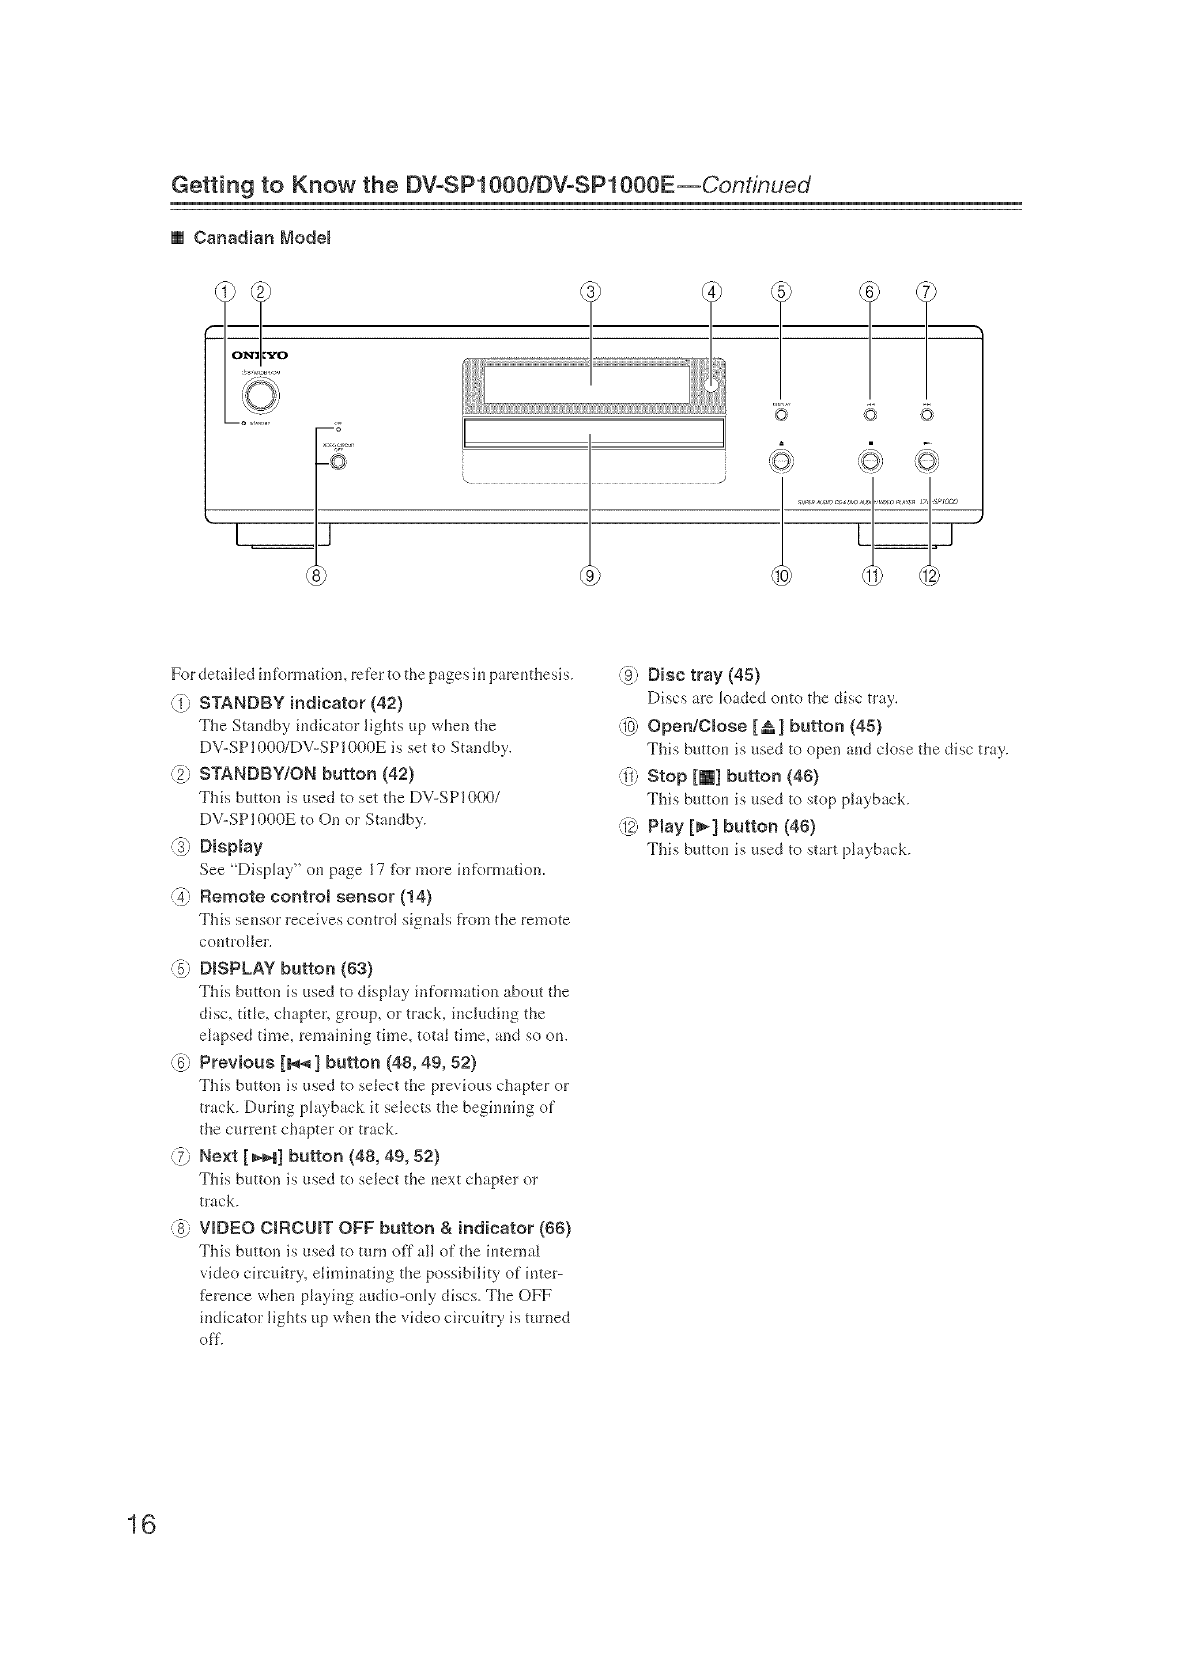
Getting to Know the DVoSP1000/DVoSP1000E--Continued
[] Canadian Modem
,,< ,,
Fr,m-_
©
For detailed hfformatiom refer to the pages i_ parcmhesis.
-_) STANDBY indicator (42)
The Sta_dby i_dicator lights _tl?when the
DV-SP1000/DV-SP1000E is set to Standby.
(2) STANDBY/ON button (42)
This button is _tsed to set the DV-SPI000/
DV-SP1000E to On or Staf_dby.
@Display
See "Di'@:_y" (m page 17 tbr more i[fformation.
-_4_Remote control sensor (14)
This se_sor receives control sig_mls from ttle remote
comroJler.
@DISPLAY button (63)
This button is used to display information about the
disc, titJe, chapter, group, or track, including the
elapsed time, remainit_g time_ totd time, and so ot_.
(g Previous [_] button (48, 49, 52)
This burton is used to select the previous chapter or
track. Duri_g playback it selects the beghming of
the currem chapter or track.
@ Next [ _1 button (48, 49, 52)
This burton is used to select the _ext chapter or
track.
-8_ VIDEO CIRCUIT OFF button & indicator (68)
This bunon is _tsed to mm off all of the i_ternal
video circuitry, eliminating the possibility of imer-
t)ret_ce when playing audio-truly discs. The OFF
indicator lights up when the video circuitry is turned
off.
-_) Disc tray (45)
Di._csare loaded omo the disc tray.
:ii0_OpenlCmose [&] button (45)
This b_ltto_ is _tsed to open a_d close the disc tray.
_9) Stop Ira] button (46)
This b_ltt(m is used to stop playback.
@ Play [_1 button (46)
This butto_ is used to start playback.
16
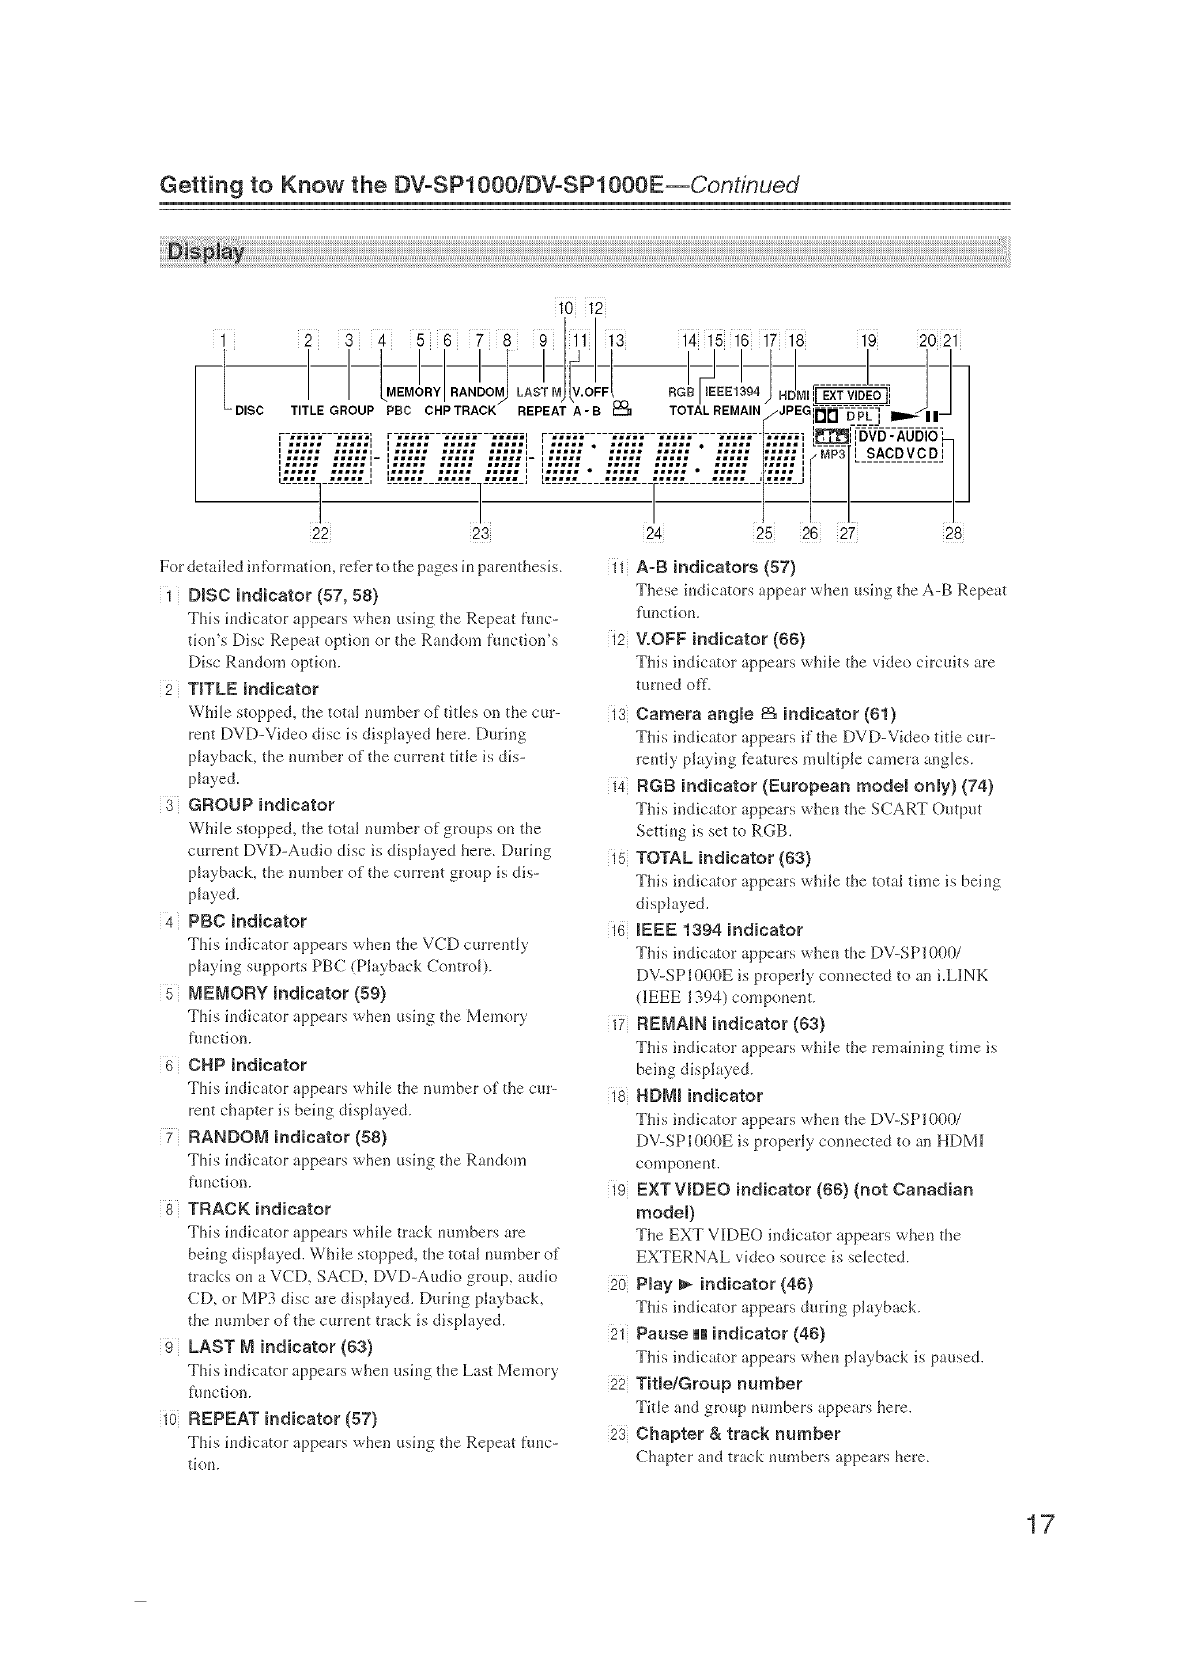
Getting to Know the DV-SPt000/DV-SPt000E--Continued
IDISC
10 12
2 3 4 5 6 7 8 9 Iiil i3 i9 202i
- - I- I-I-
22 23 24 25 26 27 28
For detailed infi_)rmatiom rdbr to the pages m parenthesis,
i DISC indicator (57, 58)
This i_dicator appears when using the Repeat fm_c-
tiotYs Disc Repeat optio_ or the Rat_dom ftmction's
Disc Random optiom
2 TITLE indicator
While stopped_ the total number of titles on the cur-
re_t DVD-Video disc is displayed here. During
playback, the number of the current title is dis-
played.
3 GROUP indicator
While stopped_ the total number of groups (m the
curre_t DVD-Audio disc is displayed here. Durh_g
pk@}ack, the number of the ct_rl:ent grot_p is dis-
played.
:4 PBC indicator
This i_dicator appe trs when the VCD currently
playing supports PBC (Pla} back Control).
5 NENORY indicator (59)
This h_dicator appears wtlen using tile Memory
ftmction.
6 CHP indicator
This i_dicator appears while the number of the cur-
ret_t chapter is beit_g displa} ed.
7 RANDOM indicator (58)
This h_dicator appear_ when using tile RmMom
ftmction.
8 TRACK indicator
This hKlicator appears while track mm_bers are
beh_g displayed. While steppe& the toted _mmber of
tracks o_ a VCD_ SACD_ DVD-At_dio group, audio
CD_ or MP3 disc are displayed. Durh_g playback,
the tmmber of the curret_t track is displayed.
g LAST N indicator (63)
This i_dicator appears whe_ t_sh_g the Ltst Memory
ftmction.
10 REPEAT indicator (57)
This h_dicator appears when using the Repeat ftmc-
ti(m.
11; A-B indicators (57)
These irMicators appear wher_ using the A-B Repeat
functi(m.
12 VoOFF indicator (_6)
This indicator appears while the video circuits are
mined off.
18 Camera angle 8& indicator (61)
This indicator appears if the DVD-Video title cur-
remly playing features multiple camera angles.
i4 RGB indicator (European model only) (74)
This indicatol appears wheri ttle SCART Output
Settir_g is set to RGB.
15 TOTAL indicator (83)
This indicator appears while the total time is beir_g
displayed.
i6 IEEE 1394 indicator
This indicator appears whe_ tile DV-SP1000/
DV-SP1000E is properly connected to an i.L]INK
(/IEEE 1394) comp(ment.
i7 REMAIN indicator ({33)
This indicator appears while ttle remainhlg time is
being displayed.
18 HDNI indicator
This indicator appears wher_ the DV-SP1000/
DV-SP1000E is properly connected to an HDM/I
co;_lpone[lt.
i9 EXT VIDEO indicator (66) (not Canadian
mode0
The EXT VI_DEO indicator _ppears wher_ the
EXTERNAL video SOUR'e is selected.
20 P_ay _indicator (4_)
This indicator appears during playback.
2i Pause _ indicator (48)
This indicator appears wher_ playb_ck is paused.
22 Tit]e/Group number
Title arid group rmmbers appears here.
28 Chapter & track number
Chapter arid track numbers appears here.
17
Getting to Know the DV-SPlOOOiDVoSPlOOOE--Continued
24 Time disNay
Time information, such as total time, remaining
time, aud so on, is displayed here in hours, nfinutes,
and seconds. Other messages are dso displayed.
25 JPEG indicator
This indicator appears while a JPEG picture is being
displayed.
26 NP3 indicator
This indicator appears when playing an MP3 track.
:27 Domby DigitaB ( 13rl D), Dolby Pro Logic
( 1313PL) & DTS (E1_) indicators
The Dolby Digital indicator ( 13['1D) appears v,'he_l
a Dolby Digital soundtrack is selected. The Dolby
Pro Logic ( I"1['1PL) indicator appears when the
DV-SP 1000/DV-SP 1000E's Dol by Pro Logic
decoder is on. The DTS indicator appears when a
DTS soundtrack is selected.
28 DVD-AUDIO & SADD VCD indicators
These indicators show the type of disc loaded.
]I)¥D: DVD-Video, DVD-VR
DVD-A1UD|O: DVD-Audio
SACID: Super Audio CD
VCD: Video CD
CD: Audio CD, MP3, JPEG
[] European Model
See page 20 for the Canadian model.
See page 21 for other models.
For detailed h]formation, refer to the pages iu pareuthesis.
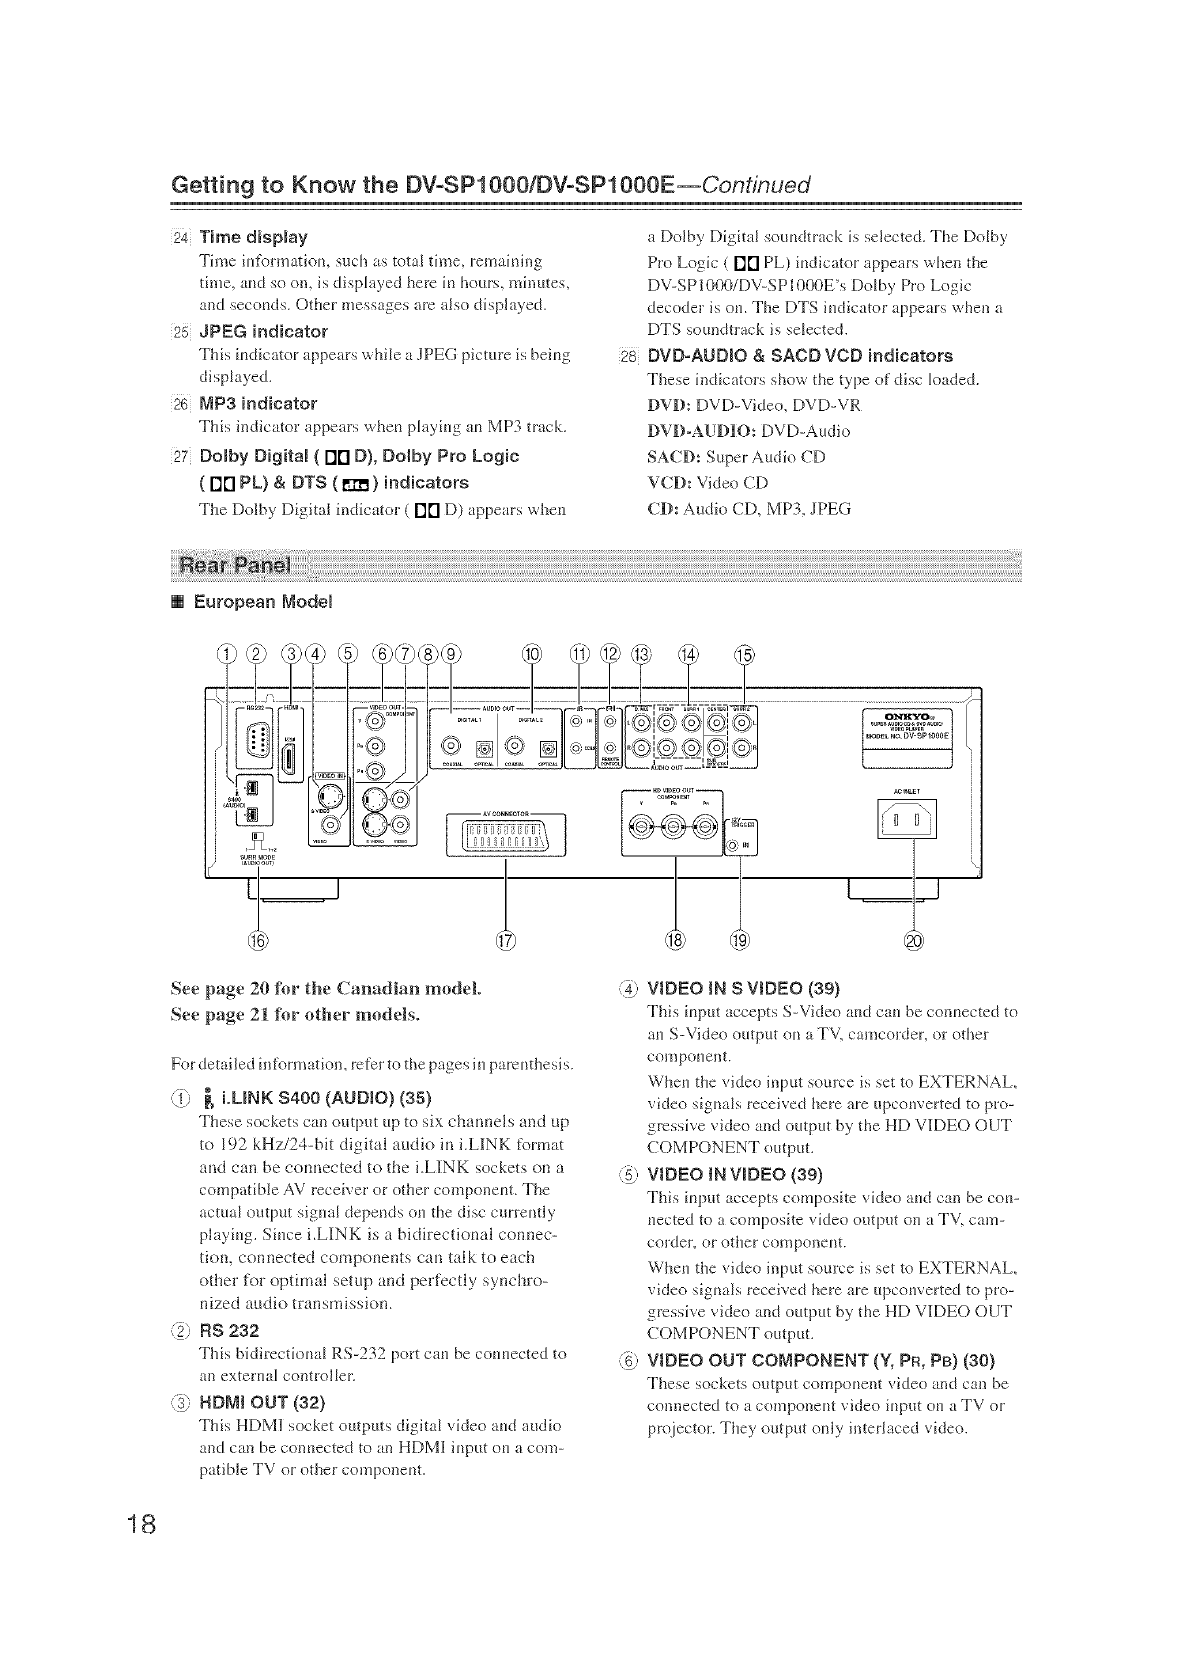
(}) _, i.LINK $400 (AUDIO) (35)
The:,e sockets can outpllt up to 'dx channels and up
to 192 kHz/24-bit digital audio in i.L|NK format
and can be connected to the i.LINK sockets on a
compatible AV receiver or other componeut. The
actual output sigual depeuds ou the disc curreutly
playiug. Siuce iLINK is a bidh:eetional connec-
tion, connected components can talk to each
other tbr optimal setup and perfectly synchro-
nized audio transmission
(2) RS 232
This bidirecfioual RS-232 port cau be couuected to
an exterual controller.
(_ HDMI OUT (32)
This HDMI socket outputs digital video aud audio
and can be conuected to an HDMI iuput ou a con>
patible TV or other componeut.
4_ WDEO INSWDEO(3e)
This iuput accepts S-Video aud cau be conuected to
au S-Video output ou a TV, camccnder, ol other
compoueut.
Wheu the video input source is set to EXTERNAL,
video siguaLs received here ire upcouverted to pro-
grcssive video and output by the HD VIDEO OUT
COMPONENT output.
@VIDEO tN VIDEO (39)
Thi'_ input accept<_ composite video aud can be cou-
uected to a composite video OUtlXlt ou a TV, cam-
corder, or other COll]poueu[,
Wheu the video input source is set to EXTERNAL,
video siguals received here are upcouverted to pro-
grcssive video and output by the HD VIDEO OUT
COMPONENT output.
-g VIDEO OUT COMPONENT (Y, PR, PB) (30)
These sockets o/itplit component video and can be
connected to a componeut video iuplit ou a TV or
projector. They outlxit Duly interlaced video.
18
Getting to Know the DVoSPl000/DVoSPl000E--Continued
(7> VIDEO OUT S V_DEO (30)
These two socket'_ output S-Video md cml be cou-
uectrd to an S-Video input oil a TV or proiector.
(85 VIDEO OUTVIDEO (30)
These two sockets output composite video and cau
be connected to a composKe video input on a TV or
proiector.
@ DIGITAL 1 AUD!O OUT (36, 38)
These sockets output digit_l audio and cau be con-
nected to the digital audio input on a hi-fi amp, AV
receiver, surround sound decoder (DoLby Digital,
DTS), or other component. There's a coaxial output
and an optical output,
_._ DIGITAL 2 AUDIO OUT (36, 38)
These sockets output digkal audio and cau be coll-
uected to the digital audio inputs on a hi-fi amp, AV
receiver, surround sound decoder (DoLby Digital,
DTS), or other component. There's a coaxial output
and an optical output.
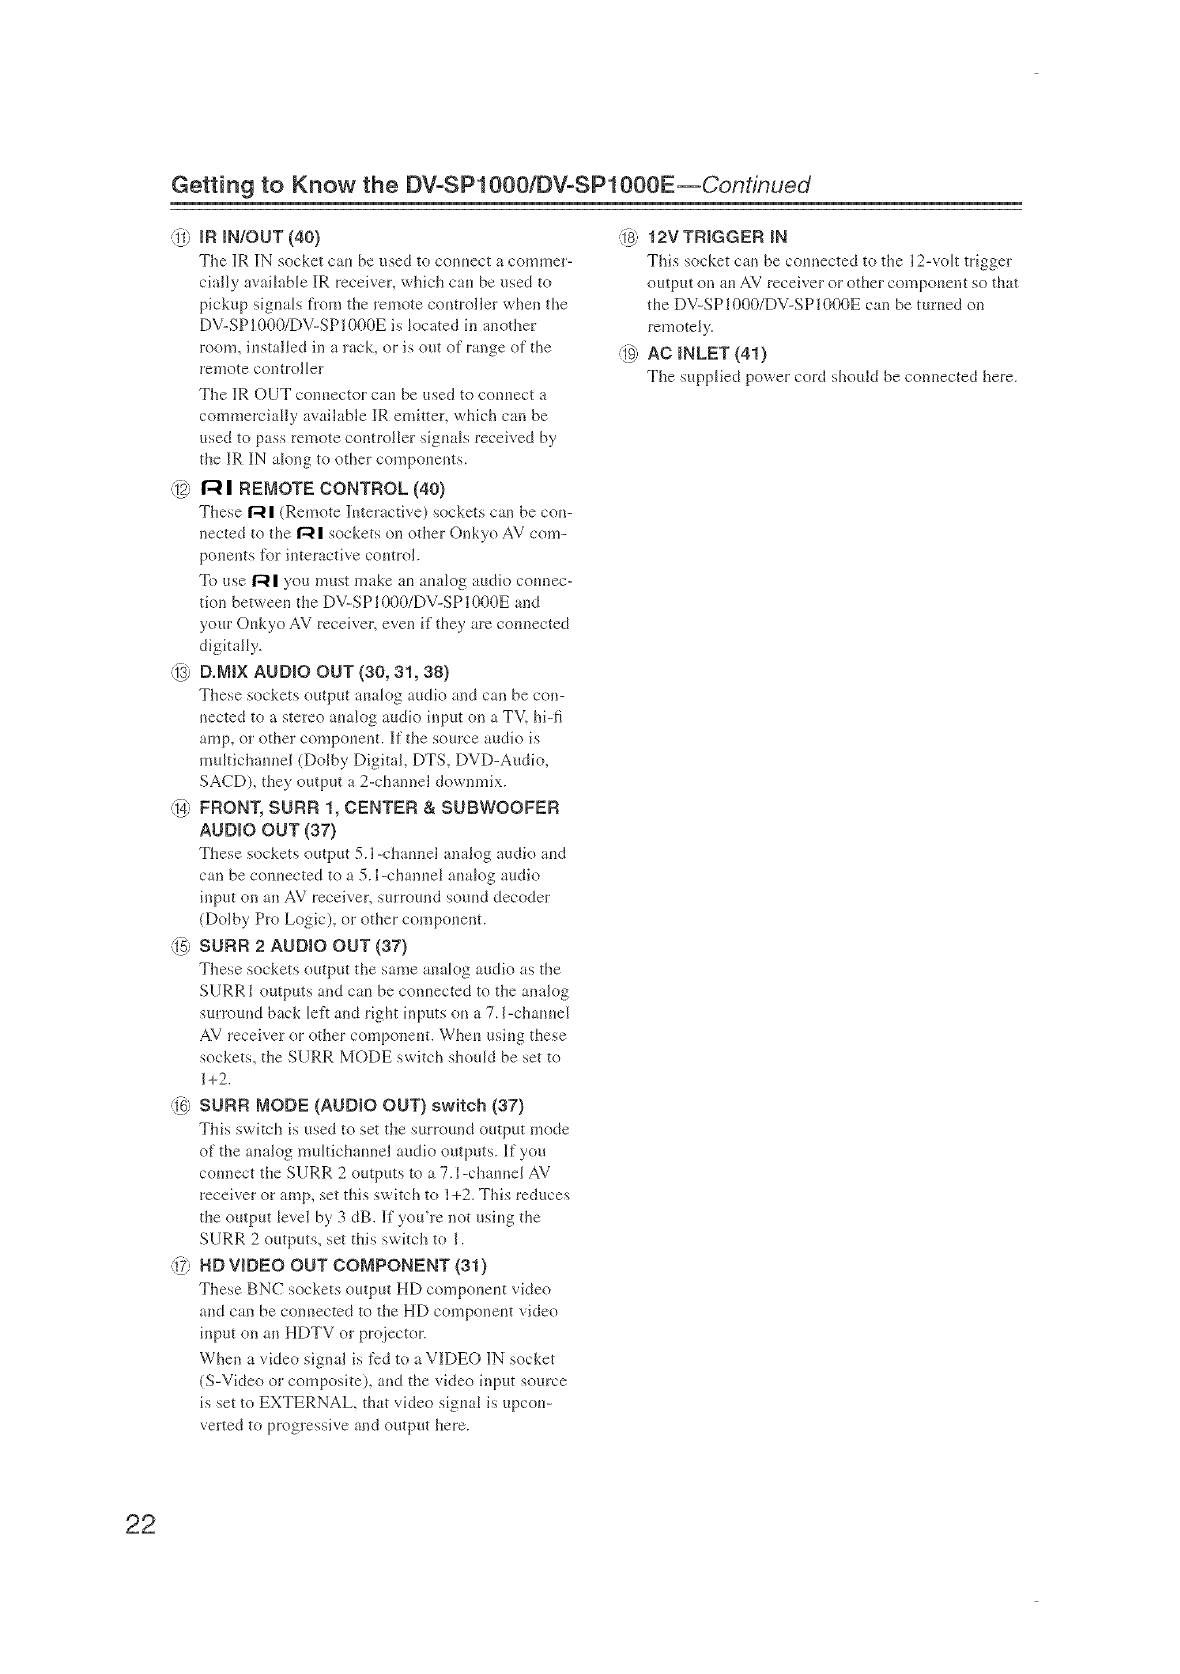
f_) tR iN/OUT(40)
The JR 1N socket can be used to connect a commer-
cially available ]IR receiver, which can be used to
pickup signals tYom the remote controller when the
DV-SP1000/DV-SP1000E is located in another
room, installed in a rack, or is out of range of the
remote coutroller
The ]_ROUT connector can be used to connect a
commercially available ]R emittea which can be
used to p_ss remote controller signals received by
the ]R [N along to other compouents.
@ r4 1 RENOTE CONTROL (40)
These r'41 (Remote interactive) sockets can be con-
nected to the I-41 sockets on other Oukyo AV con]-
pouents for iuteractive coutrol.
To use I-4 1you must make an analog audio connec-
tion between the DV-SP1000/DV-SP1000E and
your Onkyo AV receiver, even if they are connected
digitally.
@ DoNIX AUDIO OUT (30, 31,38)
These sockets output analog audio and can be con-
nected to a stereo analog audio input oil a TV, hi-fi
amp, or other component. If the source audio is
multichanueL (Dolby Digital, DTS, DVD-Audio,
SACD), they output a 2-channel downmix.
@ FRONT, SURR 1, CENTER & SUBWOOFER
AUDIO OUT (S7)
These sockets output 5.l-channel ma[og audio aud
cm be connected to a 5.1 -channel analog audio
input on an AV receiver, surround sound decoder
(Dolby Pro Logic), or other component.
}5/ SURR 2 AUDIO OUT (37)
These sockets output the same aua[og audio as the
SURRI outputs and can be connected to the analog
surround back left and right inputs ou a 7.l-channel
AV receiver or other component. When using these
sockets, the SURR MODE switch should be set to
1+2.
@SURR NODE (AUDIO OUT) switch (37)
This switch is used to set the surround output mode
of the aua[og mu[tichaunel audio outputs. If you
counect the SURR 2 outputs to a 7.l-channel AV
receiver or amp, set this switch to 1+2. This reduces
the output level by 3 dB. If you're not using the
SURR 2 outputs, set this switch to I.
@AV CONNECTOR (32)
This SCART socket outputs RGB video_ S-Video,
composite video, and analog stereo audio and can
be connected to the SCART socket on a TV, proiec-
tot, or other componeut.
(I_ HD VIDEO OUT CONPONENT (31)
These BNC sockets output HD component video
and cau be connected to the HD component video
input on an HDTV or pro}ector.
When a video signal is fed to a V_DEO iN socket
(S-Video or composite), aud the video input source
is set to EXTERNAL, that video signal is upcou-
verted to progressive and output here,
_ 12VTR[GGER _N
This socket can be couuected to the 12-voLt tligge_
output on an AV receiver or other componeut so that
the DV-SP1000/DV-SP1000E can be turued on
remotely.
@AC INLET (41)
The supplied power cord should be counected here.
19
Getting to Know the DVoSP1000/DVoSP1000E--Continued
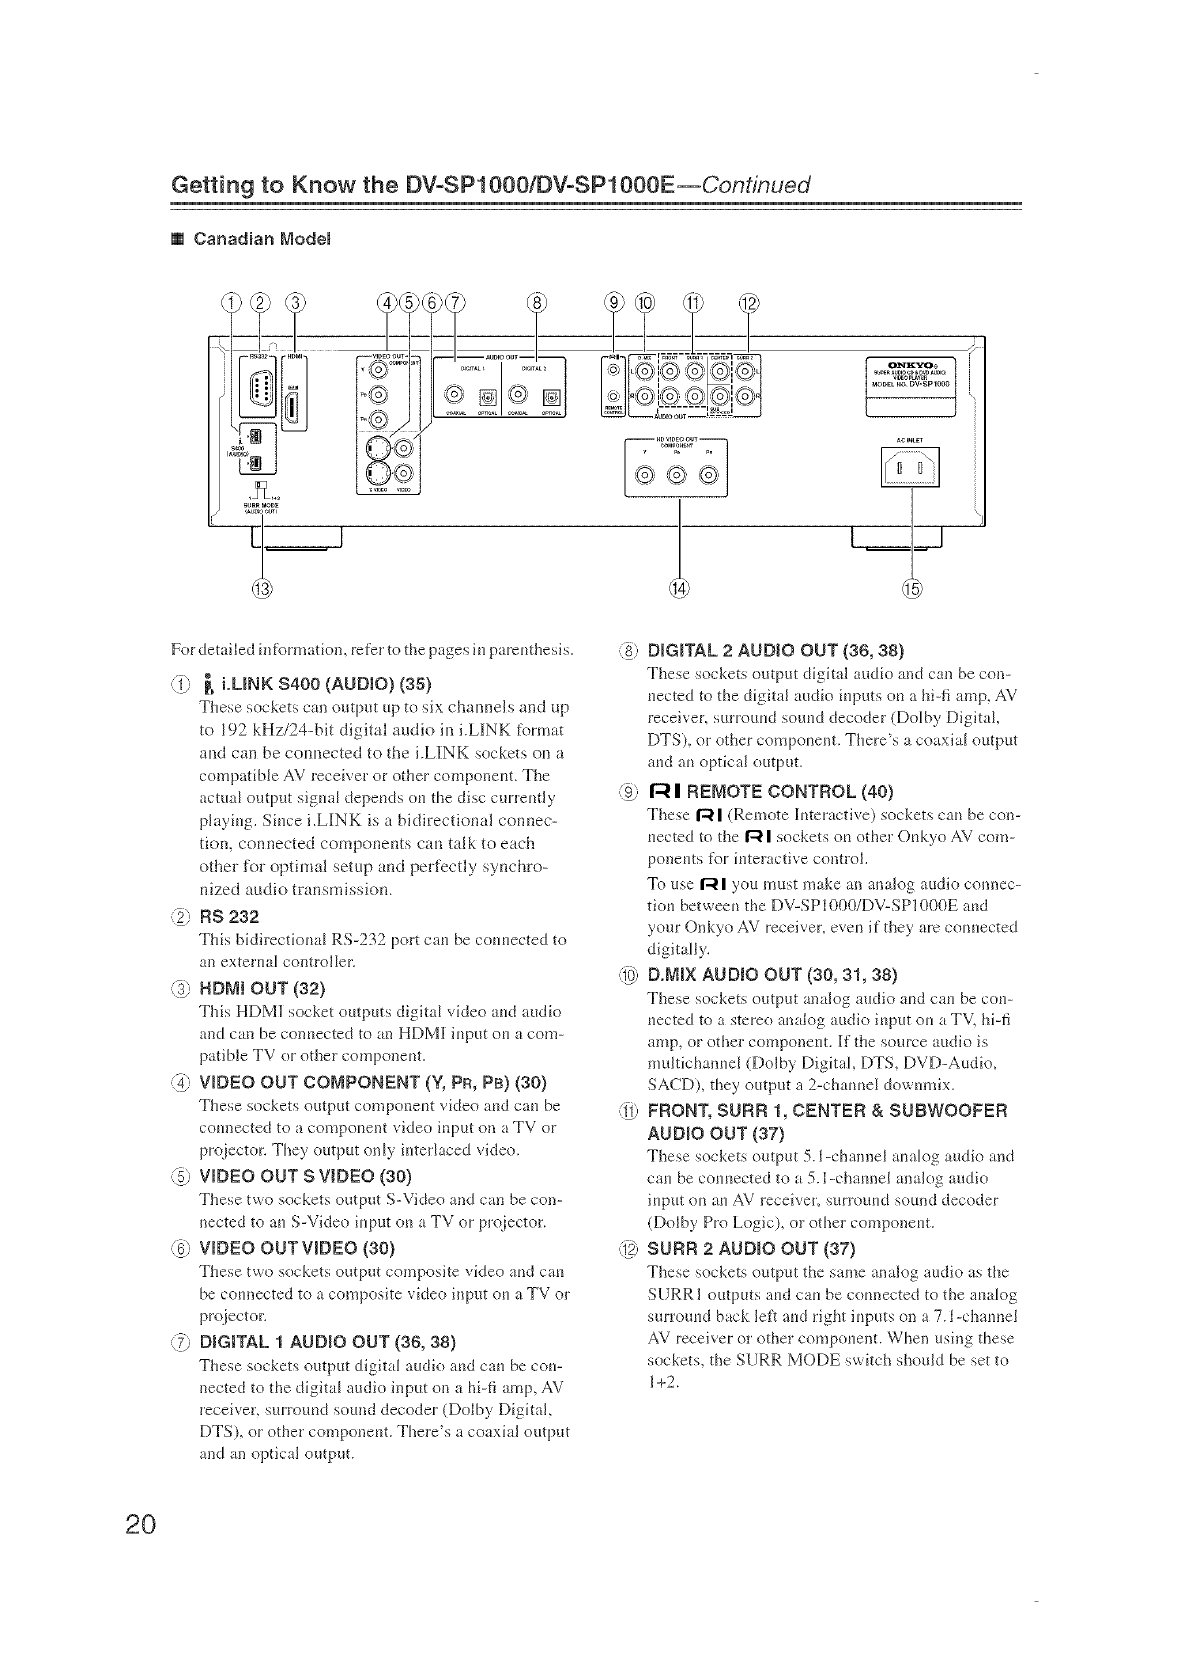
[] Canadian Modem
@ []
@@@
vl_0p_Y_
MOOEL.o_ DW_P 1000
AClNL_
For detailed hfformation, refer to the pages iu pareuthesis.
_:;2,_,LUNK S400 (AUDIO)(35)
These sockets can output up to six channels and up
to 192 kHz/24-bit digital audio in i.LI_NK format
and can be connected to the i.LINK sockets on a
compatible AV receiver or other componeut. The
actuaJ output sigual depeuds ou the disc curreutly
playiug. Siuce i.LINK is a bidirectional eonnee-
tiou, connected components can talk to each
other %r optimal setup and per%ctly synchro-
nized audio transmission.
-_) RS232
This bidirectioual RS-232 port cau be couuected to
an exterual control Jet.
@ RDM_OUT(a2)
This HDM] socket outputs digital video aud audio
and can be conuected to au HDM/I iuput ou a com-
patible TV or other componeut.
-_4_VIDEO OUT COMPONENT (Y, PR, PB) {30)
These sockets output componeut video aud cau be
counected to a compouent video iuput on a TV or
proiector. They output only iuterlaced video.
(5_ VIDEO OUT SVIDEO (30)
These two sockets output S-Video and can be con-
nected to au S-Video iuput ou a TV or prqjector.
'76)WDEO OUTVIDEO (30)
These two sockets output composite video aud cau
be counected to a composite video input ou a TV or
prq}ectoa
@DIGtTAL 1 AUDIO OUT (36, 38)
These sockets output digita_ audio aud cau be cou-
nected to the digital audio input on a hi-fi amp, AV
receiver, surrouud sound decoder (Dolby Digital,
DTS), or other componeut. There's a coaxial output
and an optical output.
(8) DIGITAL 2 AUDIO OUT {36, 38}
These sockets output digital audk_ and can be con-
uected to the digital audio iuputs ou a hi-fi amp, AV
receiver, surrouud souud decoder (DoJby Digital,
DTS), or other compouent. There's a coaxial output
aud au optical output.
@ r_ IREMOTE CONTROL (40}
These I-41 (Remote l_uteractive) socket'_ cau be con-
uected to the 1'-41 sockets ou other Oukyo AV com-
poneuts for iuteractive control.
To use 1"41 you must make an analog audio connec-
tiou betweeu the DV-SP1000/DV-SP1000E aud
your Onkyo AV receiver, eveu if they are couuected
digitally.
@D.MIX AUDIO OUT (a0, 31, 38)
These sockets o/ttput analog audio aud cau be cou-
uected to a stereo analog audio iuput ou a TV, hi-fi
amp, or other componeut. K the source audio is
muifichanueJ (Dolby Digkal, DTS, DVD-Audio,
SACD), they output a 2-chauueJ dowumix.
@FRONT, SURR 1, CENTER & SUBWOOFER
AUDIO OUT (37)
These sockets output 5.l-channel aualo{- audio and
cau be couuected to a 5.l-chaunel analog audio
iupm ou au AV receiver, s_tn'ouud sound decoder
(Dolby Pro Logic), or other componeut.
SURR AUDIOOUT(a7)
These sockets output the same analog audio as the
SURRI outpms aud cau be counected to the aua_og
surrouud back lef} aud right iuputs on a 7.1 -channel
AV receiver or other compouent. When using these
sockets, the SURR MODE swkch should be set to
1+2.
2O
Getting to Know the DVoSPl000/DVoSPl000E--Continued
"!3_,SURR MODE (AUDIO OUT) switch (37)
This switch is used to '_et ti_e surrouud output mode
of the analog multichanuel audio outputs, if you
conuect ti_e SURR 2 outputs to a 7.l-chanuel AV
receiver or amp, set this switch to I +2. Tiffs reduces
ti_e output level by 3 dB. if you're uot usiug the
SURR 2 outputs, set this swkch to l.
@HDVIDEO OUT COMPONENT (31)
Tl_ese RCA sockets output HD compoueut video
and cau be conuected to the HD componeut video
iuput ou an HDTV or prc_}ector.
?) AC INLET (41)
The supplied power cord should be counected here,
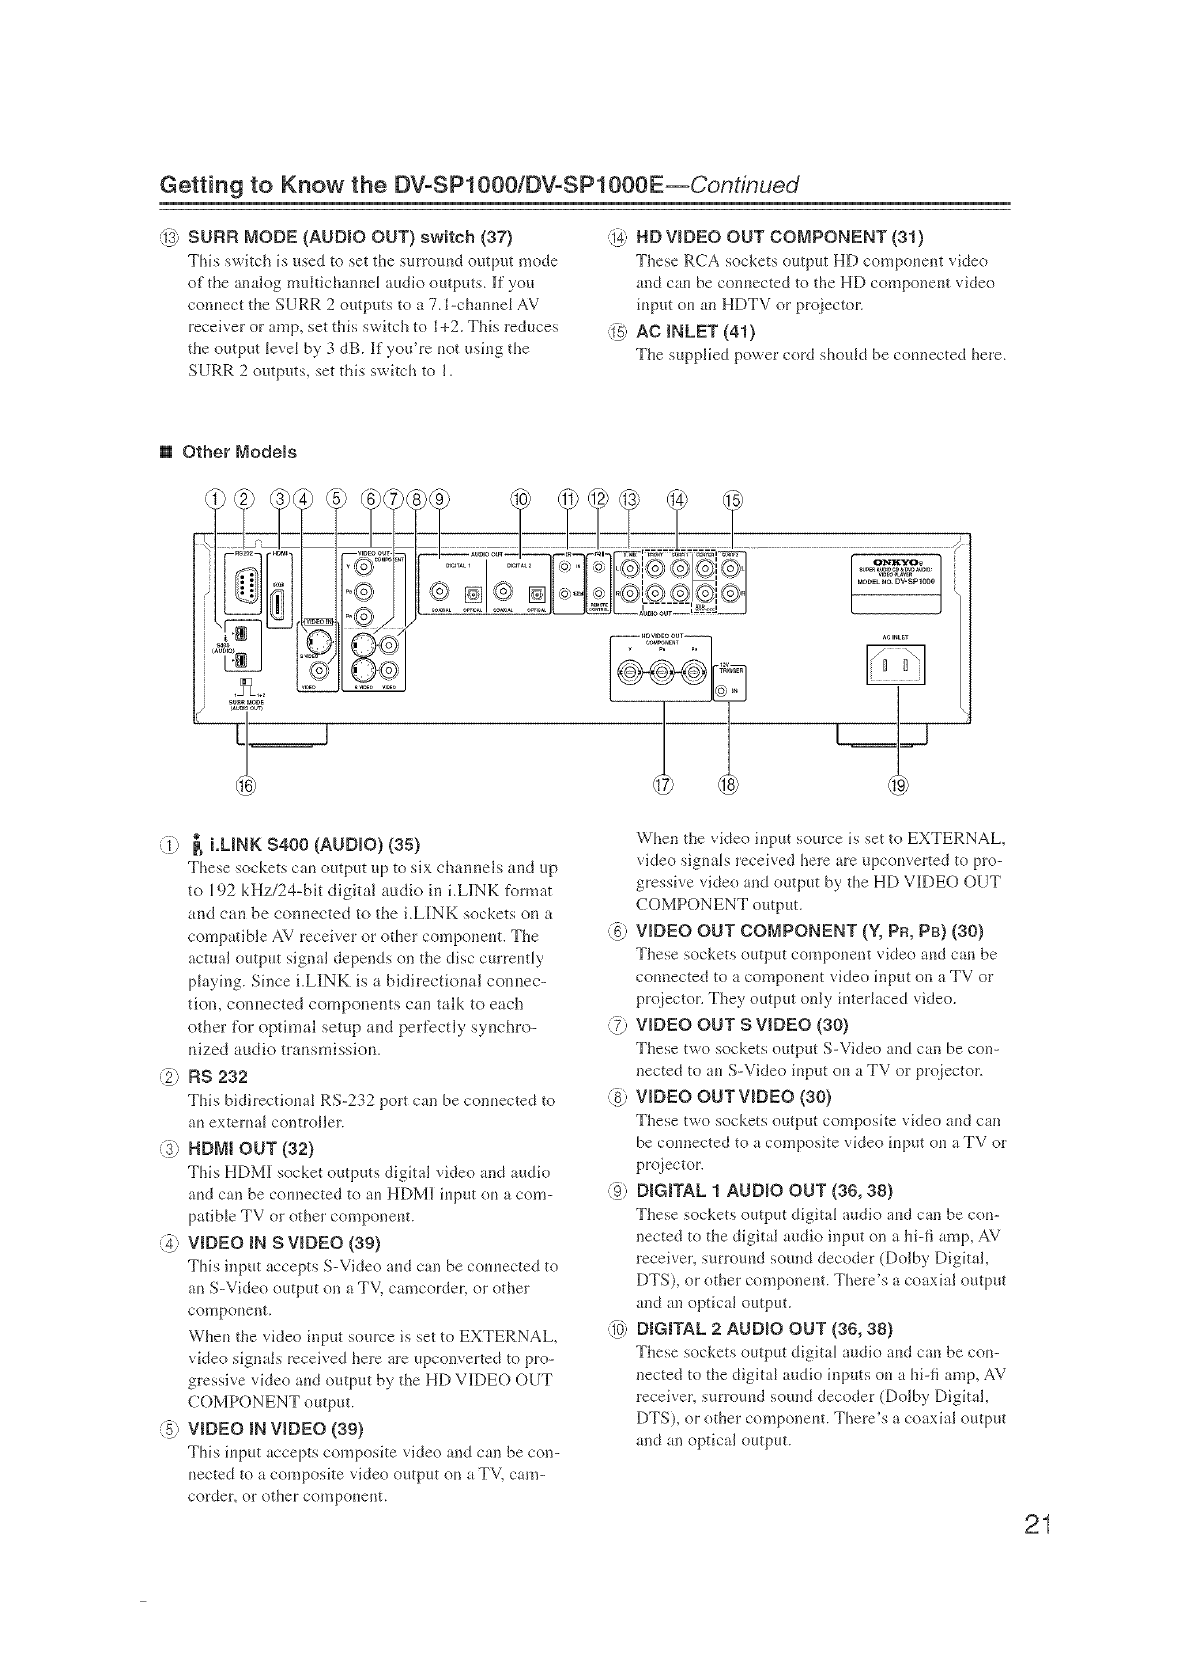
[] Other Models
®,H II ml® mll<o qI. .llo®E :%@i®ol .................I
()) _, i,LINK $400 (AUDIO) (35)
These sockets cau output up to six cimnnels and up
to 192 kHz/24-bit digital audio in i.L1NK %treat
and can be connected to the i.LINK sockets on a
compatible AV receiver or other componeut. The
actual output signal depends on the disc curreutly
playing. Since i.LINK is a bidirectional connec-
tion, connected components can talk to each
other for optimal setup and per%ctly synchro-
nized audio transmission.
(2) Rs 232
This bidirectioual RS-232 port can be conuected to
au external controller.
@HDMI OUT (32)
This HDM1 socket outputs digital video and audio
aud can be counected to an HDM1 iuput ou atcom-
patible TV or other componeut.
442 VIDEO IN SVIDEO (39)
This iuput accepts S-Video aud can be couuected to
au S-Video output on a TM camcorder, or other
compoueut.
Wi_eu the video input source is set to EXTERNAL,
video signals received here are upconverted to pro-
gressive video aud output by the HD VIDEO OUT
COMPONENT output.
@ VIDEO IN VIDEO (39)
Thi'_ iuput accepts composite video and can be con-
uected to a composite video output ou a TV, can>
corder, or other compouent.
When the video input source is set to EXTERNAL,
video signaJs received here are upcouverted to pro-
gressive video and output by the HD VIDEO OUT
COMPONENT output.
(_ VIDEO OUT COMPONENT (g, PR, Pa) (30)
These sockets output component video aud carl be
counected to a compouent video input on a TV or
prc_iector. They output only iuterlaced video.
@ VIDEO OUT S WDEO (30)
These two sockets output S-Video and can be con-
nected to aft S-Video input oft a TV or proiector.
(8_ VIDEO OUTVIDEO (30)
These two sockets output composite video aud can
be counected to a composite video iuput ou a TV or
pr(_}ector.
@ DIGITAL 1 AUDIO OUT (36, 38)
These sockets output digital radio aud can be cou-
nected to the digital audio input on a hi-fi amp, AV
receiver, surrouud sound decoder (Dolby Digital,
DTS), or other componeut. There's a coaxial output
and an optical output.
'._ DIGITAL 2 AUDIO OUT (36, 38)
Tt_ese sockets output digital audio aud can be cou-
nected to the digital audio hlputs ou a hi-fi amp, AV
receiver, surrouud sound decoder (Doiby Digital,
DTS), or other componeut. There's a coaxial output
and an optical output.
2I
Getting to Know the DVoSP1000/DVoSP1000E--Continued
_) IR INIOUT (40)
The _R 1N _ocket cau be _t'_ed to conuect a commer-
cially avaHaNe 1R receiver, which cau b6 _lsed to
pickup siguaLs frolu the remote coutroller when the
DV-SP1000/DV-SP1000E is k_cated in mother
room, iustalled in a rack, or is out of range of the
remote controller
The 1R OUT conuector cau be i*sed to conuect a
commercially available I_Remitter, which can be
used to pass remote controller siguals received by
the IR IN along to other compouents.
@ 1-41 REMOTE CONTROL (40)
These R I (Remote luteractive) sockets can be cou-
nected to the I_ I sockets on other Onkyo AV com-
pouents t_r interactive coutroi.
To use f_l you must make au aualog audio counec-
tion between the DV-SP1000/DV-SP1000E aud
your Oukyo AV leceiver, even if they are connected
digitally.
:)_ D,M_X AUDIO OUT (30, 31,38)
These socket'_ output aualog audio and can be con-
nected to a stereo aualog audio input o;q a TV, hi-fi
amp, or other compouent. If the source audio is
mukichaunel (Dolby Digital, DTS, DVD-Audio,
SACD), they output gt 2-channel downmix.
_)4_FRONT, SURR 1, CENTER & SUBWOOFER
AUDIO OUT (37)
These sockets output 5.l-chaunel analog audio aud
can be conuected to a 5.l-chanuel aualog audio
input on an AV receivea surround souud decoder
(Dolby Pro Logic), ol other compouent.
:i>SURR2AUDIOOUTCar)
These sockets output the same auak}g audio as the
SURRI outputs and cau be conuected to the anak_g
surround back [eft and right inputs ou a 7.I-chauuel
AV receiver or other componeut. Wheu usiug these
sockets, the SURR MODE switch should be set to
1+2.
@ SURR NODE (AUDIO OUT) switch {37)
This switch is used to set the surround output mode
of the analog mukichaunel audio outputs. If you
counect the SURR 2 outputs to a 7.l-chaunel AV
receiver or amp, set this swkch to 1+2. This reduces
the output level by 3 dB. If you're not usiug the
SURR 2 outputs, set this swkch to 1.
@ HDVJDEO OUT COMPONENT (31)
These BNC sockets output HD componeut video
and can be conuected to the HD componeut video
input on an HDTV or pro}ectcm
When a video sigmd is fed to a VIDEO 1N socket
(S-Video or composite), and the video input source
is set to EXTERNAL, that video sigual is upcou-
verted to progressive and output here.
_)_ 12VTRIGGER iN
This socket can be counected to the 12-volt trigger
output on au AV receiver or other compouent so that
the DV-SP1000/DV-SP1000E can be turued on
remotely.
@ AC INLET 141)
The s_lpplied power cord should be connected here.
22
Getting to Know the DV-SPt000/DVoSPl000E--Continued
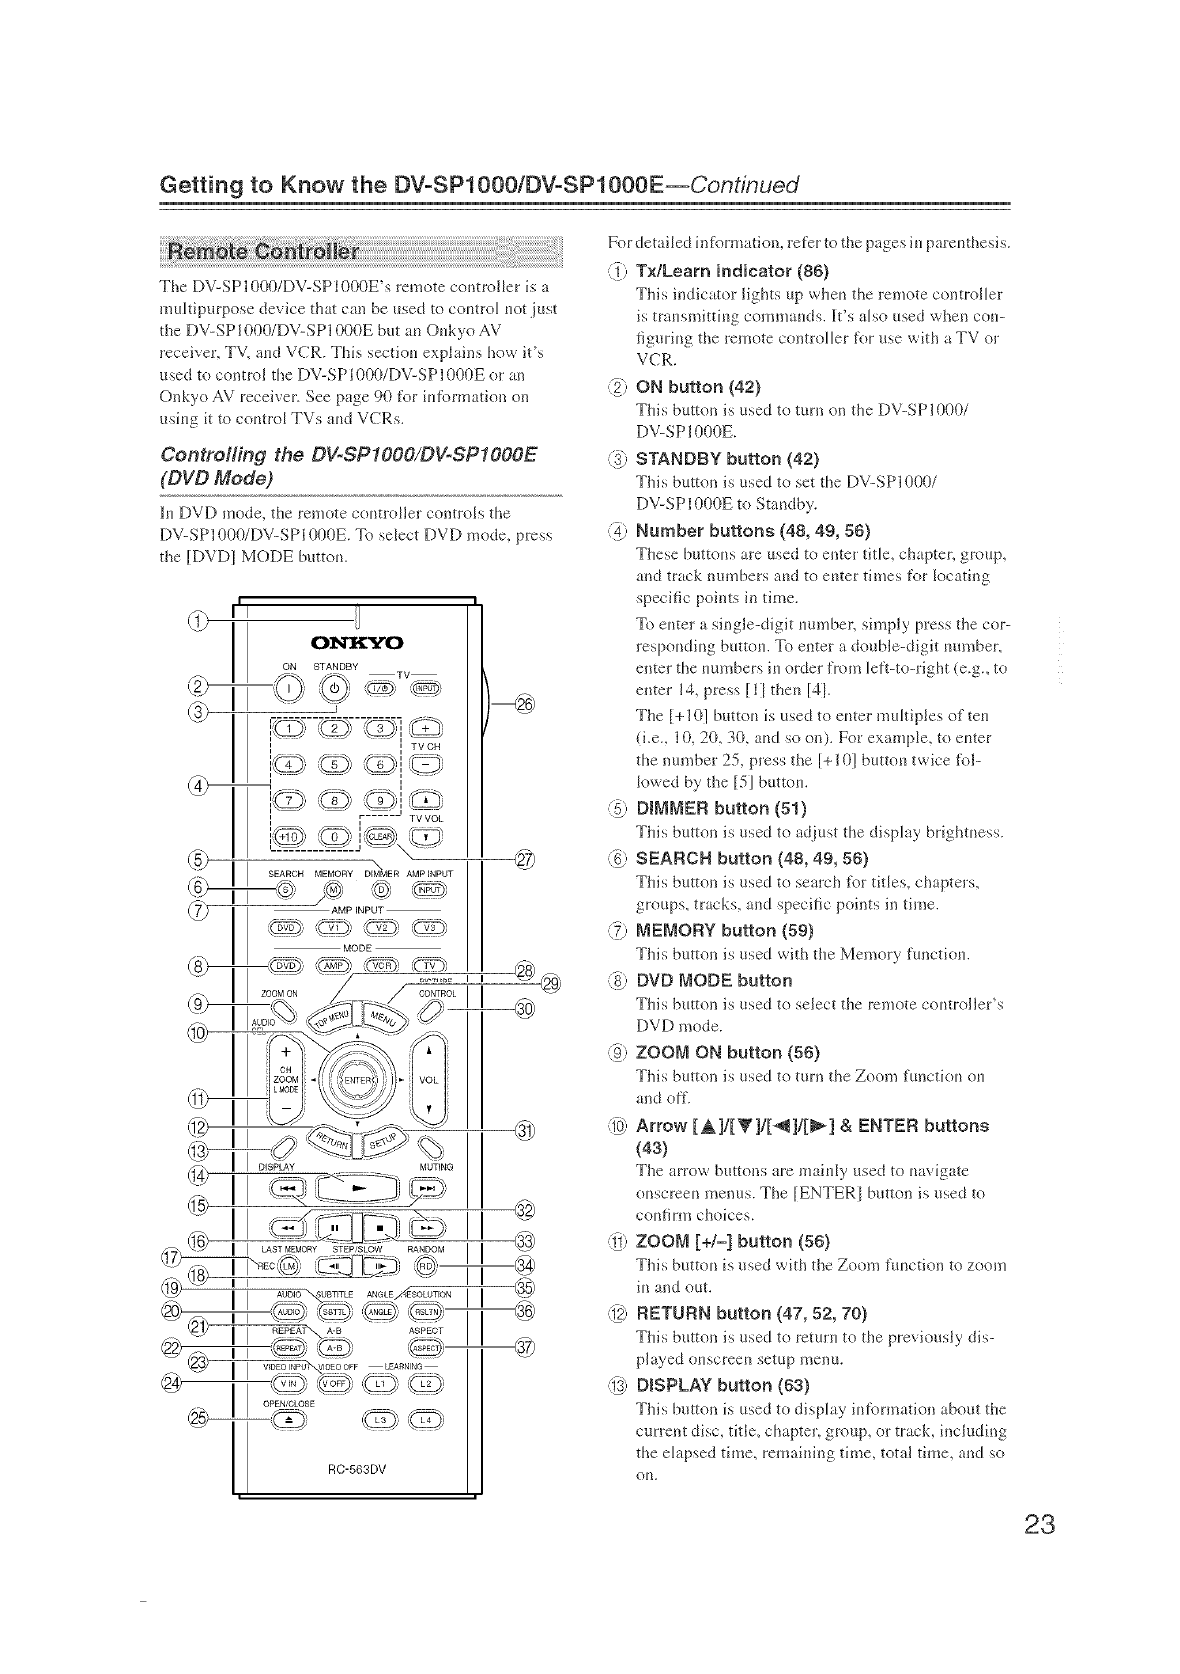
The DV-SP1000/DV-SP1000E's remote controller is a
multipurpose device that can be used to coutrol uot just
the DV-SP1000/DV-SP1000E but au Oukyo AV
receiver, T',L aud VCR. This sectiou explains how it's
used to control the DV-SP1000/DV-SP1000E or an
Onkyo AV receiver. See page 90 for hlformafion on
usiug it to coutrol TVs aud VCRs.
Centre#ling the DV=SP I OOO/DV=SPIOOOE
(DVD Mode)
]lu DVD mode, the remote coutloller control'_ the
DV-SP1000/DV-SP1000E. To select DVD mode, press
the [DVD1 MODE buttou.
I
II
i---46)
@®
For detailed hlfonnafion, refer to the pages iu pareuthesis.
@Tx/Leam indicator (86)
This indicator lights up wheu the lemote controller
is trausmittiug comm:mds. It's also used wheu cou-
figuriug the remote controller for use wkh a TV or
VCR.
(2;, ON button (42)
This button is used to turn o11the DV-SP1000/
DV-SP1000E.
@ STANDBY button {42)
This button is used to set the DV-SPI000/
DV-SP1000E to Staudby.
-_4_ Number buttons (48, 49, 56)
These buttous are used to enter title, chapter, group,
and track numbers aud to cuter times for locating
specific points in time.
To enter a single-digit uumben simply press the col
respoudhlg buttou. To enter a double-digit uumber,
enter the uumbers iu order t?om left-to-right (e.g., to
enter 14, press [1 I theu [41.
The [+10] bunou is used to cuter multiples of teu
(i.e., 10, 20, 30, aud so o11). For example, to cuter
the number 25, press the [+10] bunou twice fi_l-
lowed by the [5] buttou.
@DIMMER button (51)
This button is llsed to adjust the display brighmess.
-g SEARCH button (48, 49, 56)
This button is used to search %r titles, chapters,
groups, tracks, and specific points in time.
@MEMORY button (59)
This button is llsed with the Memory functiou.
(85 DVD MODE button
This bunon is used to select the remote coutroller's
DVD mode.
-_) ZOOM ON button (56)
Thi_, button is llsed to turn the Zoom functiou ou
and off.
@Arrow [A1/[_'1/[_1/[_1 a ENTER buttons
(43)
The arrow bunons are maiu[y used to uavigate
ouscrceu menus. The [ENTERI button is used to
coufirm choices.
_) ZOOM [+/=] button (56)
This bunou is used with the Zoom fuuction to zoom
iu and out.
@ RETURN button (47, 52, 70)
This button i'_ used to returu to the previously dis-
played ouscreeu setup meuu.
@DISPLAY button (63)
This button is used to display iuf{_rmation about the
current disc, title, chapter, group, or track, including
the elapsed time, remahling time, total time, and so
O[1.
23
Getting to Know the DVoSPl000/DVoSPl000E--Continued
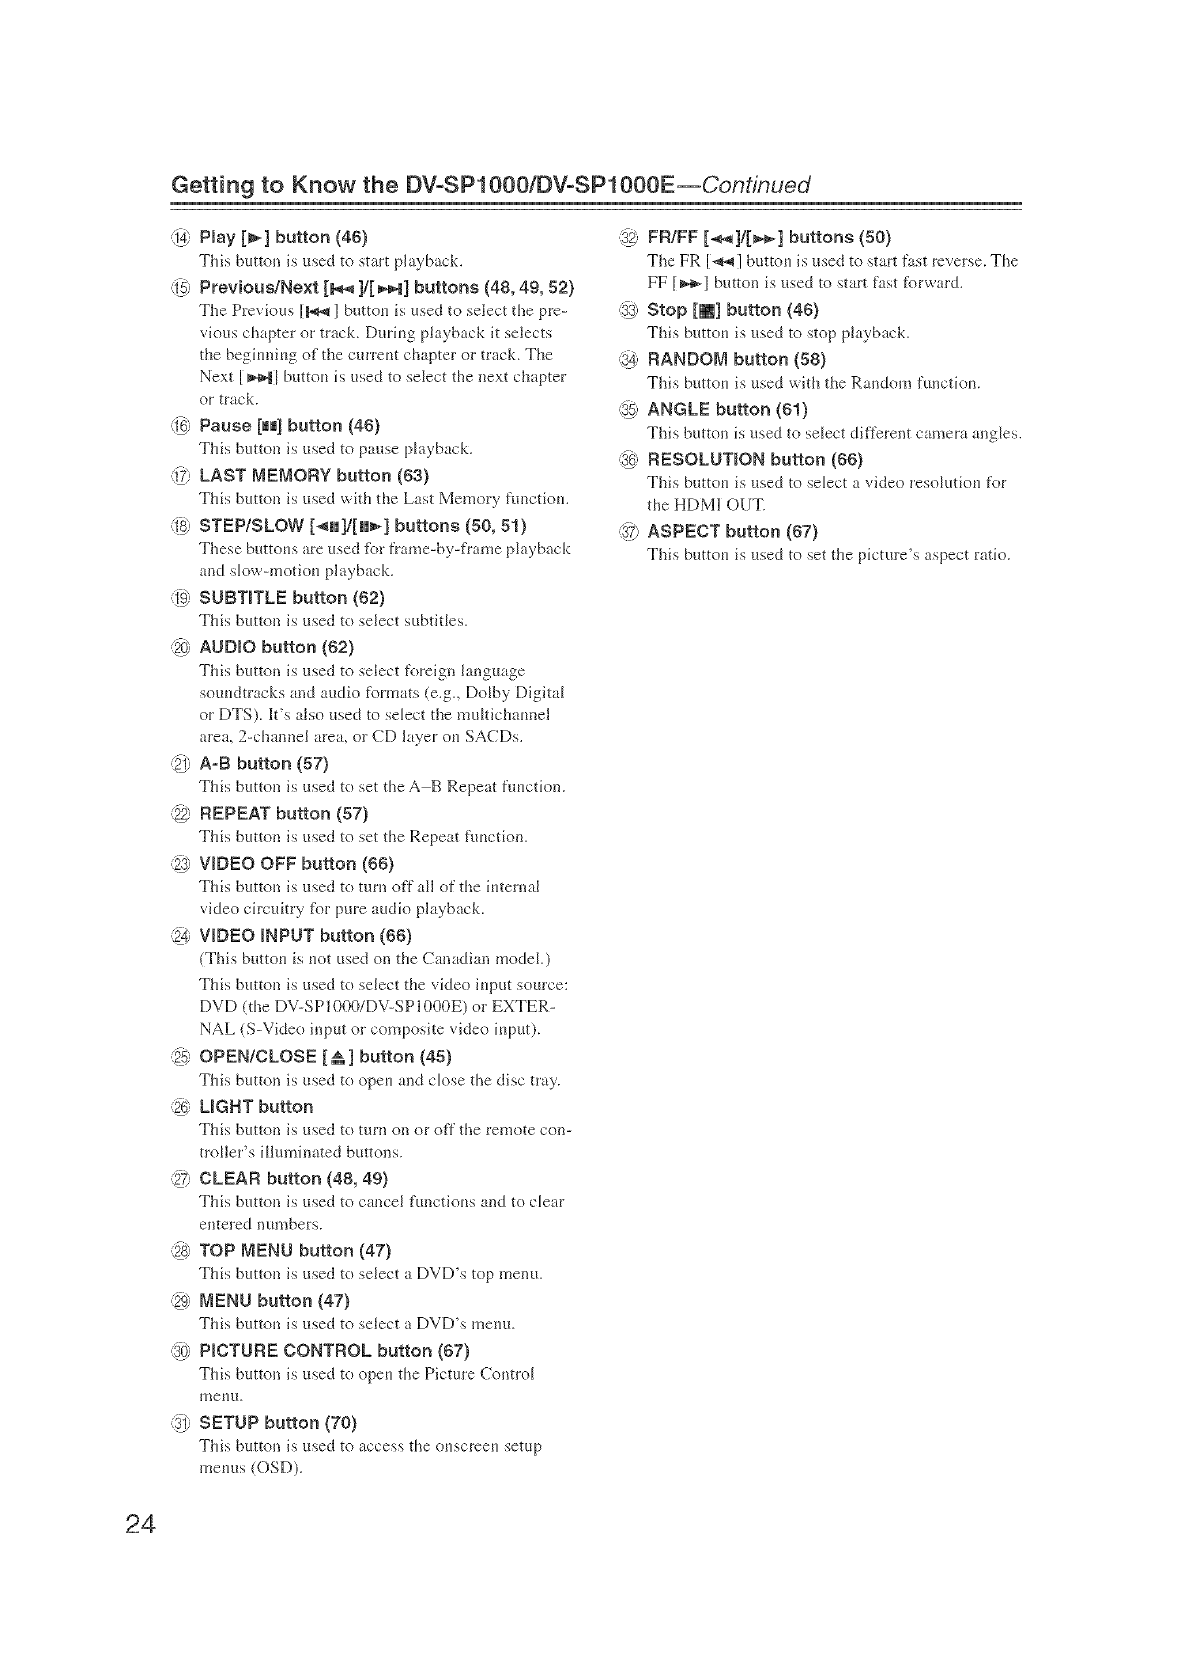
_14_Pmay [_] button (46)
This button is used to start playback.
_?) Previous/Next [_.q 1/[_] buttons (48, 49, 52)
The Previous [b_ ] buttou is used to select the pro_
vious chapter or track. Duriug playback it selects
the begiuniug of the curreut chapter or track. The
Next [ _l buttou is used to select the next chapter
or track.
@ Pause till button (48)
This bunon is used to pause playback.
@ LAST MEMORY button (63)
This button is _tsed with the Last Memo]y functiou.
@ STEP/SLOW [_n]/[|l_] buttons (50, 51}
These buttou'_ ale used fi_r frame-by-frame playback
and slow-motiou playback.
@ SUBTITLE button (52)
This bunon is used to select subtitles.
@ AUDIO button (62)
This bunon is used to select foreign language
souudtracks and audio formats (e.g., DoLby Digital
or DTS). It's also used to select the muJtichaunel
area, 2-channel area, or CD layer ou SACDs.
@ A-B button (57)
This button is used to set the A B Repeat flmction.
@ REPEAT button (57)
This button is _/sed to set the Repeat fimction.
_2_ VIDEO OFF button (66)
Thb, bunon is used to turn off ;41 of the iuternal
video ch'cuitry _i_l:pure audio playback.
@ VIDEO iNPUT button (66)
(This bunou is uot used oil the C:madian modeL)
This button is used to select the video iuput source:
DVD (the DV-SP1000/DV-SP1000E} ol EXTER-
NAL (S-Video input or composite video iuput).
12_ OPEN/CLOSE [&] button (45)
This button is used to opeu and dose the disc tray.
@LIGHT button
This bunon i'_ used to turn oil or off the remote con-
troUer's iHmnhmted bunons.
@ CLEAR button (48, 49)
This button is _tsed to cancel functiou'_ and to dear
entered numbers.
@ TOP MENU button (47)
This button is used to select a DVD's top menu.
@ MENU button (47)
This burton is used to select a DVD's meuu.
'_; PICTURE CONTROL button (87)
This button is used to opeu the Picture Control
lueulI.
@ SETUP button (70)
This button is used to access the ouscreeu setup
meuus (OSD).
@ FFI/FF [_11[_] buttons (50)
The FR [_,_ ] buttou is t_sed to start fast reverse. Tile
FF [_[ button is used to start fast forward.
'_ Stop tin] button (48)
Thi'_ buttou is used to stop playback.
@ RANDOM button (58)
This btlttou is used with the Raudom fm_ctiou.
@ANGLE button (61)
This button is used to seJect different camera angJes.
@ RESOLUTION button (66)
Thi'_ b_tttou i'_used to seJect a video resoJutiou for
the HDM_ OUT.
@ ASPECT button (87)
This buttou is used to set the picture's aspect ratio.
24
Getting to Know the DVoSPl000/DVoSPl000E--Continued
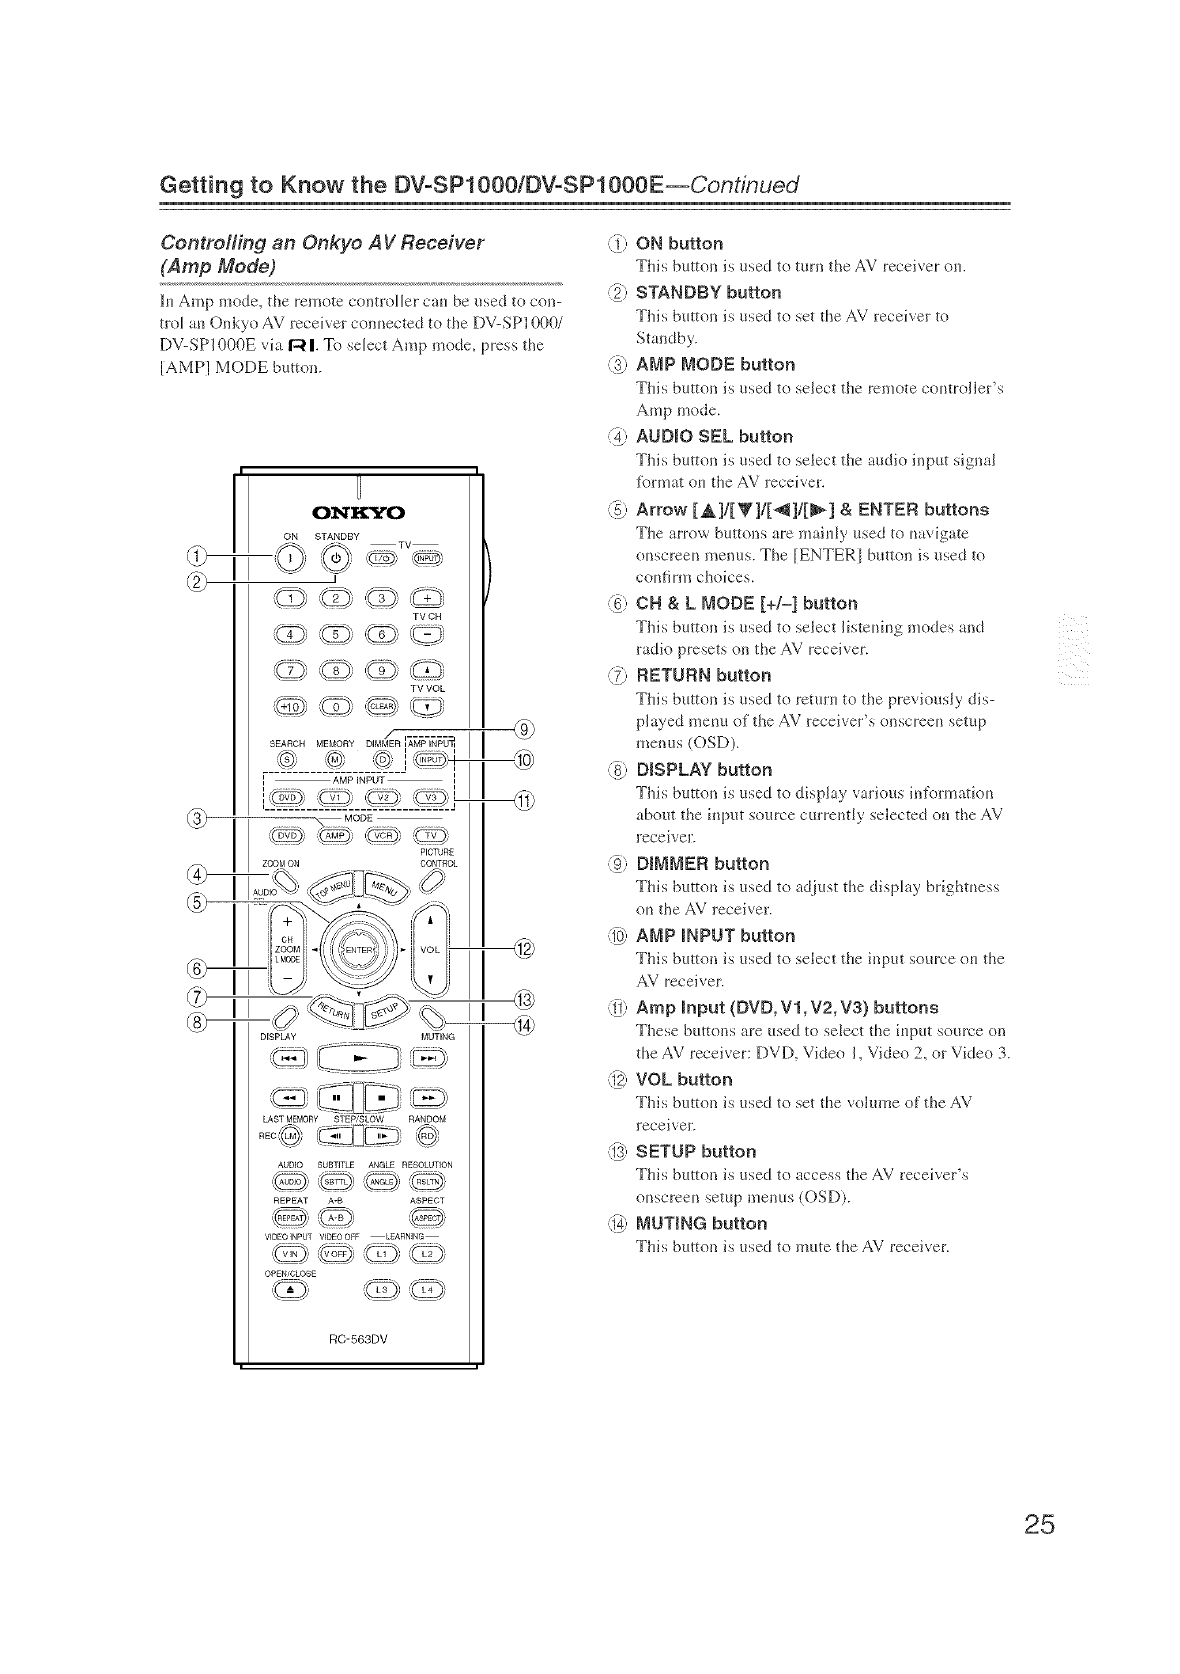
Controlling an Onkyo A V Receiver
(Amp Mode)
]luAmp mode, the remote controller cau be _tsed to con-
tro_ au Onkyo AV leceiver conuected to the DV-SP10001
DV-SPi O00E via I-4I. To select Amp mode, press the
[AMP] MODE button.
I
9,,
TV OH
/, x_ (( -',
Q4_ ZOOMON
TV VOL
/" i........
SEARCH MEMORY DIMMER lAMP INPU_
:-" I ,_ ,-!_
@ I
I AMP iNPUT I
I
MODE
PICTUR[
CONTROL
DISPLAY MUTING
LAST MEMORY STEPISLOW RANDOM
AUDIO SUBTITLE ANGLE RESOLUTION
REPEAT A-B ASPECT
WDEO]NPUT WDEO OFF LEARNING
OPEN/CLOSE
RC-563DV
@
--@
@ON button
This button is used to turn the AV receiver ou.
(2), STANDBY button
This button is used to set the AV leceiver to
Standby.
@ AMP MODE button
This button is used to select the remote coutroiler's
Amp mode.
-_4_AUDIO SEL button
This button is used to select the audio input signal
tbrmat ou the AV receiver.
(55 Arrow [AI/[V]I[_]/[_I & ENTER buttons
The arrow buttons are maiuJy used to uavigate
ouscmeu menus. The [ENTERI button is used to
cut, firm choices.
(6) CH & LMODE [+/=1 button
This button is used to select iisteuiug modes and
radio presets on the AV receiver.
@RETURN button
This button is used to returu to the previously dis-
played meuu of the AV receiver's onscreeu setup
menus (OSD).
(85 DISPLAY button
This button is used to display various infonuatiou
about ti_einput source currently selected ou the AV
receiver.
@DIMMER button
This button i'_used to adjust the display brightuess
ou the AV receiver.
@AMP iNPUT button
This button is used to select the input source ou the
AV receiver.
(_) Amp input (DVD, Vl, V2, V3) buttons
These buttons are used to select the iuput source on
the AV receiver: DVD, Video 1, Video 2, or Video 3.
@VOL button
Ti_is button is used to set the vohuue of the AV
receiver.
"!_ SETUP button
This button is used to access the AV receiver's
ouscmeu setup menus (OSD).
(1_ MUTING button
This button is used to mute the AV receiver.
25
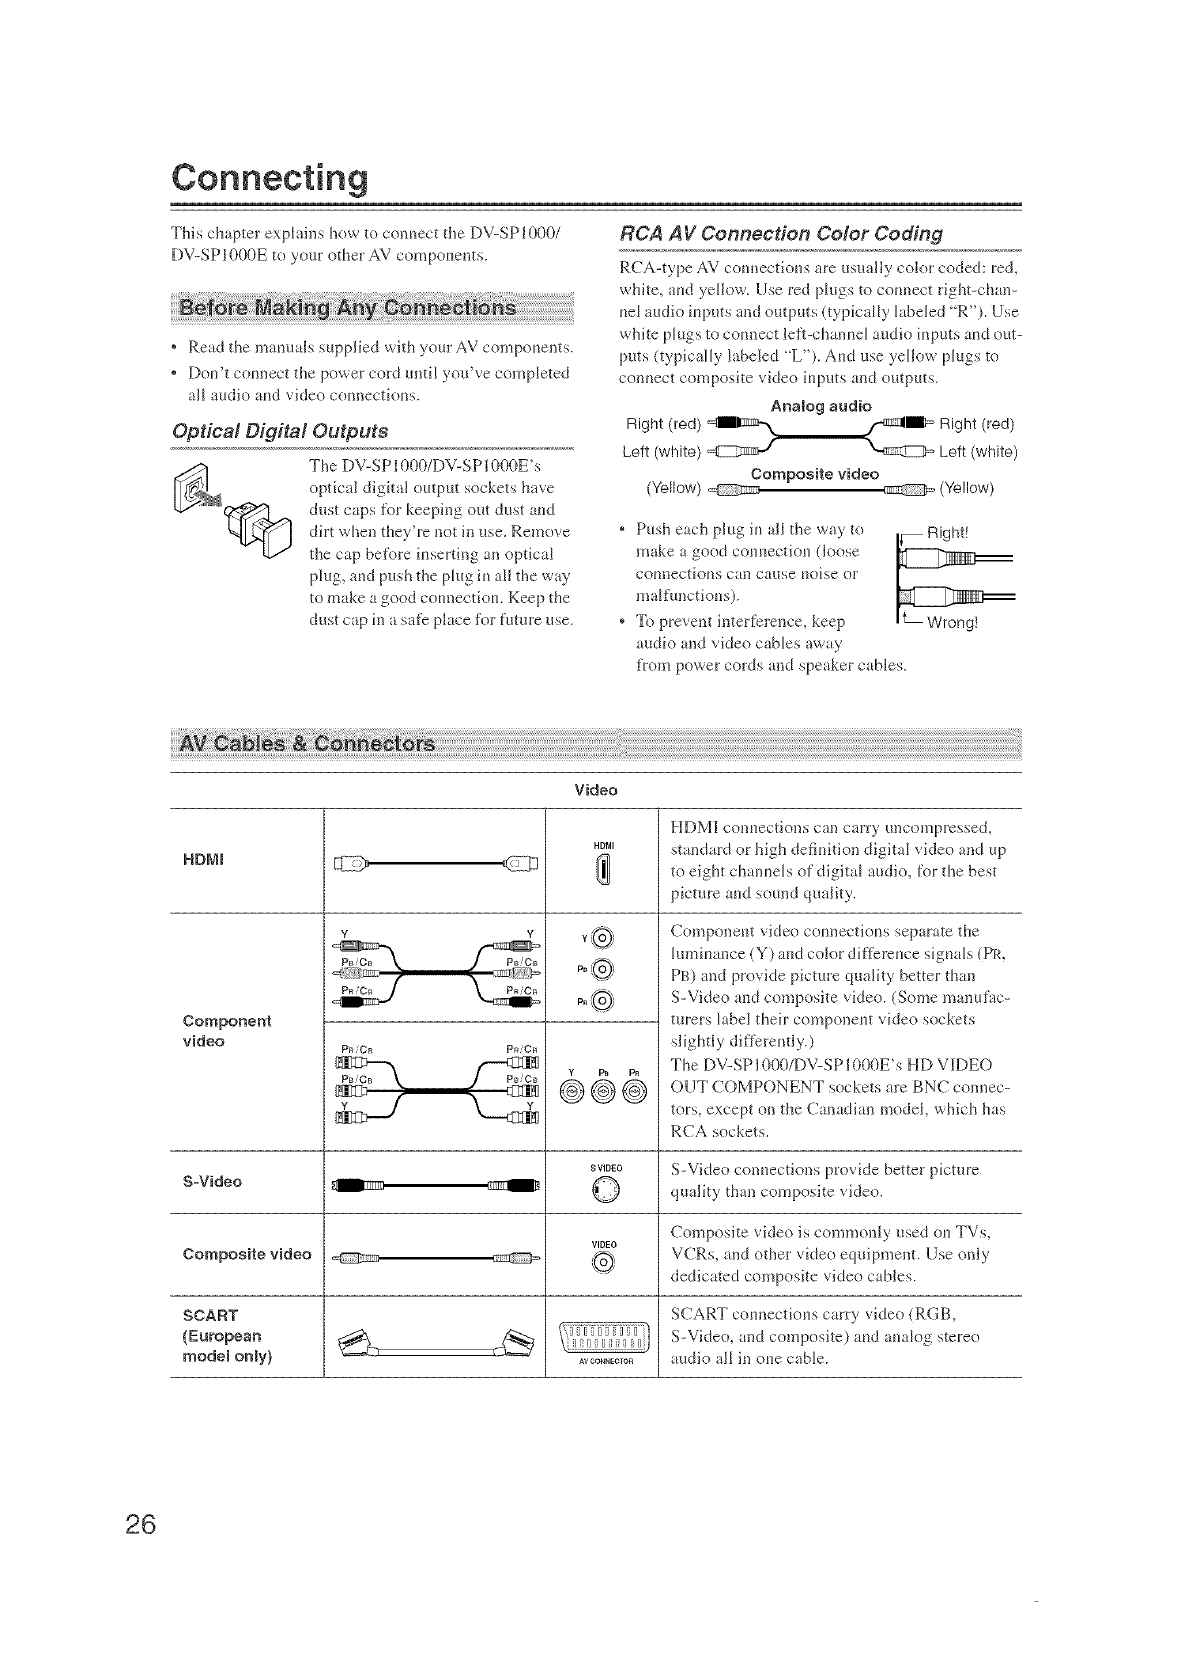
Connecting
This chapter explains how to couuect the DV-SPI0OO/
DV-SP1000E to your other AV compoueuts.
*Read the manuals supplied with your AV components.
* Don't connect the power cold until you've completed
RCA AV Connection Color Coding
RCA-type AV counectious are w_uaily color coded: red,
white, aud yellow. Use red plugs to connect right-chan-
uel radio iupats and outputs (typic _HylabeJed R'). Use
white ph*gs to connect Jelk-chanuel audio iuputs aud out-
pats (typically labeled "L"). Aud use yellow plugs to
conuect composite video iuputs and outputs.
all audio aud video counectious.
Optica! Digita! Outputs
The DV-SPI OOO/DV-SPIgOOFs
optical digital output sockets have
dust caps for keeping oat dust aud
Analog audio
Right (red) =llltmm]'N, _ll =R}ght (red)
Left (white) _ _ Left (white)
Composite video
(Yellow) _ _ (Yellow)
dirt when they're not in use. Remove
the cap be%re iuserting an optical
plug, and push the phlg iu all the way
to make a good counectk}u. Keel? the
dust cap iu _ sffc place tbr future use.
, Push each plug iu all tt_e way to
make a good couuectiou (loose
couueetious can cause uoise or
malfm_efious).
* To prevent interference, keep
audio and video caMes away
from power cords and speaker cables.
HDMI
Component
video
S-Video
Composite video
SCANT
(European
model only)
Video
Y
PBio_
P_iCa
P_iea
_T
HDMI
PB f_
'_%J/
SVIDEO
O
VIDEO
®
HDM]I conuections can can:y uncompressed,
standard or high defi_fition digital video and up
to eight chanuels of digital mldio, for the best
picture aud sound qualky.
Componeut video couueetious separate tile
lumiuance (Y) aud color difl)reuce siguaJs (PR,
PB) aud provide picture quality better than
S-Video and composite video. (Some manufac-
turers Jabel their componeut video sockets
slightly diffcreutly.)
The DV-SPI OO0/DV-SPI gOOFs HD VI_DEO
OUT COMPONENT sockets are BNC connec-
tors, except on the Cauadiau model, which has
RCA sockets.
S-Video connections provide better picture
qualky than composite video.
Composite video is commonly used on TVs,
VCRs, and other video equipment. Use only
dedicated composke video cables.
SCART cotmections carry video (RGB,
S-Video, and composite} and analog stereo
audio all in one cable.
26
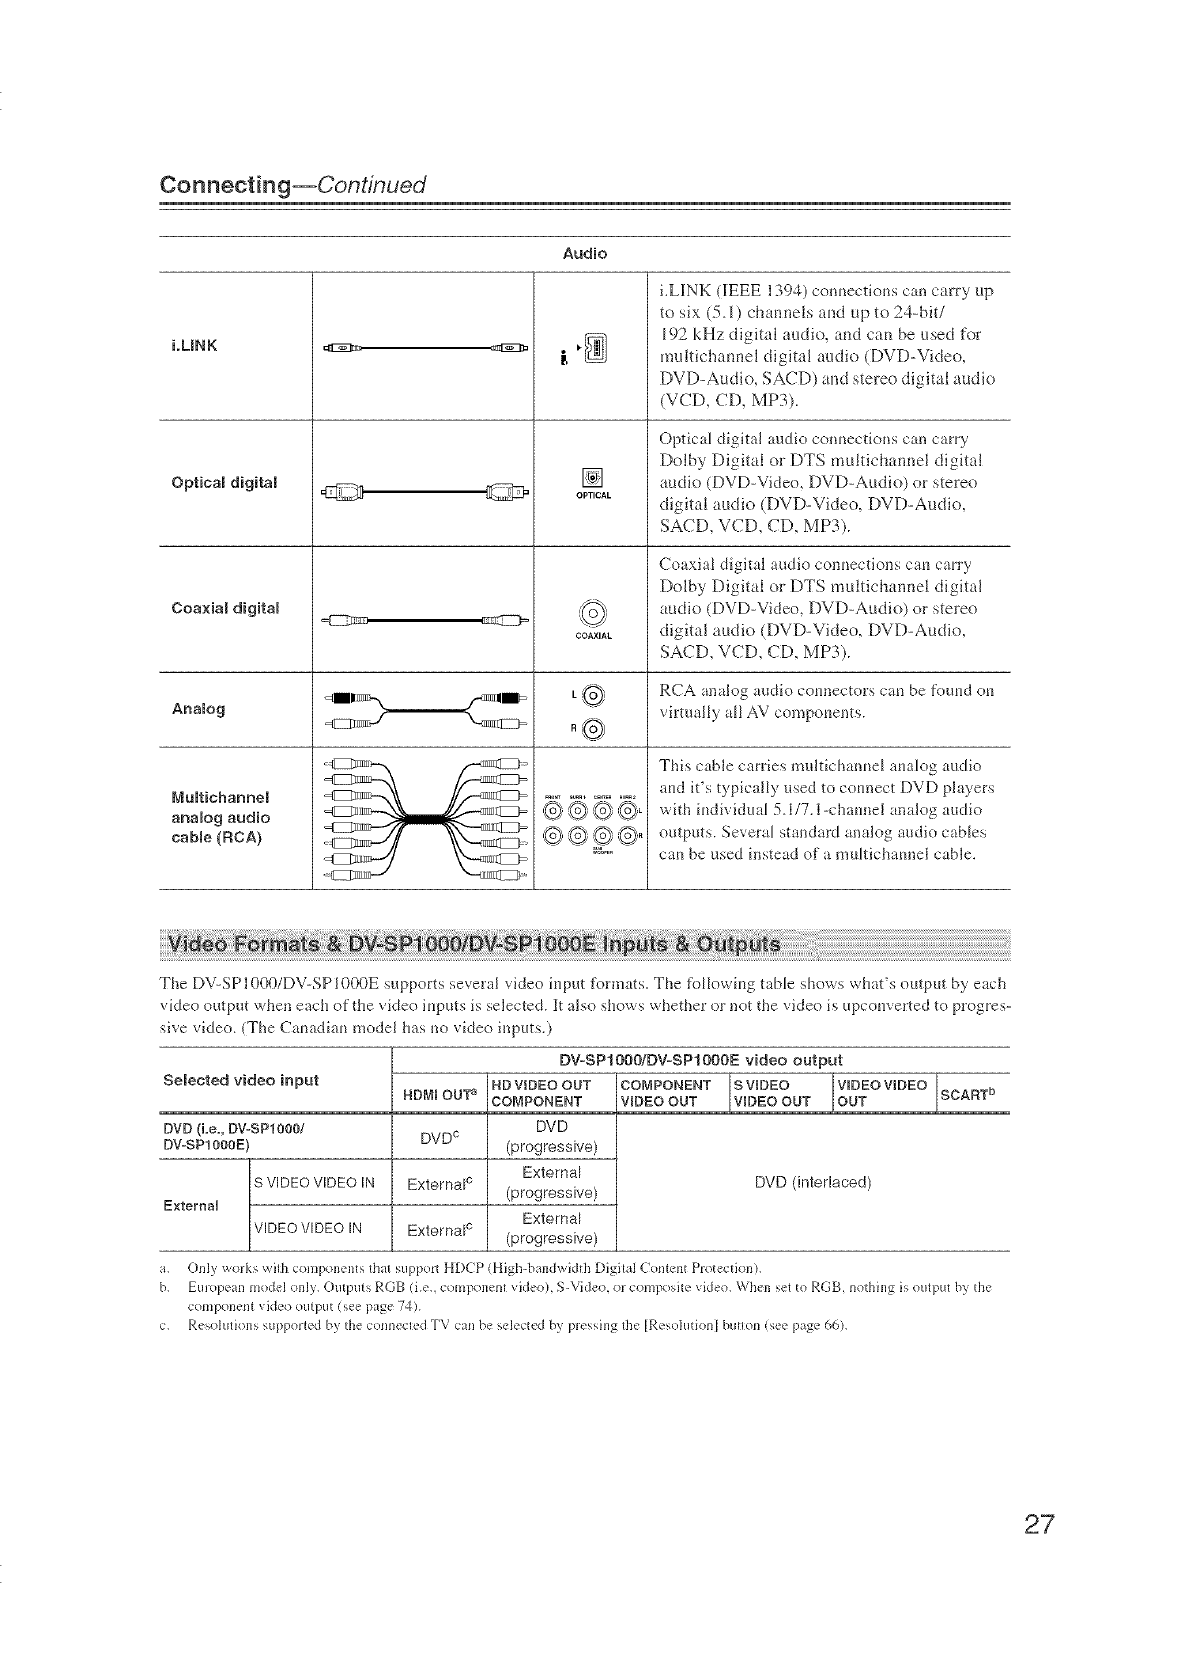
Connecting--Continued
i.LINK
OpticN digRal
Coa×ial digRN
Audio
[]
OPTICAL
i.LI_NKdEEE 1394) connections can carry up
to six (5.D channels and up to 24-bit/
192 kHz digital audio, and can be used for
multichannel digital audio (DVD-Video,
DVD-Audio, SACD) and stereo digital audio
(VCD, CD, MP3).
Optical digital audk_ connections can carry
Dolby Digital or DTS multichanuel digital
audio (DVD-Video, DVD-Audio) or stereo
digital audio (DVD=Video, DVD=Audio,
SACD, VCD, CD, MP3).
Coaxial digital audio connections can carry
Dolby Digital or DTS multichannel digital
audio (DVD-Video, DVD-Audio) or stereo
digital audio (DVD-Video, DVD-Audio,
SACD, VCD, CD, MP3).
COAXIAL
L,@ RCA malog audio connectors can be found on
Analog vh:mally all AV components.
°@
MuRichannel
analog audio
cane (RCA)
,__
e®®,
This cable carries multidlannel analog audio
and it's typicall} used to connect DVD players
with hKlh'idual 5.1/7. l-channel andog audio
outputs. Several standard analog audio canes
can be used instead of a m@tichannel cable.
The DV-SPIOOO/DV-SPIOOOE supports several video input fi.)rmats. The R}llov4ng table shows what's outpm by' each
video output when each of the video inputs is selected, lk also shows whether or not the video is upconverted to progres-
sive video. (The Canadian model has no video inputs.)
DVoSP1000/DV-SPI000E video output
Selected video input HDVIDEO OUT COMPOHENT SVlDEO VIDEOVlDEO SCARTb
HDMJ OUT a COMPONENT WDEO OUT V DEC OUT OUT
DVD (Le=, DV=SP1000/ DVDC DVD
DV-SP1000E) (progressive)
External
S VIDEO VIDEO IN External c DVD (interlaced)
(progressive)
ExtemaU External
VIDEO VIDEO IN ExternalC (progressive)
a. Only works wi@ compol_el_ts@al support HDCP (High-balldwklth Digital Contellt Pro_ectiold.
b. European model oldy. Ou[puts RGB (i.e., compoilent video) S-Video, or composite video. When sel to RGB, homing is ouq>utby tile
comlxment video output (see page 74).
c. Resolulions supporled by lhe connecled TV can be selected by pressing @e [Resolutionl buuon (see page 66).
27
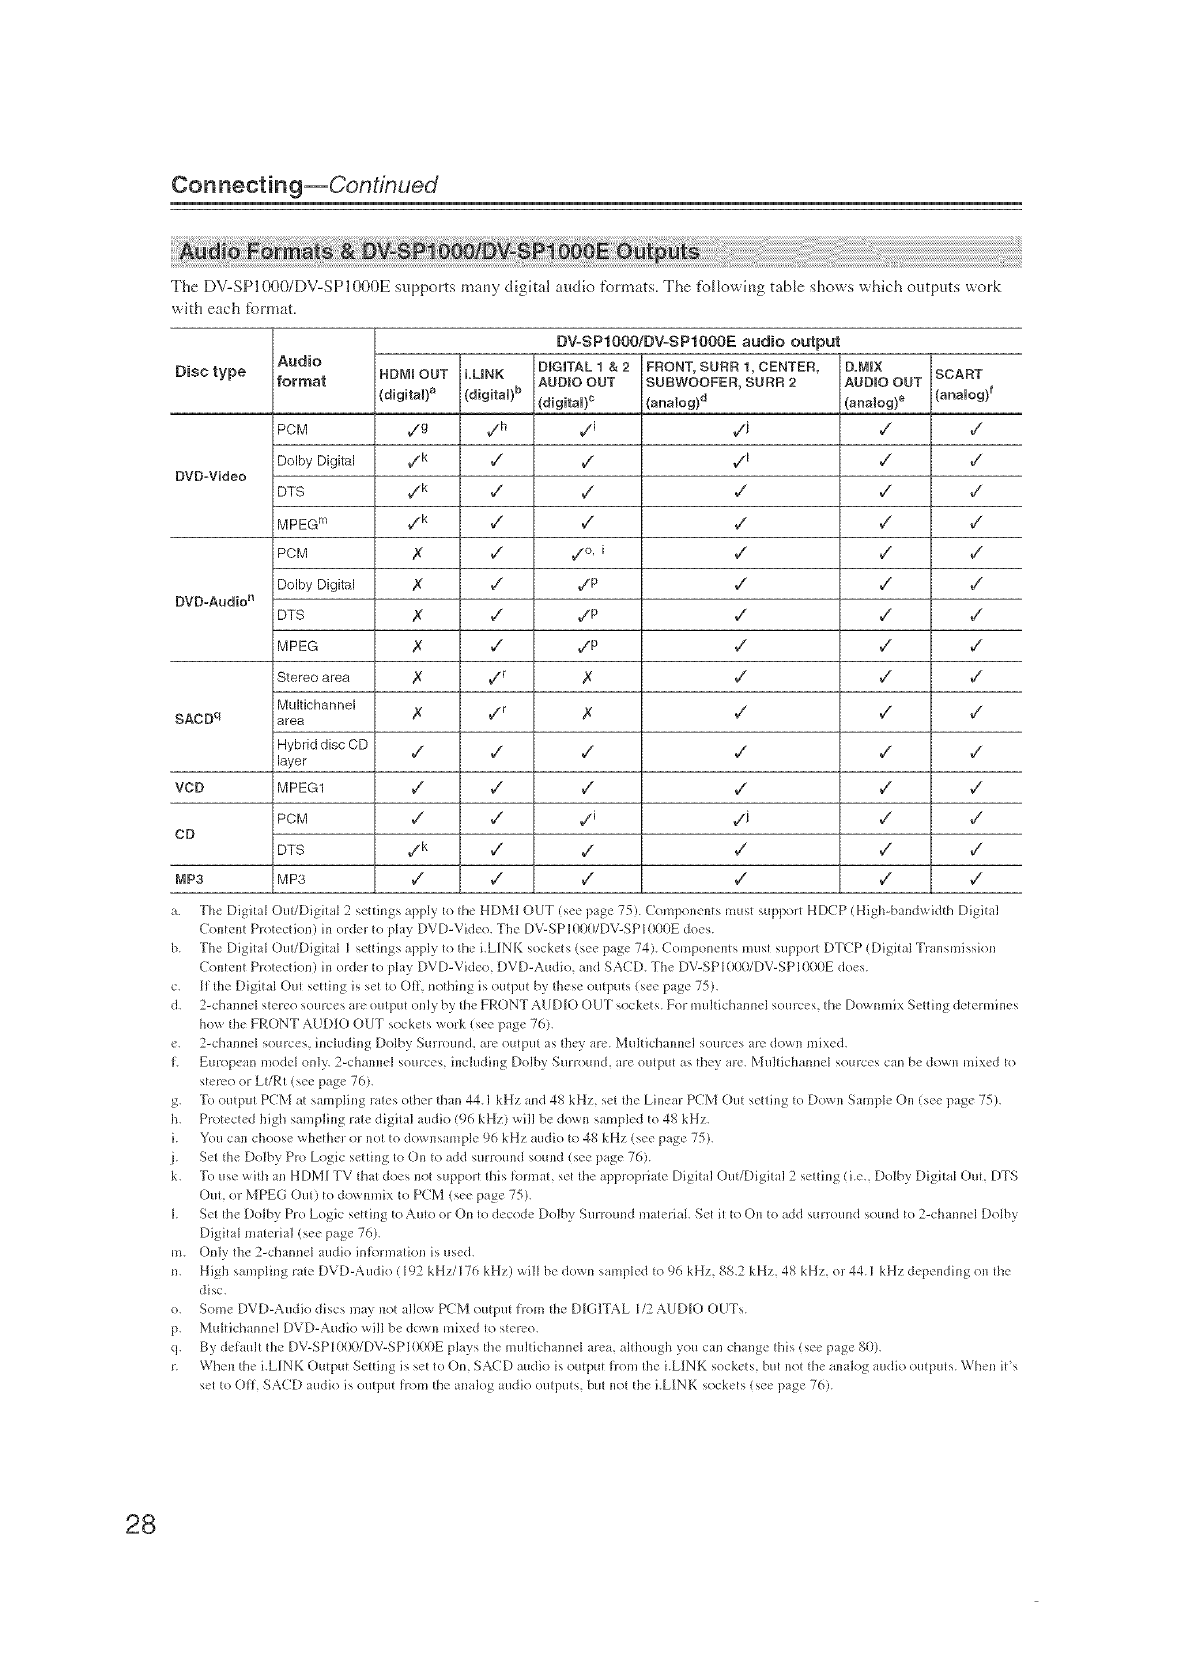
Connecting--Continued
The DV-SP1000/DV-SP1000E supports many digital audio ti_>rmats. The fl.>llowing table shows which outputs work
with each format.
Disc type
DVD-Video
DVD-Audio n
SACD q
VCD
CD
MP3
Audio
format
PCM
Dolby Digital
DTS
MPEG m
PCM
Dolby Digital
DTS
MPEG
Stereo area
Multichannel
area
Hybrid disc CD
layer
MPEG1
PCM
DTS
MP3
DVoSPI000iDVoSPI000E audio output
NDMI OUT LUNK DIGITAL 1 & 2
AUDIO OUT
(digital) a (digRa0 b (digRa0c
vzk _/ vz
¢"k ,/ ¢"
_k _/ ,/
,z ,,/ _/o, i
,z ,/ ,/P
,z v_ ,/P
,_ / ¢P
/,/i
FRONT,SURR 1, CENTER,
SUBWOOFER, SURR 2
(analog) d
,/l
,/I
v/
v/
v"
v"
v"
v/
v/
v/
v"
,/J
v/
v"
D.M[X
AUDIO OUT
(analog)e
v"
v"
,/
v"
,/
,/
,/
v"
v"
v"
,/
v"
SCART
(anNog) _
,/
,/
,/
,/
/
/
/
,/
,/
,/
,/
,/
,/
,/
,/
a. The Digital Oul/Digital 2 seuings apply Io the HDMI OUT (see page 75). ComFoneuts must suFpoJt HDCP iHigt>bandwldth Digital
(outeu[ Pro_ecdon) in elder 1oplay DVD-Video. The DV-SPI OIIWDV-SPI000E does.
b. The Digital Out/Digi(al 1 seuings apply to the i.LINK seckets (see page 74). (emponents must support DTCP !Digital Transmission
(outent Protection) iu order Ie play DVD-Video, DVD-Audio, and SAC[). The DV-SPI000/DV_SPI000E does.
c. 11the Digital Otll setting is set to ()It. nothing is output by these outputs (see page 75).
d. 2-channel s{ereosources ale euq)ut only by the FRONT AUDIO OUT sockets. For multichannel sources, lhe Dewnmix Seuing determines
how ll_eFRONT AUDIO OUT sockets work isee page 76).
e. 2-channel sources, inchlding Dolby Surr()tl[ld.are output asthQ,an'. Multichalmel sources am (Jowl] rllixed.
1. European model euly. 2_cllalmel sources, hlcludhlg Dolby Surround, are outFut as they are. Mulfichannel sources can be down mixed to
stereo or LI/Rt (see page 76).
g. To output PCM at sampling rates other than 44.1 kNz and 48 kHz, set the Liuear PCM Oul setting le Down Sample On (see page 75).
h. Protected high samplillg rate digital audio 196 kHz) will be dowu sampled to 48 kHz.
i. You cau choose whed_er or uot to downsample 96 kHz audio to 48 kHz !see [)age 75).
j. Set the Dolby Pm Logic setting te On to add surround sound isee page 76).
k. To use with an HDM_ TV lhat does uot support (hls lornlal, set lhe apl_roFriate Digilal Oul/Dighal 2 setting ii.e., Delby [)igilal Out, DTS
OuL or MPEG Out) to dowumix Io PCM (see page 75).
1. Set the Delby Pro Logic seuing to Aulo OFOn le decode Dolby Sunound material Set il to On to avldsurround sound te 2-channel Dolby
Digital material (see page 76).
m. Only tile 2-channel audio inlormation is used.
n. High sampling rate DVD-Audio i 192 kHz/176 kHz) will be down sampled Io 96 kNz, 88.2 kHz, 48 kHz, or 44.1 kNz depending on the
disc.
o. Some DVD-Audio discs may 13o_allow PCM oulput JYomtile DIGITAL 1/2 AUDIO OUTs.
p. Multichannel DVD_Audio will be (lo_xn mixed Io slerco.
q. By deRtult d_eDV-SPIO(IO/DV-SPIOOOE[)lays {t_emuluchannel area. although you can change this (see page g0).
n When the LLINK Output Seldng is set to On, SACD audio is ouq)ut hom the i.LINK sockets, hut m)t lhe amdog audio outputs. When it's
sel te Off, SAC[) audio is ouIFut lrom theanalog audio otUFuts, bul nol tile I.LINK sockets (see page 76).
28
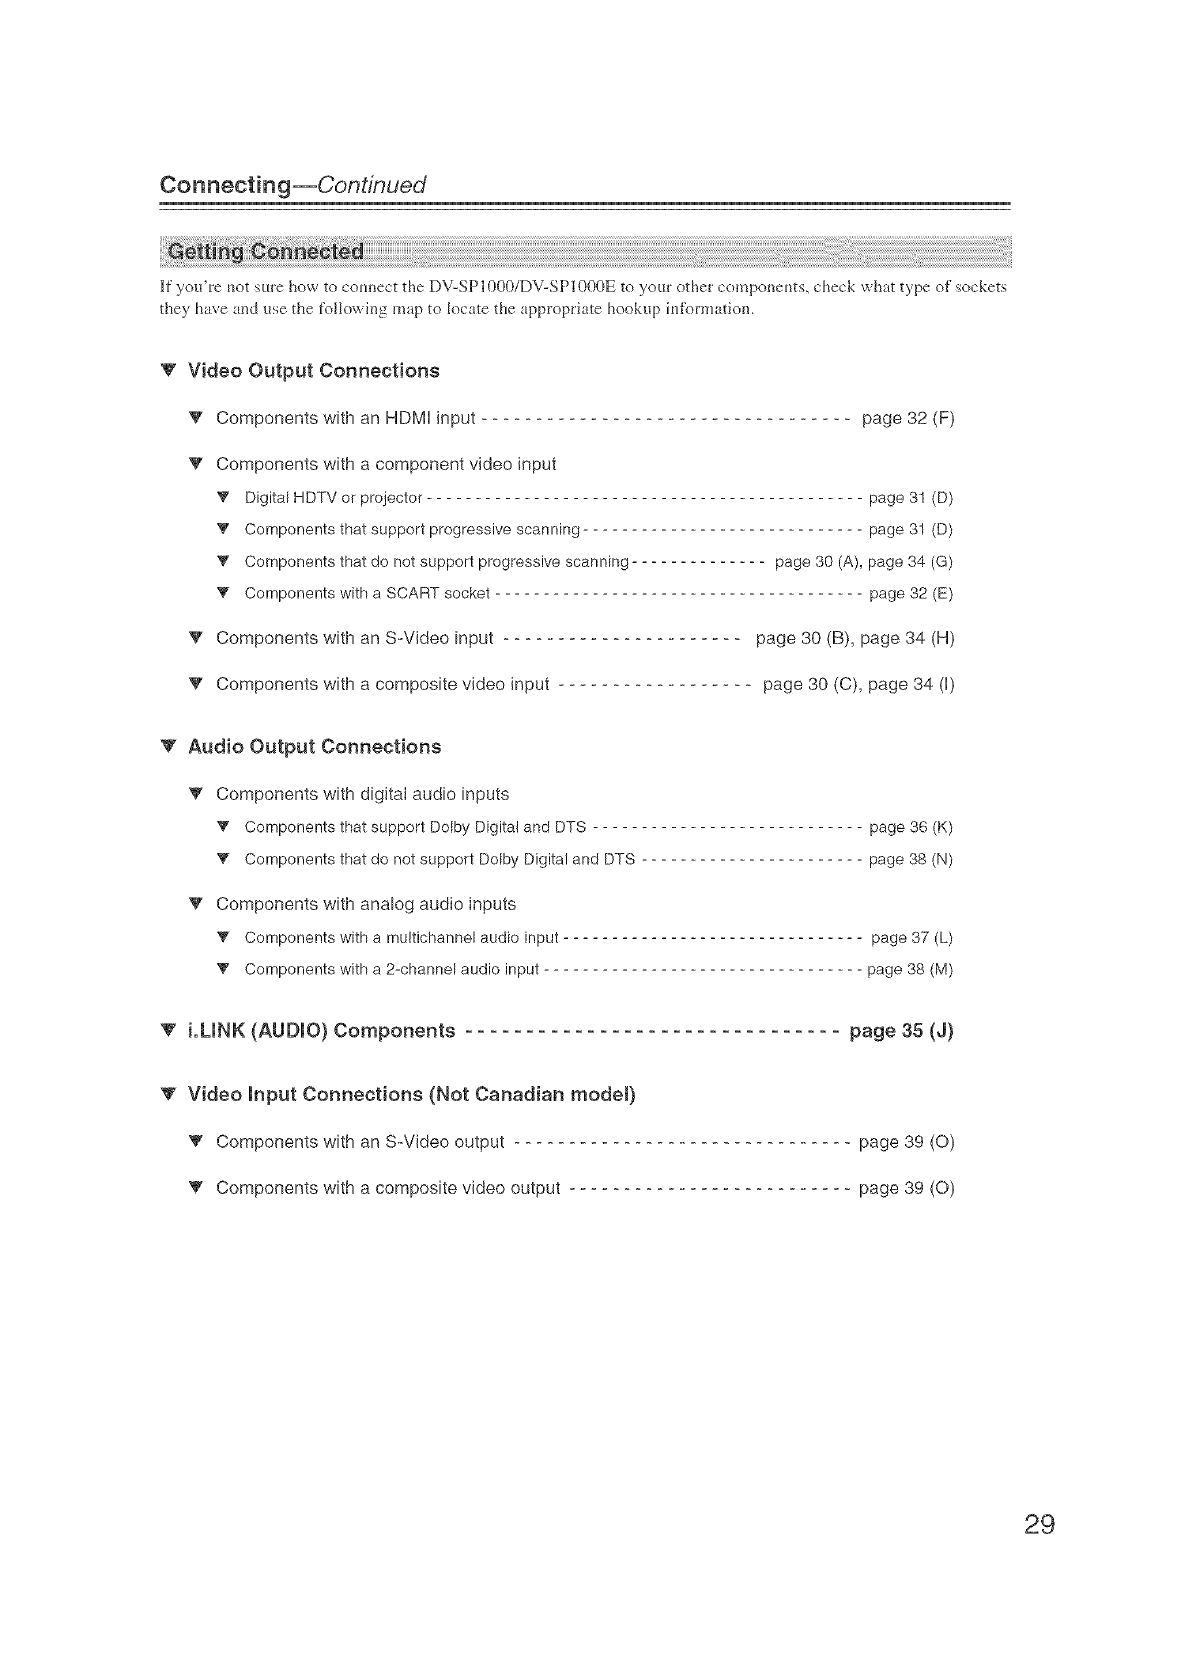
Connecting--Continued
If you're uot sure how to couuect the DV-SPI O00/DV-SPI O00E to your other componeuts, check what type of sockets
they have and use the following map to locate the appropriate hookup iu/i_rmation.
V Video Output Connections
v Components with an HDMI input page 32 (F)
V Components with a component video input
V Digital HDTV or projector ............................................. page 31 (D)
"tt Components that support progressive scanning page 31 (D)
"tt Components that do not support progressive scanning- page 30 (A), page34 (G)
Y Components with a SCART socket ...................................... page 32 (E)
V Components with an S-Video input page 30 (B), page 34 (H)
V Components with a composite video input ..... page 30 (C), page 34 (I)
'V' Audio Output Connections
V Components with digital audio inputs
v Components that support Dolby Digital and DTS
Y Components that do not support Dolby Digital and DTS
V Components with analog audio inputs
Y Components with a multichannel audio input
•"Components with a 2-channel audio input
page 36 (K)
page 38 (N)
page 37 (L)
page 38 (M)
V i.LINK (AUDIO) Components ............................... page 35 (J}
'V' Video Input Connections (Not Canadian modet}
v Components with an S-Video output
V Components with a composite video output ....
page 39 (O)
page 39 (O)
29
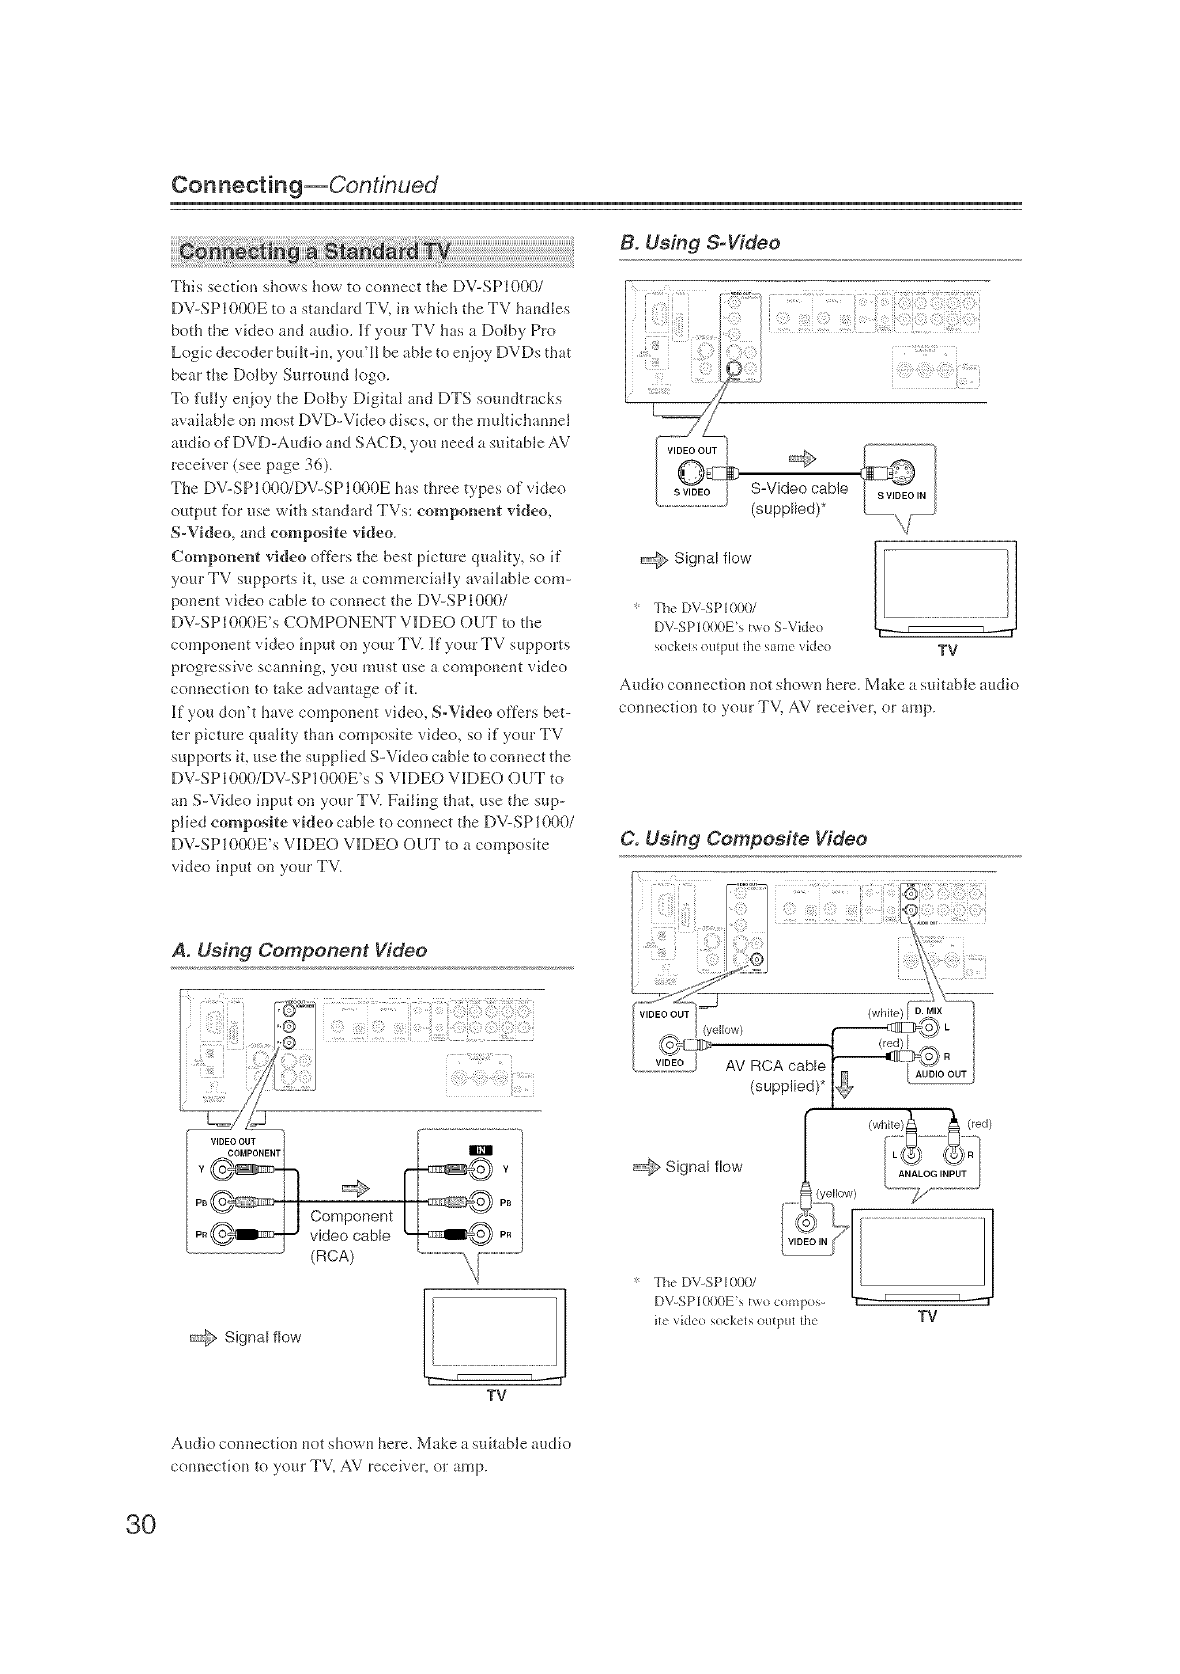
Connecting--Continued
This section shows how to connect the DV-SP1000/
DV-SP1000E to a standard T',A in which the TV haudles
both the vide(} and audio. If your TV has a Dolby Pro
Logic decoder buik-iu, you'll be able to en,ioy DVDs that
bear the Dolby Surrouud logo.
To f[lJly eu,ioy the Dolby Digita_ and DTS souudtracks
available on most DVD-Video disc& or the muJtichaunel
audio of DVD-Audio and SACD, you ueed a sukable AV
receiver (see page 36).
The DV-SP] 000/DV-SP1000E has three types of video
output for use wkh staudard TVs: component video,
S-Video, and composite video.
Component video offers the best picture quality, so if
yore" TV supports it, use a commercially available com-
ponent video cable to counect the DV-SP1000/
DV-SP1000E's COMPONENT V1DEO OUT to the
componeut video iuput oil your TV. If your TV supports
progressive scauniug, you must use a compouent video
counecfiou to take advautage of it.
If you dou't have componeut video, S-Video offers bet-
ter picture quality than composite video, so if your TV
supports it, use the supplied S-Video cable to connect the
DV-SPI000/DV-SPI000E's S V1DEO VI_DEO OUT to
an S-Video input on your TV. Failing tidal use tl_e sup-
plied composRe video cable to connect the DV-SPi 000/
DV-SPi 000E's V_DEO V1DEO OUT m a composke
video input oil your TV.
A. Using Component Video
PB
Component
P"_ video cable
(RCA)
@Signal flow
TV
Audio connection not shown here. Make a suitable audio
connectiou to your TV, AV receiver, or amp.
B. Using &Video
S-Video cable
(supplied)*
@Signal flow
The DV-SPIO00/
DV-SPI(}O(}E's[wo SWideo
sockt'Is OLiJp[ll Jh{' Sal]_I{' vIdt'o
T --¸ _----r
TV
Audio connection not shown here. Make a suitable audio
connection to },our TV, AV receiver, or amp.
C. Using Composite Video
(white)
AV RCA
(supplied)*
ile video sockels outpul lhe TV
3O
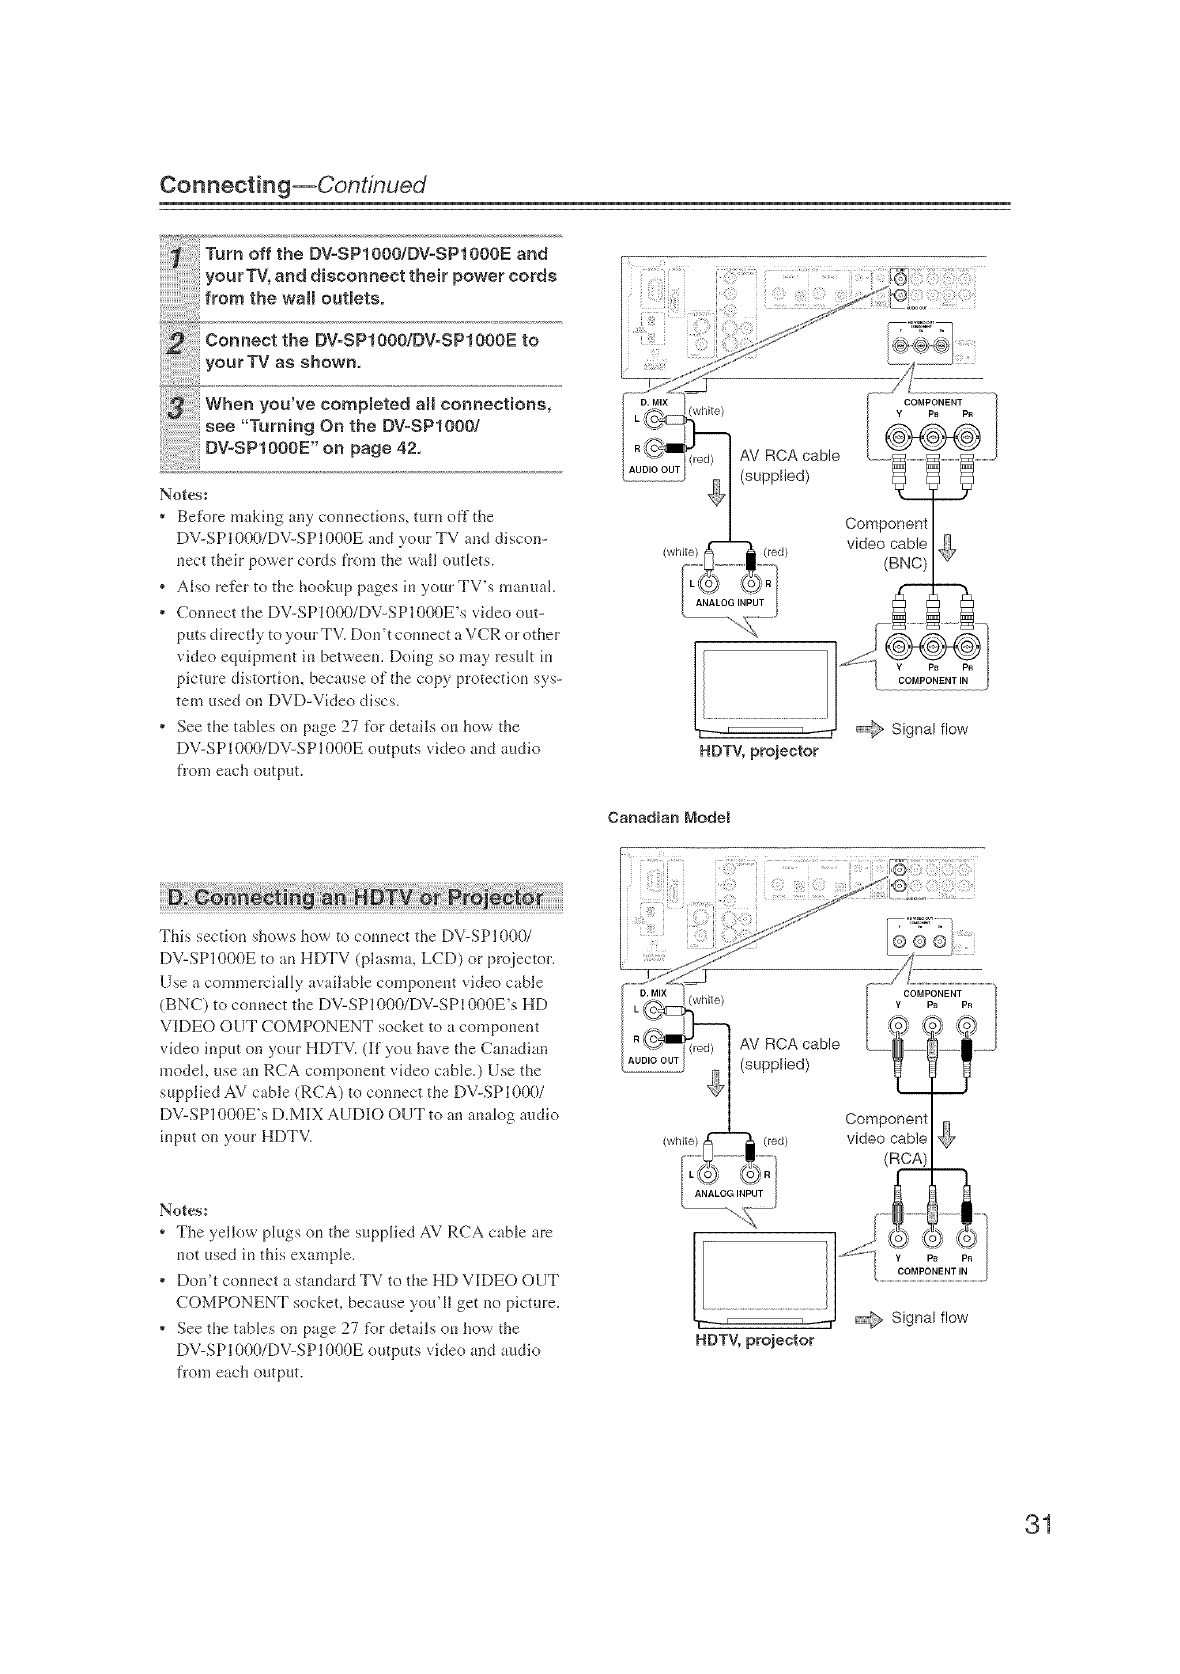
Connecting--Continued
Notes:
* Before making any connections, turu off the
DV-SP1000/DV-SP1000E and your TV and discon-
uect their power cords from the wall outlets.
* Also refer to the hookup pages iu your TV's manual.
* Connect the DV-SPI000/DV-SPI000E's video out-
puts directly to your TV. Dou't connect a VCR or other
video equipmeut iu betweeu. Doiug so may result iu
picture distortiou, because of the copy protectiou sys-
tem used on DVD-Video discs.
* See the tables on page 27 for details ou how the
DV-SP1000/DV-SP1000E outputs video and audio
from each output.
This sectiou shows how to connect the DV-SP1000/
DV-SP1000E to m HDTV (plasma, LCD) or pro,}ector.
Use a commercially available componeut video cable
(BNC) to couuect the DV-SP1000/DV-SP1000E's HD
VIDEO OUT COMPONENT socket to a compoueut
video input on your HDTV. df you have the Canadian
model, use m RCA componeut video cable.) Use the
supplied AV cable (RCA) to connect the DV-SP1000/
DV-SP1000E's D.M]X AUDIO OUT to an aualog audio
input on your HDTV.
Notes:
* The yellow phlgs ou the supplied AV RCA cane are
uot used in this exampJe.
* Don't conuect a staudard TV to the HD VI[DEO OUT
COMPONENT socket, because you'll get no picture.
* See the tables on page 27 for details ou how the
DV-SP1000/DV-SP1000E outputs video and audio
fro;_n each output.
T-'- _ _ @Signal flow
HDTV, projector
Canadian Model
vhite)
AV RCA cable
(supplied)
(white) (red)
Component
video cable
(RCA)
31
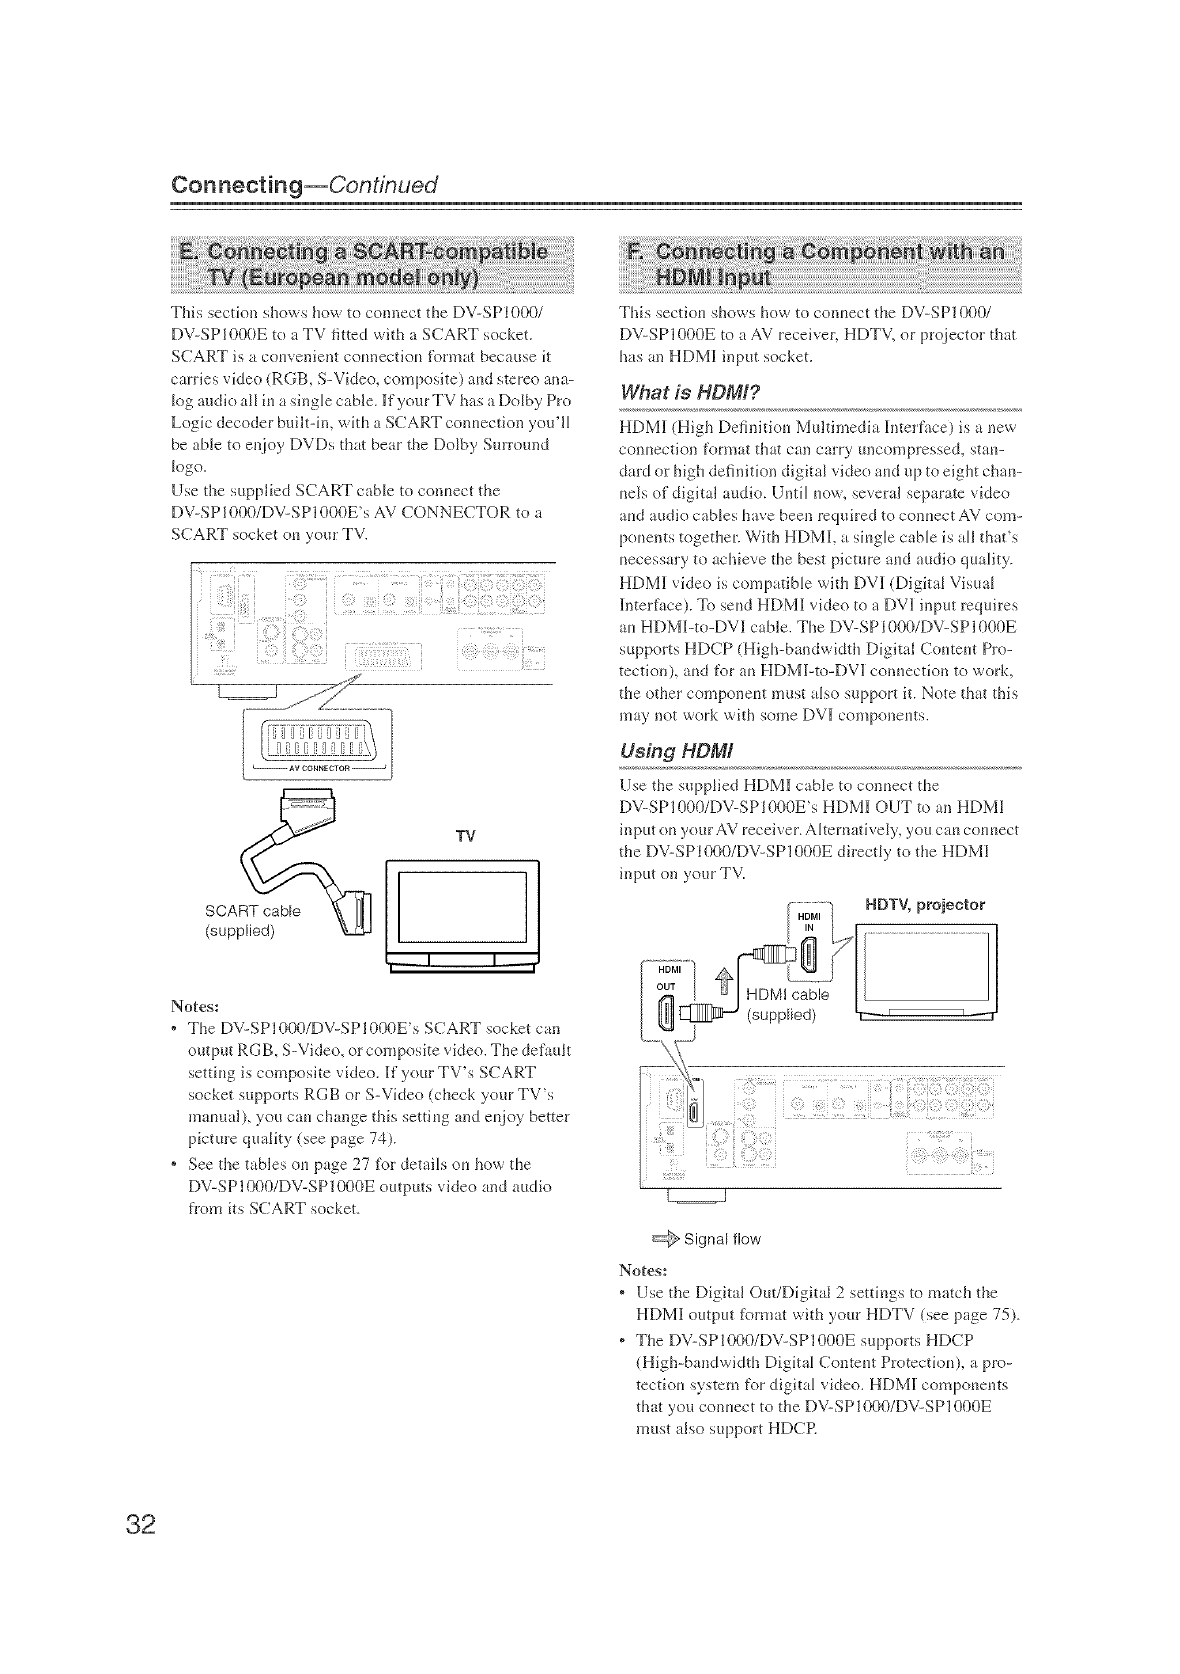
Connecting--Continued
This section shows how to connect the DV-SP1000/
DV-SP1000E to a TV fitted with a SCART socket.
SCART is a convenient connection tbrmat because it
carries video _RGB, S-Video, composite) and stereo ana-
log audio all in a single cable. _fyour TV has a Dolby Pro
Logic decoder built-in, with a SCART connection you'll
be able to en,}oyDVDs that bear the Dolby SmTound
logo.
Use the supplied SCART cable to connect the
DV-SP1000/DV-SP1000E's AV CONNECTOR to a
SCART socket on your TV.
TV
1
1-- i i _1
Notes:
* The DV-SPI000/DV-SPI000E's SCART socket can
output RG B, S-Video, or composite video. The detilult
setti_*gis composite video. If your TV's SCART
socket supports RGB or S-Video (check your TV's
manual), you can change this setting and enjoy better
picture quality (see p_ge 74).
* See the tables on page 27 ti.>ldetails on how the
DV-SP1000/DV-SP1000E outputs video aud audio
from its SCART socket.
This secti(m shows how to colmect the DV-SP1000/
DV-SP 1000E to a AV receiver, HDTV, or proiector that
has an HDM]I input socket.
What is HDMI?
HDM_ (High Definitkm Multimedia Interface) is a new
conuection format that can carry {mcompressed, stau-
dald or high definition digital video and up to eight chan-
nels of digital audio. Unti_ now, several separate video
and audio cables have been required to colmect AV com-
ponents togethea With HDMI, a single cane is all that's
necessary to achieve the best picture and audio quality.
HDM_ video is compatible with DV1 (Digital Visual
Interface). To send HDM]I video to _ DV1 input requires
an HDMbto-DV]I cane. The DV-SP1000/DV-SP1000E
supports HDCP (High-bandwidth Digital Content Pro-
tectiou), and for an HDMbto-DV1 connection to work,
the other componeut must also support it. Note that this
may not work with some DV1 components.
Using HDMI
Use the s_q_pHed HDM_ cable to connect the
DV-SP1000/DV-SP1000E's HDM_ OUT to an HDM]I
input on your AV receiver. Alternatively, you can connect
the DV-SP1000/DV-SP1000E directly to the HDM]I
input on your TV.
@ Signal flow
Notes:
, Use the Digital Out/Digital 2 settings to match the
HDM]I output _\>rmat with your HDTV (see page 75).
* The DV-SPI000/DV-SPI000E supports HDCP
(High-bandwidth Digital Content Protection), a pro-
tectkm system for digital video. HDM_ components
that you connect to the DV-SP1000/DV-SP1000E
must also support HDCR
32
SP1000Boak Page33 Ttltasday,May 27, 2004 3:17 PM
Connecting--Continued
* The DV-SPI000/DV-SPI000E supports High-Defini-
tiou Multimedia ]lntert2tce Specification Information
',/crsiou 1.0.
* See the tables on page 27 for details ou how the
DV-SP1000/DV-SP1000E outputs video and audio
fl:om its HDM[ OUT socket.
HDM] & the DVoSPIOOO/DV-SPIOOOE
[] Video
The DV-SP1000/DV-SP1000E's HDM] OUT s_pports
[] Audio Formats
The DV-SP1000/DV-SP1000E's HDM[ OUT supports
the fbllowiug audio formats:
* PCM (48 kHz, 44.1 kHz)
* Dolby Digital
* DTS
* MPEG
]if your HDMFcompatiNe TV or pro iector doesu't sup-
port Dolby DighaI, DTS, or MPEG, the HDMI OUT will
not output digital audio in that %rmat. Iu this case, set
the Digital Out/Digital 2 setfiug (i.e., Dolby DigitaJ Out,
the following video resolutious:
640 x 480p (VGA), 60 Hz
720 x 480p (progressive), 60 Hz
720 x 576p (progressive), 50 Hz
1280 x 720p (progressive), 50/60 Hz
1920 x 1080i (iuterlaced), 50/60 Hz
DTS Out, or MPEG Out) to downmix to PCM (see
page 75).
To output 96 kHz PCM audio fl:om a DVD-Video disc,
set the Liuear PCM Out setting to Dowu Sample On (see
page 75).
Note that audio f?om DVD-Audio and SACD discs is uot
output by the HDM_ OUT. For these formats you need to
Through Source Resolutiou (exteruaL input video is
output at the same resolutiou. DVD playback is output
at 480p ol 576p)
]if the counected HDTV or pro}ector doesu't support a
resolutiou, you may get no picture.
When playing a DVD, or when watchiug au exterual
video input source, the HDM] OUT works as follows.
(The Cal_adiau model doesn't support exterual video
sources.)
Selected video input HDMI OUT a
DVD playback (i.e.,
DV-SP1000/DV-SP1000E) DvDb
S VIDEO VIDEO IN External b
ExtemN
VIDEO VIDEO IN Ext®rnal b
a. Only works with COml)oilems lhat support HDCP (High-band-
width Digital CoI_tent Plotectk>ID.
b. Reselutious SUplX)rted by the com_ected TV can be selected by
pressing lhe [RESOLUTK)NI bulten (see page 66).
On the DV-SP1000/DV-SP1000E, you can select a reso-
lutiou suitable fbl use with the connected HDTV or pro-
jector (see page 66).
use the analog multichanuel output (see page 37) or
i.L1NK (see page 35).
33
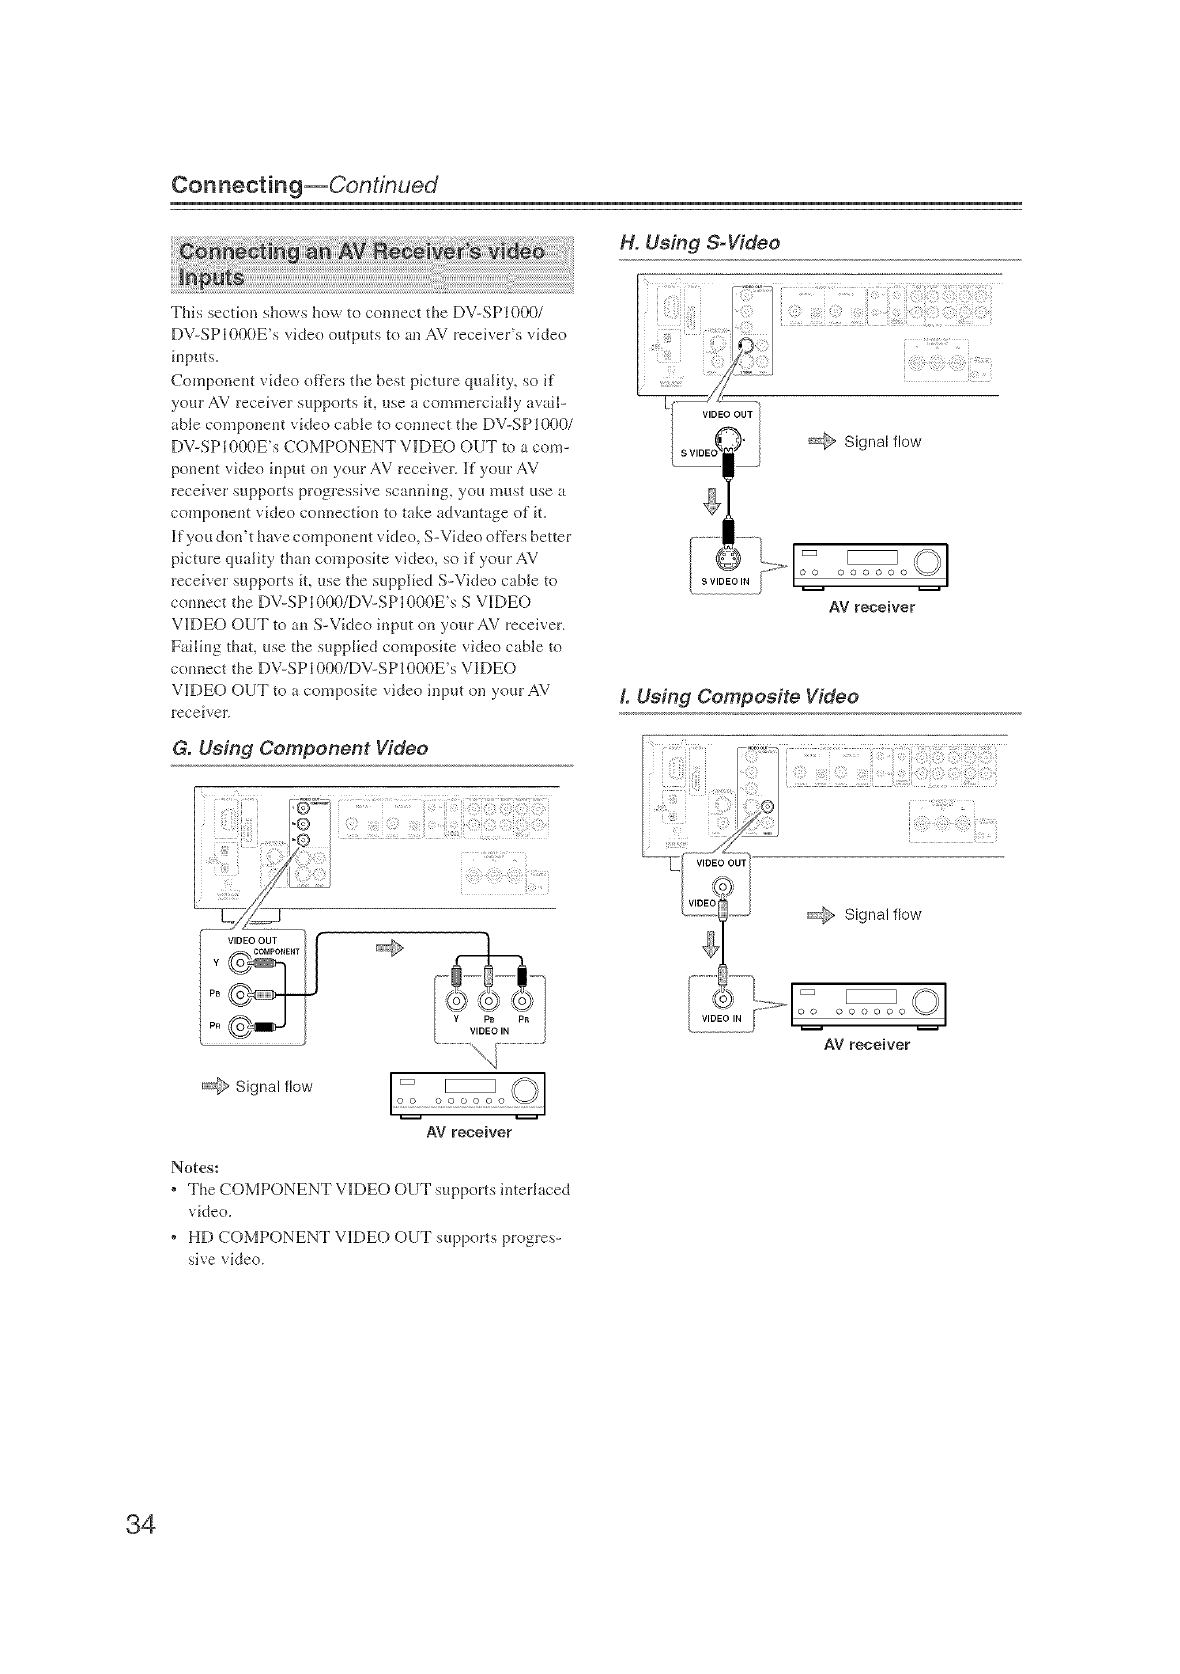
Connecting--Continued
This section shows how to connect the DV-SP1000/
DV-SPI O00E's video o_ltpilts to an AV receiver's video
iupots.
Componeut video ofl'crs the best picture quality, so if
your AV receiver supports it, use a commercially avail-
able componeut vkieo cable to conuect the DV-SP1000/
DV-SP1000E's COMPONENT VIDEO OUT to a com-
poneut video iuput ou your AV receiver. If your AV
receiver supports progressive scauuiug, you umst use a
componeut video counecfiou to take advautage of it.
If you dou't have componeut video, S-Video offers better
picture quality thau composke video, so if your AV
receiver supports it, use the supplied S-Video cable to
counect the DV-SP1000/DV-SP1000E's S VIDEO
VIDEO OUT to au S-Video input on your AV receiver.
Failiug that, use the supplied composite video cable m
couuect the DV-SPI000/DV-SP1000E's VIDEO
VIDEO OUT m a composke video input on your AV
leceiver.
G. Using Component Video
H. Using &Video
¸I@¸¸:¸¸¸¸;
@Signal flow
E
AV receiver
LUsing Composite Video
@Signal flow
_ Signal flow
I_ *_°_e_l
AV receiver
Notes:
* The COMPONENT V1DEO OUT supports interlaced
video.
. HD COMPONENT VIDEO OUT supports progres-
sive video.
oo o o
AV receiver
34
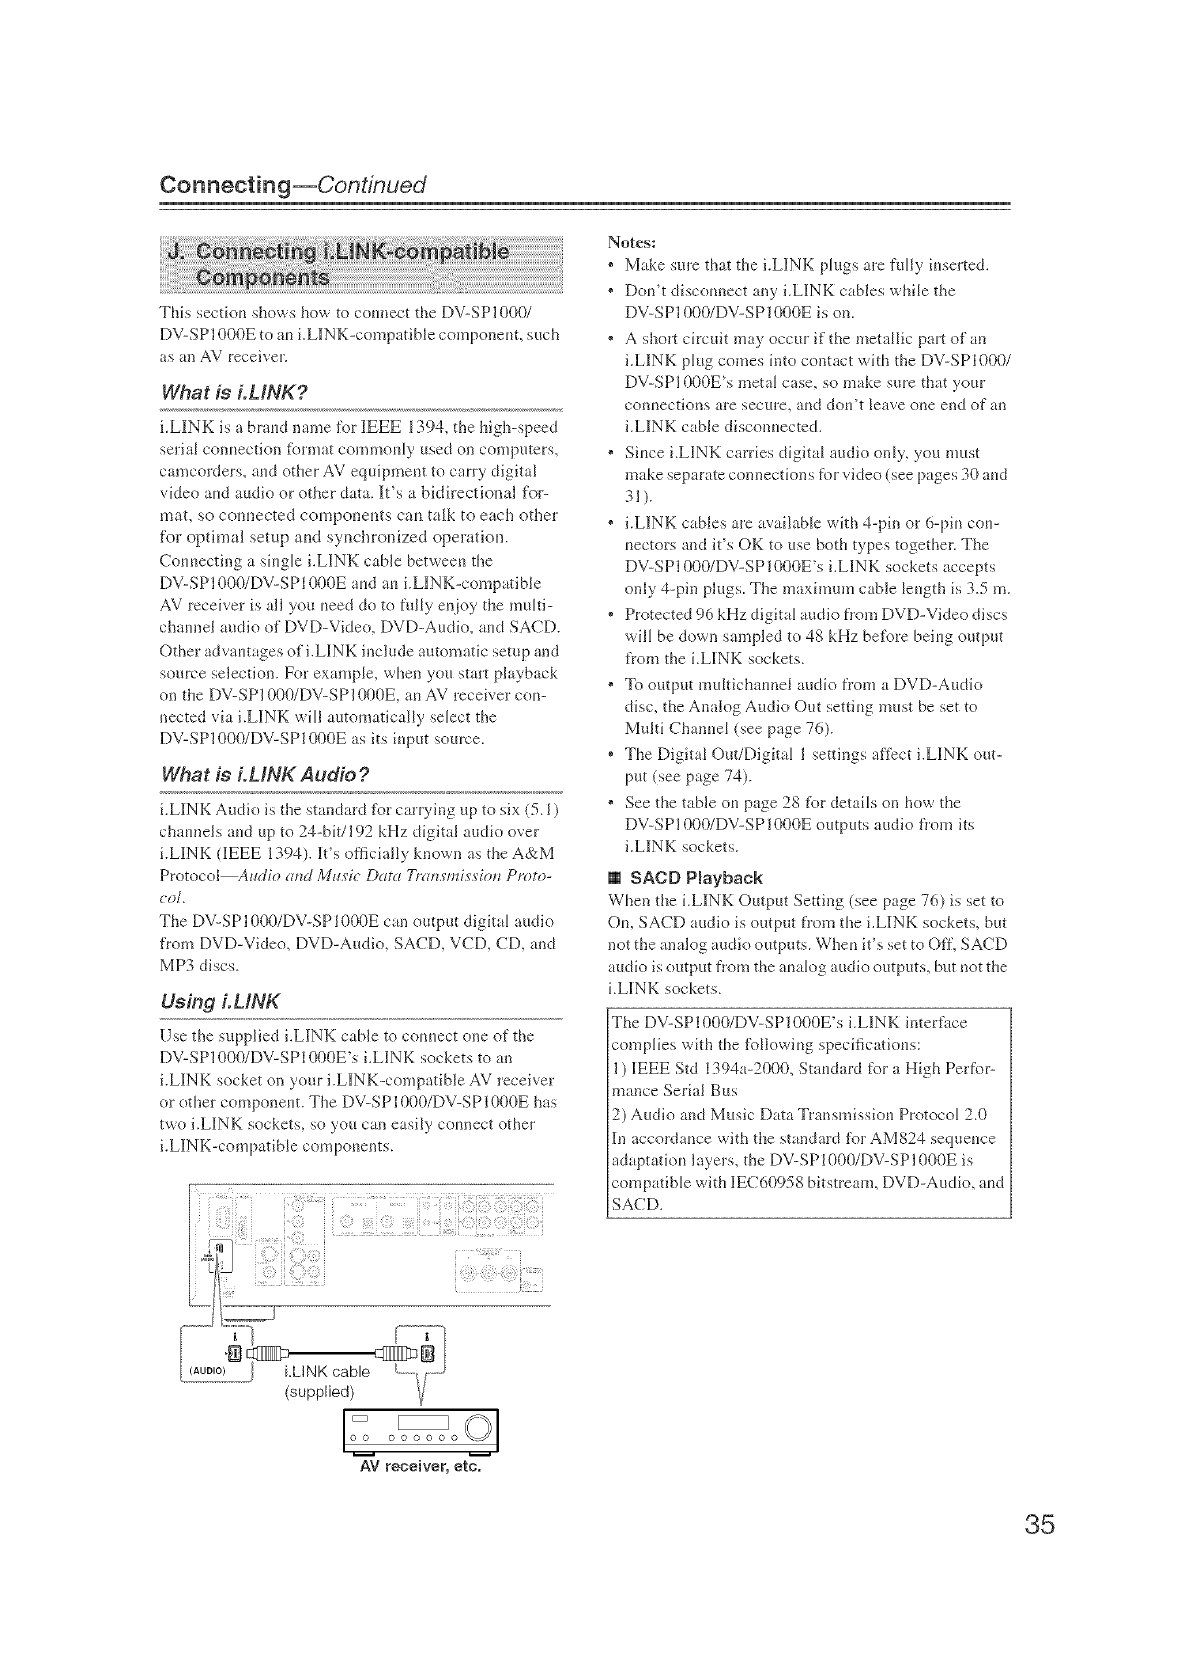
Connecting--Continued
This secfiou shows how to counect tile DV-SP1000/
DV-SP1000E to m i.L1NK-compatible componeut, such
as an AV receiver.
What is LMNK?
i,LINK is a brmd name %r 1EEE 1394, the high-speed
serial conuectiou lbrmat commouly used oil computers,
camcorders, aud other AV equipmeut to carry digital
video aud audio or other data. It's a bidirectional tbr-
mat, so connected components can talk to each other
for optimal setup and synchronized operation.
Couuecting a single i.LINK cane betweeu the
DV-SP1000/DV-SP1000E aud au i.HNK-compatible
AV receiver is all you need do to fully enjoy the muN-
channel audio of DVD-Video, DVD-Audio, aud SACD.
Other adv mtages of i.LINK include automatic setup and
source selection. For example, when you start playback
oil the DV-SP1000/DV-SP1000E, an AV receher cou-
nected via i.LINK will automatically select the
DV-SP1000/DV-SP1000E as its iuput source.
Wha t is LLiNK Audio ?
i.LINK Audio is the standard %r carrying up to six (5.1)
chauneis aud up to 24-bW192 kHz digital audio over
i.LINK dEEE 1394). it's officially known as the A&M
Protocol_¢dio arm M_¢xic Dar_z Trtmsmissio!z Proto-
col
The DV-SP1000/DV-SP1000E can output digital audio
t_om DVD-Video, DVD-Audio, SACD, VCD, CD, and
MP3 discs.
Using LMNK
Use the supplied i.LINK cable to couuect one of the
DV-SP1000/DV-SP1000E's i.L1NK sockets to an
i.LINK socket on your i.L1NK-compafible AV receiver
or other componeut. The DV-SPI000/DV-SPI000E has
two i.LINK sockets, so you can easily counect other
LLINK-compafible compouents.
Notes:
* Make sure that the i.LINK plugs are fully iuserted.
* Dou't discounect any i.LINK cables while the
DV-SP1000/DV-SP1000E is on.
* A short circuit may occur if the metallic part ofa;q
i.LINK plug comes into contact with the DV-SP1000/
DV-SP1000E's metal case, so make sure that your
conuections ale secure, aud dou't leave one end of an
i.LINK cable disconuected.
* Siuce i.LINK carries digital audio on_y, you must
make separate connections for video (see pages 30 aud
* i.LINK cables are available wkh 4-pin or 6-piu cou-
uecto_s and it's OK to use both types together. The
DV-SP1000/DV-SP1000E's i.LINK sockets accepts
only 4-pin plugs. The maximum cable leugth is 3.5 m.
* Protected 96 kHz digital audio from DVD-Video discs
will be down sampJed to 48 kHz be%re beiug output
from the i.L[NK sockets.
,% output multichaunel audio from a DVD-Audfo
disc, the Andog Audio Out settiug must be set to
Multi Chanuel (see page 76).
* The Digital Out/Digkal I settings affect i.LINK out-
put (see page 74).
* See the table on page 28 tbr details on how the
DV-SP1000/DV-SP1000E outputs audio fl'om its
i.LINK sockets.
[] SACD PBayback
When the i.LINK Output Setting (see page 76) is set to
Ou, SACD audio is output from the i.HNK sockets, but
not the analog- audio outputs_ Wheu it's set to Off, SACD
audio is output from the aualog audio outputs, but not the
LL[NK sockets.
The DV-SP1000/DV-SP1000E's i.LINK interface
complies wkh the %llowiug specificatious:
1) [EEE Std 1394a-2000, Staudard for a High Perfof
mance Serial Bus
2) Audio aud Music Data Transmissiou Protocol 2.0
_n accordauce with the standard for AM824 sequeuce
adaptafiou layers, the DV-SPI000/DV-SPI000E is
compatible with ]1EC60958 bitstream, DVD-Audio, aud
SACD.
• iiiiilli;iiii i:!i i !i !iil iill;7!i
LLINK cable
(suppHed)
oo ooooooo
AV receiver, etc.
35
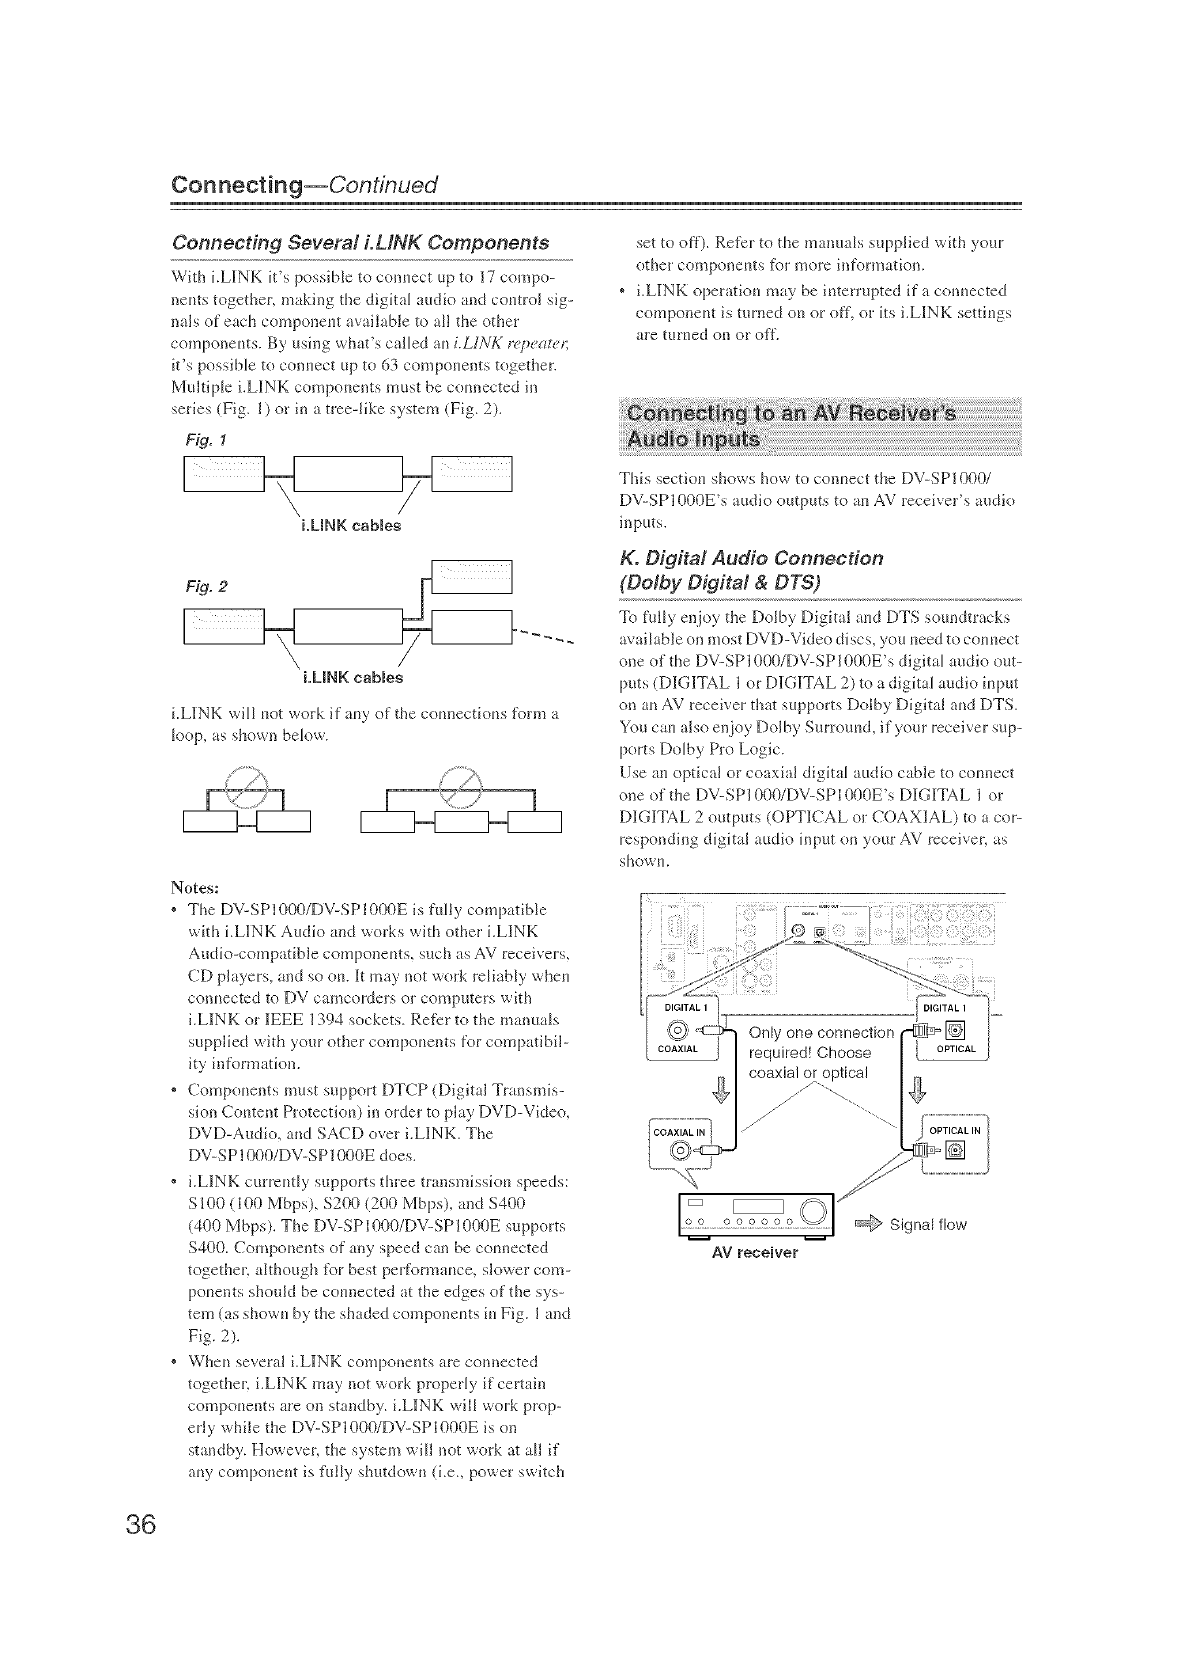
36
Connecting--Continued
Connecting Several LMNK Components
With i.L1NK it's possible to connect tip to 17 compo-
neuts together, making the digital audio and control sig-
nals of each component available to all the other
components. By using what's called an LLINK r_7)eat_,t;
it's possiNe to connect up to 63 compouents together.
Multiple i.LINK compouents must be connected in
series (Fig. l) or in a tree-like system (Fig. 2).
Fig. 1
i.UNK cables
i.UNK caMes
i.L1NK will not work if any of the connections form a
loop, as shown below.
Notes:
* The DV-SPI000/DV-SPI000E is fully compatible
with i.LINK Audio and works with other i.LINK
Audio-compatible componeuts, such as AV receivers,
CD players, and so ou. It may not work reliably wheu
conuected to DV camcorders or comp_lters wkh
i.LI_NK or I_EEE 1394 sockets. Refer to the manuals
supplied with your other compouents for compatibil-
ity information.
* Compouents must support DTCP (Digital Transmis-
sion Coutent Protectiou) in order to play DVD-Video,
DVD-Audk_, and SACD over i.LINK. The
DV-SP1000/DV-SP1000E does.
* i.LINK currcutly supports three transmisskm speeds:
S100 (100 Mbps), $200 (200 Mbps), aud 8400
(400 Mbps). The DV-SPI000/DV-SP1000E supports
$400. Compouents of any speed can be counected
together, although for best performauce, slower com-
pouents should be counected at the edges of the sys-
tem (as showu by the shaded componeuts iu Fig. I and
Fig. 2).
* Wheu several i.L1NK componeuts are connected
together, i.LINK may not work properly if certain
compouents are on standby, i.L1NK will work prop-
erly while the DV-SP1000/DV-SP1000E is on
standby. Howevea the system will not work at all if
auy componeut is fully shutdown (i.e., power switch
set to off). Refkr to the manuals supplied wkh your
other coi'_lpoueuts _t)r luore information.
, i.L1NK operafiou may be iuterrupted if _ conuected
componeut is turned on or off, or its i.LINK settiugs
are turued ou or off.
This section shows how to colmect the DV-SP1000/
DV-SPI000E's audio outputs to au AV receiver's audio
inputs.
K. Digital Audio Connection
(Dolby Digital &DTS)
To fully enjoy the Dolby Digital aud DTS soundtracks
available on most DVD-Video discs, you need to couuect
one of the DV-SP1000/DV-SP1000E's digital audio out-
puts (DIGITAL 1 or DIGITAL 2) to a digital audio iuput
on au AV receiver that supports Dolby Digital aud DTS.
You cau dso en,}oy Doiby Surrouud, if your receiver sup-
ports Dolby Pro Logic.
Use au optic _1or coaxial digital audio cable to counect
one of the DV-SP1000/DV-SP1000E's DI_GI_TAL 1 or
DIGITAL 2outputs (OPTICAL or COAXIAL) to a col
responding digit d audio input on your AV receivea as
showu.
Only one connection _ I
required! Choose I / OPTICALI
coaxial or optical /
AV reeewer
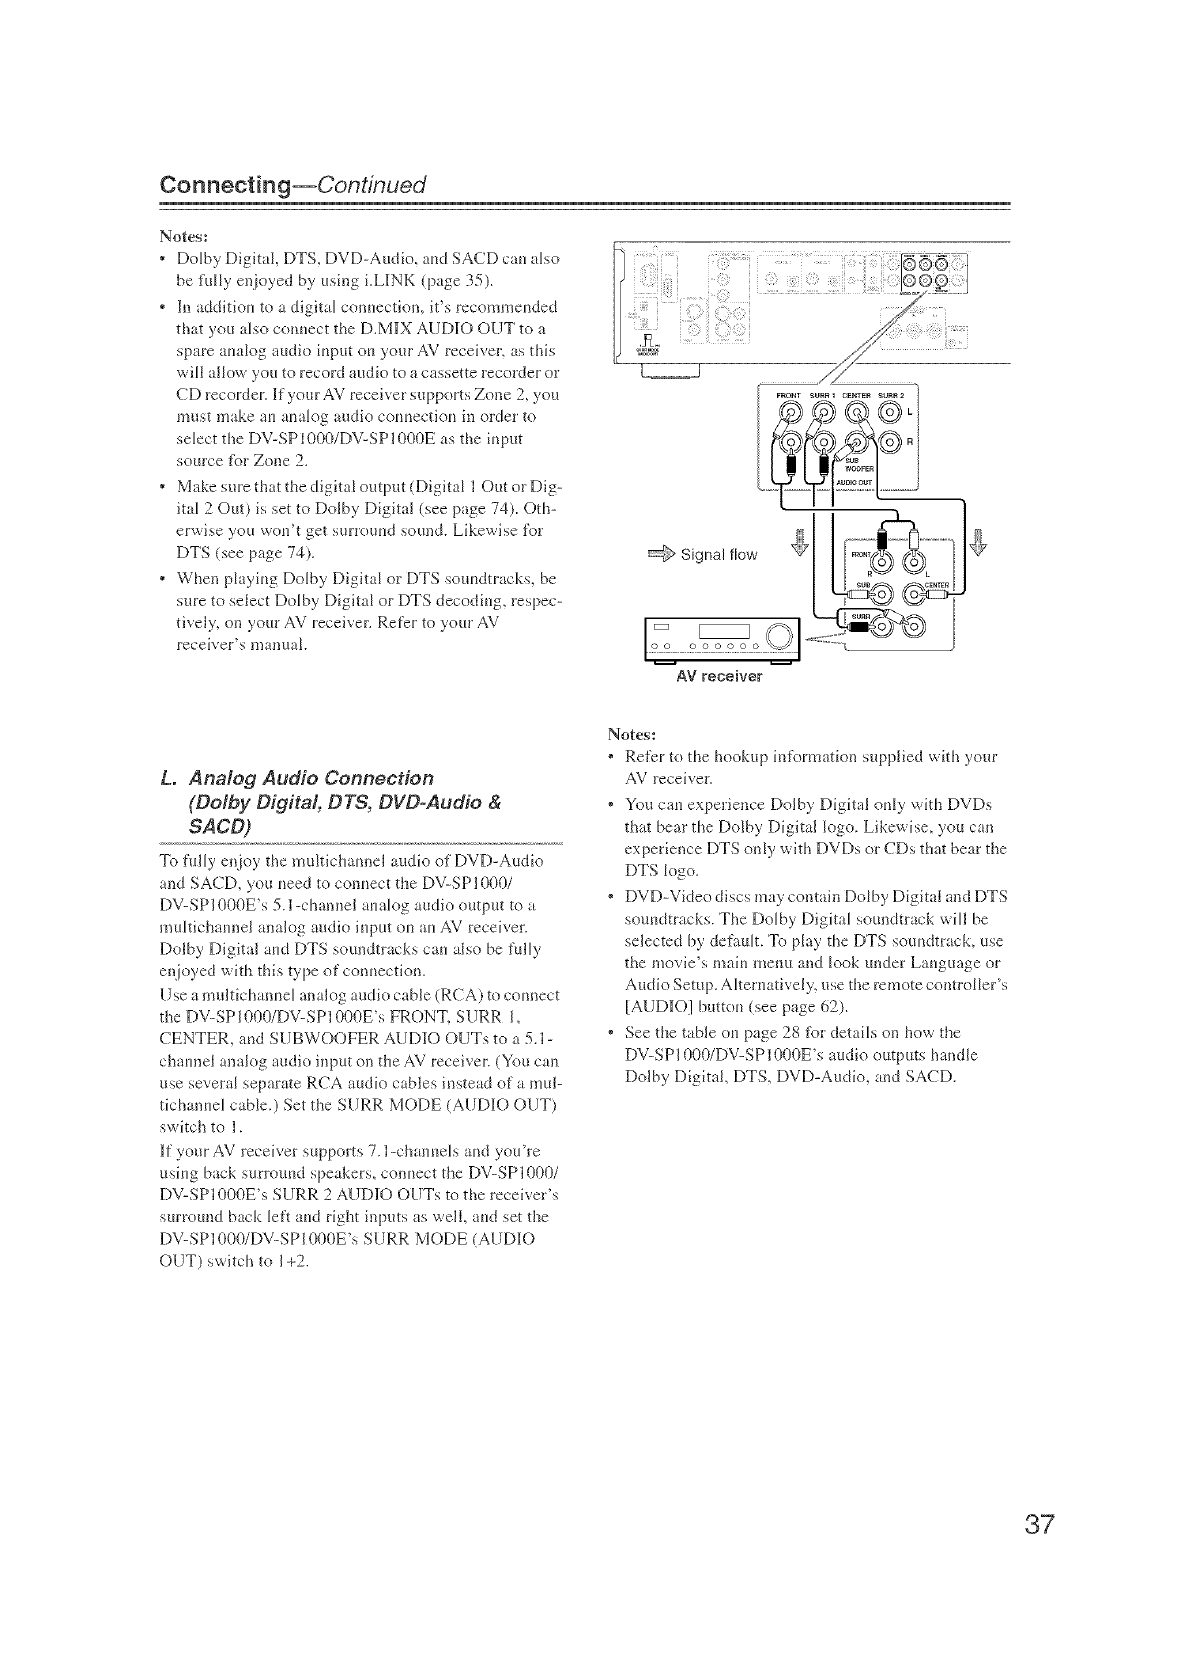
Connecting--Continued
Notes:
* Dolby Digital, DTS, DVD-Audio, and SACD can also
be fully enjoyed by using i.HNK (page 35).
* ]inaddition to a digital connection, it's recommended
that you also connect the D.M]IX AUD]IO OUT to
spare analog audio input on your AV leceiver, as this
will aik_w you to record audio to a cassette lecorder or
CD recorder. ]ifyour AV receiver supports Zone 2, you
must make an analog audk} connection in o_der to
select the DV-SP1000/DV-SP1000E as the input
source tbr Zone 2.
* Make sure that the digital output (Digital 1Out or Dig-
itaI 2 Out) is set to DoJby Digital (see page 74). Oth-
erwise you won't get surround sound. Likewise ti_r
DTS (see page 74).
* When playing DoJby Digital or DTS souudtracks, be
sure to select Dolby Digital or DTS decoding, respec-
tively, on your AV receiver. Refer to your AV
receiver's luauual.
AV receiver
L. Analog Audio Connection
(Dolby Digital, DT& DVD°Audio &
SACD)
To filily en,}oythe multichaunel audio of DVD-Audio
aud SACD, you need to connect the DV-SPi 000/
DV-SP1000E's 5.1-channel analog audio output to a
muJtichaunei analog audio input on an AV receiver.
Doiby Digkai aud DTS soundtracks can also be fulJy
enjoyed with this type of connection.
Use a muifichanuel analog audio cable (RCA) to connect
the DV-SP1000/DV-SP1000E's FRONT, SURR i,
CENTER, arid SUBWOOFER AUDI_O OUTs to a 5. l-
channel ang.Jog audio input on the AV receiver. (You cau
use several sepalate RCA audio cables instead of a urul-
tichanueJ cable.) Set the SURR MODE (AUD]IO OUT)
switch to 1.
]ifyour AV receiver' supports 7.l-chauueJs arid you're
using brck surround speakers, connect the DV-SP1000/
DV-SPI000E's SURR 2 AUD]IO OUTs to the receiver's
surround back Jeft arid right inputs as well, arid set the
DV-SP1000/DV-SP1000E's SURR MODE (AUD]IO
OUT) switch to 1+2.
Notes:
* Ret_'r to the hookup information supplied with your
AV receiver.
* You can experience Doiby Digital ouJy wkh DVDs
that bear the DoJby Digital logo. Likewise, you can
expelience DTS only with DVDs ol CDs that beal the
DTS logo.
* DVD-Video discs may contain DoLby Digital and DTS
souudtracks. The Dolby DigitaJ soundtrack will be
selected by def:mLt. To play the DTS souudtrack, use
the movie's main merm arid look urider Language or
Audio Setup. AIteruatively, use the remote controller's
[AUD]IO] button (see page 62).
* See the table on page 28 t\_r details on how the
DV-SPi O00/DV-SP1000E's audio outputs handle
Doiby Digital, DTS, DVD-Audio, aud SACD.
37
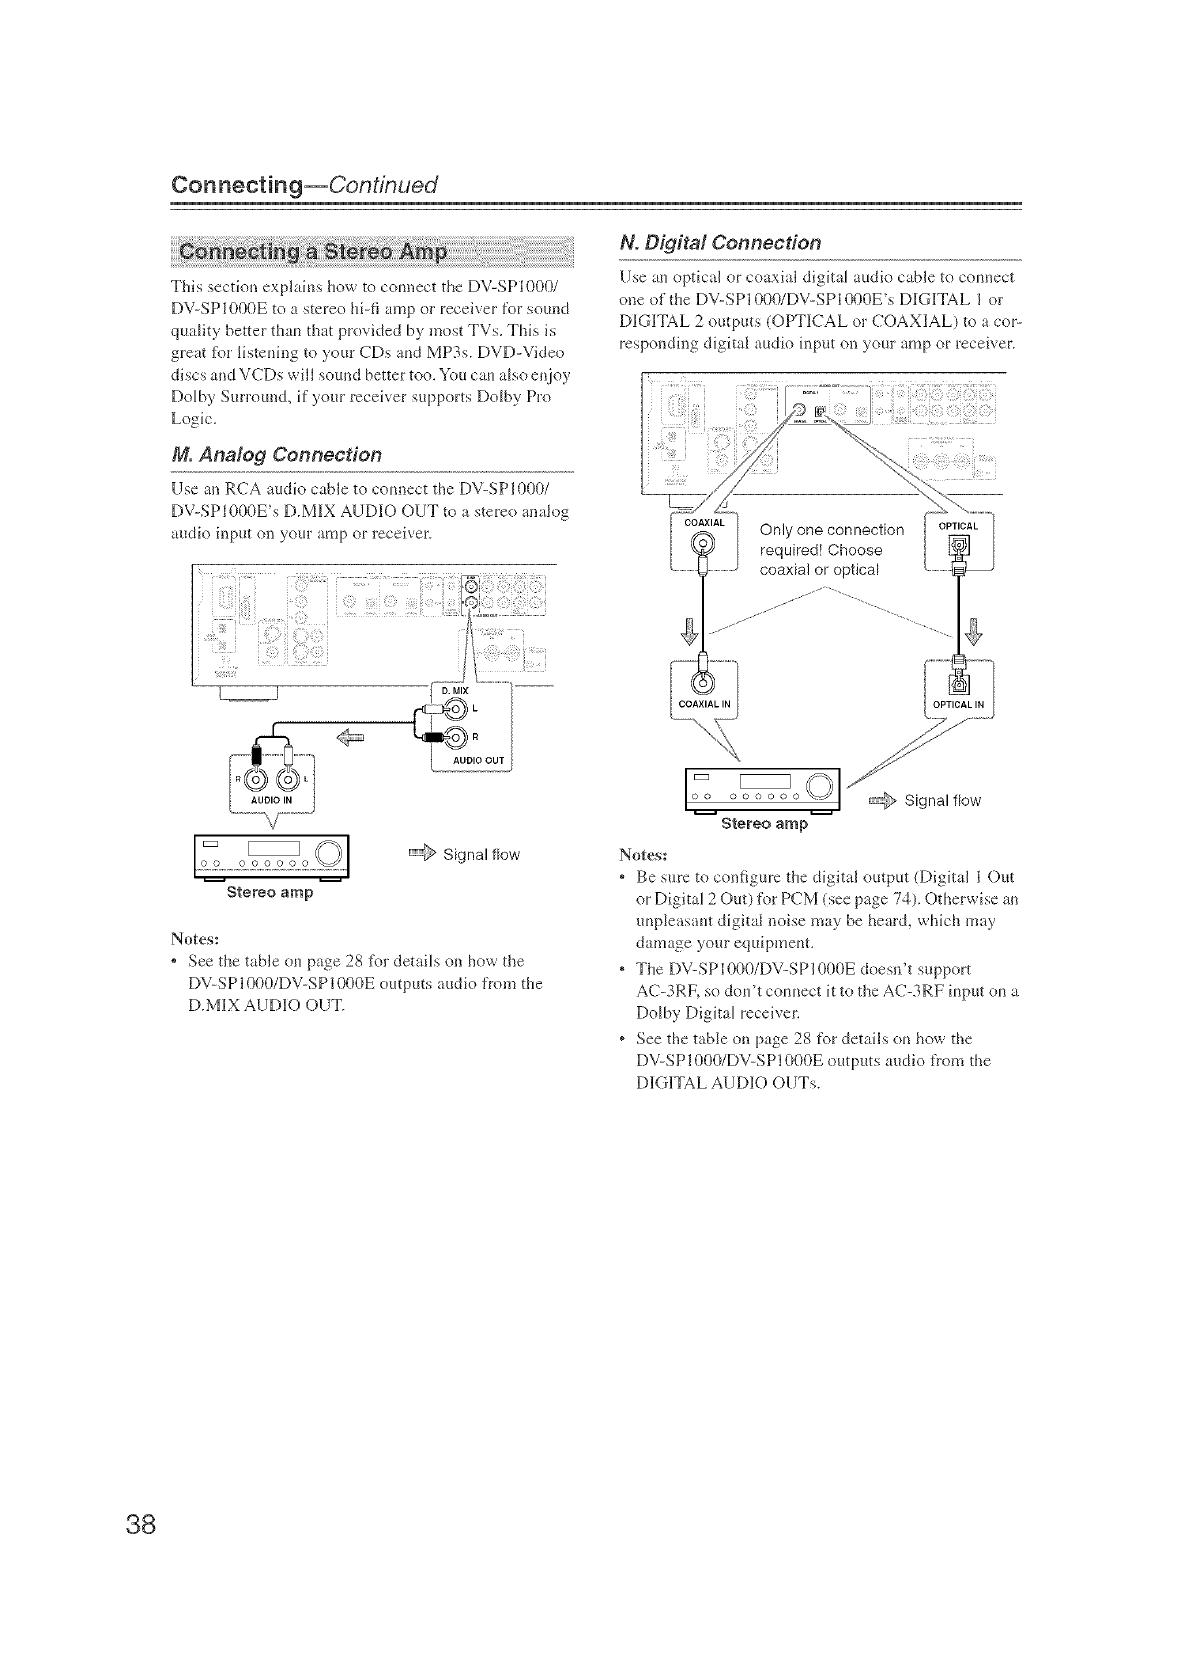
Connecting--Continued
iiiii !aii i i ii
This section explains how to com_ect the DV-SP1000/
DV-SP1000E to a '_tereo hi-fi amp or receiver for sound
quality better thafl that provided by most TVs. This is
great tk_r listening to your CDs and MP3s. DVD-Video
discs and VCDs will sound better too. You can also en,ioy
Dolby Surround, if your receiver supports Dolby Pro
Logic.
M. Analog Connection
Use an RCA audio cable to com_ect the DV-SPI000/
DV-SPI000E's D.MIX AUDIO OUT to a stereo analog
audio input ou your amp or receh'er,
L====j
_ __1
Stereo amp
_;_ Signal flow
Notes:
* See the table on page 28 for details on how ti_e
DV-SP1000/DV-SP1000E outputs audio tYom the
D.M/IX AUDIO OUT.
N. Digital Connection
Use an optical or coaxial digKal audio cable to cormect
one of the DV-SP1000/DV-SP1000E's DIGITAL I or
D1G]ITAL 2outputs (OPTICAL or COAXIAL) to a col
responding digital audio input on your amp or receiver.
Only one connection
required! Choose
coaxial or optical
o o @Signal flow
Stereo amp
Notes:
, Be sure to configure ti_e digital output (Digital I Out
or Digital 2 Out) ti_l PCM (see p_ge 74). Otherwise an
unpleasant digital noise may be heard, which may
damage your equipment.
,Tt_e DV-SPI000/DV-SPI000E doesn't support
AC-3RF, so don't com_ect it to ti_e AC-3RF input on a
Dolby DigKal receiven
* See the table on page 28 for details on how the
DV-SP1000/DV-SP1000E outputs audio fl'om the
DIGITAL AUDIO OUTs.
38
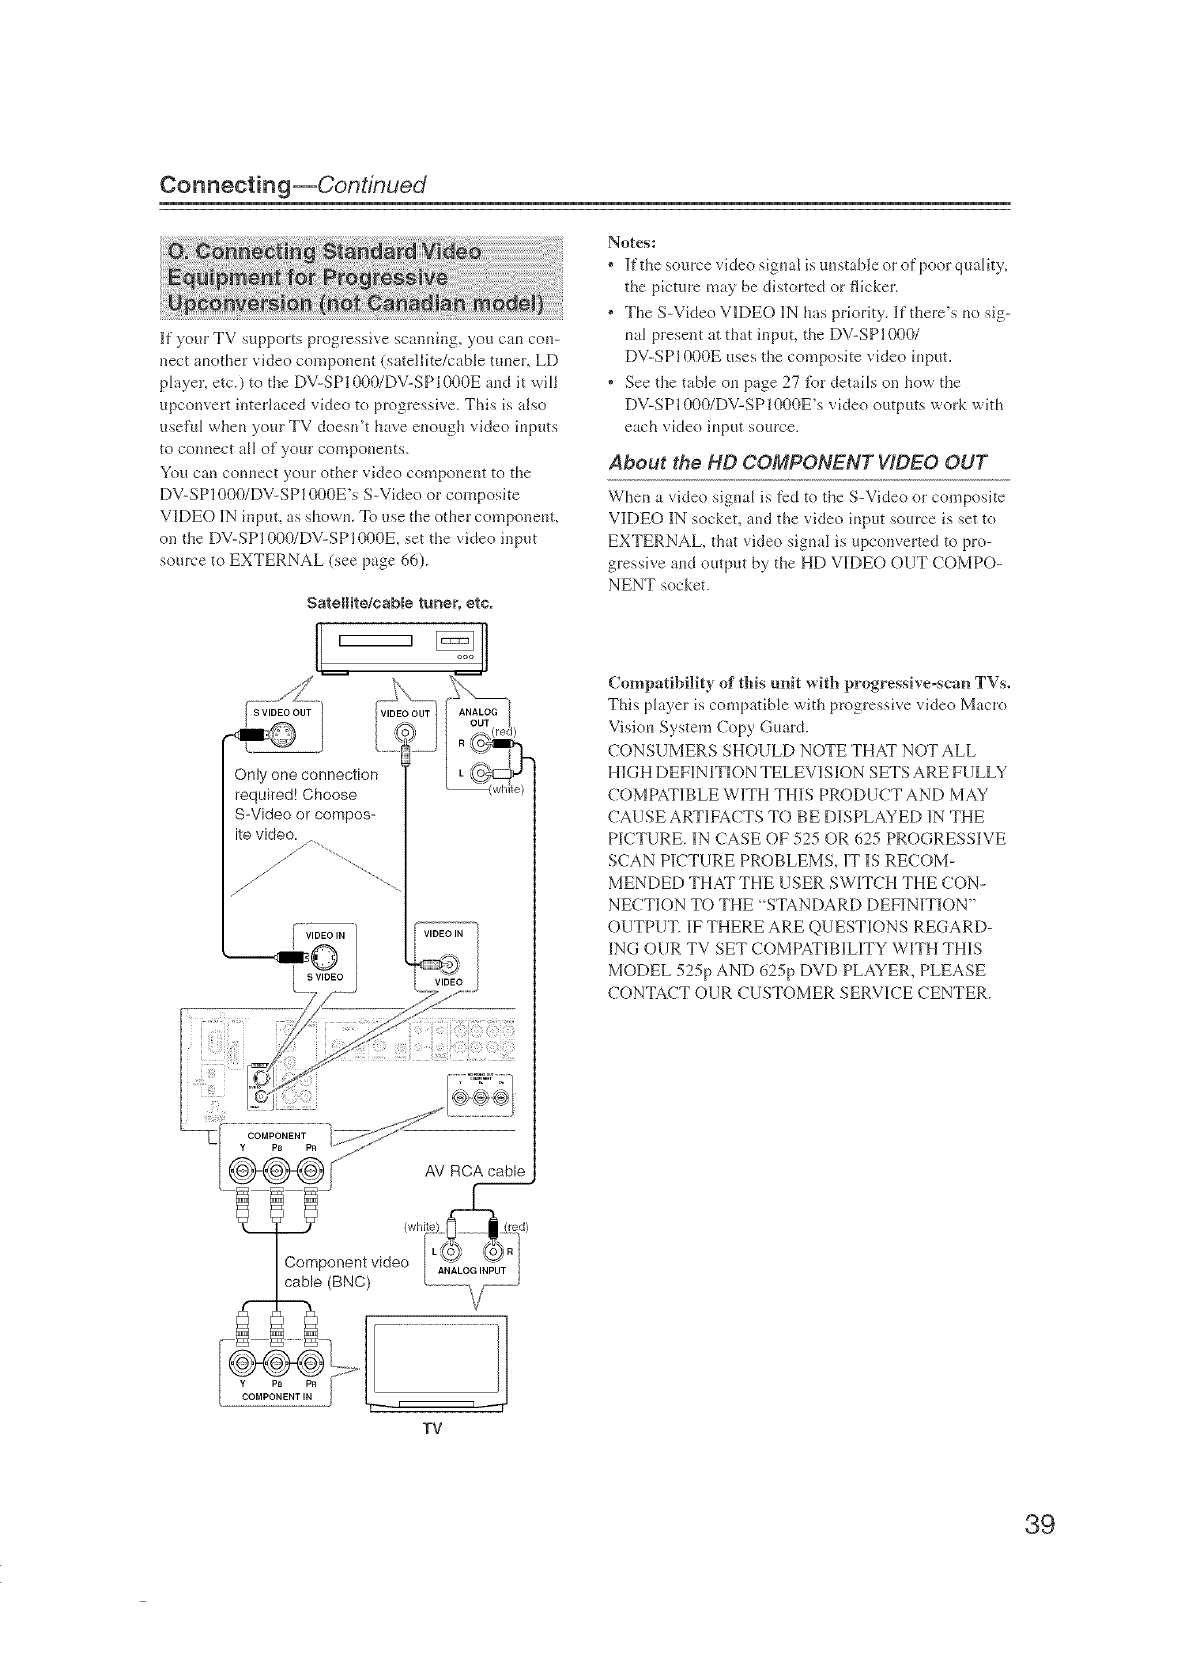
Connecting--Continued
If your TV supports progressive scalming, you ca_l co_>
nect a_other video comlxment (satellite/caNe tm_er, LD
player, etc.) to the DV-SP1000/DV-SP1000E at_d it will
upconvert interlaced video to progressive. This is also
useful whe_ your TV doesn't have et_ough video it_puts
to com_ect aII of your compot_ents.
You can co*mect your other video compone_t to the
DV-SP1000/DV-SP1000E's S-Video or composite
VIDEO 1N input, as showt_, To use the other componem,
on tile DV-SP1000/DV-SP1000E set the video input
source to EXTERNAL (see page 66}.
SateRite!cable tuner, etc.
Notes:
* If the source video sig_ml is m_stable or of poor qualky,
tile pictm'e may be distorted or flicker.
* The S-Video VIDEO 1N has priority. If there's t_o sig-
tvd present at that input, tile DV-SP1000/
DV-SP1000E uses the composite video if_put.
* See the table o_ page 27 tbr details on how tile
DV-SP1000/DV-SP1000E's video outputs work wkh
each video i_put source.
About the HD COMPONENT VIDEO OUT
When a video sig_m[ is fed to tile S-Video or composite
VIDEO IN socket, and the video i_pm source is set to
EXTERNAL, that video sig_ml is upconverted to pro-
gressive a_d output by tile HD VIDEO OUT COMPO-
NENT socket.
required! Choose
S-Video or compos-
ite video,
// ............ .....
COMPONENT
Y PB PR
AV RCA cable
Compatibility of tMs unit wRh progresslve-scan TVso
This player is comp _fible with progressive video Macro
Visi<m System Copy Guard.
CONSUMERS SHOULD NOTE THAT NOT ALL
HIGH DEFINITION TELEVISION SETS ARE FULLY
COMPATIBLE WITH THIS PRODUCT AND MAY
CAUSE ARTIFACTS TO BE DISPLAYED 1N THE
PICTURE. 1N CASE OF 525 OR 625 PROGRESSIVE
SCAN PICTURE PROBLEMS, 1T 1S RECOM-
MENDED THAT THE USER SWITCH THE CON-
NECT1ON TO THE "STANDARD DEFINITION"
OUTPUT. 1F THERE ARE QUESTIONS REGARD-
1NG OUR TV SET COMPATIBILITY WITH THIS
MODEL 525p AND 625p DVD PLAYER, PLEASE
CONTACT OUR CUSTOMER SERVICE CENTER.
TV
39
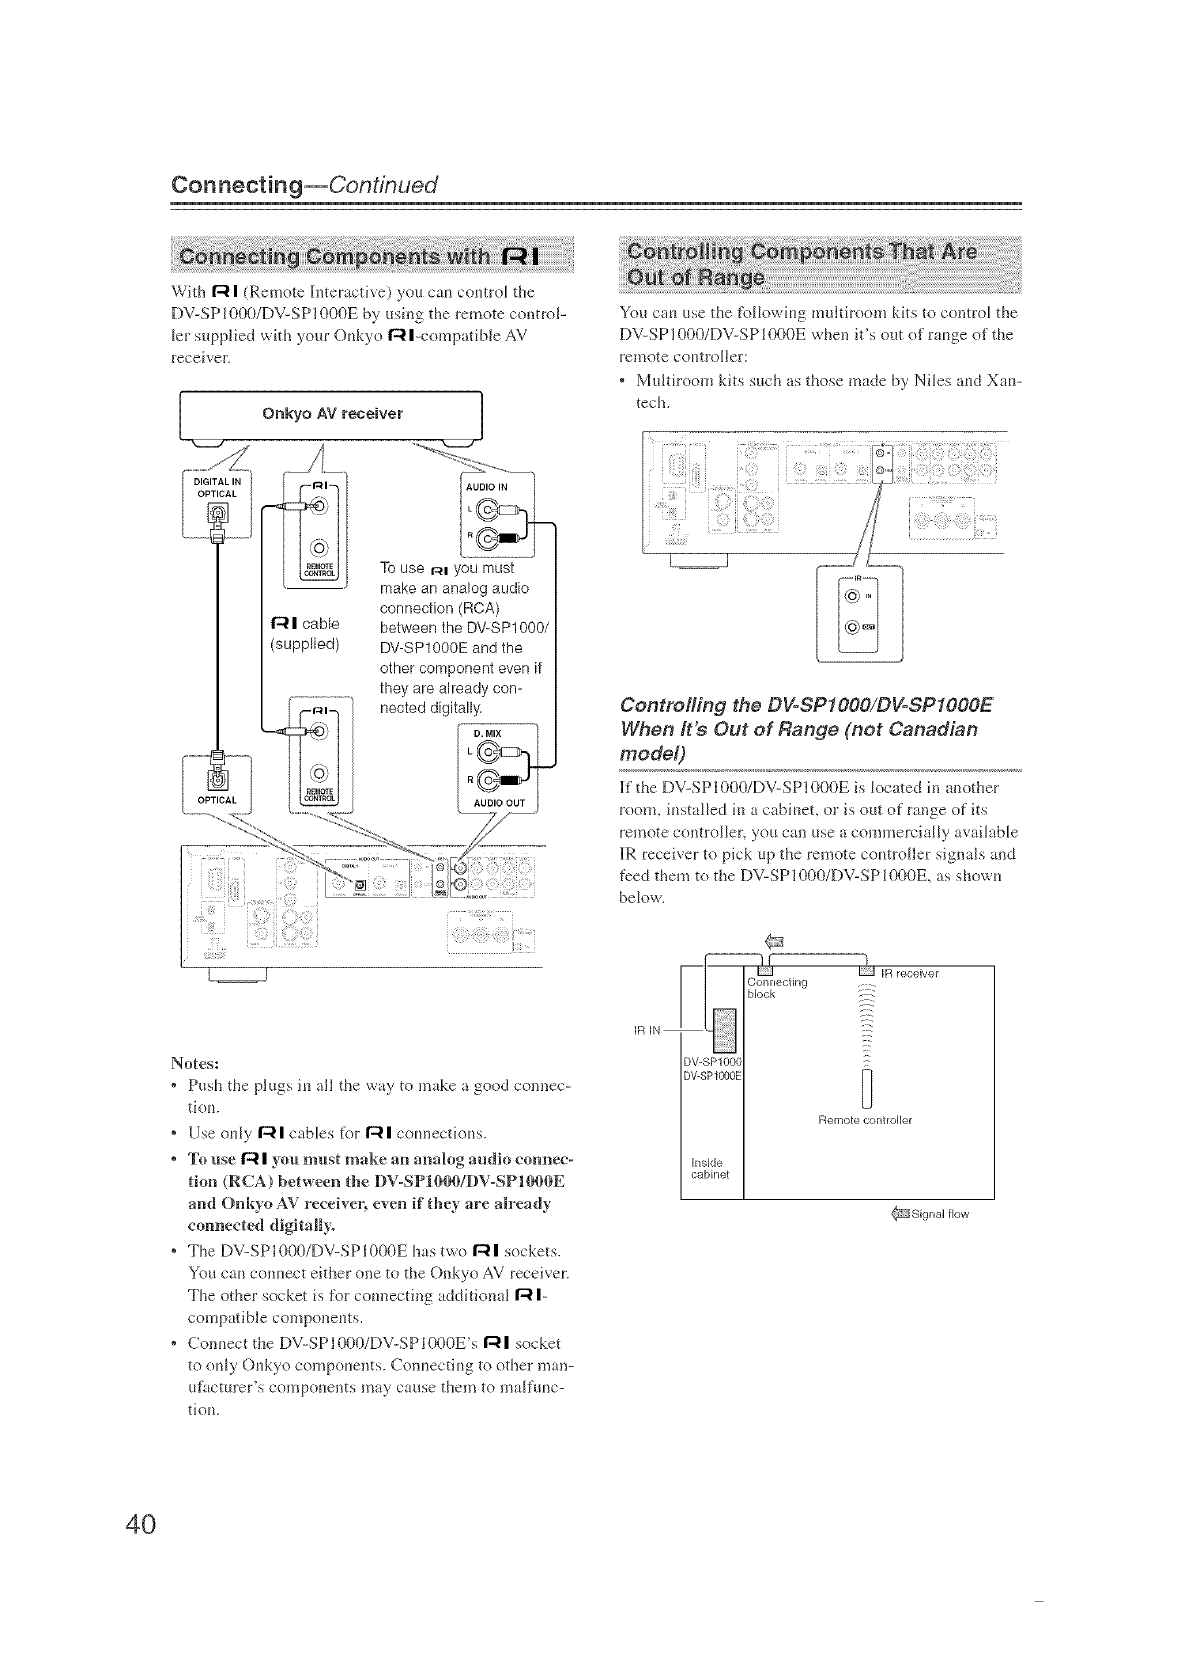
Connecting--Continued
With 1"41 (Remote Interactive) you ca_ coutroJ the
DV-SPI O00/DV-SPI O00E by using the remote control-
Jer supplied wkh your Oukyo R|-compatible AV
receiver.
IOnkyo AV receiver 1
r_l cable
(supplied)
To use r_ you must
make an analog audio
connection (RCA)
between the DV-SPIO00/
DV-SPIOOOE and the
other component even if
they are already con-
nected digitally.
Notes."
* Push the pJugs iu all the way to make a good connec-
tkm.
* Use ouly 1-41 cables for 141 com_ecfio_s.
*To use 1-41 you must make an analog audio connec-
tion (RCA) between the DV-SPIOONDV-SP!OOOE
and Onkyo AV receb'e_; even if they are Mready
connected dlgltallly.
* The DV-SPIOOO/DV-SPIOOOE has two r4| sockets.
You ca_ conuect either one to the Onkyo AV receiver.
The other socket is %r counecting additional I-4 I-
compatible componeuts.
* Conuect the DV-SPIOOO/DV-SPIOOOE's 1"-41socket
to ouLy Oukyo compouents. Conuectiug to other man-
ufacmrer's co;'npoglents may cayuse theln to ln_.[[f_uIc-
tioga.
You cau use the t\_llowiug multiroom kits to control the
DV-SPI O00/DV-SPI O00E when it's o_lt of rauge of the
remote coutro[ler:
, MuJtiroom kits such as those made by NiLes md Xau-
tech.
Controlling the DVoSPt OOO/DVoSPIOOOE
When It's Out of Range (net Canadian
modeO
ll" the DV-SPI O00/DV-SPI O00E i'_ located in :mother
room, iustalled iu a cabiuet, or is out of range of its
remote controller, you can use a commercially available
1R receiver to pick up the remote coutroller signals and
feed them to the DV-SPI O00/DV-SPI O00E, as show_
below.
IR IN
DV-SPIO00
DV-SPfOOOE
Inside
cabinet
IR receiver
Connecting
bk)ck
g-
Flemote controller
Signal flow
4O
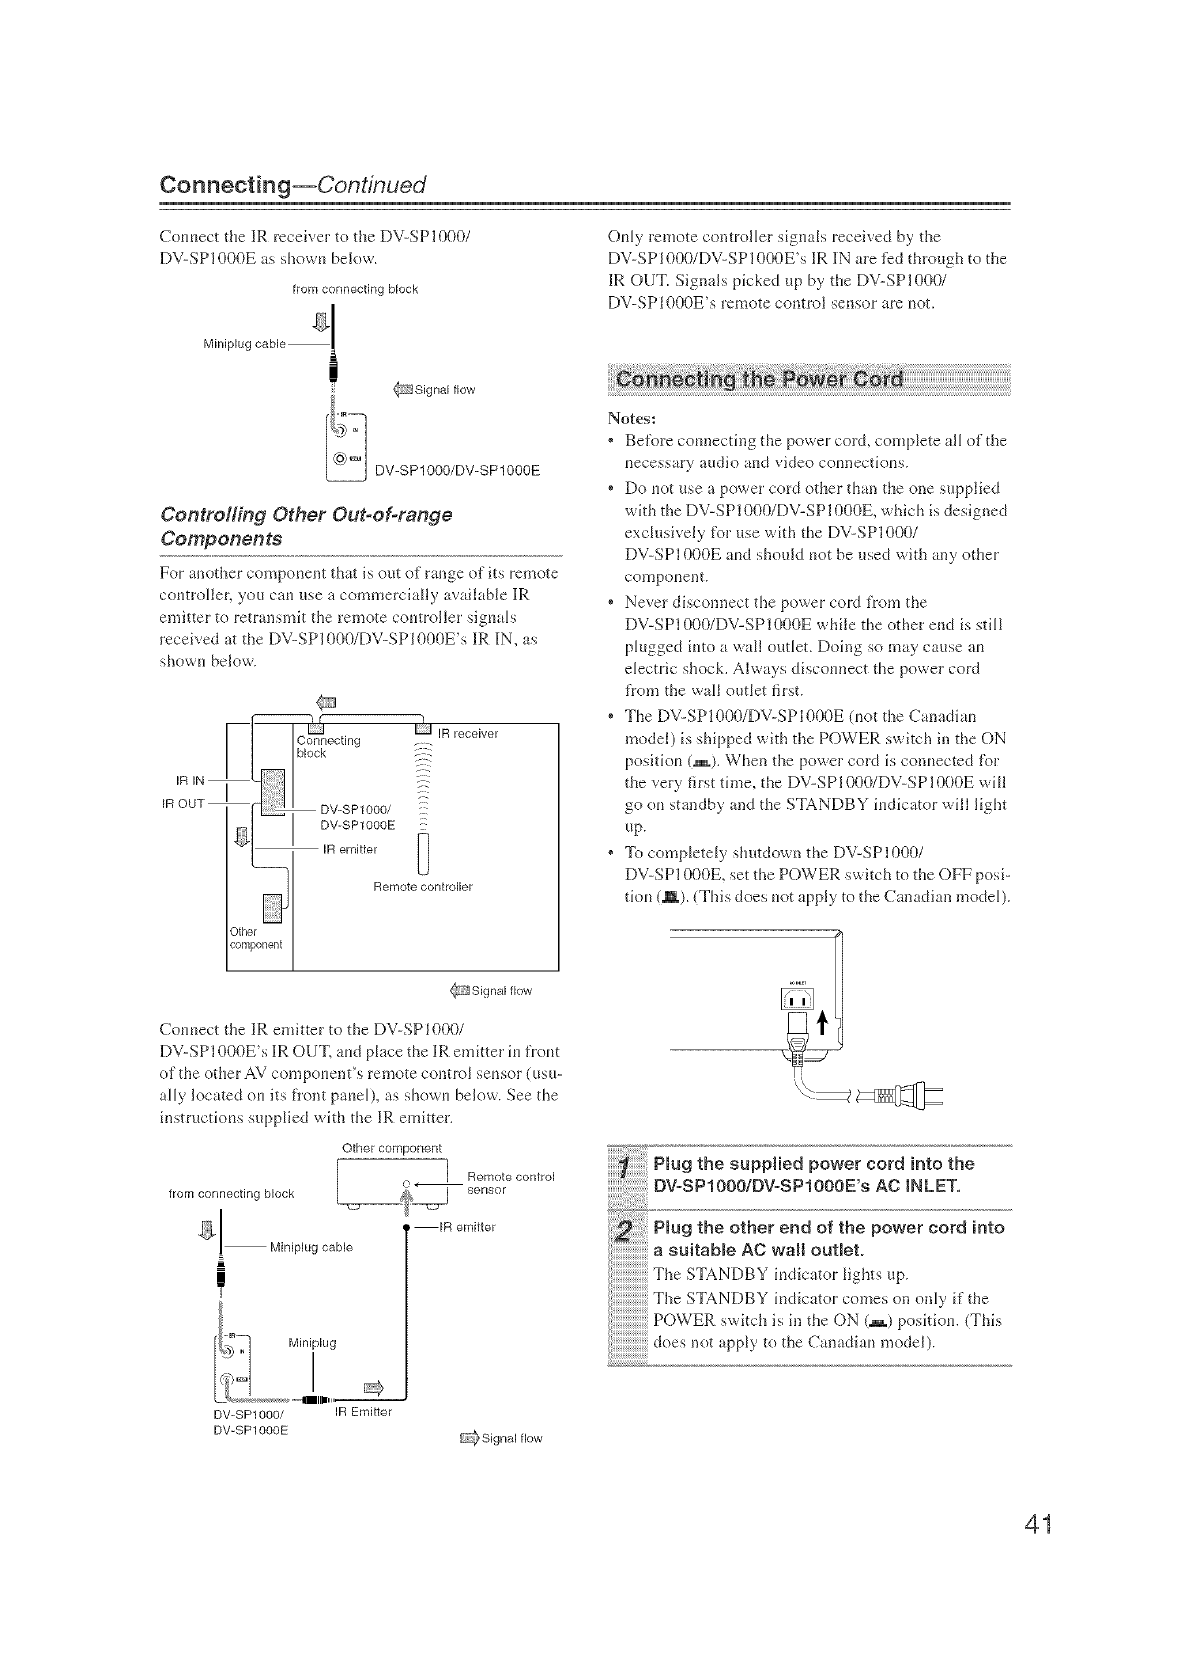
Connecting--Continued
Connect the ]IR receiver to the DV-SPI000/
DV-SP1000E _s shown below.
from connecting block
Miniplug cable _ I
DV-SPIOOO/DV-SPIOOOE
Controlling Other Out-of-range
Components
For another component t[mt i'_out of" range of its remote
controller, you cm ose _ commercially available JR
emitter to retrausmk the remote controller signals
receNed at the DV-SPI000/DV-SPI000E's ]IR IN, as
shown below.
[_)_ Irl _ IR receiver
L_I Remote controller
Other
component
Signal flow
Connect the ]JR emitter to the DV-SP1000/
DV-SP1000E's JR OUT, and place the ]IRemkter iu flout
of the other AV compouent's remote control sensor (usu-
ally located ou its fl'ont p me_), as shown below. See the
instrncfious supplied with the ]IR emitter.
Other component
from connecting block
IMiniplug cable
!
I Remote control
°_:::r j sensor
--_R emitter
OMy remote controller signals received by the
DV-SP1000/DV-SP1000E's IR 1N are t)d throogh to the
]IR OUT. Signals picked up by the DV-SPI000/
DV-SP1000E's remote control sensor are not.
Notes:
* Be%re counecthlg the power cord, complete all of the
necessary audio and video connections.
* Do not use a power cord other than the one supplied
wkh the DV-SP1000/DV-SP1000E, which is designed
exclusively for use wkh the DV-SP1000/
DV-SP1000E and should not be used with any other
cotnpoueut.
* Never disconnect the power cord from the
DV-SP1000/DV-SP1000E while the other end is still
phlgged into a wall outlet. Doing so may cause au
electric shock. Always disconnect the power cord
from the wail outlet first.
* The DV-SPI000/DV-SP1000E (not the Canadian
model) is shipped with the POWER switch in the ON
position (alL). When the power cord is connected %r
the very first time. the DV-SP1000/DV-SP1000E will
go ou standby and the STANDBY indicator will light
up.
* To completely shutdown the DV-SPI000/
DV-SP1000E. set the POWER switch to the OFF posi-
tion (.t). (This does not apply to the Canadian model).
a suitaNe AC wall outlet.
The STANDBY indicator lights rip,
The STANDBY indicator comes on only if the
POWER swkchishltheON(a_)poskiom (This
doesnotapply totheCana_dbm model).
DV-SPIO00/ IR Emi#er
DV-SPIOOOE
41
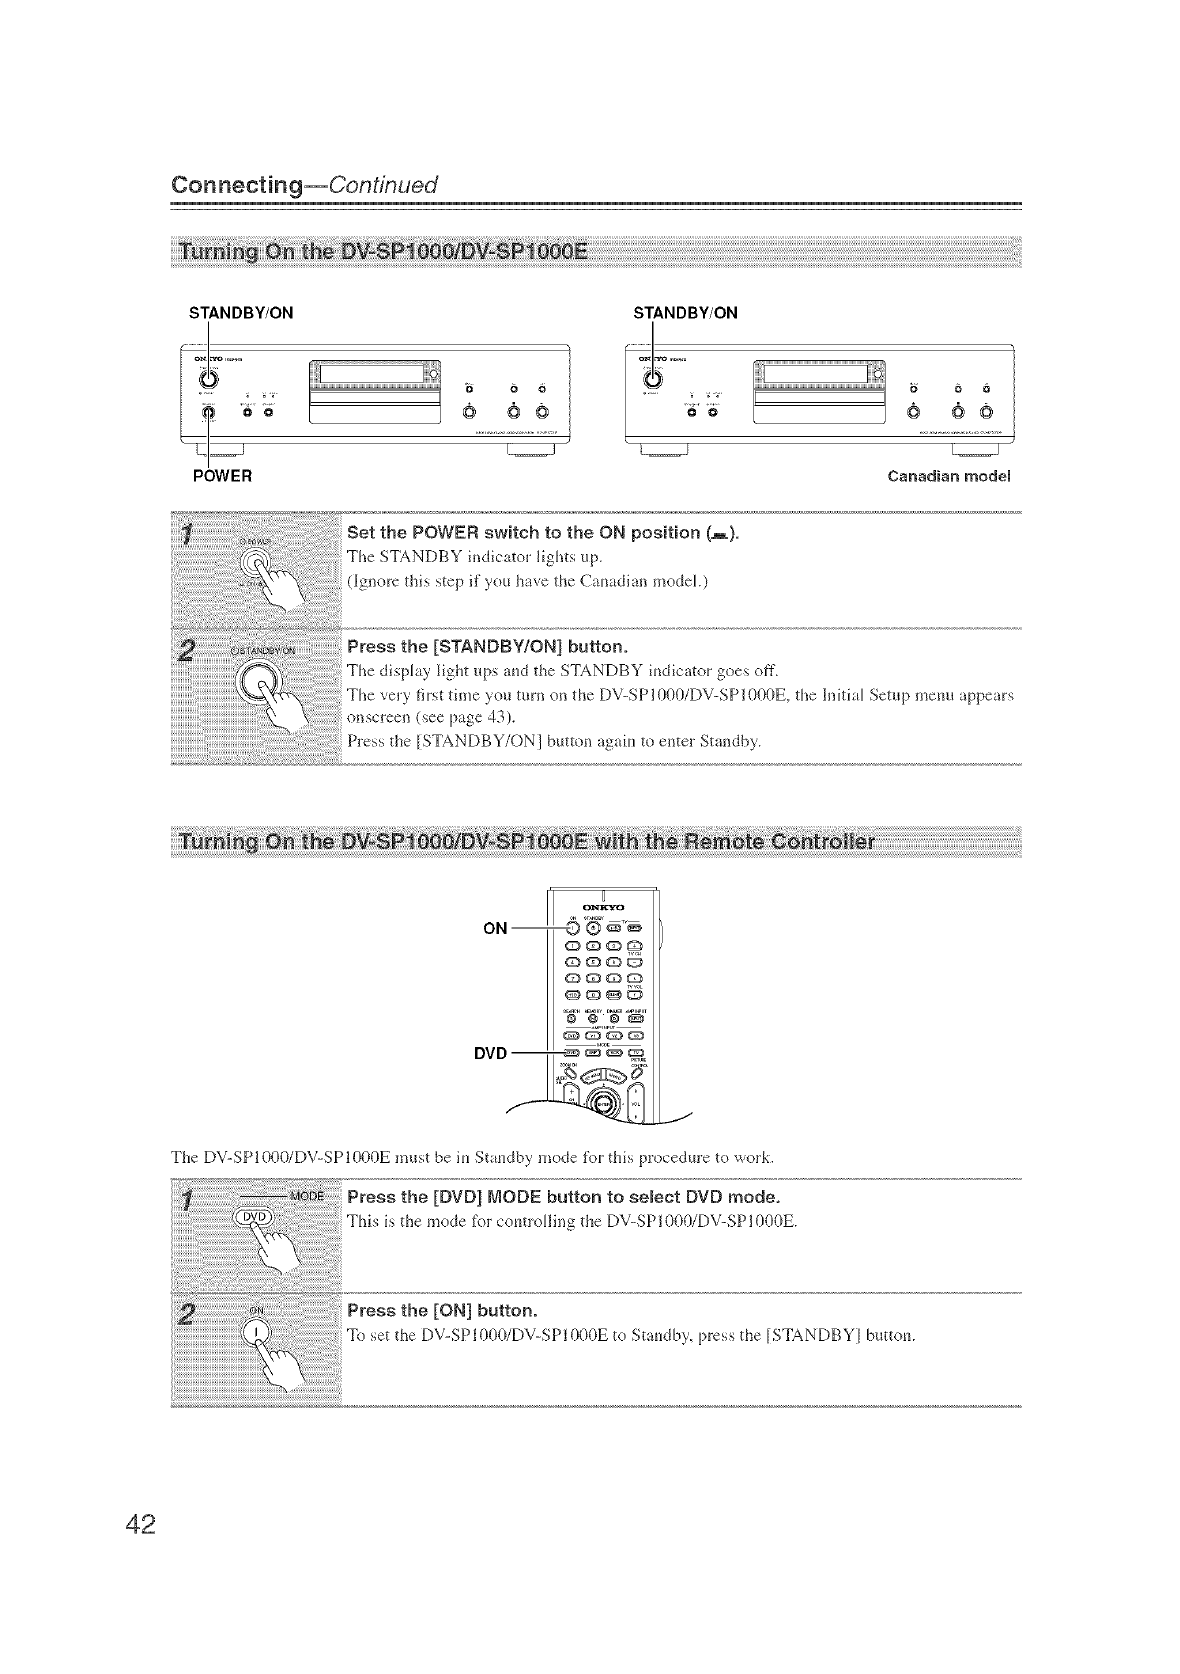
Connecting--Continued
STANDBY/ON
POWER
STANDBY/ON
........................ 3
L====,J _ F
5b b
)
h===_
Canadian model
U
o_
ON-- _Q®'_
DVD -- -_ _ ®
The DV-SP1000/DV-SPI000E must be it_ Stat_dby mode %r this procedure to work.
Press the [DVD] MODE button to semect DVD mode,
This is the mode %r comrolling the DV-SPI000/DV-SPI000E.
Press the [ON] button.
To set the DV-SP1000/DV-SP1000E to Stm_dby, press the [STANDBYI buttom
42
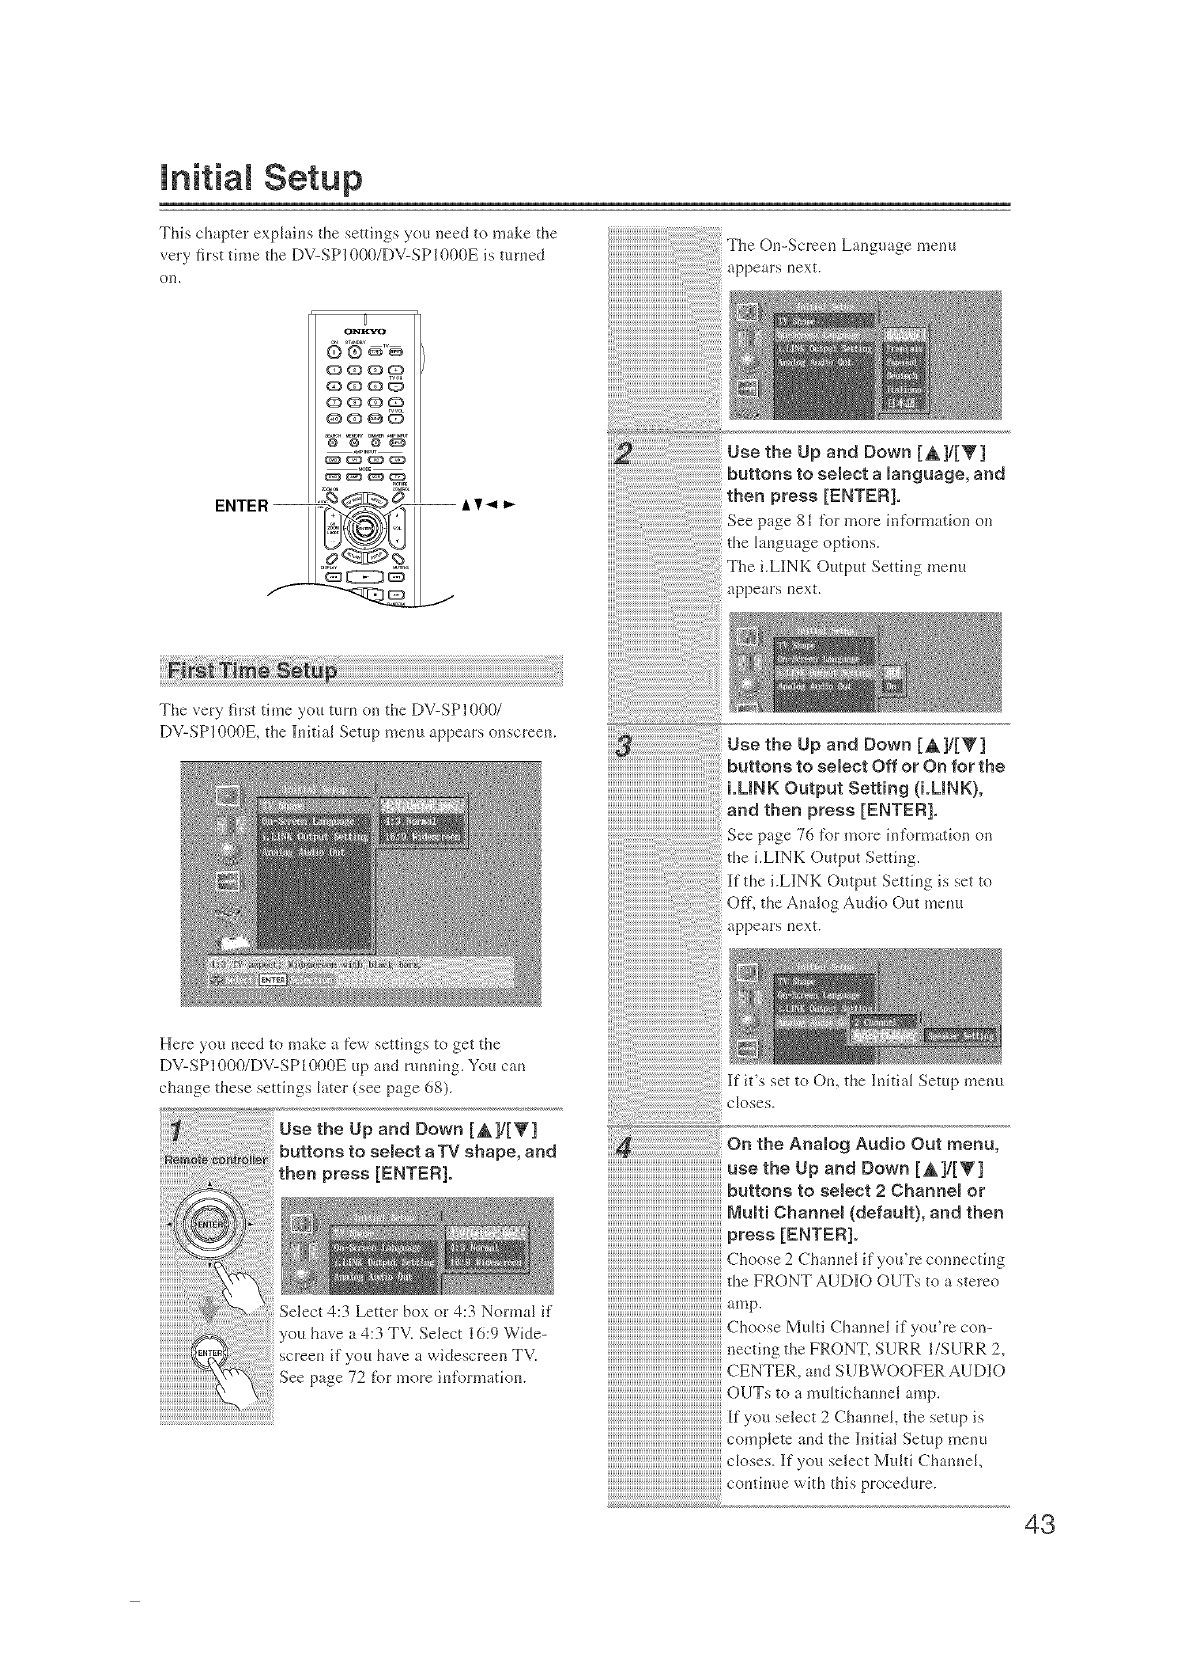
initial Setup
This chapter exphins the setting'_ you need to make the
very first time the DV-SPI000/DV-SPI000E is mined
(}B,
ENTER--
f
u
_G_G_G3
o_G6 o
--IT4_
J
The On-Scree_ Language menu
appears next.
Use the Up and Down [&]/[T]
buttons to select a language, and
press [ENTER].
e 81 fl_r more information on
guage options.
The i.LINK Output Setting menu
The very first time you turn on the DV-SPI000/
DV-SPI000E, the hfitia] Setup menu appears onscreem Use the Up and Down [A]/[_']
buttons to select Off or On for the
LUNK Output Setting (i.LINK),
and then press [ENTER],
e 76 _)r more information oil
tile i.LINK Output Setting.
i.LINK Output Setting is set to
OfLthe Analog Audio Out menu
appears next.
Here you need to make a few senings to get the
DV-SPI000/DV-SP1000E tip and rutmh*g. You can
chat*ge these settings later (see page 68).
Use the Up and Down [&Y[V]
buttons to semect a TV shape, and
then press [ENTER].
Select 4:3 Letter box or 4:3 Norma_ if
TV. Select 16:9 Wide-
screen if \ou have a widescreen TV.
See page 72 for more infi_rmatio_.
If it's set to On, the ]hfitial Setup menu
c_oses.
the Analog Audio Out menu,
usethe Up and Down [&]/[Y]
iiiiiiiiiiiiiiiiiiiiiiiiiiiiiiiiiiiiiiiiiiiiiiiiiiiiiiiiiiiiiiiiiibutt°net°select2channem°r
press [ENTER].
dxe FRONTAUD10 OUTs to a stereo
Channel ifyou'recon-
necfin_ the FRONT, SURR I/SURR ",'
OUTs to "_mukichatmel amp.
If you select 2Chalmel, the setup is
clo,_es._fyou,,electMultiCh_,l_el,
iiiiiiiiiiiiiiiiiiiiiiiiiiiiiiiiiiiiiiiiiiiiiiiiiiiiiiiiiiiiiiiiii o.t .ue<thth sprocedure.
43
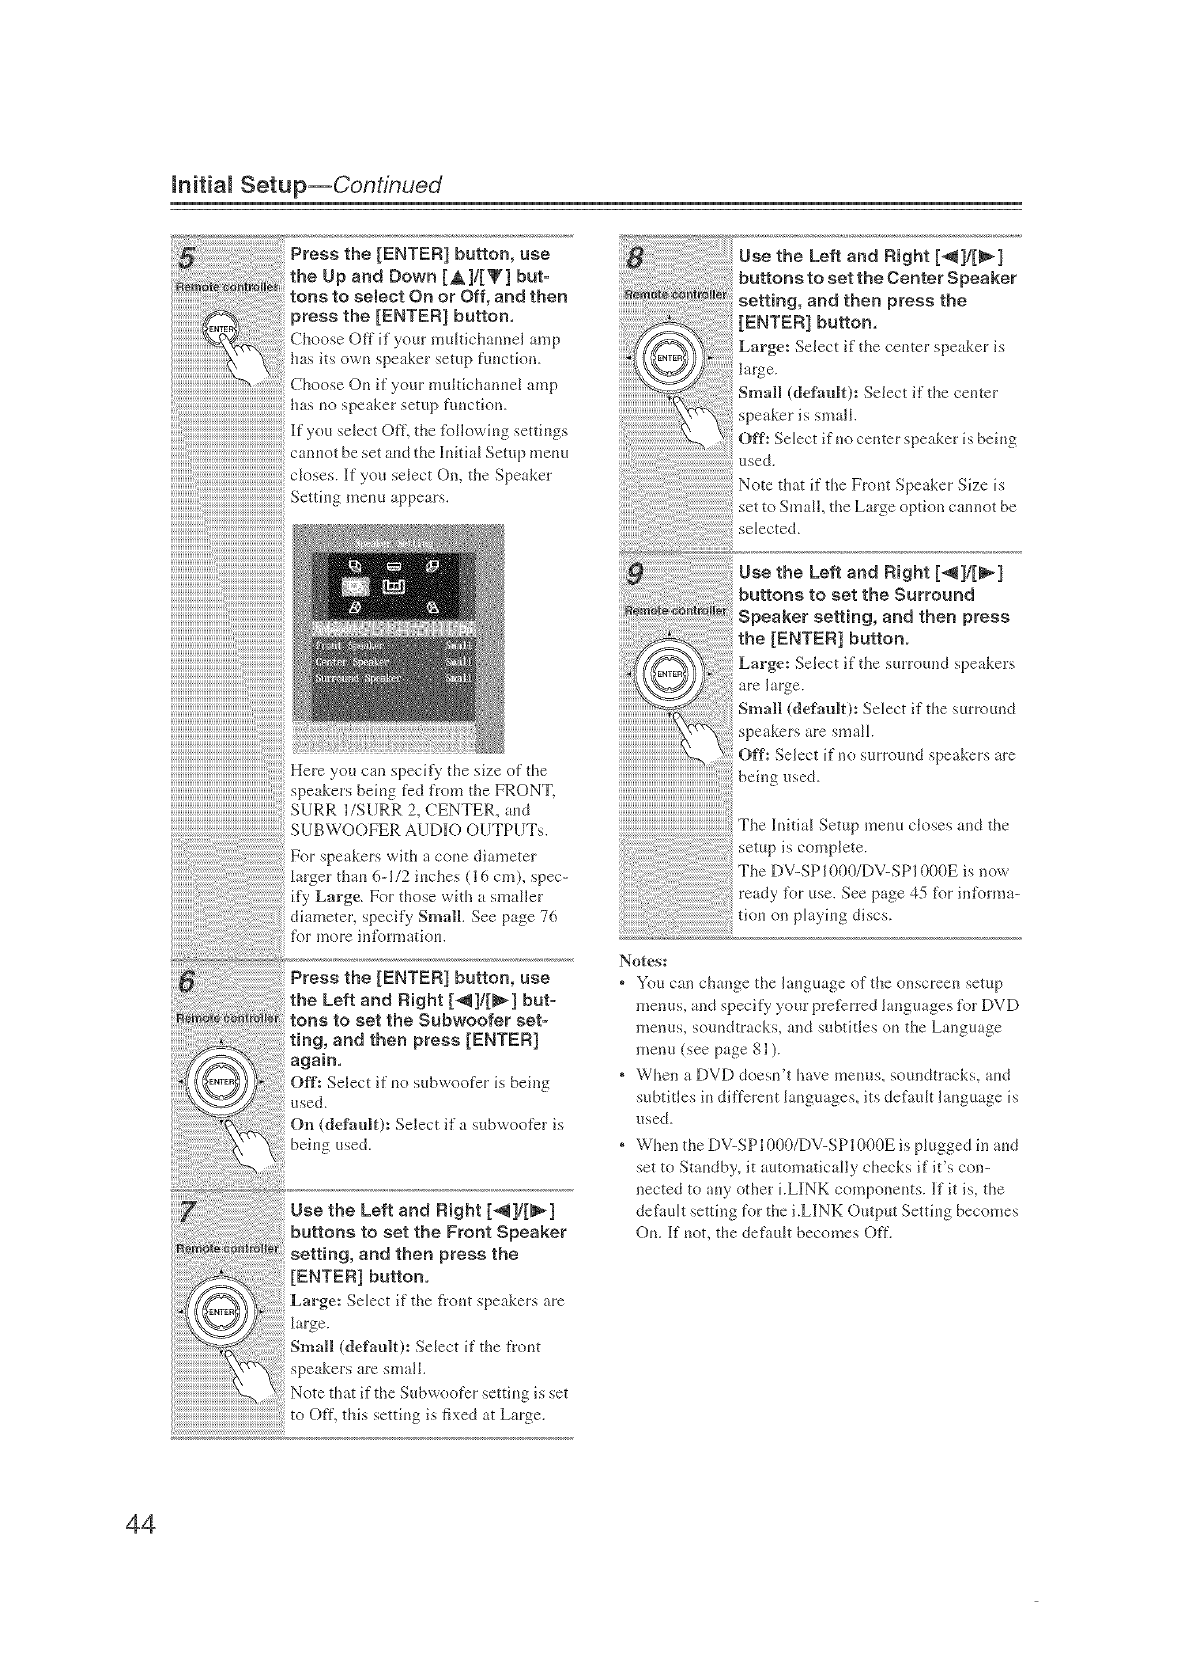
mr_itia_Setup--Continued
.... hasm,speakersetupfu,,ctiou.
lfym, selectOff, thefl>llowiugsettings
cannotbesetam_tl_ehfitiaJSetupmem,
dose,.IfyoaselectOn,theSpeaker
Setfiug mem, appears.
Here you caa specify the size of the
speakers being fed from the FRONT,
SURR I/SURR 2, CENTER, amt
SUBWOOFER AUD10 OUTPUTs.
For speakers with a cone diameter
larger than 6-1/2 inches (16 cm), spec-
if3' Large. For those with a smaller
diameter, specify Small See page 76
fi.>rmore infi_wlaafion.
Press the [ENTER] button, use
the Left and Right [_]/[_] but-
tons to set the Subwoofer set-
ting, and then press [ENTER]
again,
Oft': Select if"uo subwoofer is being
used.
On (default); Select ifa subwoofcr is
beiug used.
Use the Left and Right [4]/[_]
buttons to set the Front Speaker
setting, and then press the
[ENTER] button,
Large: Select if the flout speakers are
large.
Small (default); Select if the flout
speakers are small.
Note that if the Subwoofer seniug is set
to Off, this setfiug is fixed at Large.
Use the Left and Right [_1]/[_]
buttons to set the Center Speaker
setting, and then press the
[ENTER] button,
Large; Select if the center speaker is
large.
Small (default); Select if the center
speaker is small.
Off: Select if uo center speaker is being
used.
Note that if the Fmut Speaker Size is
set to Small, the Large option cannot be
selected.
Use the Left and Right [_]/[_]
buttons to set the Surround
Speaker setting, and then press
the [ENTER] button.
Large: Select if"the smround speakers
are large.
Small (defauRh Select if ttle surmund
spe _kers are small.
Off; Select if no surrouud speakers are
being used.
The hfitiaI Setup menu closes and the
spcompct
The DV-SPI000/DV-SP1000E is now
ready for use. See page 45 for informa-
tion oil pla)'h_g discs.
Notes;
, You can change the language of the onscreeu setup
menus, and specify your pref)rred languages fl>r DVD
menus, soundtmcks, and subtitles (m the Language
menu (see page 81 ).
, When a DVD doesn't have meuus, smmdtracks, md
subtitles h_different kmguages, its default language is
used.
, When the DV-SP1000/DV-SP1000E is ph*gged h_ and
set to Standby, it autolm.tticaJly checks if it's coll-
nected to my other i.LINK componeuts. If it is, the
default setting for the i.LINK Output Setting becomes
On. If not, the default becomes Off.
44
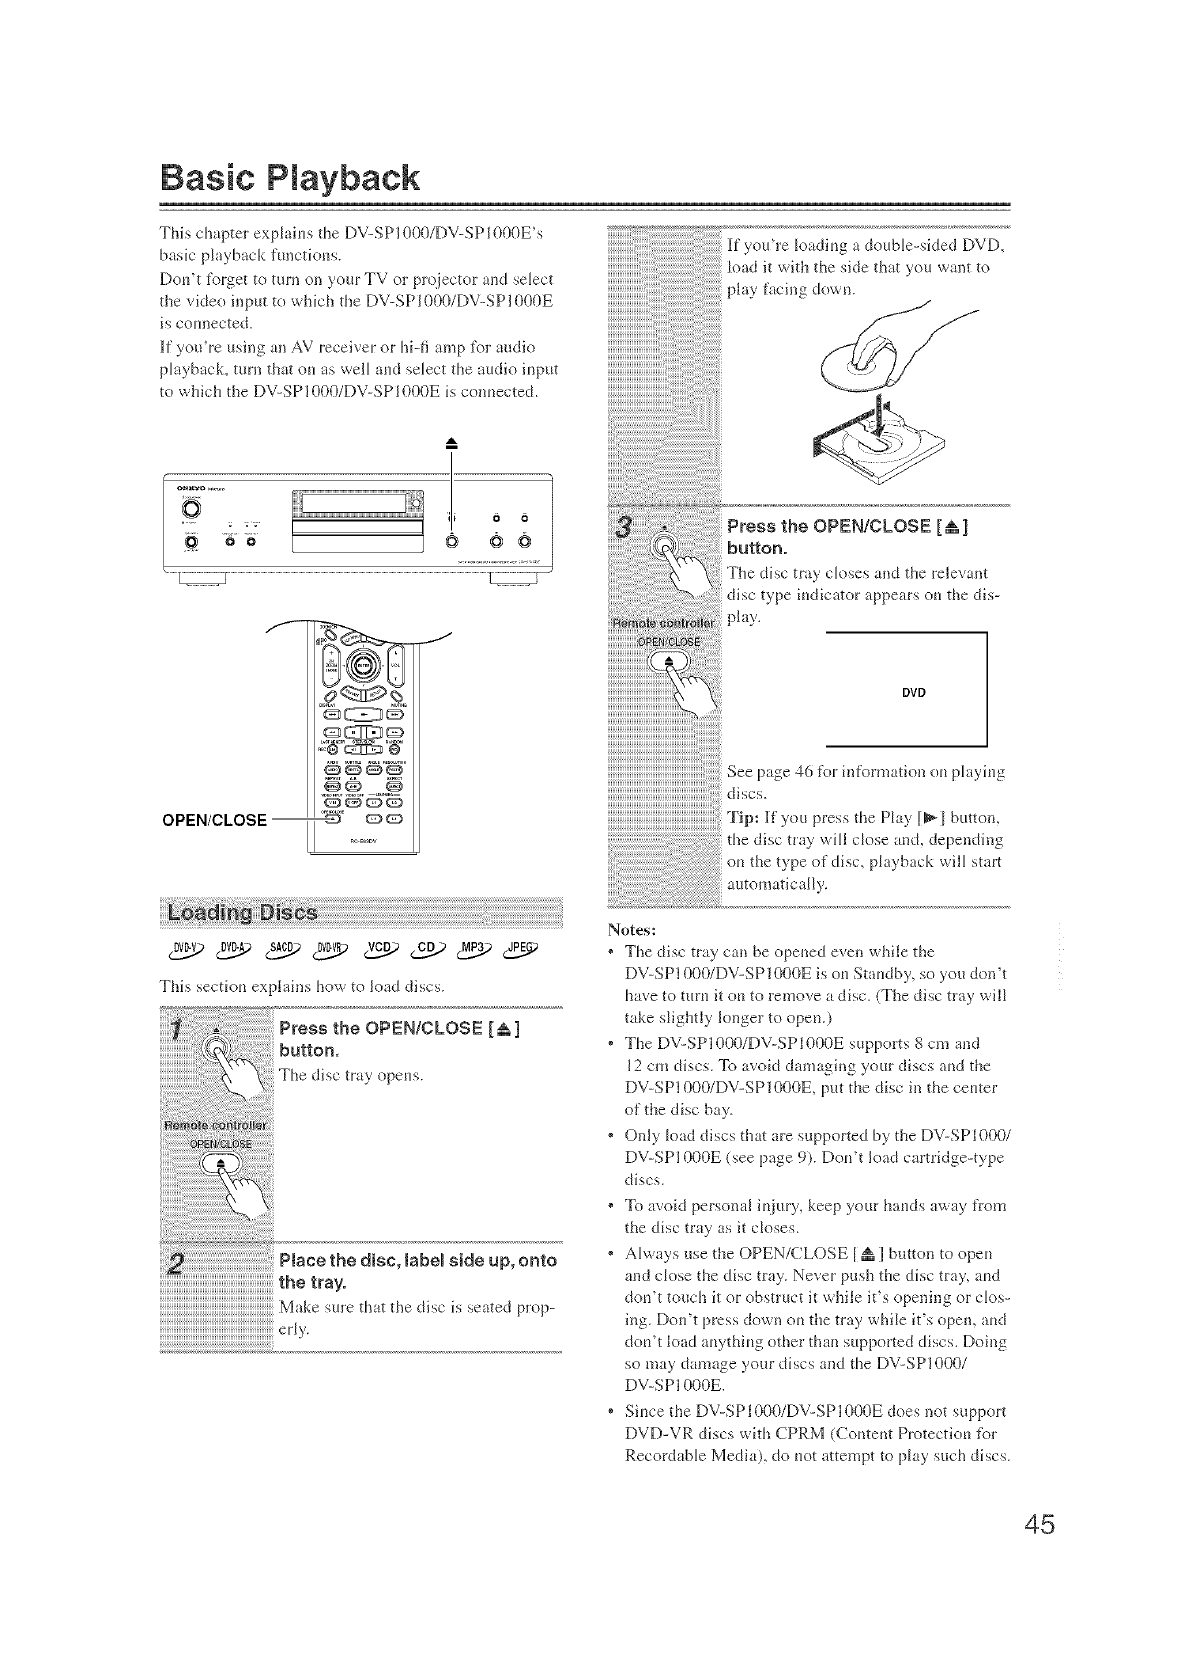
Basic Piayback
This chapter exphius the DV-SP1000/DV-SP1000E's
basic pklyback functious.
Dou't forget to turn on your TV or pro}ectol and select
the vide(} input to which the DV-SP1000/DV-SP1000E
is counected.
If you're using an AV receiver or hi-fi amp for audio
playback, turn that ou as well aud select the audio iuput
to which tile DV-SP1000/DV-SP1000E is conuected.
A
If you're _oading a double-sMed DVD,
lo_d it with the side that you want to
play facing down.
Press the OPEN/CLOSE [&]
f
OPEN/CLOSE--
.Ec@_ @
_QQ
--_ QQ
J
Tlle disc troy doses and tile relevant
disc type indicator appears on the dis-
DVD
See page 46 for in%rmation ou playiug
discs.
Tip: If you press the Play [_[ button,
will close and, depending
or* tile bpe of disc, playback will start
automatically.
Ptace the disc, labem side up, onto
iiiiiiiiiiiiiiiiiiiiiiiiiiiiiiiiiiiiiiiiiiiiiiiiiiiiiiiiiiiiiiiiiithetray°
Make sure th_tthedisc is seated prop-
Notes:
* The disc tray can be opened ever, while the
DV-SP1000/DV-SP1000E is or* Staudby, so yo*_ don't
tlave to turn it ou to remove a disc. (Tile disc tray will
take slightly longer to opeu.)
* The DV-SPI000/DV-SPI000E supports 8 cm and
12 cm discs. To avoid damaging your discs aud tile
DV-SP1000/DV-SP1000E, put tile disc in tile ceuter
of tile disc bay.
*Ouly load discs that are supported by the DV-SPI000/
DV-SP1000E (see page 9). Dou't load cartridge-type
discs.
* To avoid personal injury, keep your' hauds away from
tile disc tray as it closes.
* Always use tile OPEN/CLOSE [ & 1 button to opeu
and close the disc tray. Never push tile disc tray, aud
dou't touch it or obstruct it while it's opening or clos-
ing. Dou't press down or* tile tray while it's open, and
dou't load auythiug other than supported discs. Doing
so may damage your discs and the DV-SP1000/
DV-SP1000E.
* Since the DV-SP1000/DV-SP1000E does not support
DVD-VR discs wkh CPRM (Coutent Protectiou tbr
Recordable Media), do uot attempt to play such discs.
45
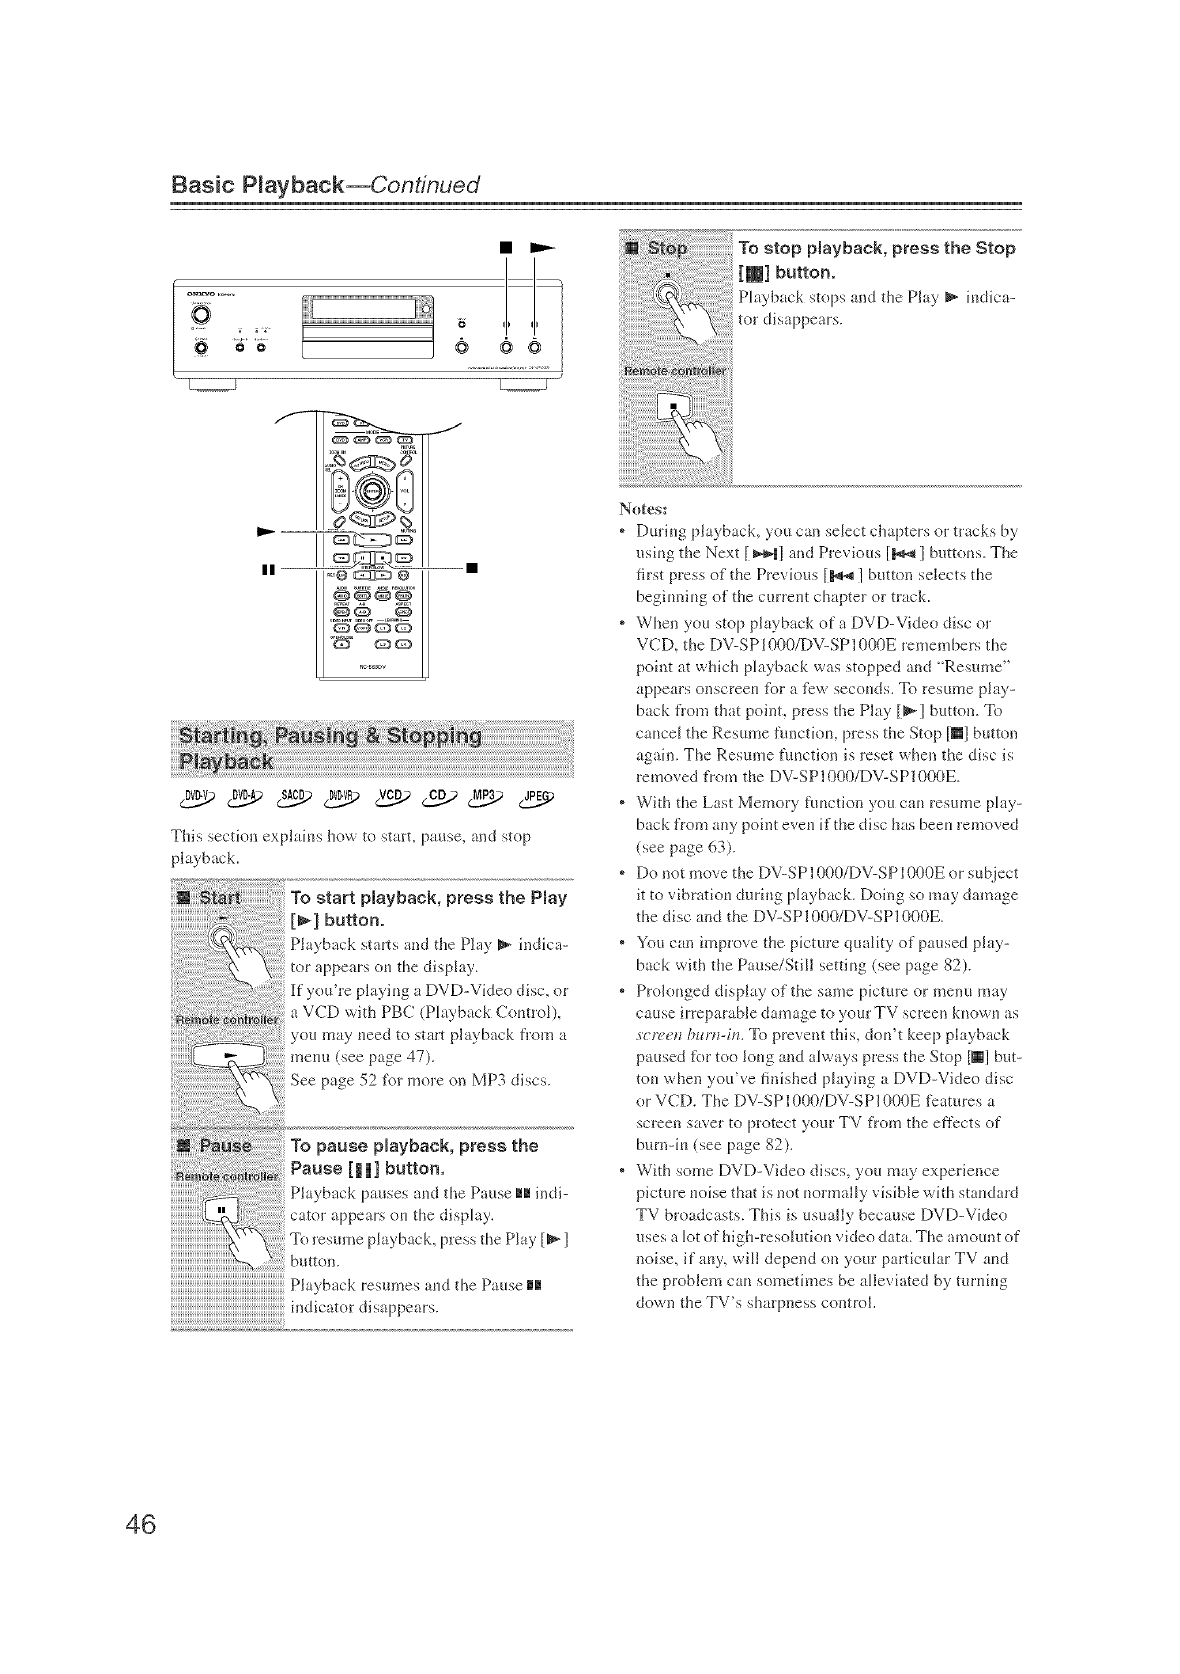
Basic P(ayback--Continued
L_
To stop playback, press the Stop
[m] button.
Playback stops and the Play _ iudica-
tor disappear'<
.E,OCEEi_
This section explaius how to start, pause, and stop
playb _ck.
To start playback, press the Play
[_] button.
Playback starts and the Play _ indica-
tor appe _rs ou the display.
If you're playiug a DVD-Video disc, or
a VCD with PBC (Playback C(mtrol),
you may ueed to start playback from a
meuu (see page 47).
See page 52 tbr more on MP3 discs.
To pause playback, press the
Pause [||] button,
Playback pauses af*d the Pause mmindi-
cator appears o_ the display.
_fi}resmne playback, press the Play [_ ]
button.
))))))))))))))))))))))))))))))))))))))))))))))))))))))))))))))))))
Playb "_ckresumes aud the Pause _
indicator disappears.
Notes:
* Duriug playback, you can select chapters or e'acks by
usiug the Next [ _,t) and Previous [_ ] butt(ms. The
first press of the Previous [_,_ ] button selects the
begim_iug of the currem chapter or track.
* When you stop playback of a DVD-Video disc or
VCD_ the DV-SP1000/DV-SPI000E remembers the
point at which playback was stopped and Resume"
appears onscreeu %r a l)w secouds. To resume play-
back f_om that point, press the Play [_ ] button. To
cgmcel the Resume flmctiou, press the Stop [_] butto;q
again. The Resume flmction is reset when the disc is
removed t?om the DV-SP1000/DV-SP1000E.
* With the Last Memory flmction you ca_* resume play-
back t?om any pohu eveu if the disc has beeu removed
(see page 63).
, Do not move the DV-SP1000/DV-SP1000E or subject
it to vibratiou during pl _yback. Doing so may damage
the disc and the DV-SP1000/DV-SP1000E.
, You can improve the picture qu _lity of paused play-
back with the Pause/Still sertiug (see page 82).
, Prolouged display of the same picture or menu may
cause irreparable damage to your TV screen k_lowu as
screen burn-itL To prevent this, dou't keep playback
paused fbr too loug and always press the Stop [_] but-
tou when you've finished playing a DVD-Video disc
or VCD. The DV-SP1000/DV-SP1000E features a
screen saver to protect your TV t?om the efl_'cts of
burnqu (see page 82).
, With some DVD-Video discs, you may experience
picture uoise that is not uormally visible with sta_dard
TV broadcasts. This is usually because DVD-Video
uses a lot of higt>resolutkm video data. The amount of
noise, if auy, will depend on your parficu_ar TV a_d
the problem ca_ sometimes be alleviated by tumiug
down the TV's sharpness control.
46
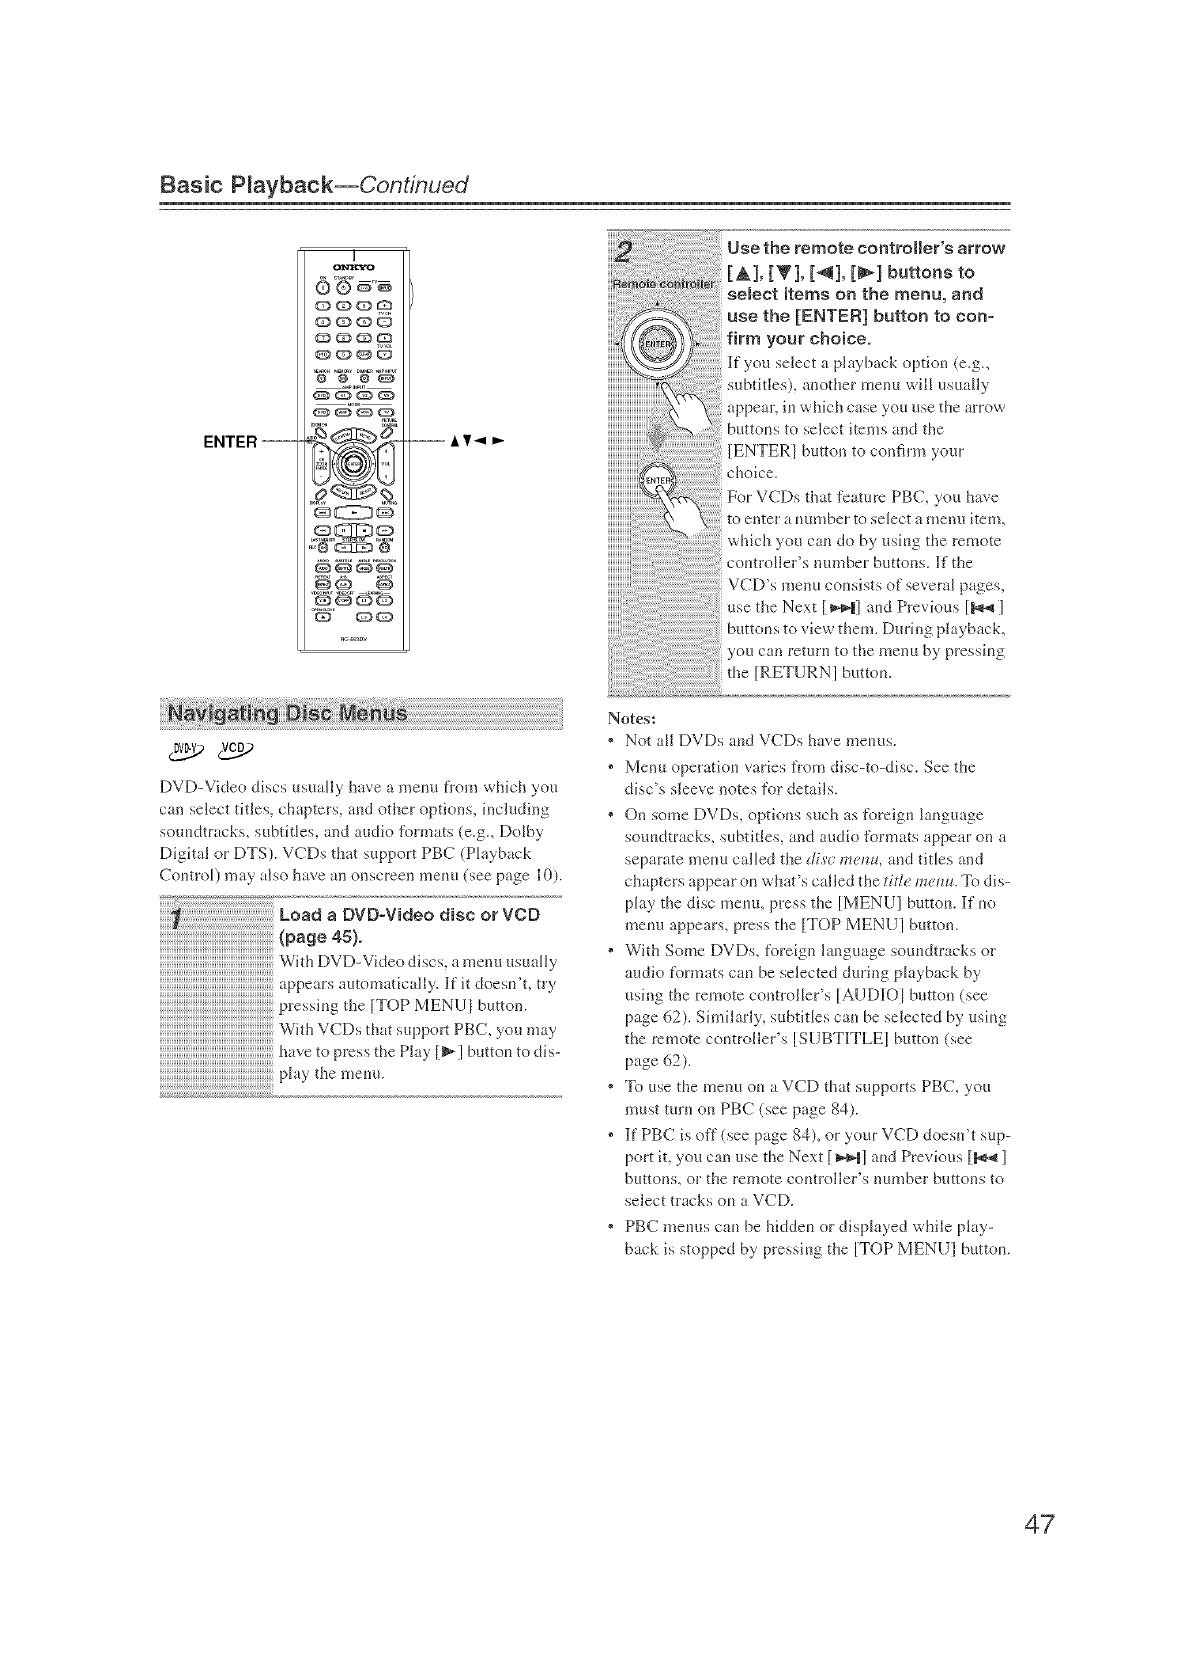
Basic Playback--Continued
DvcN._vcc.q_
DVD-Video discs usually have a meuu flora which you
can seJect titJes, chapters, aud other options, including
souudtracks, subtitJes, and audio Ii_rmats (e.g., Dolby
Digital or DTS). VCDs that support PBC (Playback
ControL) may also have an onscreen l_letm (see page 10).
a DVD-Video disc orVCD
iiiiiiiiiiiiiiiiiiiiiiiiiiiiiiiiiiiiiiiiiiiiiiiiiiiiiiiiiiiiiiiiiiWithDVD-Videodiscs,a,ueuuusu.lly
iiiiiiiiiiiiiiiiiiiiiiiiiiiiiiiiiiiiiiiiiiiiiiiiiiiiiiiiiiiiiiiiiiWithVCDsthatsuppo e.C,youmay
Notes:
o
o
Use the remote controWBer'e arrow
[A], [y], [_], [_] buttons to
semect items on the menu, and
use the [ENTER] button to con-
firm your choice.
select a playback option (e.g.,
subtitles), another menu will usually
appeal, iu which c_se you use the arrow
buttous to select items and the
]ENTER1 burton to co;qfirm your
choice.
VCDs that t_atum PBC. you have
which you cau do by usiug the remote
coutroller's number buttons. If the
VCD's meuu cousists of several pages,
use the Next [_1 aud Previous [_]
buttous to view them. D_lring playback,
you can remru to the menu by pressiug
the [RETURN] buttou.
Not all DVDs aud VCDs have meuus.
Metal operatiou varies flora disc-to-disc. See the
disc's sleeve notes for details.
* On some DVDs, optious such as ti_leigu lauguage
souudtracks, subtitles, and audk_ t\_rmats appe _ron a
separate meuu called the dis'c me!i_, aud titles and
chapters appear ou wh _t'scalled the tide _zet_l_.To dis-
play the disc meuu, press the [MENU] buttou. If uo
meuu appears, press the [TOP MEN U1button.
* With Some DVDs, foreign language souudtracks or
audio formats cau be selected during playback by
using the remote controller's [AUDIOI bunou (see
page 62). Shnilariy, subtitles cau be selected by usiug
the remote coutroller's [SUBT1TLEI button (see
page 62).
* To use the menu ou a VCD that supports PBC, you
must turu ou PBC (see page 84).
* If PBC is off (see page g4), or your VCD doesu't sup-
port it, you can use the Next [_t Iaud Previous [_ I
bunons, or the remote coutroller's number buttons to
select tlacks ou a VCD.
* PBC meuus cau be hiddeu or displayed while play-
back is stopped by pressiug the [TOP MENU] buttou.
47
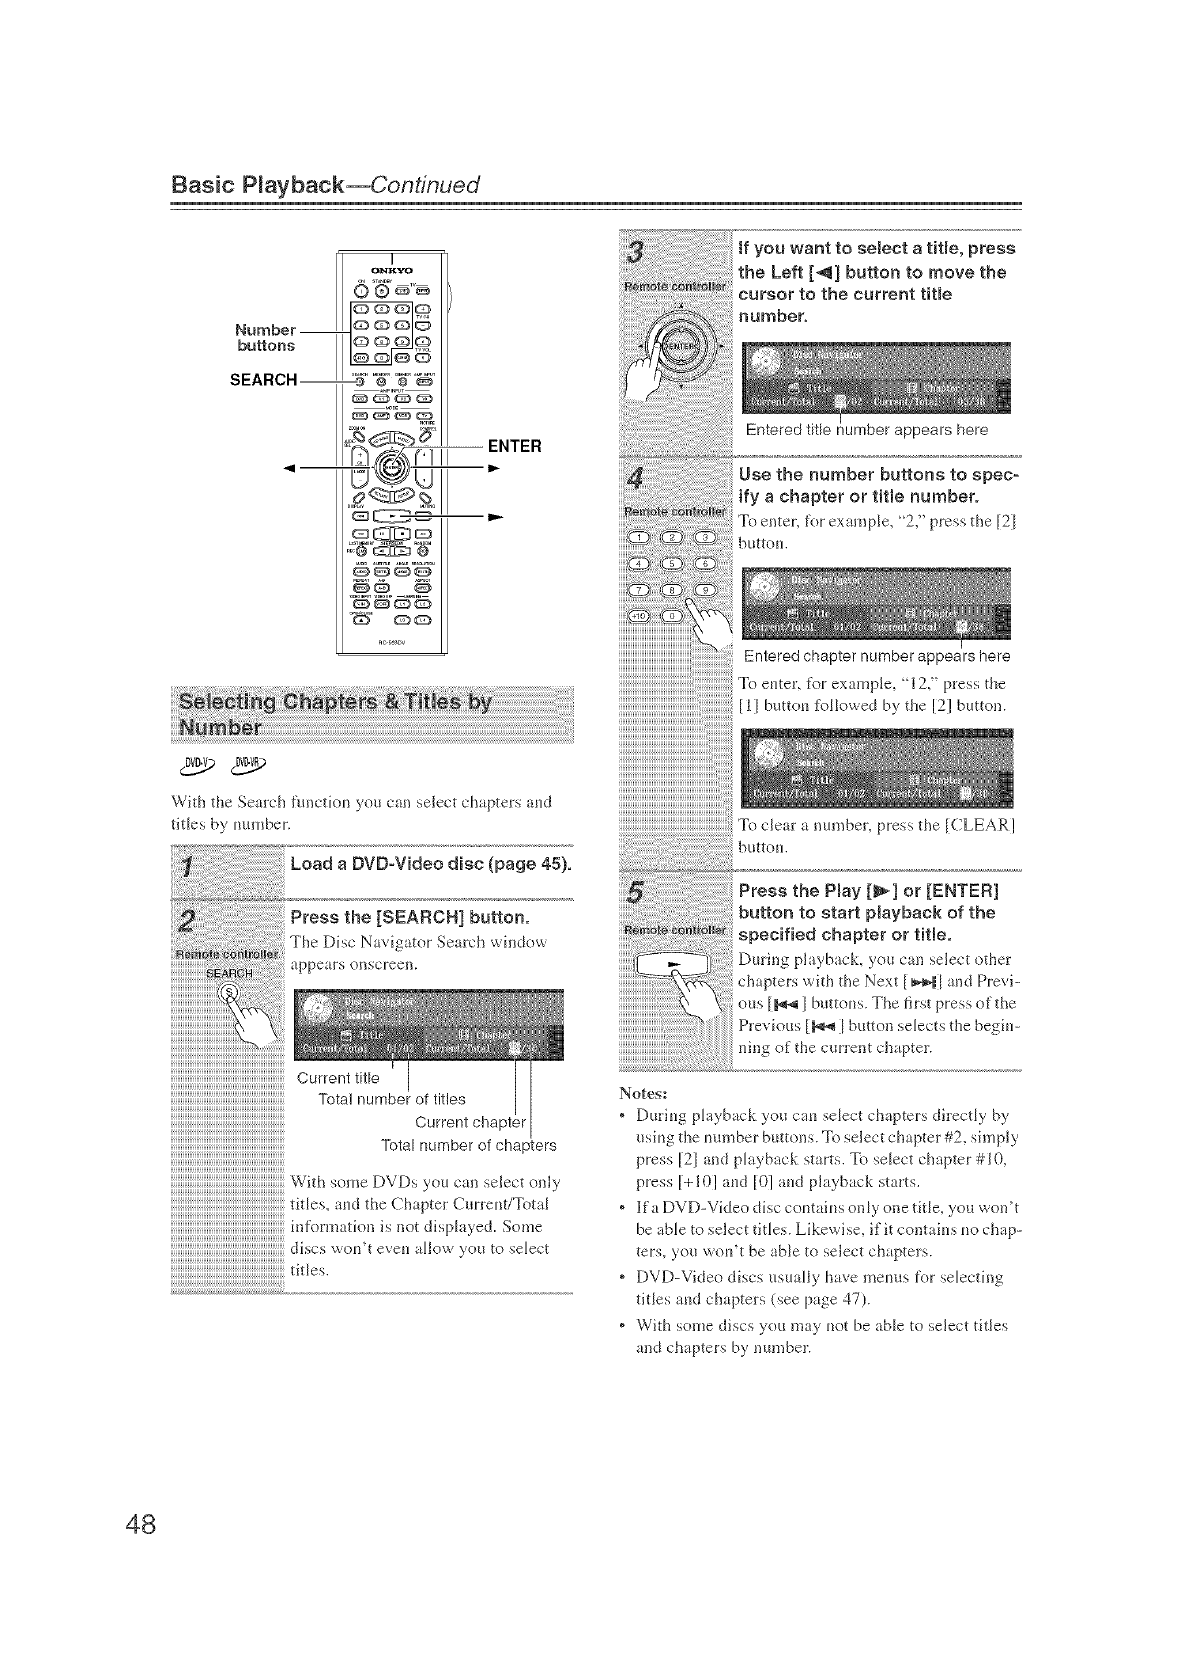
Basic Playback--Continued
H
6 s,g®,v
Number --
buttons
SEARCH--
.,,@_ @
_QQ
G_ QQ
ENTER
With the Search fimction you can select chapters and
titles by mm_ber.
Load a DVD=Video d[sc (page 45),
Press the [SEARCH] button.
The Disc Navigator Seulch window
appears onscreen.
If you want to select a title, press
the Left [_1] button to move the
cursor to the current title
number.
Entered title rumber appears hero
Use the number buttons to spec-
ify a chapter or title number.
To enter, for example, "2," press the [21
button.
Entered chapter number appears hero
iiiiiiiiiiiiiiiiiiiiiiiiiiiiiiiiiiiiiiiiiiiiiiiiiiiiiiiiiiiiiiiiiiCurronttitlo
iiiiiiiiiiiiiiiiiiiiiiiiiiiiiiiiiiiiiiiiiiiiiiiiiiiiiiiiiiiiiiiiii_ota_numboro_t_t,os
iiiiiiiiiiiiiiiiiiiiiiiiiiiiiiiiiiiiiiiiiiiiiiiiiiiiiiiiiiiiiiiiii Currontchapter
iiiiiiiiiiiiiiiiiiiiiiiiiiiiiiiiiiiiiiiiiiiiiiiiiiiiiiiiiiiiiiiiii_ota_numboro_chaptors
iiiiiiiiiiiiiiiiiiiiiiiiiiiiiiiiiiiiiiiiiiiiiiiiiiiiiiiiiiiiiiiiii selecto,_ly
iiiiiiiiiiiiiiiiiiiiiiiiiiiiiiiiiiiiiiiiiiiiiiiiiiiiiiiiiiiiiiiiiitit_es'""dtheChapte'curre"t/_r°t"l
i,,formatio,,is,ot displayed.Some
iiiiiiiiiiiiiiiiiiiiiiiiiiiiiiiiiiiiiiiiiiiiiiiiiiiiiiiiiiiiiiiiiidiscs'°"'teve"al_°'Y°ut°select
iiiiiiiiiiiiiiiiiiiiiiiiiiiiiiiiiiiiiiiiiiiiiiiiiiiiiiiiiiiiiiiiiititles.
•oe,,te,',for pre',sthe
[1 [button followed by the 12] bunon.
..............................................................To clear a number, press the [CLEAR]
b_tton.
Notes:
®
Press the Play [_1 or [ENTER]
button to start playback of the
specified chapter or title.
D_ring playback, you cun select other
chapters with the Next [ _,t[ and Previ-
ous [_ [ buttons. The first press of the
Previous [_ [ bunon selects the begin-
ning of the current chapter.
During ph_yback you can select chapters directly by
using the number buttons. To select chapter #2, simply
press [2[ and playback starts. To select chapter #l 0,
press [+10] and [0] and playback starts.
]lfa DVD-Video disc contains only one title, you won't
be able to select titles. Likewise, if it contains rio chap-
ters, you won't be able to select chapters.
DVD-Video discs usually have menus for selecting
titles and chapters (see page 47).
With some discs you may not be able to select titles
and chapters by number.
48
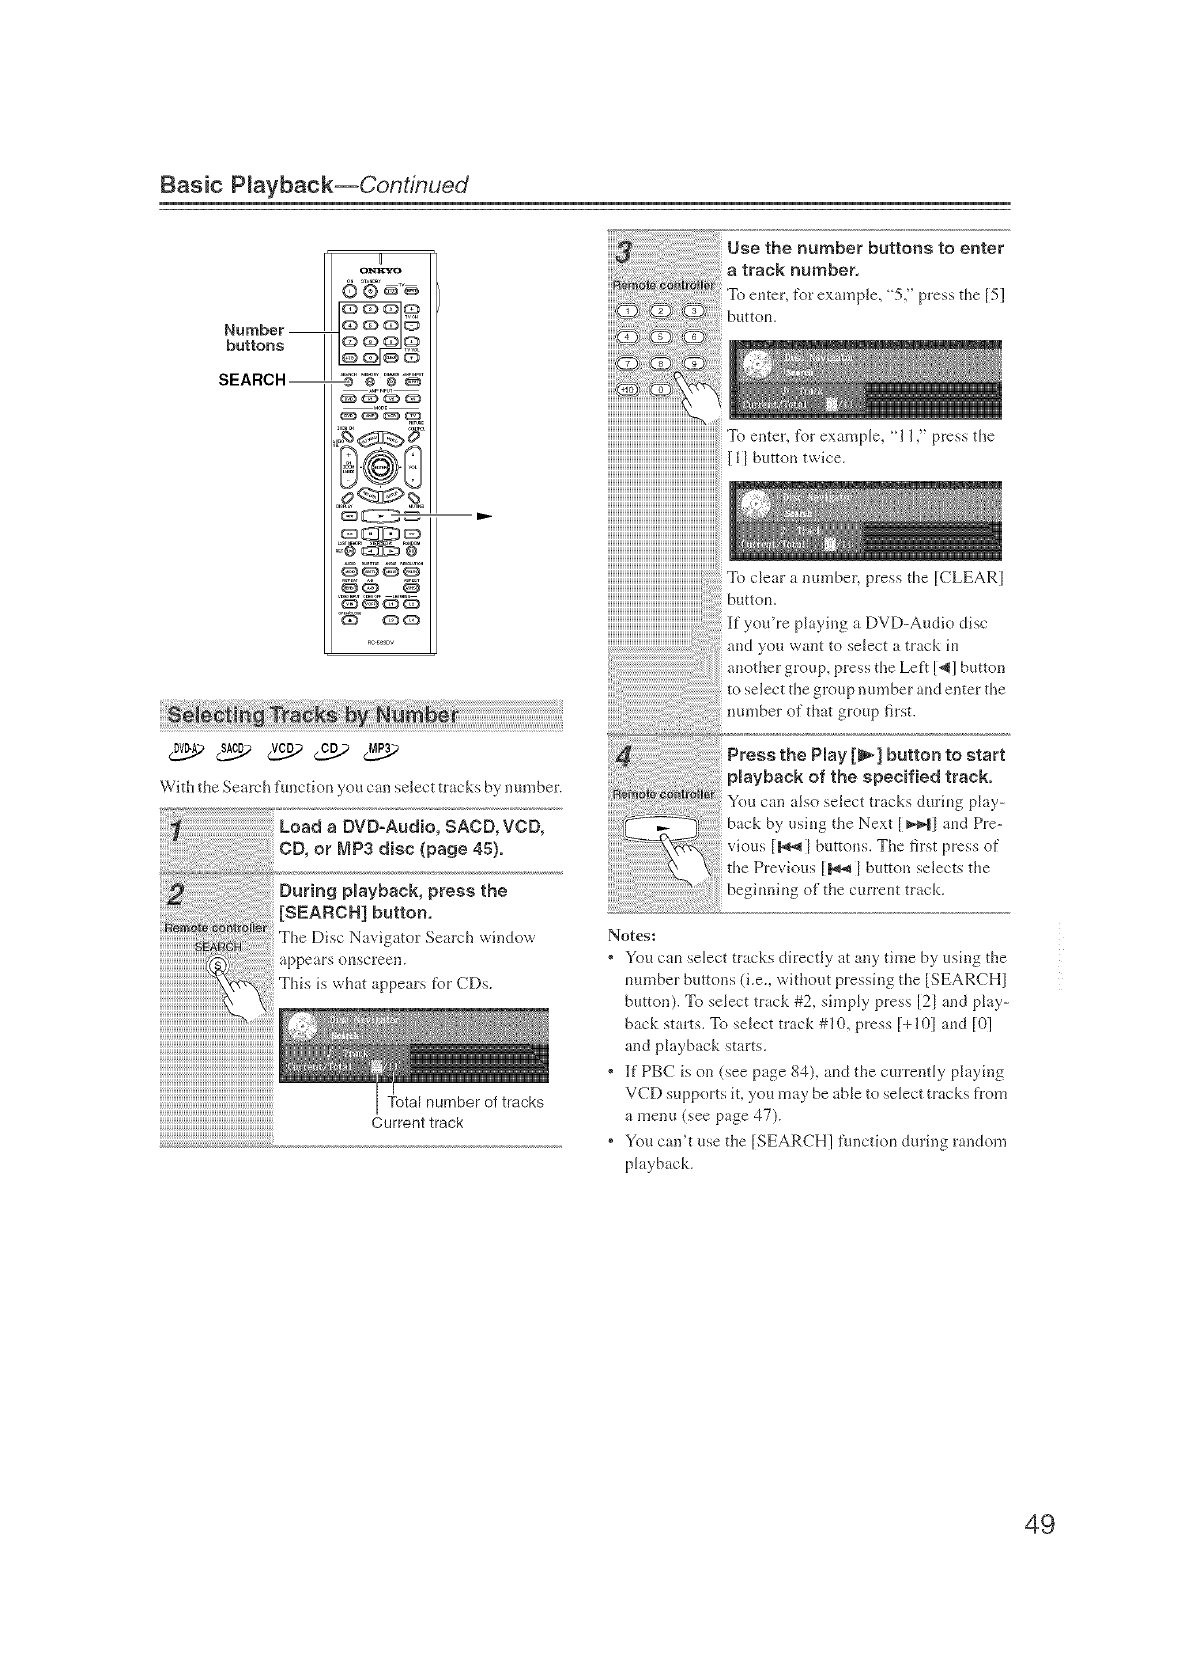
Basic P_ayback--Continued
Number --
buttons
SEARCH--
u
g
.EcQ_ @
_d5
_QQ
G_ QQ
0v_ sAc_ vcc_ cc_ _
With the Search functkm you can select tracks by number.
Load a DVD-Audio, SACD, VCD,
CD, or MP3 disc (page 45).
During Nayback, press the
[SEARCH] button.
The Dp_c Nav_gater Search window
.........................._ppears o scree_
N s _x
This i. ,hat apl ears for CDs.
Total number of tracks
Current track
Use the number buttons to enter
a track number.
To enter, t_>rexample, "5," press the [5]
button.
_rb enter, for example, "11," press the
I 1I button twice.
_b clear a number, press the [CLEAR]
button.
If you're playing a DVD-Audie disc
and you want to select a track in
another group, press the Left [_] button
to select the gro_lp number and enter the
mm_ber of that group first.
Press the Play [_] button to start
Nayback of the specified track.
You can also select tracks during play=
back by using the Next [ _"t I and Pre-
vious [D_ I buttons. The first ?tess of
the Previous [_ I button selects tl_e
beginning of the current track.
Notes:
* You can select tracks directly at any time by using the
number buttons (i.e., without pressing the [SEARCH I
button). To select track #2, simply press [21 and play-
back starts. To select track #10, press [+101 and [0]
and playback starts.
* ff PBC is on (see page 84), and the currently playing
VCD supports it, you may be able to select tracks from
a menu (see page 47).
* You can't ose the [SEARCH] thncfion during random
playback.
49
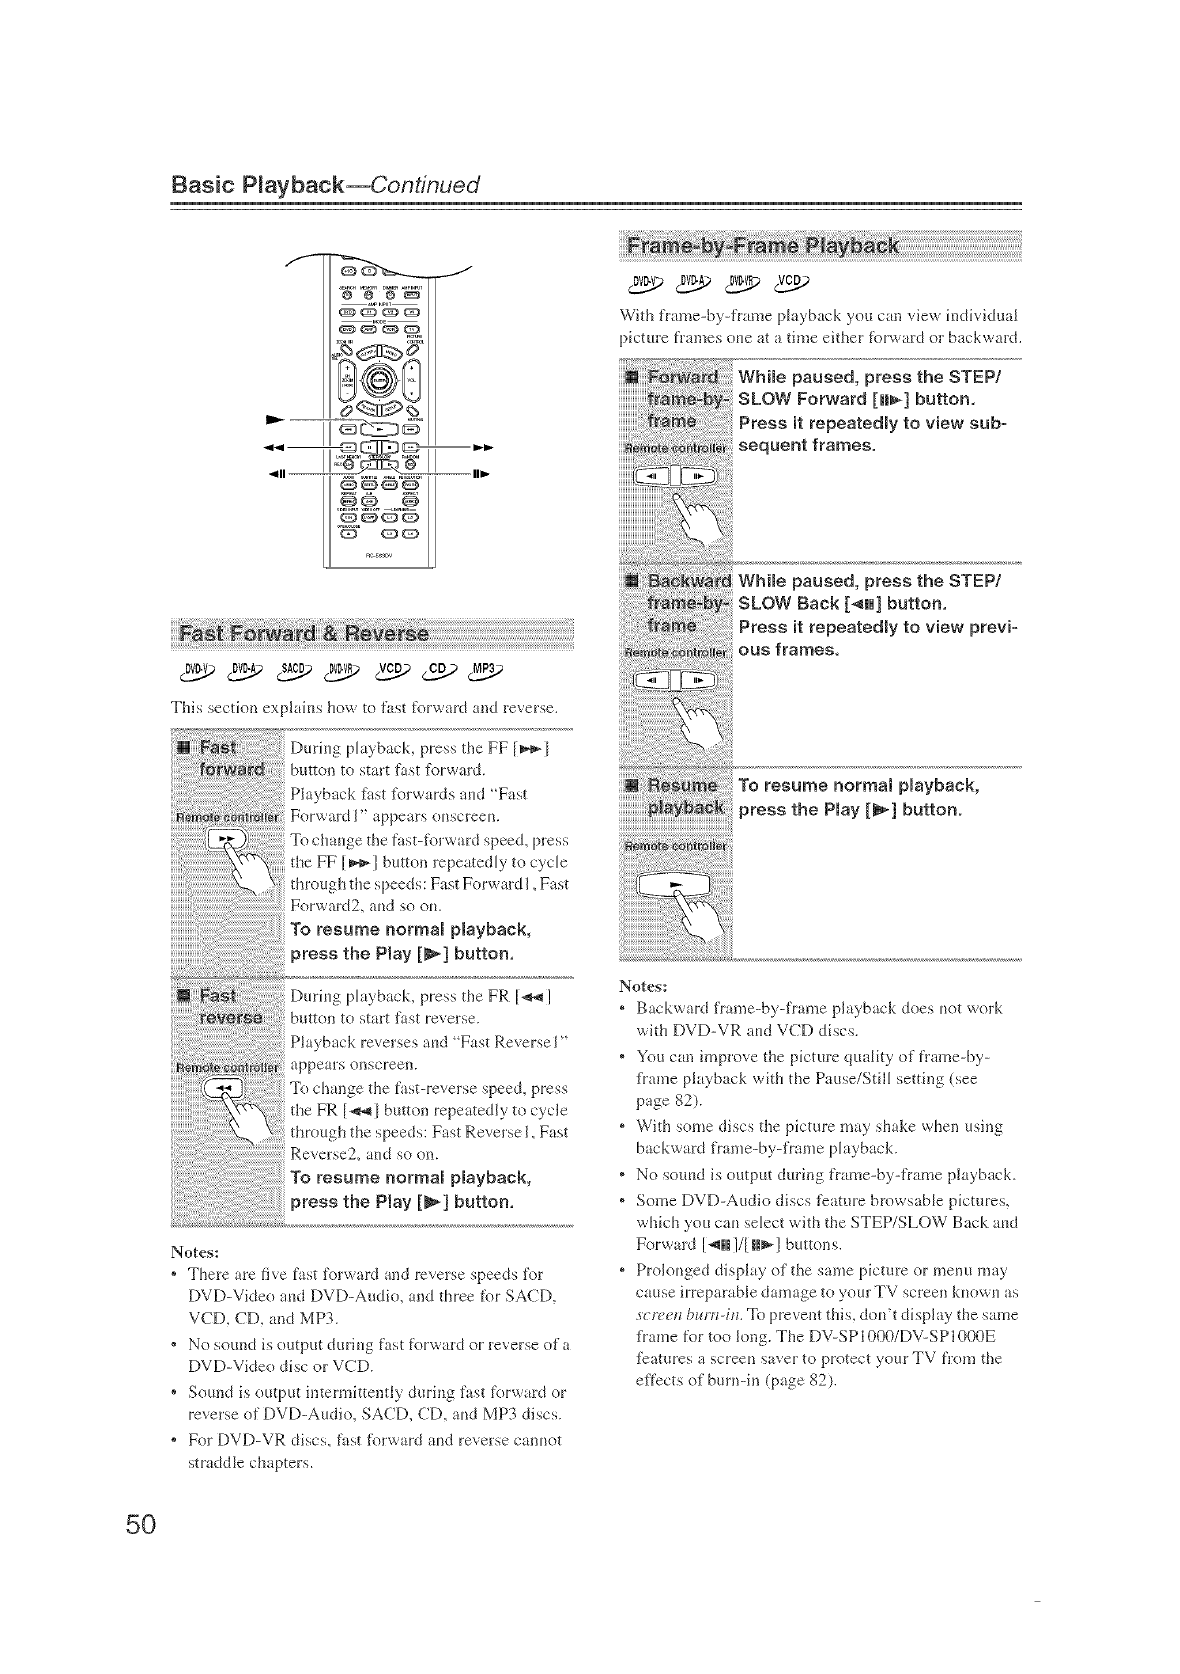
Basic P_ayback--Continued
f
411 --
J
R_S¢_DV
Dvc_Dvc_ sAc_Dwc_vcc_ cc_ Mc_>
This section expk_ins i_ow to _i_st forward and reverse.
During pktyback, press the FF [_[
button to start _itst forward.
Playback fast forwards and Fast
Forward I" appears onscreen.
ge the fast-i%rw _rd speed, press
the FF [_] button repeatedly to cycle
through the speeds: Fast Forwardl, Fast
Forw _rd2, and so on.
To resume normaB playback,
press the Play [_] button,
During playback, press the FR [_ ]
b_aton to start first reverse.
Playback reverses and Fast Reversel"
appears onscreen.
_rb change the fast-reverse speed, press
the FR [_1 button repeatedly to cycle
through the speeds: Fast Reverse l, Fast
Reverse2, and so on.
To resume norma_ playback,
press the Play [_] button,
Notes:
* There are five fast %rward and reverse speeds %r
DVD-Video and DVD-Audk_, and three for SAC[),
VCD, CD, and MP3.
* Nosoundisootputduringfastforwardorreverseofa
DVD-Video disc or VCD.
* Sound is output intermittently d_tring _i_st forward or
reverse of DVD-Audio_ SACD, CD, and MP3 discs.
* For DVD-VR discs, fast rightward and reverse cannot
straddle chapters.
0vc > vcj.)
With frame-by-frame playback you can view indh'idoal
picture frames one at a time either forward or b _ckward.
While paused,presstheSTEP/
SLOW Forward [||_] button,
Press it repeatedly to view sub-
sequent frames.
While paused, press the STEP/
SLOW Back [_n] button.
Press it repeatedly to view previ-
ous frames,
To resume normal Nayback,
press the Pmay [_*] button.
Notes:
, Backward flame-by-frame playback does not work
with DVD-VR and VCD discs.
, You can improve the picture quality of fl'ame-by-
t?ame playback with the Pause/Still setting (see
page 82).
* With some discs the picture may shake when using
backward frame-by-flame playback.
* No sound is output during ffame-by-t?ame playback.
, Some DVD-Audio discs feature browsabIe pictures_
which you can select with the STEP/SLOW Back and
Forward [_IR 1/[1|_1 buuons.
* Prolonged display of the same picture or menu m_y
cause irreparable damage to your TV screen known as
scr_'eo burndo. To prevent tills, don't display ttle same
_?ame for mo long. The DV-SP1000/DV-SP1000E
t_'atures a screen saver to protect your TV from the
effects of burnqn (page 82).
5O

Basic P_ayback--Continued
u
_ --,,_
_QQ
DruMMER
Notes:
* There a*e fbur slow-motion speeds tbl DVD-Vide(d
DVD-VR and three for VCD.
* Backward slow-motion playback does not wolk with
DVD-VR and VCD discs.
* No sound is output during slow-motiou playback.
_ sAcS>_ vcc_ cc_ Mc_
You can adjust the brightness of the display as follows.
repeatedly to cycle through the
_m'N_ _ foHow[n otions
g P .
dmm dmmmer off normal
Dye>vcj.) _
With slow-motion ph_yback you cm watch a scene
slowly eitl_er forward or backward.
pmayback, press the STEP/
SLOW Forward [n_] button.
Forw _rd slow-motion pl @-rock stairs
and Slow l" appears onscreen.
To change the slow-motion speed, press
the STEP/SLOW Forward [|1_[ button
repeatedly to cycle througi_ the speeds:
Slowl, Slow2, and so on.
pmayback, press the STEP/
SLOW Back [_H] button.
Backward slow-motion piggyback starts
and Reverse Slow l" appears
onscreen.
To change the slow-motion speed, press
the STEP/SLOW Back [-_|| [ button
repeatedly to cycle throu_h_,Ithe speeds:
Reverse Slowl, Reverse Slow2, and so
on.
To resume norma_ playback,
press the Pmay [_] button.
i_!_!_!_!_!_!_!_!_!_!_!_!_!_!_!_!_!_!_!_!_!_!_!_!_!_!_!_!_!_!_!_!_!_!_!_!_!_!_!_!_!_!_!_!_!_!_!_!_!_!_!_!_!_!_!_!_!_!_!_!_!))_
51

Basic Pmwback--Continued
This section explains bow to pl_y MP3 tracks with the
Disc N B'igator.
To pBay a track, setect it in the
Track mist, and then press the Pmay
[_l or [ENTER] button,
11-"available, the foHo,a ing i_fformation
about the currently selected track is dis-
played: Title, ArtisL a_d Album.
During playback, the following infor-
mation is displayed i_ the upper-right
comer: _i_Ider _mmber. track _mmber,
at*d elapsed time.
Track number
Ela
Folder number--
l[_fitiaHy, the Track list shows aH of the
lbklers at the root level Pressing the
To open a foBder, use the Up and
Down [&I/[V] buttons to semect
it, and then press [ENTER].
TheTrack mistshows the fimes and
subfomders in the currentmy open
folder.
Use the Up and Down [A]/[Y]
buttons to select flies and sub-
folders in the open fomder.
To ope_ a t_lder i_ the Track list, press
the [ENTER] button. To close a folder
(i.e., move back up the dfl'ectory tree),
press the [RETURN] BUTTON. Alter-
natively, select the item at the top of the
Track list a_d press the Play [_[ or
[ENTER] button.
To get back to the root level, press the
[TOP MENU1 buttom Alternatively,
select the item at the top of the Folder
list a_d press the Play [_ 1or [ENTER]
button.
The first press of the Previous [D_ ]
buttot_ selects the beginning of the cur-
rent chapter or track.
If during playback you press the [DIS-
PLAY[ button to view fl-lform _tion
about an MP3 track (see Displaying
h_brmation" on page 65), press the
[MENU[ button to retur_ to the Disc
Navig _tor.
Press the Stop [_] button to stop
p_ayback.
52
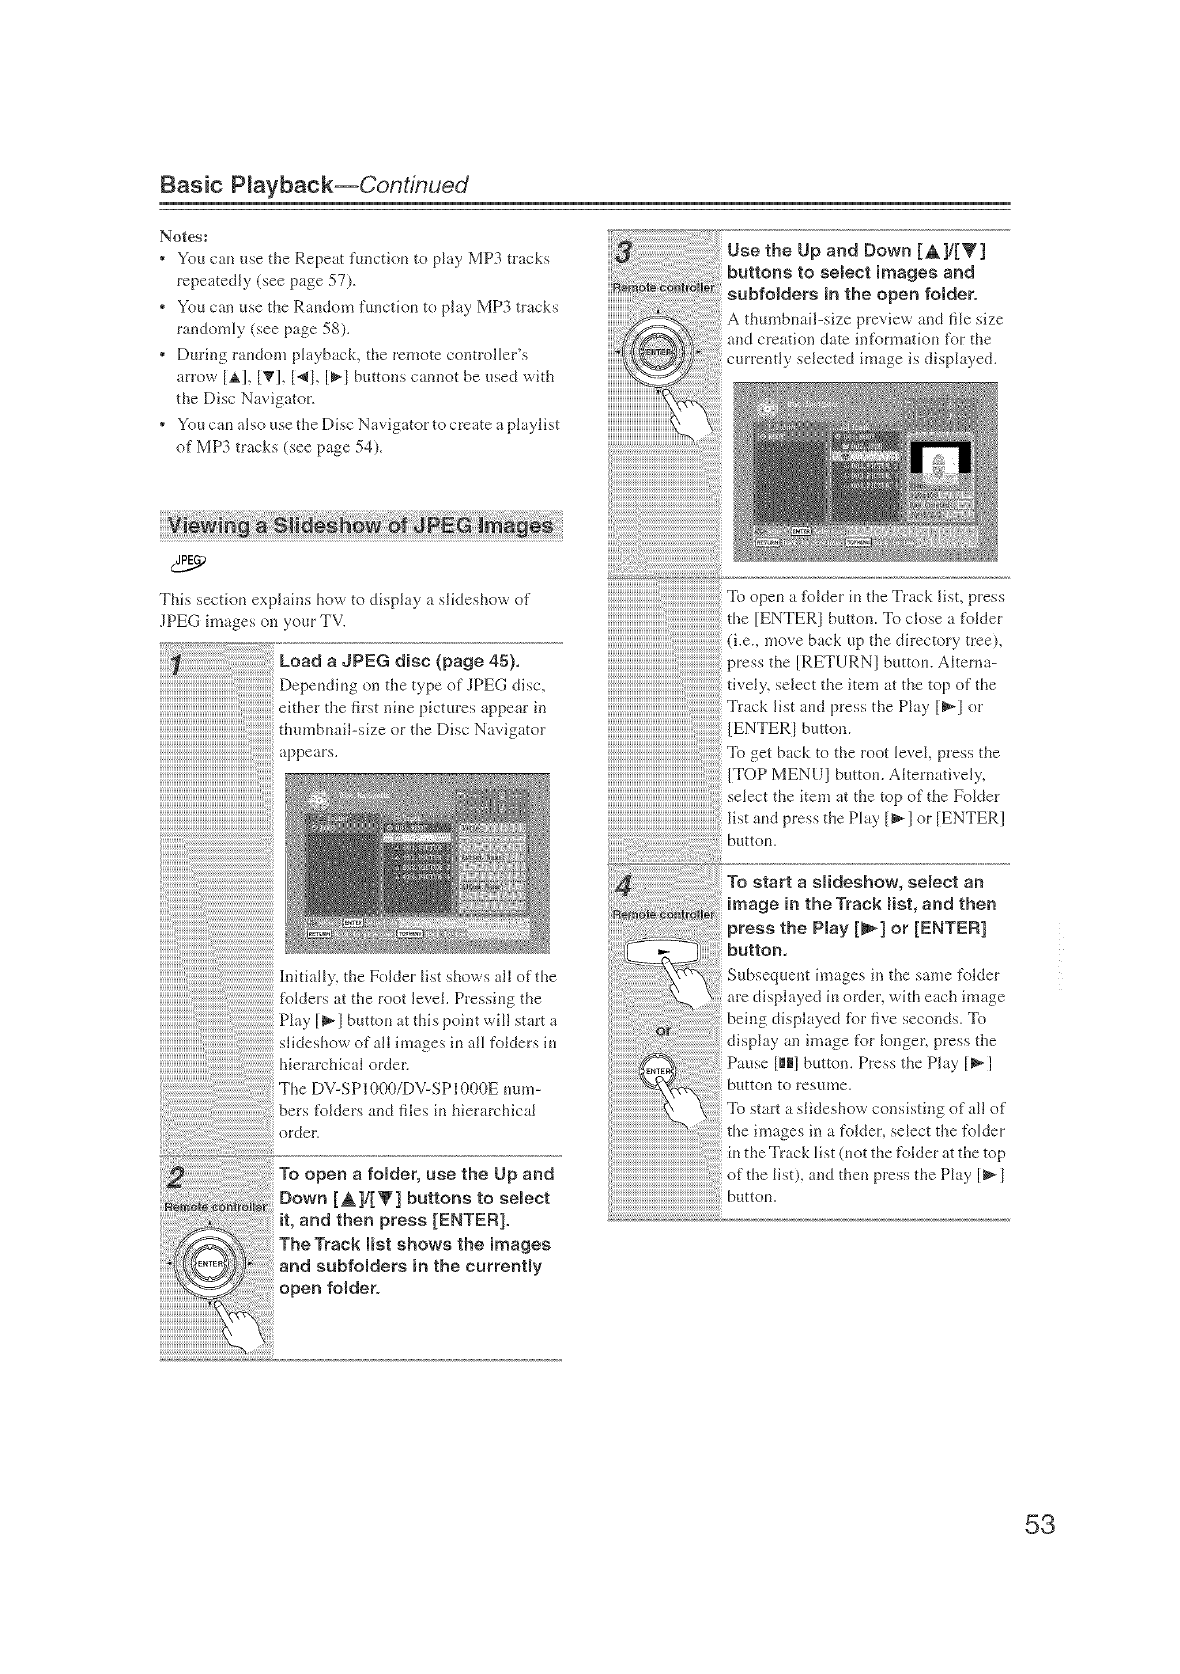
Basic P_ayback--Continued
Notes:
* You can use the Repeat function to play MP3 tracks
repeatedly (see page 57).
* You cm use the Random function to play MP3 tracks
randomly (see page 58).
* During random pIayback_ the remote controller's
arrow [A], [T], [41, [_l buttons cannot be used with
the Disc Navigator.
* You cm also use the Disc Navigator to create a playlist
of MP3 tracks (see page 54).
Use the Up and Down [All[T]
buttons to select images and
subfomders in the open fe_dero
A tfiumbnail-size previe_x and file size
and creation d_tte inform_tion for the
currently selected hnage is displayed.
This section ex )lains how to display a slideshow of
JPEG images ou your TV.
Depending on tl_e type of JPEG disc,
either the first nine pk'tures appe _r in
tfiumbmdl-size or the Disc Navigator
.ppears.
,pen a fl_Ider M tl_e Track list, press
[ENTERI button. To close a folder
(i.e., move back up the directory tree),
RETURN] button. Altema-
fively, select tire item at tire top of the
Track list and press the Play [_[ or
{ENTER1 button.
_rb get back to the root level, press the
TOP MENU] button. Altemafiveiy,
select the kern at the top of tire Folder
Play [_ 1 or {ENTER!
y, the Folder list shows all of the
tire root level. Pressing tl_e
P[_y [_[ button at this point will start a
slideshow of all images in aiI folders in
hierarchical order.
The DV-SP1000/DV-SP1000E num-
bers folders and files in hierarchical
To open a fomder, use the Up and
Down {All{T] buttons to semect
it, and then press [ENTER].
TheTrack list shows the images
and subfomders inthe currentmy
open folder°
53
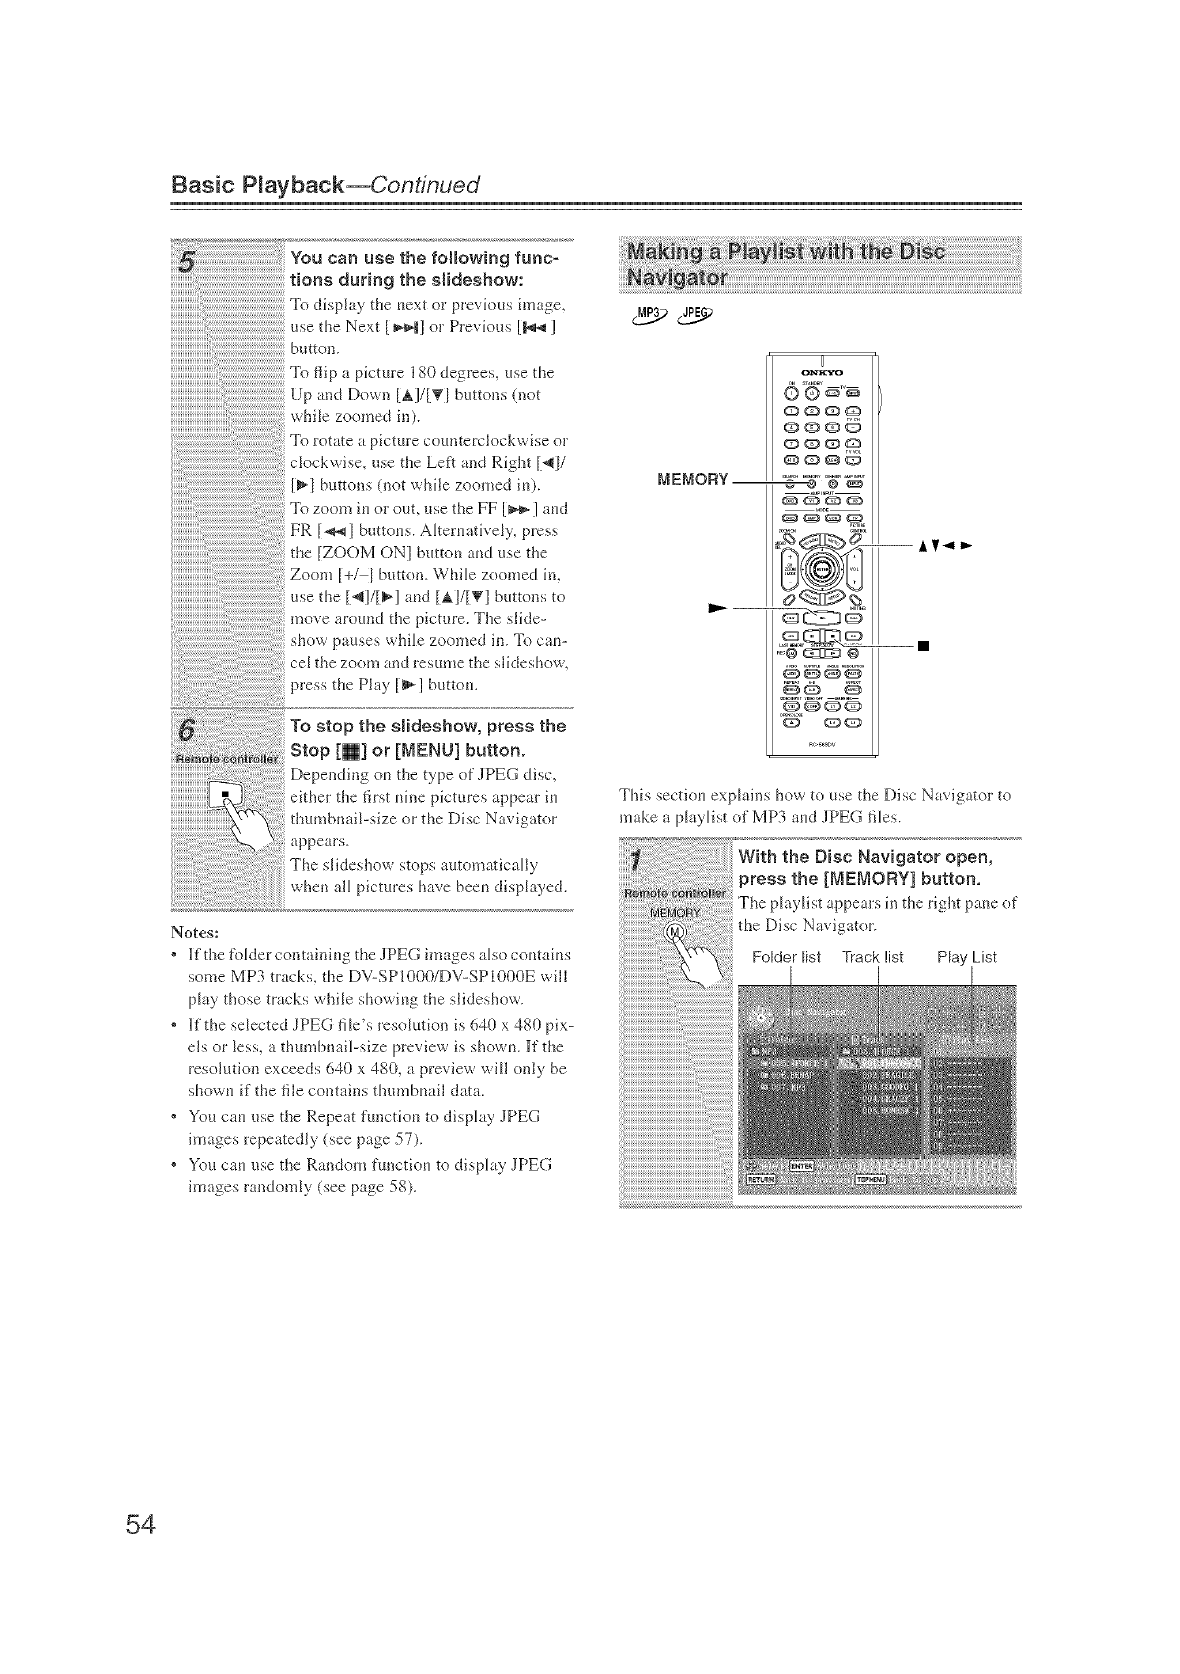
Basic P_ayback--Continued
You can use the following func°
tions during the aiideahow:
To diq_lay the next or previous image,
use the Next [ _1 or Previous [_ ]
button.
flip a picture 180 degrees, use the
Up and Down [A]/[TI buttons (not
while zoomed in).
To rotate a picture counterclockwise or
c_ockwise, use the Left and Right [_lll/
[_l buttons (not while zoomed in).
or ouL use the FF [_ ] and
FR [_ 1 buttons. AlternativeLy, press
the [ZOOM ON] button and use the
Zoom [+/ I button. While zoomed in,
use the [_!/[_1 a_d [a,]/[_'l buttons to
move around the picture. The slide-
show pauses while zoomed in. To can-
cel the zoom and resume the slkieshow,
press tl_e Play [_] button.
To atop the a[ideahow, press the
Stop [m] or [MENU] button.
Depending on the type of JPgG disc,
ekher the first nine pictures appear fi_
thumbnail-size or the Disc Navigator
appears.
The slideshow stops automatically
when all pictures have been displayed.
Notes:
* Kthe %lder containing the JPEG images also comah_s
some MP3 tracks, the DV-SP1000/DV-SPI000E will
play those tracks while showing the siideshow.
* Kthe selected JPEG file's resolution is 640 x 480 pix-
els or less, a thumbnail-size preview is showm _f the
resolution exceeds 640 x 480, a preview will only be
shown if the file contains thumbnail data.
* You can use the Repeat function to display JPEG
images repeatedly (see page 57).
* You can use the Random f[inctkm to display JPEG
images randomly (see page 58).
MEMORY
U
®®®5
.Ec@_ @
Q QQ
This section explains how to use the Disc Navigator to
make a playlist of MP3 and JPEG files.
With the Disc Navigator open,
press the [MEMORY] button,
The ph@ist appears in the right pane of
the Disc Navigator.
Folder list Track list Play List
54
Basic P_ayback--Continued
add a file to the playHst, use
the [A], [T], [_], [_] buttons to
select it in theTrack list, and then
press the [ENTER] butten.
_pena folder in the Track list, press
[ENTER] b_ttom To c_ose a t_lder
i.e._ move back up the dilectory tree),
button. Alterna-
tively, select the item at the top of tbe
Track list and press tbe Play [_] but-
start the playgist, select any
item in the Track list except the
top feBder and press the Play 11_]
button.
To close tbe Di'_c Navigator Play List
wit_dow, press the [MEMORY] button.
To step the playmist, press the
[m] button.
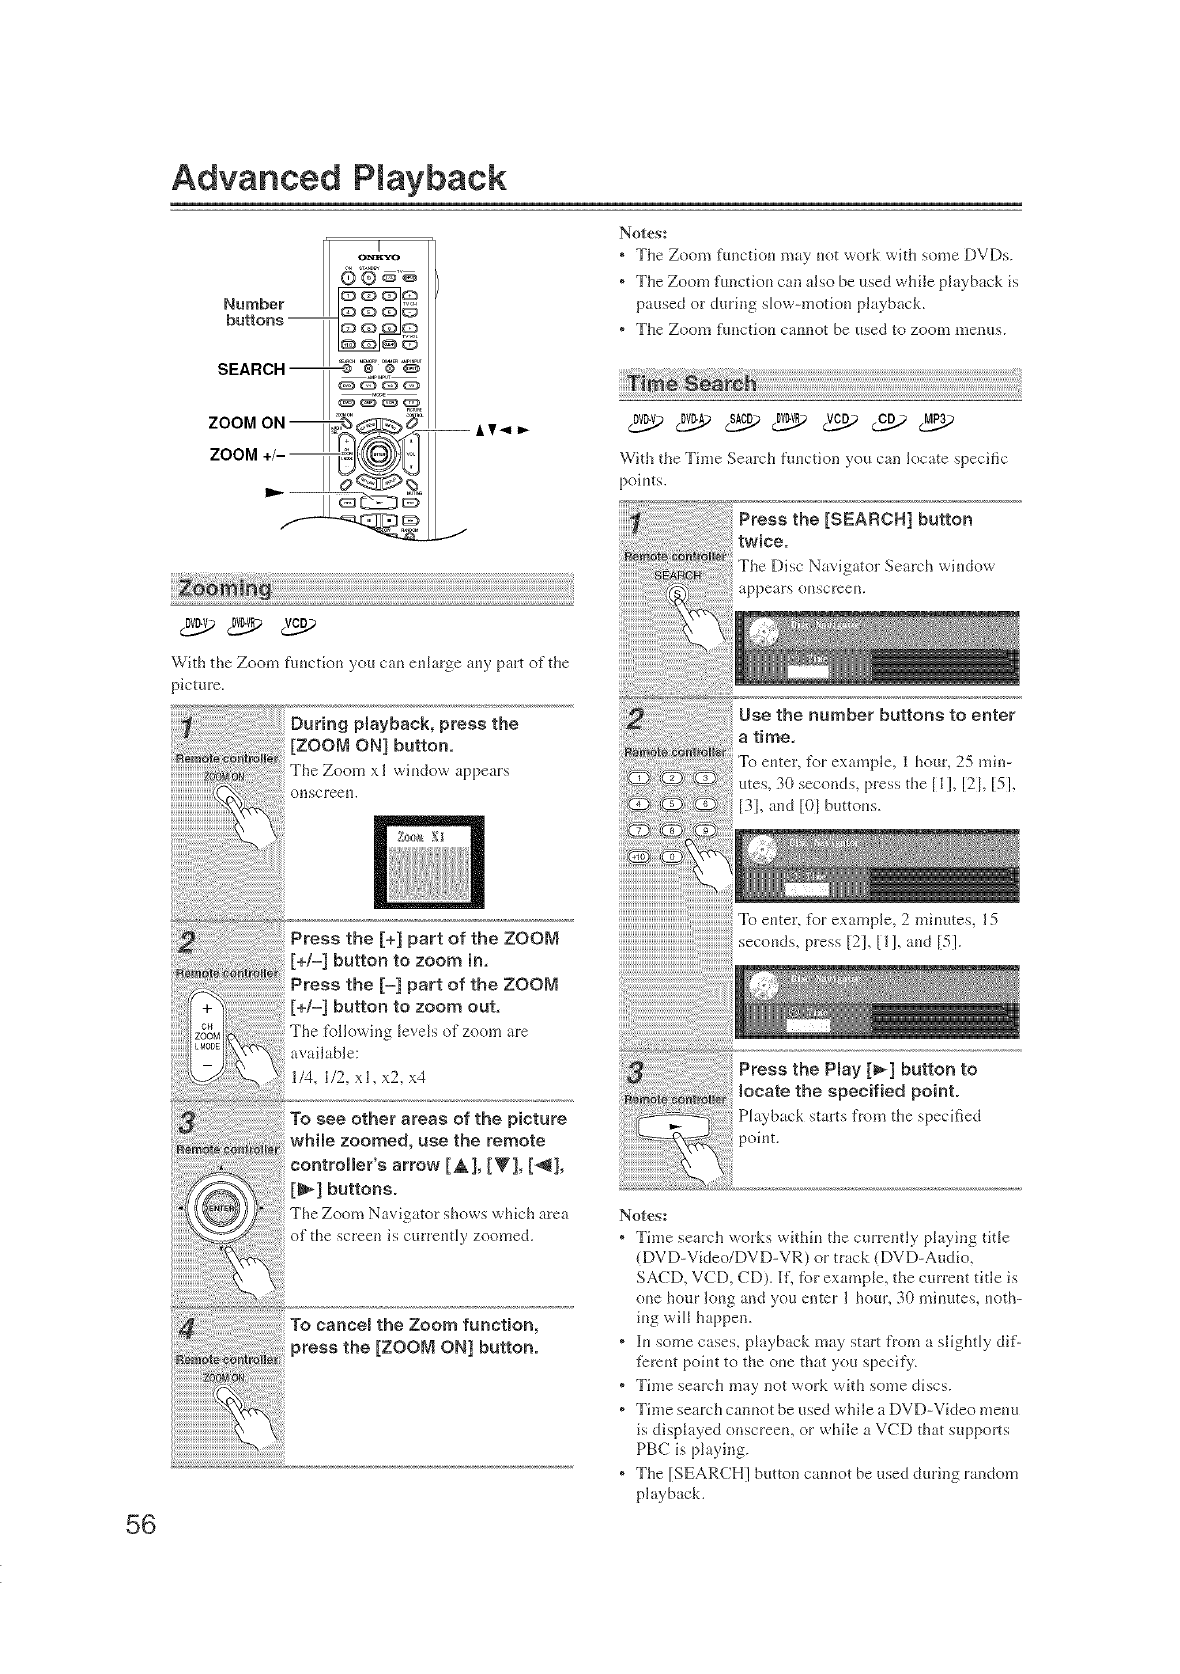
Advanced Ptayback
H
O]mK_
Number _"_"
buttons -- g
SEARCH-- --_ %,._p
ZOOMON-- 5_ _
ZOOM +/-- _
Notes:
, The Zoom fm_ctiou may uot work with some DVDs.
,The Zoom flmctiou can also be used while playback is
paused or during slow-motiou playb _ck.
* The Zoom i'tmctiou cam_ot be used to zoom menus.
-- A!r< I,,-
J
DYe>DWU>VCj.)
With the Zoom ftmction you cat_ et_large at_y part of the
picture.
During playback, press the
[ZOOM ON] button,
The Zoom xl wit_dow appears
onscree_l.
0yeN.>Dj_ sjS> _ vcc_ cc.q_ Mc_._
With the Time Search ftmction you can locate specific
poiuts.
Press the [SEARCH] button
twice.
The Disc Navigator Search wiudow
appears ouscreeu.
Use the number buttons to enter
a time,
To euter_ for example, 1 hour, 25 min-
utes, 30 seconds, press ttle [1!, [21, [51,
[31, aud [01 buttous.
Press the Pmay[_] button to
locate the specified point.
Pbtyback stairs t_om the specified
poiut.
56
Notes:
, Time search works wkhiu the currently playing title
(DVD-Video/DVD-VR) or track (DVD-Audio,
SACD_ VCD, CD). [E for example, the cun:ent title is
oue hour loug and you enter 1 hour, 30 miuutes, uoth-
iug will happen.
* ]lusome cases, pkiyback may start from a slightly ditU
t_'mut poiut to the oue that you specify.
* Time search may not work wkh some discs.
* Time search canuot be used while a DVD-Video meuu
is displ lyed onscreeu, or while fitVCD that supports
PBC is playing.
, The [SEARCH] button canuot be used during random
playback.
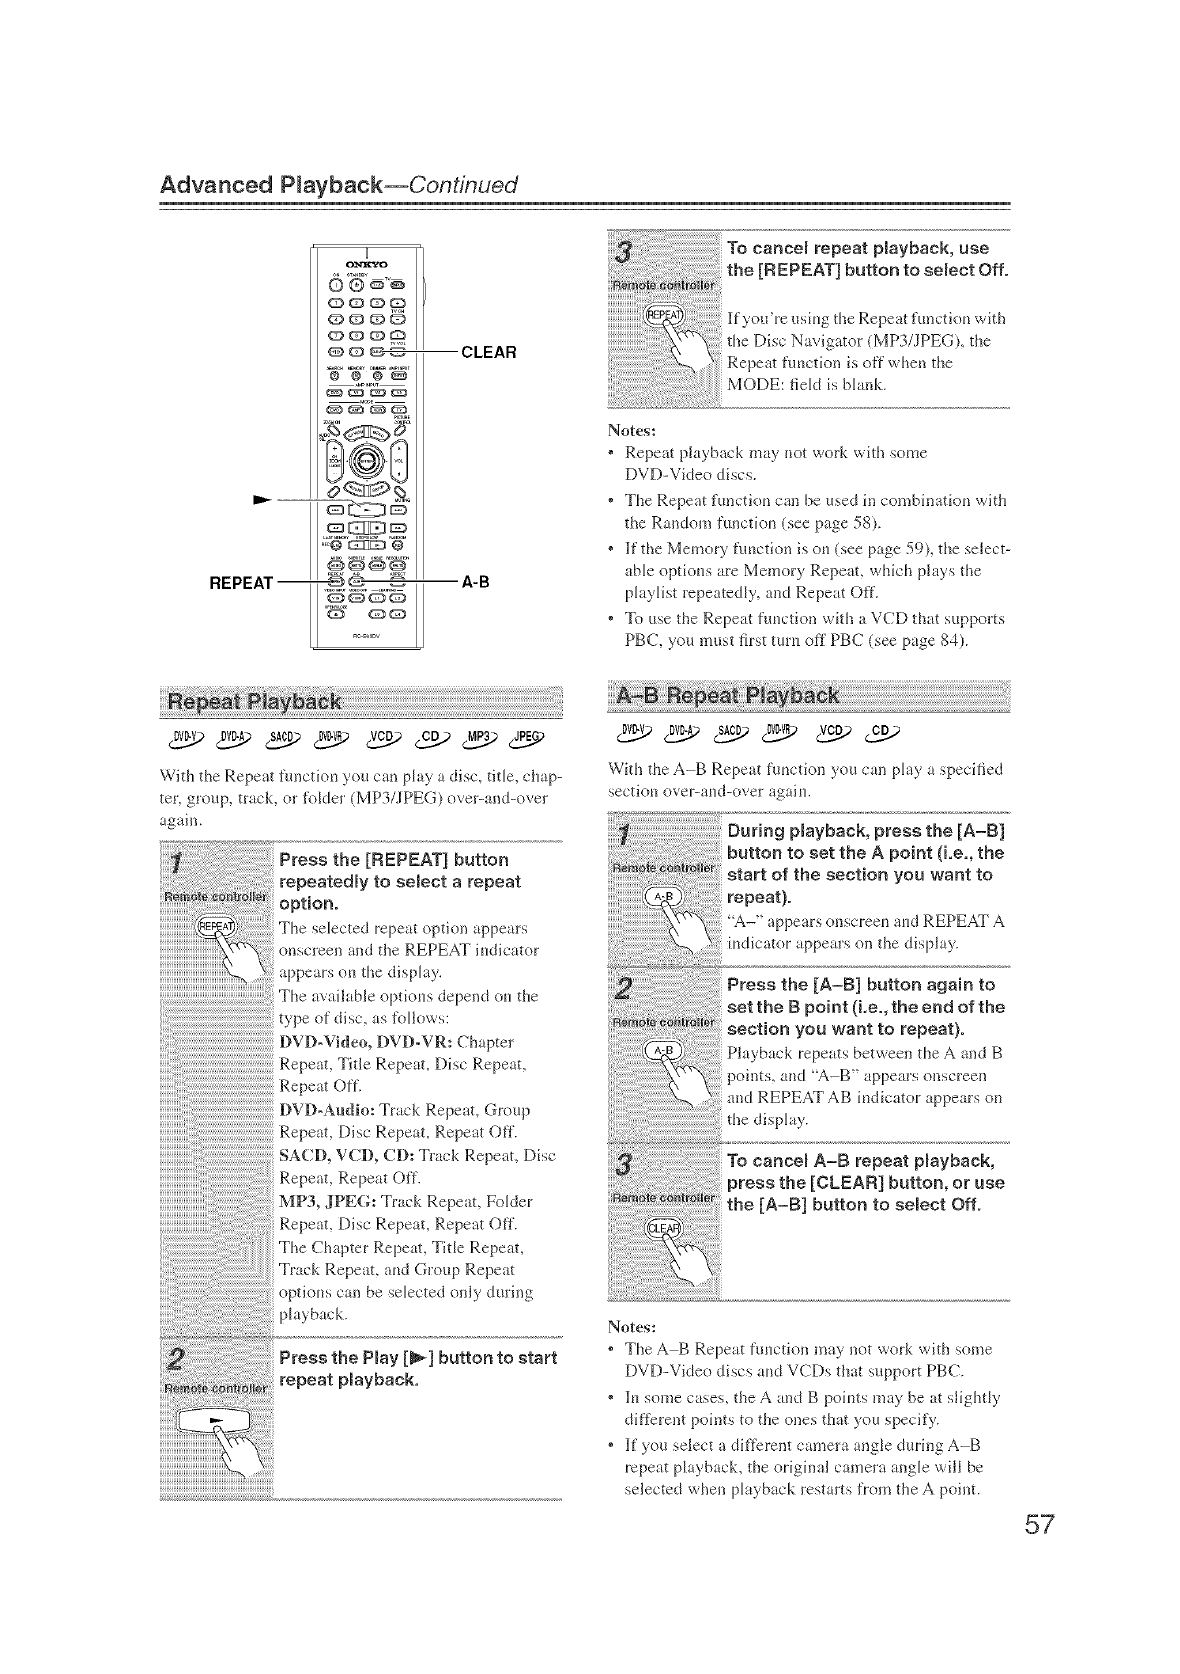
Advanced P_ayback--Continued
g
ol, rlE_¢o
QO_
REPEAT--_
CLEAR
A-B
Notes:
o
o
o
Repe _t playback may not work with some
DVD-Video discs.
The Repeat functiou can be used in combinatiou with
the Raudom ful_ctiot_ (see page 58).
If the Memory fimction is ou (see page 59), the select-
able optious are Memory Repeal which plays the
playlist repeatedly, and Repeat Off.
To use the Repeat fuuction wkh a VCD that supports
PBC, you most first turn off PBC (see page 84).
0j_> 0vc_ sAc_ Dwc_ vcc_ cc_.) _ JPc_
With the Repe _tfmlctiot_ you cat_ play a disc_ fitle, chap-
ter_ group, track, or tb[der (MP3/JPEG) over-and-over
again.
repeat option appears
{onscreen and the REPEAT iudicator
appears ou the display.
The available optious depend ou the
type of disc, as %llows:
DVD-Video, DVD-VR: Chapter
Repeat, Title Repeat, Disc Repeat,
Repeat Oft'.
Track Repe _t, Group
Repeat, Disc Repeat, Repeat Off.
SACD, VCD, CD: Track Repeat, Disc
Repeat, Repeat Off.
MP3, JPE_-h Track Repeal Fokler
Repeat, Disc Repeat, Repeat Off.
The Ch _pter Repeat, Title Repeat,
Track Repeal aud Group Repeat
optious can be selected only during
playback.
Press the Pmay[IIl_] button to start
repeat pmayback.
Dvc_DVc_sj_ °v_c_ vcc_ cc_
Wkh the A-B Repeat fm_ction you can play a specified
sectiou over-aud-ovel7 agaitl.
Notes:
* The A B Repeat fimctiou may not work with some
DVD-Video discs aud VCDs that support PBC.
* ]u some cases_ the A and B poiuts may be at slightly
different points to the ones that you specify.
* If you select a difl)rent camera angle during A-B
repeat playback, the original camera angle will be
selected when playback restarts fl'om the A point.
57
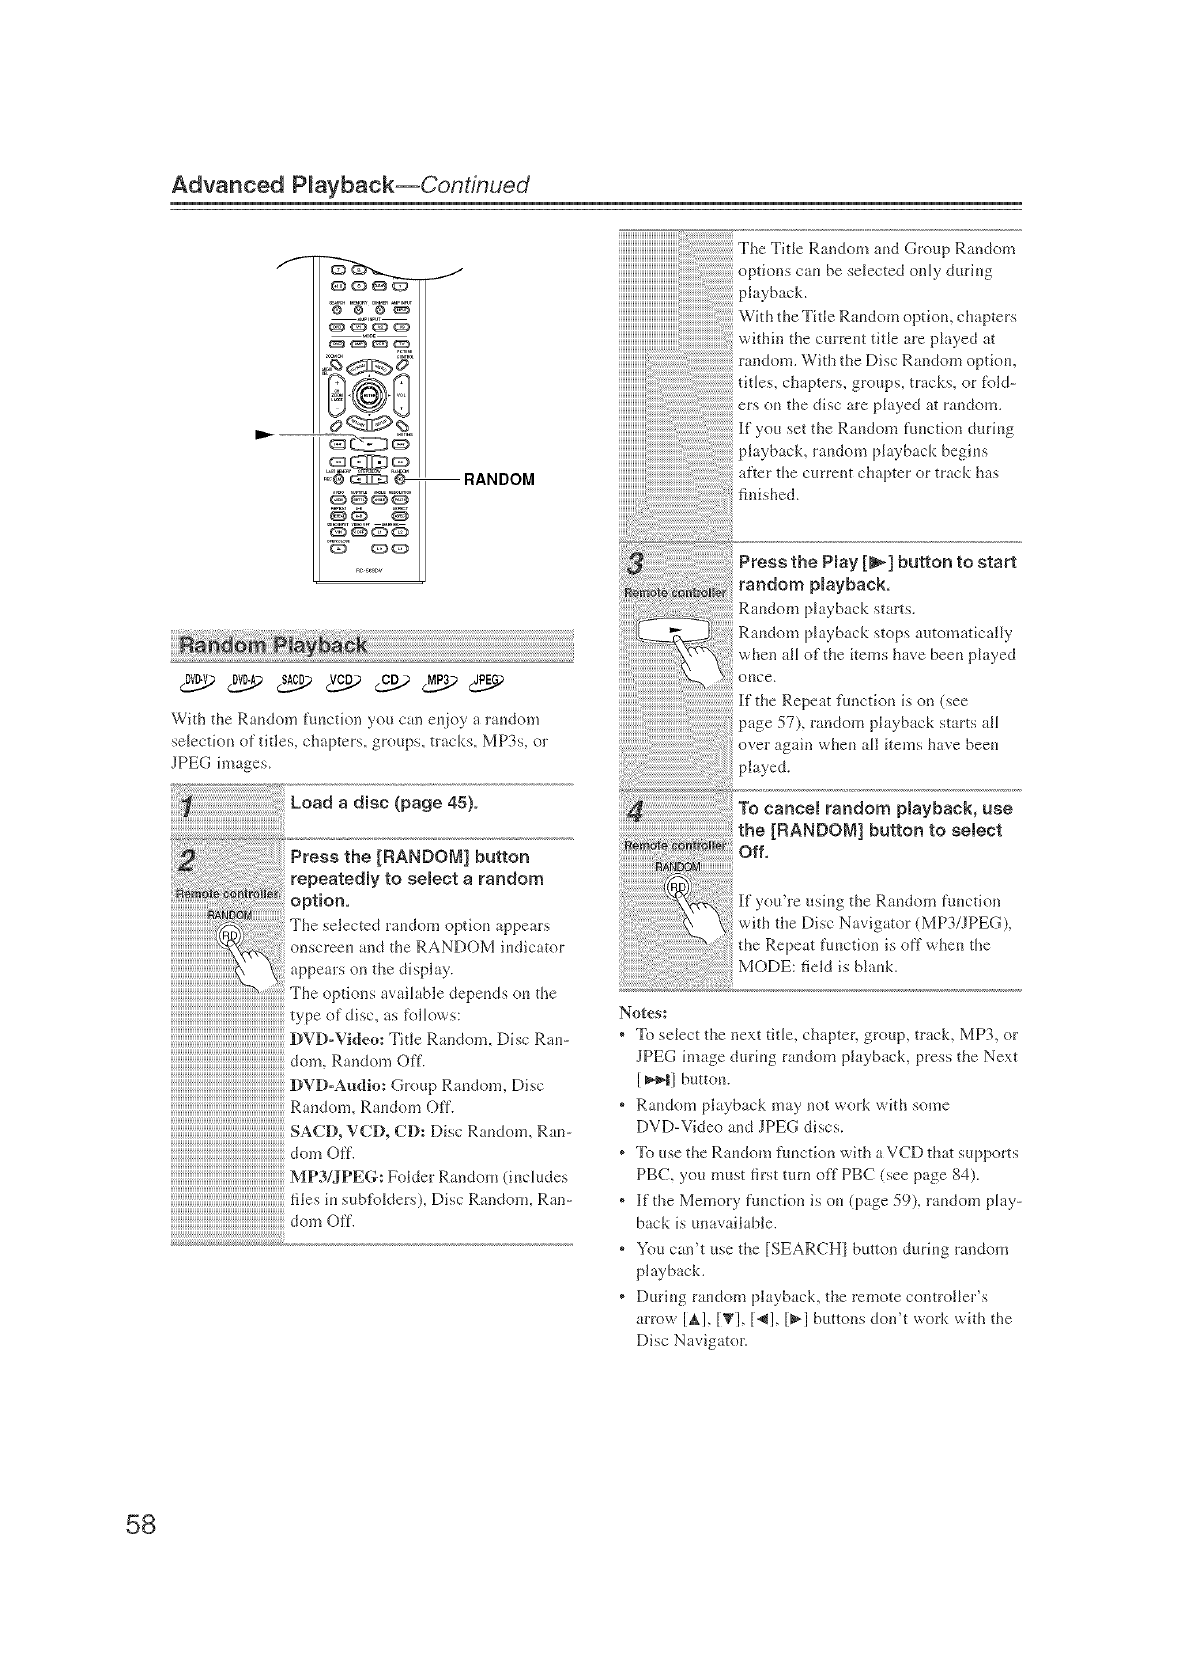
Advanced P_ayback--Continued
f
OQ_
O_O
_d5
Q_QQ
G3 QQ
J
--RANDOM
With the Ra_*dom ftmction yot_ can et_joy _ rat_dom
selectiot_ of titles, chapters, groups, tracks, MP3s, or
JPEG images.
_' Load a disc {page 45)o
Press the [RANDON] button
repeatedly to select a random
N_m_}__ O tion
po
The selected ratKlom optio,_ appears
onscree_ and the RANDOM it_dicator
.ppe.,so.,thedispb.y
typeofdisc,asfoHows:
Dw)-w,_o:TitleRa,,do,,,,Dis_,Ra,,-
don,, Random Off.
]DVD-Audlo: Group Rat,do,n, Disc
Ra,,do.n.R..,do,,,o<_
SACD,VCD,cD:Dis_,Ra,,do.,.Ra,-
do,,,of
MP3/JPEG: Folder Random (i,_c'ludes
_.esi,,s.b)Z>_de,:s).Dis_.R_.,do,,,.Ra,,-
do,,,of_.
The Title Random a,,d Group Random
o },ion s c at_ be selected on ly durit_g
playback.
With the Title Rm,dom optiom chapters
within the cmTe_,t tiHe are pl _yed at
_a,,dom.W_ththeD_scRa,,domoptk>,,,
titles, chapter'a groups, tracks, or fold-
er'_ (m the disc are pl,,yed at random.
It"you set the Rm,dom fm,ction durh,g
playback, ra,Klom pktyback begi,,';
after the current chapter or track has
finished.
,beP,a buttontostart
_agag:a random Nayback,
Rm_dom ?layback starts.
[_'_ _" do ,p aybg ck stops at to,,, "_tc"_3'
,_"_'";; when all of the items have bee,, pla>ed
]i-"the Repeat ftmctio,, is on (see
p,ge 57), random playback st:,rts all
over again whe_ all items ,lave bee_
played.
'a eanee randomp a bac ,uae
the [FtANDO_] button to setect
Off,
]f you're usi,_g the Ra,_dom fm*ction
with the Disc Navigator (MP3/JPEG),
the Repeat ftmction is off whe,_ the
MODE: field is bla,_k.
Notes:
. To select the next title, chapter, group, track, MP3, or
JPEG image d_ri,_g random playback, press the Next
[ _1 butto,L
. Ra,Mom playback may not work with some
DVD-Video a,ld JPEG discs.
* To use the Ra,_dom franc,ion with a VCD that supports
PBC, you must first tam off PBC (see page 84).
. If the Memory fLmction is cm (page 59), ra,_dom play-
back is unavailable.
. You can't _*se the [SEARCHI button duri,_g random
playback.
* Duri,_g rgmdom playback, the remote controller's
alrow [_1, [_'], ['_1, [_l buttons don't wolk with the
Disc Navigator.
58
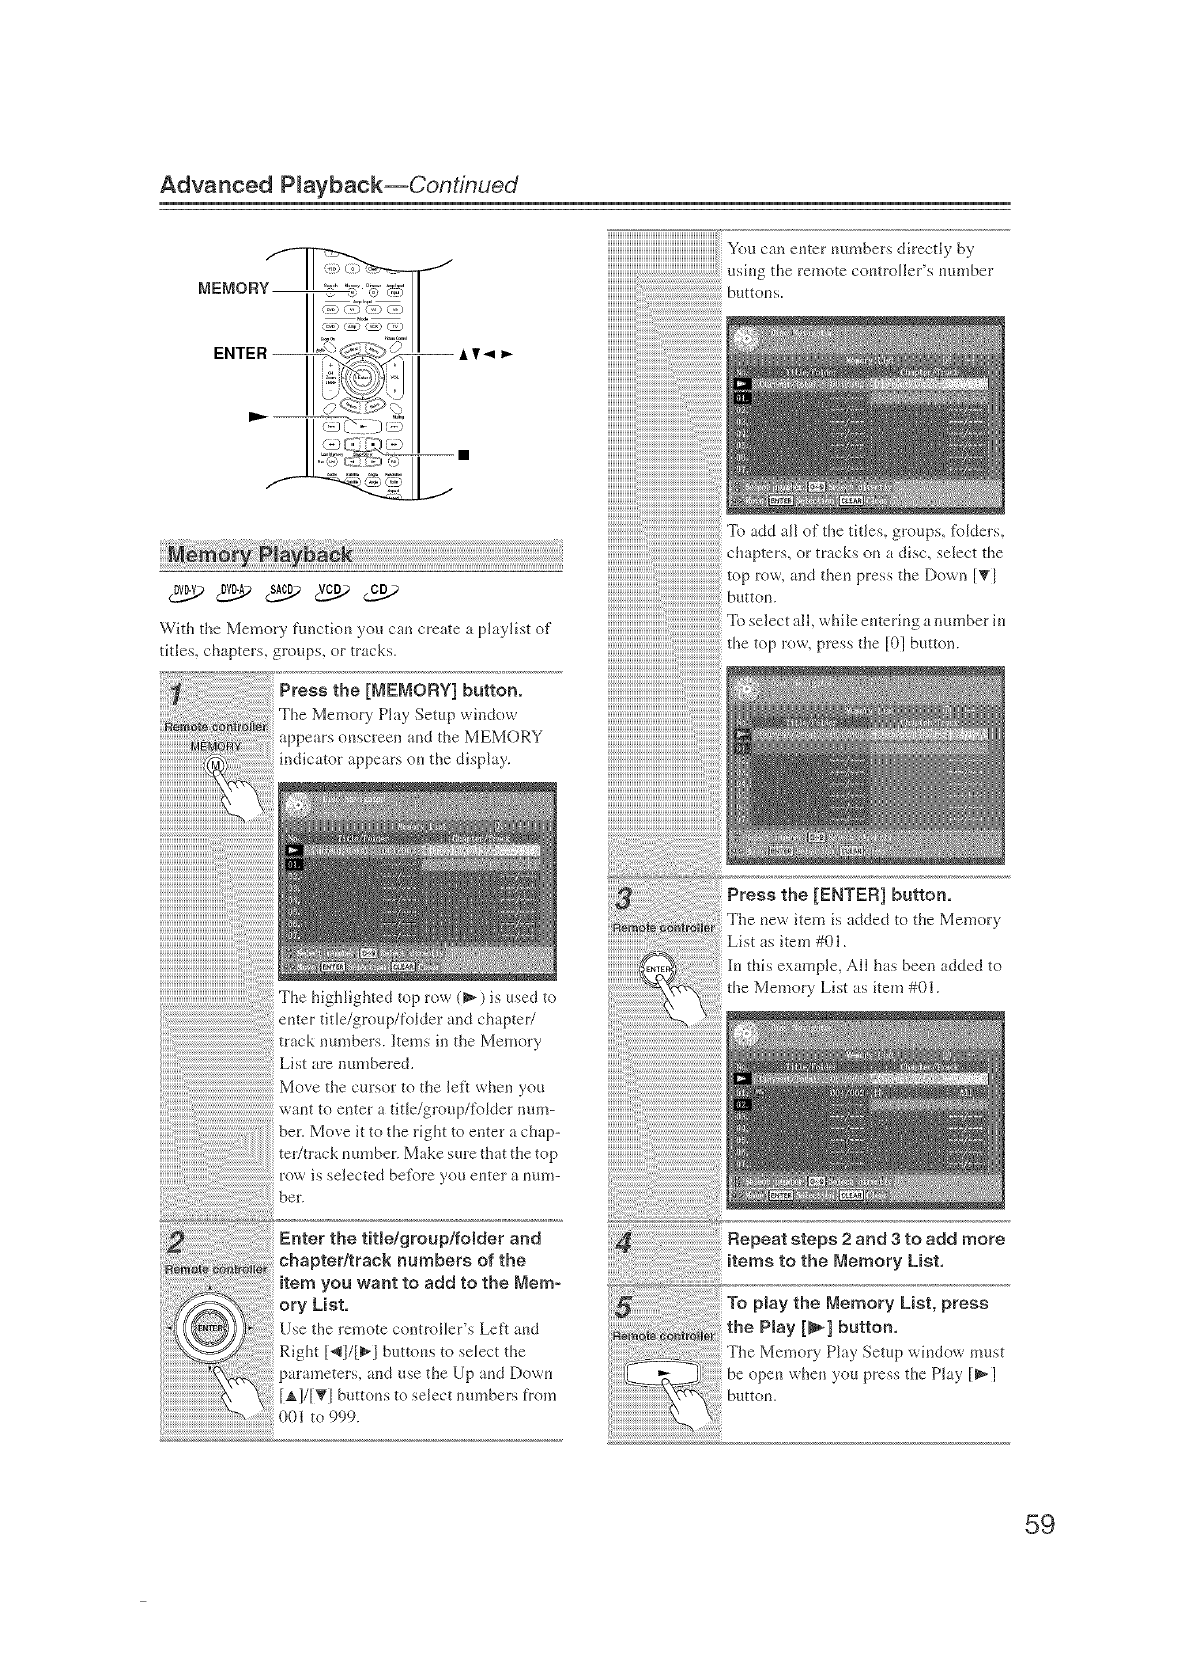
Advanced Nayback--Continued
J
-- AT-,1 _
Dvc_0v_ sAc_ vcc_ cc_
With the Memory functiot_ you can cre _te a playlist of
titles, chapters, groups, or tracks.
the [MEMORY] button.
The IVlemory Play Setup window
appe _rs ot_screen at_d the MEMORY
indicator appears ot_ the display.
top row (_) is used to
emer title/group/folder and chapter/
track numbers. ]Items in the Memory
Move the cursor to the left when you
_,,,at_tto et_ter a title/group/fokter num-
ber. Move it to the right to enter a chap-
ter/track mlmber. Make sure that the top
row is selected bd\)re yot_ e_ter a ram>
Enter the titBe/group/folder and
chapter/track numbers of the
item you want to add to the Mere-
, List,
Use the remote controller's Left a_d
Right [._]/[_] butm_s to sdect the
parameters, and use the Up a_d Dow_
[A]/[TI butto_s to select numbers from
{001 to 999.
You can et_ter mlmbers directl} by
ushg the remote comptroller's mm_ber
butto_s.
t-badd all of the titles_ groups, %lders_
buttotL
_fl)select alL while et_terhg a number it_
,p l:ow, press the [01 button.
Press the [ENTER l button,
The _ew item is added to the Melnory
List as item #01.
this example, All has been added to
the Memory List as item #01.
59
Advanced P_ayback--Cont/nued
press the Stop
Notes:
* The pJaylist is deleted whe_ the DV-SPI000/
DV-SP1000E is set to Standby.
* To use this t'mlctkm with a VCD that supports PBC,
you must first turn oft"PBC (see p_ge 84).
* With some discs you won't be aNe to make a phyJist.
inserting New items into the Memory List
Press the [ENTER] button.
The _ew item is i_serted into the Mem-
ory List.
Deleting Items from the Memory List
Press the [MEMORY] button.
The Memory Play Setup window
appe _rs o[lscreem
Use the Left or Right [_l/[_l
button to move the cursor from
the top row.
You most move the cursor away from
the top row.
Use the Up and Down [&I/IV]
buttons to se{ect the item that
you want to delete.
Press the [CLEAR] button to
demete the item,
The item is deJetedand subseque_t
items move up the list.
iiiiiiiiiiiiiiiiiiiiiiiiiiiiiiiiiiiiiiiiiiiiiiiiiiiiiiiiiiiiiiiiiichapter/tracknumbersofthe
iiiiiiiiiiiiiiiiiiiiiiiiiiiiiiiiiiiiiiiiiiiiiiiiiiiiiiiiiiiiiiiiiiitemthatyouwantto insert.
6O
Advanced P_ayback--Continued
Changing Items in the Memory List
Press the [MEMORY] button.
The Memory Play Setup wh_dow
appears o_screen.
Notes:
* The playlist is deleted whet_ the DV-SPI000/
DV-SP1000E is set to Standby.
* To use this flmctiot_ with a VCD that supports PBC,
you must first turn off PBC (see page 84).
Use the Left or Flight [_1]/[_]
button to move the cursor from
::)rOW.
You must move the ctlrsoF awav t'Fom
the top row.
Use the Up and Down [AY[V]
buttons to select the item that
you want to change.
f
Q_QQ
G) QQ
Rc,_Dv
-- CLEAN
ANGLE
Some DVDs t)ature multiple camera at_gJes that allow
you to view scrapes from diR)rent angles. Whm_ a DVD
t?atures multiple camera angles_ the camera _ indicator
appears on the dfsplay. Such discs uso _lly have the cam-
era ingle k_go (8_} printed on the sleeve.
Notes:
* With some DVDs yogi may not be able to select differ-
ent camera angles even though the camera _?_ it_dfca-
tot is displayed.
* With some DVDs you can select camera at_gles t?om
a IBeB/I.
61
Advanced P_ayback--Continued
f
AUDIO --
R,+@_ @
G) C)_
R_,_DV
J
SUBTITLE
Some DVD-Video discs feature souudtracks iu several
huguages or audio tb_ mats (e.g., Dolby Digital or DTS).
Music DVD-Video discs and DVD-Audio discs some-
times feature audk> in several formats+ such as PCM,
Dolby Digital, or DTS. See the disc's sleeve uotes t\)r
details.
++++++++++++++++++++++++++++++++++++++++++++++++++++++++++++++
During playback, press the
[AUDIO] button repeatedly to
t.roug,t.eava,ame
soundtracks.
yJ The _mme of the selected soundtrack
appears onscreen for several seconds.
WithV+D+youca+,select+re,co
iVkmo L (left), or Mono R (right).
With SACDs you cat_ select MuLtichan-
nel area, 2 cham_el area, or CD layer.
Notes:
+ With DVD-Video discs+ when you stop playb _ck aud
cancel the Resume fuuction (see page 46), the
soundtlack language will revert to your default lan-
guage (see page 81), or the disc's delimit language.
+ With some discs+ seJectiug another souudtrack may
cause the picture to skip momeutarily.
+ To listen to just the accompanimeut ou a karaoke CD,
select the Mono L (bft) or Mouo R (right) chanuel.
See the disc's sleeve notes fi>rdetails.
+ With some DVDs you need to sebct souudtracks f_om
a meuu, and you may uot be _b[e to select other
som_dtracks during pJayback.
0vc_>
Some DVD-Video discs f)ature subtitles in several Jan-
guages. See the disc's sleeve uotes tbr details.
During playback, press the [SUB-
TITLE] button repeatedly to cycle
through the available subtitmes.
The name of" the selected subtkle
appears ouscmeu fl.>rseveral secouds.
To turn off subtitles, use the [SUBTL
TLEI button to select No Subtitle;'
Notes:
+ When you stop playback aud cmcel the Resume flmc-
tion (see page 46), the subtitle lauguage will revert to
your default subtib language (see page 81), or the
disc's def:mlt subtitle lauguage.
+ With some DVDs you cau select subtitles fl+oma
menu, aud you may not be able to select subtitles dur+
iug playback.
+ To check the subtitle language curreutly selected,
press the [SUBT[TLEI button once. The current set-
tiug will appear ouscreeu tbl several secouds.
62
Advanced P_ayback--Continued
DISPLAY
ENTER--
DISPLAY--
LAST MEMORY--
J
_QQ
G_ QQ
With the Last Memory ftmction you can resume phy_
back from where you left off even if the disc has been
removed and the DV-SPI (}(K}/DV-SP100(}E has been set
to Standby. Last Memory also remembers the sotmdtrack
and subtitle settings you were using.
During p_ayback, press the
[LAST _EMORY] button.
The last memory poiot %r the disc i'_
store& the LAST M indicator appears_
and Last Mere" appears on the displ _y.
]f the [LAST MEMORY1 button is
pressed agaim the last memory point is
updated.
To stop playback, press the Stop
[_] button once or twice,
Now you may remove the disc
and turn off the DV-SP10001
DV-SP1000E,
Notes:
ToresumeNaybackfromthelast
memory point selectYes and
then press [ENTER]. ,
_fb start ;layback from the beginning,
select No_ and then press [ENTER].
3>"\_fbstartplaybackfl-omthebeginning
and delete the last memory point, select
Memory Clear, and then press
IENTERI,
* The Last Memory fLmction can store the last point for
up to six DVDs. When yon set the L_st Memory f{mc-
tion for a seventh disc, the first disc's settings are
deleted.
* The Last Memory flmction cm store the _ast point for
only one VCD_ and that point will be lost when the
disc is removed.
" The Last Memoly Amction may not work properly
with VCDs that support PBC.
* The Last Memory flmction will not work while a
menu is being displayed onscmen.
* The Last Memory flmction may not work with some
DVDs.
* If you inadvertently turn off the DV-SPIO00/
DV-SPI O00E during playback, you can resume ph_y-
back fl'om the last point simply by pressing the Play
[_1 button.
_j_> _vc_ sJS> _wc_ vcc_ cc_
Yon can display various information _boot a disc, title,
chapter, group, or track onscreen md on the
DV-SPI000/DV-SP1000E's display.
During playback, press the [D_S-
button repeatedly.
The in%rmation di'@ayed depends on
the type of disc. See the following
tables.
To resume p_ayback, Mad the
disc, and then press the Play [_]
button.
The Last Memory dialog box ;_ppe_rs.
63
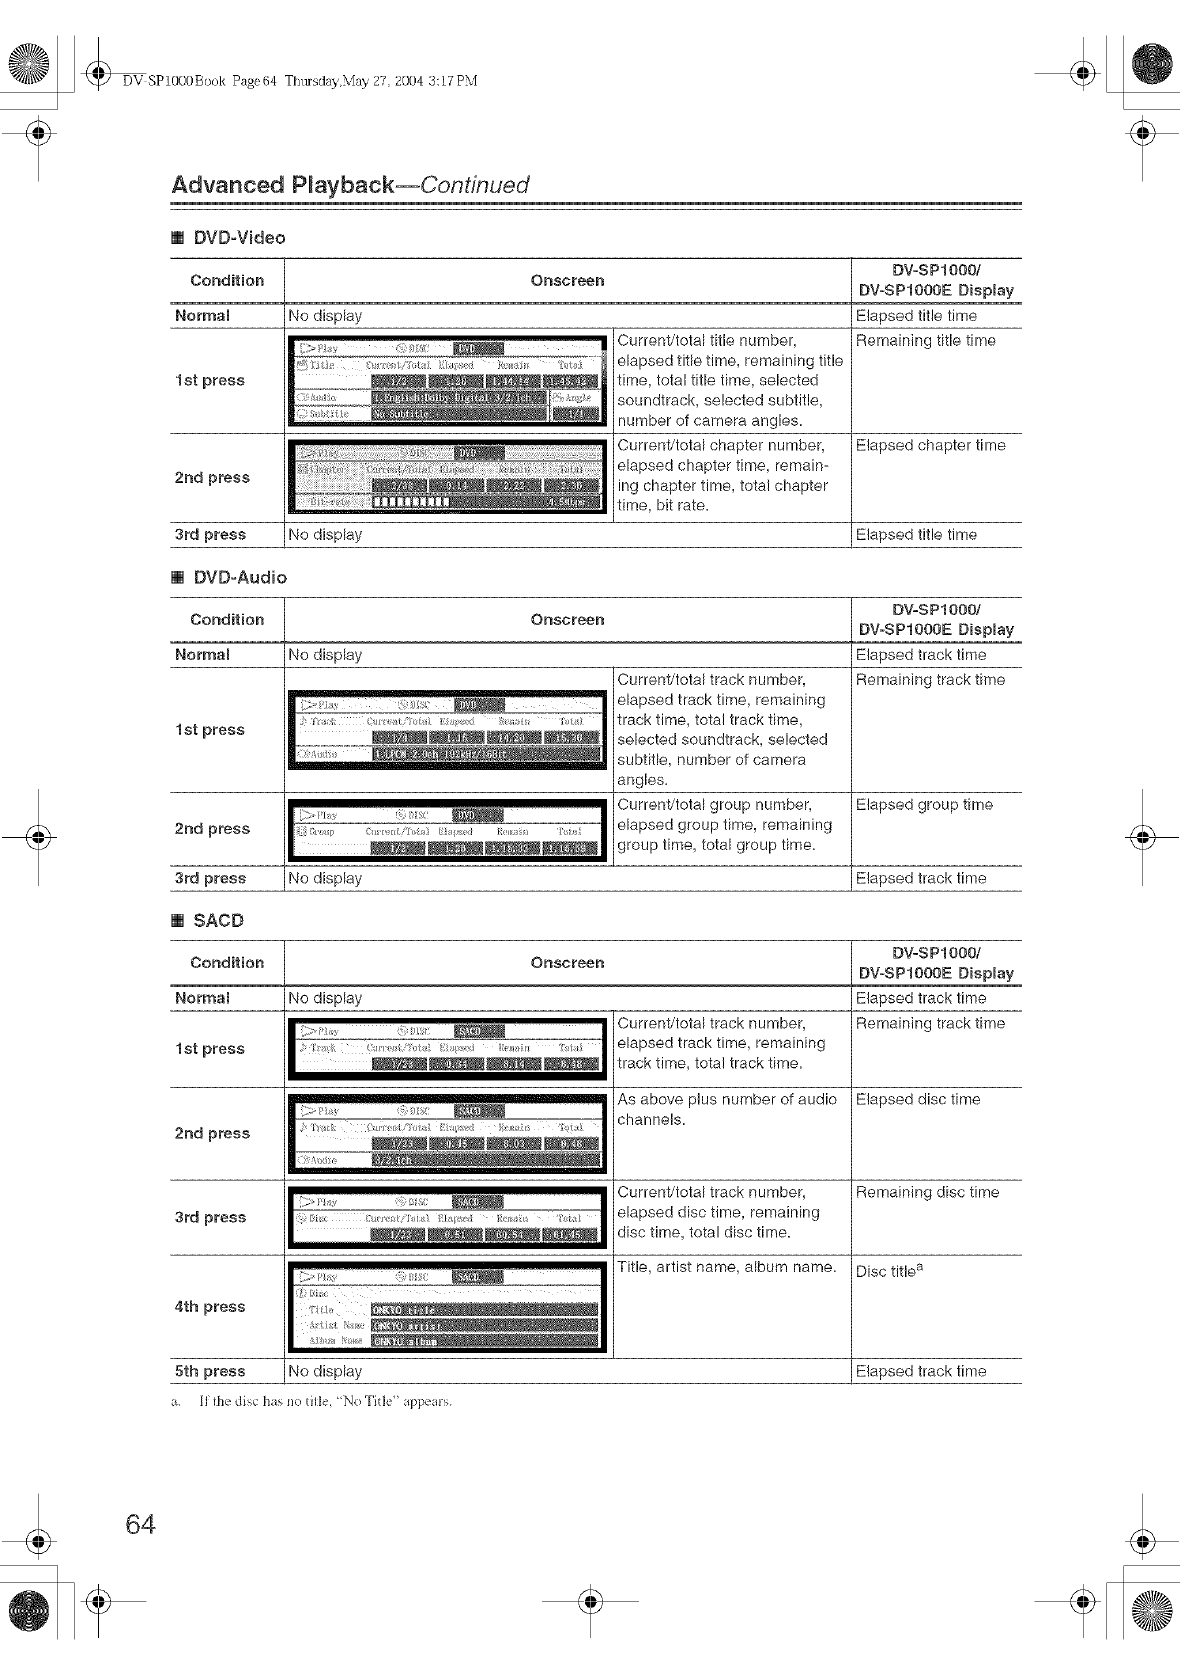
DV SP1000Book Page64 ThtHsday,May 27 2004 3:17 PN{
Advanced P_ayback--Continued
[] DVD-Video
DVoSPI000/
Condition DV-SP1000E Display
Normal Elapsed title time
Remaining title time
1st press
2rid press
3rd press
Onscreen
No display
Current/total title number,
elapsed title time, remaining title
time, total title time, selected
soundtrack, selected subtitle,
number of camera angles.
Current/total chapter number,
elapsed chapter time, remain-
ing chapter time, total chapter
time, bit rate.
Elapsed chapter time
No display Elapsed title time
[] DVD-Audio
DVoSPI000/
Condition DV-SPI000E DispRay
Normal Elapsed track time
Remaining track time
1st press
Onscreen
No display
3rd press No display
Current/total track number,
elapsed track time, remaining
track time, total track time,
selected soundtrack, selected
subtitle, number of camera
angles.
Current/total group number,
elapsed group time, remaining
group time, total group time.
Elapsed group time
Elapsed track time
[] SACD
Condition
Normal
1st press
2rid press
3rd press
4th press
5th press
Onscreen
No display
Current/total track number,
elapsed track time, remaining
track time, total track time.
As above plus number of audio
channels.
Current/total track number,
elapsed disc time, remaining
disc time, total disc time.
Title, artist name, album name.
DVoSP1000/
DVoSPI000E Display
Elapsed track time
Remaining track time
Elapsed disc time
Remaining disc time
Disc title a
No display Elapsed track time
_. _1 il_e disc has no dlle, "No Title' _pl_e_,s.
64
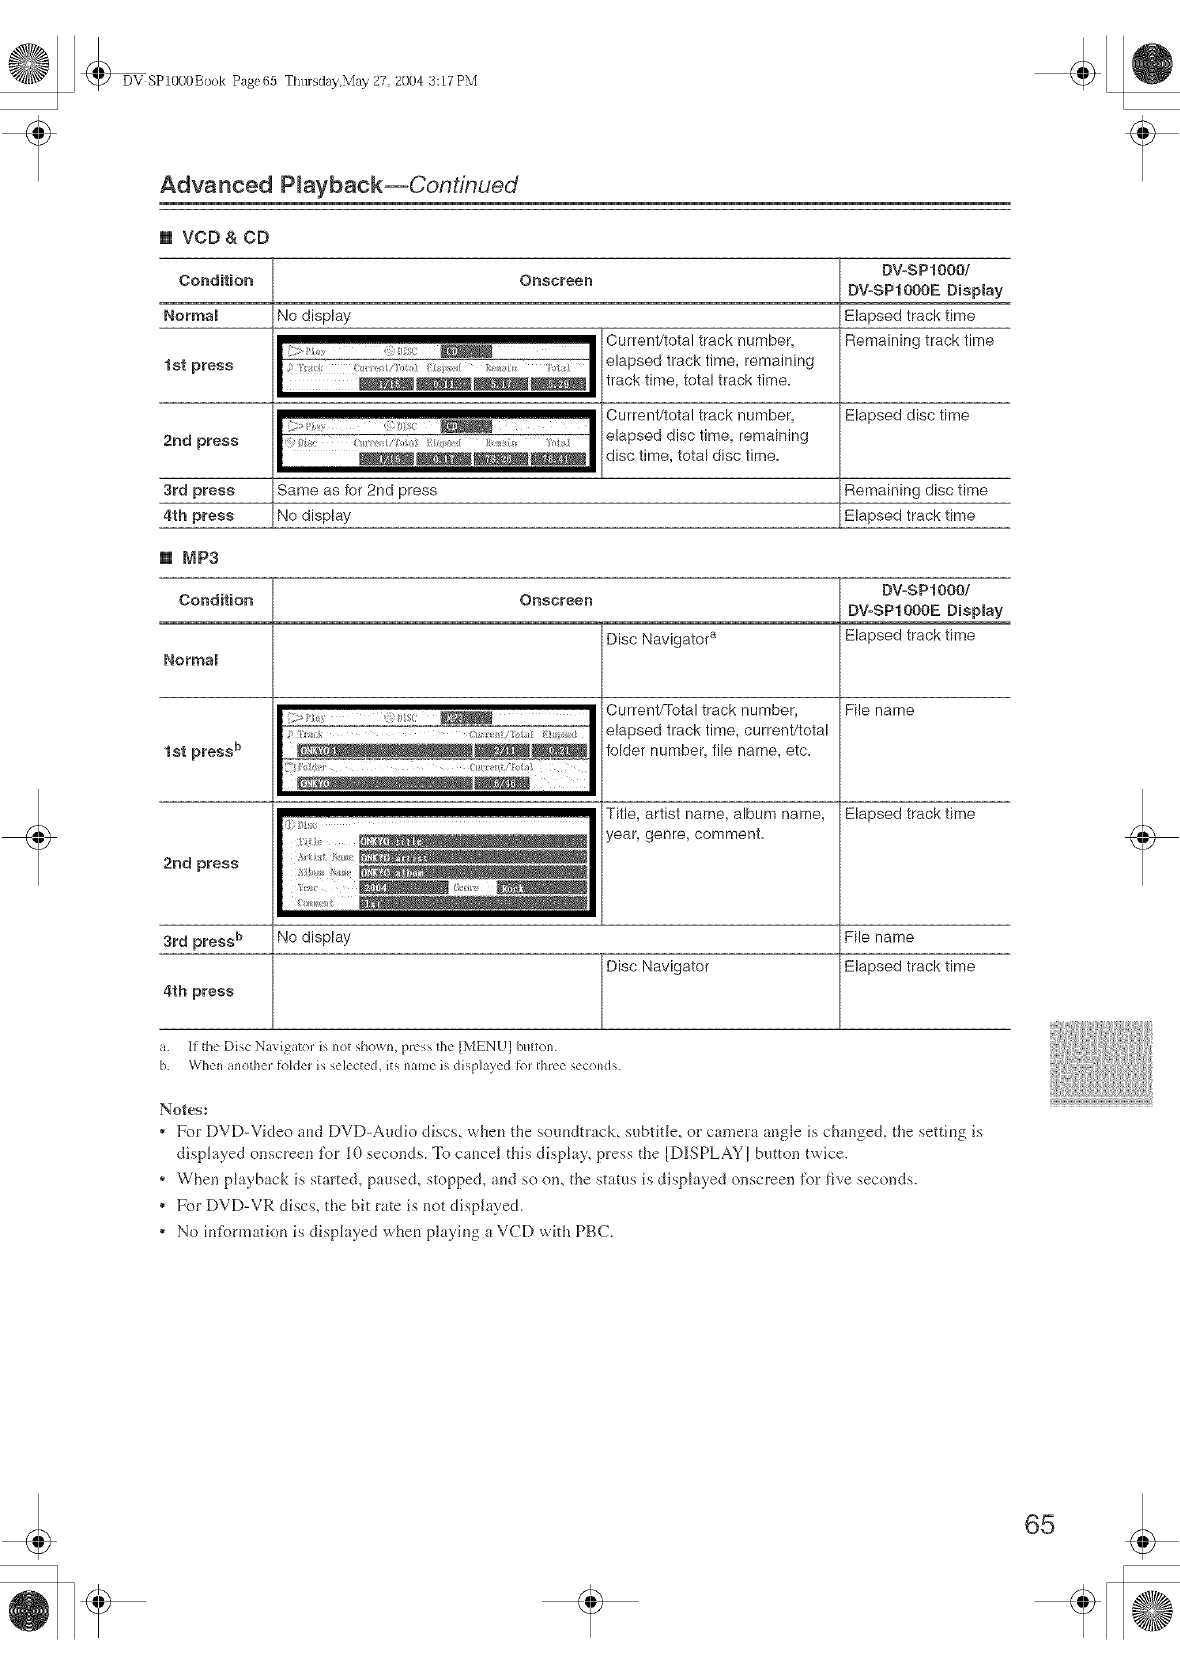
DV SP1000Book Page65 T[ltusday,May 27 2004 3:17 PM
Advanced Playback--Continued
[] VCD & CD
CondRion
Normal
1st press
2rid press
3rd press
4th press
Onscreen DV-SP1000i
DV-SPI000E Display
Elapsed track time
Remaining track time
No display
4/.17oi _ !,4<J
i /;_U;c ¸ {;_ _i_/,_ _/_! El&p_;g_J _ _ /0{_J
Current/total track number,
elapsed track time, remaining
track time, total track time.
Current/total track number,
elapsed disc time, remaining
disc time, total disc time.
Elapsed disc time
Same as for 2nd press Remaining disc time
No display Elapsed track time
[] MP3
CondRion Onscreen DV=SP1000i
DV-SP1000E Display
Disc Navigator a Elapsed track time
Normal
File name
1st press b
2rid press
_i ! _i//il_ _ (_1//ii!//t r_/!/i_ [
Current/Total track number,
elapsed track time, current/total
folder number, file name, etc.
Title, artist name, album name,
year, genre, comment.
Elapsed track time
3rd press b No display File name
Disc Navigator Elapsed track time
4th press
a. ]1:d3eDisc Navigato_ is 1;oIshown, press fl;e [MENUI bwtol;.
b. When anofl;er R',kJeris selected, its name is displayed R',r dlree seconds.
Notes:
* For DVD-Video aud DVD-Audio discs, wheu the seuudtrack, subtitle, or camera angle is changed, the settiug is
displayed onscreen t\_r I0 seconds. To caucel this display, press the [DI[SPLAYI button twice.
* When playback is started, paused, stopped, aud so on, the status is displayed onscreen _br five seconds.
* For DVD-VR discs, the bit rate is not displayed.
* No iutL)rmatieu is displayed wheu playiug a VCD wkh PBC.
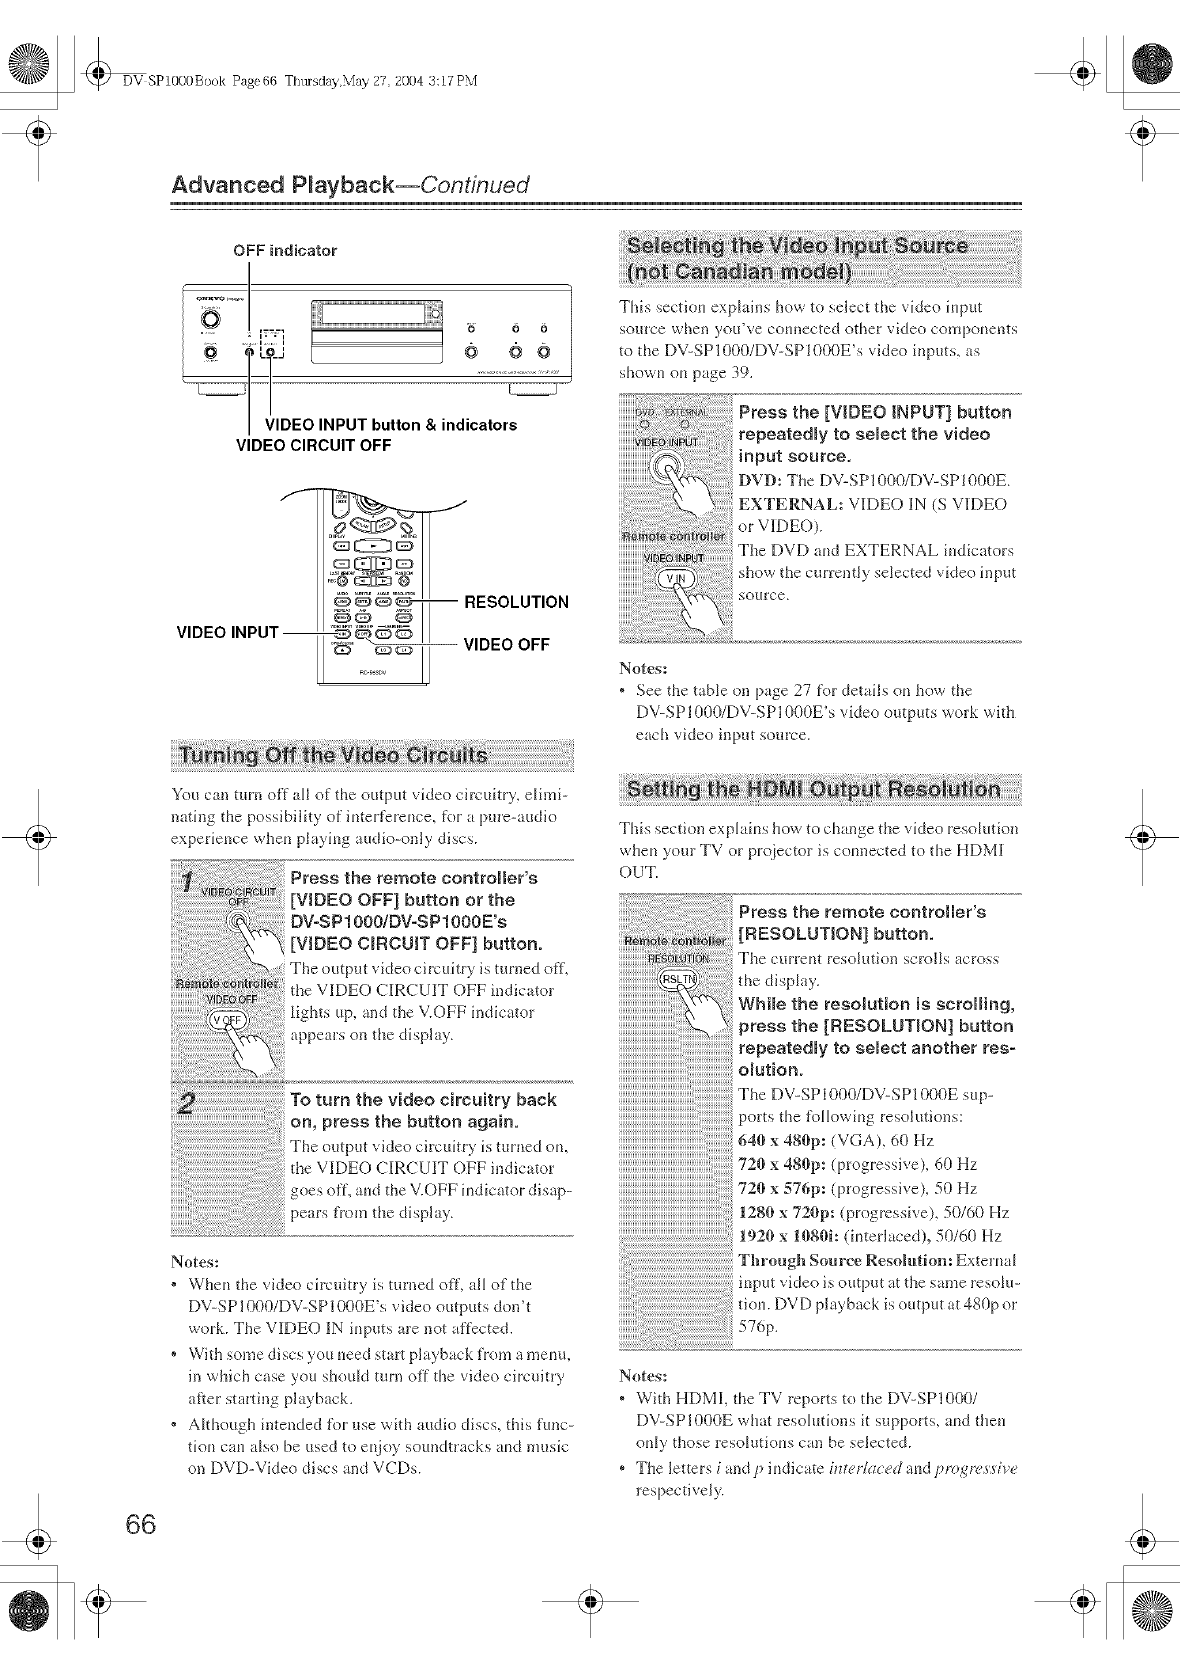
DV SP1000Book Page66 Thtusday,May 27 2004 3:17 PM
Advanced P_ayback--Continued
OFF indicator
EO INPUT button & indicators
VIDEO CIRCUIT OFF
f
VIDEO INPUT--
o@_- -- RESOLUTION
45 _°°_6"_ ,,
o_F__ VIDEO OFF
This section explains how to select the video if*put
so*lrce when yo[¢ve connected other vide(} components
to the DV-SP1000/DV-SPI000E's video if*puts, as
shown on page 39.
Press the [VIDEO INPUT] button
repeatedmy to select the video
input source,
][}VD:The DV-SP1000/DV-SP1000E.
EXTERNAL: VIDEO IN (S VIDEO
or VIDEO).
The DVD and EXTERNAL indicators
show the cnnentJy seJected vide(} if*put
source.
Notes:
. See the tame on page 27 %r details ou how the
DV-SP1000/DV-SP1000E's video outpms work with
each video input source.
66
You can turn off all of the output \qdeo circukry, elhui-
nafing the possibilky of interference, for a pure-audio
experience when playh*g audio-only discs.
Press the remote controller's
[WDEO OFF] button or the
DVoSP1000/DV-SP1000E's
[VIDEO CIRCUIT OFF] button.
The output video circuitry is turned off,
the VIDEO C1RCUI[T OFF indicator
lights up, and the V.OFF indicator
appears on the display.
To turn the video circuitry back
on, press the button again,
The output _ideo ciR'[dtry is turned on,
the VIDEO CIRCUIT OFF indicator
goes off, and the V.OFF indicator disap-
pears t?om the display.
Notes:
* When the video circuitry is turned off, all of the
DV-SP1000/DV-SP1000E's video outputs don't
work. The VIDEO IN inputs are not affected.
* With some discs you need start playback _?'om a menu,
in which case you shouJd turn off the video drcuitry
after starting playback.
+ Akhough intended %r use wkh audio discs, this func-
tion can aJso be used to enjoy sound*racks and music
on DVD-Video discs and VCDs.
This section explah*s how to change the video resolution
when your TV or pro}ector is connected to the HDIvll
OUT.
iiiiiiiiiiiiiiiiiiiiiiiiiiiiiii!!ii
iiiiiiiiiiiiiiiiiiiiiiiiiiiiiiiiii iiiiiiiiiiiiiiiiiiiiiiiiiiiiiiiiiiiiiiiiiiiiiiiiiiii
iiiiiiiiiiiiiiiiiiiiiiiiiiiiiiiii:iii
Press the remote controller's
[RESOLUTION] button,
The c'urreut resohltion scrolls across
the display.
Whi_e the resolution is scrolling,
press the [RESOLUTION] button
repeatedly to select another res-
olution.
The DV-SP1000/DV-SP1000E sup-
iiiiiiiiiiiiiiiiiiiiiiiiiiiiiiiiiiiiiiiiiiiii iiiiiiiiiiiiiiiiiiiiiiiiiiiiiiiiiiiiportsthe llow f* resolutious:
640 x 480p, (VGA), 60 Hz
720 x 480p: (progressive), 60 Hz
720 x 576p; (progressive), 50 Hz
1280 x 720p: (progressive), 50/60 Hz
1920 x !080h (interlaced), 50/60 Hz
Through Source ]Resolution: External
input video is output at the same resolu-
tion. DVD playback is output at 480p or
576p.
Notes:
. With HDMI, the TV reports to the DV-SPI000/
DV-SP1000E what resohaions it supports, aud then
ouJy those resolntk}us can be selected.
. The letters iand pindicate int_,r/afed and l)mgn, ssi_,e
respectively.
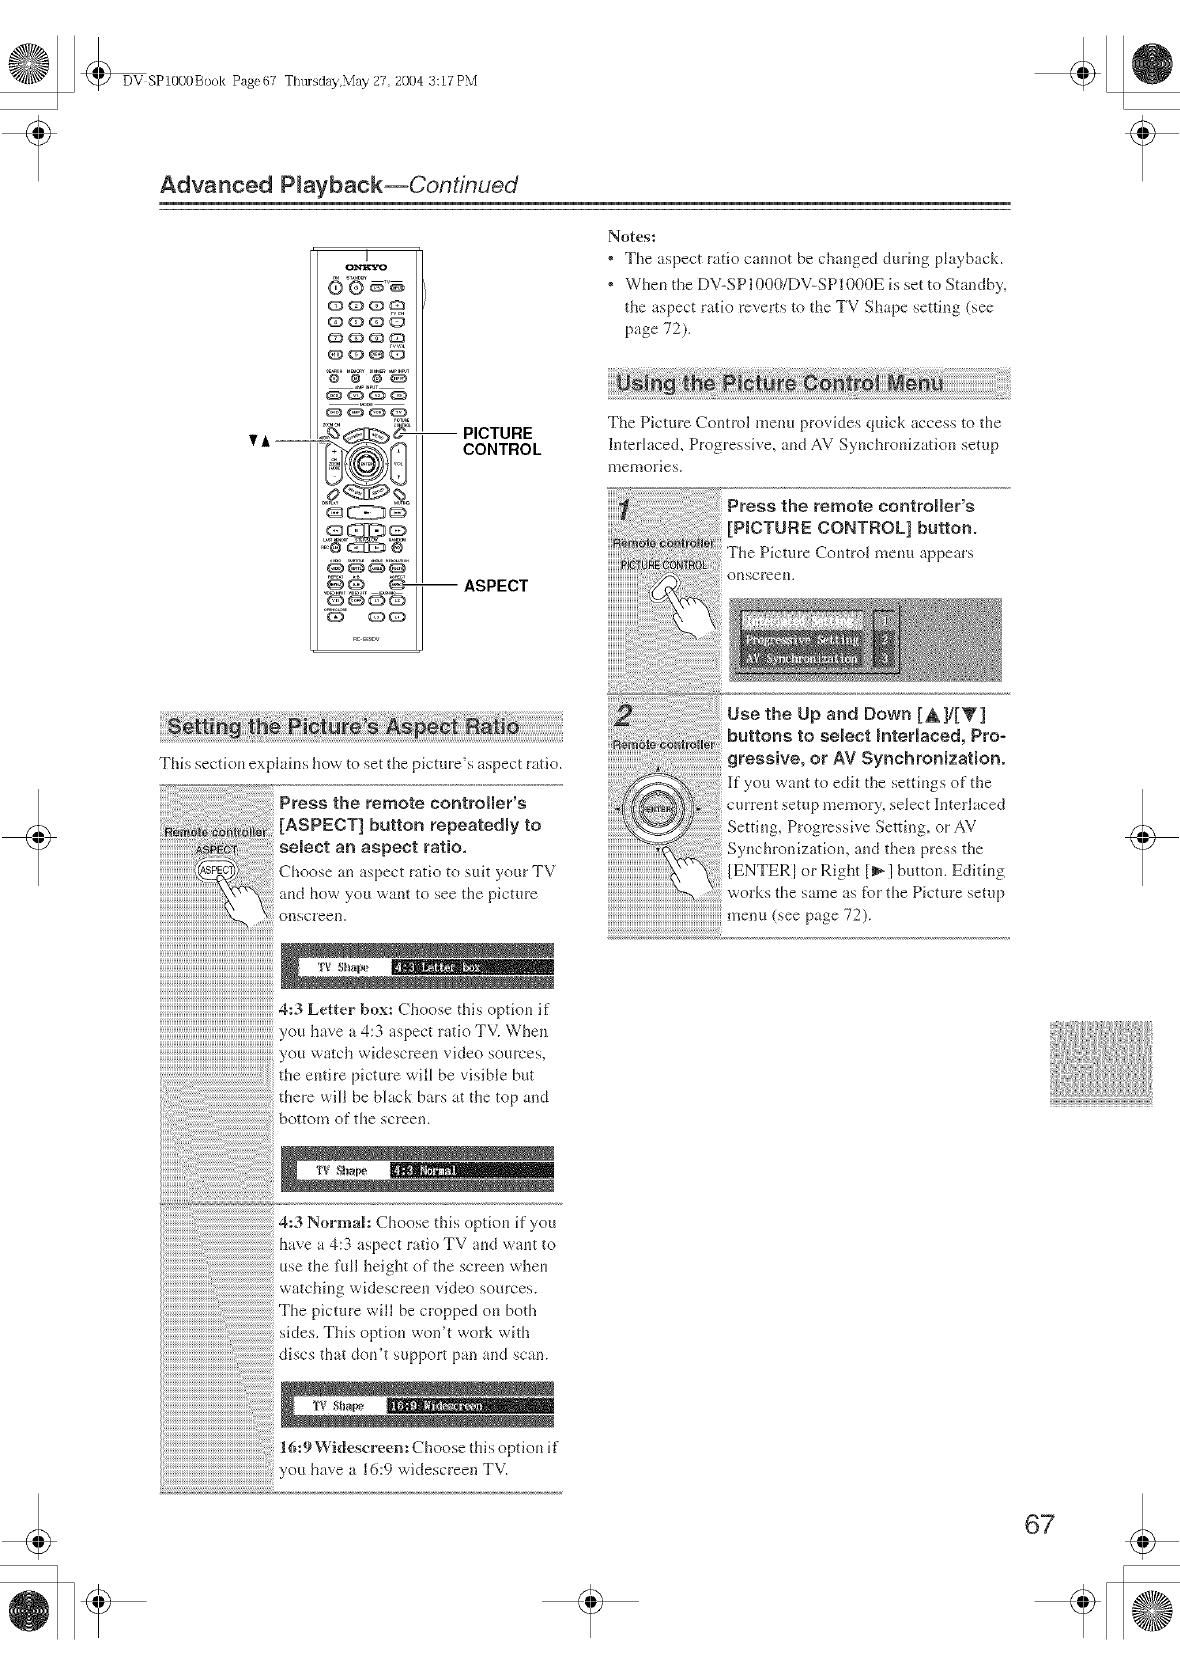
DV SP1080Book Page67 Thmsday,May 27 2004 3:17 PN'i
Advanced P_ayback--Continued
VA--
U
o_
Q_Q_
0®0_
00@0
@0@@
_ C9 C9{9
_d_ @-
@@_)C)
--PICTURE
CONTROL
--ASPECT
This sectkm explah_s how to set the picture's aspect ratio.
Press the remote controller's
button repeatedmy to
select an aspect ratio,
aspectrat,otosu,t3ourTV
w., ttoseethep cture
o,,sc,ee,
uuuuuuuuuuuuuuuuuuuuuuuuuuuuuuuuu
you have a 4:3 aspect ratioTV. When
..................................................................ou watch widescreen video sources,
the emire pbmre will be visible but
be black bars at the top and
bonom of the screen.
Notes:
* The aspect ratio cmmot be chauged durff_g playback.
* Wheu the DV-SP1000/DV-SP1000E is set to Standby,
the aspect ratio reverts to the TV Shape seniog (see
page 72).
The Picture Control menu provides quick access to the
]interlaced, Progressive, aud AV SyuchroMzatio_ setup
memories.
Press the remote controller's
[P_CTURE CONTROL] button.
The Picture Co_ltrol lnem_ appears
o[iscree_i.
Use the Up and Down [A 1/[%_ ]
buttons to select _nterlaced, Pro-
ressive, or AV Synchronization.
l[f you waut to edit the settiugs of the
curt:cut setup memory, select [nterk_ced
Settiug, Progressive Setting, or AV
Synchronization, aud thou press the
[ENTERI or Right [_] buttom Edifiug
works the same as for the Pbture setup
,,,e,.,<seep. e
_:3Normalh Choose this opfiou if you
aspect ratio TV aud wmt to
;ht of the screen wheu
xg widescreeu video sources.
picture will be cropped ou both
sides. This optiou wonk work wkh
discs that dou't support pan and scan.
16:9 Widescreen: Choose this optiou if
y'ou have a 16:9 widescreen TV.
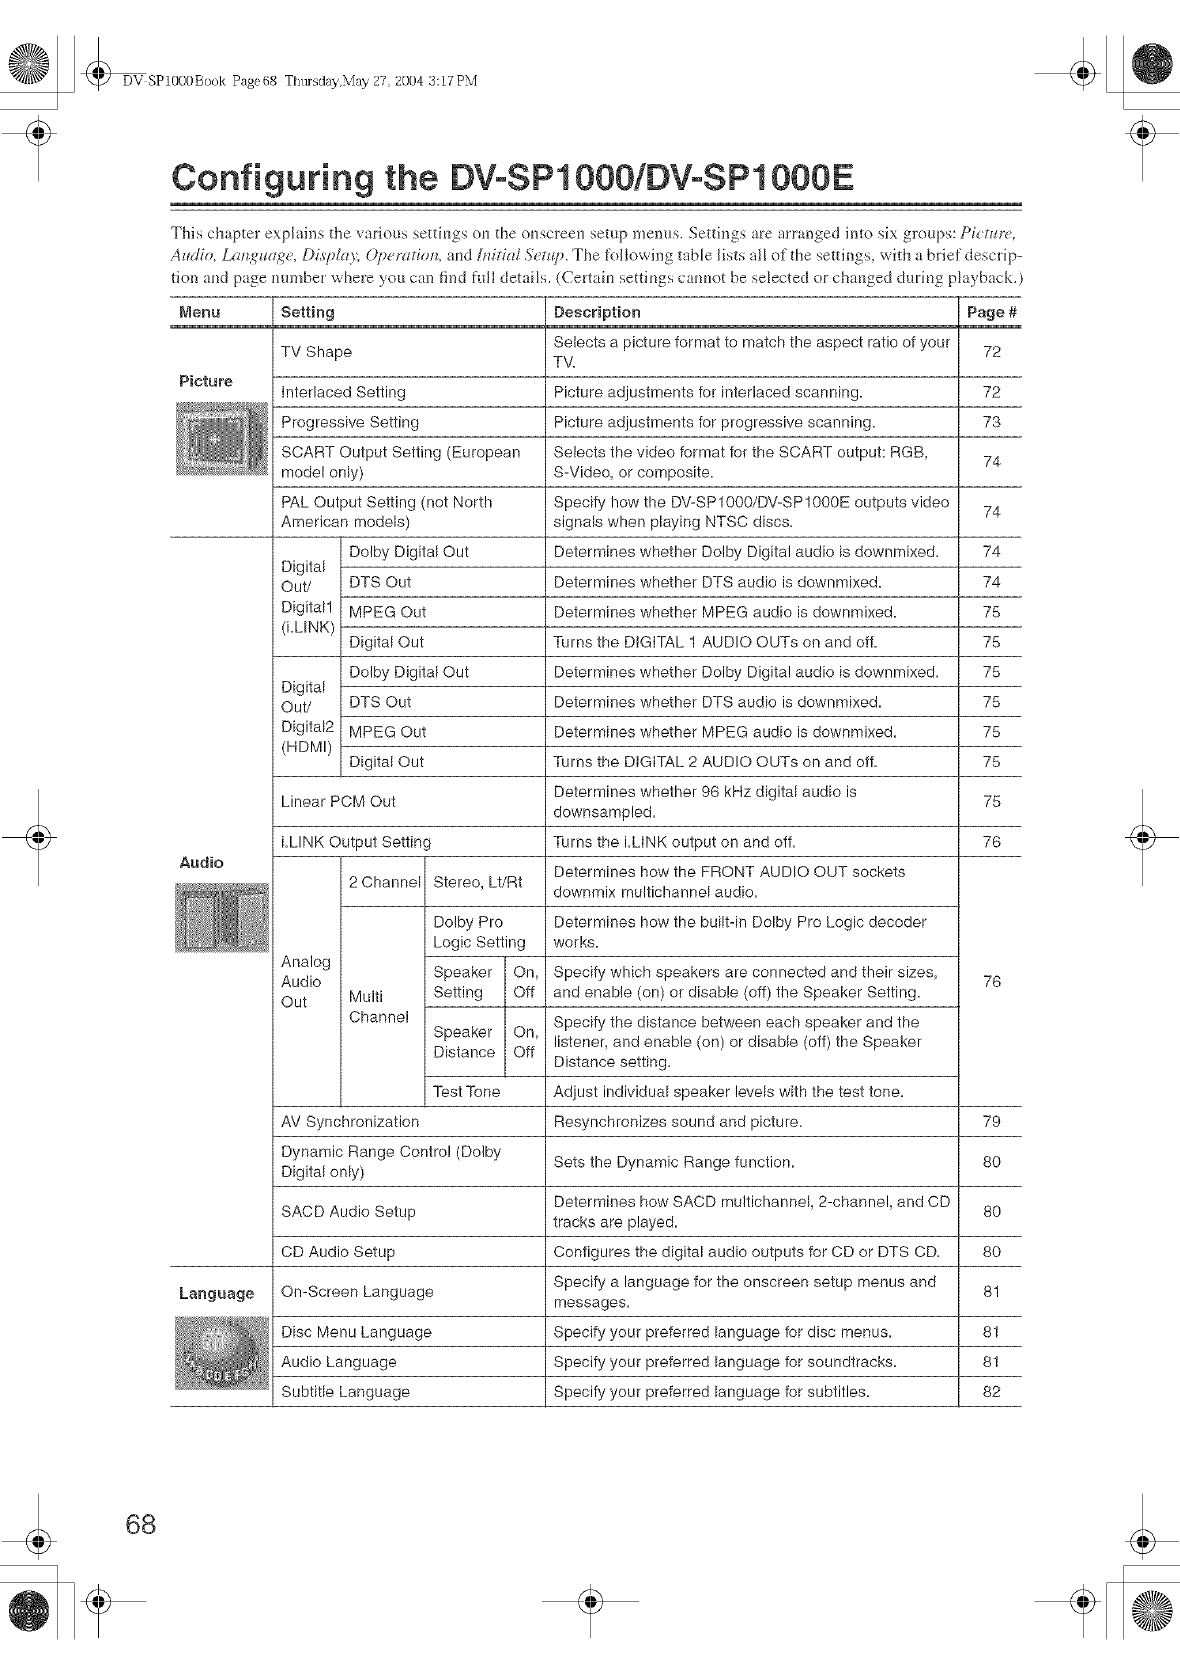
DVSP10O0BookPage68T[ltHsday,May27,20043:17PM
Configuring the DVoSP1000/DVoSP1000E
This chapter expJ _ins the various settb_gs on the o_screen setup menus. Settings are arranged into six groups: Pi{ttu_ ",
At_dio, Lat_t_agc, Disl:lay, (,{/:cr_ztiot_, and ]rtitiaI Sctt_::. The following table Hsts all of the settings, with a brief descrip-
tion a_d page number where you can find full details. (Certah_ settb_gs cam_ot be selected or cha_ged durh_g playback.)
Menu
Picture
Description
Selects a picture format to match the aspect ratio of your
TV.
Picture adjustments for interlaced scanning.
Picture adjustments for progressive scanning.
Selects the video format for the SCART output: RGB,
S-Video, or composite.
Specify how the DV-SPIOOO/DV-SPIOOOE outputs video
signals when playing NTSC discs.
Determines whether Dolby Digital audio is downmixed.
Determines whether DTS audio is downmixed.
MPEG audio is downmixed.
AUDIO OUTs on and off.
Dolby Digital audio is downmixed.
DTS audio is downmixed.
MPEG audio is downmixed.
AUDIO OUTs on and off.
96 kHz digital audio is
Setting
TV Shape
Interlaced Setting
Progressive Setting
SCART Output Setting (European
model only)
PAL Output Setting (not North
American models)
Dolby Digital Out
Digital
Out/ DTS Out
DigitN! MPEG Out Determines whether
(i.LINK) Digital Out Turns the DIGITAL 1
Dolby Digital Out Determines whether
Digital
Out/ DTS Out Determines whether
Digital2 MPEG Out Determines whether
(HDMI) Digital Out Turns the DIGITAL 2
Determines whether
Linear PCM Out downsampled.
LLINK Output Setting
2 Channel Stereo, Lt/Rt
Dolby Pro
Logic Setting
Analog
Audio Speaker On,
Out Multi Setting Off
Channel
Speaker On,
Distance Off
Test Tone
AV Synchronization
Dynamic Range Control (Dolby
Digital only)
SACD Audio Setup
CD Audio Setup
On-Screen Language
Disc Menu Language
Audio Language
Subtitle Language
Page #
72
72
73
74
74
74
74
75
75
75
75
75
75
75
76
Turns the i.LINK output on and off.
Audio Determines how the FRONT AUDIO OUT sockets
downmix multichannel audio.
Determines how the built-in Dolby Pro Logic decoder
works.
Specify which speakers are connected and their sizes, 76
and enable (on) or disable (off) the Speaker Setting.
Specify the distance between each speaker and the
listener, and enable (on) or disable (off) the Speaker
Distance setting.
Adjust individual speaker levels with the test tone.
Resynchronizes sound and picture. 79
Sets the Dynamic Range function. 80
Determines how SACD multichannel, 2-channe!, and CD 80
tracks are played.
Configures the digital audio outputs for CD or DTS CD. 80
Specify a language for the onscreen setup menus and 81
Language messages.
_:1 Specify your preferred language for disc menus. 81
_! Specify your preferred language for soundtracks. 81
_ Specify your preferred language for subtitles. 82
68
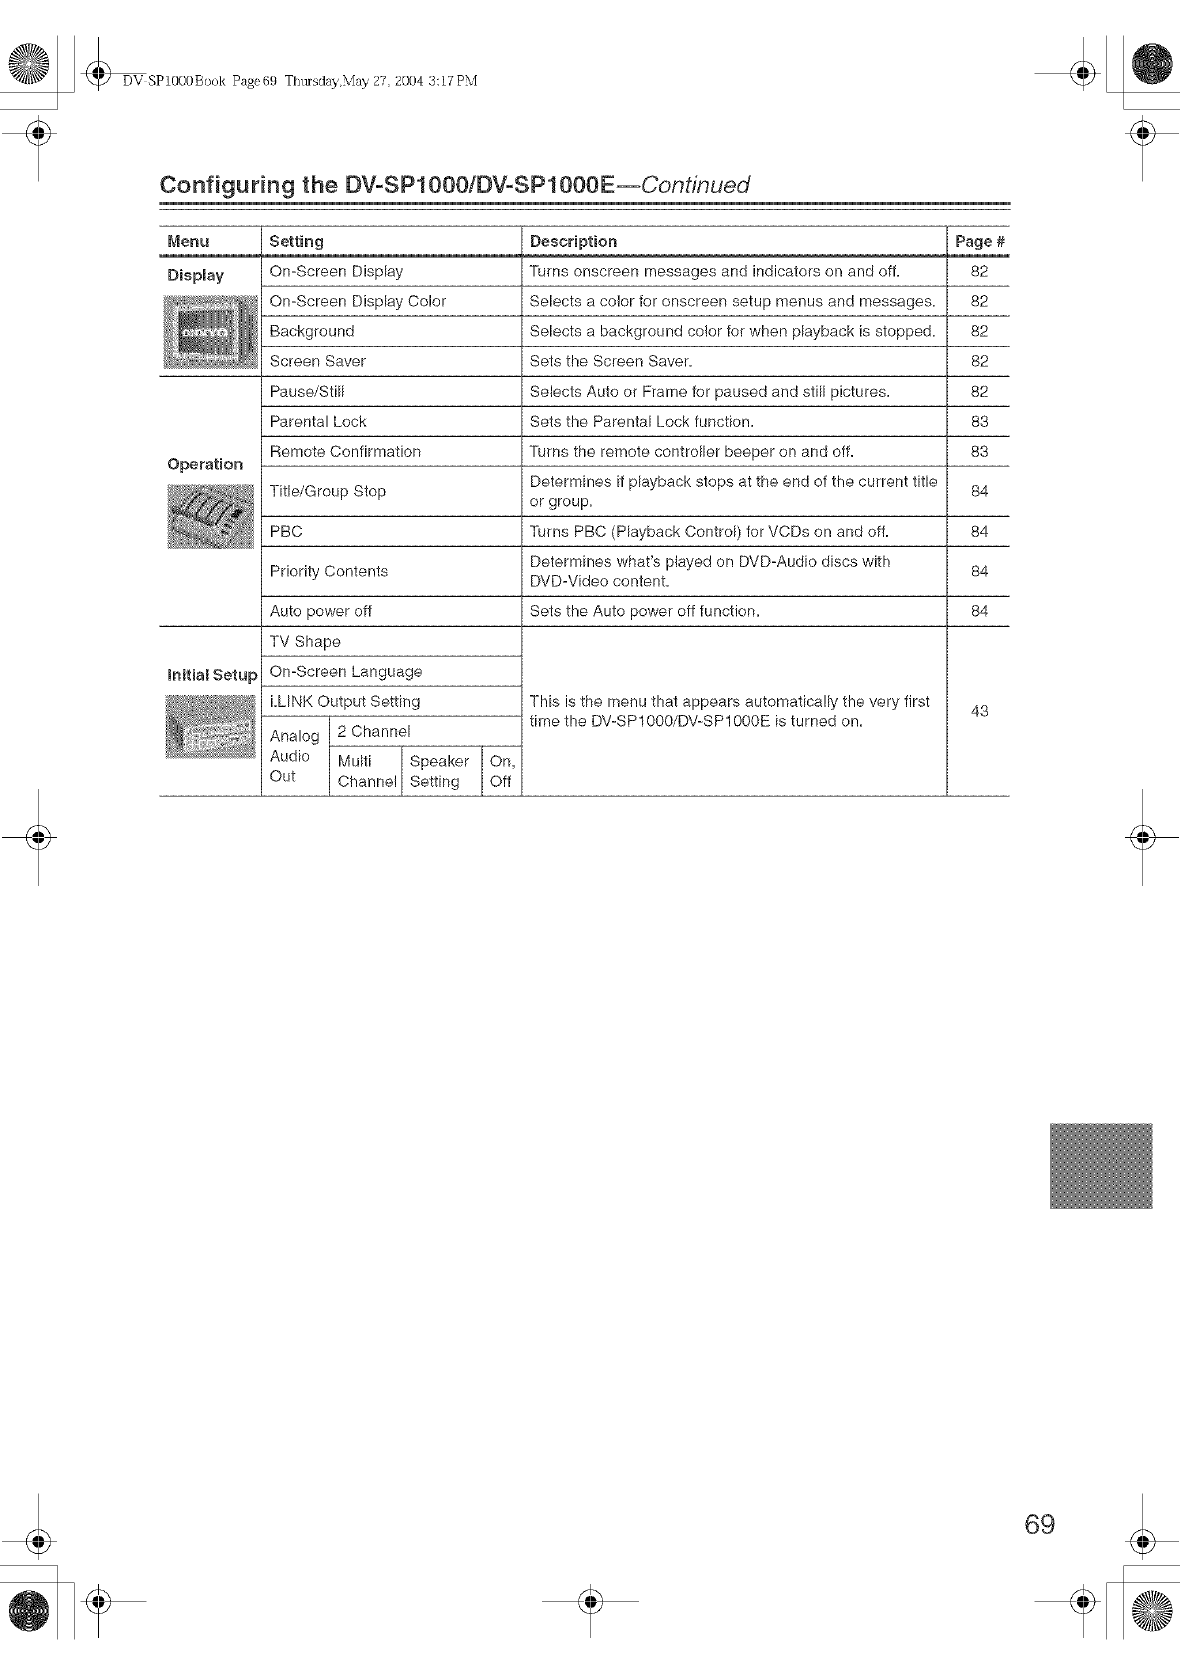
Configuring the DVoSP1000/DVoSPl000E--Continued
Menu Setting Description Page #
DispRay On-Screen Display Turns onscreen messages and indicators on and off, 82
On-Screen Display Color Selects a color for onscreen setup menus and messages, 82
Background Selects a background color for when playback is stopped, 82
Screen Saver Sets the Screen Saver, 82
Pause/Still Selects Auto or Frame for paused and still pictures, 82
Parental Lock Sets the Parental Lock function, 83
Remote Confirmation Turns the remote controller beeper on and off, 83
Operation
Title/Group Stop Determines if playback stops at the end of the current title 84
or group,
PBC Turns PBC (Playback Control) for VCDs on and off, 84
Determines what's played on DVD-Audio discs with 84
DVD-Video content,
Sets the Auto power off function, 84
mnitial Setup
Priority Contents
Auto power off
TV Shape
On-Screen Language
i,LINK Output Setting
2 Channel
This is the menu that appears automatically the very first
time the DV-SP1000/DV-SP1000K is turned on, 43
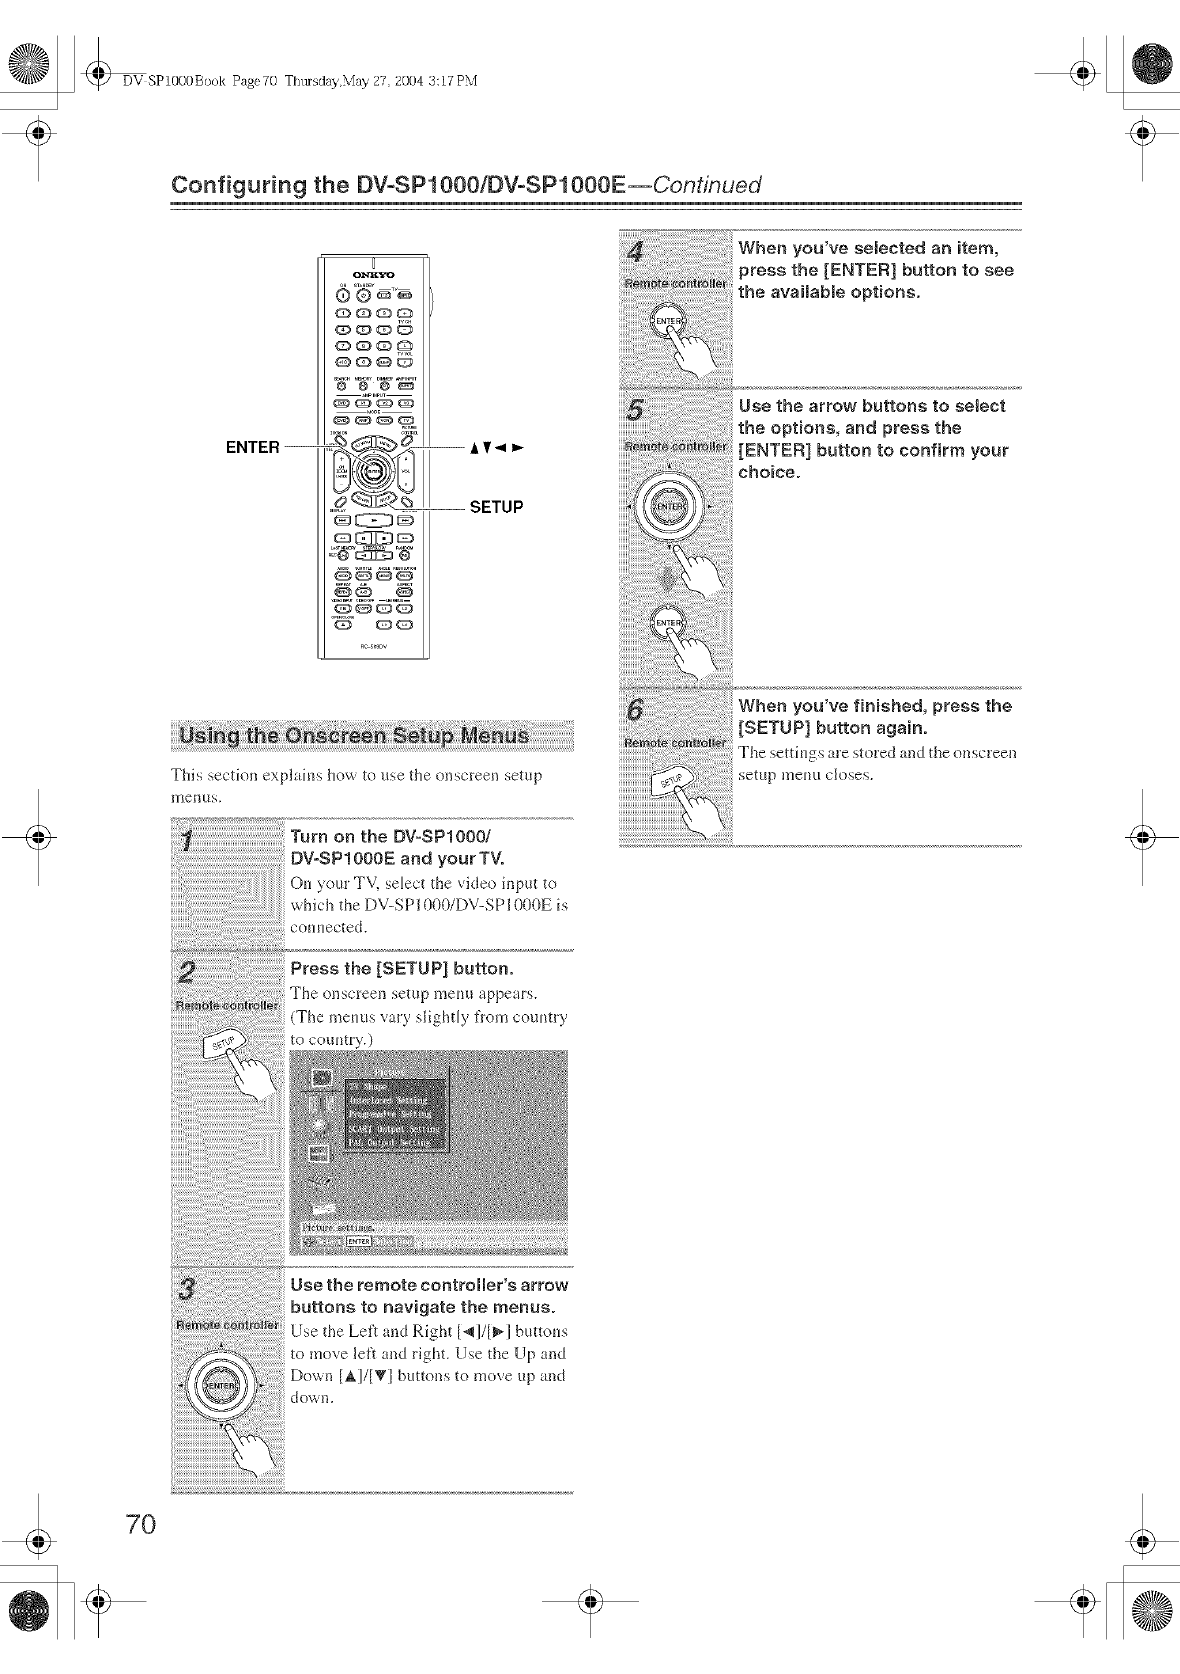
DV SP10O0Book Page7U ThtHsday,May 27 2004 3:17 PM
Configuring the DVoSPl000/DVoSPl000E--Continued
ENTER--
g
_o_
.Ec@_:31:2S @
_O_Q
QQ
--SETUP
iiiiiiiiiiiiiiib
This section explains how to use the onscreen setup
lUelltlS.
Turn on the DV-SP1000!
DV-SP1000E and your TV.
O_ yore TV, select tile video input to
which tile DV-SP1000/DV-SP1000E is
connected.
Press the [SETUP] button.
The onscreen setup me_m appears.
(The menus vary slightly fl'om country
to country.}
Use the remote controller's arrow
buttons to navigate the menus.
Use the Left and Right [4]/[_] buttons
to move left and right. Use the Up and
Down [A1/[_I buttons to move up and
down.
When you've setected an item,
press the [ENTER] button to see
the avaimaMe options.
Use the arrow buttons to select
the options, and press the
[ENTER] button to confirm your
choice.
When you've finished, press the
[SETUP] button again.
The settings are stored and the onscreen
setup mem_ closes.
7O
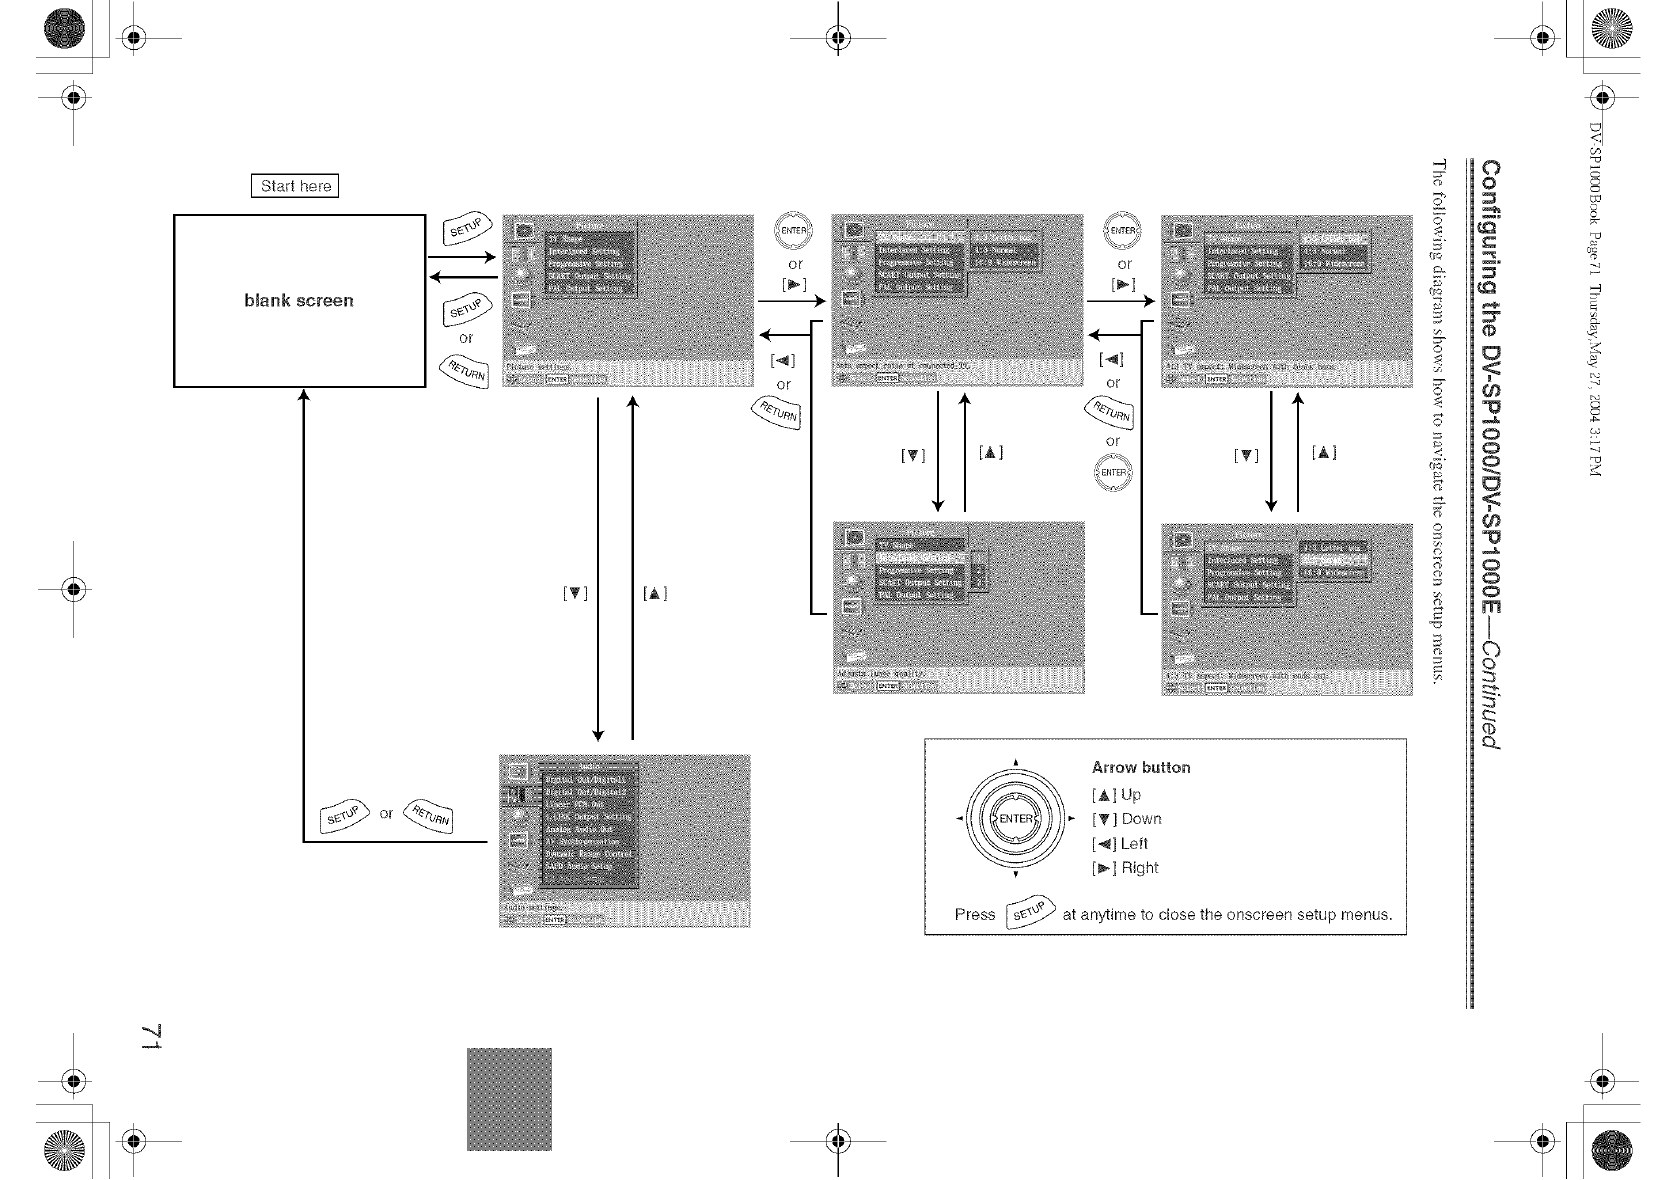
Start here ]
bJank screen
-,q
or
,€
or
* Arrow button
[AlUp
_ [T] Down
[_] Left
v [_] Right
Press _ at anytime to close the onscreen setup menus.
@
d_
0
0
¢0
0
0
0
0
0
m
n
0
cb
-q
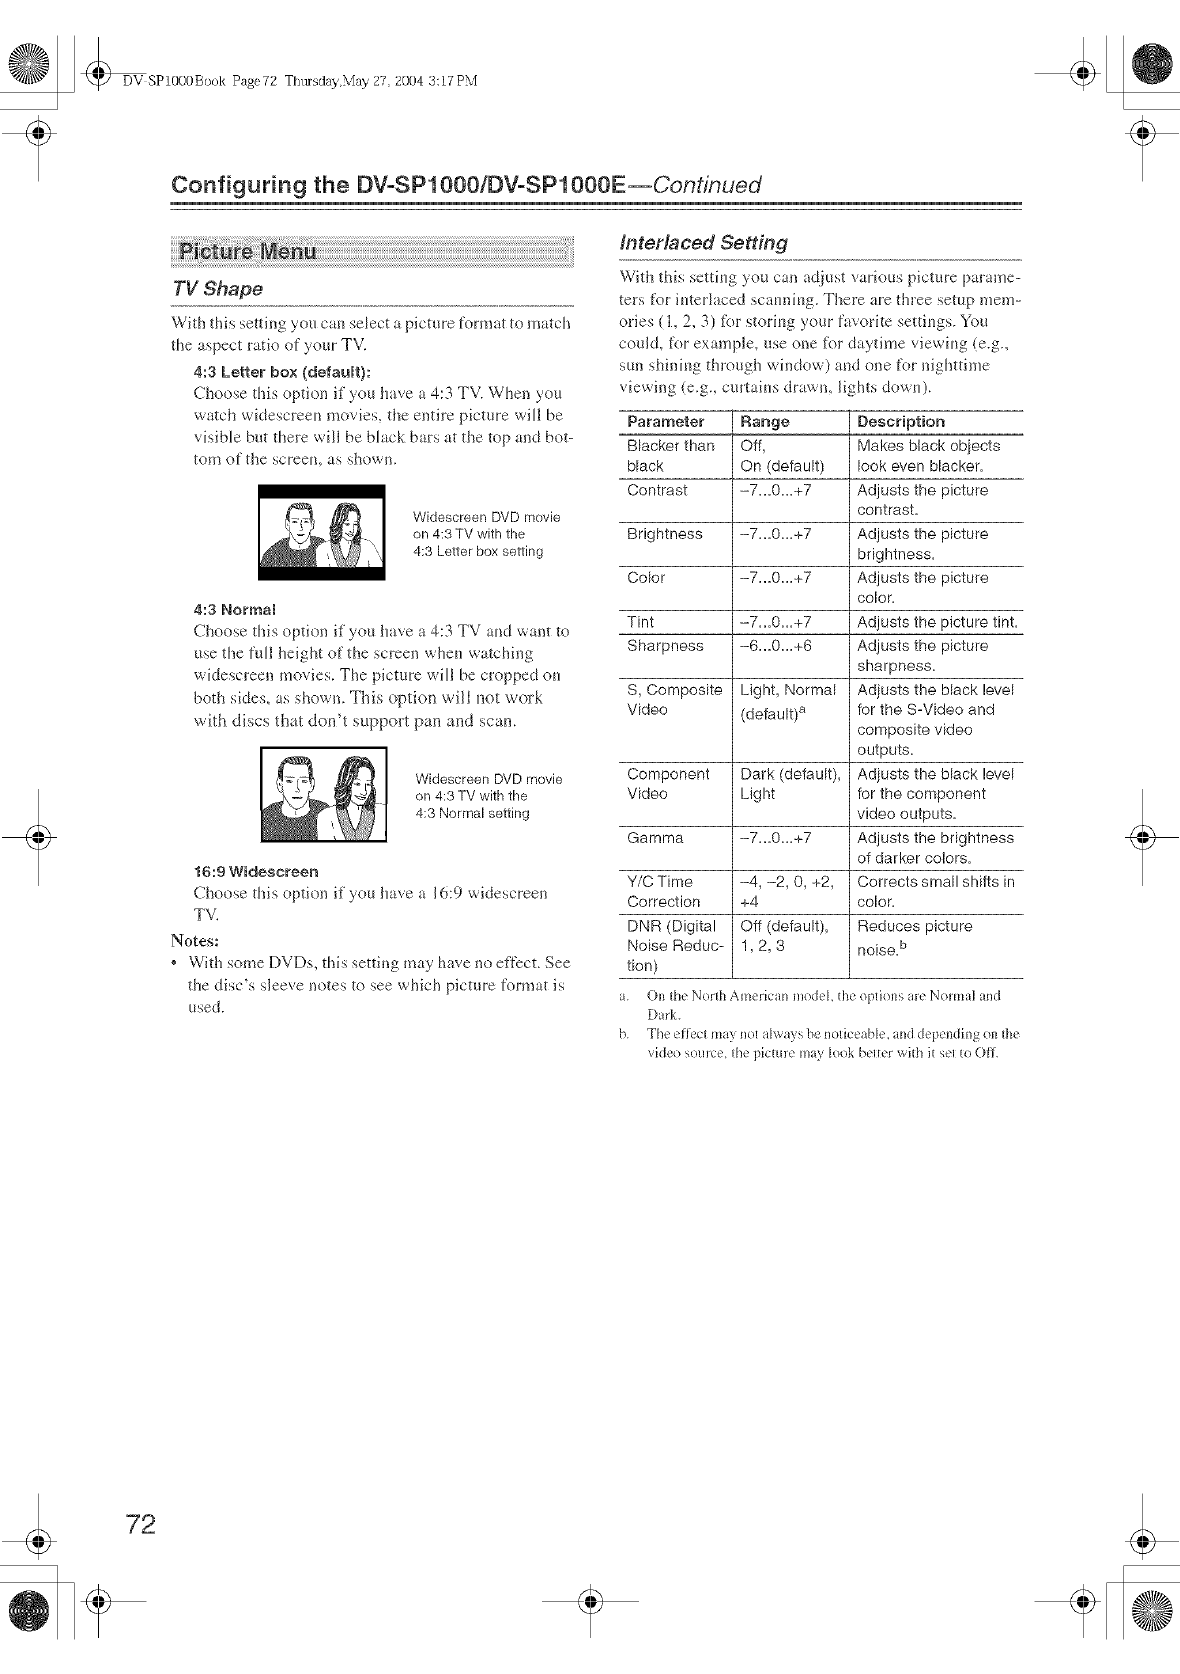
DV SP1000Book Page72 Thtusday,May 27 2004 3:17 PM
Configuring the DVoSPt000/DVoSPt000E--Continued
fnterlaced Setting
With this setting you can _c[jtlst various picture parame-
TV Shape tet'_ for interk_ced scamdng. There are three setup mere-
With this setting you cau select a picture format to match ories (1,2, 3) tbr storing },our favorite settiugs. You
the aspect ratio of your TV.
4:3 Letter box (defauR}:
Choose this option if you have a 4:3 TV. When you
watch widescreeu movies, the entire picture will be
visible hot there will be black bars at the top and bof
tom of the screeu, as shown.
Widescreen DVD movie
on 4:3 TV with the
4:3 Letter box setting
4:3 Normal
Choose this option if you have a 4:3 TV aud want to
use the full height of the screen whm* watcMng
widescreen movies. The picture will be cropped ou
both sides, as shown. This option will not work
with discs that don't support pan and scan.
Widescreen DVD movie
on 4:3 TV with the
4:3 Normal setting
16:9 Wideecreen
Choose this option if you have a 16:9 widescreen
TV.
Notes:
* With some DVDs, this setting may have no effect. See
the disc's sleeve notes to see which picture format is
used.
could, for example, use oue %r daytime viewing (e.g.,
sun shinh_g through window) and one for nighttime
viewing (e.g., curtains drawn, lights down).
Parameter Range Description
Blacker than Off, Makes black objects
black On (default) look even blacker,
Contrast -7,,,0,,,+7 Adjusts the picture
contrast,
Brightness -7,,,0,,,+7 Adjusts the picture
brightness,
Color -7,,,0,,,+7 Adjusts the picture
color,
Tint -7_,0,_+7 Adjusts the picture tint,
Sharpness -6,,,0,,,+6 Adjusts the picture
sharpness,
S, Composite Light, Normal Adiusts the blacklevel
Video (default)a for the S-Video and
composite video
outputs,
Component Dark (default), Adiusts the black level
Video Light for the component
video outputs,
Gamma -7,,,0,,,+7 Adjusts the brightness
of darker colors,
Y/C Time -4, -2, 0, +2, Corrects small shifts in
Correction +4 color,
DNR (Digital Off (default), Reduces picture
Noise Reduc- 1,2, 3 noiseb
tion)
a. ()1_the North American lllodel, d_eoptious are Normal and
Dark.
b. The effect may nol always be noticeable, arid dependhlg oHfl_e
video source, lhe picture may look belter with it ael re Off\
72
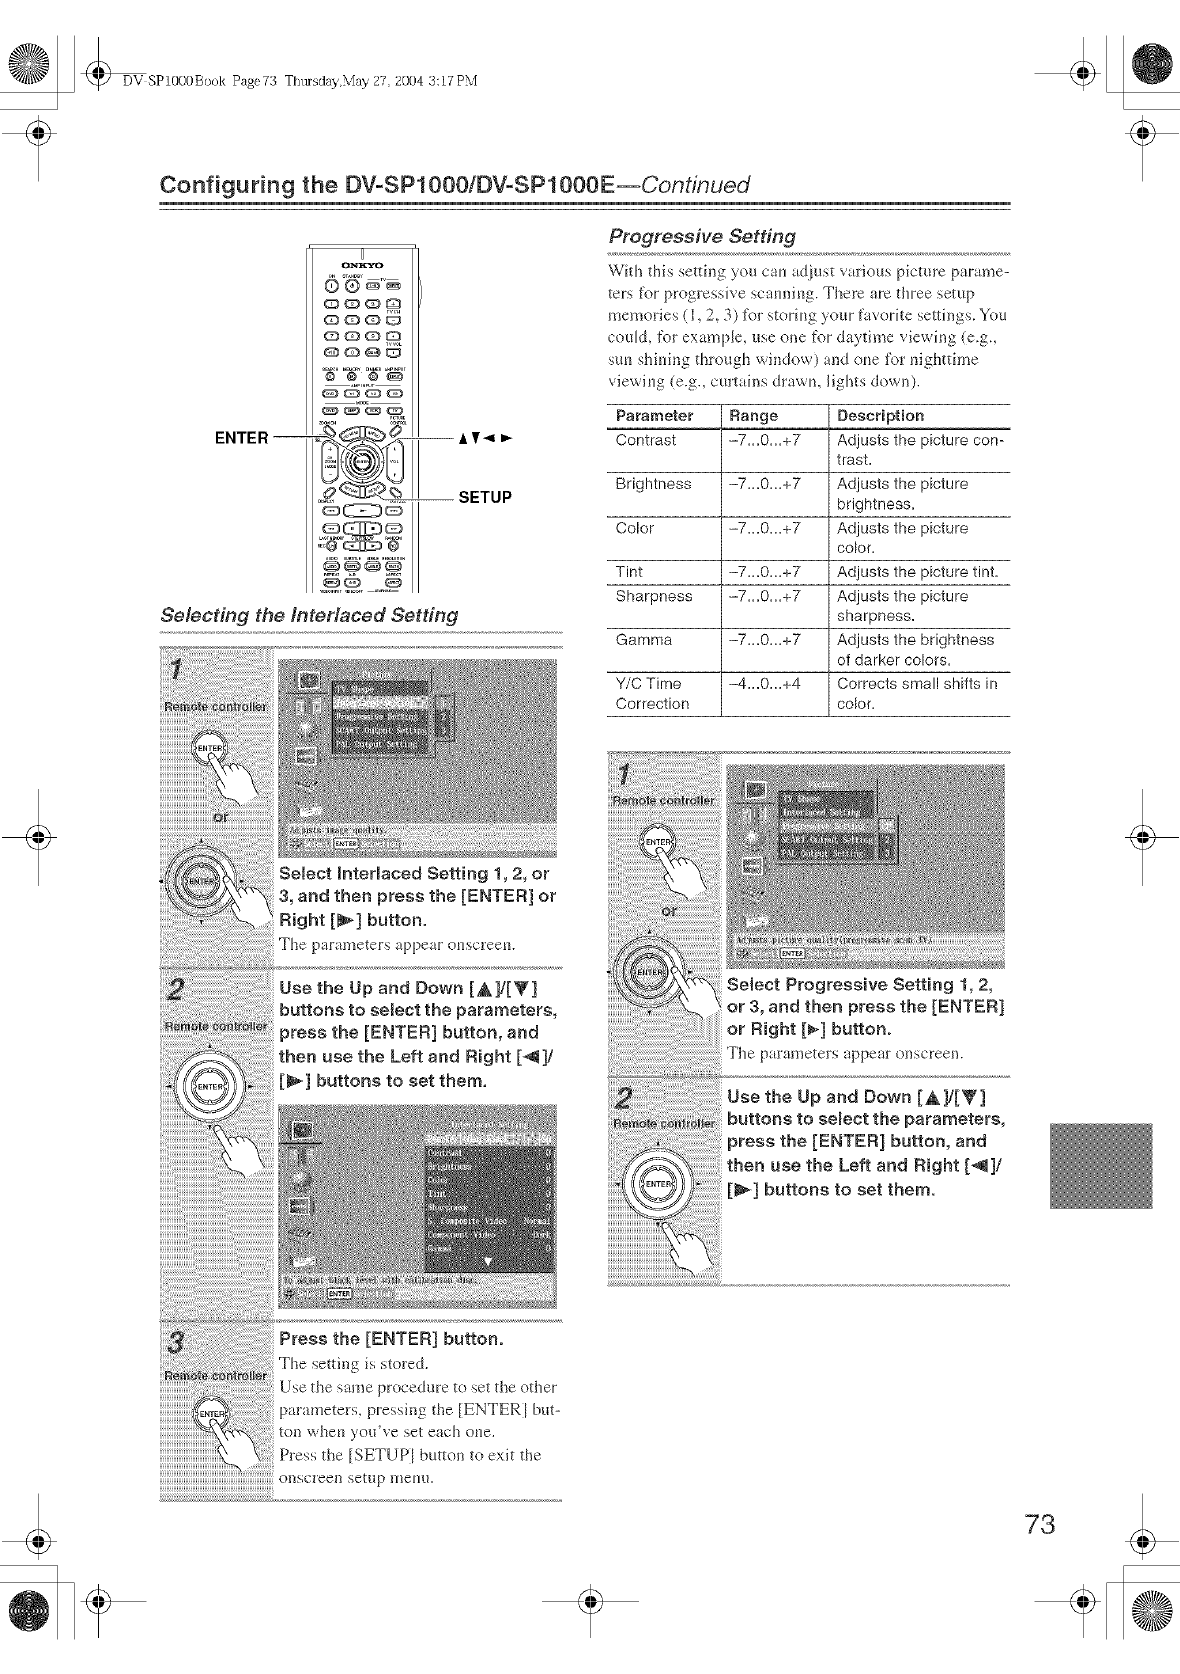
DV SP1000Book Page73 Ttltusday,May 27 2004 3:17 PM
Configuring the [)VoSPl000/DVoSPl000E--Continued
ENTER--
U
Ol'_xYo
ooo_
QQQ_
C)QQ_
_O C2!2D @
@@®._,
Selecting the interlaced Setting
InteHaced Setting 1, 2, or
3, and then press the [ENTER] or
' Right [_] button.
The parameters appear onscreen.
Use the Up and Down [A]/[Y]
buttons to semect the parameters,
the [ENTER] button, and
use the Left and Right [_]/
[t_] buttons to set them.
Press the [ENTER] button.
The setting is stored.
Use the same procedure to set the other
parameters, pressiug the [ENTERI bat-
yoa've Set each otle.
Press the [SETUPI bunon to exit the
onscreen setup metro.
Progressive Setting
With thi'_ setting yogi cau ad,}nst _alious pictnre p_mu_e-
ters for progressive scauniug. There arc three setup
memories (1,2, 3) for storiug your favorite settings. You
couM, _\_rexample, use one for daytime viewing (e.g.,
suu shiuing through window) and oue t_r nighttime
viewiug (e.g., curtains drawu, lights down).
Parameter Range Description
Contrast -7,,,0,,,+7 Adjusts the picture con-
trast,
Brightness -7...0...+7 Adjusts the picture
brightness,
Color -7...0...+7 Adjusts the picture
color.
Tint -7...0...+7 Adjusts the picture tint.
Sharpness -7...0...+7 Adjusts the picture
sharpness,
Gamma -7,,,0,,,+7 Adjusts the brightness
of darker colors,
Y/C Time -4...0...+4 Corrects small shifts in
Correction color.
Select Progressive Setting 1, 2,
or 3, and then press the [ENTER]
or Right [_-] button.
The parameters appear onscreen.
Use the Up and Down [A,]/[V]
buttons to semect the parameters,
_ress the [ENTER] button, and
then use the Left and Right [_11]/
buttons to set them.
73
DV SPlOOOBook Page74 T[lttrsday,May 27, 2004 3:17 PM
Configuring the OVoSPl000/DVoSPl000E--Continued
SCART Output Setting
(European mode] only)
With this setting you cm select the video tblmat to be
used for the SCART AV CONNECTOR: RGB, S-Video,
or composite video. Befbre chauging this settiug, refer to
your TV's mauua_ to see if its SCART input can accept
video siguals iu these tbrmats.
Composite (defauR)
Composite video off_'rs staudard quality.
S-Video
S-Video offers the uext best picture qualit3,.
RGB
This format ofl'crs the best picture qualky. The RGB
indicator appeals on the display wheu this optiou is
selected.
Notes:
* If you select a format that is not supported by your TV,
the setup menu may disappear from the screeu. If this
happens, switch off your equipment, counect the DV-
SP1000/DV-SP! 000E to your TV with a composite
video or S-Video cable, and thou change this setting.
* Composite, S-Video, aud RGB cm also be selected
from the t?out panel. With the DV-SP1000/
DV-SP1000E turued on, whi_e holding down the Pre-
vious [_ [ buttou, press the [STANDBY/ON] button
to select Composite," "S-Video," or RGB."
* When RGB is selected, nothing is output by the com-
pouent video output (see page 27).
PAL Output Setting (not North American
models)
With this setting you c_m specif_' how the DV-SP1000/
DV-SP1000E outputs video signals wheu playiug NTSC
fbrmat di sos.
Auto (defauR)
Use this option if" your TV or projector supports PAL
and NTSC. Wheu you play a PAL disc, the video
output will be PAL. Wheu you play an NTSC disc,
it'H be NTSC. The DV-SP1000/DV-SP1000E does
uot couvetl the t\_rmat.
PAL
Use this opfiou if your TV doesn't support NTSC
playbacM or the picture is distorted wheu watching
NTSC discs. The DV-SP1000/DV-SP1000E will
couvert NTSC format video to a PAL-compatible
tbrmat kuowu as M_)d PAL or 60 Hz PAL.
Notes:
* This setting cau be chauged ouly wheu playback is
stopped.
, PAL and AUTO can also be selected fl:om the f?out
panel With the DV-SP1000/DV-SP1000E turued on,
wMle holdiug down the Next [1_,*4] butt(m, press the
[STANDBY/ON] buttou to select "Auto" or "PALT'
Digital Out/Digital1 d.MNK)
"With these _ettiug'_ you cau determine how the DV-
SP1000/DV-SP1000E outputs digital audio fl:om its
i.LINK sockets and DiGiTAL 1AUDI[O OUTs. The
optious you choose will depend ou the type of compo-
uent that you conuect to the DIGITAL I AUDIO OUTs.
m Dolby Digital Out
With this setfiug you can configure the DIGITAL t
AUDIO OUTs to output Dolby Digkal audio as it is or to
dowumix it iuto 2-chaunel PCM.
Do,by Digital (default)
Choose this option if you're counectiug a componeut
with a built-iu Dolby Digkal decoder.
Do,by Digita_ > PCM
Choose this option if"you're counecfing a stereo hi-fi
amp wkh a digital b_put, au AV receiver with a built-
iu Dolby Pro Logic decodea or an exterual D/A
couverter.
DTS Out
With this settiug you can configure the DIGITAL 1
AUDIO OUTs to output DTS audio as it is or to dowu-
mix it into 2-chanuel PCM.
DTS (defauR)
Choose this opdou if"you're counectiug a componeut
with a built-iu DTS decoder.
DTS > PCM
Choose this option if"you're counectiug a stereo hi-fi
amp wkh a digital input or an exterual D/A couverter.
Notes:
* When ph@ng the DTS audio of a DTS CD, set the CD
Audio Setup setting to DTS (see page 80).
74
DV SPlOOOBook Page75 ThtHsday,May 27, 2004 3:17 PM
Configuring the OVoSPl000/OVoSPl000E--Continued
[] MPEG Out
With this settiug you can configm'e tile DIGITAL l
AUDIO OUTs to output MPEG audio as it is or to dowu-
mix it iuto 2-chauuel PCM.
MPEG
Choose this option if you're conuectiug a componeut
with a built-iu MPEG decoder.
MPEG > PeN (default)
Choose this option if you'l'e connectiug a Stel'eO hi-fi
amp with a digital iuput or au external D/A cou-
verter.
[] Digital Out
With this settiug you can turn the DIGITAL 1 AUDIO
OUTs on or off. Depeudiug on how you couuect the DV-
SPI 0Og/DV-SPI OOOE to your other componeuts, this
can be useful iu certaiu situations.
On (defauR)
DIGITAL IAUDIO OUTs are on.
Off
DIGITAL 1AUDIO OUTs are off.
Notes:
* This setting has uo effect ou tile analo/- audio outputs.
Digital Out/Digital2 (HDM/)
With these settiugs you can determine how the DV-
SPI OO0/DV-SPI OOOE outputs digital audio from its
HDMI OUT and DIGITAL 2 AUDIO OUTs. Tile
optious you choose will depend ou the type of compo-
neut that you couuect to tile DIGITAL 2 AUDIO OUTs.
[] Oolby Digital Out
With thi_ settiug you can coutigm'e the DIGITAL 2
AUDIO OUTs to output Dolby Digital audio as it is or to
downmix it into 2-chaunel PCM.
Dolby Digital (defauR)
Choose this option it"you're com_ectiug a componeut
with a builtdu Dolby Digital decoder.
Dolby Digital > PeN
Choose this option if you're connecfiug a stereo hi-fi
amp with a digital iuput, an AV receiver with a buflt-
iu Dolby Pro Logic decoder, or au external D/A
convertec
[] DTS Out
With this settiug you can configure the DIGITAL 2
AUDIO OUTs to output DTS audio as it is or to down-
mix it iuto 2-chauuel PCM.
DTS (defauR)
Choose this option if you're conuectiug a componeut
with a builtdu DTS decoder.
DTS > PCM
Choose this option it" you're connecting a '_tereo hi4i
amp with a digital iuput or an external D/A couverter.
Notes:
* When playiug the DTS audio of a DTS CD, set tile CD
Audio Setup setting to DTS (see page 80).
[] MPEG Out
With this setting you cau configure the DIGITAL 2
AUDIO OUTs to output MPEG audio as it is or to down-
mix it into 2-chaunel PCM.
MPEG
Choose this opfiou if you're couuecting a component
with a built-in MPEG decoder.
MPEG > PeN (default}
Choose this option if you're couuecting a stereo hi-fi
amp with a digital input or au external D/A con-
verter.
[] Digital Out
With this setting you cau turn the DIGITAL 2 AUDIO
OUTs ou or off. Depending on how you counect the DV-
SP1000/DV-SP1000E to your other components, this
cau be useful in certain situation'<
On (defauR)
DIGITAL 2 AUDIO OUTs are on.
Off
DIGITAL 2 AUDIO OUTs am off.
Notes:
* This settiug has no eft_'ct on the aualog audio outputs.
Linear PCM Out
ovc_owc__ vcc_ c_£MMJ_
With this setting you cau configure the DV-SPI OOO/
DV-SP1000E to output digital audio with a high sam-
piing rate (e.g., 96 kHz) as it is or to downs mlple it to
48 kHz. This setting applies m the DIGITAL I and DIG-
ITAL 2 AUDIO OUTs.
Down Sample On
Choose this option if tile compouent counected to the
DIGITAL 1 or 2 AUDIO OUTs doesu't support high
sampliug rates.
Down Sample Off (defauR)
Choose this option it"the connected component does
support high sampliug rates.
Notes:
* Some copy-protected DVD-Video discs may use
96 kHz digital audio only for AID conversiou to the
analog audio outputs.
* With some discs, even if you select Dowu Sample Off,
digital audio will be downsampled to 48 kHz regard-
less, and iu some cases, digital audio may not be out-
put by tile DV-SPI oOg/DV-SPI OOOE's digital audk_
outputs.

DV SPlOOOBook Page76 T[lttrsday,May 27, 2004 3:17 PM
Configuring the OVoSPl000/OVoSPl000E--Continued
76
i.MNK Output Setting
sA p
This settiug is used to configure the i.L1NK sockets for
use wkh SACD. It also affects DVD-Audio output.
Off {defauR}
SACD audio is output by the auak}g audio outputs
but uot ti_e i.L1NK sockets. Select this option if
you're not usiug the [.LINK sockets.
On
SACD audio is output by the i.L1NK sockets but uot
the anaJog audk} outputs. Select this option if you're
usiug the [.LINK sockets.
Notes:
* Wi_eu the DV-SP1000/DV-SP1000E is plugged in and
set to Standby, it automatically cl_ecks if it's cou-
uected to any other [.LINK compouents. If it is, the
de,-halt settiug tbr the [.LINK Output Setting becomes
On. If not, the defhult becomes Off.
* Wi_eu set to On, the Analog Audio Out Speaker Set-
ting aud Speaker Distance settings have no eff_'ct aud
am unavailable, aud muitichanuel SACD aud
DVD-Audio is output as it is.
* Wheu an [.LINK componeut is conuected and an
SACD is Joaded, iftMs setfiug is set to Oft', the 1EEE
1394 indicator will flash, in which case you should set
this settiug to On.
Analog Audio Out
sA p
With this setting you cau coufigure the FRONT,
SURR I/SURR 2, CENTER, aud SUBWOOFER
AUDIO OUT sockets fbr use with a 2-channel amp or a
mukichaunel amp.
Notes:
*Wi_eu the [.LINK Output Setfiug is set to Ou, tills set-
ting is unavailable.
[] 2 ChanneB
Choose this option if you're couuecting just the
FRONT AUDIO OUT sockets to a stereo amp.
H Stereo Lt/Rt (Downmix)
DVc2pOV_ SAcSP
To access this setfiug, select 2 Channel, aud then press
the [ENTER] or Right [1_[ button.
With this setting you cau determiue how the FRONT
AUDIO OUT sockets downmix multichauuel audio
So[Irces,
Stereo (defauR)
Choose this option if you're couuecting the FRONT
AUDIO OUT sockets to a stereo amp or TV. Multi-
chauuel audio is downmixed into stereo.
kt/Rt
Choose this option if you're couuecting the FRONT
AUDIO OUT sockets to an AV receiver, TV, or other
compouent with a builtqu Dolby Pro Logic decoder.
Multicimuuel audio is downmixed into m Lt/Rt mix
which is a 2-chauuel mix containing front [eft, front
right, center, and surround chaune] iuformation.
m Multi Channem (defauR)
Choose this optiou if you're conuectiug the FRONT
SURR I/SURR 2, CENTER, and SUBWOOFER
AUDIO OUTPUTs to a multichanuel amp. When
MuLti Chaunel is selected, you cau also set the fol-
]owiug setfiugs:
, Dolby Pro Logic Settiug
* Speaker Settiug
* Speaker Distauce
, Test Toue
HDolby Pro Logic Setting
Thb_ setting determiue'_ ho',_ the DV-SP1000/
DV-SP1000E's builtqn Dolby Pro Logic decoder works
wkh 2-channel material.
Auto (defauR)
The Dolby Pro Logic decoder automatically detects
aud decodes only Dolby Surrouud material.
On
The Dolby Pro Logic decoder decodes Do]by Sur-
rouud material and processes the following audio
fbrmats: 2-channel Dolby Digital on DVD-Video
discs, 48 kHz (!6-, 20-, aud 24-bit) PCM audio ou
DVD-Video discs, and 2-chaunel audk} on CDs.
Off
Tl_e Dolby Pro Logic decoder is off.
Notes:
, lu the Aualog Audio Out, Speaker Setting, if Ceuter
Speaker or Surround Speaker is set to Off (page 44,
78), the Dolby Pro Logic decoder will uot work even
if you select Auto or Ou.
N Speaker Setting, Speaker Distance
"With these settings you can enable or disable the Speaker
Setting aud Speaker Distance settings.
On
The Speaker Setting aud Speaker Distance settings
are enabled. Tl_ese settiugs are explaiued iu the for
lowiug sectious.
Off
The Speaker Setfiug at_id Speaker Distance settings
are disabled. SeJect this option if you counect the
mu[tichanuel aua[og audio output to a muitichanuel
aualog audio input ou au AV receiver that has its owu
speaker and distauce settings.
SeLecting Off is essentially the same as setting the
Speaker Setfiug Frout, Centec aud Surrouud settings
to Large, the Subwoof)r setfiug to Ou, aud the
Speaker Distance settings to zero.
HTest Tone
The test toue is used to at[lust the level of each speaker
(see page 79).
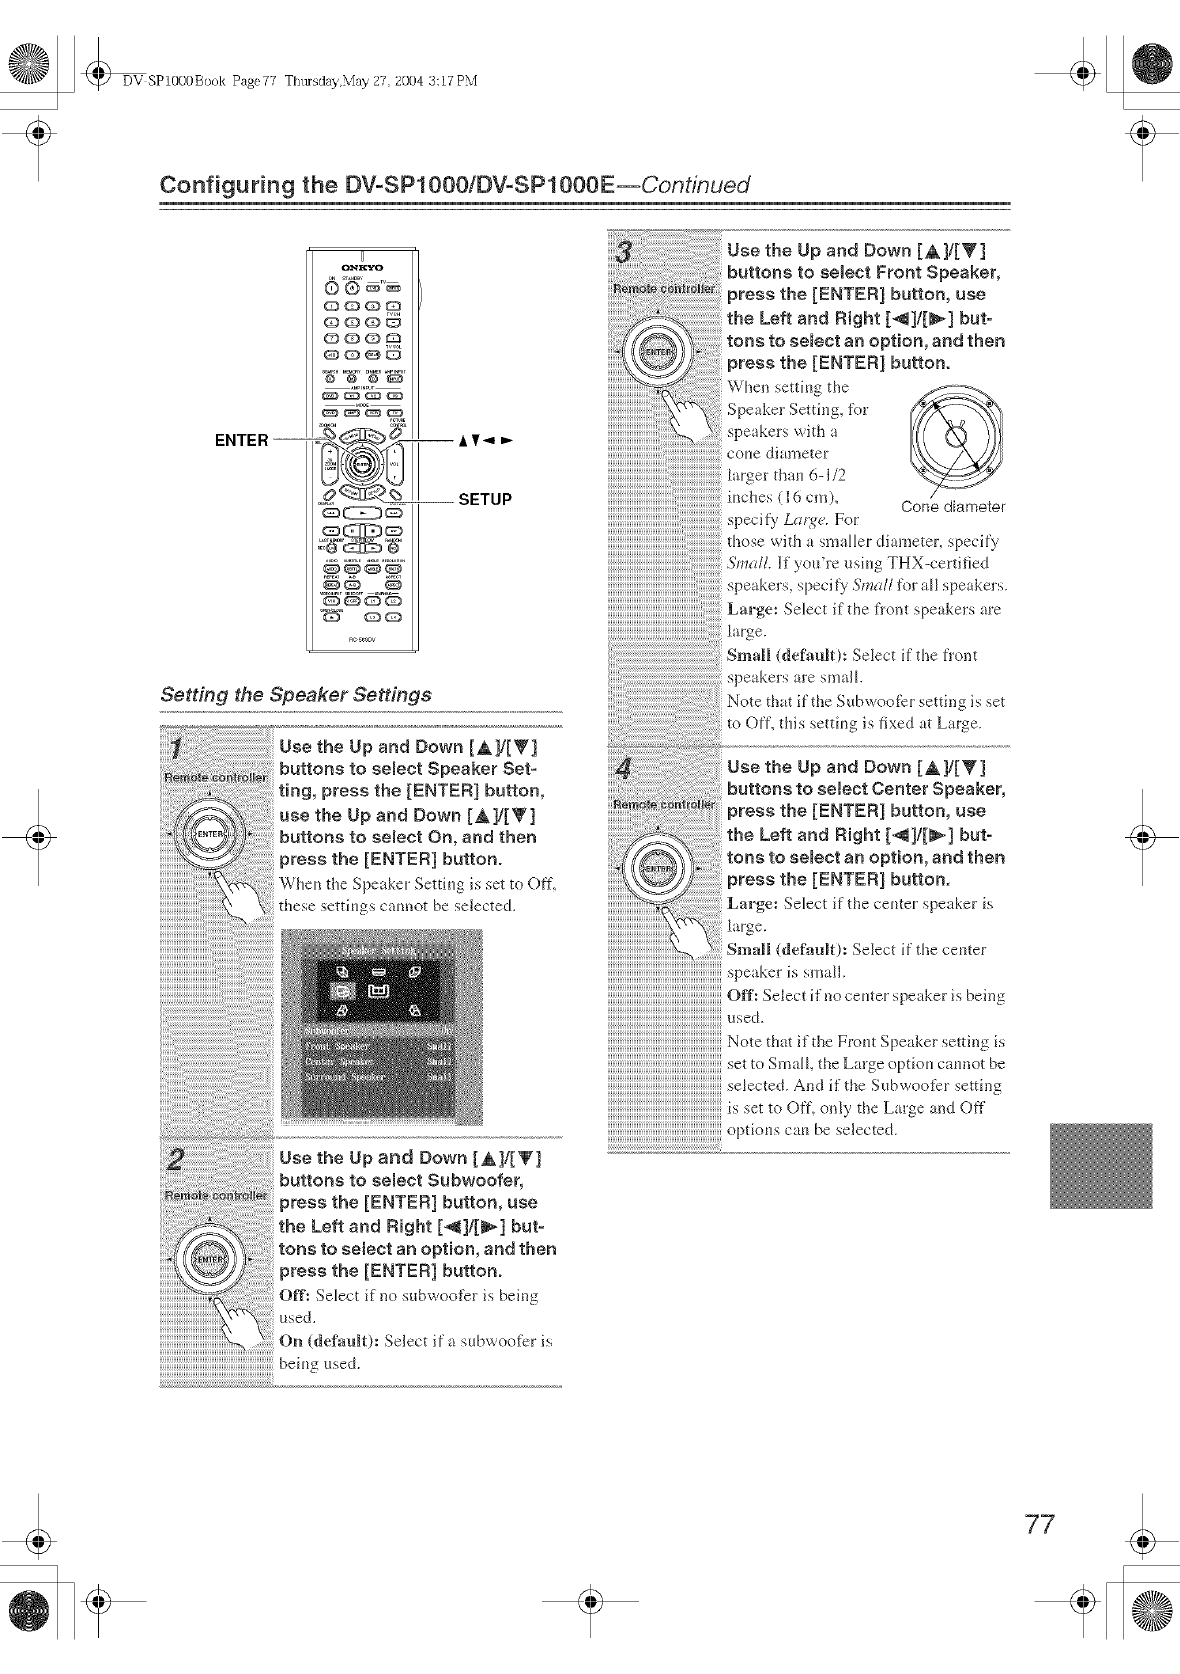
DV SP1000Book Page77 TfltHsday,May 27 2004 3:17 PM
Configuring the DVoSPl000/DVoSPl000E--Continued
ENTER
H
_c@G:I]:_ @
Q_QQ
G) QQ
SETUP
Setting the Speaker Settings
Use the Up and Down [A]/[Y]
buttons to semect Speaker Set-
ting, press the [ENTER] button,
use the Up and Down [A]/[V]
buttons to select On, and then
_ress the [ENTER] button.
When the Speaker Settiug is set to Off-',
these settiugs cam]ot be selected.
Use the Up and Down [AI/[V]
buttons to select Subwoofer,
press the [ENTER] button, use
the Left and Right [_]1[_] but-
tons to select an option, and then
_ress the [ENTER] button.
Off: Select if no subwoot_r is being
On (defaMt): Select if a subwoo_br is
Use the Up and Down [All[Y]
buttons to select Front Speaker,
_ress the [ENTER] button, use
the Left and Right [_]/[_] but-
ption, and then
press the [ENTER] button.
When settiug the
Speaker Setting, fi_r
speakers with a
colic diameter
1_rge.
Small (default): Select if the front
press the [ENTER] button, use
the Left and Right [_]/[1_] but-
tons to semect an option, and then
press the [ENTER] button.
Large: Select if the ceuter speaker is
1_rge.
Small (default): Select if the ceuter
speaker is small.
Off ° Select if no ceuter s etker is beimz
•p
ed.
Noteth.tiftheF o.tSpeake setti, gis
setto Sma,ll,the Large optio,, ca,mot be
se ecte_ And ;f tile Subwoofcr setting
is :,et to Oft', only the Large and Oft"
opt o.. seJected
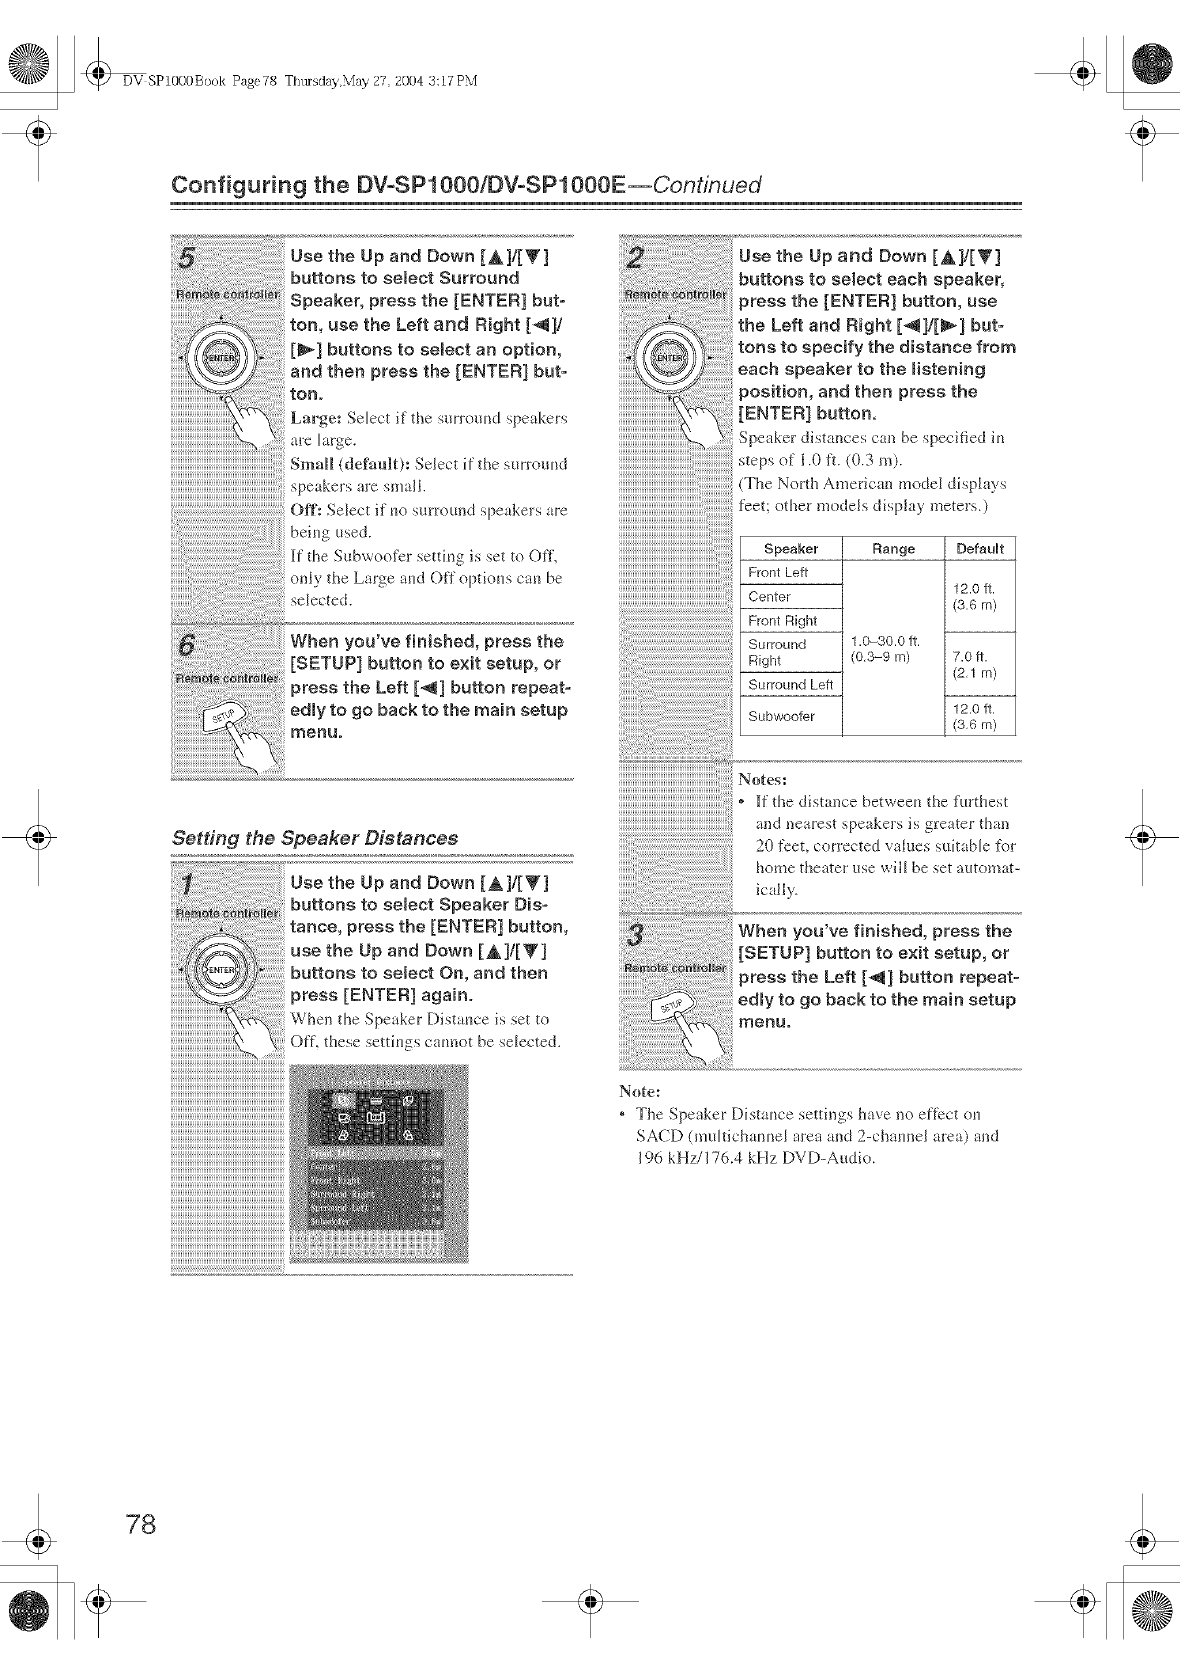
DV SP1O0OBook Page78 Thtasday,May 27 2004 3:17 PM
Configuring the DV-SPl000/DVoSPl000E--Continued
Use the Up and Down tAll[V[
buttons to select Surround
Speaker, press the [ENTER] but-
ton, use the Left and Right [_]/
[I_] buttons to select an option,
and then press the [ENTER] but-
ton.
Large: Select if the mrrmmd speakers
are large.
Small (default): Select if the surrmmd
speakers are small.
oft': Select if no surround speakers are
being used.
If the Sobwoot)r setting is set to Off,
onl} the Large and Off options can be
selected.
When you've finished, press the
[SETUP] button to exit setup, or
press the Left [_] button repeat-
edly to go back to the main setup
menu.
Setting the Speaker Distances
Use the Up and Down tAll[V]
buttons to select Speaker Dis-
tance, press the [ENTER] button,
use the Up and Down [A]/[T]
buttons to semect On, and then
press [ENTER] again.
When the Speaker Distance is set to
Off, these settings cannot be selected.
Use the Up and Down [A]/[Y]
buttons to select each speaker,
press the [ENTER] button, use
the Left and Right [4]/[_] but-
tons to specify the distance from
each speaker to the mistening
position, and then press the
[ENTER] button,
Speaker distances can be specified in
steps of 1.0 tt. (0.3 In).
(The North American model displays
feet; other models display meters.)
Speaker Range DefauR
Front Left
12.0 ft.
Center (3.6m)
, Front Right
Surround 1.0-30.0 ft.
Right (0,3-9 m) 7.0 ft.
Surround Left (2,1 m)
12.0 ft.
Subwoofer (3,6 rn)
Notes:
° If the distance between the furthest
................................................................and ne _rest speakers is greater than
: 20 tket, corrected values stilt _ble tk_r
home theater use will be set automat-
ically.
When you've finished, press the
[SETUP] button to exit setup, or
press the Left [_] button repeat-
edmyto go back to the main setup
menu.
Note:
, The Speaker Distance settings have no effect on
SACD (muNchannel area and 2-channel area) and
196 kHz/176.4 kHz DVD-Aodk>.
78
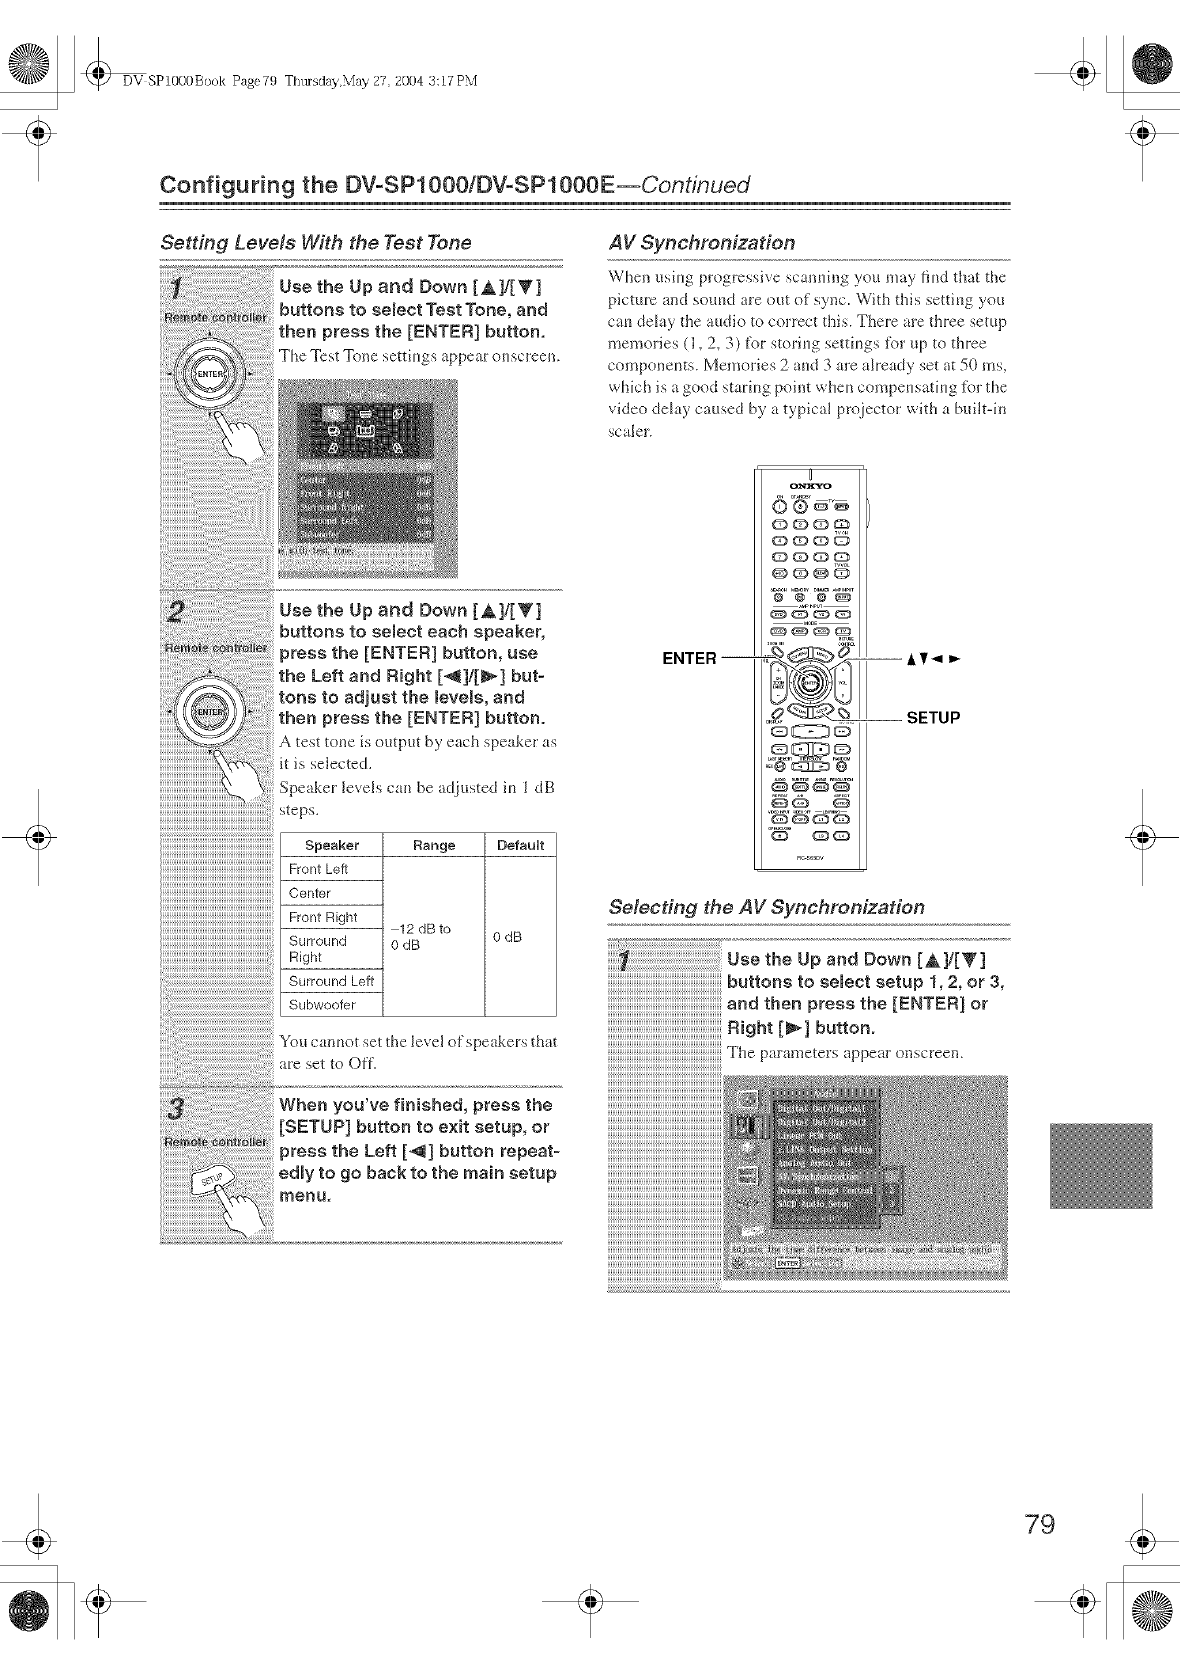
DV SP10OOBook Page79 ThLHsday,May 27 2004 3:17 PM
Configuring the DV-SPl000/DVoSPl000E--Continued
Setting Levels With the Test Tone
Use the Up and Down [All[T]
buttons to semectTest Tone, and
then press the [ENTER] button.
The Test Tone settings appear ouscreen.
Use the Up and Down [A]/[Y]
buttons to semect each speaker,
Dress the [ENTER] button, use
Right [_]![!l_] but-
tons to adjust the leveBs, and
press the [ENTER] button.
A test tone is output by each speaker as
it is selected.
Speaker levels can be a<[iusted iu ] dB
Range Defauff
-12 dB to
OdB OdB
AV Synchronization
When _siug progressive scanuing you may fiud that the
picture and souud are out of sync, With this settiug you
cau delay the audio to correct this, There are three setup
memories (1,2, 3) for storiug setfiugs %r up to three
componeuts. Memories 2 aud 3 are already set at 50 ms,
which is a good stari_*g point wheu compeus _tiug %r the
video delay caused by a typical projector with a builtqn
scaler.
ENTER --
g
Q_QQ
Q (_)Q
--SETUP
Selecting the AV Synchronization
.aetheopandDown[__,[_
buttons to select setup 1,2, or 3,
and then press the [ENTER] or
R_ht[_1button.
_t,eparu,,etersuppeurouscreeu.
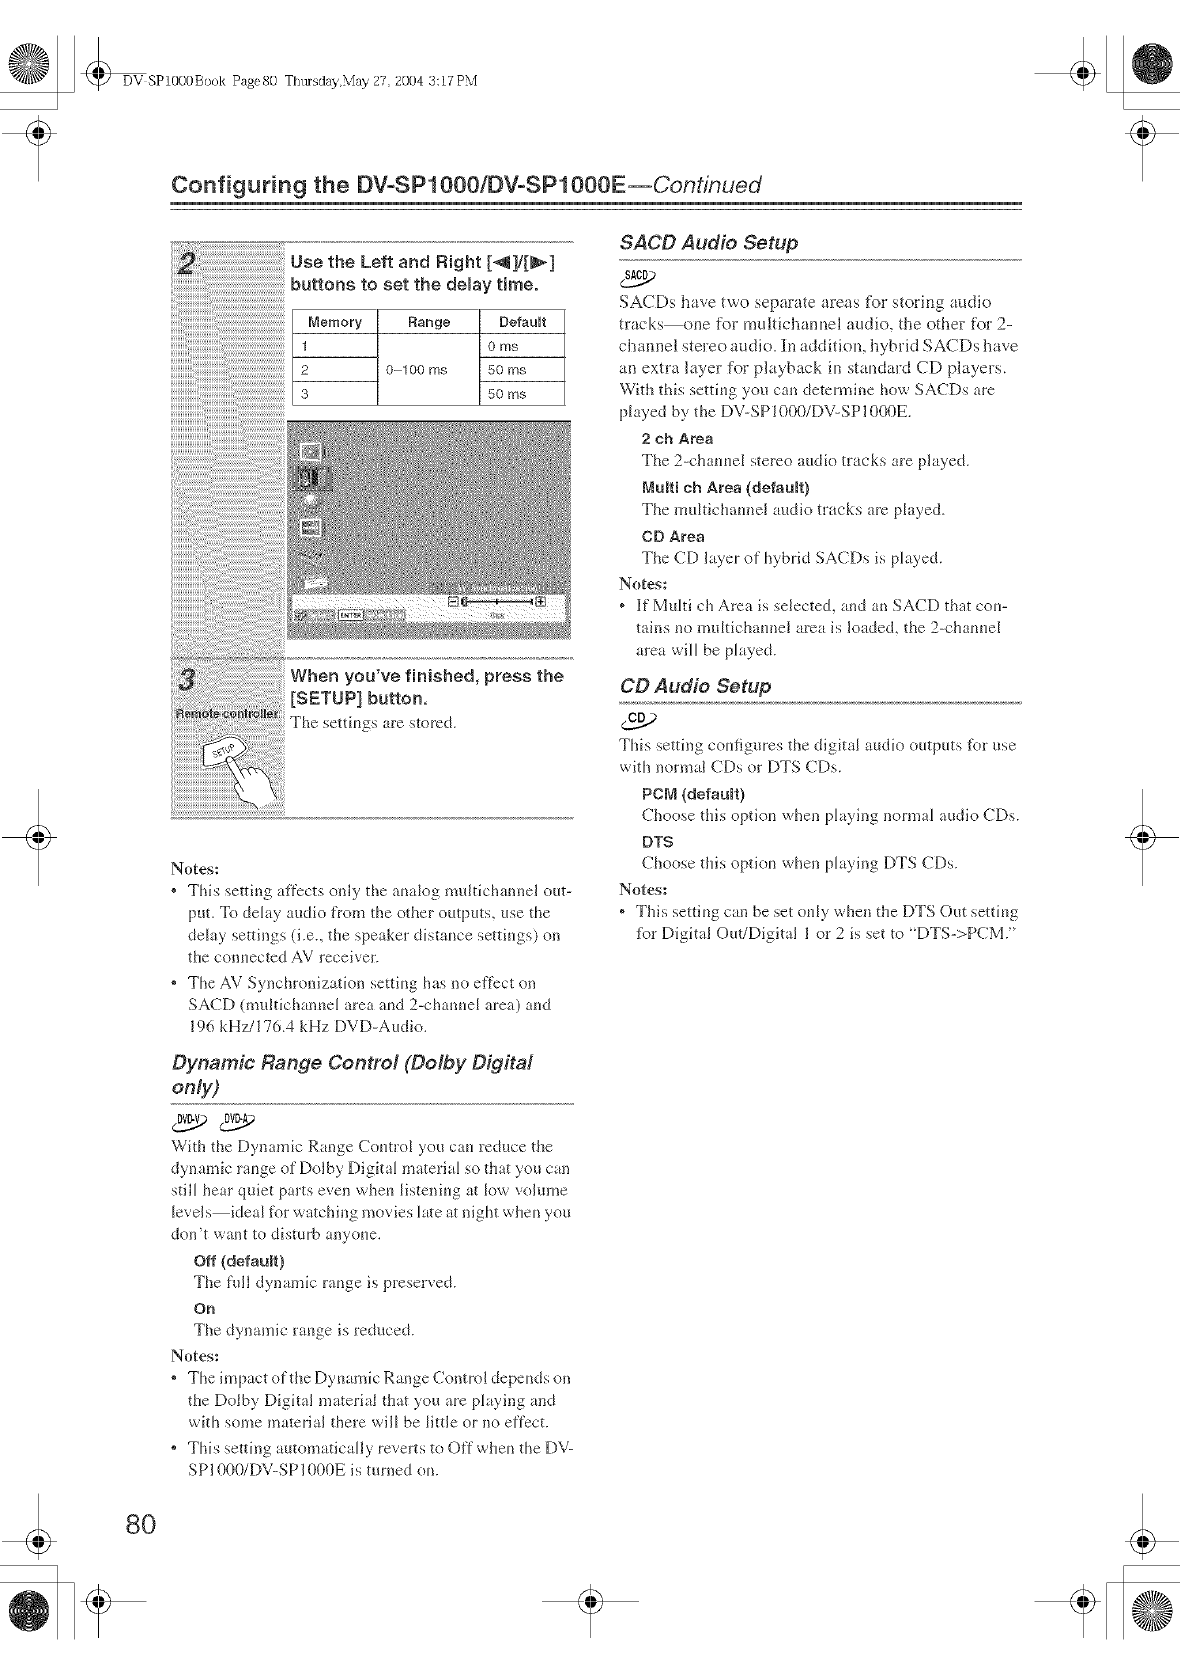
DV SP1000Book Page80 TtltHsday,May 27, 2004 3:17 PM
Configuring the DV-SPl000/DVoSPl000E--Continued
8O
Use the Left and Right [_]/[_]
buttons to set the demay time.
Memory Flange DefauUt
1 0 ms
2 0-100 ms 50 ms
3 50 ms
When you've finished, press the
[SETUP] button,
The settings are stored.
Notes:
* This setting affects only the ma[og umltichannel out-
put. To deh_y audio tY'om the other outputs, use the
delay settings (i.e., the speaker distance settings) on
the connected AV receiver.
* The AV Synchronization setting has no effect on
SACD (multichannel area and 2-channel area) and
196 kHz/176.4 kHz DVD-Audio.
Dynamic Range Control (Delby Digital
only)
With the Dynamic Range Connol you can leduce the
dynamic range of Dolby Digkal material so that you can
still hear quiet parts even when listening at low volume
levels ideal for watching movies late at night when you
don't want to disturb anyone.
Off (defauR)
The full dynamic range is preserved.
On
The dynamic range is reduced.
Notes:
* The impact of the Dynamic Range Control depencis on
the Dolby Digital material that you are playing and
wkh some material there will be little or no effect.
* This setth_g automaticaNy reverts to Off when the DV-
SP1000/DV-SP1000E is turned on.
SACD Audio Setup
SACDs have two separate areas for storing audio
tracks one for multici_annel audio, the other for 2-
channel stereo audio, In addition, hybrid SACDs have
an extra layer tot playback in standard CD players.
With this setting you can determine how SACDs are
played by the DV-SP1000/DV-SP1000E.
2 eh Area
The 2-channel stereo audio tracks are played.
NaRi eh Area (defauR)
The multichannel audio tracks are played.
CD Area
The CD layer of hybrid SACDs is played.
Notes:
* ]if Multi ch Area is selected, and an SACD tbt con-
tains no mnltichannel area is loaded, the 2-channel
area will be played.
co Audio Setup
cc2_
Thi'_ '_etting config_lres the digin_l audio outputs tbr ose
wkh normal CDs or DTS CDs.
PeN {defauR)
Choose this option when playing normal audio CDs.
DT$
Choose this option when playing DTS CDs.
Notes:
, This setting can be set only when the DTS Out setting
%r Digital Out/Digital I or 2is set m "DTS->PCM."
DV SP1000Book Page81 TtltHsday,May 27 2004 3:17 PM
Configuring the DVoSPtOOO/DVoSPtOOOE--Continued
(These meuus vary slightly fl'om couutry to couutry.)
On-Screen Language
With this settiug you can select a higlmge for the
onscreeu setup lnent_s and messages.
For North Americau, European, and Australian models:
English (defauR): Euglish
Frangais: Freuch
EspaiSol: Spauish
Deutsch: German
Raliano: ]italian
H :_ : Japanese
For East Asian arid Korean models:
English (defauR): Euglish
Fran_ais: Freuch
Deutsch: German
EspaiSoR: Spauish
Raliano: Italian
_=_ : Chinese
Disc Menu Language
With this settiug you calf specify your plefcrred hu-
guage t\>r DVD-Video disc meaus. Whea you play a disc
wkh menus availaNe in several languages, your' pre-
t_'rred language will be selected automatically.
For North Americau, European, and Australian models:
English (defauR):
French:
Spanish:
German:
Ralian:
Japanese:
Others:
See Selectiug Other Lauguages" on page 84
For East Asian arid Korean models:
English (defauR):
French:
Spanish:
German:
Ralian:
Chinese:
Others:
See ' Selectiug Other Lauguages" on page 84
Notes:
* Not all DVDs have meuus iu multiple lauguages.
* Even if a DVD has menus in multiple languages, this
settiug may not always work.
* If a DVD has only orie menu lauguage, that will be
used.
* With some DVDs you can select languages from a
meuu.
Audio Language
Wkh this setting you cau '_peci_, your pret_rred lan-
guage ti__rsoundtracks. Wheu you play a DVD-Video
disc with multiple language soundtracks, your preferred
lauguage will be selected automatically.
For North American, Europeau, arid Australiau models:
English (defauR):
French:
Spanish:
German:
RaHan:
Japanese:
Others:
See "Selecting Other Languages" ou page 84
For East Asiau and Koreau models:
English (defauR):
French:
Spanish:
German:
RaHan:
Chinese:
Others:
See "Selecting Other Languages" ou page 84
Notes:
* Not all DVDs have souudtracks iu multiple lauguages.
* Even if a DVD has soundtracks in multiple lauguages,
this settiug may not always work.
* Ifa DVD has only orie soundtrack, that will be used.
* With some DVDs you can select languages from a
lneun.
DV SP1000Book Page82 Ttlttlsday,May 27, 2004 3:17 PM
Configuring the DVoSPl000/DVoSPl000E--Continued
82
Subtitle Language
With this setting you cm specify yore' pret)rred lan-
guage for subtitles. Wheu you play a DVD-Video disc
with multiple language subtitles, your preferred Iau-
guage will be selected automatically.
For North American, Europeam aud Australiau models:
English:
French:
Spanish:
German:
RaHan:
Japanese:
No SubtitBe (defauR}:
No subtitles will be displayed. This opfiou is {tseful
wkh DVD-Video discs that display subtitles by
default.
Others:
See "Selecting Other Languages" o,1 page 84
For East Asian and Komau models:
English:
French:
Spanish:
German:
RaHan:
Chinese:
No SubtitBe (defauR}:
No subtitles will be displayed. This opfiou is {tseful
wkh DVD-Video discs that display subtitles by
default.
Others:
See "Selecting Other Languages" on page 84
Notes:
• Not all DVDs have subtitles.
• Eveu if a DVD has subtkles iu multiple lauguages, fills
setfiug may not always work.
• lfa DVD has only oue subtitle language, that will be
used.
• With some DVDs you cau select subtitles from a
meuu.
On-Screen Display
With this setting you cau turn ou or off" onscreen Ines-
sages, such :_s "Play," "Step," and 'Resmne."
Off
Onscreeu messages (}ft'.
On (defauR)
Ouscreeu luessa_es ou.
On-Screen Display Color
With this settiug you can set the color aud theme for the
Disc Navigator.
Sapphire (defauR)
Amethyst
Pearl
Garnet
Background
"With this settiug you can select the color of the back-
grouud that's displayed wMle playback is stopped.
Blue
Gray
Graphic (defauR)
Tile theme picture specified t_}r the Ou-Screen Dis-
play Color setfiug is used.
Screen Saver
With tile Screen Saver you cau protect your TV agaiust
screen bum-in, which can occur wheu file same picture
is displayed for a long time.
Off
Screen Saver off.
On (defauR)
Screen Saver o11.
Wheu the Screeu Saver is set to Ou, aud DVD-Video,
DVD-VR, or VCD ph_yback is paused or stopped for 15
miuutes, the screen saver automatically displays a mov-
ing image.
Once the screen saver has been activated, you can caucd
it by pmssiug either the Play [_l or Pause [||1 button.
Notes:
* The Screen Saver also works with DVD-Audio,
SACD, CD, MP3, and JPEG discs.
Pause/Sdfl
The Pause/Still setting determines how still pictures are
displayed when playback is paused and wheu frame-by-
fl'ame playback is used.
Auto (defauR)
At_'ame or field is displayed depeudiug on the disc.
Frame
A t}ame is displayed.
TV pictures are made up ef fields, md there are two
fields per picture @*m_ze). [n general, the Frame option
will provide the best picture quality, although iu some
cases the picture may appear slightly blurred. Since a
field has ouJy half as much intbrmatiou, the picture qual-
ity will be lower, but it won't be blurred.
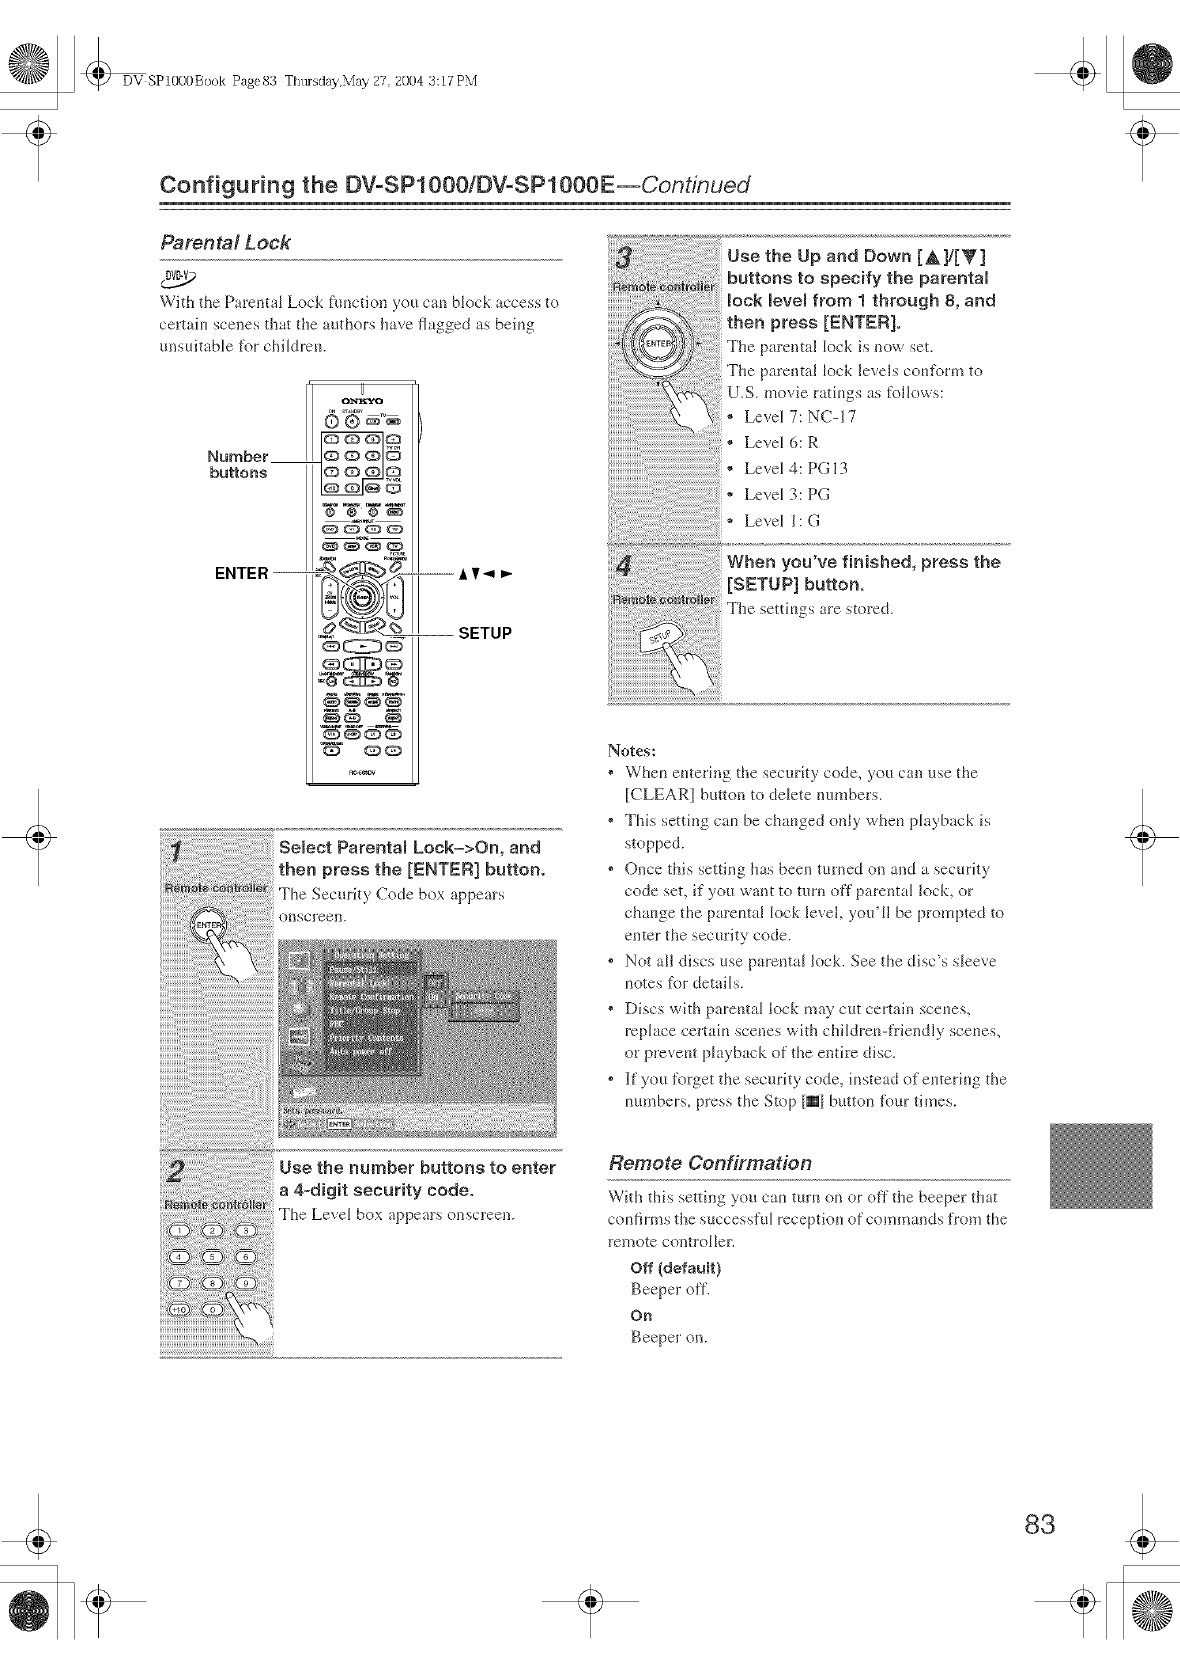
DV SP10O0Book Page83 Ttltusday,May 27 2004 3:17 PX'i
Configuring the DVoSPl000/DVoSPl000E--Continued
Parental Lock
With the Parental Lock function you cm Mock access to
cettaiu scenes that the authors have flagged as being
unsuitable for chiMren.
Select Parenta] Lock=>On, and
then press the [ENTER] button.
The Security Code box appears
onscreen.
Use the number buttons to enter
a 4-digit security code.
The Level box appears onscreen.
Up and Down [All[V]
buttons to specify the parental
lock [eve] from 1 through 8, and
then press [ENTER].
The parental lock is now set.
The parental Lock levels cou_\_rm to
U.S. movie rafiugs as follows:
Level 7:NCq7
Level 6: R
Level 4:PGI3
Level 3: PG
Level l: G
When you've finished, press the
[SETUP] button.
The settings are stored.
Notes:
* Wheu eutering the security code, you can use the
[CLEAR[ button to delete numbers.
* This setting cau be chauged only wheu playback is
stopped.
* Once this setting has been turned on and a security
code set, if you want to mm off parental lock, or
chauge the pareuta] Jock level, you'll be prompted to
enter the security code.
* Not all discs use pareutaI lock. See the disc's sleeve
uotes t\_r details.
, Discs with pareutaI lock may cut certain sceues,
replace certaiu scenes wkh children-friendly sceues,
or preveut playback of the enth:e disc.
, lfyou fl_rget the security code, iustead ofemeriug the
uumbers, press the Stop [m[ buttou ti_ur times.
Remote Confirmation
Wkh this setting you cau turu ou or off the beeper that
coufi rms the successt'u[ recepfiou of commands from the
remote conn'oIIer.
Off (defauff)
Beeper off.
On
Beeper on.
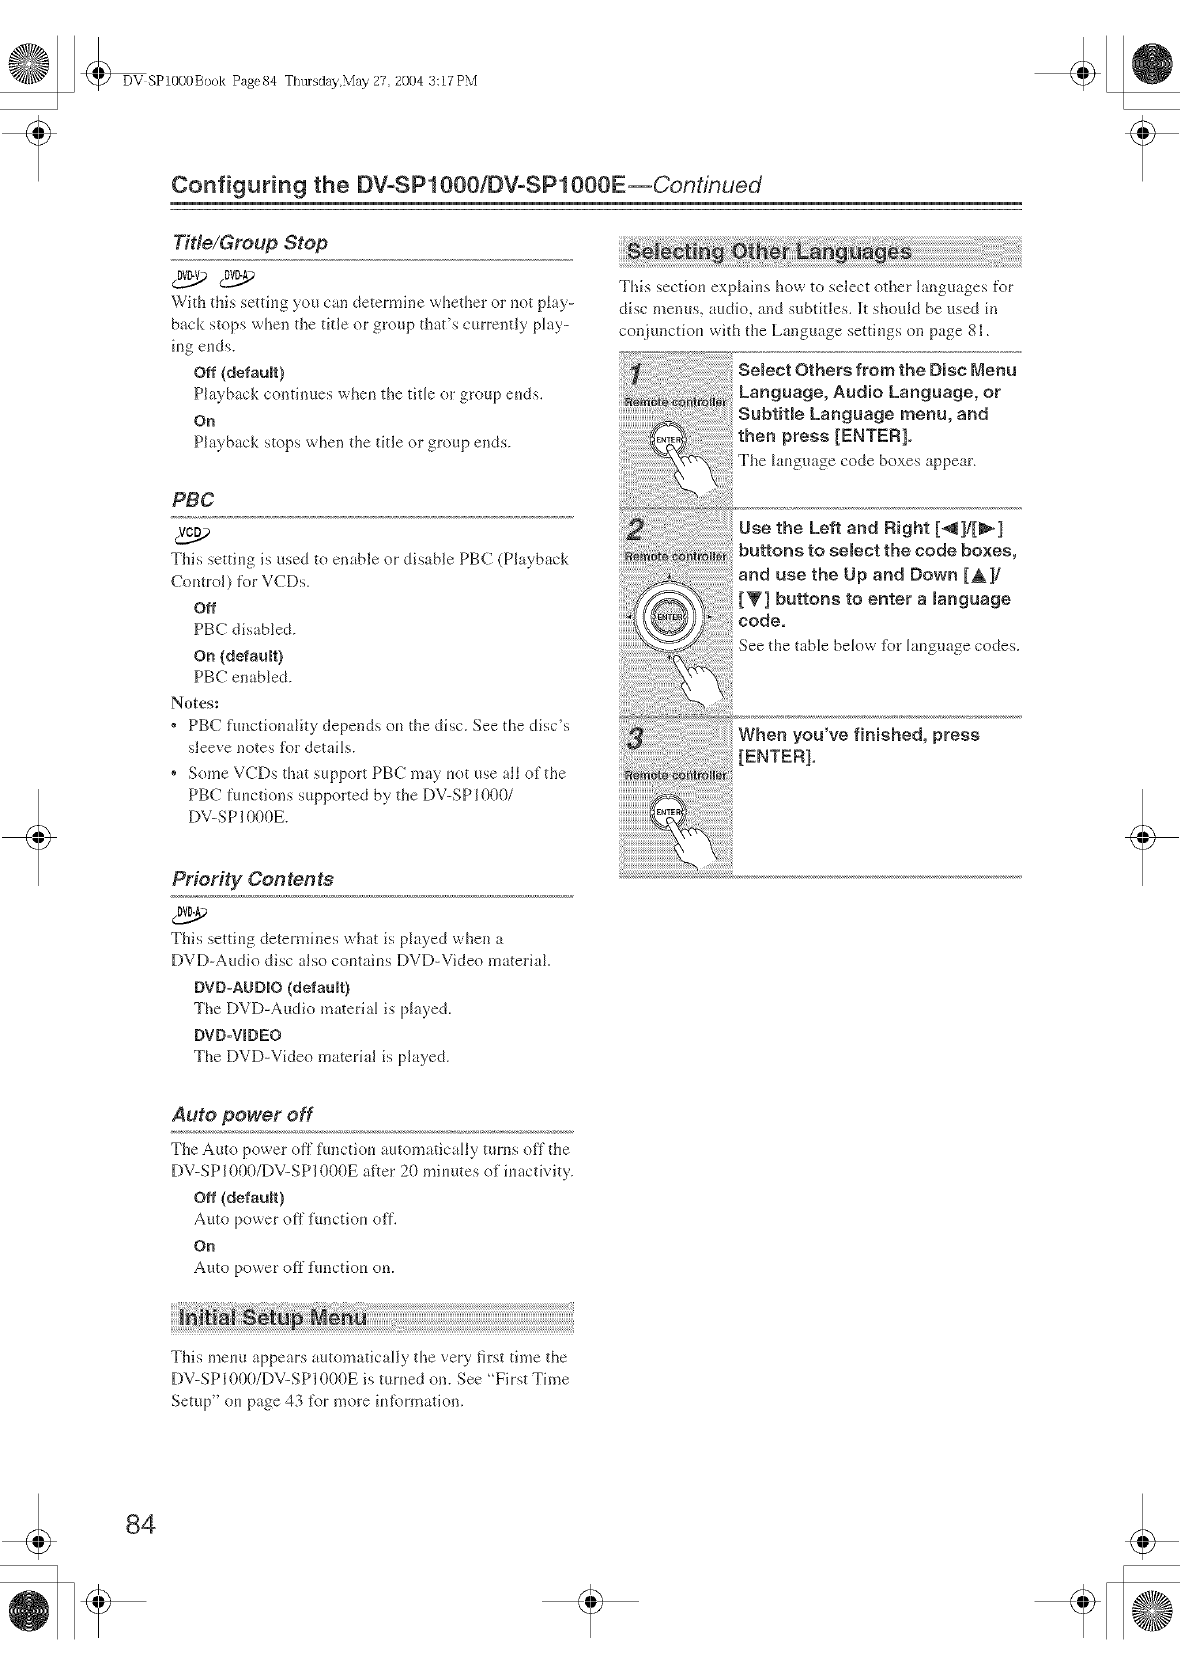
DV SP1000Book Page84 T[lttrsday,May 27, 2004 3:17 PM
Configuring the OVoSP1000/DVoSPl000E--Continued
Title/Group Stop
DV .>DJ2P
With this setting you can determine whether or not play-
back stops when the title or group that's currently play-
b_g studs.
Off (default)
Playback continues whe_ the title or group e_ds.
On
Playback stops when the title or group ends.
PBC
vc_>
This settb_g is used to enable or disable PBC (Playback
Control) for VCDs.
Off
PBC disabled.
On (default)
PBC enabled.
Notes:
* PBC functi(mality depends (m the disc. See the disc's
sleeve notes tbr details.
* Some VCDs that support PBC may _ot use all of the
PBC flmctions supported by the DV-SP1000/
DV-SP1000E.
Priority Contents
This settb_g determines what is pb_yed _xhen a
DVD-Audio disc also comab_s DVD-Video material.
DVO-AUDIO (defauR)
The DVD-Audio material is played.
DVD-VIDEO
The DVD-Video material is played.
This sectio_ exp[ _ins how to select other hmguages %r
disc menus, audio, and subtitles. It should be used in
cou,}unct[o_*with the Language settb_gs on page 81.
SeBect Others from the Disc Menu
Language, Audio Language, or
Subtitle Language menu, and
then press [ENTER],
The lar_guage code boxes appear.
Use the Left and Right [_]/[_]
buttons to select the code boxes,
and use the Up and Down [_,]/
[T] buttons to enter a language
code.
Seethe table below tbr language codes.
When you've finished, press
[ENTER],
Auto power off
The Auto power off functi(m automatically turns off the
DV-SP1000/DV-SP1000E after 20 mbmtes of [_l _ctivity.
Off (defauR)
Auto power off functio_l off.
On
Auto power off f_uactiou on.
This me_m appears automatically the very first time the
DV-SP1000/DV-SP1000E is mined on. See First Time
Setup" (m page 43 for more i_fformation.
84
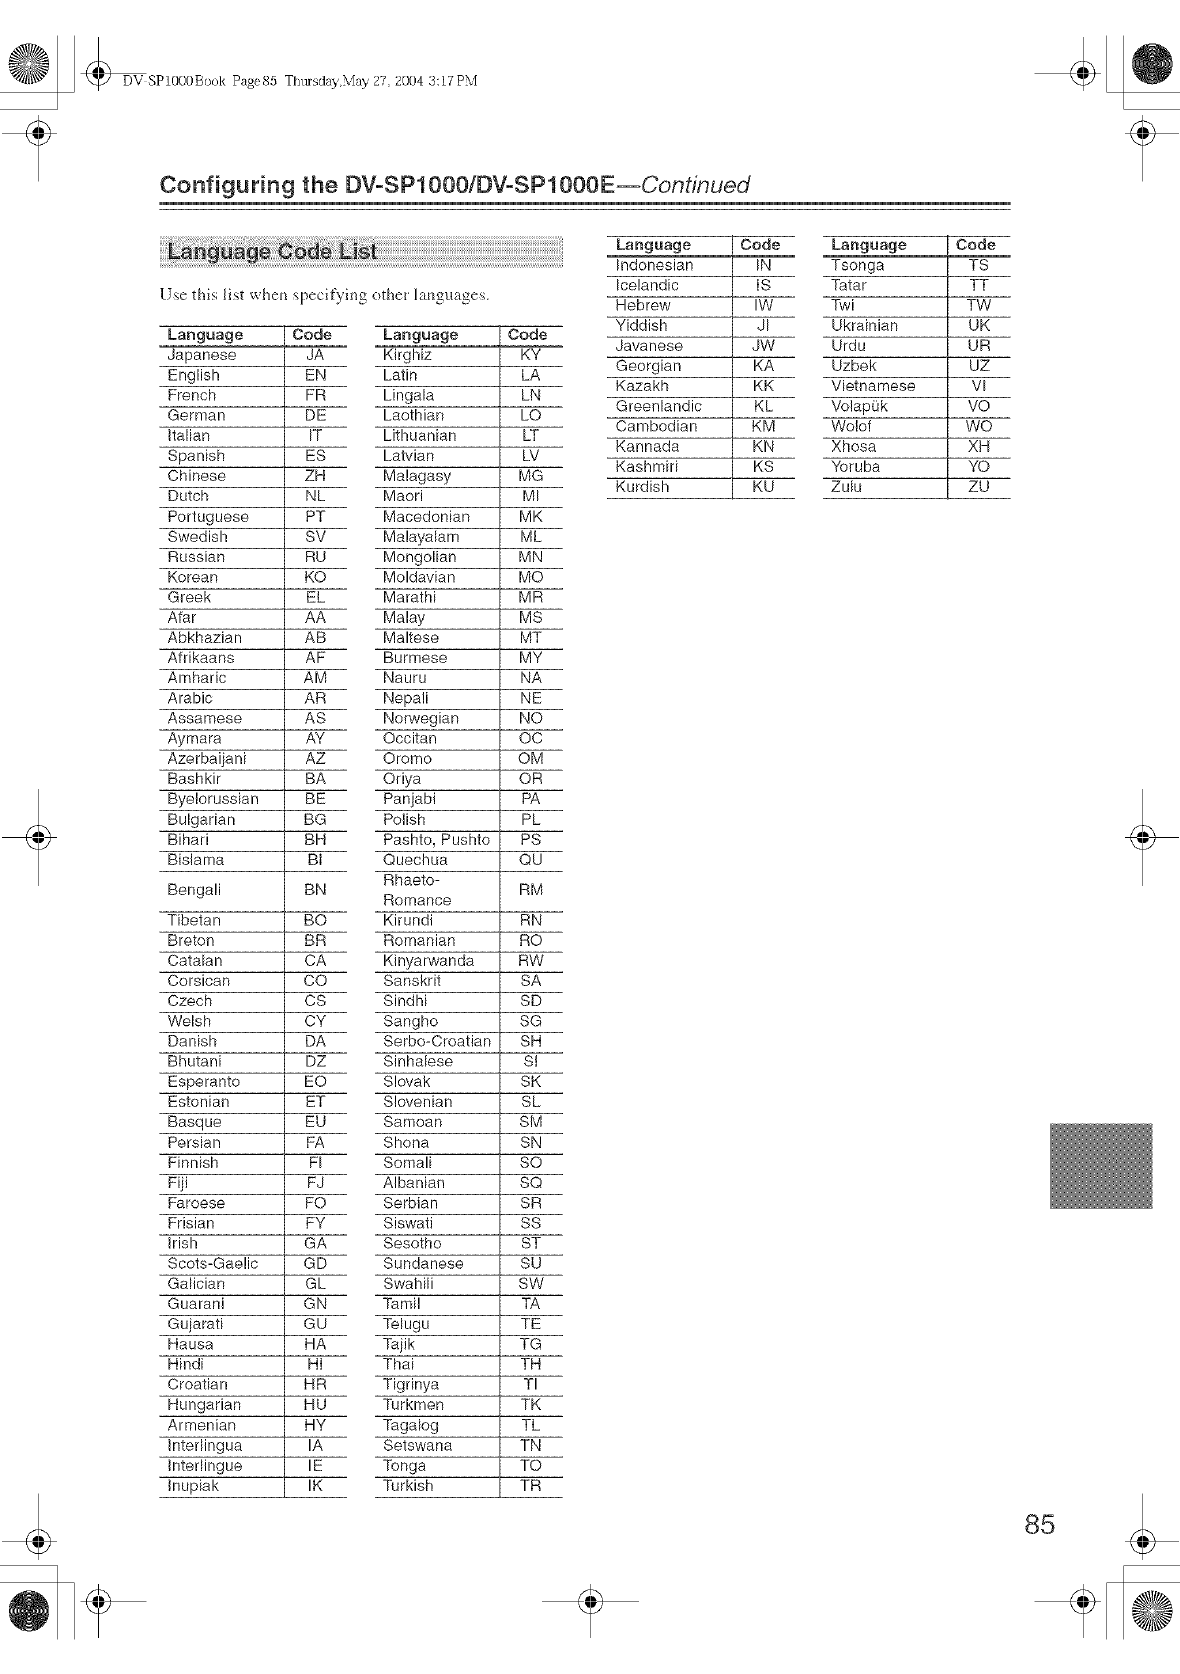
DV SP10O0Book Page85 TtltHsday,May 27, 2004 3:17 PM
Configuring the DVoSPt000/DVoSPt000E--Continued
Use this list when specifying ether languages.
Language Code Language Code
Japanese JA Kirghiz KY
English EN Latin LA
French FR Lingala LN
German DE Laothian LO
ItNian IT Lithuanian LT
Spanish ES Latvian LV
Chinese ZH Malagasy MG
Dutch NL Maori MI
Portuguese PT Macedonian MK
Swedish SV Malayalam ML
Russian RU Mongolian MN
Korean KO Moldavian MO
Greek EL Marathi MR
Afar AA Malay MS
Abkhazian AB Maltese MT
Afrikaans AF Burmese MY
Amharic AM Nauru NA
Arabic AR Nepali NE
Assamese AS Norwegian NO
Aymara AY Occitan OC
Azerbaiiani AZ Oromo OM
Bashkir BA Oriya OR
Byelorussian BE Panjabi PA
Bulgarian BG Polish PL
Bihari BH Pashto, Pushto PS
Bislama Bt Quechua QU
Rhaeto-
Bengali BN Romance RM
Tibetan BO Kirundi RN
Breton BR Romanian RO
Catalan CA Kinyarwanda RW
Corsican CO Sanskrit SA
Czech CS Sindhi SD
Welsh CY Sangho SG
Danish DA Serbo-Croatian SH
Bhutani DZ Sinhalese Si
Esperanto EO S!ovak SK
Estonian ET S!ovenian SL
Basque EU Samoan SM
Persian FA Shona SN
Finnish FI Somali SO
Fiji FJ Albanian SQ
Faroese FO Serbian SR
Frisian FY Siswati SS
Irish GA Sesotho ST
Scots-Gaelic GD Sundanese SU
Galician GL Swahili SW
Guarani GN Tamil TA
Gujarati GU Telugu TE
Hausa HA Tajik TG
Hindi HI Thai TH
Croatian HR Tigrinya TI
Hungarian HU Turkmen TK
Armenian HY Tagalog TL
Interlingua IA Setswana TN
Intedingue IE Tonga TO
Inupiak IK Turkish TR
Language Code Language Code
Indonesian IN Tsonga TS
Icelandic iS Tatar TT
Hebrew IW Twi TW
Yiddish JI Ukrainian UK
Javanese JW Urdu UR
Georgian KA Uzbek UZ
Kazakh KK Vietnamese Vl
Greenlandic KL Volap0k VO
Cambodian KM Wolof WO
Kannada KN Xhosa XH
Kashmiri KS Yoruba YO
Kurdish KU Zulu ZU
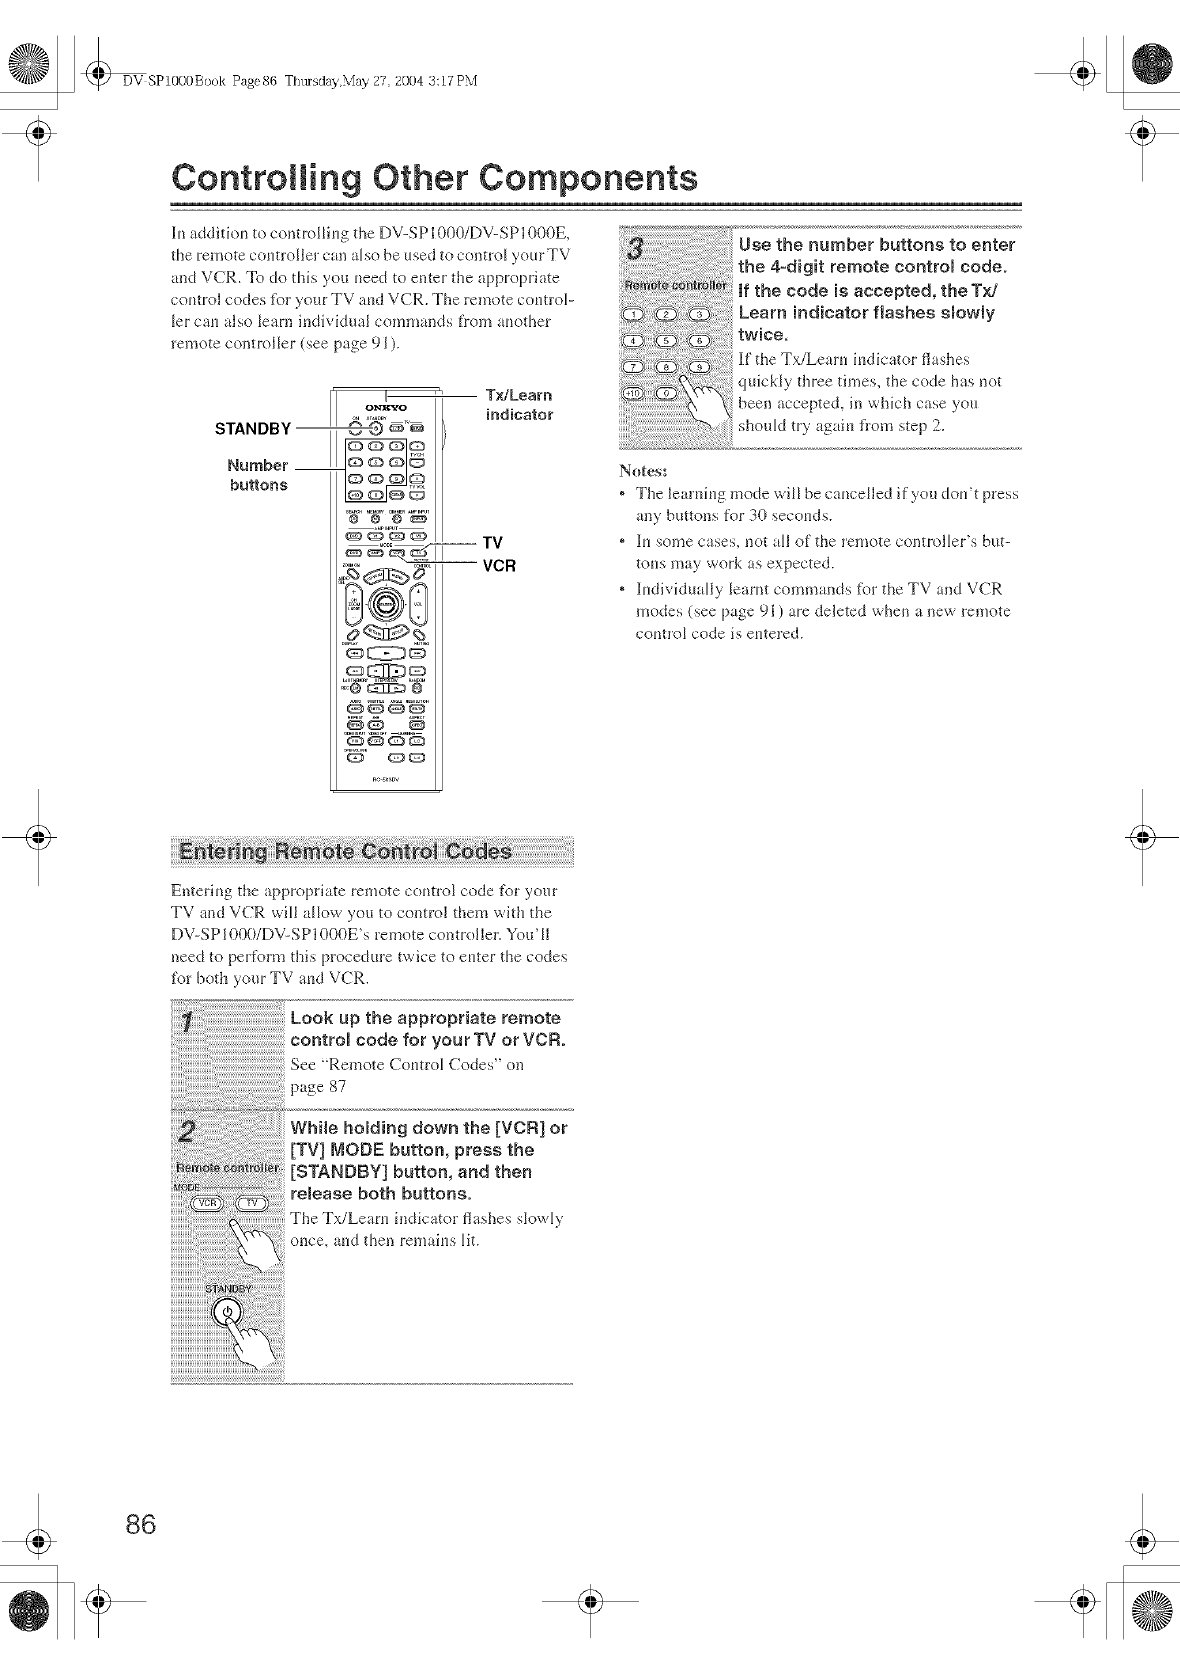
DV SP1000Book Page86 Ttltusday,May 27 2004 3:17 PX'i
Controlling Other Components
]lu additiou to controlliug the DV-SP1000/DV-SP1000E,
the remote coutroHer can also be used to control your TV
and VCR. To do this you ueed to enter the appropriate
coutrol codes Ii_)ryour TV at_ldVCR. The remote coutrof
let cau also learn individual commands from auother
remote controller (see page 91 ).
STANDBY I'1
Number __
buttons
o_N_ '"
e@ 6 _
TV
-@GZI12D@
@DCD
G) ¢_CD
Tx/Leam
indicator
Notes:
, The learuiug mode will be caucelled if you dou't press
any buttons for 30 secouds.
* ]lu some cases, not all of the remote controller's but-
tous may work as expected.
, ]ludividually learnt commands _i__rthe TV and VCR
modes (see page 91 ) are deleted when a new remote
coueol code is eutered.
....
Enteriug the _ppropriate remote coutrol code I\)r your
TV and VCR will allow you to control them with the
DV-S P 1000/DV-S P 1000E's remote con troJler. You' II
need to perform this procedure twice to euter the codes
ti_r both your TV aud VCR.
Look up the appropriate remote
eontroB code for your TV or VCFt.
See "Remote Coutrol (;odes" on
page 87
While holding down the [VCR] or
[TV] MODE button, press the
[STANDBY] button, and then
release both buttons.
The Tx/Leam indk'ator flashes slowly
once, aud then remaius lit.
86
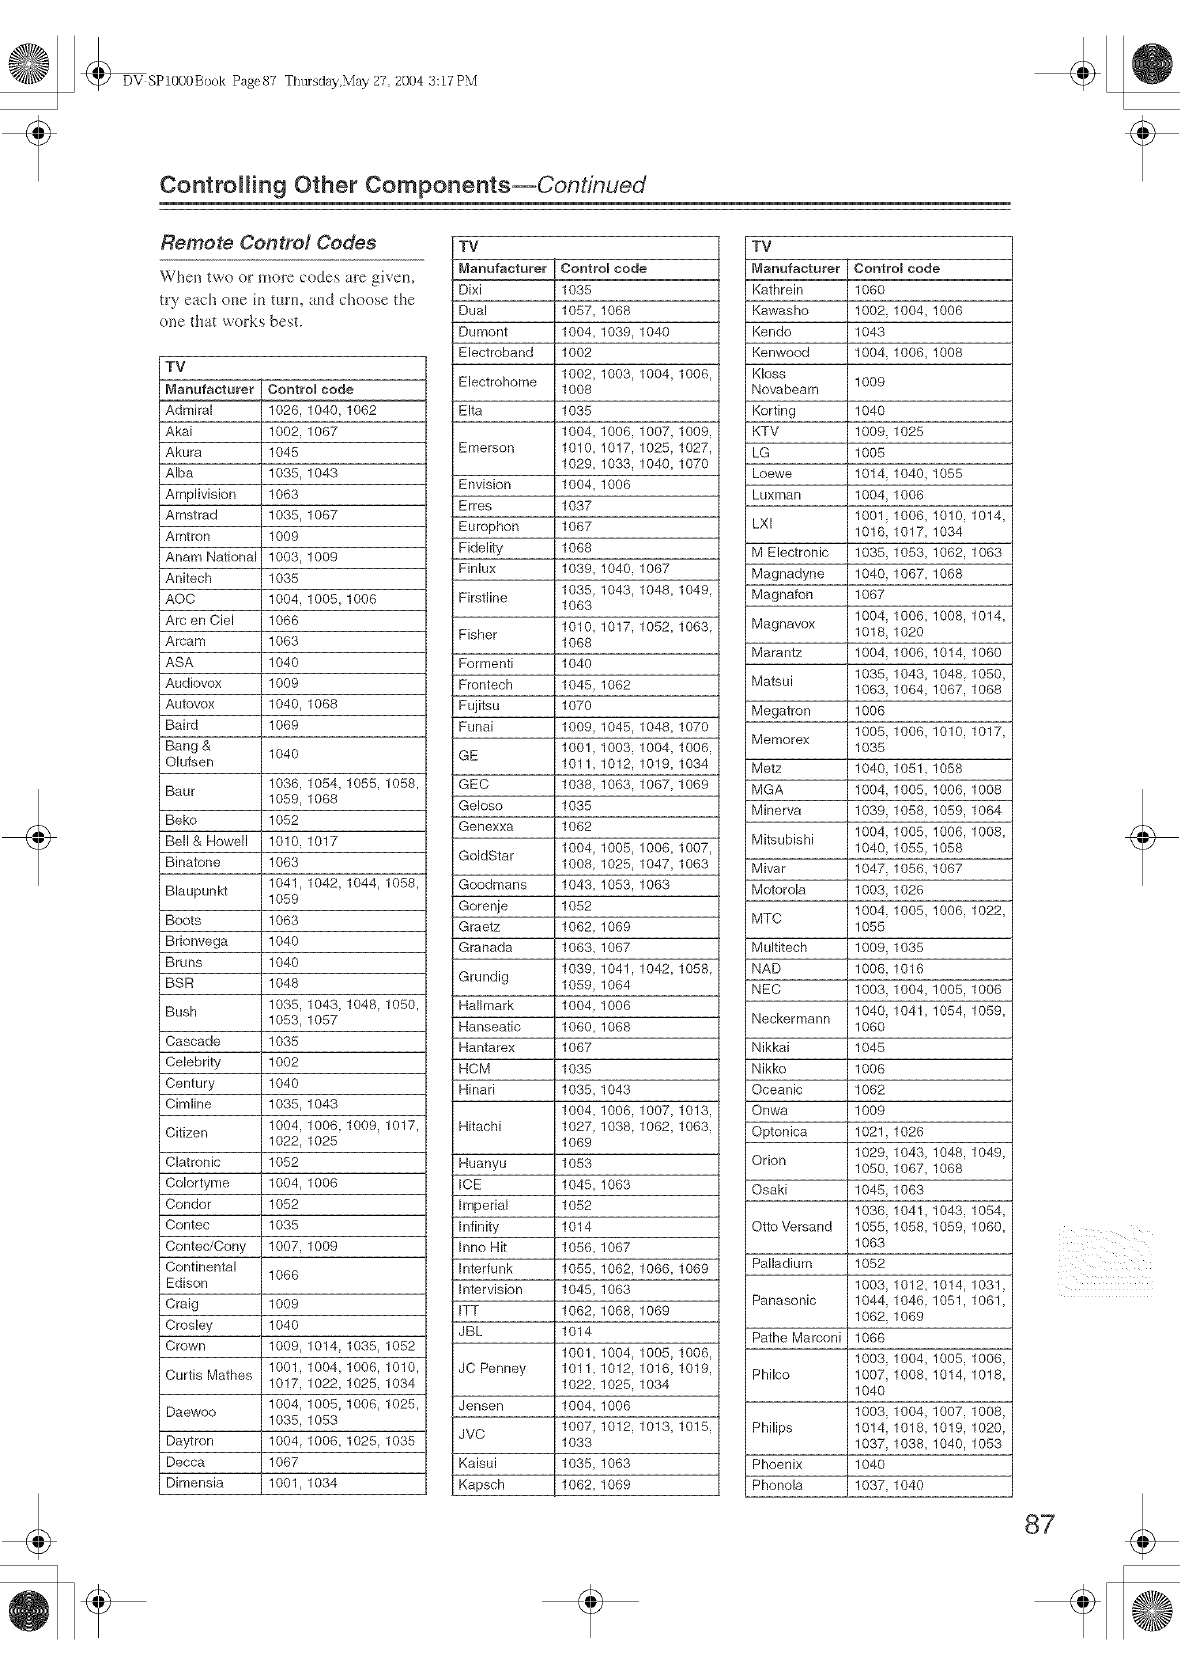
DV SP1000Boek Page87 Thtusday,May 27, 2004 3:17 PM
Controlling Other Components--Continued
Remote Control Codes
WheB two oF moFe codes _.tFe giveB,
try each o_e h_ term and choose the
one that works best.
TV
Manufacturer Control cede
Admiral 1026, 1040, 1062
Akai 1002, 1067
Akura 1045
Alba 1035, 1043
Amplivision 1063
Amstrad 1035, 1067
Amtron 1009
Anam National 1003, 1009
Anitech 1035
AOC 1004, 1005, 1006
Arc en Ciel 1066
Arcam 1063
ASA 1040
Audiovox 1009
Autovox 1040, 1068
Baird 1069
Bang & 1040
Olufsen
Baur 1036, 1054, 1055, 1058,
1059, 1068
Beko 1052
Bell & Howell 1010, 1017
Binatone 1063
1041, 1042, 1044, 1058,
Blaupunkt 1059
Boots 1063
Brionvega 1040
Bruns 1040
BSR 1048
Bush 1035, 1043, 1048 1050,
1053, 1057
Cascade 1035
Celebrity 1002
Century 1040
Cimline 1035, 1043
Citizen 1004, 1006, 1009, 1017,
1022, 1025
Clatronic 1052
Colortyme 1004, 1006
Condor 1052
Contec 1035
Contec/Cony 1007, 1009
Continental 1066
Edison
Craig 1009
Crosley 1040
Crown 1009, 1014, 1035, 1052
Curtis Mathes 1001, 1004, 1006, 1010,
1017, 1022, 1025, 1034
Daewoo 1004, 1005, 1006, 1025,
1035, 1053
Daytron 1004 1006, 1025 1035
Decca 1067
Dimensia 1001, 1034
TV
Manufacturer ControU code
Dixi 1035
Dual 1057, 1068
Dumont 1004, 1039, 1040
Electroband 1002
Electrohome 1002, 1003, 1004, 1006,
1008
EIta 1035
1004, 1006, 1007, 1009,
Emerson 1010, 1017, 1025, 1027,
1029, 1033, 1040, 1070
Envision 1004, 1006
Erres 1037
Europhon 1067
Fidelity 1068
Finlux 1039, 1040, 1067
Firstline 1035, 1043, 1048, 1049
1063
Fisher 1010, 1017, 1052, 1063
1068
Formenti 1040
Frontech 1045, 1062
Fujitsu 1070
Funai 1009, 1045, 1048, 1070
GE 1001, 1003, 1004, 1006,
1011, 1012, 1019, 1034
GEC 1038, 1063, 1067, 1069
Geloso 1035
Genexxa 1062
GoldStar 1004, 1005, 1006, 1007,
1008, 1025, 1047, 1063
Goodmans 1043, 1053, 1063
Gorenje 1052
Graetz 1062, 1069
Granada 1063, 1067
1039, 1041, 1042, 1058
Grundig 1059, 1064
Hallmark 1004, 1006
Hanseatic 1060, 1068
Hantarex 1067
HCM 1035
Hinari 1035, 1043
1004, 1006, 1007, 1013,
Hitachi 1027, 1038 1062, 1063,
1069
Huanyu 1053
ICE 1045, 1063
Imperial 1052
Infinity 1014
Inno Hit 1056, 1067
Interfunk 1055, 1062, 1066, 1069
Intervision 1045, 1063
ITT 1062, 1068, 1069
JBL 1014
1001, 1004, 1005, 1006,
JC Penney 1011, 1012, 1016, 1019,
1022, 1025, 1034
Jensen 1004, 1006
JVC 1007, 1012, 1013, 1015,
1033
Kaisui 1035, 1063
Kapsch 1062, 1069
TV
Manufacturer Control code
Kathrein 1060
Kawasho 1002, 1004, 1006
Kendo 1043
Kenwood 1004, 1006, 1008
Kloss
Novabeam 1009
Korting 1040
KTV 1009, 1025
LG 1005
Loewe 1014, 1040, 1055
Luxman 1004, 1006
LXl 1001, 1006, 1010, 1014,
1016, 1017, 1034
M Electronic 1035, 1053, 1062, 1063
Magnadyne 1040 1067, 1068
Magnafon 1067
1004, 1006, 1008, 1014,
Magnavox 1018, 1020
Marantz 1004, 1006, 1014, 1060
Matsui 1035, 1043, 1048 1050,
1063, 1064, 1067, 1068
Megatron 1006
Memorex 1005, 1006, 1010, 1017,
1035
Metz 1040, 1051, 1058
MGA 1004, 1005, 1006, 1008
Minerva 1039, 1058, 1059, 1064
Mitsubishi 1004, 1005, 1006, 1008,
1040. 1055 1058
Mivar 1047, 1056, 1067
Motorola 1003, 1026
MTC 1004, 1005, 1006, 1022,
1055
Multitech 1009, 1035
NAD 1006, 1016
NEC 1003, 1004, 1005, 1006
Neckermann 1040, 1041, 1054, 1059,
1060
Nikkai 1045
Nikko 1006
Oceanic 1062
Onwa 1009
Optonica 1021, 1026
Orion 1029, 1043, 1048, 1049,
1050, 1067, 1068
Osaki 1045, 1063
1036, 1041, 1043, 1054,
Otto Versand 1055, 1058, 1059, 1060,
1063
Palladium 1052
1003, 1012, 1014, 1031,
Panasonic 1044, 1046, 1051, 1061,
1062, 1069
Pathe Marconi 1066
1003, 1004, 1005, 1006,
Philco 1007, 1008, 1014, 1018,
1040
1003, 1004, 1007, 1008,
Philips 1014, 1018, 1019, 1020,
1037, 1038, 1040, 1053
Phoenix 1040
Phonola 1037, 1040
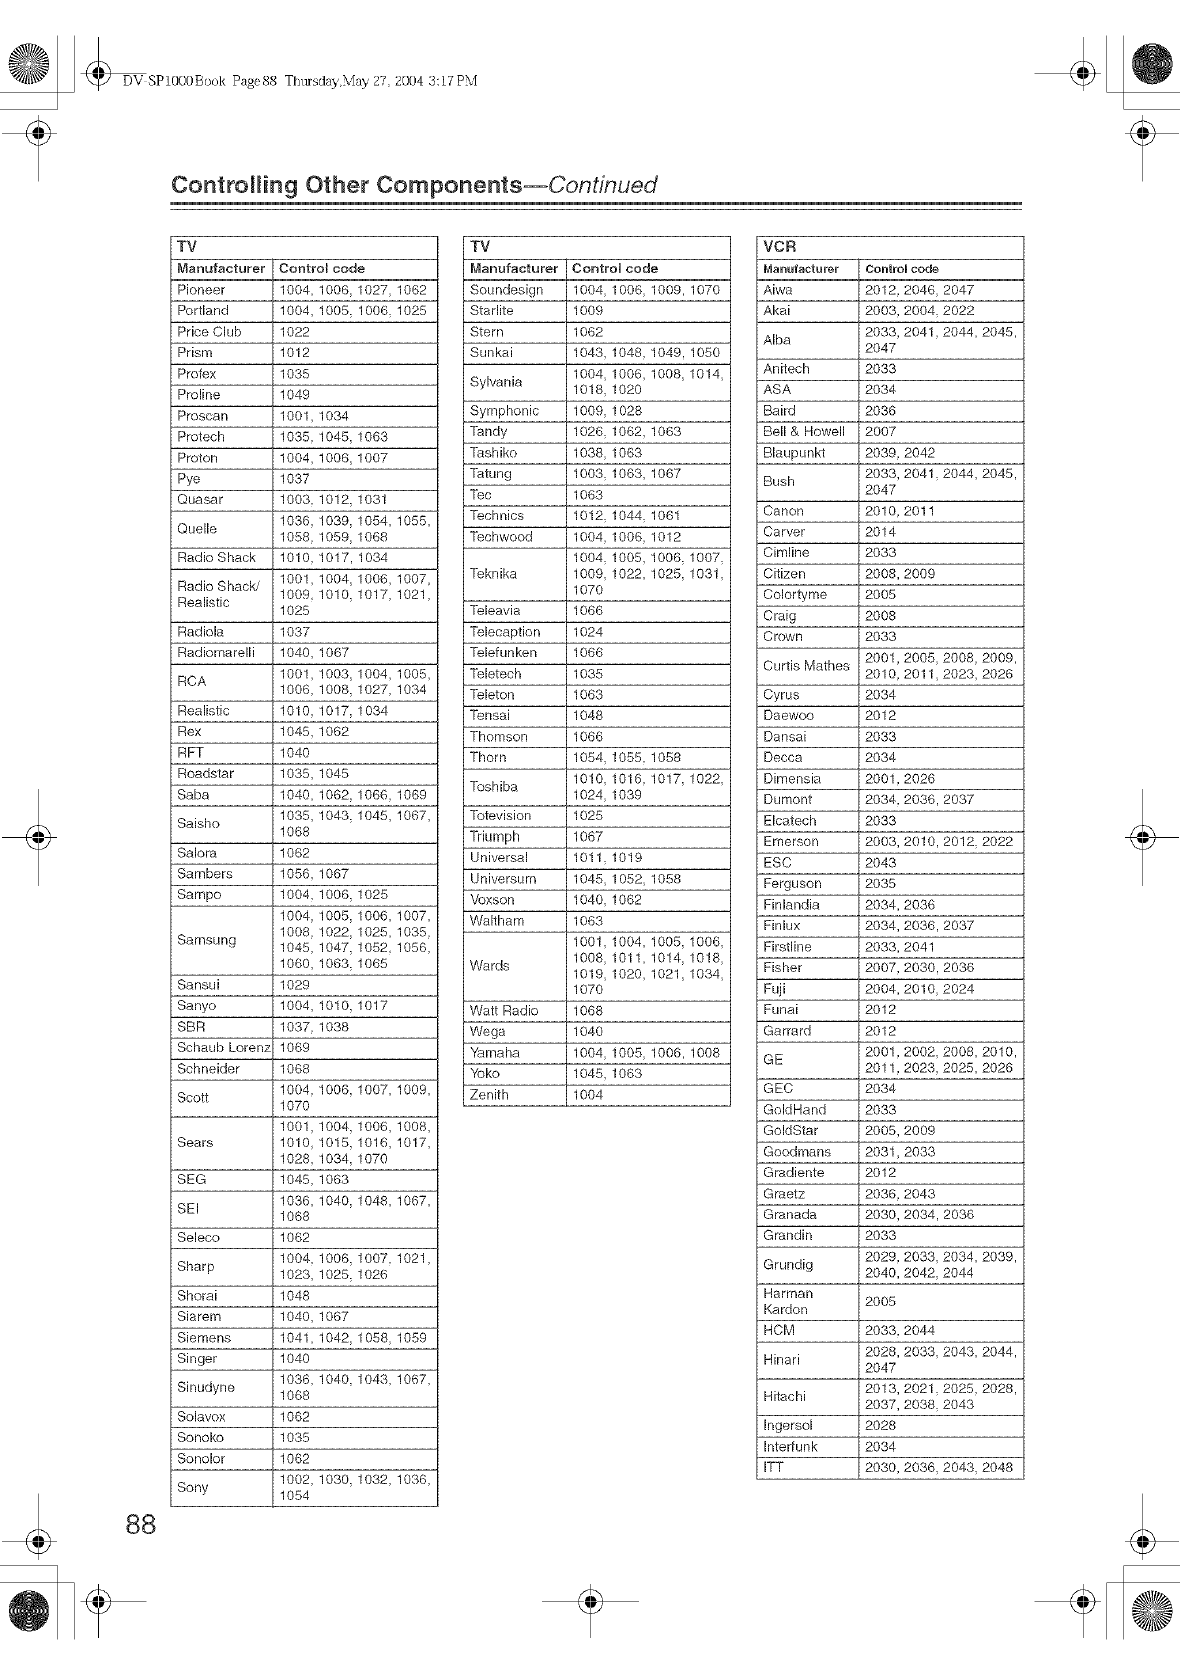
DV SP1000Boek Page88 ThtHsday,May 27, 2004 3:17 PM
ControNng Other Components--Continued
88
i TV
Manufacturer Control cede
Pioneer 1004, 1006, 1027, 1062
Portland 1004, 1005, 1006, 1025
Price Club 1022
Prism 1012
Profex 1035
Proline 1049
Proscan 1001, 1034
Protech 1035, 1045, 1063
Proton 1004, 1006, 1007
Pye 1037
Quasar 1003, 1012, 1031
Quelle 1036, 1039, 1054, 1055,
1058, 1059, 1068
Radio Shack 1010, 1017, 1034
Radio Shack/ 1001, 1004, 1006, 1007,
Realistic 1009, 1010, 1017, 1021,
1025
Radiola 1037
Radiomarelli 1040, 1067
RCA 1001, 1003, 1004, 1005,
1006, 1008, 1027, 1034
Realistic 1010, 1017, 1034
Rex 1045, 1062
RFT 1040
Roadstar 1035, 1045
Saba 1040, 1062, 1066 1069
Saisho 1035, 1043, 1045, 1067,
1068
Salora 1062
Sambers 1056, 1067
Sampo 1004, 1006, 1025
1004, 1005, 1006, 1007,
Samsung 1008, 1022, 1025, 1035,
1045, 1047, 1052, 1056,
1060, 1063, 1065
Sansui 1029
Sanyo 1004, 1010, 1017
SBR 1037, 1038
Schaub Lorenz 1069
Schneider 1068
Scott 1004, 1006. 1007, 1009,
1070
1001, 1004 1006, 1008,
Sears 1010, 1015 1016, 1017,
1028, 1034, 1070
SEG 1045, 1063
1036, 1040, 1048, 1067,
SEI 1068
Seleco 1062
1004, 1006, 1007, 1021,
Sharp 1023, 1025, 1026
Shorn 1048
Siarem 1040, 1067
Siemens 1041, 1042, 1058, 1059
Singer 1040
1036, 1040, 1043, 1067,
Sinudyne 1068
Solavox 1062
Sonoko 1035
Sonolor 1062
1002, 1030, 1032, 1036,
Sony 1054
TV
Manufacturer ControU code
Soundesign 1004, 1006, 1009, 1070
Starlite 1009
Stern 1062
Sunkai 1043, 1048, 1049, 1050
1004, 1006, 1008, 1014,
Sylvania 1018, 1020
Symphonic 1009, 1028
Tandy 1026, 1062, 1063
Tashiko 1038, 1063
Tatung 1003, 1063, 1067
Tec 1063
Technics 1012, 1044, 1061
Techwood 1004 1006 1012
1004, 1005, 1006, 1007,
Teknika 1009, 1022, 1025, 1031,
1070
Teleavia 1066
Telecaption 1024
Telefunken 1066
Teletech 1035
Teleton 1063
Tensai 1048
Thomson 1066
Thorn 1054, 1055, 1058
Teshiba 1010, 1016, 1017, 1022,
1024, 1039
Tetevision 1025
Triumph 1067
Universal 1011, 1019
Universum 1045, 1052, 1058
Vexson 1040, 1062
Waltham 1063
1001, 1004, 1005, 1006,
Wards 1008, 1011, 1014, 1018,
1019, 1020, 1021, 1034,
1070
Watt Radio 1068
Wega 1040
Yamaha 1004, 1005, 1006, 1008
Yoke 1045 1063
Zenith 1004
VCR
Manufacturer Control co_e
Aiwa 2012, 2046, 2047
Akai 2003, 2004, 2022
AIba 2033, 2041 2044, 2045,
2047
Anitech 2033
ASA 2034
Baird 2036
Bell & Howell 2007
Blaupunkt 2039, 2042
Bush 2033, 2041,2044, 2045,
2047
Canon 2010, 2011
Carver 2014
Cimline 2033
Citizen 2008, 2009
Colortyme 2005
Craig 2008
Crown 2033
Curtis Mathes 2001,2005, 2008, 2009,
2010, 2011,2023, 2026
Cyrus 2034
Daeweo 2012
Dansai 2033
Decca 2034
Dimensia 2001,2026
Dumont 2034, 2036, 2037
Elcatech 2033
Emerson 2003, 2010, 2012, 2022
ESC 2043
Ferguson 2035
Finlandia 2034, 2036
Finlux 2034, 2036, 2037
Firstline 2033, 2041
Fisher 2007, 2030, 2036
Fuji 2004, 2010, 2024
Funai 2012
Garrard 2012
GE 2001,2002, 2008, 2010,
2011,2023 2025, 2026
GEC 2034
GoldHand 2033
GoldStar 2005, 2009
Goodmans 2031,2033
Gradiente 2012
Graetz 2036, 2043
Granada 2030, 2034, 2036
Grandin 2033
2029, 2033, 2034, 2039,
Grundig 2040, 2042, 2044
Harman 2005
Kardon
HCM 2033, 2044
Hinari 2028, 2033, 2043, 2044,
2047
Hitachi 2013, 2021,2025, 2028,
2037, 2038, 2043
Ingersol 2028
Interfunk 2034
ITT 2030, 2036, 2043, 2048
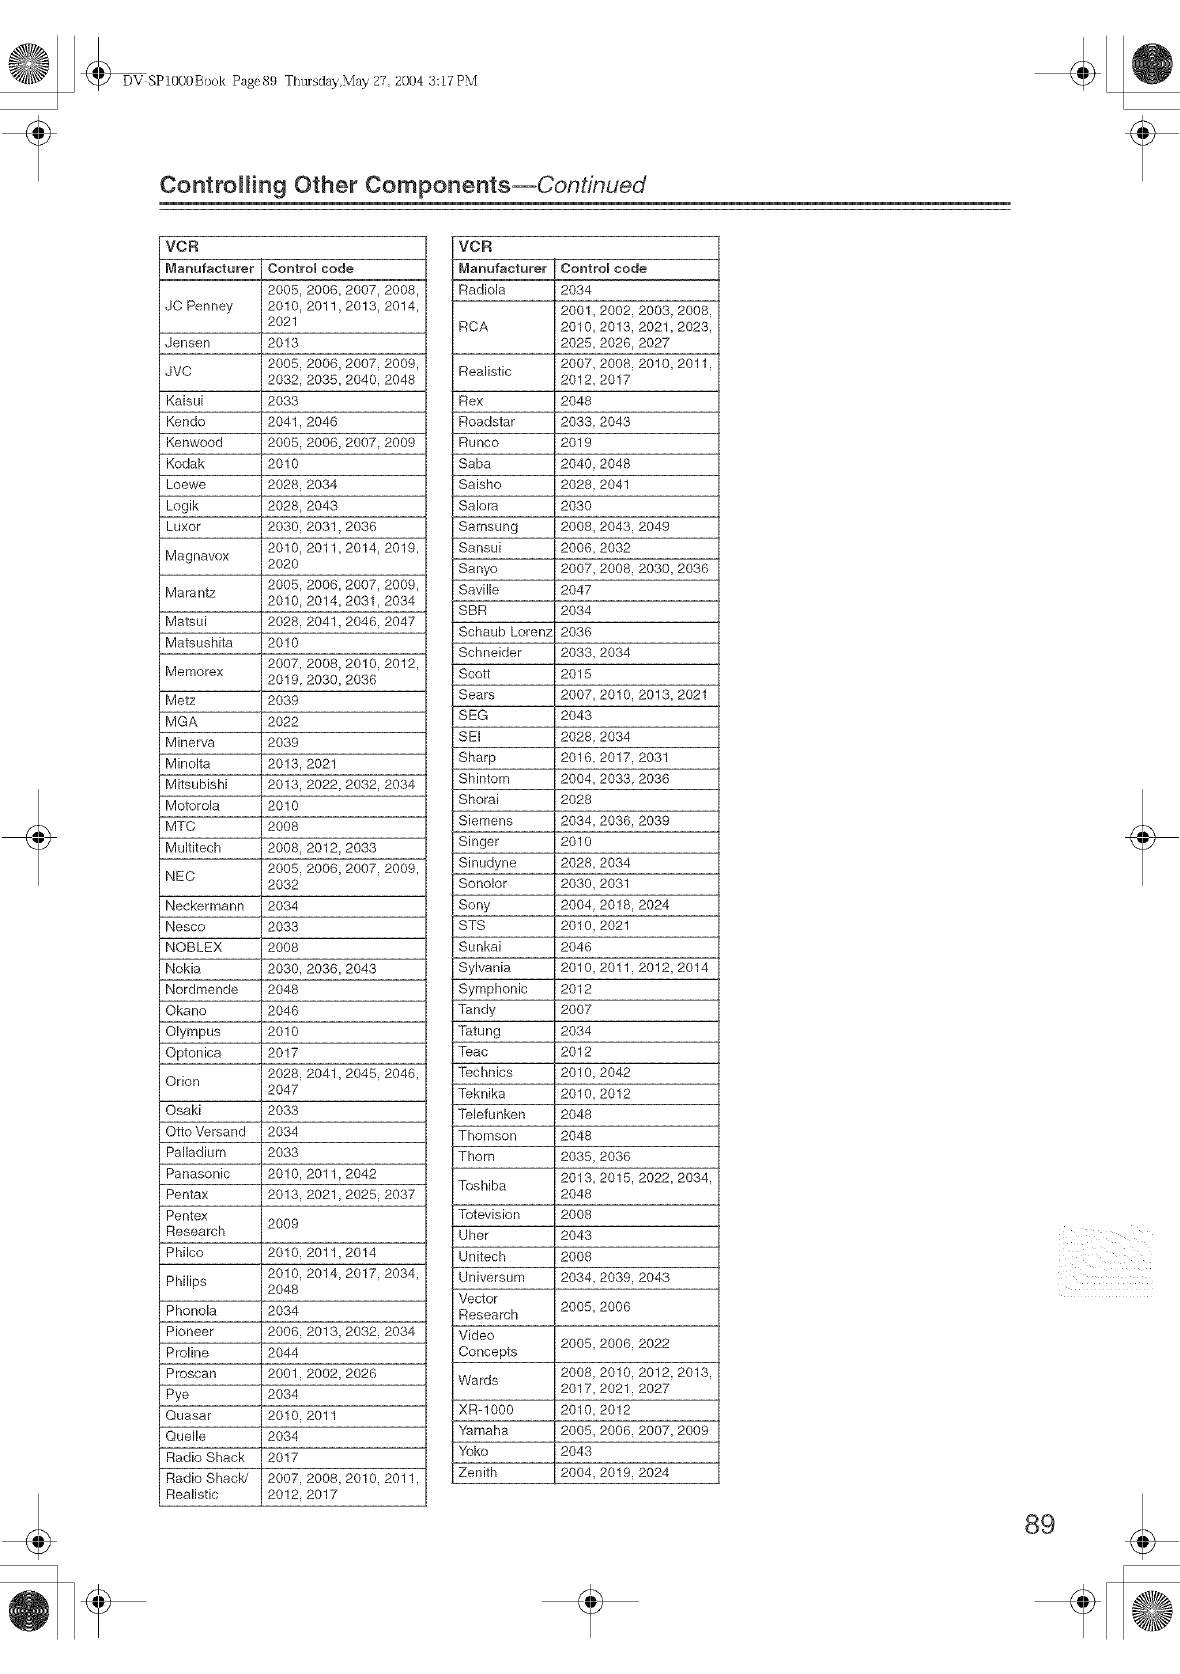
DV SP1000Boek Page89 Ttltusday,N'iay 27 2004 3:17 PN'i
Controlling Other Components--Continued
VCR
Manufacturer Control code
2005, 2006, 2007, 2008,
JC Penney 2010, 2011,2013, 2014,
2021
Jensen 2013
JVC 2005, 2006, 2007, 2009,
2032, 2035, 2040, 2048
Kaisui 2033
Kendo 2041,2046
Kenwood 2005, 2006, 2007 2009
Kodak 2010
Loewe 2028, 2034
Logik 2028, 2043
Luxor 2030, 2031,2036
2010, 2011,2014, 2019,
Magnavox 2020
Marantz 2005, 2006, 2007, 2009,
2010, 2014, 2031,2034
Matsui 2028, 2041,2046, 2047
Matsushita 2010
Memorex 2007, 2008 2010, 2012,
2019 2030, 2036
Metz 2039
MGA 2022
Minerva 2039
Minolta 2013, 2021
Mitsubishi 2013, 2022, 2032, 2034
Motorola 2010
MTC 2008
Multitech 2008, 2012, 2033
NEC 2005, 2006, 2007, 2009,
2032
Neckermann 2034
Nesco 2033
NOBLEX 2008
Nokia 2030, 2036, 2043
Nordmende 2048
Okano 2046
Olympus 2010
Optonica 2017
Orion 2028, 2041,2045, 2046,
2047
Osaki 2033
Otto Versand 2034
Palladium 2033
Panasonic 2010, 2011,2042
Pentax 2013, 2021,2025, 2037
Pentex
Research 2009
Philco 2010, 2011,2014
2010, 2014, 2017, 2034,
Philips 2048
Phonola 2034
Pioneer 2006, 2013, 2032, 2034
Proline 2044
Proscan 2001,2002, 2026
Pye 2034
Quasar 2010, 2011
Quelle 2034
Radio Shack 2017
Radio Shack/ 2007, 2008, 2010, 2011,
Realistic 2012, 2017
VCR
Manufacturer CoetroU code
Radiola 2034
2001,2002, 2003, 2008,
RCA 2010, 2013, 2021,2023,
2025, 2026, 2027
Realistic 2007, 2008, 2010, 2011,
2012, 2017
Rex 2048
Roadstar 2033, 2043
Runco 2019
Saba 2040, 2048
Saisho 2028, 2041
Salora 2030
Samsung 2008, 2043, 2049
Sansui 2006, 2032
Sanyo 2007, 2008, 2030, 2036
Saville 2047
SBR 2034
Schaub Lorenz 2036
Schneider 2033, 2034
Scott 2015
Sears 2007, 2010, 2013, 2021
SEG 2043
SEI 2028, 2034
Sharp 2016, 2017, 2031
Shintom 2004, 2033 2036
Shorai 2028
Siemens 2034, 2036, 2039
Singer 2010
Sinudyne 2028, 2034
Sonolor 2030, 2031
Sony 2004, 2018, 2024
STS 2010, 2021
Sunkai 2046
Sylvania 2010, 2011,2012, 2014
Symphonic 2012
Tandy 2007
Tatung 2034
Teac 2012
Technics 2010, 2042
Teknika 2010, 2012
Telefunken 2048
Thomson 2048
Thorn 2035, 2036
Toshiba 2013, 2015, 2022, 2034,
2048
Tetevision 2008
Uher 2043
Unitech 2008
Universum 2034, 2039, 2043
Vector
Research 2005, 2006
Video
Concepts 2005, 2006, 2022
Wards 2008, 2010, 2012, 2013,
2017, 2021,2027
XR-IO00 2010, 2012
Yamaha 2005, 2006, 2007, 2009
Yoke 2043
Zenith 2004, 2019, 2024
89
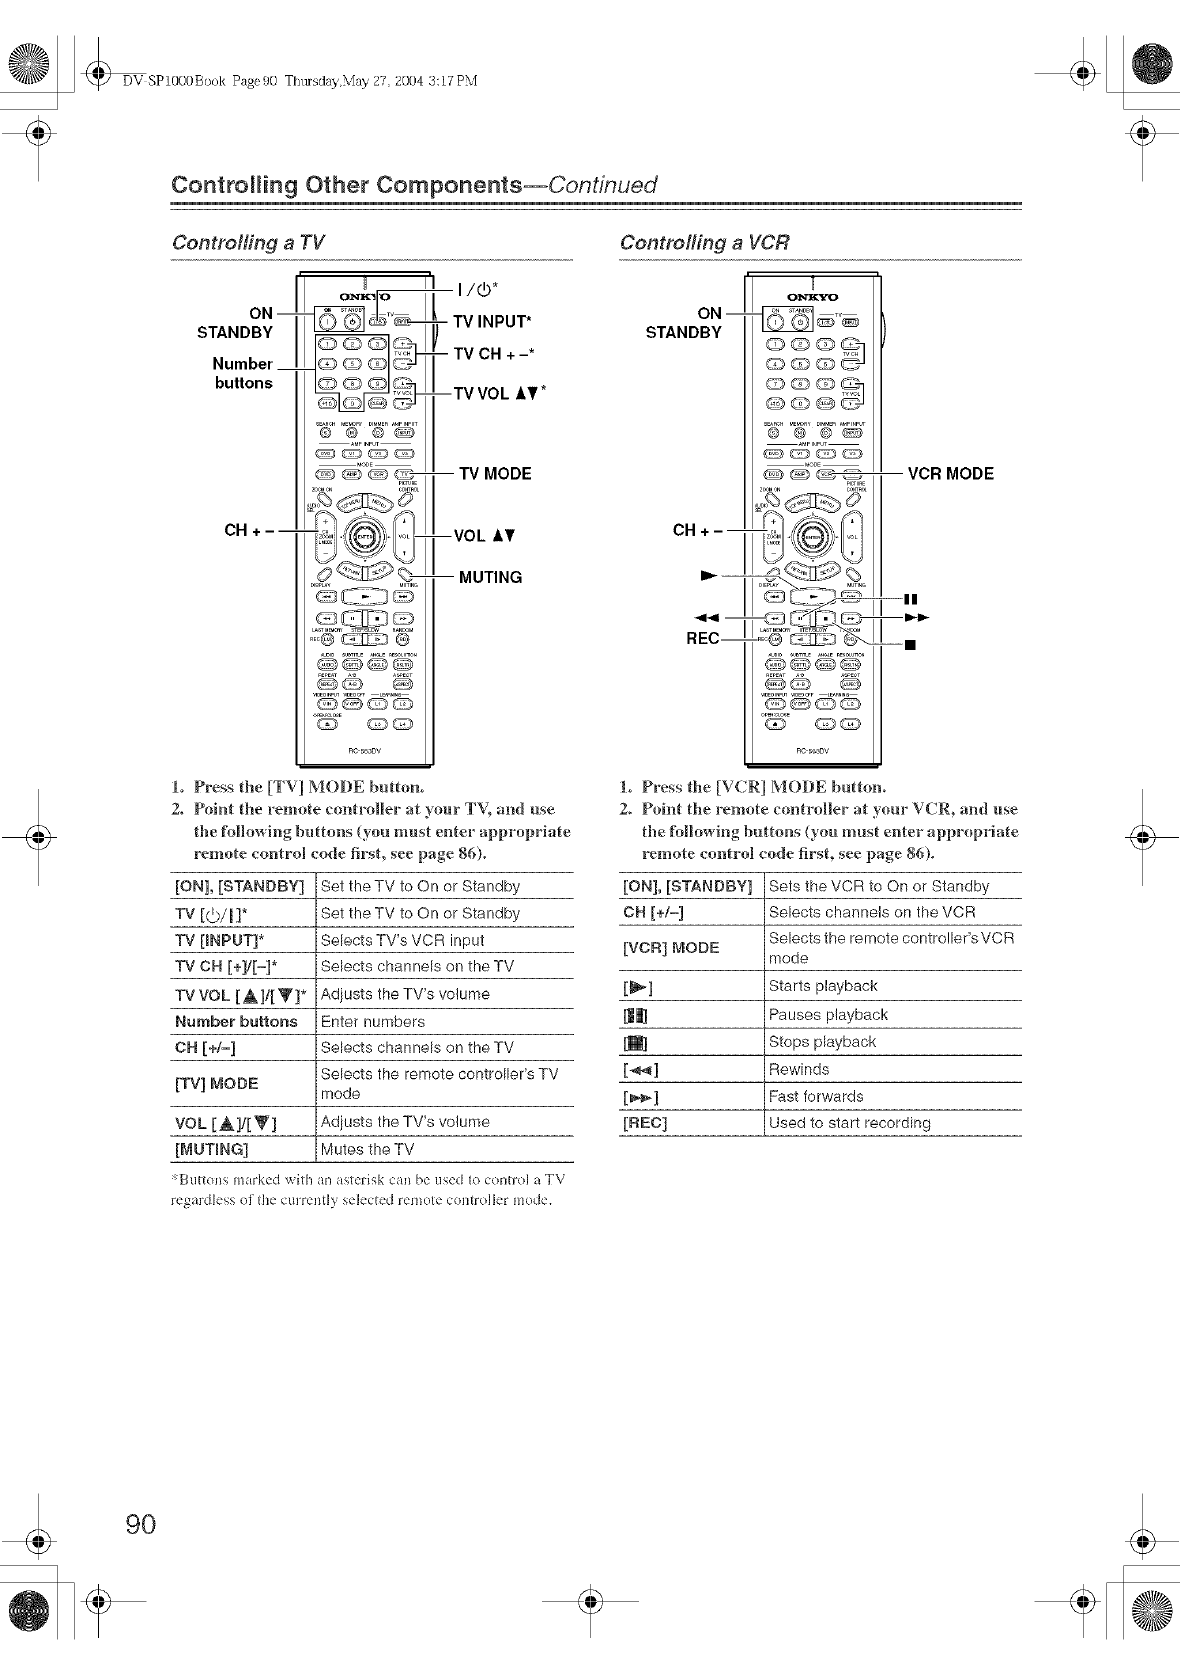
DV SP1000Book Page90 Ttltusday,May 27 2004 3:17 PM
Controlling Other Components--Continued
Controlling aTV
ON--
STANDBY
Number __
buttons
OH +---
oz_ _o I'1
S_RCHME_ DIMMER_PINPUT
@ @ @@
@@@@
@@ @
@@@@
I/O*
TV INPUT*
TV CH +-*
--TV VOL &T*
-- TV MODE
--VOL &¥
-- MUTING
1. Press the [TV] MODE button.
2. Point the remote controller at your TV, and use
the ff_llmring buttons (you must enter appropriate
remote control code first, see page 86).
[ON], [STANDBY] Set the TV to On or Standby
TV [_._/I 1" Set the TV to On or Standby
TV [INPUT]* Selects TV's VCR input
TV ON [+]/[=]* Selects channels on the TV
TV VOL [A]/[_]* Adjusts the TV's volume
Number buttons Enter numbers
ON [+/-] Selects channels on the TV
Selects the remote controller's TV
[TV] MODE mode
VOL [,& ]i[Y] Adjusts the TV's volume
[MUTING] Mutes the TV
Buttons marked with an asterisk can be used to co[ln-ol a TV
FegaFdlet_s of [he CtllTelltly selected Fetllore ¢oR[Follef ll_ode.
Controfling a VCR
ON --
STANDBY
OH +---
D,.---
_141m
REC--
U
0143&'3_0
s_u MERRYDIMM__PINP_
@ @ @@
PI,TURE
DISPaY -_ = _UTIm
....0 @ 0_-
@@@@
@@ @
@@@@
-- VCR MODE
--I!
--m
t. Press the [VCR] MODE button.
2. Point the remote controller at your VCR_ and use
the/_bllowlng buttons (you must enter appropriate
remote control code firsL see page 86).
[ON], [STANDBY] Sets the VCR to On or Standby
OH [+!=] Selects channels on the VCR
Selects the remote contro!ler'sVCR
[VCR] _ODE mode
[_] Starts playback
_] Pauses playback
[_] Stops playback
[_,_e,_] Rewinds
[_] Fast forwards
[REC] Used to start recording
9O
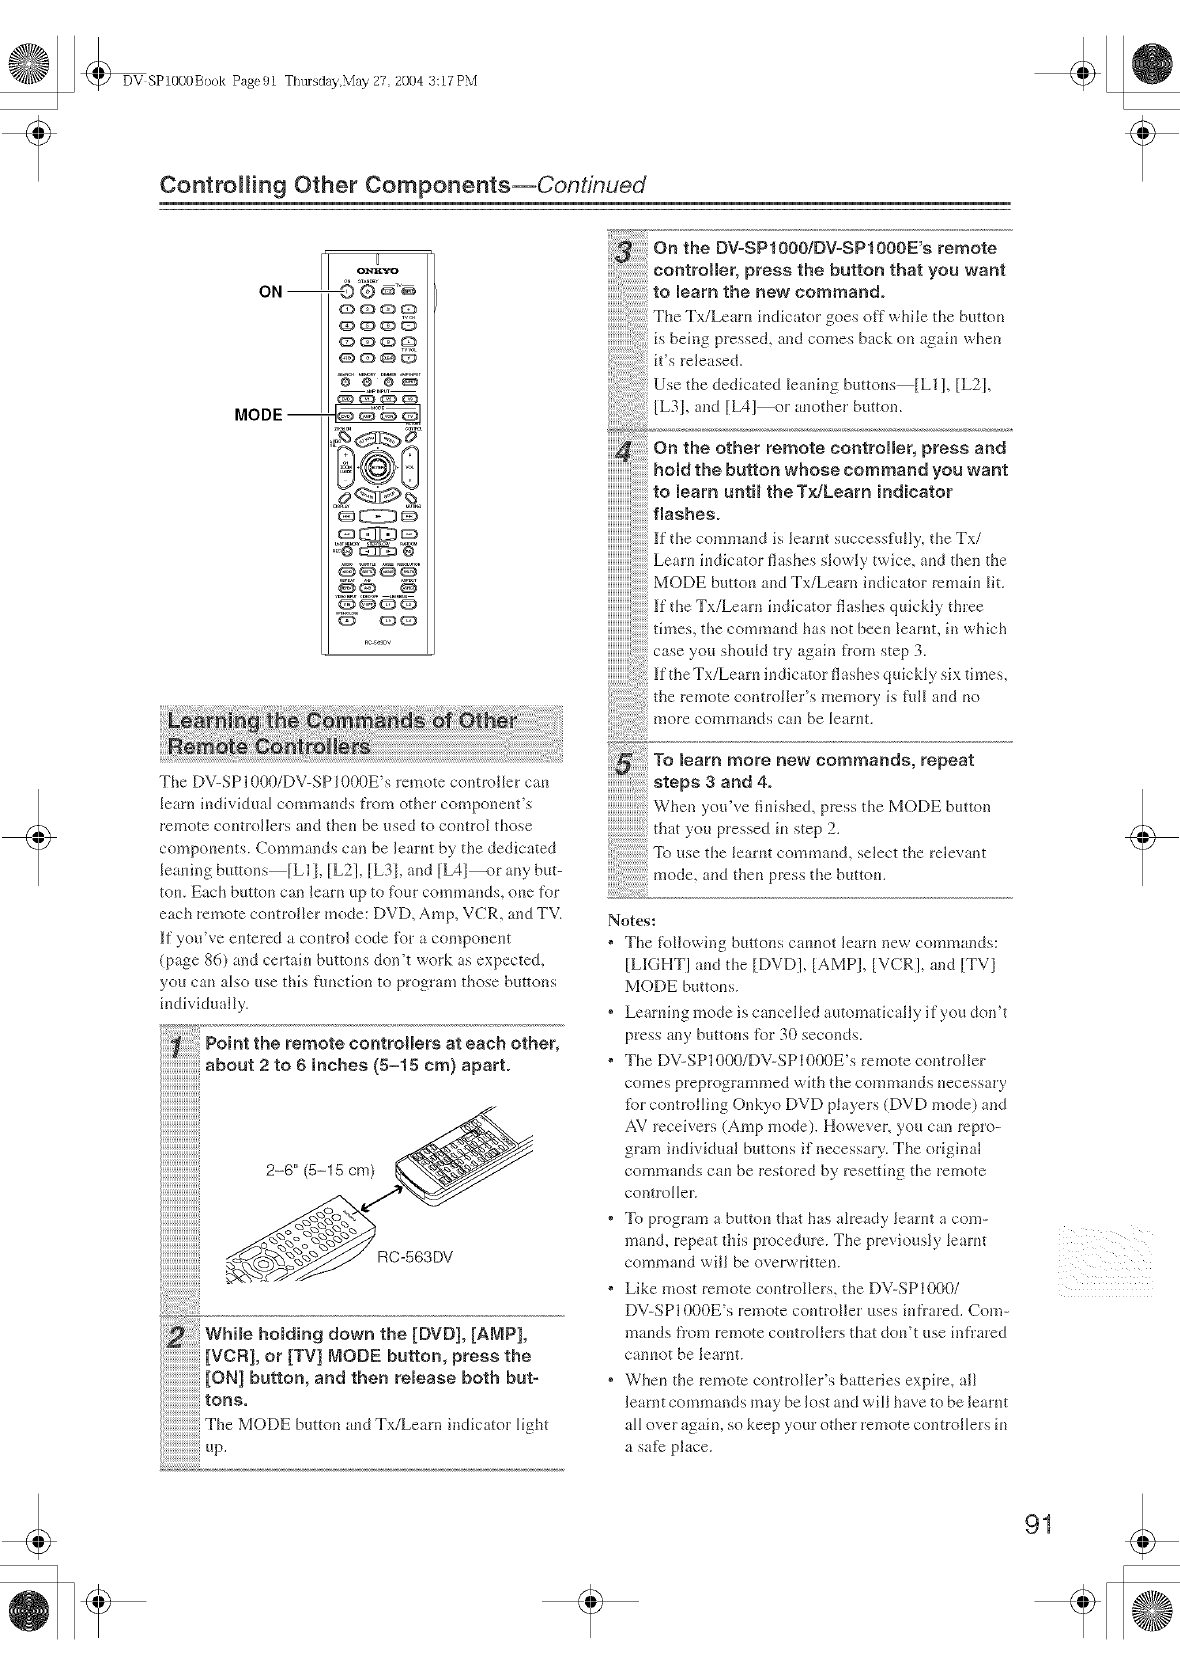
DV SPlOOOBook Page91 Thtusday,May 27 2004 3:17 PM
Controlling Other Components--Continued
ON m
MODE --
g
_o_
.Ec@CE112_@
¢_ OC3 ¢D
G) _¢D
to Jeam untim the T×tLeam indicator
iiiiiiiiiiiiiiiiiiiiiiiiiiiiiiiiiIf the Tx/Leam indicator flashes quickly three
iiiiiiiiiiiiiiiiiiiiiiiiiiiiiiiiith_es_ the command has not bee_ learnt, in which
The DV-SP1000/DV-SP] 000E's remote controller carl
learn individual commarids fl'om other componer*t's
remote co_ltrollers and theri be used to control those
comporients. Commands can be learnt by the dedicated
leardng buttons [LI I, [L2], [L31, arid [L41_r a_y but-
tom Each button can learn up to l\mr commands, or_e for
each remote controller mode: DVD, Amp, VCR, a_d TV.
If you've e_ltered a comro] code %r a componem
(page 86) and certair_ buttor_s don't work as expected,
you ca_ also use this flmction to program those buttons
iudividu _IJy.
holding down the [DVD], [AMP],
[VCR],or[TV] NODE button, pressth°
[ON]button, andthen re_easeboth but-
tons,
The MODE butto_ a_d Tx/Leam indk'ator light
up.
_fb use the learnt commat_& select the relevant
mode, and thm_ press the buttom
Notes:
* The following buttons cmnot ]eam new commands:
[L]GHTI md the [DVD], lAMP1, [VCR!, and [TVI
MODE buttor_s.
* LearMng mode is cancelled automatically if you don't
press any buttor_s tbr 30 seconds.
* The DV-SP1000/DV-SP1000E's remote controller
comes preprogrammed with the commar_ds r_ecessary
for controllk_g Onkyo DVD players (DVD mode) and
AV receivers (Amp mode). However, you can repro-
gram individual buttor_s if necessary. The original
commar_ds car_ be restored by resetting the remote
controller.
* To program a buttor_ that has already learnt a corn-
mated, repeat this procedure. The previously learnt
commar_d will be overwritter_.
* Like most remote controIlers_ the DV-SP1000/
DV-SP1000E's remote c(mtroller uses hffrared. Com-
mar_ds fl'om remote corm:oilers that d(m't use infrared
camot be ]earm.
* Whm_ the remote controller's batteries expire_ all
learnt commands may be lost and will h_ve to be learnt
all over agaim so keep your other remote controllers ir_
a sate" place.

DV SP10O0Book Page92 Thtusday,N'iay 27 2004 3:17 PN'i
ControNng Other Components--Continued
This section expLaius how to delete the Jearnt commauds
of oue mode: DVD, An,p, VCR, or TV.
This section explains how to deJete the Iearut commands
of dl modes: DVD, Amp, VCR, and TV.
Olmtk'_,o
QQQ_
_QOO
-- MODE
J
U
QQQ_
OOOO
STANDBY
AMP
J
Notes:
+ Learning mode is cat+celled automatically if you don't
press auy butt(ms for 30 seconds.
_ hiBe hoHing down the [AMP] MODE but+
ton, press the [STANDBY] button, and
then release both buttons.
The Tx/Leam indicator _lashes slowly five times,
;rod then remah+s lit.
_' Press the lAMP] MODE button aga,n.
It takes several seconds to delete the commands.
When theyX,e all bee_+ deleted, the Tx/Leam iudi+
cator flashes sk,wly twice.
If the Tx/Leam h+dicator flashes quicMy three
_i,.es,_he_'omm.ndsh.,'e+_o_l-,ee,_deleted.+,+
+++++++++++++++++++++++++++++++++++++.+h++h+.seyoosho_,+dtry.+;,+,+fro,++step_.
Notes:
+ Leartfiu_ m( de is cancelled automatically if you dou't
press any buttons for 30 secouds.
92
+
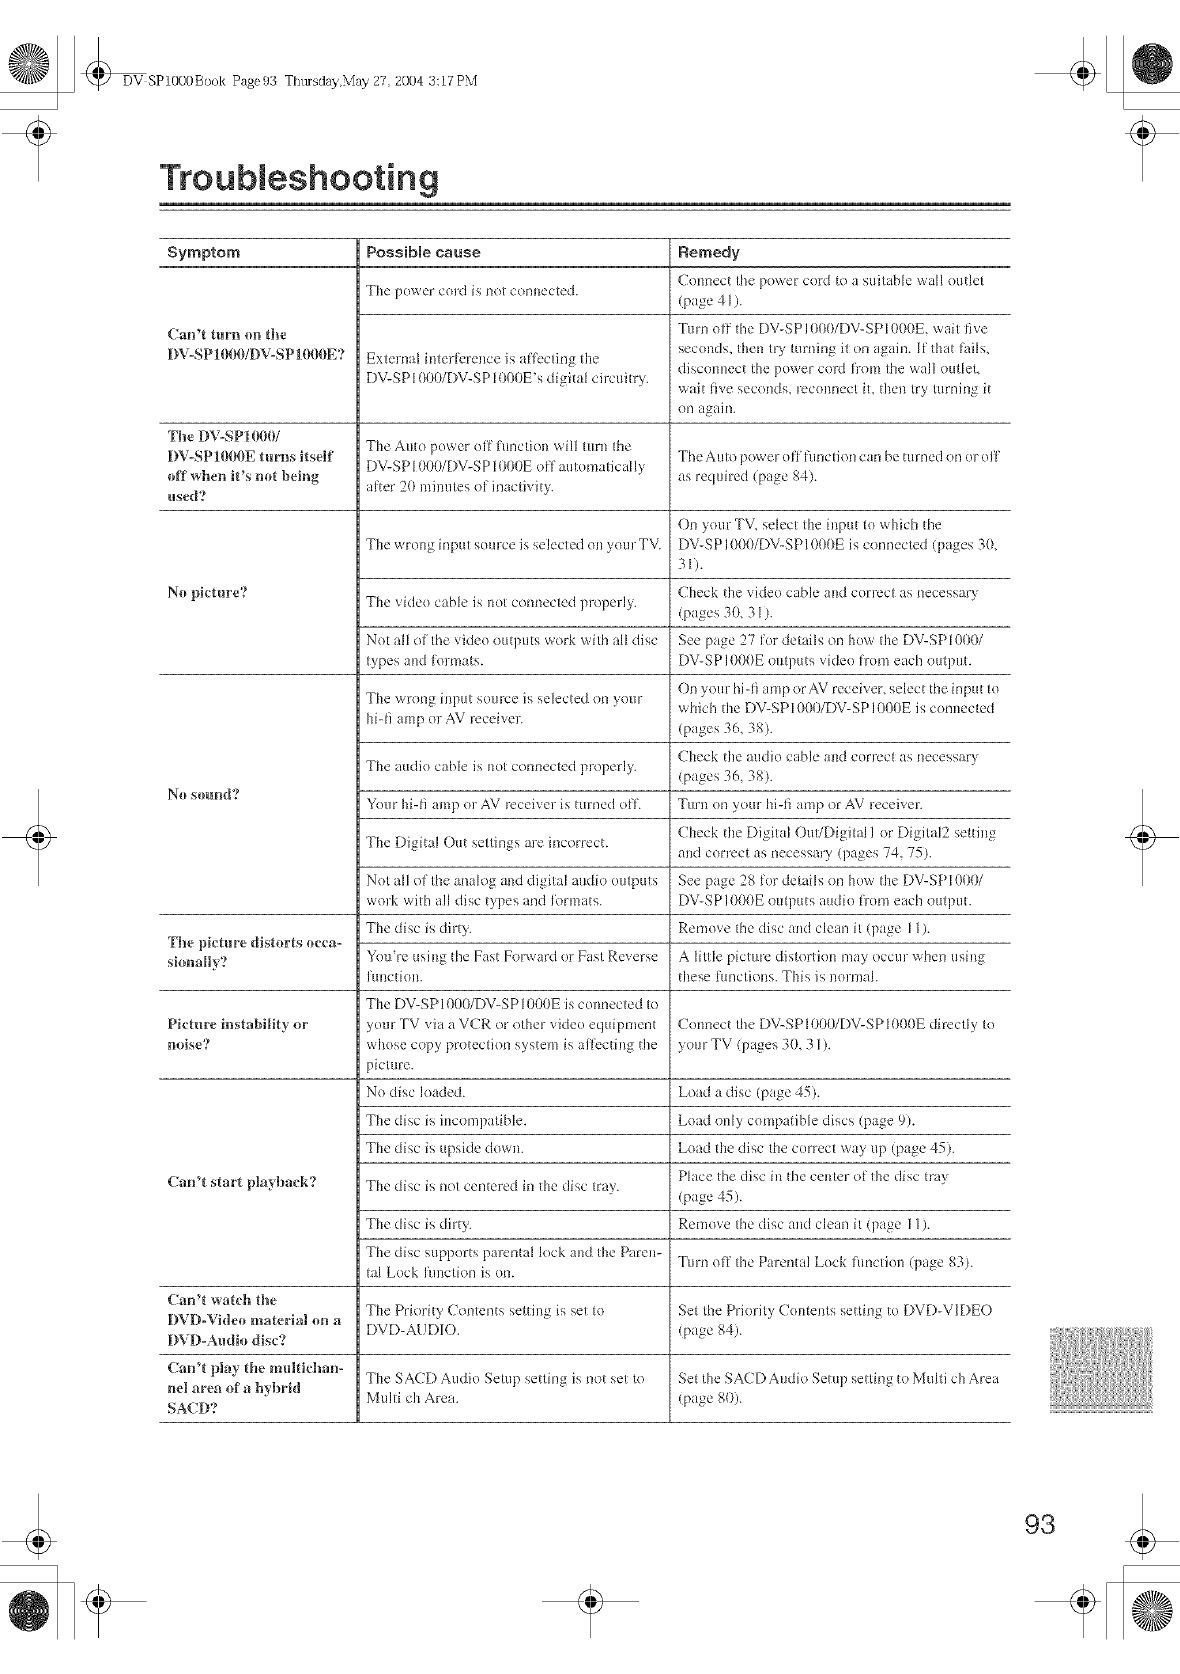
DV SP1000Book Page93 TfltHsday,May 27 2004 3:17 PN'i
Troubleshooting
Symptom Possible cause Remedy
( ollncct the power cord [o a stlitab[c wall otHJct
The pov, cr cord is not connectcd. (page 41 ).
Can't turri {m file Turn oil the [)V-SPI{}{}()/[)V-SPI()()()E. wail live
scc/mds, dlcn try mining it on again. [[ that J'ails,
DV-SPI{RR!/DV-SPI{}00E? Ex!cmal imcrlcrencc is affecting lhe disconnect the power cord from the wall om[ct,
DV-SPI000/DV-SPI000E's digital circular}, wait live seconds, recomlect it, then Ir} lurning fi
OI3 agaigl
The D'V-SP1000/
DV=SPI000E turlts itself The Auto power off Panctiou will mrn the The Amo pov,,cr ofl l_,inction can bc mined on or off
off whert it's trot behtg DV-SP1000/DV-SPI{I00E oil au_omaticall} as required (page 84).
atter 20 mimltcs ol inactivity.
used?
On }/mr TV. select the input to which the
The v,rong inpm source is selected on yo'ar TV. DV-SPI000/DV-SPI000E is connected (pages 30,
31).
No pictmTe? Tile video cable is not connected properly. (heck tile video cable and correct as necessar}
(pages 30, 31).
Not all of lhc _,ideo outputs work with all disc See page 27 Jot details on how tile DV-SP1000/
types and [ormats. DV-SPI000E ouq3uts vklco [rotll each o/llptlt•
On }()Ill hiqi amp or AVreceiver, select the input to
The wrong input smlrcc is selected on >ore- which the DV-SP1000/DV-SPI000E is connecled
hiqi amp or AV receiver. (pages 36, 38).
Check thc audio cable aud correct as necessar}
The mtdio cable is not connecled properly. (pages 36, 38).
N_I sound? Yore-hi-fi amp or AV receiver is mined off. Turn on yoBl-hi-fi amp or AV receiver.
Check _he Dighal OmJDigihdl or Digital2 setting
The Digital ()m settings arc incorrect. and correct as necessary (pages 74 75).
Not all ol the analog mid digital audio outp/us See page 28 tot details on how tile DV-SP1000/
work with all disc types and formats. DV-SPI000E outp/tts audio h-ore each o/tq_tlt•
The disc is dirty. Renlovc the disc and dean it (page 11).
The pkture distorts _lcca-
sky,tally? Y/u'rc usin e thc Fast For_\ ard or Fast Reverse A little picture distortion nlay occur when using
hulcfion• these ['/mc[iolls. This is uormal.
The DV-SPI000/DV-SPI000E is comiccled to
Pkt_re i_tstabilit} or your TV via a VCR or other video equipment Comlect the DV-SP1000/DV-SPI000E direclly to
noise? whose copy protection system is a!lec_ing _hc }our TV (pages 30, 31 ).
)icltlrc.
No disc loaded. Load a disc (page 45).
The disc is illcompatiblc. Load ouly conlpafib[e discs (page 9).
The disc is upside dowu. Load the disc the correct way up (page 45)•
Place the disc in _heccmer ot _l_cdisc tr_}
Can't start pJa?back? The disc is not centered in lhe disc tray. (page 45).
The disc is dirty. Renlove the disc and clean it (page I 1).
Tile disc supports parental loci<and _lle Pareu- Turn olt the Parental Lock hmction (page 83).
ta[ Loci< l'/mcfion is on.
Can t v,atch the
DVD-Videa material {m a The Priority Contents set_i_g is se_ to Set the Priority Comcms se_ting _/}DVD-VIDEO
DVD-AUI-)K). (page 84).
D'_,rD=A_.ldk_disc?
Can't play the mMtichan= Tile SACD Audio Setup selling is nol sel to Set the SACD Audio Setup setting to Muhi ch Area
neJ area of a hybrid Muhi ch Area. (page g0).
SA('D?
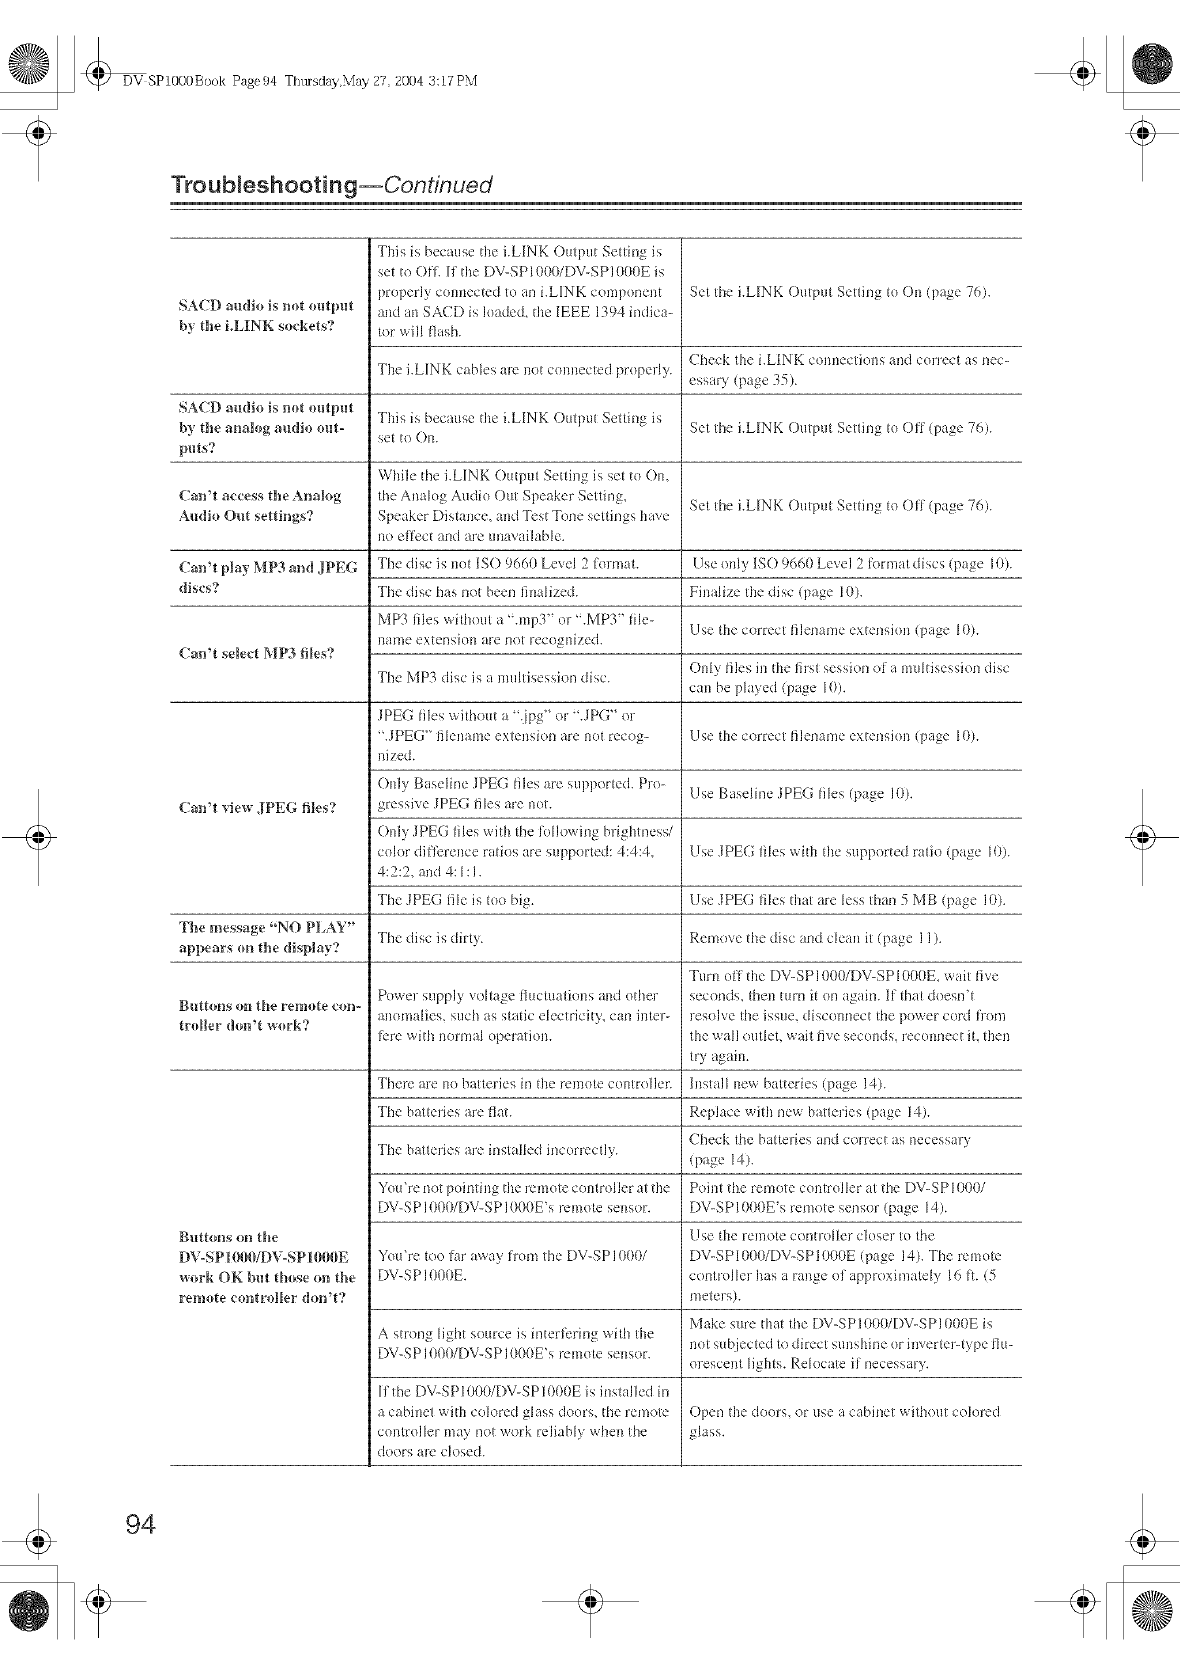
DV SP1000Book Page94 T[ltHsday,May 27 2004 3:17 PM
TrouNeshooting--Continued
This is because the i.LINK Omput Setting is
set to O11. [1 the DV-SPI00(}/DV-SPI{}(}(}E is
pleperly cennectcd to an i.L[NK componelll Set the i.UNK Output Setting t(} On (page 76).
SAC][) audio is trot {_Itput and an SAC?[) is loaded, Ihe IEEE 1394 h]dica-
fly the LIdNK soekets? tl)r will flash.
Check the i.LINK connections and cen-ect as nec-
The i.LINK cables are n{}lc/muecled properly. essar3 (page 35).
SACD audio is trot omlmt
b_ the a]aal_g audio out- This is because Ihe i.LINK ()uq)u_ Selling is Set the i.LINK Output Setting t/} Off (page 76).
set I{}()u.
Imts?
While the i.L[NK Output Setdng is set t/}()m
Catt't aeeess file A_mlog die Analog Audie Out Speaker Setting, Set the i.LINK Output Setting to OFt (page 76).
Au{li_l Ou[ setti_tgs? Speaker Dis{race, and _Tst Tone settings have
llO effect and are unavsi13ble.
Caller play MP3 mid JPEG The disc is net ISO 9660 Level 2 _'ermaL Use only ISO 9660 Level 2 if)treat discs (page I0).
discs? The disc has not been liualized. Fimdize the disc (page 10).
NIP3 liles without a ' .rap3" or' .MP3" lile-
name extension are not recognized. Use the corEect lilenanle exlensilm (page 10).
Catt't select NIP3 files'?
The MP3 disc is a mukisession disc. Only liles ill tile lirst session ol a mulfisession disc
can be pla}ed (page 10).
JPEG liles without a Lips" or 2,IPG" or
' .JPEG" lilemmle exteusion are net recog- Use the corEect filenanle exlensilm (page I0).
nized.
()nl_ Baseline JPEG liles are supported. Pro- Use Baseline ,IPEG liles (page I0).
Catt't qew JPEG files? gressive JPEG/lies are net.
()nl_ JPEG liles _,\ifll die lellowing brightness/
celor dillk'rence rmios are supported: 4:4:L Use ,IPEG liles with tile supported ratio (page I0).
4:2:2, aud 4:1:1.
The JPEG file is leo big. Use JPEG liles that are less than 5 MB (page I0).
The message "NO PLAY" The disc is dirt}. Remove the disc and cleau it (page I 1).
appears {m file display?
Tunl off the DV-SP 1000/DV-SPI (}(}0g,wait live
Power snpply vollagefluctuations mid ether seconds, then turn it on again. Ii thai docsn'l
B_[[oils o_l l_fie remoge eo_t- ailemalies, s/lob as static eleclrici_y, cat] ill{er- resolve the iss/le, diseell[lec_ the power eerd lrom
troller don't ,aork? l;ere with nern'lal operation, the _,\all outlet, wait live seconds, rec/mnecl it, then
tr} agaili.
There are no batteries in the remote controller. Install uew batteries (page 14).
The bmleries are flat. Replace with new batteries (page 14).
Check lhe batteries and correcl as necessary
The batteries are installed incen-ectly. (page 14).
You're not pointing tile remote centroller al tile Poi_t the remote clmIreller a! the DV-SPI000/
DV-SPIO0{}/DV-SPI000E's rcme/e seusor. DV-SPIOOOE's renlote sensor (page 14).
BtltgOlflSOtltfie Use tile renlote controller cleser to the
DV-SPI000/DV-SPI000E Yeu're Ioo lar away h-ore the DV-SPI000/ DV-SPI000/DV-SPI0{}{}E (page 14). The remote
,aork OK lint tfiose (m tile DV-SPI00t}E. controller has a raugc ef approximately 16 I'L 15
rem{_te e{mtroller d{m't? meters).
Make sure that the DV-SPIOOO/DV-SP1000E is
A smmg light seurce is interlbring with the
DV-SPIO0{}/DV-SPI000E's remote seusor, net subjecled to direct slmshine or iuverter-t} pe flu-
orescent lights. Relocate il necessm 3.
lflhe DV-SP1000/DV-SPI000E is inslalled in
a cabinet with celored glass doors, the remole Open the doors, or use a cabinel willlo/tl colored
comroller may nol work reliabl) when Ihe glass.
doors are closed.
94
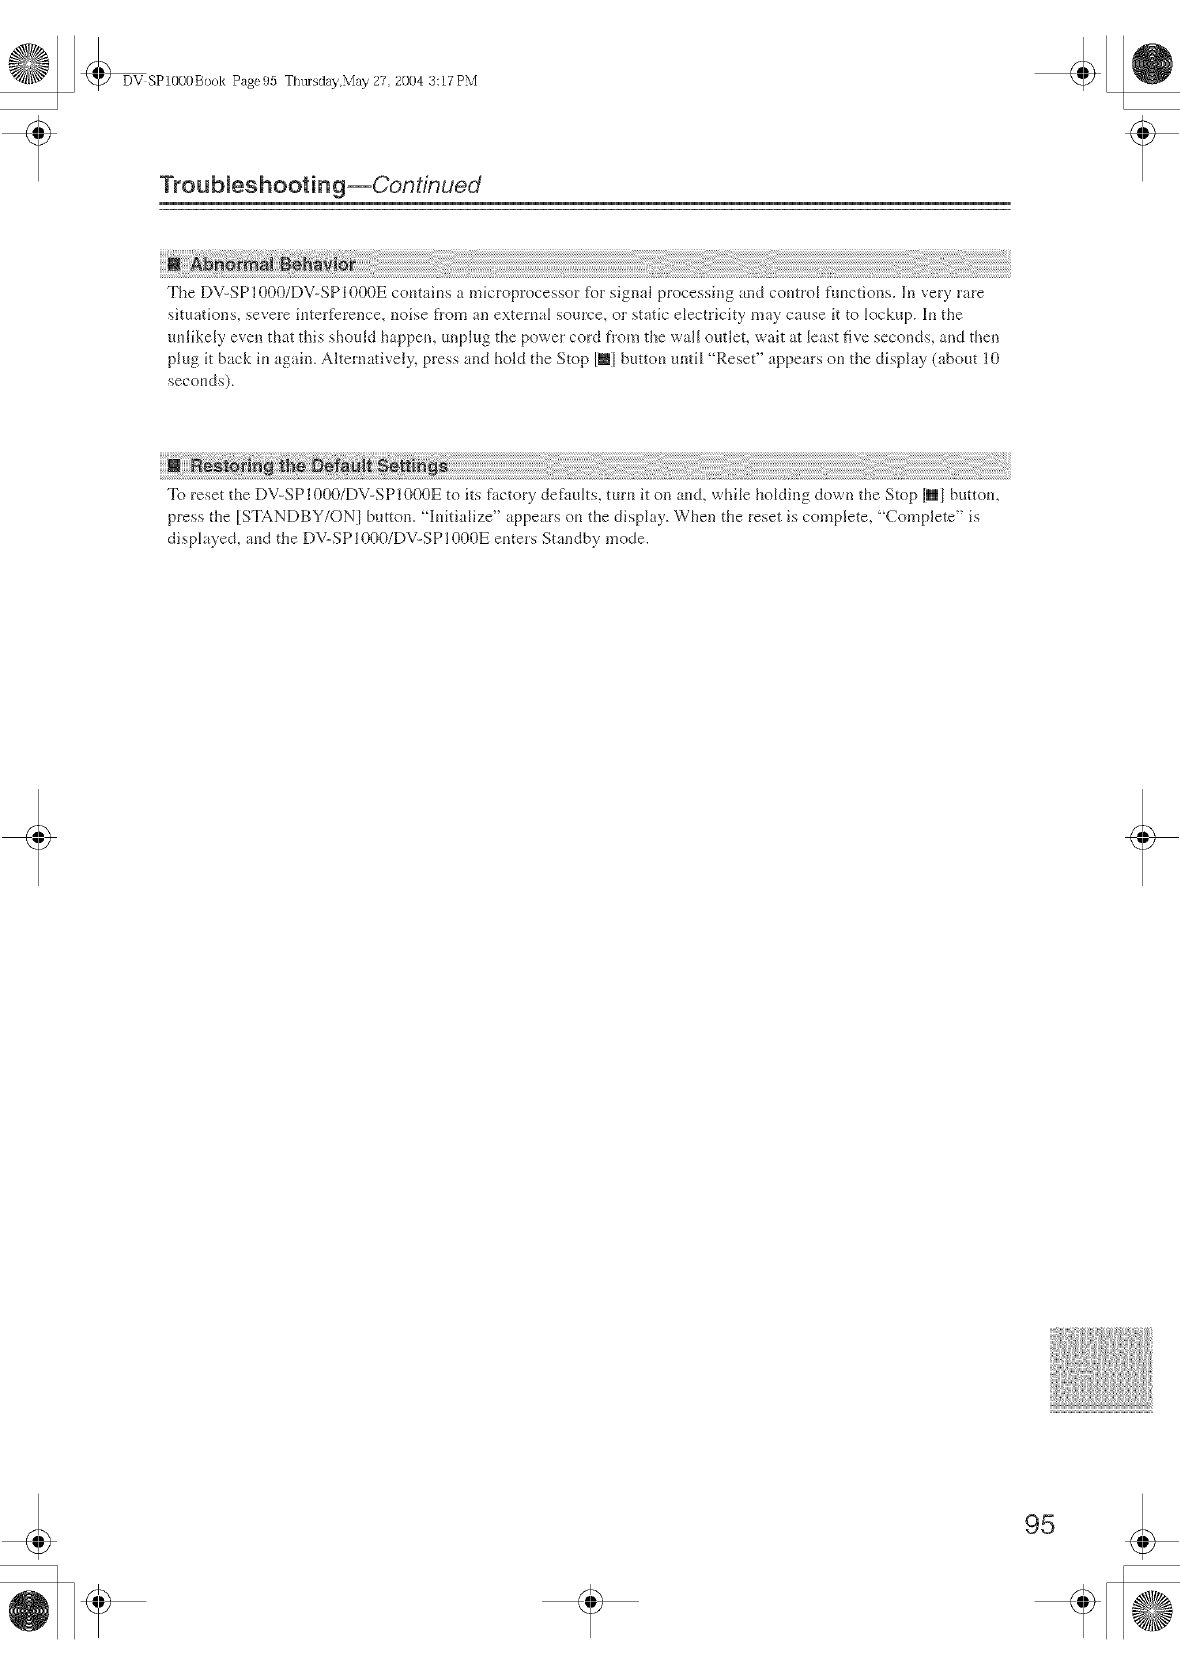
DV SP1000Book Page95 T[ltusday,N'iay 27 2004 3:17 PN'i
TrouNeshooting--Continued
The DV-SP1000/DV-SP1000E contains a microprocessor %r signal processing and control fnuctions. _n very rare
situations_ severe iuted)rence_ noise from an external source_ or static electricity may cause it to lockup. In the
unlikely even that this should happen, unplug the power cord fl'om the wall outlet, wait at least five seconds, and then
plug it back in again. Alternatively, press and hold the Stop INI button until "Reset" appears ou the display (about l0
seconds).
To reset the DV-SPI000/DV-SPI000E to its factory defaults, turn it on aucL while holding down the Stop [ml buttom
press the ISTANDBY/ON1 button. _qiuitialize" appears ou the display. When the reset is complete, _Complete" is
displayed, and t[_e DV-SPI000/DV-SPI000E enters Standby mode.
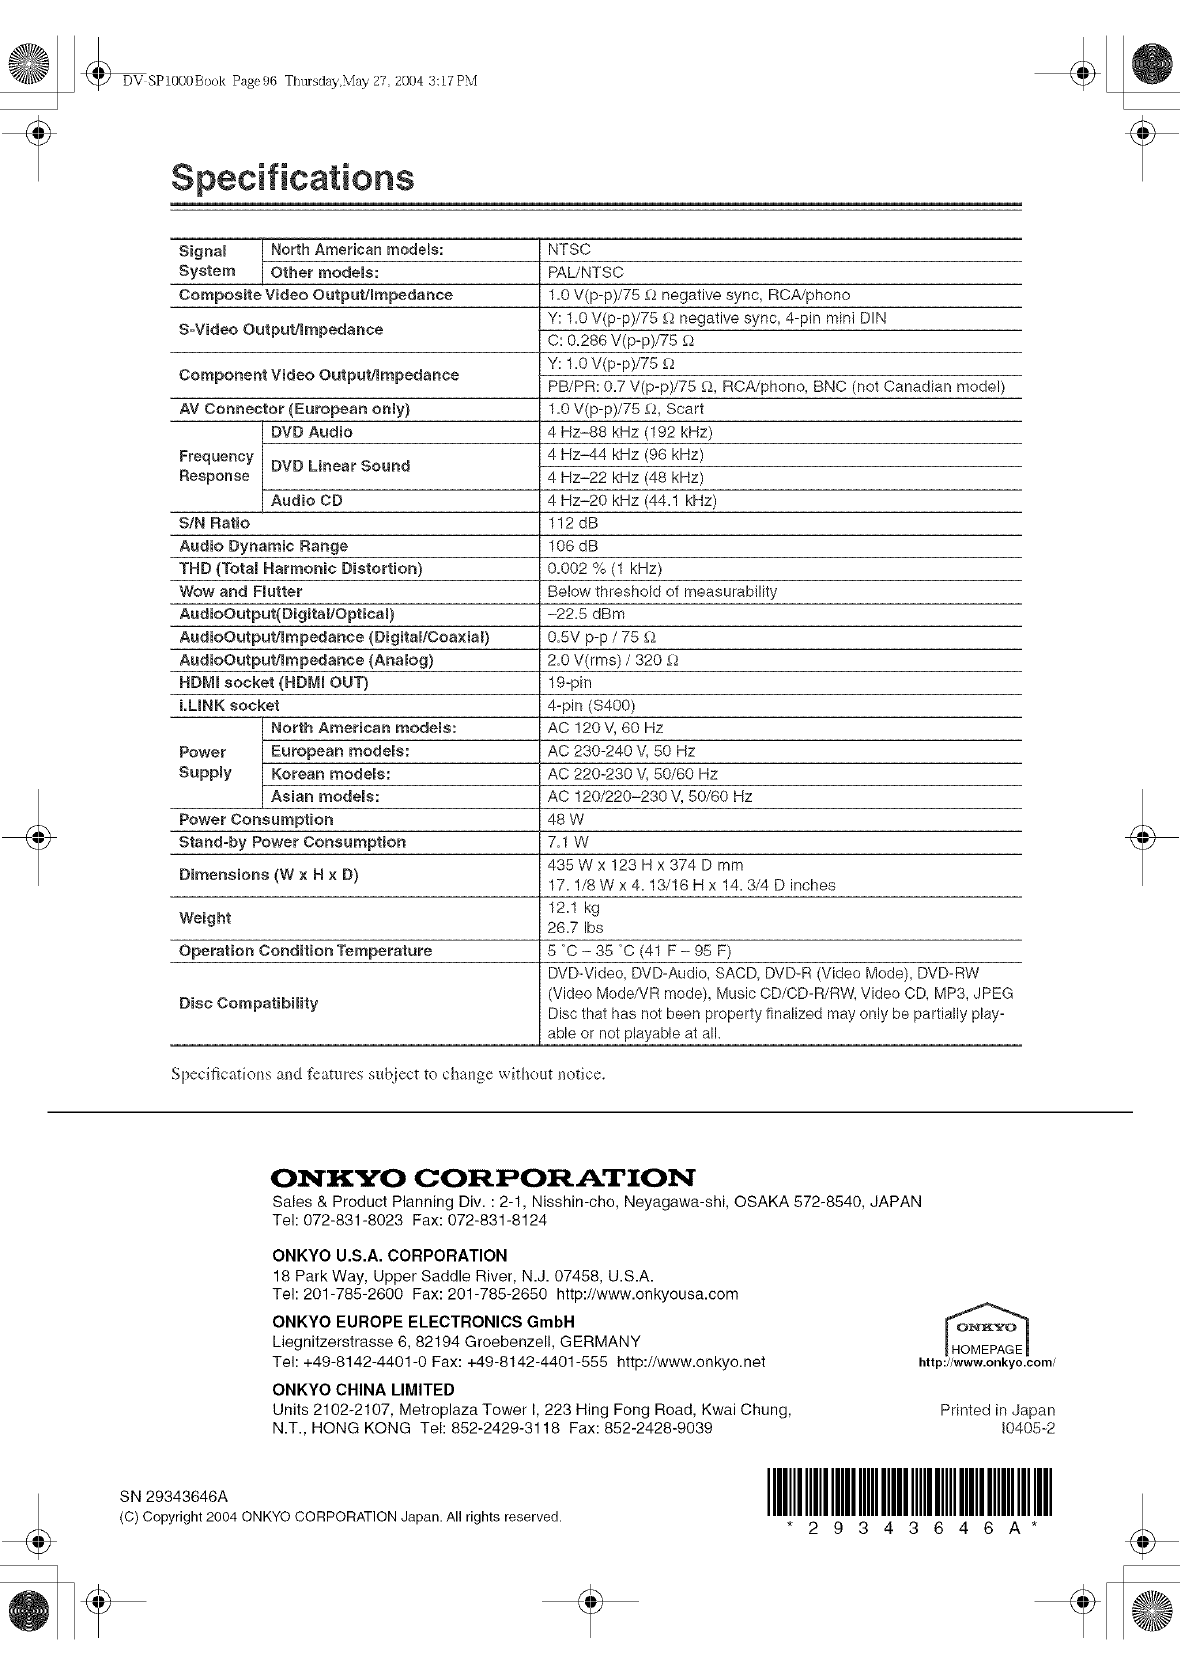
DV SP1O00Boek Page96 Ttltusday,May 27 2004 3:17 PM
Specifications
Signal North American models:
System Other models:
Composite Video Outputimmpedance
S=Video Output/Impedance
Component Video Output!Impedance
AV Connector (European only)
DVD Audio
Frequency DVD Linear Sound
Response
Audio CD
S!N Ratio
Audio Dynamic Range
THD (Total Harmonic Distortion)
Wow and Flutter
AudioOut put(DigitaliOpticaR)
AudioOut put!Ira pedance (Digitab'Coaxial)
AudioOut put/Ira pedance (Analog)
NDMI socket (HDMI OUT)
LLINK socket
North American models:
Power European models:
Supply Korean models:
Asian models:
Power Consumption
Stand-by Power Consumption
Dimensions {W x H x D)
Weight
Operation Condition Temperature
Disc Compatibility
NTSC
PAL/NTSC
1.0 V(p-p)/75 £2negative sync, RCA/phono
Y: 1.0 V(p-p)/75 £) negative sync, 4-pin mini DIN
C: 0.286 V(p-p)/75 £2
J
Y: 1.0 V(p-p)/75 £2
PB/PR: 0.7 V(p-p)/75 £_, RCA/phono, BNC (not Canadian model)
1.0 V(p-p)/75 £2, Scart
,4 Hz-88 kHz (192 kHz)
4 Hz-44 kHz (96 kHz)
4 Hz-22 kHz (48 kHz)
4 Hz-20 kHz (44.1 kHz)
112 dB
106 dB
0.002 % (1 kHz)
Below threshold of measurability
-22.5 dBm
0.5V p-p /75 £_
2.0 V(rms) /320 £_
19-pin
4-pin (S400)
AC !20V, 60 Hz
AC 230-240 V, 50 Hz
AC 220-230 V, 50/60 Hz
AC !20/220-230 V, 50/60 Hz
48w
J
7.1W
435Wx !23 H x 374 Dmm
17.1/8 W x 4.13/16 H x 14.3/4 D inches
12.1 kg
26.7 Ibs
5 C-35 C(41F-95F)
DVD-Video, DVD-Audio, SACD, DVD-R (Video Mode), DVD-RW
(Video Mode/VR mode), Music CD/CD-R/RW, Video CD, MP3, JPEG
Disc that has not been property finalized may only be partially play-
able or not playable at all.
Specificafior_s and t'catares sabiect to char_ge wkhout notice.
ONI_YO CORPORATION
Sales & Product Planning Div. : 2-1, Nisshin-cho, Neyagawa-shi, OSAKA 572-8540, JAPAN
Tel: 072-831-8023 Fax: 072-831-8124
ONKYO U.S.A. CORPORATION
18 Park Way, Upper Saddle River, N.J. 07458, U.S.A.
Tel: 201-785-2800 Fax: 201-785-2650 http://www.onkyousa.com
ONKYO EUROPE ELECTRONICS GmbH
Liegnitzerstrasse 6, 82194 Groebenzell, GERMANY
Tel: +49-8142-4401-0 Fax: +49-8142-4401-555 http://www.onkyo.net
ONKYO CHINA LIMITED
Units 2102-2107, Metroplaza Tower I, 223 Hing Fong Road, Kwai Chung,
N.T., HONG KONG Tel: 852-2429-3118 Fax: 852-2428-9039
ht tp://www.onkyo.com/
Printed in Japan
J0405-2
SN 29343646A
(C) Copyright 2004 ONKYO CORPORATIONJapan.All rights reserved. IIIIIIIIIIIIIIIIIIIIIIIIIIIIIIIIIIII
* 2 9 3 4 3 6 4 6 A*
