OPENERS WHF-7020S 900 MHz Cordless Telephone User Manual manual
OPENERS CO., LTD. 900 MHz Cordless Telephone manual
OPENERS >
users manual

FCC CERTIFICATION
Report No: E01.0608.FCC.241.N
FCC ID : O6JWHF-7020S
Openers Co., Ltd.
Cordless Telephone Model : WHF-7020S
Appendix H. User Manual

Contents
Information
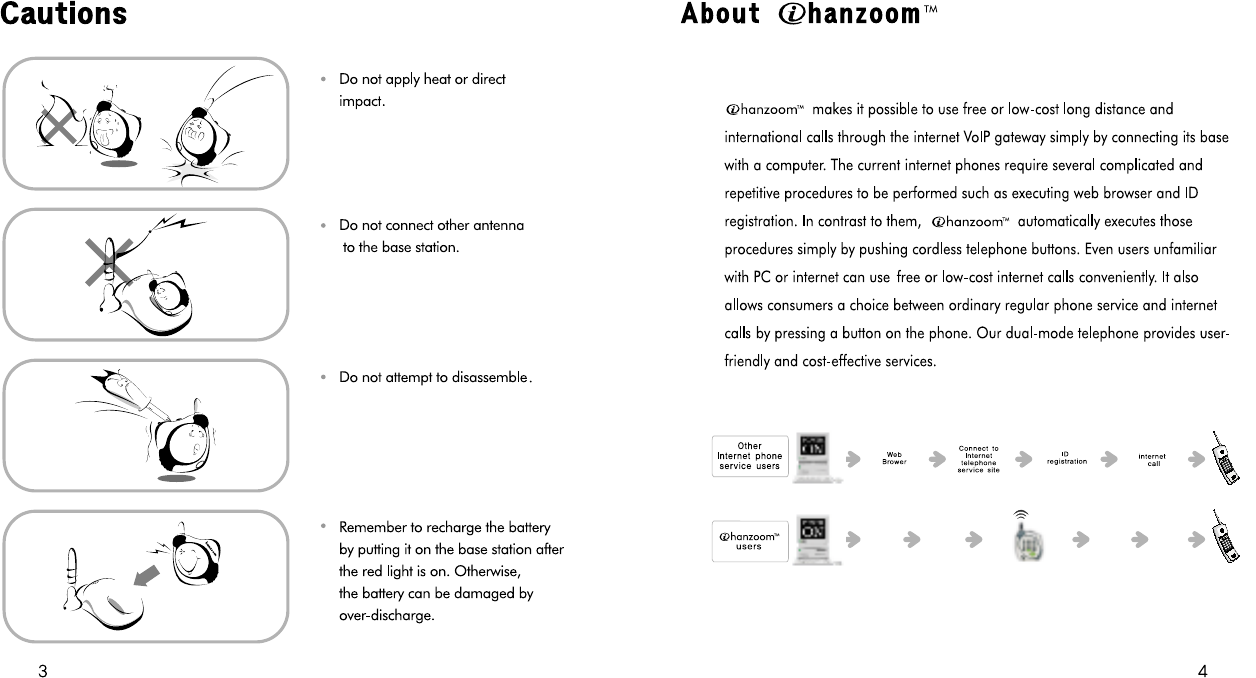
Cautions
About
PC System Requirements / Features
Unit Contents
Installation
Phone Installation
Program Installation
Program Uninstallation
Program Running
User Interface Setting
Operation
Regular Phone
Internet Phone
Additional Functions
Troubleshooting
Regular Phone
Internet Phone
Specification
Thank you for purchasing hanzoom ,
900MHz Cordless Internet Phone.
Please read this manual thoroughly before using it.
tm
3
3
4
5
6
7
7
11
13
14
15
18
18
31
33
35
35
37
39
Pentium MMX 166 or over
32 MB RAM or over
100MB HDD or over
MS Windows 95/98/NT
MS Internet Explorer 5.01 or over
Microsoft Virtual Machine (latest version)
Windows Media Player 6.4 or over
Sound Blaster compatible / Full-Duplex sound card
Internet connection via ADSL/ISDN/LAN
PC System Requirements
Features
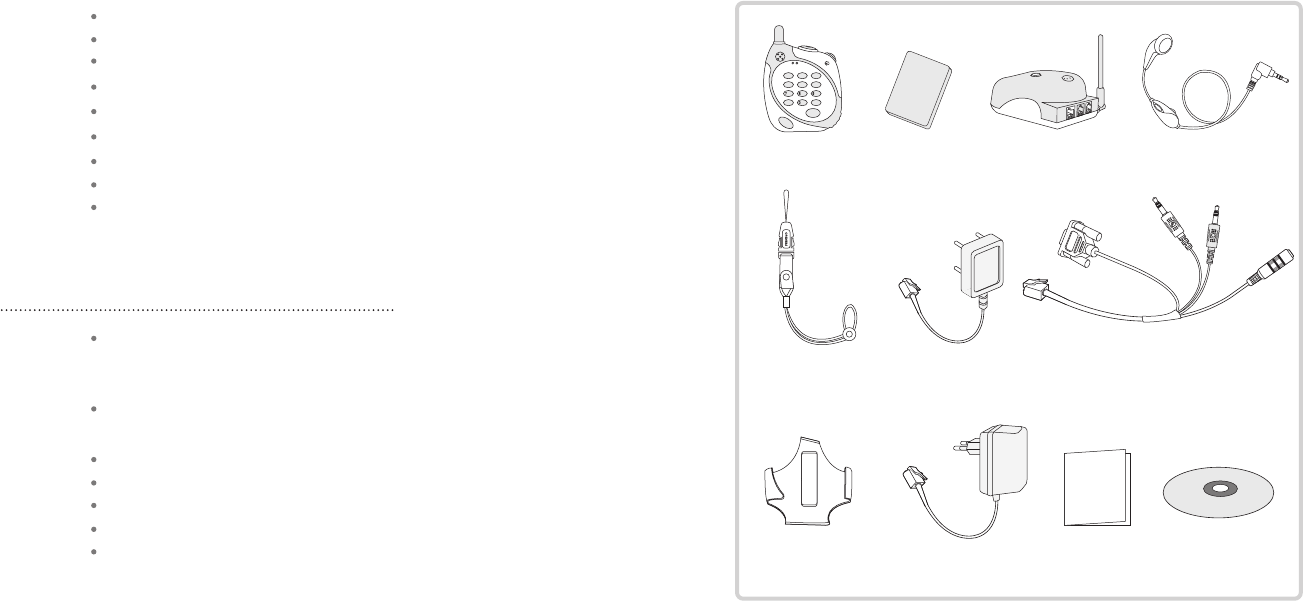
Unit Contents
Base Station
(battery charger)
Integrated Cable
Power Adapter
Handset Ni MH battery Earset
Necklace String
Belt Clip
Telephone Line
Manual Installation CD
*
#
FLASH
2
13
456
hanzoom
H
O
O
K
MANUAL
900MHz cordless internet phone that enables FREE or low-cost
internet calls
(Member registration to an Internet telephony service site is required)
Dual-mode cordless telephone that offers both internet calls and
ordinary regular phone service simply by pressing a button on the phone
Listening to MP3 music via MP3 player S/W
Listening to radio programs via internet
Voice checking of e-mail arrivals
Hands-free function
Ultra compact design and light weight
56
Information Information
WHF-7000
(NI-MH.3.6V 400mAh)
Battery
WHF-7020
(NI-MH.3.6V 400mAh)
Battery
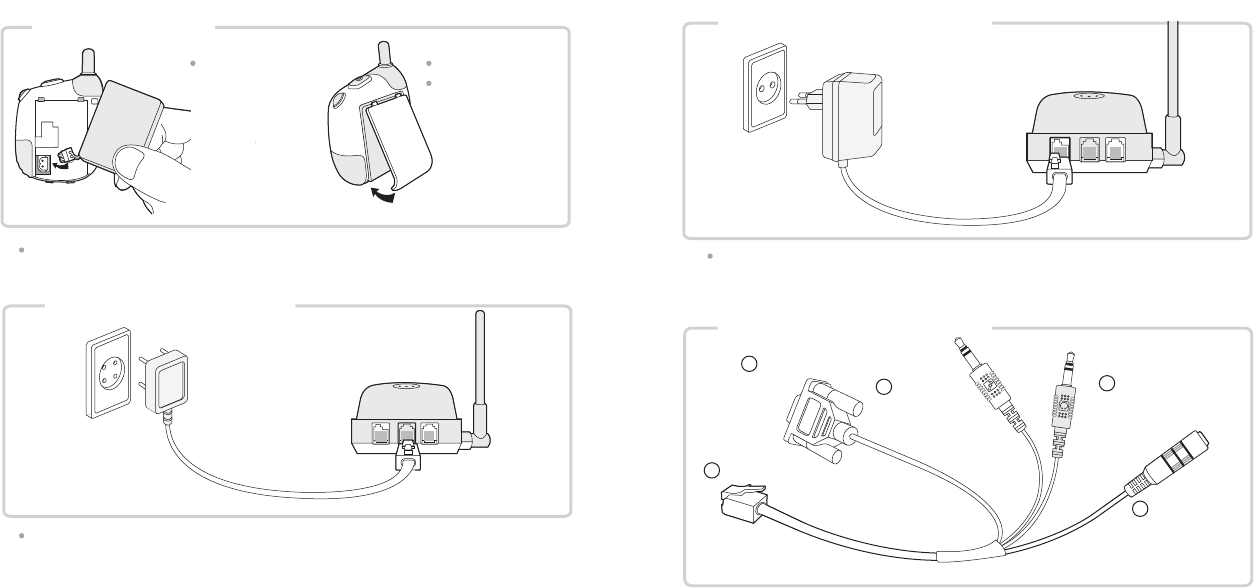
Phone Installation Phone Installation
Plug the telephone line (PSTN line) into telephone outlet, and connect the jack to "LINE"
at the back side of a base station
Plug the power adapter into power outlet, and connect the jack to the "POWER" at
the back side of the base station.
3. Power cable connection
2. Telephone line connection
4. Integrated cable connection
OPENERS
hanzoom
Insert the battery
connecting
battery jack to the
inner socket
Close the cover
Place the top part of
the battery first and
gently push the
bottom part down.
Connection jack
1
2COM port cable
(Blue) 3Microphone
jack (Red)
4Sound output jack
(Black)
5Speaker jack
(Black)
POWER Line PC
POWER Line PC
Make sure to charge the battery for more than 12 hours before using the phone.
7 8
1. Placing a battery
Installation Installation
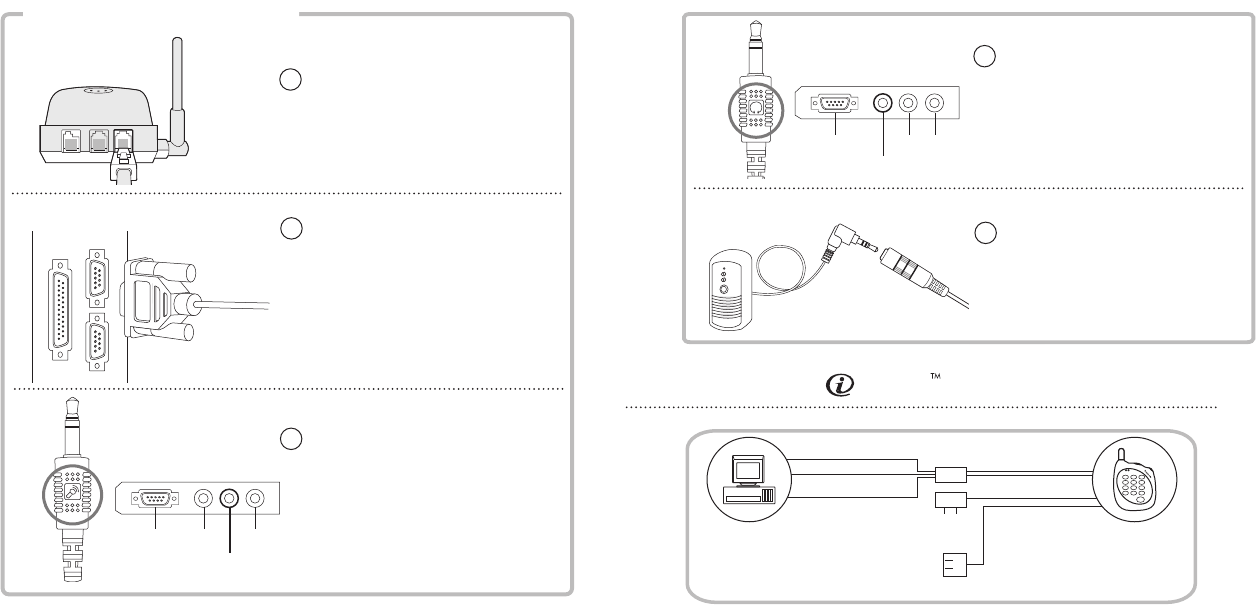
POWER Line PC
Phone Installation
Connect the COM port cable to the
unused COM port of a computer
* Caution : Please make sure
whether you connected to COM 1 or
COM2 for the convenient software
installation.
Connect the microphone jack to the
microphone input port of the computer
Connect the sound output jack to the
speaker port of the computer
Put the connection jack of the cable
into the "PC" at the backside of the
base station.
1
2
3
Phone Installation
Connection of
hanzoom
with a PC
4
SpeakerJoy Stick
Mic
Line-in
Speaker
MicJoy Stick Line-in
910
4. Integrated cable connection
PC
Integrated Cable
Phone
RS232C Cable
Mic Cable
Headphone Cable
Power Cable
PSTN Cable
Connect the speaker input jack to the
speaker jack of the integrated cable
5
Program Installation Program Installation
2 Visit to the following internet telephone service sites to sign up and get a user ID
and a password.
For Deltathree and Mediaring services, please download relevant freeware through
the websites as instructed on the web.
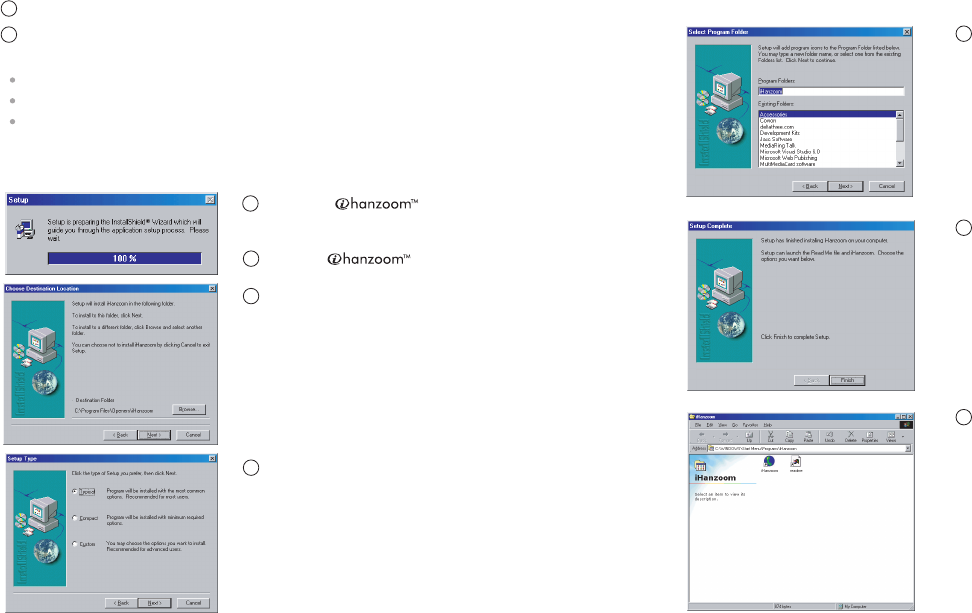
7 Use iHanzoom as a program folder
name and click the "Next" button to
continue.
8 Click the "Finish" button to complete
the installation.
9 After successful installation, iHanzoom
icon will show on your desktop and the
program folder will be settled as the left
picture.
4 Starting setup program
3 Insert the installation CD and
execute "setup.exe"
6 Choose the setup type and click the "Next"
button. Generally, the typical type is
recommended for the proper installation.
5 Choose the destination folder of the
program. To install it under C:\Program files
\Openers\iHanzoom, click the "Next" button.
To choose a different folder, click "Browse"
button. After selecting another folder, click
the "Next" button.
12
11
http://www.dialpad.com
http://www.deltathree.com
http://www.mediaring.com
1 Close all the other application programs
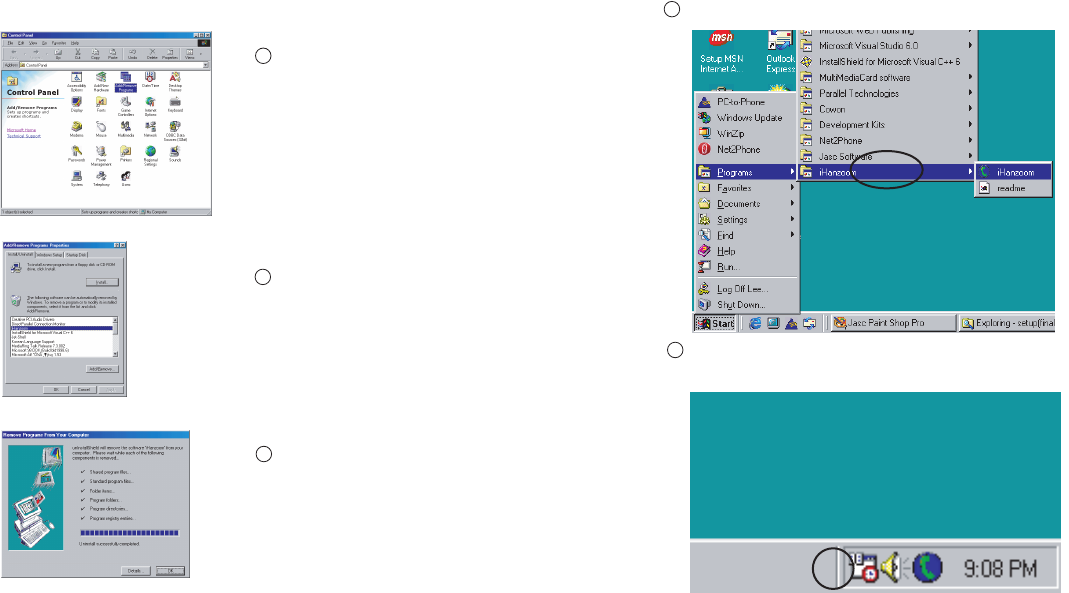
Program Uninstallation
1 Double click "add/remove
programs" icon in the control panel of
MS Windows.
2 Select iHanzoom item and click
the "add/remove" button.
3 Click the "OK" button.
1 Click iHanzoom icon in the iHanzoom folder in Windows Program
2 iHanzoom icon will appear in the right side of Windows system tray after
successful installation
Program Running
13 14

Click the right button of a mouse on
iHanzoom icon in the system tray at the
bottom of Windows.
Select the "Setting" item from popup
menu to open setting dialog box.
Click "Internet Phone Setting" tab
in the setting dialog box.
Select the internet phone service
provider, and type user ID and
password, then click OK button.
Click "COM Port Setting" tab
in the setting dialog box.
Select COM1 or COM2 on COM port
combo box and click "OK" button.
2 Internet phone setting
User Interface Setting User Interface Setting
1 User Interface Setting
3 COM port setting
15 16
User can select one of three internet
phone services after typing details for
each one.
Click "Mail Server Setting" tab
in the setting dialog box.
Click "Add" button.
4 Mail server setting
Type mail server, user-account and
password.
Click "OK" button.
Click "OK" button to complete POP3
server registration.
Add other mail servers by using "Add"
button again if any.
17 18
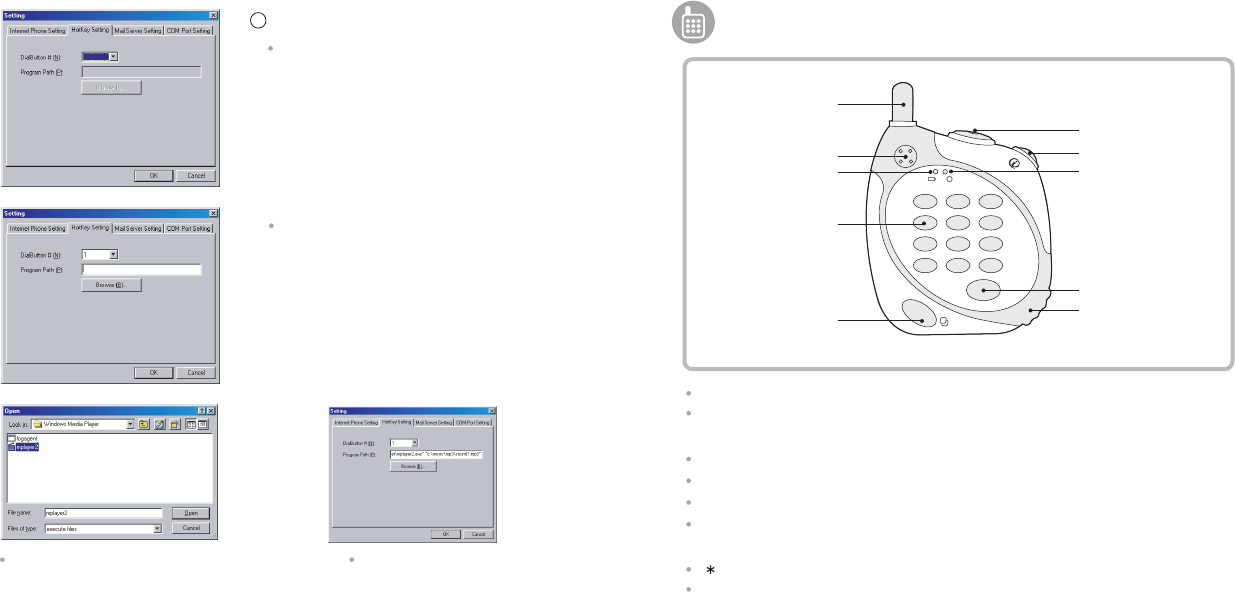
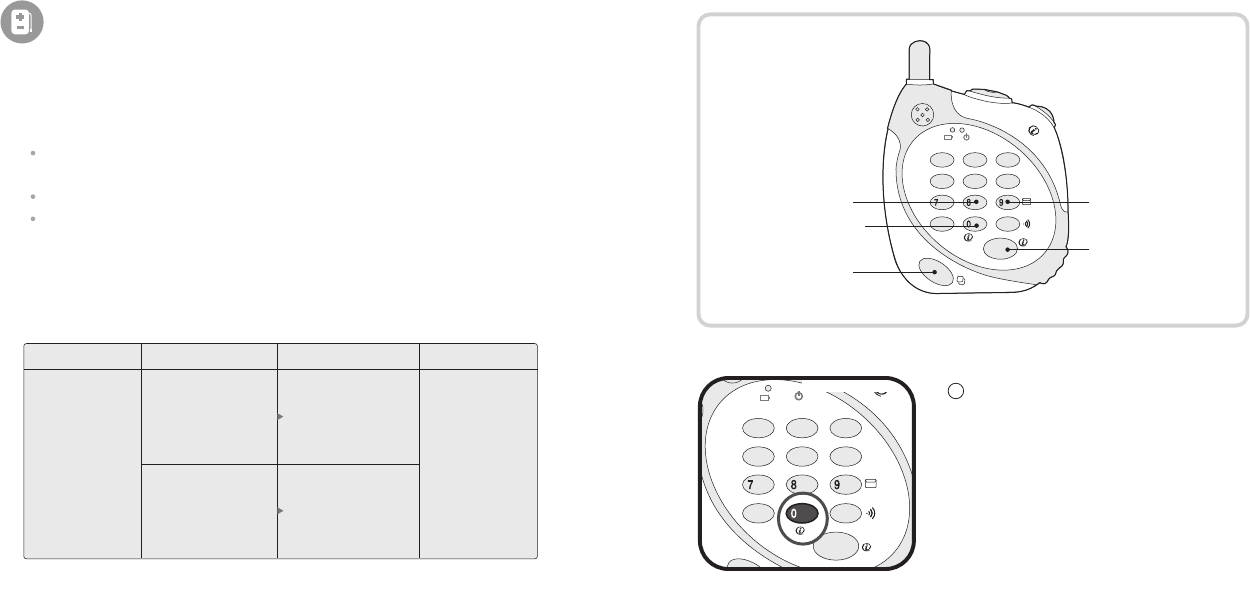
Regular Phone
Handset
Hook Button : To make and receive calls
Flash Button : To transfer a call to another connection in the same PABX
or DID switching system
Redial Button : To redial the previous number
Hold Button : To hold on a call
In-use Indicator : Green light on handset indicates that you are connected.
Low Battery Indicator : Red light is turned on when the battery should
be recharged.
( ASTERISK) Button : To change channels
# ( SHARP ) Button : To adjust a receiving volume during a call.
Speaker
Low Battery Indicator
(BATT)
Use Indicator
(USE)
Flash Button
Antenna
Earphone Jack
Hook Button
Dial Button
Redial / Hold Button
Microphone
Click "hot key setting" tab
in the setting dialog box.
5 Hot key Setting
Select a hot key number from the dial
numer combo box and click "browse"
button.
Indicate the program and click "OK" button. Click "OK" button.
User Interface Setting
hanzoom
Regular Phone
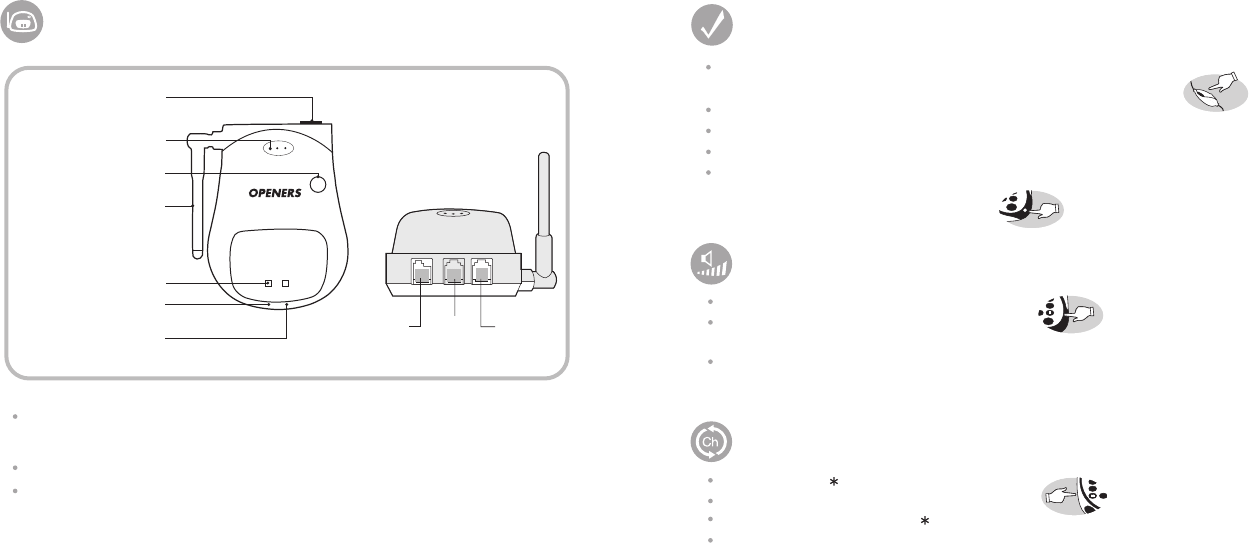
19 20
Call Button : To page a handset that is away from the base station by playing
a melody
In-use Indicator : Green light starts blinking to indicate an incoming call.
Recharging Indicator: The red light is on during recharging and doesn't change
it's color though it was completed.
Base station
Ventilation Holes
Call Button
Antenna
Charging Electrode
Use Indicator
(Green light)
Recharging Electrode
(Red light)
Power
Power Line PC
POWER Line PC
Operation Operation
Regular Phone
Note
Make sure to press the hook button of the ear-microphone adequately.
(For about one second)
Red light of handset indicates the battery needs to be charged.
An irregular noise is heard when over-discharged (Recharge immediately).
Red light is turned on during recharging and keep going on after fully recharged.
Pay attention not to cover the microphone of handset with hand during a direct
communication.( Hauling can be heard )
Receiving Volume Adjustable
Channel Selection
Press and hold # button for about 1.5 seconds.
Green light on handset starts blinking fast.
(It increases 1 level of receiving volume)
Receiving volume can be adjusted in this way up to 3 levels.
(Starting from level 1 and automatic set up in level 1 when using again.)
Press and hold button for about 1.5 seconds.
Green light on handset starts blinking fast.
Then move hand away from button.
It is automatically transferred from a current channel to the new one without
a call interference.
Placing a call Receiving a call
Regular PhoneRegular Phone
22
21
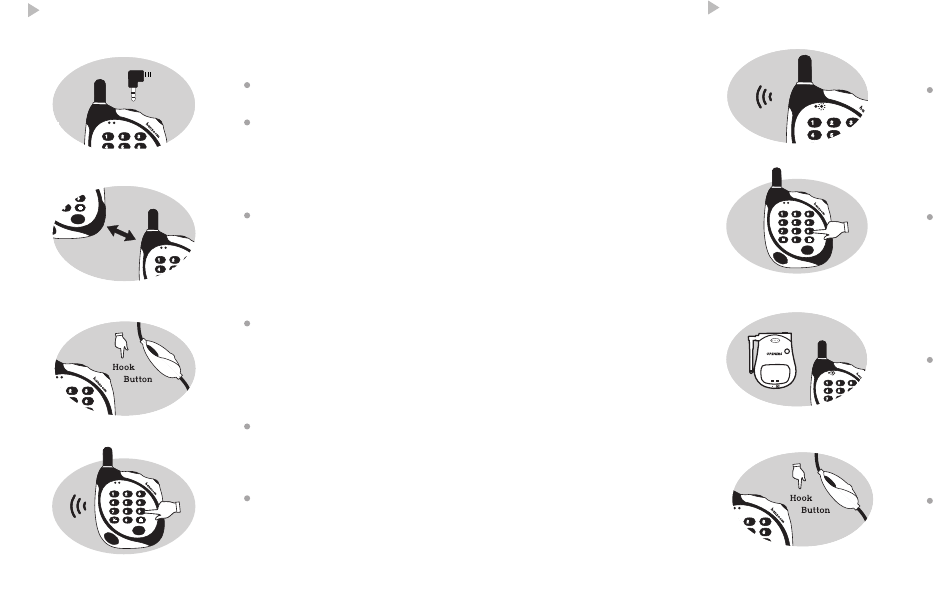
Decide whether to use an ear-microphone or not.
Connect an ear-microphone to earphone jack of
a handset for hands-free communication.
Remove an ear-microphone for direct
communication using built-in speaker
and microphone in the handset.
Press the hook button of the handset or
ear-microphone. (After green light is blinking
in the handset, dial tone is on.)
Listen to dial tone and dial the telephone number.
Press the hook button of the handset
or the ear-microphone to hang up a call.
(Green light on the handset is turned off accordingly.)
Green light is blinking with a melody.
Press any button of a handset or hook button
of ear-microphone and start your conversation
with a short beep.
Green light indicates that you are connected.
Press hook button of the handset or the
ear-microphone to hang up a call.
1. Put the handset on the base station.
2. Check red light on the base station. ( 8~12 hours are recommendable. )
3. Make sure to charge the battery for more than 12 hours before using the
phone for the first time.
Repeating full charge(more than 12hours) and full discharge( use handset
until the red light is on) more than three times, it helps the battery last long.
Frequent recharging in use ( without full discharge )may shorten the battery life.
In case that the battery life becomes short, repeat the same procedure.
(full charge and full discharge)
Regular Phone
24
23
Power Sources
Charging Error Check Point Remedy Remarks
Call interference
after recharging
1. Check if the
handset was
properly put on the
base station.
2. Check if the power
is being supplied
to the base station.
1. Reset the handset to
the base station with
correct direction.
2. Supply power to the
base station with
Adaptor.
Recharge the
handset by putting
it on the base
station.
.QZ ABC DEF
GHI JKL MNO
PRS TUV WXY
*
#
OPR
REDIAL
/HOLD
FLASH
2
13
456
hanzoom
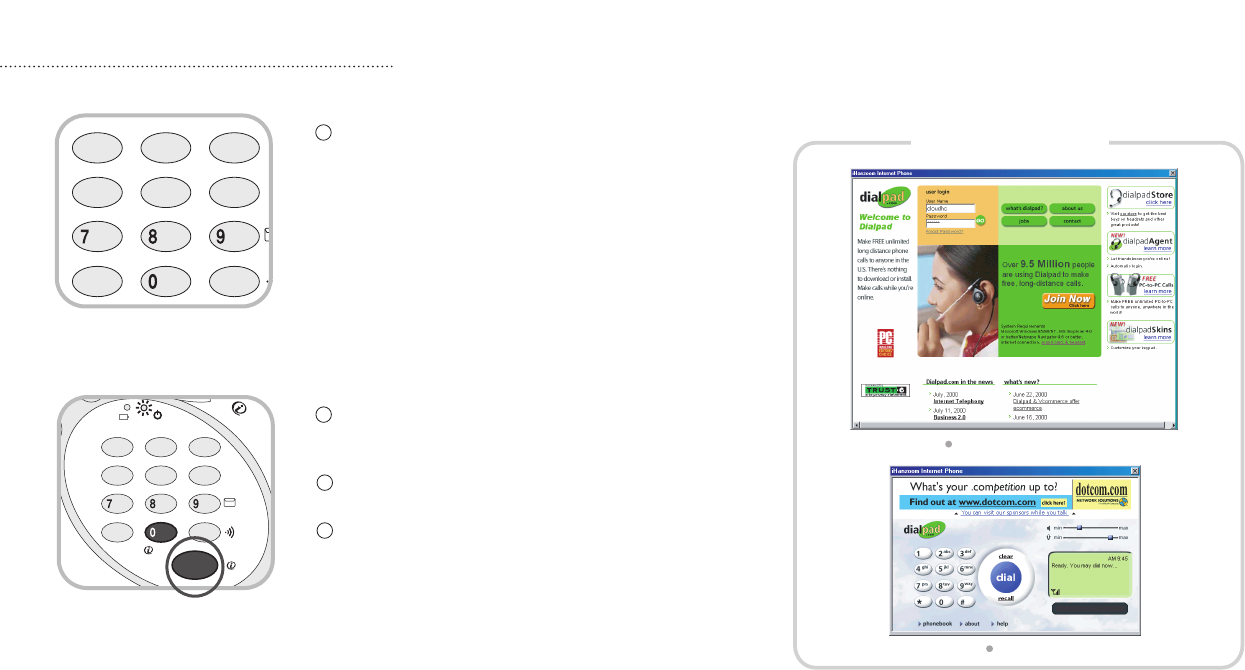
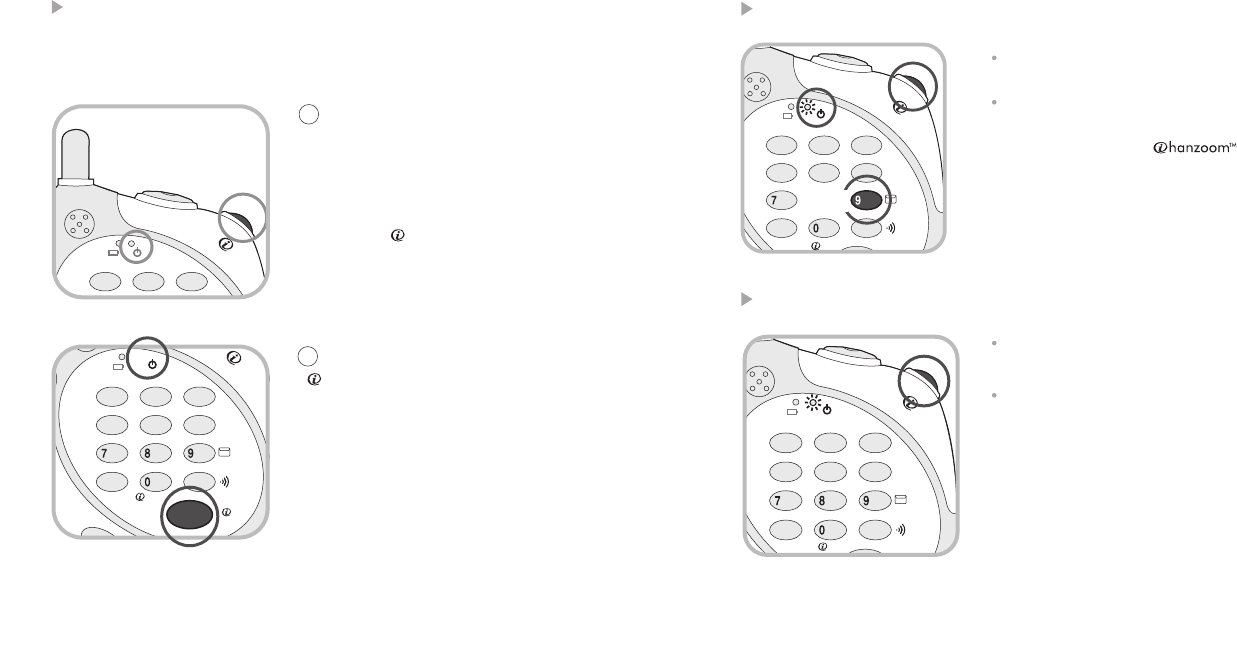
1 Press and hold ''0'' button for at least 1.5sec. to
execute the internet phone program automatically.
You will hear the voice message notifying
successful connection.
phone
call
Internet
Phone
Starting internet
phone program
E-mail checking
Making an
internet call
Redial / Cancel
Closing internet
phone program
.QZ ABC DEF
GHI JKL MNO
PRS TUV WXY
*
#
OPR
REDIAL
/HOLD
FLASH
2
13
456
hanzoom
1.5sec
1.5sec
phone call
Green light flickering
.QZ ABC DEF
GHI JKL MNO
PRS TUV WXY
*
#
OPR
REDIAL
/HOLD
2
13
456
hanzoom
3 Press and hold the "Redial/hold" button
for 1.5sec. to make a call.
4 Press the "Redial/hold" button to hang up
a call.
5 Press the "Flash" button to cancel the
dialing number and push the button for
1.5sec. for re-dialing.
phone
call
25
.QZ ABC DEF
GHI JKL MNO
PRS TUV WXY
*
#
OPR
2
13
456
hanzoom
Dial the telephone number
26
1.5sec
1.5sec.
Internet
Phone
2
Internet
Phone
Dialer
Using Dailpad.com
Log-In Window
Internet
Phone
Log-In Window
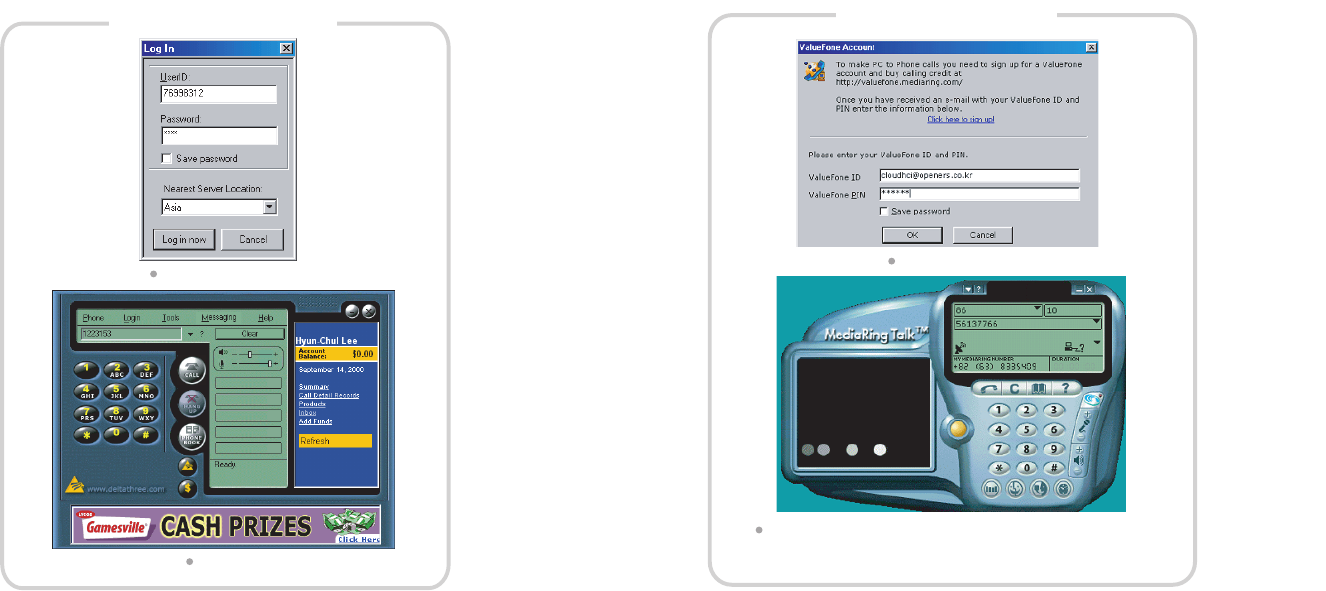
Using Mediaring.com
MediaRing Talk Dialer
- Press*(asterisk) button between country code, area code and
local phone number especially for MediaRing service
Internet
Phone
27 28
Log-In Window
Dialer
Using DeltaThree.com
Operation Operation
Internet
Phone
Hanging up
1 Push the "Hook" button to hang up
a call and also disconnect an internet
phone service site
There are two ways to hang up an internet call as follows.
.QZ ABC DEF
GHI JKL MNO
PRS TUV WXY
*
#
OPR
REDIAL
/HOLD
2
13
456
hanzoom
.QZ ABC DEF
GHI JKL MNO
2
13
456
hanzoom
HookHook
Green light
phone
call
29 30
2 Push the 'REDIAL/HOLD' button
( call) to hang up a call and maintain
the connection with an internet phone
service site.
Green light
Blink green light
Blink green light
E-mail checking
Additional Functions
.QZ ABC DEF
GHI JKL MNO
PRS TUV WXY
*
#
OPR
REDIAL
/HOLD
2
13
456
hanzoom
phone
Receiving a regular phone call on the Internet phone mode
Press the "Hook" button to receive a regular
ordinary call during the Internet phone mode.
Press the "Hook" button after finalizing the phone
conversation to go back to the Internet phone
mode.
.QZ ABC DEF
GHI JKL MNO
PRS TUV WXY
*
#
OPR
REDIAL
/HOLD
FLASH
2
13
456
hanzoom
phone
Press the ''Hook'' button, and then "9" button
for 1.5 sec.
You can hear a voice message notifying
arrivals of e-mail incoming through the mail
servers included in the mail
server setting box.
Hook
1.5sec.
Blink green light
Blink green light
Hook
1) Push the "Hook" button to hang up a call.
Then, the green light of a handset will go out.
2) Press "0" ( phone) button to make a new
Internet call.
Additional Functions
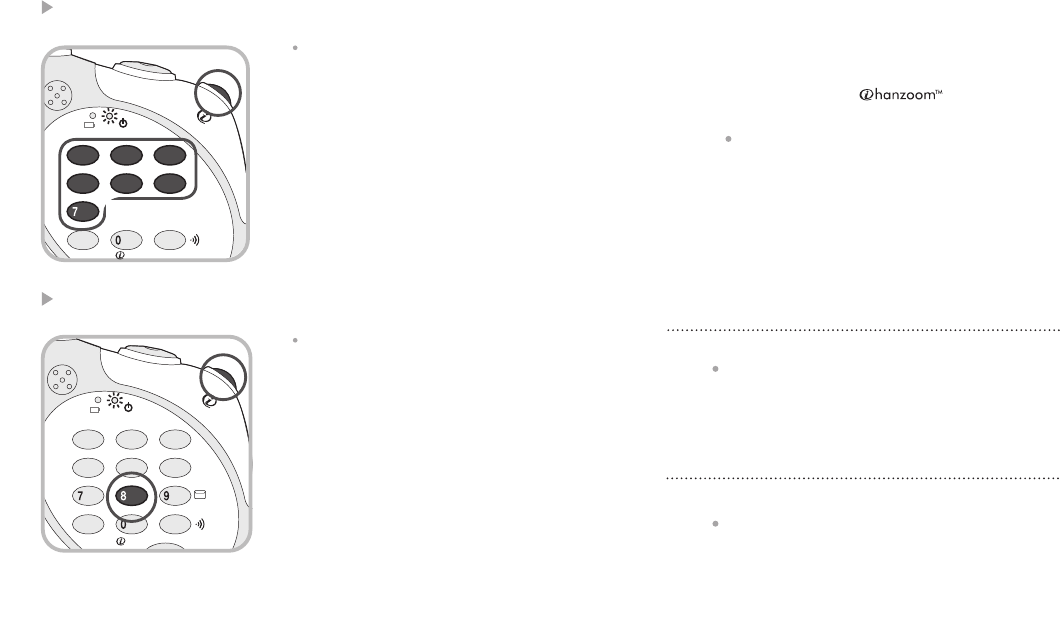
Automatic program executing by using a hot key
Press the "Hook" button and then, press the
relevant call no. (1~7) for at least 1.5 sec. to
execute the relevant program. The hot key
setting is required at the beginning stage for
the proper operation.
.QZ ABC DEF
GHI JKL MNO
PRS TUV WXY
*
#
OPR
FLASH
2
13
456
hanzoom
.QZ ABC DEF
GHI JKL MNO
PRS TUV WXY
*
#
OPR
FLASH
2
13
456
hanzoom
1.5sec.1.5sec.
Closing Internet phone service program
Press "8" button for 1.5 sec. to close the
Internet phone service program in the
computer screen.
phone
phone
32
31
Hook
Hook
1.5sec.
Normally free internet phone is not workable in the network in which any firewall
or proxy server is installed. Please consult with a network manager.
Please visit to each Internet telephony service site for free member registration and get
a user ID and a password to make low-cost or free Internet calls with .
Have you registered to internet
telephony service providers?
Internet telephony service sites
- http://www.dialpad.com
- http://www.deltathree.com
- http://www.mediaring.com
Are you using a full-duplex
sound card?
Full-duplex sound card is required for free internet calls to work properly.
Is any firewall or proxy server installed?
Is volume properly set?
Run volume control program to set up
volume and microphone of a computer
sound card.
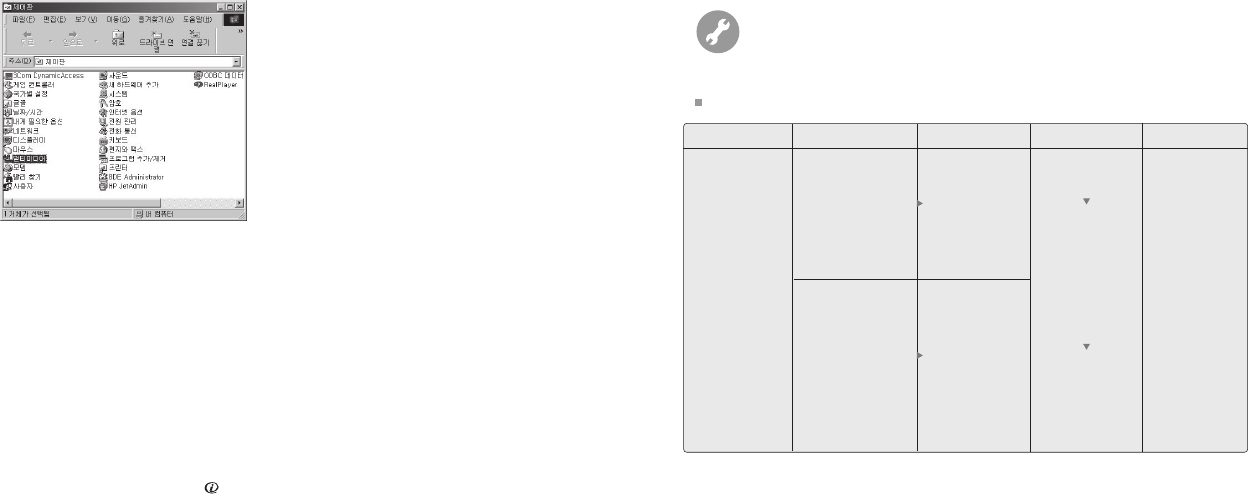
1) Open "control pannel" under Window
Start>Setting
2) Double click "Multimedia" icon.
3) Press replay button in an Audio tap
when "Multimedia registration information"
windows are running.
33 34
4) Then volume control, CD, wave control windows appears. Make sure that
microphone's phoneme is checked for removal. Otherwise, echoes may occur during
internet phone conversation.
5) Click "Recording" button, then controllable volume settings will appear. If "Mic" are
not selected, click register information from option menu. Among volume control's
selection choose a "Mic" and then select yes. If "Mic" shows up in recording control's
window, click select button.
6) Check wheather it is correctly set through windows desktop
Start>Program>Entertainment>Recorder Program.
7) Click "Redial/Hold" button ( call) of the handset for 1.5 sec.
8) Using "Sound-Recorder", click right button to record via an ear-set. Check
recording sound by clicking replay button. If recording sound is inappropriate, control
again "wave" and "mic" volume in the "Volume control's window" again.
Regular Phone
If Remedy1
doesn't work..
Refer to "Handset
Reset"
If Remedy2 abo-
ve doesn't work..
Refer to "ID setting
between handset
and base station"
Symptom Check Points Remedy1 Remedy2 Remarks
If you have any problems, please check these points first.
Green light of
handset keeps
blinking, and
making or
receiving a call
doesn't work well.
1. Check if power is
not firmly conne-
cted to the base
station.
(Green light sho-
uld be turned on)
2. Check if green
light of handset is
blinking when pr-
essing the hook
button of it.
(if not, or red light
is on, check the b-
attery recharging)
1. Supply the pow-
er to the base
station connecti-
ng AC adaptor
to the wall outlet.
2. Recharge
the battery.
If you still have a
problem, consult
where you have
purchased.
The handset doesn't work well.

Regular Phone
36
35
Handset reset
Press and hold hook button of handset for about three
seconds until green light flashes.
ID setting between handset and base station
1. Be sure to press and hold flash button, then press hook button.
2. Green light of handset is turned on (If the light is off or blinks, retry from
No.1 above in condition of light-off.)
3. Press the call button on the base station for about three seconds until red
recharging indicator on the base station starts blinking.
4. If green light is turned off after a while (1~20 seconds), the handset and
base station finished ID setting.
(If green light doesn't turned off, press the call button again.)
Melody can be played operating a paging function after the ID setting was
completed.
Troubleshooting Troubleshooting
Regular Phone
There is no melody ringing heard when receiving a call
Symptom Check Points Remedy Remarks
There is no
melody ringing
when receiving
a call.
1. Is telephone line
connected to the
base station firmly?
2. Does green light
of the base station
blink when
receiving a call?
3. Is power being
supplied to the
base station?
4. Does the battery
need recharging?
1. Connect telephone
jack to the base
station.
2. Connect telephone
jack to the base
station.
3. Supply power to the
base station
connecting AC
adaptor to the wall
outlet.
4. Recharge
immediately red
light is when on.
Check these points
and if you still have
a problems, consult
where you have
purchased.
Regular Phone
38
37
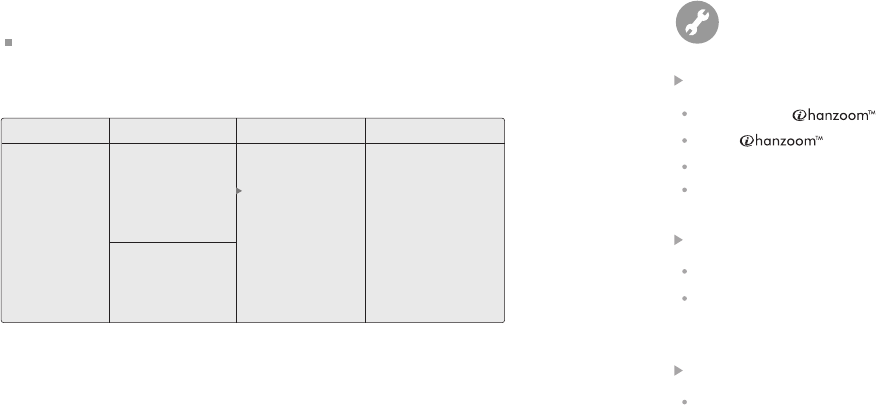
Symptom
The calling range
is getting short
along with noise
during a call
Check Points
Any electronics
may cause electric
wave around
the phone ?
Was it installed in
the airtight place ?
Remedy
Move the base
station to another
place.
Remarks
The calling range
depends on the
electric wave
circumstances around
the phone.
The calling range is getting short along with noise during a call
Internet
Phone
If you have any problems, please check the following points.
If there is no response after pressing a button on the handset,
Check whether program is currently running.
Check program icon at the right side of the system tray.
Check the connectivity of the integrated cable. Refer to the phone installation process again.
Check the port setting in the user interface setting box.
Check whether the mail server supports POP3
Check whether mail server name, mail account and password are correctly input
into the dialog box of the mail server setting tap.
If the mail checking function is not workable,
Check COM port setting procedure and change it to the other port (COM1 or COM2).
If there is failure in opening COM port
39 40
Internet
Phone
When there is an error at internet browser
Check a user ID & password of internet phone service sites are correct at internet
phone setting box.
Basically, the member registration to internet telephony service sites is required.
Visit to Internet telephony service web sites to sign up and get a free user ID & password.
Check the system requirements :
- Check the version of MS Internet Explorer. At least, MS Internet Explorer 5.01 is required
The upgrade is available through http://www.microsoft.com/windows/ie_intl/ko/download/
- Check whether MS Virtual Machine is the latest version.
To upgrade JAVA VM, please visit to the site, http://www.microsoft.com/java/dl_vm40.htm
or http://windowsupdate.microsoft.com
Check the version of MS Windows Media Player. The version should be 6.4 or above.
To upgrade MS Windows Media Player, please visit to http://www.microsoft.com/windows/
mediaplayer/ko/download/.
The Internet phone service can be delayed due to some problems of internet phone
service sites temporarily such as excessive users or unstable Internet connection.
In that case, please press "HOOK" button and then "8" button to disconnect.
Then, try to re-start the service.
Troubleshooting
Electrical/Physical Specification
Frequency Range
For Europeans
Base Station Rx, Handset Tx : 914.0125~914.9875 MHz
Base Station Tx, Handset Rx : 959.0125~959.9875 MHz
For North Americans(ISM)
Base Station Rx, Handset Tx : 925.30~927.25 MHz
Base Station Tx, Handset Rx : 902.80~904.75 MHz
For Japanese
Base Station Rx, Handset Tx : 253.8625~254.9625 MHz
Base Station Tx, Handset Rx : 380.2125~381.3125 MHz
Transmit Output Power:
For Europeans : 8.0~10.0 dBm
For North Americans : -2 dBm
For Japanese : 8.0~ 10.0 dBm
Spurious Transmission:
For Europeans : -55 dBm max.
For North Americans : -54 dBm max.
For Japanese : -40 dBm max.
Adjacent Channel Selectivity:
For Europeans : 51 dB min.
For North Americans : 45 dB min.
For Japanese : 53 dB min.
Channels : 40 ( 89 Chs. for Japanese)
Communication System : Full Duplex
Modulation System : Analog FM
Receiving Sensitivity : -110 dBm
Radiation Interference : -57 dBm
Talk Time : About 4 hours
Standby Time : About 16 hours
Weight (Handset, Including battery)
For Japan and North American : Approx. 82g
For Other Countries : Approx. 90g
Dimension (Handset) : 70.0mm(H) x 59.3 mm(W) x 28mm(D)
NOTICES TO USER
This device complies with Part 15 of the FCC Rules. Operation is subject to the following two
conditions:
(1) this device may not cause harmful interference, and (2) this device must accept any
interference received, including interference that may cause undesired operation.
Privacy of communications may not be ensured when using this phone
This equipment generates or uses radio frequency energy. Changes or modifications to this
equipment may cause harmful interference unless the modifications are expressly approved in the
instruction manual. The user could lose the authority to operate this equipment if an unauthorized
change or modification is made.
INFORMATION TO THE USER
This equipment has been tested and found to comply with the limits for a Class B digital device,
pursuant to Part 15 of the FCC Rules.
These limits are designed to provide reasonable protection against harmful interference in a
residential installation.
This equipment generates, uses and can generate radio frequency energy and, if not installed and
used in accordance with the instructions, may cause harmful interference to radio
communications. However, there is no guarantee that the interference will not occur in a particular
installation. If this equipment does cause harmful interference to radio or television reception,
which can be determined by turning the equipment off and on, the user is encouraged to try to
correct the interference by one or more of the following measures:
· Reorient or relocate the receiving antenna.
· Increase the separation between the equipment and receiver.
· Connect the equipment to an outlet on a circuit different from that to which the receiver is
connected.
· Consult the dealer for technical assistance.
FCC WARNING