OPTOELECTRONICS OPL9712 Bar Code Data Collector User Manual OPL972X en usersmanual
OPTOELECTRONICS Co., Ltd. Bar Code Data Collector OPL972X en usersmanual
UserManual.wiki
>
OPTOELECTRONICS
>
OPL9712 User Manual
Users manual
Navigation menu
Upload a User Manual
Namespaces
Wiki Guide
HTML
PDF
Info
Views
User Manual
Discussion / Help
Navigation


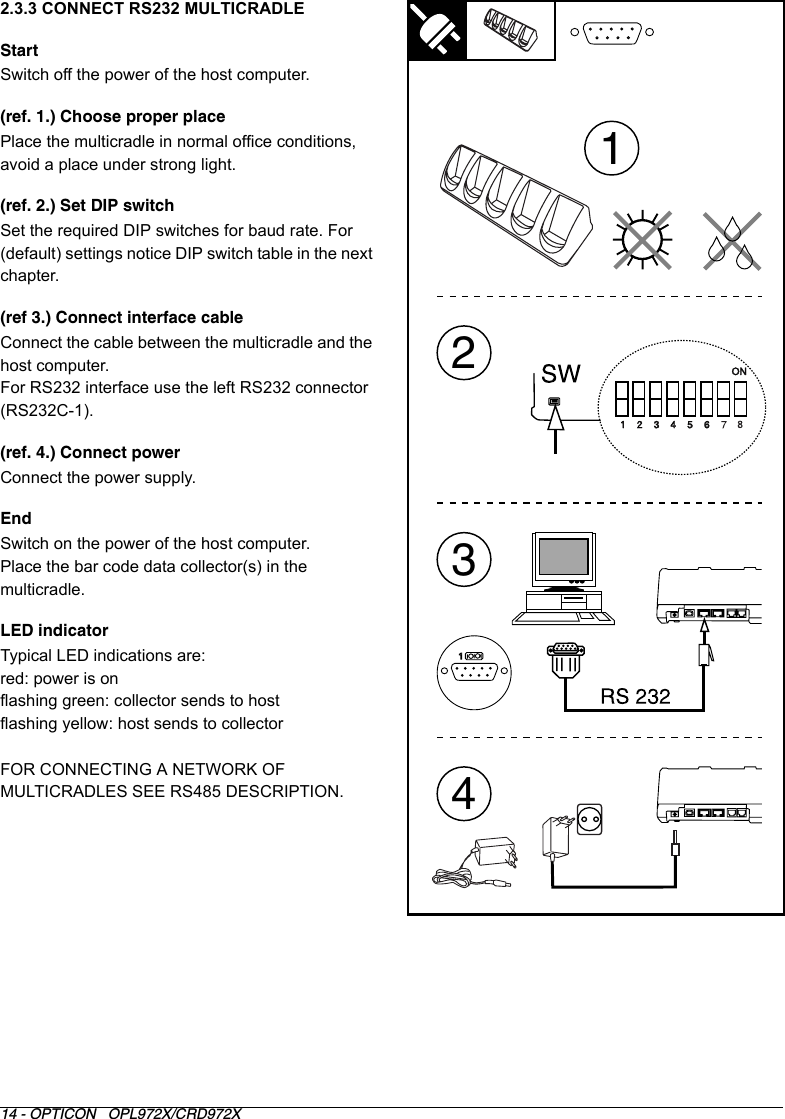


![18 - OPTICON OPL972X/CRD972X2.5 BLUETOOTH INSTALLATIONIn the bar code collector with Bluetooth interface some settings can be made in the system menu.2.5.1 SET OR SEARCH BLUETOOTH DEVICE ADDRESS:To enable the bar code data collector with Bluetooth interface to communicate to another Bluetooth device, the Bluetooth address of the device needs to be set in the system menu of the bar code data collector.Get system menu Press all 3 keys at the same time to get the system menu.To navigate downwards use the right key [Q2] and to navigate upwards use the left key [Q1]. Confirm or select with the middle [Trigger]key.Cancel operation When an operation needs to be cancelled, press all 3 keys at the same time to cancel the current option and get the system menu. Start the system menuSelect option Input address.Set Bluetooth addressTo set by manual entry, select Manual.To search for Bluetooth device address, select Discovery.Manual entryThe address shown is either 000000000000, or the address that was entered before.The Bluetooth address can be found on the other device. Mostly it is displayed on the product label as a 12 digits number or a number with 6 hex digit pairs. (e.g. 0050f27d78c5). The digits can be selected one by one by the block marker.Change the digit by pressing the left key [Q1]. Every time the left key [Q1] is pressed the value of the digit is incremented by one hexadecimal value. When the proper value is displayed move the marker to the next digit with the right key [Q2]. When the setting of the device address is done, confirm with the middle [Trigger]key.](https://usermanual.wiki/OPTOELECTRONICS/OPL9712/User-Guide-750668-Page-19.png)
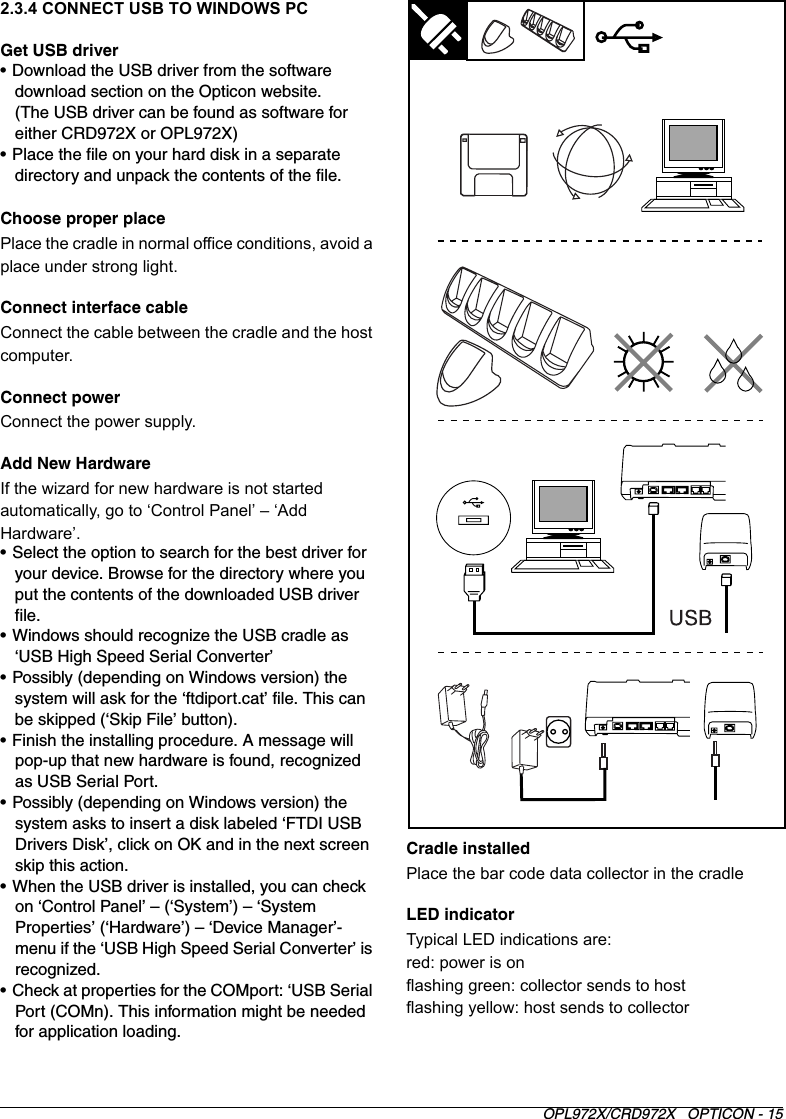
![OPL972X/CRD972X OPTICON - 192.5.2 SECURITYTo provide additional security connections, the Bluetooth specification allows you to enable a special security setting, so that a PIN-code is required from the barcode data collector in order to establish a connection.If you want to use 'unsecured' connections, do not set the PIN-code.DiscoveryThe discovery method is a more automated method. The bar code data collector will try to discover all Bluetooth devices in range (up to a maximum of 10 devices). The address and the name of each Bluetooth device is shown one by one in the display.Navigate downwards by the right key [Q2] and navigate upwards by the left key [Q1]. When device that should be used for communication is found, select it by the middle [Trigger]key.Start the system menu.Select option Input PIN-code.Select option Input PIN-code.Set PIN-codeThe code shown is either ……………., or the code that was entered before.The PIN-code is a code of 1 to 16 digits. Any personal combination of numeric values can be set. The digits of the address can be selected one by one by the block marker.Change the digit by pressing the left key [Q1]. Every time the left key [Q1] is pressed the value of the digit is going up with one numeric value. When the proper value is displayed move the marker to the next digit with the right key [Q2]. When the setting of the code is done, confirm by the middle [Trigger]key.Delete PIN-codeThe PIN-code is seen as not set when all digits are set to none (…………….)](https://usermanual.wiki/OPTOELECTRONICS/OPL9712/User-Guide-750668-Page-20.png)