Contents
- 1. user manual
- 2. User Manual
User Manual


table of contents
1. what’s in the box
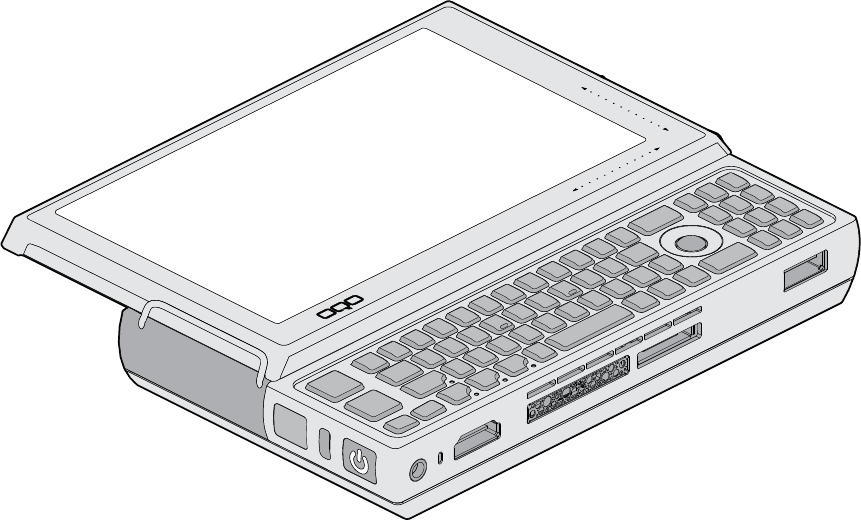
2. introducing the model 02
3. powering up and down
4. removing and attaching the battery
5. using the thumb keyboard and track stick
6. using the TouchScrollers, digital pen, and other screen features
7. connecting to a network
8. connecting the docking station and peripherals
9. installing software and copying files
10. using the model 02 security features
11. model 02 accessories
12. product support
3
4
6
8
10
12
14
16
18
20
22
24

what’s in the box
Begin by comparing the list below to what’s in the box. You
should find:
OQO model 02 computer with standard battery
pre-installed screen protector
universal power supply and AC power cord
VGA/Ethernet adapter
spare track stick cap
Microsoft® Start Here guide
OQO start guide with Windows® XP reinstallation CD
If you ordered Windows XP Tablet PC Edition 2005 with your
model 02, you will also find a digital pen and carrying case in
the box.
If you ordered your model 02 with integrated Wireless Wide
Area Network (WWAN) technology, your box will also include
an instruction card for service activation.
•
•
•
•
•
•
•
Any accessories you ordered will be packed separately.
If anything is missing, contact us by phone at 1-877-676-6688
or email support@oqo.com.
Please register your OQO model 02 by visiting
http://www.oqo.com/support.
3

introduction
Welcome to the OQO model 02 computer. The model 02 is a
full-featured Windows XP computer that gives you the total
productivity you need to fulfill your personal and professional
requirements.
mobility
The model 02 is the world’s smallest Windows Vista™
Capable computer. Its mobile form factor allows you to take it
anywhere and its ergonomic design facilitates usability on the
go. Because the model 02 uses the Windows XP operating
system, you have uncompromised access to software
applications and seamless connectivity – anytime, anywhere
– via WiFi, Ethernet, Bluetooth®, or Wireless Wide Area
Network (WWAN) technology.
flexibility
While you’re on the go, the model 02 is your standalone,
handheld computer with its own integrated keyboard, track
stick, and capacitive TouchScrollers. The rugged, magnesium
alloy chassis with shock mounted hard drive and active drop
detect technology helps protect your data in the event your
model 02 is dropped. At the office, the model 02 functions
as your desktop computer connected to an external monitor,
keyboard, and mouse. Also available is an array of accessories
and a docking station that provides additional usage modes.
power
The model 02 was designed to deliver the total computing
performance necessary to achieve personal and professional
productivity, anytime and anywhere. The model 02 – with its
robust processing power, Windows XP operating system,
application compatibility, memory and storage capacity, and
unparalleled connectivity options – is everything you need to
meet your total productivity requirements.
4
5

powering up and down
Your model 02 ships with a screen protector and battery
attached.
To turn on your model 02, press the power button located on
the left side of the computer. When idle, conserve battery
power by putting your computer in Standby or Hibernate mode.
To charge the battery, connect the power supply to the model
02 as shown at right, and then plug into an outlet. The battery
will charge whenever the computer is connected to an outlet.
standby mode
Standby mode reduces the power consumption of your
computer by cutting power to non-critical hardware
components. The system maintains power to your computer’s
random access memory (RAM), which allows the system to
quickly restore your active applications and files.
To put your computer into Standby mode, press the power
button.
hibernate mode
Hibernate mode saves your current system state to the
hard disk drive and then powers down your computer. When
you power up again, your open files and applications are re-
stored just as you left them. Hibernate mode draws no power
and is best for conserving battery life and changing batteries.
To put your computer into Hibernate mode, select ‘Shut Down’
from the Start menu and choose the ‘Hibernate’ option or
press the ‘H’ key on your keyboard.
conserving battery power
Additional ways to conserve battery power include:
Turn off wireless radios when not in use.
Turn off the keyboard backlight.
Lower the internal display brightness.
Adjust power settings in the Power Options control panel.
•
•
•
•
6

docking connector
power button
power supply
7
power

removing and attaching the battery
On the model 02, a fully charged battery typically provides 2 to
3 hours of operating time depending on usage. Double capacity
batteries that provide up to 6 hours of charge are also available
at http://www.oqo.com/store.
charging the battery
A battery fuel gauge is located on the right side of the battery.
When pressed and released, the fuel gauge will illuminate to
indicate remaining battery power. While the battery is charging,
the fuel gauge lights flash in sequence.
A standalone battery detached from the model 02 can be
charged using a battery charging adapter (optional accessory)
with your power supply.
removing the battery
Before replacing the battery, the computer should be plugged
into an outlet, shut down, or placed in Hibernate mode.
Removal of the battery while in Standby mode may result in
loss of user and system data.
To remove the battery, press the battery release button located
next to the power button and lift the battery away from the
computer.
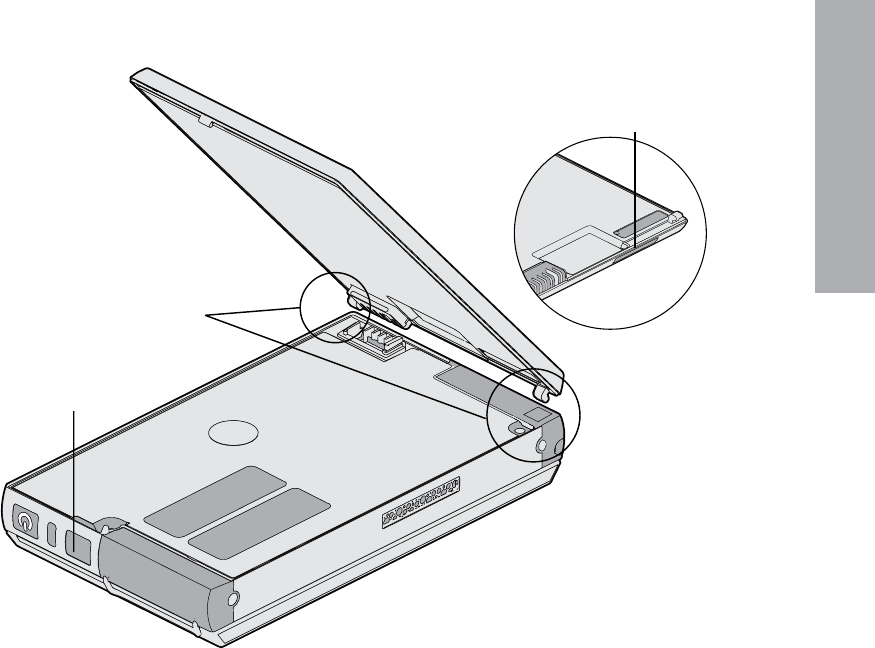
attaching the battery
To attach the battery, rest the battery hooks in the slots
alongside the back edge of the computer before lowering
the battery onto the computer. Press the battery against the
computer until the latch clicks.
8
battery
battery release
battery fuel gauge
insert both
battery hooks
to attach battery
9

using the thumb keyboard and track stick
When using your model 02 as a handheld computer, use the
thumb keyboard and track stick for input and navigation.
using the thumb keyboard
Slide the screen upward to reveal the keyboard and track stick.
The keyboard can be backlit to accommodate use in low light
conditions. To turn the backlighting on or off, press the key
sequence:
The mouse buttons are located on the left edge of the key-
board. Use the top mouse button to left-click and the bottom
mouse button to right-click. You can control the mouse pointer
by moving the track stick with your thumb.
SmartLock™ keys
The OQO keyboard has four SmartLock keys: shift (SHIFT),
function (FN), control (CTL), and alt (ALT). These modifier keys
let you input key combinations by pressing them sequentially
instead of simultaneously.
Press a SmartLock key once and the LED next to it will start
to pulse. The next key you press will be modified. Press a
SmartLock key twice to lock it, and the LED will remain solid.
All subsequent key presses will be modified until you press the
SmartLock key a third time to unlock it and the LED turns off.
The model 02 provides a number of custom keyboard
shortcuts for quick access to functions using SmartLock
keys. Keyboard shortcuts are described in the diagram to
the right. For example, on a regular keyboard, you press 3
keys (CTL, ALT, and DEL) simultaneously to pull up Windows
Task Manager (default if your computer is not connected to a
network domain). On the model 02 you can simply press the
SmartLock key sequence below to perform the same
function:
10

11
keyboard
FN
!
5
7
+
=
1 2 3
"
'
SHIFT Z X
S
W E
V
F
T Y I
H J K L :
;
>
.
<
,
?
/
N M
"
'
SHIFT
K L :
;
>
.
<
,
?
/
N M
left mouse
button
SmartLock™ keys track stick
CTL+ALT+DEL shortcut
print screen
screen brightness down
screen brightness up
launch wireless dashboard
keyboard backlight on/off
"
'
?
/
N
FN
FN
FN
FN
FN
FN
zoom out/zoom in
volume up
volume down
rotate screen
show/hide desktop
mute on/off
page up
K
L
:
;
M
<
,
FN
FN
FN
FN
FN
FN
>
.
FN
FN
FN
FN
FN
FN
page down
switch output display
jump to beginning of line
jump to end of line
delete
switch between insert and
typeover mode
right mouse
button

using TouchScrollers, digital pen, and other screen features
screen features
Your model 02 features a 5-inch Wide VGA LCD screen for
readability indoors and outdoors. The computer automatically
adjusts screen brightness using a sensor to detect ambient
light. To manually increase and decrease screen brightness, use
the keyboard shortcuts:
The native screen resolution is set to 800 x 480 pixels. You can
increase the resolution and adjust many other display settings
in the Display control panel. You can also rotate the display by
pressing the keyboard shortcut:
Zoom in and zoom out keys are located in the bottom left
corner of the keyboard. To pan around the screen while in a
zoomed mode, move the mouse pointer towards the screen
edge in the desired direction.
capacitive TouchScrollers
Capacitive TouchScrollers are embedded in the lower right
corner of the screen frame. To scroll horizontally or vertically
within an application window, slide your thumb along the
scrollers.
digital pen
The display is also equipped with a digitizer that accepts input
from a digital pen (optional accessory for Windows XP Home or
Professional). Use the digital pen as follows:
To select an object, tap the object with the tip of the pen.
To double-click an object, quickly tap it twice.
To right-click an object, select it and click the button on the
digital pen.
Before using the digital pen you should first calibrate the pen
to the display. Use the Pen Tablet applet in the Control Panel
to calibrate the pen and adjust user preferences. Use only
light pressure with the pen. The angle of the pen will affect its
behavior, and it should be calibrated at the angle which feels
most natural to you. More information on the pen can be found
at http://www.oqo.com/support.
•
•
•
12
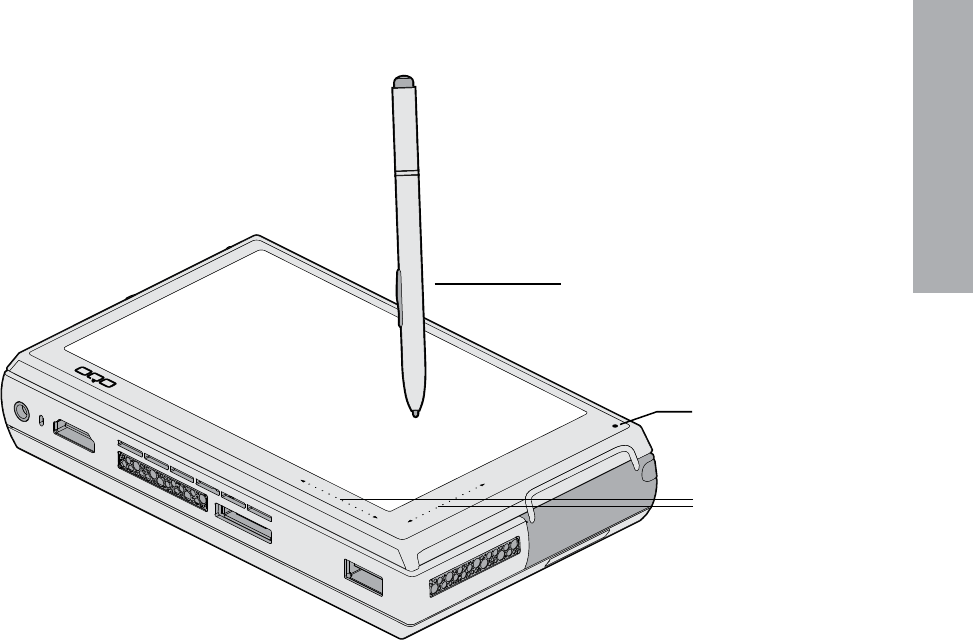
ambient light sensor
capacitive TouchScrollers™
digital pen
(included with Tablet PC edition)
13
screen features

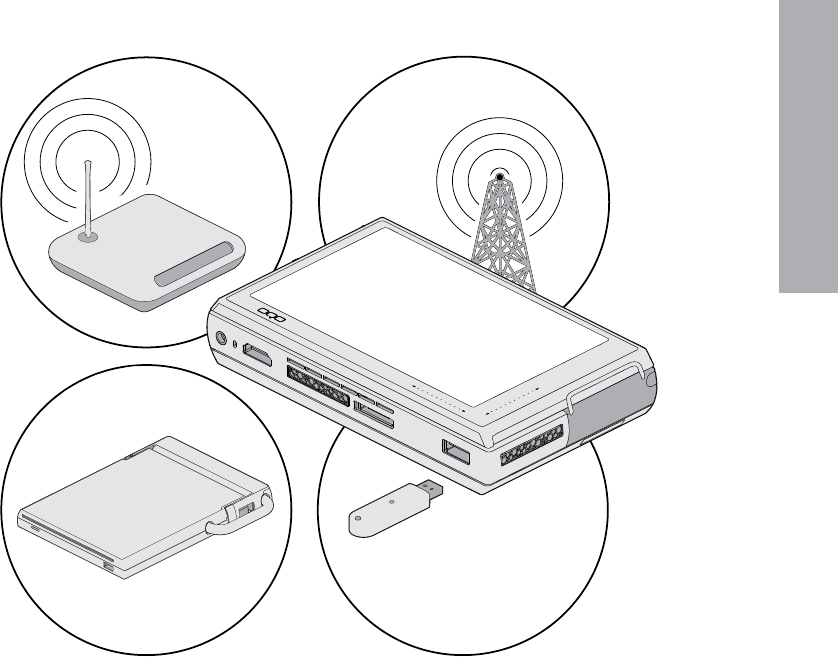
connecting to a network
The model 02 offers a number of ways to connect your com-
puter to a network:
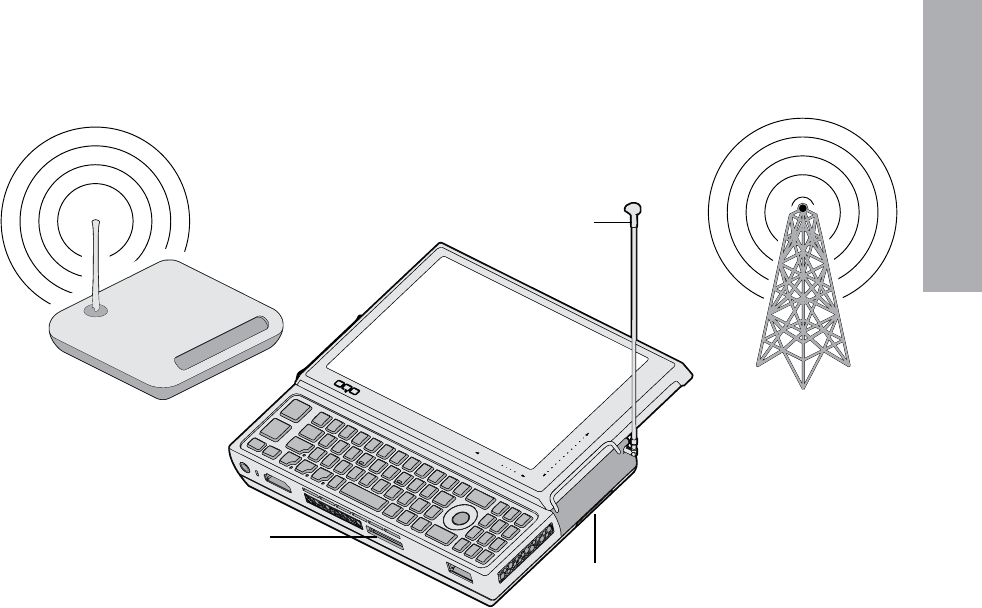
Use the integrated WiFi for high-speed wireless connections
in hot spots.
Use the integrated Wireless Wide Area Network* (WWAN)
technology (optional) for mobile broadband connectivity.
Use the VGA/Ethernet adapter to attach an Ethernet cable
and connect to a Local Area Network (LAN).
Use the integrated Bluetooth and a Bluetooth-enabled cel-
lular phone to connect to a mobile broadband network (see
http://www.oqo.com/support for more information).
The OQO wireless dashboard provides fast and convenient
control of your wireless connections. You can turn radios on
and off and view connection status information. Additionally,
you can access device-specific configuration settings through
the wireless dashboard. To access the wireless dashboard, use
the keyboard shortcut:
•
•
•
•
If you purchased your model 02 with integrated WWAN
technology, you will need to activate your service following the
separate instruction card in your box. For enhanced WWAN
reception, your model 02 is also equipped with a retractable
whip antenna.
To connect the computer to an Ethernet network, use the
supplied VGA/Ethernet adapter. Plug the VGA/Ethernet adapter
into the computer’s docking connector and connect the
Ethernet cable to the adapter.
For detailed information about configuring WiFi or Ethernet
network connections, see the documentation for Windows XP.
*requires activation with third party service provider
14
15
networking
retractable whip antenna
(WWAN models only)
standard WiFi and
optional WWAN antennas
WiFi Wireless Wide
Area Network
(WWAN)
connect VGA/Ethernet
adapter to docking connector

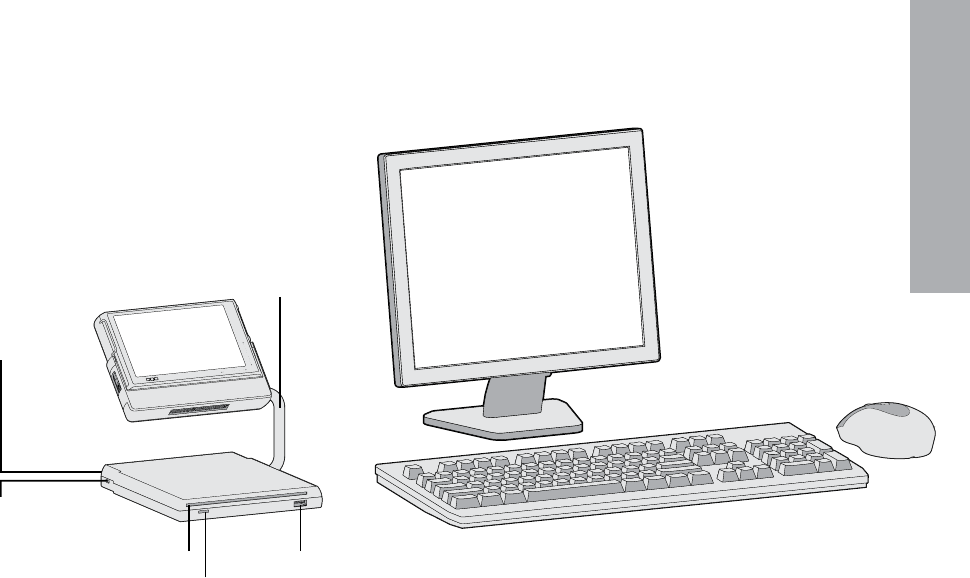
connecting the docking station and peripherals
The model 02 offers a number of ways to connect peripherals
to your computer.
For USB devices, the model 02 has a USB 2.0 port for high-
speed data transfer. For multiple USB devices, you can use a
USB hub with the model 02. You can also connect peripherals
to the computer using Bluetooth. The device and the computer
must first be paired through the Toshiba Bluetooth manager.
connecting an external display
There are several ways to connect an external display or
projector to the model 02:
To attach a display using a VGA connection, plug the
supplied VGA/Ethernet adapter into the computer’s docking
connector, and connect the video cable from the display to
the VGA port of the adapter.
To attach a display using an HDMI connection, simply plug
the video cable from the display into the model 02’s HDMI
port.
If the external display has a DVI connection, you’ll need to
use an HDMI to DVI adapter.
•
•
•
The optional OQO docking station also has VGA and HDMI
ports for simultaneous output to two external displays.
Once an external display is connected, the model 02 with
DisplaySense™ technology should automatically detect and
output to it. You can switch video output between the external
display and internal only display by pressing the keyboard
shortcut:
Settings for external display resolution and mirrored and
extended desktop mode can be found in the Display control
panel.
connecting a docking station
OQO docking stations with port extension and optical drive
are available for the model 02. The OQO docking station is
uniquely designed with an adjustable arm that can be angled
for optimal screen viewing and compact storage.
OQO docking stations have HDMI, VGA, Ethernet, audio jack
and power ports in addition to 3 high-speed USB ports. To use
the optical drive, the docking station must be powered by your
computer power supply connected to an AC outlet or by a
car/airplane adapter (optional).
•
16
docking station ports
• 2 USB
• Ethernet
• audio jack
• VGA
• HDMI
adjustable arm
optical drive USB port
CD/DVD eject
security slot
17
peripherals

installing software
18
Install your own software on the model 02 or transfer files
between the model 02 and another computer.
software installation
There are several ways to install your own software on the
model 02:
For software provided on a CD or DVD, install the software
either by using the optical drive in the optional docking
station or by connecting to an external USB optical drive.
For software downloaded over the Internet, install the
software just as you would with a desktop computer.
For software available on a local area network, connect
to the network using the VGA/Ethernet adapter, WiFi, or
optional WWAN and then install the software just as you
would with a desktop computer.
•
•
•
file transfers
You can transfer files between the model 02 and another
computer by doing one of the following:
Use the optical drive in the optional docking station, an
external USB optical drive, or a USB flash key to store files
on external media for transfer to another computer.
Connect the computer to a local area network using the
VGA/Ethernet adapter, WiFi, or optional WWAN and transfer
files over the network.
Use Bluetooth to transfer files between the model 02 and
another Bluetooth-enabled computer.
Use an e-mail program to mail files from one computer to
another.
Use an FTP program to upload files from one computer and
then download them to the other.
•
•
•
•
•
19
software
USB flash key
external optical drive
WiFi Wireless Wide Area
Network (WWAN)

using model 02 security features
The model 02 offers a number of features to help protect both
your computer and your data.
active drop detect
The model 02 detects free-fall and automatically parks the
head on the computer’s hard drive if the computer is dropped.
This feature helps prevent data loss that might occur if the
drive heads were to contact the disk during impact.
universal security slot
Both the model 02 and the optional docking station have
universal security slots for attaching an optional security
locking cable. The slots are compatible with standard security
locking cables designed for laptops.
hardware security engine
The VIA PadLock™ Security Engine is a hardware based
security technology that provides the latest military-grade
encryption and protection for your personal or corporate files.
The security engine incorporates advanced protection features
such as AES encryption and a secure hash algorithm.
20
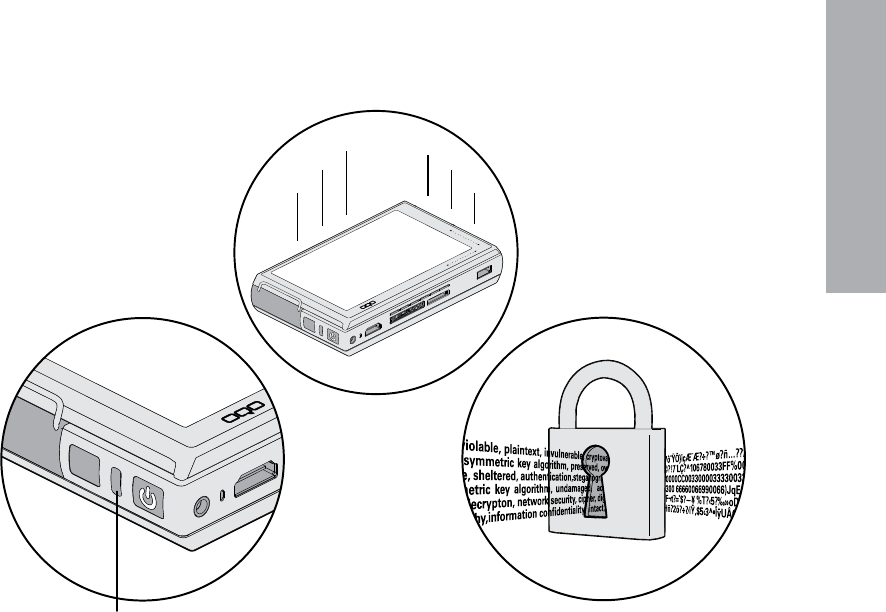
universal
security slot
hardware security
engine
shock mounted HDD
with active drop detect
21
security

model 02 accessories
docking stations
docking station with optical drive (CD±RW/DVD-ROM)
docking station with dual layer optical drive (DVD±RW/RAM)
carrying cases & bags
stronghold case (standard)
stronghold case (double capacity)
executive case
belt clip case
mesh cable bag
power solutions
standard battery
double capacity battery
universal power supply
battery charging adapter
car/airplane adapter
short power supply cable
cables & adapters
VGA/Ethernet adapter
HDMI-DVI cable
HDMI-HDMI cable
HDMI-DVI adapter
other accessories
digital pen
track stick caps, 3-pack
screen protectors, 3-pack
Targus Defcon combination lock
keyboard & mice
iGo® Stowaway® Bluetooth keyboard
iGo® Stowaway® Bluetooth travel mouse
Targus USB mini mouse
For updated info on available accessories, visit
http://www.oqo.com/store.
22

accessories
23

product support
The OQO support site provides additional information, including
FAQs and articles, and contact information for technical
support.
Access the support site at
http://www.oqo.com/support.
In the event you need to contact OQO technical support
for help, be sure to have your serial number and Microsoft
Certificate of Authenticity (COA) product key ready. They are
located under the battery on the underside of the model 02.
See the section on removing and attaching the battery for
instructions.
Warranty information is available at
http://www.oqo.com/warranty.
The OQO return policy is available at
http://www.oqo.com/returns.
24

support
25
FCC Statement
This equipment has been tested and found to comply with
the limits for a Class B digital device, pursuant to Part 15
of the FCC Rules. These limits are designed to provide
reasonable protection against harmful interference in a
residential installation. This equipment generates, uses, and
can radiate radio frequency energy and, if not installed and
used in accordance with the instructions, may cause harmful
interference to radio communications. However, there is no
guarantee that interference will not occur. If this equipment
does cause harmful interference to radio or television
reception, which can be determined by turning the equipment
off and on, the user is encouraged to try to correct the
interference by one or more of the following measures:
Reorient the receiving antenna.
Increase the separation between the equipment and
receiver.
Connect the equipment into an outlet on a circuit different
from that to which the receiver is connected.
Consult the dealer or an experienced technician for help.
The highest SAR value for the computer when next to the
body, as described in this user guide, is 1.17 W/kg. No
1)
2)
3)
4)
separation from the body is required when the wireless
computer is in operation, as the SAR measurements were
taken with the unit “touching” the surface of the body.
This device was tested for SAR compliance in the lap held
configuration. If the device is purchased with the WWAN
option, a whip antenna is utilized for WWAN coverage. When
operating in WWAN mode, the whip antenna should be pulled
out and up to the vertical position. In order to comply with
FCC RF exposure requirements, and to align with the SAR test
configuration, users must maintain a separation distance of
1.5 cm between the antenna and all persons, and maintain the
antenna in the vertical position during WWAN operation.
This Class [B] digital apparatus complies with Canadian ICES-
003. Cet appareil numérique de la class [B] est conformé à la
norme NMB-003 du Canada.
The IEEE 802.11a device for the band 5150-5250 MHz is only
for indoor usage, to reduce the potential for harmful interfer-
ence to co-channel mobile satellite systems.
Caution: Any changes or modifications not expressly approved
by OQO for compliance will void the user’s authority to operate
the equipment.
FCC Radio Frequency Exposure and SAR
The available scientific evidence does not show that any
health problems are associated with using low power wireless
devices. There is no proof, however, that low power wireless
devices are absolutely safe.
The exposure standard for low power wireless devices em-
ploys a unit of measurement known as the Specific Absorption
Rate, or SAR. Tests for SAR are conducted using standard op-
erating positions accepted by the FCC and by Industry Canada
with the device transmitting at its highest certified power level
in all tested frequency bands. Although the SAR is determined
at the highest certified power level, the actual SAR level of the
device while operating can be well below the maximum value.
This is because the device is designed to operate at the mini-
mum power level required to reach the network.
Before a low power wireless device is available for sale to the
public in the US and Canada it must be tested and certified
to the FCC and the Industry Canada that it does not exceed
the limit established by each government for safe exposure.
The personal computer (OQO model 02) has been tested and
found to comply with the Federal Communications Committee
guidelines on radio frequency (RF) energy exposure.
Industry Canada
This Class [B] digital apparatus complies with Canadian ICES-
003. Cet appareil numérique de la classe [B] est conformé à
la norme NMB-003 du Canada. The term IC before the radio
certification number only signifies that Industry Canada techni-
cal specifications were met.
FCC Declaration of Conformity
We, OQO, Inc. 583 Shotwell Street, San Francisco, California,
USA, 1-415-430-6200, declare under our sole responsibility
that the product, OQO model 02, complies with Part 15 of FCC
Rules. Operation is subject to the following two conditions:
(1) This device may not cause harmful interference, and (2)
This device must accept any interference received, including
interference that may cause undesired operation.

CE Declaration of Conformity
We, OQO, Inc. 583 Shotwell Street, San Francisco, California,
USA, 1-415-430-6200, declare under our sole responsibility
that the product, OQO model 02, to which this declaration
relates is in conformance with the provisions of the following
directives: Directive 1999/5/EC governing Radio Equipment
and Telecommunications Terminal Equipment and the Mutual
Recognition of their Conformity
Directive 73/23/EEC governing product safety
Directive 89/336/EEC governing electromagnetic compatibility
using the following standards:
EN 60950-1: 2001
EN 300 328-2 v1.2.1
EN 301 489-17 v1.2.1/EN 301 489-1 v1.4.11
EN 55022: 1994 w/A1 and A2
EN 55024: 1998
For a list of countries where the model 02 can be used and the
restrictions, see: http://www.oqo.com/support.
Copyright © 2006 OQO, Inc. All rights reserved. This manual
may not be copied, in whole or in part, without the written
consent of OQO.
OQO, Inc.
583 Shotwell Street
San Francisco, CA 94110
1-415-430–6200
OQO Support 1-877-676-6688
http://www.oqo.com
The information in this guide is subject to change without
notice. OQO makes no warranty of any kind with regard to this
manual, including, but not limited to, the implied warranties of
merchantability and fitness for a particular purpose. OQO shall
not be held liable for errors contained herein or direct, indirect,
special, incidental, or consequential damages in connection
with the furnishing, performance, or use of this material.
Trademarks
OQO, TouchScrollers, SmartLock, and DisplaySense are trade-
marks or registered trademark of OQO, Inc.
Microsoft and Windows are registered trademarks of
Microsoft Corporation in the U.S. and other countries.
Bluetooth is a registered trademark of Bluetooth SIG, Inc.
VIA Padlock is a trademark of VIA Technologies, Inc.
iGo is a registered trademark of Mobility Electronics, Inc.
Stowaway is a registered trademark of Mobility California, Inc.
Targus is a registered trademark of Targus Group
International, Inc.