ORION ELECTRIC M2B8A DVD & Hi-Fi VCR Home Theater User Manual manual
ORION ELECTRIC CO., LTD. DVD & Hi-Fi VCR Home Theater manual
UserManual.wiki
>
ORION ELECTRIC
>
M2B8A User Manual
manual
Navigation menu
Upload a User Manual
Namespaces
Wiki Guide
HTML
PDF
Info
Views
User Manual
Discussion / Help
Navigation
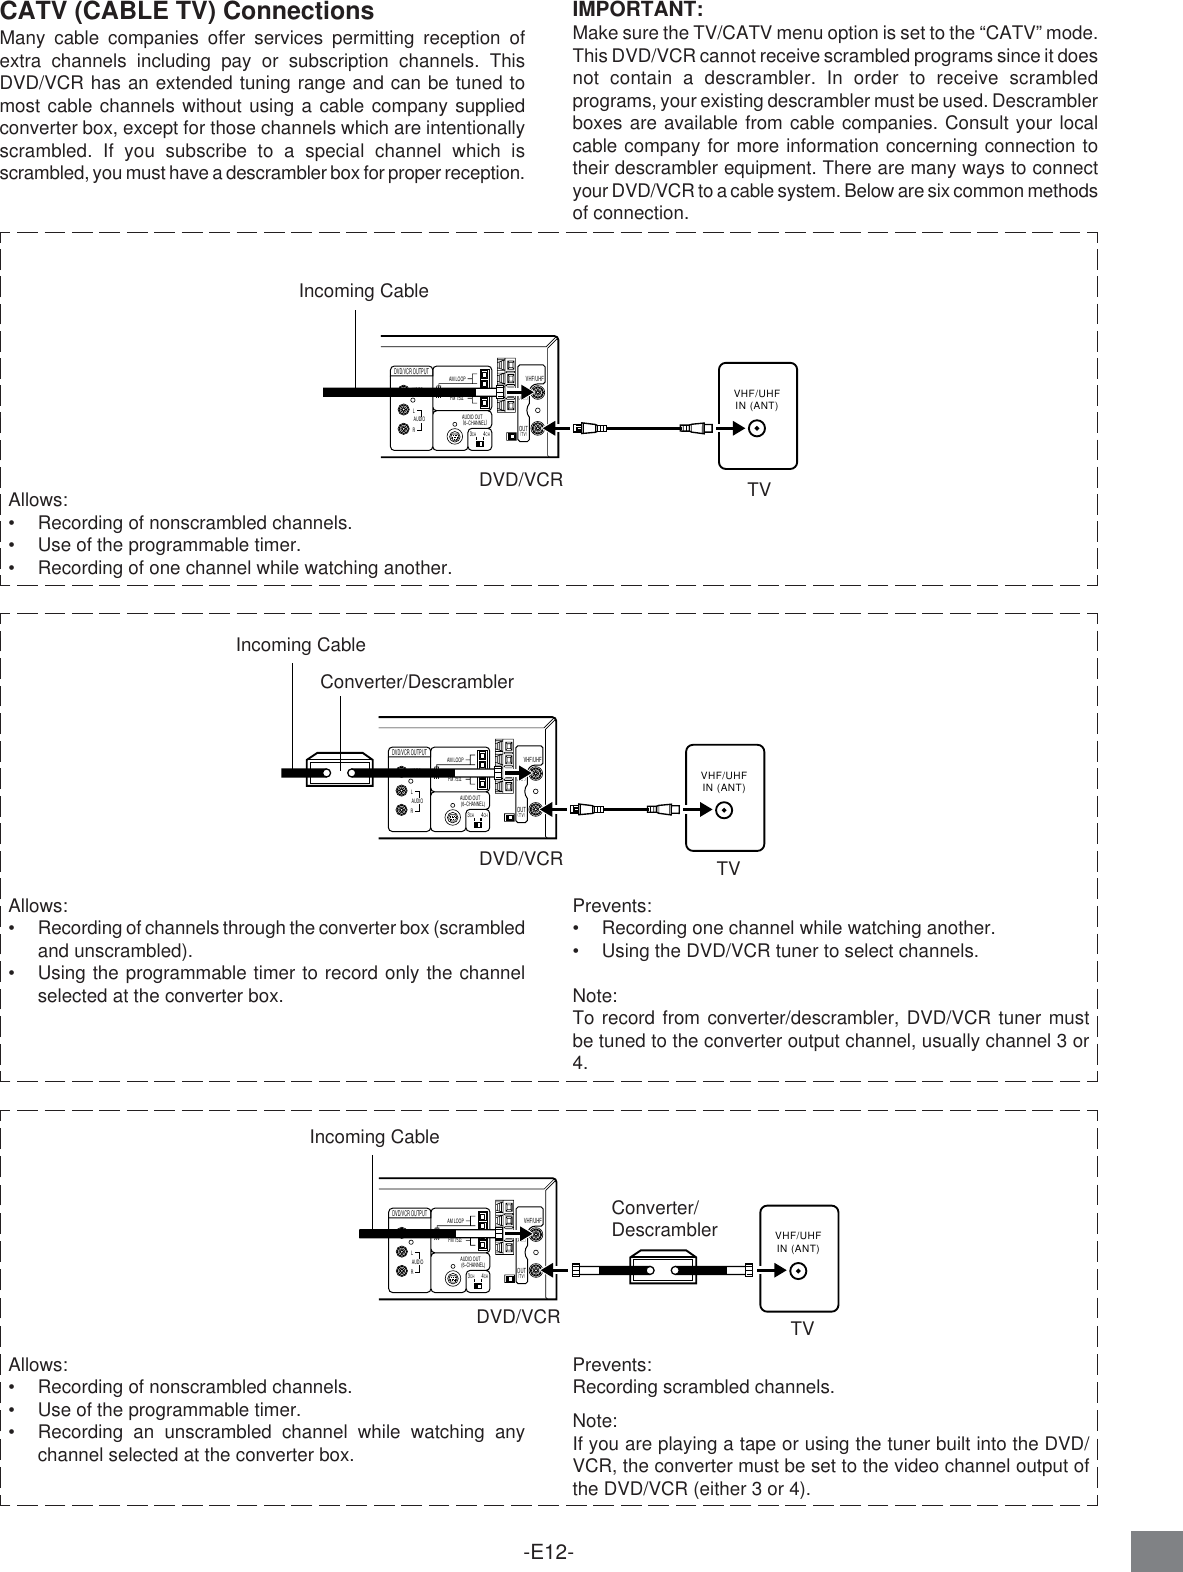
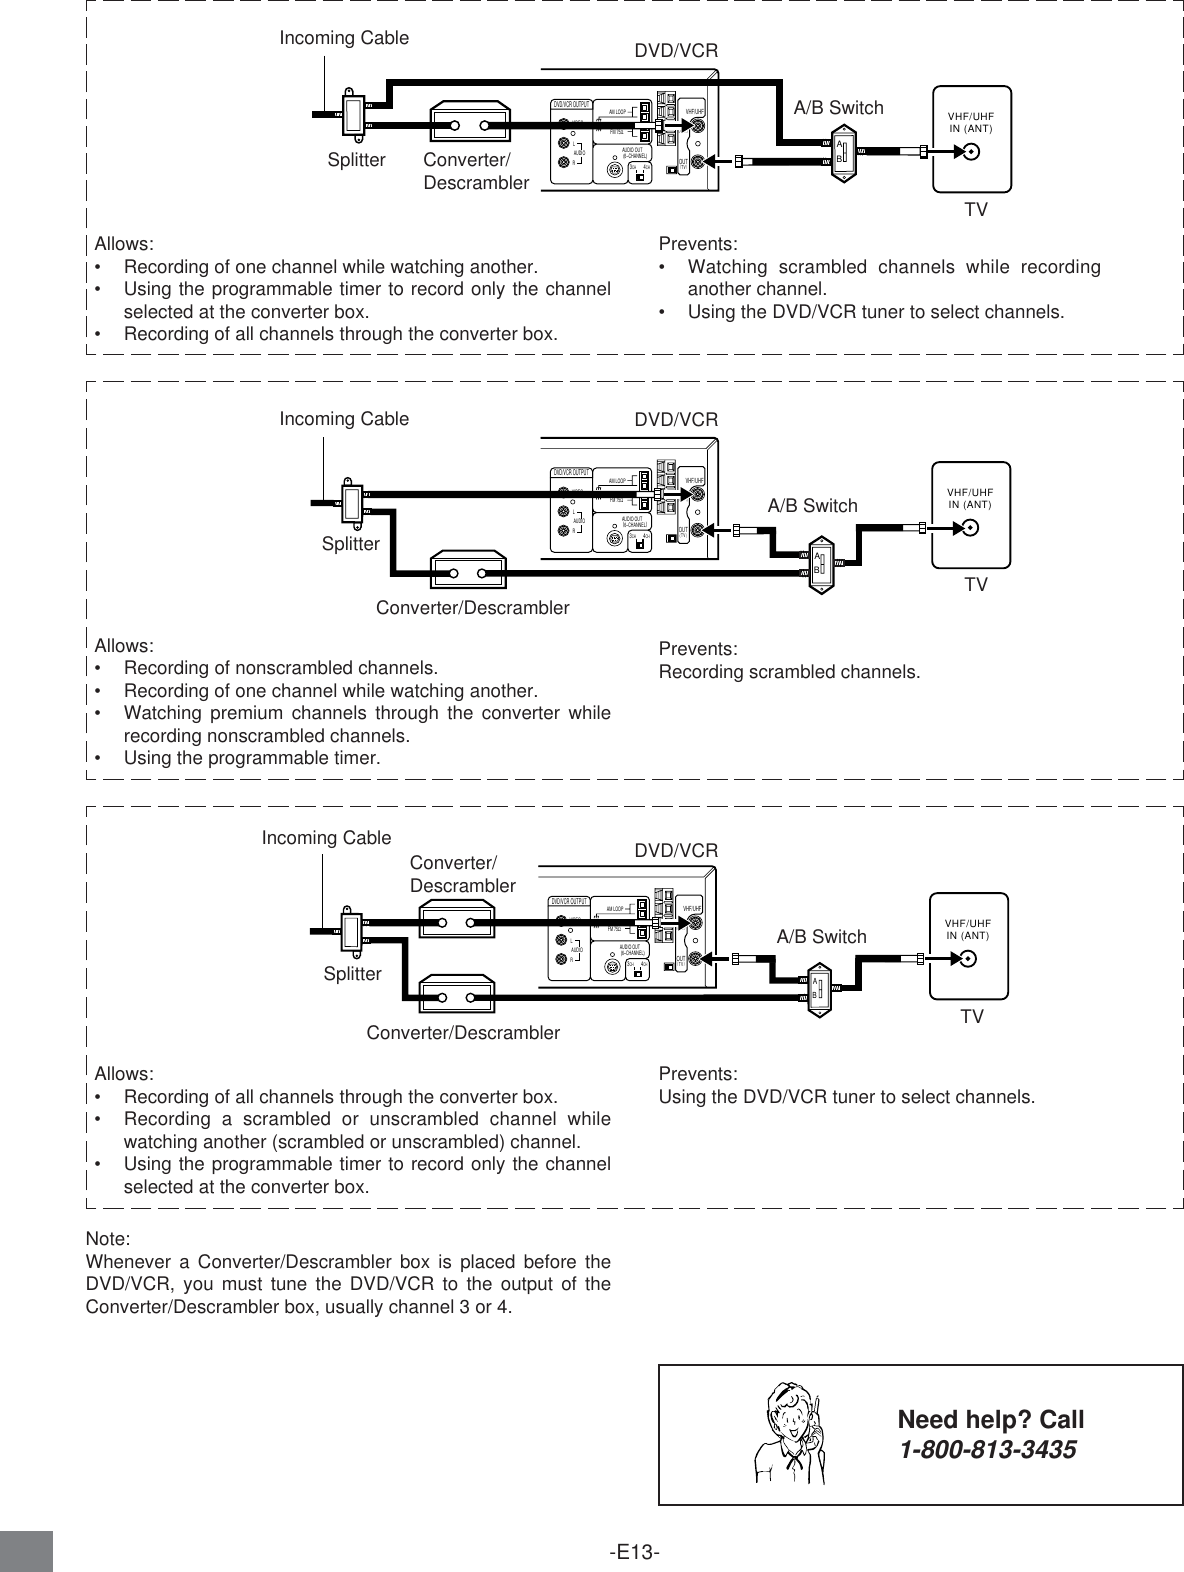
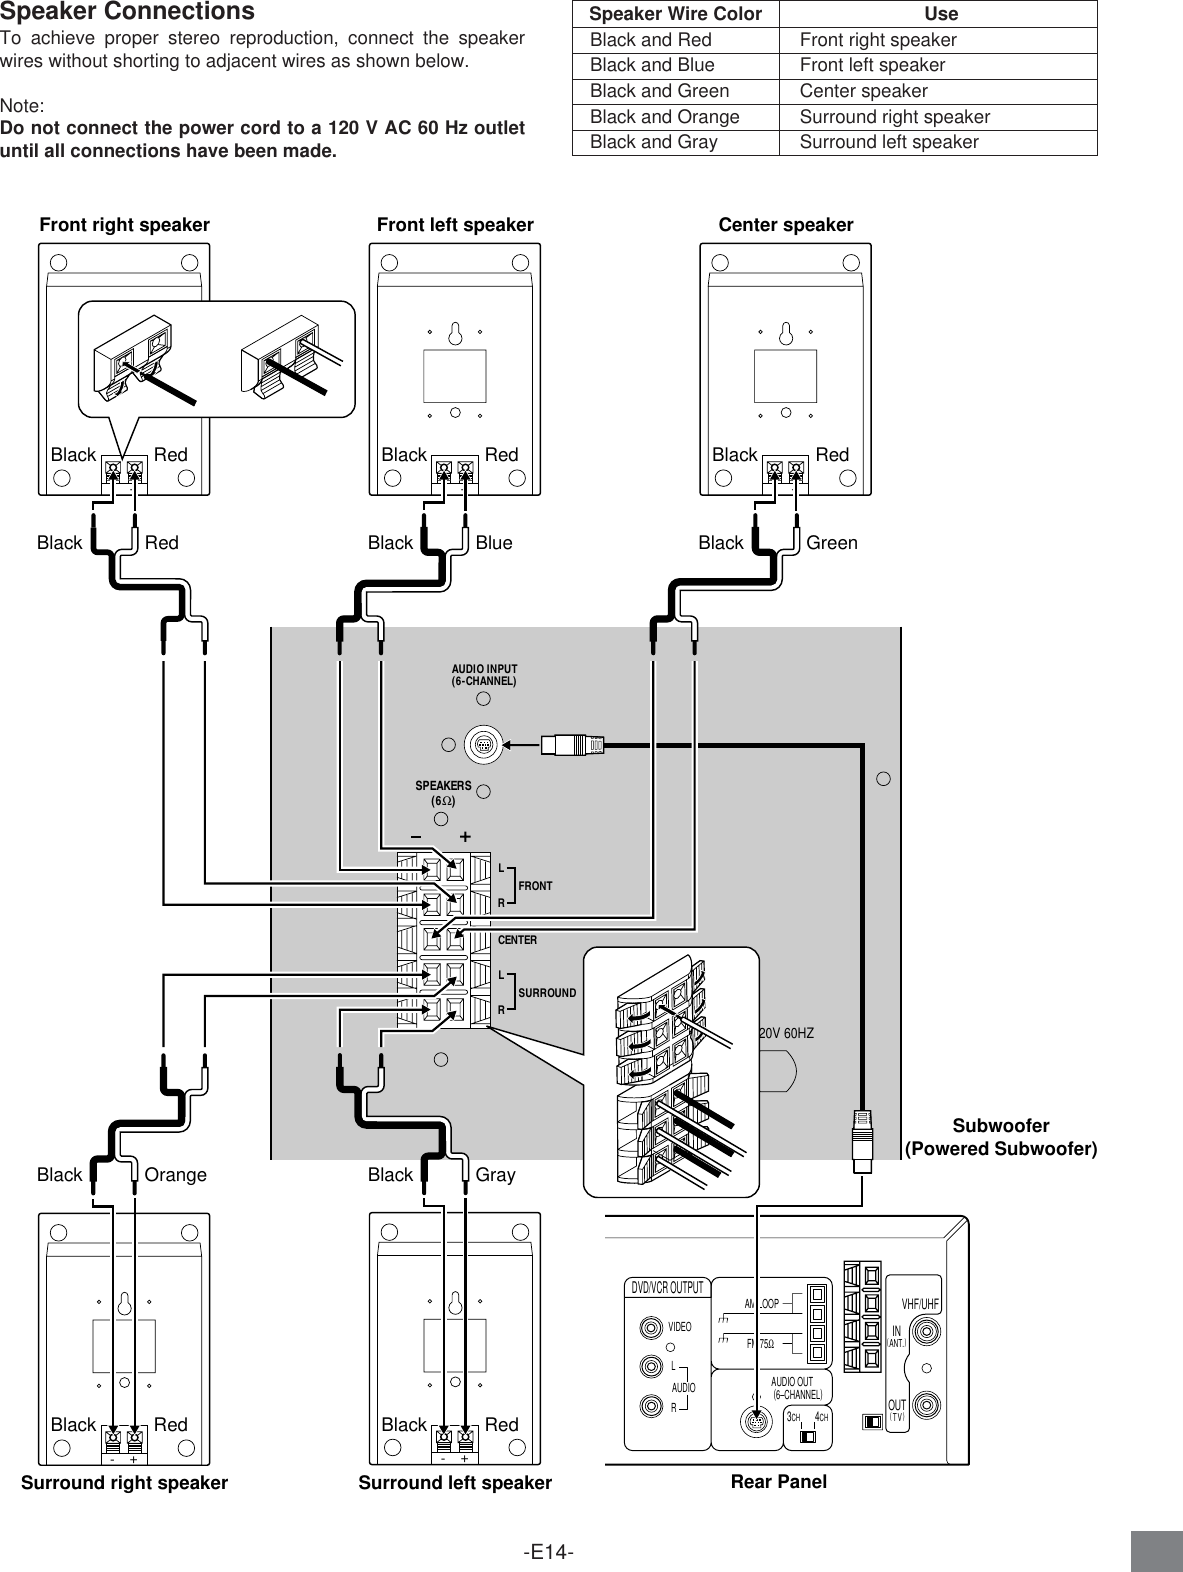
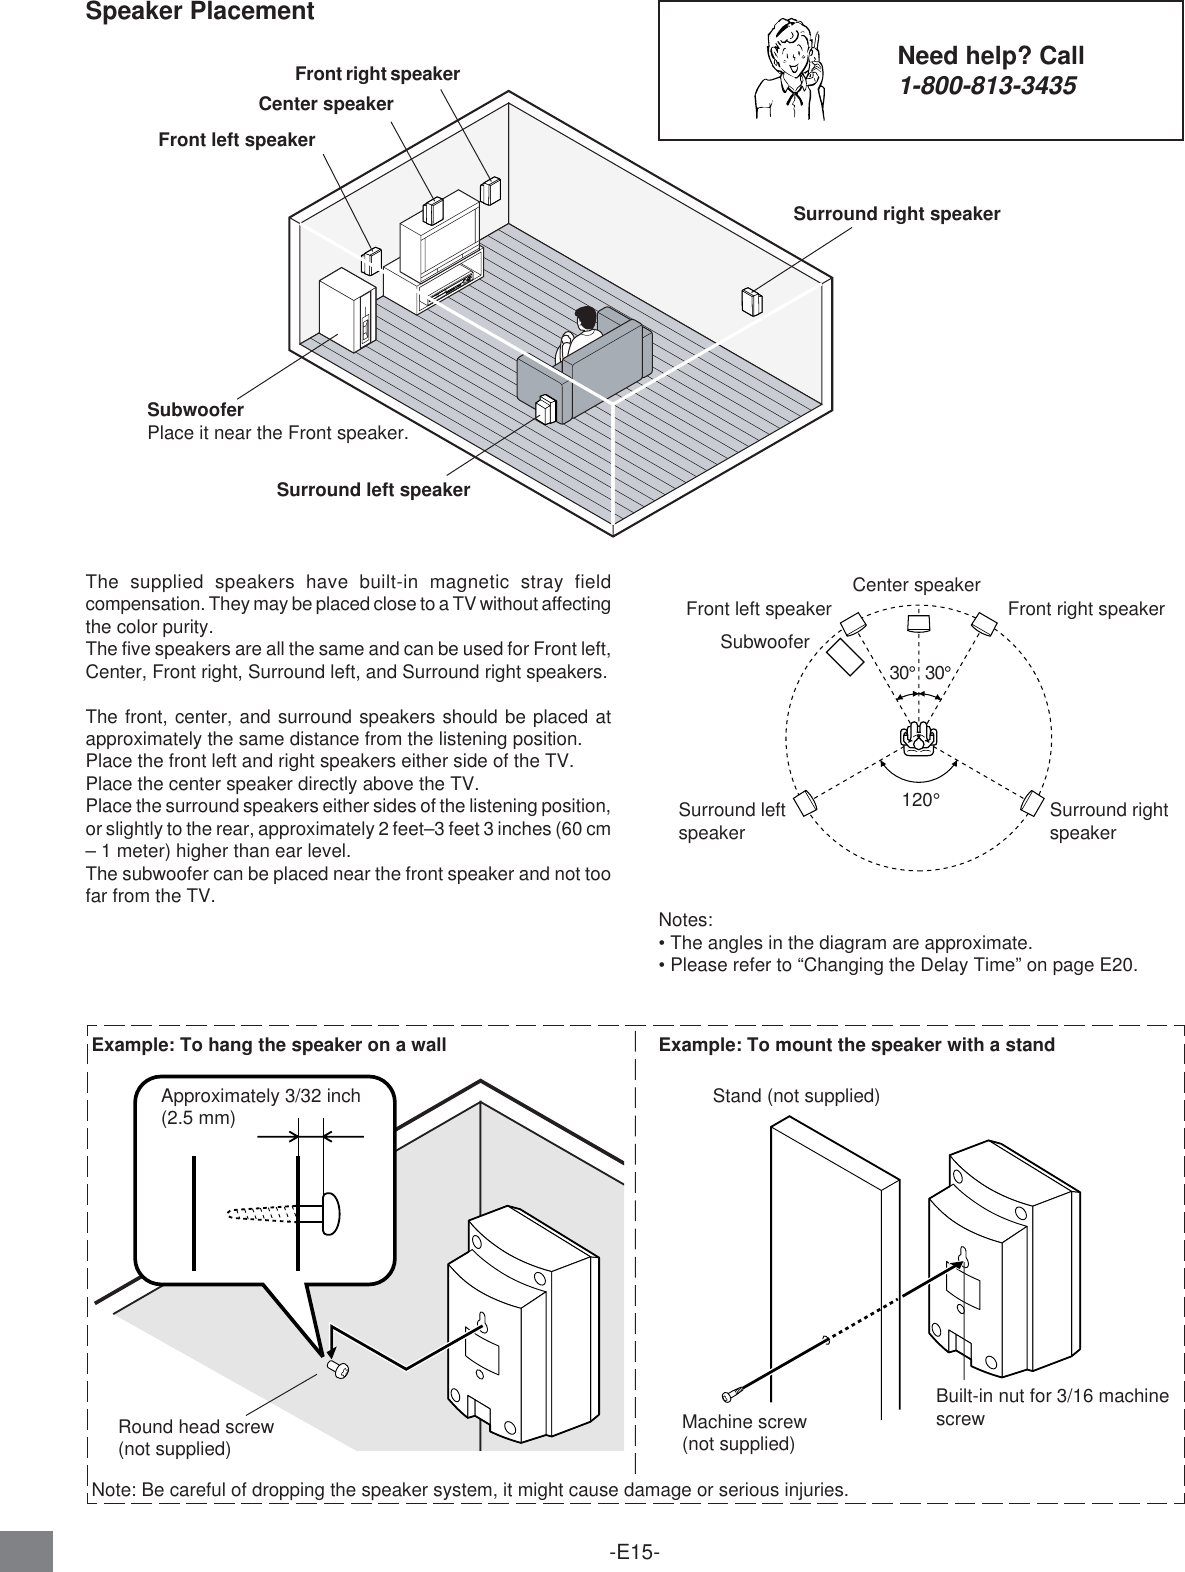
![-E4-CONTENTSSAFETY PRECAUTIONS ..................................................... E1IMPORTANT SAFETY INSTRUCTIONS............................... E2CONTENTS .......................................................................... E4ACCESSORIES .................................................................... E5PRECAUTIONS .................................................................... E5CONTROLS .......................................................................... E6Front Panel ...................................................................... E6FL Display........................................................................ E6Rear Panel....................................................................... E6REMOTE CONTROL ............................................................ E7Controls ........................................................................... E7Inserting Batteries ........................................................... E8Remote Control Range.................................................... E8To Set the Remote Control Code for TV .......................... E9BASIC CONNECTIONS ........................................................ E9TV Antenna Connections ................................................ E9Basic TV Connections ................................................... E10Audio/Video Connection ................................................ E10Optional, Preferred TV Connections .............................. E11CATV (CABLE TV) Connections .................................... E12Speaker Connections .................................................... E14Speaker Placement ....................................................... E15FM/AM Antenna Connections ....................................... E16Power Supply (Main Unit and Powered Subwoofer) ...... E16BEFORE OPERATION........................................................ E17Common Operation ....................................................... E17Selecting Surround Mode .............................................. E18Adjusting the Speaker Volume Balance......................... E19Adjusting the Speaker and Subwoofer Level ................. E19Changing the Delay Time .............................................. E20Setting the Video Channel ............................................. E21Setting the Language .................................................... E21Auto Clock Setting ......................................................... E22Manual Clock Setting..................................................... E24Tuner Setting ................................................................. E25To ADD/DELETE Channels ........................................... E26Noise Elimination........................................................... E26CASSETTE TAPE PLAYBACK ........................................... E27Loading and Unloading a Cassette Tape....................... E27Basic Playback .............................................................. E28Special Playback ........................................................... E29ZERO RETURN Function.............................................. E30Video Index Search System .......................................... E30RECORDING ...................................................................... E31Recording a TV Program ............................................... E31One-touch Timer Recording (OTR) ............................... E33Timer Recording ............................................................ E34Stereo Recording and Playback .................................... E36Separate Audio Program (SAP) .................................... E36Duplicating a Video Tape ............................................... E37PLAYABLE DISCS .............................................................. E38DISC PLAYBACK ................................................................ E39Preparations .................................................................. E39Basic Playback .............................................................. E39Stopping Playback ......................................................... E40Chapter (Track) Skip ...................................................... E40Selecting a DVD Menu .................................................. E41Selecting a Title Menu [DVD] ......................................... E41Title Search [DVD] ......................................................... E42Chapter Search [DVD] ................................................... E42Time Search [DVD] ........................................................ E42Time Search [CD] .......................................................... E43Track Search [CD] ......................................................... E43Fast Playback ................................................................ E44Slow Motion Playback [DVD] ......................................... E44Still Picture (Pause) ....................................................... E44Frame by Frame Advance Playback [DVD].................... E45Picture Zoom [DVD] ....................................................... E45Viewing from a Desired Camera Angle (Multi-Angle)[DVD] ............................................................................. E45Normal Repeat Playback ............................................... E46Designated Range Repeat Playback (A-B Repeat) ....... E46Random Playback [CD] [MP3] ....................................... E46Programmed Playback [CD] [MP3] ................................ E47Selecting Subtitle Language [DVD] ............................... E48Selecting Audio Soundtrack Language(Multi-Language) [DVD] ................................................. E48Karaoke Playback [DVD] ............................................... E48Selecting On-Screen Information .................................. E49Marking Desired Scenes [DVD] [CD] ............................. E49MP3 CD OPERATION ......................................................... E50MP3 CD Information ...................................................... E50MP3 CD Playback ......................................................... E50Stopping Playback ......................................................... E51Pause ............................................................................ E51File Skip......................................................................... E51Programmed Playback .................................................. E51Random Palyback ......................................................... E51Repeat Playback ........................................................... E51TVGuardian OPERATION ................................................... E52Before Setting ................................................................ E52Set the TVG MODE to On Mode(TOLERANT, MODERATE, STRICT) ............................ E52DVD SPEAKER MUTE Setting ...................................... E53CC (Closed Caption) DISPLAY Settingwith TVG MODE is ON Mode ........................................ E53CC (Closed Caption) DISPLAY Settingwith TVG MODE is OFF Mode ...................................... E53INITIAL SETTINGS ............................................................. E54Setting Language .......................................................... E54Setting OSD Language ................................................. E54Seting Picture ................................................................ E55Seting Sound ................................................................. E55Setting Parental ............................................................. E56To Change the Parental Level ....................................... E56LISTENING TO THE RADIO ............................................... E57Automatic/Manual Tuning .............................................. E57To Preset Stations ......................................................... E57Listening to Preset Stations........................................... E58TROUBLESHOOTING GUIDE ............................................ E59MAINTENANCE .................................................................. E60LANGUAGE CODE LIST .................................................... E61SPECIFICATIONS............................................................... E62WARRANTY........................................................................ E63](https://usermanual.wiki/ORION-ELECTRIC/M2B8A/User-Guide-267593-Page-5.png)
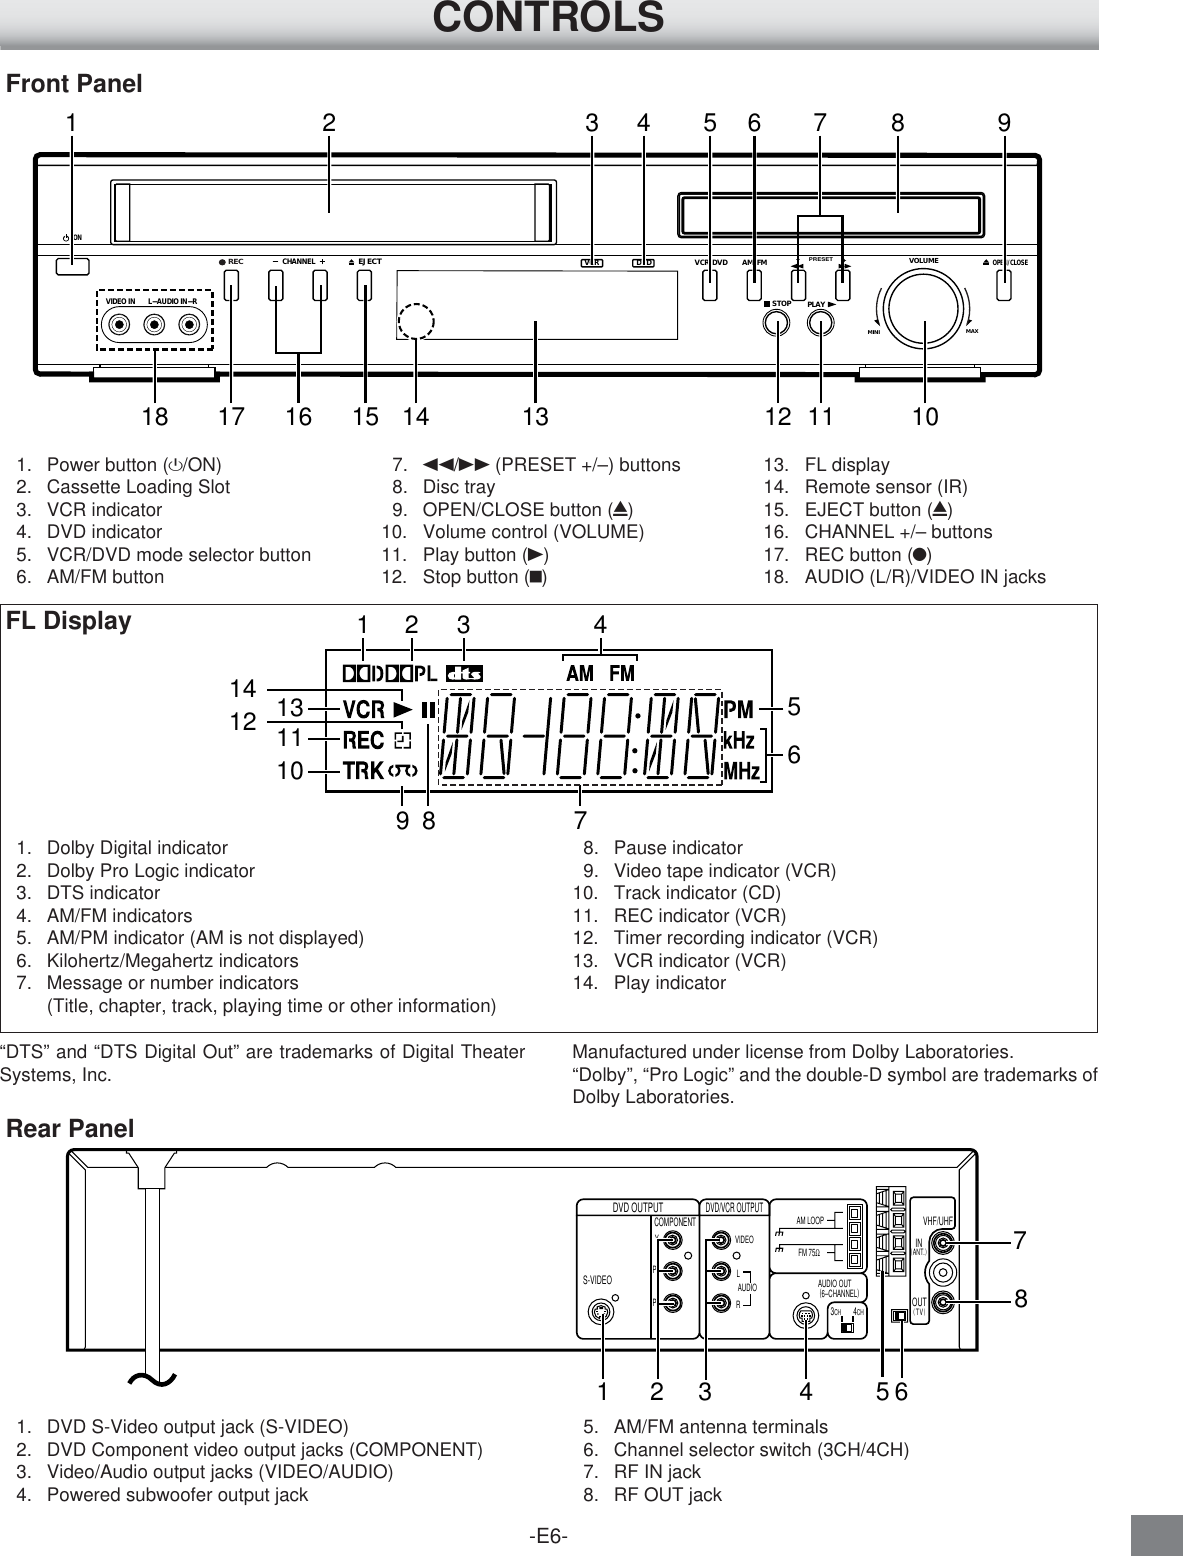
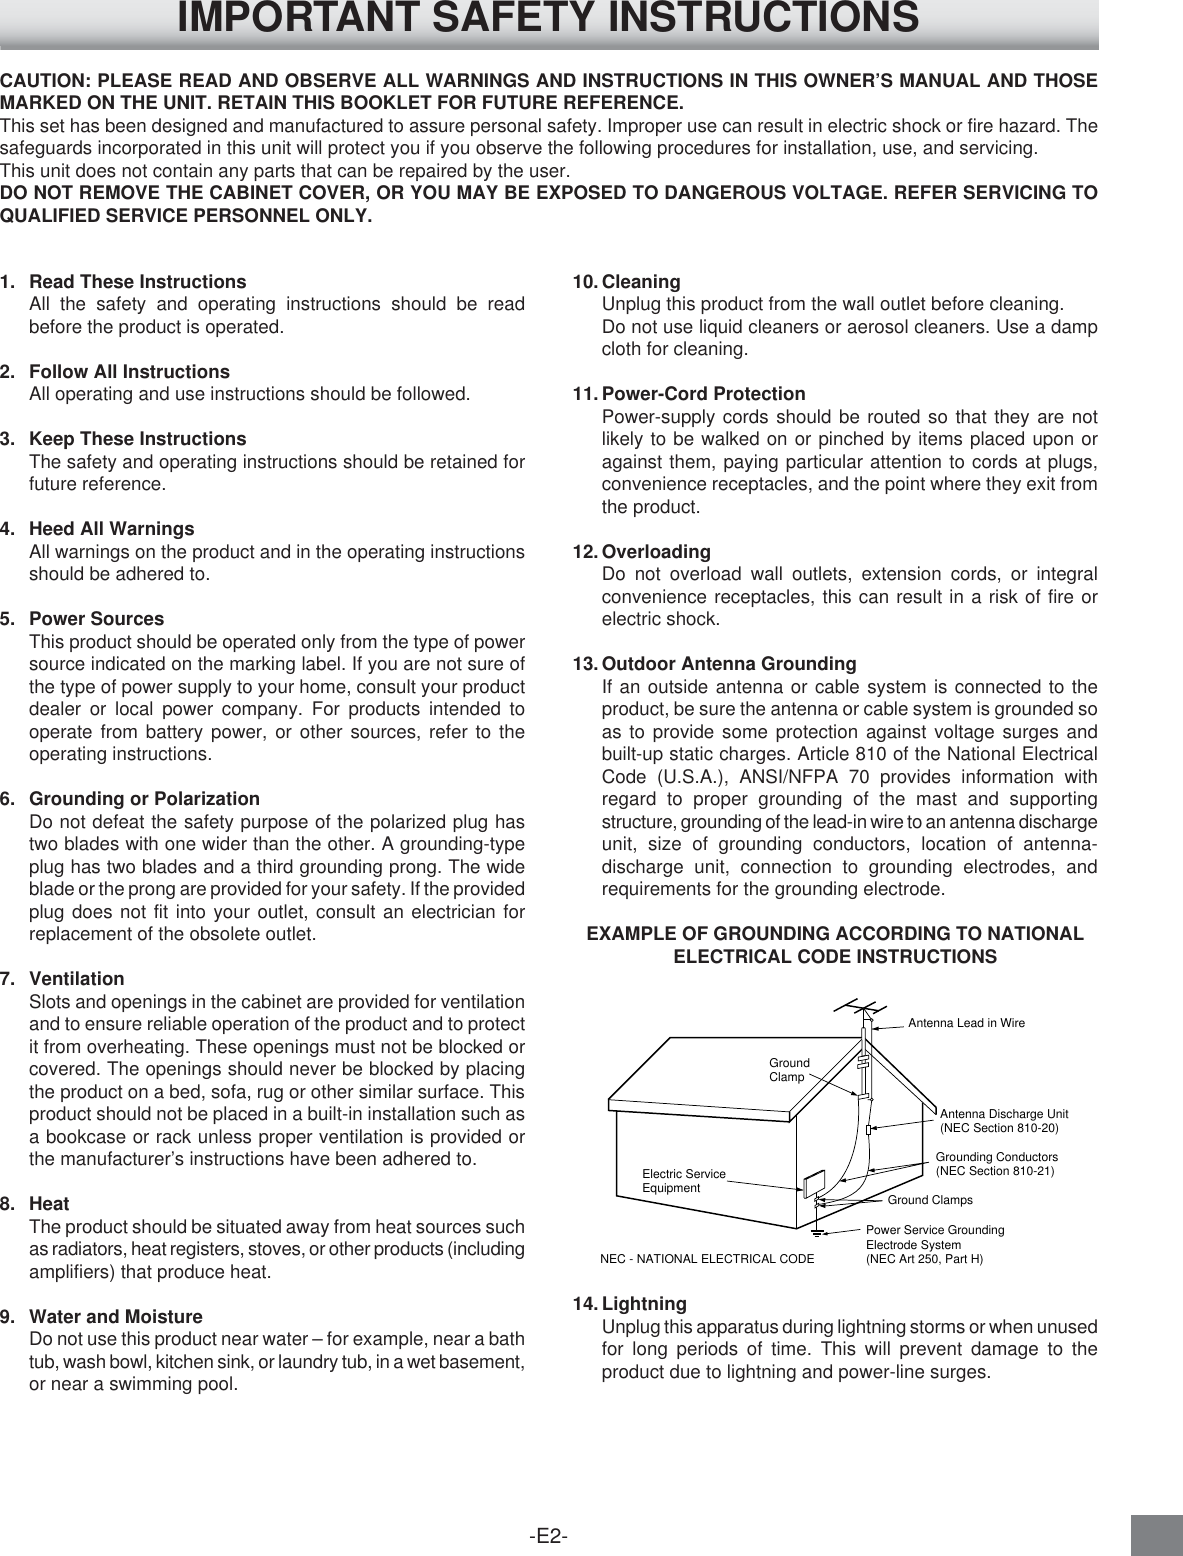
![-E7-1. POWER button2. VCR button3. DVD button4. OPEN/CLOSE button5. Number and other function buttonsThese buttons are used as number buttons and as functionbuttons of each name.•When using as a number button, press the appropriatebutton directly.•When using as a function button of each name, pressthe appropriate button while holding the [SHIFT] buttondown.Number buttons (1–9, 0)ANGLE buttonZOOM buttonJUMP buttonTOP MENU buttonAUDIO buttonPLAY MODE buttonA-B REPEAT buttonSUBTITLE buttonMARKER buttonDVD MENU button6. RETURN button7. AM/FM button8. VCR control buttonsAUDIO OUT buttonINPUT buttonTIMER REC buttonZERO RETURN buttonCOUNTER RESET buttonCLOCK/COUNTER buttonREC/OTR buttonTAPE SPEED buttonTV/VCR button9. CLEAR/CANCEL button10. SETUP/MENU button11. Directional arrow buttons (4, a, 5, b)12. SURROUND button13. a button (PLAY)14. n button (STOP)15. f/e buttonsTuning buttons (– TUNE +)16. SLOW button17. ATR button18. TV control buttonsPOWER button (TV POWER)INPUT select button (TV/VIDEO)Channel scanning buttons (– TV CH +)Volume buttons (– TV VOLUME +)19. d/c buttonsPreset tuning buttons (– PRESET +)20. k button (PAUSE)21. BASS BOOST button22. ENTER button23. SOUND button24. VOLUME buttons (– VOLUME +)25. DISPLAY button26. SHIFT button2 34758910 1112 1314 15171612624232522 212019186REMOTE CONTROLControls](https://usermanual.wiki/ORION-ELECTRIC/M2B8A/User-Guide-267593-Page-8.png)
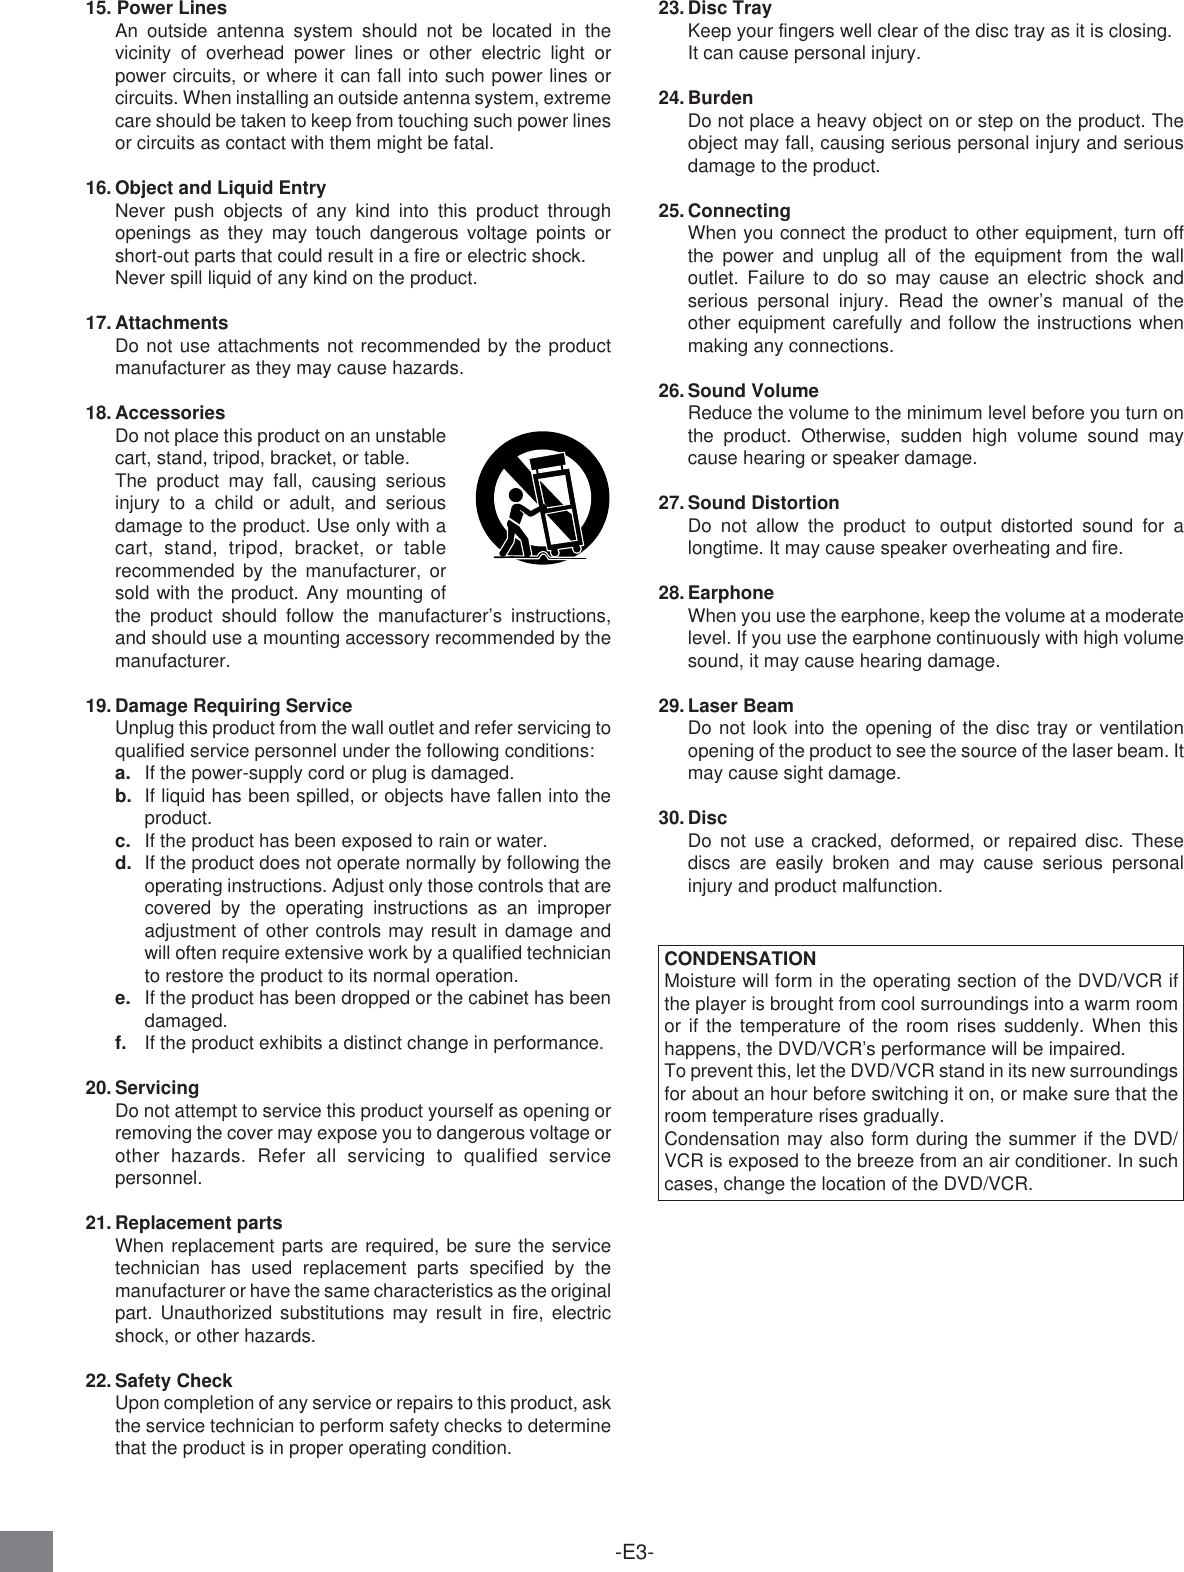
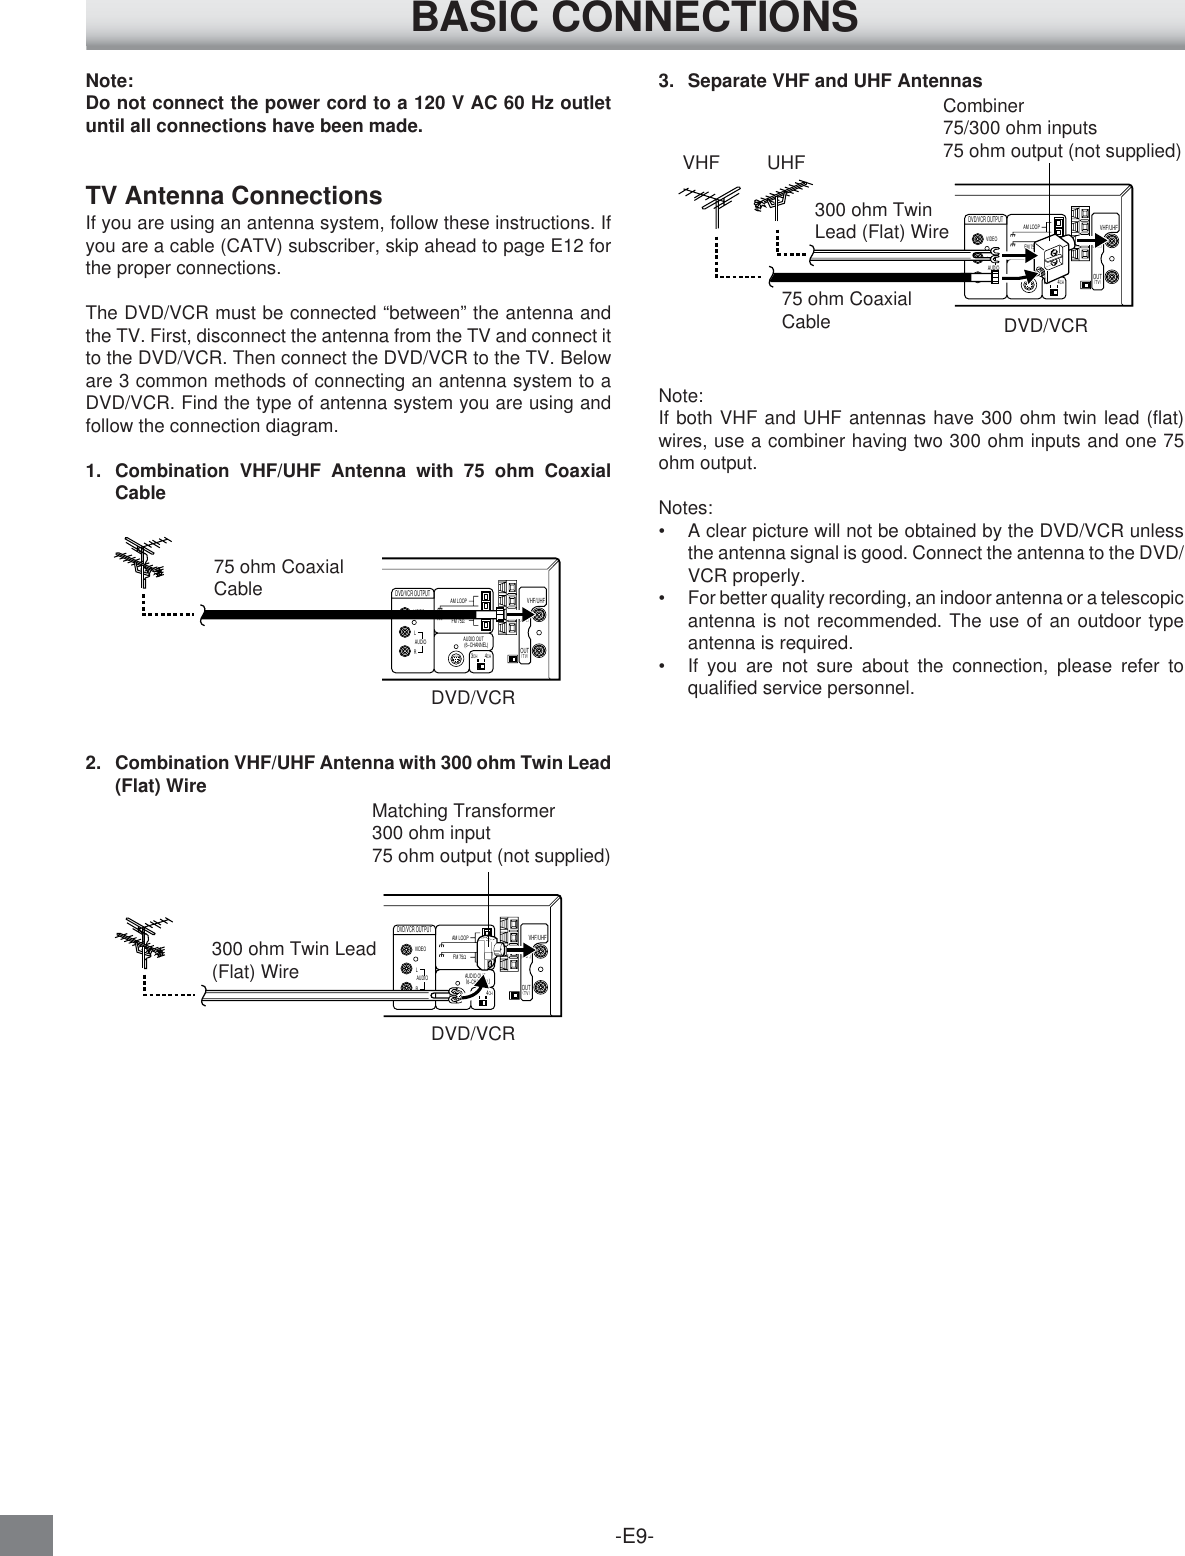
![-E8-Need help? Call1-800-813-3435Inserting BatteriesNote:Remove the batteries if the remote control is not to be used for amonth or more. Batteries left in the unit may leak and causedamage.IMPORTANT NOTE:SPENT OR DISCHARGED BATTERIES MUST BERECYCLED OR DISPOSED OF PROPERLY IN COMPLIANCEWITH ALL APPLICABLE LAWS.FOR DETAILED INFORMATION, CONTACT YOUR LOCALCOUNTY SOLID WASTE AUTHORITY.Remote Control RangeTwo “AA” batteries (not supplied)12VIDEO IN L-AUDIO IN-R/ONVOLUMEMINIMAXEJECTRECCHANNELAM/FMVCR/DVDPRESET+-OPEN/CLOSESTOP PLAYWithin approx.16 feet (5 meters)Remote sensor30°30°To Set the Remote Control Code for TVThis remote control can operate the basic functions of TVs madeby the manufacturers listed below.To enter the remote control code for your brand of TV, follow thesteps below.1. In the chart below, find the code corresponding to your brandof TV .2. While holding down [(TV CONTROL) POWER], enter the 2-digit code using the number buttons [0–9], then release [(TVCONTROL) POWER].•The remote control is now set to operate your TV.TV brands CodeADMIRAL 05, 10, 13EMERSON 17FISHER 03GE 07GOLD STAR 01HITACHI 02JVC 15MAGNAVOX 08MATSUSHITA 12, 18MITSUBISHI 14PANASONIC 12, 18QUASAR 12, 18RCA 06SAMSUNG 16SANYO 03SHARP 00, 13SONY 11TECHNOL ACE 05TOSHIBA 04ZENITH 09, 10Notes:•Only remote-controlled TVs can be operated using this remotecontrol. (Refer to your TV instruction manual for more details.)•There may be some older TV models that cannot be operatedwith this remote control. If this is the case, use the originalremote control supplied with the TV.IMPORTANT NOTE:If the batteries in the remote control are changed, the codesettings for the TV must be re-entered.Write your code number below for future reference.TV:(TV CONTROL)POWER](https://usermanual.wiki/ORION-ELECTRIC/M2B8A/User-Guide-267593-Page-9.png)
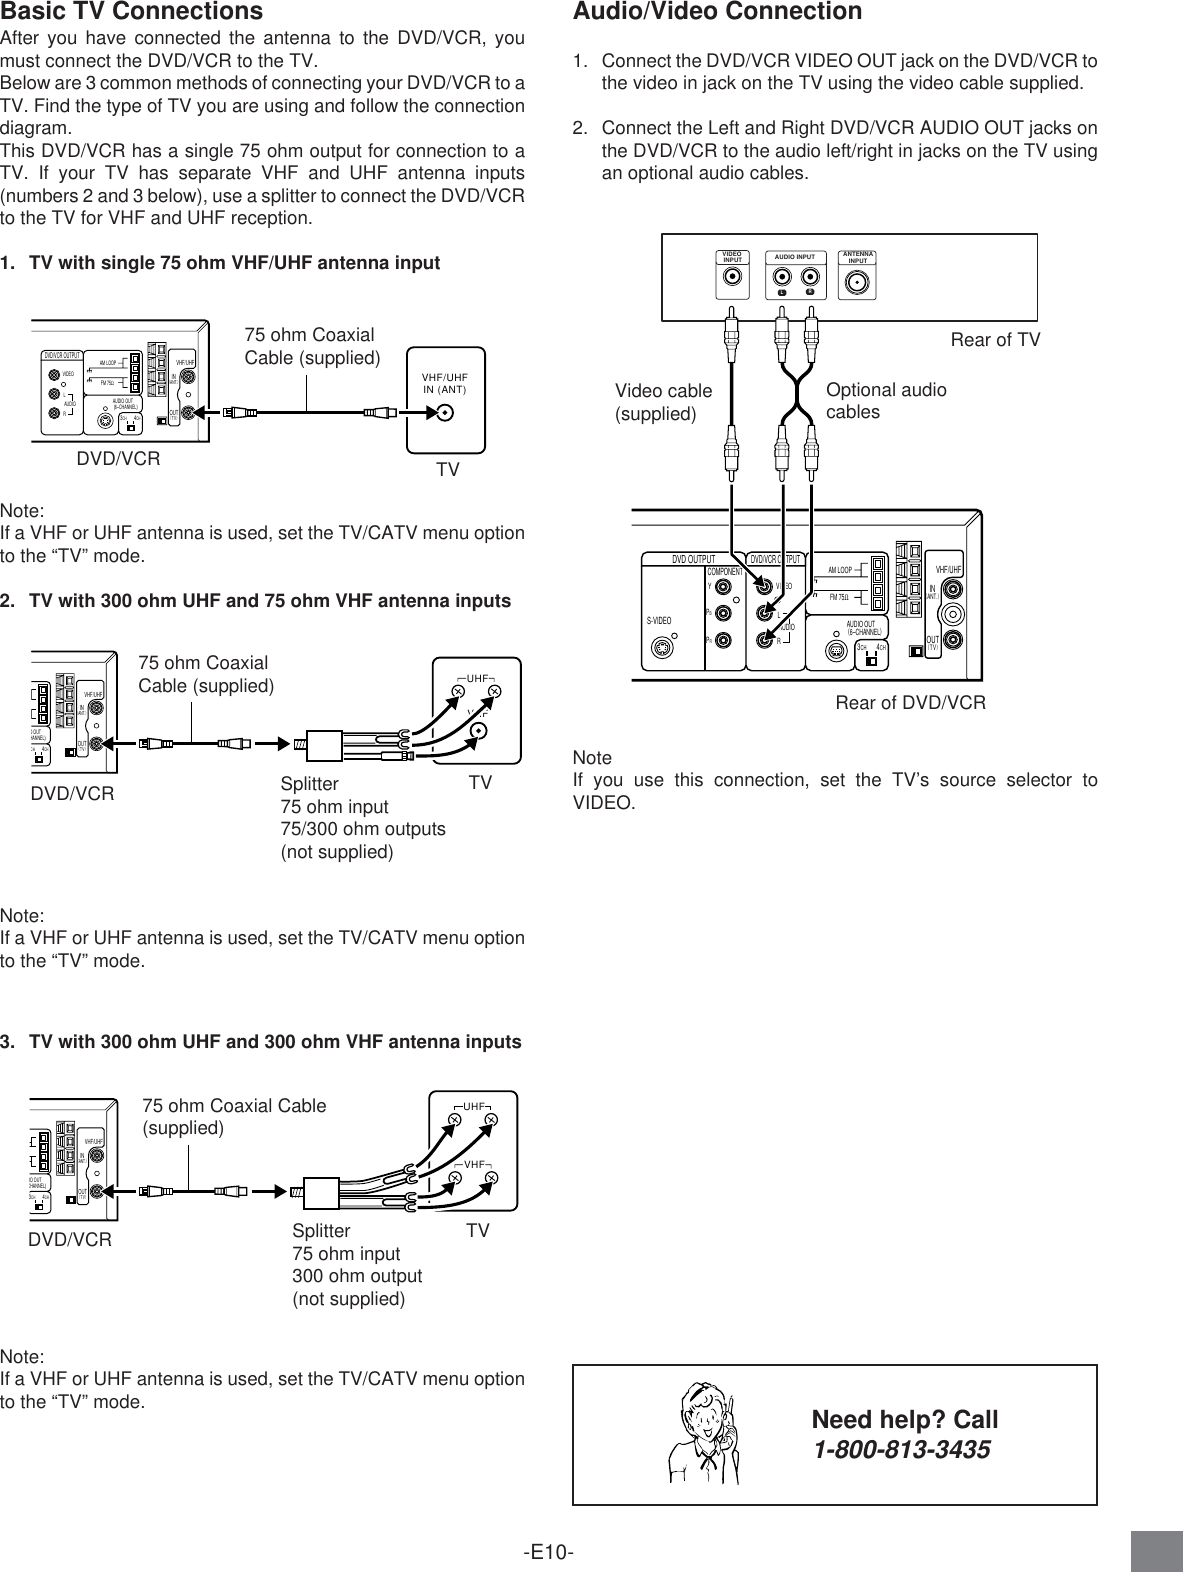
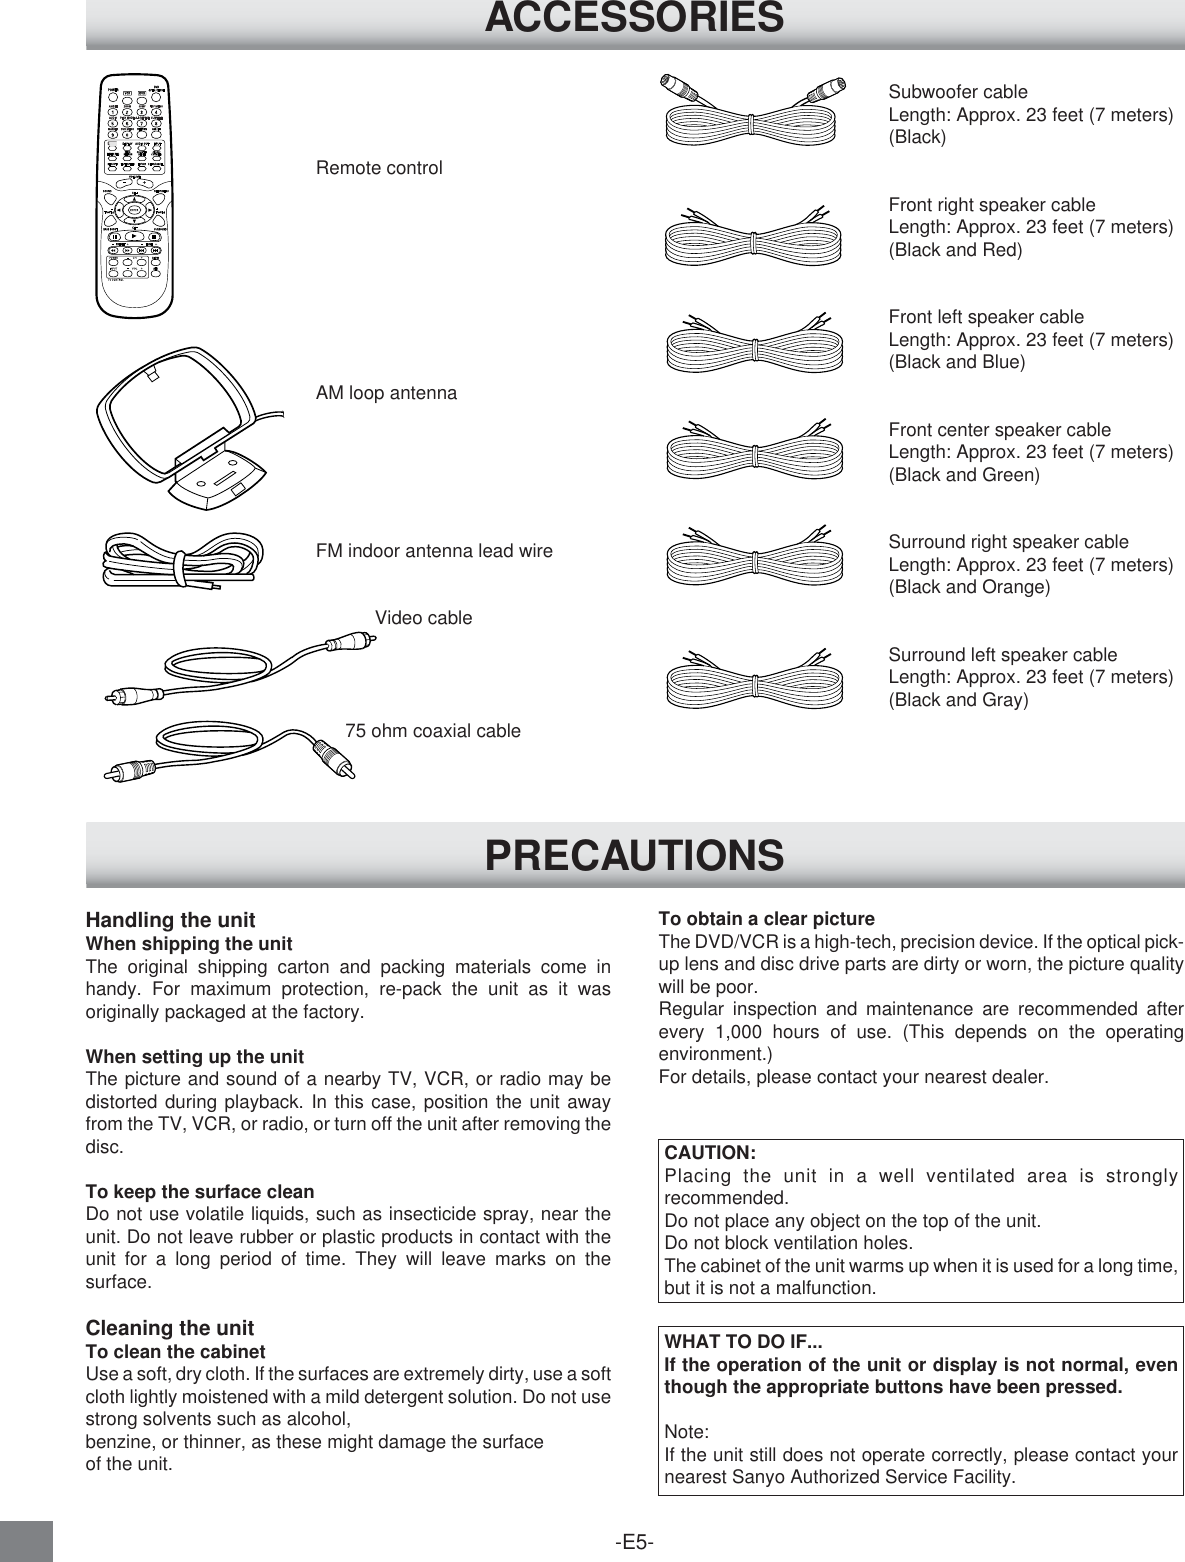
![-E17-Common OperationVIDEO IN L-AUDIO IN-R/ONVOLUMEMINIMAXEJECTRECCHANNELAM/FMVCR/DVDPRESET+-OPEN/CLOSESTOP PLAYPLAY aAM/FMq OPEN/CLOSEVOLUMEz/ONTurning the power on and offPress [z/ON] to turn the power on.(After connecting the power cord, when you press [z/ON] for thefirst time, the volume-reset feature automatically sets the initialvolume level.)When the power cord is connected to the AC outlet, the unit willrespond to commands from the remote control.To turn the power off, press [z/ON] again.Selecting the sourcePress [VCR] to select the “VCR” function.Press [DVD] to select the “DVD” function.Press [AM/FM] to select the “Tuner” function.Press [INPUT] repeatedly to select the external source connectedto AUDIO/VIDEO IN jacks on the front panel or original source.•When the source selection is changed to the “Tuner” function,disc and tape playback automatically stops.VCR–VOLUME+BASS BOOSTDVD45OPEN/CLOSEAM/FMINPUTSOUNDaAdjusting the volumeRotate [VOLUME] (or press [VOLUME] + or – on the remotecontrol). The volume level appears on the display (Vol 0 ~ Vol40).Adjusting the bass, treble and speaker level1. Press [SOUND] then press [ENTER] repeatedly to select thedesired sound mode.Each time [ENTER] is pressed, the sound mode changes asfollows:BA (Bass) v TR (Treble) v FL (Front left speaker) v C(Center speaker) v FR (Front right speaker) v SR(Surround right speaker) v SL (Surround left speaker) vSU (Subwoofer) v BA (Bass)…2. Press “4” or “5” to adjust the sound level.Bass/ Treble: “+5”–“–5”.Front left speaker/Front right speaker: “0”–“–10”.Center speaker/Surround left speaker/Surround left speaker/Subwoofer: “+10”–“–10”.3. Repeat steps 1 and 2 for another sound mode.•You can also use the menu screen to adjust the speakerlevel. See “Adjusting the Speaker and Subwoofer level” onpage E19.Bass boost systemPress [BASS BOOST] to switch the bass boost effect On andOff.BA ON v BA OFF v BA ON...BEFORE OPERATION](https://usermanual.wiki/ORION-ELECTRIC/M2B8A/User-Guide-267593-Page-18.png)
![-E18-Need help? Call1-800-813-3435Selecting Surround ModePress [SURROUND] to select the surround mode.Each time the button is pressed, the surround mode changes asfollows:AUTO v Surr (Surround) v HALL v LIVE v 2ch vAUTO ...Notes:•DVD video disc with DTS may not work correctly. You cansee the picture on the TV screen, but there is no sound.•There is no Dolby Surround effect when monaural programmaterial is used.•When receiving weak FM broadcasts, set it to “2ch”. Thesound quality may improve.Function FL display DescriptionDVD/CD AUTO The unit selects the surround mode automatically depending on the disc.Dolby Digital (not encoded with Dolby Surround Sound)“s D” appears on the FL display.Dolby Digital is a discrete 5.1 channel surround system, developed for cinema use. But, not all DolbyDigital sources are recorded with 6 channel.Some sources marked Dolby Digital may be recorded in Dolby Surround, a 2 channel system.Dolby Digital (encoded with Dolby Surround Sound)“s D” and “s PL” appear on the FL display.The surround mode is set to Dolby Pro Logic mode.Dolby Pro Logic is a decoding system that was developed to enhance the soundtracks of theatricalmotion pictures with Dolby Surround. All speakers sound, but the surround left and right speakers aremonophonic sound.Other (PCM, CD, MP3, etc.)The surround mode is set to 2.1 channel (Front left and right speakers, and Subwoofer).Surr When using a disc with Dolby Digital 3 channel – 5.1 channel, it is set to Dolby Digital sound mode.When using an MP3 CD, it is set to matrix-surround mode (not Dolby Pro Logic).Other discs are set to Dolby Pro Logic mode.HALL ????????LIVE ????????2ch The surround mode is set to 2.1 channel (Front left and right speakers, and Subwoofer).TV AUTO It is set to 2.1 channel (Front left and right speakers, and Subwoofer).VIDEOFM TUNER Surr All speakers work, but it is set to the matrix-surround mode (not Dolby Pro Logic).If a monaural source is used, it is set to 3.1 channel (Front left and right, Center speaker, andSubwoofer).2ch It is set to 2.1 channel (Front left and right speakers, and Subwoofer).SURROUNDAM TUNER](https://usermanual.wiki/ORION-ELECTRIC/M2B8A/User-Guide-267593-Page-19.png)
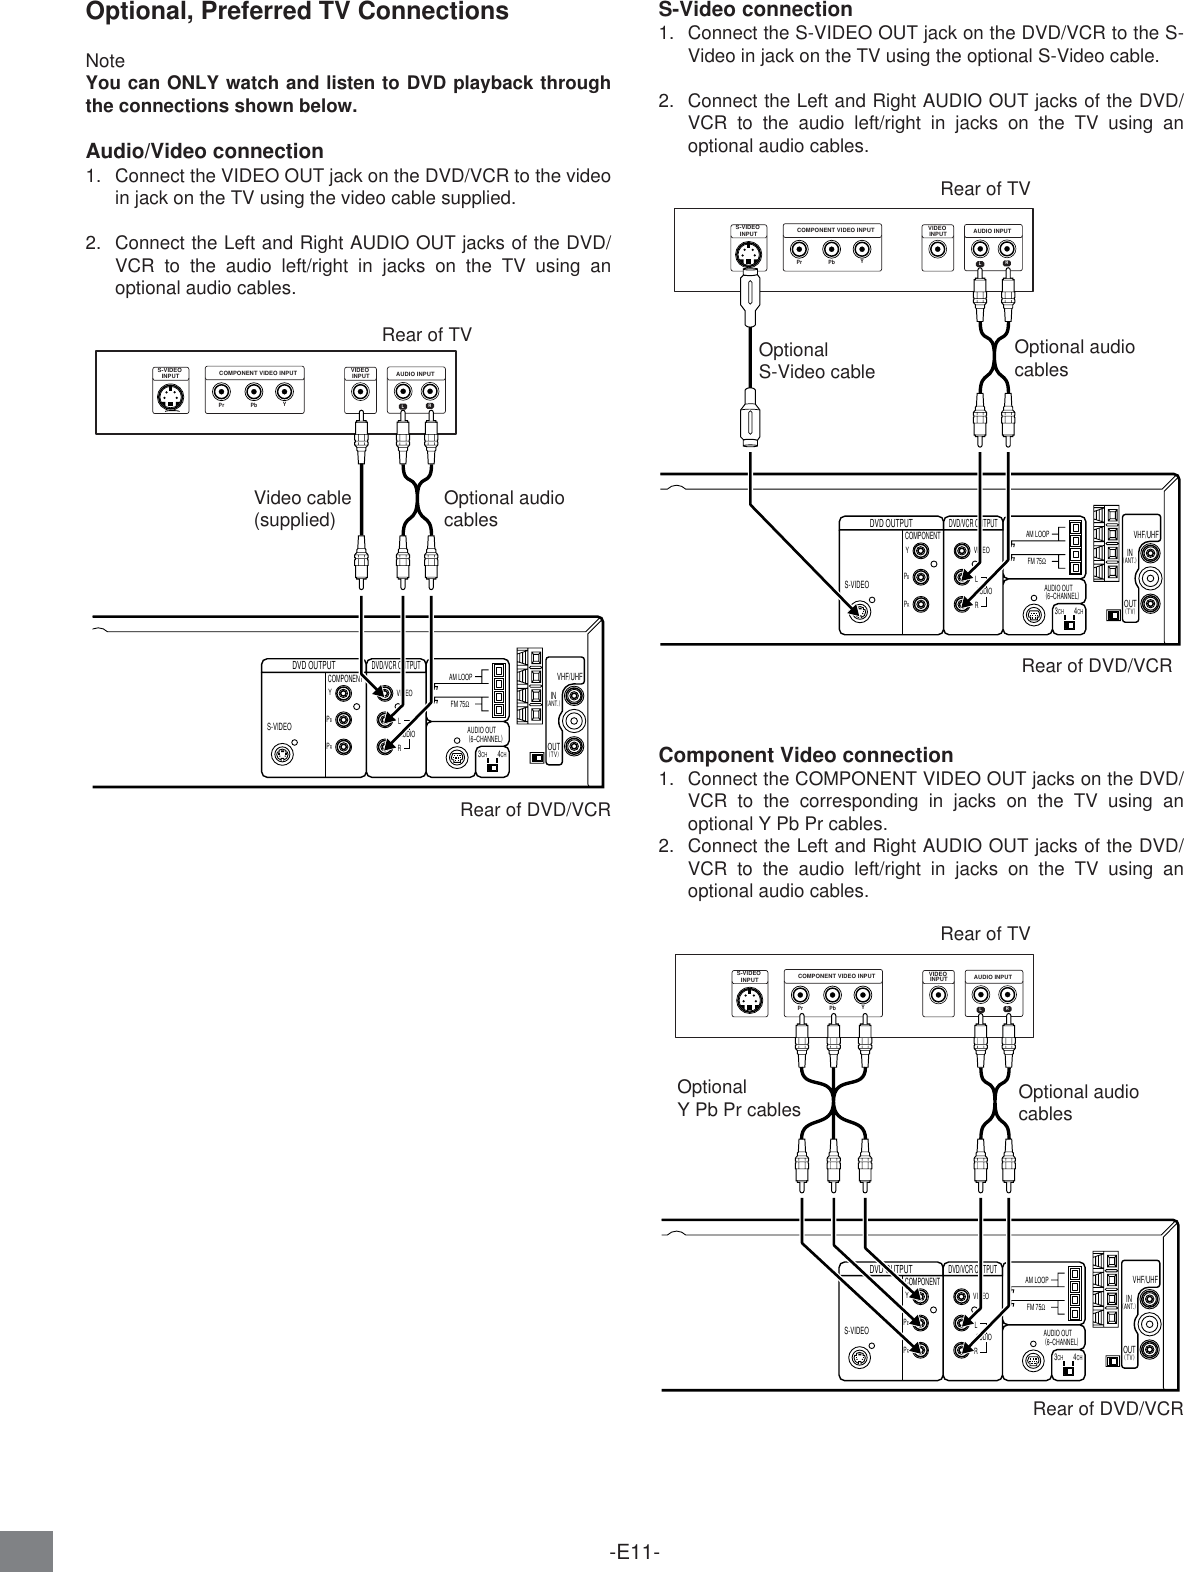
![-E19-Need help? Call1-800-813-3435Adjusting the Speaker Volume BalanceThis unit is set to the standard level before shipping from thefactory. You may not need adjustment.But, depending on the size of the room and the placement of thespeakers, you may need a fine adjustment.In this case, follow the steps below. Please use the remotecontrol at the listening point.1. Press [SETUP/MENU].The “Menu” screen appears on the TV screen.2. Press [5] to select “SPEAKER SETUP”.3. Press [ENTER].The Speaker Setup screen appears.4. Press [ENTER].The Volume Adjust screen appears.5. Press [4] or [5] to select “TEST TONE”.6. Press [ENTER].7. The test tone will be heard from each speaker for 2 secondsin the following order.TV screen FL display SpeakerF-L FL Front left SpeakerCENTER C Center SpeakerF-R FR Front right SpeakerSURR.R SR Surround right SpeakerSURR.L SL Surround left Speaker8. Press [VOLUME] + or – until the test tone is at a comfortablelevel.9. If the test tone level is not the same from each speaker, press[4] or [5] to adjust it while the speaker is activating.F-R/F-R: “0”–“–10”CENTER/SURR v R/SURR v L: “+10”–“–10”10. Repeat steps 8 to 9 for other settings.11. Press [SETUP/MENU] repeatedly to close the screen.Adjusting the Speaker and Subwoofer Level1. Press [SETUP/MENU].The “Menu” screen appears on the TV screen.2. Press [5] to select “SPEAKER SETUP”.3. Press [ENTER].The Speaker Setup screen appears.4. Press [ENTER].The Volume Adjust screen appears.5. Press [4] or [5] to select “TRIM”.6. Press [ENTER].7. Press [ENTER] repeatedly to select the desired speaker.Each time the button is pressed, the selected speaker andtone level flash.8. Press [4] or [5] to adjust the level as desired.F-L/F-R: “0”–“–10”CENTER/SURR v R/SURR v L/SUBWOOFER: “+10”–“–10”Note: No test tone.9. Repeat steps 9 to 10 for other settings.10. Press [SETUP/MENU] repeatedly to close the screen.Note:If no adjustment are made, the original display returns afterapproximately 60 seconds.4, 52, 5, 91, 11ENTER3, 4, 681, 10ENTER3, 4, 6, 74, 52, 5, 8](https://usermanual.wiki/ORION-ELECTRIC/M2B8A/User-Guide-267593-Page-20.png)
![-E20-Changing the Delay TimeThe sound from speakers can reach the listening position atdifferent times depending the speaker placements. You canallow for this difference by changing the delay time of the centerand surround speakers.1. Press [n] to stop DVD playback completely.2. Press [SETUP/MENU].The “Menu” screen appears on the TV screen.3. Press [5] to select “SPEAKER SETUP”.4. Press [ENTER].The Speaker Setup screen appears.5. Press [4] or [5] to select “DELAY ADJUST”.6. Press [ENTER].The Delay Adjust screen appears.7. Press [4] or [5] to select “CENTER DELAY”.8. Press [ENTER].9. Press [4] or [5] to select the center speaker delay time.(“0ms”, “1ms”, “2ms”, “3ms”, “4ms” and “5ms”)Center speaker delay timeIf D1=<D2, set the delay time to “0ms”.If D1>D2, set the delay time as follows:Difference between D1 and D2 Delay time1 foot (Approx. 30.5cm) 1ms2 feet (Approx. 61cm) 2ms3 feet (Approx. 91.5cm) 3ms4 feet (Approx. 122cm) 4ms5 feet (Approx. 152.5cm) 5msD1: The distance from the front speakerD2: The distance from the center speakerD3: The distance from the surround speakerNeed help? Call1-800-813-343510. Press [ENTER].“CENTER DELAY” and the selected delay time remain.11. Press [5] to select “SURR. DELAY”.12. Press [ENTER].13. Press [4] or [5] to select the surround speaker delay time.(“0ms”, “5ms”, “10ms” and “15ms”)Surround speaker delay timeIf D1=<D3, set the delay time to “0ms”.If D1>D3, set the delay time as follows:Difference between D1 and D3 Delay time5 feet (Approx. 152.5cm) 5ms10 feet (Approx. 305cm) 10ms15 feet (Approx. 457.5cm) 15ms14. Press [ENTER].“SURR. DELAY” and the selected delay time remain.15. Press [SETUP/MENU] repeatedly to close the screen.Note:If no adjustment are made, the original display returns afterapproximately 60 seconds.4, 53, 5, 7, 9,11, 132, 15ENTER4, 6, 8, 10,12, 141D1 D2D3D3D1Center speakerFront left speaker Front right speakerSurround leftspeaker Surround rightspeaker](https://usermanual.wiki/ORION-ELECTRIC/M2B8A/User-Guide-267593-Page-21.png)
![-E21-Setting the Video ChannelTo view playback of a recorded tape or DVD disk, or to watch aprogram selected by the VCR’s channel selector, the TV must beset to channel 3 or 4 (video channel).When a TV is connected with the 75 ohm coaxial cable only.1. Press [POWER] to turn on the DVD/VCR.2. Press [VCR] to select the VCR mode.The VCR indicator on the front panel will light.3. Set the 3/4 Channel selector switch on the rear panel to CH 3or 4.4. Turn ON the TV and set to CH 3 or 4 to correspond with thechannel selected in step 3.5. Press [TV/VCR] to select the VCR position.The VCR indicator will appear in the display.6. Select any channel to receive a TV station in your area.The channel number will appear on the screen for about 4seconds.For a push-button TV tunerIf CH 3 or 4 corresponding to the video channel cannot be tunedon your TV, proceed as follows: set the DVD/VCR 3/4 channelselector and the TV to CH 3 or 4, play back a prerecorded tapeand tune the TV to receive a sharp color picture from the videocassette recorder. Refer to your TV owner’s manual for details.Setting the LanguageYou can choose from three different languages (English, Frenchand Spanish) for the on-screen displays.1. Press [SETUP/MENU].If you use the unit for the first time and press [SETUP/MENU], instead of the main menu screen below the “SYSTEMSETUP” menu screen in step 3 may appear.⟨4/5/ENTER/MENU⟩MENUTIMER REC SETAUTO REPEAT ON OFFON OFFSAPCH SETUPSYSTEM SETUPSPEAKER SETUPTVGuardian SETUP2. Press [4] or [5] to select the “SYSTEM SETUP” option, thenpress [ENTER].3. Press [4] or [5] to select the “LANGUAGE/IDIOMA/LANGUE”option, then press [ENTER].⟨4/5/ENTER/MENU⟩SYSTEM SETUPCLOCK SETLANGUAGE/IDIOMA/LANGUENO NOISE BACKGROUNDAUTO CLOCKSTANDARD TIMEDAYLIGHT SAVING TIMEON OFFON OFF4. Press [4] or [5] to select the desired language: English(ENGLISH), Spanish (ESPAÑOL) or French (FRANCAIS),then press [ENTER].⟨4/5/ENTER/MENU⟩5. Press [SETUP/MENU] until the MENU screen is cleared.Notes:•Both the VCR and the DVD have their own menu option (Seepage E54).•If no buttons are pressed for more than 60 seconds, theMENU screen will return to normal TV-operation automatically.521ENTER 4,51, 5](https://usermanual.wiki/ORION-ELECTRIC/M2B8A/User-Guide-267593-Page-22.png)
![-E22-Auto Clock SettingThe Auto Clock feature enables the automatic clock setting andupdating, and also to set the Time Zone and Daylight SavingTime by receiving XDS (Extended Data Service) informationcarried on the channel signal.Preparation:You must set the antenna connection before the AC cord plug isinserted into the AC outlet.Auto clock settingWAIT 30 MINUTES! when the power switch is off, after theconnections of the antenna and the power plug. Because theAuto Clock setting feature is activate.After the clock is set automatically, you may have to set the TimeZone and Daylight Saving Time.Press [POWER] to turn on the DVD/VCR after the Auto Clockoperation completed.•When shipped from factory, the AUTO CLOCK option is setto ON position.•If you turn the DVD/VCR on during Auto Clock setting, theclock is not set.•With cable box connection, if the Auto Clock Setting isunsuccessful, please select the PBS channel carrying theXDS information, then turn the DVD/VCR off. After 30 minutes,turn the DVD/VCR on, and if the clock is not set automatically,set the clock manually. (See page E24)Time Zone setting (STANDARD TIME)In the rare event that you live within broadcast range of twostations in two different time zones, the DVD/VCR may recognizethe wrong station for the AUTO CLOCK set. To correct thesituation:Preparation:•Turn ON the TV.•When a TV is connected with an audio/video cable, select thevideo input mode on the TV.•When a TV is connected only with an antenna cable, set tothe video channel 3 or 4. Then select VCR position with [TV/VCR].•Press [VCR] to select the VCR mode. (The VCR indicator willlight.)1. Press [SETUP/MENU].The VCR menu screen will appear.2. Press [4] or [5] to select the “SYSTEM SETUP” menu, thenpress [ENTER].⟨4/5/ENTER/MENU⟩MENUTIMER REC SETAUTO REPEAT ON OFFON OFFSAPCH SETUPSYSTEM SETUPSPEAKER SETUPTVGuardian SETUP3. Press [4] or [5] to select the “STANDARD TIME” option, thenpress [ENTER].⟨4/5/ENTER/MENU⟩SYSTEM SETUPCLOCK SETLANGUAGE/IDIOMA/LANGUENO NOISE BACKGROUNDAUTO CLOCKSTANDARD TIMEDAYLIGHT SAVING TIMEON OFFON OFF4. Press [4] or [5] to select your Time Zone, then press [ENTER].⟨4/5/ENTER/MENU⟩STANDARD TIMEATLANTICCENTRALPACIFICEASTERNMOUNTAINALASKAHAWAIIAUTO5. Press [SETUP/MENU] until the MENU screen is cleared.Notes:•After Auto Clock setting, in some case the clock may displaythe other time zone’s. You can correct the clock by selectingyour Time Zone setting above.•When the clock is not set or you set the clock manually, TimeZone setting is not available.ENTERVCR4,51, 5TV/VCRNeed help? Call1-800-813-3435](https://usermanual.wiki/ORION-ELECTRIC/M2B8A/User-Guide-267593-Page-23.png)
![-E23-Daylight saving time settingYou can set the Daylight saving time automatically or manually.Preparation:•Turn ON the TV.•When a TV is connected with an audio/video cable, select thevideo input mode on the TV.•When a TV is connected only with an antenna cable, set to thevideo channel 3 or 4. Then select VCR position with [TV/VCR].•Press [VCR] to select the VCR mode. (The VCR indicator willlight.)1. Repeat the steps 1–2 on page E22 and press [4] or [5] toselect “DAYLIGHT SAVING TIME”, then press [ENTER].⟨4/5/ENTER/MENU⟩SYSTEM SETUPCLOCK SETLANGUAGE/IDIOMA/LANGUENO NOISE BACKGROUNDAUTO CLOCKSTANDARD TIMEDAYLIGHT SAVING TIMEON OFFON OFF2. Press [4] or [5] to select one of the options, then press[ENTER].⟨4/5/ENTER/MENU⟩DAYLIGHT SAVING TIMEONOFFAUTOON: for manual setting (forward one hour)OFF: for manual setting (back one hour)AUTO: for automatic setting (read XDS in the signal)When you want to set the Daylight Saving Time manually, on thefirst Sunday in April you set to “ON”, and on the last Sunday inOctober you set to “OFF”.Notes:•When shipped from factory, the DAYLIGHT SAVING TIMEoption is set to “AUTO” position.•When the clock is not set, Daylight Saving Time setting is notavailable.•When there is no Daylight Saving Time in your area, alwaysselect “OFF” position in step 2.ENTERVCR4,5TV/VCRNeed help? Call1-800-813-3435](https://usermanual.wiki/ORION-ELECTRIC/M2B8A/User-Guide-267593-Page-24.png)
![-E24-Manual Clock SettingYou must set the date and time for timer recordings.Preparation:• Turn ON the TV and set to the video input mode.•Press [VCR] to select the VCR mode. (The VCR indicator willlight.)Example: Setting the clock to “8:30 AM” March, 23 (SAT), 2002.1. Press [SETUP/MENU].The VCR menu screen will appear.2. Press [4] or [5] to select the “SYSTEM SETUP” menu, thenpress [ENTER].⟨4/5/ENTER/MENU⟩MENUTIMER REC SETAUTO REPEAT ON OFFON OFFSAPCH SETUPSYSTEM SETUPSPEAKER SETUPTVGuardian SETUP3. Press [4] or [5] to select the “CLOCK SET” option, thenpress [ENTER].⟨4/5/ENTER/MENU⟩SYSTEM SETUPCLOCK SETLANGUAGE/IDIOMA/LANGUENO NOISE BACKGROUNDAUTO CLOCKSTANDARD TIMEDAYLIGHT SAVING TIMEON OFFON OFF4. Press [4] or [5] to set the month, then press [ENTER].⟨4/5/ENTER/CANCEL/MENU⟩MONTHDAYYEARTIME31 (FRI)200212 : 00AM5. Set the day, year and time as in step 4.⟨4/5/ENTER/CANCEL/MENU⟩MONTHDAYYEARTIME323 (SAT)20028 : 30AM6. After setting the clock, date and time starts functioningautomatically.8 : 30AM SATNotes:•To make corrections any time during the process, press[CLEAR/CANCEL] repeatedly until the item you want tochange blinks, then press [4] or [5].•After a power failure or disconnection of the power, the timersettings will be lost. In this case, reset the present time.ENTERVCR4,5CLEAR/CANCEL1](https://usermanual.wiki/ORION-ELECTRIC/M2B8A/User-Guide-267593-Page-25.png)
![-E25-Tuner SettingThis DVD/VCR is equipped with a channel memory featurewhich allows channels to skip up or down to the next channel setinto memory, skipping over unwanted channels. Before selectingchannels, they must be programmed into the DVD/VCR’s memory.In addition to normal VHF and UHF channels, this DVD/VCR canreceive up to 125 Cable TV channels. To use this DVD/VCR withan antenna, set the TV/CATV menu option to the TV mode.When shipped from the factory, this menu option is in the CATVmode.Preparation:• Turn ON the TV and set to the video input mode.•Press [VCR] to select the VCR mode. (The VCR indicator willlight.)Note:You can’t select “CH SETUP” if you set the channel to “L”.TV/CATV selection1. Press [SETUP/MENU].The VCR menu screen will appear.2. Press [4] or [5] to select “CH SETUP”, then press ENTER.⟨4/5/ENTER/MENU⟩MENUTIMER REC SETAUTO REPEAT ON OFFON OFFSAPCH SETUPSYSTEM SETUPSPEAKER SETUPTVGuardian SETUP3. Press [4] or [5] to select the “TV/CATV” option.⟨4/5/ENTER/MENU⟩CH SETUPTV CATVAUTO CH MEMORYADD/DELETE4. Then press [ENTER] to select the TV or CATV mode.⟨4/5/ENTER/MENU⟩CH SETUPTV CATVAUTO CH MEMORYADD/DELETE•The arrow indicates the selected mode.TV: VHF/UHF channelsCATV: CABLE TV channels5. Press [SETUP/MENU] until the menu screen is cleared.Setting channels automaticallyThe VCR can receive a maximum of 125 channels in CATVmode, 69 channels in TV mode by presetting the channels intomemory.1. Repeat above steps 1–2 and press [4] or [5] to select “AUTOCH MEMORY”.⟨4/5/ENTER/MENU⟩CH SETUPTV CATVAUTO CH MEMORYADD/DELETE2. Then press [ENTER].CH 002The auto tuning will start. The channel display will count upand when finished, the screen returns to normal.3. Press [SETUP/MENU] until the menu screen is cleared.ENTERVCR4,5SETUP/MENUNeed help? Call1-800-813-3435](https://usermanual.wiki/ORION-ELECTRIC/M2B8A/User-Guide-267593-Page-26.png)
![-E26-To ADD/DELETE ChannelsYou can add the channels you want or delete the channels youdo not want manually.Preparation:• Turn ON the TV and set to the video input mode.•Press [VCR] to select the VCR mode. (The VCR indicator willlight.)1. Repeat the steps 1–2 in “TV/CATV selection” on page E25.Then press [4] or [5] to select the “ADD/DELETE” option andpress [ENTER].⟨4/5/ENTER/MENU⟩CH SETUPTV CATVAUTO CH MEMORYADD/DELETE2. Press the number button(s), [4] or [5] to select a channelnumber you want to add or delete.The channel number will blink.⟨4/5/0-9/ENTER/MENU⟩ADD CH 0033. To add channelsPress [ENTER] until “ADD” appears on the screen to set toadd the unmemorized channel.To delete channelsPress [ENTER] until “DELETE” appears on the screen to setto delete the channel from memory.4. Repeat 2 and 3 to add or delete other channel.5. Press [SETUP/MENU] until the menu screen is cleared.Noise EliminationWhen you don’t want to receive a weak signal broadcast, theBlue back screen can be obtained by selecting the NO NOISEBACKGROUND “ON”. When the unit is shipped from the factory,the NO NOISE BACKGROUND is set to “ON”.1. Press [SETUP/MENU].The VCR menu screen will appear.2. Press [4] or [5] to select the “SYSTEM SETUP” menu, thenpress [ENTER].⟨4/5/ENTER/MENU⟩MENUTIMER REC SETAUTO REPEAT ON OFFON OFFSAPCH SETUPSYSTEM SETUPSPEAKER SETUPTVGuardian SETUP3. Press [4] or [5] to select the “NO NOISE BACKGROUND”option.⟨4/5/ENTER/MENU⟩SYSTEM SETUPCLOCK SETLANGUAGE/IDIOMA/LANGUENO NOISE BACKGROUNDAUTO CLOCKSTANDARD TIMEDAYLIGHT SAVING TIMEON OFFON OFF4. Press [ENTER] to select the “ON” position.5. Press [SETUP/MENU] until the menu screen is cleared.ENTERVCR4,5SETUP/MENU](https://usermanual.wiki/ORION-ELECTRIC/M2B8A/User-Guide-267593-Page-27.png)
![-E27-CASSETTE TAPE PLAYBACKLoading and Unloading a Cassette TapeUse only video cassette tapes marked .LoadingPush the center of the tape until it is automatically inserted.Insert the cassette tape with its labeled side facing up and theerase prevention tab positioned at your left. An inverted cassettetape cannot be inserted.Erase prevention tabAutomatic power ONWhen you insert a cassette tape the DVD/VCR power will turnON automatically.Automatic playbackWhen loading a cassette tape without an erase prevention tab,playback will start automatically.Unloading1. Press [q EJECT] on the unit.2. Remove the cassette tape.Automatic tape ejectThis DVD/VCR will automatically rewind the tape when the tapehas ended. And when the tape is rewinded to its beginning, thecassette tape will be ejected automatically.To prevent accidental erasureRemove the erase prevention tab with a screwdriver.Erase prevention tabTo record againCover the hole with a piece of adhesive tape.Adhesive tapeTape speed and maximum recording timeTape Speed Video cassette tapeT-160 T-120 T-90 T-60 T-30SP 2-2/3 hours 2 hours 1-1/2 hours 1 hour 30 minutes(Standard Play)SLP 8 hours 6 hours 4-1/2 hours 3 hours 1-1/2 hours(Super Long Play)](https://usermanual.wiki/ORION-ELECTRIC/M2B8A/User-Guide-267593-Page-28.png)
![-E28-Basic PlaybackPreparation:• Turn ON the TV and set to the video input mode.•Press [VCR] to select the VCR mode. (The VCR indicator willlight.)1. Load a prerecorded tape (When loading a cassette tapewithout the erase prevention tab, playback will startautomatically).2. Press [a].• Playback will start.•“a” will appear on the screen for about 4 seconds.To stop playbackPress [n] once.The tape will stop but remain fully loaded and ready to play.“n” will appear on the screen for about 4 seconds.To rewind the tape or forward it rapidly1. Stop the playback or recording with [n].2. To rewind the tape, press [d].•“d” will appear on the screen for about 4 seconds.To forward the tape, press [c].•“c” will appear on the screen for about 4 seconds.3. To stop the tape-winding, press [n]. To switch to playbackdirectly (without STOP), press [a].Forward/Reverse picture search modeWhen the tape is being winded, you can switch to picture searchmode (see next page). To do this, press [d] or [c] and hold itdown. The unit will resume the tape winding as soon as thebutton is released.Notes:•This VCR selects the playback tape speed SP, LP or SLPautomatically.•The Cassette tape and DVD disc can be played backsimultaneously. If you press [VCR] or [DVD], the tape playbackand DVD playback alternate with each other on the screen.•When you select the VCR mode during DVD playback, DVDplayback will stop automatically after approx. 5 minutes.adVCR DVDncNeed help? Call1-800-813-3435](https://usermanual.wiki/ORION-ELECTRIC/M2B8A/User-Guide-267593-Page-29.png)
![-E29-Special PlaybackPicture SearchReverse picture search function:Press [d] x 1 or x 2 during the playback.Forward picture search function:Press [c] x 1 or x 2 during the playback.To return to playback: Press [a].SPEED SEARCH TIMESTAPE SPEED PICTURE SEARCH SPEEDPRESS ONCE PRESS TWICESP (Standard Play) 3 X 5 XLP (Long Play) 7 X 9 XSLP (Super Long Play) 9 X 15 XStill PicturePress [k] during playback.To resume normal playback: Press [a] or [k].Slow MotionDuring playback press [SLOW].To return to playback: Press [a] or [SLOW].Slow tracking and vertical lock adjustment:If noise bars appear in the picture during slow motion, press[Tracking] +/– to reduce the noise bars.If the still picture jitters excessively, press [Tracking] +/– tostabilize the still picture.Frame by Frame picturePress [k] during playback.Press [SLOW] one by one: The picture advances frame byframe.To return to playback: Press [a] or [k].Adjusting tracking conditionAutomatic tracking adjustment:Whenever you insert a tape and start playback, automatic trackingstarts working and continuously analyzes the signal to enableoptimum picture quality during playback.Manual tracking adjustment:If automatic tracking cannot eliminate noises well during playback,press [Tracking] +/– to eliminate the noises. “MANUAL TR.” willappear. Press it briefly for a fine adjustment, or press and hold fora coarse adjustment.•Press [ATR] to reactivate automatic tracking again.“AUTO TR.” will appear.Notes:•The audio output is muted during SPEED SEARCH, STILL,FRAME ADVANCE and SLOW MOTION.•During picture search mode there will be noise bars whichare caused by the system.•The Special Playback will automatically change to playbackafter approx. 5 minutes to protect the video tape againstexcessive wear.Repeat playbackThe entire video tape will be played until its end. The tape willthen automatically rewind to the beginning and the playback willbe repeated.1. Press [SETUP/MENU].2. Press [4] or [5] to select “AUTO REPEAT”.3. Then press [ENTER] to select “ON” or “OFF”.•If “ON” is selected, the playback will be repeated endlessly.⟨4/5/ENTER/MENU⟩MENUTIMER REC SETAUTO REPEAT ON OFFON OFFSAPCH SETUPSYSTEM SETUPSPEAKER SETUPTVGuardian SETUP4. Press [SETUP/MENU] until the menu screen is cleared.•If you press [DISPLAY], “ ” will appear on the screen.5. To start the playback, press [a].The playback will be repeated endlessly.To cancel repeat mode:Follow the above steps 1–2, then press [ENTER] to select theOFF position. Press [SETUP/MENU] to return to the TV.Need help? Call1-800-813-3435](https://usermanual.wiki/ORION-ELECTRIC/M2B8A/User-Guide-267593-Page-30.png)
![-E30-ZERO RETURN FunctionThis function makes tape-rewinding stop at the counter 00:00:00position automatically.Preparation:• Turn ON the TV and set it to the video input mode.•Press [VCR] to select the VCR mode. (The VCR indicator willlight.)1. Press [DISPLAY].The counter display shows the tape running time duringplayback or recording.CH 0018 : 47AM MON00 : 04 : 38 SPSTEREO SAP2. Press [COUNTER RESET] at the desired tape position.The counter display will be reset to the “00:00:00” position(e.g. the begining of recording).CH 0018 : 47AM MON00 : 00 : 00 SPSTEREO SAP3. Press [n] when playback or recording is finished.4. Press [ZERO RETURN].The tape will be rewinded or fast forwarded and automaticallystop at the “00:00:00” position.The CLOCK/COUNTER-buttonPress [CLOCK/COUNTER]. The clock and tape counter alternatewith each other in the display.Notes:•If you rewind the tape beyond “00:00:00”, a minus sign (“–”)will be displayed in front of the time.•When you load a tape, the counter will reset to “00:00:00”.•The counter does not function on nonrecorded (blank) sectionsof the tape. When you rewind, fast forward or play tapesthrough blank sections, the counter stops.Video Index Search SystemThis function enables you to locate the beginning of any recordingmade on the VCR.Recording an INDEX MARKThe Index Search function automatically records an INDEX markon the tape whenever a recording is initiated.CH 001INDEXIndex SearchPress [e] or [f] during stop or play mode.For Succeeding programs: Press [e].For Preceding programs: Press [f].(Additional press increases the INDEX NO. up to 9.)When the [e] or [f] is pressed, the unit starts searching theINDEX NO. selected and finds the portion, then playback startsautomatically.To stop the Index Search, press [n].INDEX NO. (up to 9)e or f is displayed+3Notes:•When you record an INDEX mark at the very beginning of thetape, the mark may not be found.•During INDEX search, the tape may stop and begin to play ata slightly different location.•INDEX may not function properly with old or worn out videotapes.•INDEX marks may not be found if it is extremely close to thepoint where the search began.•In recording, if you stop recording temporarily, the INDEXmark is not recorded on the tape.CLOCK/COUNTER32VCR14nef](https://usermanual.wiki/ORION-ELECTRIC/M2B8A/User-Guide-267593-Page-31.png)
![-E31-RECORDINGRecording a TV programRecording and viewing the same TV programPreparation:• Turn ON the TV and set to the video input mode.•Press [VCR] to select the VCR mode. (The VCR indicator willlight.)1. Load a cassette tape with the erase prevention tab intact.The VCR will automatically turn on.2. Press [TAPE SPEED] to select the desired tape speed SP orSLP.The tape counter and SP or SLP will appear on the screen forabout 4 seconds.00 : 00 : 00 SP3. Set the TV/CATV option to the appropriate position (Seepage E25).TV: VHF/UHF channelsCATV: CABLE TV channels4. Press [number buttons (0–9)] or [CH] +/– to select the channelto be recorded.In the TV mode1–9 Press [0] and then [1]–[9] as required.Example: To select “2”, press [0][2].10–69 Press 2 digits in order.Example: Press [2][2] for “22”.In the CATV mode1–9 Press [0] twice and then [1]–[9] as required.Example: To select “2”, press [0][0][2].10–12 Press [0] first and then the remaining 2 digits inorder from left to right.Example: Press [0][1][2] for “12”.13–99 Press 2 digits in order.Example: Press [2][2] for “22”.100–125 Press the 3 digits in order.Example: Press [1][1][0] for “110”.CH 110VHF/UHF/CATV CHANNELSTV CATVVHF VHF2–13 2–13UHF STD/HRC/IRC14-69 14–36 (A) (W)37–59 (AA) (WW)60–85 (AAA) (ZZZ)86–94 (86) (94)95–99 (A-5) (A-1)100–125 (100)(125)01 (5A)5. Press [REC/OTR].“m” will appear on the screen for about 4 seconds and “REC”will appear on the display.CH 110INDEXNotes:•If the erase prevention tab is removed, the tape will ejectwhen [REC/OTR] is pressed for recording.•If you wish to watch the DVD playback during the normalrecording on VCR, press [DVD] to change to DVD mode andperform the DVD playback (see page E39).•You can not record disc material in DVD, Video CD, AudioCD, etc. onto a video tape with this DVD/VCR.5VCR42DVD4](https://usermanual.wiki/ORION-ELECTRIC/M2B8A/User-Guide-267593-Page-32.png)
![-E32-To stop recordingPress [n] to stop recording.“n” will appear on screen for about 4 seconds.To stop recording temporarilyPress [k] to avoid recording unwanted material. Press again tocontinue the recording.“m k” will appear on screen for about 4 seconds.Notes:•The pause function will be released after 5 minutes to preventdamage to the tape or the VCR. The VCR will change to theSTOP mode.•You can select a recording channel in the recording pausemode.Recording one program while watching anotherWhile the VCR is recording, press [TV/VCR] to select the TVposition.The “VCR” will go off and recording will continue.Select the TV channel you want to watch by using the TVchannel selector.Note:Some CATV hookups do not permit viewing one channel whilerecording another. See pages E12, E13.To Display VCR operation StatusPress [DISPLAY]. The clock, day of the week and more informationwill be indicated.While watching TV:CH 1258 : 47AM MON00 : 00 : 00 SPSTEREO SAPREAL TIME COUNTERDAY OF THE WEEKCLOCKTAPE SPEEDCHANNELSTEREO ANDSEPARATE AUDIOPROGRAM (SAP)While operating a tape:CH 1258 : 30AM MON00 : 00 : 00 SPHI-FITAPE INOPERATINGMODEHI-FI STEREOAUTO REPEATTo cancel the display:Press [DISPLAY] until all indicators disappear.Auto Rewind featureThis VCR will automatically rewind the tape when the tape hasended (except during One-touch Timer Recording and TIMERREC). It will also eject the tape.Need help? Call1-800-813-3435kDISPLAYnTV/VCR](https://usermanual.wiki/ORION-ELECTRIC/M2B8A/User-Guide-267593-Page-33.png)
![-E33-One-touch Timer Recording (OTR)The One-touch Timer Recording feature provides a simple andconvenient way to make a timed recording.Preparation:• Turn ON the TV and set to the video input mode.•Press [VCR] to select the VCR mode. (The VCR indicator willlight.)Example: One-touch Timer Recording for 30 minutes.1. Load a cassette tape with the erase prevention tab intact.The VCR will automatically turn on.2. Press [TAPE SPEED] to select the desired tape speed SP orSLP.The tape counter and SP or SLP will appear on the screen forabout 4 seconds.00 : 00 : 00 SP3. Set the TV/CATV option to the appropriate position (Seepage E25).TV: VHF/UHF channelsCATV: CABLE TV channels4. Press [number buttons (0–9)] or [CH] +/– to select the channelto be recorded.CH 1105. Press [REC/OTR].6. Press [REC/OTR] again to stop recording after 30 minutes.Each additional press of [REC/OTR] will increase recordingtime as shown in the chart below, up to a maximum of 5hours. The OTR and recording time will appear on the screenfor about 4 seconds. And, REC will keep blinking in thedisplay.CH 125INDEXOTR 0 : 30Press Recording time Press Recording timeonce NORMAL REC 6 times 3:00twice 0:30 7 times 4:003 times 1:00 8 times 5:004 times 1:30 9 times NORMAL REC5 times 2:00To cancel OTRPress [n] or turn off the power.“n” will appear on screen for about 4 seconds.Note:If you wish to watch the DVD playback during the OTR, press[DVD] to change to DVD mode and perform the DVD playback(see page E39).Need help? Call1-800-813-34355, 6VCR42nDVD4](https://usermanual.wiki/ORION-ELECTRIC/M2B8A/User-Guide-267593-Page-34.png)
![-E34-Timer RecordingTimer recording can be programmed on-screen with the remotecontrol. The built-in timer allows automatic unattended recordingof up to 8 programs within 1 month.Preparation:•Press [VCR] to select the VCR mode.Load a cassette tape with the erase prevention tab intact.•Press the [DISPLAY] button to verify that the time and dateare correct (see page E32).Example: Program a timer recording for the 26th day, channel125 (CATV), 11:00–11:30 PM on timer program number 1 (Tapespeed: SLP).1. Press [SETUP/MENU].The VCR menu screen will appear.2. Select the “TIMER REC SET” option, then press [ENTER].⟨4/5/ENTER/MENU⟩MENUTIMER REC SETAUTO REPEAT ON OFFON OFFSAPCH SETUPSYSTEM SETUPSPEAKER SETUPTVGuardian SETUP3. Press [4] or [5] to select one of the program line, then press[ENTER].⟨4/5/ENTER/CANCEL/MENU⟩DATE START END CH–4. Press [4] or [5] to select the date, then press [ENTER].⟨4/5/ENTER/CANCEL/MENU⟩DATE START END CH 26 SU5. Set the start time, end time, channel and tape speed as instep 4.⟨4/5/ENTER/CANCEL/MENU⟩DATE START END CH26 SU11:00PM11:30PM125SLPNotes:•Press [CLEAR/CANCEL] to move cursor backward forcorrection.•To record from external source set the channel to “L”. “L”will appear next to CH 125 (or 69).6. To enter other programs, repeat step 3 through 5.•To return to the normal screen, press [SETUP/MENU]twice.⟨4/5/ENTER/CANCEL/MENU⟩DATE START END CH26 SU11:00PM11:30PM125SLP7. Press [TIMER REC].The clock symbol ( ) will appear on the display and the VCRstands by for recording. At the same time, VCR mode willchange to DVD mode automatically. You can use DVD evenif the VCR is in the Timer recording mode.If you do not use the DVD, turn the power off.The timer recording will start at 5 seconds before the time youpredetermined.Notes:•If the clock symbol ( ) does not appear on the display inspite of the pressing of [TIMER REC], the cassette may nothave been loaded yet. (see page E27)•If the cassette is ejected in spite of the pressing of [TIMERREC], the erase prevention tab of the cassette may havebeen removed. (see page E27)•If the clock symbol ( ) blinks when the timer recordingended, the TV program has not been completely recordedbecause of an insufficient tape supply. Press [TIMER REC]to cancel the timer program or press [q EJECT] to removethe cassette tape.•During timer recording standby mode, the VCR mode cannotbe selected. To use the VCR, press [TIMER REC] at first,then press [VCR] to change to VCR mode. After you use theVCR, press [TIMER REC] again to put the VCR into timerrecording standby mode.•If you press [TIMER REC] during timer recording, the recordingoperation will be interrupted. If you press [TIMER REC] againwithin the programmed time, the recording operation will startagain.•After a power failure or disconnection of the power plug, allprogrammed recording settings and time display will be lostupon resumption of power. In this case, reset the clock (seepage E24) and reprogram any timer recordings.TIMER RECENTERDISPLAYVCR4,5CLEAR/CANCELSETUP/MENU](https://usermanual.wiki/ORION-ELECTRIC/M2B8A/User-Guide-267593-Page-35.png)
![-E35-Timer recording special caseWeekly (e.g. WKL-TU: each Tuesday) or daily (e.g. MO-SA:Monday to Saturday) Timer recordingFollow the procedure of timer recording on the previous page. Atpicture 4 press [4] or [5] repeatedly until the desired settingappears. Then press [ENTER].When you press [5] repeatedly, the indicator at DATE will changeas follows, in this case the day is Friday.The current day (Friday) SU-SA (Sunday to Saturday)MO-SA (Monday to Saturday)One month later minus one dayMO-FR (Monday to Friday)WKL-WE (Weekly Wednesday) WKL-TH (Weekly Thursday)⟨4/5/ENTER/CANCEL/MENU⟩DATE START END CH WKL-WEIn case Timer programs-overlap•Do not overlap timer programs as portions of the conflictingprograms will be lost. The first recording time has priority overthe next recording time as shown in the diagram below.8 : 00 11 : 009 : 00 10 : 00Program 1Prog.1Deleted PartsNon Recorded Portion PartsProg.2 Prog.3Program 2Program 3Recording Control SettingsNotes:•The daily/weekly recording can be made continuously untilthe recording is canceled or the tape reaches the end.•During timer recording the automatic rewinding mechanismdoes not function.Confirmation/Cancellation of the Timer recording1. If the Timer has been activated, press [TIMER REC] todeactivate the Timer.The clock symbol ( ) will disappear.2. Then press [VCR] to change to VCR mode.3. To confirm Timer program:At picture 2 on the previous page select the “TIMER RECSET” option and press [ENTER].Then the timer program list below will appear on the screen.⟨4/5/ENTER/CANCEL/MENU⟩DATE START END CH26 SU11:00PM11:30PM125SLP4. To cancel Timer program:Press [4] or [5] to select the unnecessary program, thenpress [CLEAR/CANCEL] to cancel the program.⟨4/5/ENTER/CANCEL/MENU⟩DATE START END CH26 SU11:00PM11:30PM125SLP5. Press [SETUP/MENU] repeatedly until the TV-picture appears.1ENTERCLEAR/CANCEL24,55Notes:•If there are other timer record programs remaining, [TIMERREC] must be pressed to reactivate the timer, otherwise theremaining timer record programs will be ignored.•You cannot confirm the Timer program during timer recordingoperation.•You can correct or cancel a programmed setting in programconfirm mode.Need help? Call1-800-813-3435](https://usermanual.wiki/ORION-ELECTRIC/M2B8A/User-Guide-267593-Page-36.png)
![-E36-Stereo Recording and PlaybackThe VHS Hi-Fi audio system permits high fidelity recording ofMTS STEREO TV broadcasts.When a MTS STEREO broadcast is received, the word STEREOwill appear on the screen and the program can be viewed orrecorded in stereo.The Hi-Fi STEREO recording procedure is the same as fornormal recordings.STEREONote:When using a CATV system, stereo TV programs may betransmitted over a mono cable channel. In this case the word“STEREO” will not appear and the sound will be in mono.Output selectionWhen viewing an MTS STEREO TV program, or playing aprerecorded VHS Hi-Fi STEREO videotape, press [AUDIO OUT]to select how the audio will be heard through the speakers.Normally set to the Hi-Fi STEREO position, this button can be setto the MONO position if the stereo broadcast or videotape audiois of poor quality. The “R” and “L” positions allow the audio fromthe Right or Left Hi-Fi channel to be heard over both TV speakers.This button has no effect when viewing a MONO videotape or TVprogram. Each time when you press the button, OUTPUTSELECTION display appears on the screen for several seconds.Refer to the chart below.OUTPUT SOUND HEARD ON BOTHSELECTION SPEAKERSSTEREO STEREOL ch LEFT CHANNEL AUDIOR ch RIGHT CHANNEL AUDIOMONO MONONotes:•When playing back a tape that is not recorded in Hi-Fi stereomode, the audio will automatically be monaural.•When listening to a VHS Hi-Fi video tape or MTS broadcastthrough the VHF/UHF jack (Audio/Video cord not connected),the sound will be monaural.AUDIO OUTSeparate Audio Program (SAP)Your VCR is fitted with a SAP broadcast system which enablesyou to switch to a separate audio program when viewing aselected channel.This function applies only when the program is broadcast inmulti-languages through the SAP broadcast system.1. Press [SETUP/MENU].2. Press [4] or [5] to select “SAP”.3. Press [ENTER] to select “ON”.⟨4/5/ENTER/MENU⟩MENUTIMER REC SETAUTO REPEAT ON OFFON OFFSAPCH SETUPSYSTEM SETUPSPEAKER SETUPTVGuardian SETUP4. Press [SETUP/MENU] until the menu screen is cleared.321, 4Listening to SAPWhen the VCR is turned on or a channel selection is made, makecertain the letters “SAP” appears on the screen. This means thatthe “Separate Audio Program” broadcasting is available.SAPSTEREO SAPOR](https://usermanual.wiki/ORION-ELECTRIC/M2B8A/User-Guide-267593-Page-37.png)
![-E37-Duplicating a Video TapeIf you connect the VCR to another VCR or camcorder, you canduplicate a previously recorded tape.Make all connections before turning on the power.1. Load a blank cassette tape with the erase prevention tabintact into the recording VCR.Load a previously recorded tape into the playback VCR orCAMCORDER.2. Press [TAPE SPEED] to select the desired tape speed SP orSLP.•It is recommended that you set the Speed to the SP modeon the recording VCR for best results.3. Press [INPUT] to select AUDIO/VIDEO input position.“L” will appear in the display.4. Press [REC/OTR] on the recording VCR, then press [k].5. Press the [a] button on the playback VCR or CAMCORDER,then press the [k] button.6. Release the recording pause and the playback stillsimultaneously to begin the duplicating process.Connection with second Video recorderTo AUDIO (R) INTo VIDEO INTo AUDIO (L) INTo AUDIO (R) OUTTo VIDEO OUTPlayback VCRRecording VCRTo AUDIO (L) OUTAUDIO/VIDEO Cord (not supplied)Connection with Video cameraTo AUDIO (R) INTo AV JackTo VIDEO INTo AUDIO (L) INAUDIO/VIDEO Cord (not supplied)Recording VCRPlayback CamcorderFor duplicating a previously recorded tape from a camcorder,follow the camcorder manufacturer’s instructions. A typicalcamcorder dubbing hookup is shown above.Need help? Call1-800-813-3435](https://usermanual.wiki/ORION-ELECTRIC/M2B8A/User-Guide-267593-Page-38.png)

![-E39-13, 526DISC PLAYBACKImportant Note:•This instruction manual explains the basic instruction of thisDVD video player using the remote control unit.•Some DVD video discs have different functions that maynot be explained in this instruction manual. You may needextra instructions. In this case, please follow the instructionsdisplayed on the TV screen or jacket or case of the disc.•“ ” may appear on the TV screen during operation. Thisicon means that the function is not available on the discnow.•For improvement, on-screen displays subject to changewithout notice.Preparations•Turn on the TV and select the video input source.To use the remote control for TVNote:You must set the remote control code for TV first. (SeePage E8.)1. Press [(TV CONTROL) POWER] to turn on the power.•When using the remote control, the TransmitterWindow on the remote control must be pointed towardyour TV.2. Press [(TV CONTROL) INPUT] to select the video inputsource.3. Set the TV volume minimum.Notes:•Only remote-controlled TVs can be operated using thisremote control. (Refer to your TV instruction manual formore details.)•There may be some older TV models that cannot beoperated with this remote control. If this is the case, usethe original remote control supplied with the TV.•Select the playback picture size according to the aspect ratioof the TV. (See “Setting Picture” in “INITIAL SETTINGS” onPage E55.)Basic PlaybackNotes:•Do not touch the disc tray while it is moving.•Never place anything except a disc on the disc tray. Foreignobjects can damage the unit.•Do not apply excessive force to the disc tray.•Discs must be placed on the disc tray one at a time.When operation buttons are pressed, that operation is displayedon the TV screen. The display turns off after several seconds.1. Press [POWER].2. Press [DVD] to select DVD function.•“SANYO” logo appears on the TV screen.•The DVD indicator on the front panel will light.•“No Disc” appears on the TV screen.3. Press [q OPEN/CLOSE] (or OPEN/CLOSE on the remotecontrol).•“q” appears on the TV screen and the disc tray opens.Note:To open or close the disc tray, be sure to press [OPEN/CLOSE]. Do not press the disc tray with your hand.Note:If the disc is loaded with the label side downward (and it is asingle sided disc), or if a badly scratched disc is loaded, “Err(Error)” appears on the FL display and “Incorrect Disc” appearson the TV screen. If this occurs, load the disc correctly orreplace the disc.If a menu screen appears on the TV screen...Select the desired menu by pressing [4],[a], [5] or [b] (or the number buttons),then press [ENTER]. Playback of theselected menu starts.Note:For more details, please refer to the jacket or case of the disc.For 5-inch (12cm) disc For 3-inch (8cm) discVIDEO IN L-AUDIO IN-R/ONVOLUMEMINIMAXEJECTRECCHANNELAM/FMVCR/DVDPRESET+-OPEN/CLOSESTOP PLAY1 6 4 3, 54. Place the disc with the label facing up on the disc tray.5. Press [OPEN/CLOSE] again.The disc tray closes. “Reading” appears on the TV screen.Note:Some discs may start playback automatically.6. Press [a] (or [PLAY a]) to start playback.•“a” appears.Example:Elapsed playing time](https://usermanual.wiki/ORION-ELECTRIC/M2B8A/User-Guide-267593-Page-40.png)
![-E40-VIDEO IN L-AUDIO IN-R/ONVOLUMEMINIMAXEJECTRECCHANNELAM/FMVCR/DVDPRESET+-OPEN/CLOSESTOP PLAYPLAY an STOPafenNeed help? Call1-800-813-3435This product incorporates copyright protection technology thatis protected by method claims of certain U.S. patents and otherintellectual property rights owned by Macrovision Corporationand other rights owners. Use of this copyright protectiontechnology must be authorized by Macrovision Corporation,and is intended for home and other limited viewing uses onlyunless otherwise authorized by Macrovision Corporation.Reverse engineering or disassembly is prohibited.Skipping forwardPress [e] during playback to skip to the next chapter (or track).“e” appears on the TV screen.A chapter (or track) is skipped each time the button is pressed.Skipping backwardPress [f] during playback to skip back to the beginning of thechapter (or track) currently play.“f” appears on the TV screen.Press the button again immediately to skip back to the beginningof the previous chapter (or track).Note:You can skip only through the chapters, not over the title on theDVD disc.Chapter (Track) SkipStopping Playback•Press [n] (or [n STOP]) once during playback. “ ” brieflyappears on the TV screen.When you press [a] (or [PLAY a]), playback startsautomatically from the point where you stopped. “a” appearson the TV screen.Note:Some discs may not resume playback.•Press [n] (or [n STOP]) twice during playback. “n” appears onthe TV screen and playback stops completely.When you press [a] (or [PLAY a]), playback starts from thebeginning of the disc.](https://usermanual.wiki/ORION-ELECTRIC/M2B8A/User-Guide-267593-Page-41.png)
![-E41-Selecting a DVD MenuNotes:•The operation may differ depending on the disc used.• Selecting a menu may not be possible on some discs.1. Press [DVD MENU] while holding [SHIFT] down.The main menu screen will appear.2. Press [4], [5], [b] or [a] (or the number buttons) to select thedesired menu.3. Press [ENTER].The selected menu playback starts.Selecting a Title Menu [DVD]Notes:•The operation may differ depending on the disc used.•Selecting a title may not be possible on some discs.1. Press [TOP MENU] while holding [SHIFT] down.The title menu will appear (if the disc contains a title menu).2. Press [4], [5], [b] or [a] (or the number buttons) to select thedesired title.3. Press [ENTER].The selected title playback starts.Important Note:“ ” may appear on the TV screen during operation. This iconmeans that the function is not available on the disc now.Need help? Call1-800-813-3435123213](https://usermanual.wiki/ORION-ELECTRIC/M2B8A/User-Guide-267593-Page-42.png)
![-E42-Important Note:“ ” may appear on the TV screen during operation. This iconmeans that the function is not available on the disc now.Title Search [DVD]1. Press [JUMP] while holding [SHIFT] down during playback orin the stop mode.The Jump screen appears on the TV screen.Example:Jump Time : --:--:--Title : ---Chapter : ---2. Press [4] or [5] to select the Title.3. Press the number button(s) to enter the title number.Example:To select Title No.3, press [3].To select Title No.10, press [1], then [0].To select Title No.24, press [2], then [4].Note:If you make a mistake, press [CLEAR/CANCEL].4. Press [ENTER].Playback starts from the selected title.Chapter Search [DVD]1. Press [JUMP] while holding [SHIFT] down during playback orin the stop mode.The Jump screen appears on the TV screen.Example:Jump Time : --:--:--Title : ---Chapter : ---2. Press [4] or [5] to select the Chapter.3. Press the number button(s) to enter the chapter number.Example:To select Chapter No.3, press [3].To select Chapter No.10, press [1], then [0].To select Chapter No.24, press [2], then [4].Note:If you make a mistake, press [CLEAR/CANCEL].4. Press [ENTER].Playback starts from the selected chapter .Time Search [DVD]1. Press [JUMP] while holding [SHIFT] down during playback.The Jump screen appears on the TV screen.Example:Jump Time : --:--:--Title : ---Chapter : ---2. Press [4] or [5] to select the Time.3. Press the number button(s) to enter the time.Example:20 minutes 5 seconds Press [2], [0], [0] and [5].42 minutes 39 seconds Press [4], [2], [3] and [9].1 hour 4 minutes 35 seconds Press [1], [0], [4], [3] and [5].Note:If you make a mistake, press [CLEAR/CANCEL].4. Press [ENTER].Playback starts from the searched time.Need help? Call1-800-813-343542CLEAR/CANCEL3142CLEAR/CANCEL3142CLEAR/CANCEL31](https://usermanual.wiki/ORION-ELECTRIC/M2B8A/User-Guide-267593-Page-43.png)
![-E43-42CLEAR/CANCEL3142CLEAR/CANCEL31Time Search [CD]1. Press [JUMP] while holding [SHIFT] down during playback orin the stop mode.The Jump screen appears on the TV screen.Example:Jump Time : --:--:--Track : ---2. Press [4] or [5] to select the Time.3. Press the number button(s) to enter the time.Example:2 minutes 5 seconds Press [2], [0] and [5].42 minutes 39 seconds Press [4], [2], [3] and [9].Note:If you make a mistake, press [CLEAR/CANCEL].4. Press [ENTER].Playback starts from the searched time in the track (or fromthe beginning of the disc).Track Search [CD]1. Press [JUMP] while holding [SHIFT] down during playback orin the stop mode.The Jump screen appears on the TV screen.Example:Jump Time : --:--:--Track : ---2. Press [4] or [5] to select the Track.3. Press the number button(s) to enter the track.Example:To select Track No. 3, press [3].To select Track No. 10, press [1], then [0].To select Track No. 24, press [2], then [4].Note:if you make amistake, press [CLEAR/CANCEL].4. Press [ENTER].Playback starts from the selected track.Note: Please refer to “Example for Music CD” in “Selecting On-Screen information” on page E49.Important Note:“ ” may appear on the TV screen during operation. This iconmeans that the function is not available on the disc now. Need help? Call1-800-813-3435](https://usermanual.wiki/ORION-ELECTRIC/M2B8A/User-Guide-267593-Page-44.png)
![-E44-adcaSLOWakFast PlaybackFast forward playbackPress [c] repeatedly to select the fast speed forward playback.Each time the button is pressed, the speed is changed.c v ca v caa v caaa (4 steps)Press [a] to return to normal playback.Fast reverse playbackPress [d] repeatedly to select the fast speed reverse playback.Each time the button is pressed, the speed is changed.d v db v dbb v dbbb (4 steps)Press [a] to return to normal playback.Note:The sound is muted during fast playback in DVD.Slow Motion Playback [DVD]Forward slow playbackPress [SLOW] repeatedly to select the forward slow speedplayback. Each time the button is pressed, the speed is changed.1/2 v 1/4 v1/6 v 1/7 (4 steps)Press [a] to return to normal playback.Note:•The sound is muted during slow motion playback.•Slow motion playback is operated forward only.Important Note:“ ” may appear on the TV screen during operation. This iconmeans that the function is not available on the disc now.Still Picture (Pause)Press [k] during playback.•“k” appears on the FL display.•“k” appears on the TV screen.Press [a] to return to normal playback.[DVD]Still picture mode[CD]Pause modeNote: The sound is muted.Need help? Call1-800-813-3435](https://usermanual.wiki/ORION-ELECTRIC/M2B8A/User-Guide-267593-Page-45.png)
![-E45-3ANGLESHIFTFrame by Frame Advance Playback[DVD]Press [k] during still picture.•“” appears on the TV screen.Each time the button is pressed, the picture advances one frame.Press [a] to return to normal playback.Notes:•The sound is muted.•Frame playback is operated forward only.Picture Zoom [DVD]1. Press [ZOOM] while holding [SHIFT] down during normal/slow/fast playback or still picture.The central part of the picture is magnified, and “ 1”appears on the TV screen.•Each time the button is pressed, the zoom mode will bechanged as follows: 1 v 2 v 3v Off•Press [4], [a], [5] or [b] to change the zoom point.2. Press [ZOOM] while holding [SHIFT] down to select “ Off”to returm to the original screen.Note:Picture Zoom may not work on some discs.Viewing from a Desired Camera Angle(Multi-Angle) [DVD]Some DVD video discs may contain scenes which have beenshot simultaneously from a number of different camera angles.The jacket or case of discs that are recorded with angles will bemarked.Example:Note:The recorded angles differ depending on the disc used.1. Play the disc that is recorded with angles.2. Press [ANGLE] while holding [SHIFT] down repeatedly untilthe desired angle appears.Example:Important Note:“ ” may appear on the TV screen during operation. This iconmeans that the function is not available on the disc now.Need help? Call1-800-813-34353/5ZOOMSHIFT4, a, 5, bak](https://usermanual.wiki/ORION-ELECTRIC/M2B8A/User-Guide-267593-Page-46.png)
![-E46-PLAY MODESHIFTENTER5, b, aA-B REPEATSHIFT132Point A Point BNormal Repeat Playback[DVD]1. Press [PLAY MODE] while holding [SHIFT] down duringplayback or stop mode.The Play mode screen (“Repeat”) appears.2. Press [b], [a] or [ENTER] once or twice to selectChapter or Title.Repeat: Chapter Repeat of chapter being playedRepeat: Title Repeat of title being playedRepeat: Off Normal playback modeThe selected repeat mode may work.3. Press [PLAY MODE] while holding [SHIFT] down again toclose the screen.[CD]1. Press [PLAY MODE] while holding [SHIFT] down duringplayback or stop mode.The Play mode screen (“Play Mode” and “Repeat”) appears.2. Press [5] to skip Play Mode and select Repeat.3. Press [b], [a] or [ENTER] once or twice to select Track or All.Repeat: Track Repeat of track being playedRepeat: All Repeat all tracksRepeat: Off Normal playback modeThe selected repeat mode may work.4. Press [PLAY MODE] while holding [SHIFT] down again toclose the screen.Note:In case of stop mode, press [a] to start Repeat playback.Designated Range Repeat Playback(A-B Repeat)1. Press [A-B REPEAT] while holding [SHIFT] down duringplayback at the beginning of the section you want to repeat(Point A).•“ A-” appears on the TV screen.2. Press [A-B REPEAT] while holding [SHIFT] down again atthe end of the section you want to repeat (Point B).•“ A-B” appears on the TV screen.The section between points A and B is played repeatedly.3. To return to normal playback, press [A-B REPEAT] whileholding [SHIFT] down again.•“ Off” appears on the TV screen.Notes:•Normal repeat playback or A-B repeat playback mode maynot work correctly with some discs.•During the Random/Programmed playback the A-B repeatfeature will not operate.Random Playback [CD] [MP3]1. Press [PLAY MODE] while holding [SHIFT] down duringplayback or stop mode.The Play mode screen (“Play Mode” and “Repeat”) appears.RepeatPlay Mode:Off:Off2. Press [b] or [a] to select Random.RepeatPlay Mode:Random:Off3. Press [a] to start Random Playback.Note:To stop Random Playback completely, press [n] twice.Important Note:“ ” may appear on the TV screen during operation. This iconmeans that the function is not available on the disc now.](https://usermanual.wiki/ORION-ELECTRIC/M2B8A/User-Guide-267593-Page-47.png)
![-E47-Repeat123456789101112Clear Program PlaybackPlay Mode:Program:OffClear Program Playback25811369121 94 7 10Repeat:OffPlay Mode:ProgramRepeatPlay Mode:Off:Off162CLEAR/CANCEL4371Programmed Playback [CD] [MP3]Up to 12 selections can be programmed.Programming procedure1. Press [PLAY MODE] while holding [SHIFT] down in the stopmode.The Play mode screen (“Play Mode” and “Repeat”) appears.Need help? Call1-800-813-34355. Repeat steps 3 and 4 above to select another track.6. Press [4], [5], [b] or [a] to select “Program Playback” on theTV screen.7. Press [ENTER].Program playback starts in the programmed order.To return to normal playback, press [PLAY MODE] whileholding [SHIFT] down and select Play Mode “Off”.•The program is canceled when you open the disc tray orturn the power off.3. Press the number buttons to select the track number.Example:To select Track No.3, press [3].To select Track No.10, press [1], then [0].To select Track No.24, press [2], then [4].Notes:•If you make a mistake, press [CLEAR/CANCEL].•To quit the “Play Mode” screen, press [PLAY MODE]while holding [SHIFT] down.4. Press [5] to move the highlighted box down.Example:2. Press [b] or [a] to select Program.The Program screen appears.To clear the program one by one1. Repeat the steps 1 to 2 as described in “Programmingprocedure” to open the Program screen.2. Press [4], [5], [b] or [a] to select the track number.3. Press [CLEAR/CANCEL].To clear all the programs1. Repeat the steps 1 to 2 as described in “Programmingprocedure” to open the Program screen.2. Press [4], [5], [b] or [a] to select “Clear”.3. Press [ENTER].To change the program1. Repeat the steps 1 to 2 as described in “Programmingprocedure” to open the Program screen.2. Press [4], [5], [b] or [a] to select the track number.3. Press the number buttons to select the track number to bereplaced.Note:To quit the “Play Mode” screen, press [PLAY MODE] whileholding [SHIFT] down.](https://usermanual.wiki/ORION-ELECTRIC/M2B8A/User-Guide-267593-Page-48.png)
![-E48-1, 21, 2123Selecting Subtitle Language [DVD]This operation works only with discs on which multiple subtitlelanguages are recorded.1. Press [SUBTITLE] while holding [SHIFT] down during playback.“ Off ” appears.2. Press [SUBTITLE] while holding [SHIFT] down repeatedlyuntil the desired subtitle language appears on the TV screen.After few seconds, “ ” disappears.Example: 1/3 EngEnglishSelecting Audio Soundtrack Language(Multi-Language) [DVD]This operation works only with discs on which multiple audiosoundtrack languages are recorded.1. Press [AUDIO] while holding [SHIFT] down during playback.2. Press [AUDIO] while holding [SHIFT] down repeatedly untilthe desired language appears on the TV screen.Examples: 1/3 Eng Dolby DigitalEnglish Dolby Digital soundNotes:•When the desired language is not selected even if the buttonis pressed, the language is not available on the disc.•When the power is turned on or the disc is replaced, selectthe language again.•If the language is not recorded on the disc, only the availablelanguage on the disc will be heard.Karaoke Playback [DVD]You can turn the vocal on or off recorded on the DVD KARAOKE.1. During DVD KARAOKE disc playback, press [AUDIO] whileholding [SHIFT] down.2. Press [4] or [5] until the KARAOKE symbol ( ) appears.Examples: 1/8 Eng Dolby Digital On3. Press [b] or [a] to select “On” or “Off”.On: The primary vocal is output when it is recorded on thedisc.Off: The primary vocal is not output.Hello! Holà! ¡Hola!Need help? Call1-800-813-3435Notes:•In some cases, the subtitle language is not changed to theselected one.•When a disc supporting closed caption is played, the subtitleand the closed caption may overlap each other on the TVscreen. In this case, turn the subtitle off.•When the desired language is not selected even if the buttonis pressed, the language is not available on the disc.•When the power is turned on or the disc is replaced, selectthe subtitle language again.•If the subtitle language is not necessary, press [SUBTITLE]while holding [SHIFT] down to select “ Off”.Notes:•The vocal output feature is used during playback of DolbyDigital (multi-channel) recorded DVD KARAOKE discs. Thisfeature allows you to turn off vocal audio tracks, or restorethem for back-ground accompaniment.•When playing KARAOKE, connect appropriate audioequipment such as an amplifier to the DVD.](https://usermanual.wiki/ORION-ELECTRIC/M2B8A/User-Guide-267593-Page-49.png)
![-E49-00:08:40 01:12:331/9Title 1/991/81/32Chapter 1/999Eng DolbyDigitalEng02:25 05:04Track 11/99ENTERMARKERSHIFT DISPLAY4,5Example for Music CD:Selecting On-Screen InformationExample for DVD:Press [DISPLAY] repeatedly to show the disc information (Title,Chapter, Title elapsed playing time, Language, etc.).Title total timeTitle elapsed playing time00:08:20 01:12:33Title elapsed playing timeSubtitle languageCamera angleTitle total timeA kind of audioAudio languageTitle number Chapter numberTrack elapsed playing timeTrack numberImportant Note:“ ” may appear on the TV screen during operation. This iconmeans that the function is not available on the disc now.Need help? Call1-800-813-3435Marking Desired Scenes [DVD] [CD]The unit stores the points that you want to watch (or listen it)again. You can resume playback from that scene.Marking the Scenes1. Press [MARKER] while holding [SHIFT] down during playback.Marker screen appears.Marker 1 : **:**:**Marker 2 : **:**:**Marker 3 : **:**:**2. Select the blank Marker using [4] or [5], then press [ENTER]at the desired scene.Example:Marker 1 : 00:27:54Marker 2 : **:**:**Marker 3 : **:**:**•Up to 3 scenes can be selected.•Repeat this procedure to set the other 2 scenes.3. To quit the Marker screen, press [MARKER] while holding[SHIFT] down.Returning to the Scenes1. Press [MARKER] while holding [SHIFT] down during playbackor stop mode.Example:Marker 1 : 00:27:54Marker 2 : 01:16:25Marker 3 : 02:08:312. Press [4] or [5] to select the Marker 1-3.Example:Marker 1 : 00:27:54Marker 2 : 01:16:25Marker 3 : 02:08:313. Press [ENTER].Playback starts from the marked scene.•To quit the Marker screen, press [MARKER] while holding[SHIFT] down.To Cancel the Mark1. Press [MARKER] while holding [SHIFT] down.2. Press [4] or [5] to select the Marker 1-3.3. Press [CLEAR/CANCEL].Notes:•You may not mark it on some discs.• The marking is canceled when you open the disc trayor turn the power off.Track total time2. Press [DISPLAY].1. Press [DISPLAY] during playback.3. Press [DISPLAY] to close the disc information.When a CD is loaded or playback is started, the disc informationmay appear on the TV screen.](https://usermanual.wiki/ORION-ELECTRIC/M2B8A/User-Guide-267593-Page-50.png)
![-E50-1, 3MP3 CD OPERATIONThis player can play back the CD-R/RW that have recordedmusic data or MP3 files. However, some CD-R/RWs can not beplayed back depending on the recording conditions.Before playing back MP3 CD, please read the following.MP3 CD InformationLimitations on MP3 CD playback•This unit can read 200 files per one directory. If one directoryhas more than 200 files, it reads up to 200 files, the more fileswill be omitted.•This unit can recognize up to 50 directory trees per disc.•MP3 CD may not be played in the recorded order.•As for multi-session disc, only the first session can be played.•If the CD has both audio tracks and MP3 files, only audiotracks are played.•It would take 30 seconds or more for this player to read MP3files depending on its structure.Limitations on display•The maximum number for display is 17 letters.•Available letters for display are the following: capital or smallalphabets of A through Z, numbers of 0 through 9 and _(underline).•Other letters than those above are replaced in “-” (hyphen).MP3 CD Playback1. Press [OPEN/CLOSE].•“q” appears on the TV screen and the disc tray opens.Note:To open or close the disc tray, be sure to press [OPEN/CLOSE]. Do not press the disc tray with your hand.2. Place the disc with the label facing up on the disc tray.Notes on MP3 files•The recommend recording setting for a high-quality sound is38 kHz, 44.1 kHz and 48 kHz of sampling frequency, and32kbps ~ 320kbps of fixing bit rate (or variable bit rate).•To play back MP3 CD in the recorded order,1. Please use the MP3 software with the function that canrecord data alphabetically or numerically.2. Put the name including two-digit or three-digit number like“01” “02” or “001” “002” on each file.3. Please refrain from making many sub-folders by preference.CAUTION:•Some MP3 CDs can not be played back depending on therecording conditions.•The CD-R/RW that has no music data or non-MP3 files cannot be played back.1MP3Track -/12 00:0012345JapanBay BridgeCLOSE MY EYESDIVE TO BLUEHoney678910BLUE EYESBlurry EyesflowerLies and Truth-winter fallPopsNotes:•If the disc is loaded with the label side downward, or if a badlyscratched disc is loaded, “Err (Error)” appears. If this occurs,load the disc correctly or replace the disc.•During MP3 CD Playback, you can not use SEARCH and A-B REPEAT functions.3. Press [OPEN/CLOSE].The disc tray closes.•“Reading” appears on the TV screen.•A table of contents in the root directory appears on the TVscreen.Example:VIDEO IN L-AUDIO IN-R/ONVOLUMEMINIMAXEJECTRECCHANNELAM/FMVCR/DVDPRESET+-OPEN/CLOSESTOP PLAY1, 32](https://usermanual.wiki/ORION-ELECTRIC/M2B8A/User-Guide-267593-Page-51.png)
![-E51-1Jazz1112 MotherHold Your LastPopsTrack 1/12 01:28 Japan5454,6kfean1, 42a3Stopping PlaybackPress [n] during playback. “ ” appears on the TV screen. Press[a] to resume playback (from the stopped point). To stop theplayback completely, press [n] twice.PausePress [k] during playback.•“k” appears on the TV screen.•“k” appears on the FL display.Note:The sound is muted.Press [a] to return to normal playback.File SkipSkipping forwardPress [e] during playback to skip to the next file.“e” appears on the TV screen.Each time the button is pressed, a file is skipped within the samedirectory.Skipping backwardPress [ f] during playback to skip back to the beginning of thefile currently play.“f” appears on the TV screen.Press the button again immediately to skip back to the beginningof the previous file.Programmed PlaybackPlease see page E47.Random PlaybackPlease see page E46.Important Note:“ ” may appear on the TV screen during operation. This iconmeans that the function is not available on the disc now.Need help? Call1-800-813-34354. Press [b] or [a] or [ENTER] to select folder.5. Press [4], [5], [b], [a] or [number buttons (0–9)] to selectyour desired track.6. Press [ENTER] to start playback.•In case the folder include more than 11 tracks, press [b] or[a] to display next track list.Example:Repeat Playback1. Press [PLAY MODE] while holding [SHIFT] down duringplayback or stop mode.The Play mode screen (“Play Mode” and “Repeat”) appears.2. Press [5] to select Repeat.Play Mode: OffRepeat: Off3. Press [b], [a] or [ENTER] repeatedly to select Track or All.Repeat: Track Repeat of track being playedRepeat: All Repeat all tracksRepeat: Off Normal playback mode4. Press [PLAY MODE] while holding [SHIFT] down again toclose the screen.In case of stop mode, press [a] to start Repeat playback.To resume normal playback, select Repeat Off.Note:Repeat playback may not work correctly with some discs.](https://usermanual.wiki/ORION-ELECTRIC/M2B8A/User-Guide-267593-Page-52.png)
![-E52-Need help? Call1-800-813-3435ENTER3, 5, 7 4, 52, 4, 61, 10TVGuardian® OPERATIONIn this instruction manual, the language in on-screen display isEnglish. If you change the language (see page E21), pleasefollow the selected language in on-screen display.Before Setting•Set the subtitle language to “Off” (See page E54.)•Press [VCR] to select the “VCR” mode.Set the TVG MODE to On Mode (TOLERANT,MODERATE, STRICT)1. Press [SETUP/MENU].The setup screen appears.2. Press [4] or [5] to select “TVGuadian SETUP” option.⟨4/5/ENTER/MENU⟩MENUTIMER REC SETAUTO REPEAT ON OFFON OFFSAPCH SETUPSYSTEM SETUPSPEAKER SETUPTVGuardian SETUP3. Press [ENTER].The TVGuardian setup screen appears.4. Press [5] or [4] to select “TVG MODE” option.⟨4/5/ENTER/MENU⟩TVGuardian SETUPDVD SPEAKER MUTE:CENTERCC DISPLAY :ONTVG MODE :OFF5. Press [ENTER].6. Press [5] or [4] to select the setting option.If “TOLERANT”, “MODERATE” or “STRICT” is selected, wordsetting option menu appears.⟨4/5/ENTER/MENU⟩TVGuardian SETUPDVD SPEAKER MUTE:CENTERCC DISPLAY :ONTVG MODE :OFFOFF: In the OFF mode, TVG will not operate. Your player willoperate as normal.TOLERANT: In the Tolerant mode, only the most offensivefoul language will be filtered.MODERATE: In the Moderate mode, more offensive wordswill be filtered.STRICT: In the Strict mode, all the foul language wordsknown to the TVG process will be filtered.7. Press [ENTER].Note:•If TVG MODE is not necessary, select “OFF”.•When shipped from factory, the TVG MODE option is set to“OFF” position.8. TVG WORD SettingsIn addition to the main TVG modes, three additional sets ofwords are available to the user to selectively turn on or off. Onmeans that the words belonging to the set will be filtered. Offmeans that they will not be affected by the TVG processing.Press [5] or [4] to select the setting option, then press[ENTER].⟨4/5/ENTER/MENU⟩TVGuardian SETUPDVD SPEAKER MUTE:CENTERCC DISPLAY :ON MUTETVG MODE :TORELANTDAMN AND HELL :ONRELIGIOUS :ONSEXUAL REFERENCE :ONDAMN AND HELL: This set includes variations of “Damn”and “Hell”.RELIGIOUS: This set includes numerous Religious words,such as God and Jesus. One might want to turn this WordSet to Off if watching religious programming material.SEXUAL REFERENCE: This set includes various sexuallyrelated words.9. Press [5] or [4] to select “ON” or “OFF”, then press [ENTER].⟨4/5/ENTER/MENU⟩TVGuardian SETUPDVD SPEAKER MUTE:CENTERCC DISPLAY :ON MUTETVG MODE :TORELANTDAMN AND HELL :ONRELIGIOUS :ONSEXUAL REFERENCE :ON10. Press [SETUP/MENU] until the MENU screen is cleared.Notes:•When the user changes from any TVG On mode (Tolerant,Moderate or Strict) to the Off mode, all the word sets areturned Off. Whenever you change from the TVG Off mode toany three On modes, all three of these word sets are changedto On setting.•When shipped from factory, the TVG WORD option is set to“ON” position.](https://usermanual.wiki/ORION-ELECTRIC/M2B8A/User-Guide-267593-Page-53.png)
![-E53-Need help? Call1-800-813-3435DVD SPEAKER MUTE Setting1. Press [SETUP/MENU].2. Press [5] or [4] to select “TVGuadian SETUP” option, thenpress [ENTER].3. Press [4] or [5] to select “DVD SPEAKER MUTE” option,then press [ENTER].⟨4/5/ENTER/MENU⟩TVGuardian SETUPDVD SPEAKER MUTE:ALLCC DISPLAY :ONTVG MODE :OFF4. Press [5] or [4] to select the setting option, then press[ENTER].CENTER: If the TVG MODE is On mode, mute the sound ofcenter speaker while DVD is playing.ALL: If the TVG MODE is On mode, mute the sound of allspeakers while DVD is playing.5. Press [SETUP/MENU] until the MENU screen is cleared.Note:•When shipped from factory, the DVD SPEAKER MUTE optionis set to “CENTER” position.CC (Closed Caption) DISPLAY Setting withTVG MODE is On Mode1. Press [SETUP/MENU].2. Press [4] or [5] to select “TVGuadian SETUP” option, thenpress [ENTER].3. Press [4] or [5] to select “CC DISPLAY” option, then press[ENTER].4. Press [5] or [4] to select the setting option, then press[ENTER].⟨4/5/ENTER/MENU⟩TVGuardian SETUPDVD SPEAKER MUTE:CENTERCC DISPLAY :ON MUTETVG MODE :TORELANTDAMN AND HELL :ONRELIGIOUS :ONSEXUAL REFERENCE :ONON MUTE: Whenever Foul Language is detected, captionsare displayed with a suitable replacement word substitutedfor the foul language, and audio is muted for the foullanguage.CONTINUOUS: You can see all captions, whether or not anyfoul language was detected. But like the ON MUTE mode,captions are displayed with a suitable replacement wordsubstituted for the foul language, and audio is muted forthe foul language.OFF: You cannot see captions.5. Press [SETUP/MENU] until the MENU screen is cleared.CC (Closed Caption) DISPLAY Setting withTVG MODE is OFF Mode1. Press [SETUP/MENU].2. Press [4] or [5] to select “TVGuadian SETUP” option, thenpress [ENTER].3. Press [4] or [5] to select “CC DISPLAY” option, then press[ENTER].4. Press [5] or [4] to select the setting option, then press[ENTER].⟨4/5/ENTER/MENU⟩TVGuardian SETUPDVD SPEAKER MUTE:CENTERCC DISPLAY :ONTVG MODE :OFFON: You can see all captions.OFF: You cannot see captions.5. Press [SETUP/MENU] until the MENU screen is cleared.Notes:•When playback starts, the TVG information may appear onthe TV screen (TVG or NO TVG).•Although the CC DISPLAY is set to OFF, the closed captionmay appear on the TV screen according to a TV with closedcaption capability.TVGuardian® and TVG® are registered trademarks of PrincipleSolutions, Inc.IMPORTANT INFORMATION:•The built-in TVGuardian® Foul Language Filter (TVG®) worksonly English language DVD video disc supporting closedcaption, not any other languages.•For improvement, on-screen displays subject to changewithout notice.54SETUP/MENUENTER](https://usermanual.wiki/ORION-ELECTRIC/M2B8A/User-Guide-267593-Page-54.png)
![-E54-Language Picture Sound Parental OtherLanguageMenuSubtitleAudioEnglishAutomaticEnglishPicture Parental OtherSoundLanguageMenuSubtitleAudioEnglishAutomaticEnglishPicture Parental OtherFrancaisEnglishEspanolOtherOriginalSoundLanguage Picture Parental OtherSoundLanguage Picture Parental OtherOSD LanguageSoundEnglishEnglishFrancaisEspanolLanguage Picture Parental OtherOSD LanguageSoundEnglish4, a, 5, bSETUP/MENUENTERRETURNOnce the initial settings have been completed, the player canalways be operated under the same conditions.The settings will be retained in the memory until they are changed,even if the power is turned off.Setting Language1. Press [SETUP/MENU] in the stop mode or No Disc.The setup screen appears.2. Press [5] or [ENTER].The Language screen appears.3. Press [4] or [5] to select the item.Example:4. Press [a] or [ENTER].The submenu appears.5. Press [4] or [5] to select your desired language.Example:6. Press [ENTER].The selected language remains.7. Repeat steps 3 through 6 for other setting.English, Francais, Espanol:The language you have selected will play if it is recorded onthe disc.Other:If you want to select another language, enter the languagecode (see the language code list on page E61).Original:The unit will select the first priority language of each disc.Automatic:•The unit will automatically select the same language inthe AUDIO setting.•When the unit selects the same language as the AUDIO,the subtitles will not appear during playback.•When you do not use the same language as the AUDIO,the subtitles will appear during playback.Off:Subtitles do not appear.8. Press [SETUP/MENU] or [RETURN] to close the screen.INITIAL SETTINGSNotes:•In this instruction manual, the language in on-screendisplay is English.If you change the language, please follow the selectedlanguage in on-screen display.•You cannot switch audio sound track languages if there isonly one language recorded on the disc.•When you play back a DVD video disc, the playerautomatically displays the pre-selected subtitle language ifit is included on the disc.•If “Other” is selected, enter the language code. (See“LANGUAGE CODE LIST” on page E61.)Setting OSD Language1. Press [SETUP/MENU] in the stop mode or No Disc.2. Press [a] to select “Other”.3. Press [5] or [ENTER].The OSD Language screen appears.4. Press [a] or [ENTER].The submenu appears.5. Press [4] or [5] to select your desired language.Example:6. Press [ENTER].The language remains. (The OSD Language is changed.)7. Press [SETUP/MENU] or [RETURN] to close the screen.](https://usermanual.wiki/ORION-ELECTRIC/M2B8A/User-Guide-267593-Page-55.png)
![-E55-LanguageTv ScreenDisplayPicture Parental OtherOn4:3 4:316:94:3SoundLanguageDRCPicture Parental OtherStd StdMinSoundNeed help? Call1-800-813-3435Setting Picture1. Press [SETUP/MENU] in the stop mode or No disc.2. Press [a] to select “Picture”.3. Press [5] or [ENTER].The Picture screen (“Tv Screen” and “Display”) appears.“TV Screen” is selected.4. Press [a] or [ENTER].The submenu appears.5. Press [4] or [5] to select your desired screen type.6. Press [ENTER].The TV screen size is set.7. Press [5] to select “Display”.8. Press [a] or [ENTER] to select “On” or “Off”.On: On-screen displays appear when you press the buttons.Off: On-screen displays do not appear when you press anybuttons.9. Press [SETUP/MENU] or [RETURN] to close the screen.Cut off Cut offSetting SoundUsed to adjust the sound level between the powerful sound andthe faint sound.1. Press [SETUP/MENU] in the stop mode or No disc.2. Press [a] to select “Sound”.3. Press [5] or [ENTER].The Sound screen (DRC) appears.(DRC: Dynamic Range Control)4. Press [a] or [ENTER].The submenu (“Std” and “Min”) appears.5. Press [4] or [5] to select your desired sound type.Std : Level difference is medium.Min : Level difference is small.6. Press [ENTER].7. Press [SETUP/MENU] or [RETURN] to close the screen.Notes:•The DRC function works only during playback of Dolby Digitalrecorded discs.•The level of DRC may differ depending on the DVD videodisc.4:3 (Letterbox):Select when a conventional TV set isconnected.When the wide screen disc is playedback, the black bands appear at thetop and bottom of screen.4:3 (Panscan):Select when a conventional TV set isconnected.When the wide screen disc is playedback, it displays pictures cropped tofill to your TV screen. The left andright edges are cut off.16:9 (Wide screen):Select when a wide screen TV set isconnected.Played in “FULL” size. (Setting thewide screen TV to “FULL” mode isalso necessary.)Notes:•The screen size may differ depending on the DVD videodiscs.•If you select 16:9 to get rid of the black bands on screenwhen wide screen disc is played back, picture may beslightly distorted.•In some discs, even if 4:3 is selected, the black bandsmay remain on the screen.](https://usermanual.wiki/ORION-ELECTRIC/M2B8A/User-Guide-267593-Page-56.png)
![-E56-LanguagePasswordParentalPicture Parental Other11 2 3 4SoundLanguagePasswordParentalPicture Parental Other1SoundLanguagePasswordParentalPicture Parental OtherOffSoundLanguagePasswordParentalPicture Parental Other1Sound4, a, 5, bNumberbuttonsSETUP/MENUENTERParental ControlMPAA (Motion Picture Association of America) Guideline is arating system that provides advanced cautionary information toparent about the content of movie programs.The parental lock level is equivalent to the following MPAARating System.Level 7: NC-17 (No one 17 and under admitted)Level 6: R (Restricted)Level 4: PG13 (Parental guidance cautioned)Level 3: PG (Parental guidance suggested)Level 1: G (General audiences)Some DVD discs contain a restriction level which enablesparents to prevent playback of discs by children. This DVDvideo player is equipped with a password designed to preventchildren changing the level.You cannot play DVD video discs rated higher than the levelyou selected unless you cancel the parental lock function.For example, when you select level “5”, the DVD video playerwill not play discs with ratings of “6”, “7” or “8”.The information will appear on the TV screen.When you select level "Off", all DVD video discs can be playedback.If you forget the password…1. Press [OPEN/CLOSE] to open the disc tray.2. Remove the disc.3. Press [OPEN/CLOSE] again to close the tray.“No Disc” appears on the TV screen.4. While holding [n STOP] down on the front panel, press [7]on the remote control.“Initialize” appears on the TV screen.5. Enter a new password again.Note:DVD video discs may or may not respond to the parental locksettings. Make sure this function works with your DVD videodiscs.Setting ParentalSome discs are specified not suitable for children. Such discscan be limited not to play back with the unit.1. Press [SETUP/MENU] in the stop mode or No disc.2. Press [a] to select “Parental”.3. Press [5] or [ENTER].The Parental screen (“Password” and “Parental”) appears.4. Press [5] to skip “Password” and select “Parental”.5. Press [b] or [a] repeatedly to select the level (1–8) or "Off".6. Press [4] to select “Password”.7. Press [number buttons (0–9)] to input a 4-digit password.Be sure to remember this number!If you input a wrong number, press [CLEAR/CANCEL].8. Press [ENTER].9. Press [SETUP/MENU] or [RETURN] to close the screen.To change the Parental Level1. Repeat the steps 1 ~ 3 as above to open the Parental screen.2. Press [number buttons (0–9)] to enter the password you havestored.3. Press [ENTER].The rating is now unlocked.4. Press [5] to select “Parental”, then press [b] or [a] tochange the parental level.5. Press [4] to select “Password”.Press [number buttons (0–9)] to enter the password.Note: You can change the password if you want.6. Press [ENTER].Now the parental level is changed and locked.7. Press [SETUP/MENU] or [RETURN] to close the screen.Need help? Call1-800-813-3435](https://usermanual.wiki/ORION-ELECTRIC/M2B8A/User-Guide-267593-Page-57.png)
![-E57-Need help? Call1-800-813-3435LISTENING TO THE RADIOTo turn the unit on and listen to the last received station, press[AM/FM] on the remote control.Automatic/Manual Tuning1. Press [AM/FM] to select FM or AM.2. Automatic tuningPress [TUNE] + or – for at least 1 second to tune in a station.The unit will scan up or down the band and receive the nextreceivable station. Press the button again to continue.Manual tuningPress [TUNE] + or – briefly until the desired frequency isdisplayed. The frequency changes in 200 kHz steps for FMand 10 kHz steps for AM.To Preset StationsUp to 24 FM and 12 AM stations can be preset.Automatic presetting (APT)1. Press [AM/FM] to select FM or AM.2. Press [SETUP/MENU] for at least 3 seconds.“– –” and “FM (or AM)” blink.The automatic tuning mode is set and automatic presettingbegins from the low end of the band.When 24 FM or 12 AM stations have been preset or the highend of the band is reached, automatic presetting stops.“– –” disappears and the station memorized on channel 1 willbe heard.Note:If APT is activated, all previously programmed stations of theband will be cleared and new stations will be programmed.1212](https://usermanual.wiki/ORION-ELECTRIC/M2B8A/User-Guide-267593-Page-58.png)
![-E58-Manual presetting1. Tune in the station to be preset as described in “Automatic/Manual Tuning”.2. Press [SETUP/MENU].“Preset number” blinks.3. While “preset number” is blinking, press [PRESET] + or – toselect the channel to be preset.•The number buttons on the remote control can also beused.•In this example, the channel is “9”.4. While “preset number” is blinking, press [ENTER].“Preset number” bliking stops.5. Press [SETUP/MENU].“Preset number” disappears.•In this example, “103.1 MHz” FM station is preset on FMchannel 9.6. Repeat steps above to add more preset stations.•When presetting a new station, the previous preset station iscleared.Listening to Preset Stations1. Press [AM/FM] to select FM or AM.2. Press [PRESET] + or – briefly to select the desired channel.•If using the number buttons, press the number button(s),then press [ENTER].Example:To select preset number 4, press [0] [3], then [ENTER].To select preset number 12, press [1] [2], then [ENTER].43Numberbuttons2, 5ENTER12Numberbuttons](https://usermanual.wiki/ORION-ELECTRIC/M2B8A/User-Guide-267593-Page-59.png)
![-E59-TROUBLESHOOTING GUIDEIf you have followed the instructions and are having difficulty operation the unit, locate the SYMPTOM in the left column below. Checkthe corresponding POSSIBLE CAUSE and CORRECTIVE ACTION columns to locate and remedy the problem.SymptomNo power.The power is on,but the DVD/VCR doesnot work.No picture.No sound.Sound is heard from only one speaker.The playback picture is poor.The DVD/VCR does not start playback.The remote control does not work properly.Correction•Plug the power cord into the wall outlet securely.•Insert a disc or tape. (Check that the disc or tapeindicator in the display window is lit.)•Select the appropriate video input mode on the TVso the picture from the DVD/VCR appears on theTV screen.•Press the TV/VCR button on the remote controlrepeatedly to choose VCR mode. VCR indicatorlight appears in the display window.•Connect the video cable securely.•Turn on the TV.•Load a playable disc. (Check the disc logo, type,color system and regional code.)•Connect the video cable into the jack.•Connect the video cable into the jack.• Connect the 75 ohm coaxial cable into the jack.•Connect the audio cable securely.•Turn on the equipment connected with the audiocable.•Turn up the volume.•Select the correct function.•Connect the speaker wires firmly to the speakerterminals.•Connect the speaker wires firmly to the speakerterminals.• Clean the disc.•Clean video heads.•Use [Tracking] +/– for manual tracking adjustmentwhile tape is playing.•Load a playable disc. (Check the disc logo, type,color system and regional code.)•Insert a disc or tape. (Check that the disc or tapeindicator is lit.)•Insert a playable disc. (Check the disc type,colorsystem,and Regional code.)•Place the disc with the playback side down.•Place the disc on the disc tray correctly inside theguide.• Clean the disc.•Cancel the parental lock function or change therating level. Reset it after play. (See page E56.)•Point the remote control at the remote sensor ofthe DVD/VCR.•Operate the remote control within 16 ft (5 m).•Remove the obstacle.•Check the battery polarity (+ or –).•Replace the batteries.•When using a VCR, first press the [VCR] button.When using a DVD, first press the [DVD] button.Cause•The power cord is disconnected.•No disc is inserted.•No tape is inserted.•The TV is not set to receive DVD/VCR signaloutput.•TV/VCR mode for DVD/VCR is set to TV.•The video cable is not connected securely.•The connected TV power is turned off.•An unplayable disc is loaded.• The S-video cable is not connected.•The video cable or 75 ohm coaxial cable is notconnected.•The audio cables are not connected securely.•The power of the equipment connected with theaudio cable is turned off.• Volume control is set to minimum.•The wrong function is selected.•Faulty speaker connections.•Faulty connection of speaker wires.•The disc is dirty.•Tape heads are dirty.•Tape is a rental or was recorded on another VCR.•An unplayable disc is loaded.•No disc is inserted.•No tape is inserted.•An unplayable disc is inserted.•The disc is placed upside down.•The disc is not placed within the guide.•The disc is dirty.•“PARENTAL” is set.•The remote control is not pointed at the remotesensor of the DVD/VCR.•The remote control is too far from the DVD/VCR.•There is an obstacle in the path of the remotecontrol and the DVD/VCR.•The batteries in the remote control are weak, orinstalled incorrectly.•This remote control use the same buttons for VCRand DVD functions (ex. PLAY).](https://usermanual.wiki/ORION-ELECTRIC/M2B8A/User-Guide-267593-Page-60.png)
![-E60-SymptomSome channels are skipped over whenusing [CH] +/–.Picture and sound of broadcasting channelare weak or missing.The conversation in DVD programs is hardto listen to.Camcorder image is not shown.Camcorder image via A/V input to DVD/VCR is not shown on TV screen.Timer recording is not possible.TIMER indicator light appears after DVD/VCR is turned off.The operation or display is not normal.Correction•Use ADD/DELETE to restore channels. See “ToADD/DELETE Channels”on page E26.•Tighten connections or replace cable.•See “To ADD/DELETE Channels” on page E26for details.•Raise the Center speaker level.• Turn camcorder on and operate properly.•Press INPUT to select LINE input channel.•Set clock to correct time. See “Manual ClockSetting” on page E24.•Turn DVD/VCR off to enable timer. TIMER indicatorlight appears in the display window.•Reprogram Timer. See “Timer Recording” onpages E34 and E35.•Reprogram Timer and turn DVD/VCR off to enabletimer.•This is the normal indication that the DVD/VCR isin TIMER mode.1. Disconnect the power cord.2. Reconnect the power cord.3. Resume operation.Cause•Those channels were deleted with the ADD/DELETE option.•Antenna or cables are loose.•Wrong TV/CATV option is being used.•Center speaker level is low.•Camcorder is off.•DVD/VCR INPUT SELECT is not set to LINE.• Clock in DVD/VCR is not set to correct time.•DVD/VCR is on which disables timer.•Timer has been programmed incorrectly.•TIMER indicator light does not appear afterprogramming timer.•DVD/VCR is in Timer Recording mode.•The player must be reset.SERVICING:Should this product require service, refer to the SANYO DVD limited warranty.If you do not have a convenient SANYO service station nearby, contact the SANYO dealer where you purchased the unit. Be sure togive the model number and explain the problem. The dealer will advise you how to obtain service.MAINTENANCEWARNING:FOR YOUR PERSONAL SAFETY, BE SURE TODISCONNECT THE AC POWER CORD BEFOREPROCEEDING WITH ANY MAINTENANCE OR CLEANING.Cleaning the cabinetUse a clean soft cloth moistened with plain lukewarm water andwrung dry. Never use benzol, benzene or other strong chemicalcleaners since these could damage the finish of your unit. It isimportant that no liquid reaches the inside of the unit.](https://usermanual.wiki/ORION-ELECTRIC/M2B8A/User-Guide-267593-Page-61.png)