ORION ELECTRIC M2J4B DVD / VCR TV Interface Device User Manual 2J40801A En 01 05
ORION ELECTRIC CO., LTD. DVD / VCR TV Interface Device 2J40801A En 01 05
UserManual.wiki
>
ORION ELECTRIC
>
M2J4B User Manual
>
User Manual 3
Contents
1.
User Manual 1
2.
User Manual 2
3.
User Manual 3
User Manual 3
Navigation menu
Upload a User Manual
Namespaces
Wiki Guide
HTML
PDF
Info
Views
User Manual
Discussion / Help
Navigation
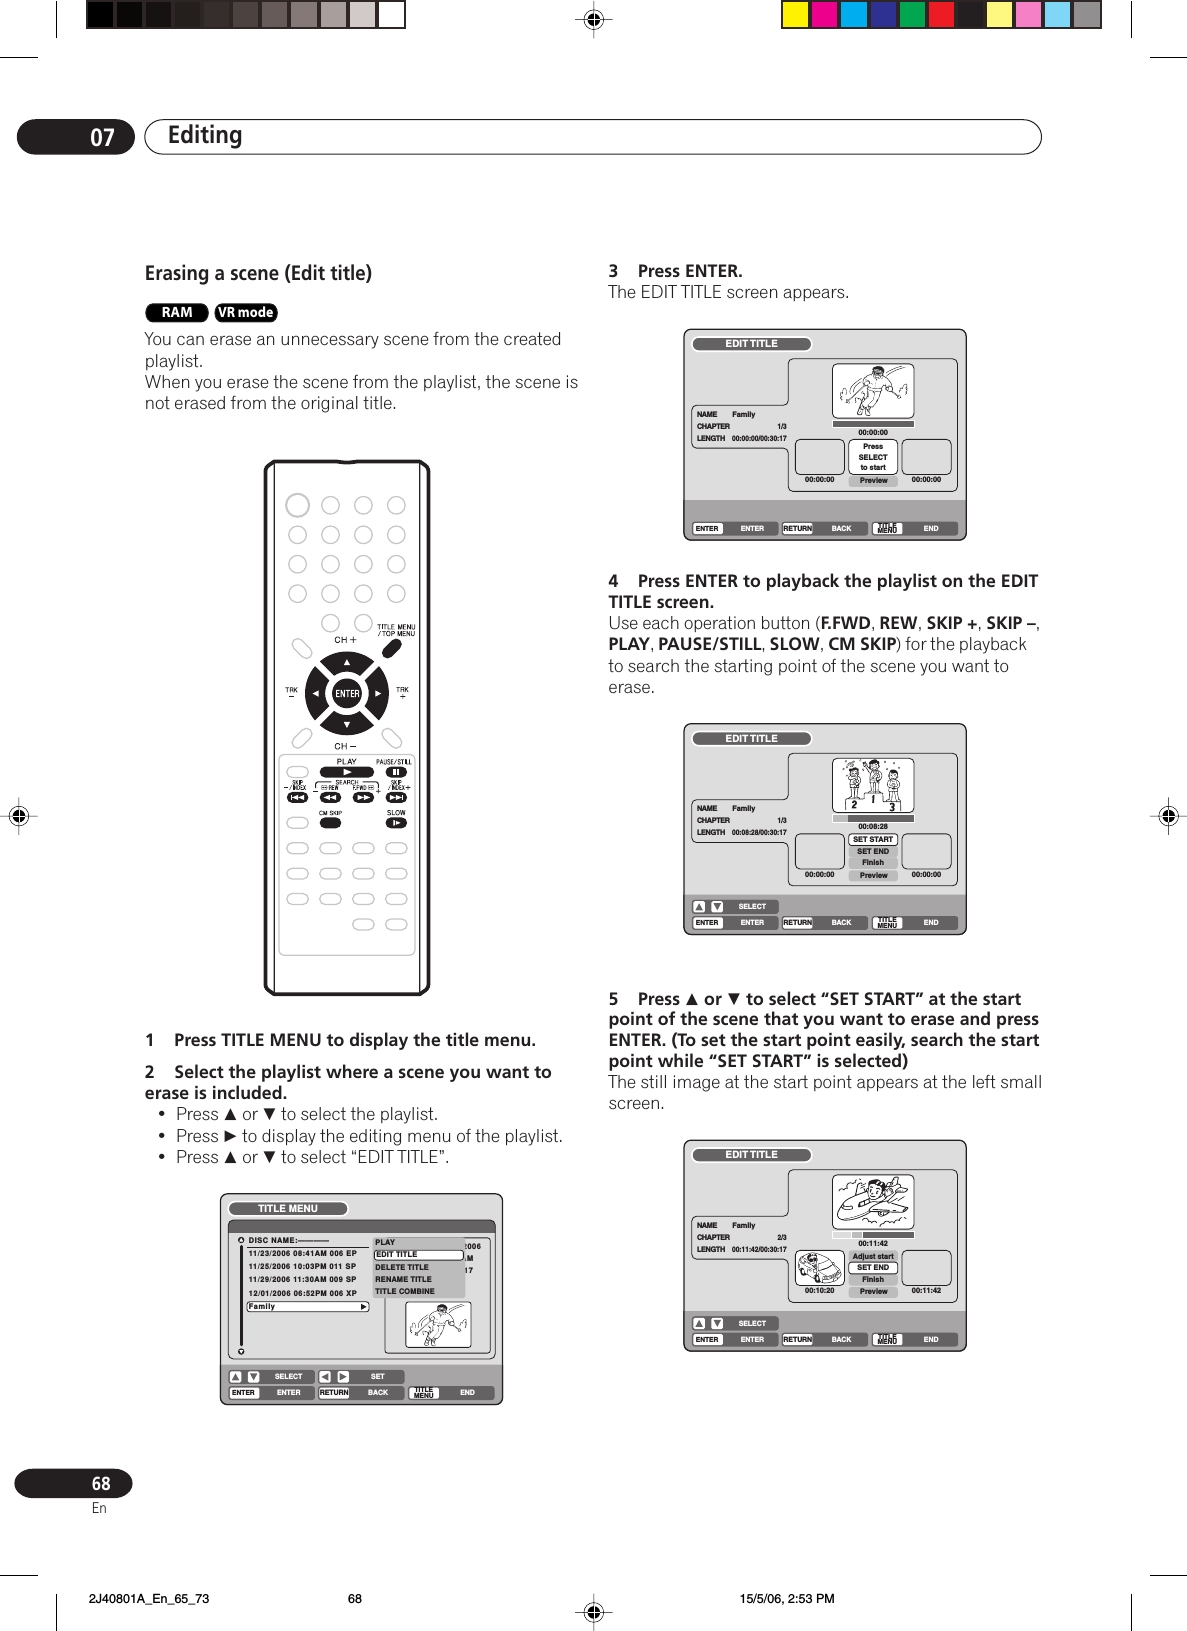

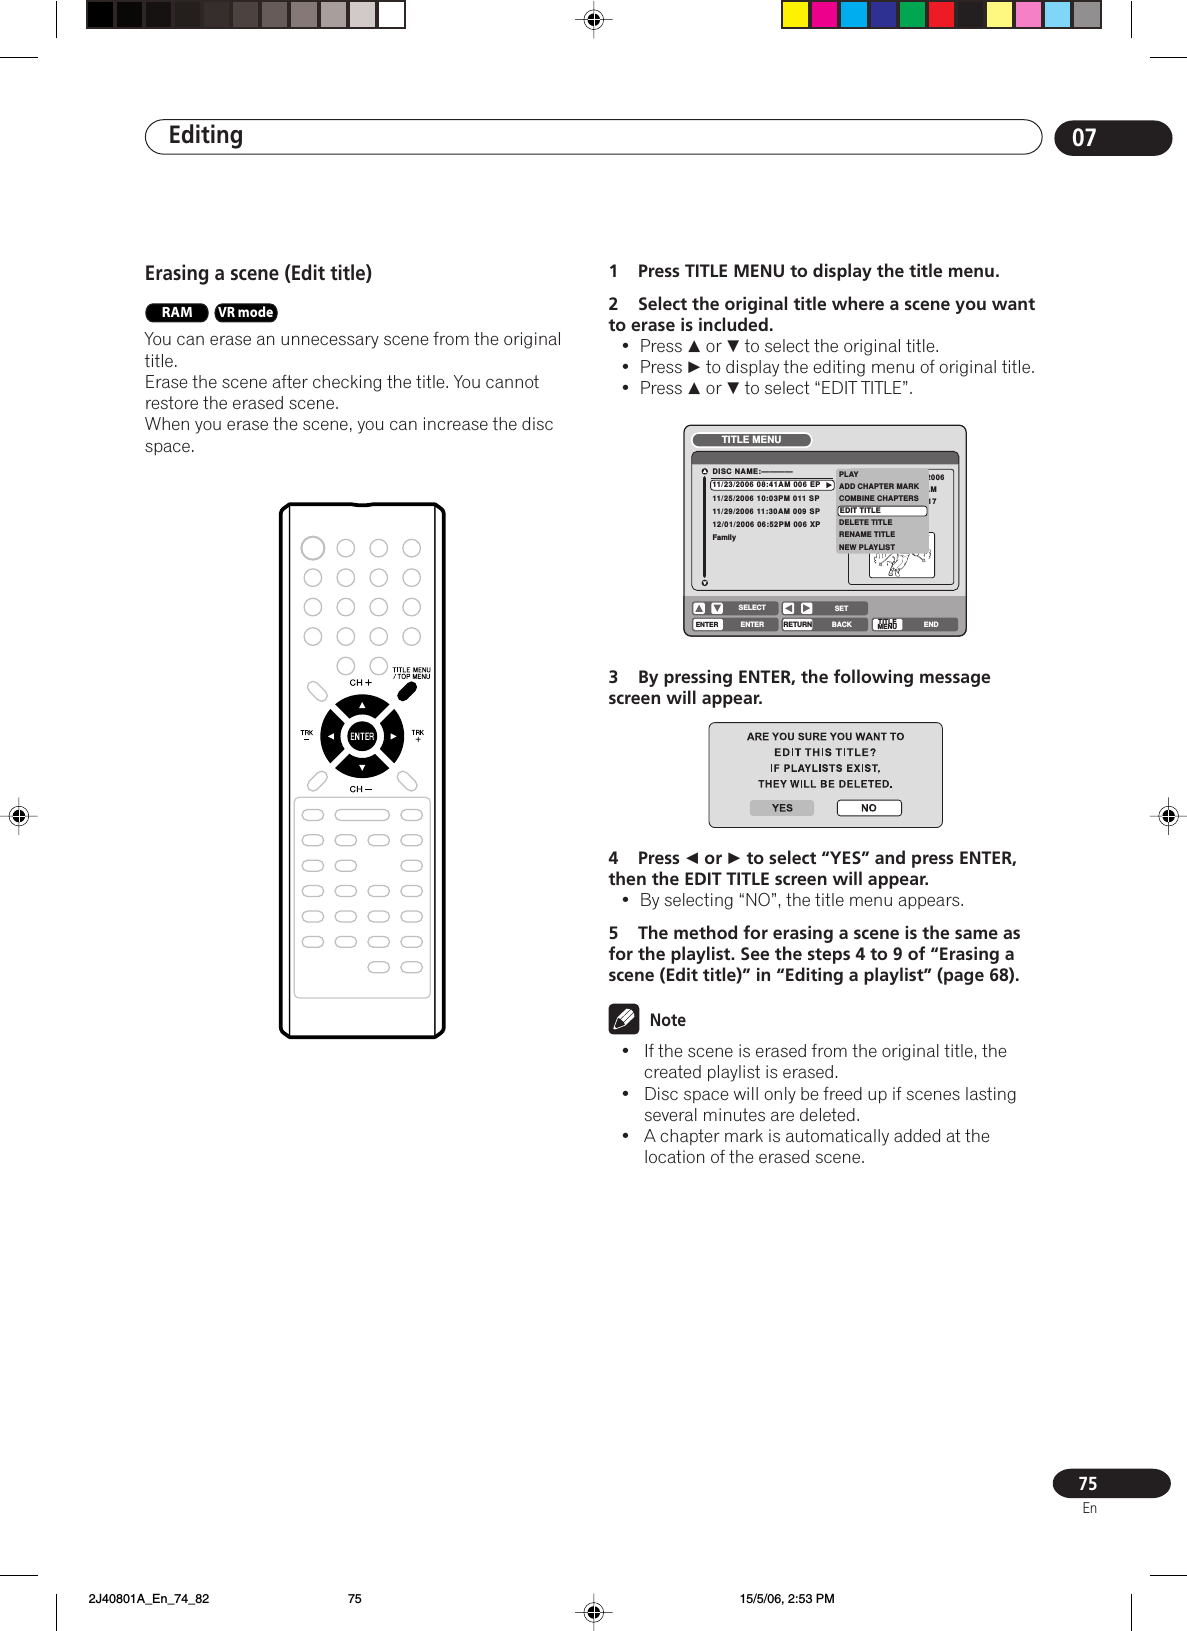
![Editing0778EnUsing the keyboard screenRAM VR mode Video mode DVD-RThis section explains the function of the keyboardscreen and how to input characters. The disc name andthe title name can be changed using the keyboardscreen.Keyboard screen typesThe keyboard screen has three types of “Letters”,“Numbers” and “Signs”. The type can be switched overby pressing REW or F.FWD.Letters:This is mainly used for inputting alphabetical letters.For the keyboard screen of Letters, see the previouspage.Numbers:This is used for inputting numbers.Live ShowNumbersSignsLetters1< > 2 3CANCELBackRETURNExit4 5 67 809DISPLAYOKDISPLAYOKSigns:This is used for inputting symbols.Live ShowNumbersSignsLetters1) !< > ,2? @ #3& % /CANCELBackRETURNExit0Space bar4. * _5- + =6[ ] :7¨; \ ‘8< > $9:·) :·( ;-/ :·}DISPLAYOKDISPLAYOKInputting charactersThere are two methods for inputting characters.Character input 11Press , , or to select the character to beinput.2Press ENTER.The selected character will be input.Character input 2Example: Explained here is the procedure when youinput “F” and “J”.1Press the numeric keys continuously and selectthe character to be input.To input F, press 3 three times.3de fNote•When the interval between the pressing of thenumeric keys is 2 seconds or more in selecting theinput character, the selected character willautomatically be input.2 Stop the key operation when you select thecharacter to be input.The selected character will automatically be input.F3Press the numeric keys where the followingcharacter is assigned.5jk l4When the character to be input is selected, stopthe key operation.The selected character is automatically input.Fj 2J40801A_En_74_82 15/5/06, 2:53 PM78](https://usermanual.wiki/ORION-ELECTRIC/M2J4B.User-Manual-3/User-Guide-661737-Page-11.png)


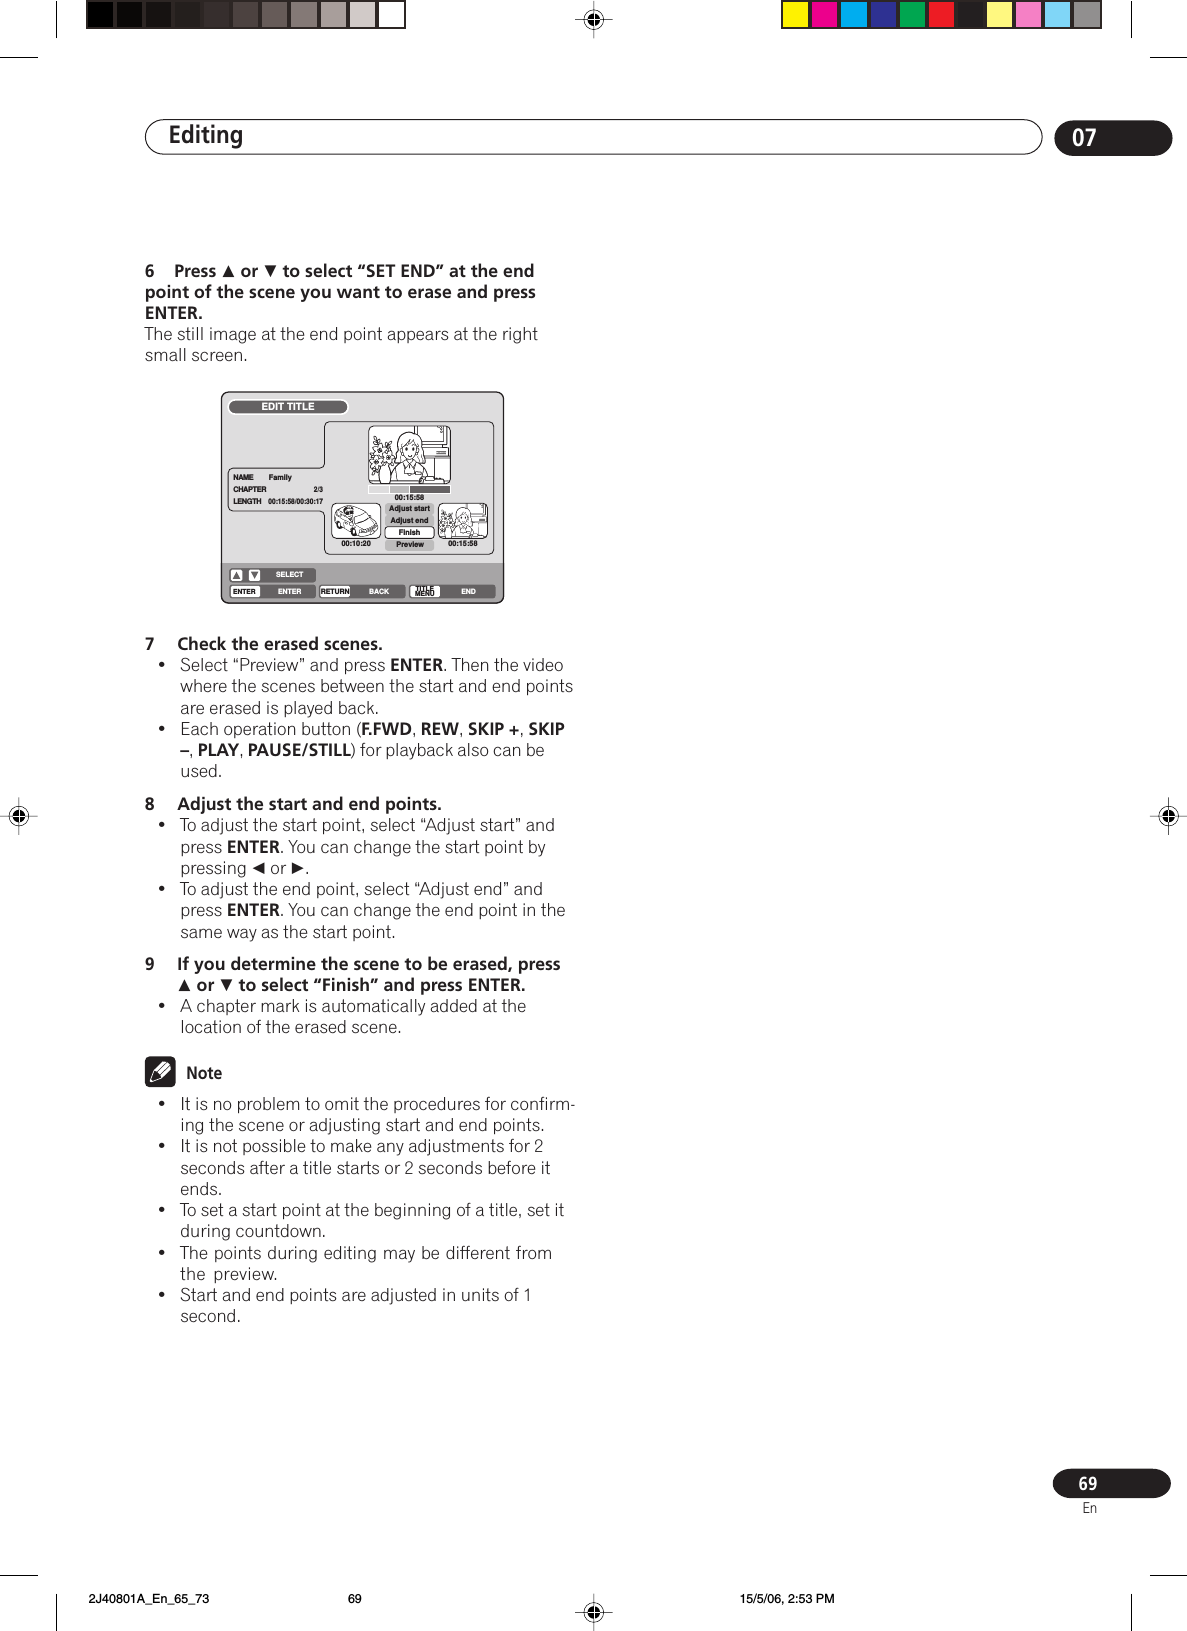
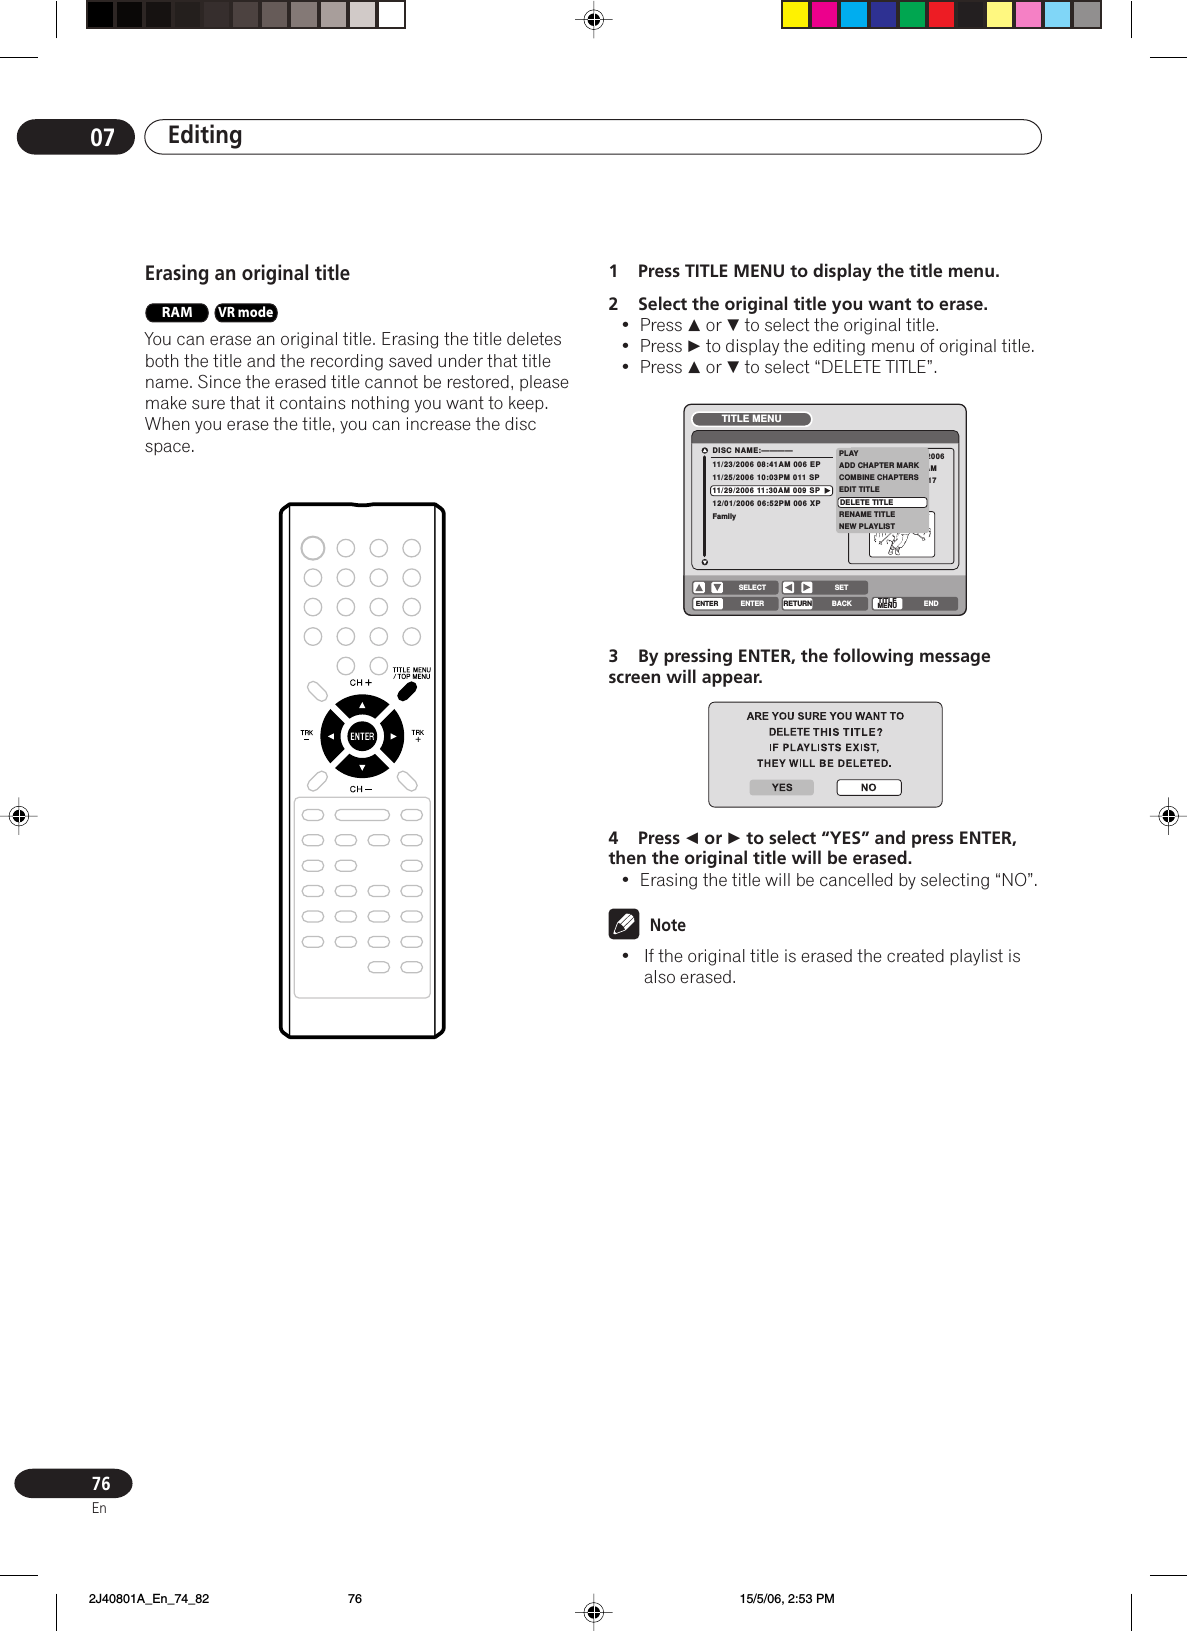
![Additional information0992EnSpecificationsGENERALPower supply ..................................................... AC 120V 60HzPower consumption ....................................... Operation: 29WStandby: 2.5W (if display window is off.)Weight .............................................................. 5.0 kg (11.0 lb.)Dimensions ............ 430 mm (W) x 90 mm (H) x 330 mm (D)(16-5/16 in. (W) x 3-9/16 in. (H) x 13 in. (D))Operating temperature .................. 41°F to 95°F (5°C to 35°C)Operating humidity ................................... Less than 80% RHInputs/Outputs: Video ............................................................ In: 1Vp-p/75 ohmOut: 1Vp-p/75 ohm Audio ...................................................... In: –8dBm/50k ohmOut: –8dBm/1k ohm Antenna .......................... UHF/VHF IN/OUT: 75 ohm coaxialProgram ............................................... 12 programs/1 monthPower off memory .......................................... Approx. 30 min.VCR sectionVideo head ...................................................... 4 Rotary HeadsAudio track ........................................... Hi-Fi Sound - 2 TracksMONO Sound - 1 TrackHi-Fi frequency response............................ 20Hz to 20,000HzHi-Fi dynamic range ...................................... More than 90dBTuner ...................................... 181 Channel Freq. Synthesized VHF ................................................................................... 2-13 UHF .................................................................................14-69 CABLE.. 14-36 (A)-(W) 37-59 (AA)-(WW) 60-85 (AAA)-(ZZZ) 86-94 (86)-(94) 95-99 (A-5)-(A-1) 100-125 (100)-(125)01 (5A)RF channel output ...................... Channel 3 or 4, SwitchableF.FWD/REW Time ............. Approx. 1minute and 48 seconds (with T-120 Cassette Tape)(at+25˚C)DVD sectionSignal system .................................................................. NTSCApplicable disc .. DVD (12cm, 8cm[Self Recording/Playbackonly]), CD (12cm, 8cm)Recording format .............. DVD-Video Recording (VR mode)DVD-VIDEO (Video mode)Recording discs ........................ DVD-RAM, DVD-RW, DVD-RRecording time (based on a 4.7GB disc) XP .................................................................. Approx. 60 min SP ................................................................. Approx. 120 min LP .................................................................. Approx. 240 min EP ................................................................. Approx. 360 minAudio characteristicsfrequency response .................................... DVD: 4Hz - 22kHzCD: 4Hz - 20kHzS/N Ratio ........................................................................... 90dBHarmonic distortion ........................................... Less than 1%Wow and flutter .................................. Less than 0.01% WrmsDynamic range .............................................. More than 90dBOutput ........................................ Video: (RCA) 1 Vp-p/75 ohmAudio : (RCA) –12 dB/1k ohmDigital Audio : 0.5Vp-p/75 ohmPickup ............................................ CD : Wavelength: 780 nmMaximum output power: 8.5 mWDVD : Wavelength: 660 nmMaximum output power: 120 mWACCESSORIESRemote control ........................................................................1Dry cell batteries (AAA/R03) ..................................................2Audio / Video cable (red/white/yellow) .................................. 1RF antenna cable ....................................................................1Blank DVD-RW disc ................................................................1Warranty card ..........................................................................1Quick Start Guide ....................................................................1Operating InstructionsNote: The specifications and design of this product are subjectto change without notice, due to improvement. 2J40801A_En_90_94 15/5/06, 2:54 PM92](https://usermanual.wiki/ORION-ELECTRIC/M2J4B.User-Manual-3/User-Guide-661737-Page-25.png)