Ocean Digital Technology MS238D0000 Internet Radio With DAB User Manual WR 238 IB ODT
Ocean Digital Technology Ltd. Internet Radio With DAB WR 238 IB ODT
User Manual

User Manual
WR-238
Please read this user manual carefully before using the receiver.
Internet Radio with Bluetooth

1
1
Internet
Radio
1
Internet
Radio
2
Media
Center
3
Information
Center
4
Auxiliary
5
Bluetooth
6
Configuration
7
Local
Radio
Software
Home
Location
The Ocean Digital Internet Radio is a multi-function digital radio:
1. Internet Radio - Plays radio stations from around the world streamed over the Internet
2. Media Center - Plays audio streamed over the local Wi-Fi network by any other UPnP (Universal Plug and
Play) device
3. Information Center - Provide worldwide weather and financial information along with the Internet Radio
software version and wireless network information
4. Auxiliary - Plays music connected to the Aux Input
5. Bluetooth - Plays music files streamed by another Bluetooth device
6. Configuration - Set up options regarding the way the radio plays music and displays information
7. LocalRadio - Plays local radio stations streamed over the internet
The software Home location can be reached at any time by pressing the Home button on the front of the radio.
When at the Home location the functions are shown on the color display screen with apicture and text message
in the selected language.
Rotating the Dial/Select knob clockwise causes the display to move forward to the next function and
anticlockwise to go back to the previous function.
When a desired function is displayed press the Dial/Select knob to confirm the selection of the function.
The Internet Radio, Media Center, Information Center and Local Radio functions require connection to a Wi-Fi
network that has abroadband connection to the Internet.
2
Home Preset
1 2 3 4 5 Aux-in Line-out DC IN 12V
ON/OFF
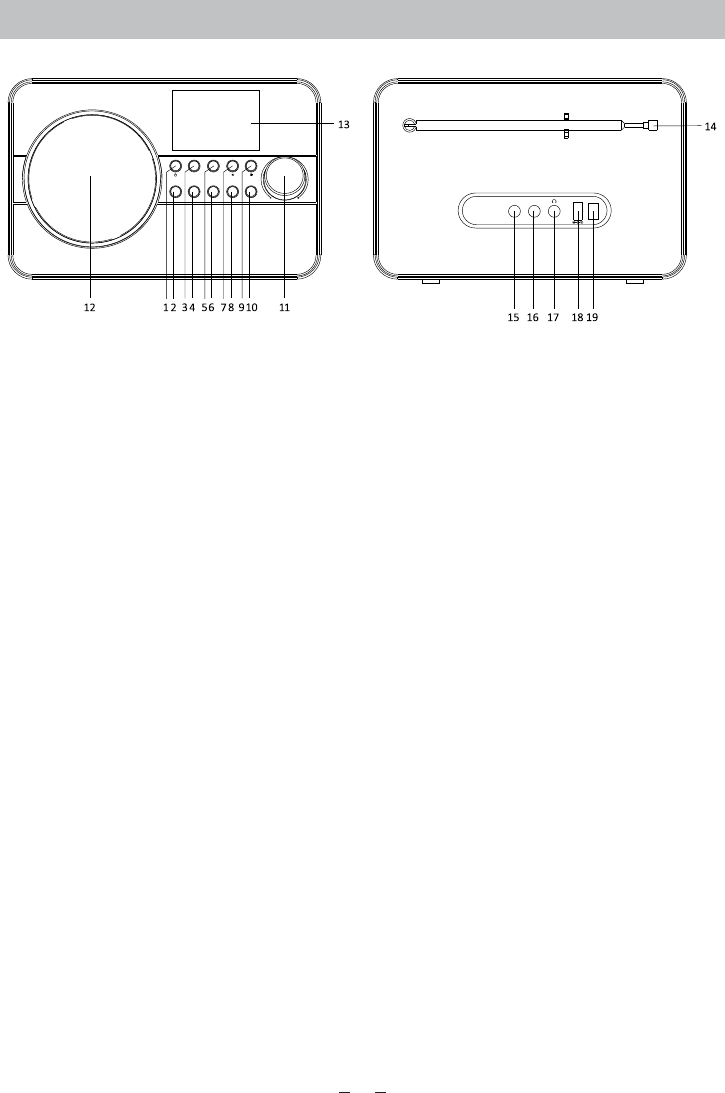
Location of Controls
1. Standby - Turns off all functions except the clock and alarm features
2. Preselect1 - Used to select previously stored favorite radio station
3. Home - Press to return to the central location of the software for selection of functions while
continuing to play the currently selected function
4. Preselect 2 - Used to select previously stored favorite radio station
5. Preset - Used to save and access favorite radio stations while using several different functions
6. Preselect 3 - Used to select previously stored favorite radio station
7. Display Previous - Back cursor used to change the displayed information back to an earlier display
8. Preselect 4 - Used to select previously stored favorite radio station
9. Display Next - Forward cursor used to change the displayed information to the next display
10. Preselect 5 - Used to select previously stored favorite radio station
11. Dial/Select - Multifunction knob used for making selections by browsing the information displayed
and pressing to confirm a selection. Controls music volume when playing music
12. Speaker - Loud speaker
13. Colored Display - 61mm color display used to display function symbols and information to enable
the selection of desired features and functions
14. Telescopic Antenna - Extend to receive local radio signals broadcast over the air
15. Auxiliary Input -3.5mm connector for music signal from another music player’s “Line Output” or
“Headphone Output”
16. Line Output - For connecting the radio music signal to another music player’s “Auxiliary Input / Line
Input”
17. Headphone - 3.5mm connector for “Headphones” or “Ear Buds”
18. DC Power Input - Power connector for the AC / Mains power supply adaptor
Use only the supplied power supply to prevent damage to the radio or possible injury
19. On/Off Switch - Turns on / off power to all functions of the radio
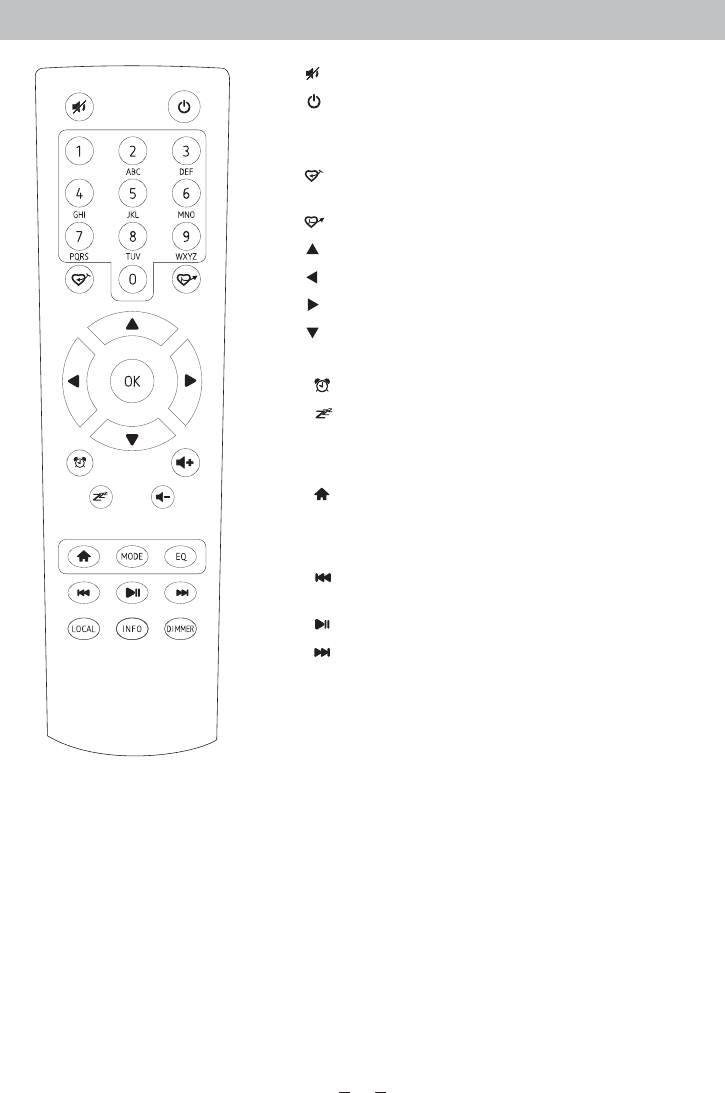
Remote Control
1. : Mute
2. : Standby button
3. 0-9: Favorite station key / input letters and
numbers for WiFi Encryption code
4. : Preset the current playing station to
Favorite
5. : Recall the favorite list
6. : Cursor up
7. : Cursor left / back to previous menu
8. : Cursor right
9. : Cursor down
10. OK: confirm button
11. : Alarm button
12. : Sleep Timer
13. Vol+: Volume up
14. Vol-: Volume down
15. : Main Menu
16. Mode: Switch between the functions of radio
17. EQ: Equalizer
18. : Previous station on the list/previous
track on UPnP
19. : Play/pause for internet radio
20. : Next station on the list/next track on
UPnP
21. Local: Access the local station list (Local
area set up in Configuration)
22. Info: View the detailed info of the radio channel or the
music info under UPnP.
23. Dimmer: Dim down the backlight of display
3

4
Press 1
Press 2
Press 3
Press 4
Press 5
Press 6
Press 7
Press 8
Press 9
Press 10
Press 11
Press 12
Press 13
Press 14
Press 15
Press 16
Press 17
Press 18
Press 19
Press 20
Press 21
Press 22
Press 23
Press 24
Press 25
Press 26
Press 27
Press 28
Press 29
Press 30
Press 31
Press 32
Press 33
Delete @
Space
!
“
#
$
%
&
‘
(
)
*
+
,
-
.
/
:
<
=
>
?
[
\
^
]
_
‘
{
|
}
~
Key #
012 3 45678 9
A
B
C
D
E
F
G
H
I
J
K
L
M
N
O
P
Q
R
S
T
U
V
W
X
Y
Z
0123 4 56789
a
b
c
d
e
f
g
h
i
j
k
l
m
n
o
p
q
r
s
t
u
v
w
x
y
z
The remote controller numeric keypad (buttons labeled 0 – 9) transmit to the radio different numbers
and letters depending on the number of times the key is pressed as shown in the table below.
When entering information into the radio (e.g. entering the Wi-Fi password) press the keypad button a
number of times until the character required is displayed on the radio. Use the cursor control keys
(forward or reverse arrows) to move to the next character or previous character position until all the
characters have been entered then press the OK key to confirm the entry.
The descriptions in this manual always refer to using the buttons or knob on the front of the radio for clarity but
each button or knob has an equivalent button on the remote controller that may also be used.

Getting Started
Connect the power cable to the radio and turn on the main power switch located on the back of the radio.
CAUTION: Use only the mains AC adaptor supplied with the radio to prevent permanent damage to the radio or
potential hazard to the user.
The display will light up with a “Welcome” message followed by options for the language to use in future
messages. Using the Dial/Select knob highlight the preferred language and then press to confirm selection.
It is recommended to Enable the “Check Network when Power On” option so that the radio will automatically
connect to the Wi-Fi network when it is turned on.
Connecting to a Wi-Fi network
Music and information for several of the radio functions is streamed over the internet with connection to the
radio by wireless Wi-Fi network.
If the router has WPS it can be used to setup the connection with the radio or use manual setup.
From the list of available networks on the display highlight the network to be connected and confirm the
selection by pressing the Dial/Select knob.
Enter the WEP (Wired Equivalent Privacy) or WPA (Wi-Fi Protected Access) code or if one of these is not
available enter the Password or Passphrase.
To enter the information rotate the Dial/Select knob to display characters until the correct one is shown then
use the forward cursor (arrow) button to move to the next character position. To correct a previous entry use
the back cursor button. After the final character is shown on the display do not press the forward cursor button
to move to the next character position and press the Dial/Select knob to confirm that the information entry is
complete.
The radio will automatically connect to the network and when successful display the Internet Radio function
symbol.
Rotate the Dial/Select knob to change the function symbol displayed until it shows the desired function and
press to confirm the selection.
Internet Radio
After selecting Internet Radio function from the Home location a list of options will be displayed:
1) My Favorite – Select to play a station from a previously stored list of favorite radio stations
2) Radio Station / Music – Use this option to search for any radio station worldwide by Category, Genre or
Location.
3) Local Radio – The display will show a list of all the local radio station available.
4) History – Displays a list of the last 10 radio stations selected and played.
5) Service – after entering a radio station name a search is made over the internet to find the station.
After the selected radio station has started playing the color logo for the station is displayed.
Use the Dial/Select knob or the remote controller to adjust the volume.
Adding a radio station to the Preset List
Start playing any radio station and “Long Press” the Preset button on the front of the radio until the “Add to My
Favorite” list is displayed.
5

Press the Dial/Select knob to add the currently playing radio station in the next empty entry in the list. When
250 entries have been added to the list it is overwritten starting back at the first entry or the list can be edited
and entries removed at any time.
To edit the list press the Preset button on the front of the radio or select Internet Radio and My Favorite to
display the list of favorite radio stations. Using the Dial/Select knob highlight the desired entry to be edited and
press the forward cursor button on the front of the radio to display the edit options:
1) Delete – Removes the radio station from the list
2) Shift Up – Move the radio station up the list by one entry position
3) Shift Down – Move the radio station down the list by one entry position
4) Rename – Change the name of the radio station in list
5) Play – Play the radio station
Entries 1 – 5 are reserved for use with the ‘Preset’ buttons on the front of the radio but can also be selected in
the same way as any other entry in the list.
Media Center
Any UPnP (Universal Plug and Play) enabled device (e.g. PC/Laptop with Windows Media Player) can stream
music over the same Wi-Fi network used by the radio to be played.
Start the music stream over the network by the UPnP enabled device and go to the Home location on the radio
by pressing the Home button on the front of the radio.
Use the Dial/Select knob to select the Media Center function and the display will show a list of options:
1) UPnP – The radio will play the music being streamed over the network
2) My Playlist – Music to be played can be selected from a playlist
3) Clear Playlist – The entries in the playlist will be removed
There can be more than one UPnP server streaming music over the network at the same time and after
selecting UPnP a list of available servers will be displayed. If there are no UPnP servers found on the network
Empty List will be displayed.
Information Center
Go to the home location by pressing the Home button, use the Dial/Select knob to select the function and three
options will be displayed:
1) Weather – Displays weather information from the region selected from the list provided using the
Dial/Select knob. After a few seconds the display will automatically return to the previous list of cities.
2) Financial – Displays a list of stock markets from around the world including the current main index value
and session change. After a few seconds the display will automatically return to the previous list of stock
markets.
3) System Information – Displays information for support or function setup e.g. Radio software version
number and wireless information including status, MAC address, SSID, IP address, Subnet, Gateway, DNS1
and DNS2.
The weather information can be displayed when the radio is in Standby by pressing the Dial/Select knob while
the desired region weather information is being displayed. Confirm the selection by pressing the Dial/Select
knob or use the Back Cursor button to decline the option and return to the weather information.
6

Auxiliary
Music can be played from any other device by connecting its “Line Output” or “Headphone Output” to the
3.5mm Aux connector on the back of the radio.
After making the connection go to the home location by pressing the Home button and use the Dial/Select
knob to select the function.
The music will start playing with the volume controlled by rotating the Dial/Select knob.
Bluetooth
The radio can receive and play music streamed wirelessly by any Bluetooth device located nearby after the two
devices have been connected to each other by the pairing process.
Go to the home location by pressing the Home button and use the Dial/Select knob to select the function.
BLUETOOTH will be displayed indicating that the radio is “discoverable” by other Bluetooth devices as “WR-
238”.
After pairing is successful the radio will play streamed music files at a volume controlled by the Dial/Select
knob.
Once the radio has been paired with a particular Bluetooth device it will be remembered by that device with
no further pairing being necessary when the function is next selected.
Configuration
Go to the home location by pressing the Home button, use the Dial/Select knob to select the function and a list
of twenty one options will be displayed:
1) Time Display – Change the clock display from analogue to digital
2) Manage my mediaU – Sets up a link to your MediaU account. You can tailor made your own favorite
station list using a computer. Visit http://www.mediayou.net/ and sign up to become a member.
3) Network – Change network set up options e.g. enable auto network connect on power up
4) Date & Time – Change date and time display format e.g. 12 or 24 hour. The default time setting is local
time with automatic adjustment for “Daylight Saving Time”. Alternatively manual set up allows for setting
any time desired with an adjustment setting for “Daylight Saving Time”.
5) Alarm – A “Main” and “Nap” alarm are provided with independent setup along with setup for the “Main”
alarm sound and volume. In the event there is no music available from the function selected the radio will
start beeping after one minute of silence. To use the snooze feature press any button on the radio except
Standby to silence the alarm and set a five minute Nap alarm. To silence and turn off the Alarm press the
Standby button
6) Timer – A time interval can be set in 1 second increment up to 99.99 seconds with a loud beeping sound
alarm when the time interval has expired
7) Language – Seventeen different languages are available for the display messages
8) Dimmer – The display brightness can be adjusted to save power
9) Display – Select color or monochrome for the display
10) Power Management – To save power when the internet connection is lost the Radio will go to Standby
with a selectable delay between 0 and 30 minutes
11) Sleep Timer – A delay can be setup from 15 to 180 minutes before the radio goes into Standby when the
Standby button is pressed
7

12) Buffer – The music storage buffer used to remove short interruptions in the internet music stream can be
adjusted from the default value of 2 seconds to 4 or 8 seconds
13) Weather – Option to select region, temperature units (C or F) and to display this weather information
along with the time when in Standby
14) Local Radio Setup – Option to automatically detect the physical location of the radio or manual setup to
any location in the world
15) Playback Setup – UPnP playback options: Repeat One, Repeat All , Shuffle or Turn Off the feature
16) Device – Option to change the radio device name (default is AirMusic) when using DLNA and Android
App or iOS Control App
17) Equalizer – Option to choose from eight different sound effects
18) Resume When Power On – Enable to start playing the same function playing when the radio turned off
19) Software Update – Display will provide information when a software update is available
20) Reset to Default – Use this option to reset all optional setting back to the factory default value
Local Radio
Go to the home location by pressing the Home button and use the Dial/Select knob to select this function. A
complete list of the available local radio stations being streamed over the internet will be displayed.
Select the desired station using the Dial/Select knob or press the Forward Cursor button to display a list of
options:
1) Add to My Favorites – Press the Dial/Select knob to add the currently playing station to the next empty
entry in the preset list as described under Adding a radio station to the Preset List
2) Auto Scan – Use this option to scan slowly through the list of available stations. To select a station while it
is playing press the Dial/Select knob.
3) Play – Play the station highlighted in the list.
Solutions for some Common Problems
1) Trouble connecting the radio to a Wi-Fi network:
A) Make sure that a Wi-Fi network or hard wired Ethernet connected PC / Laptop can access the internet and
is connected to the same Wi-Fi network as the radio
B) A DHCP (Dynamic Host Configuration Protocol) server must be available on the PC/Laptop or a Static IP
(Internet Protocol) address must be assigned to the radio by using the following procedure:
• Search the internet for instructions on “how to get an IP address”
• From the Home location on the radio select the Configuration function, Network, Manual Configuration,
Wireless and DCHP to turn it off. A display will appear so that the static IP address can be assigned to the
radio.
C) Make sure the PC/Laptop firewall is not blocking the port used by the radio.
D) Sometime access points (ports) are configured such that to connect to it devices must have their MAC
address assigned to it. If this is the case the display will show a message of “Bad ESSID or Key”. To resolve
this problem obtain the radio’s MAC address using the Information Center function and enter it into the
Access Point allowed devices list.
E) If the Wi-Fi network is using “Encryption” make sure that the correct “Key” or “Passphrase” have been
8

entered into the radio. To re-enter from Home location go to Configuration function, Network, Wireless
Configuration and select the correct Wi-Fi network.
2) Successfully connected to the internet but unable to play particular stations:
A) The station may be in a different time zone and not streaming at this time.
B) The station server is overloaded (too many listeners) or reached the maximum allowable listeners and
cannot accept new listeners at this time.
C) The station is no longer streaming or its URL (internet address) is out of date. For these problems contact
MediaU (the service provider) at mediayou.net/web/index.php.
3) Trying to use the UPnP Function:
If a PC is not shown on the list of available servers on the Radio make sure that the radio is connected to the
Wi-Fi network and there are no password or other access point problems.
4) The radio stops playing for short periods intermittently and then continues playing:
The radio uses a data “Buffer” that is filled with streaming music data before the radio starts playing to remove
short term interruptions in the data stream. If the broadband internet connection is too slow or suffering from
excessive error rates the buffer will become empty causing the music to stop playing until it is refilled. To
overcome this problem increase the size of the buffer using the Configuration function.
9
Technical Specification
Model: WR-238
Wireless Network: IEEE802.11b/g/n
Security Protocol: WEP/WPA/WPA2
Bluetooth: 2.1 + EDR
Power input: ϱV 1͘ϮA
Power voltage: 100-240V~50/60Hz
Audio output power: 5W (RMS) x 1
Audio sockets: 3.5mm earphone jack, 3.5mm Aux-in jack, 3.5mm Line out jack.
Unit Dimension: 194 x 126 x 122 mm (L x D x H)
Remark: Specification may vary without notice
What is included in the box
* Internet Radio
* Power adaptor
* Remote control
* User manual
WEEE and Recycling
The European laws do not allow any more the disposal of old or defective electric or
electronic devices with the household waste. Return your product to a municipal
collection point for recycling to dispose of it. This system is financed by the industry
and the ensures environmentally responsible disposal and the recycling of valuable
raw materials.
Ocean Digital Technology Ltd.
Flat B, 12/F., Yeung Yiu Chung (No.8) Ind. Bldg.,
20 Wang Hoi Road, Kowloon Bay,
Hong Kong
Email: support@oceandigital.com.hk
10
FCC Radiation Exposure Statement:
This equipment complies with FCC radiation exposure limits set forth for an uncontrolled
environment. This equipment should be installed and operated with minimum distance 20cm
between the radiator & your body.
FCC Warning
This device complies with Part 15 of the FCC Rules. Operation is subject to the following two
conditions:
(1) This device may not cause harmful interference, and (2) this device must accept any
interference received, including interference that may cause undesired operation.
NOTE: Any changes or modifications to this unit not expressly approved by the party responsible
for compliance could void the user's authority to operate the equipment.