Ocean Digital Technology MS60I00000 iTalkBB Chinese TV User Manual WR 60 IB OD
Ocean Digital Technology Ltd. iTalkBB Chinese TV WR 60 IB OD
UserManual.wiki
>
Ocean Digital Technology
>
MS60I00000 User Manual
Users manual
Navigation menu
Upload a User Manual
Namespaces
Wiki Guide
HTML
PDF
Info
Views
User Manual
Discussion / Help
Navigation

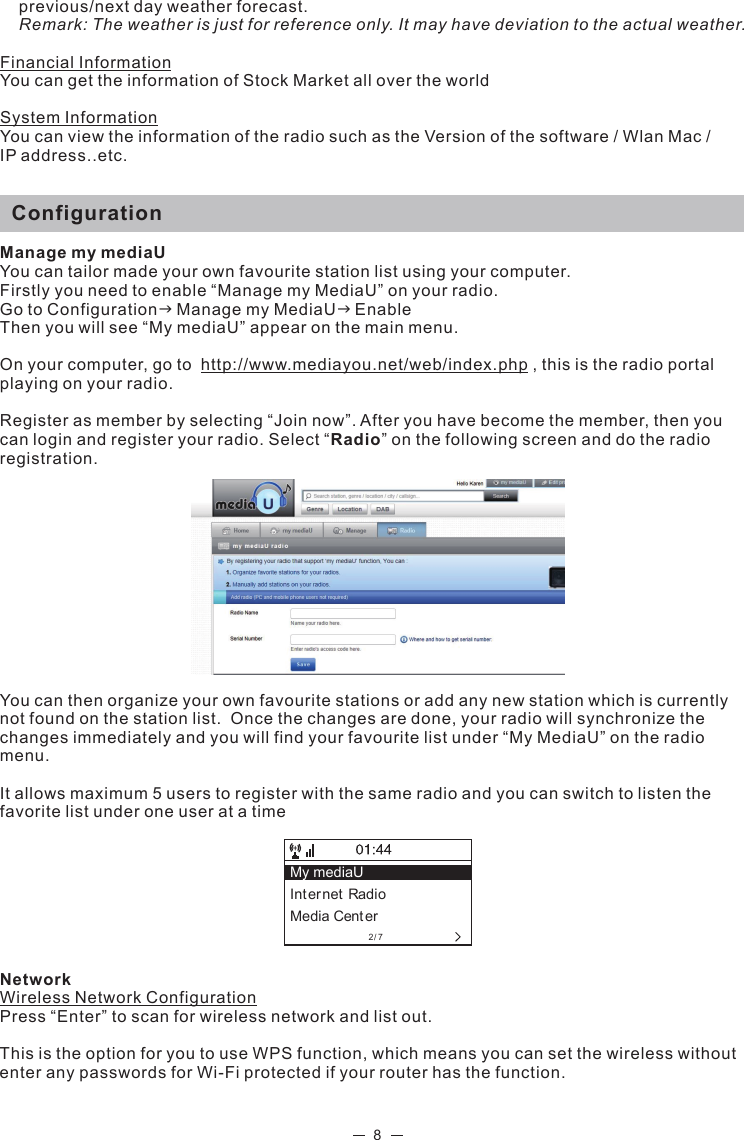
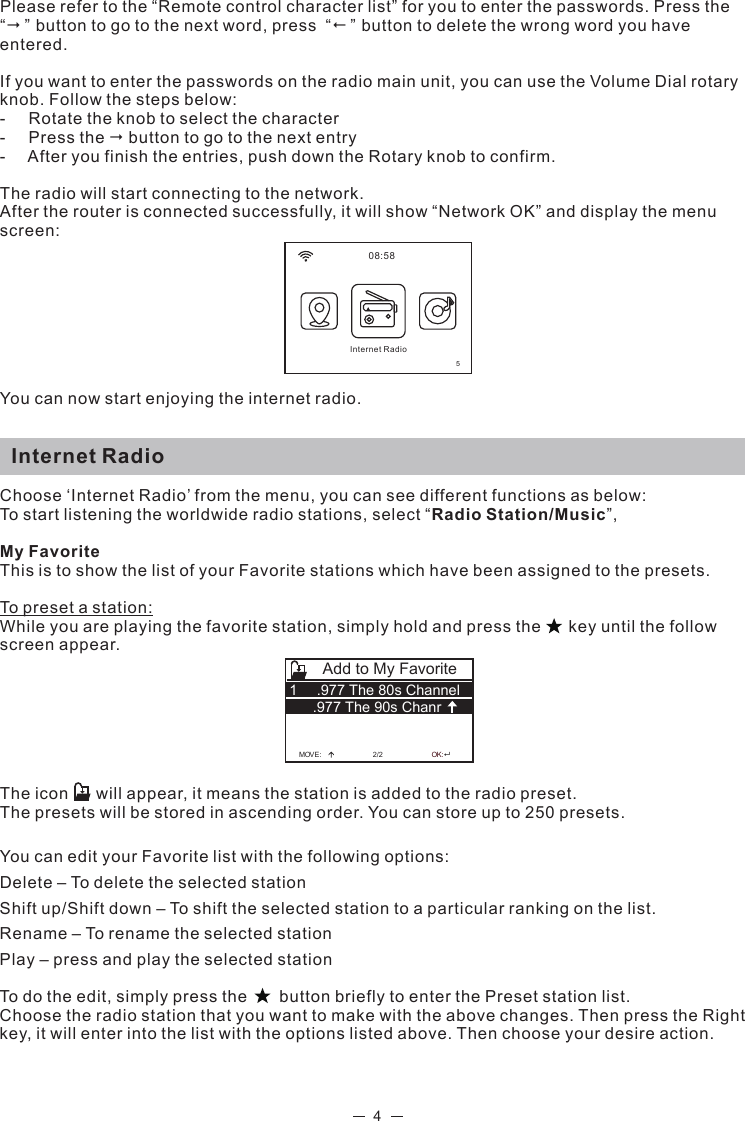
![2Remoter controller1. : Standby button2. : Mute3. 0-9: Favorite station key / input letters and numbers for WiFi Encryption code4. : Dim the display 5. : Favorite button, adding station to your favorite list6. : Cursor up7. : Cursor down8. : Cursor left / back to previous menu9. : Cursor right10. OK: confirm button11. : Alarm button12. : Sleep Timer13. : Volume up14. : Volume down15. : Main Menu 16. Mode: Switch between Internet radio, Media Center (UPnP)17. EQ: Equalizer18. : Previous song (for UPnP)19. : Play/pause (for UPnP)20. : Next song (for UPnP)Remote control character listKey 0 –– ‘0’->‘DEL’key 1 –– ‘1’->‘@’->‘ ’(Space)->‘!’-> ”(double quotes) ->'('->')'->'*'->'+'->','->'-'->'.'->'/' ->':'->';'->'<'->'='->'>'->'?'->'['->'\'->']'->'^'->'_'->'`'->'{'->'|'->'}'->'~'Key 2 –– ‘2’->‘A’->‘B’ ->‘C’->‘a’ ->‘b’ ->‘c’Key 3 –– ‘3’->‘D’->‘E’ ->‘F’->‘d’ ->‘e’ ->‘f’Key 4 –– ‘4’->‘G’->‘H’ ->‘I’->‘g’ ->‘h’ ->‘i’Key 5 –– ‘5’->‘J’->‘K’ ->‘L’->‘j’ ->‘k’ ->‘l’Key 6 –– ‘6’->‘M’->‘N’ ->‘O’->‘m’ ->‘n’ ->‘o’Key 7 –– ‘7’->‘P’->‘Q’->‘R’->‘S’->‘p’->‘q’->‘r ’->‘s’Key 8 –– ‘8’->‘T’->‘U’ ->‘V’->‘t’ ->‘u’ ->‘v’Key 9 –– ‘W’->‘X’->‘Y’->‘Z’->‘w’->‘x’->‘y’->‘z’Remark: Press ‘’ to move to next character and press ‘OK’ button to confirm. You can also press to change the character /number, then press the right key to confirm the entry.After you finish the entry, press the select button to confirm](https://usermanual.wiki/Ocean-Digital-Technology/MS60I00000/User-Guide-3166693-Page-3.png)
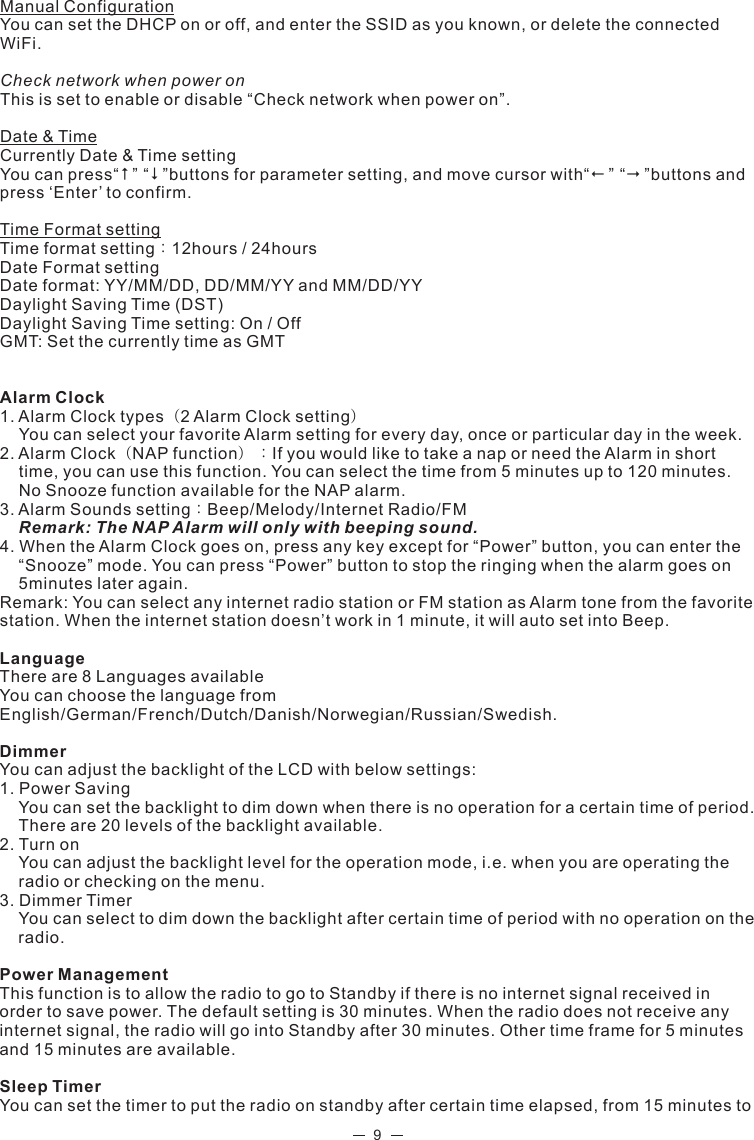
![3Switching on the radioPlug the connector plug of the mains adaptor into the DC jack on the unit. Connect the other end of the adaptor to the wall socket. Caution: Use only the main adaptor supplied with the radio. Connecting a power supply with a different rating will cause permanent damage to the radio and may be hazardous.The display on the front of the radio will light up and show: Then you can select your prefer language on the radio. It will ask you if you want to Enable the “Check Network” when Power on”, it is suggested to choose “Yes”. Then the radio will always check the available WiFi network automatically. Connecting to your WiFi NetworkThe screen below will appear. You can choose Yes to proceed to search for the available WiFi network. If your router has the WPS function, you can select the “Yes[WPS]” to proceed. It will then start scanning the network. After the search is done, it will display a list of the available router. Choose your router from the list, enter the WEP(Wired Equivalent Privacy) or WPA(Wi-Fi Protected Access) code. If your network is not configured to be with the WEP or a WPA code, the unit will connect to the router automatically. Note: The encryption code would have been set up by the person who set up and configured your network.Welcome• English Deutsch Français< 2/7 8:54AM01:01Would you like toconfigure Network now? Yes(WPS) NOYes01:44LinksysHomeaudioDemoMOVE INPUT:OKEnter Password1/116:23](https://usermanual.wiki/Ocean-Digital-Technology/MS60I00000/User-Guide-3166693-Page-4.png)
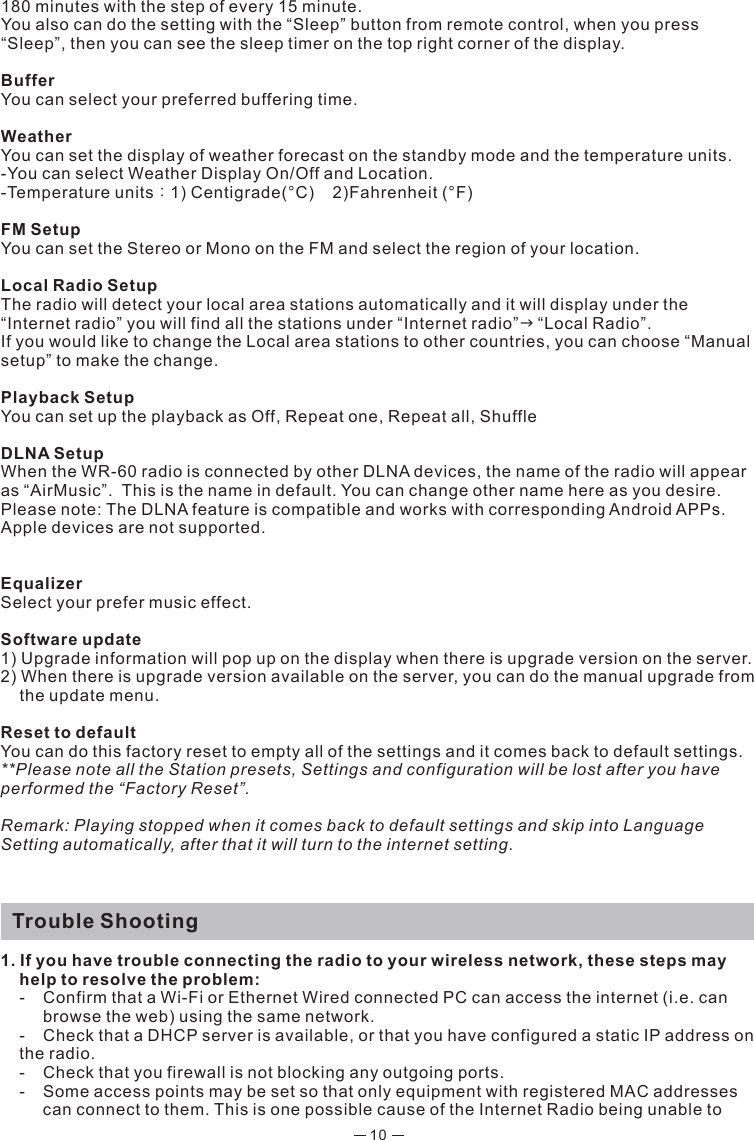
![7to complete its scan and before the scan has completed, the radio will display ‘[Empty]’. The radio will continue to display ‘[Empty]’ if no UPnP servers and found. c. After a successful scan. Select your UPnP server, by rotating the dial if there is more than one UPnP server, and then press SELECT (note, your radio will display’ Access Denied’ at this stage)4. Your PC will now prompt you that a device has attempted to connect to your UPnP server. In order to allow the radio to have access to the media files, you will need to click the ‘Library’ tab from Windows Media Player 11 and select the <Media Sharing> item to open the ‘Media Sharing’ window.Selecting ‘Media Sharing…’ for Windows Media Player11: 5. From the ‘Media Sharing’ windows , the radio will be listed as an unknown device. Click on the unknown device listed, then click the ‘Allow’ button and then click ‘OK’. Allowing the Radio to Connect: Note: When you are playing the music under UPnP, you are able to change the mode of playback via selecting Media Player/Playback Mode. Information CenterWeatherYou can learn the weather forecast all over the world1. Add to Standby Display Press “” to display the “add to standby display”, then press “Enter” to confirm.“Currently Date & Time” and “Currently Weather” will be on alternation display every 10 seconds under the standby mode if the weather forecast display is started. Remark: On standby mode, you also can press “Enter” button for the switching of “Currently Date & Time” and “Currently Weather”, and you can press “” buttons to display the](https://usermanual.wiki/Ocean-Digital-Technology/MS60I00000/User-Guide-3166693-Page-8.png)