Ocean Star Electronics 19078BT Bluetooth Speaker User Manual Manuale TS522D IT EN DE FR indd
Ocean Star Electronics Ltd. Bluetooth Speaker Manuale TS522D IT EN DE FR indd
user manual

Batteries: 9V DC 1.5 x 6 R14 (Size C)
(Batteries does not included in the package)
Batteries operation: Disconnect the AC adaptor. Insert the batteries 9V DC 1.5 x 6 R14 (Size C)
into the battery compartment (Batteries does not included in the package)
REMOTE CONTROL
STANDBY Press this button to turn the radio on or off
MODE
MODE
press to toggle between the DAB/FM/
Bluetooth (BT) and AUX modes
INFO
INFO
In DAB FM mode, while receiving a broadcast
signal, press this button to display information
about the selected station
EQ
EQ
Press to access the preset equalization or to
create a customized one.
SCAN
SCAN
Allows you to run a full scan of the radio in
DAB mode. Press to search for the next
available station in FM mode
Buttons to browse the menu in the various
modes.
Increases or decreases the frequency in the
FM mode, or selects the next or previous
DAB station available.
PLAY/
PAUSE/
PAIR
During playback via Bluetooth, press to start
or pause listening to the associated device.
Hold for pairing a Bluetooth device.
MENU
MENU
Press this button to access the menu settings
VOLUME + Press to increase the listening volume.
VOLUME - Press to decrease the listening volume.
MUTE Press this button to select or deselect the
mute function.
1/6
2/7
3/8
4/9
5/10
Buttons to store or retrieve the set radio
stations (only in DAB and FM modes)
ALARM
1 & 2
1
Press this button to set the alarm
(Alarm 1/Alarm 2)
SNOOZE
SNOOZE
This button has three different functions:
1. it stops the alarm when it is active.
2. it sets the dimmability of the LCD when
the unit is off (4 levels of brightness).
3. it sets the time interval for repeating
the alarm when the unit is on
PAIR
IMPORTANT
The lightning bolt arrow located within an equilateral triangle is intended to
alert the user of the presence of non-insulated "dangerous voltage" within the
product that may be of suffi cient magnitude to cause electric shock to the user.
WARNINGS ABOUT THE USE AND THE OPERATION OF THE UNIT
WARNING:
The main switch does not completely shut off all power from the AC outlet. Since the
power cord serves as the main disconnecting device for the unit from the power source,
the cord should be unplugged from the AC outlet to shut down all current fl ow. Then, verify
that the unit has been installed so as to easily unplug the power cord from the wall outlet, if
necessary. In addition, to avoid fi re hazard, the power cord should be unplugged from the AC
outlet if the unit is not going to be used for relatively long periods of time (for example, when
on vacation).
VENTILATION WARNING
Install the unit ensuring to leave room around it for proper air circulation and for improving heat
radiation (at least 10 cm from top, 10 cm from rear, and 10 cm from each side).
CAUTION
• The product case is equipped with small openings which also serve for ventilation, in
order to ensure reliable operation and to protect it from overheating. To prevent fi re
hazard, the openings should never be blocked or covered during operation (by objects
such as newspapers, tablecloths, curtains, or drapes, etc.) and the device should not be
placed on thick carpet or on the bed.
• If the plug of the power cord of this unit does not match the AC outlet into which you want
to insert the plug itself, it must be replaced with one fi t for the purpose. The replacement
of the plug of the power cord must be performed only by qualifi ed service personnel.
After replacement, the old plug cut off from the power cord must be properly disposed
of, to avoid possible severe electrical shock due to accidental insertion of the plug itself
into a live power outlet. If you do not plan to use the unit for a relatively long period
(e.g. during a holiday), unplug the power cord from the AC outlet.
To avoid the risk of electric shock, do not remove the
screws located on the back of the product. There are no
parts whose maintenance can be performed by the user. If
necessary, contact qualifi ed service personnel.
The exclamation point within an equilateral triangle is intended to alert the user
of the presence of important operating and maintenance instructions in the
literature accompanying the product.
ENGLISH

ENVIRONMENT AND DISPOSAL
It may contain materials which constitute a health and environmental hazard. To prevent harmful
materials from being released into the environment, BV Srl provides the following information
regarding the disposal and recycling, following the decommissioning of the product.
You can give your contribution to the environment by following these simple steps:
When you no longer wish to use your electrical and electronic equipment, take it to your local
waste disposal facility for recycling.
You may return your old equipment to your dealer free of charge when you buy a new product
which is equivalent to or has the same functions as the old one.
Contact BV Srl to fi nd your local dealer.
If you need more information regarding recycling, reuse, and product exchanges, please contact
our customer service at the number provided in the manual.
Lastly, we suggest further measures to safeguard the environment, such as recycling of internal
and external packaging (including the one used for shipping) the product was delivered in.
With your help, we can reduce the amount of environmental resources required to manufacture
electric and electronic equipment, reduce the use of waste landfi lls for used equipment and, in
general, improve our quality of life by ensuring that hazardous materials are correctly disposed of.
Incorrect treatment of the product at the end of life and failure to follow the above disposal
instructions are punishable under local legislation.
CAUTION
This unit is not waterproof. To prevent fi re or shock hazards, do not place this unit near water-
fi lled containers (such as fl ower pots, or similar), and do not expose it to dripping, splashing,
rain, or moisture.
Waste electrical and electronic materials (WEEE) should never be disposed
of in normal urban waste disposal facilities (residential garbage collection).
This symbol on the products, packaging, and/or accompanying documents,
means that used electrical and electronic equipment should be disposed of
in an appropriate manner at the end of useful life.
For proper treatment, recovery, and recycling of used products, please
refer to the applicable collection points, in accordance with your national
legislation.
ENGLISH
SAFETY REGULATIONS
DANGER
Follow the instructions provided.
Do not throw the unit into fi re or expose it to heat.
Do not throw the device, hit it with a hammer or other object, and do not pierce it.
Do not use or store this device near places at very high temperature, such as a heater, or a
closed car in direct sunlight.
Do not allow the product to be splashed with liquids.
WARNING
Do not use the device if it emits unusual odors, heats up, changes color or shape, or if you
notice any other abnormal circumstances during use, recharging or storage.
CAUTION - USAGE IN HUMID ENVIRONMENTS
TS522D+ is not a waterproofed device.
When using it, protect it from water and do not use in humid environments.
If it should come into contact with any type of liquid, immediately remove the moisture with a
dry cloth. Install the unit only on stable and level surfaces. Do not operate the unit upside down
or in tilted position.
Install the unit in a place where water cannot penetrate.
Do not tilt the unit or keep it tilted after it has been exposed to water or drops of water.
Since water may enter the unit, do not tilt it when it is wet
Water may enter the device. Do not transport the unit if it is wet.
Do not use the AC adapter near water.
Keep the remote control battery away from children.
It may cause a fi re or chemical burn if mishandled.
Do not recharge, disassemble, or heat above 100°C.
Replace only with a battery of the same type and model (CR2025).
INSTALLATION OF THE UNIT
When installing the unit, be sure to place it on a fl at, stable surface.
Avoid installing the unit in the following places:
• on a color TV (the screen may be distorted because of the Bluetooth connection);
• near a cassette deck (or a device that emits a magnetic fi eld). This could interfere with the
sound;
• under the direct sunlight;
• in an extremely hot or cold environment;
• in places subject to vibration or other movement;
• in extremely dusty places;
• in places where there are fumes or hot oils (e.g. a stove)
CAUTION
• If it is in use, do not place the unit on its side, do not lean it against anything, and do not
hang it.
• Do not sit or stand on the product
• Do not fi x the unit to a wall or ceiling. It may fall and cause harm.
• Some elements of the speakers are magnetic. The metallic materials may be attracted
by the speakers. Do not place credit cards or other magnetic storage media near the
speakers, because the stored information may be erased.
THANK YOU FOR PURCHASING THIS PRODUCT CUBO.
With FM/DAB/DAB+ Bluetooth TS522D+ you can listen to music played at FM/DAB/DAB+
frequencies: the music stored on your audio device or compatible mobile phone using Bluetooth
connectivity, and the one connected to the AUX input.
Before using the product, please read these instructions for use, in order to learn how to properly
use the device. After reading, keep the instructions in a safe place for later use.
BLUETOOTH WIRELESS TECHNOLOGY
The Bluetooth wireless technology allows you to connect compatible devices with no cable.
To establish a connection via Bluetooth wireless technology the unit and the other device do
not need to be in line of sight, but it is suffi cient that the two devices are at a maximum distance
of 10 meters from each other. The connection can be subject to interference from obstructions
such as walls or other electronic devices.
The unit is compliant with Bluetooth Specifi cation v2.1. Contact the manufacturers of the other
devices to be paired, in order to determine their compatibility with this device. There may be
restrictions on using Bluetooth technology in some countries. Contact your local authorities or
service provider.
PACKAGE CONTENTS
• The package contains:
• Radio TS522D+
• External AC Power Supply
• Remote control with battery
• Instruction Manual
• Soft case
If something is missing from your package, please contact your dealer.
ENGLISH
INSTALLING AND REPLACING THE REMOTE CONTROL BATTERY
The remote control is supplied with a battery of the "CR2025" type that must be installed.
When the remote controllable distance is lower, or if it ceases to function properly, it is time to
replace the battery.
To perform this simple operation, proceed as follows:
CAUTION:
Lithium batteries can explode or cause burns if disassembled, shorted, recharged, exposed to
water, fi re, or high temperatures. Do not leave batteries in your pocket, purse, or other container
with metal objects, do not mix them with other types of batteries, and do not store them with
hazardous materials or fuels. Store in a cool, dry and ventilated place. Follow the laws and
regulations for transport and disposal.
GETTING STARTED
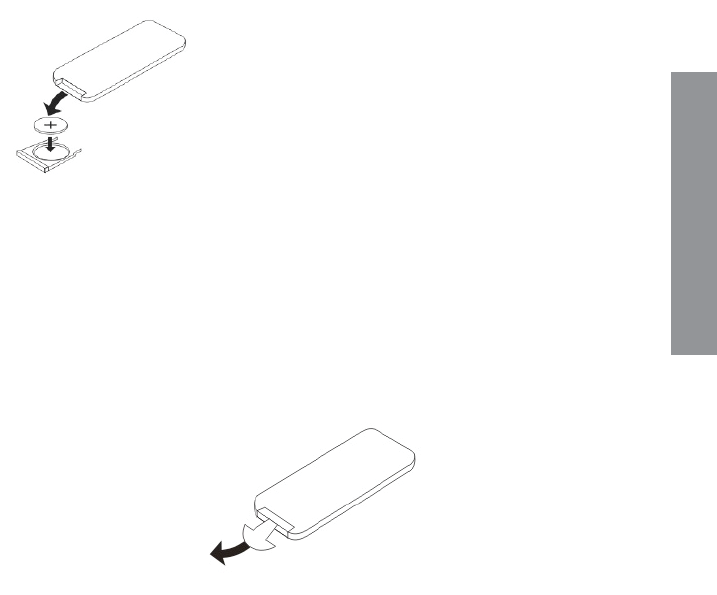
1. Remove the protective plastic from the battery compartment of the remote control as
shown in the fi gure.
2. Connect the supplied power adapter to the DC input on the rear panel of the radio. Connect
the other end of the power supply to an AC outlet. If you want to power the radio with the
battery, insert 6 "C" batteries inside the battery compartment on the bottom of the radio.
3. When you fi rst turn it on, the display will show “00:00”
4. Turn on the device by pressing the standby button on the main unit or on the remote
control. The radio will enter DAB mode and start scanning for stations. At the end of the
scan, the unit will automatically use the date and clock information gathered from the DAB
stations
CAUTION:
If the unit is powered by batteries (the power adapter is not connected), use the standby button
placed on the main unit.
When the radio is powered by batteries, the remote control has no function.
1. Remove the battery compartment as indicated in the
instructions printed on the back of the remote control
2. In case of replacement, remove the battery, insert the
new CR2025 battery as shown in the fi gure below
(making sure that the "+" side is facing upwards)
3. Replace the battery in the slot.
LISTEN TO THE DAB RADIO
1. The scan operation must be performed at fi rst start-up. The DAB icon on the display will
light up and the scanning process will start (this might take a few minutes)
2. On the remote control, use the MODE button to select the DAB mode. From the main unit,
press the MODE knob to enter the various modes and select DAB.
3. Press INFO to visually display information about the selected radio station (depending on
availability offered by the station - broadcaster)
4. Using the remote control, press the buttons to navigate through the list of scanned
DAB stations. From the main unit, use the MENU/SELECT knob to listen to the next or
previous scanned DAB station.
5. Press SCAN to perform a full scan of the radio stations in DAB mode.
LISTEN TO THE FM RADIO
1. On the remote control, use the MODE button to select the FM mode. The display will show
an FM frequency, e.g. "102.5". The FM icon will light on the display. From the main unit,
press the MODE knob to enter the various modes and select FM.
2. Using the remote control, press the buttons to browse the FM frequencies: one
press increases or decreases the frequency by 50 kHz. From the main unit, use the MENU/
SELECT knob to increase or decrease the FM frequency.
3. Press and hold either button to fi nd the next or previous available radio frequency,
or press SCAN from the remote control to directly search for the next available station.
When a station is found, the search stops automatically. From the main unit, use the BT
PAIR/SCAN knob to fi nd the next available FM frequency.
4. Press INFO to visually display information about the selected radio station (depending on
availability offered by the station)
5. Press INFO 4 times to access the MONO/STEREO function of the FM station. Press
ENTER to toggle between MONO and STEREO. In STEREO mode, this icon will light up
on the display .
STORING AND RECALLING A RADIO STATION (PRESETS)
1. To store your favorite stations to memory locations (presets) from 1 to 5, proceed as
follows:
Press and hold the button
1/6
2/7
3/8
4/9
5/10
corresponding to the number where
you want to store that station until the display shows “STORED #” (# indicates the number
where will be stored, e.g. “STORED 3” – stored in the preset no. 3)
2. To store your favorite stations in memory locations (presets) from 6 to 10, proceed as follows:
3. Press SHIFT once;
Press and hold the button
1/6
2/7
3/8
4/9
5/10
corresponding to the number where
you want to store that station until the display shows “STORED #” (# indicates the number
where it will be stored, e.g. “STORED 6” – stored in the preset no. 6)
ENGLISH
4. You can store up to 10 DAB radio stations and 10 FM radio stations (the radio
frequency of the FM station saved by default on all presets is 87.50 MHz).
5. To retrieve one of the 10 stored presets, proceed as follows:
For stored presets 1 to 5 press one of the buttons
1/6
2/7
3/8
4/9
5/10
6. For stored presets 6 to 10 press SHIFT once (the display of the main unit will show
“SHIFT”) and then the button corresponding to the desired preset.
PAIRING, CONNECTION AND OPERATION MODE OF THE UNIT THROUGH THE
BLUETOOTH WIRELESS TECHNOLOGY
The TS522D+ radio can be paired with most Bluetooth devices 2.0 and 2.1. The pairing may
differ from device to device. Refer to the instruction manual of your Bluetooth device for the
correct pairing with the unit.
1. On the fi rst access to this mode, the unit will go into the "waiting for connection" status,
the LED will fl ash slowly, and in this condition it will be possible to associate a device that
has already been paired. If the device you want to connect has Bluetooth turned on, it will
automatically connect to the radio.
2. To connect a new device, press the PAIR button for about 4 seconds until the LED fl ashes
quickly ("waiting for pairing" status). Turn on your device.
3. Turn on your Bluetooth device (for example a SmartPhone), enter the Bluetooth setup
menu and scan for available devices. In the list of found devices the label TS522D+ will
be shown.
4. Connect the device to the TS522D+ unit, the device will show the "Connected" status and
the radio LED will change from fl ashing to solid (if the pairing was successful).
5. At this point, with the TS522D+ radio it will be possible to wirelessly play the music stored
inside the associated device.
6. While a device is connected via Bluetooth, if you want to pair it with another Bluetooth
device, you must fi rst disconnect it by pressing and holding the PAIR button for about 3
seconds until you hear a "beep" sound, or by disabling the connection established directly
from the Bluetooth menu of the associated device. The unit will switch directly to pairing
mode and, at this point, you can connect another device.
CAUTION:
For mobile phones with Bluetooth 2.0, you will be prompted to enter a password during the
pairing process. Press the following string: 0000 (zerozerozerozero)
MUSIC PLAYBACK
The device you wish to associate with TS522D+ must support AVRCP (Audio Video Remote
Control Profi le) in order to control playback through it. Refer to the user manual of your device.
When the music is playing:
1. Button PLAY/PAUSE
a. Press once to pause playback
b. Press again to resume playback
2. VOL - button (from the main unit, rotate the VOL/STB knob counter-clockwise)
a. Press once to decrease the volume by one step
b. Press and hold to decrease the volume in a consistent manner
3. VOL + button (from the main unit, rotate the VOL/STB knob counter-clockwise)
a. Press once to increase the volume by one step
b. Press and hold to increase the volume in a consistent manner
after reaching the maximum level, the display will show the label VOL MAX)
CAUTION:
listen to music at a moderate volume. Continuous exposure to high volume may damage your
hearing.
CONNECT THE LAST PAIRED BLUETOOTH ENABLED DEVICE
4. The following is a quick way to connect TS522D+ to the last paired device.
When the product is in standby mode, press the STANDBY button and enter the BT mode
using the MODE button (if the unit is on, but in a different mode, press the MODE button until
you see BT). Turn on the Bluetooth device to be associated. It will be connected automatically.
The Bluetooth Mode LED will light when the connection is successful. If the product fails to fi nd
the last paired device, it will go into standby mode waiting for connection. In this status, the
previously paired devices may be connected to the unit.
RESETTING THE UNIT'S MEMORY
The unit can store up to 8 different Bluetooth devices. To clear the memory manually you must
be in the BT mode, in the pairing status (LED fl ashes quickly), press the PAIR button twice (with
an interval of about one second between presses) until it plays a "beep" sound. At this point, the
LED indicating the status of the Bluetooth switches off, and then it starts to fl ash again.
CAUTION:
After erasing all memory, the unit will go immediately into pairing mode and you will need to
follow the pairing and connection procedure of a new Bluetooth device.
Remember to delete the name of the radio also from the device you want to connect it to again,
in order to completely reset the pairing between the two devices.
ENGLISH
PLAYING A DEVICE CONNECTED TO THE AUX INPUT
1. Connect the jack cable (not supplied) from the external device (such as an MP3 player) to
the AUX IN
2. Use the MODE button on the remote control to access the AUX IN mode, or press the
MODE knob on the main unit until the AUX IN source is displayed. The display will show
the AUX IN label.
3. Use your device to control the playback, the volume level can be controlled either from the
connected device, or from the main unit. Use the MUTE button on the remote control to
mute the sound, and then restart it by pressing the same button again.
SETTING THE UNIT
Press the MENU button on the remote or press and hold the MENU/SELECT knob on main
unit to enter the menu of the various modes.
Press on the remote, or rotate the MENU/SELECT knob on the main unit to select
the desired menu item and press ENTER on the remote control or press the MENU/SELECT
knob to enter the submenu or to save the settings. Press BACK to return to the previous level,
or press MENU again to exit.
MENU AVAILABLE IN DAB MODE
Press MENU to access the multiple functions of the DAB mode.
Use the buttons to browse the various menu items.
Press ENTER to enter the selected menu item.
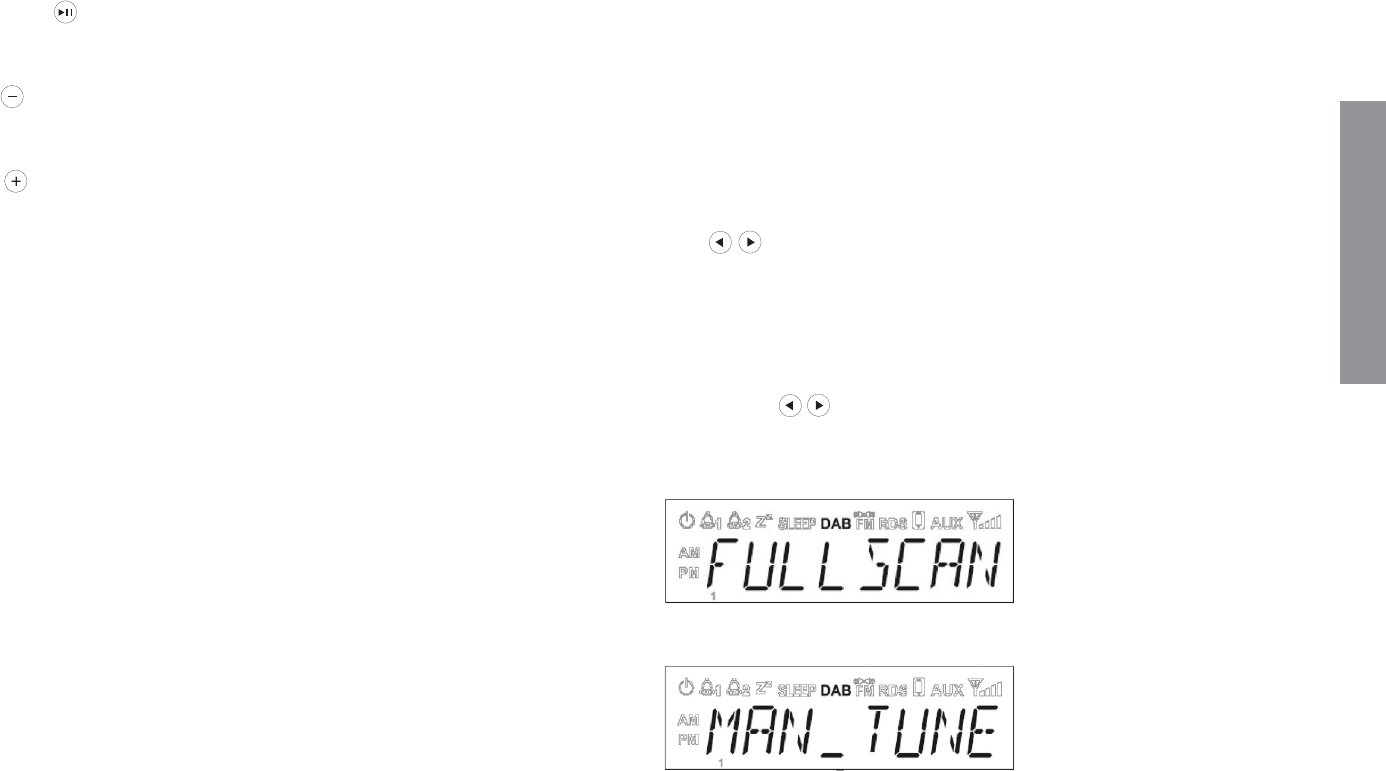
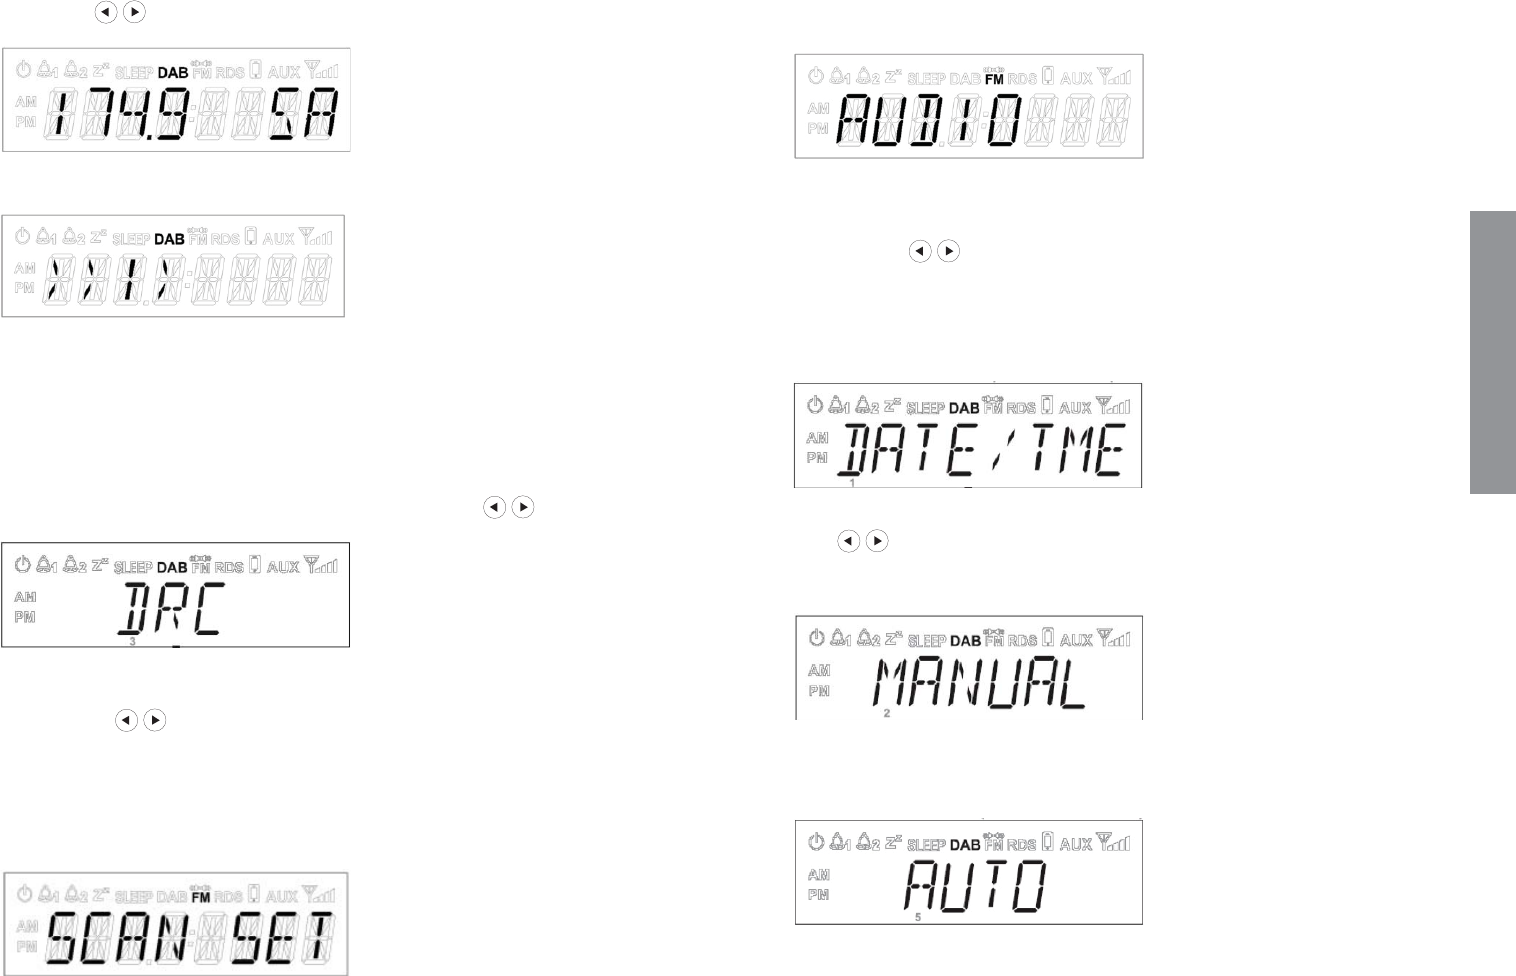
FULL SCAN: allows to perform a full scan of the DAB channels
MANUAL TUNE: allows to set the DAB frequency to be tuned
Press buttons
to adjust the frequency and press
ENTER
to confi rm (e.g. 174.928 MHz)
The display will show the signal strength of the frequency set manually for the tuning.
The > symbol indicates the power of the signal; it means that the signal of that station is strong
enough to allow the tuning of such DAB station. The --- symbol indicates the absence of signal.
Press MENU twice to return to the DAB mode, or press BACK three times to play the tuned
DAB station.
DRC (DYNAMIC RANGE COMPRESSION)
Allows you to set the DRC level to High, Low, or Off.
To select one of the three options mentioned above press the buttons .
MENU AVAILABLE IN FM MODE
Press MENU to access the multiple functions of the FM mode.
Use the buttons to browse the various menu items.
Press ENTER to enter the selected menu item.
SCAN
Allows you to set the quality of the reception of FM stations for the scanning.
STRONG: only the stations with a strong signal will be scanned.
ALL: the stations with both strong and weak signal will be scanned.
ENGLISH
AUDIO
Allows you to set the listening to MONO or STEREO in FM mode.
MENU AVAILABLE IN ALL MODES
Press MENU to access features common to all modes of TS522D+.
Use the buttons to browse the various menu items.
Press ENTER to enter the selected menu item.
DATE/TIME
Allows you to set the date and time manually or through the signal received from the DAB
stations.
MANUAL
Press on the remote control, turn the MENU/SELECT knob on the main unit, to set the
time and date, press the ENTER button on the remote control or the MENU/SELECT knob on
the main unit to confi rm and save the entered information.
AUTO
By selecting this option, the radio will automatically use the date and clock information gathered
from the station.
CAUTION:
If the unit is battery-powered, when the radio is turned off all information regarding the date and
clock will be lost. When the radio is turned back on, going in DAB mode, it will perform an automatic
scan and receive the clock and date information from the DAB station.
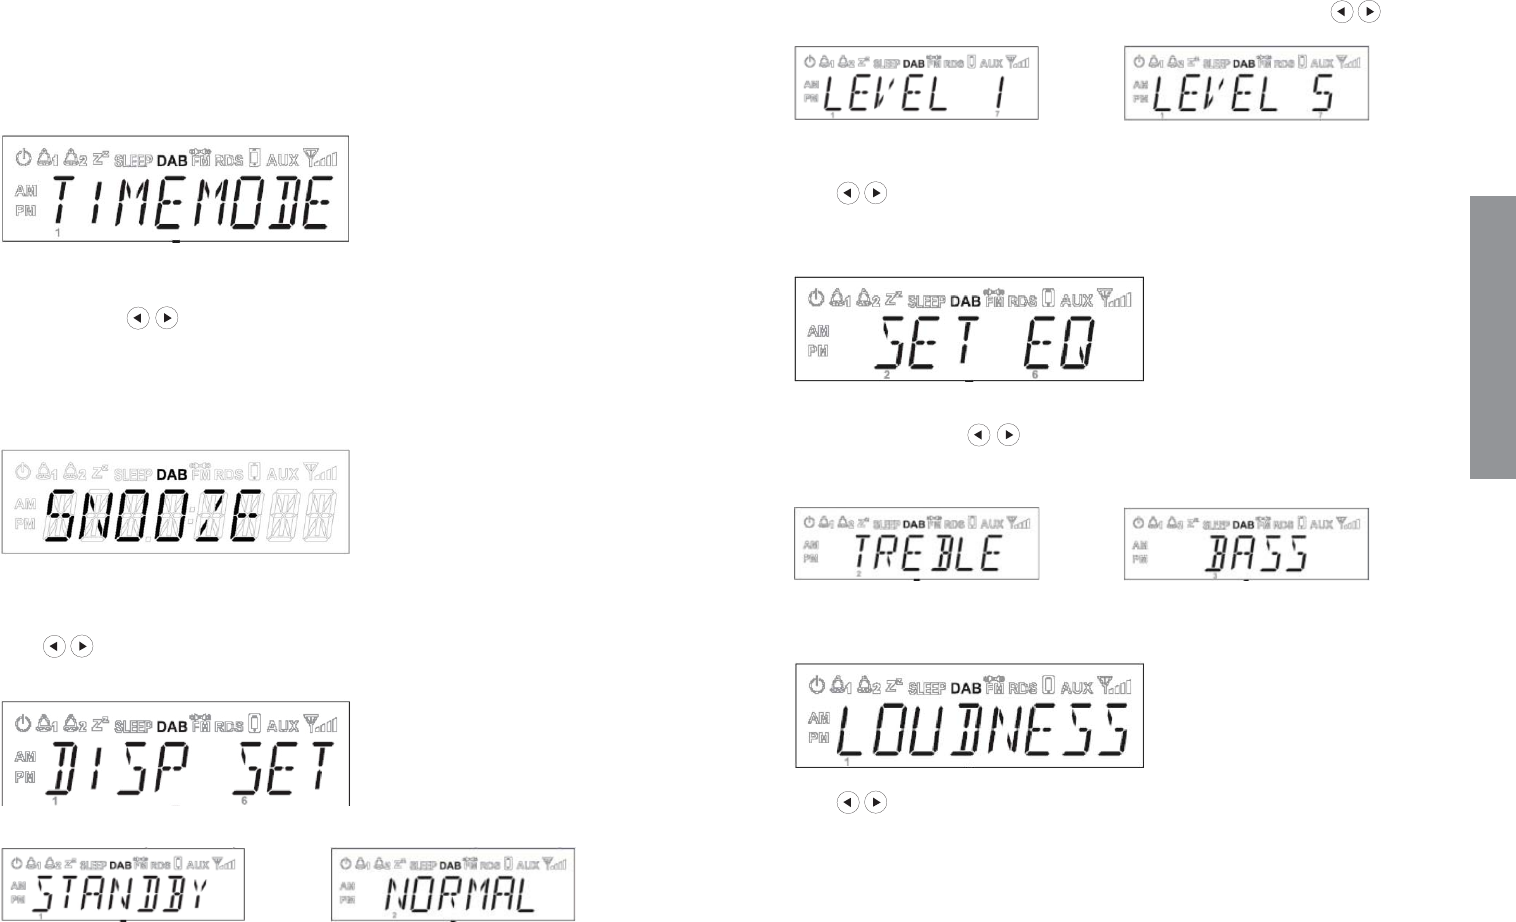
TIME MODE
Allows you to set the clock format to 12 or 24 hours.
SNOOZE
Allows to set the time interval to repeat the alarm (snooze).
Press the buttons on the remote or turn the MENU/SELECT knob on the main unit to
adjust the time interval from 5 to 15 minutes with 1-minute routers.
Press the ENTER button on the remote or the MENU/SELECT knob on the main unit to save
the chosen value
.
To disable the Snooze function, press the STANDBY button on the remote control or on the
main unit.
DISPLAY SET
Allows to set the brightness of the display.
Press on the remote control or turn the MENU/SELECT knob on the main unit to adjust
the brightness for normal and/or standby-mode.
Standby mode Normal operating mode
ENGLISH
Press ENTER on the remote or the MENU/SELECT knob on the main unit to access the two
operating modes and increase or decrease the brightness of the display with the buttons.
SET EQ
Allows to set the equalization of the radio.
Press on the remote control or turn the MENU/SELECT knob on the main unit to select
one of the stored equalization presets: NORMAL, ROCK, POP, JAZZ. Press the ENTER button
on the remote or the MENU/SELECT knob on the main unit to confi rm the chosen preset.
By the MY EQ option, you can set the value of the high (treble) and low (bass) frequencies in a
personalized way. Press on the remote control or turn the MENU/SELECT knob on
the main unit to increase or decrease the value. Press the ENTER button on the remote or the
MENU/SELECT knob on the main unit to confi rm the set values.
LOUDNESS
Allows to set the loudness level to ON and OFF.
Press on the remote control or turn the MENU/SELECT knob on the main unit to select
one of two possible statuses. The loudness can be toggled between ON and OFF only when
the equalization mode is NORMAL (the other equalization modes have the loudness set to ON
by default).
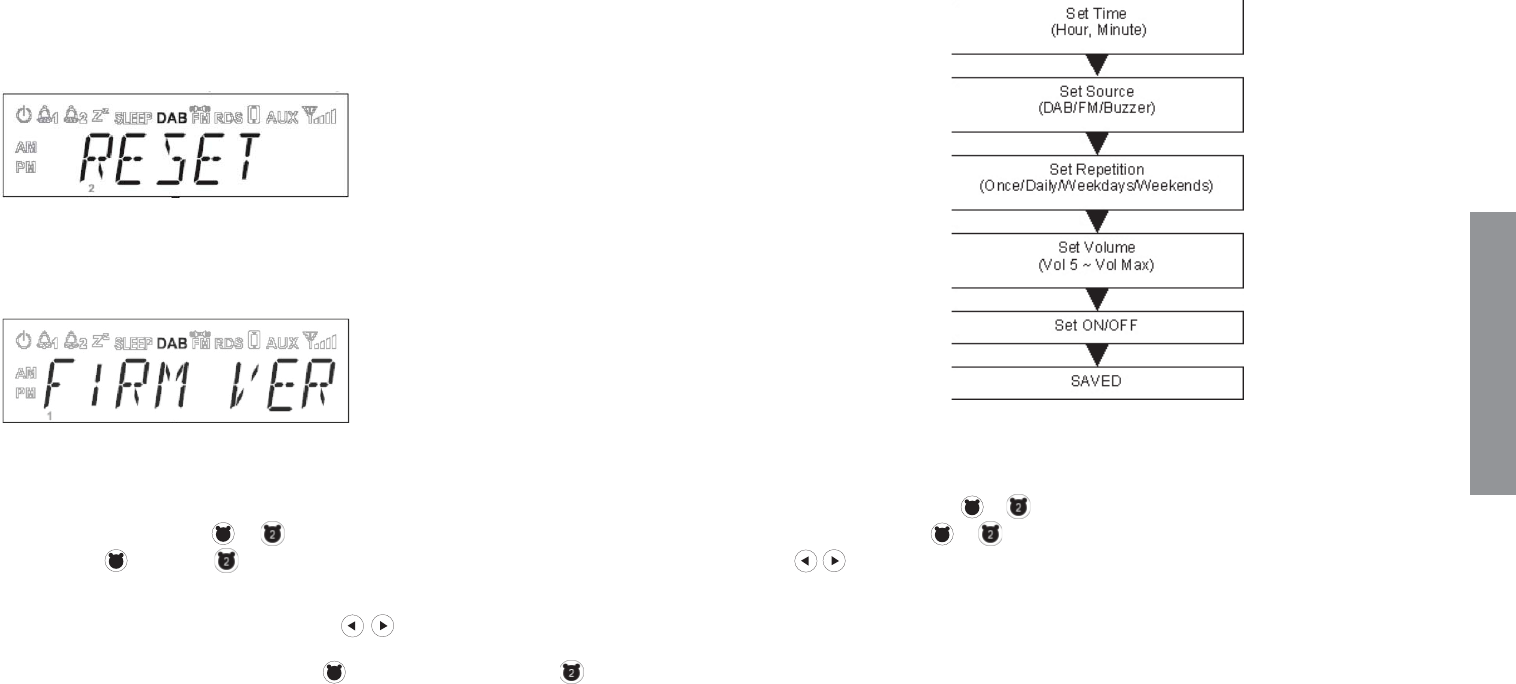
RESET
Allows you to clear all settings and restore the factory confi guration. Select the option YES and
press the ENTER button on the remote control or the MENU/SELECT knob on the main unit to
start the reset to factory settings or NO to cancel the operation.
CAUTION: all the date, clock, alarm, equalizer presets, and radio stations settings will be lost.
FIRMWARE VERSION
Allows to view the fi rmware version installed in the unit.
USING THE ALARM
Setting the alarm
1. Turn the radio on, press
1
or on the remote control to select alarm 1 or alarm 2.
The icon
1
or the icon will fl ash on the display.
Press ENTER to enter the Alarm menu, press on the remote or turn the MENU/
SELECT knob on the main unit to adjust the desired time for the alarm. Press ENTER or the
MENU/SELECT knob to confi rm your choice
1
and move to the next function , or press
BACK to return to the previous menu item.
After setting of the alarm time, you can select the alarm source (DAB/FM/Buzzer). By setting
DAB or FM you can set a radio station stored in the preset, to be associated to the alarm or the
last radio station listened to.
The next option is the repetition frequency of the alarm that may have the following options:
Once – Daily – Weekdays – Weekends. When selecting the option Once you need to confi rm
the date of the alarm before moving on to the next step. Set the playback volume of the alarm.
When the alarm is set to ON and saved, the icon for alarm 1 and/or 2 will be shown on the
display to indicate the active status.
ENGLISH
ENABLING OR DISABLING THE ALARM
In standby mode, press
1
or on the remote control to enable or disable the alarm, or turn
on the radio, press
1
or to select alarm 1 or 2, on the remote control press the buttons
to select ON/OFF and confi rm with ENTER.
The icons are shown on the display to confi rm that the alarm has been activated.
SNOOZE OPTION AND ALARM SLEEP MODE
While the alarm is enabled, press SNOOZE on the remote control to repeat the alarm after a
certain interval (according to the settings entered in the relevant menu - the default value is 5
minutes) or by pressing the VOL/STANDBY knob on the main unit.
When the SNOOZE mode is active, the display shows the ZzZz icon that identifi es its active status
of operation.
To stop the alarm, press any button on the remote control except for SNOOZE, or any knob on
the main unit except for VOL/STANDBY.

BV s.r.l.
Viale Lino Zanussi, 11
33170 Pordenone
Numero Verde 800 238 891
Email: info@brionvega.com
Web: www.brionvega.it
Web: www.radiocubo.it