Ohsung Electronics URCMRF250C RF BASE STATION User Manual EMISSION TEST REPORT
Ohsung Electronics Co., Ltd. RF BASE STATION EMISSION TEST REPORT
UserManual.wiki
>
Ohsung Electronics
>
URCMRF250C User Manual
Users Manual
Navigation menu
Upload a User Manual
Namespaces
Wiki Guide
HTML
PDF
Info
Views
User Manual
Discussion / Help
Navigation

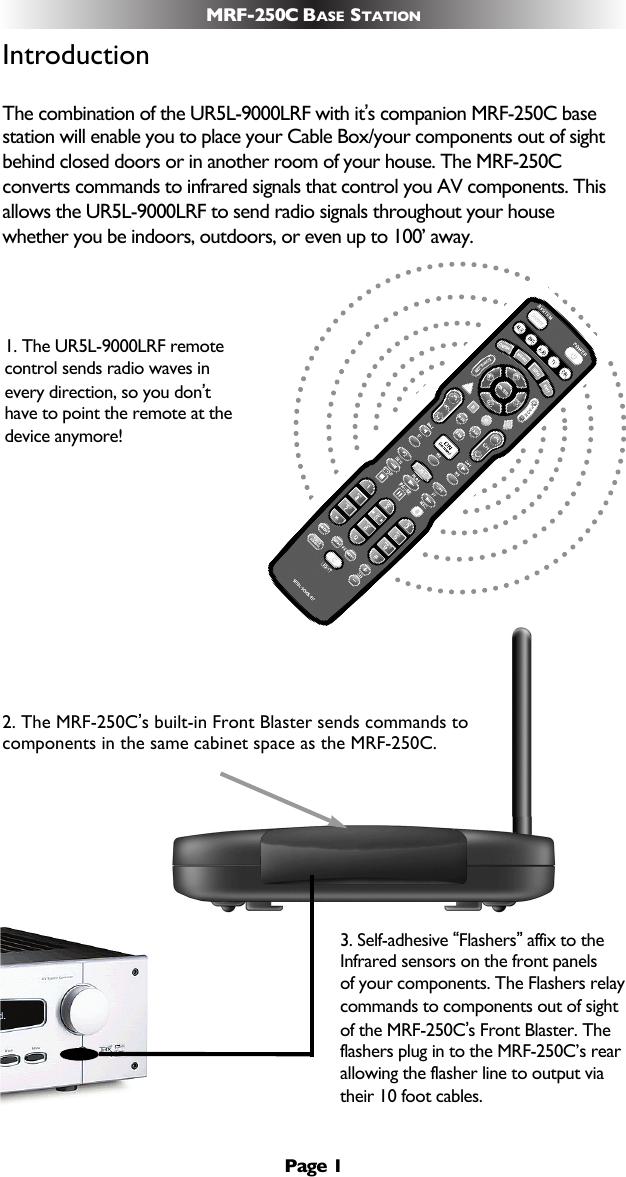
![Page 6MRF-250C BASE STATIONOnce you have found the spot that gives the most reliable operation, peel offthe protective backing of the self-adhesive tape on the included Flashers andstick them in place. Important Note: Always replace the self-adhesive tabs if you have to reposi-tion a flasher. Six extra self-adhesive tabs are supplied for this purpose.Front Blaster OverloadA few models of Cable Box or your components can be OVERLOADED bythe Front Blaster. If you are having intermittent or inconsistent results with aparticular component, try repositioning the MRF-250C and facing the FrontBlaster in a different direction. If this improves the situation but is impractical, itmay be necessary to utilize the self-adhesive flashers only. This will limit thenumber of components your MRF-250C can control to six. RF Setup Method for remote — Step by StepStep 1 -After installing the MRF-250C, press the [CBL] and [LIST] button simultaneouslyfor 3 seconds. The [CBL] device LED will turn on indicating that it is ready tobe programmed. The LED will remain on for 30 seconds.Step 2 -After installing the MRF-250C, press the [CBL] and [LIST] button simultaneouslyfor 3 seconds. The [CBL] device LED will turn on indicating that it is ready to beprogrammed. The LED will remain on for 30 seconds.Step 3 - Once you have completed RF ID setting, Store the 2-digit number bypressing the [CBL] button once again. The [CBL] device LED will blinktwice to confirm that the RF ID number has been stored.Note - Install and select the ID # on the MRF-250C. (For further details, refer tothe MRF-250C manual.) You can operate up to 15 different equipmentlocations, each with an MRF-250C unique Receiver ID #Frequently Asked QuestionsCan I use flasher/emitters that I have already installed in the system to con-nect to the MRF-250C?Yes, the flashers are compatible, however flashers from other companies are equippedwith a mini plug that is too large to fit the MRF-250C’s flasher jacks. Use Radio Shackpart # 274-327 to convert 3.5mm plug Flasher/Emitters to the MRF-250C.How can I increase the range of the UR5L-9000LRF?Often, you can increase range by repositioning the MRF-250C and/or by re-orientingthe antenna. Try to avoid placing the MRF-250C directly adjacent to satellitereceivers, personal computers or any other component using high speedmicroprocessors if possible.](https://usermanual.wiki/Ohsung-Electronics/URCMRF250C/User-Guide-1446288-Page-10.png)