Omega Cl23A Users Manual CL23A, 24, 25, 26, 27 Digital Calibrator/Thermometer
26 CL20
CL23A to the manual 1733572b-c73c-49b3-bd6e-06a2e1eb80c1
2015-02-05
: Omega Omega-Cl23A-Users-Manual-496360 omega-cl23a-users-manual-496360 omega pdf
Open the PDF directly: View PDF ![]() .
.
Page Count: 46
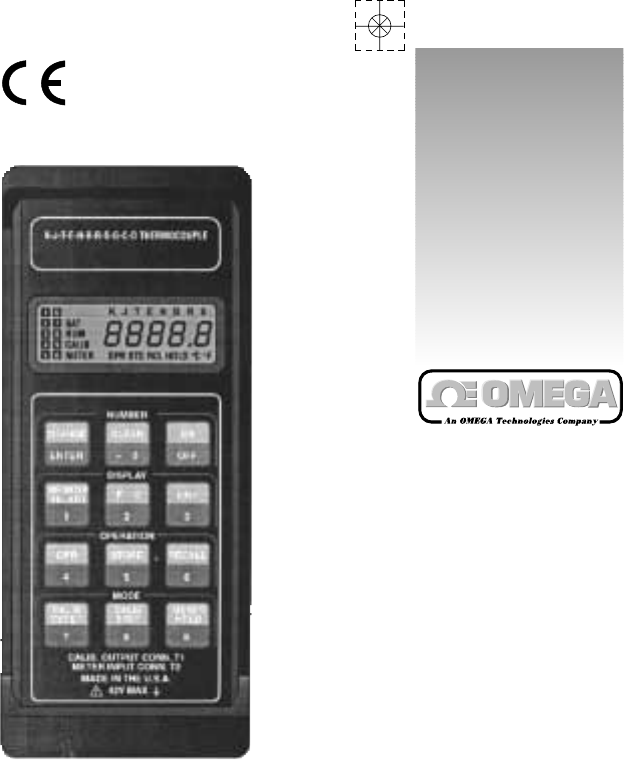
http://www.omega.com
e-mail: info@omega.com
®
User’s Guide
CL23A, 24, 25, 26, 27
Digital Calibrator/Thermometer

Servicing North America:
USA: One Omega Drive, Box 4047
ISO 9001 Certified Stamford, CT 06907-0047
Tel: (203) 359-1660 FAX: (203) 359-7700
e-mail: info@omega.com
Canada: 976 Bergar
Laval (Quebec) H7L 5A1
Tel: (514) 856-6928 FAX: (514) 856-6886
e-mail: canada@omega.com
For immediate technical or application assistance:
USA and Canada: Sales Service: 1-800-826-6342 / 1-800-TC-OMEGASM
Customer Service: 1-800-622-2378 / 1-800-622-BESTSM
Engineering Service: 1-800-872-9436 / 1-800-USA-WHENSM
TELEX: 996404 EASYLINK: 62968934 CABLE: OMEGA
Mexico and
Latin America: Tel: (95) 800-TC-OMEGASM FAX: (95) 203-359-7807
En Espan˜ ol: (203) 359-1660 ext: 2203 e-mail: espanol@omega.com
Servicing Europe:
Benelux: Postbus 8034, 1180 LA Amstelveen, The Netherlands
Tel: (31) 20 6418405 FAX: (31) 20 6434643
Toll Free in Benelux: 06 0993344
e-mail: nl@omega.com
Czech Republic: Ostravska 767, 733 01 Karvina
Tel: 42 (69) 6311899 FAX: 42 (69) 6311114
e-mail: czech@omega.com
France: 9, rue Denis Papin, 78190 Trappes
Tel: (33) 130-621-400 FAX: (33) 130-699-120
Toll Free in France: 0800-4-06342
e-mail: france@omega.com
Germany/Austria: Daimlerstrasse 26, D-75392 Deckenpfronn, Germany
Tel: 49 (07056) 3017 FAX: 49 (07056) 8540
Toll Free in Germany: 0130 11 21 66
e-mail: germany@omega.com
United Kingdom: 25 Swannington Road, P.O. Box 7, Omega Drive,
ISO 9002 Certified Broughton Astley, Leicestershire, Irlam, Manchester,
LE9 6TU, England M44 5EX, England
Tel: 44 (1455) 285520 Tel: 44 (161) 777-6611
FAX: 44 (1455) 283912 FAX: 44 (161) 777-6622
Toll Free in England: 0800-488-488
e-mail: uk@omega.com
omega.com
TM
OMEGA
®
OMEGAnetSM On-Line Service Internet e-mail
http://www.omega.com info@omega.com
It is the policy of OMEGA to comply with all worldwide safety and EMC/EMI regulations that apply. OMEGA is
constantly pursuing certification of its products to the European New Approach Directives. OMEGA will add the
CE mark to every appropriate device upon certification.
The information contained in this document is believed to be correct but OMEGA Engineering, Inc. accepts no liability for any
errors it contains, and reserves the right to alter specifications without notice.
WARNING: These products are not designed for use in, and should not be used for, patient connected applications.
TABLE OF CONTENTS
General Information......................................................................... 2
Common Specifications................................................................... 2
Unique Specifications ...................................................................... 5
Features........................................................................................... 6
Manual Addenda ............................................................................. 6
Unpacking Your Unit........................................................................ 7
Safety Information ........................................................................... 7
Safety Precautions .......................................................................... 7
Battery Installation/Replacement..................................................... 9
Memory Backup.............................................................................. 10
Operation with Rechargeable Battery............................................. 10
Operating Instructions..................................................................... 11
11. Diagnostics and Error Messages...................................... 11
12. Initial Turn On ................................................................... 11
3. Meter Mode Operation (Thermocouple) ........................... 13
14. Meter Mode Operation (RTD, Thermistor, Ohms)............ 14
15. Data Logging & Recall...................................................... 15
16. Calibrator Mode Operation (Thermocouples) ................... 17
17. Calibrator Mode Operation (RTD, Thermistor, Ohms) ..... 18
18. Storage and Recall of Calibrator Settings ........................ 20
9. Step Function.................................................................... 22
10. Ramp Function ................................................................. 22
Service Information......................................................................... 23
11. Calibration Procedures ..................................................... 23
12. Calibration Verification...................................................... 32
13. Mechanical Parts Diagram................................................ 38
Warranty ......................................................................................... 45
Limitation of Warranty..................................................................... 45
Statement of Calibration ................................................................. 45
1
GENERAL INFORMATION
This manual provides operating instructions and maintenance information for
five temperature instruments. These instruments are high performance cali-
brator-thermometers capable of simulating and measuring a wide-variety of
sensors. In addition, features such as data storage and ramping further
enhance their versatility.
It is recommended that you read this manual thoroughly, especially the sec-
tions on safety, prior to operating these instruments.
COMMON SPECIFICATIONS
THERMOMETER INPUTS: THERMOCOUPLE; Miniature TC jack. RTD, OHMS,
THERMISTOR; T-series instrumentation connector.
CALIBRATOR OUTPUTS: THERMOCOUPLE; Miniature TC jack. RTD, OHMS,
THERMISTOR; T-series instrumentation connector.
THERMOCOUPLE TYPES: K, J, T, E, N, B, R, S, G, C, D.
RTD TYPES: 1100Ωplatinum (∝= 0.00385)
1000Ωplatinum (∝= 0.00385)
THERMISTOR TYPE: 2252Ω(YSI Series 400).
RANGES: RTK; –200°C to 1372°C, –328°F to 2502°F
RTJ; –210°C to 760°C, –346°F to 1400°F
RTT; –200°C to 400°C, –328°F to 752°F
RTE; –230°C to 1000°C, –382°F to 1832°F
RTN; –200°C to 1300°C, –328°F to 2372°F
RTB; 500°C to 1820°C, 932°F to 3308°F
RTR; 0°C to 1768°C, 32°F to 3214°F
RTS; 0°C to 1768°C, 32°F to 3214°F
RTG; 300°C to 2316°C, 572°F to 4201°F
RTC; 0°C to 2316°C, 32°F to 4201°F
RTD; 0°C to 2316°C, 32°F to 4201°F
RTD; –200°C to 850°C, –328°F to 1562°F
THERMISTOR; –40°C to 150°C, –40°F to 302°F
OHMS; 0-999.99Ω
OHMS; 0-9,999.9Ω
OHMS; 0-99,999Ω
ACCURACY (18°C to 28°C ambient, 2 years)*:
K, J, T, E, N; ± 0.5°F (rdg ≥–50°F)
K, J, T, E, N; ±1.0°F (rdg < –50°F)
B, R, S, G, C, D; ±1.7°F
2
3
RTD; ±0.2°F (rdg ≥– 50°F)
RTD; ±0.5°F (rdg < – 50°F)
RTD; ±0.2°F ±0.04% rdg (meter mode)
THERMISTOR; ±0.5F
OHMS; ±0.02% range
* Exclusive of sensor errors, and lead resistance induced errors.
RESOLUTION: TEMPERATURE; 0.1°/1° F/C
RESOLUTION: OHMS; 0.01Ω/0.1Ω/1Ω
REPEATABILITY (1 week at constant ambient temperature):
K, J, T, E, N; ±0.2°F typ.
B, R, S, G, C, D; ±1.0°F typ.
RTD, THERMISTOR; ±0.1°F typ.
OHMS; ±0.01% rng typ.
TEMPERATURE COEFFICIENT:
From 18°C to 28°C, included in accuracy specifications.
From 0°C to 18°C, and 28°C to 50°C:
K, J, T, E, N; ±(0.002% rdg + 0.03°C)/°C
B, R, S, G, C, D; ±(0.002% rdg + 0.1°C)/°C
RTD, THERMISTOR, OHMS; ±(0.002% rdg + 0.004% rng)/°C
METER-MODE INPUT-CURRENT (THERMOCOUPLES): 50nA typ.
METER-MODE READING-RATE: 1 reading/second typ.
METER-MODE EXCITATION-CURRENTS:
100ΩRTD; <2mA
1000ΩRTD; <200µA
999.99Ω; <2mA
9999.9Ω; <200µA
99999Ω; <50µA
THERMISTOR; T ≤113°F <50µA
T> 113°F, <2mA
CALIBRATOR MODE OUTPUT LOAD (THERMOCOUPLES): 500Ωmin.
CALIBRATOR-MODE EXCITATION-CURRENTS:
100ΩRTD; 0.5 – 1mA (0.1 – 2mA typ.)
1000ΩRTD; 50 – 100µA (10-200µA typ.)
999.99Ω; Same as 100ΩRTD
9999.9Ω; Same as 1000ΩRTD
99999Ω; 10 – 20µA (1 – 20µA typ.)
THERMISTOR; T ≤113°F, 10 – 20µA
T> 113°F, 0.5 – 1mA
MAXIMUM COMMON MODE VOLTAGE: 42V peak to earth.
4
KEYPAD: 12 momentary switches with tactile feedback select;
• On/Off
• Change/Enter
• Clear/–0
• Sensor Select/1
• °F/°C/2
• Resolution/3
• Operate/4
• Store/5
• Recall/6
• Calibrator/Meter/Up Ramp/7
• Calibrator Step/Down Ramp/8
• Calibrator Ramp/Meter Hold/9
DISPLAY: 5 digit LCD, 0.4" height, and decimal point. Annunciators;
• Loaded Memory Locations (10 for data storage, 4 for ramp parameters)
• Low Battery (BAT)
• Number Change Mode (NUM)
• Calibrator Mode (CALIB)
• Meter Mode (METER)
• Operate Mode (OPR)
• Store Mode (STO)
• Recall Mode (RCL)
• Meter Hold (HOLD)
• Scale (°F/°C)
• Sensor Type
POWER OFF CONFIGURATION RETENTION: Instrument retains last selected;
• Sensor Type
• °F/°C Scale
• 0.1°/1° Resolution
• Calibrator/Meter Mode
• Memory Contents (data storage and ramp parameters).
DIAGNOSTICS: Display codes indicate following conditions;
• 'BAT': Low Battery
• 'OPEN': Open Input Thermocouple, RTD or Thermistor.
• 'E-1' (momentary): Invalid Keypad Entry
• 'E-2' (momentary): Ramp Function Not Installed
• 'HI': Temperature Reading or Keypad Entry Exceeds Rating
• 'LO': Temperature Reading or Keypad Entry Too Low For Accuracy
• LCD Test: During power-up, all segments and annunciators enabled momentarily
ENVIRONMENTAL LIMITS FOR OPERATING: 0°C to 50°C, less than 90% relative
humidity (R.H.) up to 35°C; reduce R.H. limit by 3%/°C from 35°C to 50°C.
ENVIRONMENTAL LIMITS FOR STORAGE: –35°C to 60°C, less than 95% relative
humidity (R.H.) up to 35°C; reduce R.H. limit by 3%/°C from 35°C to 60°C.
POWER: 9 volt alkaline battery (NEDA 1604A).
5
BATTERY LIFE, CONTINUOUS: 10 hrs. typical, alkaline; 3 hrs typical, Ni-Cd
(rechargeable).
BATTERY INDICATOR: Display indicates BAT when less than 10% of life remains.
DIMENSIONS, WEIGHT: 7.0" ×2.9 × 1.1". Net weight 12 oz.
UNIQUE SPECIFICATIONS
NOTE: The specifications below are specific to the model(s) as identified by model
number. The difference specifications are in addition to the OVERALL SERIES SPEC-
IFICATIONS found on pages 2-5.
•MODEL CL23A/CL23EC:
SENSOR SELECTION: K, J, T/K, J, T, L Thermocouples
ACCURACY: (18°C to 28°C ambient, 2 years): ±0.5°F (rdg ≥–50°F).
±0.04% rdg (rdg > 1250°F)
±1.0°F (rdg < –50°F)
TEMPERATURE COEFFICIENT: 18°C to 28°C; included in accuracy specifications.
From 0°C to 18°C, and 28°C to 50°C; less than ±(0.006% rdg +0.03°C)/°C.
RAMP FUNCTION: Not Included.
BATTERY LIFE, CONTINUOUS: 16 hrs typical, alkaline; 4 hrs typical, Ni-Cd
(rechargeable).
•MODEL CL24:
SENSOR SELECTION: K, J, T, E Thermocouples
ACCURACY: (18°C to 28°C ambient, 2 years): ±0.5°F (rdg ≥–50°F).
±0.04% rdg (rdg > 1250°F)
±1.0°F (rdg < –50°F)
TEMPERATURE COEFFICIENT: 18°C to 28°C; included in accuracy specifications.
From 0°C to 18°C, and 28°C to 50°C; less than ±(0.006% rdg +0.03°C)/°C.
RAMP FUNCTION: Not Included.
BATTERY LIFE, CONTINUOUS: 16 hrs typical, alkaline; 4 hrs typical, Ni-Cd
(rechargeable).
•MODEL CL25/CL25EC:
SENSOR SELECTION: K, J, T, E, N, B, R, S, G, C, D/K, J, T, E, N, B, R, S, L, C,
D Thermocouples
RAMP FUNCTION: Included.
BATTERY LIFE, CONTINUOUS: 16 hrs typical, alkaline; 4 hrs typical, Ni-Cd
(rechargeable)
•MODEL CL26:
SENSOR SELECTION: K, J, T, E Thermocouples
100ΩPlatinum RTD
2252ΩThermistor
1,000Ω/100,000ΩResistance
ACCURACY: (18°C to 28°C ambient, 2 years): ±0.5 °F (rdg ≥–50°F).
±0.04% rdg (rdg > 1250°F)
±1.0°F (rdg < –50°F)
OHMS; ±0.04% range
TEMPERATURE COEFFICIENT: 18°C to 28°C; included in accuracy specifications.
From 0°C to 18°C, and 28°C to 50°C.
K, J, T, E; ±(0.006% rdg + 0.03°C)/°C
RTD, THERMISTOR, OHMS; ±(0.006% rdg +0.012% rng)/°C
RAMP FUNCTION: Not Included.
•MODEL CL27/CL27EC:
SENSOR SELECTION: K, J, T, E, N, B, R, S, G, C, D/K, J, T, E, N, B, R, S, L, C,
D Thermocouples
100Ω/1000ΩPlatinum RTD
1,000Ω/10,000ΩResistance
RAMP FUNCTION: Included.
FEATURES
• Combination calibrator, thermometer and datalogger.
• Function selection and numeric data entered via 12 keyswitch color coded
keypad.
• Keyswitches have tactile feedback.
• 5 digit LCD includes annunciators for operating modes.
• Up to 11 thermocouple types, 2 RTD types, and thermistor.
• 1° or 0.1° resolution over temperature range of each sensor.
• °F and °C scales.
• Reading hold mode.
• 10 memory locations for saving meter readings and/or calibrator outputs.
• Step mode for quick sequential recall of calibrator outputs from memory.
• Manual/automatic ramping for testing controller setpoints.
• Conforms to ITS-90 thermocouple tables.
• Dust proof, splash proof, drop proof construction.
• Built-in tilt stand/hanger for bench use or hands free field measurements.
• User friendly programming.
• Retains data and programming, even when turned off.
• Performs diagnostic tests and indicates fault conditions.
• Low battery and open sensor indications.
MANUAL ADDENDA
Improvements or changes to this manual will be explained on an addendum
included with the instrument. All change information should be incorporated
immediately into the appropriate places in the manual.
6
UNPACKING YOUR UNIT
Remove the Packing List and verify that you have received all equipment. If
you have any questions about the shipment, please call the OMEGA
Customer Service Department at 1-800-622-2378 or (203) 359-1660.
When you receive the shipment, inspect the container and equipment for any
signs of damage. Note any evidence of rough handling in transit. Immediately
report any damage to the shipping agent.
NOTE: The carrier will not honor any claims unless all shipping
material is saved for their examination. After examining and
removing contents, save packing material and carton in the event
reshipment is necessary.
Make sure that you have the following items in the packing box.
• 1 CL20 Series Calibrator and Holster.
• 1 Operator’s Manual
• 1 NIST Certificate
• 1 Accessories Kit
SAFETY INFORMATION
SAFETY SYMBOLS AND TERMS
The symbol on the instrument denotes that the user should refer to the
operating instructions.
The WARNING used in this manual explains dangers that could result in
personal injury or death.
The CAUTION used in this manual explains hazards that could damage
the instrument.
SAFETY PRECAUTIONS
WARNING
These instruments are intended for use by qualified person-
nel trained in the safe operation of electronic testing equip-
ment. Read the instruction manual thoroughly before using,
to become familiar with the instrument's operations and
capabilities.
▲
!
7
WARNING
Do not touch a temperature probe sheath when measuring
excessively high or low temperatures, or toxic substances.
WARNING
Do not attempt to measure temperatures beyond the range of
the probe being used. Probe damage or personal injury
could result from exceeding a probe's maximum temperature
rating.
WARNING
The American National Safety Institute (ANSI) states that a
shock hazard exists when probes or sensors are exposed to
voltage levels greater than 42VDC or 42V peak AC. Do not
use this instrument where voltages at the measurement sur-
face exceed these levels.
WARNING
Do not substitute a metal part for the nylon screw in the rear
case. Doing so will degrade electrical isolation of the case.
WARNING
The battery is accessible through a cover on the back of the
instrument. To avoid electrical shock hazard, disconnect all
temperature probes and sensors and turn the unit off before
removing the cover.
WARNING
Never use this instrument or any probe or sensor inside a
microwave oven.
CAUTION
Avoid making sharp bends in probe or sensor lead wires.
Bending lead wires at a sharp angle can damage the wire
causing probe failure.
8
CAUTION
Keep inputs electrically isolated from outputs. Do not con-
nect an external voltage source between the two connectors,
and avoid any external electrical pathways between input
and output (T2 & T1).
Failure to do so will disturb meter readings and calibrator
output levels. Damage to the instrument is also possible.
Where the meter and calibrator connectors are simultane-
ously wired into a system lacking the above isolation, it is
necessary to use an "ungrounded" (i.e. electrically isolated)
probe at the thermometer input.
BATTERY INSTALLATION/REPLACEMENT
A 9V alkaline battery is supplied with the instrument but not installed. Read
the following installation instructions before attempting to install or remove
the battery. Replacement batteries should also be alkaline types.
WARNING
Turn the unit off and disconnect any input/output connec-
tions before replacing the battery. Put the cover back into
place on the battery compartment before resuming use of
the instrument.
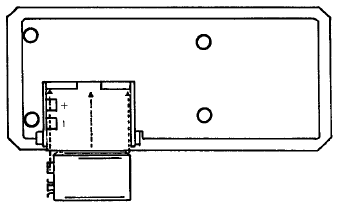
1. Remove the cover from the battery compartment by sliding it off in the
direction of the arrow located on the battery cover.
9
Figure 1. Battery Installation
2. Remove the old battery by lifting the battery extractor loop.
3. Place the new battery in the battery compartment. Be sure to observe
proper polarity.
4. Re-install the battery cover before resuming use of the instrument.
NOTES:
• Less than 10% of battery life remains when the BAT annuncia-
tor turns on.
• When the battery is excessively discharged, the display is
blanked.
• If the instrument is going to be stored for a long period of time
or in a high temperature environment, remove the battery to
prevent leakage damage.
•After a new battery is installed, allow approximately 5 sec-
onds for display turn-on the first time the unit is turned on.
During this period, microcomputer initialization is per-
formed.
MEMORY BACKUP
During battery replacement, the contents of user-programmed memory
(data, operating modes, etc.) can be saved. Prior to removing the old battery,
turn off the instrument, and connect an HH22-AC battery charger. Then
exchange batteries, and disconnect the battery charger. Do not leave the bat-
tery charger connected to instruments with non-rechargeable batteries.
OPERATION WITH RECHARGEABLE
BATTERY
HH22-AC provides a 9-volt Ni-Cd battery and recharger suitable for use with
the unit. This battery provides 3-4 hours of continuous operation. This dura-
tion can be extended to several days by operating simultaneously from both
the battery and recharger.
Turn off the instrument to recharge the battery. Allow 7 hours to fully
recharge the battery. Then unplug the recharger to avoid overcharging.
10
OPERATING INSTRUCTIONS
1. DIAGNOSTICS AND ERROR MESSAGES
Unit self-diagnostics provide fault condition readouts which are described
below:
PROBLEM: LIKELY CAUSE:
Blank display, unit does not (1) Improper battery installation.
power-up. (1) Check battery polarity.
(2) Dead battery.
BAT Annunciator. (1) Low battery voltage, install a new
battery. If problem persists, con-
sult factory.
Display reads OPEN. (1) No thermocouple, RTD or thermis-
tor is plugged into the meter input.
Display reads E1 momentarily. (1) This indicates that an invalid key-
pad entry has been made. Review
keystroke sequence, or consult
manual for input instructions.
Display reads E2 momentarily. (1) Attempt made to activate non-
installed ramp function. NOTE:
RAMP Function enabled on
Models CL25 and CL27 only.
Display reads HI. (1) Meter-mode input-temperature
exceeds rating of selected sensor.
(2) Calibrator-mode keypad-entry
exceeds rating of sensor type.
Display reads LO. (1) Meter-mode input-temperature too
low for accurate measurement.
(2) Calibrator-mode keypad-entry too
low for accurate simulation.
2. INITIAL TURN ON
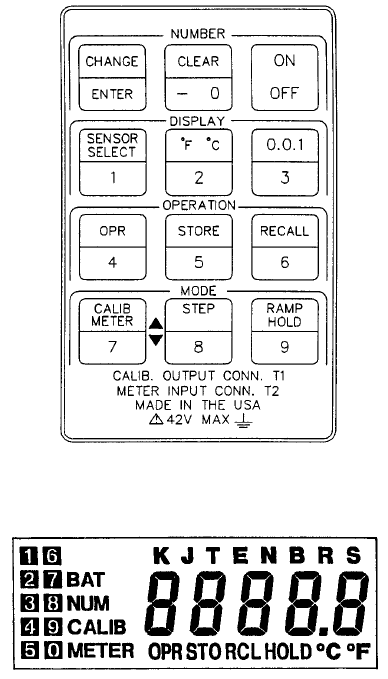
Turn on the instrument by depressing the ON-OFF keyswitch once (Figure
2). At power-up, the unit first performs a display test. All segments and
annunciators of the liquid crystal (LCD) are momentarily turned on for visual
confirmation by the user (Figure 3).
NOTE: In case of missing or poor-contrast segments, contact
factory.
11
If the unit is turning on for the first time after a new battery is installed, it will
automatically default to the METER mode (ie. temperature measurement
operation). It also defaults to K-type thermocouples, and °F readings with
0.1° resolution. The corresponding LCD annunciators are enabled:
12
Figure 3. Display Test
Figure 2. Keypad
METER: (unit functioning as a thermometer)
K: (K-type thermocouple)
°F: (Fahrenheit readings)
OPR: (Instrument is operational)
If no input thermocouple is connected to the unit at this time, the numeric
segments will indicate "OPEN".
Plugging a thermocouple into the meter jack (connector T2, on the top right
side) will give actual thermocouple temperature readings.
NOTE: To obtain full accuracy, allow 1-2 minutes after connect-
ing a thermocouple plug, for thermal setting.
If the instrument is to be used as a thermometer or ohmmeter, refer to the
Meter Mode Operation section for detailed instructions. For use as a tem-
perature-calibrator or ohms simulator, refer to Calibrator Mode Operation.
3. METER MODE OPERATION (Thermocouples)
Set-Up:
1. Turn on instrument by depressing the ON/OFF key.
2. Check that the BAT annunciator turns off following the power-up LCD test.
If it does not turn off, less than 10% of battery remains. Refer to Battery
Installation/Replacement instructions.
3. If the meter is already in the METER mode, the METER annunciator will
be on. Otherwise the calibrator mode is enabled and the CALIB annunci-
ator is on. Depress the METER key to return to meter mode.
4. Connect an input thermocouple (TC) to connector T2. Select the appro-
priate TC Type with the select-key. A display annunciator will indicate the
selected TC-type.
NOTE: Space and legibility constraints on the display preclude
the use of dedicated annunciators for the less common tungsten-
rhenium thermocouple types (G, C & D). Instead, these types are
annunciated momentarily on the alpha-numeric display when first
selected. Both T and R annunciators remain on to indicate a
Tungsten-Rhenium selection. To recall the actual G, C, D selec-
tion, turn the unit off, then on again for another momentary read-
out.
5. Select temperature scale with °F/°C key. The corresponding annunciator
is enabled.
13
14
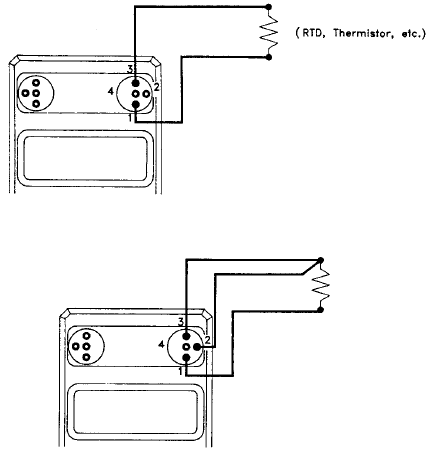
Figure 4. 2-Wire Resistance Measurement
Figure 5. 3-Wire Resistance Measurement
6. Select display resolution with 0.1°/1° key.
NOTE: Set-up is retained during power-off.
Hold:
Meter readings can be put on hold at any time by depressing the HOLD key.
At this time, the HOLD annunciator turns on, the reading is frozen, and all
keys (except ON/OFF and HOLD) are locked out. Depress the HOLD key
again to return to real-time readings, and re-enable the keypad.
4. METER MODE OPERATION (RTD, Thermistor & Ohms)
Set-Up:
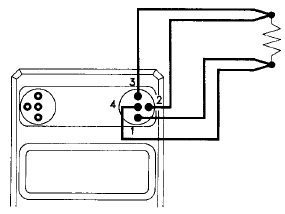
1. Connect a sensor or unknown resistance to the instrument as shown in
Figures 4, 5, or 6.
The 2-wire configuration is simplest, but includes lead-wire resistance in
the measurement. 2-wire measurements are generally limited to high
resistance sensors (e.g. 1000-ohm RTDs, 2252-ohm thermistors).
15
Lead resistance errors are compensated for in 3-wire configurations.
However full compensation requires equal resistance in each lead. This
configuration is common with 100-ohm RTDs.
In 4-wire configurations, accuracy is unaffected by lead resistance, and
resistance differences between leads.
NOTE: These instruments measure input voltages on all 4 termi-
nals, and are able to distinguish between 2-4 and 3-wire hookups.
Switching between these measurement modes is automatic.
2. Set instrument to METER mode.
3. Use the sensor-select key to set the instrument to the appropriate func-
tion and range.
NOTE: Due to limited display area, 100Ωand 1000ΩRTD's are
indicated on the display by a momentary readout of "RTD-100"
(or "RTD-1000") when first selected.
Thermistors are identified by a momentary alpha-numeric readout
of "Y-400" (signifying YSI Series-400 type thermistor).
Any of these readouts can be recalled by turning the unit off and
back on.
5. DATA LOGGING AND RECALL
Operating as a meter, the unit can save and recall up to 10 readings (each
with independent parameters: eg. °F/°C, TC-type and resolution) in random
access memory.
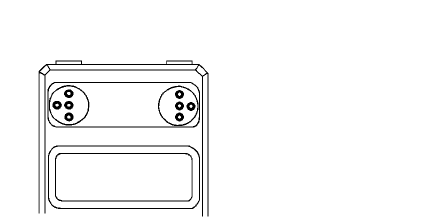
Figure 6. 4-Wire Resistance Measurement
WHT
BLK
GRN
RED
To Save Readings:
1. While in the METER OPR mode, depress the STORE key. Note that the
OPR annunciator is replaced by STO.
2. Next depress one of the memory location numbers (keys 0, 1, . . ., 9). The
corresponding memory annunciator turns on and the meter returns
momentarily to the OPR mode, displaying thermocouple temperature.
eg. STORE 7
NOTES:
•The enabled location annunciator indicates that the meter read-
ing at the instant that the location number key was hit, was
stored in memory.
• When data is stored in a location already filed with data, the
new data replaces the old.
• Stored readings are retained during power-off.
To Recall Readings:
1. While in the METER OPR mode, readings stored earlier can be displayed
by first depressing the RECALL key. Note that the OPR annunciator is
replaced by RCL, and all memory location annunciators are blanked.
2. Next depress the keypad number corresponding to the desired location.
Note that the annunciator for this location turns on, and the memory con-
tents are displayed.
3. Several stored readings can be randomly recalled by a key sequence
such as:
16
Figure 7.
T1
Calibrator
(output)
T2
Thermometer
(input)
eg. RECALL 3
eg. RECALL 5
eg. RECALL 2
eg. etc.
4. To return the meter to the operate mode, depress OPR after recalling the
last reading. All active location annunciators will turn on again, together
with the OPR annunciator.
NOTE: Recalling data from unused (ie, empty) locations will give
a zero reading.
To Erase Data Locations (Meter Mode):
1. Individual data locations can be erased by recalling the location to be
cleared, followed by a CLEAR key input. Note that the annunciator for the
cleared location is turned off, and the meter returns to OPR.
eg. RECALL 3
eg. CLEAR
NOTES: There is no need to clear a location if new data is ready
for saving in this location. Just STORE the new data. It will write
over and delete the old.
6. CALIBRATOR MODE OPERATION (Thermocouples)
Set-Up:
1. Turn on the instrument by depressing the ON/OFF key.
2. Check that the BAT annunciator turns off after display check. If not, refer
to Battery Installation/Replacement instructions.
3. When operating as a calibrator, the display indicates CALIB. Should the
instrument be in the METER mode, hit the CALIB key to change to the cal-
ibrator function.
4. Select the thermocouple type that will be used.
NOTE: Space and legibility constraints on the display preclude
the use of dedicated annunciators for the less common tungsten-
rhenium thermocouple types (G, C, & D). Instead, these types are
annunciated momentarily on the alpha-numeric display when first
selected. Both T and R annunciators remain on to indicate a
Tungsten-Rhenium selection. To recall the actual G, C, D selec-
tion, turn the unit off, then on again for another momentary read-
out.
5. Select the desired temperature scale (°F/°C key).
17
18
6. Select the resolution desired (0.1°/1° key).
NOTE: With 1° resolution, one less key stroke will be required to
enter calibrator output temperatures via the keypad.
7. The unit accepts numeric inputs by first changing the keypad to its num-
ber-entry mode (NUM) by depressing the CHANGE/ENTER key once.
The numeric display will flash, the OPR annunciator will turn off, and the
NUM annunciator will turn on. Key in desired temperature value, most sig-
nificant digit first. After the desired temperature value is keyed in, hit
CHANGE//ENTER to return to OPR mode.
7. To enter a value of 212° with 0.1° resolution, the following keystrokes are
used:
CHANGE/ENTER, 2, 1, 2, 0, CHANGE/ENTER
NOTES:
•Invalid numeric entries (eg. a temperature beyond the span of
the selected TC type) will cause a corresponding error code to
be displayed.
• To enter negative (ie. minus) temperatures, hit the –0 key first
when in the NUM mode. The first hit on this key enters the neg-
ative sign. Subsequent hits enter zeros.
• To correct a numeric entry while in the NUM mode, hit the
CHANGE/ENTER key twice. This will return number entry to
the beginning of a new number.
• To return the calibrator output to 0° while in the OPR mode, hit
the CLEAR key.
• The unit can be used as a convenient °F to °C or °C to °F cal-
culator.
For example, to convert 77°F to a Celsius reading, go to the CALIB OPR
mode, enter the reading to be converted, and change scale.
eg. °F
eg. CHANGE/ENTER
eg. 77
eg. CHANGE/ENTER
eg. °C (Display reads 25°C)
7. CALIBRATOR MODE OPERATION (RTD, Thermistor & Ohms)
Set-Up:
1. Connect measurement equipment under test (eg. RTD thermometer,
ohmmeter, etc.) to the instrument as shown in Figures 8, 9, or 10.
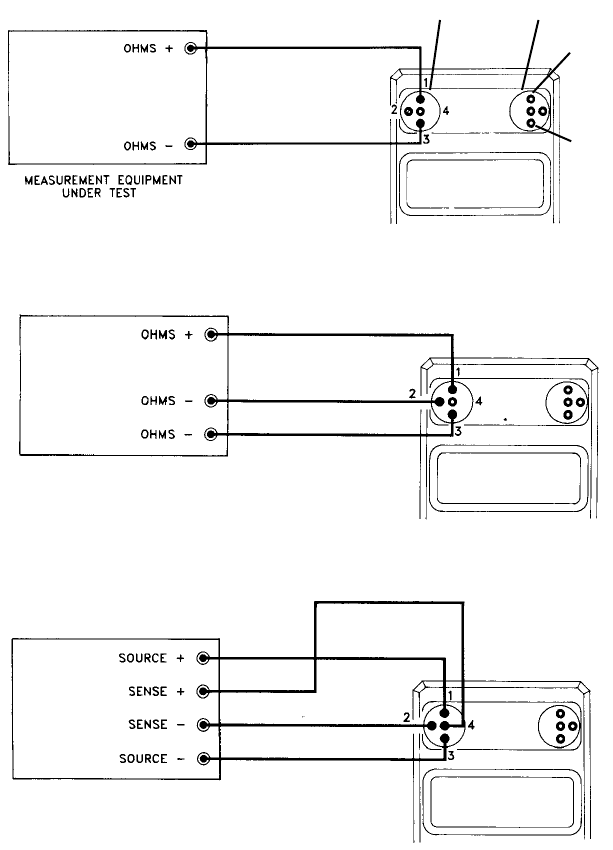
Figure 10. 4-Wire Resistance Simulation
19
Figure 8. 2-Wire Resistance Simulation
Figure 9. 3-Wire Resistance Simulation
GRN
RED
BLK
WHT
NOTE: Colors indicated apply to
Model 84937 Calibration Cable.
mA (current) source Calibrator (out) Thermometer (in)
I out
V out
8. STORAGE AND RECALL OF CALIBRATOR SETTINGS
While operating as a calibrator, the unit can store and recall up to 10 output
settings (each with independent parameters, eg. °F/°C, sensor type, and res-
olution) in random access memory.
To Store Outputs:
1. While in the CALIB OPR mode, depress the STORE key. Note that the
OPR annunciator is replaced by STO.
2. Next depress one of the memory location numbers (keys 0, 1, 2, . . ., 9).
The corresponding memory annunciator turns on, and the calibrator
returns to the OPR mode.
eg. STORE 2
NOTES:
• The enabled memory annunciator shows that the output set-up
has been saved.
• When a set up is stored in a location already in use, the new
set-up replaces the old.
• Saved set-ups are retained during power-off.
• To store a reading of 0° just hit the CLEAR while in the CALIB
OPR mode. Then depress STORE and a location number.
20
1. The same performance tradeoffs apply to 2, 3 and 4-wire simulations as
to 2, 3, and 4-wire measurements. Refer to RTD, Thermistor and Ohms
Meter-Mode section above for wiring guidelines.
2. Set instrument to CALIBRATOR mode.
3. Use the sensor-select key to set the instrument to the appropriate func-
tion and range.
NOTE: To ensure accurate calibrator outputs, observe specified
limits to excitation currents. If in doubt, check current levels with
a DMM in series with either source lead (1 or 3).
NOTE: Due to limited display area, 100Ωand 1000ΩRTD's are
indicated on the display by a momentary readout of "RTD-100"
(or "RTD-1000") when first selected.
Thermistors are identified by a momentary alpha-numeric readout
of "Y-400" (signifying YSI Series-400 type thermistor).
Any of these readouts can be recalled by turning the unit off and
back on.
To Recall Outputs:
1. While in the CALIB OPR mode, set-ups saved earlier in memory can be
recalled to program the calibrator output. First depress the RECALL key
to recall a set-up.
1. Note that the RCL annunciator turns on, OPR turns off, and all memory
locations annunciators are blanked.
2. Next hit the key with the number corresponding to the desired memory
location. The corresponding annunciator turns on, and the LCD updates
to show the new calibrator setting.
eg. RECALL 8
3. Several stored set-ups can be randomly recalled by a key sequence such
as:
eg. RECALL 6
eg. RECALL 3
eg. RECALL 9
eg. etc.
4. To return the unit to the CALIB OPR mode after recalling the last set-up,
hit the OPR key.
NOTES:
•Any other key except ON/OFF and CLEAR will also return the
OPR mode.
• Set-ups recalled from unused locations will display and output
0°.
• Calibrator set-ups can be recalled even when the unit is func-
tioning in the meter mode. The same 10 storage locations are
shared in both meter and calibrator modes.
• Readings stored in memory while operating as a METER, can
be recalled in the CALIB mode. In this unusual application, the
unit generates calibrator outputs that simulate earlier stored
meter inputs.
To Erase Set-Up Locations (Calibrator Mode):
1. Individual set-up locations can be erased by recalling the location followed
by a hit to the CLEAR key.
eg. RECALL 5
eg. CLEAR
21
9. STEP FUNCTION
When operating in the CALIBRATOR mode, the STEP key will sequentially
recall data stored in memory (up to 10 steps). At each step, the calibrator will
display and output these parameters. The STEP function is non-functional in
METER mode.
10. RAMP FUNCTION: CL25 and CL27
This feature, available only on Models CL25 and CL27, allows the calibrator
to automatically ramp up and down a user-defined staircase. Up and down
keys allow for manual ramping by the user.
To activate the RAMP function, the instrument must first be in the CALI-
BRATE mode. Depress the RAMP key once to enter the ramp programming
mode. The display reads "prog", with memory annunciators 1-4 flashing. A
second hit to the RAMP key starts automatic ramping. A third hit turns off the
RAMP function.
User definable RAMP memory locations 1, 2, 3, & 4 are dedicated to storage
of RAMP parameters; step size, staircase starting point, upper limit, and
lower limit respectively. These memory locations are accessible only when in
RAMP “prog” mode, and are independent of the other 10 memory locations.
Numeric values for RAMP parameters can be set, stored, recalled, and
cleared like other calibrator settings. (Refer page 17, CALIBRATOR MODE
OPERATION).
When automatic ramping is in progress, a hit to either the 7 or 8 key activates
manual up-ramping or down-ramping respectively. Whenever the battery is
replaced (and memory backup is not performed), the ramp parameters
default to factory-set values:
LOC 1 Step Size =10°F (K TC)
LOC 2 Start Point = 500°F
LOC 3 High Limit = 550°F
LOC 4 Low Limit = 450°F
22
SERVICE INFORMATION
WARNING
All service information is intended for qualified electronic mainte-
nance personnel only.
1. CALIBRATION PROCEDURES
This is a two-part procedure. Products with thermocouple functions only, fol-
low the Thermocouple Calibration procedure below. Products with resistance
functions (RTD, thermistor, ohms) follow first the Thermocouple Calibration
procedure, then the Resistance Calibration procedure.
A. THERMOCOUPLE CALIBRATION
Test Equipment Required:
1. Thermocouple simulator (OMEGA CL521, or equivalent) calibrated to
ITS-90.
2. Microvolt DMM (OMEGA OM7551, or equivalent)
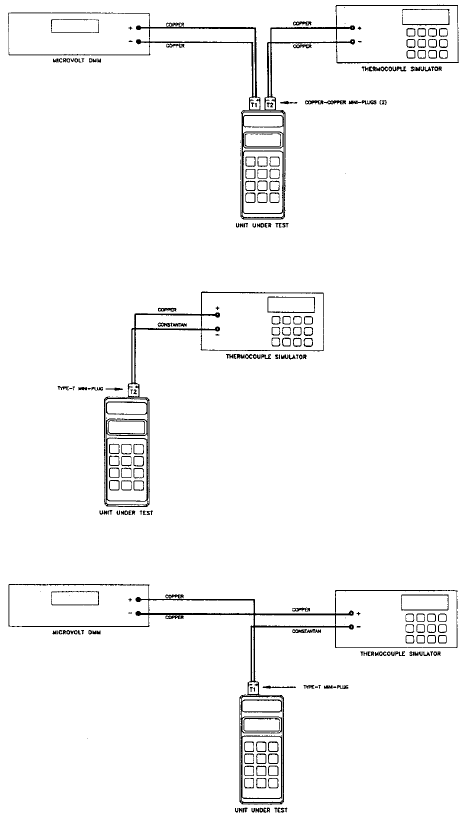
3. Calibration cables, per Figures 11, 12, 13.
NOTE: The copper constantan cables used in Figures 12 and 13
need to be calibrated. Voltage errors in these cables should be com-
pensated at the simulator.
4. Calibration cover (OMEGA 820-307-4).
Ambient Conditions:
Units should be calibrated at an ambient temperature of 23°C ±1°C, with rel-
ative humidity less than 80%.
Preparation for Calibration:
11. Remove battery from unit under test (U.U.T.). Refer to Battery
Installation/Replacement section in the manual.
12. Remove bottom-cover from U.U.T. Refer to Disassembly Instructions.
13. Remove calibration-jumpers J1 and J2 from printed-circuit board.
NOTE: Removal of J1, J2 causes partial loss of previously stored
calibration data. Do not remove these jumpers unless recalibra-
tion is intended.
23
24
NOTE: For calibrators with the older, single-jumper configura-
tion, refer to calibration procedure beginning on page 39.
14. Install calibration cover in place of bottom-cover.
15. Re-install battery.
16. Hook up test-equipment, calibration cables, and U.U.T. per Figure 10.
17. Turn on DMM and TC simulator for warmup. Allow at least 30 minutes.
18. Set the DMM to 200mV DC range.
19. Set the TC simulator to its COPPER output mode, with a reference tem-
perature of 32.0°F.
10. Turn on U.U.T. and verify that "RTD" and "Ω" annunciators are flashing
on the display. This verifies removal of J1 and J2 respectively.
NOTE: Flashing “RTD” indicates that zero-offset corrections can
be stored in EEPROM. It also indicates that cold-junction com-
pensation is disabled.
Flashing 'Ω' indicates that error corrections for the cold-junction
sensors can be stored or recalled from EEPROM.
11. Clear the EEPROM locations used to store E1 (meter cold-junction sen-
sor error) and E2 (calibrator cold-junction sensor error) as follows:
a. Set U.U.T to CALIB, OPR, K, °F mode.
b. Key in: CHANGE/0.0/ENTER/STO/1/OPR (E1 is set to 0.0°F)
c. Key in: CHANGE/0.0/ENTER/STO/2/OPR (E2 is set to 0.0°F)
NOTE: Both 1 & 2 memory annunciators should be turned on,
but the “RTD” annunciator will have turned off.
d. Perform RECALL 1 and RECALL 2 to verify storage of 0.0°F in both
locations.
NOTE: At the completion of calibration, E1 and E2 will be saved
in EEPROM. Memory locations 1 and 2 will be free for normal
use.
e. Set U.U.T. to METER, OPR, K, °F.
f. Turn U.U.T. OFF, then ON to re-enable 'RTD' and 'Ω' annunciators.

Calibration Adjustments:
NOTE: Do not deviate from the calibration adjustment sequence
that follows. This will ensure that adjustments to be stored in
EEPROM go to the correct locations.
1. Set meter-mode zero and gain adjustments per Table 1.
2. Hit OPR key (RTD annunciator turns off).
3. Set U.U.T. to CALIB, OPR, K, °F.
4. Turn U.U.T. OFF, then ON, to re-enable RTD & Ωannunciators.
5. Set calibrator-mode zero and gain adjustments per Table 2. Hit
CHANGE and ENTER at the completion of each step in Table 2.
6. Hit OPR key (RTD annunciator turns off).
7. Install J1 jumper.
8. Set U.U.T. to METER, OPR, T, °F
9. Change TC simulator output to Type T, 32°F, ALLOY mode.
10. Reconfigure calibration set-up per Figure 12. Allow 2-3 minutes for ther-
mal stabilization.
11. Calculate E1 as follows: E1 = U.U.T. Reading — 32.0.
12. Set U.U.T. to CALIB, OPR, T, °F mode.
13. Store E1; CHANGE/(E1 value)/ENTER/STO/1/OPR.
14. Go to METER mode, and verify U.U.T. reading of 32.0 ±0.1°F.
15. Reconfigure calibration setup per Figure 12. Leave simulator output at
32°F, Type T, ALLOY mode. Allow 2-3 minutes for thermal stabilization.
16. Set U.U.T. to CALIB mode, 32°F, Type T.
17. Calculate E2 as follows:
E2 = DMM Reading (in µV)
–22
(For example with DMM reading of +11µV, E2 = –0.5°F)
18. Store E2; CHANGE/(E2 value)/ENTER/STO/2/OPR.
19. Install J2 jumper.
20. Re-set U.U.T. output to 32°F, DMM reading should be 0±2µV.
21. Turn OFF U.U.T.
22. Thermocouple calibration is complete. Remove calibration cover. Re-
install original back-cover, unless going on to Part B (Resistance
Calibration). 25

Sensor U.U.T. DMM
Step Select Output Adjust Reading*
1 K 32.0°F P1 0.000 mV ±1µV
2 K 2500.0°F P41 54.856 mV ±1µV
3 Repeat Steps 1 & 2 As Required
4 J 32.0°F P1 0.000 mV ±1µV
5 T 32.0°F P1 0.000 mV ±1µV
6 E 32.0°F P1 0.000 mV ±1µV
7 N 32.0°F P1 0.000 mV ±1µV
8 B 1000.0°F P1 1.439 mV ±1µV
9 R 32.0°F P1 0.000 mV ±1µV
10 S 32.0°F P1 0.000 mV ±1µV
11 **G** 600.0°F P1 2.238 mV ±1µV
12 C 32.0°F P1 0.000 mV ±1µV
13 D 32.0°F P1 0.000 mV ±1µV
Table 2: Calibrator-Mode Zero & Gain Adjustments
** exclusive of noise.
** on EC models, G replaced by L. Calibrate L per J.
Sensor U.U.T. U.U.T.
Step Select Input Adjust Reading*
1 K 0.000 mV P1 32.0 ±0.1°F
2 K 54.856 mV P11 2500.0 ±0.1°F
3 Repeat Steps 1 & 2 As Required
4 J 0.000 mV P1 32.0 ±0.1°F
5 T 0.000 mV P1 32.0 ±0.1°F
6 E 0.000 mV P1 32.0 ±0.1°F
7 N 0.000 mV P1 32.0 ±0.1°F
8 B 1.439 mV P1 1000.0 ±0.5°F
9 R 0.000 mV P1 32.0 ±0.5°F
10 S 0.000 mV P1 32.0 ±0.5°F
11 **G** 2.238 mV P1 600.0 ±0.2 °F
12 C 0.000 mV P1 32.0 ±0.2°F
13 D 0.000 mV P1 32.0 ±0.2°F
Table 1: Meter-Mode Zero & Gain Adjustments
** exclusive of noise.
** on EC models, G replaced by L. Calibrate L per J.
26
27
Figure 13. Calibration Setup, Calibrator Mode.
Figure 11. Calibration Setup, Copper Mode.
Figure 12. Calibration Setup, Meter Mode.
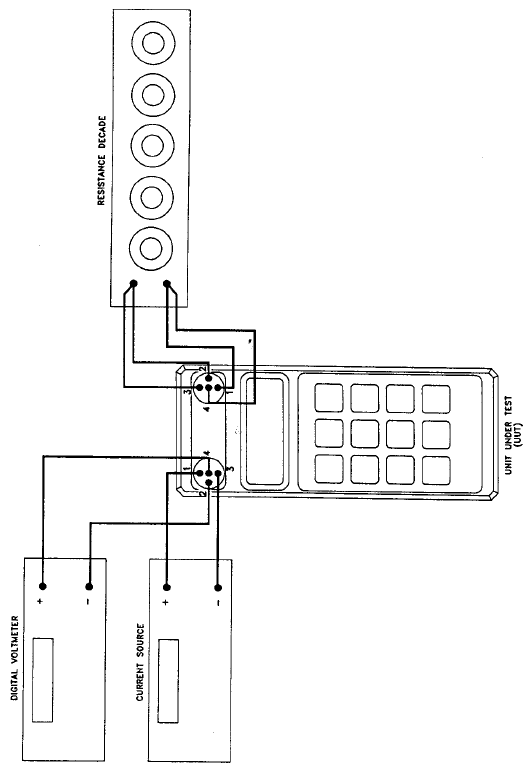
B. RESISTANCE CALIBRATION
NOTE: Thermocouple and resistance calibrations are indepen-
dent. However, potentiometer P1 is used in both thermocouple
and resistance calibrations to set EEPROM constants. Follow cal-
ibration procedures carefully to ensure that thermocouple and
resistance calibrations do not disturb one another.
Test Equipment Required:
1. Resistance Decades (General Resistance RTD-100, RTD-500/1000, and
RDS-54, or equivalent).
2. Current Source (Fluke 5101B, or equivalent).
3. Digital Multimeter (OMEGA OM7551, or equivalent).
4. Calibration cables per Figure 14.
Ambient Conditions:
Unit should be calibrated at an ambient temperature of 23°C±1°C, with rela-
tive humidity less than 80%.
Preparation For Calibration:
1. Turn off unit, and remove bottom-cover. Refer to Disassembly
Instructions.
2. Secure battery with a piece of adhesive tape.
NOTE: Momentary loss of battery power during the following cal-
ibration will invalidate previous adjustments, both resistance and
thermocouple.
3. Hook up test-equipment and unit per Figure 14.
4. Set current-source to 1mA, STANDBY mode.
5. Set DMM to 2V DC range.
6. Turn on unit.
7. Set unit to METER mode, RTD-100, °F.
8. Turn off unit. Remove jumper J1. Turn on unit. 'RTD' annunciator should
be flashing.
NOTES: Flashing 'RTD' indicates that calibration adjustments
will be written to memory. Avoid selecting thermocouple
functions while in this mode.
NOTES: Should it be necessary to scroll through thermocouple
functions, first hit the OPR key (disables flashing 'RTD'),
and start again at Step 7 above.
28
29
Figure 14. Resistance Calibration Setup

Sensor Unit Unit
Step Select Input Adjust Verify Reading*
1 RTD-100 390.26ΩP1** 1562.0°F±0.5°F
2 RTD-100 100.00Ω√32.0±0.1°F
3 RTD-100 18.49Ω√–328.0±0.2°F
4 RTD-1000 3,902.6ΩP1** 1562.0°F±0.5°F
5 RTD-1000 1000.0Ω√32.0+0.1°F
6 1,000Ω900.00ΩP1 900.00Ω
7 1,000Ω1.00Ω√1.00±0.10Ω
8 10,000Ω9,000.0ΩP1 9000.0Ω
9 10,000Ω10.0Ω√10.0±1.0Ω
Table 3: Calibration of Meter-Mode Resistance Functions
(RTD-100/1000)
* exclusive of noise.
** adjust as necessary to obtain steps 2, 5.
Calibration Adjustments:
NOTE: Do not deviate from the calibration adjustment sequence
that follows. This will ensure that adjustments to be stored in
EEPROM go to the correct locations.
1. Perform meter-mode adjustments and verifications per Table 3 (use Table
5 for RTD-Thermistor models).
2. Hit OPR key (Flashing 'RTD' annunciator turns off).
3. Install J1 jumper.
4. Set unit to CALIB mode, RTD-100, °F.
5. Switch current source to OPERATE mode.
6 Perform calibrator-mode adjustments and verifications per Table 4 (use
Table 6 for RTD-Thermistor models).
7. Turn off unit. Remove tape holding battery.
8. Re-install back cover. Resistance-function calibration is complete.
30

31
Current
Sensor Unit Source DMM
Step Select Output Input Adjust Verify Reading*
1 RTD-100 1562.0°F 1mA P38 0.39026v
2 RTD-100 32.0°F 1mA √0.10000
±0.00003v
3 RTD-100 –328.0°F 1mA √0.01849
±0.00006v
4 RTD-1000 1562.0°F 100µA P51 0.39026v
5 RTD-1000 32.0°F 100µA √0.10000
±0.00003v
6 1,000Ω900.00Ω1mA √0.90000
±0.00010v
7 1,000Ω1.00Ω1mA √0.00100
±0.00010v
8 10,000Ω9,000.0Ω100µA √0.90000
±0.00010v
9 10,000Ω10.0Ω100µA √0.00100
±0.00010v
Table 4: Calibration of Calibrator-Mode Resistance Functions
(RTD-100/1000)
* exclusive of noise.
Sensor Unit Unit
Step Select Input Adjust Verify Reading*
1 RTD-100 390.26ΩP1 1562.0°F
2 RTD-100 100.00Ω√32.0±0.3°F
3 RTD-100 18.49Ω√–328.0±0.5°F
4 1,000Ω900.00ΩP1 900.00Ω
5 1,000Ω1.00Ω√1.00±0.20Ω
6 100,000Ω90,000ΩP1 90,000Ω
7 100,000Ω100Ω√100±20Ω
8 Thermistor 47.0ΩP1 293.0°F
9 Thermistor 2252Ω√77.0±0.2°F
10 Thermistor 75,790Ω√–40.0±0.2°F
Table 5: Calibration of Meter-Mode Resistance Functions
(RTD-Thermistor)
* exclusive of noise.

Current
Sensor Unit Source DMM
Step Select Output Input Adjust Verify Reading*
1 RTD-100 1562.0°F 1mA P38 0.39026v
2 RTD-100 32.0°F 1mA √0.10000
±0.00006v
3 RTD-100 –328.0°F 1mA √0.01849
±0.00012v
4 1,000Ω900.00Ω1mA √0.90000
±0.00020v
5 1,000Ω1.00Ω1mA √0.00100
±0.00020v
6 100,000Ω90,000Ω10µA P51 0.90000v
7 100,000Ω100Ω10µA √0.00100
±0.00020v
8 Thermistor 293.0°F 1mA √0.04700
±0.00020v
9 Thermistor 77.0°F 10µA √0.02252
±0.00020v
10 Thermistor –40.0°F 10µA √0.75790
±0.00500v
Table 6: Calibration of Calibrator-Mode Resistance Functions
(RTD-Thermistor)
* exclusive of noise.
2. CALIBRATION VERIFICATION
Calibration is verified with the same instrument hookups as used for calibra-
tion (ie. Figures 12 and 13 for thermocouple functions, Figure 14 for resis-
tance functions).
While one hookup serves to verify all resistance functions (RTD, thermistor,
ohms), a full check-out of thermocouple functions requires a set of calibration
cables for each thermocouple type.
To simplify the verification of thermocouple calibration, software has been
enhanced to reactivate the copper-mode used during calibration. This feature
is available on products that use the following (and later) software revisions:
32
33
Model Software Revision
CL23A 6.7
CL24 7.7
CL25 3.7
CL26 5.6
CL27 4.16
(Software revision is marked on a label attached to integrated-circuit U1 on
the mother-board).
"Copper-mode" is a non-compensated mode of operation during which
cold-junction compensation of inputs and outputs is disabled. This permits
the use of copper-wire interconnections between instruments, while avoid-
ing the time and expense of multiple thermocouple-cable hookups. At the
conclusion of calibration verification, cold-junction compensation is re-
enabled, and operation returns to "alloy-mode".
“Alloy-mode” refers to Thermocouple operations; for example, a Type-K
thermocouple is made up of Nickel/Chromium and Nickel/Aluminum alloys.
Referring to the OMEGA Calibrator(s) in TC operation, “Alloy-mode” means
in effect “other than Copper-mode.” In order to make accurate measure-
ments using a thermocouple device one must eliminate erroneous voltage
signals. In “Alloy-mode”, the OMEGA calibrator automatically calculates the
cold-junction compensation for the selected TC type, based on the value(s)
from the ITS-90 table. This feature enables the user to make accurate tem-
perature measurements without making manual calculations for error cor-
rections.
COPPER MODE VERIFICATION PROCEDURE FOR THERMOCOUPLE
FUNCTIONS
Equipment Required:
1. OMEGA Model to be verified.
2.
Voltmeter
accurate to 1µV resolution.
3.
Cable assembly
(Fig. 11).
1. Start your calibration with a fresh battery.
2. Press the ON function button to turn the unit on.
3. Select the calibrator mode (“CALIB” on display) by pressing the
CALIB/METER function button.

4. Select type K thermocouple (“K” on display) by pressing the SENSOR
SELECT function button until type K is reached.
5. Select the tenth degree display (with a digit appearing after the decimal
point on the display) by pressing the 0.0.1 function button.
6. Select °F (“°F” on display) by pressing the °F °C function button.
7. Press the CHANGE function button. The numerical display should blink.
8. Press 9 9 9 9 9. (“9999.9” should appear blinking on display).
9. Press the ENTER function button. The display will blink “Hi” once or
twice, and then will display “0.0 °F” blinking. There will also be an “Ω”
symbol blinking in the upper left. It will blink with the “0.0 °F” display.
10. Press the ENTER function button. The “0.0 °F” display will stop blinking,
and the “Ω” will continue to blink. You are now in the copper mode. If or
when you turn off the power (or remove the battery) the unit will no longer
be in the copper mode and you would have to repeat the above steps to
return to the copper mode. As long as you see the “Ω” blinking you
are in the copper mode.
11. While in the copper mode attach the
Copper Mode Calibrator Verification
Cable
to the connector on the top of the
CL25
that is labeled T1. Attach
the other end of the cable to a
precision voltmeter.
12. Press the CHANGE function button. The “0.0 °F” display will blink, and
“NUM” will appear on the display.
13. Press 3 2 0 buttons and then press the ENTER function button. “NUM”
will disappear and “32.0 °F” will appear, not blinking. The voltmeter
should read 0.000 mV.
14. Press the CHANGE function button. The “32.0 °F” display will blink, and
“NUM” will appear on the display.
15. Press 2 5 0 0 0 buttons and then press ENTER function button. “NUM”
will disappear and “2500.0 °F” will appear, not blinking. The voltmeter
should read 54.845 mV.
16. Press the CHANGE function button. The “2500.0 °F” display will blink,
and “NUM” will appear on the display.
17. Press 3 2 0 buttons and then press the ENTER function button. “NUM”
will disappear and “32.0 °F” will appear, not blinking. The voltmeter
should read 0.000 mV.
18. Press the SENSOR SELECT function button. The sensor type will
change to type J. The “K” will disappear from the display and a “J” will
appear on the display. The voltmeter should read 0.000 mV.
34
19. Press the SENSOR SELECT function button. The sensor type will
change to type T. The “J” will disappear from the display and a “T” will
appear on the display. The voltmeter should read 0.000 mV.
20. Press the SENSOR SELECT function button. The sensor type will
change to type E. The “T” will disappear from the display and an “E” will
appear on the display. The voltmeter should read 0.000 mV.
21. Press the SENSOR SELECT function button. The sensor type will
change to type N. The “E” will disappear from the display and a “N” will
appear on the display. The voltmeter should read 0.000 mV.
22. Press the SENSOR SELECT function button. The sensor type will
change to type B. The “N” will disappear from the display and a “B” will
appear on the display. “LO” will also appear on the display.
23. Press the CHANGE function button. The “32.0 °F” display will blink, and
“NUM” will appear on the display.
24. Press 1 0 0 0 0 buttons and then press ENTER function button. “NUM”
will disappear and “1000.0 °F” will appear, not blinking. The voltmeter
should read 1.438 mV.
25. Press the SENSOR SELECT function button. The sensor type will
change to type R. The “B” will disappear from the display and a “R” will
appear on the display.
26. Press the CHANGE function button. The “1000.0 °F” display will blink,
and “NUM” will appear on the display.
27. Press 3 2 0 buttons and then press ENTER function button. “NUM” will
disappear and “32.0 °F” will appear, not blinking. The voltmeter should
read 0.000 mV.
28. Press the SENSOR SELECT function button. The sensor type will
change to type S. The
“R” will disappear from the display and a “S” will
appear on the display. The voltmeter should read 0.000 mV.
29. Press the SENSOR SELECT function button. The sensor type will change to
type G. The “R” will disappear from the display and a “g” will appear momen-
tarily in the center of the display. “LO” will then appear in the center of the dis-
play and both the “T” and “R” will appear along the top row of the display.
30. Press the CHANGE function button. The “32.0 °F” display will blink, and
“NUM” will appear on the display.
31. Press 6 0 0 0 buttons and then press ENTER function button. “NUM” will dis-
appear and “600.0 °F” will appear, not blinking. The voltmeter should read
2.238 mV.
35
32. Press the SENSOR SELECT function button. The sensor type will change to
type C. A “C” will appear momentarily in the center of the display. “600.0” will
then appear in the center of the display and both the “T” and “R” will appear
along the top row of the display.
33. Press the CHANGE function button. The “600.0 °F” display will blink, and
“NUM” will appear on the display.
34. Press 3 2 0 buttons and then press ENTER function button. “NUM” will dis-
appear and “32.0 °F” will appear, not blinking. The voltmeter should read
0.000 mV.
35. Press the SENSOR SELECT function button. The sensor type will change to
type D. A “d” will appear momentarily in the center of the display. “32.0” will
then appear in the center of the display and both the “T” and “R” will appear
along the top row of the display. The voltmeter should read 0.000 mV.
36. Press the SENSOR SELECT function button. The sensor type will change to
type K. The “T” and the “R” will disappear from the display and a “K” will
appear on the display. The voltmeter should read 0.000 mV.
37. Press the OFF function button. The unit will turn off.
38. Press the ON function button. The unit will power up and return to the cali-
brator mode. “CALIB” will appear on the display along with the “K” enuncia-
tor, the “OPR” enunciator, and “32.0 °F” will be displayed. The blinking
“Ω”
symbol will have completely disappeared indicating that you have exited the cop-
per mode.
39. Remove the
Copper Mode Calibrator Verification Cable
from both the
voltmeter
and the CL25
.
40. The copper mode verification is now complete. Press the OFF function button to
turn the unit off.
ALLOY MODE VERIFICATION PROCEDURE FOR THERMOCOUPLE
FUNCTIONS
Equipment Required:
1. OMEGA Model to be verified.
2. Precision
temperature simulator / voltage source.
3. Voltmeter
accurate to 1µV resolution.
4.
Cable assembly
.
1. Start your calibration with a fresh battery.
2. Press the ON function button to turn the unit on.
36
3. Select the calibrator mode (“CALIB” on display) by pressing the
CALIB/METER function button.
4. Select type K thermocouple (“K” on display) by pressing the SENSOR
SELECT function button until type K is reached.
5. Select the tenth degree display with a digit appearing after the decimal
point on the display) by pressing the 0.0.1 function button.
6. Select °F (“°F” on display) by pressing the °F °C function button.
7. Attach the
Alloy Mode Calibrator Verification Cables
per Fig. 12 & 13. If
you are using a
Type K Thermocouple Temperature Simulator ITS-90
you will use the regular set up. If you are using a
Precision Voltage
Source
use the alternate set up. When performing the following proce-
dure using a
Precision Voltage Source
with the alternate set up, any-
where a temperature is transmitted (output) by the
Thermocouple
Temperature Simulator
, you should adjust the
Voltage Source
to the
equivalent voltage as listed by a Type K N.I.S.T. ITS-90 Thermocouple
Reference Table. (Example: 32.0 °F would equal 0.000 mV)
8. Press the CHANGE function button and the numerical display will blink
and “NUM” will appear on the display.
9. Press 3 2 0 buttons and then press the ENTER function button. “NUM”
will disappear and “32.0 °F” will appear, not blinking.
10. Adjust the
Thermocouple Temperature Simulator
to 32.0 °F.
00. Note: The reading on the voltmeter should read null. 0.000 mV. Adjusting
the CL25 to any temperature and adjusting the Temperature Simulator to
the same temperature should result in a null, or 0.000 mV on the volt-
meter.
11. Remove the
Alloy Mode Calibrator Verification Cable
from all equipment.
12. The Alloy Mode verification is now complete. Press the OFF function but-
ton to turn the unit off.
37
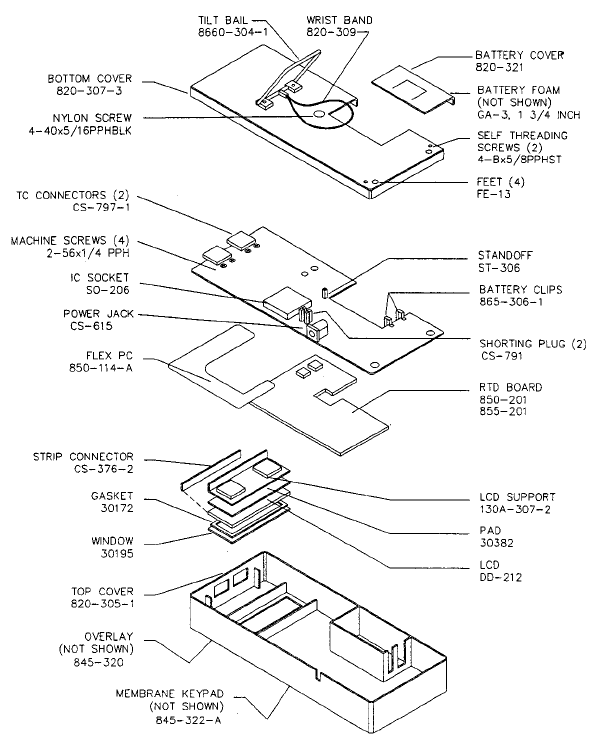
4. MECHANICAL PARTS DIAGRAM
38
39
CALIBRATION PROCEDURES
Test Equipment Required:
1. Thermocouple simulator (OMEGA CL25, or equivalent).
2. Microvolt null-meter (Keithley 155, or equivalent)
3. Calibration cover (OMEGA 820-307-4).
4. Calibration cables, T.C. types K, J, T & E (as required) per Figure1 below.
5. Low-thermal (eg. copper) shorting-link for null-meter.
NOTE: The (2) alloy-copper junctions in the calibration cables
can be either solder-joints (cleaned to remove flux), or crimp-con-
nections. Insulate each junction with heat-shrink tubing, then
wrap them close together in copper-foil to ensure that they main-
tain identical temperatures (ambient).
Ambient Conditions:
Units should be calibrated at an ambient temperature of 23°C ±1°C, with rel-
ative humidity less than 80%. Test equipment and the unit-under-test
(U.U.T.) should have 1 hour to reach thermal equilibrium with ambient-tem-
perature.
Calibration Adjustments:
11. Remove battery from unit under test (U.U.T.). Refer to Battery
Installation/Replacement instructions in the manual.
12. Remove bottom-cover from U.U.T. Refer to Disassembly Instructions.
13. Remove calibration-jumper J1 from printed-circuit board.
NOTE: When installed, J1 protects the contents of EEPROM
locations where zero-offset adjustments are stored. Once J1 is
removed, this data is erased when the U.U.T. is turned on.
14. Install calibration cover in place of bottom-cover.
15. Re-install battery.
16. Connect U.U.T. to test equipment per Figure 2 using the K-type calibra-
tion cable.
17. Turn on U.U.T. and allow 2-3 minutes for thermal re-stabilization of the
TC mini-plug and input-jack.
NOTE: • U.U.T. will be in the Type K, °F meter-mode. The FUNC
annunciator is on, indicating that new constants will be
stored in EEPROM.
40
NOTE: • With J1 removed, the digital-filters in the U.U.T. are dis-
abled. This is to speed up U.U.T. response to calibra-
tion adjustments. In this mode ±0.1°F of reading noise
is normal.
NOTE: • Do not deviate from the calibration adjustment
sequence that follows. This will ensure that zero adjust-
ments for each TC type will be stored in the appropriate
memory locations.
18. Apply 32°F (Type K) to U.U.T. Adjust potentiometer P1 for a reading of
32.0°F (exclusive of noise).
19. Apply 2500°F (Type K) to U.U.T. Adjust potentiometer P11 for a reading
of 2500.0°F.
NOTE: Adjustment steps 8 & 9 are interactive. Repeat these
steps as necessary to get the desired readings.
10. Hit OPR key to store K-meter zero-adjustment in EEPROM. Note that
“FUNC” annuciator turns off.
11. Select Type J thermocouple (KJT key on CL23A, SENSOR SELECT key
on CL24).
12. Turn off U.U.T.
13. Replace K calibration-cable with J calibration-cable.
14. Turn on U.U.T. Note that “FUNC” annunciator is on again. Allow 2-3 min-
utes for thermal restabilization.
15. Apply 32°F (Type J). Adjust P1 for a reading of 32.0°F (exclusive of
noise).
16. Hit OPR key to store J-meter zero-adjustment.
17. Select Type T thermocouple.
18. Turn off U.U.T.
19. Replace J calibration-cable with T calibration-cable.
20. Turn on U.U.T. Allow 2-3 minutes for thermal stabilization.
21. Apply 32°F (Type T). Adjust P1 for a reading of 32.0°F (exclusive of
noise).
22. Hit OPR key to store T-meter zero-adjustment.
NOTE: Steps 23 thru 28 apply to Model CL24 only. For Model
CL23A, go to step 29 next.
41
23. Select Type-E thermocouple.
24. Turn off U.U.T.
25. Replace T calibration-cable with E calibration-cable.
26. Turn on U.U.T. Allow 2-3 minutes for thermal stabilization.
27. Apply 32°F (Type E). Adjust P1 for a reading of 32.0°F (exclusive of
noise).
28. Hit OPR key to store E-meter zero-adjustment.
29. Select Type-K thermocouple.
30. Select CALIB mode.
31. Turn off U.U.T.
32. Connect U.U.T. to test-equipment per Figure 3 using the K calibration-
cable.
33. Turn-on U.U.T. and allow 2-3 minutes, for thermal stabilization
34. Set both the U.U.T. and TC-simulator to output 32.0°F (Type K). Adjust
P2 for a null-meter reading of 0±3µV.
35. Set both the U.U.T. and T-simulator to output 2400°F (Type K). Adjust
P41 for a null-meter reading of 0±3µV.
NOTE: Steps 34 and 35 are interactive. Repeat each as neces-
sary to get the desired null readings.
36. Hit OPR key to store K-calib zero adjustment.
37. Select J thermocouple.
38. Turn off U.U.T.
39. Replace K calibration-cable with J calibration-cable.
40. Turn on U.U.T. Allow 2-3 minutes for thermal stabilization.
41. Set both the U.U.T. and TC-simulator to output 32.0°F (Type J). Adjust
P1 for a null-meter reading of 0±3µV.
42. Hit OPR Key to store J-calib zero adjustment.
43. Select Type-T thermocouple.
44. Turn off U.U.T.
45. Replace J calibration-cable with T calibration-cable.
46. Turn on U.U.T. Allow 2-3 minutes for thermal stabilization.
42
47. Set both the U.U.T. and TC-simulator to output 32.0°F (Type T). Adjust
P1 for a null-meter reading of 0±3µV.
48. Hit OPR key to store T-calib zero adjustment.
NOTE: Steps 49 thru 54 apply to Model CL24 only. For Model
CL23A go next to step 55.
49. Select Type-E thermocouple.
50. Turn off U.U.T.
51. Replace T calibration-cable with E calibration-cable.
52. Turn on U.U.T. Allow 2-3 minutes for thermal stabilization.
53. Set both the U.U.T. and thermocouple-simulator to 32.0°F (Type E).
Adjust P1 for a null-meter reading of 0±3µV.
54. Hit OPR Key to store E-calib zero adjustment
55. Turn off U.U.T.
56. Remove calibration cover. Be careful not to disturb battery connections.
57. Re-install J1 jumper.
58. Re-install original back cover. Calibration is complete.

WARRANTY/DISCLAIMER
OMEGA ENGINEERING, INC. warrants this unit to be free of defects in materials and workmanship for a
period of 37 months from date of purchase. OMEGA Warranty adds an additional one (1) month grace
period to the normal three (3) year product warranty to cover handling and shipping time. This
ensures that OMEGA’s customers receive maximum coverage on each product.
If the unit should malfunction, it must be returned to the factory for evaluation. OMEGA’s
Customer Service Department will issue an Authorized Return (AR) number immediately upon
phone or written request. Upon examination by OMEGA, if the unit is found to be defective it will
be repaired or replaced at no charge. OMEGA’s WARRANTY does not apply to defects resulting
from any action of the purchaser, including but not limited to mishandling, improper interfacing,
operation outside of design limits, improper repair, or unauthorized modification. This
WARRANTY is VOID if the unit shows evidence of having been tampered with or shows evidence
of being damaged as a result of excessive corrosion; or current, heat, moisture or vibration;
improper specification; misapplication; misuse or other operating conditions outside of OMEGA’s
control. Components which wear are not warranted, including but not limited to
contact points, fuses, and triacs.
OMEGA is pleased to offer suggestions on the use of its various products. However,
OMEGA neither assumes responsibility for any omissions or errors nor assumes liability for any
damages that result from the use of its products in accordance with information provided by
OMEGA, either verbal or written. OMEGA warrants only that the parts
manufactured by it will be as specified and free of defects. OMEGA MAKES NO OTHER
WARRANTIES OR REPRESENTATIONS OF ANY KIND WHATSOEVER, EXPRESSED OR IMPLIED,
EXCEPT THAT OF TITLE, AND ALL IMPLIED WARRANTIES INCLUDING ANY WARRANTY OF MER-
CHANTABILITY AND FITNESS FOR A PARTICULAR PURPOSE ARE HEREBY DISCLAIMED. LIMI-
TATION OF LIABILITY: The remedies of purchaser set forth herein are exclusive and the total
liability of OMEGA with respect to this order, whether based on contract, warranty, negligence,
indemnification, strict liability or otherwise, shall not exceed the purchase price of the compo-
nent upon which liability is based. In no event shall OMEGA be liable for consequential, incidental
or special damages.
CONDITIONS: Equipment sold by OMEGA is not intended to be used, nor shall it be used: (1) as a “Basic
Component” under 10 CFR 21 (NRC), used in or with any nuclear installation or activity; or (2) in medical
applications or used on humans. Should any Product(s) be used in or with any nuclear installation or
activity, medical application, used on humans, or misused in any way, OMEGA assumes no
responsibility as set forth in our basic WARRANTY/ DISCLAIMER language, and additionally, purchaser
will indemnify OMEGA and hold OMEGA harmless from any liability or damage whatsoever arising out
of the use of the Product(s) in such a manner.
RETURN REQUESTS / INQUIRIES
Direct all warranty and repair requests/inquiries to the OMEGA Customer Service Department.
BEFORE RETURNING ANY PRODUCT(S) TO OMEGA, PURCHASER MUST OBTAIN AN AUTHORIZED
RETURN (AR) NUMBER FROM OMEGA’S CUSTOMER SERVICE DEPARTMENT (IN ORDER TO AVOID
PROCESSING DELAYS). The assigned AR number should then be marked on the outside of the return
package and on any correspondence.
The purchaser is responsible for shipping charges, freight, insurance and proper packaging to prevent
breakage in transit.
FOR WARRANTY RETURNS, please have the fol-
lowing information available BEFORE
contacting OMEGA:
1. P.O. number under which the product was
PURCHASED,
2. Model and serial number of the product under
warranty, and
3. Repair instructions and/or specific
problems relative to the product.
FOR NON-WARRANTY REPAIRS,
consult
OMEGA for current repair charges. Have the fol-
lowing information available BEFORE
contacting OMEGA:
1. P.O. number to cover the COST
of the repair,
2. Model and serial number of product, and
3. Repair instructions and/or specific problems
relative to the product.
OMEGA’s policy is to make running changes, not model changes, whenever an improvement is possible.
This affords our customers the latest in technology and engineering.
OMEGA is a registered trademark of OMEGA ENGINEERING, INC.
© Copyright 1996 OMEGA ENGINEERING, INC. All rights reserved. This document may not be copied, photocopied, reproduced,
translated, or reduced to any electronic medium or machine-readable form, in whole or in part, without prior written consent of
OMEGA ENGINEERING, INC.
USA
MADE
IN
M1554/499
Where Do I Find Everything I Need for
Process Measurement and Control?
OMEGA…Of Course!
TEMPERATURE
䡺
⻬Thermocouple, RTD & Thermistor Probes, Connectors, Panels & Assemblies
䡺⻬ Wire: Thermocouple, RTD & Thermistor
䡺⻬ Calibrators & Ice Point References
䡺⻬ Recorders, Controllers & Process Monitors
䡺⻬ Infrared Pyrometers
PRESSURE, STRAIN AND FORCE
䡺⻬ Transducers & Strain Gauges
䡺⻬ Load Cells & Pressure Gauges
䡺⻬ Displacement Transducers
䡺⻬ Instrumentation & Accessories
FLOW/LEVEL
䡺⻬ Rotameters, Gas Mass Flowmeters & Flow Computers
䡺⻬ Air Velocity Indicators
䡺⻬ Turbine/Paddlewheel Systems
䡺⻬ Totalizers & Batch Controllers
pH/CONDUCTIVITY
䡺
⻬pH Electrodes, Testers & Accessories
䡺⻬ Benchtop/Laboratory Meters
䡺⻬ Controllers, Calibrators, Simulators & Pumps
䡺⻬ Industrial pH & Conductivity Equipment
DATA ACQUISITION
䡺⻬ Data Acquisition & Engineering Software
䡺⻬ Communications-Based Acquisition Systems
䡺⻬ Plug-in Cards for Apple, IBM & Compatibles
䡺⻬ Datalogging Systems
䡺⻬ Recorders, Printers & Plotters
HEATERS
䡺⻬ Heating Cable
䡺⻬ Cartridge & Strip Heaters
䡺⻬ Immersion & Band Heaters
䡺⻬ Flexible Heaters
䡺⻬ Laboratory Heaters
ENVIRONMENTAL
MONITORING AND CONTROL
䡺⻬ Metering & Control Instrumentation
䡺⻬ Refractometers
䡺⻬ Pumps & Tubing
䡺⻬ Air, Soil & Water Monitors
䡺⻬ Industrial Water & Wastewater Treatment
䡺⻬ pH, Conductivity & Dissolved Oxygen Instruments