Omnilink Systems OL300G GSM/GPS Ankle Worn Tracking Device User Manual
Omnilink Systems, Inc. GSM/GPS Ankle Worn Tracking Device Users Manual
Users Manual

Omnilink User Guide 1 12-18-08 v2.0
Omnilink Orion Hardware User Guide
for OL300-G, OL300-C and OL300-B
Omnilink User Guide 2 12-18-08 v2.0
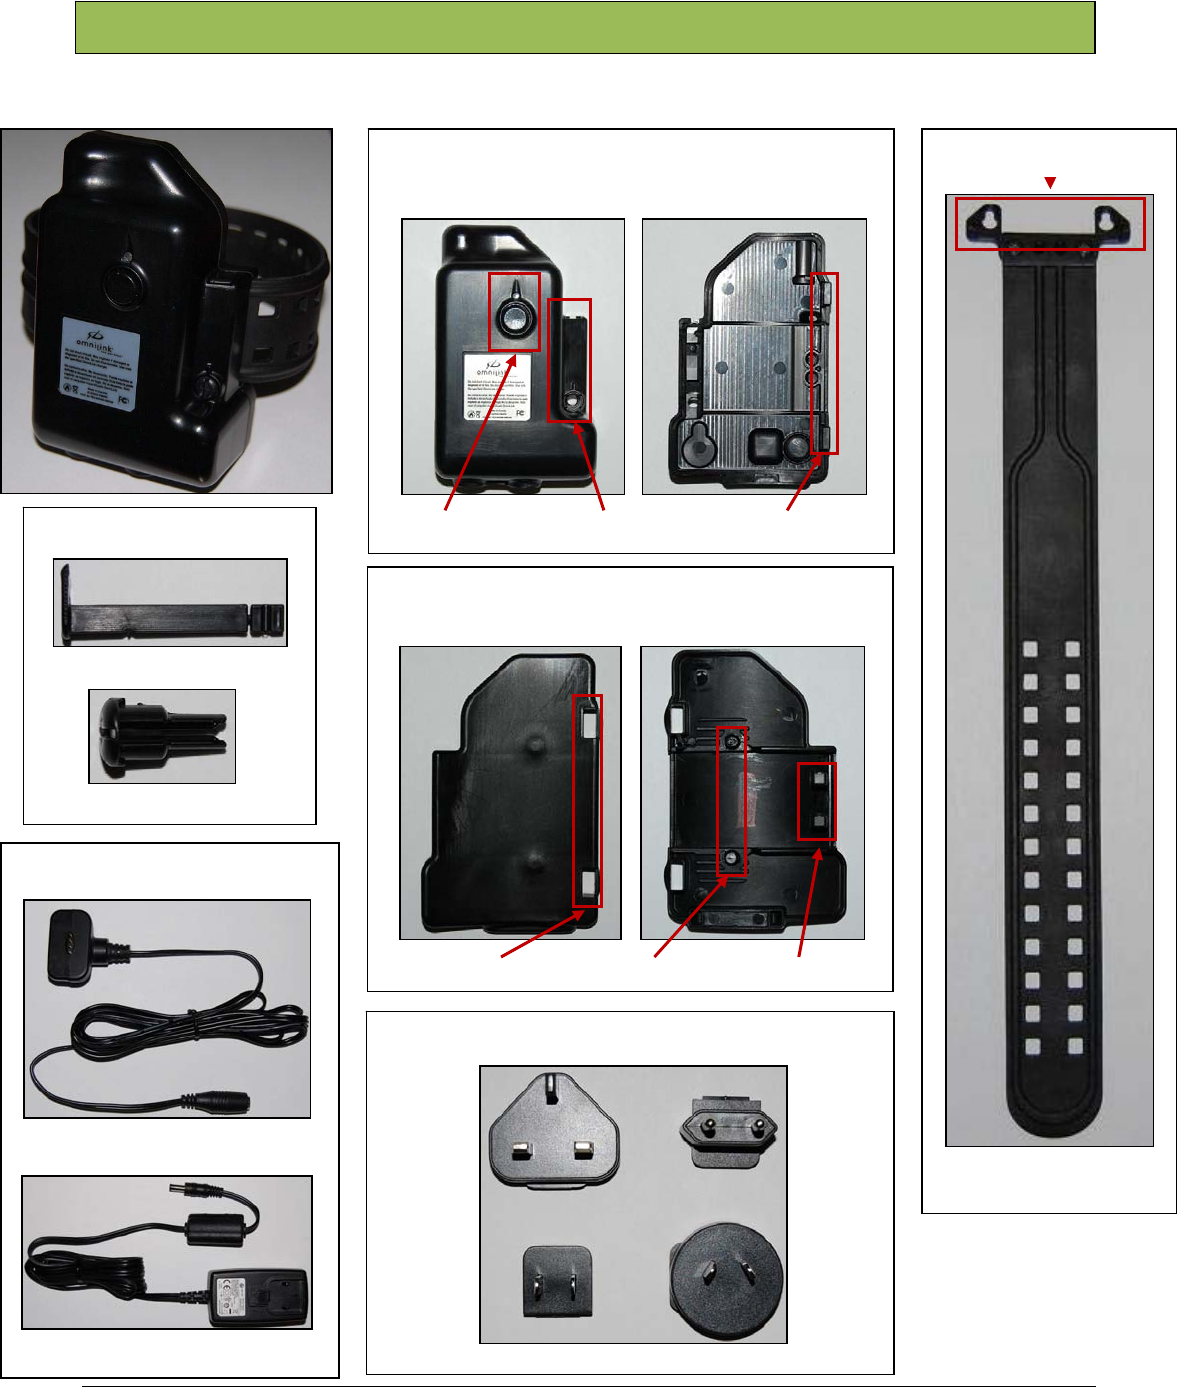
Omnilink Orion - Components
Strap Retaining Bracket
Device
Device Inside
Device Hinges
Device Outside
Response Button Locking Column
Strap
Back Plate
Back Plate Inside
Locking Posts
Back Plate Outside
Hinge Gaps Strap Retaining Pins
Charger
Extension and Char
g
in
g
Head
Wall Plug
Wall Plug Adapters
Pins
Top Pin
Bottom Pin
North America Australia
EMEA United Kingdom
Omnilink User Guide 3 12-18-08 v2.0
The device should be stored with the strap and back plate positioned as if the device were
placed on an offender. The strap needs to remain in a circular position so it stays soft and
pliable. Store the device with only the top pin inserted. When possible, the device should
be plugged into an electrical outlet to ensure that it has been charged for at least 3 hours prior
to use.
Users should prepare the device and populate FocalPoint with the necessary information prior
to attaching the device. There are two key tasks to complete as part of the pre-installation
process:
1. Assign a rate plan (i.e., frequency with which the device is located)
2. Assign a bracelet to an offender in FocalPoint.
TASK ONE: ASSIGN A RATE PLAN
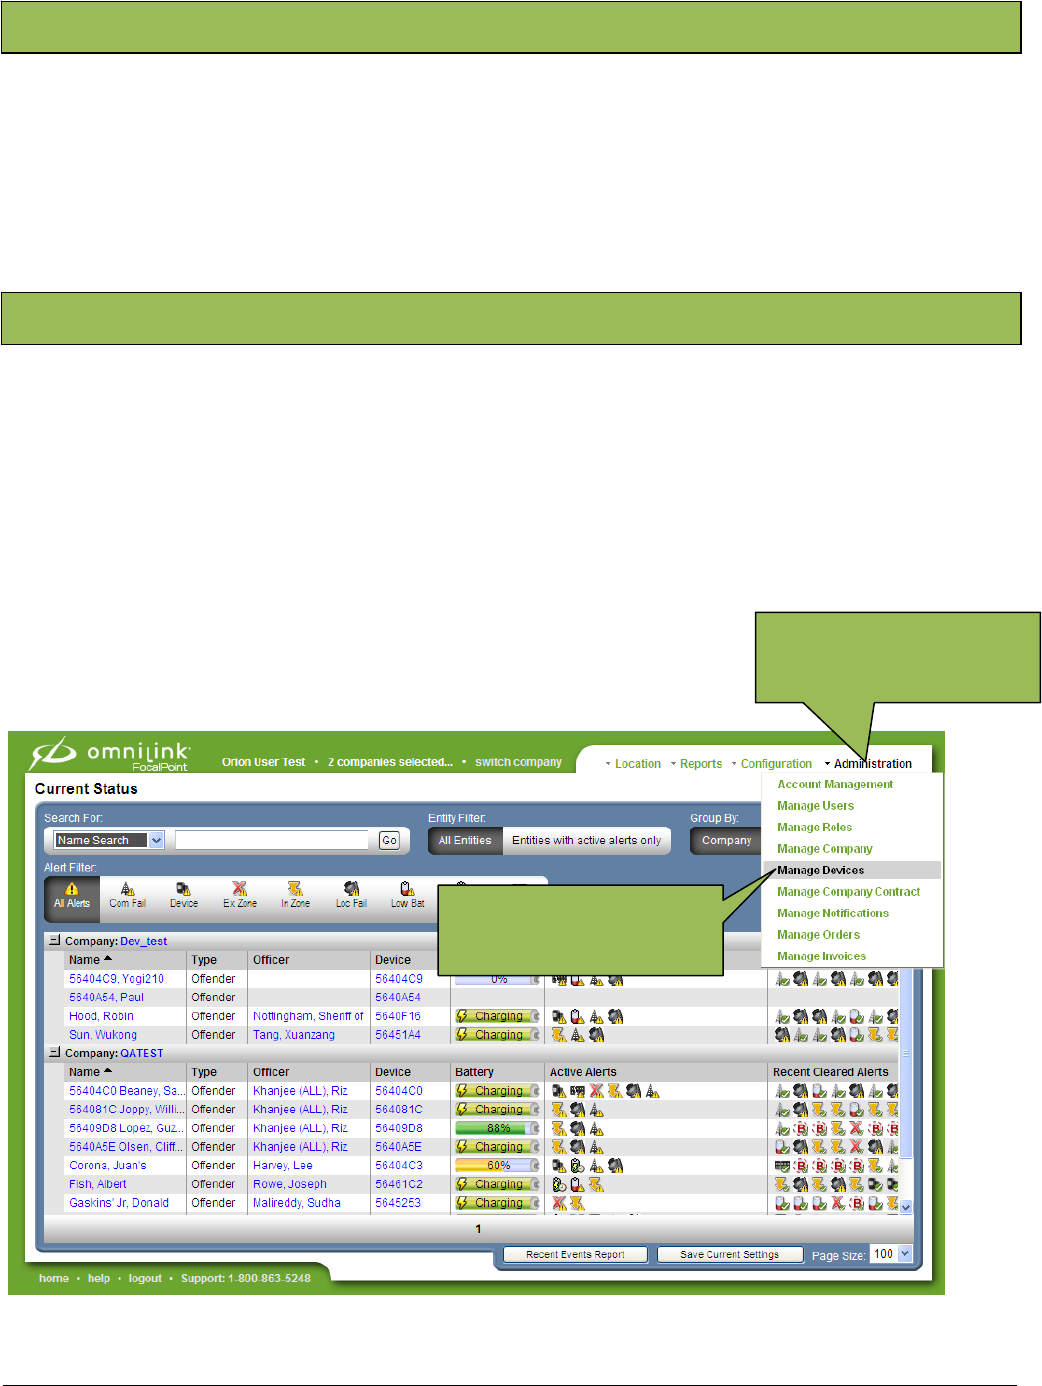
Step 1: Hover over the “Administration” link.
Step 2: Click “Manage Devices” to launch the “Device ID” screen.
Omnilink Orion
–
Storin
g
the Unit
Omnilink Orion
–
Pre-Installation
Step 1: Hover over the
Administration link.
Step 2: Click Manage
Devices.
Omnilink User Guide 4 12-18-08 v2.0
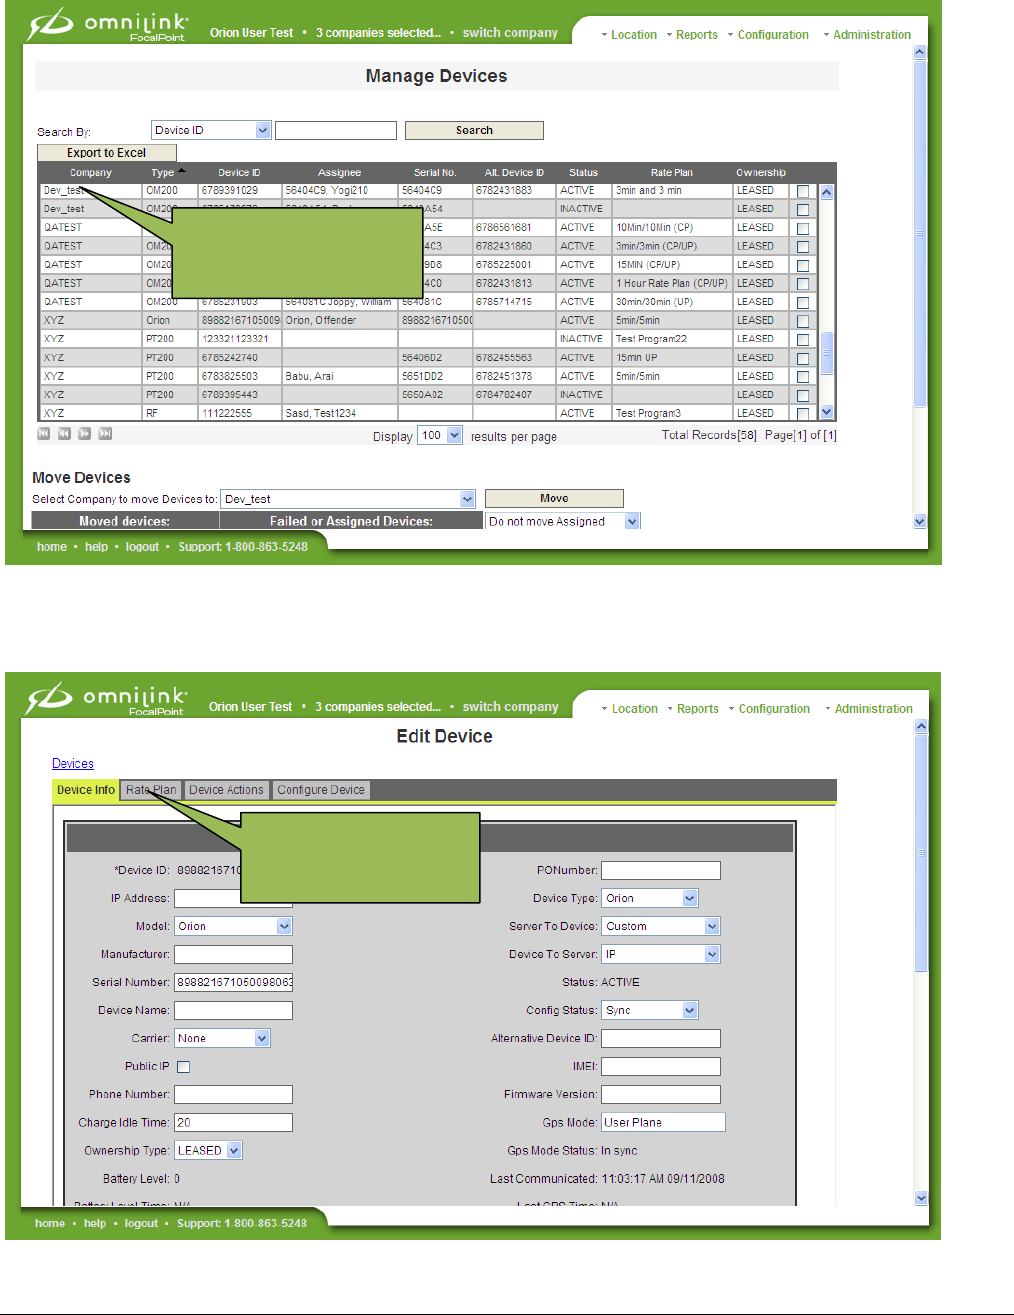
Step 3: Click the desired device when the “Device ID” screen launches.
Step 4: Click the “Rate Plan” button on the “Edit Device” screen to launch the “Rate” screen.
Step 3: Click on the
desired device.
Step 4: Click on the
Rate Plan button.
Omnilink User Guide 5 12-18-08 v2.0
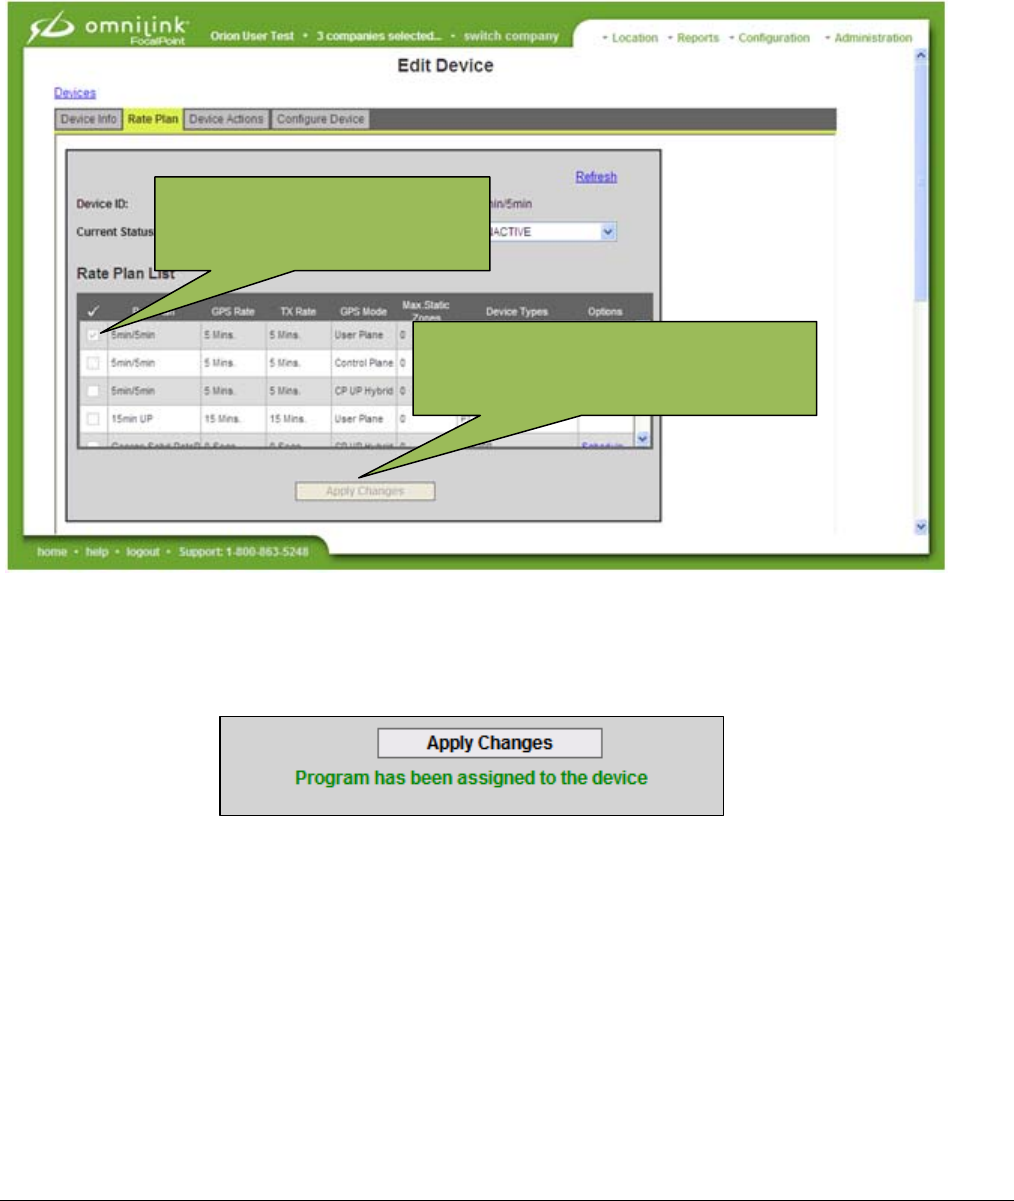
Step 5: Click the check box of the desired rate plan. Note: Only the rate plans available to
you will appear on the Rate screen.
Step 6: Click the “Apply Changes” button to refresh the screen.
Step 7: Ensure that “Program has been assigned to the device” appears
below the Apply Changes button.
TASK TWO: ASSIGN A BRACELET TO AN OFFENDER IN FOCALPOINT.
(See Setting up an Offender in the FocalPoint software guide).
Step 5: Click the check box
for the desired rate plan.
Step 6: Click the Apply Changes
button to save the change.
Omnilink User Guide 6 12-18-08 v2.0
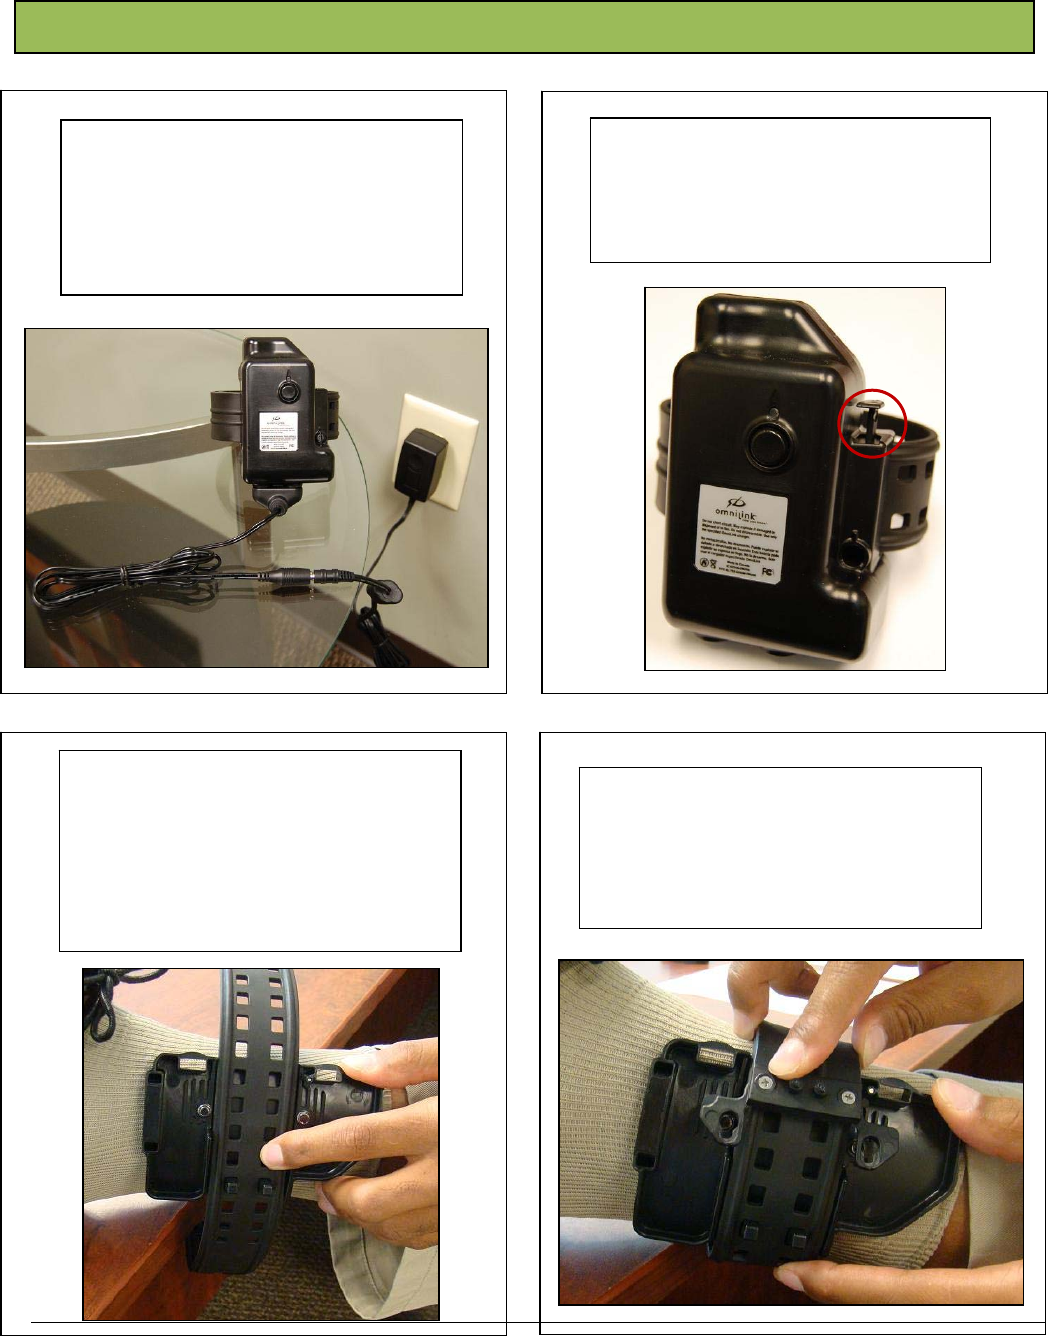
Step 3: Hold the back plate
against the ankle, place one of the
sets of strap holes over the locking
posts and wrap the strap around
the ankle
Step 4: Place the locking posts in
different sizing holes as necessary
for the locking harness to reach
the retaining pins.
Step 2: Remove the top pin from
the device. Remove the device
and back plate from the strap. Set
the device aside.
Step 1: Charge the Device for
3 hours prior to installation.
Unplug the charger from the
wall outlet and remove the
charger cord from the device.
Omnilink Orion – Installation
Omnilink User Guide 7 12-18-08 v2.0
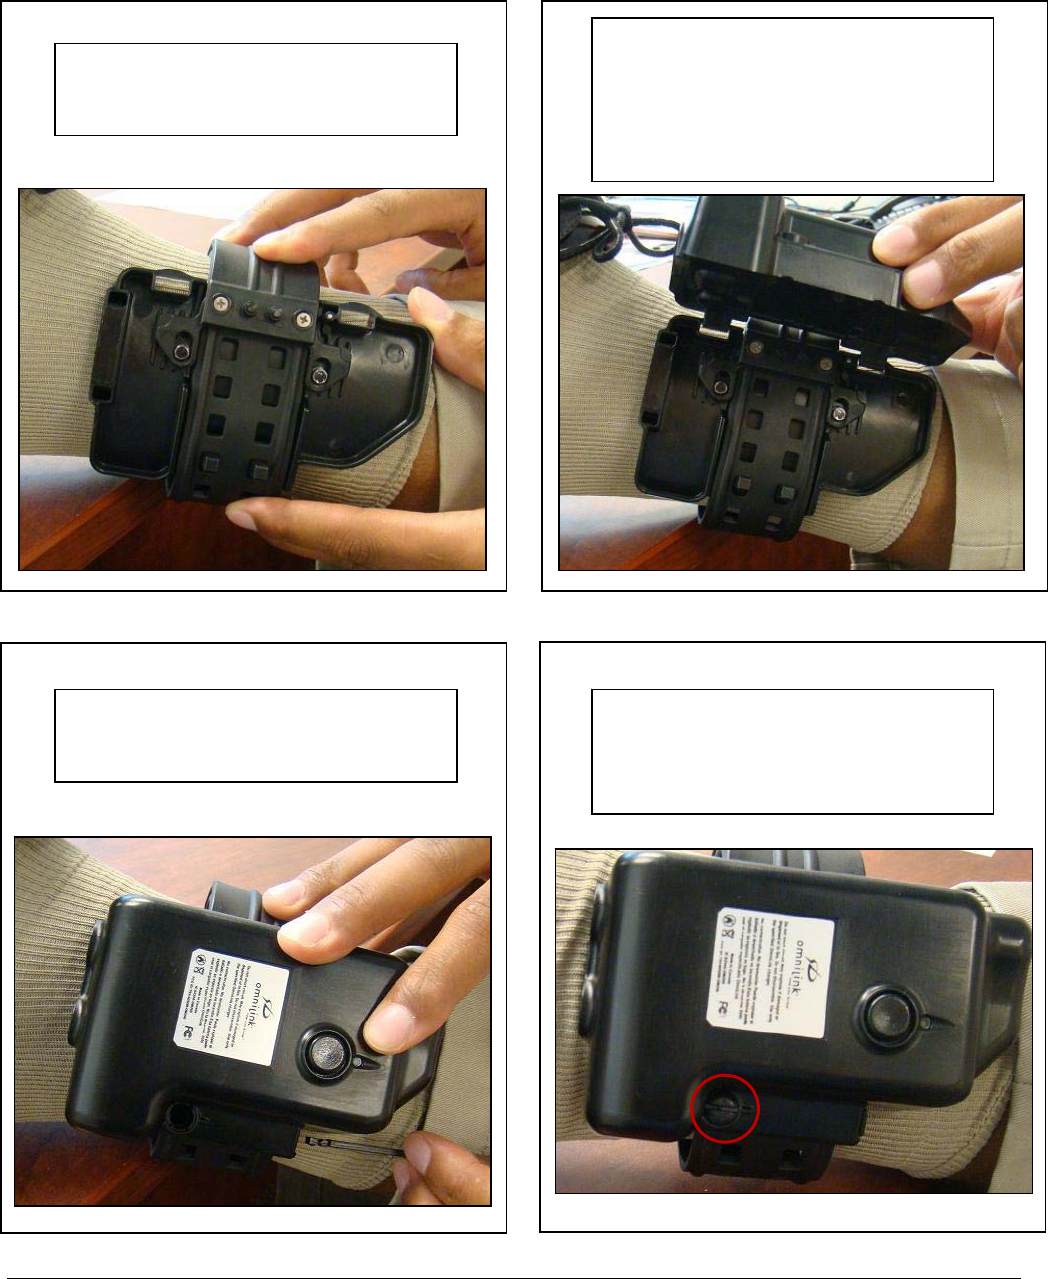
Step 5: Slide the locking harness
onto the retaining pins.
Step 6: Place the device hinges
into the hinge gaps and roll the
device closed until the device is
flush with the back plate.
Step 7: Insert the top pin until it is
flush with the device.
Step 8: Insert the bottom pin until
it connects with the top pin and
sits flush with the device.
Omnilink User Guide 8 12-18-08 v2.0
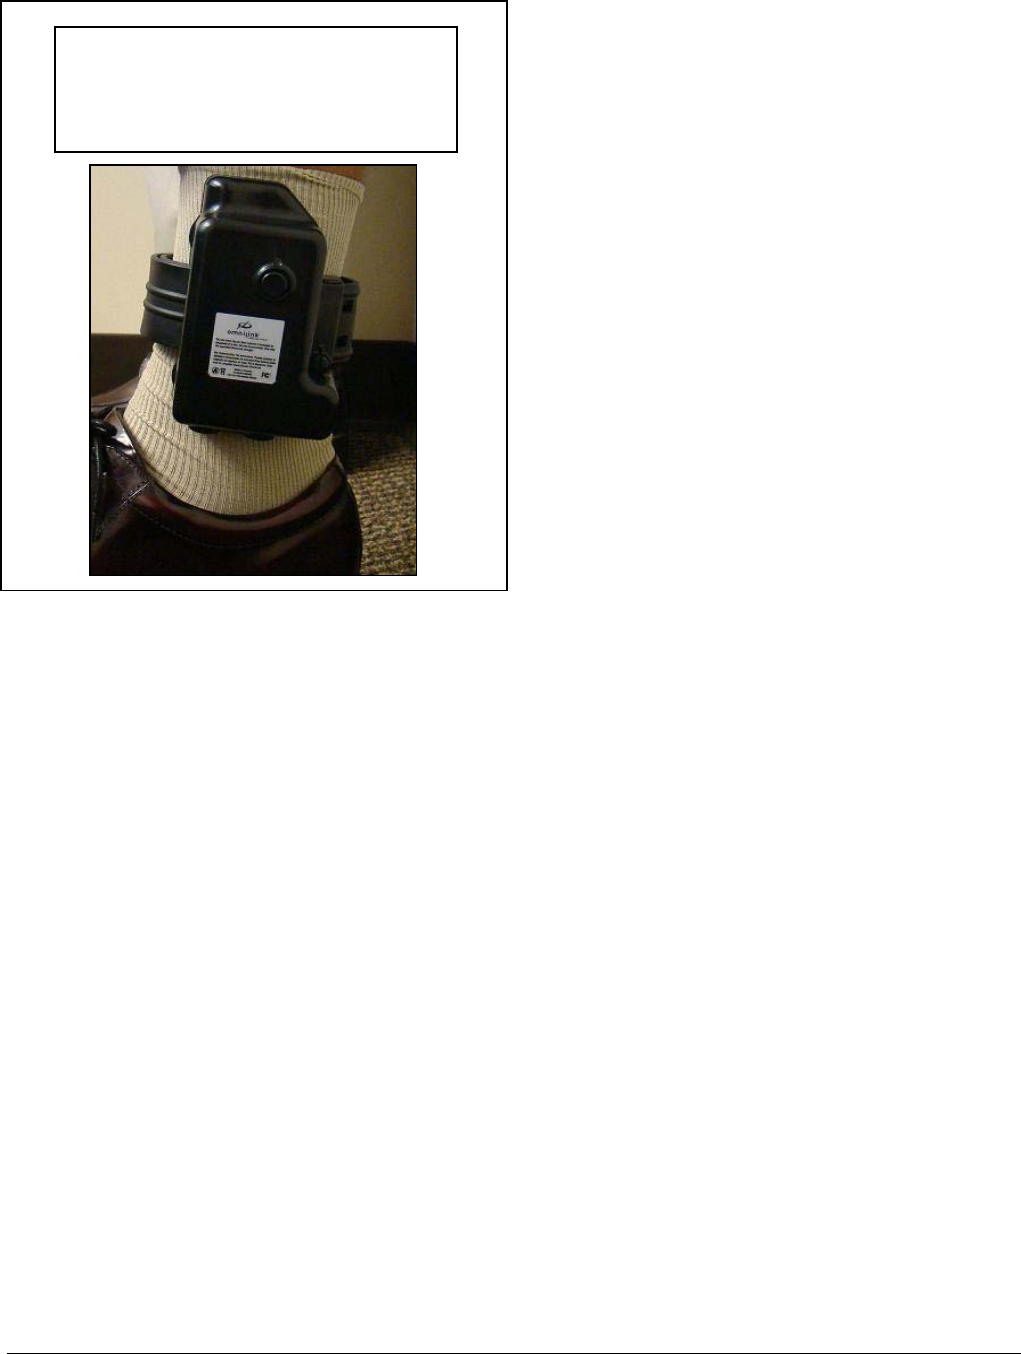
Step 9: Ensure that the device is
securely attached to the ankle and
that the Omnilink decals point up.
Omnilink User Guide 9 12-18-08 v2.0
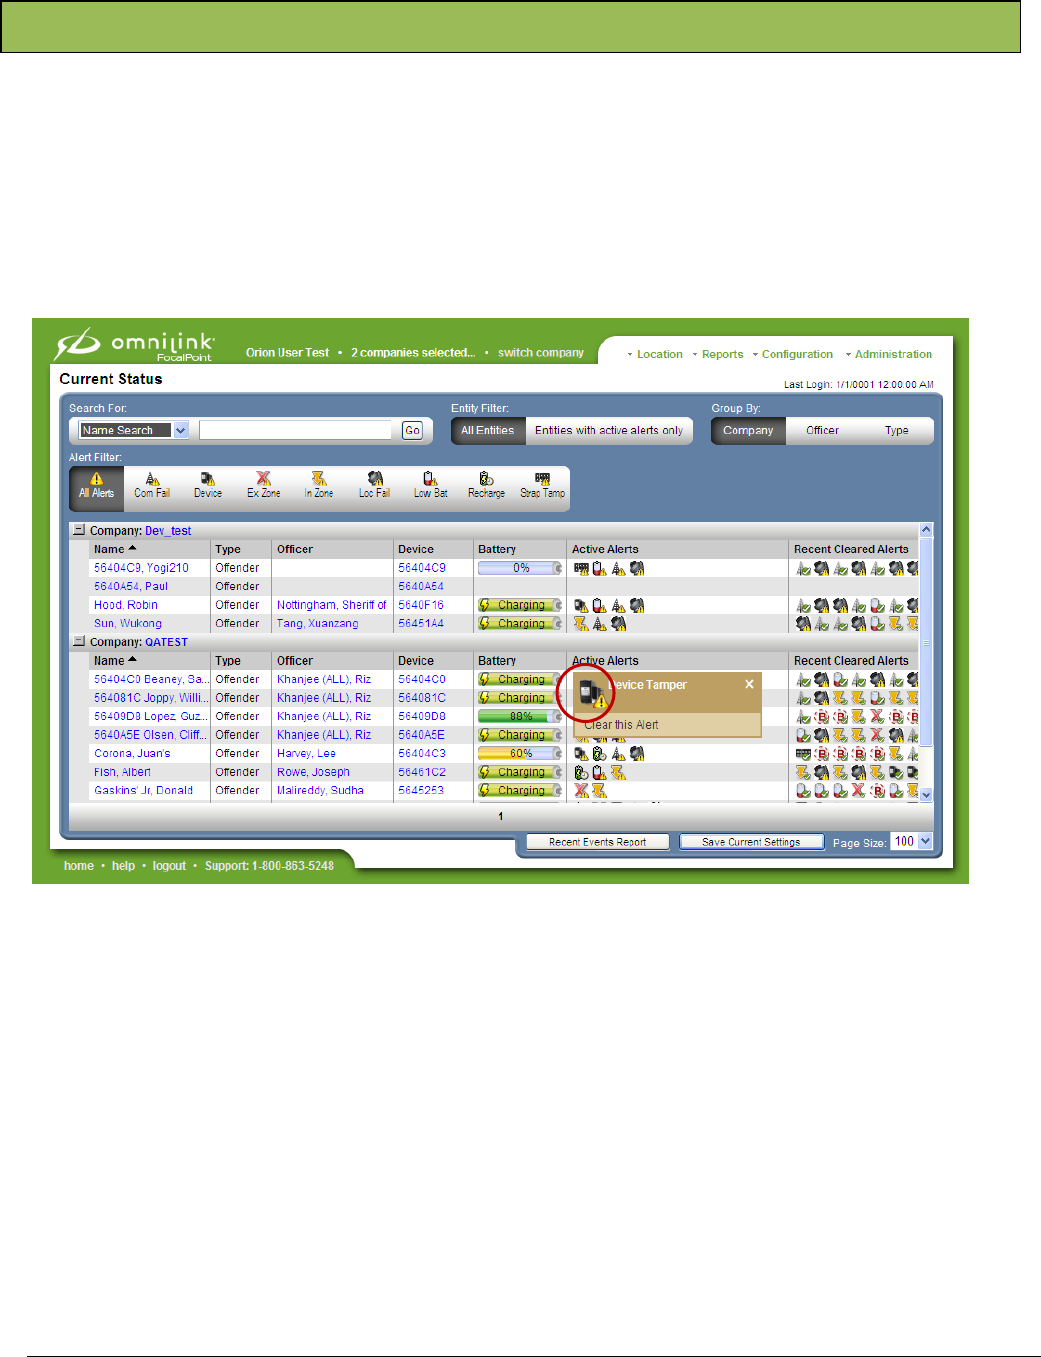
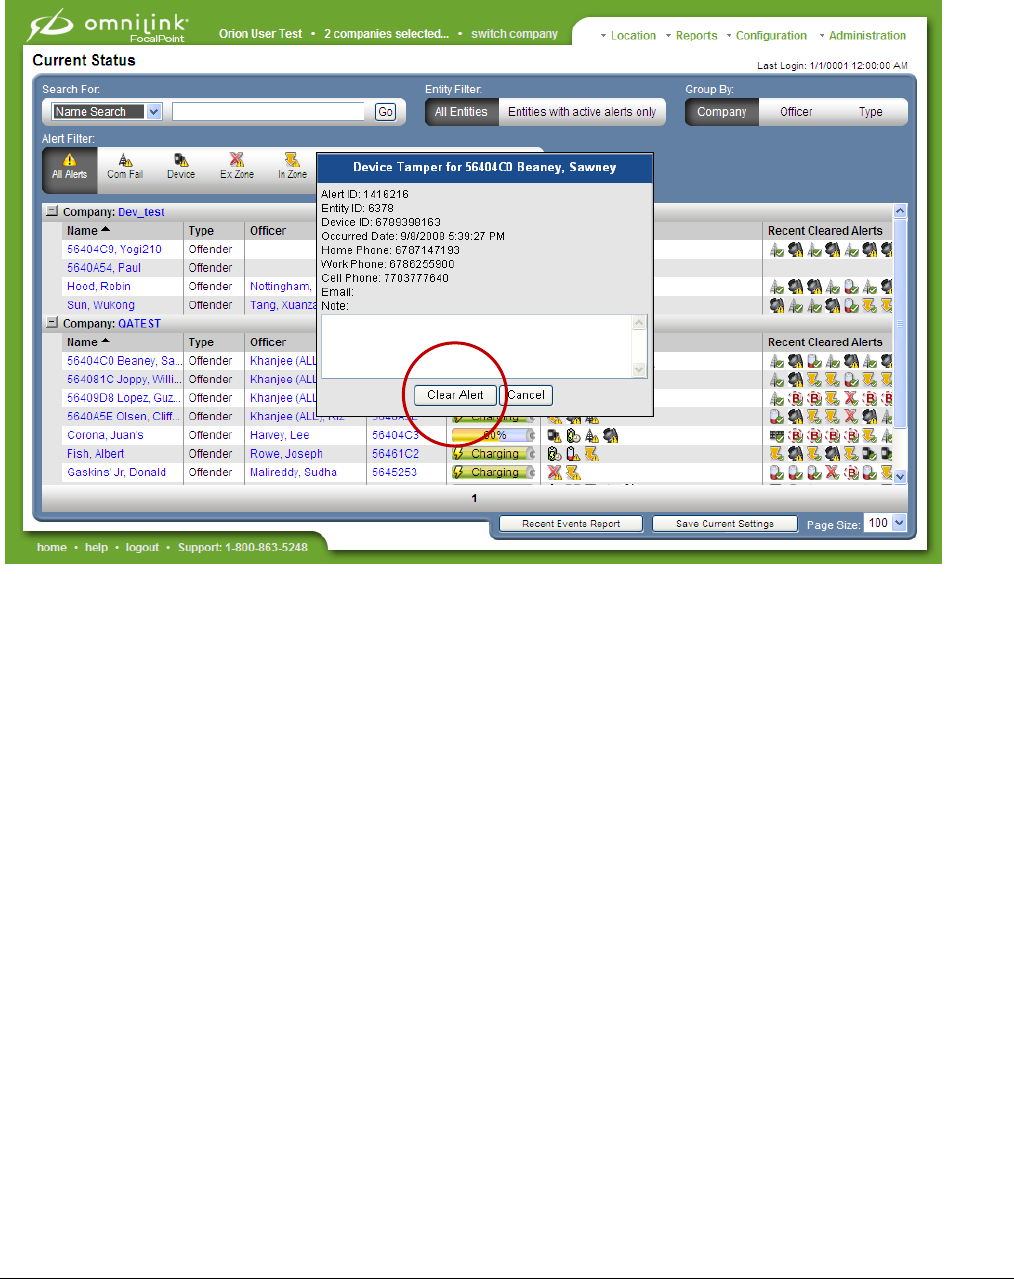
Once the device is attached, Users must log into FocalPoint and clear the “device tamper”
alerts, as well as wait to ensure that FocalPoint is successfully tracking the device.
Step 1: Log into FocalPoint.
Step 2: On the home page, look for any “Device Tamper” icons for the device.
Step 3: Click the “Device Tamper” icon. The tamper details window will open.
Omnilink Orion – Finalizing Setup in FocalPoint
Omnilink User Guide 10 12-18-08 v2.0
Step 4: Click the “Clear Alert” button on the “Alert Details” screen.
Step 5: Before releasing the offender, wait until two location points are received to verify that
FocalPoint is successfully tracking the device and that NO device tamper alert has returned to
the screen. If a tamper alert appears, exchange the pins.
Omnilink User Guide 11 12-18-08 v2.0
Omnilink Orion
–
Removin
g
the Device
Omnilink Orion
–
Char
g
in
g
the Device
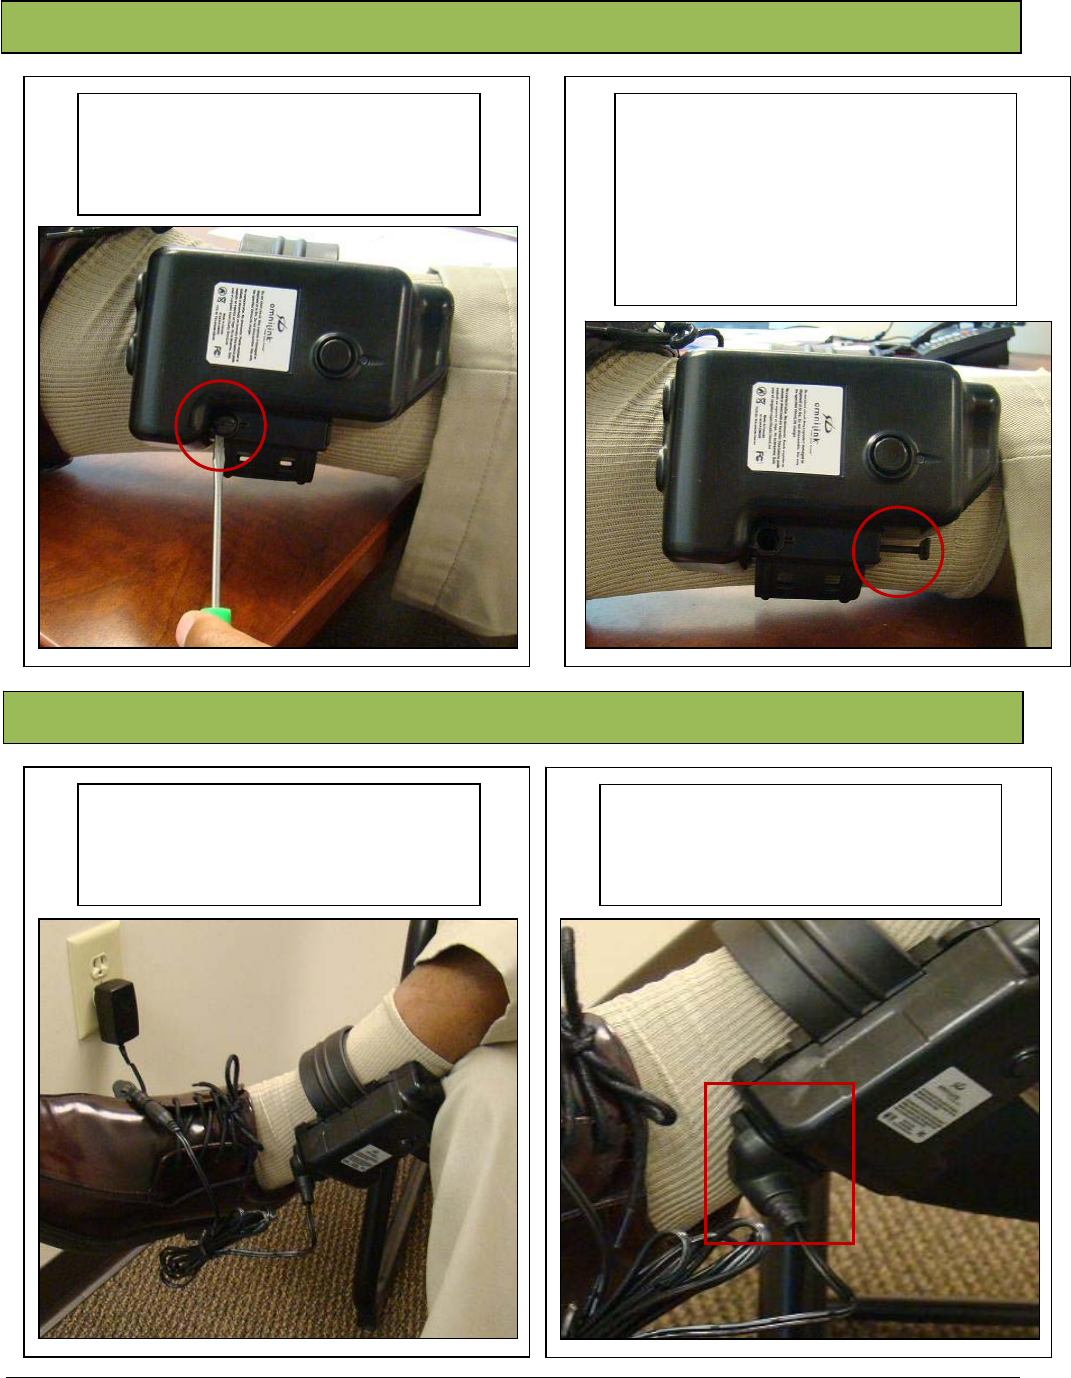
Step 1: Direct offender to place
the heel of the shoe on the edge of
the table.
Step 2: Using a flat-head
screwdriver, turn the bottom pin ¼
turn until the top pin snaps and
pops out of the device. Remove
the top pin and device.
Step 1: Plug the wall adapter into
an outlet and attach the charger
head to the device.
Tip: Magnets in the charger head
and device ensure placement of
the char
g
in
g
contacts.

Omnilink User Guide 12 12-18-08 v2.0
TECHNICAL SUPPORT
(800) 297-0128
(678) 624-5919
techsupport@Omnilinksystems.com
FULFILLMENT
(678) 624-5944
fulfillment@Omnilinksystems.com
Warning: Changes or modifications to this device not expressly approved by Omnilink Systems could void the
user’s authority to operate the equipment.
FCC Notices:
NOTE: This equipment has been tested and found to comply with the limits for a Class B digital device, pursuant
to Part 15 of the FCC Rules. These limits are designed to provide reasonable protection against harmful
interference in a residential installation.
This equipment generates, uses, and can radiate radio frequency energy and, if not installed and used in
accordance with the instructions, may cause harmful interference to radio communications. However, there is no
guarantee that interference will not occur in a particular installation. If this equipment does cause harmful
interference to radio or television reception, which can be determined by turning the equipment off and on, the
user is encouraged to try to correct the interference by one or more of the following measures:
• Reorient or relocate the receiving antenna.
• Increase the separation between the equipment and receiver.
• Connect the equipment into an outlet on a circuit different from that to which the receiver is connected.
• Consult the dealer or an experienced radio/TV technician for help.
This device complies with Part 15 of the FCC Rules and with RSS-210 of Industry Canada.
Operation is subject to the following two Conditions:
(1) this device may not cause harmful interference, and
(2) this device must accept any interference recievec, including interference that may cause undesired
operation.
Omnilink Orion – Contacting Omnilink
Omnilink Orion – Notifications

Omnilink User Guide 13 12-18-08 v2.0
CE Statement:
Hereby, Omnilink Systems declares that the Omnilink Orion OL300-G is in compliance with the essential
requirements and other relevant provisions of Directive 1999/5/EC.
CE Labeling Requirements:
The ‘CE’ marking must be affixed to a visible location on the OEM product.
The CE mark shall consist of the initials “CE” taking the following form:
• If the CE marking is reduced or enlarged, the proportions given in the above graduated drawings must be
respected.
• The CE marking must have a height of at least 5mm except where this is not possible on account of the
nature of the apparatus.
• The CE marking must be affixed visibly, legibly, and indelibly.