One Stop Gardens Car Wash Nozzle 95996 Users Manual
CAR WASH NOZZLE 95996 95996
2015-02-05
: One-Stop-Gardens One-Stop-Gardens-Car-Wash-Nozzle-95996-Users-Manual-496759 one-stop-gardens-car-wash-nozzle-95996-users-manual-496759 one-stop-gardens pdf
Open the PDF directly: View PDF ![]() .
.
Page Count: 4
CAR WASH NOZZLE
Model
95996
ASSEMBLY AND OPERATION INSTRUCTIONS
Due to continuing improvements, actual product may differ slightly from the product described herein.
®
3491 Mission Oaks Blvd., Camarillo, CA 93011
Visit our website at: http://www.harborfreight.com
TO PREVENT SERIOUS INJURY, READ AND UNDERSTAND
ALL WARNINGS AND INSTRUCTIONS BEFORE USE.
Copyright© 2007 by Harbor Freight Tools®. All rights reserved. No portion of this
manual or any artwork contained herein may be reproduced in any shape or form
without the express written consent of Harbor Freight Tools.
For technical questions or replacement parts, please call 1-800-444-3353.
SPECIFICATIONS
Construction Aluminum Head with Rubber Nozzle Head Ring.
Hard Rubber Handle.
9 Spray Patterns Jet, Mist, Flood, Flat, Angle, Shower, Fan, Cone, Center.
Overall Dimensions 10” L X 7-1/8” H X 2.69” W
Inlet Fitting 5/16” ID (0.322”) Plastic Barb Fitting
Aluminum Nozzle Head 2-1/4” L X 2.41” Diameter
Pattern Adjustment Ring 2.68” Diameter X 1/2” W (Black Rubber)
Detergent Tube 3.47” L X 1.93” Diameter
Mix-Water Dial 1.52” Diameter X 3/4” H (Gray Plastic)
Markings: Mix & Water
Trigger Lock Folding Steel Wire
Squeeze Trigger 4.31” L X 7/8” W (Black Plastic)

Page 2SKU 95996 For technical questions, please call 1-800-444-3353.
Save This Manual
You will need this manual for the safety warnings and precautions, assembly, oper-
ating, inspection, maintenance and cleaning procedures, parts list and assembly diagram.
Keep your invoice with this manual. Write the invoice number on the inside of the front
cover. Write the product’s serial number in the back of the manual near the assembly
diagram, or write month and year of purchase if product has no serial number. Keep this
manual and invoice in a safe and dry place for future reference.
GENERAL SAFETY RULES AND WARNINGS
Check for misalignment or binding of moving parts and any other condition
that may affect the Nozzle’s operation. If damaged do not use.
Maintain labels and nameplates on the tool. These carry important information.
If unreadable or missing, contact Harbor Freight Tools for a replacement.
Use only cold, clean water and soaps that are intended for use with this kind
of Car Wash Nozzle.
Always release the Handle before changing the spray pattern.
NEVER use water from pressure washers or other water pressure systems.
Do not direct hose spray at people or animals.
WARNING: The brass components of this product contain lead, a chemical
known to the State of California to cause birth defects (or other reproductive
harm). (California Health & Safety code § 25249.5, et seq.)
UNPACKING
When unpacking, check to make sure that the item is intact and undamaged. If any
parts are missing or broken, please call Harbor Freight Tools at the number shown on the
cover of this manual as soon as possible.
ASSEMBLY INSTRUCTIONS
NOTE: For additional information regarding the parts listed in the following pages, refer to
the Assembly Diagram near the end of this manual.
1.
2.
3.
4.
5.
6.
7.

Page 3SKU 95996 For technical questions, please call 1-800-444-3353.
OPERATION INSTRUCTIONS
With Car Wash Nozzle not connected to water supply, twist the Plastic Soap Con-
tainer counterclockwise and remove it from the Handle.
Fill with soap to highest level marked on the Plastic Soap Container. It is located
roughly 1/2” from the top of the Container.
Thread the Plastic Soap Container onto the Handle with clockwise motion, and
thread the Car Wash Nozzle onto your water hose at the Hose Connector located
at the base of the Handle.
Be sure the Mix-Water Dial is set at “Water” before turning on your water pres-
sure.
Select the pattern you wish to use by dialing the Pattern Adjustment Ring to any of
the 9 positions on the Ring.
Adjust the water pressure by turning the Water Pressure Dial towards Minus sign for
less pressure, or Plus sign for more water pressure. See Parts Diagram on page
4 of this manual.
NOTE: Always make sure you have released the Trigger and there is no pressure running
through the Car Wash Nozzle when you are changing spray patterns using the
Pattern Adjustment Ring. The same information applies to changing the position of
the Water-Mix Dial.
After making your Pattern selection and before squeezing the Trigger, change the
Water-Mix Dial to “Mix” (Soap). Now squeeze the Trigger and apply soapy water to
your vehicle.
To rinse, release the Trigger, change the Water-Mix Dial to “Water” and squeeze the
Trigger to get cold clean water for rinsing.
TIPS FOR GETTING A BETTER WASH
When possible, always wash vehicle in shaded area.
Thoroughly hose down the vehicle first with clean clear water.
Apply soap/water mix to entire vehicle from top to bottom. Use soft, lint-free towels
to wash wheels and hard to get areas. Wash entire vehicle lightly with soft towels
to completely loosen any dirt.
Rinse vehicle with cold, clean water.
Wipe vehicle down with soft lint-free towels or chamois cloths.
1.
2.
3.
4.
5.
6.
7.
8.
1.
2.
3.
4.
5.
Page 4SKU 95996 For technical questions, please call 1-800-444-3353.
INSPECTION, MAINTENANCE, AND CLEANING
BEFORE EACH USE, inspect the general condition of the Car Wash Nozzle. Check
for misalignment or binding of Dials, and any other condition that may affect its operation.
If anything abnormal is found, do not use the Nozzle.
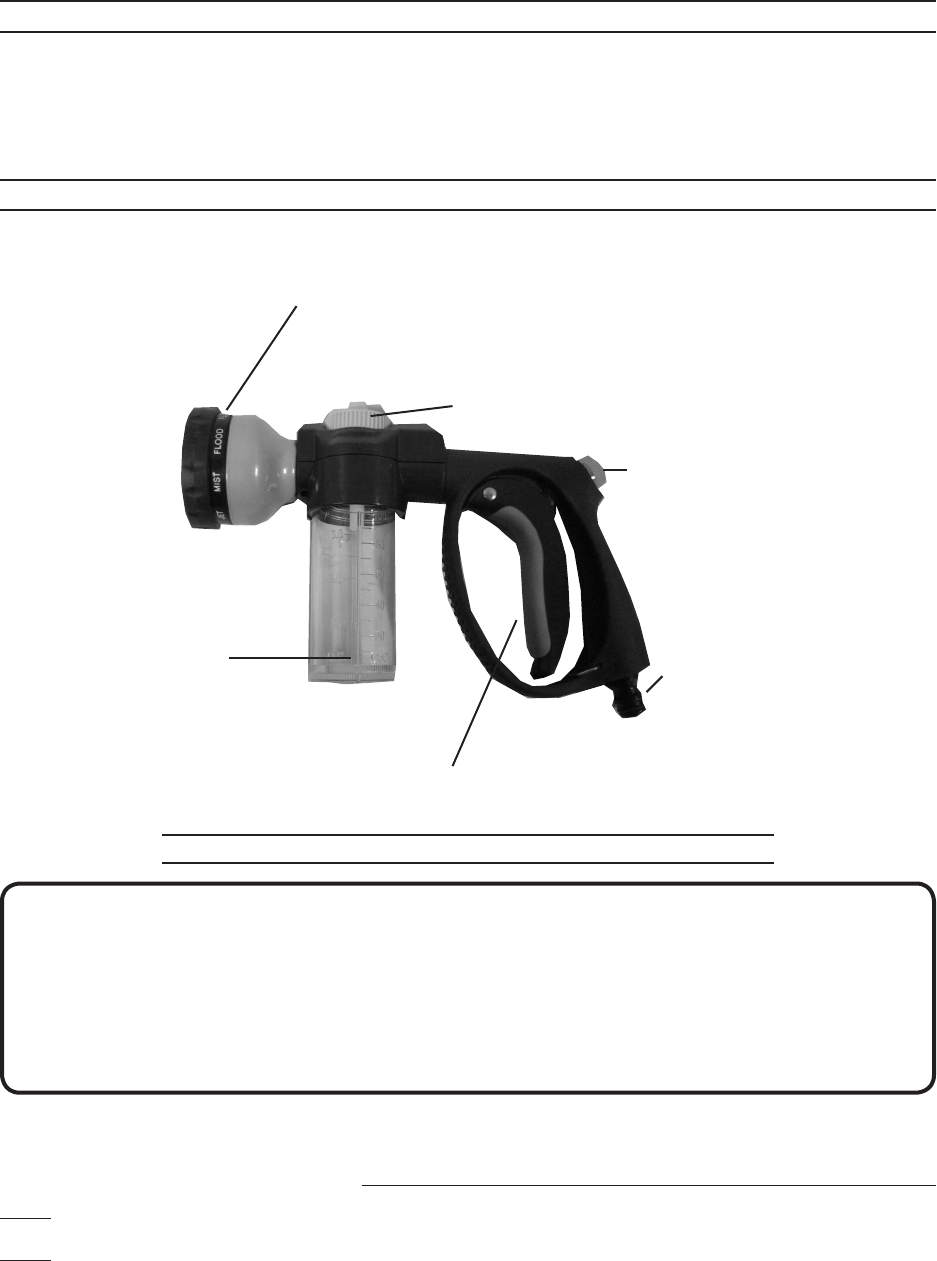
PARTS DIAGRAM
Water-Mix Dial
Water Pressure Dial
Hose Connectior
Plastic Soap
Container
Pattern Adjustment Ring
Trigger
PLEASE READ THE FOLLOWING CAREFULLY
The manufacturer and/or distributor has provided the parts list and assembly diagram in this
manual as a reference tool only. Neither the manufacturer or distributor makes any representation or
warranty of any kind to the buyer that he or she is qualified to make any repairs to the product, or that
he or she is qualified to replace any parts of the product. In fact, the manufacturer and/or distributor
expressly states that all repairs and parts replacements should be undertaken by certified and licensed
technicians, and not by the buyer. The buyer assumes all risk and liability arising out of his or her repairs
to the original product or replacement parts thereto, or arising out of his or her installation of replacement
parts thereto.
Record Product’s Serial Number Here:
Note: If product has no serial number, record month and year of purchase instead.
Note: Some parts are listed and shown for illustration purposes only, and are not available individually as
replacement parts.PARTS LIST
